
New In 2024, How To Change Speed of Video in Final Cut Pro?

How To Change Speed of Video in Final Cut Pro?
When there are certain boring but necessary parts in your video, you need to speed them up. Similarly, you may need to reduce the duration of the entire video. Speeding up the video is your only option when you do not want to cut any part. You must have also observed that certain videos look funny when you speed them up. To speed up videos, you will need a video editor that does not degrade the video quality.
Final Cut Pro is a popular choice to speed up video without distorting the pitch. Many think that the video quality can degrade when they change the speed of the video clip. This concern can be taken care of when you alter the video speed with Final Cut Pro. Instead of changing the speed of the entire video, you can change the speed of specific parts. We will illustrate how to speed up the video using Final Cut Pro and suggest a better choice than FCP.
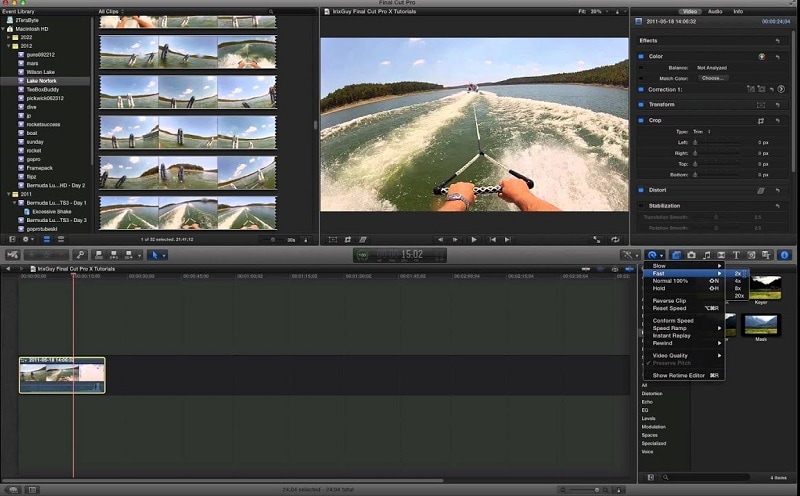
Part I. Speed Up Video using Final Cut Pro
Final Cut Pro by Apple is one of Mac users’ most popular video editors. Many video creators purchase MacBooks for editing their videos in Final Cut Pro. The video editor is suitable for beginners as well as professionals. FCP, as a video editor, is super fast in rendering and processing video while exporting. Here are the steps for the Final Cut Pro speed-up clip.
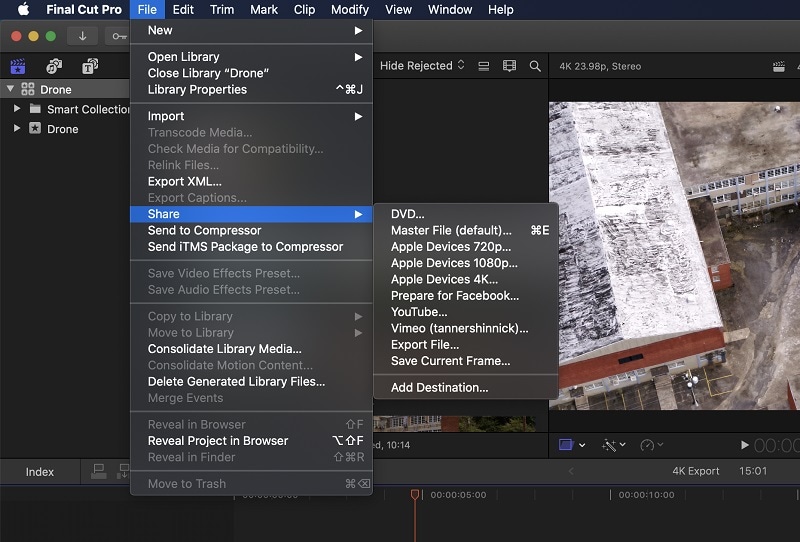
Step1 Open FCP. Navigate to File>New> and tap Project to start a new project.
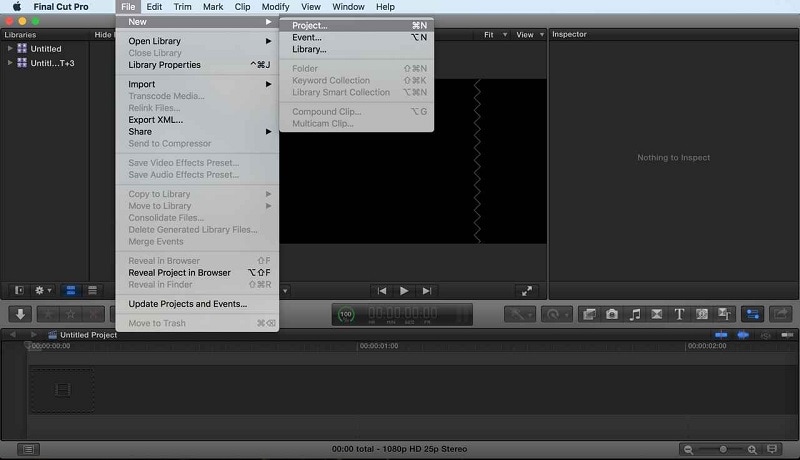
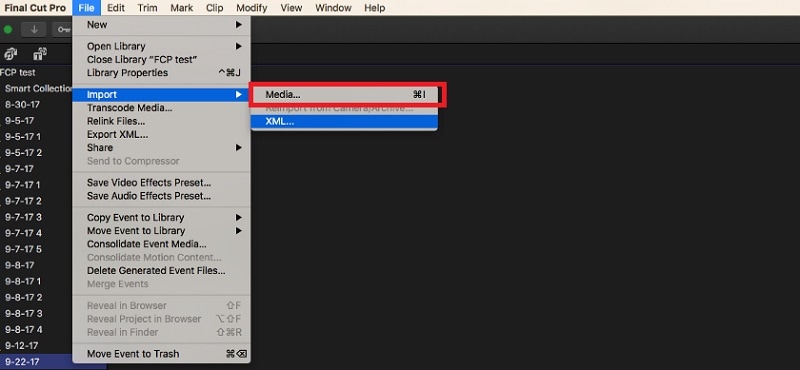
Step2 Go to File>Import> Media and fetch your video clip. After that, drag/drop the video clip into the timeline.
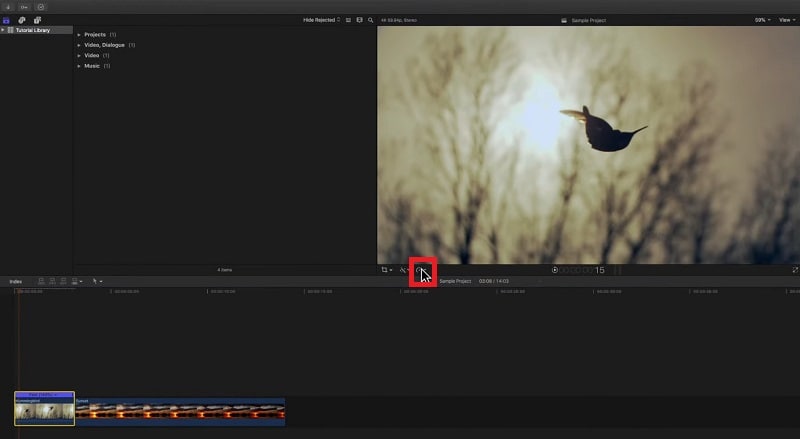
Step3 Choose the video clip from the timeline. Click on the Speedometer(Retime) icon at the top of the timeline.
Step4 Tap the Speedometer icon, to get the drop-drop menu. For the Final Cut Pro speed-up video, go to Fast and select the speed. You get to choose from 2X to 20X.
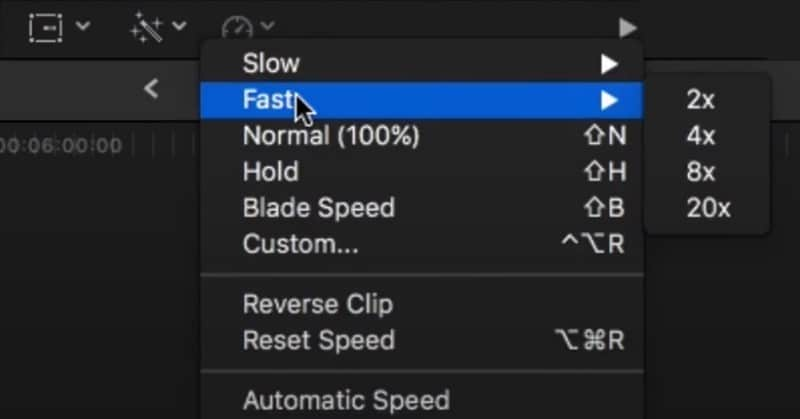
If you want to customize the speed-up rate, you can click on the Custom option. Enter any desired percentage speed.
Step5 Now, play the video.
Part II. Tips for Speeding Up Video in Final Cut Pro
You have to keep a few points in mind when you speed up videos in Final Cut Pro. This ensures that the video does not get distorted while speeding up a section. Here are some tips to follow to speed up the video in FCP.
Adjust The Pitch of Sped-Up Clips -
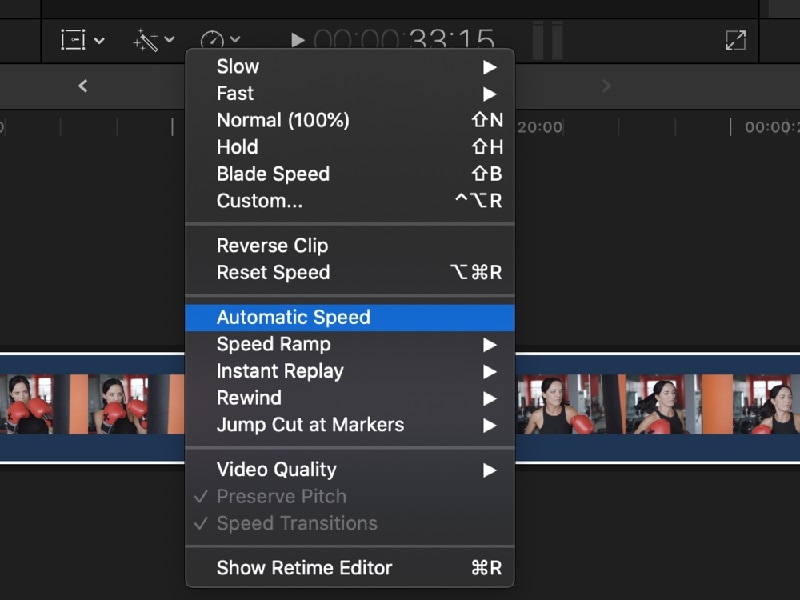
By default, Final Cut Pro preserves the pitch of the audio even when you change the speed of the video. However, you may want to change the pitch per the video’s speed. This is because you might want to make the audio sound funny. You need to turn off the Preserve Pitch option from Retime menu. Once you do that, the pitch of the sped-up clip adjusts itself as per the change in speed.
Speeding Up Video by Adjusting Frame Rate -
You can shoot at a low frame rate for the scene you want to speed up. The frame rate should be lower than the overall video project’s frame rate.
You can add the scene to your video project on the timeline. Then you need to choose Automatic Speed from Retime menu. This will increase the frame rate from the scene to the video project frame rate. Once the frame rate increases, the video will speed up automatically.
Smoothen Out the Sped-Up Video -
Sometimes, the overall video may look old when you speed up a particular portion. That is why there are two options available on Final Cut Pro. The first option is frame blending which is more suitable for the slow-motion clip.
The second option is the optical flow that smoothens out the sped-up clip. It adds in-between frames by analyzing the directional movement of pixels. You can find the option from Video Quality present in the Retime menu.
Part III. The Right Final Cut Pro Alternative for Changing Speed - Filmora
Final Cut Pro has a steep learning curve. Unless you have some experience in video editing, you will find the user interface slightly complicated. Besides, Final Cut Pro is only available for Mac users since it is an Apple product.
Many people look for a Final Cut Pro alternative to change the speed of the video. Wondershare Filmora is the best choice over Final Cut Pro to change the speed of video Final Cut Pro.
Wondershare Filmora is a professional video editor that is available for Windows and Mac users. The video editor is suitable for beginners as well as experienced video creators. The popularity of Filmora is due to its super intuitive user interface. You get almost all the features of FCP in Filmora.
In comparison, there are more video effects, elements, and stock media files available to enhance your videos. You get the latest effects from time to time so that you can have the trending elements in the video, you can also save the edited video in different video file formats as per your requirements, and even record video through a webcam and capture the screen using Filmora.
Several AI effects, stickers, and elements are available to enhance your videos. Most users find it easier to edit videos on Filmora over Final Cut Pro.
Free Download For Win 7 or later(64-bit)
Free Download For macOS 10.14 or later
How to Change Video Speed in Filmora?
Changing video speed in Filmora is super easy. You can speed up your video as per your requirements in a number of ways. That is why Filmora happens to be a better option than Final Cut Pro. We will illustrate all the different methods to change video speed in Filmora.
You can watch this video to understand how to change video speed in Filmora.
Method 1. The Simplest Way - Click “2x-100x” Speed Options
Just like Final Cut Pro, you can choose from preset speed options to change video speed. This is undoubtedly the easiest way to change video speed instantly. While Final Cut Pro offers 2X to 20X speed options, Filmora has 2X to 100X speed presets. Here are the steps to speed up video by choosing a preset speed option.
Step1 Download, install and simply Launch Filmora. Tap Create New Project option.

Step2 Go to File> Import Media> Import Media Files and choose the video file. The selected video will be imported into the Project Media folder. Alternatively, you can also use the drag/drop function.

Step3 Drag and drop the video file onto the timeline. Select the video clip from the timeline and click on the Speed (timer icon) option at the top of the timeline. If you want to speed up a portion of the video, you need to split the video clip.

Step4 From the menu, go to Fast and select any speed option as per your requirements. Thereafter, play the video to see the changes.

Step5 Press Export to save the video file in your desired file format.
Method 2. Use Uniform Speed to Change Speed
If you want to customize the video speed uniformly, there is a dedicated option called Uniform Speed in Filmora. This means you do not want to choose from the preset speed options. You may want to set the speed of the video to 3X, but it is not available in the preset options.
That is where Uniform Speed comes in handy, and you can set any speed from 0.01X to 100X. Here are the steps to follow.
Step1 Once you have dropped the video file onto the timeline, click on the Speed(timer) icon.
Step2 Click on the Uniform Speed option. This will open the Uniform Speed tab above the timeline.

Step3 Adjust the speed slider to set the desired speed as per your requirements. The duration will change as per the speed you set, and you can set the duration below the speed slider. Just like Final Cut Pro, you can turn on Ripple and Audio Pitch as per your preference.

Step4 Once you are satisfied with the speed, click on the Ok button. Thereafter, tap Export to save the edited video file.
Method 3. Use Speed Ramping to Change Speed
There is a unique way to change your video speed called speed ramping. You can speed up some parts and slow down the other parts, like crests and troughs in a graph.
The speed ramping feature comes with several graphical presets. You can choose from the presets and customize the speed as per your requirements. Check the steps to use speed ramping to change your video speed.
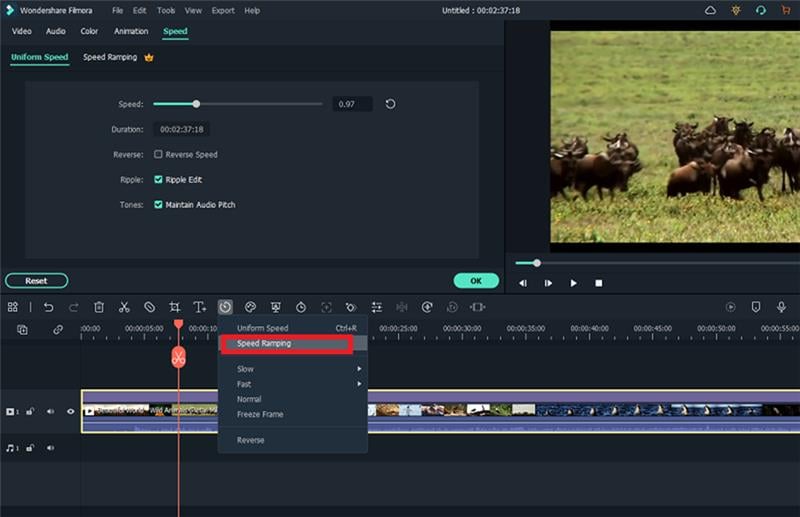
Step1 Drag and drop the video file onto the timeline. Click on the Speed(timer) icon at the top of the timeline.
Step2 Click on Speed Ramping option. This will open Speed Ramping above the timeline.

Step3 Select from the available preset as per your requirements. Otherwise, you can select Customize option and edit the nodes as needed.
Step4 Once satisfied with the result, click on the Ok button. Finally, tap Export
Conclusion
There are some videos where you may have to speed up certain parts. In detail, we have illustrated how to speed up the video in Final Cut Pro. However, if you do not have Final Cut Pro or are unsatisfied with FCP, Wondershare Filmora is a great choice. Most importantly, the steps for all the different methods are very simple for everyone to follow.
Free Download For macOS 10.14 or later
How to Change Video Speed in Filmora?
Changing video speed in Filmora is super easy. You can speed up your video as per your requirements in a number of ways. That is why Filmora happens to be a better option than Final Cut Pro. We will illustrate all the different methods to change video speed in Filmora.
You can watch this video to understand how to change video speed in Filmora.
Method 1. The Simplest Way - Click “2x-100x” Speed Options
Just like Final Cut Pro, you can choose from preset speed options to change video speed. This is undoubtedly the easiest way to change video speed instantly. While Final Cut Pro offers 2X to 20X speed options, Filmora has 2X to 100X speed presets. Here are the steps to speed up video by choosing a preset speed option.
Step1 Download, install and simply Launch Filmora. Tap Create New Project option.

Step2 Go to File> Import Media> Import Media Files and choose the video file. The selected video will be imported into the Project Media folder. Alternatively, you can also use the drag/drop function.

Step3 Drag and drop the video file onto the timeline. Select the video clip from the timeline and click on the Speed (timer icon) option at the top of the timeline. If you want to speed up a portion of the video, you need to split the video clip.

Step4 From the menu, go to Fast and select any speed option as per your requirements. Thereafter, play the video to see the changes.

Step5 Press Export to save the video file in your desired file format.
Method 2. Use Uniform Speed to Change Speed
If you want to customize the video speed uniformly, there is a dedicated option called Uniform Speed in Filmora. This means you do not want to choose from the preset speed options. You may want to set the speed of the video to 3X, but it is not available in the preset options.
That is where Uniform Speed comes in handy, and you can set any speed from 0.01X to 100X. Here are the steps to follow.
Step1 Once you have dropped the video file onto the timeline, click on the Speed(timer) icon.
Step2 Click on the Uniform Speed option. This will open the Uniform Speed tab above the timeline.

Step3 Adjust the speed slider to set the desired speed as per your requirements. The duration will change as per the speed you set, and you can set the duration below the speed slider. Just like Final Cut Pro, you can turn on Ripple and Audio Pitch as per your preference.

Step4 Once you are satisfied with the speed, click on the Ok button. Thereafter, tap Export to save the edited video file.
Method 3. Use Speed Ramping to Change Speed
There is a unique way to change your video speed called speed ramping. You can speed up some parts and slow down the other parts, like crests and troughs in a graph.
The speed ramping feature comes with several graphical presets. You can choose from the presets and customize the speed as per your requirements. Check the steps to use speed ramping to change your video speed.
Step1 Drag and drop the video file onto the timeline. Click on the Speed(timer) icon at the top of the timeline.
Step2 Click on Speed Ramping option. This will open Speed Ramping above the timeline.

Step3 Select from the available preset as per your requirements. Otherwise, you can select Customize option and edit the nodes as needed.

Step4 Once satisfied with the result, click on the Ok button. Finally, tap Export
Conclusion
There are some videos where you may have to speed up certain parts. In detail, we have illustrated how to speed up the video in Final Cut Pro. However, if you do not have Final Cut Pro or are unsatisfied with FCP, Wondershare Filmora is a great choice. Most importantly, the steps for all the different methods are very simple for everyone to follow.
Do You Know How AI Is Helping Video Editors and Enthusiasts? Many Video Editing Software Allows an Auto Reframe Option to Use that Can Help Manage Videos
If you’ve struggled with adjusting the frame of your videos, there is a solution for you. The solution is to change the video aspect ratio, which is a game-changer in the world of video editing. It is a powerful feature that automatically adjusts the frame to fit different aspect ratios. With this feature, you don’t have to manually resize and reposition your video. The Auto Reframe feature will do all the work for you.
Additionally, it ensures that your videos look great on any screen by frame adjustment. It will keep your subject in focus and eliminate any unnecessary cropping. As we all know, the utility of auto reframe is undeniable. So, share your videos, knowing that they will look their best. The good part is that you can view your video at its best regardless of the device on which they are viewed.
Part 1: How Has AI Been Helping Video Editors?
With AI’s help, video editors’ jobs have become more accessible. You can change the aspect ratio of video with this feature to reduce your time and effort. Some of these ways are mentioned below, benefiting the video editors.
1. Automation in Video Editing
AI tools can help you analyze your video content and generate automated edited versions. This feature use algorithm to identify key moments in your video. Additionally, it improves your video by doing basic edits on it. These edits include basic trimming, color correction, and other options.
2. Content Analysis
This AI-based technology can help you to analyze your content in both video and image form. You can extract valuable information using AI, like facial recognition and sentiment analysis. With the help of this analysis, the editors can make precise decisions regarding editing and more.
3. Automated Captions
AI technology also recognizes speech which is very helpful for transcribing videos automatically. This feature is helping many video editors to add a professional touch to videos. Additionally, speech recognition tools add attention-grabbing subtitles with good accuracy. This saves the editors a lot of time and effort compared to manual transcription.
4. Noise Enhancement
If you have a problem with background noise and distortion, AI tools can help. AI algorithms can help you to improve your noise quality and reduce background noise. For this, you will need the original footage so that AI can work well on it. Furthermore, this will also improve the overall experience of the viewer.
5. Changing Background
With the help of AI, you can even remove unwanted elements or objects in your video. These AI tools allow you to replace objects from video frames. Also, it makes your video’s background look more appealing. In scenarios where removing logos and replacing the green screen background, this feature helps you a lot.
6. Professional Video Effects
Additionally, you can add artistic filters, effects, and appealing filters to your video with these tools. Such AI tools use deep learning algorithms to analyze the video and suggest you some corrections. This allows editors to add desired visual aesthetic effects to their content to look more attractive.
7. Content Recommendation
Using deep learning algorithms, AI can give you recommendations for your video content. These recommendations are based on user preferences and viewing patterns. This can help content creators understand their audience preferences and trends to create better video content.
Auto Reframe Video in 1-Click
Automatically resize videos in the fastest way. No editing skills are required!
Resize Video for Free Resize Video for Free Learn More >

Part 2: Understanding The Auto Reframe Feature in Wondershare Filmora
Wondershare Filmora embeds high-profile features into its video editing ecosystem. The platform integrates artificial intelligence into its video editing system to bring some of the best features. The Auto Reframe feature is one of the AI-integrated features of Wondershare Filmora. The video editing platform resizes the videos in the quickest possible ways.
Using this feature, you can easily involve a single video for all available platforms for posting videos. With a single click, you can save all the time and effort required to resize videos manually. The videos are easily adjusted across different aspect ratios using the efficient AI feature offered by Filmora.
Part 3: Other Prominent AI Features Offered by Wondershare Filmora
Wondershare Filmora offers many advanced and unique features. However, its newly incorporated AI features are some of the best. Here are the top 5 AI features Filmora offers, as discussed in the portion below.
1. AI Smart Cutout
Wondershare Filmora introduced an extraordinary feature of the smart cutout. This feature is a straightforward approach for creators who want to delete undesired items from a video. It uses AI to quickly and accurately find and separate people or objects from the background in videos. Users can easily make cool effects with a few steps, like having a green screen or changing the background effortlessly.
2. AI Copywriting
Filmora offers an AI copywriting feature that directly integrates with ChatGPT. It can generate video text and can also write titles and descriptions of YouTube Videos. The AI copywriting function saves a lot of time. It allows users to easily create professional-looking videos by incorporating AI into their platform.
3. AI Audio Stretch
Any audio track can be quickly re-timed to match the length of your video. AI Audio Stretch can be used with all kinds of music tracks. It works well for various types of videos, whether a casual vlog or a professional video. AI Audio Stretch can recognize and analyze music’s singing or vocal parts. It then remixes the audio clip to match the patterns.
4. AI Portrait
By using this feature of Filmora, users can easily remove backgrounds from images and videos. It offers over 70 different AI effects for portraits and stickers. Moreover, it can automatically detect faces and apply augmented reality (AR) stickers to them. Users don’t need any professional skills to use its portrait effects. Simply select the effect you like and click to add it to your video.
5. AI Audio Denoise
This feature automatically detects noise in any audio or video file and removes unwanted noise. It uses AI to detect background distortion in a video or audio file . Then, it further eliminates the distortion from your video project. This feature allows you to experience your video in quality and crisp sound.
Part 4: Using The Auto Reframe Feature in Wondershare Filmora
After covering an overview of Wondershare Filmora, we will work on the Auto Reframe feature. Look ahead into the steps to figure out how to auto-reframe a video using Filmora:
Convert Text-to-Speech For Win 7 or later(64-bit)
Convert Text-to-Speech For macOS 10.14 or later
Filmora Tutorial -Auto Reframe Filmora Tutorial
Step 1Start Using Auto Reframe Feature
Open Wondershare Filmora on your computer and proceed to select the “Auto Reframe” feature from the options available on the home screen.

Step 2Import The Video
This opens a new window where you can proceed with auto reframing of the video. Click the “Import” button on the top-right of the window to add the video you wish to reframe.

Step 3Change Parameters and Export
After adding the video, adjust the “Aspect Ratio” and “Motion Speed” with the available parameters. Click “Analyze” to observe the changes in reframing as provided. In this way, you can change the aspect ratio of your video using the auto reframe feature. Once completed, save your video project in the system.

Conclusion
In conclusion, auto reframe is a remarkable feature that simplifies video editing. This feature aims to ensure that your videos look great on any screen. If you seek a way to explain how to change the aspect ratio of a video, many video editing tools are now offering this feature to provide a better editing experience. Wondershare Filmora has this feature available for its users. You can easily download and install this tool to auto-reframe your video project.
Resize Video for Free Resize Video for Free Learn More >

Part 2: Understanding The Auto Reframe Feature in Wondershare Filmora
Wondershare Filmora embeds high-profile features into its video editing ecosystem. The platform integrates artificial intelligence into its video editing system to bring some of the best features. The Auto Reframe feature is one of the AI-integrated features of Wondershare Filmora. The video editing platform resizes the videos in the quickest possible ways.
Using this feature, you can easily involve a single video for all available platforms for posting videos. With a single click, you can save all the time and effort required to resize videos manually. The videos are easily adjusted across different aspect ratios using the efficient AI feature offered by Filmora.
Part 3: Other Prominent AI Features Offered by Wondershare Filmora
Wondershare Filmora offers many advanced and unique features. However, its newly incorporated AI features are some of the best. Here are the top 5 AI features Filmora offers, as discussed in the portion below.
1. AI Smart Cutout
Wondershare Filmora introduced an extraordinary feature of the smart cutout. This feature is a straightforward approach for creators who want to delete undesired items from a video. It uses AI to quickly and accurately find and separate people or objects from the background in videos. Users can easily make cool effects with a few steps, like having a green screen or changing the background effortlessly.
2. AI Copywriting
Filmora offers an AI copywriting feature that directly integrates with ChatGPT. It can generate video text and can also write titles and descriptions of YouTube Videos. The AI copywriting function saves a lot of time. It allows users to easily create professional-looking videos by incorporating AI into their platform.
3. AI Audio Stretch
Any audio track can be quickly re-timed to match the length of your video. AI Audio Stretch can be used with all kinds of music tracks. It works well for various types of videos, whether a casual vlog or a professional video. AI Audio Stretch can recognize and analyze music’s singing or vocal parts. It then remixes the audio clip to match the patterns.
4. AI Portrait
By using this feature of Filmora, users can easily remove backgrounds from images and videos. It offers over 70 different AI effects for portraits and stickers. Moreover, it can automatically detect faces and apply augmented reality (AR) stickers to them. Users don’t need any professional skills to use its portrait effects. Simply select the effect you like and click to add it to your video.
5. AI Audio Denoise
This feature automatically detects noise in any audio or video file and removes unwanted noise. It uses AI to detect background distortion in a video or audio file . Then, it further eliminates the distortion from your video project. This feature allows you to experience your video in quality and crisp sound.
Part 4: Using The Auto Reframe Feature in Wondershare Filmora
After covering an overview of Wondershare Filmora, we will work on the Auto Reframe feature. Look ahead into the steps to figure out how to auto-reframe a video using Filmora:
Convert Text-to-Speech For Win 7 or later(64-bit)
Convert Text-to-Speech For macOS 10.14 or later
Filmora Tutorial -Auto Reframe Filmora Tutorial
Step 1Start Using Auto Reframe Feature
Open Wondershare Filmora on your computer and proceed to select the “Auto Reframe” feature from the options available on the home screen.

Step 2Import The Video
This opens a new window where you can proceed with auto reframing of the video. Click the “Import” button on the top-right of the window to add the video you wish to reframe.

Step 3Change Parameters and Export
After adding the video, adjust the “Aspect Ratio” and “Motion Speed” with the available parameters. Click “Analyze” to observe the changes in reframing as provided. In this way, you can change the aspect ratio of your video using the auto reframe feature. Once completed, save your video project in the system.

Conclusion
In conclusion, auto reframe is a remarkable feature that simplifies video editing. This feature aims to ensure that your videos look great on any screen. If you seek a way to explain how to change the aspect ratio of a video, many video editing tools are now offering this feature to provide a better editing experience. Wondershare Filmora has this feature available for its users. You can easily download and install this tool to auto-reframe your video project.
How to Spruce Up Your Telegram Profile
Telegram Profile Picture is a great way to show your friends and family who you are. You can add a picture to your profile, change it at any time, and even hide it from certain people.
A profile picture for Telegram might interest you as it adds a personal touch to your searchable profile and invokes others to show more interest. However, some users don’t know how to edit their DPs.
In this article, we’ll discuss how to add a short video to your Telegram profile as well as change, delete and hide your profile picture with step-by-step instructions.
Part 1. How To Set A Short Video As Your Profile
The Detailed Steps
Following a few simple steps below, it is possible to set a video profile on Telegram instead of a regular photo profile. Let’s give your profile more magic touch:
Step1 On your device, launch the Telegram app and tap the three-line Menu icon.
Step2 Tap your profile or go to Settings and tap “Set Profile Photo.”
Step3 Tap the “Camera” icon to shoot a new video or select from your Camera Roll.
Step4 Trim the video to the required length and adjust it in the circular frame.
Step5 Select the “Brush” icon to apply stickers or text, and tap Done. You can also flip, rotate, or adjust the color of your video. Once done, tap the Check icon to upload the video and wait a few minutes to complete the uploading process.
Creating Telegram Profile Video with the Best Video Editor - Filmora
After knowing how to set the video as your profile, you may want to try it immediately. Here, we sincerely recommend an excellent video editor to create a stunning video for your Telegram profile - Wondershare Filmora . The software has an intuitive interface which makes it beginner-friendly and easy to use. You can start your Telegram profile video creation journey immediately!
Here’s how you can use Filmora to edit a video:
Step1 Download the Filmora software’s latest version on your PC and launch it. Select “New Project” from the main Menu, click the “Plus” icon, or drag and drop your media file to import it.
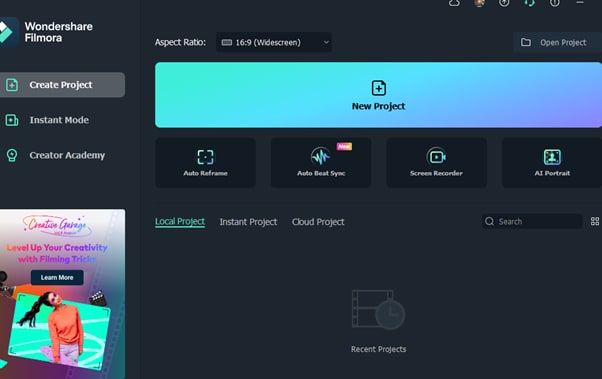
Step2 Select your media file and drop it in the Timeline, and from the top menu ribbon, add effects, filters, titles, and music to your videos.
Step3 Once satisfied with your edits, click the Export option to save the video on your PC.
Part 2. Complete Guide - How to add, change, delete, and hide Telegram Profile Pictures
After knowing how to make a video profile on Telegram and realise it with a user-friendly video editor, let’s see how to spruce up your Telegram profile with a complete guidance - the detailed steps to add, change, delete and hide you Telegram profile pictures.
- How To Add Telegram Profile Pictures
- How To Change Your Telegram Profile Pictures
- How To Delete Your Telegram Profile Pictures
- How To Hide Your Telegram Profile Pictures
How To Add Telegram Profile Pictures
Compared with making an impressing profile video, changing your profile pictures is a quick and easy process. Follow the steps below to add a profile picture for your Telegram account and have a new DP in no time:
Step1 On your device, open the Telegram app and tap the Menu icon in the top left corner.
Step2 Head to Settings and tap “Set profile photo.”

Step3 Now, select the image you want to use from your gallery, or click the Camera icon and take a picture to upload.
Step4 Once you’ve selected your image, you can crop and resize it to fit your Telegram profile.
![]()
Note: You can choose to add stickers to your Profile Pictures by tapping the Stickers icon. If you want to know how to find more exciting Telegram stickers, you can read this article: Best Telegram Sticker Sets and How to Find Stickers on Telegram.
Step5 When you’re happy with the way your image looks, tap the Done icon to save your changes.
How To Change Your Telegram Profile Pictures
If you are getting tired of the current profile, it is really easy for you to change it. Here’s how to do it:
Step1 Open the Telegram app and go to your Profile (tap the three lines and choose your username at the top of the screen).
Step2 Tap “Set Profile Photo” and select whether you want to take a new photo or choose one from your camera roll
Step3 Once you’ve selected or taken a new photo, crop it as desired or edit it. Finally, tap “Done” to change your profile picture for Telegram.

How To Delete Your Telegram Profile Pictures
When it comes to a point where you want to start over, you choose to delete all of your Telegram profile images. Here’s a quick guide on how to remove all your Telegram profile pictures:
Step1 On your device, launch the Telegram app and tap the “Menu” icon.
Step2 Select your Profile Picture and swipe to the right to find the picture you want to delete.
Step3 Now, tap the three-dots Menu icon at the top right side of the screen. Select the “Delete” option from the Menu.

Step4 Tap “Delete” again on the pop-up message to confirm your action.
How To Hide Your Telegram Profile Pictures
Telegram’s security function allows you to hide your profile picture so that only people who you approve can see it, which is a great way to keep your privacy and avoid unwanted attention.
Follow the instructions below step-by-step to hide your Telegram profile picture on iPhone and Android.
iPhone
Step1 On your iPhone, launch the Telegram app and go to the “Settings” tab at the bottom right of the screen.
Step2 Select “Privacy and Security” and tap the “Profile Photo” option.
Step3 If you want to keep your profile picture private, choose the “My Contacts” option. This way, only people in your contact book will be able to see it.
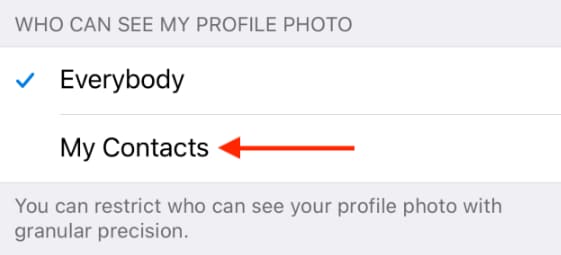
Step4 You can add exceptions to your privacy settings from the “Exceptions” section. To hide your Telegram profile picture from certain users/contacts or groups, tap the “Never Share With” button. This will help prevent someone who is harassing you from seeing your profile picture.
Now, choose “Add Users or Groups,” search for and select their name from your list of contacts. Finally, tap “Done” to apply your changes.
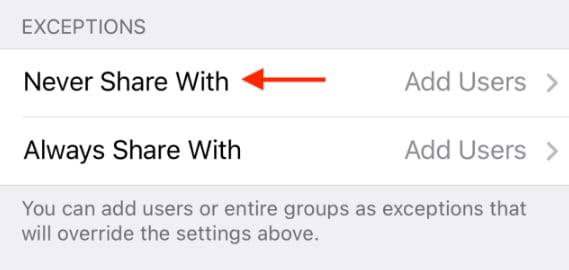
Step5 If you want to always share your profile picture with a particular user or group, you can select the “Always Share With” option.
To add contacts, tap the “Add Users or Groups” option. Next, search for and select the contacts you want to add. Finally, tap “Done” to save your changes. Your profile picture will now only be visible to the selected people.
Android
Step1 Open the Telegram app on your Android device.
Step2 In the top left corner of the screen, tap the three lines to open the Menu.
Step3 Scroll down and tap the “Settings” option.
Step4 Now, tap “Privacy and Security” and select the “Profile Photo” option. If you want to share your profile picture with only your contacts, choose the “My Contacts” option. This will hide your photo from everyone else on Telegram.

Step5 Telegram offers two great options for managing who can see your profile picture: “Always Allow” and “Never Allow.”
The “Always Allow” feature lets you add specific users or groups who will always be able to see your profile picture, even if they’re not in your contact book.
Simply tap the “Always Allow” option and search for contacts using their usernames to add them to your list. Tap the “Check” icon to apply your changes.
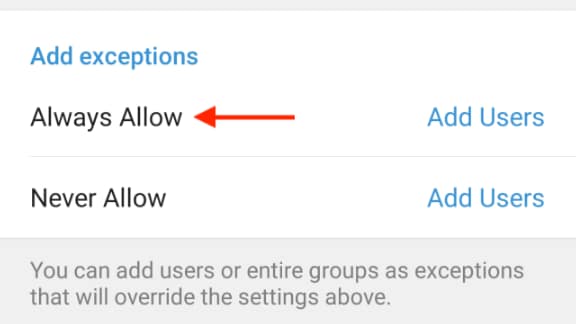
Step6 You can also choose the “Never Allow” feature to add contacts, users, or groups from whom you wish to hide your profile picture.
To do this, search for and select the contacts (or users) from whom you want to hide your profile picture. Tap the Checkmark icon to apply your changes.
Once you’re done customizing the settings, tap the Checkmark icon from the top-right corner to save the settings. Now only people who you approve will be able to see your profile picture.
Conclusion
In conclusion, this article has outlined how to set a video as yourt Telegram profile. We’ve also discussed how to add, change, delete, and hide profile picture for Telegram.
Your DP is perhaps the most important feature to personalize your profile on the messaging app, so hopefully, you’ve enjoyed this comprehensive guide and learned how to manage your Telegram account’s profile section without any issues.
Step5 When you’re happy with the way your image looks, tap the Done icon to save your changes.
How To Change Your Telegram Profile Pictures
If you are getting tired of the current profile, it is really easy for you to change it. Here’s how to do it:
Step1 Open the Telegram app and go to your Profile (tap the three lines and choose your username at the top of the screen).
Step2 Tap “Set Profile Photo” and select whether you want to take a new photo or choose one from your camera roll
Step3 Once you’ve selected or taken a new photo, crop it as desired or edit it. Finally, tap “Done” to change your profile picture for Telegram.

How To Delete Your Telegram Profile Pictures
When it comes to a point where you want to start over, you choose to delete all of your Telegram profile images. Here’s a quick guide on how to remove all your Telegram profile pictures:
Step1 On your device, launch the Telegram app and tap the “Menu” icon.
Step2 Select your Profile Picture and swipe to the right to find the picture you want to delete.
Step3 Now, tap the three-dots Menu icon at the top right side of the screen. Select the “Delete” option from the Menu.

Step4 Tap “Delete” again on the pop-up message to confirm your action.
How To Hide Your Telegram Profile Pictures
Telegram’s security function allows you to hide your profile picture so that only people who you approve can see it, which is a great way to keep your privacy and avoid unwanted attention.
Follow the instructions below step-by-step to hide your Telegram profile picture on iPhone and Android.
iPhone
Step1 On your iPhone, launch the Telegram app and go to the “Settings” tab at the bottom right of the screen.
Step2 Select “Privacy and Security” and tap the “Profile Photo” option.
Step3 If you want to keep your profile picture private, choose the “My Contacts” option. This way, only people in your contact book will be able to see it.

Step4 You can add exceptions to your privacy settings from the “Exceptions” section. To hide your Telegram profile picture from certain users/contacts or groups, tap the “Never Share With” button. This will help prevent someone who is harassing you from seeing your profile picture.
Now, choose “Add Users or Groups,” search for and select their name from your list of contacts. Finally, tap “Done” to apply your changes.

Step5 If you want to always share your profile picture with a particular user or group, you can select the “Always Share With” option.
To add contacts, tap the “Add Users or Groups” option. Next, search for and select the contacts you want to add. Finally, tap “Done” to save your changes. Your profile picture will now only be visible to the selected people.
Android
Step1 Open the Telegram app on your Android device.
Step2 In the top left corner of the screen, tap the three lines to open the Menu.
Step3 Scroll down and tap the “Settings” option.
Step4 Now, tap “Privacy and Security” and select the “Profile Photo” option. If you want to share your profile picture with only your contacts, choose the “My Contacts” option. This will hide your photo from everyone else on Telegram.

Step5 Telegram offers two great options for managing who can see your profile picture: “Always Allow” and “Never Allow.”
The “Always Allow” feature lets you add specific users or groups who will always be able to see your profile picture, even if they’re not in your contact book.
Simply tap the “Always Allow” option and search for contacts using their usernames to add them to your list. Tap the “Check” icon to apply your changes.

Step6 You can also choose the “Never Allow” feature to add contacts, users, or groups from whom you wish to hide your profile picture.
To do this, search for and select the contacts (or users) from whom you want to hide your profile picture. Tap the Checkmark icon to apply your changes.
Once you’re done customizing the settings, tap the Checkmark icon from the top-right corner to save the settings. Now only people who you approve will be able to see your profile picture.
Conclusion
In conclusion, this article has outlined how to set a video as yourt Telegram profile. We’ve also discussed how to add, change, delete, and hide profile picture for Telegram.
Your DP is perhaps the most important feature to personalize your profile on the messaging app, so hopefully, you’ve enjoyed this comprehensive guide and learned how to manage your Telegram account’s profile section without any issues.
How to Add Customized Transitions to OBS
OBS Studio is an open-source video editor that is widely popular for live streaming on online platforms. Even though OBS is a completely free application, its features are comparable to any premium video editor. We always look for available transition effects in a video editor and OBS takes it to the next level by allowing users to add custom transitions.
Among custom transitions, Stinger transitions have gained a lot of traction from the users. Stinger transitions are made popular by sports channels who use Stinger frequently whenever there is a change in the scene. We will illustrate how to add custom transitions in OBS and apply Stinger transitions in your video.
Part 1. What is Stinger in OBS
Stinger is a special type of customized animated video transition effect that is available in the latest version of OBS Studio. It is a combination of a transparent video animation and a cut transition. Stinger begins with the transparent video animation that grows into full-screen overlay, and it is followed by the cut transition. After the cut transition, you place the next scene or video clip. You will notice Stinger transition whenever sports channels show an instant replay during a live match.
The transparent video animation starts on top of the current video you are editing. When the animation expands and covers up the entire screen, you place the cut transition, and thereafter, you place the next video clip or scene as per your requirement. Some customized stinger effect also includes audio effects along with video effect.
Part 2. How to add stinger transitions to OBS
The Stinger transition is available on OBS Studio and Streamlabs, and both of them are open-source and free applications. Before you add stinger transition, you should have a video animation ready that you will play on top of the current video followed by the cut transition effect. You can download several stinger video animations from the internet and include any of them in OBS while adding stinger transition. Here are the steps on how to add a custom transition to OBS.
Step1 Go to Scene Transitions section and click on Effects option to open the drop-down menu.
Step2 From the drop-down menu, click on “Add: Stinger” option.

Step3 Give a name to the Stinger transition and click Ok button.

Step4 You will see Properties window now. Click on Browser button against Video file and select the transparent video animation file that you want to play on top of the current video before applying the cut transition effect.

Step5 For Transition Point Type, select Time(milliseconds) option. In the Transition Point field, add the duration of the transparent video animation so that the transition to the next scene takes place immediately after the video animation gets completed.

Step6 If your video animation has audio, go to Audio Monitoring and select Monitor and Output option from the dropdown. For Audio Fade Style, you can select Crossfade option for better output.

Step7 Scroll down and click on Preview Transition button to check if the stinger transition is taking place as expected. You can adjust the transition point and other parameters to get it perfect.

Step8 Finally, click on Ok button and play the video to check out the stinger transition on the big screen.
The steps on how to add a custom transition to Streamlabs OBS are almost similar, and therefore, you can add stinger transition using Streamlabs comfortably.
Part 3. OBS Alternative to Add Transitions
There is no denying the fact that OBS Studio has a complicated user interface. That is why most amateur video editors find OBS Studio difficult to learn quickly even though there is no dearth of features. Apart from add custom transition OBS, there are very limited effects available on OBS Studio. That is why many users look for an OBS alternative to add transitions to their videos.
We recommend Wondershare Filmora as the best alternative to OBS Studio when it comes to adding transition effects. That is because Filmora is a professional video editor with a wide range of effects. Most importantly, Filmora is widely loved by amateurs and professionals for its intuitive user interface. Here are the steps on how to add transitions to your video in Filmora.
Free Download For Win 7 or later(64-bit)
Free Download For macOS 10.14 or later
Step1 Download and install Filmora as per your operating system. Open Filmora and click on New Project option.

Step2 Import or drop your video clips under Project Media folder. Then drag and drop them on Timeline and place them sequentially as appropriate.

Step3 Go to Transitions tab located at the top of the application screen. You will see different categories of transitions on the left side.

Step4 Check them out and once you have selected one to apply, drag and drop it in between the video clips.

Step5 Play the video and click on Export button to save the video.
Part 4: Related FAQs about OBS Transitions
How do I add a transition overlay in OBS?
You need to go to Scene Transition tab and select any transition overlay effect that is available. Thereafter, you can change the settings and parameters to customize the transition effect as per your requirements. Apart from the built-in transitions, you can download and add plugins for more transitions.
Can you have different scene transitions in OBS?
Yes, you can have different scene transitions in OBS Studio. You can add them directly from Scene Transition tab one by one as per your requirements. You can add them in between scenes so that the transition effects play when you switch between scenes.
How do I download transitions in OBS?
Go to the OBS Forums from where you get to download transitions for OBS Studio. Click on Download button and download plugin installer as per your operating system. Double-click the installer file to install it on your computer. Go to OBS Studio and go to Scene Transition to use the installed transition.
Free Download For macOS 10.14 or later
Step1 Download and install Filmora as per your operating system. Open Filmora and click on New Project option.

Step2 Import or drop your video clips under Project Media folder. Then drag and drop them on Timeline and place them sequentially as appropriate.

Step3 Go to Transitions tab located at the top of the application screen. You will see different categories of transitions on the left side.

Step4 Check them out and once you have selected one to apply, drag and drop it in between the video clips.

Step5 Play the video and click on Export button to save the video.
Part 4: Related FAQs about OBS Transitions
How do I add a transition overlay in OBS?
You need to go to Scene Transition tab and select any transition overlay effect that is available. Thereafter, you can change the settings and parameters to customize the transition effect as per your requirements. Apart from the built-in transitions, you can download and add plugins for more transitions.
Can you have different scene transitions in OBS?
Yes, you can have different scene transitions in OBS Studio. You can add them directly from Scene Transition tab one by one as per your requirements. You can add them in between scenes so that the transition effects play when you switch between scenes.
How do I download transitions in OBS?
Go to the OBS Forums from where you get to download transitions for OBS Studio. Click on Download button and download plugin installer as per your operating system. Double-click the installer file to install it on your computer. Go to OBS Studio and go to Scene Transition to use the installed transition.
Also read:
- [New] In 2024, How-To Enhancing Your Experience with Facebook's Lived-In Content
- BitRaser Pro: Comprehensive Tutorial on Secure Data Destruction via Video
- Capturing and Keeping Your Social Media Moments
- CatchEmAll Celebrate National Pokémon Day with Virtual Location On Xiaomi Redmi Note 12T Pro | Dr.fone
- Effective Strategies for Removing Memory Dump Logs in Windows 11
- July's Top Discounted Apple Gadgets: IPhones to iPads - Special Deals Revealed by ZDNET
- Shoppers Rejoice: Get Your Hands on a Deal-of-a-Lifetime with the 202#iPad Pro for Just $630 This Labor Day - ZDNET's Inside Scoop
- The New Frontier of Personal Health: The Amazon Halo's Revolutionary Design and Functionality
- Updated Do You Want a LUT that You Can Use for Your High-Definition Content? You Can Use Rec 709 LUT Premiere Pro for Your HD Digital Media to Give the Perfect Result
- Updated How To Make Ninja Jump Effect with Filmora
- Title: New In 2024, How To Change Speed of Video in Final Cut Pro?
- Author: Chloe
- Created at : 2025-02-26 21:57:20
- Updated at : 2025-03-04 04:46:00
- Link: https://ai-editing-video.techidaily.com/new-in-2024-how-to-change-speed-of-video-in-final-cut-pro/
- License: This work is licensed under CC BY-NC-SA 4.0.

