:max_bytes(150000):strip_icc():format(webp)/X-Logo-on-Phone-35c83db6a3c34b689ab069ff50b96bcc.jpg)
New In 2024, How to Concatenate Videos Using FFmpeg

How to Concatenate Videos Using FFmpeg
Video editing is a crucial aspect of creating content for many people. Whether you’re a YouTuber, a marketer, or just someone who wants to share videos with friends and family, being able to edit and manipulate your videos is key. One of the most basic video editing tasks is concatenating videos, which combines multiple files to create one cohesive video.
FFmpeg is a powerful tool that allows you to do just that, and in this guide, we’ll walk you through the process of FFmpeg concatenate videos. Whether a beginner or an experienced video editor, this guide will provide you with all the information you need to seamlessly merge your videos. From installation to execution, we’ll cover it all so you can streamline your video editing process.
Overview and Installation of FFmpeg
FFmpeg is free, open-source project that allows you to record, convert, and stream digital audio and video. It is a command-line tool widely used in video editing and transcoding. FFmpeg can be used to concatenate videos and other tasks, such as adding subtitles, changing video resolution, and more. It is available for Windows, Mac, and Linux, making it a versatile and accessible tool for anyone to use.
Here’s how to install FFmpeg:
Step1 Log in to your Ubuntu server via SSH and update the package index.
$ sudo apt update
Step2 Install FFmpeg and all the required dependencies
$ sudo apt install ffmpeg
Step3 Verify the version of FFmpeg that you’ve installed.
$ ffmpeg -version
Prerequisite
Before we merge videos using FFmpeg, we must understand the various methods available to us. FFmpeg offers three ways to concatenate videos: a demuxer, a filter, or a protocol. However, each method has its own set of considerations, and the best method for you will depend on the properties of the videos you’re working with.
It’s crucial to ensure that all encoding-related properties align with your chosen method. This includes the timebase, height and width, codecs, and pixel format. Some methods require the videos you’re merging to have the same encoding, while others allow for different encodings. It’s essential to keep this in mind to ensure that the final video is seamless without any breaks. Remember that these prerequisites will help you have a smooth process.
Concatenate Videos With Same Codecs Using FFmpeg
If the videos you want to concatenate have the same codec, you can use the FFmpeg “concat” demuxer or protocol to join them together. This simple and efficient method doesn’t require re-encoding the videos, saving time and preserving the original quality. This section will review the steps to concatenate videos using the “concat” demuxer and “concat” protocols in FFmpeg.
Merge Videos With the “Concat” Demuxer
The concat demuxer in FFmpeg allows you to join together multiple video files with the same codecs by reading a list of file paths from a text file and demuxing them in sequence. Each video starts where the previous one finishes without needing to re-encode the videos. Here’s how to do it:
Step1 Create a .txt file and list the paths of the video files you want to merge.
Join_video.txt
file /Users/Video/input1.mp4
file /Users/Video/input2.mp4
![]()
Note: You can add more than two video files.
Step2 Run the FFmpeg command:
ffmpeg -f concat -safe 0 -i join_video.txt -c copy output_demuxer.mp4
![]()
Note: -safe 0 is added to accept any file name.
-c copy will copy all the streams.
As this method allows you to “stream copy” the files instead of re-encoding them, the concatenation is very fast. This can be a good option if you have videos with the same codecs and want to join them quickly without losing quality.
Join Videos With the “Concat” Protocol
The concat protocol in FFmpeg allows you to join together multiple video files in a specific format that supports file-level concatenation, such as MPEG-2 TS. However, it cannot be used for other video formats like MP4 and WEBM.
Here’s how to use the “concat protocol:
Step1 Run the FFmpeg command:
ffmpeg -i “concat:input1.ts|input2.ts” -c copy output_protocol.ts
![]()
Note: The concat protocol allows you to “stream copy” the files by adding the option -c copy.
Step2 Input the file name of the video using this code:
ffmpeg -i “concat:input1.mp4|input2.mp4” -c copy output_protocol.mp4
![]()
Note: If you try to use this method on video formats that are not supported, only the first input video will be saved in the output video. And the video ends after the first video.
Although this method is limited in terms of supported video formats, it’s very easy to use if you merge videos in the supported formats. It’s a single command in the terminal without needing a text file. Additionally, using the -c copy option makes it efficient as it doesn’t require re-encoding, saving time.
Concatenate MP4 Video Files of Different Codecs & Resolutions Using FFmpeg
If the videos you want to concatenate have different codecs or resolutions, you can still use FFmpeg to join them together. However, this method requires re-encoding the videos, which can take longer and may result in a loss of quality. This section will cover the steps to concatenate videos with different codecs or resolutions using FFmpeg.
Here’s how to do it:
Step1 Provide the names of the input files to FFmpeg.
ffmpeg -i file1.mp4 -i file2.mp4 -i file3.mp4 \
Step2 Use the filter_complex filtergraph parameter to instruct FFmpeg from where to take the audio and video.
-filter_complex “[0:v] [0:a] [1:v] [1:a] [2:v] [2:a]
![]()
Note: [0:v][0:a] means FFmpeg needs to take the video and audio from the 0th video (file1.mp4).
Step3 Tell FFmpeg to concatenate three files (n=3).
concat=n=3:v=1:a=1 [vv] [aa]“ \
![]()
Note: The v=1:a=1 implies one stream for the audio and one stream for the video.
Step4 Map these audio and video outputs to the final video container. This is done as follows:
-map “[vv]“ -map “[aa]“ mergedVideo.mp4
It is important to note that this method requires re-encoding the videos, which can take more time and may result in a loss of quality. However, it offers the flexibility of filtering the videos before concatenating them. The filter_complex method in FFmpeg allows you to concatenate videos of different codecs and resolutions. The final step is to map the audio and video outputs to the final video container. This can be done using the -map command.
Concatenate Videos With Multiple Audio Streams Using FFmpeg
Concatenating videos with multiple audio streams can be more complex than concatenating videos with a single audio stream. This section will cover the steps to concatenate videos with multiple audio streams using FFmpeg. We’ll be using the filter_complex method in FFmpeg, which allows you to manipulate and concatenate multiple audio and video streams in a single command. This method is more advanced but allows you to join videos with different audio streams and create a final video with multiple audio tracks.
Step1 Specify the input files and opening.mkv, episode.mkv, and ending.mkv:
$ ffmpeg -i opening.mkv -i episode.mkv -i ending.mkv -filter_complex
Step2 Use the filter_complex parameter in FFmpeg to specify the input streams for the video and audio.
[0:0] [0:1] [0:2] [1:0] [1:1] [1:2] [2:0] [2:1] [2:2]
![]()
Note: Single video stream ([0:0], [1:0], [2:0])
Dual audio streams ([0:1][0:2], [1:1][1:2], [2:1][2:2])
Step3 Use the concat filter to specify that you want to concatenate 3 files (n=3) with 1 video stream (v=1) and 2 audio streams (a=2). Specify the output streams as [v], [a1], [a2]:
concat=n=3:v=1:a=2 [v] [a1] [a2]
Step4 Use the -map option to map the output streams to the final video container:
-map ‘[v]‘ -map ‘[a1]‘ -map ‘[a2]‘ output.mkv
[Bonus] Join Videos Together With Filmora
While FFmpeg offers a wide range of options for joining videos together, it can have a steep learning curve for some users. An alternative method for joining videos is using Filmora. Wondershare Filmora is a user-friendly video editing software that allows you to easily join multiple videos. It’s a great option for users new to video editing or needing experience with command-line tools like FFmpeg.
Free Download For Win 7 or later(64-bit)
Free Download For macOS 10.14 or later
Filmora has a simple drag-and-drop interface, making adding, arranging, and editing videos and audio tracks easy. Additionally, it offers various features like split, trim, crop, merge, and more. It also has various effects, transitions, and animations to enhance the overall look of your video. With Filmora, you can create professional-looking videos with minimal effort.
How-to Steps
Here’s how to merge videos using Filmora:
Step1 Open Filmora and click “New Project.”

Step2 Go to “File“ > “Import Media“ > “Import Media Files“ to add your video files to the media library.

Step3 Drag and drop the files you want to merge from the media library to the timeline, and then you’ll get the merged video seamlessly.

Step4 Edit your video.

Step5 After editing, click the “Export“ tab to save your videos.

Conclusion
FFmpeg is a powerful tool that allows you to concatenate videos in various ways. Whether you’re working with videos of the same codecs and resolutions or videos with multiple audio streams, FFmpeg can handle it. However, for users new to video editing or needing experience with command-line tools, using Filmora can be a more user-friendly option. It offers a simple drag-and-drop interface and a variety of features and effects to enhance the overall look of your video.
Step2 Run the FFmpeg command:
ffmpeg -f concat -safe 0 -i join_video.txt -c copy output_demuxer.mp4
![]()
Note: -safe 0 is added to accept any file name.
-c copy will copy all the streams.
As this method allows you to “stream copy” the files instead of re-encoding them, the concatenation is very fast. This can be a good option if you have videos with the same codecs and want to join them quickly without losing quality.
Join Videos With the “Concat” Protocol
The concat protocol in FFmpeg allows you to join together multiple video files in a specific format that supports file-level concatenation, such as MPEG-2 TS. However, it cannot be used for other video formats like MP4 and WEBM.
Here’s how to use the “concat protocol:
Step1 Run the FFmpeg command:
ffmpeg -i “concat:input1.ts|input2.ts” -c copy output_protocol.ts
![]()
Note: The concat protocol allows you to “stream copy” the files by adding the option -c copy.
Step2 Input the file name of the video using this code:
ffmpeg -i “concat:input1.mp4|input2.mp4” -c copy output_protocol.mp4
![]()
Note: If you try to use this method on video formats that are not supported, only the first input video will be saved in the output video. And the video ends after the first video.
Although this method is limited in terms of supported video formats, it’s very easy to use if you merge videos in the supported formats. It’s a single command in the terminal without needing a text file. Additionally, using the -c copy option makes it efficient as it doesn’t require re-encoding, saving time.
Concatenate MP4 Video Files of Different Codecs & Resolutions Using FFmpeg
If the videos you want to concatenate have different codecs or resolutions, you can still use FFmpeg to join them together. However, this method requires re-encoding the videos, which can take longer and may result in a loss of quality. This section will cover the steps to concatenate videos with different codecs or resolutions using FFmpeg.
Here’s how to do it:
Step1 Provide the names of the input files to FFmpeg.
ffmpeg -i file1.mp4 -i file2.mp4 -i file3.mp4 \
Step2 Use the filter_complex filtergraph parameter to instruct FFmpeg from where to take the audio and video.
-filter_complex “[0:v] [0:a] [1:v] [1:a] [2:v] [2:a]
![]()
Note: [0:v][0:a] means FFmpeg needs to take the video and audio from the 0th video (file1.mp4).
Step3 Tell FFmpeg to concatenate three files (n=3).
concat=n=3:v=1:a=1 [vv] [aa]“ \
![]()
Note: The v=1:a=1 implies one stream for the audio and one stream for the video.
Step4 Map these audio and video outputs to the final video container. This is done as follows:
-map “[vv]“ -map “[aa]“ mergedVideo.mp4
It is important to note that this method requires re-encoding the videos, which can take more time and may result in a loss of quality. However, it offers the flexibility of filtering the videos before concatenating them. The filter_complex method in FFmpeg allows you to concatenate videos of different codecs and resolutions. The final step is to map the audio and video outputs to the final video container. This can be done using the -map command.
Concatenate Videos With Multiple Audio Streams Using FFmpeg
Concatenating videos with multiple audio streams can be more complex than concatenating videos with a single audio stream. This section will cover the steps to concatenate videos with multiple audio streams using FFmpeg. We’ll be using the filter_complex method in FFmpeg, which allows you to manipulate and concatenate multiple audio and video streams in a single command. This method is more advanced but allows you to join videos with different audio streams and create a final video with multiple audio tracks.
Step1 Specify the input files and opening.mkv, episode.mkv, and ending.mkv:
$ ffmpeg -i opening.mkv -i episode.mkv -i ending.mkv -filter_complex
Step2 Use the filter_complex parameter in FFmpeg to specify the input streams for the video and audio.
[0:0] [0:1] [0:2] [1:0] [1:1] [1:2] [2:0] [2:1] [2:2]
![]()
Note: Single video stream ([0:0], [1:0], [2:0])
Dual audio streams ([0:1][0:2], [1:1][1:2], [2:1][2:2])
Step3 Use the concat filter to specify that you want to concatenate 3 files (n=3) with 1 video stream (v=1) and 2 audio streams (a=2). Specify the output streams as [v], [a1], [a2]:
concat=n=3:v=1:a=2 [v] [a1] [a2]
Step4 Use the -map option to map the output streams to the final video container:
-map ‘[v]‘ -map ‘[a1]‘ -map ‘[a2]‘ output.mkv
[Bonus] Join Videos Together With Filmora
While FFmpeg offers a wide range of options for joining videos together, it can have a steep learning curve for some users. An alternative method for joining videos is using Filmora. Wondershare Filmora is a user-friendly video editing software that allows you to easily join multiple videos. It’s a great option for users new to video editing or needing experience with command-line tools like FFmpeg.
Free Download For Win 7 or later(64-bit)
Free Download For macOS 10.14 or later
Filmora has a simple drag-and-drop interface, making adding, arranging, and editing videos and audio tracks easy. Additionally, it offers various features like split, trim, crop, merge, and more. It also has various effects, transitions, and animations to enhance the overall look of your video. With Filmora, you can create professional-looking videos with minimal effort.
How-to Steps
Here’s how to merge videos using Filmora:
Step1 Open Filmora and click “New Project.”

Step2 Go to “File“ > “Import Media“ > “Import Media Files“ to add your video files to the media library.

Step3 Drag and drop the files you want to merge from the media library to the timeline, and then you’ll get the merged video seamlessly.

Step4 Edit your video.

Step5 After editing, click the “Export“ tab to save your videos.

Conclusion
FFmpeg is a powerful tool that allows you to concatenate videos in various ways. Whether you’re working with videos of the same codecs and resolutions or videos with multiple audio streams, FFmpeg can handle it. However, for users new to video editing or needing experience with command-line tools, using Filmora can be a more user-friendly option. It offers a simple drag-and-drop interface and a variety of features and effects to enhance the overall look of your video.
Step by Step to Split a Clip in VLC
The VLC media player is top-rated as it is freely available and operates on different platforms efficiently. Its framework helps play almost all the audios, videos, DVDs and various resources available on your systems. Even optimizing the videos and audio as the playback from your devices is possible. There is also a possibility of integrating a number of programs along with the streaming services.
You can even search the album covers. With the functionality of the playlist, you can play a number of films one after the other. This feature is helpful when you have downloaded the whole film in parts or watched different short films. The best part is to know it is not just a video player. It is an editor; yes, you heard it right. VLC is the correct choice for splitting or cutting your videos without facing any difficulties.
The article is a guide about the split of the videos in VLC. There is also a particular description of its alternative: Wondershare Filmora. It is suitable as well as reasonable.
How can you split the video clips in VLC?
VLC Media player has all the amazing tools for playing back the audios and videos regardless of the format. It is still on top of all the media players because of its simple interface. Below are the very easy steps to split the videos in the VLC media player.
Step 1: After completing the download, install the updated version of the VLC media player if it is not on your PC. Once it is installed, you need to double click on its icon for launching it.
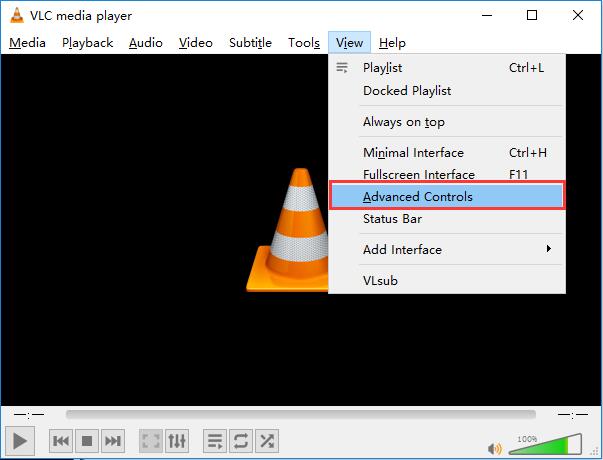
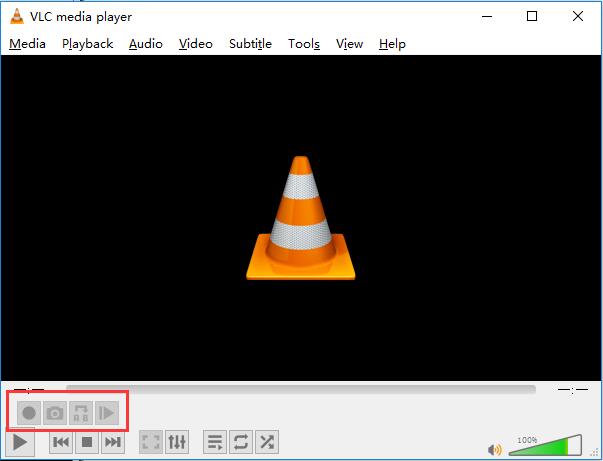
Step 2: This step is the activation of the advanced controls in the media player. Click on “View” visible on the menu bar. Click on the “Advanced Controls” and appears the menu of four additional buttons more than the button for play or pause.
Step 3: Now, you can easily play the video simply by clicking the “Open File” option present in the media menu. The drag and drop option is available inside the VLC media player.
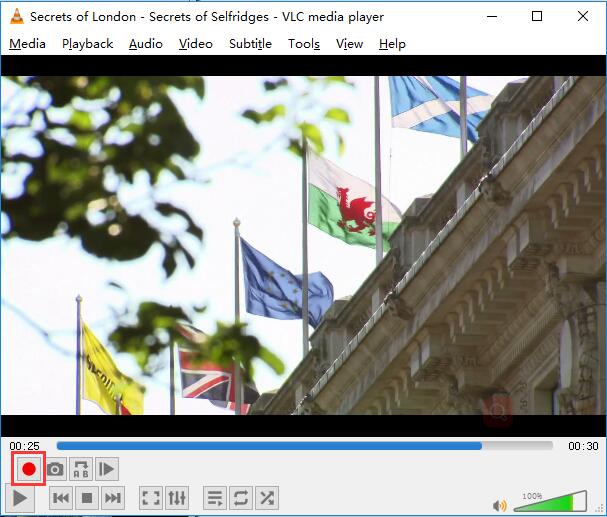
You should start playing the video now and recording the parts with the help of a decoder. Look for the position from where you want to begin the recording and press both Play and Pause buttons one after the other.
Even the Frame-by-Frame button is also available. It is the last one in the advance controls for navigating the actual frame from where you want to begin the recording.
Step 4:
Press the button “Record” again whenever you want the recording to stop. This is the final step for cutting the videos in VLC. The split video from the actual video saves automatically as the MP4 video file in the folder of Libraries or Videos if you are using Windows operating system.
Almost all, playing any video and audio format is possible in VLC media player. It includes AVI, MP4, FLV, WMV, RMVB and Quick time. You can even play the videos partially or preview them even before completing the downloads.
An easier way to split the video
The whole process of splitting the video into a VLC media player is extremely easy for managing and handling without any requirement of technical knowledge. But unfortunately, you can apply the frame-by-frame technique on the short videos. Monitoring is essential during the split and looking at the complete process whenever the recording is in VLC.
This causes the loss of quality. Here, the substitute that is also available is Filmora Video Editor . It is the recommendation of the graphic designers, web developers and videographers because it is freely available and lightweight software for the systems. You can apply its features to your images and videos. This includes the cutting, rotating and resizing of your videos along with the images.
For Win 7 or later (64-bit)
For macOS 10.14 or later
Features:
- There are 300+ special effects available
- Splitting of the screens and video clips
- Adding and tracking the motion graphics
- Unlimitedly sharing of the videos
- Addition of the transitional effects
- Dragging and dropping the video contents
- Customization of the effects
You can easily split and cut the large videos in Wondershare Filmora simply. There is no loss of video quality. Follow the steps below for splitting the video from Wondershare Filmora:
Step 1:
Import your videos to Filmora Video Cutter After installing the video cutter, launch it and select New Project to enter the video editing interface. Now, you need to import the video that needs to cut into several parts.

Step 2:
Drag and drop the videos in the timeline to start the splitting. Click the Split icon (scissor icon) on the toolbar or the Split button on the playhead to split the video

Apart from splitting the videos, you can even combine and merge different videos into one. Even the rotation of the videos is possible.
Therefore, Wondershare Filmora has received recognition due to its simple features. It is available for everyone, whether for individual, educational, or business purposes. It can help you in changing the look of your brand completely. Even adding the logos in the videos is also possible, along with adjusting the sizes. There is a huge range of features without any watermark, and all the upgrades are freely available.
Also, tech support is available for any assistance you need. Edit your images and videos on the social media platforms with ease, along with the adjusting tool. The perfect video editor is Wondershare Filmora, as it has compatibility with both Windows and Mac users. Correct and match the colour with the customization tools. Start using the Wondershare Filmora today without being concerned regarding the format of the video clips. You will definitely enjoy using it.
Step 3: Now, you can easily play the video simply by clicking the “Open File” option present in the media menu. The drag and drop option is available inside the VLC media player.
You should start playing the video now and recording the parts with the help of a decoder. Look for the position from where you want to begin the recording and press both Play and Pause buttons one after the other.
Even the Frame-by-Frame button is also available. It is the last one in the advance controls for navigating the actual frame from where you want to begin the recording.

Step 4:
Press the button “Record” again whenever you want the recording to stop. This is the final step for cutting the videos in VLC. The split video from the actual video saves automatically as the MP4 video file in the folder of Libraries or Videos if you are using Windows operating system.
Almost all, playing any video and audio format is possible in VLC media player. It includes AVI, MP4, FLV, WMV, RMVB and Quick time. You can even play the videos partially or preview them even before completing the downloads.

An easier way to split the video
The whole process of splitting the video into a VLC media player is extremely easy for managing and handling without any requirement of technical knowledge. But unfortunately, you can apply the frame-by-frame technique on the short videos. Monitoring is essential during the split and looking at the complete process whenever the recording is in VLC.
This causes the loss of quality. Here, the substitute that is also available is Filmora Video Editor . It is the recommendation of the graphic designers, web developers and videographers because it is freely available and lightweight software for the systems. You can apply its features to your images and videos. This includes the cutting, rotating and resizing of your videos along with the images.
For Win 7 or later (64-bit)
For macOS 10.14 or later
Features:
- There are 300+ special effects available
- Splitting of the screens and video clips
- Adding and tracking the motion graphics
- Unlimitedly sharing of the videos
- Addition of the transitional effects
- Dragging and dropping the video contents
- Customization of the effects
You can easily split and cut the large videos in Wondershare Filmora simply. There is no loss of video quality. Follow the steps below for splitting the video from Wondershare Filmora:
Step 1:
Import your videos to Filmora Video Cutter After installing the video cutter, launch it and select New Project to enter the video editing interface. Now, you need to import the video that needs to cut into several parts.

Step 2:
Drag and drop the videos in the timeline to start the splitting. Click the Split icon (scissor icon) on the toolbar or the Split button on the playhead to split the video

Apart from splitting the videos, you can even combine and merge different videos into one. Even the rotation of the videos is possible.
Therefore, Wondershare Filmora has received recognition due to its simple features. It is available for everyone, whether for individual, educational, or business purposes. It can help you in changing the look of your brand completely. Even adding the logos in the videos is also possible, along with adjusting the sizes. There is a huge range of features without any watermark, and all the upgrades are freely available.
Also, tech support is available for any assistance you need. Edit your images and videos on the social media platforms with ease, along with the adjusting tool. The perfect video editor is Wondershare Filmora, as it has compatibility with both Windows and Mac users. Correct and match the colour with the customization tools. Start using the Wondershare Filmora today without being concerned regarding the format of the video clips. You will definitely enjoy using it.
Step 3: Now, you can easily play the video simply by clicking the “Open File” option present in the media menu. The drag and drop option is available inside the VLC media player.
You should start playing the video now and recording the parts with the help of a decoder. Look for the position from where you want to begin the recording and press both Play and Pause buttons one after the other.
Even the Frame-by-Frame button is also available. It is the last one in the advance controls for navigating the actual frame from where you want to begin the recording.

Step 4:
Press the button “Record” again whenever you want the recording to stop. This is the final step for cutting the videos in VLC. The split video from the actual video saves automatically as the MP4 video file in the folder of Libraries or Videos if you are using Windows operating system.
Almost all, playing any video and audio format is possible in VLC media player. It includes AVI, MP4, FLV, WMV, RMVB and Quick time. You can even play the videos partially or preview them even before completing the downloads.

An easier way to split the video
The whole process of splitting the video into a VLC media player is extremely easy for managing and handling without any requirement of technical knowledge. But unfortunately, you can apply the frame-by-frame technique on the short videos. Monitoring is essential during the split and looking at the complete process whenever the recording is in VLC.
This causes the loss of quality. Here, the substitute that is also available is Filmora Video Editor . It is the recommendation of the graphic designers, web developers and videographers because it is freely available and lightweight software for the systems. You can apply its features to your images and videos. This includes the cutting, rotating and resizing of your videos along with the images.
For Win 7 or later (64-bit)
For macOS 10.14 or later
Features:
- There are 300+ special effects available
- Splitting of the screens and video clips
- Adding and tracking the motion graphics
- Unlimitedly sharing of the videos
- Addition of the transitional effects
- Dragging and dropping the video contents
- Customization of the effects
You can easily split and cut the large videos in Wondershare Filmora simply. There is no loss of video quality. Follow the steps below for splitting the video from Wondershare Filmora:
Step 1:
Import your videos to Filmora Video Cutter After installing the video cutter, launch it and select New Project to enter the video editing interface. Now, you need to import the video that needs to cut into several parts.

Step 2:
Drag and drop the videos in the timeline to start the splitting. Click the Split icon (scissor icon) on the toolbar or the Split button on the playhead to split the video

Apart from splitting the videos, you can even combine and merge different videos into one. Even the rotation of the videos is possible.
Therefore, Wondershare Filmora has received recognition due to its simple features. It is available for everyone, whether for individual, educational, or business purposes. It can help you in changing the look of your brand completely. Even adding the logos in the videos is also possible, along with adjusting the sizes. There is a huge range of features without any watermark, and all the upgrades are freely available.
Also, tech support is available for any assistance you need. Edit your images and videos on the social media platforms with ease, along with the adjusting tool. The perfect video editor is Wondershare Filmora, as it has compatibility with both Windows and Mac users. Correct and match the colour with the customization tools. Start using the Wondershare Filmora today without being concerned regarding the format of the video clips. You will definitely enjoy using it.
Step 3: Now, you can easily play the video simply by clicking the “Open File” option present in the media menu. The drag and drop option is available inside the VLC media player.
You should start playing the video now and recording the parts with the help of a decoder. Look for the position from where you want to begin the recording and press both Play and Pause buttons one after the other.
Even the Frame-by-Frame button is also available. It is the last one in the advance controls for navigating the actual frame from where you want to begin the recording.

Step 4:
Press the button “Record” again whenever you want the recording to stop. This is the final step for cutting the videos in VLC. The split video from the actual video saves automatically as the MP4 video file in the folder of Libraries or Videos if you are using Windows operating system.
Almost all, playing any video and audio format is possible in VLC media player. It includes AVI, MP4, FLV, WMV, RMVB and Quick time. You can even play the videos partially or preview them even before completing the downloads.

An easier way to split the video
The whole process of splitting the video into a VLC media player is extremely easy for managing and handling without any requirement of technical knowledge. But unfortunately, you can apply the frame-by-frame technique on the short videos. Monitoring is essential during the split and looking at the complete process whenever the recording is in VLC.
This causes the loss of quality. Here, the substitute that is also available is Filmora Video Editor . It is the recommendation of the graphic designers, web developers and videographers because it is freely available and lightweight software for the systems. You can apply its features to your images and videos. This includes the cutting, rotating and resizing of your videos along with the images.
For Win 7 or later (64-bit)
For macOS 10.14 or later
Features:
- There are 300+ special effects available
- Splitting of the screens and video clips
- Adding and tracking the motion graphics
- Unlimitedly sharing of the videos
- Addition of the transitional effects
- Dragging and dropping the video contents
- Customization of the effects
You can easily split and cut the large videos in Wondershare Filmora simply. There is no loss of video quality. Follow the steps below for splitting the video from Wondershare Filmora:
Step 1:
Import your videos to Filmora Video Cutter After installing the video cutter, launch it and select New Project to enter the video editing interface. Now, you need to import the video that needs to cut into several parts.

Step 2:
Drag and drop the videos in the timeline to start the splitting. Click the Split icon (scissor icon) on the toolbar or the Split button on the playhead to split the video

Apart from splitting the videos, you can even combine and merge different videos into one. Even the rotation of the videos is possible.
Therefore, Wondershare Filmora has received recognition due to its simple features. It is available for everyone, whether for individual, educational, or business purposes. It can help you in changing the look of your brand completely. Even adding the logos in the videos is also possible, along with adjusting the sizes. There is a huge range of features without any watermark, and all the upgrades are freely available.
Also, tech support is available for any assistance you need. Edit your images and videos on the social media platforms with ease, along with the adjusting tool. The perfect video editor is Wondershare Filmora, as it has compatibility with both Windows and Mac users. Correct and match the colour with the customization tools. Start using the Wondershare Filmora today without being concerned regarding the format of the video clips. You will definitely enjoy using it.
Slow Down Videos on Instagram With Perfection: A Guide
Do you wish to see your followers on Instagram growing? As an influencer, you can make your content engaging through slow-motion Instagram reels. Slow-motion videos are visually pleasing as they highlight the details. People can easily observe the little movements in slow-motion Instagram videos. Moreover, such videos can showcase your creative skills to the audience.
This guide will explore how to generate professional slow-motion Instagram videos. By following the instructions, you can produce captivating results. Also, it will increase the chances of getting more followers on your Instagram feed.
Slow Motion Video Maker Slow your video’s speed with better control of your keyframes to create unique cinematic effects!
Make A Slow Motion Video Make A Slow Motion Video More Features

Part 1: How Can Slow Motion Videos Be Used in Social Media Content?
Slow-motion videos can be a great addition to your social media platforms. It will insert a cinematic impression into your content. To learn more details, jump to the below part explaining the use of slow motion videos in social media:
1. Displaying Products
Do you want to promote your product? Slow-motion videos can highlight the details of your product in a professional manner. You can display the main features of the product at a slow speed. Moreover, viewers would absorb the information with great ease.
2. Demos and Tutorials
Slow-motion videos can assist you in providing clear demonstrations. Slow-motion tutorials on your social media platform can make your audience understand better. Hence, while producing cooking or DIY videos, slow-motion effects would be valuable.
3. Adds Dramatic Effect
Slow-motion Instagram videos evoke emotions in people. In an action sequence, you can add dramatic effect through slow motion. Furthermore, it can help with the storytelling of your video. This will also help in generating an immersive experience for the audience.
Part 2: Composite Ways To Perform Slow Mo on Instagram
On Instagram, there are different approaches to creating slow-mo videos. Within a few taps, you can reduce the speed of the video on Instagram. This section will highlight the two ways to generate slow-motion Instagram reels.
Way 1: Before Recording the Reel
To create a slow-motion video, you can reduce the speed before recording. To do so, you will need to check the following steps in detail:
Step 1
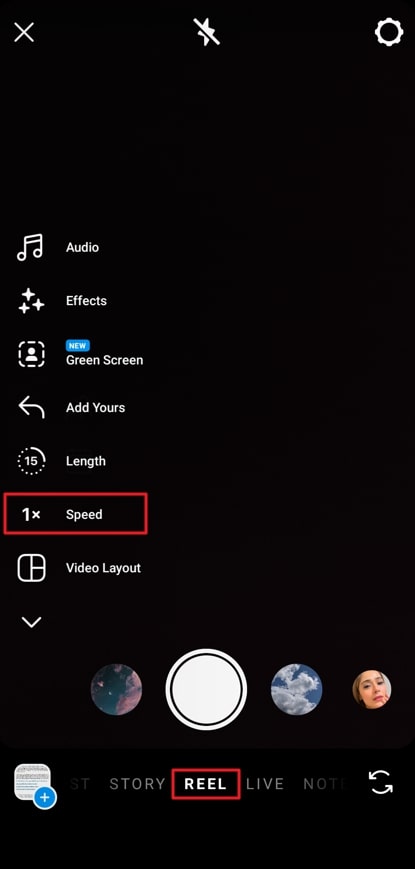
Open your Instagram and swipe from left to right. Select “Reel” from the below options for recording. On the left panel, you can see the options for settings. From there, tap “Speed” to display the further options.
Step 2
Here, you can choose the lowest speed for slow-mo, which is “0.3x.” Then, tap on the desired speed from the given option. Afterward, press and hold the recording button to capture the video.
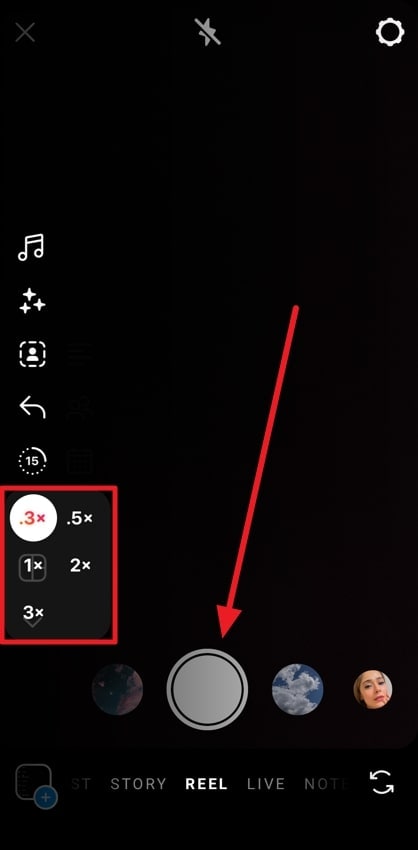
Way 2: During Editing Video
Instagram lets you modify the speed of a pre-recorded video. Thus, after recording the video, users can still reduce the speed. Mentioned below are the steps to help you with this process:
Step 1
Open your Instagram profile and swipe from left to right. Choose “Reel” from the bottom and select the “Plus” icon given in the bottom-left corner.
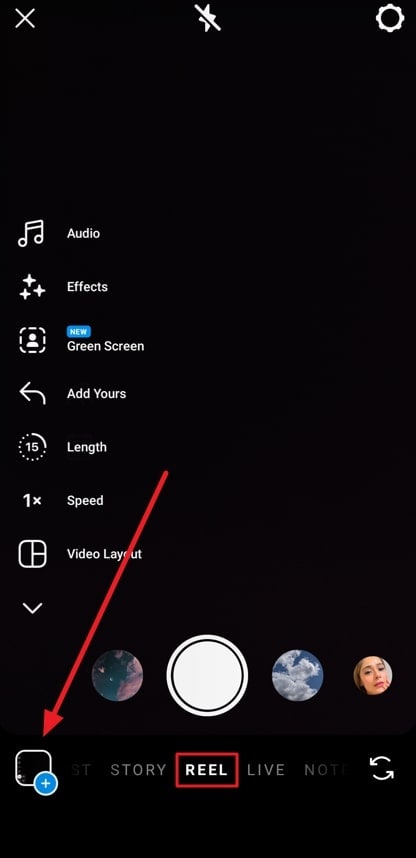
Step 2
Now, you can select and upload the desired video from your phone to Instagram. Afterward, click the “Edit” option at bottom left side to access further options. Here, select the “Speed” option and then move the slider to reduce the speed and make the video slow mo.
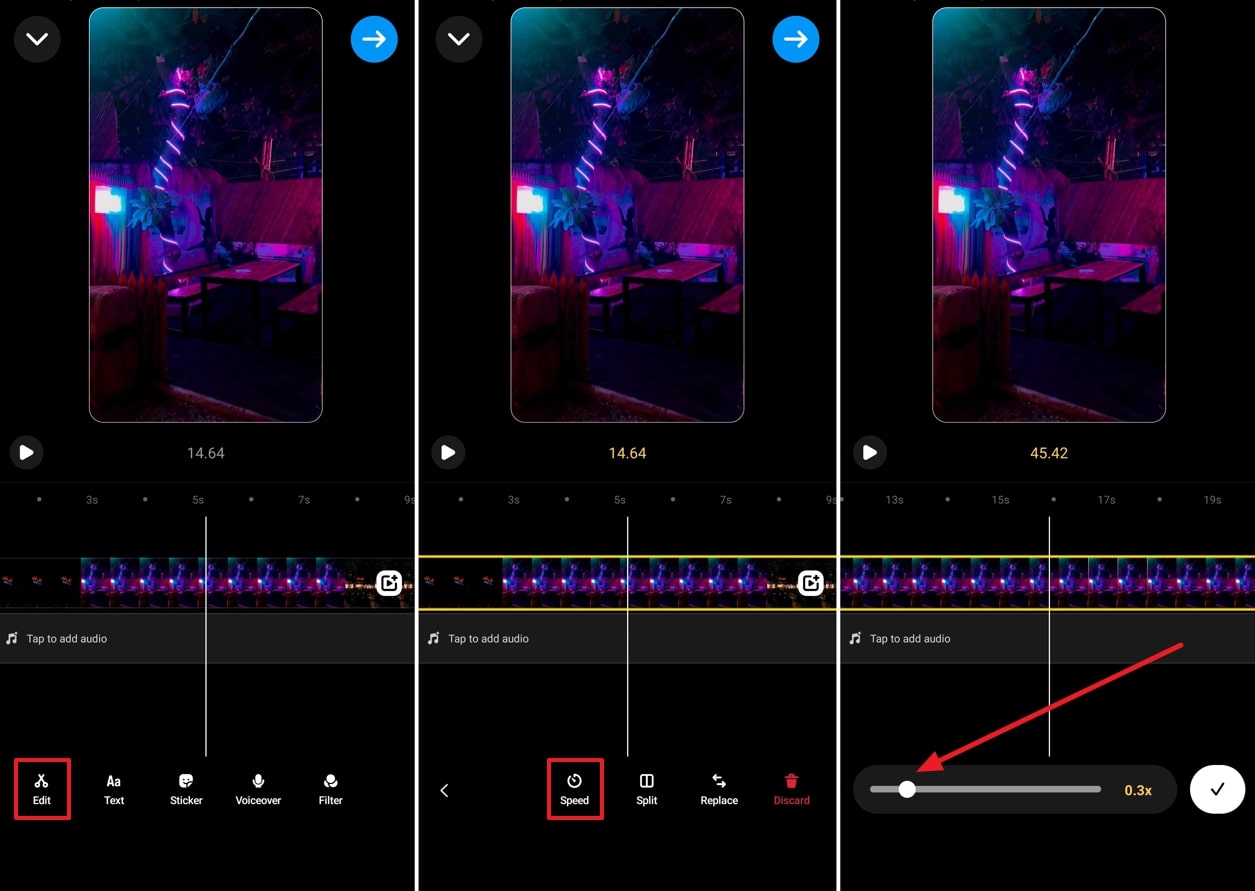
Part 3: Make Video Editing in Slow Mo Easy With Wondershare Filmora
Creating slow-mo reels on Instagram won’t add uniformity to the results. Thus, you should use a third-party tool like Filmora to produce convincing results. With the latest release of Volume 13, this tool has upgraded itself to a massive scale. It includes many AI features that can transform your editing experience. The AI features can finish tasks with great accuracy within a few minutes.
This desktop tool can also generate slow-motion videos with natural results. It does not degrade the frame rate of the video after slow-mo. In fact, it increases the video quality through rendering. Along with slow motion, this tool can add many visual effects. Hence, it’s an all-rounder tool to confront all the requirements for video editing.
Free Download For Win 7 or later(64-bit)
Free Download For macOS 10.14 or later
Methods to Create Slow Motion Instagram Reels with Filmora
On Filmora, there are many ways to create slow-motion Instagram reels. To discover them, jump to the below section:
Method 1: Using Optical Flow in Speed Ramping
Heading to our first method, we will use optical flow to smoothen the video’s slow motion. Let’s get started with the below-mentioned steps:
Step 1Sign in to Create a New Project
Start by following the on-screen instructions to sign into Filmora. Once logged into this tool, hit the “New Project” option. It will open the main interface of this tool on your screen.
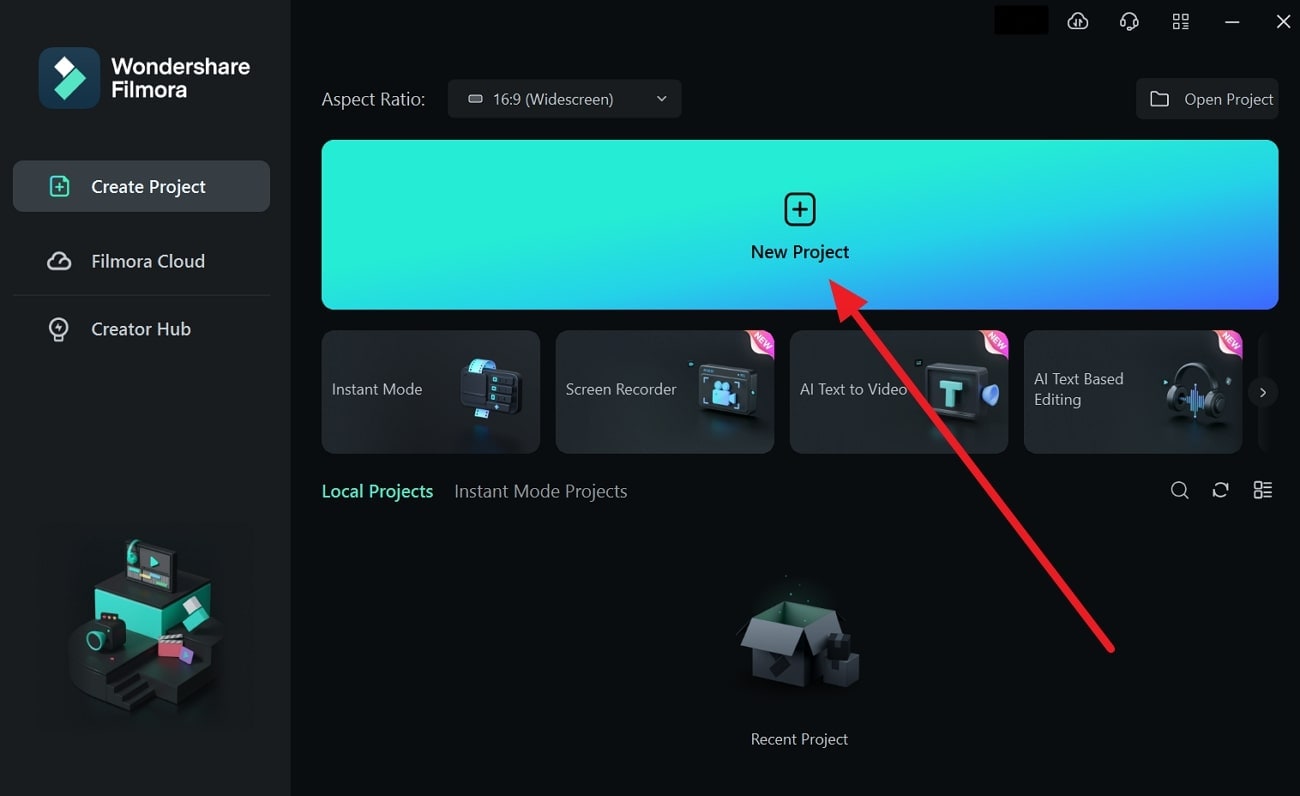
Step 2Import Video to the Timeline
To import the preferred video, press “Ctrl+I”. With this, your video will be uploaded within a time of few minutes. Afterward, drag and drop it to the timeline below.
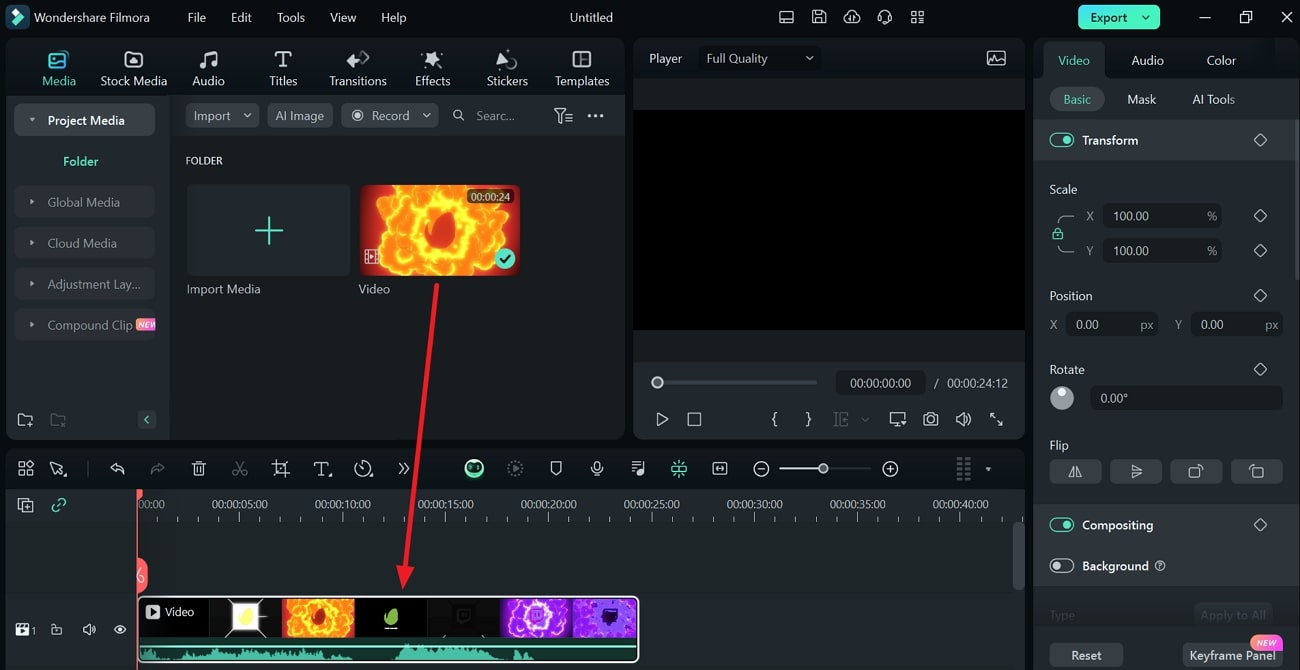
Step 3Select Uniform Speed
After dropping the video into the timeline, select it with your cursor. Go to the settings given on the right side and choose “Speed”. Select “Uniform Speed” and proceed to extend the settings for “AI Frame Interpolation.” Once done, select the “Optical Flow” option. To generate the final results, choose “Render Preview” from the toolbar of the timeline.
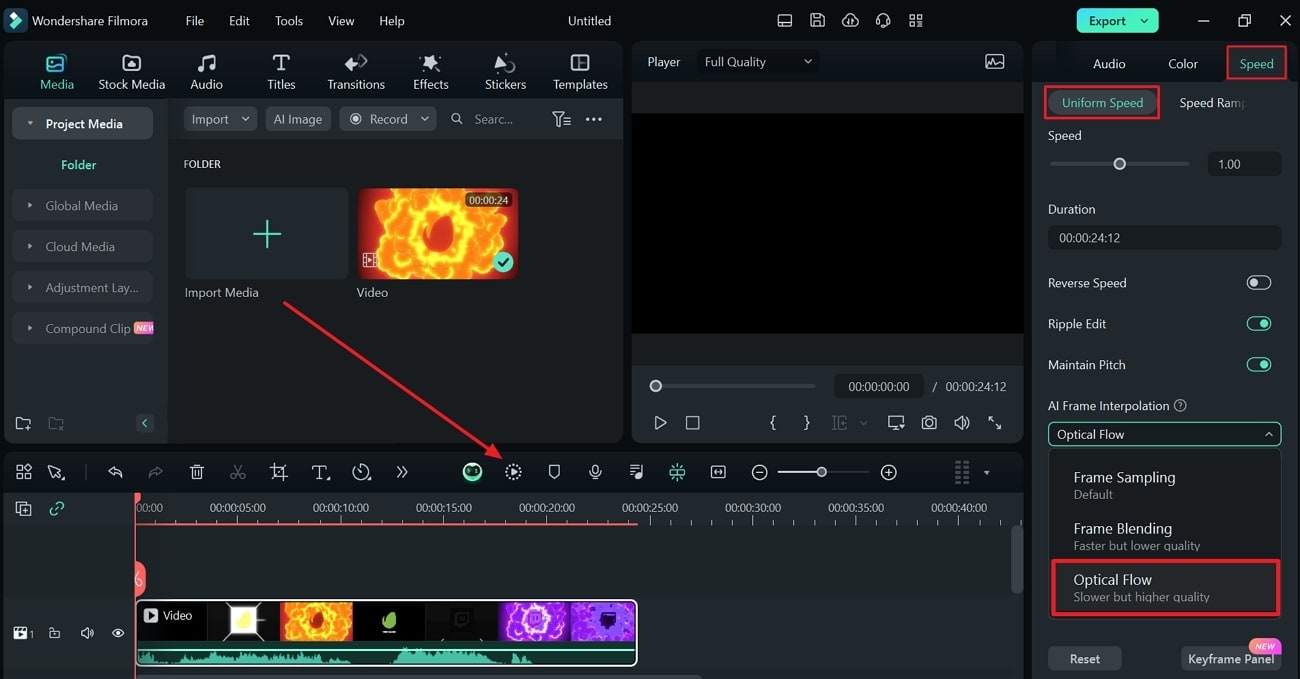
Method 2: Using Uniform Speed
After dragging the video on the timeline, right-click on it. From the pop-up options, select the option called “Uniform Speed”. Once done, follow the instructions given above to conclude the process.
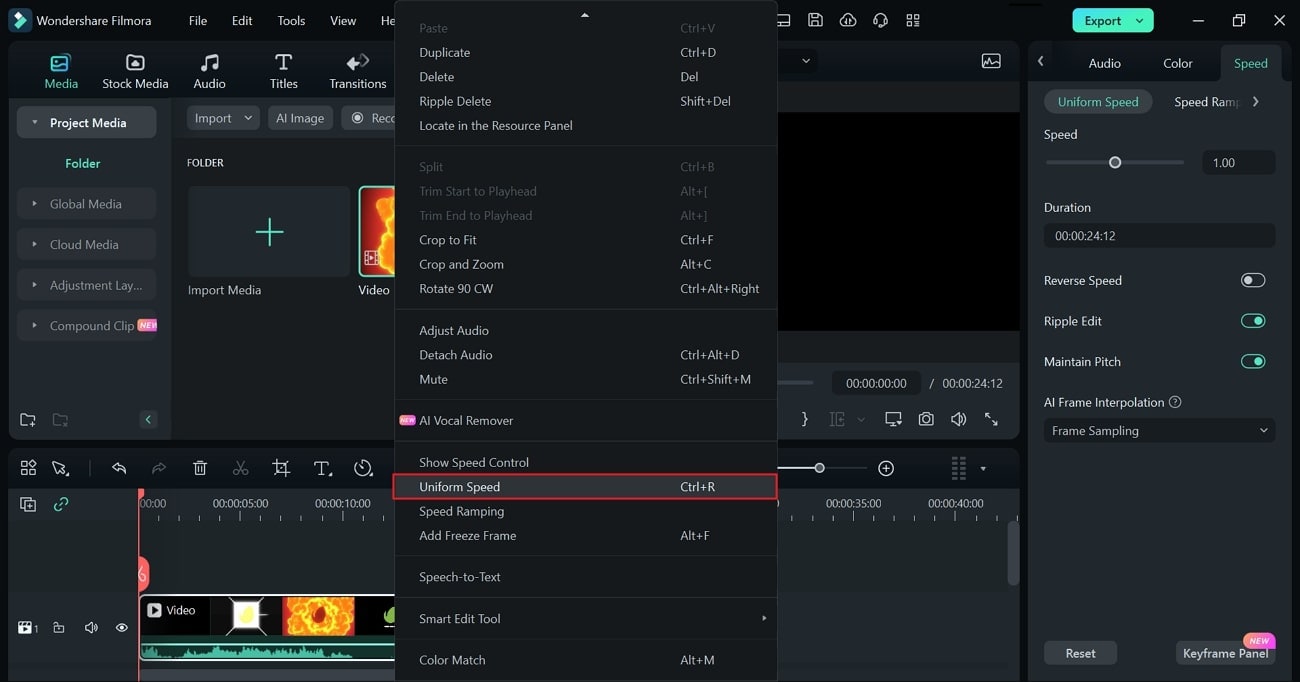
Method 3: Using Toolbar
Start by selecting the video clip on the timeline. Once done, head to the “Toolbar” given above and click “Tools”. Now, expand “Speed” and then select “Uniform Speed”. Now, you can follow the steps given above to continue with the process.
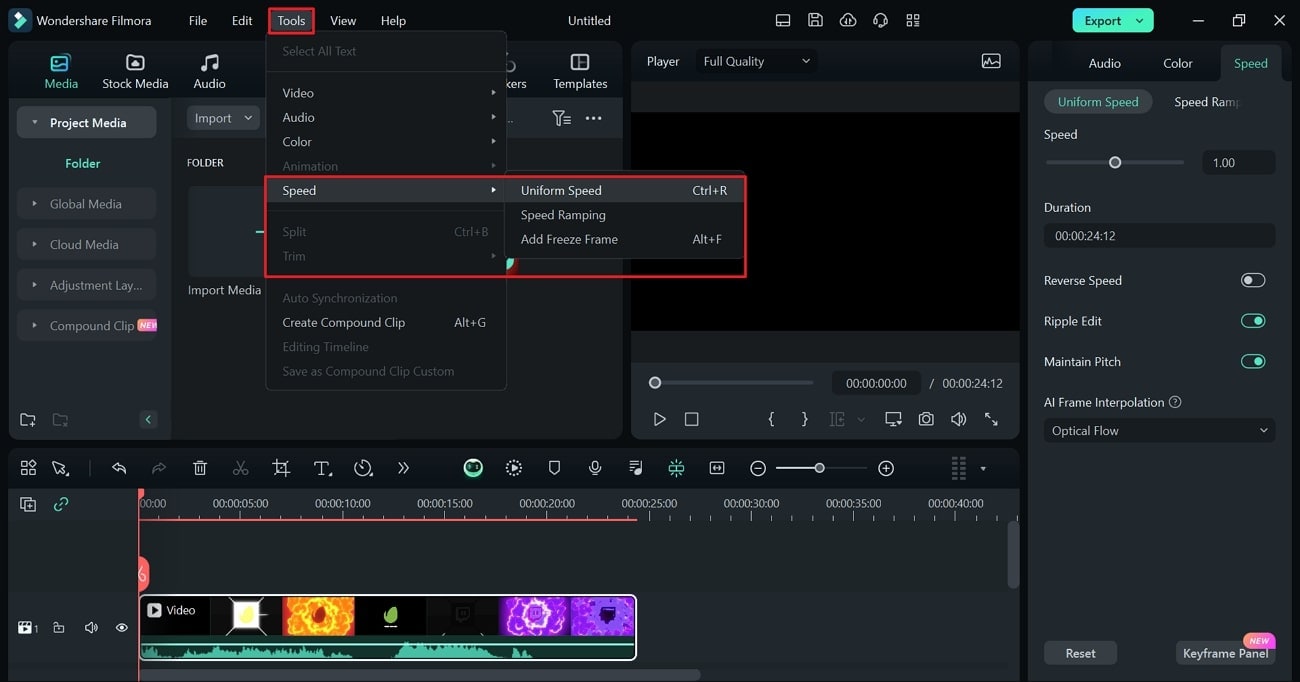
Key Features of Wondershare Filmora
AI Thumbnail Creator: This tool observes the three best shots in your video for a thumbnail. Moreover, it contains 58 templates to produce engaging thumbnails for the videos. It also lets you customize the results with text and image editing.
Auto Reframe: Every social media platform has requirements for aspect ratio. With the auto-reframe feature, you can adjust the aspect ratios in an automated way. With this feature, you can convert videos for YouTube shorts, TikTok, and Instagram.
Background Remover: You can replace backgrounds from your video without needing a green screen. By doing so, the tool can make transparent or virtual backgrounds for you. Also, it cuts out images and objects from the background with accuracy.
Color Correction: Do you need to enhance the colors of your video? This tool provides many color correction techniques for videos. It contains over 40 color presets that you can apply to your videos. Also, it allows you to adjust the color gradings and properties with ease.
Conclusion
Slow-motion Instagram videos have higher chances of getting maximum views. Viewers can catch the unique details in such videos efficiently. Moreover, it will help you promote your brand by emphasizing its features. However, Filmora gives the best results in producing slow-motion videos. It uses advanced algorithms to create slow-mo videos without distorting the original quality.
Make A Slow Motion Video Make A Slow Motion Video More Features

Part 1: How Can Slow Motion Videos Be Used in Social Media Content?
Slow-motion videos can be a great addition to your social media platforms. It will insert a cinematic impression into your content. To learn more details, jump to the below part explaining the use of slow motion videos in social media:
1. Displaying Products
Do you want to promote your product? Slow-motion videos can highlight the details of your product in a professional manner. You can display the main features of the product at a slow speed. Moreover, viewers would absorb the information with great ease.
2. Demos and Tutorials
Slow-motion videos can assist you in providing clear demonstrations. Slow-motion tutorials on your social media platform can make your audience understand better. Hence, while producing cooking or DIY videos, slow-motion effects would be valuable.
3. Adds Dramatic Effect
Slow-motion Instagram videos evoke emotions in people. In an action sequence, you can add dramatic effect through slow motion. Furthermore, it can help with the storytelling of your video. This will also help in generating an immersive experience for the audience.
Part 2: Composite Ways To Perform Slow Mo on Instagram
On Instagram, there are different approaches to creating slow-mo videos. Within a few taps, you can reduce the speed of the video on Instagram. This section will highlight the two ways to generate slow-motion Instagram reels.
Way 1: Before Recording the Reel
To create a slow-motion video, you can reduce the speed before recording. To do so, you will need to check the following steps in detail:
Step 1
Open your Instagram and swipe from left to right. Select “Reel” from the below options for recording. On the left panel, you can see the options for settings. From there, tap “Speed” to display the further options.

Step 2
Here, you can choose the lowest speed for slow-mo, which is “0.3x.” Then, tap on the desired speed from the given option. Afterward, press and hold the recording button to capture the video.

Way 2: During Editing Video
Instagram lets you modify the speed of a pre-recorded video. Thus, after recording the video, users can still reduce the speed. Mentioned below are the steps to help you with this process:
Step 1
Open your Instagram profile and swipe from left to right. Choose “Reel” from the bottom and select the “Plus” icon given in the bottom-left corner.

Step 2
Now, you can select and upload the desired video from your phone to Instagram. Afterward, click the “Edit” option at bottom left side to access further options. Here, select the “Speed” option and then move the slider to reduce the speed and make the video slow mo.

Part 3: Make Video Editing in Slow Mo Easy With Wondershare Filmora
Creating slow-mo reels on Instagram won’t add uniformity to the results. Thus, you should use a third-party tool like Filmora to produce convincing results. With the latest release of Volume 13, this tool has upgraded itself to a massive scale. It includes many AI features that can transform your editing experience. The AI features can finish tasks with great accuracy within a few minutes.
This desktop tool can also generate slow-motion videos with natural results. It does not degrade the frame rate of the video after slow-mo. In fact, it increases the video quality through rendering. Along with slow motion, this tool can add many visual effects. Hence, it’s an all-rounder tool to confront all the requirements for video editing.
Free Download For Win 7 or later(64-bit)
Free Download For macOS 10.14 or later
Methods to Create Slow Motion Instagram Reels with Filmora
On Filmora, there are many ways to create slow-motion Instagram reels. To discover them, jump to the below section:
Method 1: Using Optical Flow in Speed Ramping
Heading to our first method, we will use optical flow to smoothen the video’s slow motion. Let’s get started with the below-mentioned steps:
Step 1Sign in to Create a New Project
Start by following the on-screen instructions to sign into Filmora. Once logged into this tool, hit the “New Project” option. It will open the main interface of this tool on your screen.

Step 2Import Video to the Timeline
To import the preferred video, press “Ctrl+I”. With this, your video will be uploaded within a time of few minutes. Afterward, drag and drop it to the timeline below.

Step 3Select Uniform Speed
After dropping the video into the timeline, select it with your cursor. Go to the settings given on the right side and choose “Speed”. Select “Uniform Speed” and proceed to extend the settings for “AI Frame Interpolation.” Once done, select the “Optical Flow” option. To generate the final results, choose “Render Preview” from the toolbar of the timeline.

Method 2: Using Uniform Speed
After dragging the video on the timeline, right-click on it. From the pop-up options, select the option called “Uniform Speed”. Once done, follow the instructions given above to conclude the process.

Method 3: Using Toolbar
Start by selecting the video clip on the timeline. Once done, head to the “Toolbar” given above and click “Tools”. Now, expand “Speed” and then select “Uniform Speed”. Now, you can follow the steps given above to continue with the process.

Key Features of Wondershare Filmora
AI Thumbnail Creator: This tool observes the three best shots in your video for a thumbnail. Moreover, it contains 58 templates to produce engaging thumbnails for the videos. It also lets you customize the results with text and image editing.
Auto Reframe: Every social media platform has requirements for aspect ratio. With the auto-reframe feature, you can adjust the aspect ratios in an automated way. With this feature, you can convert videos for YouTube shorts, TikTok, and Instagram.
Background Remover: You can replace backgrounds from your video without needing a green screen. By doing so, the tool can make transparent or virtual backgrounds for you. Also, it cuts out images and objects from the background with accuracy.
Color Correction: Do you need to enhance the colors of your video? This tool provides many color correction techniques for videos. It contains over 40 color presets that you can apply to your videos. Also, it allows you to adjust the color gradings and properties with ease.
Conclusion
Slow-motion Instagram videos have higher chances of getting maximum views. Viewers can catch the unique details in such videos efficiently. Moreover, it will help you promote your brand by emphasizing its features. However, Filmora gives the best results in producing slow-motion videos. It uses advanced algorithms to create slow-mo videos without distorting the original quality.
Ultimate Guide to Countdown Animation in Videos
Many online marketers find that the animated countdown timer is the perfect way to bring a visual element to their videos while maintaining the quality and effectiveness of the video itself.
There are many ways to show a countdown timer on videos using animated GIFs. But they can be hard to implement or could cost a lot of money. You can use some free services, but they are limited in terms of features.
But not to worry, this post will go through a detailed process of creating an animated timer with 3 different methods. Before that, let’s discuss the benefits of using a timer for videos.
- Method 1: Make a Countdown Animation with a Professional Video Editing Software
- Method 2: Generate the timer with Free Online Countdown Timer Video Generators
- Method 3: Make a Countdown Timer with a Graphic Design Platform
- Cool Countdown
- Fitness Countdown
- Cinematic Countdown
- Neon Countdown
- Cyber Countdown
- Digital Countdown Pack
- Big Metal Countdown
- Glitch Countdown Transition
- Countdown To New Year
- Flashing Light Countdown
What are the benefits of using a countdown timer for videos/live streams?
Countdowns are a great way to get your message across and get your viewers excited about your product or service. A countdown timer provides a very simple visual cue to help motivate yourself and your audience to start watching the video.
It also works well with vlogs and YouTube, seamlessly transitioning from one part of your video to the next. This works best when your video isn’t about the product itself (but rather a review, a demo, or something else that lends itself well to a countdown).
As you can see, the Vlogger uses a countdown timer at the beginning of his video. Vlogger uses a countdown timer to make it appear as if the time is running out because it adds urgency and suspense. As a viewer, you’ll want to hurry up and watch this video, so you don’t miss out on anything.
Let’s now dive deep into methods of creating countdown animation for videos.
Method 1: Make a Countdown Animation with a Professional Video Editing Software
The most common trend today is video content creation, and it’s everywhere. Videos are not only entertaining, but they have a significant impact on audience retention.
With a video editor, you can create compelling content that will entice your viewers to watch the whole thing. Moreover, it can also help you get started by adding captions, transitions, effects, etc.
If you’re ready to make your next project more engaging and interactive, you can try the best video editing software, Wondershare Filmora !
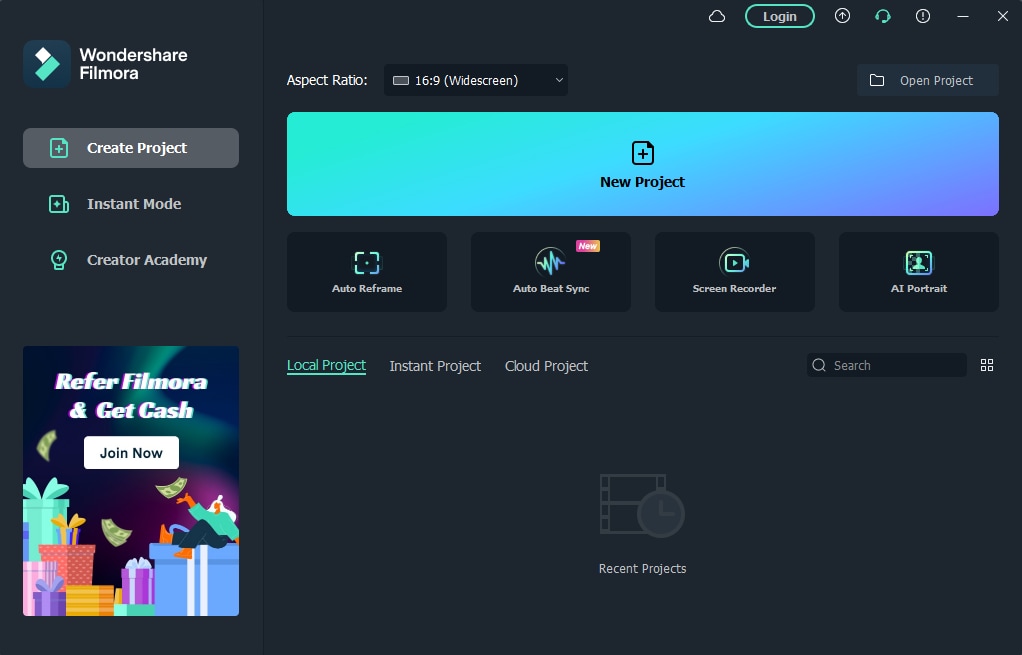
Wondershare Filmora is the industry standard when it comes to editing video. The video editing software industry is filled with features that promise to be faster, smarter, and easier to use than others.
Moreover, Wondershare has Filmstock effects that have revolutionized the world of video creators.
Filmstock is a collection of videos ready to be used with Filmora that contains more than 1,000 free stock footage clips of various scenes and locations, plus video effects, transitions, and titles, to make creating professional-quality videos faster and easier.
Let’s see some of its features that help us make animation countdown timers easily.
- Rich effects for you to choose customizing countdown animation at ease.
- You’re not stuck with traditional slow motion in your videos; you can add dynamism and energy to your videos with smooth animations.
- It has various countdown animation templates simplify the whole process, just drag-and-drop, everything gets done.
How to make a countdown animation with Filmora
You’re looking for an animated countdown timer for your website or your very first YouTube video, but you want one that stands out. You don’t want your visitors to think it’s generic or boring, so you’re thinking about how to make your countdown timer more interesting.
That’s where Filmora comes in. It’s an amazing tool that makes it easy to create countdown animations on websites or videos for almost any purpose. Let’s look at how to create your own cool, creative countdown timers using Filmora.
Free Download For Win 7 or later(64-bit)
Free Download For macOS 10.14 or later
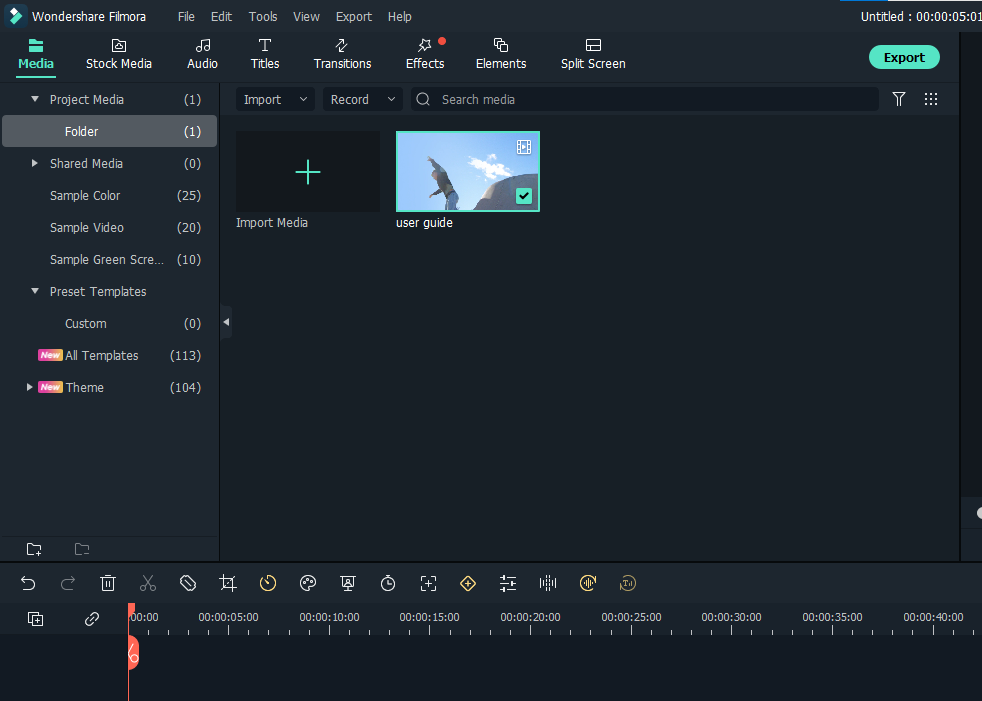
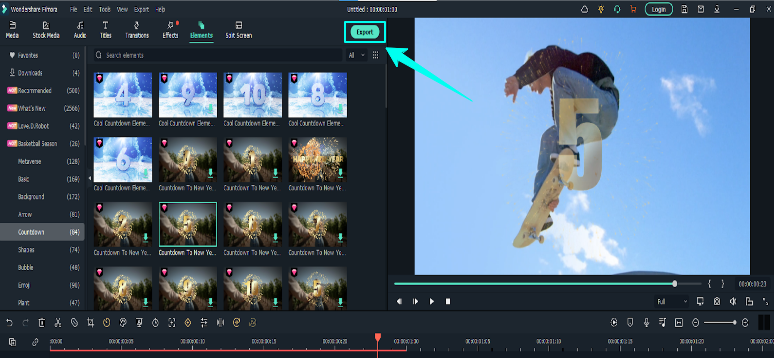
Step1 Open Filmora and import the background video file from the media section.
Step2 After importing the video, go to elements options from the top tab.
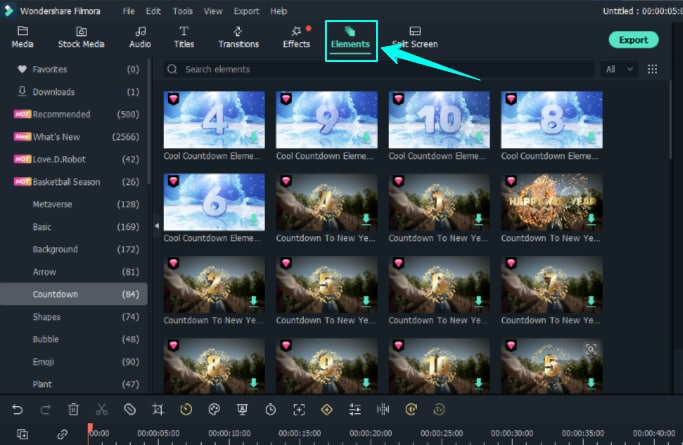
Step3 After choosing elements, you’ll see the countdown tab on your left. Click on the countdown and choose any animation. You can adjust the animation duration, size, and audio.
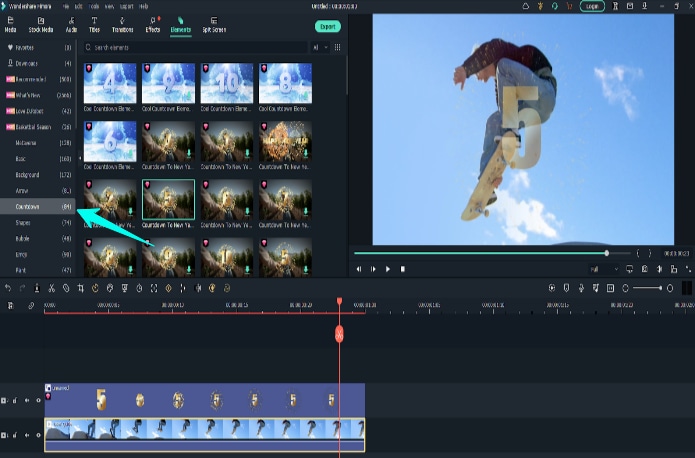
Step4 Adjust the animation duration according to the background video, and finally, export your animated countdown timer.
Pros and Cons of using Video Editing Software to make a countdown animation
Pros
- You can save any countdown effects project as a project to be used in future videos
- You can create a vision of your brand concept in your way
- Free templates are available according to your brand and target audience
- More stable
Cons
- Standard out-of-the-box video editing software isn’t enough to create a professional-quality video
Method 2: Generate the timer with Free Online Countdown Timer Video Generators
If you’re trying to catch your audience’s attention by giving them a reason to ‘countdown’ to something, then you’ll want to use a countdown timer with some great free online countdown videos.
There are many countdown timer websites like;Biteable ,Kapwing ,Movavi ,and MakeWebVideo . But we’ve rounded up the best countdown video generator site you’ll ever see:
FlexClip

FlexClip is a powerful yet easy-to-use online video editor. Its music library is versatile and high-quality. It lets you pick and add favorite tracks without infringing worries. Apply interesting editing to make your videos look better by adding transitions, filters, text, and more.
FlexClip’s biggest advantage is its extensive amount of free media assets. Whether you’re a master or rookie with FlexClip, you’re capable of producing excellent videos with music. You can be a video guru or a video beginner. You’re capable of producing awesome videos with great sound using FlexClip.
Key Features:
- Provides a complete set of video-making processes.
- A diverse range of royalty-free music selection
- Loads of handy editing tools
- Thousands of ready-made templates
- Multiple advanced features like adding text, emoji, effects, and more
How to make a countdown animation with FlexClip
The FlexClip countdown creator is a leading video editor with many powerful features. To make your countdown video, click the Create a Video button below.
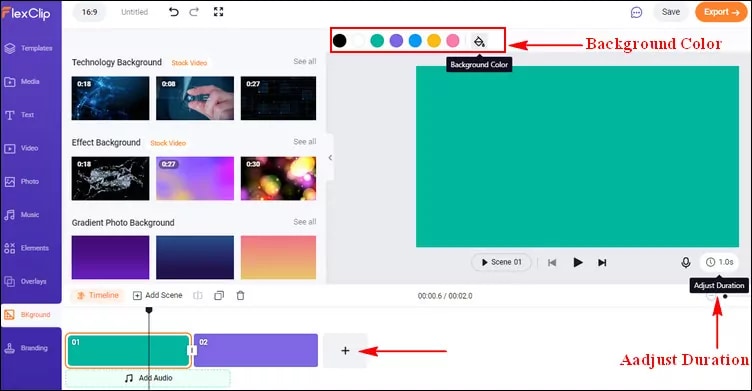
Step1 Set Your Countdown Video Background
Set your timer to how long you want your message to start your countdown. Usually, it’s 10 seconds.
Then add scenes and adjust the duration of scenes to make them all length. You can use the background color to make it more appealing to your audience.
Step2 Highlight Your Countdown with Animated Elements
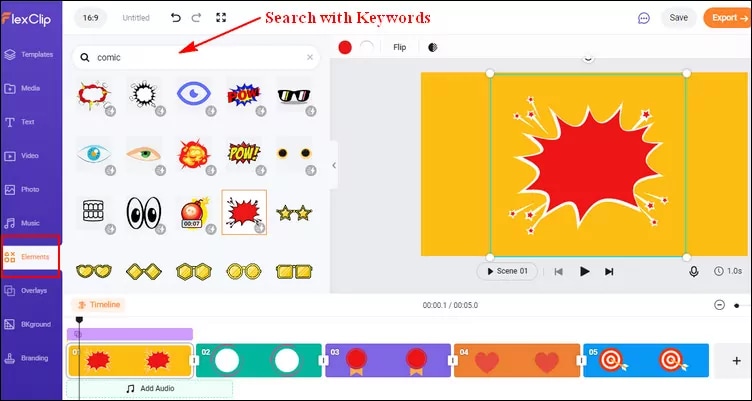
Using the amazing elements, you can make your countdown interactive and much more fun. Just go to the sidebar and switch to the Elements options. Apply the elements you want, then customize them on size, position, and color.
Step3 Add the Number to Your Countdown
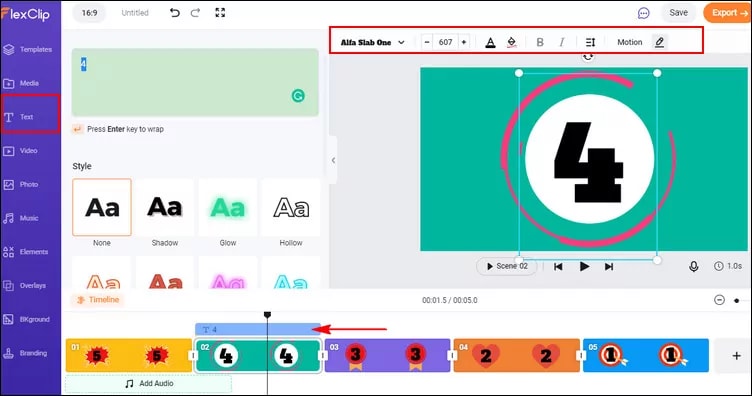
Now, add the numbers for the countdown, e.g., if you want a 10-second countdown, type in the number “10”. You can pick a basic text effect and manually enter the number.
After you’ve created the number, go to the timeline and control how long the number will appear and when it will disappear.
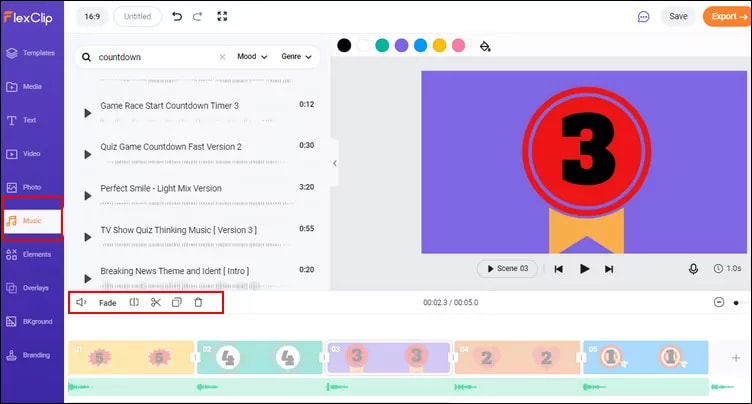
Step4 Add Music or Sound Effects to Your Countdown Video
FlexClip lets you upload your audio files from a local folder, or you can select one from FlexClip’s library. Once you’re done adding the countdown music, you can trim the duration, set it to start and end at any time, and use the fade-in/out effect to make the music match your countdown. Plus, you can also adjust the volume to make the music softer.
Step5 Preview and Export Your Countdown Video
You can preview it to see how the countdown video will look in the end, finally, hit export, and you’re done!
Method 3: Make a Countdown Timer with a Graphic Design Platform
Today’s graphic design platforms give designers more options than ever before, but many designers struggle to make the most of these resources. Let us share some tips and tricks on designing a countdown timer using the tools available through Canva, a graphic design platform.
Canva
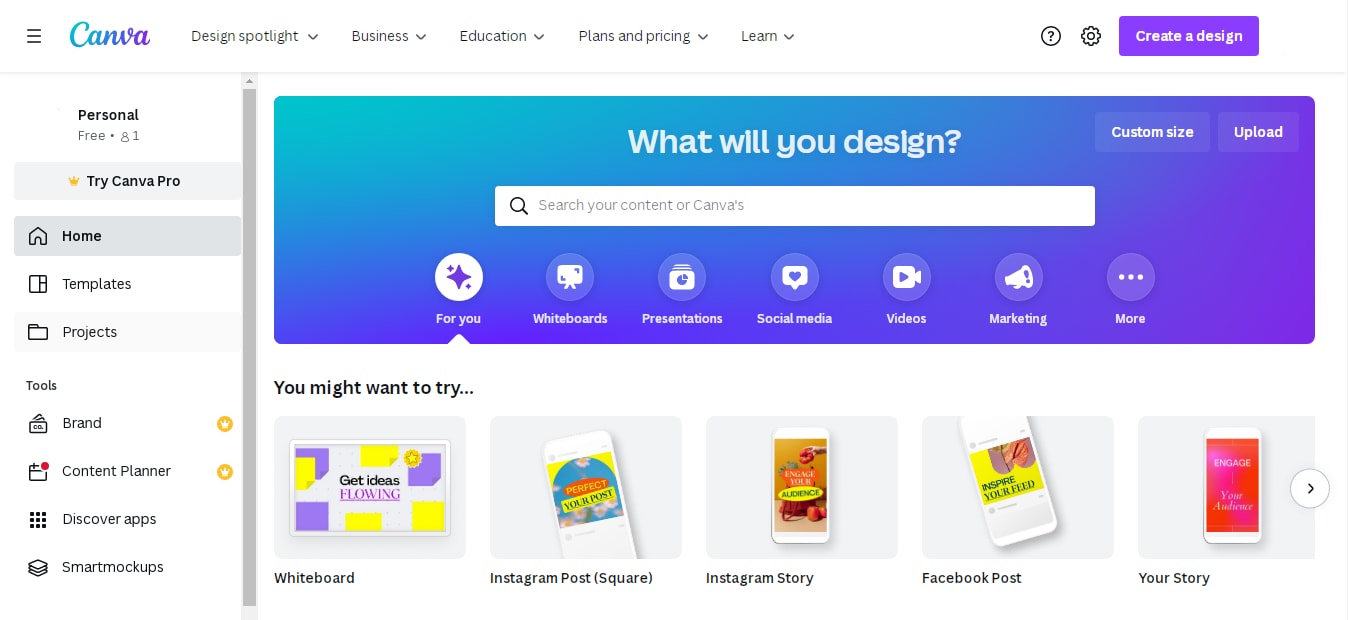
Many types of graphic design software are available, and Canva is one of the best. While its critics may disagree, Canva is an undeniable tool to help millions of business owners and marketers improve their social media graphics and redesign their brand image without needing to learn graphic design.
Key Features:
- Drag and drop feature
- Free templates
- Background Removal Tool
- Canva Brand Kit
- Magic Resizing
How to make a countdown animation with Canva
Canva offers a range of great-looking countdown templates that’ll help you create one in just a few minutes. And if you need a simple countdown animation, you can download one of their free templates. Let’s make it from scratch:
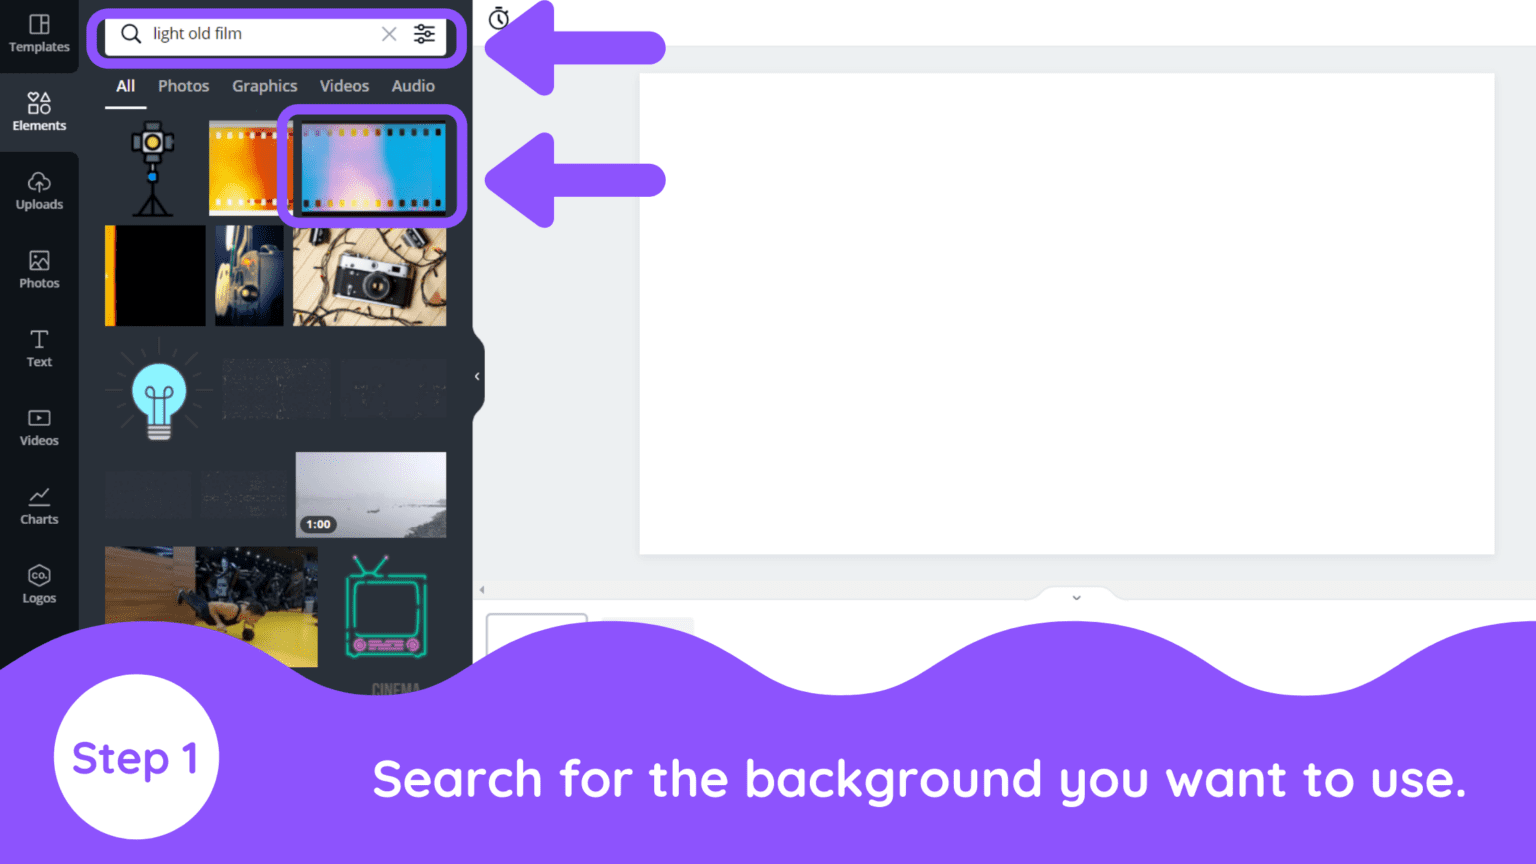
Step1 Select The Background
With Canva, you get a wide range of free backgrounds. Click on the button labeled “Search.” Now choose the “light old film” background element and click Add.
Step2 Enter Your Text (Number)
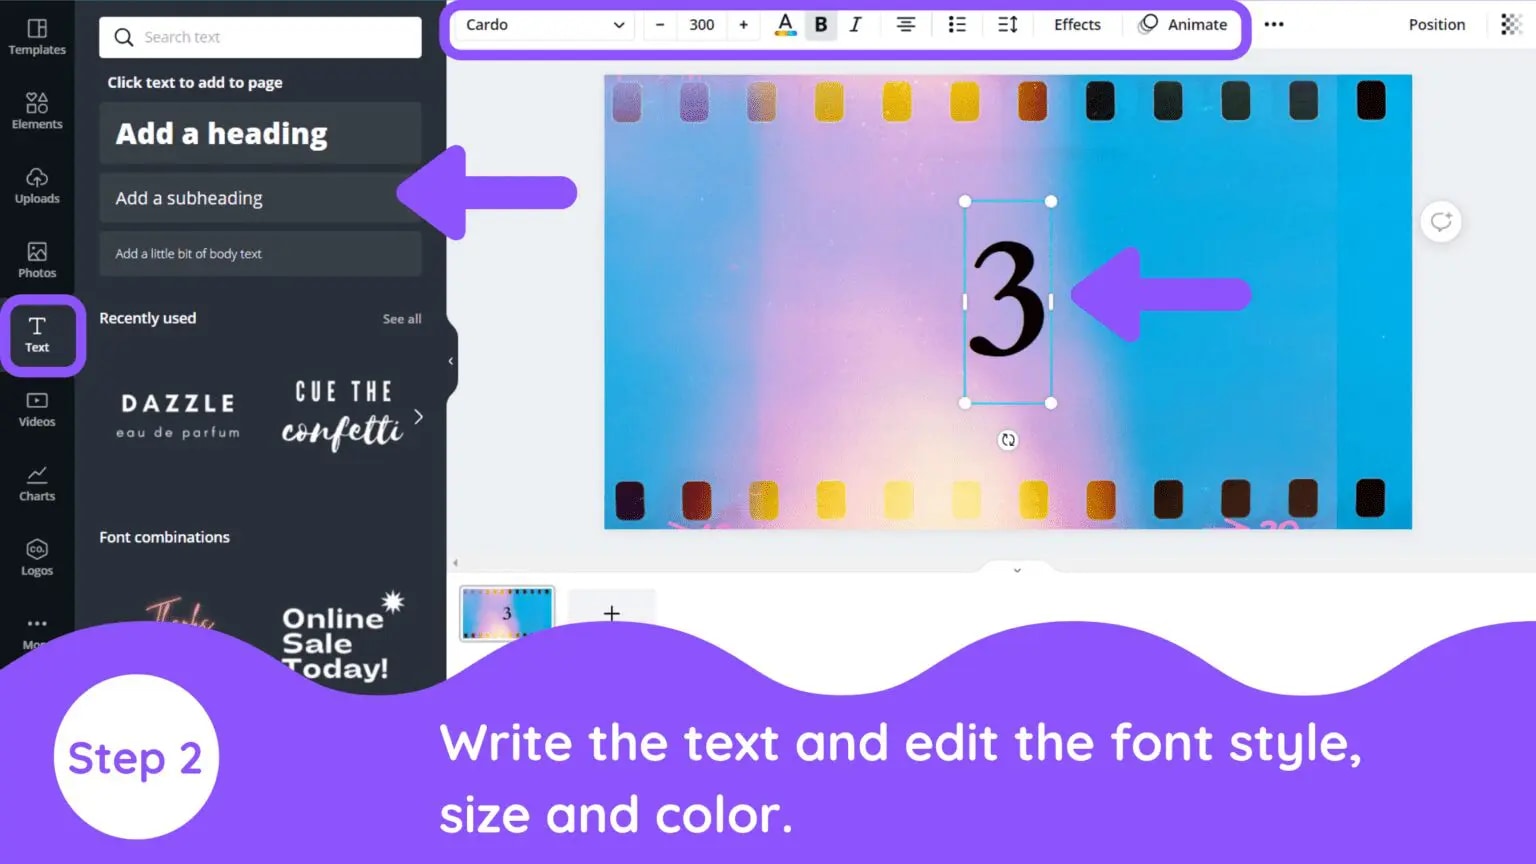
Then select the text tab and choose any font style, color, and size.
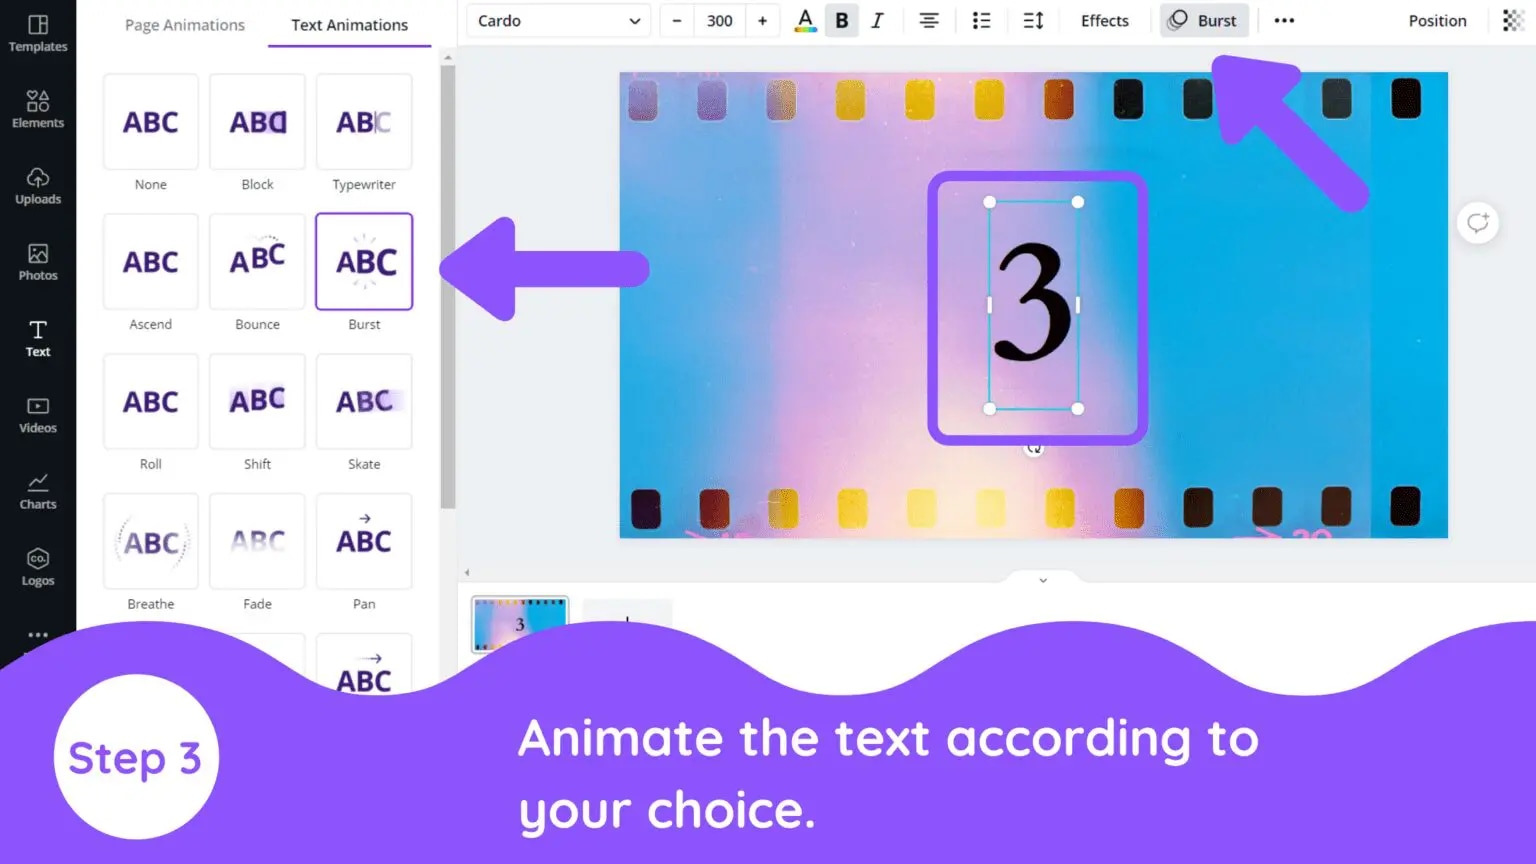
Step3 Animate Text
Next, select the font again, and then, at the top, there’s an option for Text Animation.
Adding text animation to your countdown timer will make it more realistic and match your background better than a straight-up countdown timer.
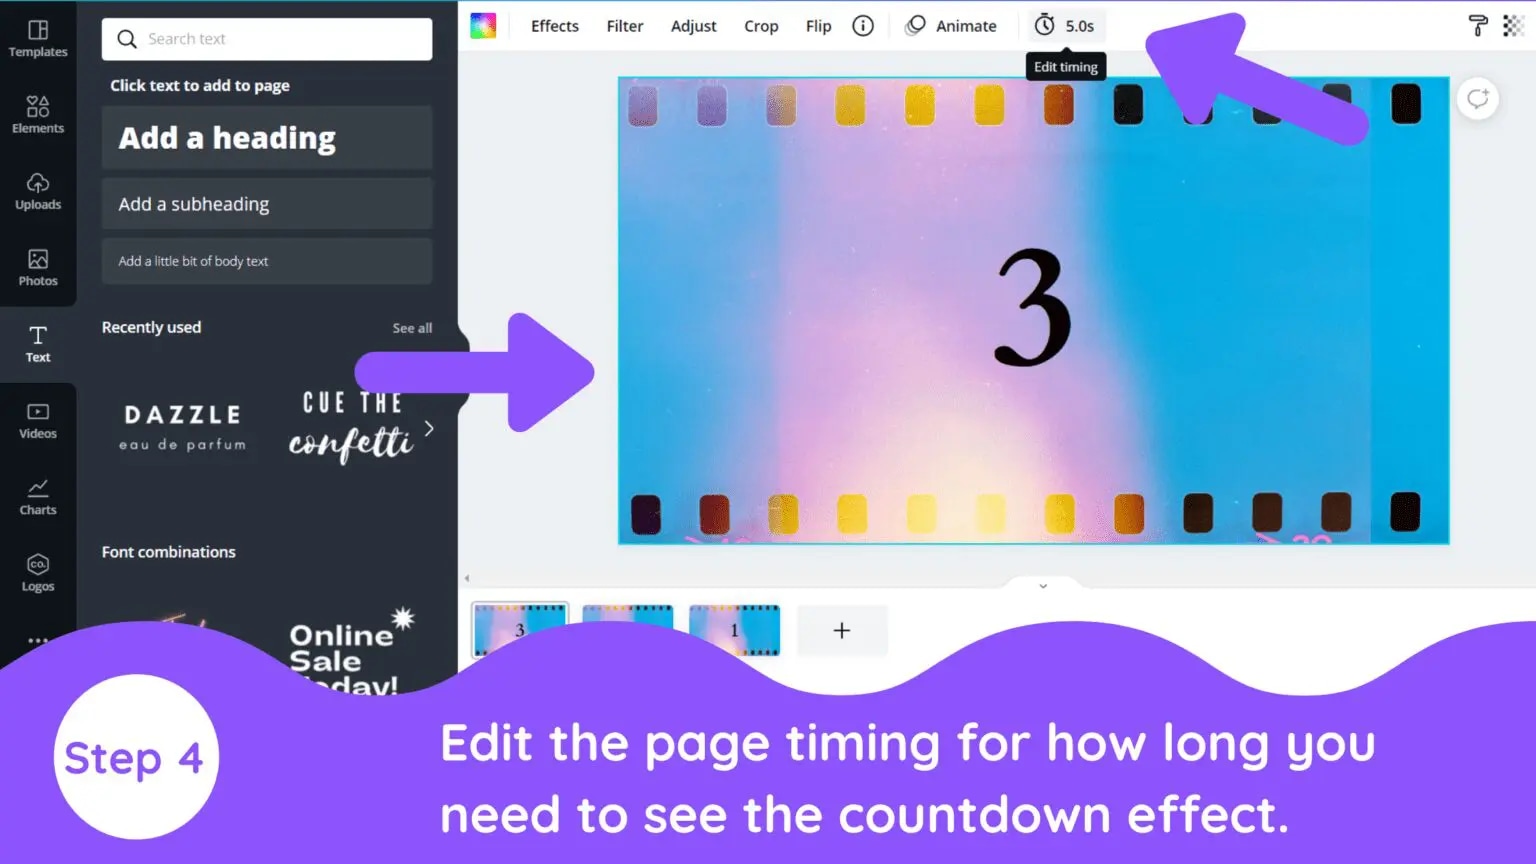
Step4 Edit The Page Timing
Next, click on the “Edit Timing” option. You can set the timer for each page as per your choice
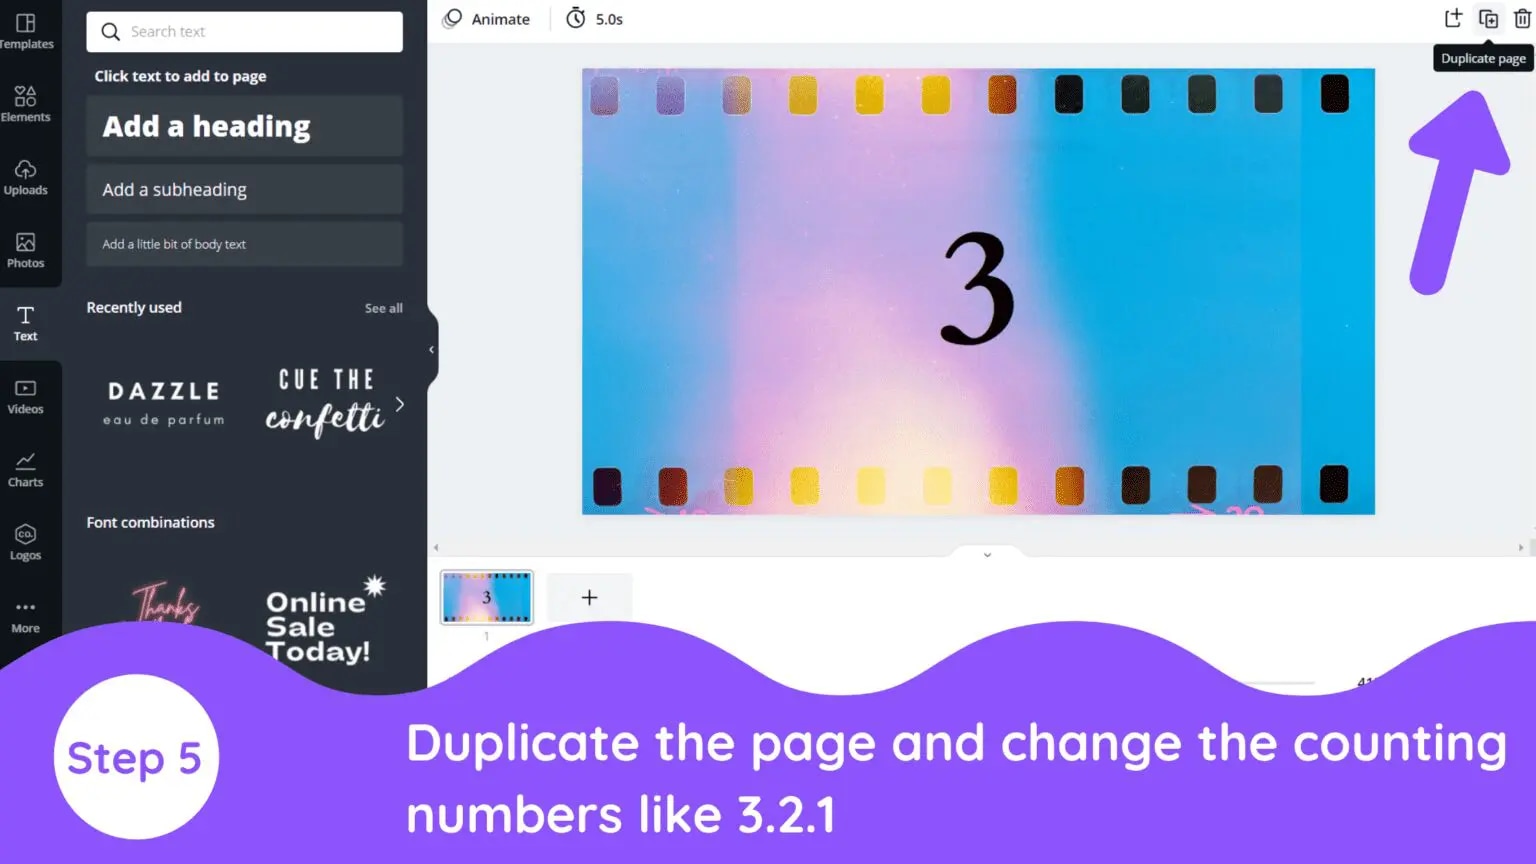
Step5 Duplicate The Page
Now, select the duplicate page option and change the number of duplicate pages from 3 to 2,1, with the same design and formatting.
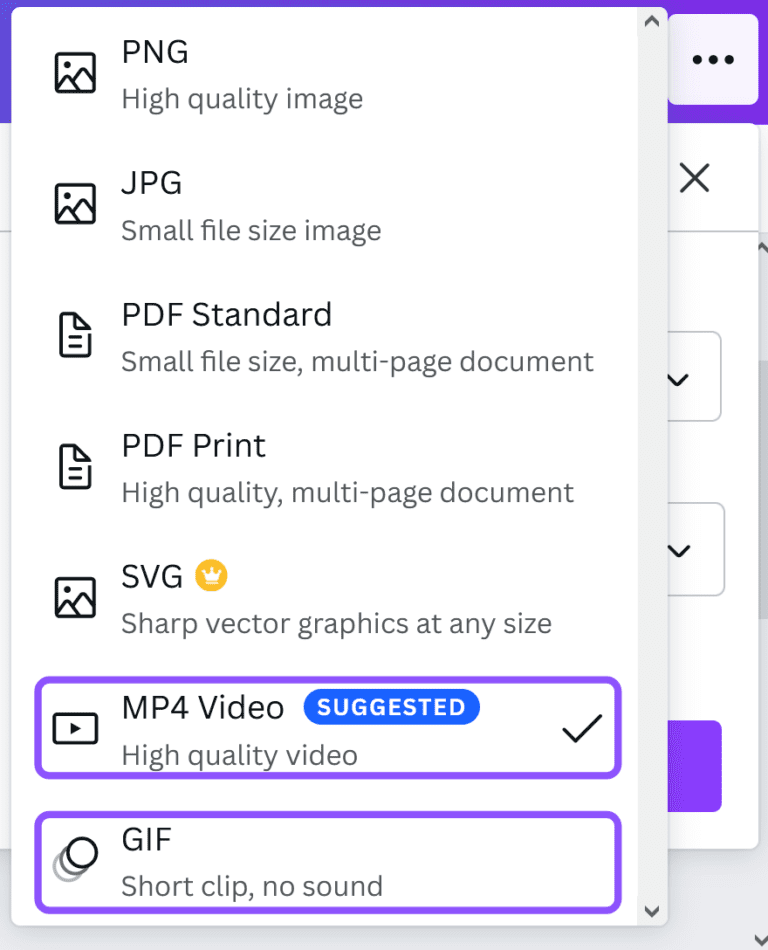
Step6 Export / Download Video
You’re finally done! Click the Download button to export your design.
The background of this photo is not a static image, so you cannot select the JPG, PNG, or SVG. You must choose an MP4 video or a GIF when creating an animation.
Top 10 animated countdown effects to make your video like a Pro
Animated countdown effects are a great way to add some “pizzazz” to a simple video. They look awesome and are extremely effective in creating a memorable video. When used well, they can add some excitement to a boring video. We’ll go over the top 10 animated countdown effects from Filmstock
1. Cool Countdown

2. Fitness Countdown
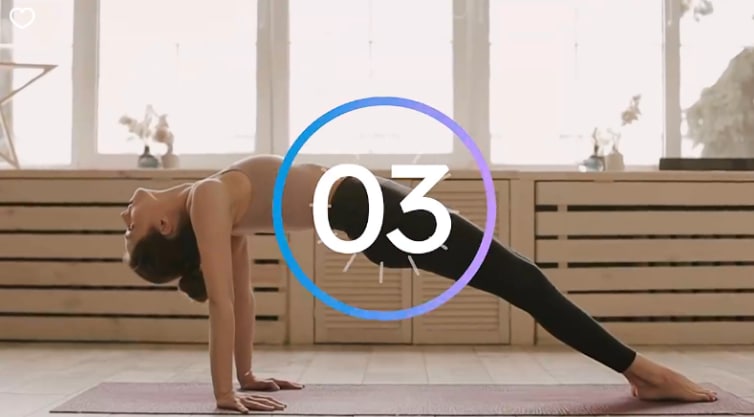
3. Cinematic Countdown
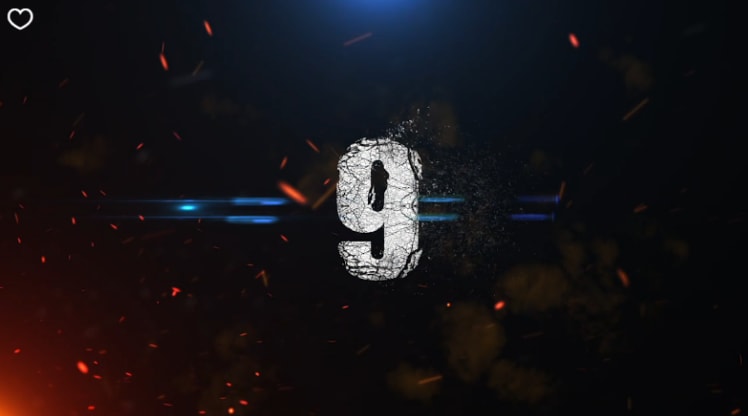
4. Neon Countdown

5. Cyber Countdown

6. Digital Countdown Pack

7. Big Metal Countdown
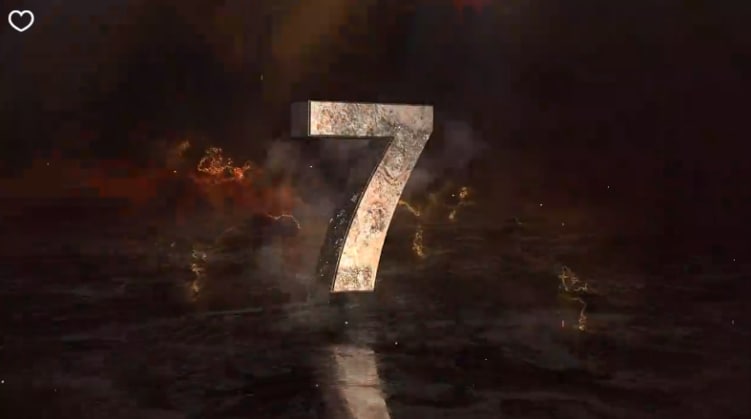
8. Glitch Countdown Transition

9. Countdown To New Year
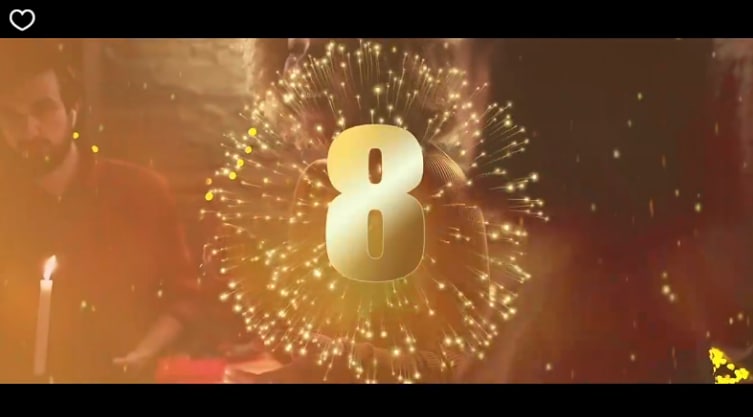
10. Flashing Light Countdown

How to use these effects in Wondershare Filmora
You can access Filmstock directly from the Filmora application or by visiting the website:
- Create a new project by clicking Filmora Video Editor in the menu.
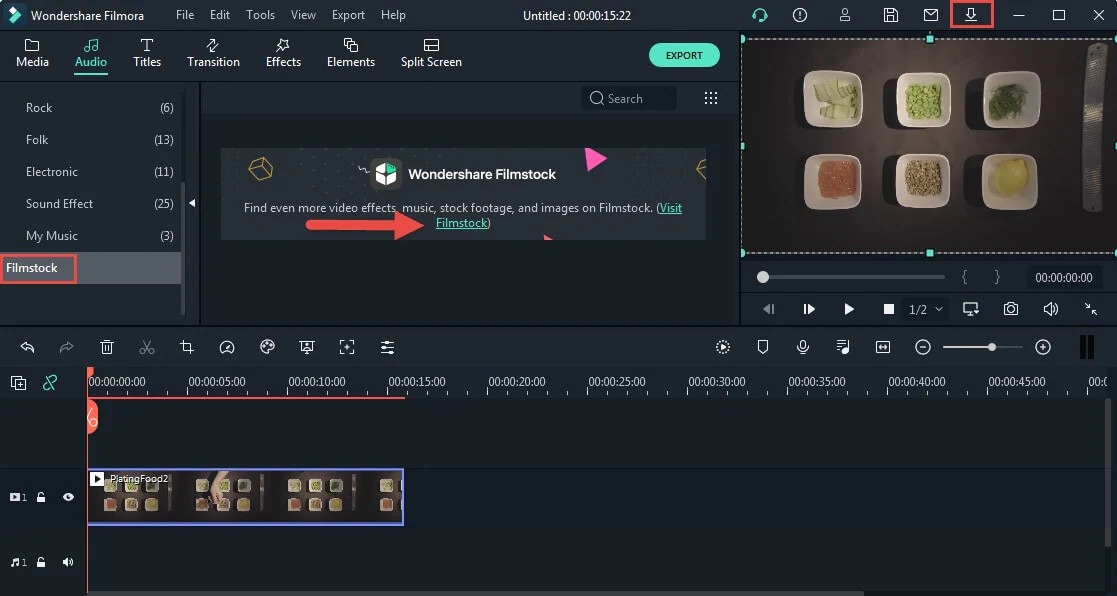
- Select the audio effects tab, or go to the Audio tab, title tab. You will see the film stock option.
- Click the Visit Filmstock button, and you will be taken to the Filmstock website.
Free Download For Win 7 or later(64-bit)
Free Download For macOS 10.14 or later
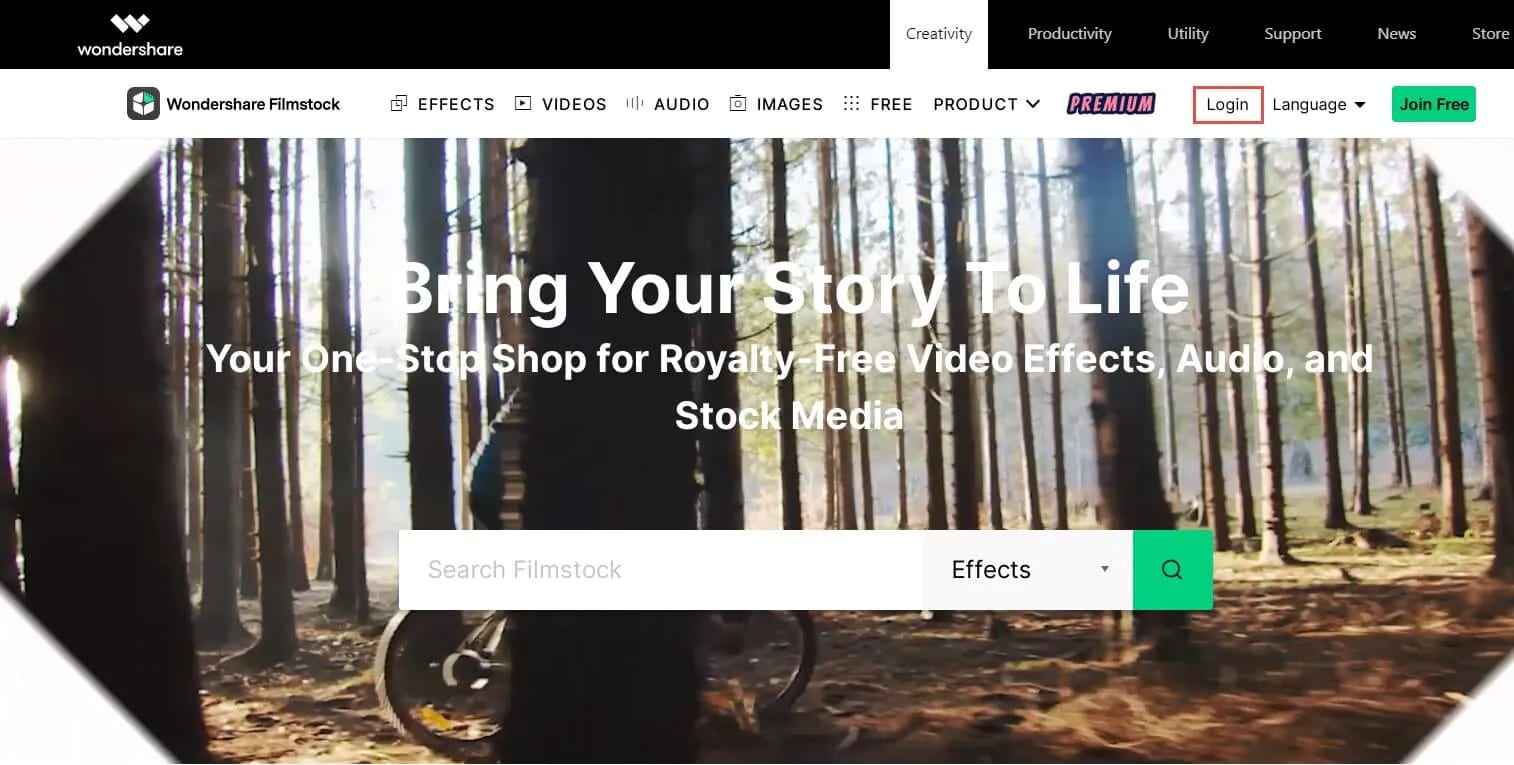
- Log in to Filmstock using your Wondershare account.
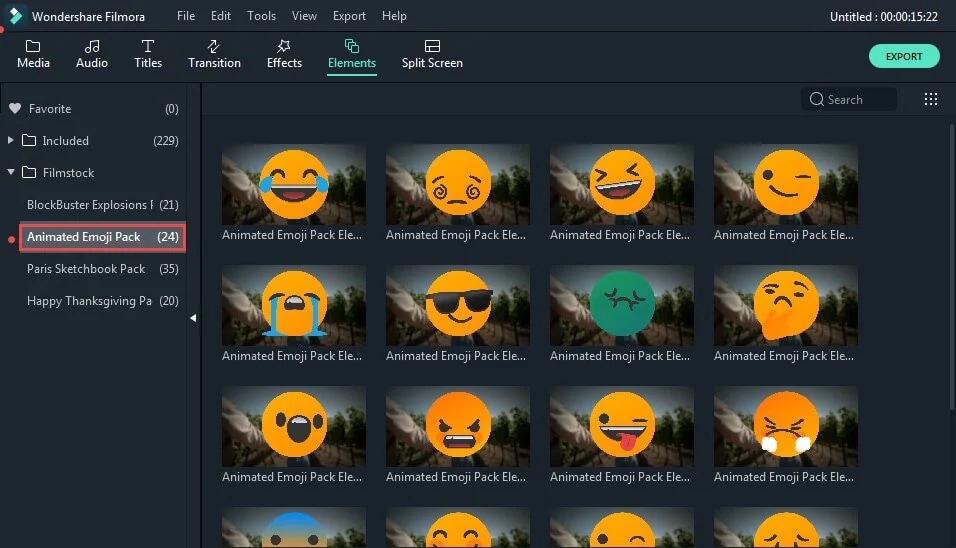
- After the download, the new effects will be added to your project in the appropriate section (Audio, Title, Transitions, and Elements). You’ll also be able to preview each effect from this window.
![]()
Note: it is highly recommended to log in to Filmstock and Filmora with the same Wondershare ID.
Final Words
A countdown is a powerful tool to add suspense to your videos. It gives your audience more incentive to watch your video all the way through. Get this article, as it is the ultimate guide to making your countdown animations, plus the best video editing software, Wondershare Filmora.
Wondershare Filmora is an excellent place to be creative and make some terrific countdown timers that can improve your viewers’ overall experience. Use their templates to create a strong and engaging online presence. Your audience won’t be able to resist the mesmerizing, hypnotizing, and enthralling effects of Wondershare Filmora.
Free Download For Win 7 or later(64-bit)
Free Download For macOS 10.14 or later
- Cool Countdown
- Fitness Countdown
- Cinematic Countdown
- Neon Countdown
- Cyber Countdown
- Digital Countdown Pack
- Big Metal Countdown
- Glitch Countdown Transition
- Countdown To New Year
- Flashing Light Countdown
What are the benefits of using a countdown timer for videos/live streams?
Countdowns are a great way to get your message across and get your viewers excited about your product or service. A countdown timer provides a very simple visual cue to help motivate yourself and your audience to start watching the video.
It also works well with vlogs and YouTube, seamlessly transitioning from one part of your video to the next. This works best when your video isn’t about the product itself (but rather a review, a demo, or something else that lends itself well to a countdown).
As you can see, the Vlogger uses a countdown timer at the beginning of his video. Vlogger uses a countdown timer to make it appear as if the time is running out because it adds urgency and suspense. As a viewer, you’ll want to hurry up and watch this video, so you don’t miss out on anything.
Let’s now dive deep into methods of creating countdown animation for videos.
Method 1: Make a Countdown Animation with a Professional Video Editing Software
The most common trend today is video content creation, and it’s everywhere. Videos are not only entertaining, but they have a significant impact on audience retention.
With a video editor, you can create compelling content that will entice your viewers to watch the whole thing. Moreover, it can also help you get started by adding captions, transitions, effects, etc.
If you’re ready to make your next project more engaging and interactive, you can try the best video editing software, Wondershare Filmora !

Wondershare Filmora is the industry standard when it comes to editing video. The video editing software industry is filled with features that promise to be faster, smarter, and easier to use than others.
Moreover, Wondershare has Filmstock effects that have revolutionized the world of video creators.
Filmstock is a collection of videos ready to be used with Filmora that contains more than 1,000 free stock footage clips of various scenes and locations, plus video effects, transitions, and titles, to make creating professional-quality videos faster and easier.
Let’s see some of its features that help us make animation countdown timers easily.
- Rich effects for you to choose customizing countdown animation at ease.
- You’re not stuck with traditional slow motion in your videos; you can add dynamism and energy to your videos with smooth animations.
- It has various countdown animation templates simplify the whole process, just drag-and-drop, everything gets done.
How to make a countdown animation with Filmora
You’re looking for an animated countdown timer for your website or your very first YouTube video, but you want one that stands out. You don’t want your visitors to think it’s generic or boring, so you’re thinking about how to make your countdown timer more interesting.
That’s where Filmora comes in. It’s an amazing tool that makes it easy to create countdown animations on websites or videos for almost any purpose. Let’s look at how to create your own cool, creative countdown timers using Filmora.
Free Download For Win 7 or later(64-bit)
Free Download For macOS 10.14 or later
Step1 Open Filmora and import the background video file from the media section.

Step2 After importing the video, go to elements options from the top tab.

Step3 After choosing elements, you’ll see the countdown tab on your left. Click on the countdown and choose any animation. You can adjust the animation duration, size, and audio.

Step4 Adjust the animation duration according to the background video, and finally, export your animated countdown timer.

Pros and Cons of using Video Editing Software to make a countdown animation
Pros
- You can save any countdown effects project as a project to be used in future videos
- You can create a vision of your brand concept in your way
- Free templates are available according to your brand and target audience
- More stable
Cons
- Standard out-of-the-box video editing software isn’t enough to create a professional-quality video
Method 2: Generate the timer with Free Online Countdown Timer Video Generators
If you’re trying to catch your audience’s attention by giving them a reason to ‘countdown’ to something, then you’ll want to use a countdown timer with some great free online countdown videos.
There are many countdown timer websites like;Biteable ,Kapwing ,Movavi ,and MakeWebVideo . But we’ve rounded up the best countdown video generator site you’ll ever see:
FlexClip

FlexClip is a powerful yet easy-to-use online video editor. Its music library is versatile and high-quality. It lets you pick and add favorite tracks without infringing worries. Apply interesting editing to make your videos look better by adding transitions, filters, text, and more.
FlexClip’s biggest advantage is its extensive amount of free media assets. Whether you’re a master or rookie with FlexClip, you’re capable of producing excellent videos with music. You can be a video guru or a video beginner. You’re capable of producing awesome videos with great sound using FlexClip.
Key Features:
- Provides a complete set of video-making processes.
- A diverse range of royalty-free music selection
- Loads of handy editing tools
- Thousands of ready-made templates
- Multiple advanced features like adding text, emoji, effects, and more
How to make a countdown animation with FlexClip
The FlexClip countdown creator is a leading video editor with many powerful features. To make your countdown video, click the Create a Video button below.
Step1 Set Your Countdown Video Background
Set your timer to how long you want your message to start your countdown. Usually, it’s 10 seconds.
Then add scenes and adjust the duration of scenes to make them all length. You can use the background color to make it more appealing to your audience.

Step2 Highlight Your Countdown with Animated Elements
Using the amazing elements, you can make your countdown interactive and much more fun. Just go to the sidebar and switch to the Elements options. Apply the elements you want, then customize them on size, position, and color.

Step3 Add the Number to Your Countdown
Now, add the numbers for the countdown, e.g., if you want a 10-second countdown, type in the number “10”. You can pick a basic text effect and manually enter the number.
After you’ve created the number, go to the timeline and control how long the number will appear and when it will disappear.

Step4 Add Music or Sound Effects to Your Countdown Video
FlexClip lets you upload your audio files from a local folder, or you can select one from FlexClip’s library. Once you’re done adding the countdown music, you can trim the duration, set it to start and end at any time, and use the fade-in/out effect to make the music match your countdown. Plus, you can also adjust the volume to make the music softer.

Step5 Preview and Export Your Countdown Video
You can preview it to see how the countdown video will look in the end, finally, hit export, and you’re done!
Method 3: Make a Countdown Timer with a Graphic Design Platform
Today’s graphic design platforms give designers more options than ever before, but many designers struggle to make the most of these resources. Let us share some tips and tricks on designing a countdown timer using the tools available through Canva, a graphic design platform.
Canva

Many types of graphic design software are available, and Canva is one of the best. While its critics may disagree, Canva is an undeniable tool to help millions of business owners and marketers improve their social media graphics and redesign their brand image without needing to learn graphic design.
Key Features:
- Drag and drop feature
- Free templates
- Background Removal Tool
- Canva Brand Kit
- Magic Resizing
How to make a countdown animation with Canva
Canva offers a range of great-looking countdown templates that’ll help you create one in just a few minutes. And if you need a simple countdown animation, you can download one of their free templates. Let’s make it from scratch:
Step1 Select The Background
With Canva, you get a wide range of free backgrounds. Click on the button labeled “Search.” Now choose the “light old film” background element and click Add.

Step2 Enter Your Text (Number)
Then select the text tab and choose any font style, color, and size.

Step3 Animate Text
Next, select the font again, and then, at the top, there’s an option for Text Animation.
Adding text animation to your countdown timer will make it more realistic and match your background better than a straight-up countdown timer.

Step4 Edit The Page Timing
Next, click on the “Edit Timing” option. You can set the timer for each page as per your choice

Step5 Duplicate The Page
Now, select the duplicate page option and change the number of duplicate pages from 3 to 2,1, with the same design and formatting.

Step6 Export / Download Video
You’re finally done! Click the Download button to export your design.
The background of this photo is not a static image, so you cannot select the JPG, PNG, or SVG. You must choose an MP4 video or a GIF when creating an animation.

Top 10 animated countdown effects to make your video like a Pro
Animated countdown effects are a great way to add some “pizzazz” to a simple video. They look awesome and are extremely effective in creating a memorable video. When used well, they can add some excitement to a boring video. We’ll go over the top 10 animated countdown effects from Filmstock
1. Cool Countdown

2. Fitness Countdown

3. Cinematic Countdown

4. Neon Countdown

5. Cyber Countdown

6. Digital Countdown Pack

7. Big Metal Countdown

8. Glitch Countdown Transition

9. Countdown To New Year

10. Flashing Light Countdown

How to use these effects in Wondershare Filmora
You can access Filmstock directly from the Filmora application or by visiting the website:
- Create a new project by clicking Filmora Video Editor in the menu.
- Select the audio effects tab, or go to the Audio tab, title tab. You will see the film stock option.
- Click the Visit Filmstock button, and you will be taken to the Filmstock website.
Free Download For Win 7 or later(64-bit)
Free Download For macOS 10.14 or later

- Log in to Filmstock using your Wondershare account.

- After the download, the new effects will be added to your project in the appropriate section (Audio, Title, Transitions, and Elements). You’ll also be able to preview each effect from this window.

![]()
Note: it is highly recommended to log in to Filmstock and Filmora with the same Wondershare ID.
Final Words
A countdown is a powerful tool to add suspense to your videos. It gives your audience more incentive to watch your video all the way through. Get this article, as it is the ultimate guide to making your countdown animations, plus the best video editing software, Wondershare Filmora.
Wondershare Filmora is an excellent place to be creative and make some terrific countdown timers that can improve your viewers’ overall experience. Use their templates to create a strong and engaging online presence. Your audience won’t be able to resist the mesmerizing, hypnotizing, and enthralling effects of Wondershare Filmora.
Free Download For Win 7 or later(64-bit)
Free Download For macOS 10.14 or later
Also read:
- Updated In 2024, How to Make Video Slow Motion?
- In 2024, Are You Looking for a Voice Changer to Make Your Gaming Experience More Fun? Here Is a List of the Top 6 Best Alternatives of Clownfish Voice Changers to Use
- New 2024 Approved 3D Ray Traced Settings In After Effects
- 2024 Approved Top 5 Best Video Denoisers
- New In 2024, Making Slow Motion Videos in Premiere Pro A Review on The Best Methods
- Do You Want to Replace the Sky in Your Media? Read the Article to Learn How to Change the Sky App on Your Mobile Phone for 2024
- New Splice Video Editor Online - Get Your Videos Splice Easily
- In 2024, Something About Skin Care Vlog Ideas
- In 2024, How to Add Echo Effect to Video
- New 2024 Approved Convert MP4 to 60 FPS GIF A Step-by-Step Guide
- Updated How to Add Camera Shake to Video in Adobe After Effects
- How to Make Vintage Film Effect 1980S
- In 2024, Read This Article to Learn How to Convert Your Slow-Motion Videos Into Normal-Speed Videos in a Few Simple Steps and Methods. So, Stick to the End
- How Can You Deny These Top 10 Free Speech to Text Software for 2024
- 2024 Approved Most-Used 3 Ways to Compress Video for Instagram Story, Feed, and IGTV
- New In 2024, 6 Websites to Free Download Motivational Video Footage
- In 2024, Facts About GIF Background You Didnt Know
- In This Article, We Introduce You Our Top 5 Picks of Video to Ppt Converter
- Updated How to Add Adjustment Layer (Clip) in DaVinci Resolve?
- Updated Add Emoji to Linkedin Post – 5 Tips You Would Like to Know for 2024
- New How Do You Create In-Camera Transitions in Your Videos? A Complete Guide for Beginners to Create These Transitions Using Their Camera at Home
- New Now, You Can Also Apply the Stranger Things Upside Down Effect to Your Video! This Effect Combines Camera Tricks and Video Editing Within Filmora to Transition From the Normal World Into the Upside Down
- New 5 Tips for Faster Editing in Filmora Video Editor for 2024
- Updated Your Recorded Video Footage Has some Visible Grains Making Your Video Noisy and Thus Hampering the Overall Viewing Experience. No Worries, as There AI Video Denoiser and Other Software Available to Correct the Issue
- How PGSharp Save You from Ban While Spoofing Pokemon Go On Tecno Pova 5 Pro? | Dr.fone
- In 2024, How to Change your Vivo Y56 5G Location on Twitter | Dr.fone
- In 2024, Rootjunky APK To Bypass Google FRP Lock For Poco C51
- In 2024, Easy Methods How To Transfer Pictures From Apple iPhone 14 to PC | Dr.fone
- Top 6 Apps/Services to Trace Any Apple iPhone XR Location By Mobile Number | Dr.fone
- Android Screen Stuck General Vivo Y100 5G Partly Screen Unresponsive | Dr.fone
- Android Screen Stuck General Oppo Find N3 Partly Screen Unresponsive | Dr.fone
- In 2024, How To Reset the Security Questions of Your Apple ID From Your iPhone 11 Pro
- Simple ways to get lost videos back from Realme 11 Pro+
- How to Unlock Vivo S18 Phone without Google Account?
- Top 10 Password Cracking Tools For Xiaomi Redmi Note 13 5G
- In 2024, How to Delete iCloud Account From iPhone 13 mini without Password?
- In 2024, Top-Notch Solutions for Disabled Apple ID From iPhone 14 Pro Max Making It Possible
- Fixes for Apps Keep Crashing on Samsung Galaxy A24 | Dr.fone
- Easy Guide to Nokia XR21 FRP Bypass With Best Methods
- Title: New In 2024, How to Concatenate Videos Using FFmpeg
- Author: Chloe
- Created at : 2024-04-24 07:08:34
- Updated at : 2024-04-25 07:08:34
- Link: https://ai-editing-video.techidaily.com/new-in-2024-how-to-concatenate-videos-using-ffmpeg/
- License: This work is licensed under CC BY-NC-SA 4.0.


