:max_bytes(150000):strip_icc():format(webp)/ps6-concept-trailer-64aac5b7323041ad93d7535eccf7df40.png)
New In 2024, How to Create an Alternate Reality Effect

How to Create an Alternate Reality Effect
Ditch boring one-dimensional videos and create a mesmerizing video with this alternative reality effect you can easily create using Wondershare Filmora.
This cool effect enables you to show a dream-like scene where two mirrored footages appear within the same frame using the Masking feature. But why stop there?
Keep reading to find out how you can use this style of effect to spice up your daily vlog bumper intro or even for your upcoming sci-fi content.

Preparing the footage
There are not many restrictions on preparing the footage for this effect. However, depending on the results you’re aiming for, you might need to consider a few things.
First, a wider view and some camera panning, or tilting will deliver a better result as it provides angle variations. This will later enhance the dynamic of the scene, making it feels even more uncanny.
Then, while you’re at it, you need to also figure out the purpose of the video itself. If you want to upload it to certain platforms where vertical videos are more popular, you will want to work on that as well. When you’re shooting your footage, make sure that you’re taking it at the correct angle that would fit the ratio you’re aiming for.
Last but not least, consider the length of the footage. If you’re planning to make a bumper video, you might want a quick yet comprehensive shot of the objects you want to highlight. You can always trim and adjust the timing later, but it is better to also plan it early.
Editing the video
If you have your footage or stock video ready, then you can start editing. Follow this simple step-by-step guide to create your own alternate reality using Filmora .
Free Download For Win 7 or later(64-bit)
Free Download For macOS 10.14 or later
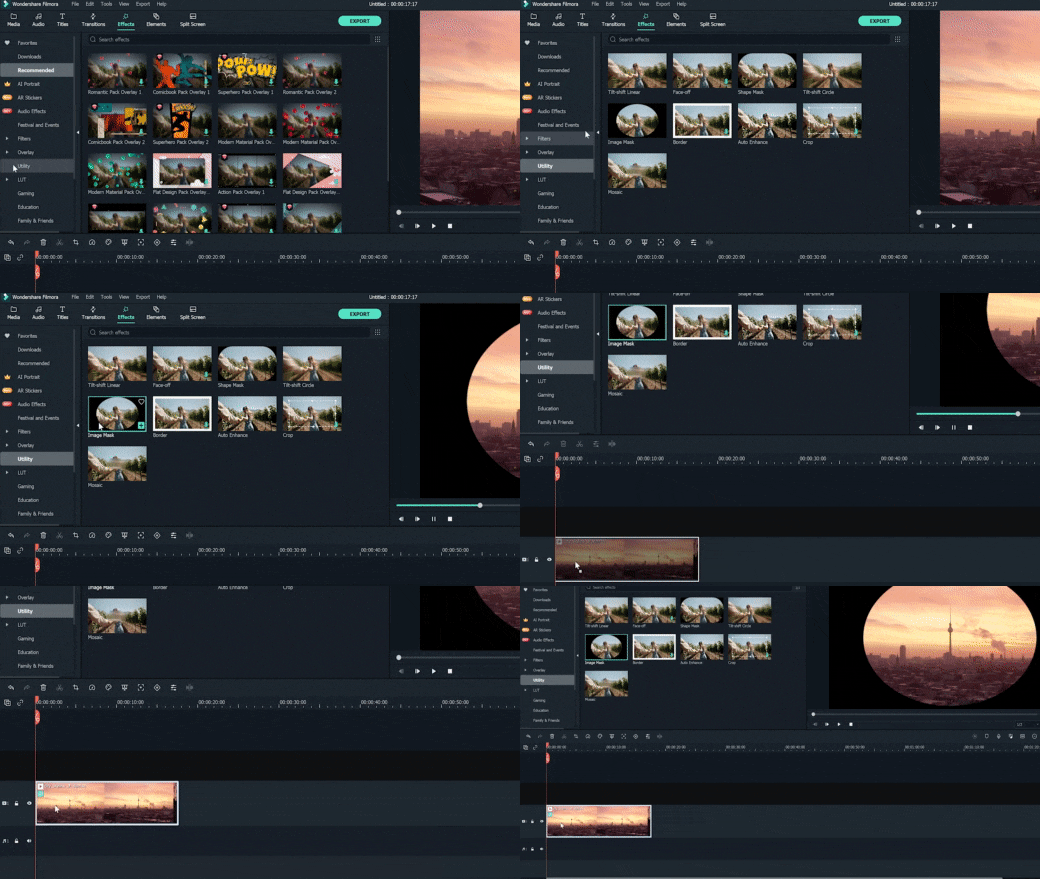
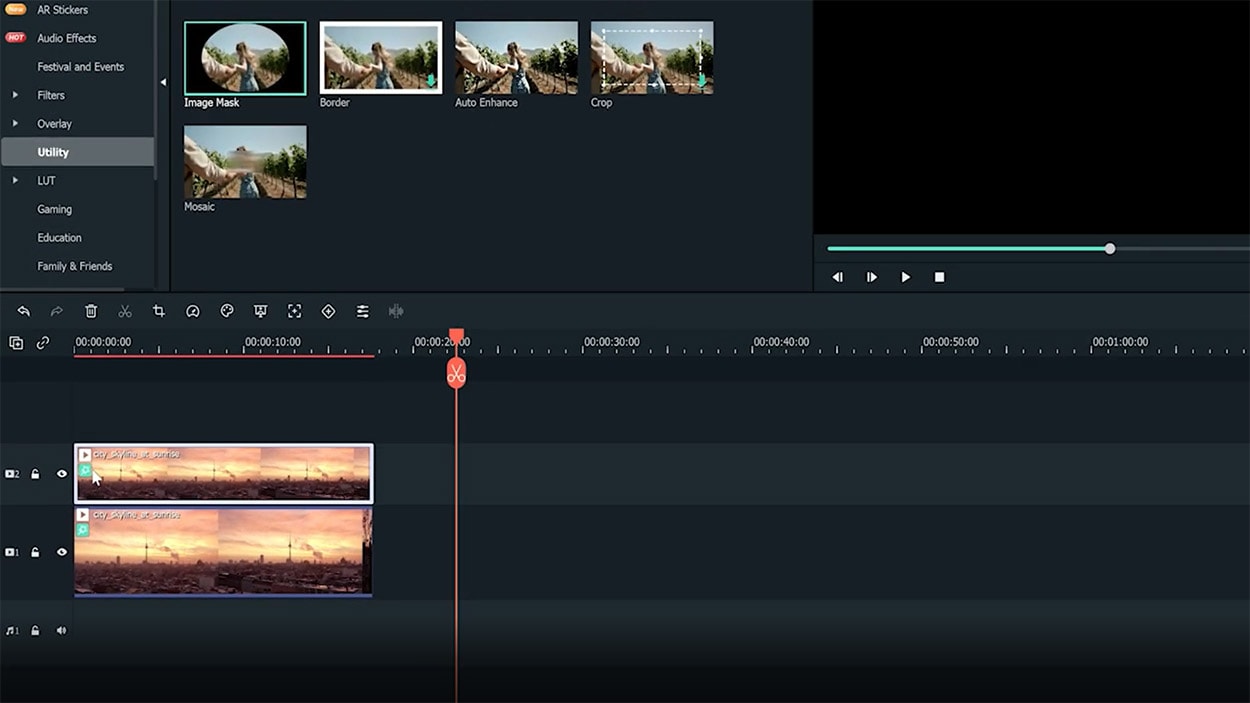
Step 1: Drag and drop the video footage into the timeline - this will be the bottom part of the scene. Go to Effect > Utility > Image Mask. Drag and drop it onto the video footage.
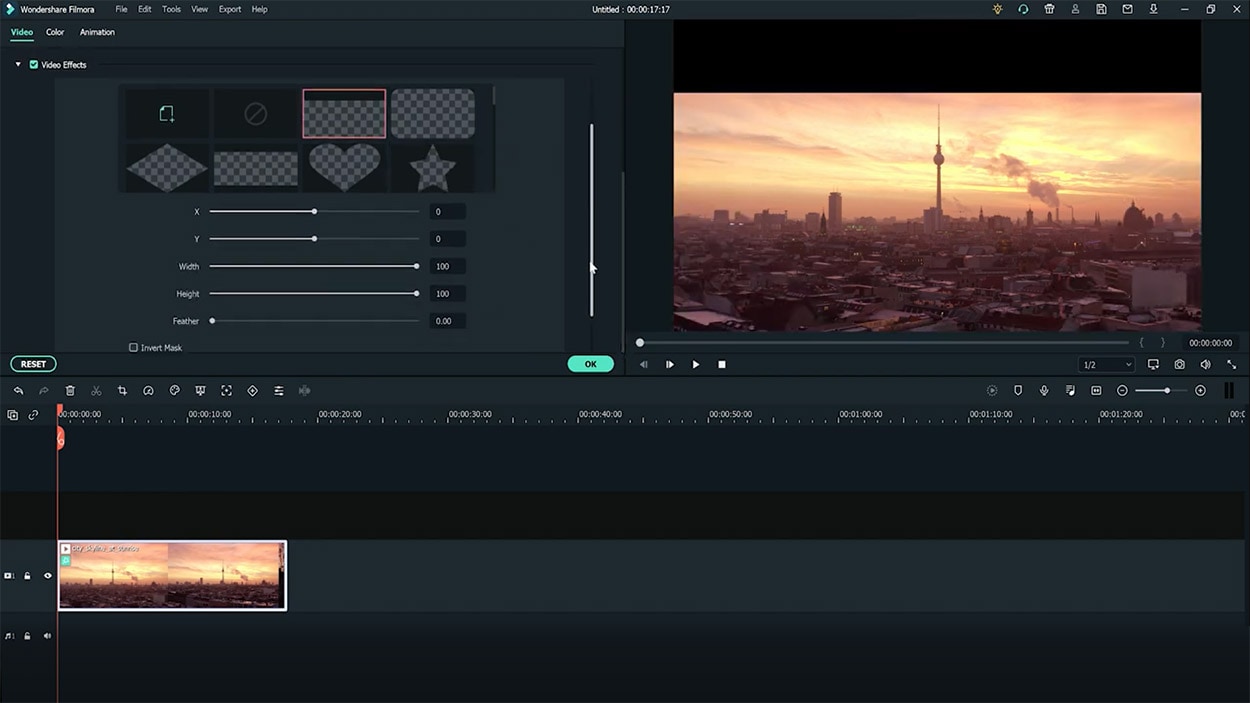
Step 2: Adjust the mask by double-clicking the video footage. Go to Setting > Mask Setting and choose any shape you like. Set the feather number to 100.
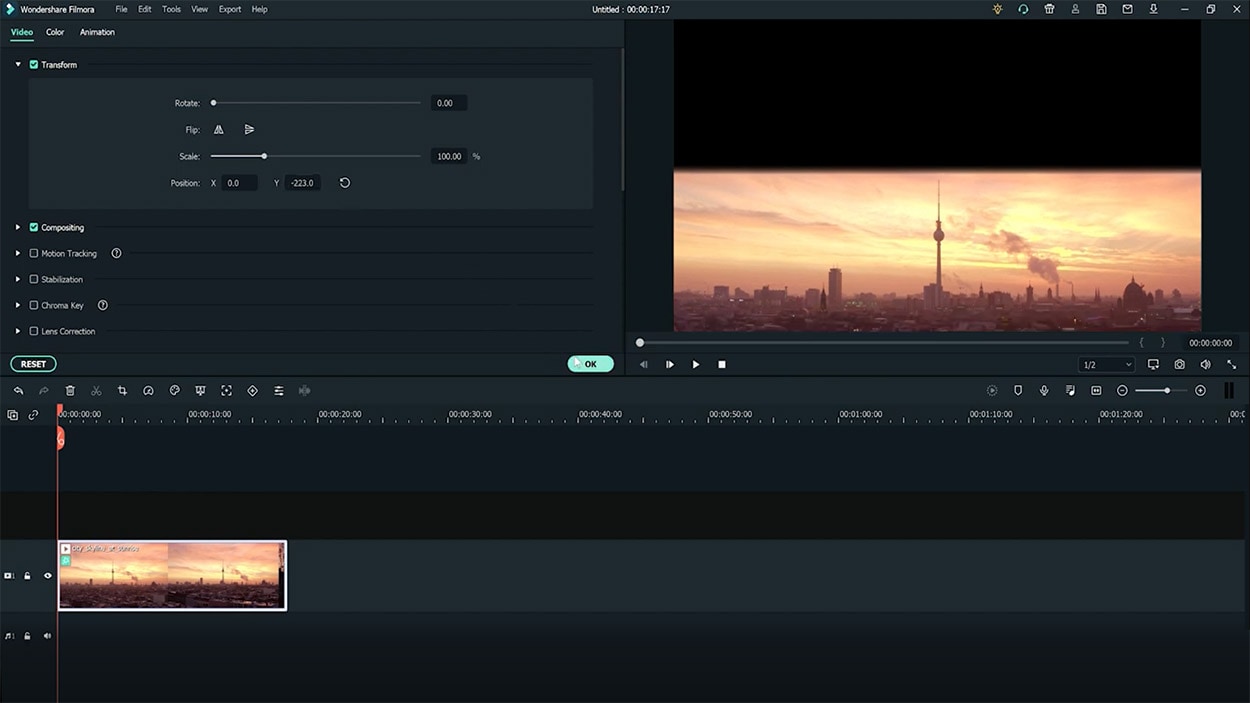
Step 3: Scroll up the Setting > Transform. Adjust the position of the video footage on the x and y-axis to ensure that the mask shows the bottom of the landscape view. Click Ok.
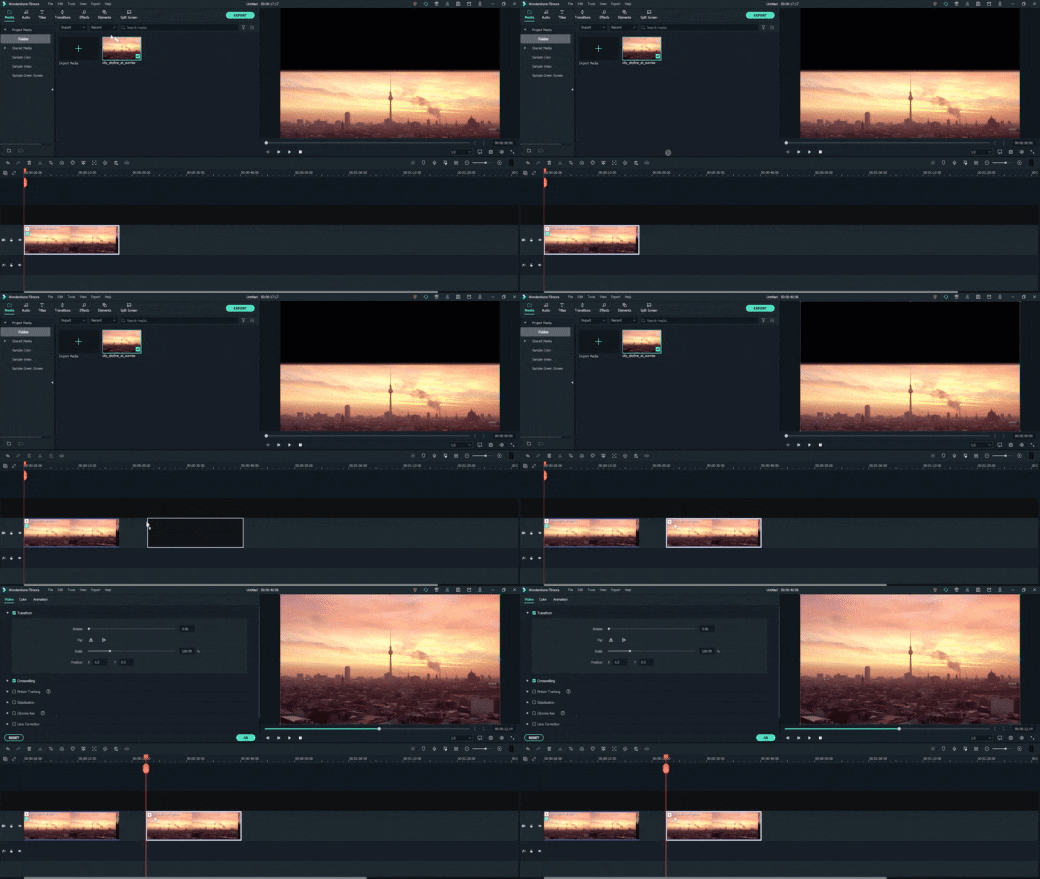
Step 4: Drag and drop the same video footage onto the timeline next to the first video footage. Place an Image Mask as well on this footage. This will be the upper part of the scene.
Step 5: Double-click the second footage to open the Setting menu on the top left. Choose Transform > Vertical Flip.
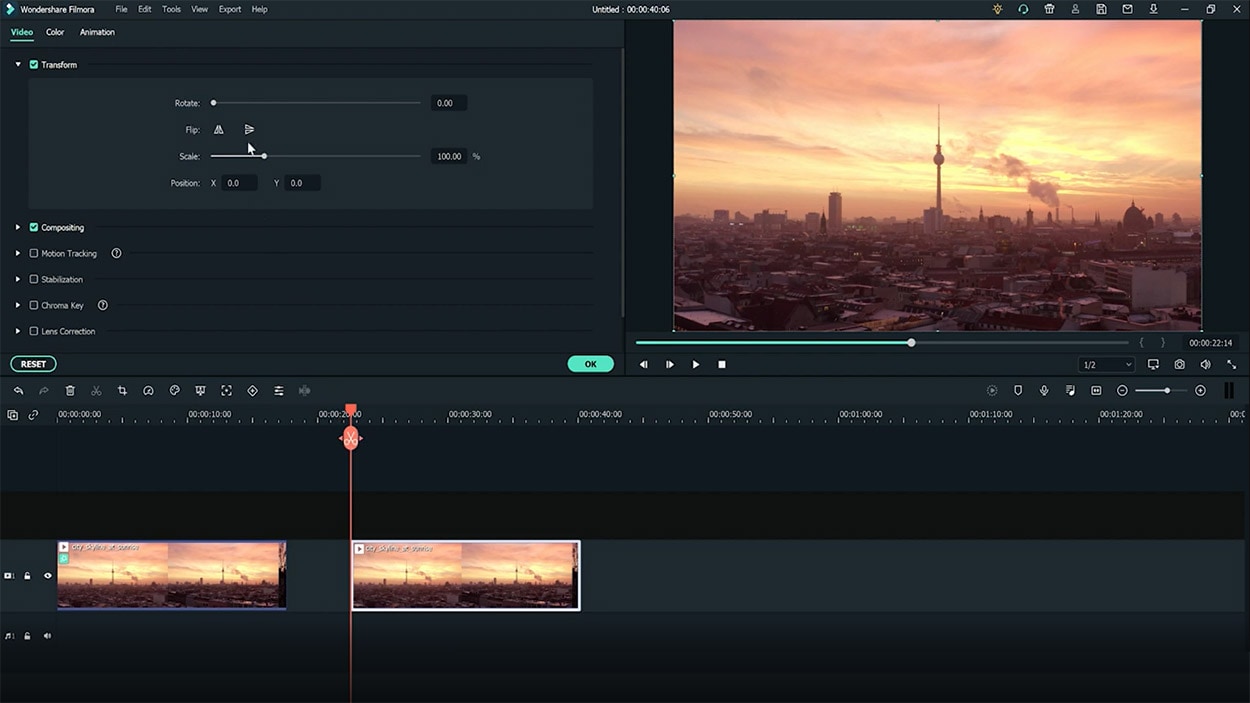
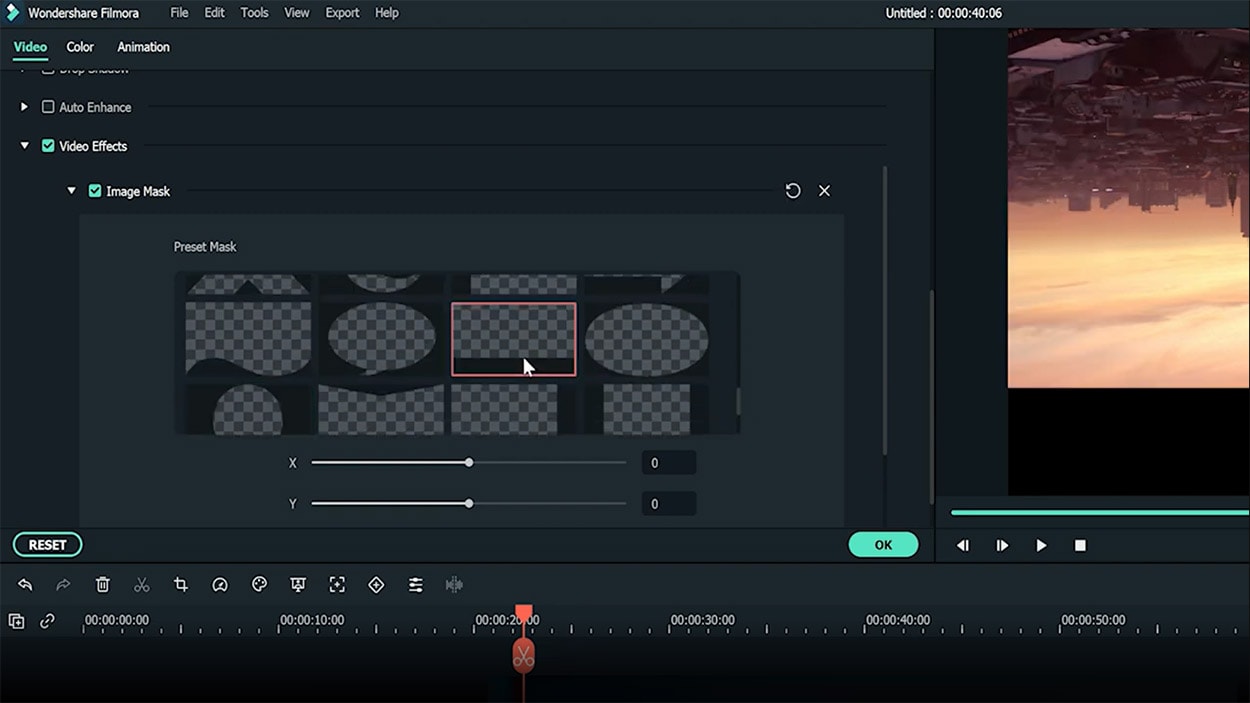
Step 6: Scroll down the Setting menu to find the mask settings. Choose an opposing mask shape for this second footage then set the feather number to 100 as well.
Step 7: Adjust the video footage position by dragging the second footage to the second video track and aligning it with the first video footage.
Step 8: Double-click to open the Setting > Transform, then, adjust the x and y-axis numbers to ensure that the mask reveals only the top half of the landscape. Click Ok.
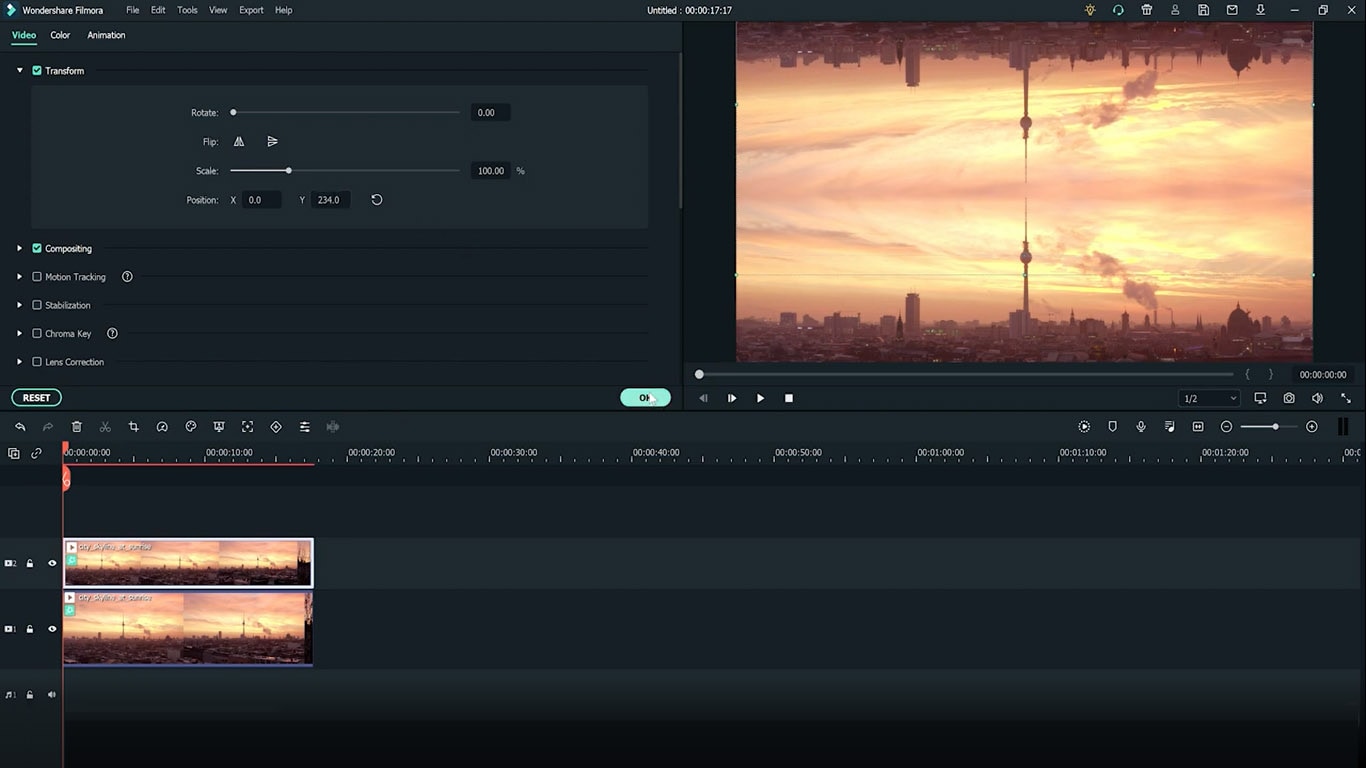
You can recheck the preview at this stage and just save it as it is if you’re already satisfied with the result. However, if you want a more dynamic alternate reality scene, continue reading to see advanced tips you can follow to make your video looks even more otherworldly.
Enhancing the effect with rotation keyframes
If you’re using stock videos or encountering limitations when making your footage, chances are your alternate reality is not looking as dynamic as you want it to be. Go all out by adding the rotation keyframes to the video footage so that the alternate reality looks more unreal.
Step 1: Double-click the video footage on the first video track to open the Animation Settings > Customize.
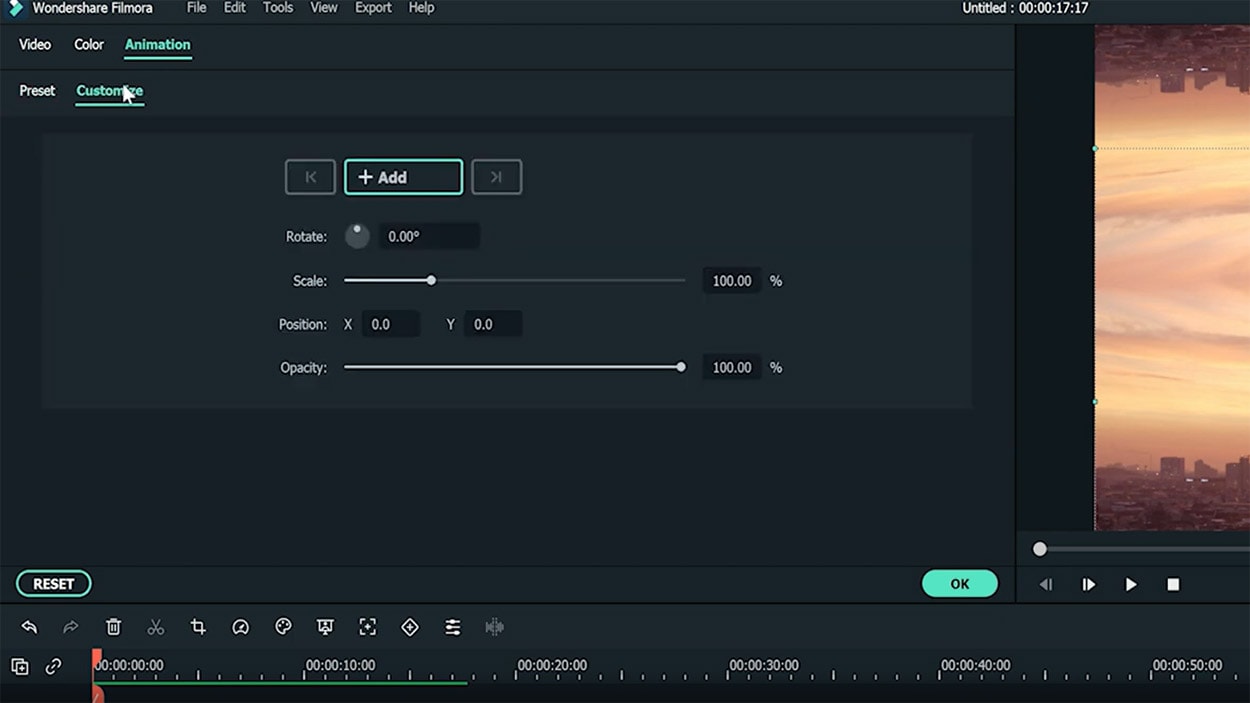
Step 2: Move the playhead to the beginning of the first video footage and add a keyframe by clicking on the Add button. Set the rotation of this keyframe at 0 and the scale at 100.
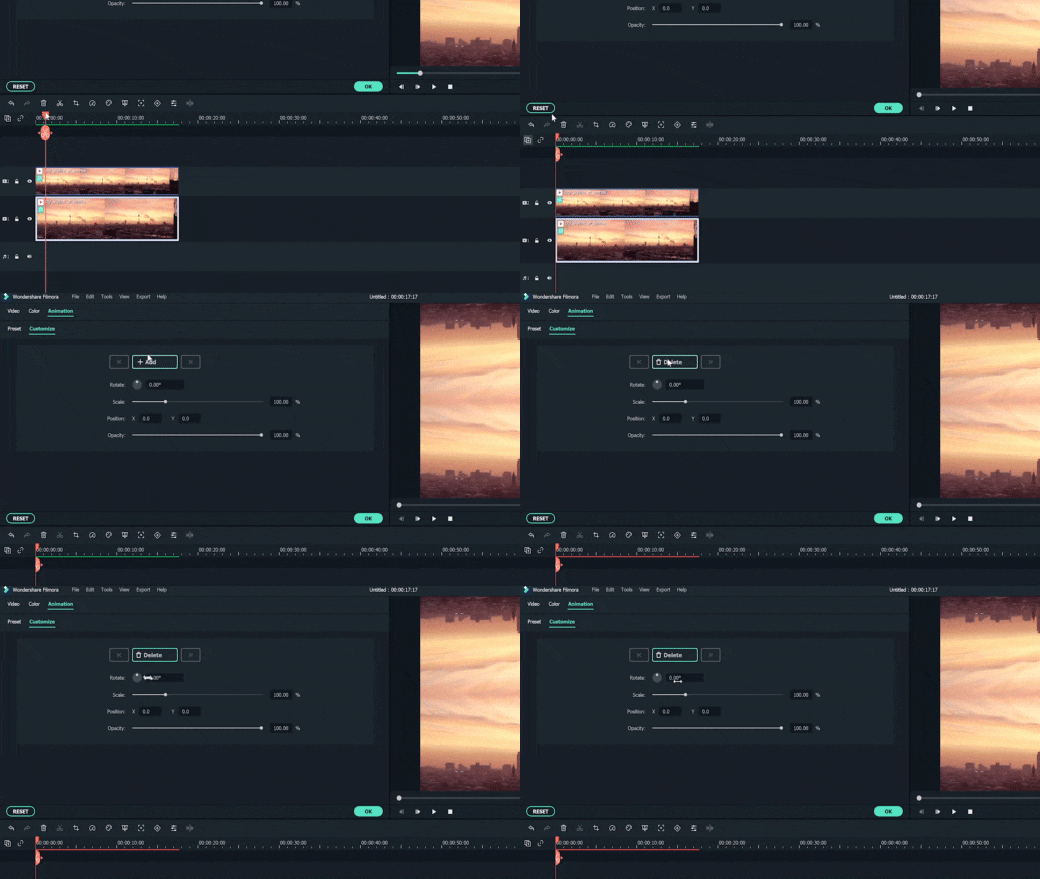
Step 3: Now move the playhead to the end of the video footage and add another keyframe. This time, set the rotation to 20 and adjust the scale number to 115.
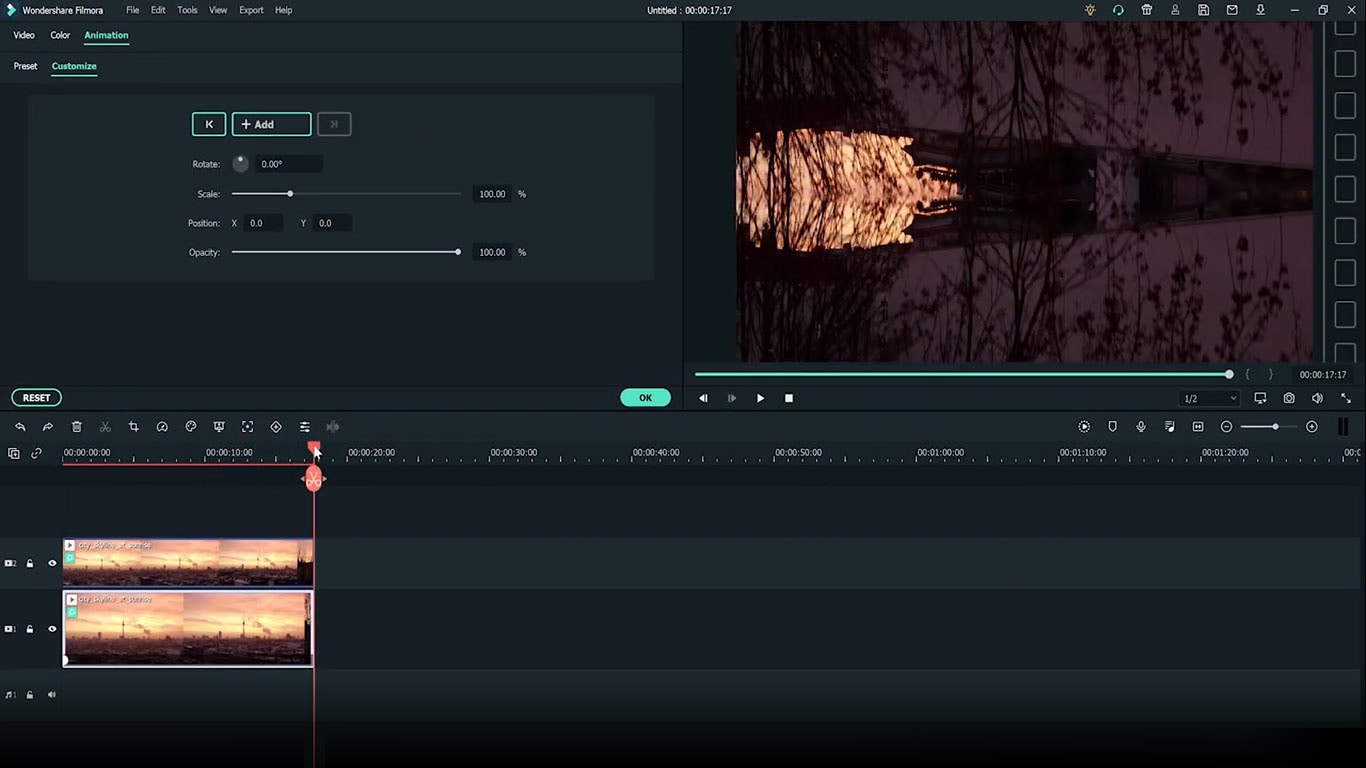
Step 4: Do Steps 1 to 3 to the second video footage. Don’t forget to preview the result to see if both footages are rotated properly.
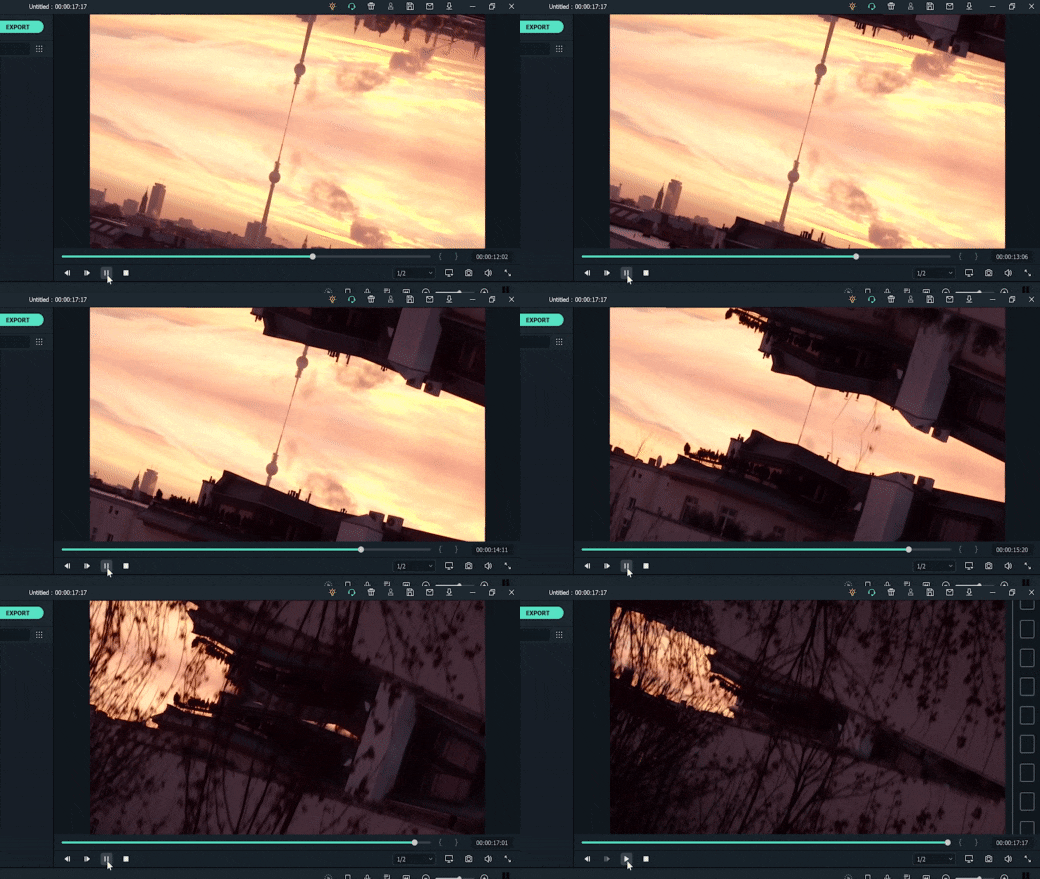
Your alternate reality is now more dynamic with more movement. You can also add more filters or effects to further enhance the sci-fi ambiance. Once you’re satisfied, you can export the file to a format that is compatible with your destination platform.
Conclusion
Wondershare Filmora aims to empower your inner video creator with its robust yet easy-to-use editing suite. You can easily mimic the scenes from the latest blockbuster superhero movies with some simple clicks.
Not only it offers a strapping video editing menu with simple visual effects plug-ins and beginner-friendly smart templates, but you can also access its rich royalty-free stock media library. You can operate the program on both Windows and Mac. Install the program and let it do wonders to your content.
Free Download For macOS 10.14 or later
Step 1: Drag and drop the video footage into the timeline - this will be the bottom part of the scene. Go to Effect > Utility > Image Mask. Drag and drop it onto the video footage.

Step 2: Adjust the mask by double-clicking the video footage. Go to Setting > Mask Setting and choose any shape you like. Set the feather number to 100.

Step 3: Scroll up the Setting > Transform. Adjust the position of the video footage on the x and y-axis to ensure that the mask shows the bottom of the landscape view. Click Ok.

Step 4: Drag and drop the same video footage onto the timeline next to the first video footage. Place an Image Mask as well on this footage. This will be the upper part of the scene.

Step 5: Double-click the second footage to open the Setting menu on the top left. Choose Transform > Vertical Flip.

Step 6: Scroll down the Setting menu to find the mask settings. Choose an opposing mask shape for this second footage then set the feather number to 100 as well.

Step 7: Adjust the video footage position by dragging the second footage to the second video track and aligning it with the first video footage.

Step 8: Double-click to open the Setting > Transform, then, adjust the x and y-axis numbers to ensure that the mask reveals only the top half of the landscape. Click Ok.

You can recheck the preview at this stage and just save it as it is if you’re already satisfied with the result. However, if you want a more dynamic alternate reality scene, continue reading to see advanced tips you can follow to make your video looks even more otherworldly.
Enhancing the effect with rotation keyframes
If you’re using stock videos or encountering limitations when making your footage, chances are your alternate reality is not looking as dynamic as you want it to be. Go all out by adding the rotation keyframes to the video footage so that the alternate reality looks more unreal.
Step 1: Double-click the video footage on the first video track to open the Animation Settings > Customize.

Step 2: Move the playhead to the beginning of the first video footage and add a keyframe by clicking on the Add button. Set the rotation of this keyframe at 0 and the scale at 100.

Step 3: Now move the playhead to the end of the video footage and add another keyframe. This time, set the rotation to 20 and adjust the scale number to 115.

Step 4: Do Steps 1 to 3 to the second video footage. Don’t forget to preview the result to see if both footages are rotated properly.

Your alternate reality is now more dynamic with more movement. You can also add more filters or effects to further enhance the sci-fi ambiance. Once you’re satisfied, you can export the file to a format that is compatible with your destination platform.
Conclusion
Wondershare Filmora aims to empower your inner video creator with its robust yet easy-to-use editing suite. You can easily mimic the scenes from the latest blockbuster superhero movies with some simple clicks.
Not only it offers a strapping video editing menu with simple visual effects plug-ins and beginner-friendly smart templates, but you can also access its rich royalty-free stock media library. You can operate the program on both Windows and Mac. Install the program and let it do wonders to your content.
Splitting the Clips in Adobe After Effects [Step by Step]
Adobe After Effects is a complete software that is helpful in composition and animations, particularly for designers, web developers and animators. You can depend on Adobe After Effects to apply a number of effects and the availability of templates related to the motion graphics. It is among the tools of Adobe Creative Cloud and declared as the standard in videography.
Being a user offers a number of amazing effects that bring your images and videos into reality. This article is regarding the guideline for splitting the video clips in Adobe After Effects. Here, you will also know about the most appropriate substitute, Wondershare Filmora. Being economical, you can also use it practically.
How you can split the video clips in After Effects
The After Effects is versatile in terms of tools and complete potential for creating high-quality content. It can be the addition of the animation, making the effects of virtual reality, immersion of the graphics and improvement in the text input.
It is challenging to do editing in After Effects, but the tool kit is indeed powerful. You need to use this to create beautiful effects, and still, you need proper guidelines for several functionalities. Such as trimming and splitting of the video clips. Following are the easy steps to split the videos in the After Effects:
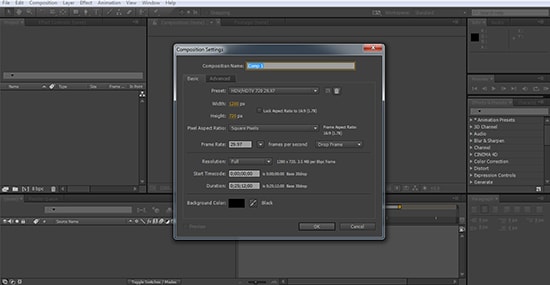
Step 1: After Effects, the main menu appears on the screen that consists of different projects. Now, you can proceed towards the number of settings after selecting “New Composition”. Adjust the frame rate, duration, resolution, background colour, and various options available to create your composition.
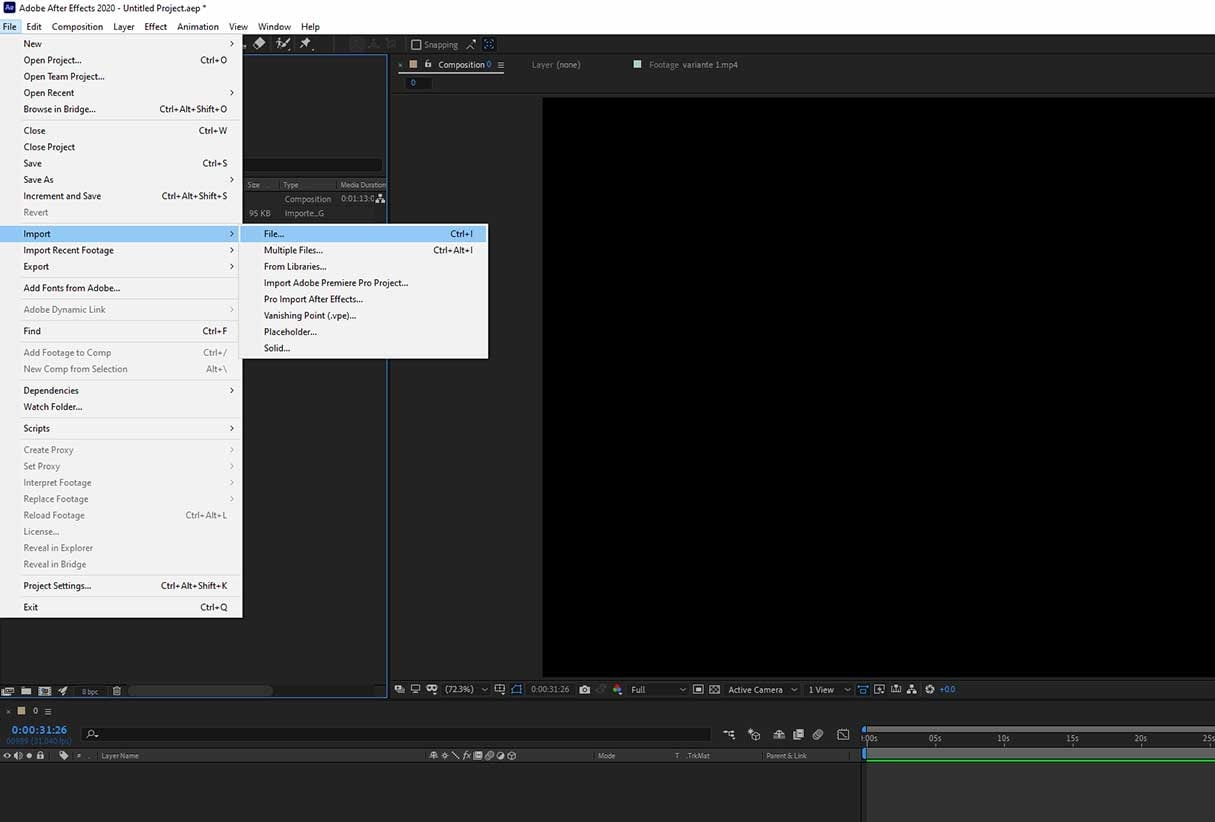
You can import the required video file. Simply click on “File”à ImportàFile. Now, this is the time to drag your video file on the timeline.
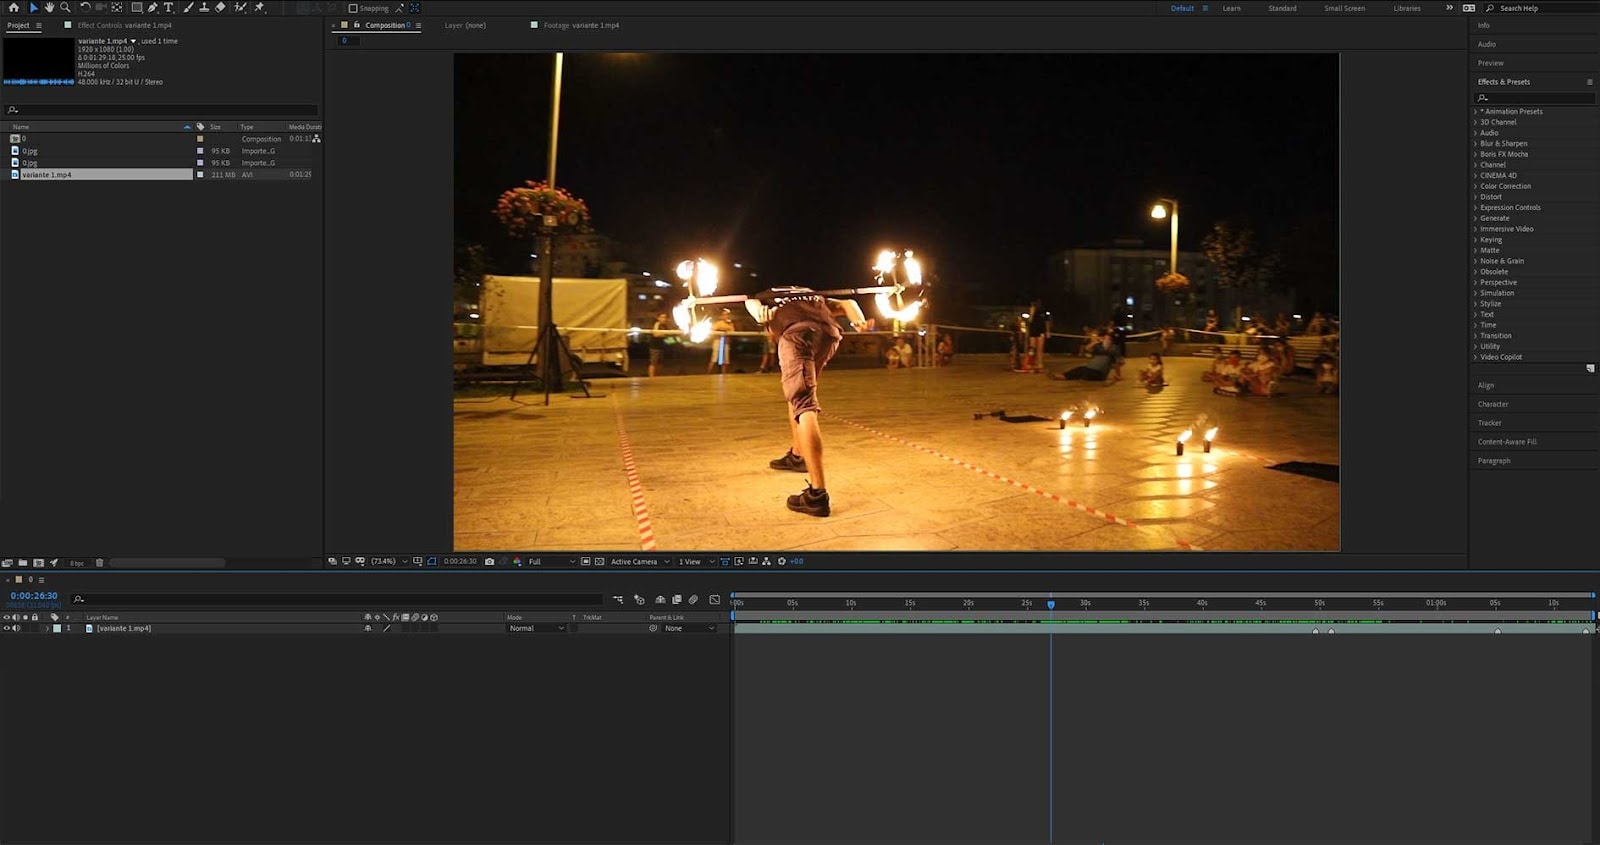
Step 2: After the first step, you need to drag the video file from the file box of “Project” that is on the top-left to the “Composition” box. Now, the video clip is visible on the new layer on the frame of the “Composition”.
Step 4: This is the actual step of selecting that point in the timings where you are looking for splitting the clip in After Effects. If you are using a PC, simply press CTRL +SHIFT+D. According to the selection, your required split video clip is now in two layers.
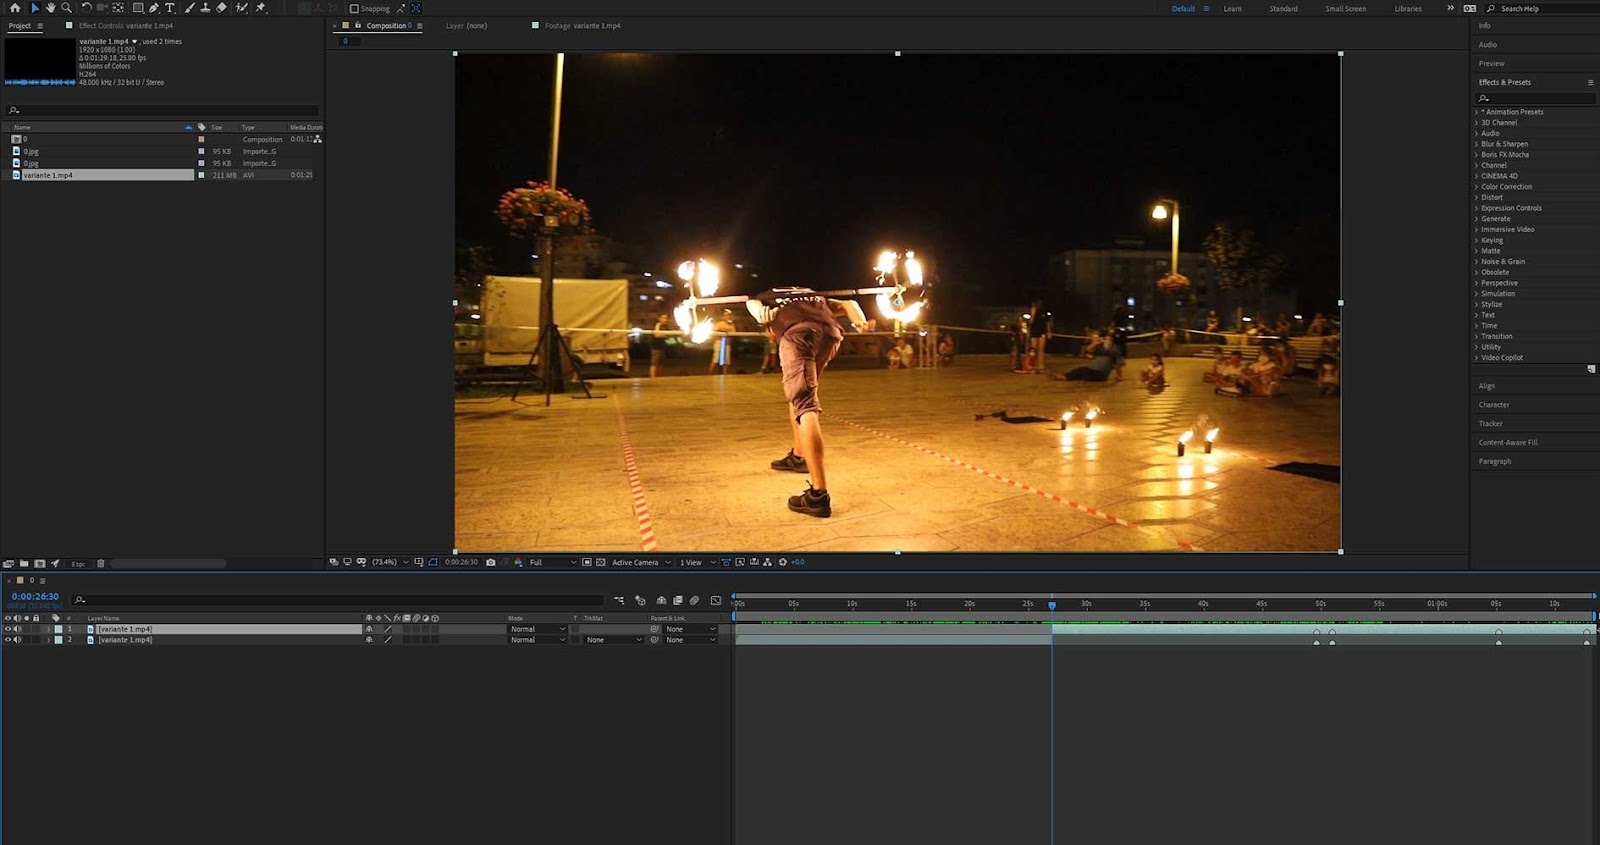
One more technique for splitting the videos in After Effects:
Splitting the video clips is also easily possible by duplicating and pressing CTRL+D. Do this action when it is in your timeline. Now there are similar copies of the clips and present in two layers. To cut down the layer according to the timeline marker, press ALT + or [ either].
An easier way to split the video clips
After Effects is, of course, a wonderful tool for editing videos and images, but the users are finding the pricing of After Effects unsuitable. Luckily, similar software is available that Filmora Video Editor considered an alternative.
It is capable of splitting the videos without losing their quality. The most important point about Wondershare Filmora is its assistance in completing all the tasks in a perfect manner. Apart from being a powerful tool, Wondershare Filmora can also split the video into different famous formats such as MP4, AVI, MPG, FLV and others. Export the videos after adding the effects of your own choice.
For Win 7 or later (64-bit)
For macOS 10.14 or later
Features:
- Editing of the text from advanced tools
- Controls available for controlling the speed of video and audio
- Importing the files to the social networking websites
- Splitting and layering of the video clips
- Mixing of the audio
- Recording of the screen and removing the noise
Wondershare Filmora is a proper selection if you are looking for trimming or want to split your videos. Following are the steps in complete detail regarding cutting the videos simply and a short time:
Step 1: Your video clips are on your timeline when you click on “Import” and drag them.
Step 2: In this step, selecting the clip is essential after dragging the video on the timeline. Keep moving the play head at the correct location from the ending of the first area and the starting of the other one. Now, you need to click on the “Split” button (the scissor icon is visible on the toolbar). It is for separating the videos into parts. You can also use this step with even larger video clips to make small video clips.
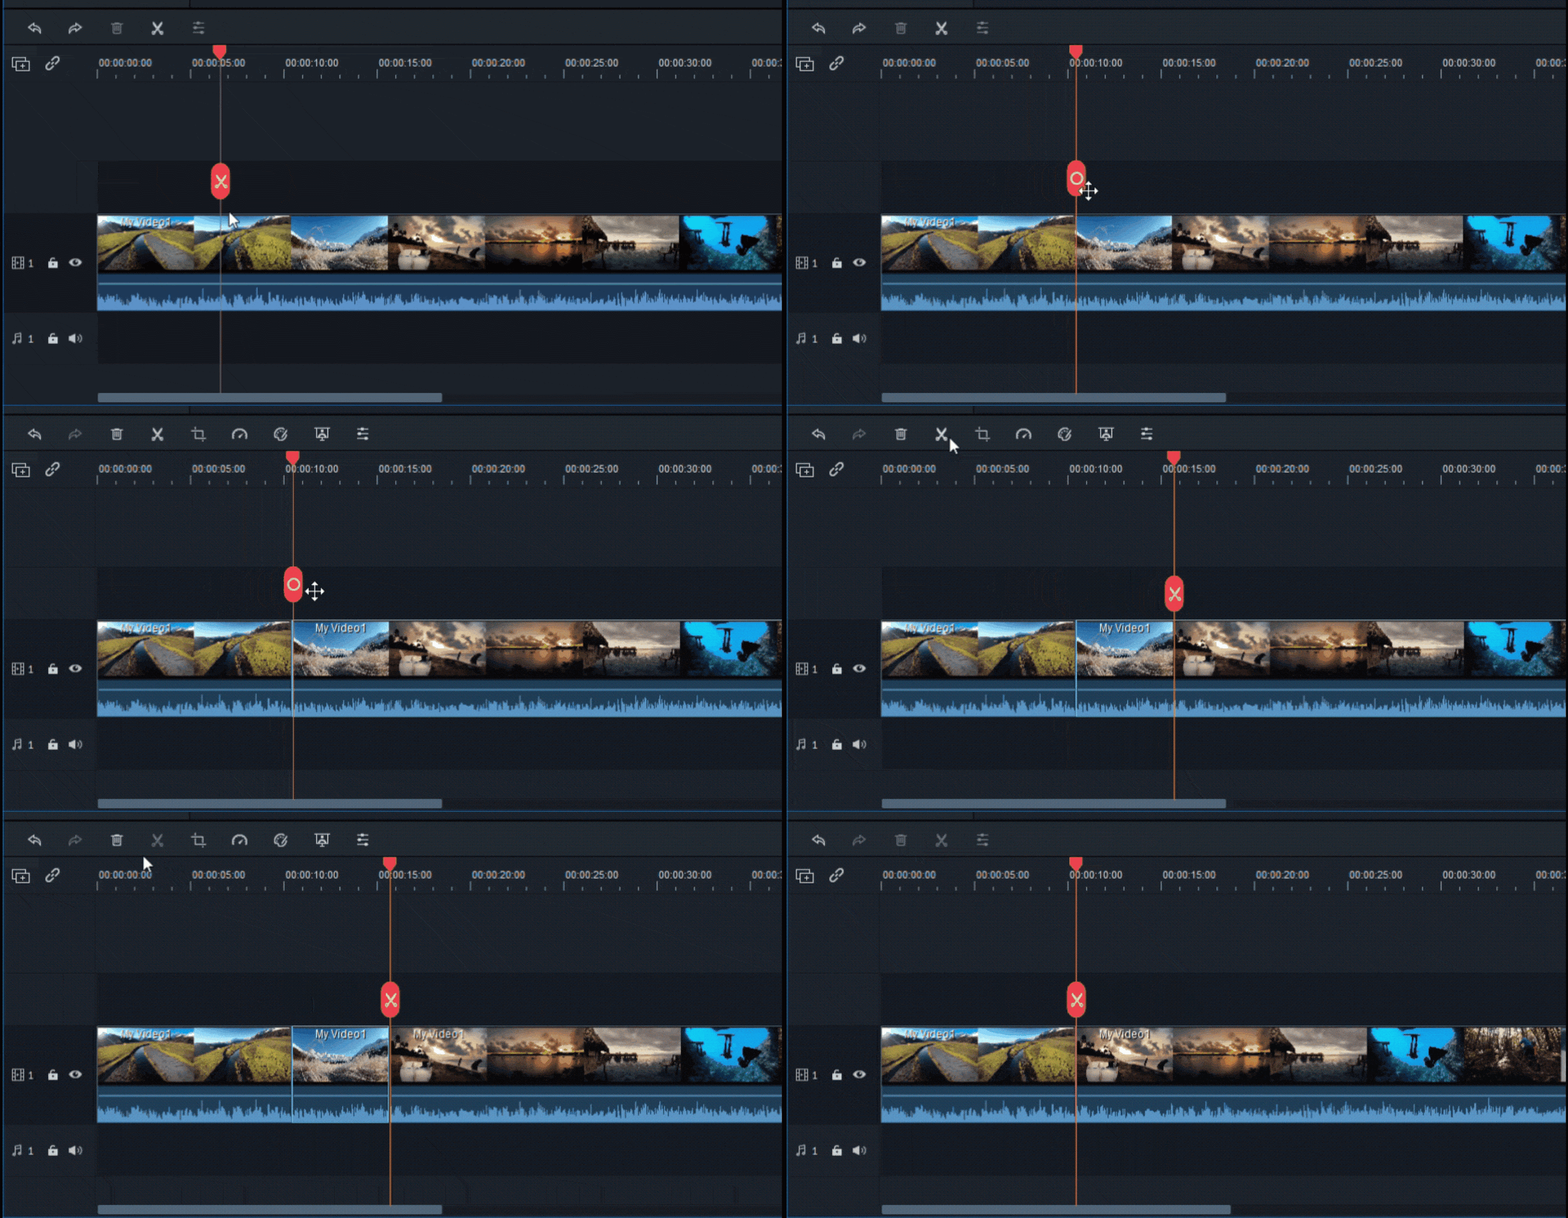
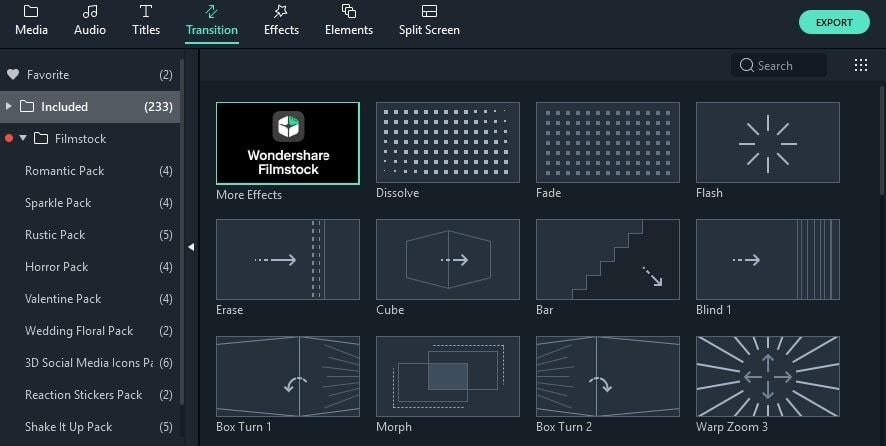
Step 3: After splitting the video, select any part of it and click on the Delete icon present on the toolbar for removing. Even, you can also add transitional effects at this stage.
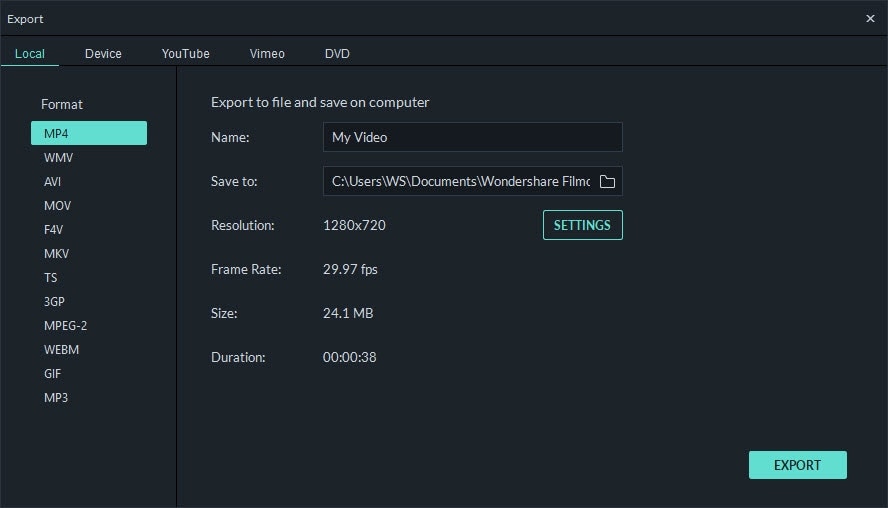
Step 4: Save the video in the format of your choice. Select the format from the list available on the export window. After saving the clips from the complete video, it is easier to load the project again and export it individually.
Even though a number of editing software are available, Wondershare Filmora is the first choice for every user. No matter whether you are using it at the beginner or professional level. This is just due to the simplicity of the Wondershare Filmora. It also has advanced features that fulfil the demands and requirements of the user.
The whole interface is easy, straightforward, and suitable for Windows and Mac operating systems. There are a number of tools present in the Wondershare Filmora that is helpful in deleting the particular video clips, crop, changing the speed, and much more. Even, you can export your videos on your YouTube channels directly through the Wondershare Filmora. You can start using it without any assistance and proceed towards your editing tasks.
You can import the required video file. Simply click on “File”à ImportàFile. Now, this is the time to drag your video file on the timeline.

Step 2: After the first step, you need to drag the video file from the file box of “Project” that is on the top-left to the “Composition” box. Now, the video clip is visible on the new layer on the frame of the “Composition”.

Step 4: This is the actual step of selecting that point in the timings where you are looking for splitting the clip in After Effects. If you are using a PC, simply press CTRL +SHIFT+D. According to the selection, your required split video clip is now in two layers.

One more technique for splitting the videos in After Effects:
Splitting the video clips is also easily possible by duplicating and pressing CTRL+D. Do this action when it is in your timeline. Now there are similar copies of the clips and present in two layers. To cut down the layer according to the timeline marker, press ALT + or [ either].
An easier way to split the video clips
After Effects is, of course, a wonderful tool for editing videos and images, but the users are finding the pricing of After Effects unsuitable. Luckily, similar software is available that Filmora Video Editor considered an alternative.
It is capable of splitting the videos without losing their quality. The most important point about Wondershare Filmora is its assistance in completing all the tasks in a perfect manner. Apart from being a powerful tool, Wondershare Filmora can also split the video into different famous formats such as MP4, AVI, MPG, FLV and others. Export the videos after adding the effects of your own choice.
For Win 7 or later (64-bit)
For macOS 10.14 or later
Features:
- Editing of the text from advanced tools
- Controls available for controlling the speed of video and audio
- Importing the files to the social networking websites
- Splitting and layering of the video clips
- Mixing of the audio
- Recording of the screen and removing the noise
Wondershare Filmora is a proper selection if you are looking for trimming or want to split your videos. Following are the steps in complete detail regarding cutting the videos simply and a short time:
Step 1: Your video clips are on your timeline when you click on “Import” and drag them.
Step 2: In this step, selecting the clip is essential after dragging the video on the timeline. Keep moving the play head at the correct location from the ending of the first area and the starting of the other one. Now, you need to click on the “Split” button (the scissor icon is visible on the toolbar). It is for separating the videos into parts. You can also use this step with even larger video clips to make small video clips.

Step 3: After splitting the video, select any part of it and click on the Delete icon present on the toolbar for removing. Even, you can also add transitional effects at this stage.

Step 4: Save the video in the format of your choice. Select the format from the list available on the export window. After saving the clips from the complete video, it is easier to load the project again and export it individually.

Even though a number of editing software are available, Wondershare Filmora is the first choice for every user. No matter whether you are using it at the beginner or professional level. This is just due to the simplicity of the Wondershare Filmora. It also has advanced features that fulfil the demands and requirements of the user.
The whole interface is easy, straightforward, and suitable for Windows and Mac operating systems. There are a number of tools present in the Wondershare Filmora that is helpful in deleting the particular video clips, crop, changing the speed, and much more. Even, you can export your videos on your YouTube channels directly through the Wondershare Filmora. You can start using it without any assistance and proceed towards your editing tasks.
You can import the required video file. Simply click on “File”à ImportàFile. Now, this is the time to drag your video file on the timeline.

Step 2: After the first step, you need to drag the video file from the file box of “Project” that is on the top-left to the “Composition” box. Now, the video clip is visible on the new layer on the frame of the “Composition”.

Step 4: This is the actual step of selecting that point in the timings where you are looking for splitting the clip in After Effects. If you are using a PC, simply press CTRL +SHIFT+D. According to the selection, your required split video clip is now in two layers.

One more technique for splitting the videos in After Effects:
Splitting the video clips is also easily possible by duplicating and pressing CTRL+D. Do this action when it is in your timeline. Now there are similar copies of the clips and present in two layers. To cut down the layer according to the timeline marker, press ALT + or [ either].
An easier way to split the video clips
After Effects is, of course, a wonderful tool for editing videos and images, but the users are finding the pricing of After Effects unsuitable. Luckily, similar software is available that Filmora Video Editor considered an alternative.
It is capable of splitting the videos without losing their quality. The most important point about Wondershare Filmora is its assistance in completing all the tasks in a perfect manner. Apart from being a powerful tool, Wondershare Filmora can also split the video into different famous formats such as MP4, AVI, MPG, FLV and others. Export the videos after adding the effects of your own choice.
For Win 7 or later (64-bit)
For macOS 10.14 or later
Features:
- Editing of the text from advanced tools
- Controls available for controlling the speed of video and audio
- Importing the files to the social networking websites
- Splitting and layering of the video clips
- Mixing of the audio
- Recording of the screen and removing the noise
Wondershare Filmora is a proper selection if you are looking for trimming or want to split your videos. Following are the steps in complete detail regarding cutting the videos simply and a short time:
Step 1: Your video clips are on your timeline when you click on “Import” and drag them.
Step 2: In this step, selecting the clip is essential after dragging the video on the timeline. Keep moving the play head at the correct location from the ending of the first area and the starting of the other one. Now, you need to click on the “Split” button (the scissor icon is visible on the toolbar). It is for separating the videos into parts. You can also use this step with even larger video clips to make small video clips.

Step 3: After splitting the video, select any part of it and click on the Delete icon present on the toolbar for removing. Even, you can also add transitional effects at this stage.

Step 4: Save the video in the format of your choice. Select the format from the list available on the export window. After saving the clips from the complete video, it is easier to load the project again and export it individually.

Even though a number of editing software are available, Wondershare Filmora is the first choice for every user. No matter whether you are using it at the beginner or professional level. This is just due to the simplicity of the Wondershare Filmora. It also has advanced features that fulfil the demands and requirements of the user.
The whole interface is easy, straightforward, and suitable for Windows and Mac operating systems. There are a number of tools present in the Wondershare Filmora that is helpful in deleting the particular video clips, crop, changing the speed, and much more. Even, you can export your videos on your YouTube channels directly through the Wondershare Filmora. You can start using it without any assistance and proceed towards your editing tasks.
You can import the required video file. Simply click on “File”à ImportàFile. Now, this is the time to drag your video file on the timeline.

Step 2: After the first step, you need to drag the video file from the file box of “Project” that is on the top-left to the “Composition” box. Now, the video clip is visible on the new layer on the frame of the “Composition”.

Step 4: This is the actual step of selecting that point in the timings where you are looking for splitting the clip in After Effects. If you are using a PC, simply press CTRL +SHIFT+D. According to the selection, your required split video clip is now in two layers.

One more technique for splitting the videos in After Effects:
Splitting the video clips is also easily possible by duplicating and pressing CTRL+D. Do this action when it is in your timeline. Now there are similar copies of the clips and present in two layers. To cut down the layer according to the timeline marker, press ALT + or [ either].
An easier way to split the video clips
After Effects is, of course, a wonderful tool for editing videos and images, but the users are finding the pricing of After Effects unsuitable. Luckily, similar software is available that Filmora Video Editor considered an alternative.
It is capable of splitting the videos without losing their quality. The most important point about Wondershare Filmora is its assistance in completing all the tasks in a perfect manner. Apart from being a powerful tool, Wondershare Filmora can also split the video into different famous formats such as MP4, AVI, MPG, FLV and others. Export the videos after adding the effects of your own choice.
For Win 7 or later (64-bit)
For macOS 10.14 or later
Features:
- Editing of the text from advanced tools
- Controls available for controlling the speed of video and audio
- Importing the files to the social networking websites
- Splitting and layering of the video clips
- Mixing of the audio
- Recording of the screen and removing the noise
Wondershare Filmora is a proper selection if you are looking for trimming or want to split your videos. Following are the steps in complete detail regarding cutting the videos simply and a short time:
Step 1: Your video clips are on your timeline when you click on “Import” and drag them.
Step 2: In this step, selecting the clip is essential after dragging the video on the timeline. Keep moving the play head at the correct location from the ending of the first area and the starting of the other one. Now, you need to click on the “Split” button (the scissor icon is visible on the toolbar). It is for separating the videos into parts. You can also use this step with even larger video clips to make small video clips.

Step 3: After splitting the video, select any part of it and click on the Delete icon present on the toolbar for removing. Even, you can also add transitional effects at this stage.

Step 4: Save the video in the format of your choice. Select the format from the list available on the export window. After saving the clips from the complete video, it is easier to load the project again and export it individually.

Even though a number of editing software are available, Wondershare Filmora is the first choice for every user. No matter whether you are using it at the beginner or professional level. This is just due to the simplicity of the Wondershare Filmora. It also has advanced features that fulfil the demands and requirements of the user.
The whole interface is easy, straightforward, and suitable for Windows and Mac operating systems. There are a number of tools present in the Wondershare Filmora that is helpful in deleting the particular video clips, crop, changing the speed, and much more. Even, you can export your videos on your YouTube channels directly through the Wondershare Filmora. You can start using it without any assistance and proceed towards your editing tasks.
HOW to Add Fade to Black on Premiere Pro
The most fundamental and typical sort of Fading is a simple cut, which is often used by editors to go from one shot to another. Applying effects between clips, at the start of a clip, or at its finish may sometimes help you smooth out or stylize your edit. Fade to black transition premiere pro can be used to get this outcome. To help users create current and trendy styles, Premiere Pro features a vast range of effects and tools including fade to black in premiere pro.
Going back to the days of black and white may sometimes be a welcome change of pace in the era of vivid digital and flashy film. Being a professional editor, you’ll understand that editing should be undetectable. If an editor has done their job well, no one will notice their efforts. You’ve failed as soon as the audience realizes the cut has occurred. But fading out to black (or white) seems out of the ordinary. Use this how to fade to black premiere pro guide to learn the steps in Adobe PR.
Part 1. What is Fade to Black
You will become a better filmmaker if you expand your vocabulary in video editing by learning about transitions. The dissolve-to-black, or fade-to-black (a fade to black in premiere pro), works well in part because it has a certain theatrical feel to it. A fade-out/fade-down, often known as a fade-to-black in theater, occurs in total darkness. One of the key components of video editing is using transitions in Adobe Premiere Pro.
The fundamental elements of many other transitions are fades. Effective use of Fades is a crucial skill in your video editing repertoire since it is subtle to the point of practically being undetectable. A video transition called a “fade to black” causes a scene or clip to gradually conclude with a black backdrop. It dates back to the time when the stage curtains were drawn and the lights were dimmed during a theatrical performance. The stage therefore went completely black while the team behind hurriedly changed into new clothing and stage items for the following action.
Those that seem to take place close together chronologically are edited together, while scenes that occur at separate periods or locales are faded out. These are recognizable features of the film. They alert us to the fact that the tale is moving to a later time or place, either thematically, chronologically, or geographically. In a practical sense, this is the time when the cast and crew switch out the set and clothes. But the fade-to-black marks the end of the scene in a symbolic and narrative sense.
Part 2. How to Fade to Black in Premiere Pro
One of the most widely used video editing programs is Adobe Premiere Pro. In Premiere Pro, a number of transitions are available. One of the first, most important responsibilities for a film editor to do is the utilization of numerous transitions. In fact, many aspiring film editors start off by learning how to fade to black in Premiere. Fortunately, creating a fade to black transition in Premiere isn’t that difficult to do step by step. Everything from straightforward dissolves to wipes, slides, and zooms may be found here.
Steps to Fade to Black in Premiere Pro:
Step1Launch the Program and Refer to the Effects
After launching Adobe Premier Pro CC, simply drag the Dip to Black effect from the Effects tab to the very start or very finish of the clip you want to use. The effect may then be moved around to change its duration as needed. Add two clips to the Premiere Pro timeline.

Step2 Add the fade to black transition
Drag and drop the Dip to Black effect between two clips on the timeline after selecting the Effects tab and typing “dip to black” into the search field. The right half of the clip will display the dip to black effect.

Step3 Customize the fade to black effect
Go to Effect Controls and, while the dip to black effect is chosen, alter the alignment to Center at Cut. Before video B starts, video A will now fade to black.
Step4 Optionally change the fade-to-black effect’s duration
just extend the timeline’s fade to black effect at the very end. The slower and smoother the fade to black effect will be, and vice versa, as you move the effect outward.

Part 3. Premiere Pro Alternative to Fade to Black
Although Premiere Pro is a powerful tool to fade to black, but what if your audience wishes to evoke a certain atmosphere, swap between tales, adopt a different point of view, spice up the narrative, or advance or recede in time? Here, more creative transitions would be beneficial. For that, Filmora is a fantastic substitute for Premiere Pro if you need to quickly apply a fade to black transition to your video.
The tool is packed with built-in features that are powerful enough to polish your videos in addition to fade to black effect. For creating scroll-stopping video content, you can also discover a ton of completely adjustable video templates for YouTube, TikTok, Instagram, Facebook, and other platforms as well as a ton of attractive overlay transitions and royalty-free music and sound effects.
Free Download For Win 7 or later(64-bit)
Free Download For macOS 10.14 or later
Steps to Fade to Black Using Filmora
Step1 Install Filmora on your laptop
You must first download this software application to your computer from one of the following sources in order to start:
You must install it on your computer once you’ve done downloading it before you can use it with your laptop.

Step2 Customize the Video
After the Import, you may edit your audio recordings using tools that are completely customizable. Use the editor in Filmora to edit your recorded audio files, using simple to advanced editing techniques. Your recorded video may be improved using Filmora’s Editor by adding animated titles, spectacular effects, audio enhancements, and more.

Step3 Fade to Black Videos
Spice up the Fade effect into your videos and add the effect into the timeline. You will be able to make it black at the ends by customizing the effect inside the Fade window.

Step4 Add VFX to Your Video
The software is embedded with Effects primarily to give your videos a polished appearance. You may utilize a variety of its eye-catching and adjustable effects to make your video productions stand out from the competition. In this area, we’ve covered some of the best effects for bringing life to your dull, unprofessional videos as shown below:

Step5 Save or Share the Videos
Finally, you may use the complete Filmora editor as previously mentioned when you’ve done editing the recorded video. When you want to submit your creative work right away to YouTube or another well-known website, click the Export option and choose the platform where you want to distribute your video clip. If you like, you may even make changes to the video before uploading it.
Part 4. Related FAQs
How do you fade a clip to black?
Utilizing the dip to black transition in your video sequence is the key to learning how to fade to black in Premiere. To produce the Fade to Black reaction you’re trying to accomplish, you must Dip to Black. Simply drag the feature to the conclusion of your sequence to complete the task. Where you want the fading to start and terminate. The length of the fade or dip may be altered using the effects control panel.
How do I fade to white in Premier Pro?
Contrarily, as this montage demonstrates, fading to white may be utilized to convey uncertainty or a feeling of optimism. One of the most traditional transition effects that is often utilized in movies and videos is the fade to white. Your film gains a cinematic feel from it, and the change from one scene to the next is more seamless.
How do you keyframe colors in Premiere?
You can find other color problems in Premiere Pro that you need to fix. Therefore, it makes sense to adjust your highlight, mid, and black points first and have them dialed in before addressing saturation and color temperature. Open the Color panel on the right side of the screen while your adjustment layer is highlighted in the sequence. Make your color adjustments while keeping in mind that the effect will be applied to every clip below it in the timeline.
We only stop feeling immersed when we notice abrupt cuts. It makes sense to know when to color correct your footage throughout the video editing process. If you color correct your film too early, you can be wasting your time by color grading footage that you might eventually cut out or never use. We hope that this article will assist you in streamlining your editing process if you’re just starting started using Premiere Pro’s adjustments layers. Try experimenting with Filmora if you often utilize them to improve your edits.
Free Download For macOS 10.14 or later
Steps to Fade to Black Using Filmora
Step1 Install Filmora on your laptop
You must first download this software application to your computer from one of the following sources in order to start:
You must install it on your computer once you’ve done downloading it before you can use it with your laptop.

Step2 Customize the Video
After the Import, you may edit your audio recordings using tools that are completely customizable. Use the editor in Filmora to edit your recorded audio files, using simple to advanced editing techniques. Your recorded video may be improved using Filmora’s Editor by adding animated titles, spectacular effects, audio enhancements, and more.

Step3 Fade to Black Videos
Spice up the Fade effect into your videos and add the effect into the timeline. You will be able to make it black at the ends by customizing the effect inside the Fade window.

Step4 Add VFX to Your Video
The software is embedded with Effects primarily to give your videos a polished appearance. You may utilize a variety of its eye-catching and adjustable effects to make your video productions stand out from the competition. In this area, we’ve covered some of the best effects for bringing life to your dull, unprofessional videos as shown below:

Step5 Save or Share the Videos
Finally, you may use the complete Filmora editor as previously mentioned when you’ve done editing the recorded video. When you want to submit your creative work right away to YouTube or another well-known website, click the Export option and choose the platform where you want to distribute your video clip. If you like, you may even make changes to the video before uploading it.
Part 4. Related FAQs
How do you fade a clip to black?
Utilizing the dip to black transition in your video sequence is the key to learning how to fade to black in Premiere. To produce the Fade to Black reaction you’re trying to accomplish, you must Dip to Black. Simply drag the feature to the conclusion of your sequence to complete the task. Where you want the fading to start and terminate. The length of the fade or dip may be altered using the effects control panel.
How do I fade to white in Premier Pro?
Contrarily, as this montage demonstrates, fading to white may be utilized to convey uncertainty or a feeling of optimism. One of the most traditional transition effects that is often utilized in movies and videos is the fade to white. Your film gains a cinematic feel from it, and the change from one scene to the next is more seamless.
How do you keyframe colors in Premiere?
You can find other color problems in Premiere Pro that you need to fix. Therefore, it makes sense to adjust your highlight, mid, and black points first and have them dialed in before addressing saturation and color temperature. Open the Color panel on the right side of the screen while your adjustment layer is highlighted in the sequence. Make your color adjustments while keeping in mind that the effect will be applied to every clip below it in the timeline.
We only stop feeling immersed when we notice abrupt cuts. It makes sense to know when to color correct your footage throughout the video editing process. If you color correct your film too early, you can be wasting your time by color grading footage that you might eventually cut out or never use. We hope that this article will assist you in streamlining your editing process if you’re just starting started using Premiere Pro’s adjustments layers. Try experimenting with Filmora if you often utilize them to improve your edits.
Learn How to Make a Gaming Montage - Guide & Tips
The popularity of gaming montage is growing every day in today’s pop culture. There are currently more than 2.5 billion gamers, and most of them love watching gaming video content on YouTube. Whether people use a montage to parody gaming montages themselves or show off their skills, the effort and time put into them create impressive results.
We will explain how to create gaming montages and give you some tips that you might want to keep in mind to make epic videos.
How to Make a Gaming Montage
You have several options when it comes to creating gaming montages. You can include a random cut of great scenes, a mixture of the highlighted moments you found thrilling and would like to share with other gamers. In other cases, you’ll have to think of an engaging story in advance, then base your gameplay on this story.
Essentially, the workflow will be slightly different for these two scenarios. It’s much easier with the random cut type, especially when using a reliable video editor. Editing montages is as exciting as playing the game.
With that in mind, here is how to make a gaming montage.
1) Decide Your Montage Story/Type
Deciding your montage type beforehand helps clear your mind and create an epic gaming montage that will keep viewers watching. It allows you to choose the relevant video clips for your gaming montage.
Choose the topic of the video and decide the length of each clip and the sequence of the clips. Be sure to put the most epic or funny clips in the last section of your video. And this will make your viewers watch the video until the end.
2) Record Your Gameplay Footage
The methods to capture the gameplay varies depending on the platform where the game is. The most important thing you have to keep in mind is to ensure your recorder supports Replay Buffer; this will allow you to record scenes that occurred minutes or seconds ago.
That means you do not need to record the gameplay the whole time and burn your hardware. Instead, you’ll capture the moment after interesting things occur.
Game consoles like PS4 allow you to record the video natively for a maximum of one hour with the gamepad. A capture card lets you record it longer than 60 minutes.
Once you’ve all the clips you want on your PC, head over to https://filmora.wondershare.net/filmora-video-editor.html and download Filmora and install the software on your computer. This program allows you to edit your video clips and add cool effects that will make viewers keep watching.
3) Import You Videos to Media Library
You only have to import the videos to Filmora’s media library and then drag and drop them into the timeline, where you can start making the edits.
By right-clicking on the clip in your timeline, you’ll see the options to zoom, speed, change, split, or trim your videos. You can also add sound effects by going to the Audio Tab.

Import Videos
4) Choose Background Music for Your Montage
Music will help make your gaming montage engaging. Make sure you use a license-free track if you plan to post it on social media.
Using copyrighted music tracks and uploading the video on social media platforms can lead to video strikes. Luckily, Filmora has loads of non-copyrighted music tracks.
Navigate to Stock Media, where you’ll find non-copyrighted music on Pixabay, and choose the one you prefer.

Choose Background Music
5) Edit the Gaming Montage
With Filmora’s auto gaming montage maker, you can watch the video clip with the music you have selected. This tool will analyze beat points to change the video and effects.
Additionally, the tool can identify any bad parts in your video and delete them so that the video matches the music.
The Effects tab allows you to add multiple overlays and filters to your gaming montage video. Filmora has different categories of overlays that let you add emotions or personality to your montage. You can also use it to set the tone in your video.
Filters allow you to spice up your gaming videos. There are also different types of filters on Filmora.

Edit Gaming Montage
6) Export Your Gaming Montage Video
Once you have finished editing your video and added music, hit the Export button. Doing this will allow you to export your edited video and save it on your computer.
You can now enter your login details and upload your gaming montage video on your YouTube channel to share it with other players.
Useful Tips for Making a Gaming Montage
Making gaming montages can help you build a large online community if you do the right thing. When making a gaming montage, there are a few tips that you should keep in mind. They include:
1. Apply Velocity Effects
Adding velocity effects to your montage will help get the attention of viewers. You can couple the transition between scenes with a speed ramping effect.
Include slow motion where there is a gunshot or other big gaming moment. You can then speed up things to quickly move into another scene. You can create these velocity effects in Filmora and make it smooth.
2. Avoid Game Loading Scenes
Do not include game loading scenes or any unnecessary clips in the gaming montage. Your audience does not have the time to wait for the scenes to load because they want to see action fast.
3. Sync Gunshot with Music Beat
Try to match gunshot sounds with beats and rhythms in shooter video games. The beats of the music and the soothing sync of gunshots will catch viewers’ attention and your video will become popular among gamers.
4. Add Creative Transitions
You can spice up your gaming montage by adding transitions, especially when you have loads of clips for the montage. But avoid overusing it, as you could confuse your audience with a range of dazzling and glaring transitions.
5. Color Grade the Video for the Mood
Use color grading to your advantage, as it can set the mood of your viewers. You can decide to make some scenes black and white to catch the viewers’ attention.
6. Add Video Vignettes for Special Occasions
You can add dark edges around the corners of your video to highlight action or create a certain mood. For gameplay based on a story, use vignetting to add a sense of nostalgia or as a flashback that shows viewers the past.
You can use Filmora to apply the vignetting effect by heading to Advanced Color Tuning, then clicking the Vignette option. You can then add the vignette effect to the video. Additionally, you can adjust the vignette’s exposure, feather, roundness, size, and highlights.
Best Gaming Montage for Studying
Here are three gaming montages that are good for studying.
1. Call of Duty: Modern Warfare
Uploaded by DemixB, the Call of Duty Game Montage uses Jacques Offenbach’s Can Can Music track. It’s a happy song that has a tempo of 81 BPM. The track has average danceable energy, and it’s somewhat danceable.
DemixB set the gunshot in the montage video to the music tune. The track builds up to the climax when the gunshot echoes with the attention-grabbing orchestral explosions.

Call of Duty: Modern Warfare
2. ShutteR’s Gaming Montage
In the gaming montage uploaded by ShutteR on his YouTube channel, he used velocity effects to enhance the video. You’ll see that the transition in each scene is paired with adrenaline-pumping, speed-ramping effects.
ShutteR used a slow-motion to highlight action in each scene, then speeds up again when he wants to fast out into the next scene.; this makes the video more engaging to keep viewers glued to their screens.

ShutteR’s Gaming Montage
3. NEVERMORE [CS: GO]
NEVERMORE [CS: GO] was uploaded by Fuze on his YouTube channel, and it has creative gameplay. The gaming montage is based on a story. He did the project with Apel, an artist who designed the Fever Dream series skins in the video.
The basic idea of this gaming montage was that the main game character is a corrupted policeman with purple glowing eyes because he’s not human.
When the edits begin, the shape of the main character will shift from CS: GO CT models and turn into his real corrupt CT shape. So that’s why his name keeps changing. You can get his real identity by pausing some of the frames and looking at the “Killfeed.”

NEVERMORE [CS: GO]
Closing Thoughts:
Gaming montage involves picking and editing a range of video clips, which are brought together to create engaging video content. It consists of the best scenes from gameplay and non-copyrighted background music.
Use Filmora to edit and add effects to your video, including transitions and overlays. Your gaming montage will get more views, hence becoming popular among players.
The popularity of gaming montage is growing every day in today’s pop culture. There are currently more than 2.5 billion gamers, and most of them love watching gaming video content on YouTube. Whether people use a montage to parody gaming montages themselves or show off their skills, the effort and time put into them create impressive results.
We will explain how to create gaming montages and give you some tips that you might want to keep in mind to make epic videos.
How to Make a Gaming Montage
You have several options when it comes to creating gaming montages. You can include a random cut of great scenes, a mixture of the highlighted moments you found thrilling and would like to share with other gamers. In other cases, you’ll have to think of an engaging story in advance, then base your gameplay on this story.
Essentially, the workflow will be slightly different for these two scenarios. It’s much easier with the random cut type, especially when using a reliable video editor. Editing montages is as exciting as playing the game.
With that in mind, here is how to make a gaming montage.
1) Decide Your Montage Story/Type
Deciding your montage type beforehand helps clear your mind and create an epic gaming montage that will keep viewers watching. It allows you to choose the relevant video clips for your gaming montage.
Choose the topic of the video and decide the length of each clip and the sequence of the clips. Be sure to put the most epic or funny clips in the last section of your video. And this will make your viewers watch the video until the end.
2) Record Your Gameplay Footage
The methods to capture the gameplay varies depending on the platform where the game is. The most important thing you have to keep in mind is to ensure your recorder supports Replay Buffer; this will allow you to record scenes that occurred minutes or seconds ago.
That means you do not need to record the gameplay the whole time and burn your hardware. Instead, you’ll capture the moment after interesting things occur.
Game consoles like PS4 allow you to record the video natively for a maximum of one hour with the gamepad. A capture card lets you record it longer than 60 minutes.
Once you’ve all the clips you want on your PC, head over to https://filmora.wondershare.net/filmora-video-editor.html and download Filmora and install the software on your computer. This program allows you to edit your video clips and add cool effects that will make viewers keep watching.
3) Import You Videos to Media Library
You only have to import the videos to Filmora’s media library and then drag and drop them into the timeline, where you can start making the edits.
By right-clicking on the clip in your timeline, you’ll see the options to zoom, speed, change, split, or trim your videos. You can also add sound effects by going to the Audio Tab.

Import Videos
4) Choose Background Music for Your Montage
Music will help make your gaming montage engaging. Make sure you use a license-free track if you plan to post it on social media.
Using copyrighted music tracks and uploading the video on social media platforms can lead to video strikes. Luckily, Filmora has loads of non-copyrighted music tracks.
Navigate to Stock Media, where you’ll find non-copyrighted music on Pixabay, and choose the one you prefer.

Choose Background Music
5) Edit the Gaming Montage
With Filmora’s auto gaming montage maker, you can watch the video clip with the music you have selected. This tool will analyze beat points to change the video and effects.
Additionally, the tool can identify any bad parts in your video and delete them so that the video matches the music.
The Effects tab allows you to add multiple overlays and filters to your gaming montage video. Filmora has different categories of overlays that let you add emotions or personality to your montage. You can also use it to set the tone in your video.
Filters allow you to spice up your gaming videos. There are also different types of filters on Filmora.

Edit Gaming Montage
6) Export Your Gaming Montage Video
Once you have finished editing your video and added music, hit the Export button. Doing this will allow you to export your edited video and save it on your computer.
You can now enter your login details and upload your gaming montage video on your YouTube channel to share it with other players.
Useful Tips for Making a Gaming Montage
Making gaming montages can help you build a large online community if you do the right thing. When making a gaming montage, there are a few tips that you should keep in mind. They include:
1. Apply Velocity Effects
Adding velocity effects to your montage will help get the attention of viewers. You can couple the transition between scenes with a speed ramping effect.
Include slow motion where there is a gunshot or other big gaming moment. You can then speed up things to quickly move into another scene. You can create these velocity effects in Filmora and make it smooth.
2. Avoid Game Loading Scenes
Do not include game loading scenes or any unnecessary clips in the gaming montage. Your audience does not have the time to wait for the scenes to load because they want to see action fast.
3. Sync Gunshot with Music Beat
Try to match gunshot sounds with beats and rhythms in shooter video games. The beats of the music and the soothing sync of gunshots will catch viewers’ attention and your video will become popular among gamers.
4. Add Creative Transitions
You can spice up your gaming montage by adding transitions, especially when you have loads of clips for the montage. But avoid overusing it, as you could confuse your audience with a range of dazzling and glaring transitions.
5. Color Grade the Video for the Mood
Use color grading to your advantage, as it can set the mood of your viewers. You can decide to make some scenes black and white to catch the viewers’ attention.
6. Add Video Vignettes for Special Occasions
You can add dark edges around the corners of your video to highlight action or create a certain mood. For gameplay based on a story, use vignetting to add a sense of nostalgia or as a flashback that shows viewers the past.
You can use Filmora to apply the vignetting effect by heading to Advanced Color Tuning, then clicking the Vignette option. You can then add the vignette effect to the video. Additionally, you can adjust the vignette’s exposure, feather, roundness, size, and highlights.
Best Gaming Montage for Studying
Here are three gaming montages that are good for studying.
1. Call of Duty: Modern Warfare
Uploaded by DemixB, the Call of Duty Game Montage uses Jacques Offenbach’s Can Can Music track. It’s a happy song that has a tempo of 81 BPM. The track has average danceable energy, and it’s somewhat danceable.
DemixB set the gunshot in the montage video to the music tune. The track builds up to the climax when the gunshot echoes with the attention-grabbing orchestral explosions.

Call of Duty: Modern Warfare
2. ShutteR’s Gaming Montage
In the gaming montage uploaded by ShutteR on his YouTube channel, he used velocity effects to enhance the video. You’ll see that the transition in each scene is paired with adrenaline-pumping, speed-ramping effects.
ShutteR used a slow-motion to highlight action in each scene, then speeds up again when he wants to fast out into the next scene.; this makes the video more engaging to keep viewers glued to their screens.

ShutteR’s Gaming Montage
3. NEVERMORE [CS: GO]
NEVERMORE [CS: GO] was uploaded by Fuze on his YouTube channel, and it has creative gameplay. The gaming montage is based on a story. He did the project with Apel, an artist who designed the Fever Dream series skins in the video.
The basic idea of this gaming montage was that the main game character is a corrupted policeman with purple glowing eyes because he’s not human.
When the edits begin, the shape of the main character will shift from CS: GO CT models and turn into his real corrupt CT shape. So that’s why his name keeps changing. You can get his real identity by pausing some of the frames and looking at the “Killfeed.”

NEVERMORE [CS: GO]
Closing Thoughts:
Gaming montage involves picking and editing a range of video clips, which are brought together to create engaging video content. It consists of the best scenes from gameplay and non-copyrighted background music.
Use Filmora to edit and add effects to your video, including transitions and overlays. Your gaming montage will get more views, hence becoming popular among players.
Also read:
- Updated Add some Sci-Fi Touch to Your Next Video Content Using Wondershare Filmora Editing Tools to Create an Alternate Reality Effect
- With the HDR Feature, You Can Make Your Images Look More Realistic and Add More Depth to Them. But if You Are Clueless as to How This Can Be Done Using Your Android Devices and the Best Situations for the Same, Then This Article Will Just Be an Apt Read
- 2024 Approved Ultimate Guidelines to Help You Better Use VLC Media Player
- New Make A Tattoo Disappear Like A Magic
- In 2024, Premiere Pro Slow Playback Issues Finding The Best Solutions
- New Read This Review to Learn Everything You Need to Know About Leeming LUT Pro and How to Apply Pro LUTs Using Different Video Editors
- Updated How Can You Get VHS Filter and Glitch Filter to Your Images or Videos?
- How Can You Get VHS Filter and Glitch Filter to Your Images or Videos for 2024
- Updated How to Make Discord GIF PFP? Solved
- Best 8 Top Premiere Pro Slideshow Templates
- 2024 Approved Learn How Video Montages Were Used over Film History with Examples and the Types of Videos for Shorter Montages. Plus, Learn About the Best Software for It
- Updated Little Tricks to Create Canva Slideshow No One Is Telling You for 2024
- Updated Control Playback Speed in Premiere Pro
- Best 5 Solutions on How to Add Emojis to iPhone for 2024
- 2024 Approved Want to Learn How to Add VHS Green Screen to Your Videos? This Guide Will Cover All the Details You Need to Know to Add This Effect to Your Videos and Make Them Stand Out
- Updated How to Add a Lower Third to Your Video for 2024
- Updated Doable Ways to Create Transparent Background in Procreate
- Updated How to Animate Your Designs With Canva GIF for 2024
- 2024 Approved Have You Ever Watched a Movie Where You Felt the Filmmakers Left You Hanging? Yea, Thats What Freeze Frame Does. Here We Will Enlighten You on What It Is, Freeze Frame Examples Where It Has Been Helpful to Drive Our Point Home
- New This Article Is Regarding the Guidance About the Split of the Audio From the Video in Premiere Pro. And Also, the Discussion of the Wondershare Fllmora as the Replacement and How to Perform a Similar Task in It
- How to Turn Text Into a Podcast
- Updated Deleting White Background in Photoshop Is Hard, In 2024
- In 2024, Legend Intro Maker – Create Intro Video with Ease
- New In 2024, Top List 20 Best LUTs for Music Videos
- In 2024, 100 Workable How to Mask Track with Adobe Premiere Pro
- In 2024, Detailed Guide to Crop Video in Sony Vegas Pro
- New 2024 Approved Best Ways to Blur Zoom Background for Free
- Updated How to Make a Bokeh Effect
- New In 2024, Best MOV to GIF Converters
- New 2024 Approved Best Ever Ways Make Tiktok Slideshow Solved
- The Best Way to Remove Audio From Your Videos for 2024
- Updated How to Create a Clideo Slideshow for 2024
- Create Promotional Video
- New Create Kinetice Typography Text Effect in Filmora
- Beginners Guide About WMV Format and Best WMV Video Editor
- Updated A Countdown Effect Is Widely Used in Gaming and Report Videos. So How to Create Your Own Countdown Video? This Article Will Tell You some Ideas About Contdown Video Editing for 2024
- In 2024, Forgot Locked iPhone 14 Password? Learn the Best Methods To Unlock
- In 2024, 5 Ways to Move Contacts From Xiaomi Redmi K70E to iPhone (13/14/15) | Dr.fone
- 9 Quick Fixes to Unfortunately TouchWiz has stopped Of Sony Xperia 5 V | Dr.fone
- In 2024, Best 3 Vivo X100 Emulator for Mac to Run Your Wanted Android Apps | Dr.fone
- In 2024, How to Track a Lost Samsung Galaxy Z Fold 5 for Free? | Dr.fone
- Life360 Learn How Everything Works On Honor Magic Vs 2 | Dr.fone
- How to Remove and Reset Face ID on Apple iPhone 15 Pro | Dr.fone
- Reliable User Guide to Fix Poco C50 Running Slow and Freezing | Dr.fone
- Effective Ways To Fix Checkra1n Error 31 From Apple iPhone 6s Plus
- Apple ID Locked or Disabled From Apple iPhone 12 Pro? 7 Mehtods You Cant-Miss
- In 2024, How To Remove the Two Factor Authentication From iPhone 11 Pro
- How to Change Your Apple iPhone 6 Plus Location on life360 Without Anyone Knowing? | Dr.fone
- Read This Guide to Find a Reliable Alternative to Fake GPS On Tecno Pop 8 | Dr.fone
- In 2024, How to Unlock iPhone 14 Plus without Passcode or Face ID | Dr.fone
- How to Use Pokémon Emerald Master Ball Cheat On Oppo A56s 5G | Dr.fone
- Fixing Foneazy MockGo Not Working On Itel A70 | Dr.fone
- How to Change Motorola Edge 40 Neo Location on Skout | Dr.fone
- 7 Fixes for Unfortunately, Phone Has Stopped on Infinix Zero 30 5G | Dr.fone
- A Detailed VPNa Fake GPS Location Free Review On Nokia 105 Classic | Dr.fone
- In 2024, Apple ID is Greyed Out On Apple iPhone 11 How to Bypass?
- Title: New In 2024, How to Create an Alternate Reality Effect
- Author: Chloe
- Created at : 2024-04-24 07:08:35
- Updated at : 2024-04-25 07:08:35
- Link: https://ai-editing-video.techidaily.com/new-in-2024-how-to-create-an-alternate-reality-effect/
- License: This work is licensed under CC BY-NC-SA 4.0.

