
:max_bytes(150000):strip_icc():format(webp)/reddit-app-for-andoird-652f6fcd646245e9807afbac25a072ee.jpg)
New In 2024, How to Create Photoshop GIF The Easy Way
How to Create Photoshop GIF The Easy Way
How to Create Photoshop GIF The 100% Easy Way
An easy yet powerful editor
Numerous effects to choose from
Detailed tutorials provided by the official channel
Having trouble creating Photoshop GIFs? Stay tuned to set everything straight.
In this article
01 [Easy Ways to Create an Animated GIF in Photoshop](#Part 1)
02 [6 Ways To Make An Animated GIF Without Photoshop](#Part 2)
Part 1 Easy Ways to Create an Animated GIF in Photoshop
Animated GIFs are a naturally captivating means of information exchange and entertainment. When the talk is about creating these, you can visibly see a flood of creation tools and software solutions. However, standing out in the crowd, are those catchy Photoshop snippets that certainly have the potential to leave you jaw dropped.
A Photoshop GIF is bound to capture attention, owing to its high quality imaging and top rated professional editing outlook. If you possess the editing flare, do try creating one for an amazing editing experience.
Creating Animated Photoshop GIFs: Easiest Solutions
Let’s take a look into some easy and interesting ways of creating a GIF in Photoshop, to leave you with handy solutions, just in case you feel motivated to take up the creation idea.
Before you begin, make sure to install and launch a suitable version the Photoshop application in your device and keep a set of selected images at hand that you will require for GIF creation.
● Step 1: Load Image Files
Photoshop requires you to load your selected files into its creation stack. There is no limit on the image count, but make sure you choose images in a natural series so that the GIF doesn’t give an out of the box feel.

Reach the ‘File’ tab at the top and load your image files into the Photoshop stack using the following path:
File -> Scripts -> Load Files into Stack

● Step 2: Image Selection
In the next pop-up window, click ‘Browse’ and choose the image file you wish to load into the Photoshop stack. In case the selected images seem tom lack proper alignment, click on the ‘Attempt to Automatically Align Source Images’ checkbox to set this straight and make your GIF frame stable.

Click on ‘OK’ when you are happy with your selections.

At this instant, Photoshop starts creating layers for the uploaded images, which you can see in the ‘Layers’ panel at the bottom-right. You are allowed to rearrange the image layers by selecting and dragging them or click on layer names to rename them.

If you notice distortion in Photoshop’s automatic alignment of your images, just crop the images frames to sort this out. Here’s how you can get this done:
● Tap the ‘Crop’ symbol.
● Adjust the crop frame to select the desired portion.
● Click on ‘Enter’ to confirm the action.
If you didn’t permit auto alignment previously, no worries, you can move ahead.
● Step 3: Make a Timeline Setup
Navigate to the ‘Window’ tab in the top menu and click the ’Timeline’ checkbox. You will see the ‘Timeline Window’ pop up below the Photoshop workspace, where you need to select the ‘Create Frame Animation’ tab. This will cause the options for frame animation to pop-up.

Select you topmost image layer, followed by clicking on the ‘Duplicate’ icon to generate a copy of the image frame.

● Step 4: Decide Time Frames
Select your topmost image frame to see a play duration of ‘0 sec’ below its thumbnail. Click to open the drop-down menu beside it and choose suitable time duration for the frame to run. Allot time durations to all successive frames in a similar manner.

● Step 5: Conceal Top Layers
You will see am combination of the first and second image layers in the image thumbnail. To set this right, navigate to ‘Layers’ to hide the top layer.

Continue to hide previous layers in successive frames so that each layer appears in its respective frame at the end of the process.

● Step 6: Preview Your Creation
Tap the ‘Play’ button to see your GIF preview. Ensure a smooth run with correct appearance order of images and precise frame durations.

● Step 7: Time to Share.
When you are satisfied, navigate to the ‘File’ tab and select ‘Save As’. From the menu that drops down, choose the GIF file format and click on ‘Save’.

In the ’GIF Save Options’ that follows, adjust file settings suited to your preference and tap ‘OK’.

As an alternative you can take the following path to open the ‘GIF Preview Window’:
File -> Export -> Save for Web

In the top-right comer, choose the GIF file format from the drop-down menu. There is also an option to resize your image at the bottom-right. It is advisable to keep the image size within 500 pixels for a convenient export across various media sharing platforms. When you finish, click on ‘Save’. Your creation is now ready for a media export.

Part 2 6 Ways to Make an Animated GIF Without Photoshop
The idea to create GIF in Photoshop is fun and exciting, no doubt on that, but you may often want to switch to a different platform. No issues with that, the web is there to sort out everything for you. All you need to do is open your favorite browser to land across a heap of welcoming solutions to create GIFs without Photoshop. Let’s have a look through the best ones:
01**Wondershare Filmora Video Editor **
Filmora by Wondershare is probably the best GIF maker tool you can rely on. This is packed with a diverse inventory of exciting design features that are ready to provide a creative boost to your editing skills. Loaded with a ton of classic audio visual effects, this software is certainly comprises of everything you need to create static and animated GIFs like a pro.

Wondershare Filmora - Best Video Editor for Mac/Windows
5,481,435 people have downloaded it.
Build unique custom animations without breaking a sweat.
Focus on creating epic stories and leave the details to Filmora’s auto features.
Start a creative adventure with drag & drop effects and endless possibilities.
Filmora simplifies advanced features to save you time and effort.
Filmora cuts out repetition so you can move on to your next creative breakthrough.
Key Features
● This is free software with possibly the most convenient interface.
● You get the freedom to play with hundreds of audio-visual effects to your heart’s content.
● You can create GIFs with static images and videos that are simply awesome to say the least.
● You need not worry about specific file formats. The software is compatible with almost all commonly known ones.
● Filmora allows you to expand and explore your editing talent to the fullest. You can play with tools like, cut, trim or combine image frames and make color and speed adjustments to get the perfect results for your artwork.
02Photoscape
This is another GIF maker tool you can choose to create catchy and interesting GIFs. Photoscape is a simple graphic editor that makes GIF creation exciting and fun. Available to you for free, this software allows you to design and edit animated GIFs with a series of image enhancements, like, resizing, color selection, image prints, etc. Photoscape is compatible with your Windows, Linux and Mac supported devices and has a clean interface. However, the program may sometimes take up a slow run.

Key Features
● You can improvise you GIF with image editing tools, like, color and size adjustments, clip arts, effects, overlays, etc.
● It has a unique ‘Photo Batch’ tool that you can use to process and rename multiple images simultaneously.
● Photoscape allows you to create interesting collages by merging a series of images into a single one.
● You can create captivating animated GIFs with multiple still images.
● The software is loaded with a bunch of utilities like, photo splitter, page merger, color picker, image viewer and others to give that perfect professional outlook to your creations.
03Gifted Motion
This is also among the commonly preferred GIF creator software. The best this about the tool is that it is platform independent and compatible with almost any Operating System. Another choice appeal of the software is its direct workability that is, you don’t require any program installations to create GIFs using this tool.

Key Features
● This is a simple graphic editor that runs on JAVA and is quite convenient to use.
● You can use this software to edit and create GIFs with images saved locally in your device.
● File formats supported by the software include PNG, JPEG, BMP and GIF.
● You don’t need to worry about licensing costs or in-app purchases; this tool is absolutely free to use.
● Loading big image files on this software may however, cost you some extra time.
01SSuite GIF Animator
This one is Windows compatible software that works well with both, 32 and 64-bit Operating System configurations. It lies among those ’Green Software Programs’ that cut down on your net energy cost. Apart from high quality animated GIFs, y6ou can also create movies and slides shows with this software.

Key Features
● This is a free of cost, clean and user-friendly graphic editor software.
● You don’t require Windows registration to use this software
● You can conveniently save the software into any USB or memory device; it is easily portable.
● It facilitates a speedy GIF creation and editing.
● You can explore a variety of editing features and add separate time frames to each image using this software.
● Picasion
This is a free, online GIF maker tool that gives you the liberty to import images and videos from different app galleries, like, Picasa, Flickr and others to create and edit motion GIFs. The tool, though having a simple interface and feature packed, is quite ad-stricken, but you can skip that by sticking to the right webpage.

Key Features
● The tool crosses language borders and is available to you in English, Spanish, Portuguese and Russian.
● You can make size adjustments to the GIF images, or add a completely new avatar of your own.
● The tool offers you a variety of editing effects and filters to enhance and improvise your created GIFs.
● You need not limit yourself to specific file formats with this tool; all common ones are conveniently supported.
● It is a quick and clean tool that rescues you from the glitch of a messy interface.
05GifPal
This one is also a free, online GIF creator with amazing editing features and tools. It comes with a diverse library of 20 frames and 30 effects to choose from, for creating normal and animated GIFs. It further has a variety of drawing and text editing tools you can use to add messages to your GIFs to make more impactful.

Key Features
● The tool is packed with a vast set of quality image editing tools that can create attractive motion and animated GIFs.
● The tool allows you to adjust and change the speed of image frames to give a natural flow to your GIF.
● An exclusive feature of the tool is that it allows you to edit frames in its timeline.
● Your creations with the tools are deprived of any default watermarks. You can either add one of your choice, or even create GIFs without a watermark.
● The tool site is free of unwanted and irrelevant ads.
● Key Takeaways from This Episode →
● Making a GIF in Photoshop is a great idea to design animation snippets, both for fun and a target purpose. Using the Photoshop GIF maker ensures quality and class in complete professional styles.
● However, if you are keen on browsing through other GIF creator alternatives, you can safely pick the Filmora GIF Maher software for creating excellent, next level animated GIFs.
Having trouble creating Photoshop GIFs? Stay tuned to set everything straight.
In this article
01 [Easy Ways to Create an Animated GIF in Photoshop](#Part 1)
02 [6 Ways To Make An Animated GIF Without Photoshop](#Part 2)
Part 1 Easy Ways to Create an Animated GIF in Photoshop
Animated GIFs are a naturally captivating means of information exchange and entertainment. When the talk is about creating these, you can visibly see a flood of creation tools and software solutions. However, standing out in the crowd, are those catchy Photoshop snippets that certainly have the potential to leave you jaw dropped.
A Photoshop GIF is bound to capture attention, owing to its high quality imaging and top rated professional editing outlook. If you possess the editing flare, do try creating one for an amazing editing experience.
Creating Animated Photoshop GIFs: Easiest Solutions
Let’s take a look into some easy and interesting ways of creating a GIF in Photoshop, to leave you with handy solutions, just in case you feel motivated to take up the creation idea.
Before you begin, make sure to install and launch a suitable version the Photoshop application in your device and keep a set of selected images at hand that you will require for GIF creation.
● Step 1: Load Image Files
Photoshop requires you to load your selected files into its creation stack. There is no limit on the image count, but make sure you choose images in a natural series so that the GIF doesn’t give an out of the box feel.
Reach the ‘File’ tab at the top and load your image files into the Photoshop stack using the following path:
File -> Scripts -> Load Files into Stack
● Step 2: Image Selection
In the next pop-up window, click ‘Browse’ and choose the image file you wish to load into the Photoshop stack. In case the selected images seem tom lack proper alignment, click on the ‘Attempt to Automatically Align Source Images’ checkbox to set this straight and make your GIF frame stable.
Click on ‘OK’ when you are happy with your selections.
At this instant, Photoshop starts creating layers for the uploaded images, which you can see in the ‘Layers’ panel at the bottom-right. You are allowed to rearrange the image layers by selecting and dragging them or click on layer names to rename them.
If you notice distortion in Photoshop’s automatic alignment of your images, just crop the images frames to sort this out. Here’s how you can get this done:
● Tap the ‘Crop’ symbol.
● Adjust the crop frame to select the desired portion.
● Click on ‘Enter’ to confirm the action.
If you didn’t permit auto alignment previously, no worries, you can move ahead.
● Step 3: Make a Timeline Setup
Navigate to the ‘Window’ tab in the top menu and click the ’Timeline’ checkbox. You will see the ‘Timeline Window’ pop up below the Photoshop workspace, where you need to select the ‘Create Frame Animation’ tab. This will cause the options for frame animation to pop-up.
Select you topmost image layer, followed by clicking on the ‘Duplicate’ icon to generate a copy of the image frame.
● Step 4: Decide Time Frames
Select your topmost image frame to see a play duration of ‘0 sec’ below its thumbnail. Click to open the drop-down menu beside it and choose suitable time duration for the frame to run. Allot time durations to all successive frames in a similar manner.
● Step 5: Conceal Top Layers
You will see am combination of the first and second image layers in the image thumbnail. To set this right, navigate to ‘Layers’ to hide the top layer.
Continue to hide previous layers in successive frames so that each layer appears in its respective frame at the end of the process.
● Step 6: Preview Your Creation
Tap the ‘Play’ button to see your GIF preview. Ensure a smooth run with correct appearance order of images and precise frame durations.
● Step 7: Time to Share.
When you are satisfied, navigate to the ‘File’ tab and select ‘Save As’. From the menu that drops down, choose the GIF file format and click on ‘Save’.
In the ’GIF Save Options’ that follows, adjust file settings suited to your preference and tap ‘OK’.
As an alternative you can take the following path to open the ‘GIF Preview Window’:
File -> Export -> Save for Web
In the top-right comer, choose the GIF file format from the drop-down menu. There is also an option to resize your image at the bottom-right. It is advisable to keep the image size within 500 pixels for a convenient export across various media sharing platforms. When you finish, click on ‘Save’. Your creation is now ready for a media export.
Part 2 6 Ways to Make an Animated GIF Without Photoshop
The idea to create GIF in Photoshop is fun and exciting, no doubt on that, but you may often want to switch to a different platform. No issues with that, the web is there to sort out everything for you. All you need to do is open your favorite browser to land across a heap of welcoming solutions to create GIFs without Photoshop. Let’s have a look through the best ones:
01**Wondershare Filmora Video Editor **
Filmora by Wondershare is probably the best GIF maker tool you can rely on. This is packed with a diverse inventory of exciting design features that are ready to provide a creative boost to your editing skills. Loaded with a ton of classic audio visual effects, this software is certainly comprises of everything you need to create static and animated GIFs like a pro.
Wondershare Filmora - Best Video Editor for Mac/Windows
5,481,435 people have downloaded it.
Build unique custom animations without breaking a sweat.
Focus on creating epic stories and leave the details to Filmora’s auto features.
Start a creative adventure with drag & drop effects and endless possibilities.
Filmora simplifies advanced features to save you time and effort.
Filmora cuts out repetition so you can move on to your next creative breakthrough.
Key Features
● This is free software with possibly the most convenient interface.
● You get the freedom to play with hundreds of audio-visual effects to your heart’s content.
● You can create GIFs with static images and videos that are simply awesome to say the least.
● You need not worry about specific file formats. The software is compatible with almost all commonly known ones.
● Filmora allows you to expand and explore your editing talent to the fullest. You can play with tools like, cut, trim or combine image frames and make color and speed adjustments to get the perfect results for your artwork.
02Photoscape
This is another GIF maker tool you can choose to create catchy and interesting GIFs. Photoscape is a simple graphic editor that makes GIF creation exciting and fun. Available to you for free, this software allows you to design and edit animated GIFs with a series of image enhancements, like, resizing, color selection, image prints, etc. Photoscape is compatible with your Windows, Linux and Mac supported devices and has a clean interface. However, the program may sometimes take up a slow run.
Key Features
● You can improvise you GIF with image editing tools, like, color and size adjustments, clip arts, effects, overlays, etc.
● It has a unique ‘Photo Batch’ tool that you can use to process and rename multiple images simultaneously.
● Photoscape allows you to create interesting collages by merging a series of images into a single one.
● You can create captivating animated GIFs with multiple still images.
● The software is loaded with a bunch of utilities like, photo splitter, page merger, color picker, image viewer and others to give that perfect professional outlook to your creations.
03Gifted Motion
This is also among the commonly preferred GIF creator software. The best this about the tool is that it is platform independent and compatible with almost any Operating System. Another choice appeal of the software is its direct workability that is, you don’t require any program installations to create GIFs using this tool.
Key Features
● This is a simple graphic editor that runs on JAVA and is quite convenient to use.
● You can use this software to edit and create GIFs with images saved locally in your device.
● File formats supported by the software include PNG, JPEG, BMP and GIF.
● You don’t need to worry about licensing costs or in-app purchases; this tool is absolutely free to use.
● Loading big image files on this software may however, cost you some extra time.
01SSuite GIF Animator
This one is Windows compatible software that works well with both, 32 and 64-bit Operating System configurations. It lies among those ’Green Software Programs’ that cut down on your net energy cost. Apart from high quality animated GIFs, y6ou can also create movies and slides shows with this software.
Key Features
● This is a free of cost, clean and user-friendly graphic editor software.
● You don’t require Windows registration to use this software
● You can conveniently save the software into any USB or memory device; it is easily portable.
● It facilitates a speedy GIF creation and editing.
● You can explore a variety of editing features and add separate time frames to each image using this software.
● Picasion
This is a free, online GIF maker tool that gives you the liberty to import images and videos from different app galleries, like, Picasa, Flickr and others to create and edit motion GIFs. The tool, though having a simple interface and feature packed, is quite ad-stricken, but you can skip that by sticking to the right webpage.
Key Features
● The tool crosses language borders and is available to you in English, Spanish, Portuguese and Russian.
● You can make size adjustments to the GIF images, or add a completely new avatar of your own.
● The tool offers you a variety of editing effects and filters to enhance and improvise your created GIFs.
● You need not limit yourself to specific file formats with this tool; all common ones are conveniently supported.
● It is a quick and clean tool that rescues you from the glitch of a messy interface.
05GifPal
This one is also a free, online GIF creator with amazing editing features and tools. It comes with a diverse library of 20 frames and 30 effects to choose from, for creating normal and animated GIFs. It further has a variety of drawing and text editing tools you can use to add messages to your GIFs to make more impactful.
Key Features
● The tool is packed with a vast set of quality image editing tools that can create attractive motion and animated GIFs.
● The tool allows you to adjust and change the speed of image frames to give a natural flow to your GIF.
● An exclusive feature of the tool is that it allows you to edit frames in its timeline.
● Your creations with the tools are deprived of any default watermarks. You can either add one of your choice, or even create GIFs without a watermark.
● The tool site is free of unwanted and irrelevant ads.
● Key Takeaways from This Episode →
● Making a GIF in Photoshop is a great idea to design animation snippets, both for fun and a target purpose. Using the Photoshop GIF maker ensures quality and class in complete professional styles.
● However, if you are keen on browsing through other GIF creator alternatives, you can safely pick the Filmora GIF Maher software for creating excellent, next level animated GIFs.
Learn Color Correction in After Effects with These Videos
Create High-Quality Video - Wondershare Filmora
An easy and powerful YouTube video editor
Numerous video and audio effects to choose from
Detailed tutorials provided by the official channel
When it comes to understanding and mastery of information, videos are always the best. Research carried out by Wyzwol, a marketing research institute, states that 68% of people like to learn about services through videos.
Color correction in After Effects involves a wide range of tools, including Lumetri color, Hue saturation, and RGB curves. It involves extensive reading and interpretation of graphs and histograms – A thing not for the faint-hearted. To better your understanding of color correction in After Effects, you not only need to rely on blogs but also videos. Therefore from this article, you will learn about color correction in After Effects with videos.
Let’s dive in!

In this article
01 What is Color Correction in After Effects
02 Learn Color Correction in After Effects with These Videos
What is Color Correction in After Effects
Color correction is a functionality feature in Adobe After effects that fixes all the color complications in an image or a video. This functionality feature alters a clip of footage to match a constant appearance.
Most colorists and editors use After Effects to adjust color, saturation, and contrast in clips that look unreal and make them appear natural and unprocessed.
When you want to color correct your footage, you first need to establish your video clip and then determine the colors needs for your clip. With this, color grading will become an absolute breeze for you.
Learn Color Correction in After Effects with These Videos
1. Pro Tip - Cinematic Color Grade in After Effects - After Effects Tutorial by Dope Motions
One of the top-notch videos we will use to learn color correcting is one produced by Dope Motions. Dope Motions is a YouTube channel that is managed by Nick Pawar. Nick creates high-quality graphics and VFX tutorials where he shares insightful ideas on how to carry out various cinematic edits to videos – This includes color correction.
In this video, Nick gives his voice on color grid videos giving it that cinematic look with much ease. His method is relatively simpler since one need not use plugins to do color correction. Though it is much easier to carry out color correction with plugins, Nick emphasizes more on color correction without plugins since you will be able to extensively customize your video based on your preference.
In this video, Nick spotlights various topics, including how to use lumetri color, color correction, cinematic color grading, how to make presets, color effects, among many more. All in After Effects.
Besides, with these techniques, you cannot not only use color correction in After Effects but also in premiere pro. Beginners, as well as intermediate video editors, will significantly benefit from this exemplary video. Learn from Nick and create splendid videos that will leave your clients and viewers all rooted to the ground.
2. Create a Cinematic Look with After Effects Tricks! by Kriscoart
Another enlightening video that talks about color correction in After Effect are this one from Kriscoart. Kriscoart is a fast-growing YouTube channel developed by managed by Kris Truini. Some of the core values of this channel are to learn, create and share content. From his channel, Truini does not centralize his focus to only video editing; he goes to the extremes of edifying on VFX tutorials, lighting workshops, and short film breakdowns.
In this video, Truini shares some simple tricks with his subscribers as well as new visitors on how to carry out a color correction in After Effects. He elaborates on manipulating lights and adding dramatic atmospheres and cinematic looks to your video shots by using some simple masks, solids, and adjustment layers.
Truini uses the project he is working on to flesh out various color correction tools and how to put them into use authentically. He targets not only beginner video editors but also intermediate ones who are looking forward to increasing their skill set.
Through his YouTube channels, Truini aims at educating the masses so that they can be well conversant with most of the video editing tools. He wants the voice of every filmmaker and prospective to be heard by their prospective audiences.
3. Advanced Color Grading in After Effects - NO PLUGINS by the VFX Show
Color correcting and Color grading without plugins is something that is a back-breaking activity to beginner video editors. Here, Collin Black of @ The VFX Show tends to break that misconception. Collin Black, the manager of The VFX Show, teaches his subscribers and new visitors to his channel how to carry out color correction without necessarily using plugins.
Collin Black states that even though plugins are very easy to use in color correction, you cannot carry out a wide range of customizable activities. It makes color correction without plugins be something to use to create neck-breaking video clips.
In this video, Collin uses a photo that he took while driving. The image appears to be faulty with lousy lighting. He uses a wide range of tools while elaborating every single step. When compared to the start, the final result of his work can be said to be “something out of this world.”
The target audience is beginner video editors with the zeal and zest of learning and wanting to get to know more about color correction without plugins.
4. Easy Colour Correction - After Effects Tutorial by DM Design
Are there scenarios where you come across a simple-looking video clip that is perfectly edited with ideal visual colors and has a sensational cinematic appearance? Debra Mayer, the founder, and owner of DM Designs, a renowned YouTube channel, simplify the processes required to get stunning videos.
Debra Mayer, in her YouTube channel, does all in her powers to teach all the Adobe techniques. She simplifies it and makes every single step to be somewhat relatable. In her channel, she does say much but expounds on tons of tools and activities.
Debra uses footage of a deserted land occupied by trees and grassland in this video. Everything in the picture looks dull and dusty. Debra expounds on how to create some cinematic appearance on clips with straightforward steps. Her after video appears to be something unreal due to extensive editing.
Her target audience for this video is beginner video editors. She can explain color correction in the easiest way possible from her immerse skillset. With that, beginner editors will significantly benefit from it.
5. Make Cinematic Looks with After Effects Color Correction Tricks! by Black Mixture
Paying for the After Effects subscription and again paying for color correction is something most people cannot wish to do. Even though you are not good at color correction, you need to stress yourself since Nate and Chriselle of Black Mixture will make things easy for you. Black Mixture is a YouTube account managed by Nate and Chriselle, a couple. In their channel, they expound on topics surrounding filmmaking, graphic design, motion design, and photography.
In this video, Nate elaborates on various steps on how to carry out a color correction in Adobe After Effects without plugins. He even goes to the extent of showing how to add music video effects as well as cinematic effects.
Nate uniquely uses only three color correction effects to carry out all the color correction needed to his footage – A super-fast driving car on a highway – And comes up with stunning results. He uses various customizable Adobe Effects settings such as hue, contrast, saturation.
Furthermore, Nate explains how to interpret and use histograms and graphs in adjusting various customizable settings. He also emphasizes the glow, a unique functionality feature that alters the lighting of clips to make his background appear super cool. Most editors do not commonly use glow, but it creates outstanding videos when used.
Nate does not only target beginner video editors but also intermediate ones. There is something new that intermediate editors will also learn.
6. Color Correction in After Effects - Tutorial by Kenneth Moore
This is the last YouTube video that we are going to learn about color correcting from. It is a video produced by Kenneth Moore, A prime owner of Kenneth Moore’s YouTube Channel. Even though his channel, Kenneth Moore channel, is still on the grow, he straightforwardly brought out every step to carry out when doing color correction in After Effects.
In this video, Moore uses a shot of a drown to elaborate color correction. The initial footage appears to be dull with indistinct features. With the color corrections tools, Moore is able to liven the footage giving it that outstanding look.
Moore unfolds on how to use various functionality tools in After Effects. In his video, he incorporates contrast, curves, RGB Parade, color balancing, color wheels, Vectorscope, and HSL Secondary functionalities. He used another footage, a car, to elaborate on HSL secondary.
In the video, Moore targets beginner and intermediate video editors to throw light on other color correction functionalities that video editors need to learn.
Conclusion
● Supplement your reading about color correction in After Effects with these videos. The above six videos evidently explain how to carry out a color correction in Adobe After Effects with ease. The videos are created with established producers and video editors; therefore they give professional insights and teachings.
● Color correction in After Effects should no longer stress you out. All you have to do is watch any of the above videos, or you can watch all of them and have a better grip of color correction. You will be able to create exceptional footage.
When it comes to understanding and mastery of information, videos are always the best. Research carried out by Wyzwol, a marketing research institute, states that 68% of people like to learn about services through videos.
Color correction in After Effects involves a wide range of tools, including Lumetri color, Hue saturation, and RGB curves. It involves extensive reading and interpretation of graphs and histograms – A thing not for the faint-hearted. To better your understanding of color correction in After Effects, you not only need to rely on blogs but also videos. Therefore from this article, you will learn about color correction in After Effects with videos.
Let’s dive in!
In this article
01 What is Color Correction in After Effects
02 Learn Color Correction in After Effects with These Videos
What is Color Correction in After Effects
Color correction is a functionality feature in Adobe After effects that fixes all the color complications in an image or a video. This functionality feature alters a clip of footage to match a constant appearance.
Most colorists and editors use After Effects to adjust color, saturation, and contrast in clips that look unreal and make them appear natural and unprocessed.
When you want to color correct your footage, you first need to establish your video clip and then determine the colors needs for your clip. With this, color grading will become an absolute breeze for you.
Learn Color Correction in After Effects with These Videos
1. Pro Tip - Cinematic Color Grade in After Effects - After Effects Tutorial by Dope Motions
One of the top-notch videos we will use to learn color correcting is one produced by Dope Motions. Dope Motions is a YouTube channel that is managed by Nick Pawar. Nick creates high-quality graphics and VFX tutorials where he shares insightful ideas on how to carry out various cinematic edits to videos – This includes color correction.
In this video, Nick gives his voice on color grid videos giving it that cinematic look with much ease. His method is relatively simpler since one need not use plugins to do color correction. Though it is much easier to carry out color correction with plugins, Nick emphasizes more on color correction without plugins since you will be able to extensively customize your video based on your preference.
In this video, Nick spotlights various topics, including how to use lumetri color, color correction, cinematic color grading, how to make presets, color effects, among many more. All in After Effects.
Besides, with these techniques, you cannot not only use color correction in After Effects but also in premiere pro. Beginners, as well as intermediate video editors, will significantly benefit from this exemplary video. Learn from Nick and create splendid videos that will leave your clients and viewers all rooted to the ground.
2. Create a Cinematic Look with After Effects Tricks! by Kriscoart
Another enlightening video that talks about color correction in After Effect are this one from Kriscoart. Kriscoart is a fast-growing YouTube channel developed by managed by Kris Truini. Some of the core values of this channel are to learn, create and share content. From his channel, Truini does not centralize his focus to only video editing; he goes to the extremes of edifying on VFX tutorials, lighting workshops, and short film breakdowns.
In this video, Truini shares some simple tricks with his subscribers as well as new visitors on how to carry out a color correction in After Effects. He elaborates on manipulating lights and adding dramatic atmospheres and cinematic looks to your video shots by using some simple masks, solids, and adjustment layers.
Truini uses the project he is working on to flesh out various color correction tools and how to put them into use authentically. He targets not only beginner video editors but also intermediate ones who are looking forward to increasing their skill set.
Through his YouTube channels, Truini aims at educating the masses so that they can be well conversant with most of the video editing tools. He wants the voice of every filmmaker and prospective to be heard by their prospective audiences.
3. Advanced Color Grading in After Effects - NO PLUGINS by the VFX Show
Color correcting and Color grading without plugins is something that is a back-breaking activity to beginner video editors. Here, Collin Black of @ The VFX Show tends to break that misconception. Collin Black, the manager of The VFX Show, teaches his subscribers and new visitors to his channel how to carry out color correction without necessarily using plugins.
Collin Black states that even though plugins are very easy to use in color correction, you cannot carry out a wide range of customizable activities. It makes color correction without plugins be something to use to create neck-breaking video clips.
In this video, Collin uses a photo that he took while driving. The image appears to be faulty with lousy lighting. He uses a wide range of tools while elaborating every single step. When compared to the start, the final result of his work can be said to be “something out of this world.”
The target audience is beginner video editors with the zeal and zest of learning and wanting to get to know more about color correction without plugins.
4. Easy Colour Correction - After Effects Tutorial by DM Design
Are there scenarios where you come across a simple-looking video clip that is perfectly edited with ideal visual colors and has a sensational cinematic appearance? Debra Mayer, the founder, and owner of DM Designs, a renowned YouTube channel, simplify the processes required to get stunning videos.
Debra Mayer, in her YouTube channel, does all in her powers to teach all the Adobe techniques. She simplifies it and makes every single step to be somewhat relatable. In her channel, she does say much but expounds on tons of tools and activities.
Debra uses footage of a deserted land occupied by trees and grassland in this video. Everything in the picture looks dull and dusty. Debra expounds on how to create some cinematic appearance on clips with straightforward steps. Her after video appears to be something unreal due to extensive editing.
Her target audience for this video is beginner video editors. She can explain color correction in the easiest way possible from her immerse skillset. With that, beginner editors will significantly benefit from it.
5. Make Cinematic Looks with After Effects Color Correction Tricks! by Black Mixture
Paying for the After Effects subscription and again paying for color correction is something most people cannot wish to do. Even though you are not good at color correction, you need to stress yourself since Nate and Chriselle of Black Mixture will make things easy for you. Black Mixture is a YouTube account managed by Nate and Chriselle, a couple. In their channel, they expound on topics surrounding filmmaking, graphic design, motion design, and photography.
In this video, Nate elaborates on various steps on how to carry out a color correction in Adobe After Effects without plugins. He even goes to the extent of showing how to add music video effects as well as cinematic effects.
Nate uniquely uses only three color correction effects to carry out all the color correction needed to his footage – A super-fast driving car on a highway – And comes up with stunning results. He uses various customizable Adobe Effects settings such as hue, contrast, saturation.
Furthermore, Nate explains how to interpret and use histograms and graphs in adjusting various customizable settings. He also emphasizes the glow, a unique functionality feature that alters the lighting of clips to make his background appear super cool. Most editors do not commonly use glow, but it creates outstanding videos when used.
Nate does not only target beginner video editors but also intermediate ones. There is something new that intermediate editors will also learn.
6. Color Correction in After Effects - Tutorial by Kenneth Moore
This is the last YouTube video that we are going to learn about color correcting from. It is a video produced by Kenneth Moore, A prime owner of Kenneth Moore’s YouTube Channel. Even though his channel, Kenneth Moore channel, is still on the grow, he straightforwardly brought out every step to carry out when doing color correction in After Effects.
In this video, Moore uses a shot of a drown to elaborate color correction. The initial footage appears to be dull with indistinct features. With the color corrections tools, Moore is able to liven the footage giving it that outstanding look.
Moore unfolds on how to use various functionality tools in After Effects. In his video, he incorporates contrast, curves, RGB Parade, color balancing, color wheels, Vectorscope, and HSL Secondary functionalities. He used another footage, a car, to elaborate on HSL secondary.
In the video, Moore targets beginner and intermediate video editors to throw light on other color correction functionalities that video editors need to learn.
Conclusion
● Supplement your reading about color correction in After Effects with these videos. The above six videos evidently explain how to carry out a color correction in Adobe After Effects with ease. The videos are created with established producers and video editors; therefore they give professional insights and teachings.
● Color correction in After Effects should no longer stress you out. All you have to do is watch any of the above videos, or you can watch all of them and have a better grip of color correction. You will be able to create exceptional footage.
Windows Movie Maker Review
Are you considering creating impressive movies from your video clips? Then you need to install this famous Windows movie maker tool to fulfill your job. This is expert video editing Microsoft software that you may use for free. This video editing tool by Windows has received massive recognition due to its simplicity. Also, it makes every task easy and quick, like combining video clips to form digital movies, including various effects, background music, transitions, and titles.
So, Windows Movie Maker is undoubtedly the ideal software for this job. Moreover, video editors using this app experience several attributes in their organization to finally emerge with the perfect videos, like audio options, animations, transitions overlays, and timeline narration. It has user-friendly features, which you’ll enjoy experimenting with. This software also has XML code allowing its end users to modify live effects and transitions or even prepare very new ones.
This brilliant tool can even do primary track editing, including fade-out and fade-in effects in your final audio tracks. Windows movie maker even allows you to post your final project effortlessly on various video sites and social media platforms. Here’s a complete guide:
1. Download and Install Windows Movie Maker
Windows movie maker was previously recognized in Windows 7 as Windows Live Movie Maker. So to experience the features of this software, first, you need to download and install this app which is available free of charge. The steps are as follows.
- Firstly, download the setup file of Windows Live Essentials.
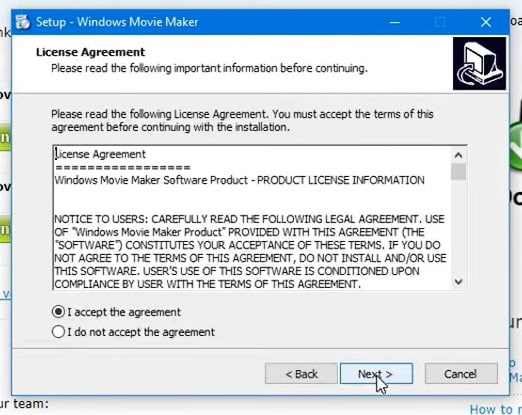
- You’ve to double-click on this setup file called windows-movie-maker.exe. Then tap on ‘Yes’ to permit the setup package to function.
- You’ll now be redirected to the installation window of Windows Essential. Next, you’ll see two options towards the web page’s top, and you’ll have to select the option ‘Install all of Windows Essentials (recommended)’ to continue with the installation process.
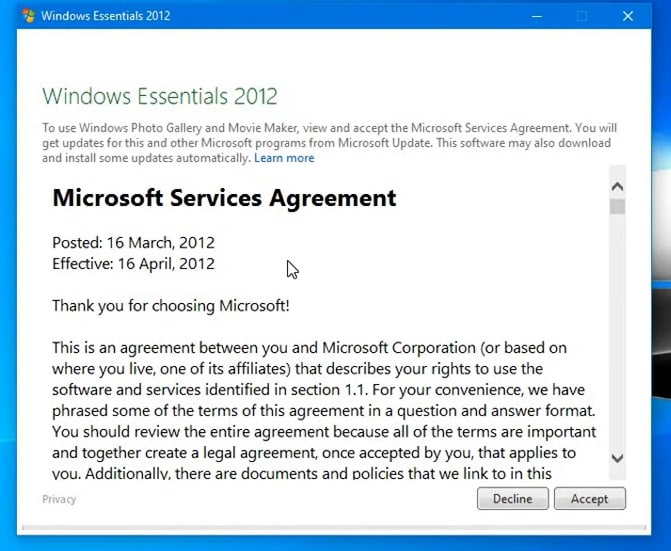
Windows Essentials comprise Microsoft OneDrive, Outlook Connector Pack, Movie Maker, Writer, Mail, Photo Gallery, and Messenger.
- Locate ‘View Details’ towards the left end of the page and tap on it. A progress and percentage bar will pop out along with the details regarding the program you’re installing.
- You need to wait a while to install Windows Movie Maker Software. Pause until the program completes its installation. After you find that the program title changes to another program such as Mail, you may proceed again.
- Now click on the Windows icon and then the ‘Start’ menu on the bottom left of your computer screen.
- Type and Search for ‘Windows Movie Maker, and you’ll find the newly downloaded app on the screen.
- Click on the icon with film reel, which is the Movie Maker app, and you’ll locate it above the Start menu. Next, you’ll be redirected to the terms of use of Windows Essentials for this Window to begin.
- Find the ‘Accept ‘ button towards the screen’s right-end corner and tap on it. Windows Movie Maker will now open.
- Next, tap on ‘Close’ when prompted with an error message from the installation windows.
You may now Enjoy Windows Movie Maker Live and begin making movies and videos using this software.
2. Interface
The user interface of Winona Movie Maker has three essential areas: the timeline and the storyboard, the panes and the toolbar, and the menu bar. This area covers…
- Timeline and storyboard: It offers a timeline and storyboard usage details for working with the current project clips.
- Panes: It offers details regarding Collections pane usage for viewing all your collections. Furthermore, it offers information regarding the Movie Task pane for all general tasks during movie making or project editing.
- Toolbar and Menubar: Here, you’ll get details regarding toolbar and menu commands usage for different tasks in this software.
3. Basic Editing
Adding clips to your timeline is the most straightforward method for creating digital movies using Movie Maker. Thereby, picking any one AutoMovie Themes out of those seven choices from default, sepia, black and white, pan and zoom, fade, cinematic, and contemporary.
You can enjoy the following choices for editing all your video clips:
- Creating clips: You may create new clips from different video clips after you’re done with capturing and importing in the Windows Movie Maker. You may create clips in the software anytime, according to your convenience.
- Trimming any clip: You may hide any clip part you don’t wish to keep in the project. For instance, you may trim the clip’s end or beginning. Also, trimming doesn’t erase the details provided in their source material.
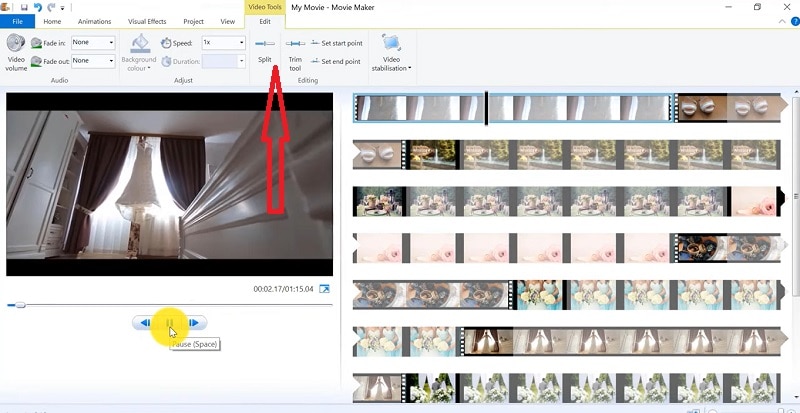
- Splitting Clips: Movie Maker allows you to split any video into two parts which can be helpful when you wish to add a video transition picture between the clips.
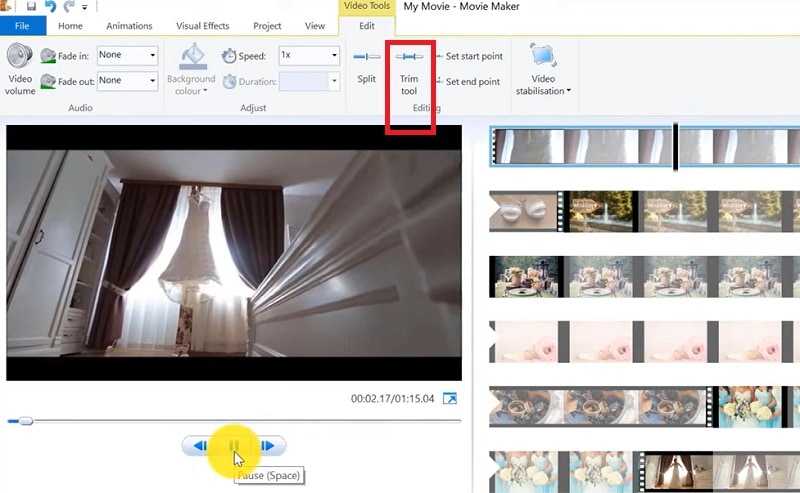
- Combining clips: Movie Maker allows you to merge two or multiple contiguous clips. Contiguous indicates that you need to record these clips together so that the beginning and end times are the same as the following video clip.
4. Add Video Effects
Video effects’ ascertain how any title, picture, or video clip displays in the final movie or project. Video effects permit you to include various effects in the movie and are added for the total time that the title, picture, or video clip displays.
Furthermore, you may add various other effects, which you’ll find in the folder of video effects in their Collections pane. You may maintain video effects when moving, copying, cutting, or splitting a picture or video clip.
5. Audio Editing
Windows Movie Maker permits you to operate various audios in several ways. A few specific audio-related jobs you may execute in Windows Movie Live Maker comprise the following:
- Audio levels adjustment: You can adjust your audio level so that you can easily control the audio playback and balance after you have the audio that comes up on Music/ Audio and Audio tracks in your timeline.
- Timeline narration: You may include a voice narration for the picture or video clips, which will appear on the timeline’s video track. There’ll be an automated synchronization of the audio narration with your video, where the narration shall elaborate on the movie event or action when you play it.
- Audio Clips Volume adjustment: You may adjust the audio volume for the video clip’s audio portion or the clips containing only audio. This permits you to control the audio clip’s volume such that you can hear it based on the sound level you’ve set for your audio clip.
- Adding audio effects: You may add various audio effects like mute, fade out and fade in.
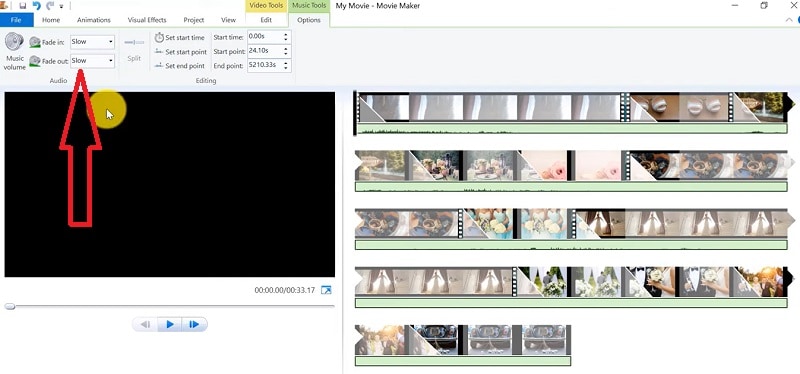
6. Share Files
Are you done with video project editing, and now you wish to share it? Windows Movie Maker offers you various choices for sharing straight away from their app, comprising:
- YouTube
- Vimeo
So with this power, you may guarantee to share the video’s correct aspect ratio and size version to any planned platform. Nevertheless, you don’t require signing in to your Microsoft account for sharing to the preferred platform, which may act as a hurdle for all its users who do not have Microsoft Office accounts.
7. Pros and Cons
The software’s advantages are its automated preview, simple controls, and user-friendliness. Additionally, the following are some clear advantages and disadvantages of using Windows Movie Maker:
Pros
- This app is perfect for all novices and is an ideal introduction as it utilizes several pro editing systems’ general workflow components like assembling timelines and importing. Its interface has easy navigation and is exceptionally intuitive for most new beginners as well.
- Windows Live MovieMaker is a video editing Microsoft application that arrives standard with all Windows computers. It is amongst the most favorite editing apps obtainable and exact, as other programs are user-friendly and fun. This software comes free with Vista, XP, and Windows Me and has effortless usage. Moreover, you may download additional video plugins, plus it won’t give you any chance to complain regarding its free software.
- This app is straightforward to learn, and you won’t require any experience in film editing for using Windows Media Player. You’ll explore more than 130 effects with accessible Fantastic credits, titles, and transitions. Next to this, you may drag and then drop the clip at any place in the timeline.
- Windows Movie Maker is an ideal app for image slide shows and was developed to create photo and home movie slide shows. It presents excellent fun transitions and themes; you may add music easily. This app provides excellent variety, being a free editing application. Furthermore, it offers transitions and striking effects to function with.
- Windows Live Movie Maker is free of cost for all Microsoft Windows users and is basically for clients having zero to minimum experience editing audio and videos. Moreover, it has many special effects you may use while creating videos. Also, you may frag and then place any picture or video anywhere you wish to see it.
- You can choose from several themes, enhancing your film with tools like contemporary themes, fade effects, and sepia toning choices. You have to click once, and then the users can choose and apply from the multiple effects collection.
Cons
- Windows Movie Maker contains unlimited audio and video tracks, yet it provides just one accessible one at a time. Hence, if you wish to include some other audio or music track, you may prepare the video, thereby sending it to the ultimate file.
- It isn’t uninstallable using any remove or add control panel. Also, it is impossible to do video overlaying.
- This app requires much patience because it is prone to crashes. Moreover, you’ll require enough time and effort to do video reversing. It often becomes frustrating for all advanced editors to cut clips into small parts and then add them back. Hence, Windows Movie maker isn’t good for professional video editors.
- Windows Live MovieMaker can crash and freeze and is known to suffer frequent crashes. Hence, ensure saving often and avoid creating complex videos. Also, you cannot perform complex editing and can now prepare single audio and video track.
8. Windows Movie Maker Alternative Software
Wondershare Filmora Video Editor is the best alternative for Windows Movie Live Maker and is a highly favored and most effective software program. You can download it for free, and it is adaptable with Windows 7 OS or above. This app is user-friendly but powerful and allows you to split, merge, crop, and trip various video clips with essential built-in video editing attributes.
Free Download For Win 7 or later(64-bit)
Free Download For macOS 10.14 or later
Additionally, you may get a few advanced properties like video stabilization, color correction, and green screen in Filmora effortlessly. You may even explore several fashionable and modern video effects such as music, text, and intros for topics like games, Education, Travel, Vlogger, Beauty, etc. Here is the comparison between the two software:
Filmora and Windows Movie Maker comparison
| Basis | Windows Movie Maker | Wondershare Filmora |
|---|---|---|
| Pricing | Free/ inexpensive | Quote basedAnnual SubscriptionOne-time paymentMonthly Payment |
| Interface | Pleasing interface | Auto movie options |
| Effects | Several overlays and effects | Special effects choices and transition overlays |
| Integration | YouTubeFacebookVimeoEmail | TwitterInstagramFacebookVimeoYouTube |
Conclusion
You may use Windows Movie Maker Live for capturing videos and audio to the computer using various video sources, including Web Cameras and Video Cameras, thereby using the recorded data in your new movies. You may import still pictures, video, and audio into this application to use in the movies you’re making. Moreover, after you’ve finished with video and audio content editing in this app, which may involve adding effects, video transitions, and titles, you may finally save the ultimate movie and then share and watch it with your family and friends.
Also read:
- 2024 Approved Blender Tips - How to Make Blender Render Transparent Background
- New 10 Best Free Spanish Text To Speech Converter Software Windows, Mac, Android, iPhone, & Online
- New Do You Waste Time Making Transparent Background in Paint
- Updated How To Make Boring Videos Look Cool By B Rolls for 2024
- New 10 Top Free GIF Background Remover for PC and Online
- What Can Be Better than Converting Apple Video Format Into Other Formats so that You Can Use the Files Easily. We Have a Few Options that You Can Use for This Purpose
- Updated In 2024, Working Out All Important Details of Slowing Down Video in After Effects
- In 2024, How to Animate Your Designs With Canva GIF
- Color Correction Basics (S-LOG Footage) for 2024
- 2024 Approved How to Add Camera Shake to Video in Adobe After Effects
- How to Create The Best Video Collages , In 2024
- Top 7 Best GoPro Video Editors for Mac
- Updated 6 Instant Ways to Create Windows 10 Slideshow for 2024
- How to Split a Video Into Parts on All Platforms for 2024
- Updated 4 Methods to Resize a WebM File for 2024
- New In 2024, 15 Free Cinematic LUTs for Your Film
- New 10 Mind-Blowing Video Collage Maker for PC
- New In 2024, End This Problem! Make Transparent Background Video Today
- New Best Slow Motion Camera Apps for Best Content Creation for 2024
- 2024 Approved 100+ Best TikTok Captions Enhance Your Content
- New LumaFusion Color Grading Achieving It Through LUTs for 2024
- Updated End This Problem! Make Transparent Background Video Today for 2024
- New Why You Should Master Slideshows In Lightroom?
- New Best Tricks for Learning Photo Slideshow for 2024
- New Want to Learn How to Make a Fortnite Montage? This Guide Will Give You the Low-Down on Creating Epic Montage Fortnite Videos that You Can Share with Other Players on Social Media Platforms
- Updated After Reading This Article, You Can Add a B-Roll Feature From Filmora and Captivate More Audience. Explanation Video B-Roll and Story-Telling B-Roll Are Well Illustrated for 2024
- New Elevate Your TikTok Game with Catchy Captions! Explore the Trendiest 2024 TikTok Captions for Every Occasion and Style. Up Your TikTok Content with Style
- New The Only Guide Youll Ever Need to Learn GIF Design That Get Shared Like Crazy for 2024
- Best Tips for Camtasia Freeze-Frame for 2024
- 2024 Approved Best Android Apps For Creating Slow Motion Videos
- New What Is AI Composite Video App and AI Composite Video Tutorial
- New for 2024
- New 2024 Approved Best Cinematic LUTs For Premiere Pro Recommendation
- New How To Fix Slow Playback Issues in DaVinci Resolve Finding the Best Solutions for 2024
- Here We Are, Now the Main Topic of Interest of This Article - How to Put Together Several Videos so that They Become One? This Case, Unlike Other Possibilities We Discussed Above, Is More Complicated, so We Will Study This Feature Step by Step
- New 2024 Approved 3 Ways to Create Motion Text Effects for Your Video
- Updated 2024 Approved Fast Method to Match Color in Photoshop
- Updated How to Create Emoji on Mac That Take Less Than 10 Mins
- New In 2024, Guide Adding Audio in Wondershare Filmora
- Updated How to Brighten a Video in Windows 10 | Step-By-Step Guide for 2024
- Updated In 2024, Easy Way to Add Transitions to Videos
- 3 Solutions to Hard Reset Vivo X Fold 2 Phone Using PC | Dr.fone
- Top 4 Android System Repair Software for Google Pixel 8 Pro Bricked Devices | Dr.fone
- Easy Guide to Nokia XR21 FRP Bypass With Best Methods
- How to Fix It Samsung Galaxy M14 5G Wont Turn On | Dr.fone
- In 2024, How to Change Lock Screen Wallpaper on Xiaomi 14 Ultra
- 7 Solutions to Fix Chrome Crashes or Wont Open on Tecno Pova 5 Pro | Dr.fone
- Methods to Change GPS Location On Oppo Reno 10 5G | Dr.fone
- Full Guide to Hard Reset Your Vivo Y78+ | Dr.fone
- In 2024, Unlock Apple ID without Phone Number From iPhone 12 Pro Max
- Recover iPhone 7 Data From iCloud | Dr.fone
- In 2024, Hassle-Free Ways to Remove FRP Lock on Tecno Phantom V Foldwith/without a PC
- In 2024, Full Guide to Unlock Your Xiaomi 13 Ultra
- In 2024, How to Make Lip Sync Video Without Installing Any App
- In 2024, Tutorial to Change Xiaomi Redmi Note 12 Pro 4G IMEI without Root A Comprehensive Guide
- How to Use Pokémon Emerald Master Ball Cheat On Honor Magic V2 | Dr.fone
- In 2024, iPogo will be the new iSpoofer On Vivo T2x 5G? | Dr.fone
- Apply These Techniques to Improve How to Detect Fake GPS Location On Honor Magic V2 | Dr.fone
- How to Bypass iCloud Lock from Apple iPhone 15
- In 2024, Where Is the Best Place to Catch Dratini On OnePlus Ace 2 Pro | Dr.fone
- Vivo Y17s Screen Unresponsive? Heres How to Fix It | Dr.fone
- Solved Warning Camera Failed on Vivo Y56 5G | Dr.fone
- How To Check if Your Nokia C12 Is Unlocked
- How to watch AVCHD MTS video on HTC U23 Pro?
- In 2024, Is GSM Flasher ADB Legit? Full Review To Bypass Your HTC U23 Phone FRP Lock
- New In 2024, Tips for GIF to Animated PNG You Should Know
- Find My App Troubleshooting No Location Found vs. Location Not Available & How to Fix Them On Apple iPhone 7 Plus | Dr.fone
- In 2024, Overview of the Best Nokia C12 Screen Mirroring App | Dr.fone
- In 2024, Best 3 Software to Transfer Files to/from Your Honor V Purse via a USB Cable | Dr.fone
- In 2024, Complete Fixes To Solve iPhone 13 Pro Max Randomly Asking for Apple ID Password
- Title: New In 2024, How to Create Photoshop GIF The Easy Way
- Author: Chloe
- Created at : 2024-04-24 07:08:43
- Updated at : 2024-04-25 07:08:43
- Link: https://ai-editing-video.techidaily.com/new-in-2024-how-to-create-photoshop-gif-the-easy-way/
- License: This work is licensed under CC BY-NC-SA 4.0.
