
New In 2024, How To Export Video in Filmora

How To Export Video in Filmora
After you edit your video with Filmora you may wonder how to export your video in Filmora Indeed, you can export your video in Filmora in various options. This article will show you the multiple options you can get if you want to export your video in Filmora.
Steps to export your video with Filmora
To open the export box, press “CTRL+E” on your keyboard. After that, you’ll see many export options you can do.
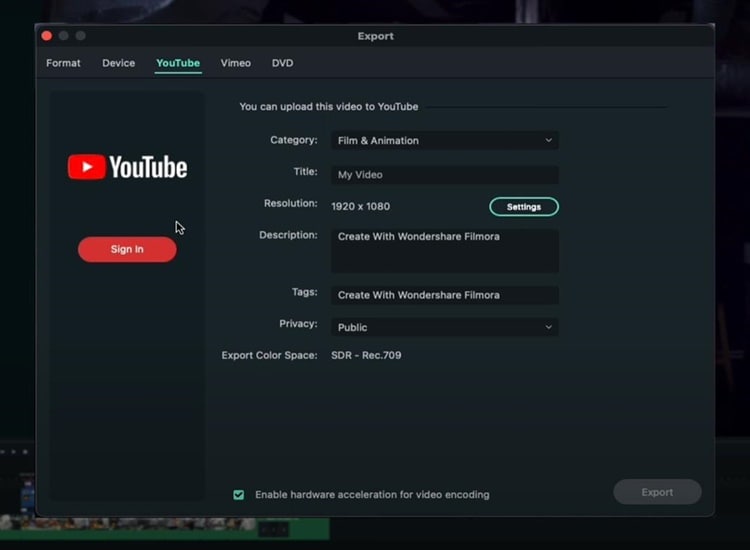
Export Video Platform
If you want your video to end up on YouTube, you can click on the “YouTube” option, sign in, and enter all the basic metadata you need for your YouTube video. Then you can click “Export”, and the video will go straight to YouTube. Also, you can have all of your privacy settings, descriptions, and everything else.
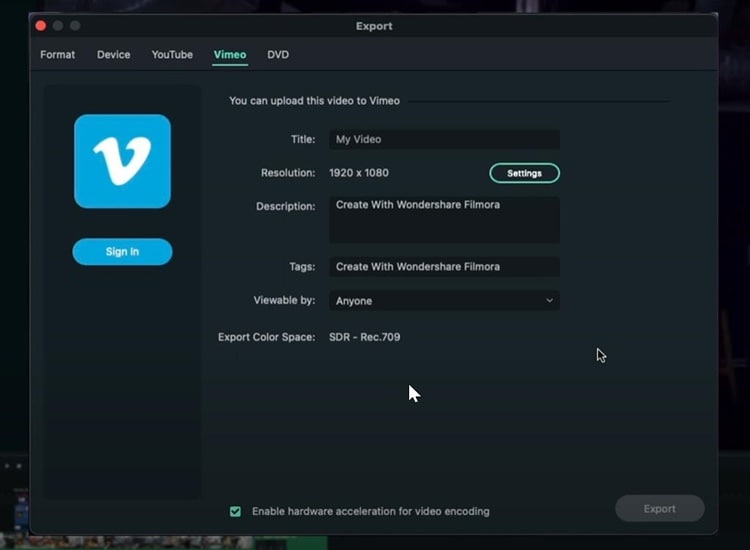
Similar to YouTube, you can do the same thing if you want to export your video on Vimeo.
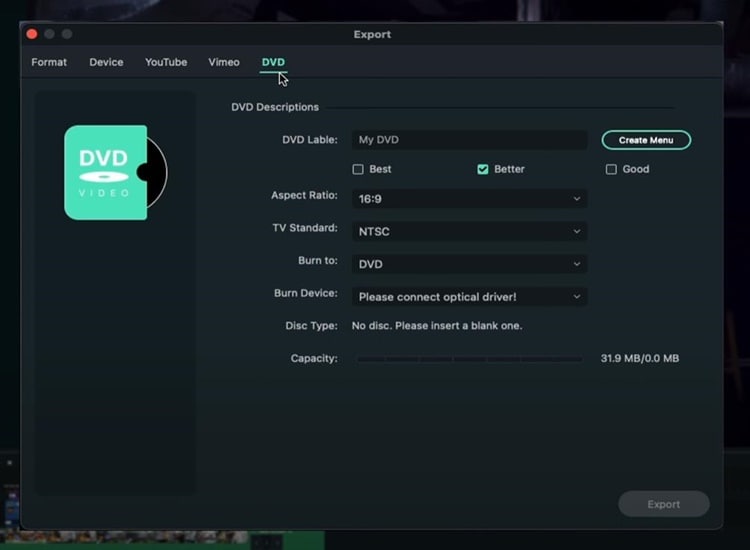
Export and Burn Video into DVD
You can also directly burn your video to a DVD. Even though video to DVD isn’t as common as it used to be, it’s still nice to be able to do it, especially if you like making DVDs.
Export Video to Other Devices
Go to the “Devices” option if you want to export your video to specific devices with everything looking good on that particular device. For instance, if you want to export your video to iPhone, you can see the size will be 41MB, and the resolution will be 1080p. All those things are going to look much better on an iPhone.
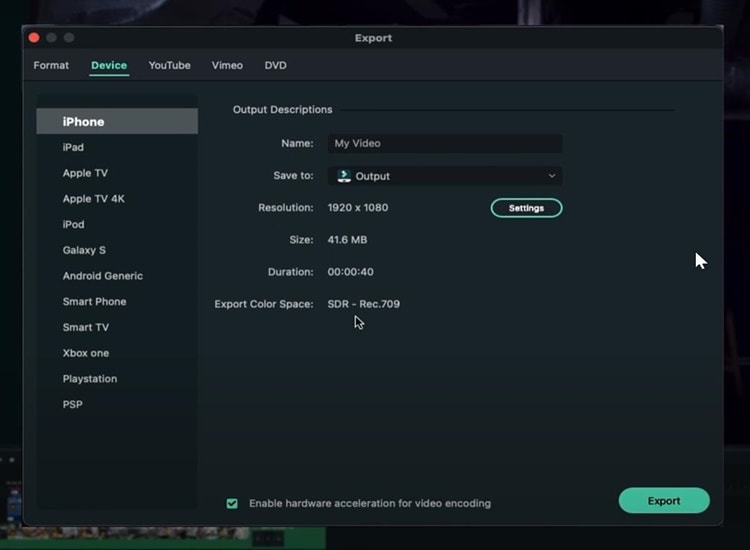
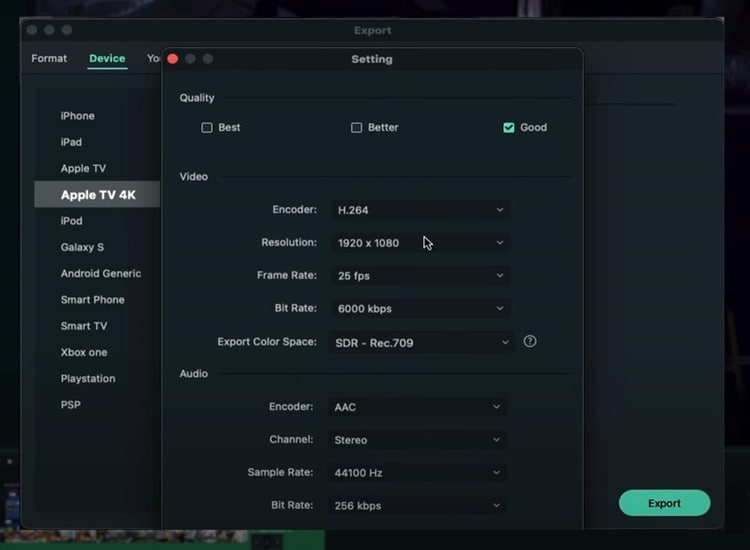
You can also adjust the quality of your video based on your needs by clicking on “Setting.”
Export Videos in High Res Quality
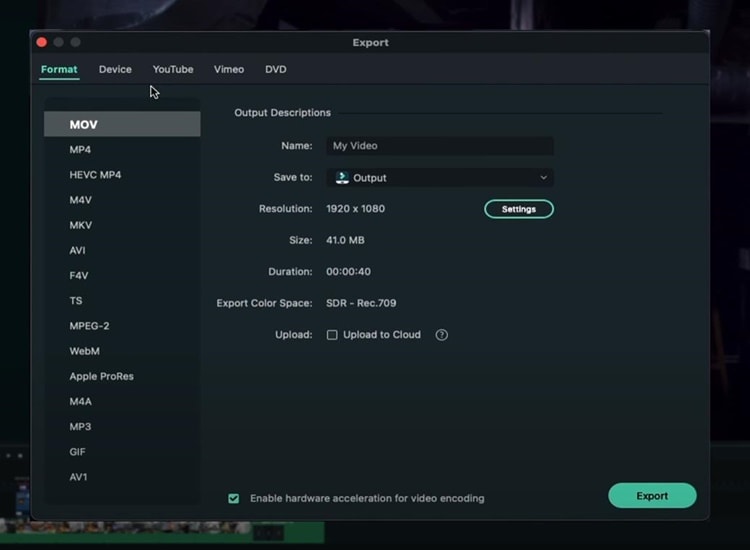
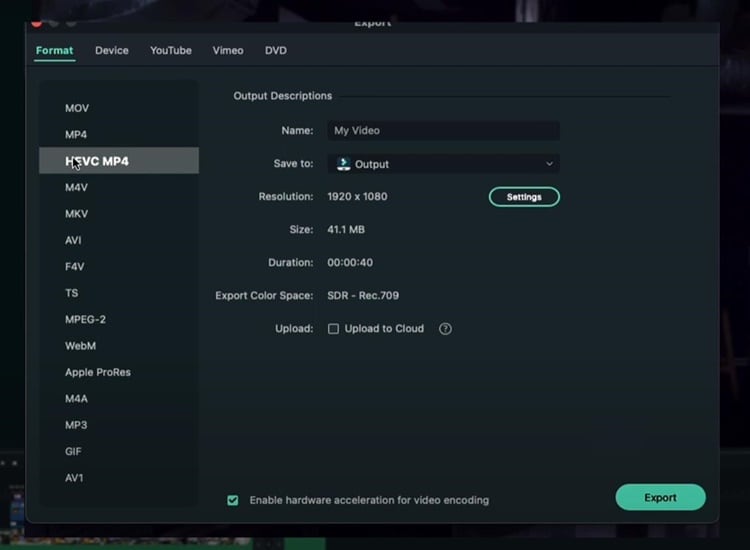
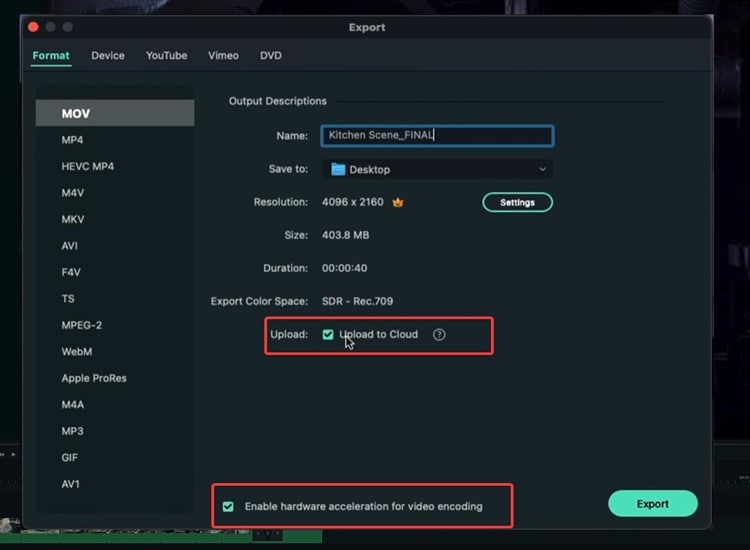
In the “Format” option you can choose the file extension, the format, or the codec. Exporting your video based on format is good if you prefer to save your video on your computer since maybe you may upload your video on YouTube, Instagram or other social media platforms.
You can choose “Apple Prores” if you want the least amount of compression possible and don’t care about the file size. For example, if you want to export a video from Filmora and then import it into another video editor without losing too much quality, you should definitely choose “Apple Prores.”
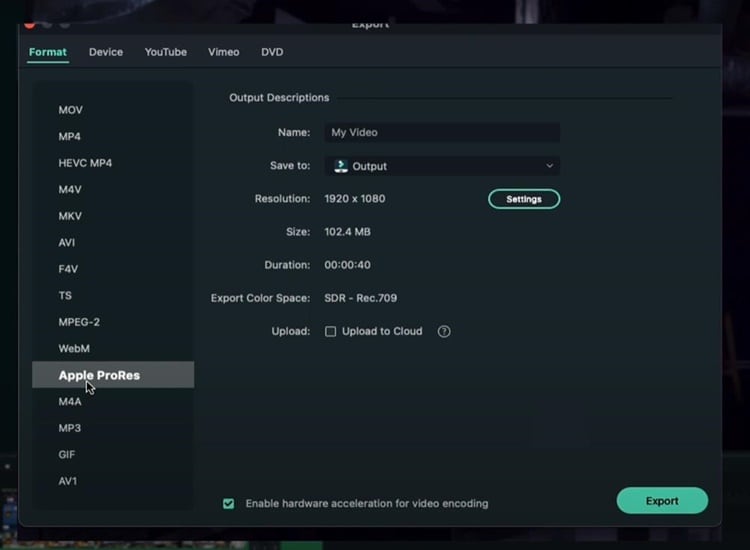
Before exporting, there is the option to upload to the cloud. If you do not know what it is, Wondershare has its own Drive, which allows you to save and remotely view your video files.
In the meantime, if you have a decent PC, you can enable “Hardware acceleration for video encoding.” This option will utilize as much computer power as you have to export the video and make the process significantly faster. Once everything is finished, click “Export.”
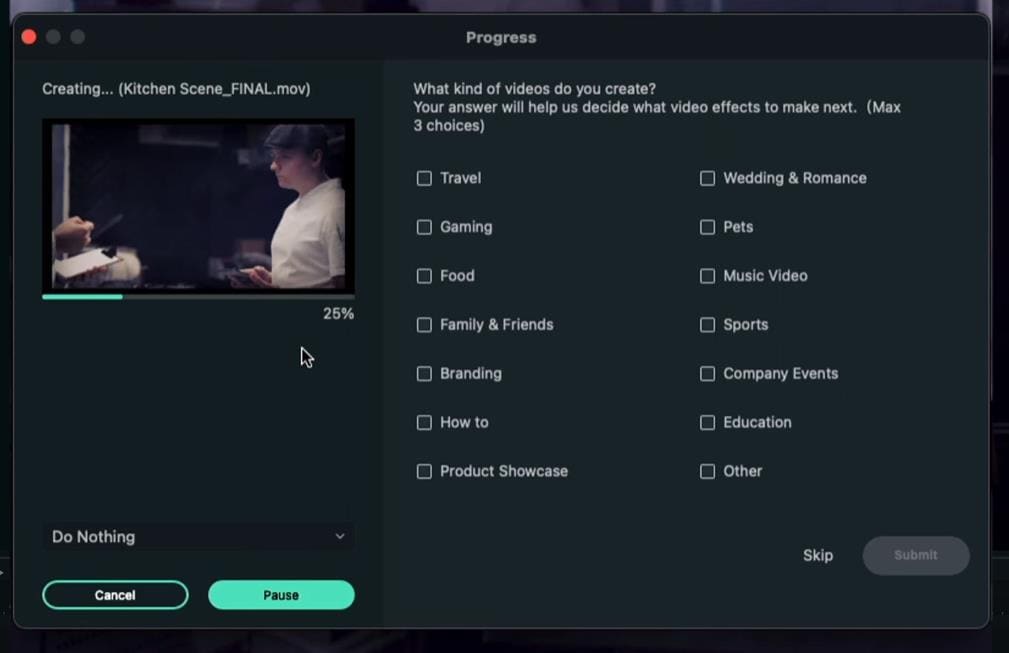
When you click Export, you can see the progress with thumbnails and everything. Lastly, your video has been exported successfully when the exporting process reaches 100%.
Summary
Indeed, there are many options to export your video using Filmora. If you wish to export your video directly to YouTube, simply select the YouTube option in the Export box. Meanwhile, if you want to export your video on your computer and upload it to various social media platforms, it’s much better to export it with a format option.
Free Download For Win 7 or later(64-bit)
Free Download For macOS 10.14 or later
Free Download For macOS 10.14 or later Free Download For macOS 10.14 or later Free Download For macOS 10.14 or later
Step-By-Step Guide To Creating Halftone Effects In Photoshop
Halftone is a technique that uses dots to create a deliberate screen-like image and textured effect. In recent years, it has become trendy in digital design.
This effect is often used in magazines, newspapers, and other printed materials. When applied correctly, it can add depth and dimension to an image, resulting in a softer, more pleasing, and appealing look.
So, if you have ever wanted to add interesting effects and textures to your images, but weren’t sure where to start, then keep on reading to discover and learn everything you need to know regarding creating the halftone printing effect in Photoshop.
Without further ado, let’s get started!
What Are Halftone Effects?
Before we know how to create a halftone effect in Photoshop, let’s have a basic understanding of it first.
In the 19th century, William Henry Fox Talbot introduced the halftone screen printing effect to create the illusion of tones in black and white images.
The halftone originated from printers who previously only worked with cyan, magenta, yellow, and black (CMYK ). The solid colors were tiny dots placed together closely with continuous tones that remained unchanged. From the mixing and matching of these four colors, a wide range of colors emerged.
The effect is usually created by putting dots of ink on paper in different sizes and positions. This illusion uses optical bleeding to make the desired impression on the human eye. These color dots act like analog pixels that result in a recognizable image.
For instance, when you look at a pixelated picture and zoom it, you will see missing details. When you zoom out, the photo gets more minor and back to its original form.
Modern Definition and Usage
In the 21st century, the halftone is a static-visual technique applied in print and digital images to create continuous tone imagery using dots that vary in spacing and size to create a gradient effect.
Halftone produces a deliberate screen-like image distortion in different fields, such as pop art, graphic designing, and screen printing, to create nostalgic or vintage effects and make the images more captivating.
How To Use Photoshop To Create Halftone Printing Effect
Below we’ve provided detailed step-by-step guidance on creating a color halftone effect as well as black and white halftone printing effects in Photoshop:
1. How to Create Color Halftone Effect
If you want to create a color halftone effect in Photoshop, do the following steps in a sequence:
Step1 Launch the Photoshop software on your laptop/desktop, and drag and drop the image file on which you want to apply the Halftone effect.
Step2 Click “Filters” in the top toolbar and select the “Pixelate” option from the drop-down menu.
Step3 Click the “Color Halftone” option from the menu. On the new pop-up window, adjust the radius and channel to configure the appearance of the effect.
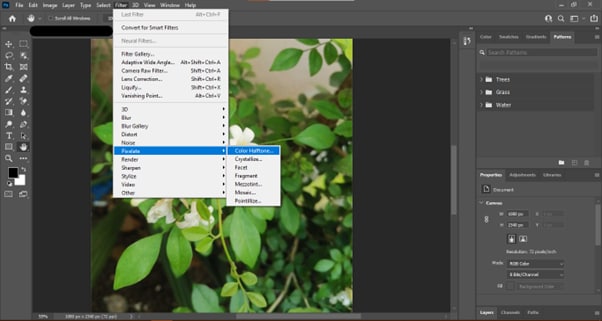
That’s about it! You have successfully created the color halftone effect in Photoshop.
2. How to Create Black and White Halftone Effect
Follow these steps to create black and white halftone printing effect:
Step1 Open your image in Adobe Photoshop and click the “Image” option from the top taskbar.
Step2 Now, click the “Mode” option from the drop-down menu and select “Greyscale” to convert your RGB image.
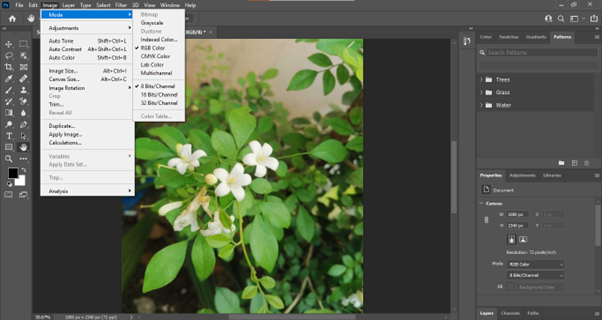
Step3 Again, open the image menu and click the “Mode” option. From the drop-down options, click “Bitmap…”
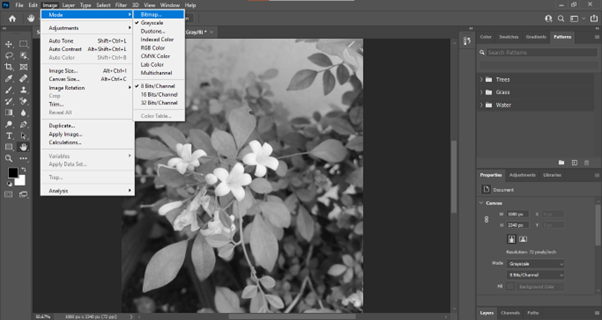
Step4 A dialogue box will open. Set the resolution to 1000, 1,500, or 2,000ppi to create smooth edges on your halftone. Next, click “Halftone Screen…” under the “Method” header and click “OK” to proceed further.
Now, you can adjust the frequency (Lines/Inch), angle (Degrees), and shape (Circle, Line, Cross, etc.) to determine how big your halftone dots are at the maximum diameter and their direction.
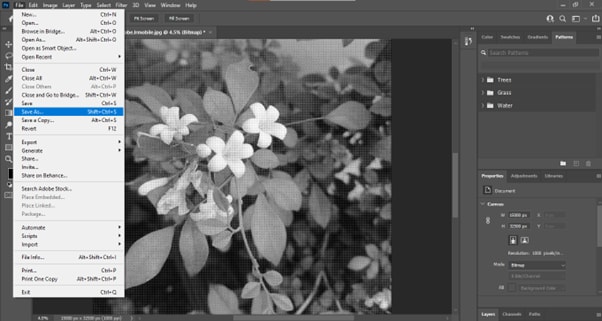
Step5 Finally, click “Files” from the top taskbar, scroll down, and select “Save As…” Save your file as PSD or TIFF and import it to InDesign to apply color.
Video Tutorial - How To Create Halftone Effect | Photoshop 2022
To help you better put the guidance into practice, we have prepared a video tutorial to deepen your understanding.
Two Concepts You Should Know In Creating Halftone Effect
Apart from the practical guidance, there are two important concepts you need to be aware of: radius and channels. Below, we’ve discussed both of them in detail to make things more understandable to you:
1. Radius
Radius refers to the size of the dots that make up the halftone image and is an important factor in determining the overall look of the photo.
You can adjust the sizes of the dots to change the gradient, spacing in between, and blur of the color and image. However, if you want a more subtle effect, you will need to use a smaller radius. For a more dramatic effect, like vintage comics, old ads, or DIY grunge zines., you will need to use a larger radius.
2. Channel
Channel refers to the number of values that are used to create the image. The more values you use, the more details will be visible.
The Channel setting of halftone effects affects how the dots are positioned and overlap. Each Channel is governed by a Screen Angle setting, which is listed in degrees. Changing the value modifies the angle at which Cyan, Magenta, Yellow, and Black dots are added to the pattern. When the dots overlap, a new color is created depending on the combination of the primary colors and black.
Conclusion
In this comprehensive guide, we’ve explored the halftone effect, how it originated and discussed its modern definition and usage. We’ve also provided step-by-step processes to help you create the halftone effect in Photoshop, both colored and black and white.
Furthermore, we discussed two important concepts (radius and channel) of the halftone screen printing effect to help you understand the technique in detail.
Hopefully, you’ve found this article helpful and can now add a new level of creativity to your images using the halftone effect in Adobe Photoshop.
Free Download For Win 7 or later(64-bit)
Free Download For macOS 10.14 or later
In This Article I Will Share to You My Tips and Experiences on How to Become a YouTube Vlogger and Things You Need to Consider Being a Vlogger
Being a vlogger is a lot of fun specially making videos but is not also very easy, there are times you feel giving up specially when no one in the family supports you, there are also times when you get tired because you think no one is interested in your videos, but very fulfilling at the same time being able to do what you love. As you all know making video on YouTube is making also money that is through google AdSense, but if you are into money without the passion of being a vlogger, you will definitely get tired immediately, because being a vlogger requires more effort, patience, love of work, creativity and most specially passion.
![]()
Note: You don’t need to study a career to become a vlogger, but it’s not easy as simply pressing the publishing button. You’ll need a purpose, a message, a platform, an audience and more.
In this article I will share to you my tips and experiences on How to become a YouTube Vlogger and things you need to consider being a Vlogger.
1. What is Vlog?
A Vlog is a piece of video that document a person’s life or expertise, with an average length of around five minutes. The word vlog is “video” and “blog”. Vlog are created to connect with an audience through shared ideas and experiences in the form of video.
2. Tips on How to Become a YouTube Vlogger
- Create a Channel
- Content
- Equipment
- Skills
- Collaborate
3. Create a YouTube Channel
Your channel name is the official name for your channel on YouTube. Your channel name is a big part of how people will define and understand what your channel is about. So, it’s important that your name accurately represents your brand. It’s important that your name stands out from another channel on YouTube or should be unique.
![]()
Note: So before deciding on a name, pop your potential name into YouTube and see what comes up, if you can’t find any similar sounding channels, you’re good to go.
For example, my channel name is Mayang Dyosa, Mayang is what my family and friend called me and Dyosa means Goddess. I find it unique and cute because that’s my dream to be a Goddess.
❶ Content
One of the challenging parts being a YouTuber is finding a right content for your channel.
You can use YouTube’s trending page this is the easiest way to find trending topic for you to have an idea of what topic or content you like. You can always use or share experiences to be your topic content whether it is beauty, make-up tutorial, DIY’s, Skin care ideas, etc. As long as you can share honestly and correctly.
Do whatever you love, do something that you like, expertise, make a relatable videos or timely videos and searchable videos. Create a content that people need or are often searched for online, content that can provide information to people. I suggest you go with “how to” videos, because people always searched for this kind of content.
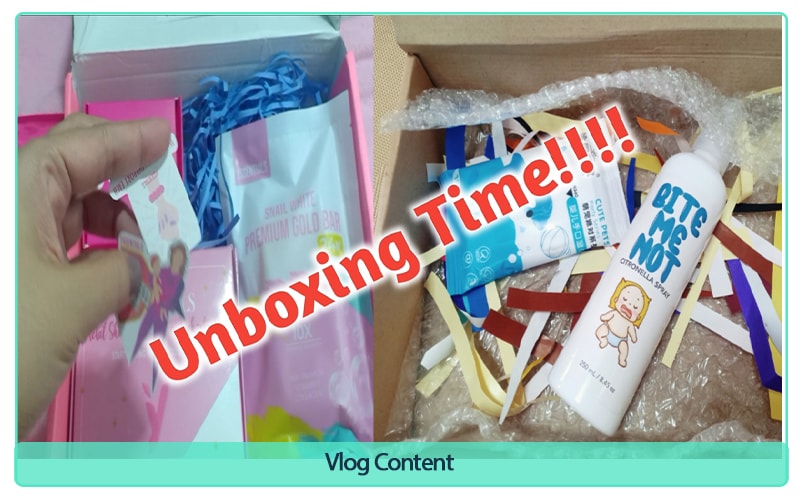
Vlog Content
❷ Equipment
Gear is essential for making a YouTube video obviously a camera is the most important piece of equipment, you can use anything that can record at least 1080p resolution of video. You can use your mobile phone or a digital camera. Whatever your equipment you have now, you can start your first vlog as long as you can record a video at you have a clear audio you are good to go.
Many of the successful YouTube creators started with very simple equipment so don’t let equipment get in your way. Start your vlog now!
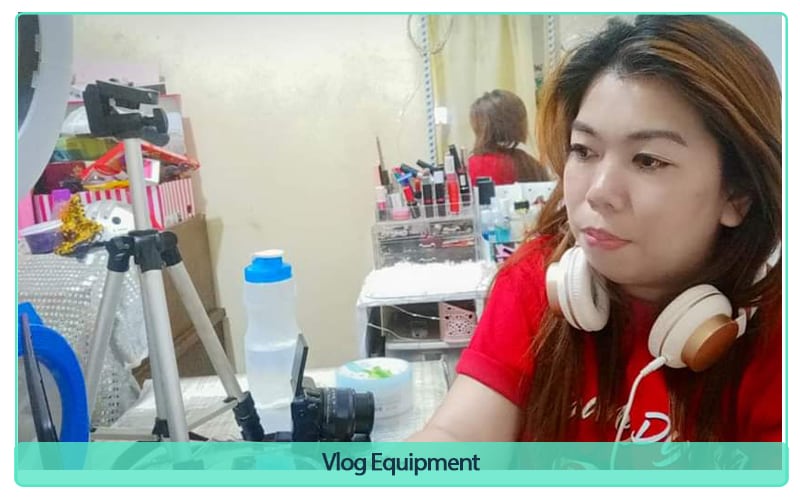
Vlog Equipment
❸ Skills
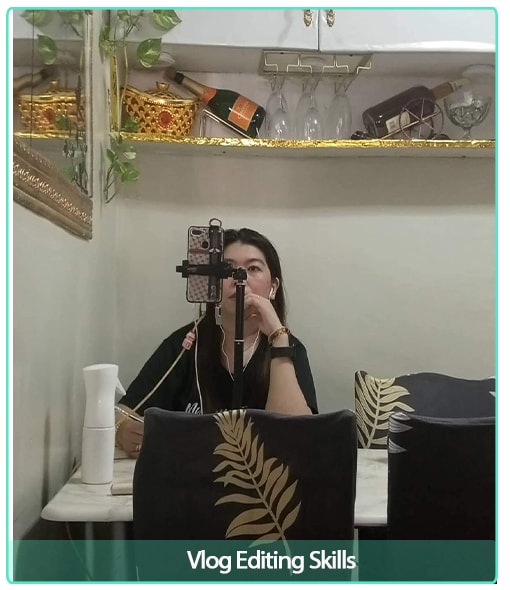
Vlog Editing Skills
Speaking with confident in the front of camera is always a skill of being a vlogger, you must be talkative in order for you to share more information to you viewers but make sure that your ideas are related to your chosen content.
You should be entertaining in front of the camera so that the viewers don’t get bored, because sometimes it’s not just the information that excite them to watch a vlogger, but also on how you entertain the viewers.

Entertain in Front of the Camera
❹ Editing Skils
In Editing skills, there are two ways you can edit your vlog, first on your phones, second on your pc or laptops.
You don’t have to be good at editing but this is one of the things you need to study to make your videos better.
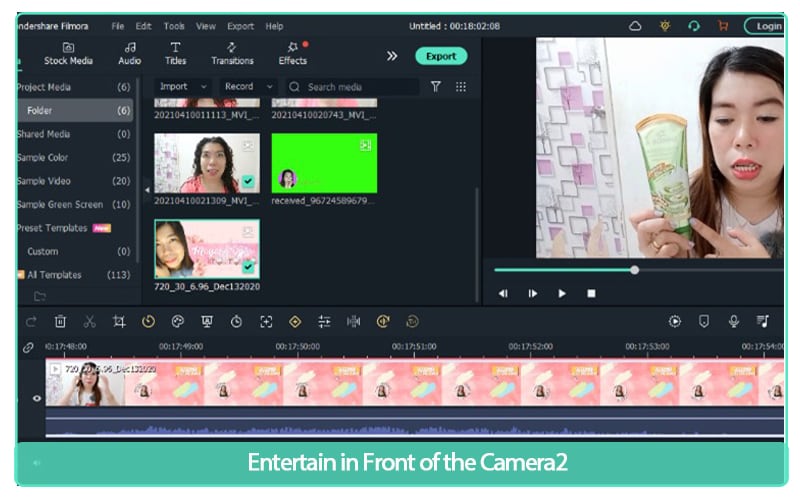
Entertain in Front of the Camera2
Wondershare Filmora Video Editor is one of my personally used editing software, this is considered to be the best option for YouTubers because there is how-to video guide that allows anyone to quickly pick up the pace and start producing or creating an eye-catching video.
Wondershare Filmora 11 The Best video editor that makes your editing experience efficient and playful.
Try It Free Try It Free Learn More

I am using this software for almost 5 years and always satisfied by its performance. It is easy to use software with a lot of tools needed to edit a video in a fast way and it even has animation/affects you can add to your video to look more creative and catchier.
Filmora allows you to export your videos in multiple video formats with lot of customization settings.
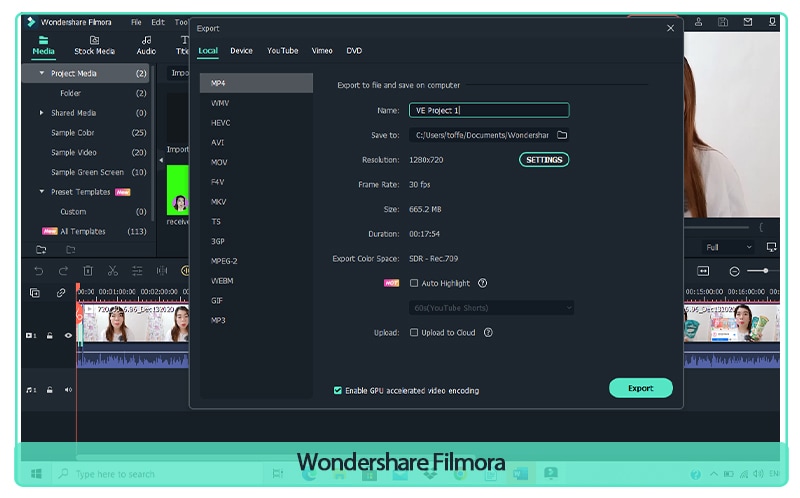
Wondershare Filmora
It also allows you to export your videos directly to your social media platforms like YouTube, Facebook, Vimeo. The speed of exporting videos is also quite fast so not time consuming.
❺ Collaborate
It really helps your channel to grow if you collaborate with someone that is same passion as you, you can share ideas of content and help one another channel grow. Also, this will help others to know that you also have a YouTube channel and this is another way to promote your channel by the help of other content creator. In this way you can gain a friend and someone that you can seek for advice as you are starting for your career.

Wondershare Filmora
Wrap Up
- You must also remember when starting to be a vlogger you should be emotionally and mentally ready because this is not easy as you expected.
- You can earn money by doing a vlog but don’t make the money to be your motivation to be a Vlogger, ask yourself first if this is really you like or is this really your passion? because being a Vlogger comes with great responsibility and it comes with great effort.
- If you are ready to become a vlogger because of the tips I gave, you can start now but you should not expect more subscriber and views immediately because you still need a lot effort and a lot of work to get people get to know your channel. So just keep working and work hard on the content, one day you will be famous and recognized by many.
In this article I will share to you my tips and experiences on How to become a YouTube Vlogger and things you need to consider being a Vlogger.
1. What is Vlog?
A Vlog is a piece of video that document a person’s life or expertise, with an average length of around five minutes. The word vlog is “video” and “blog”. Vlog are created to connect with an audience through shared ideas and experiences in the form of video.
2. Tips on How to Become a YouTube Vlogger
- Create a Channel
- Content
- Equipment
- Skills
- Collaborate
3. Create a YouTube Channel
Your channel name is the official name for your channel on YouTube. Your channel name is a big part of how people will define and understand what your channel is about. So, it’s important that your name accurately represents your brand. It’s important that your name stands out from another channel on YouTube or should be unique.
![]()
Note: So before deciding on a name, pop your potential name into YouTube and see what comes up, if you can’t find any similar sounding channels, you’re good to go.
For example, my channel name is Mayang Dyosa, Mayang is what my family and friend called me and Dyosa means Goddess. I find it unique and cute because that’s my dream to be a Goddess.
❶ Content
One of the challenging parts being a YouTuber is finding a right content for your channel.
You can use YouTube’s trending page this is the easiest way to find trending topic for you to have an idea of what topic or content you like. You can always use or share experiences to be your topic content whether it is beauty, make-up tutorial, DIY’s, Skin care ideas, etc. As long as you can share honestly and correctly.
Do whatever you love, do something that you like, expertise, make a relatable videos or timely videos and searchable videos. Create a content that people need or are often searched for online, content that can provide information to people. I suggest you go with “how to” videos, because people always searched for this kind of content.

Vlog Content
❷ Equipment
Gear is essential for making a YouTube video obviously a camera is the most important piece of equipment, you can use anything that can record at least 1080p resolution of video. You can use your mobile phone or a digital camera. Whatever your equipment you have now, you can start your first vlog as long as you can record a video at you have a clear audio you are good to go.
Many of the successful YouTube creators started with very simple equipment so don’t let equipment get in your way. Start your vlog now!

Vlog Equipment
❸ Skills

Vlog Editing Skills
Speaking with confident in the front of camera is always a skill of being a vlogger, you must be talkative in order for you to share more information to you viewers but make sure that your ideas are related to your chosen content.
You should be entertaining in front of the camera so that the viewers don’t get bored, because sometimes it’s not just the information that excite them to watch a vlogger, but also on how you entertain the viewers.

Entertain in Front of the Camera
❹ Editing Skils
In Editing skills, there are two ways you can edit your vlog, first on your phones, second on your pc or laptops.
You don’t have to be good at editing but this is one of the things you need to study to make your videos better.

Entertain in Front of the Camera2
Wondershare Filmora Video Editor is one of my personally used editing software, this is considered to be the best option for YouTubers because there is how-to video guide that allows anyone to quickly pick up the pace and start producing or creating an eye-catching video.
Wondershare Filmora 11 The Best video editor that makes your editing experience efficient and playful.
Try It Free Try It Free Learn More

I am using this software for almost 5 years and always satisfied by its performance. It is easy to use software with a lot of tools needed to edit a video in a fast way and it even has animation/affects you can add to your video to look more creative and catchier.
Filmora allows you to export your videos in multiple video formats with lot of customization settings.

Wondershare Filmora
It also allows you to export your videos directly to your social media platforms like YouTube, Facebook, Vimeo. The speed of exporting videos is also quite fast so not time consuming.
❺ Collaborate
It really helps your channel to grow if you collaborate with someone that is same passion as you, you can share ideas of content and help one another channel grow. Also, this will help others to know that you also have a YouTube channel and this is another way to promote your channel by the help of other content creator. In this way you can gain a friend and someone that you can seek for advice as you are starting for your career.

Wondershare Filmora
Wrap Up
- You must also remember when starting to be a vlogger you should be emotionally and mentally ready because this is not easy as you expected.
- You can earn money by doing a vlog but don’t make the money to be your motivation to be a Vlogger, ask yourself first if this is really you like or is this really your passion? because being a Vlogger comes with great responsibility and it comes with great effort.
- If you are ready to become a vlogger because of the tips I gave, you can start now but you should not expect more subscriber and views immediately because you still need a lot effort and a lot of work to get people get to know your channel. So just keep working and work hard on the content, one day you will be famous and recognized by many.
Do You Want to Remove Unnecessary Sound From Your Video? We Are Providing You the List of the Best Software to Remove Audio From Video for Mac and Apple
Videography is getting into a trend nowadays. Everyone is recording videos for different reasons. However, when shooting outside, background sounds and noise reduce video quality.
You can remove audio from your video on Mac devices using different software. For instance, you can go for iMovie to remove sound from video on Mac. Filmora also allows you to remove audio from video on Mac.
Method 1: Use online and free solutions to mute audio in videos
1. Canva
Canva is a free design platform for anyone. It has both web and app versions. A very user-friendly graphic design tool that is easy to use, even for those with no design experience.
Canva offers a wide selection of templates and over 1 million templates. A library of over 2 million stock photos and illustrations for free. It also has a paid option at an affordable price.
An Ultimate Guide to How to remove audio from video in Canva?
To remove audio from your video in Canva, you can do so by following these simple steps:
Step1 Open the video in Canva.
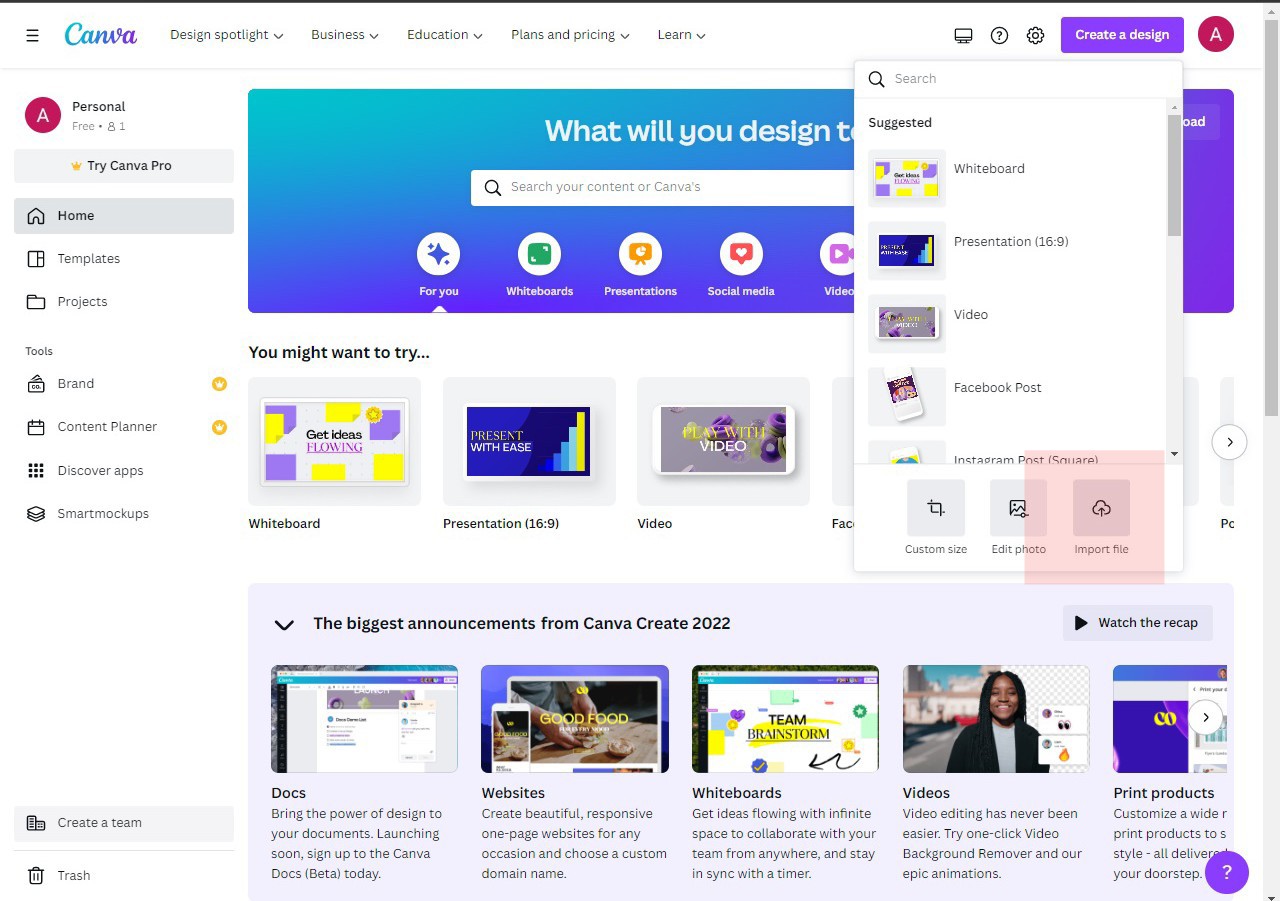
Step2 Click on the “Audio” tab in the toolbar and remove the audio.
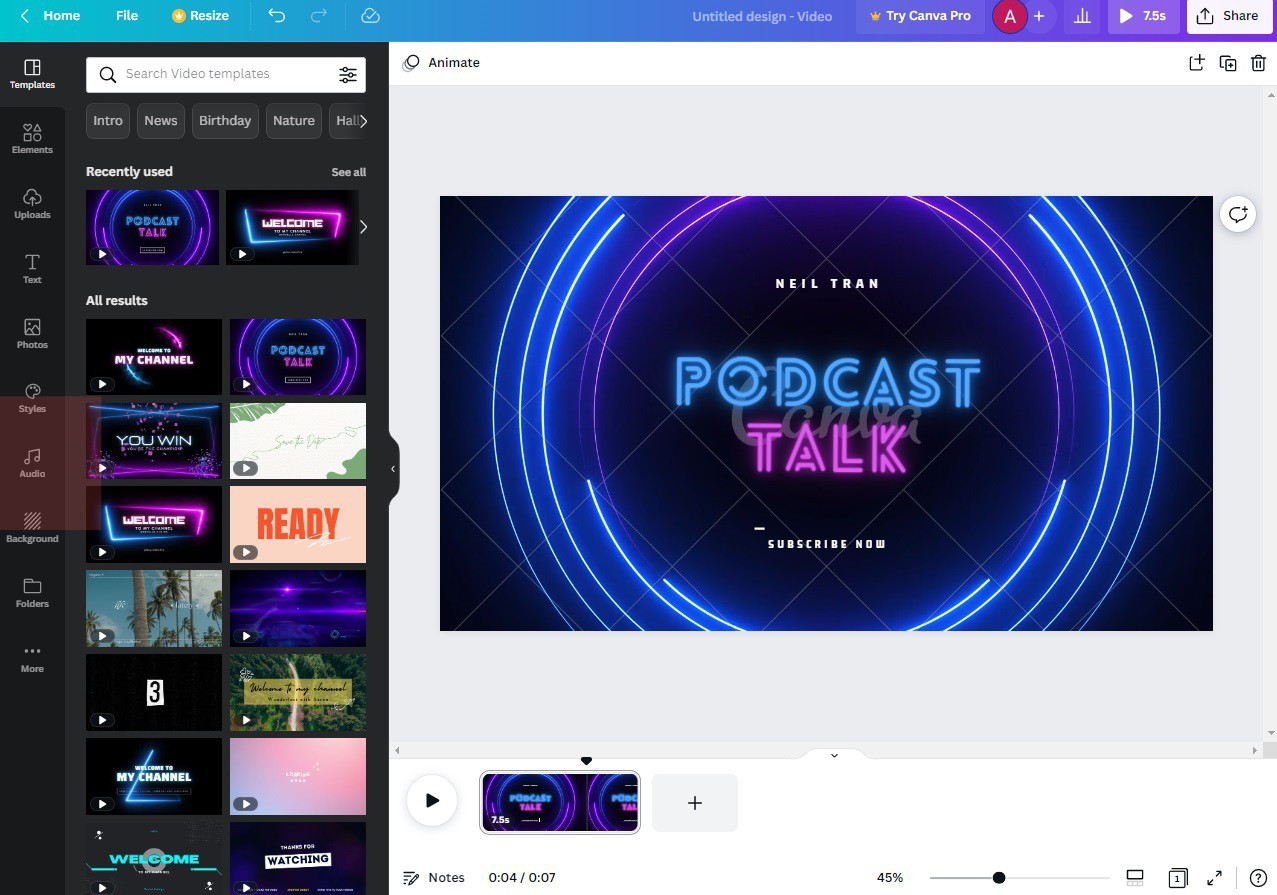
Step3 Save the video in desired option.
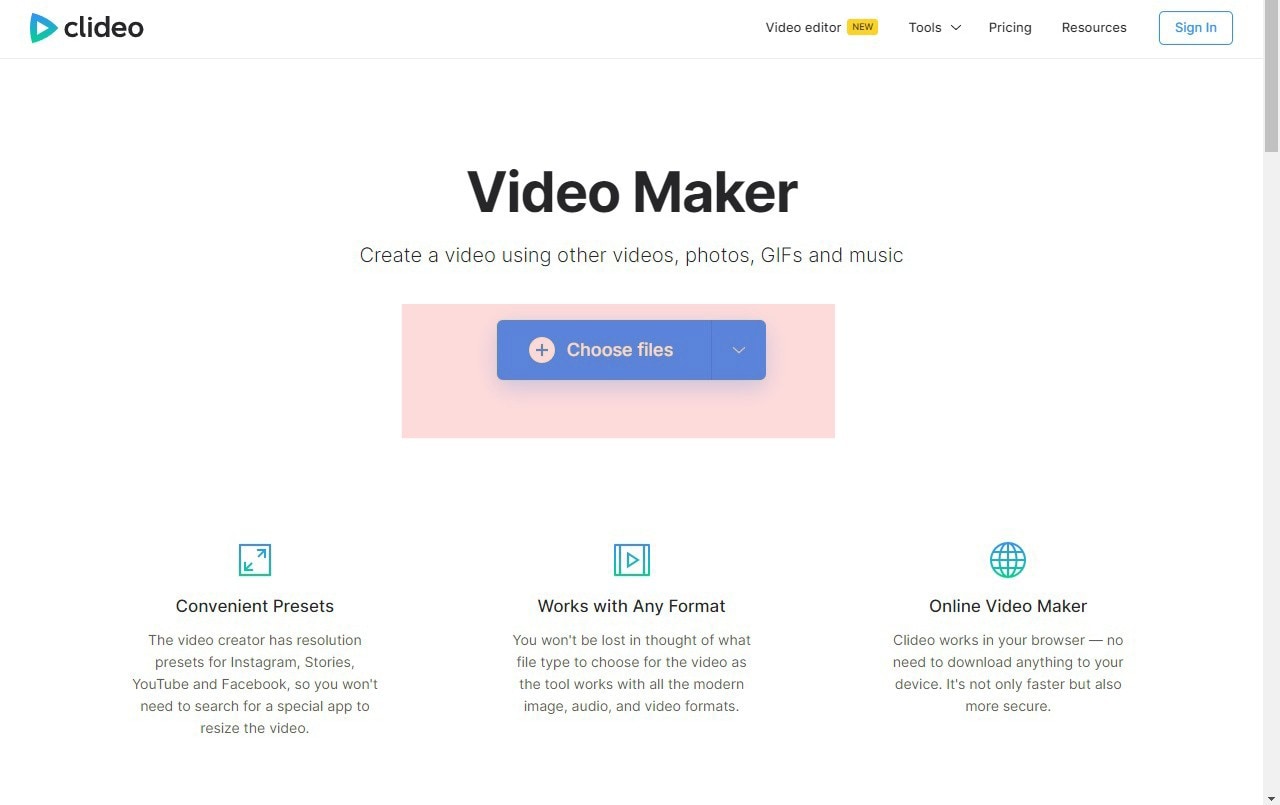
2. Clideo
Clideo is a cloud-based video editing tool that offers a simple yet powerful way to edit videos. With Cleo, you can trim, crop, merge, and audio or text to their videos.
Its user-friendly interface makes it easy to edit videos. Clideo offers a variety of effects and transitions that let you create videos that look unique. It supports a wide range of video formats, making it easy to export your videos.
An Ultimate Guide to How to remove audio from video in Clideo?
This online video editor offers a straightforward way to remove audio from any video file.
Here’s how you can do it:
Step1 Go to clideo.com and upload the video from which you want to remove the audio. You can either drag and drop the file into the designated area or click the “Choose file” button.
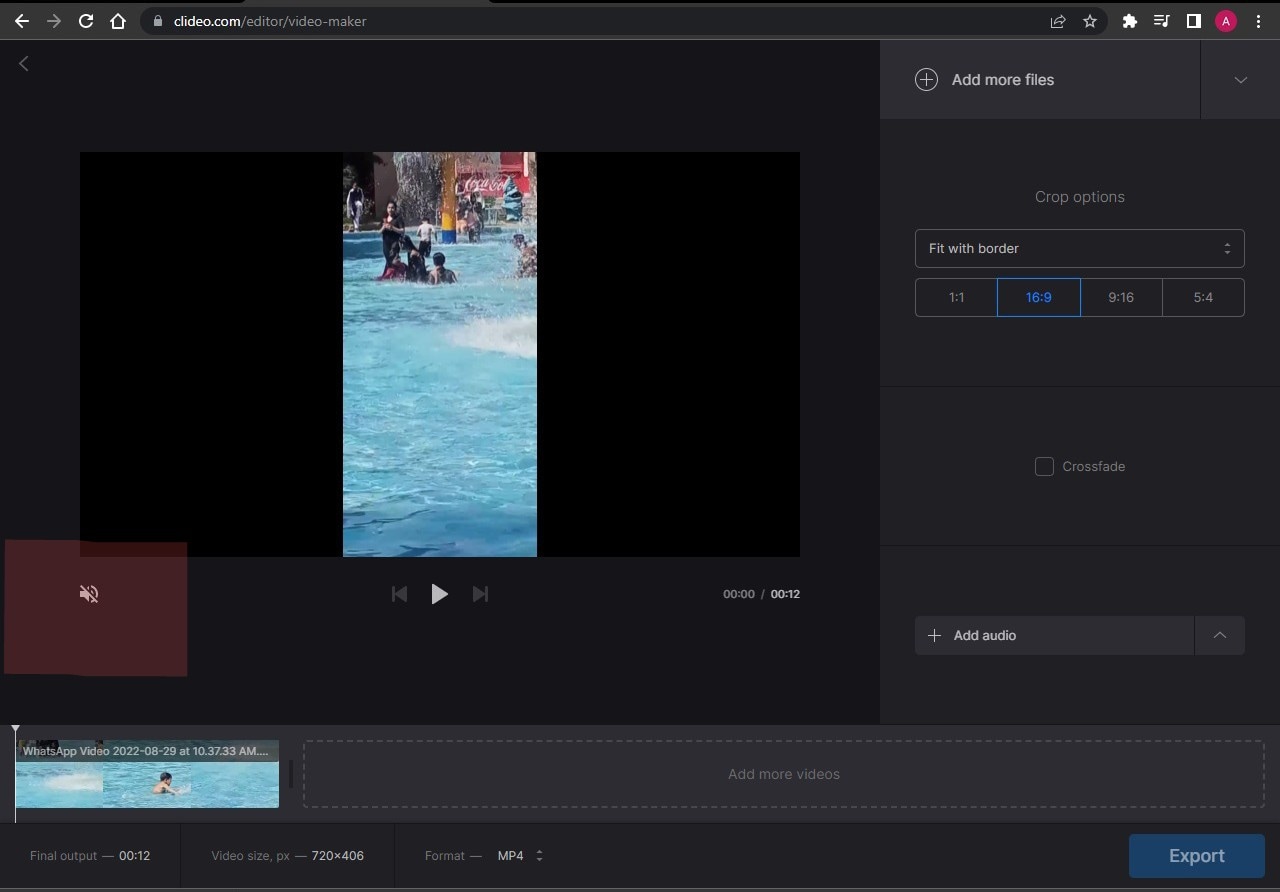
Step2 Once the video is uploaded, select the “Mute” option from the toolbar above the video player.
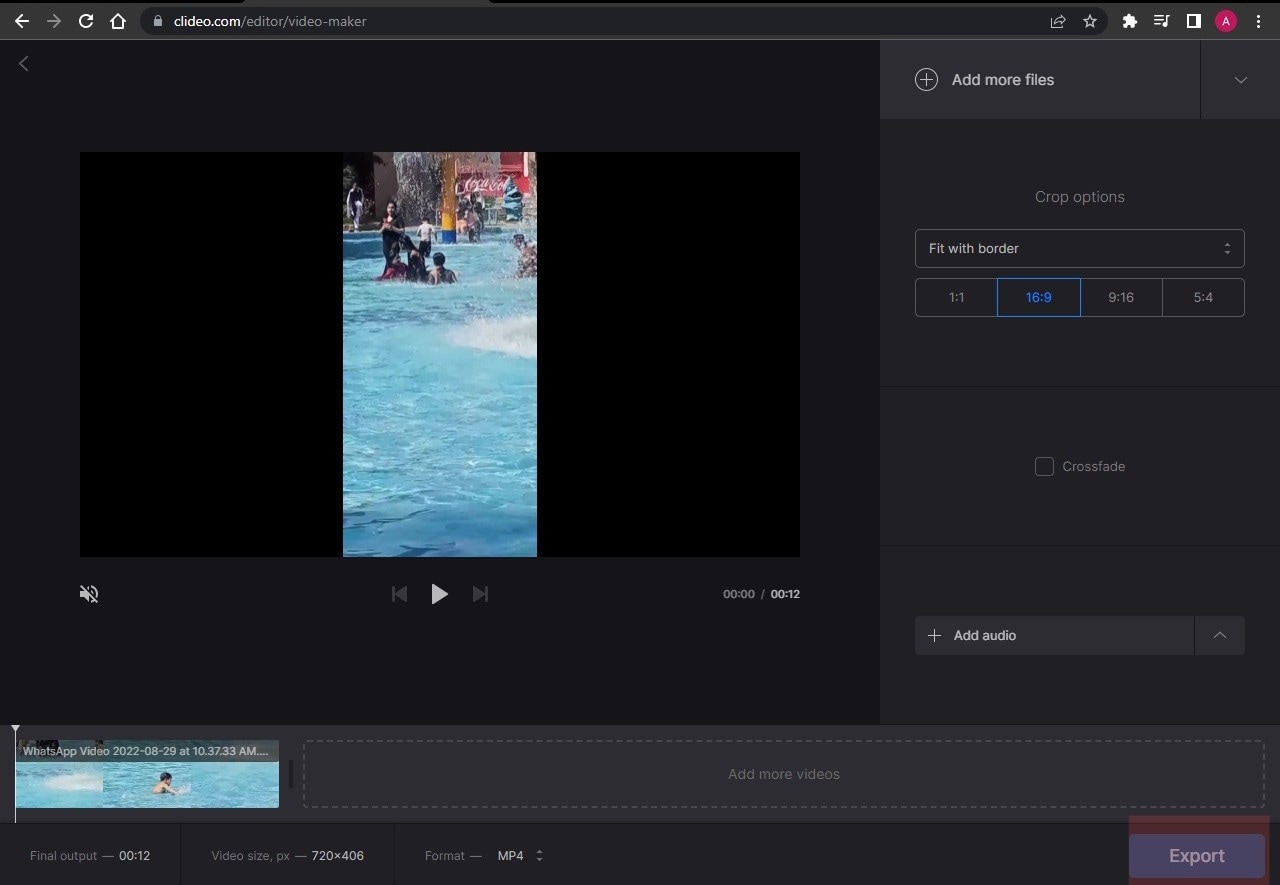
Step3 Click on “Export” to save the video without audio.
3. Ezgif
Ezgif.com is a great online resource for creating and editing GIF images. This online software has a user-friendly interface.
You can upload images or video files from your computer or a URL, and Ezgif will create a GIF for you. It lets you edit your GIFs before you download them. You can crop, resize, rotate, and reverse your GIFs and add text, filters, audio, and other effects.
How to remove audio from video in Ezgif?
To remove audio from a video using Ezgif, follow the steps below;
Step1 Upload the video to the website.
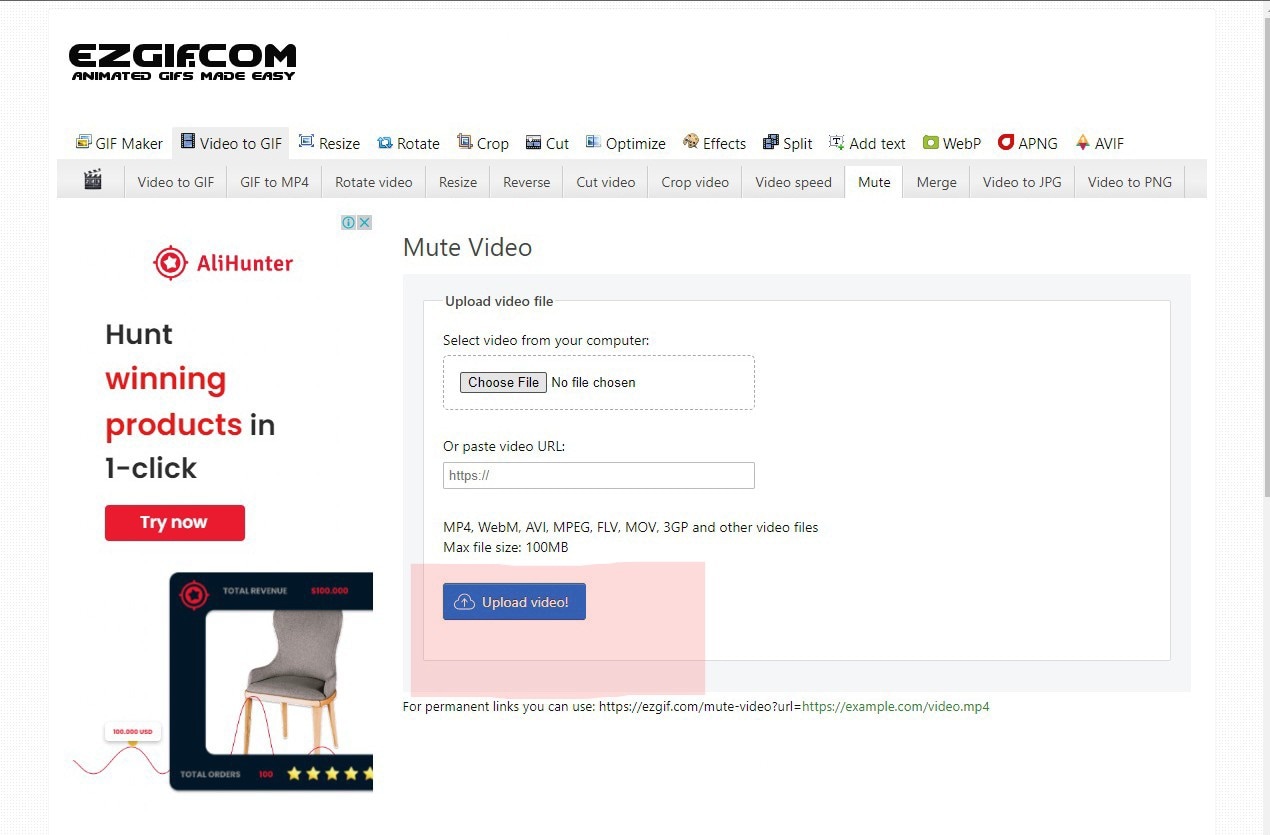
Step2 Once the video is uploaded, select the “Audio” tab and click on the “Remove audio” button.
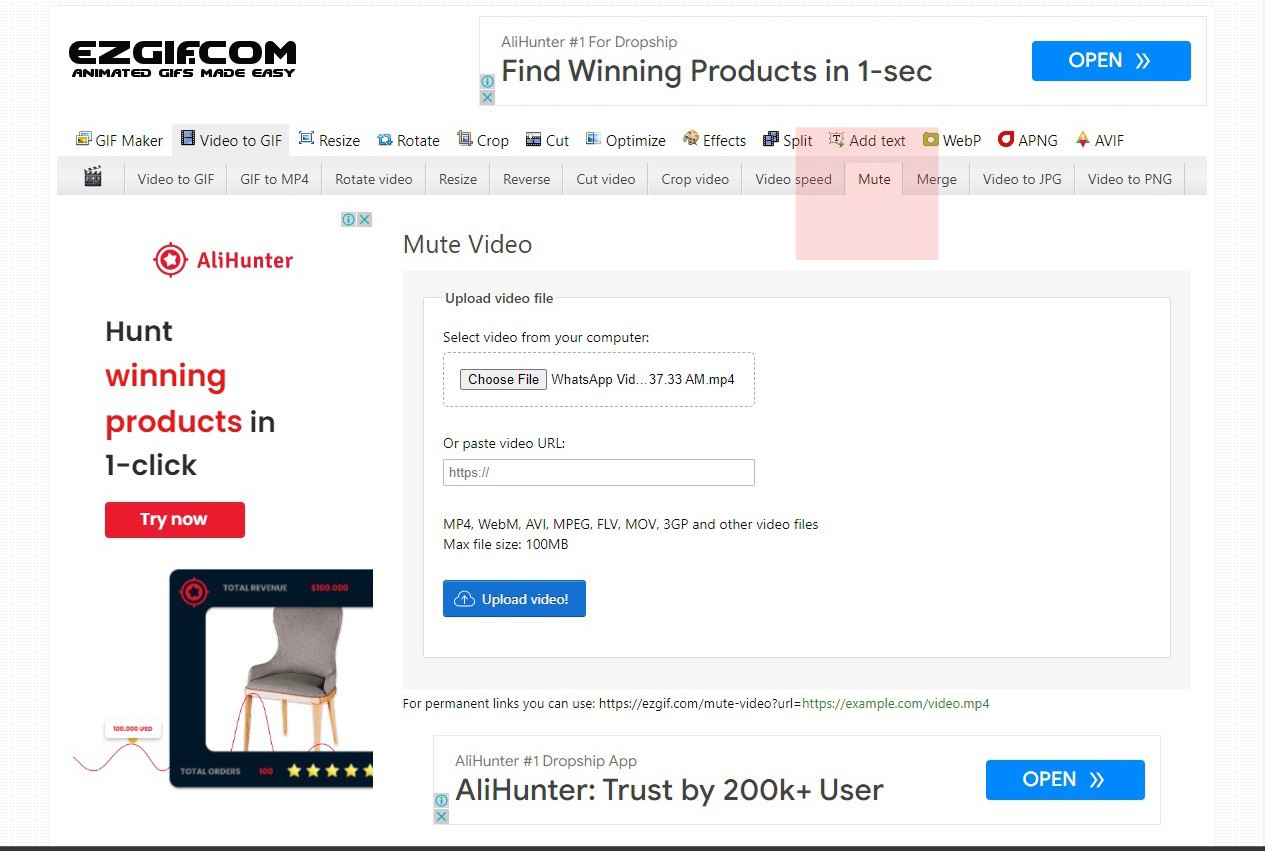
Step3 It will remove the audio from the video, and you can download the new video file.
Method2: Use Apple official tools to remove audio from videos
1.QuickTime
QuickTime is a video editor that comes installed on all Mac computers. It is easy to use yet packed with features that allow you to create, edit, and share your work.
QuickTime includes a basic set of video editing features perfect for simple tasks like trimming a clip or adding a title. You can export your video in various formats or upload it directly to YouTube.
An Ultimate Guide to How to remove audio from video in QuickTime?
You can remove and mute the audio from video in Quicktime as follows:
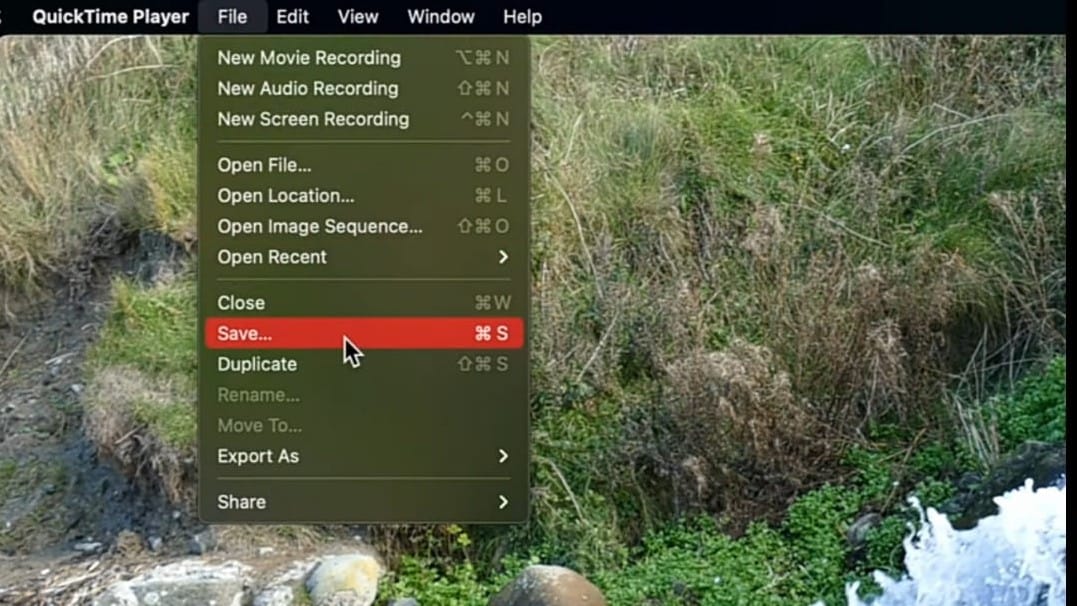
Step1 Open the video with “QuickTime Player,” from which you want to remove the audio.
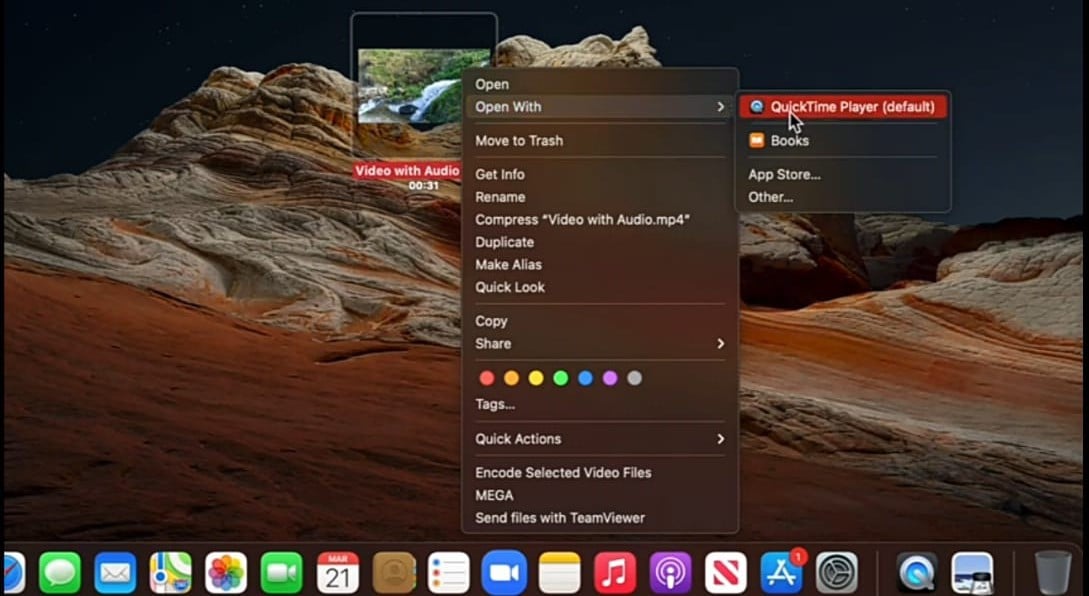
Step2 Select “Edit” from the taskbar and click “Remove Audio.”
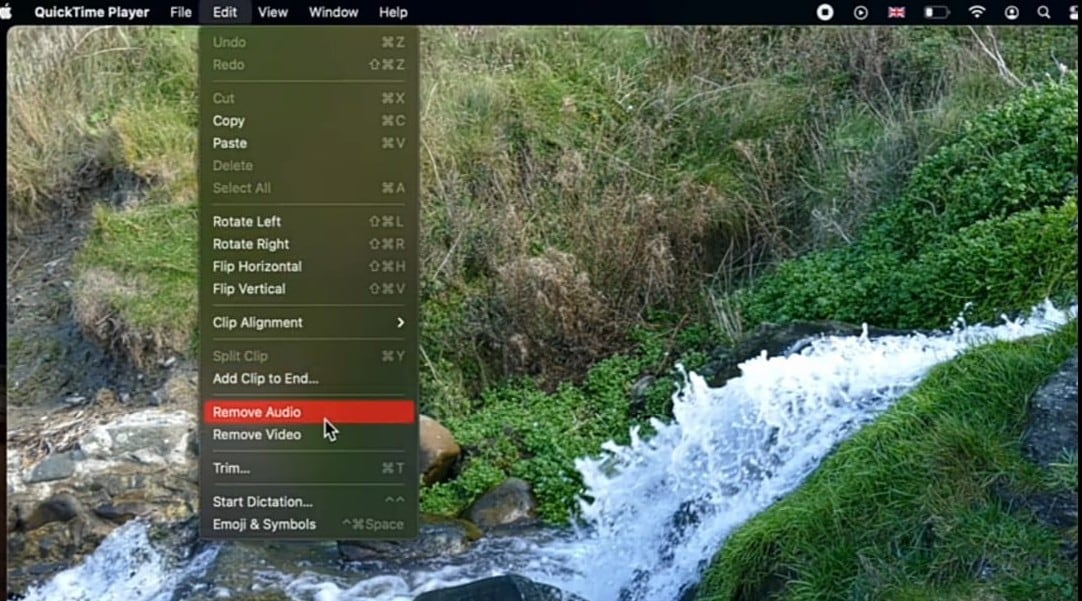
Step3 Now select ‘File” and then click “Save.” It will save the muted video.
2. iMovie:
iMovie is a video editing software application by Apple Inc. It was released in 1999 as a Mac OS. iMovie is a cross-platform application with the Mac OS X operating system and iOS.
It is easy to use and free. You can use iMovie to make movies from your photos and video clips. You can add titles, transitions, filters, text, background music, audio, color correction, animations, and video effects.
How to remove audio from video in iMovie?
There are a few different ways that you can remove audio from video in iMovie.
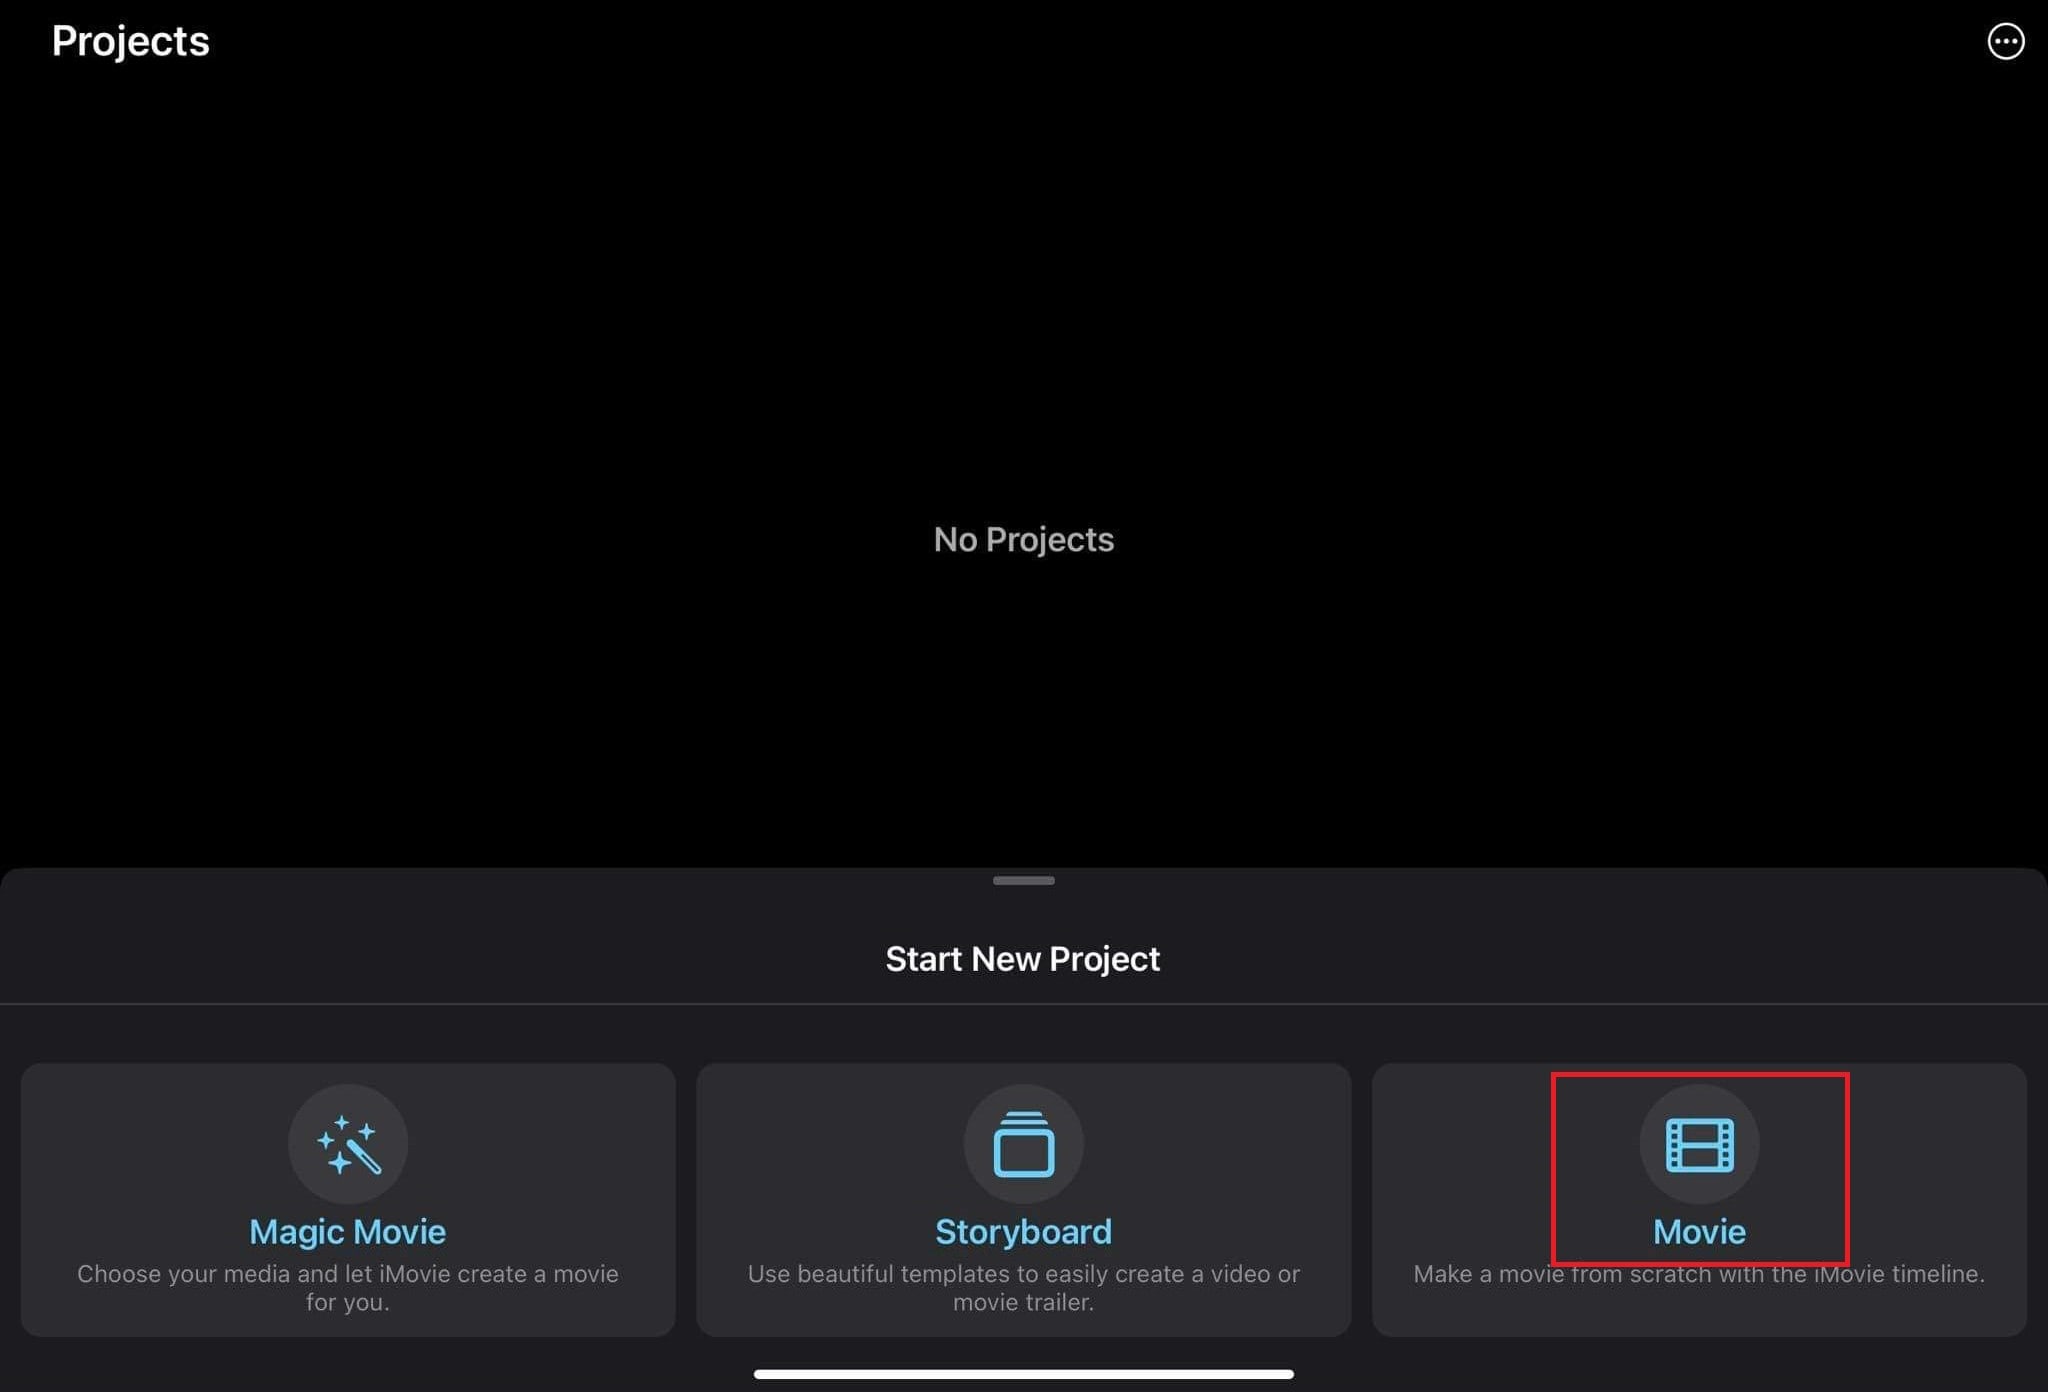
Step1 Click on the “Movie” button. Select the video whose audio is to be removed.
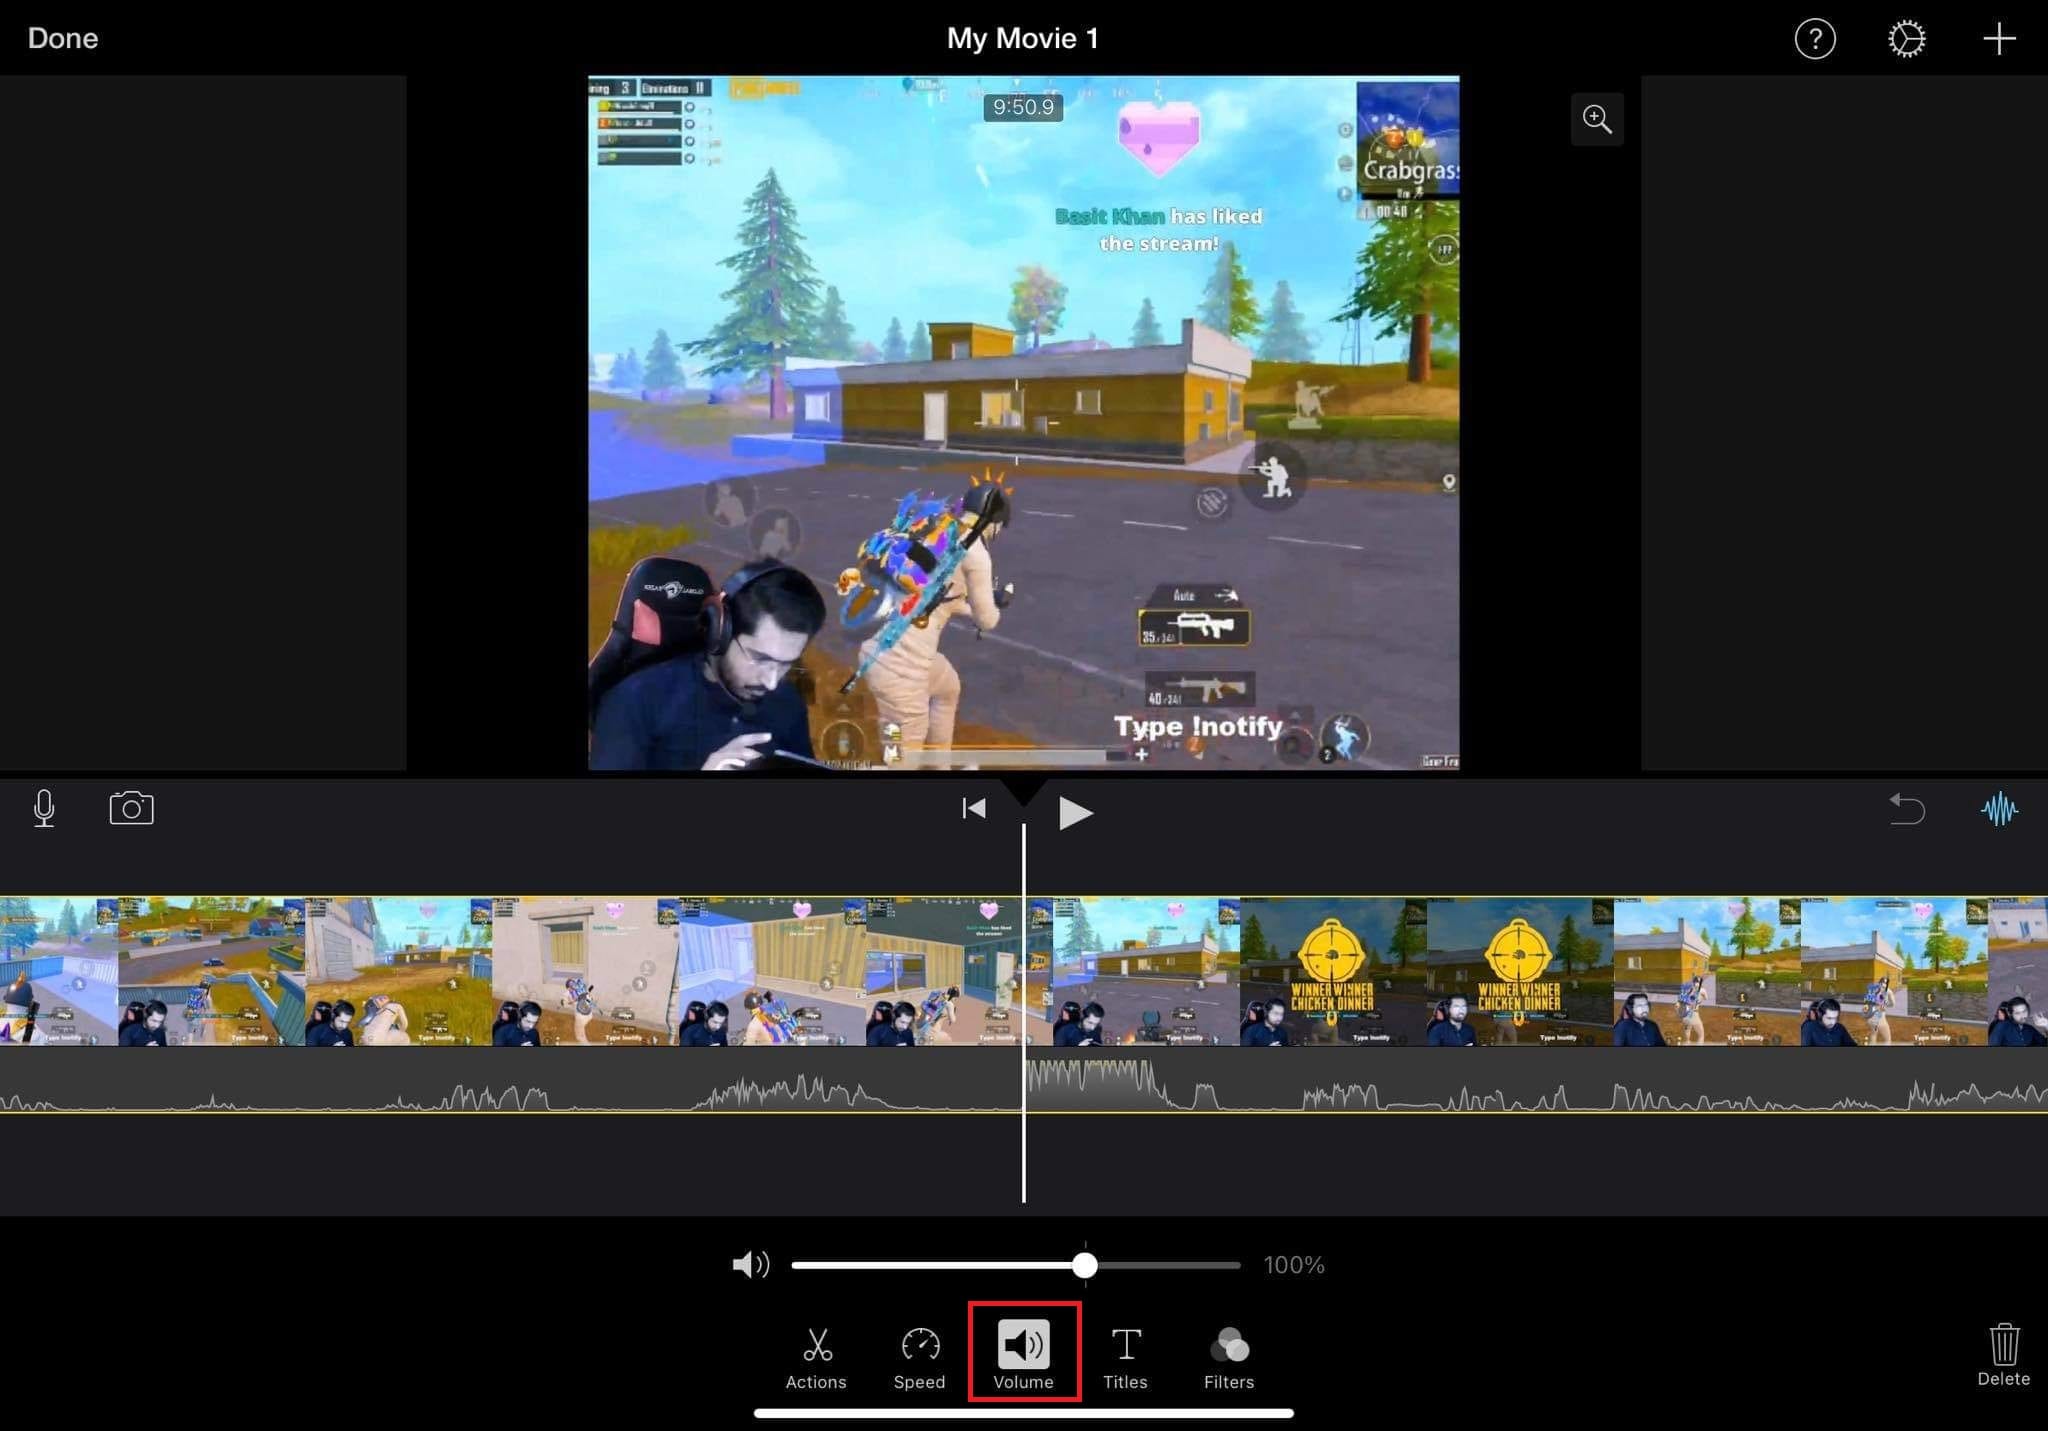
Step2 Now press and hold the timeline. Some options will appear. Click on the “Volume” button.
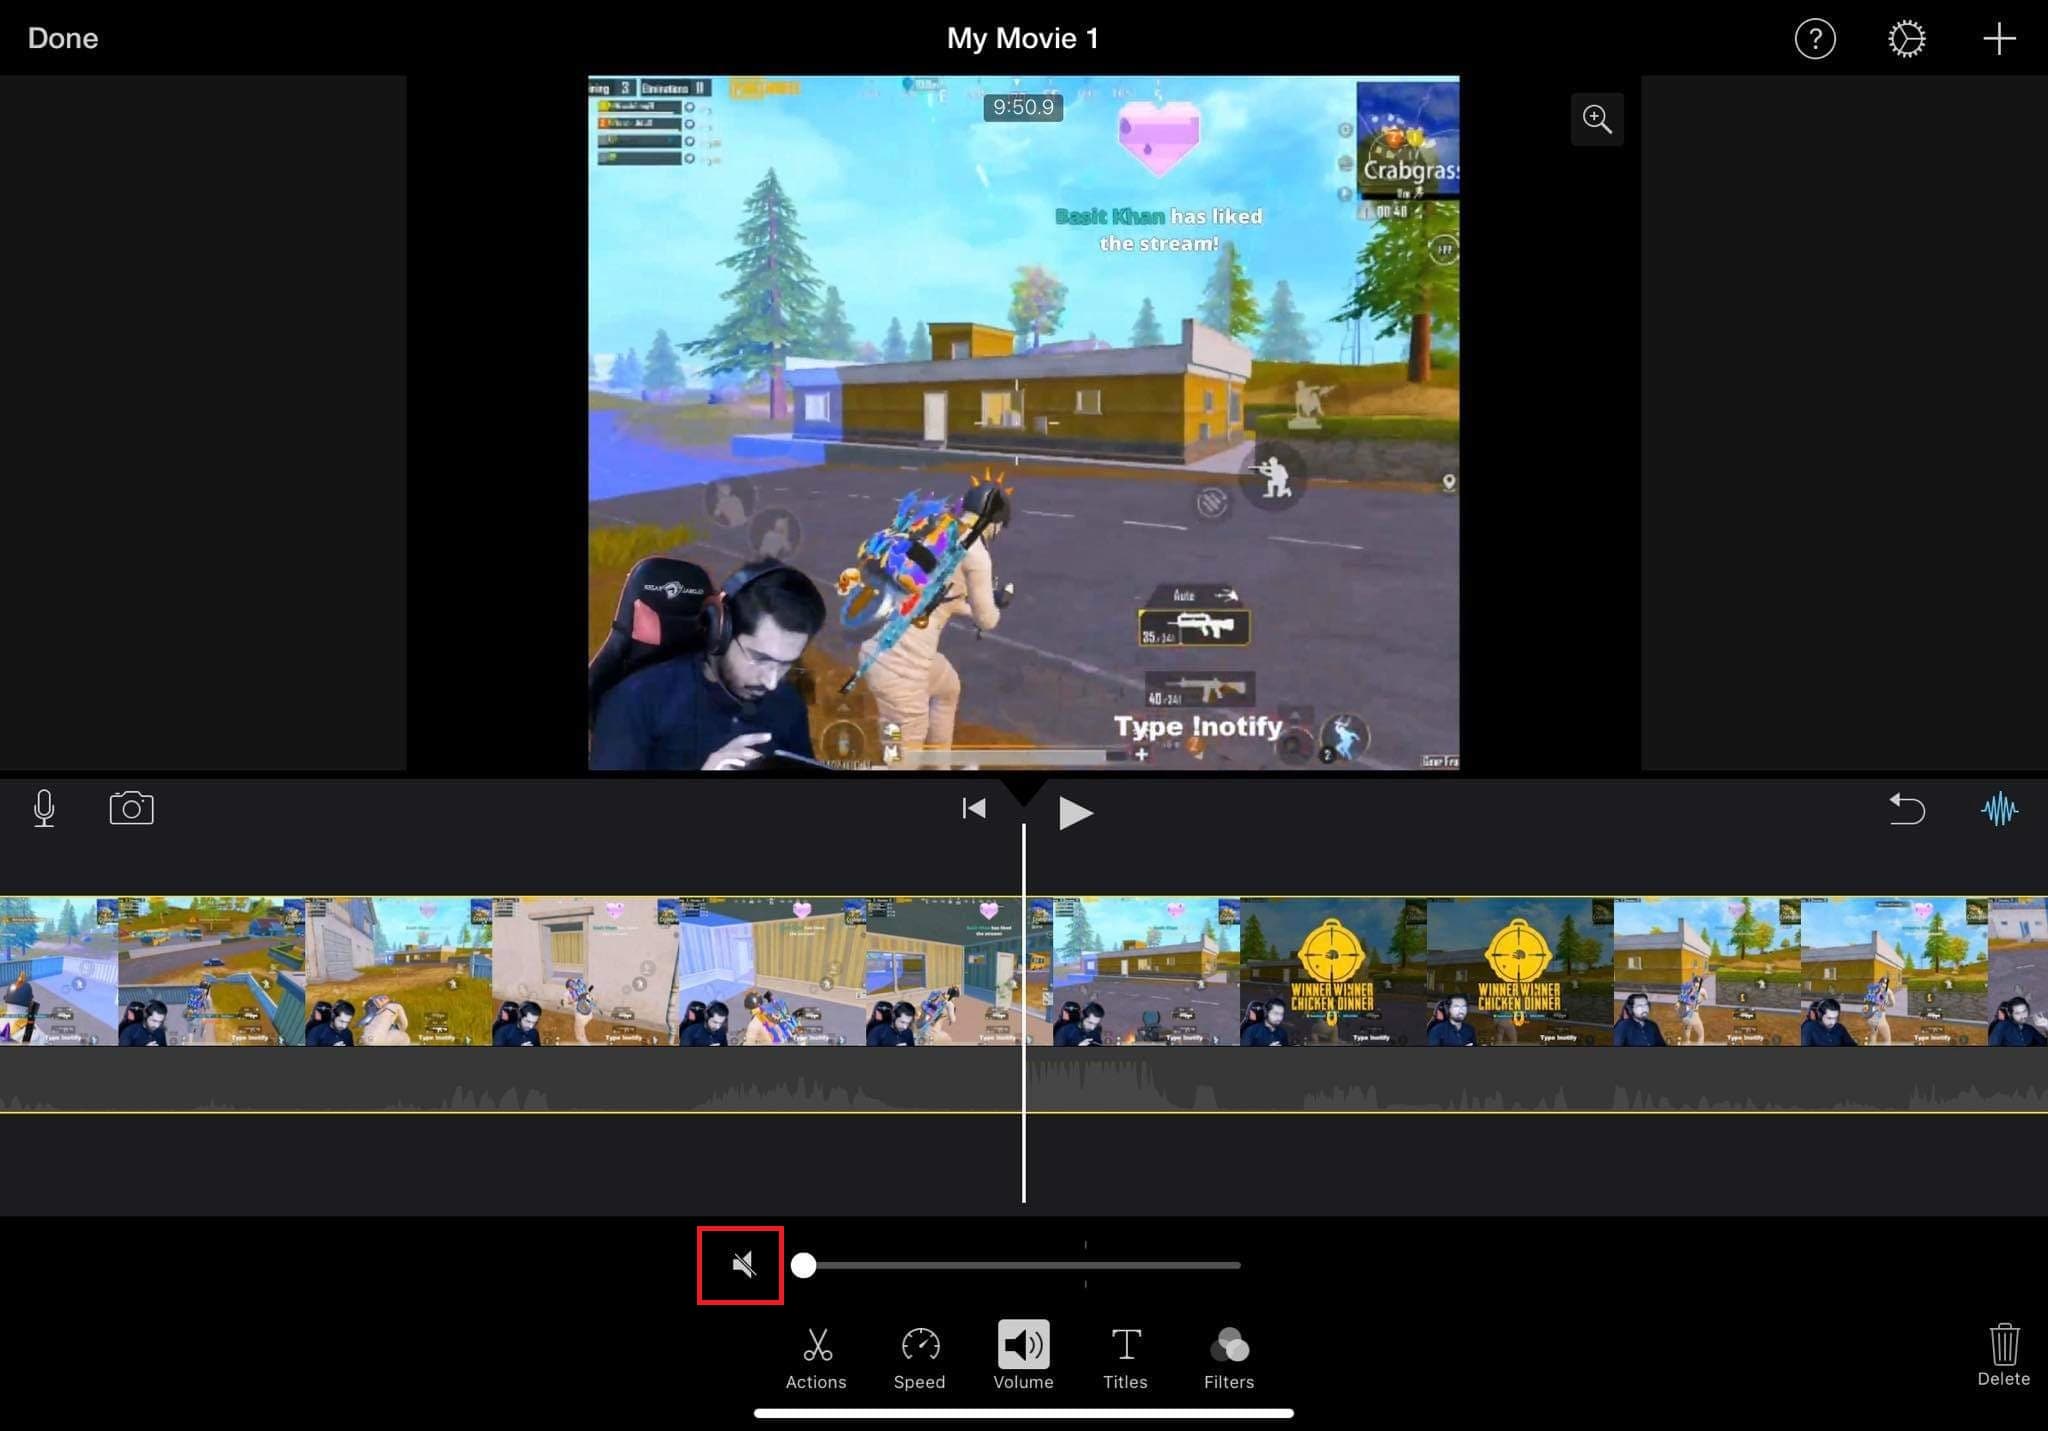
Step3 Mute the audio.
Step4 Now release the timeline and click the “arrow “button.
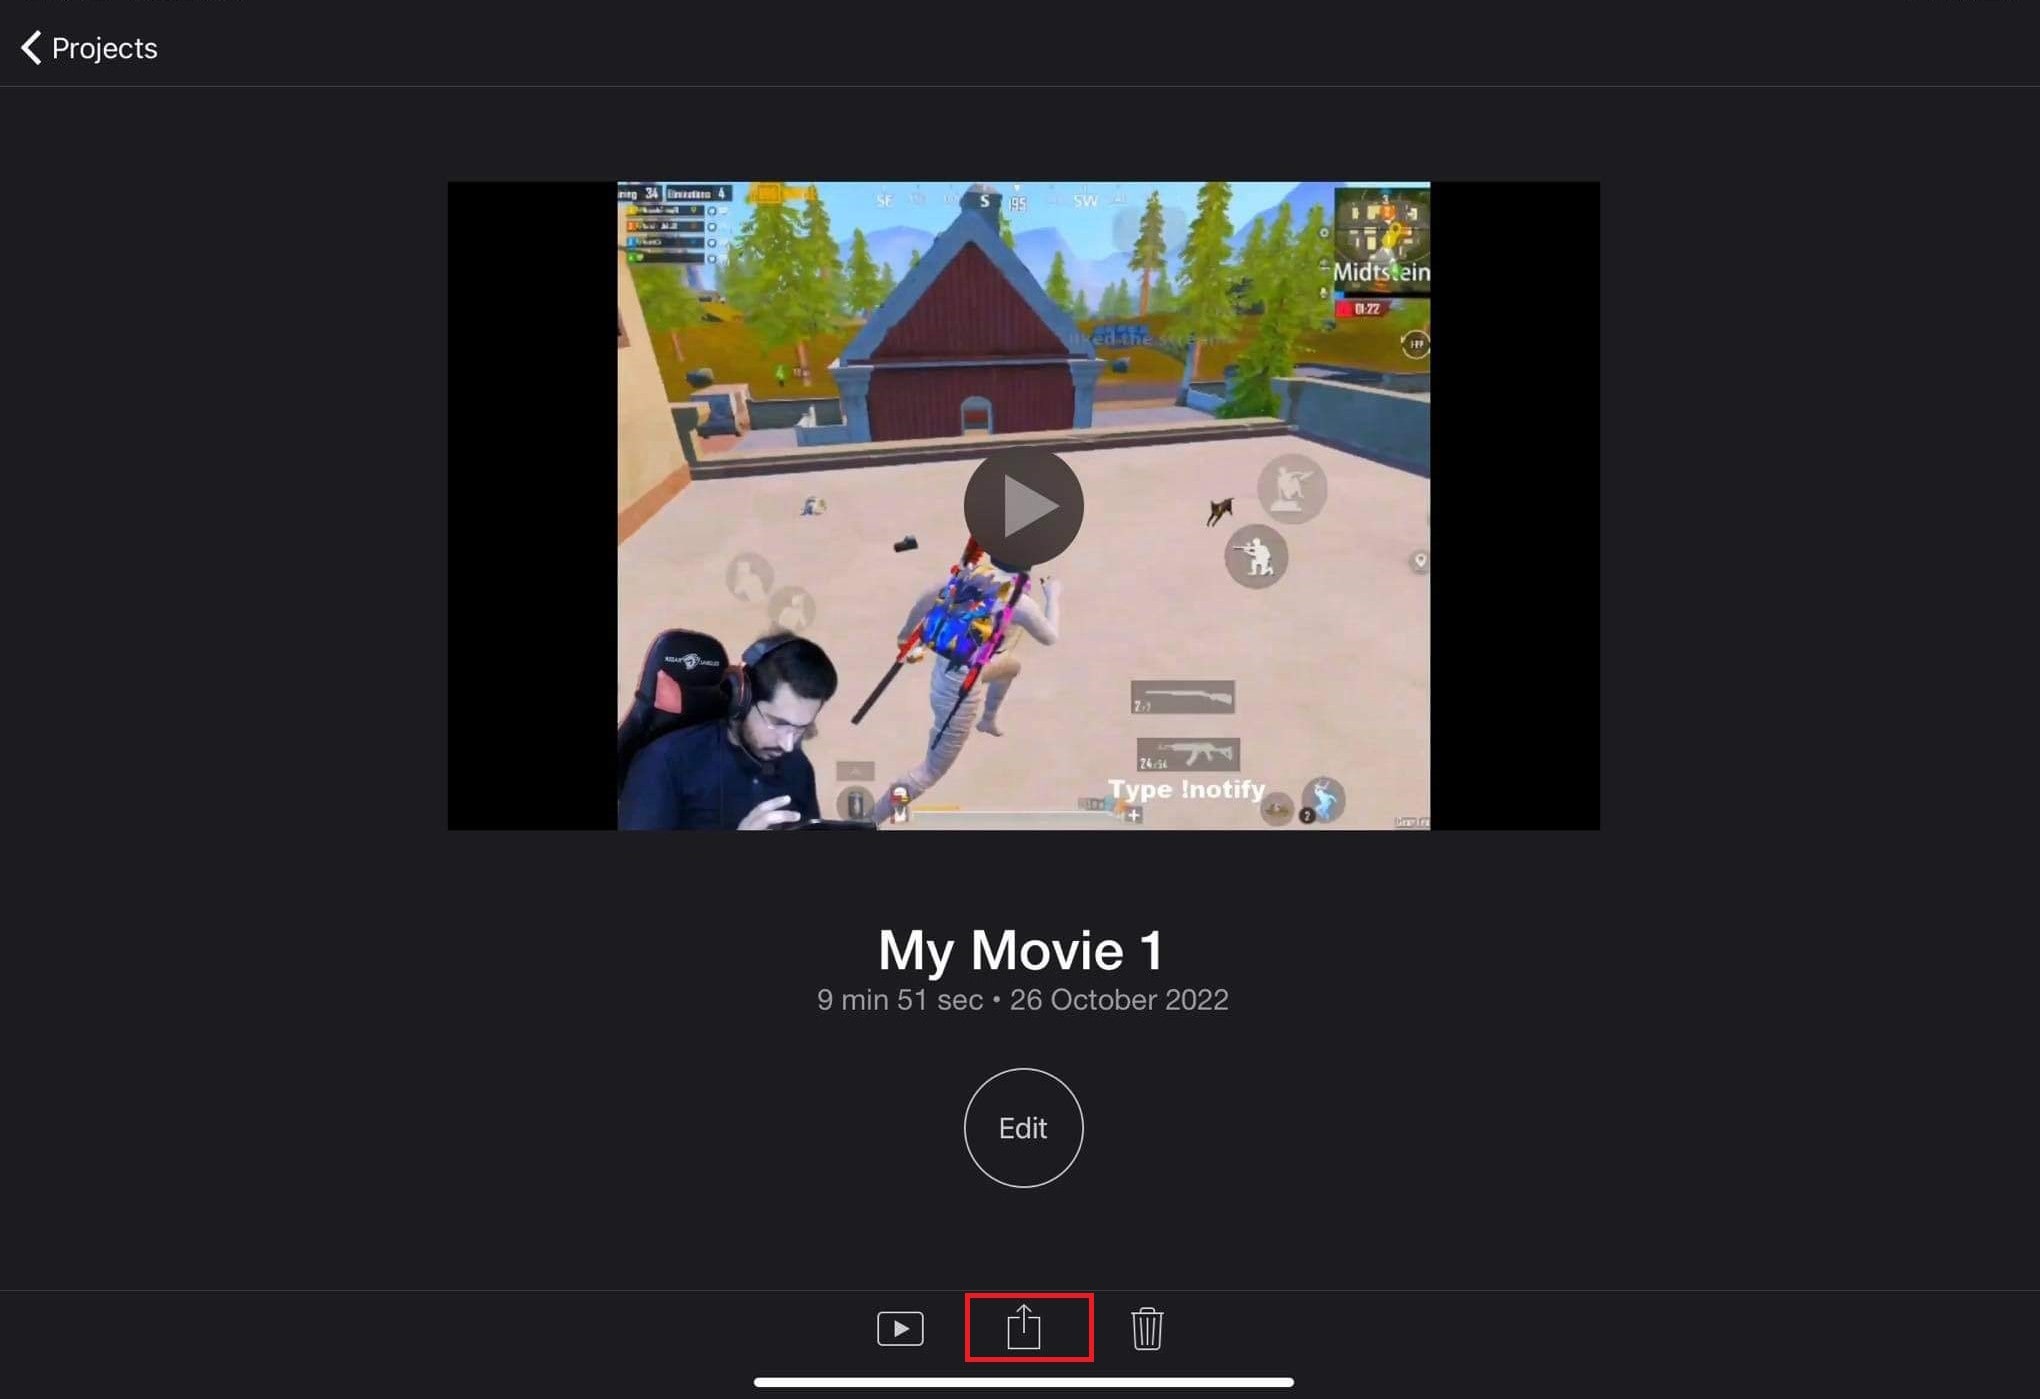
Step5 Save the muted file on your Mac by clicking “Save.”
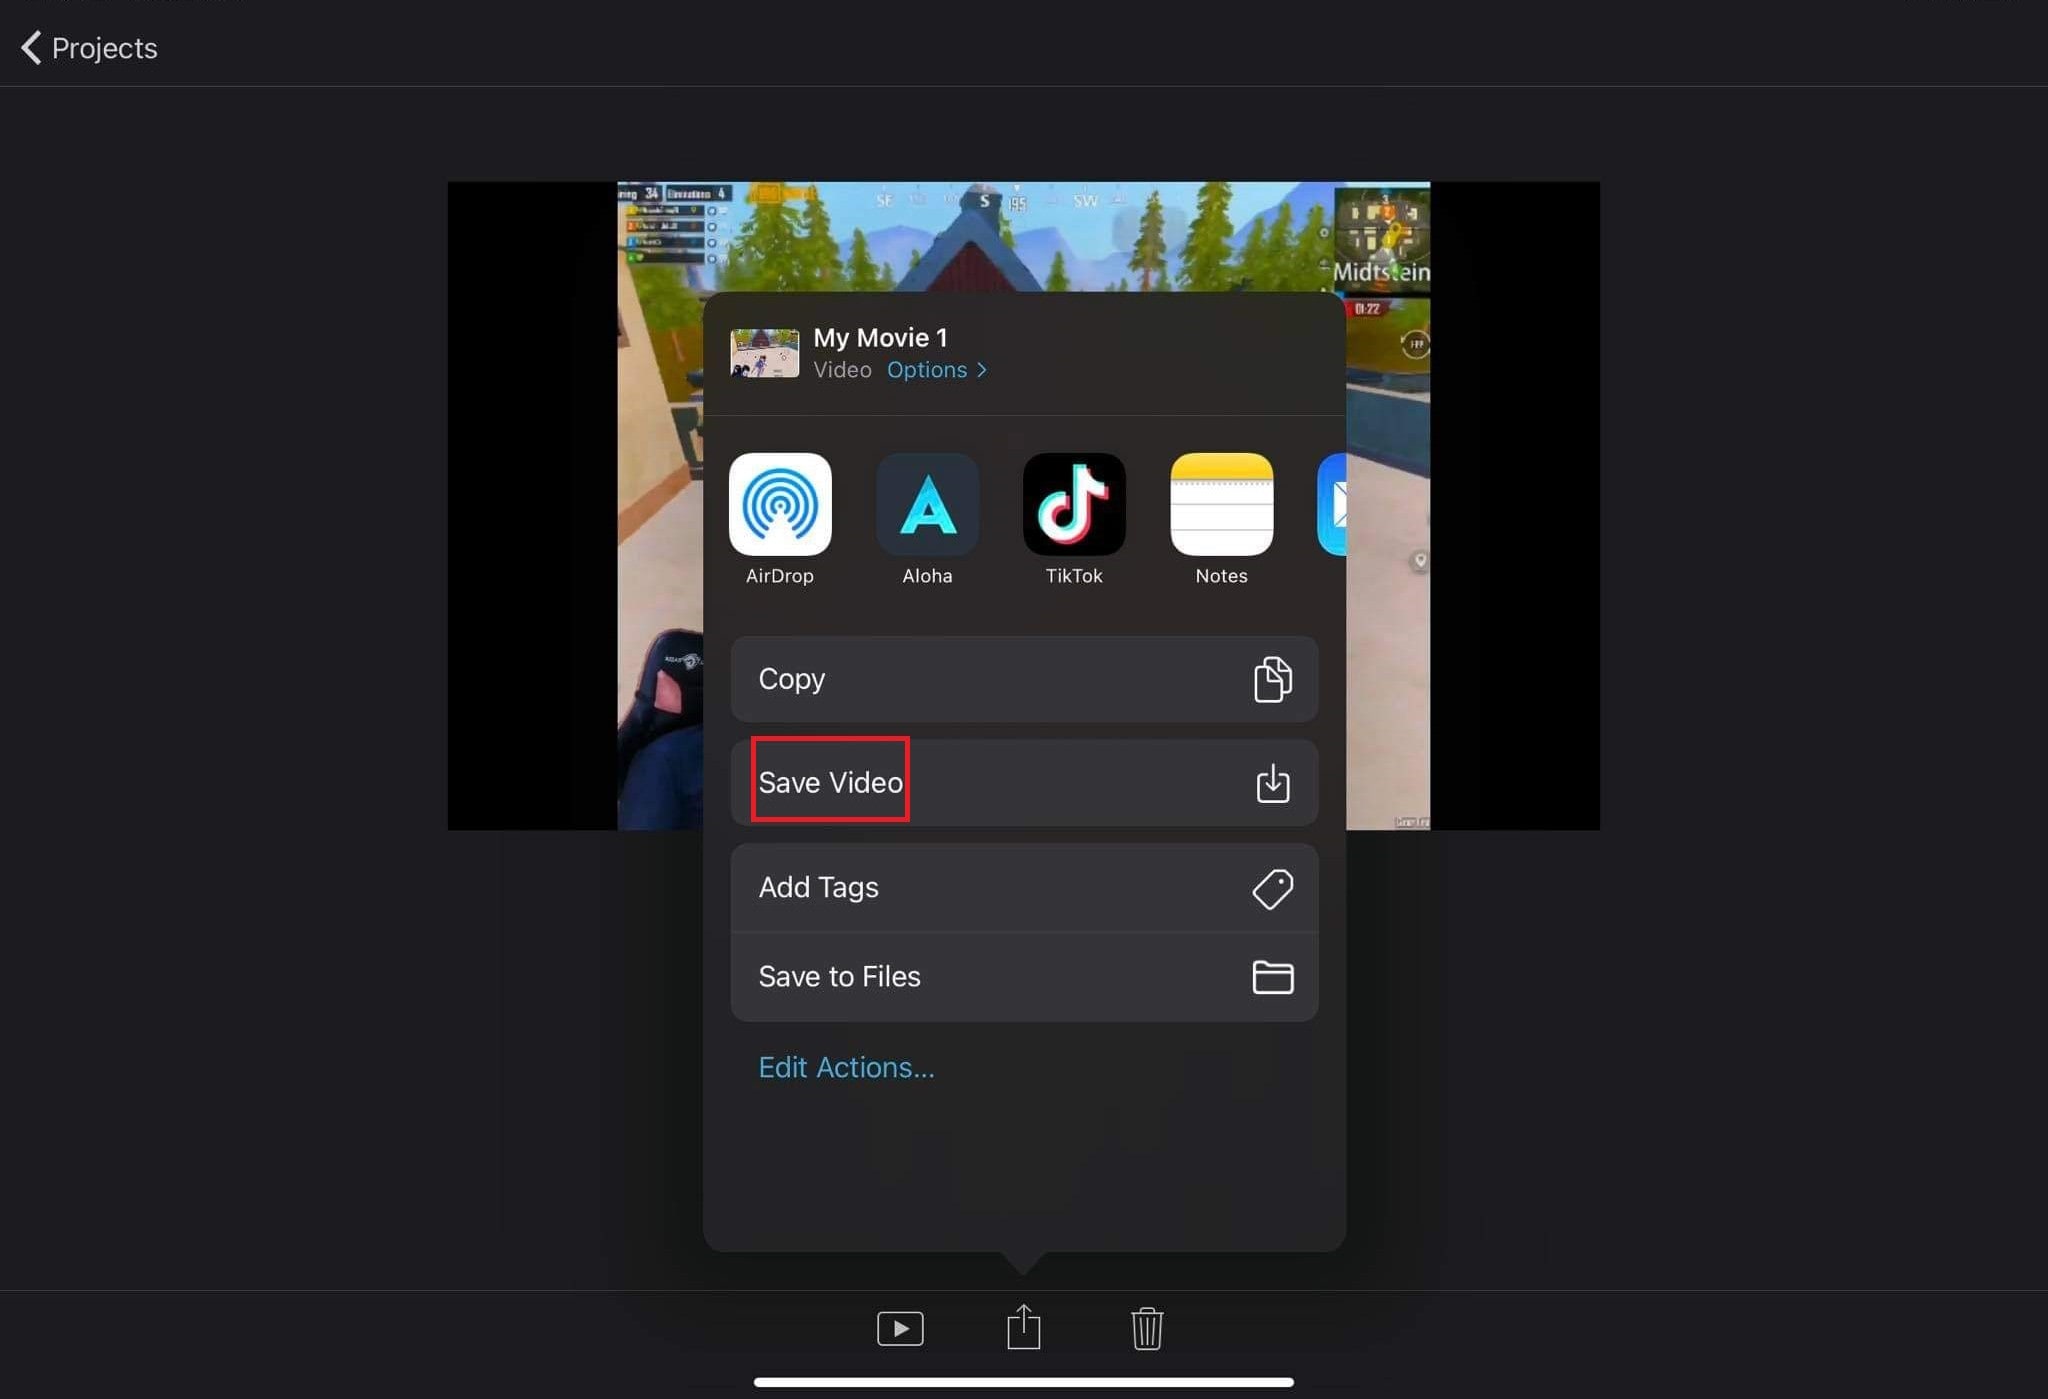
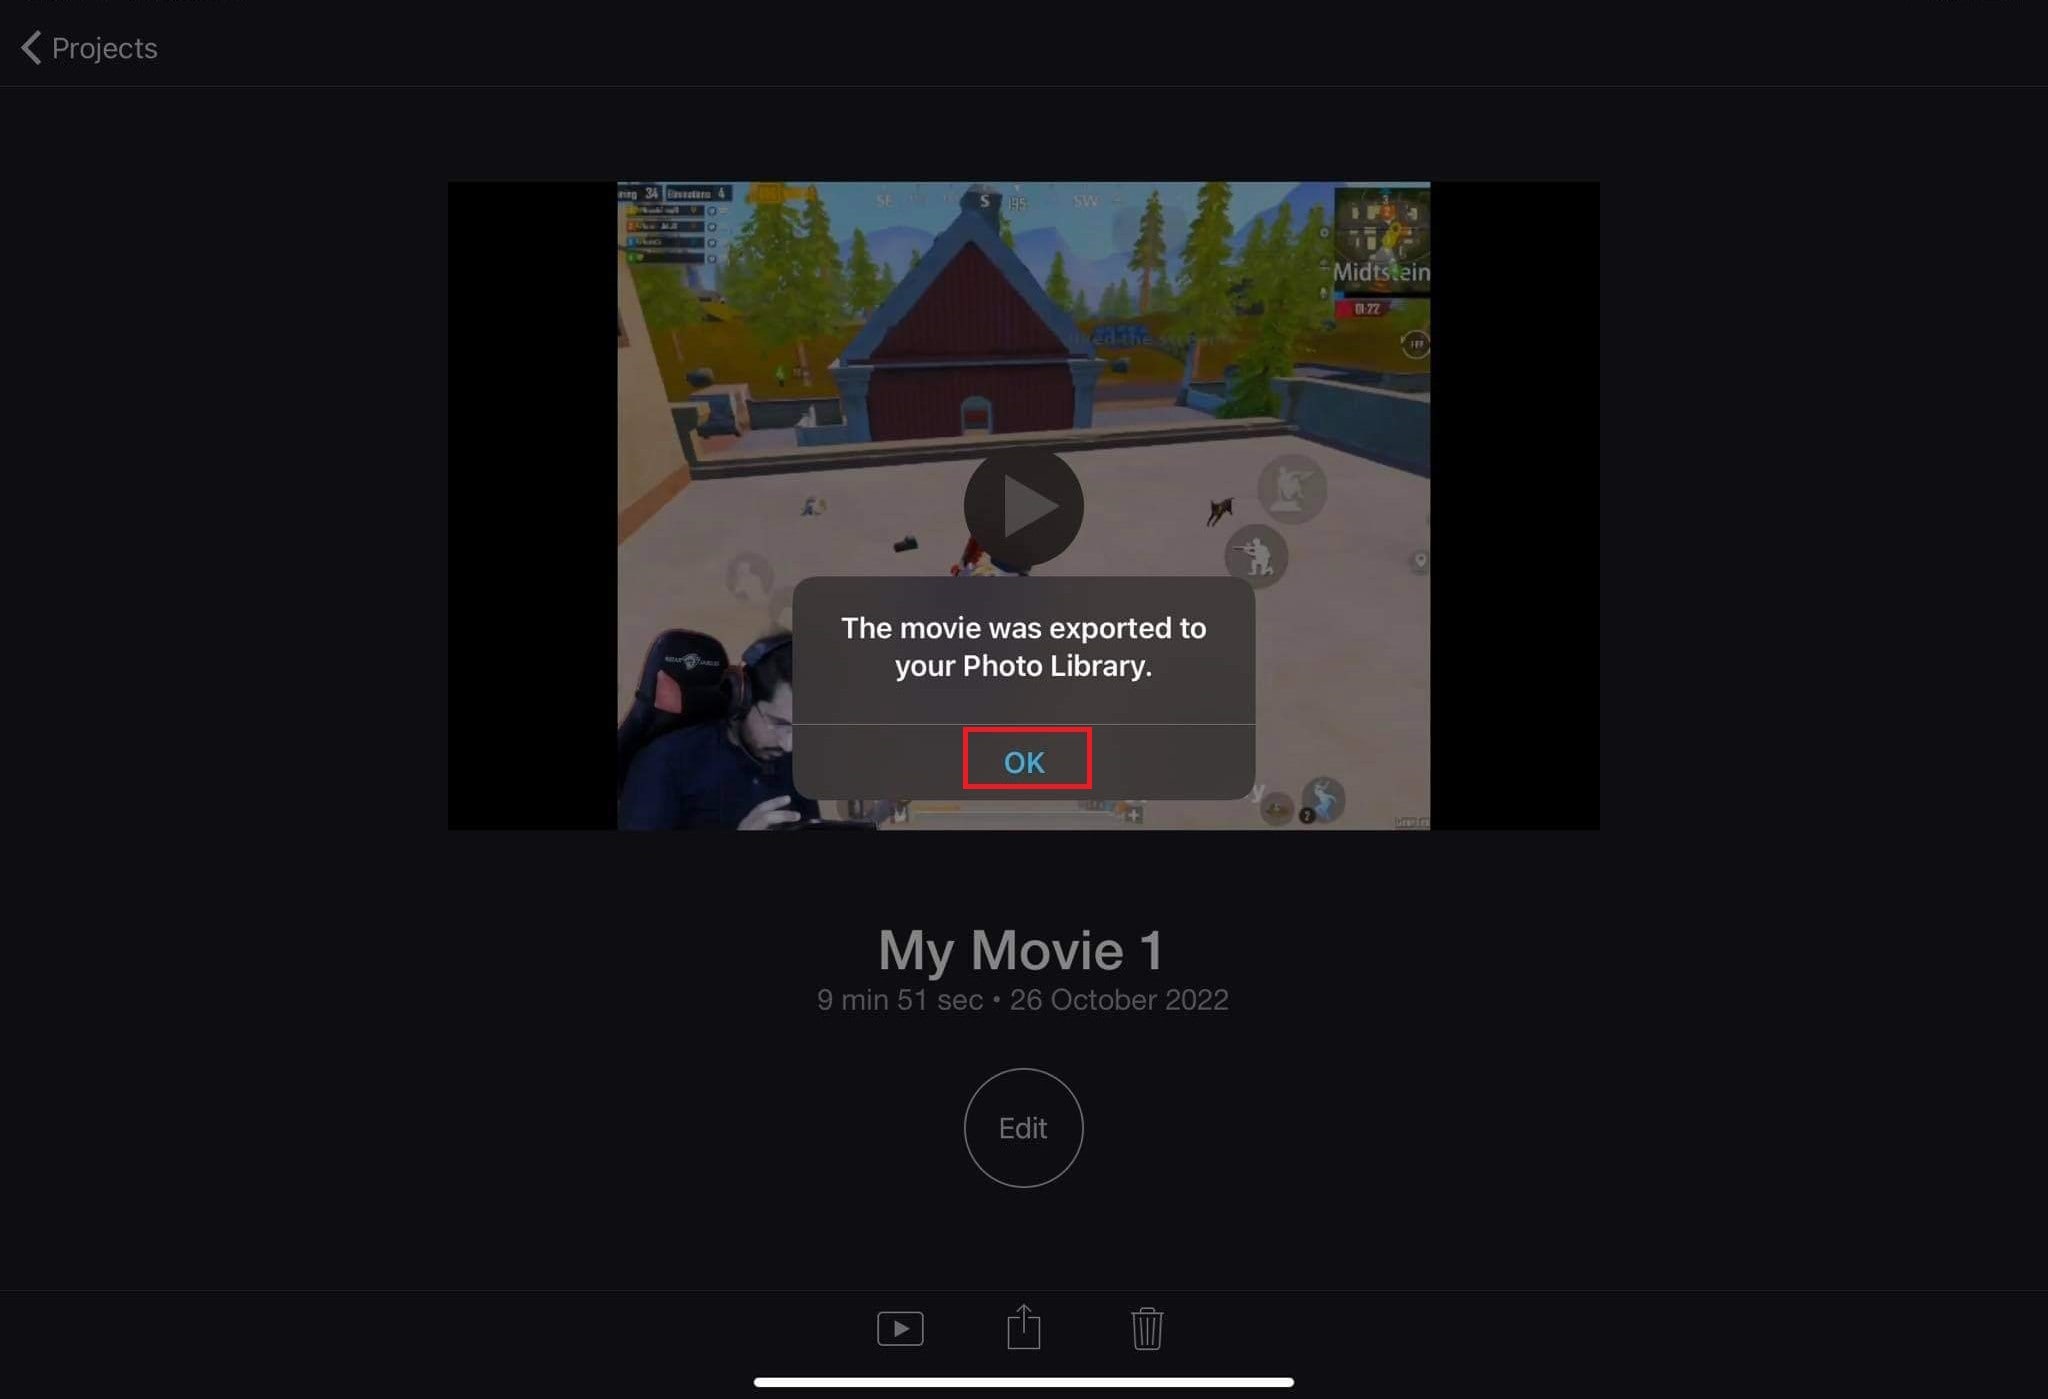
Step6 Muted videos will get exported to your library.
3. Final Cut Pro
Final Cut Pro is a powerful video editor that allows users to create professional-quality videos. With its intuitive design and wide range of features, Final Cut Pro is the perfect tool for anyone looking to create videos for personal or professional use.
Final Cut Pro is a professional-grade video editing software for some of the biggest Hollywood movies. It’s also become a favorite among YouTubers and filmmakers.
How to remove audio from video in Final Cut Pro?
You can remove audio from your video in either of two ways.
Step1 Open the video from which the audio is to be removed.
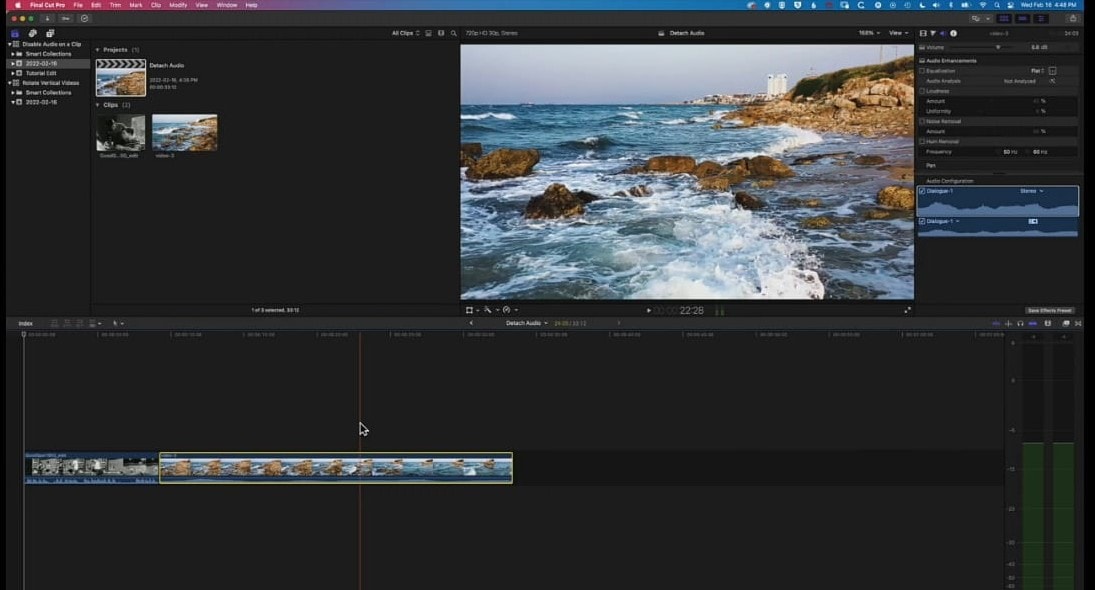
Step2 Now select the timeline.
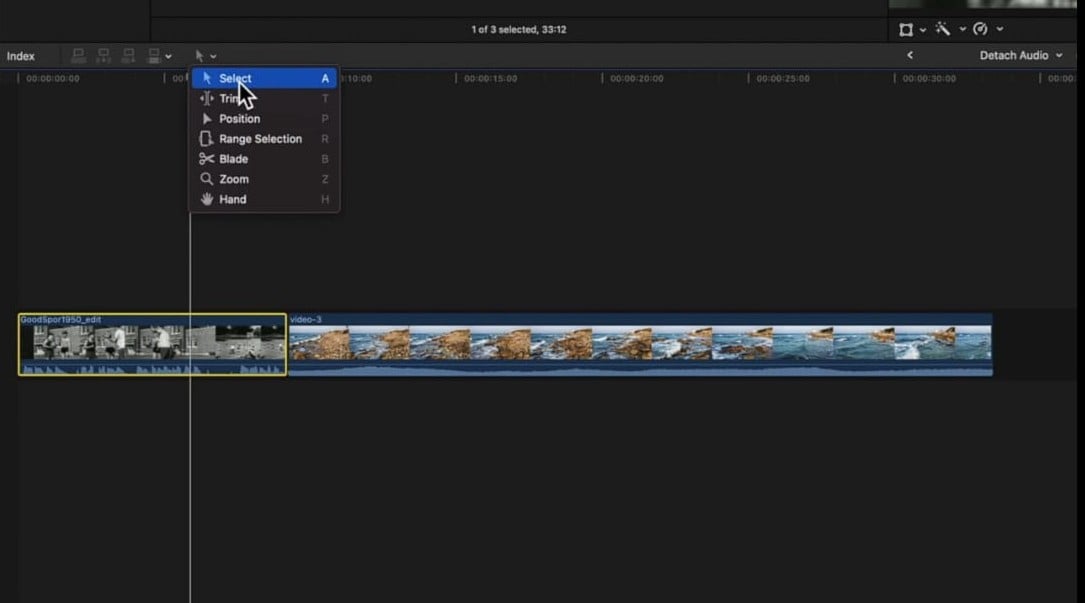
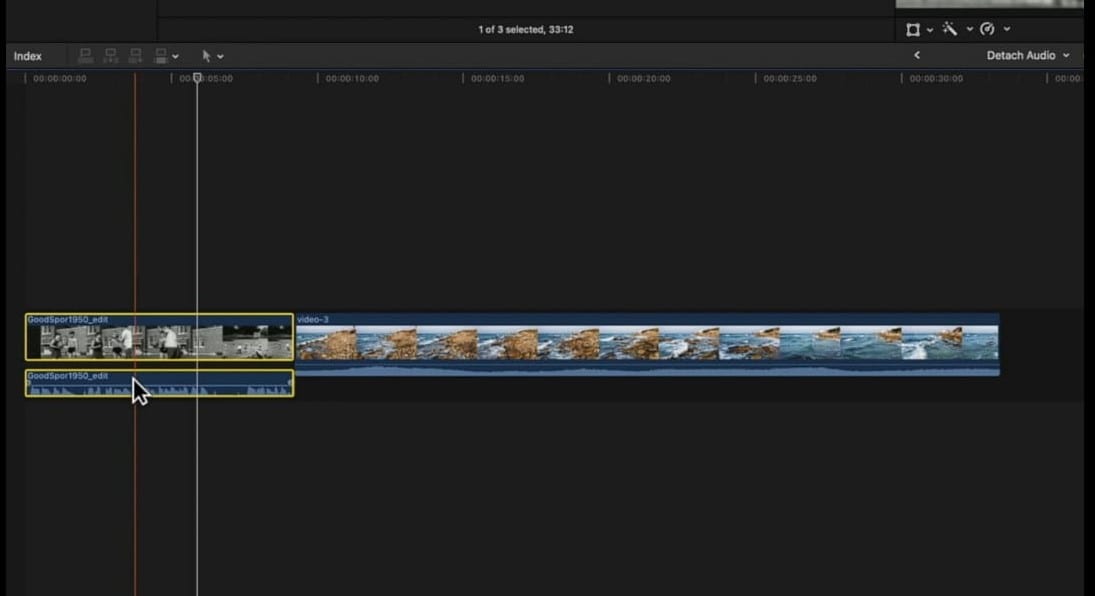
Step3 Double-click on the timeline. It will detach the audio from the video.
Now press the “Delete key” on the keyboard. The audio will get removed.
Method 3: Use Filmora to remove audio from the video
Filmora
If you’re looking for easy-to-use video editing software, Filmora is a great option. It’s simple to use yet still offers a wide range of features. Plus, it’s affordable and supports both Windows and Mac computers.
Free Download For Win 7 or later(64-bit)
Free Download For macOS 10.14 or later
An Ultimate Guide to How to remove audio from video in Filmora?
One way is to mute the audio track. To do this, follow the given steps.
Step1 Open a new project in Filmora.
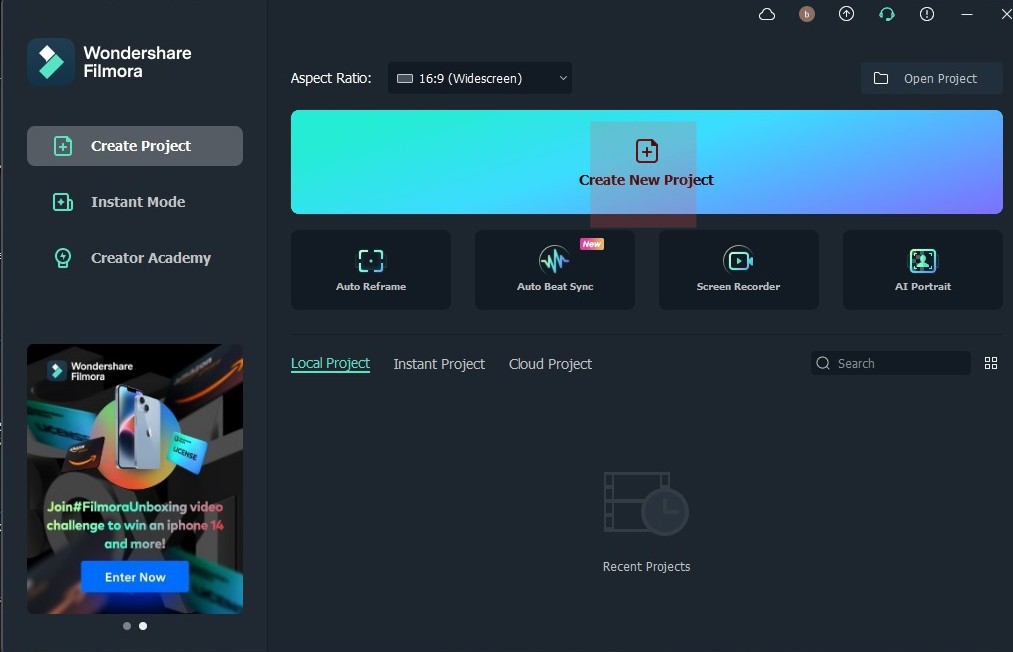
Step2 Click on the audio track in the timeline.
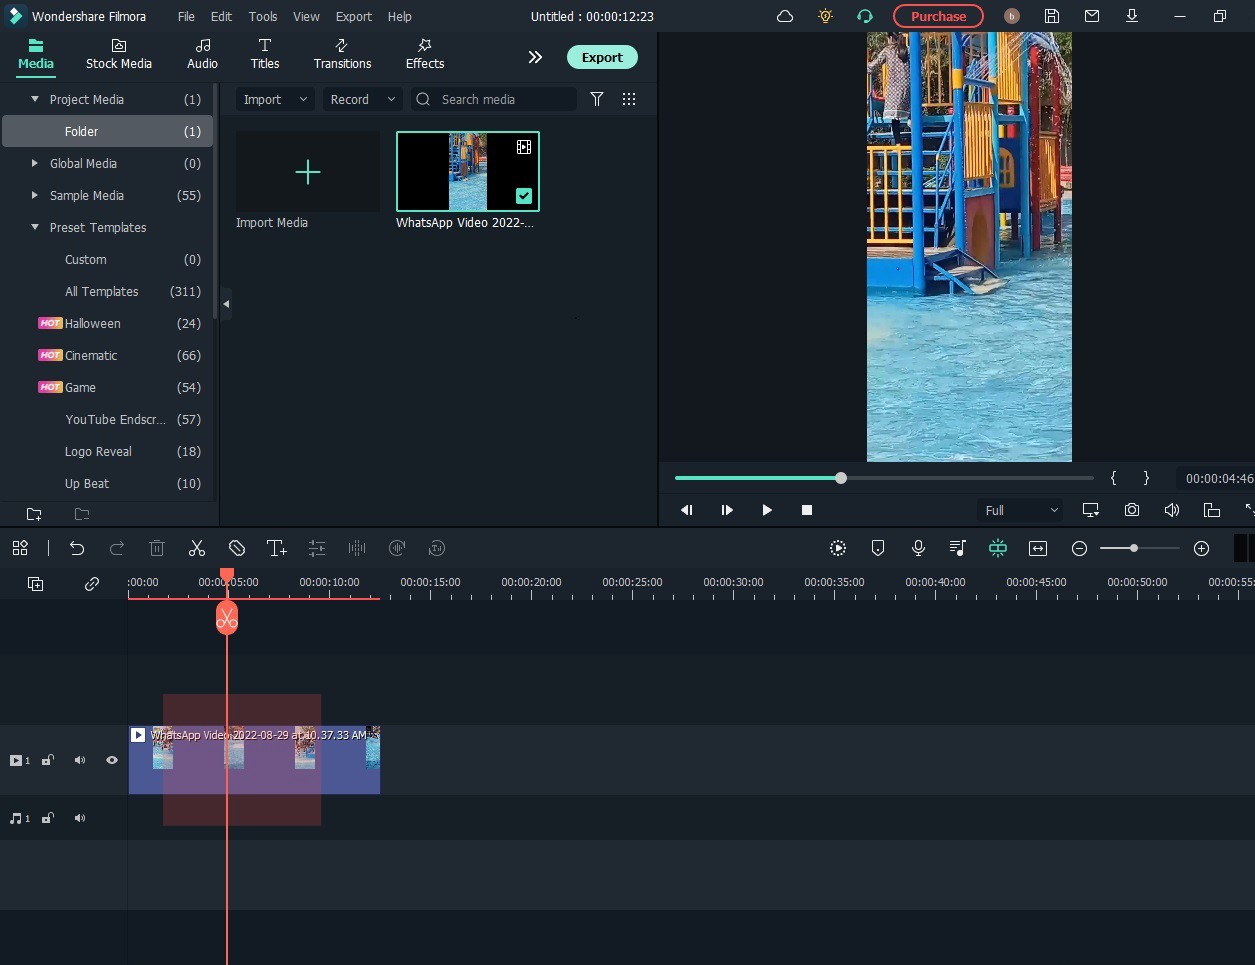
Step3 Now, click the mute button.
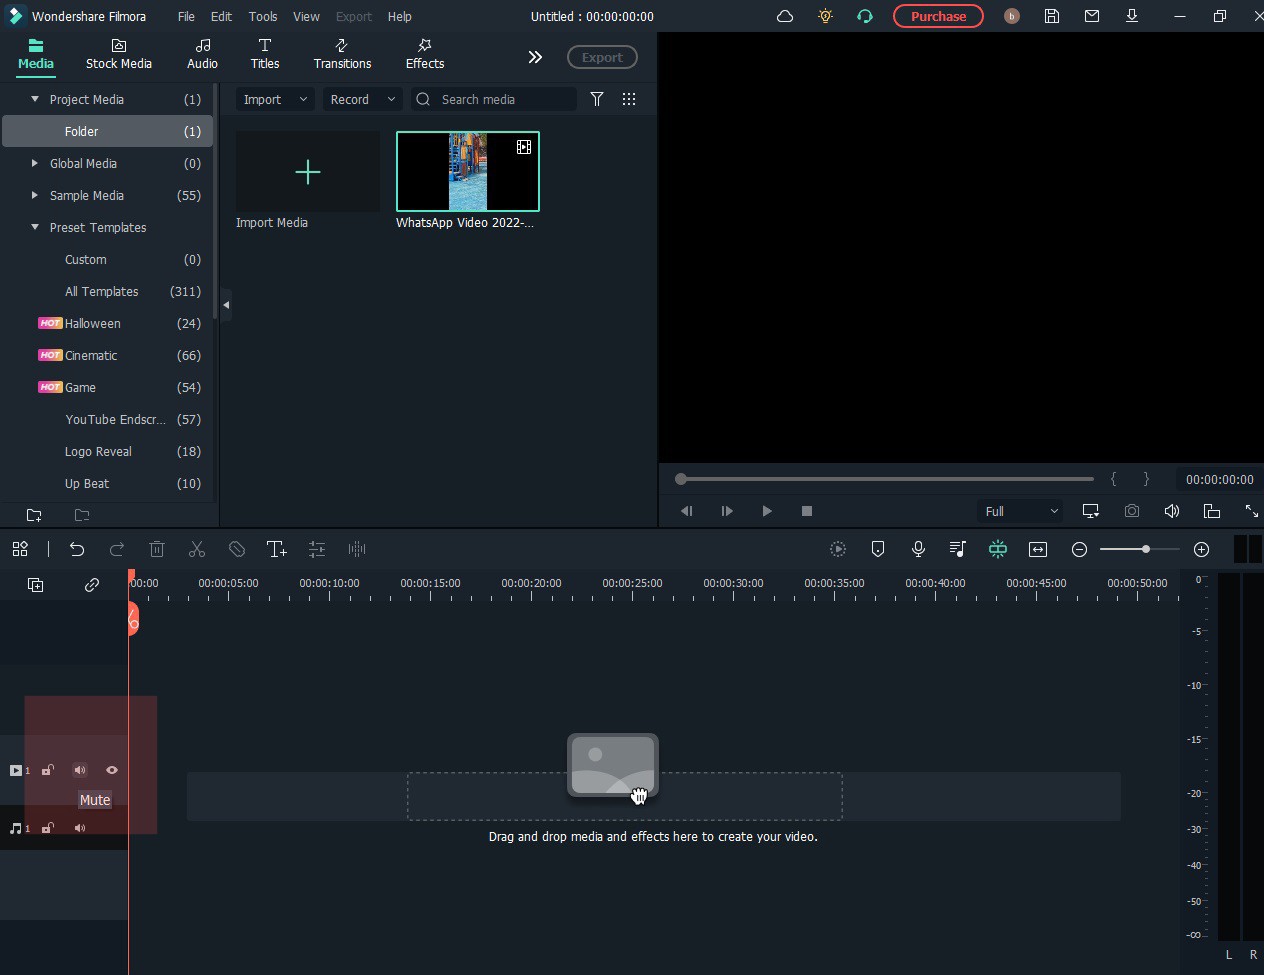
Another way to remove the audio from a video is to delete the audio track. To do this:
Step1 Click on the audio track in the timeline
Step2 Press the delete key on your keyboard.
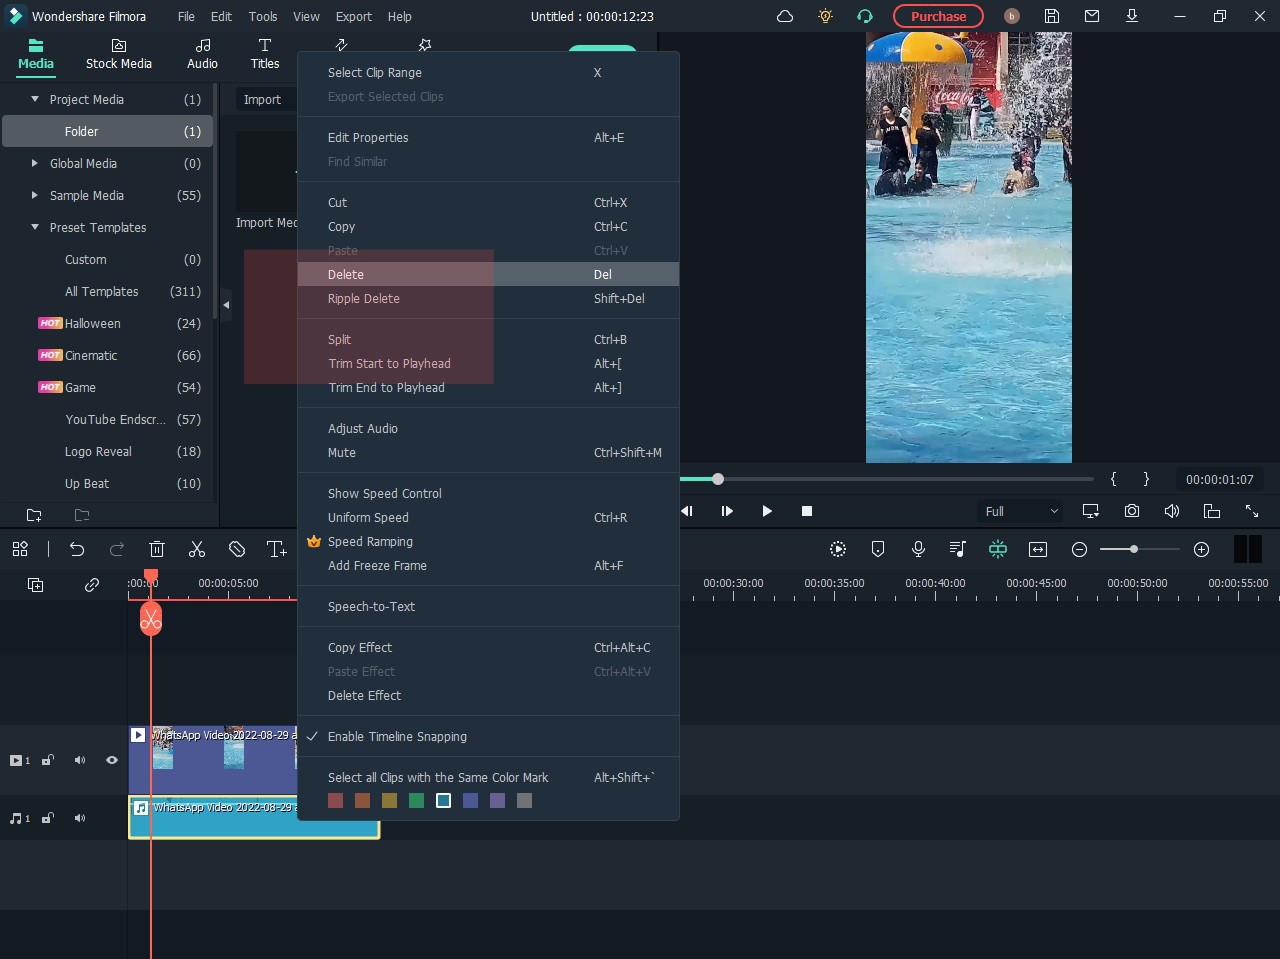
Step3 Click on the export button.
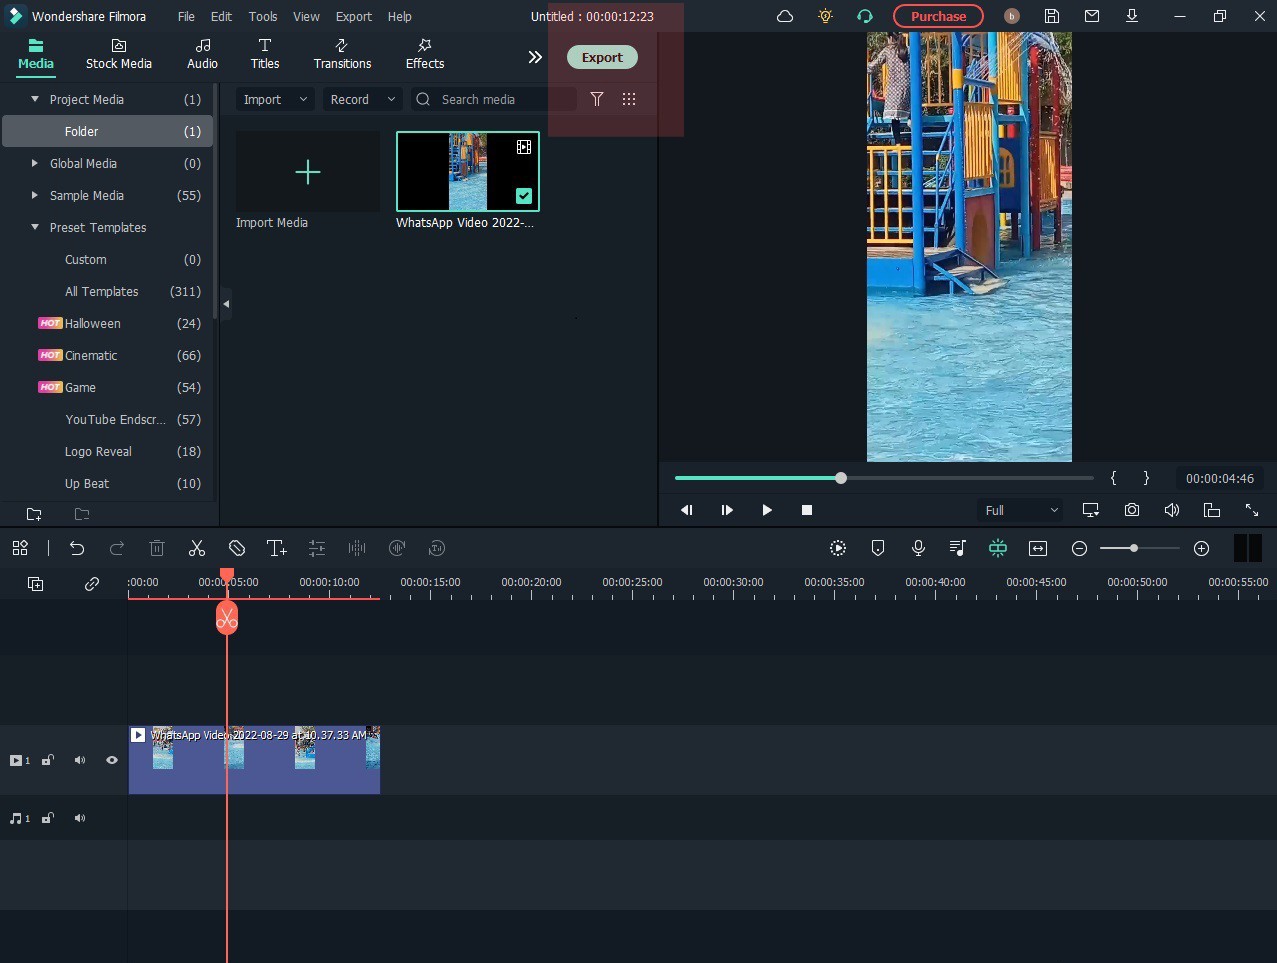
Special Features:
#Silent Detection
With silence detection, you can quickly and easily find the silent moments in your footage. It is great for finding those perfect moments of silence that can impact your film much.
#Audio Ducking
Audio Ducking is a feature in Filmora that automatically lowers the volume of an audio track when another audio track is getting played. It can help ensure that dialog is always audible, even when other sounds are playing in the background.
#TTS and STT
TTS and STT are two features in Filmora that you can use to create subtitles for your video.
TTS stands for text-to-speech, meaning you can create subtitles by typing in the text you want to speak in the video.
STT stands for speech-to-text, meaning you can create subtitles by recording your voice and having Filmora transcribe the text.
Conclusion
Here you go, the best solutions to remove audio from video on Mac. You may choose anyone as per your need.
However, Wondershare Filmora is recommended due to its cross-platform nature and unlimited features.
Free Download For macOS 10.14 or later
An Ultimate Guide to How to remove audio from video in Filmora?
One way is to mute the audio track. To do this, follow the given steps.
Step1 Open a new project in Filmora.

Step2 Click on the audio track in the timeline.

Step3 Now, click the mute button.

Another way to remove the audio from a video is to delete the audio track. To do this:
Step1 Click on the audio track in the timeline
Step2 Press the delete key on your keyboard.

Step3 Click on the export button.

Special Features:
#Silent Detection
With silence detection, you can quickly and easily find the silent moments in your footage. It is great for finding those perfect moments of silence that can impact your film much.
#Audio Ducking
Audio Ducking is a feature in Filmora that automatically lowers the volume of an audio track when another audio track is getting played. It can help ensure that dialog is always audible, even when other sounds are playing in the background.
#TTS and STT
TTS and STT are two features in Filmora that you can use to create subtitles for your video.
TTS stands for text-to-speech, meaning you can create subtitles by typing in the text you want to speak in the video.
STT stands for speech-to-text, meaning you can create subtitles by recording your voice and having Filmora transcribe the text.
Conclusion
Here you go, the best solutions to remove audio from video on Mac. You may choose anyone as per your need.
However, Wondershare Filmora is recommended due to its cross-platform nature and unlimited features.
Also read:
- [Updated] 2024 Approved Simple Steps for Android Voice Recording (No Root)
- [Updated] Discover Hidden Secrets Unveiling TikTok's Best & Mystery Emojis
- [Updated] Mobile Harmony 6 Essential Free Apps to Download YouTube Tracks
- 2024 Approved How to Make Glitch Effect with Filmora
- Advanced Text Dynamics Presets Collection for 2024
- Cross-Platform Promotion: How to Embed a Pin It Feature on Your Facebook Wall
- How to Delete iCloud Account with or without Password from your Apple iPhone 15 Pro Max/Windows/Mac
- Identifying & Resolving Hardware Compatibility Problems with YL Solutions
- In 2024, Do You Know How to Create a Lol Montage Video? Had You Ever Tried that Video Type Before? Connect with This Article to Study the Tips and Tricks Associated with the Making of Montage Videos
- New 2024 Approved Add Text Animation to A Video Online
- New 2024 Approved Guide Adding Audio in Wondershare Filmora
- New 2024 Approved How to Add Filter to Video Online
- New 2024 Approved Working Through the Details of iMovie Slow Motion Video Making 100 Effective
- New Create a Movie with Windows Movie Maker
- New How to Add the Popular Video Text Effects to Your Video, In 2024
- Transfer iPads Books to Personal Computer - A No-iTunes Method for Crossing Platforms
- Troubleshooting: Overactive MsMpEng.exe Eating CPU on Your Windows 10 System (FIXED)
- Title: New In 2024, How To Export Video in Filmora
- Author: Chloe
- Created at : 2025-02-28 18:46:41
- Updated at : 2025-03-04 02:11:37
- Link: https://ai-editing-video.techidaily.com/new-in-2024-how-to-export-video-in-filmora/
- License: This work is licensed under CC BY-NC-SA 4.0.