
:max_bytes(150000):strip_icc():format(webp)/how-to-safely-use-airport-charging-stations-4690583-01-6085c56e46b34f84b5f5d2d976e20677.jpg)
New In 2024, How to Loop Video in Canva
How to Loop Video in Canva
Looping a video is a great way to make your content stand out from the competition. The looped video will repeat the same section of the video, which gives it an eerie feeling like an old-timely music box. For example, if you are creating a series of videos about a product launch, you could use loops to create anticipation for when the product will be available.
You can use this feature on Canva to create an eye-catching looped video that you can use in your social media posts and ads. It is great if you need to use a video in your project, but don’t have time to do the editing. In this article, we’ll walk you through how to Loop a video on Canva.
Part 1: How to Loop Video in Canva
Canva is a great video editing tool that allows users to create stunning videos. It has a simple interface that makes it easy to use even for beginners. Looping a video is a great way to make your content more engaging. You can add a looping effect to any video, whether it’s yours or one you find online. Creating the looping video is super easy!
Canva is a great way to create custom designs for your business. It’s also a great way to make a video for your brand. The looping feature in Canva is a great way to create more engaging infographics. By using this feature, you can create a custom loop, which allows you to create an infographic that repeats itself in the same or different sizes.
Step 1: Create an account on Canva and select the video:
Log in to Canva and click on “Create a design”. Import your video into Canva. You can find the import button on the right side of the screen when you’re editing a new project or opening an existing project by clicking “Open.”, then click on the “Add Video” button. The new video will appear underneath your other assets.

Step 2: Choose the “Present” option by clicking on Share:
Click on the drop-down arrow next to the title bar and select “Present” from the list of available options. Then you can select the feature of Present that how your video will appear in front of you or your audience.

Step 3: Loop your video by choosing the feature “Start auto play”:
A new window will pop up and allow you to customize where in your project this loop will be placed: by default, it will start at 0 seconds and play until it reaches 500 seconds; however, you can change this if needed!

Why should we need the Loop video in Canva?
If you’re looking for a way to make your video stand out from the crowd, then you’ve come to the right place! Here are three ways that you can use looping videos in Canva software to create a more compelling piece of content.
- It adds more value to your content because viewers can watch it over and over again without having to do anything else.
- It helps attract new viewers because they’ll feel compelled to watch the whole thing or at least take action after watching part of it (like clicking on a button).
- It increases retention rates because people will remember something much better than just a static image or text string because there’s movement involved in each frame of the image.
Part 2: Alternative Way to Loop a Video
If you’re using a video editing software like Adobe Premiere or Final Cut Pro, it is likely that you have seen the generic technique of looping a video is by splitting it in two and pasting it together again. What if you need to put on repeat just one individual cut? This is where Filmora steps in! It is a handy tool for trimming and adding clips into your recordings.
The Filmora software can be used to quickly create continual sequences of any duration, irrespective of how long the footage is. It makes possible to synchronize sound and video clips, splice them into one another, and even add titles and motion graphics for a special effect. If you utilize Filmora, you do not need to be an expert in video editing to make professional-looking results. Let us explore why Filmora is necessary for video editing.
Filmora is a video editing software that allows you to make professional-looking videos from your footage. It has a loop feature that lets you create seamless loops where each clip in the sequence plays over and over until you stop it. This can be useful for creating music videos, for example, or for creating small clips that loop seamlessly through the whole video.
The loop feature in Filmora software is a great way to put your video editing skills to the test. It allows you to edit a clip of any length and then play it back over and over again, which can be useful when you’re looking for an ideal looping point or want to see how long a clip is before going back to find out why it didn’t work.
Let’s have a look that how can we loop the video on Filmora:
Step 1: Download Filmora for free and Create a project in it:
Free Download For Win 7 or later(64-bit)
Free Download For macOS 10.14 or later
Download the Filmora software from any browser. After installation opens the software and clicks on create a project. Just add a video in your timeline that you would like to loop. With the Loop tool, you can easily add titles and credits, as well as transitions and effects to your videos.

Step 2: Select the video and make copies of it:
Move the play head to the end of your clip and press right-click to copy the video then use CTRL + V to paste the clip and continue pasting as many copies as you want to create.

Step 3: Add Transition to the video to make it more seamless
Lastly, If you want to make your loop more seamless then go to the Transitions tab and type dissolve in the search bar. Drag the dissolve transition between the two clips on the timeline. This can be useful when you want viewers to watch the video repeatedly.

Part 3: FAQs About Video Loop
1. Can you loop animation in Canva?
Yes, we can make loop animation in Canva. Looping animation in Canva software is not difficult, but it does require a little bit of practice. To loop animation in Canva, follow these steps:
- Go to the Animation tab on the left side of the screen.
- Click on the New Animation button in the top right corner of your screen.
- Select the type of animation you want to create from the drop-down menu next to “Create New Animation From.” This will open up a window that allows you to select between several different options for how your animation will appear, choose one that appeals most to you!
2. How do I loop an mp4 video?
Looping the mp4 video is a fairly simple process. First, you need to import the video into your computer. The easiest way to do this is using the .mp4 files that come with your camera or phone. You can also use any other audio file or a preview of the video as an indicator of where you want to start and end your looping.
Once you have imported your video, you can begin looping it. To do this, click on the “play” button and wait until all the videos have been played. Then, click on one of the two buttons below. The bottom button will play one frame forward in time while the top button will play one frame backward in time.
3. How do I make Canva videos longer?
We’ve got a special function in Canva that lets you crop your video while making it longer. Here’s how:
- Go to the video editor by clicking the cog icon on the top right of your screen.
- Select “Crop Video” from the menu.
- Choose how much footage you want to cut out and press “OK.”
- You’re done! Your video is now cropped and longer than before!
Wondershare Filmora Easy Video Looper Software for PC and Mac Users.
Free Download Free Download Learn More

![]()
Conclusion
Looping video generates interest and emotion in the minds of viewers and it is a great tool. According to research, over 80% of internet users watch videos online to get information or because they want to gain knowledge. People’s attention span has diminished significantly, since the invention of gadgets and all these must-have devices. The video will seem like you are editing the video in real-time.
Free Download For macOS 10.14 or later
Download the Filmora software from any browser. After installation opens the software and clicks on create a project. Just add a video in your timeline that you would like to loop. With the Loop tool, you can easily add titles and credits, as well as transitions and effects to your videos.
Step 2: Select the video and make copies of it:
Move the play head to the end of your clip and press right-click to copy the video then use CTRL + V to paste the clip and continue pasting as many copies as you want to create.
Step 3: Add Transition to the video to make it more seamless
Lastly, If you want to make your loop more seamless then go to the Transitions tab and type dissolve in the search bar. Drag the dissolve transition between the two clips on the timeline. This can be useful when you want viewers to watch the video repeatedly.
Part 3: FAQs About Video Loop
1. Can you loop animation in Canva?
Yes, we can make loop animation in Canva. Looping animation in Canva software is not difficult, but it does require a little bit of practice. To loop animation in Canva, follow these steps:
- Go to the Animation tab on the left side of the screen.
- Click on the New Animation button in the top right corner of your screen.
- Select the type of animation you want to create from the drop-down menu next to “Create New Animation From.” This will open up a window that allows you to select between several different options for how your animation will appear, choose one that appeals most to you!
2. How do I loop an mp4 video?
Looping the mp4 video is a fairly simple process. First, you need to import the video into your computer. The easiest way to do this is using the .mp4 files that come with your camera or phone. You can also use any other audio file or a preview of the video as an indicator of where you want to start and end your looping.
Once you have imported your video, you can begin looping it. To do this, click on the “play” button and wait until all the videos have been played. Then, click on one of the two buttons below. The bottom button will play one frame forward in time while the top button will play one frame backward in time.
3. How do I make Canva videos longer?
We’ve got a special function in Canva that lets you crop your video while making it longer. Here’s how:
- Go to the video editor by clicking the cog icon on the top right of your screen.
- Select “Crop Video” from the menu.
- Choose how much footage you want to cut out and press “OK.”
- You’re done! Your video is now cropped and longer than before!
Wondershare Filmora Easy Video Looper Software for PC and Mac Users.
Free Download Free Download Learn More
![]()
Conclusion
Looping video generates interest and emotion in the minds of viewers and it is a great tool. According to research, over 80% of internet users watch videos online to get information or because they want to gain knowledge. People’s attention span has diminished significantly, since the invention of gadgets and all these must-have devices. The video will seem like you are editing the video in real-time.
Windows Movie Maker Review
Are you considering creating impressive movies from your video clips? Then you need to install this famous Windows movie maker tool to fulfill your job. This is expert video editing Microsoft software that you may use for free. This video editing tool by Windows has received massive recognition due to its simplicity. Also, it makes every task easy and quick, like combining video clips to form digital movies, including various effects, background music, transitions, and titles.
So, Windows Movie Maker is undoubtedly the ideal software for this job. Moreover, video editors using this app experience several attributes in their organization to finally emerge with the perfect videos, like audio options, animations, transitions overlays, and timeline narration. It has user-friendly features, which you’ll enjoy experimenting with. This software also has XML code allowing its end users to modify live effects and transitions or even prepare very new ones.
This brilliant tool can even do primary track editing, including fade-out and fade-in effects in your final audio tracks. Windows movie maker even allows you to post your final project effortlessly on various video sites and social media platforms. Here’s a complete guide:
1. Download and Install Windows Movie Maker
Windows movie maker was previously recognized in Windows 7 as Windows Live Movie Maker. So to experience the features of this software, first, you need to download and install this app which is available free of charge. The steps are as follows.
- Firstly, download the setup file of Windows Live Essentials.
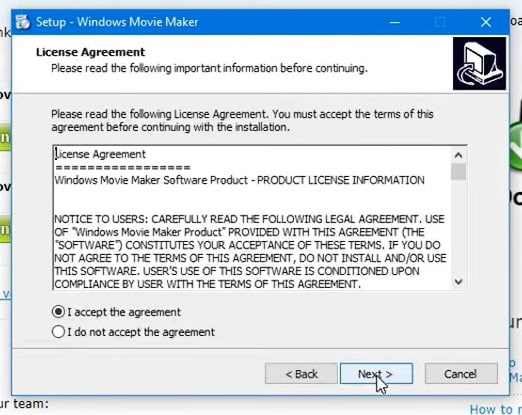
- You’ve to double-click on this setup file called windows-movie-maker.exe. Then tap on ‘Yes’ to permit the setup package to function.
- You’ll now be redirected to the installation window of Windows Essential. Next, you’ll see two options towards the web page’s top, and you’ll have to select the option ‘Install all of Windows Essentials (recommended)’ to continue with the installation process.
Windows Essentials comprise Microsoft OneDrive, Outlook Connector Pack, Movie Maker, Writer, Mail, Photo Gallery, and Messenger.
- Locate ‘View Details’ towards the left end of the page and tap on it. A progress and percentage bar will pop out along with the details regarding the program you’re installing.
- You need to wait a while to install Windows Movie Maker Software. Pause until the program completes its installation. After you find that the program title changes to another program such as Mail, you may proceed again.
- Now click on the Windows icon and then the ‘Start’ menu on the bottom left of your computer screen.
- Type and Search for ‘Windows Movie Maker, and you’ll find the newly downloaded app on the screen.
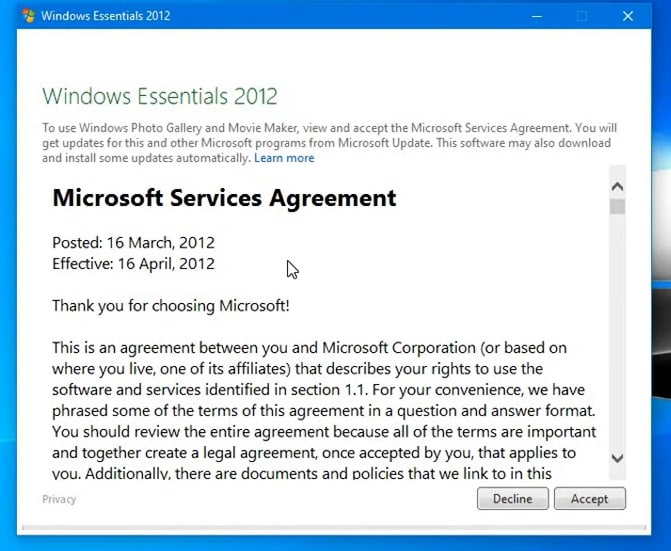
- Click on the icon with film reel, which is the Movie Maker app, and you’ll locate it above the Start menu. Next, you’ll be redirected to the terms of use of Windows Essentials for this Window to begin.
- Find the ‘Accept ‘ button towards the screen’s right-end corner and tap on it. Windows Movie Maker will now open.
- Next, tap on ‘Close’ when prompted with an error message from the installation windows.
You may now Enjoy Windows Movie Maker Live and begin making movies and videos using this software.
2. Interface
The user interface of Winona Movie Maker has three essential areas: the timeline and the storyboard, the panes and the toolbar, and the menu bar. This area covers…
- Timeline and storyboard: It offers a timeline and storyboard usage details for working with the current project clips.
- Panes: It offers details regarding Collections pane usage for viewing all your collections. Furthermore, it offers information regarding the Movie Task pane for all general tasks during movie making or project editing.
- Toolbar and Menubar: Here, you’ll get details regarding toolbar and menu commands usage for different tasks in this software.
3. Basic Editing
Adding clips to your timeline is the most straightforward method for creating digital movies using Movie Maker. Thereby, picking any one AutoMovie Themes out of those seven choices from default, sepia, black and white, pan and zoom, fade, cinematic, and contemporary.
You can enjoy the following choices for editing all your video clips:
- Creating clips: You may create new clips from different video clips after you’re done with capturing and importing in the Windows Movie Maker. You may create clips in the software anytime, according to your convenience.
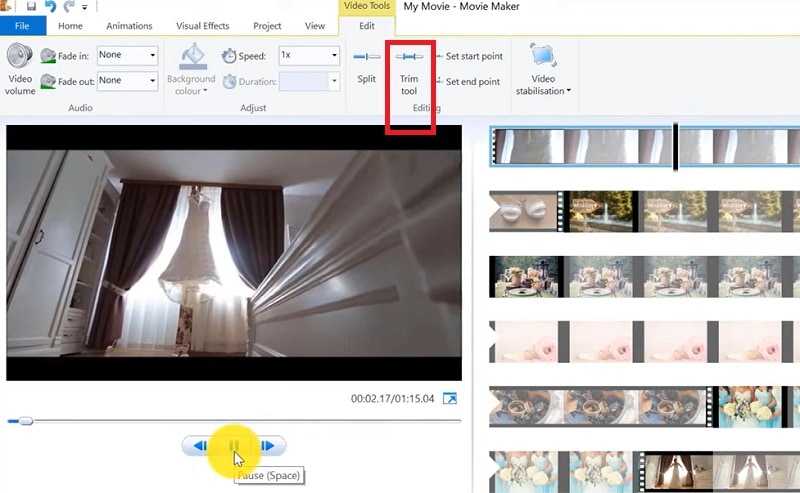
- Trimming any clip: You may hide any clip part you don’t wish to keep in the project. For instance, you may trim the clip’s end or beginning. Also, trimming doesn’t erase the details provided in their source material.
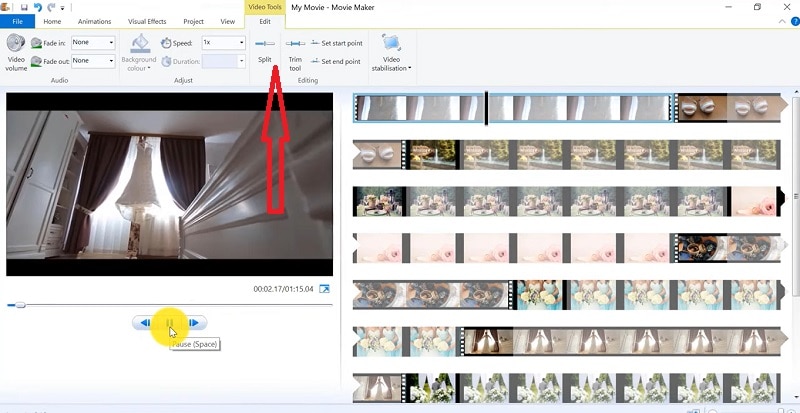
- Splitting Clips: Movie Maker allows you to split any video into two parts which can be helpful when you wish to add a video transition picture between the clips.
- Combining clips: Movie Maker allows you to merge two or multiple contiguous clips. Contiguous indicates that you need to record these clips together so that the beginning and end times are the same as the following video clip.
4. Add Video Effects
Video effects’ ascertain how any title, picture, or video clip displays in the final movie or project. Video effects permit you to include various effects in the movie and are added for the total time that the title, picture, or video clip displays.
Furthermore, you may add various other effects, which you’ll find in the folder of video effects in their Collections pane. You may maintain video effects when moving, copying, cutting, or splitting a picture or video clip.
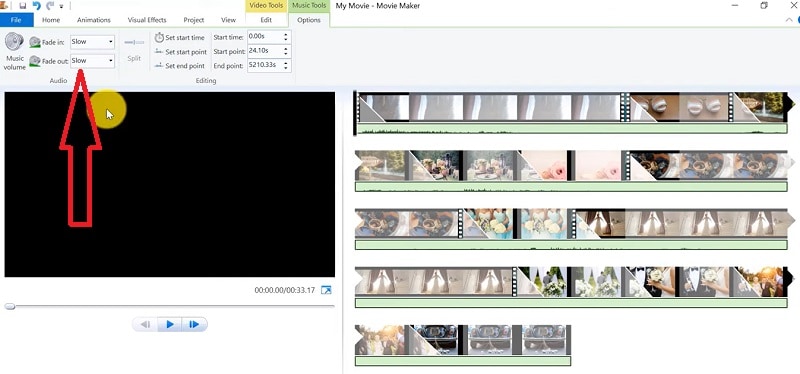
5. Audio Editing
Windows Movie Maker permits you to operate various audios in several ways. A few specific audio-related jobs you may execute in Windows Movie Live Maker comprise the following:
- Audio levels adjustment: You can adjust your audio level so that you can easily control the audio playback and balance after you have the audio that comes up on Music/ Audio and Audio tracks in your timeline.
- Timeline narration: You may include a voice narration for the picture or video clips, which will appear on the timeline’s video track. There’ll be an automated synchronization of the audio narration with your video, where the narration shall elaborate on the movie event or action when you play it.
- Audio Clips Volume adjustment: You may adjust the audio volume for the video clip’s audio portion or the clips containing only audio. This permits you to control the audio clip’s volume such that you can hear it based on the sound level you’ve set for your audio clip.
- Adding audio effects: You may add various audio effects like mute, fade out and fade in.
6. Share Files
Are you done with video project editing, and now you wish to share it? Windows Movie Maker offers you various choices for sharing straight away from their app, comprising:
- YouTube
- Vimeo
So with this power, you may guarantee to share the video’s correct aspect ratio and size version to any planned platform. Nevertheless, you don’t require signing in to your Microsoft account for sharing to the preferred platform, which may act as a hurdle for all its users who do not have Microsoft Office accounts.
7. Pros and Cons
The software’s advantages are its automated preview, simple controls, and user-friendliness. Additionally, the following are some clear advantages and disadvantages of using Windows Movie Maker:
Pros
- This app is perfect for all novices and is an ideal introduction as it utilizes several pro editing systems’ general workflow components like assembling timelines and importing. Its interface has easy navigation and is exceptionally intuitive for most new beginners as well.
- Windows Live MovieMaker is a video editing Microsoft application that arrives standard with all Windows computers. It is amongst the most favorite editing apps obtainable and exact, as other programs are user-friendly and fun. This software comes free with Vista, XP, and Windows Me and has effortless usage. Moreover, you may download additional video plugins, plus it won’t give you any chance to complain regarding its free software.
- This app is straightforward to learn, and you won’t require any experience in film editing for using Windows Media Player. You’ll explore more than 130 effects with accessible Fantastic credits, titles, and transitions. Next to this, you may drag and then drop the clip at any place in the timeline.
- Windows Movie Maker is an ideal app for image slide shows and was developed to create photo and home movie slide shows. It presents excellent fun transitions and themes; you may add music easily. This app provides excellent variety, being a free editing application. Furthermore, it offers transitions and striking effects to function with.
- Windows Live Movie Maker is free of cost for all Microsoft Windows users and is basically for clients having zero to minimum experience editing audio and videos. Moreover, it has many special effects you may use while creating videos. Also, you may frag and then place any picture or video anywhere you wish to see it.
- You can choose from several themes, enhancing your film with tools like contemporary themes, fade effects, and sepia toning choices. You have to click once, and then the users can choose and apply from the multiple effects collection.
Cons
- Windows Movie Maker contains unlimited audio and video tracks, yet it provides just one accessible one at a time. Hence, if you wish to include some other audio or music track, you may prepare the video, thereby sending it to the ultimate file.
- It isn’t uninstallable using any remove or add control panel. Also, it is impossible to do video overlaying.
- This app requires much patience because it is prone to crashes. Moreover, you’ll require enough time and effort to do video reversing. It often becomes frustrating for all advanced editors to cut clips into small parts and then add them back. Hence, Windows Movie maker isn’t good for professional video editors.
- Windows Live MovieMaker can crash and freeze and is known to suffer frequent crashes. Hence, ensure saving often and avoid creating complex videos. Also, you cannot perform complex editing and can now prepare single audio and video track.
8. Windows Movie Maker Alternative Software
Wondershare Filmora Video Editor is the best alternative for Windows Movie Live Maker and is a highly favored and most effective software program. You can download it for free, and it is adaptable with Windows 7 OS or above. This app is user-friendly but powerful and allows you to split, merge, crop, and trip various video clips with essential built-in video editing attributes.
Free Download For Win 7 or later(64-bit)
Free Download For macOS 10.14 or later
Additionally, you may get a few advanced properties like video stabilization, color correction, and green screen in Filmora effortlessly. You may even explore several fashionable and modern video effects such as music, text, and intros for topics like games, Education, Travel, Vlogger, Beauty, etc. Here is the comparison between the two software:
Filmora and Windows Movie Maker comparison
| Basis | Windows Movie Maker | Wondershare Filmora |
|---|---|---|
| Pricing | Free/ inexpensive | Quote basedAnnual SubscriptionOne-time paymentMonthly Payment |
| Interface | Pleasing interface | Auto movie options |
| Effects | Several overlays and effects | Special effects choices and transition overlays |
| Integration | YouTubeFacebookVimeoEmail | TwitterInstagramFacebookVimeoYouTube |
Conclusion
You may use Windows Movie Maker Live for capturing videos and audio to the computer using various video sources, including Web Cameras and Video Cameras, thereby using the recorded data in your new movies. You may import still pictures, video, and audio into this application to use in the movies you’re making. Moreover, after you’ve finished with video and audio content editing in this app, which may involve adding effects, video transitions, and titles, you may finally save the ultimate movie and then share and watch it with your family and friends.
How to Create a Smooth Cut Transition Effect?
Transition effects are necessary for making amazing videos, slideshows, and presentations. These are the dedicated effects appearing when one slide or clip replaces the other. Hence, any video editing software is incomplete without impressive transition effects.
Going by the same, Wondershare Filmora offers different video and audio transitions to help users. Wondershare Filmora users can bring the best transitions at the beginning or end of the video or between two video clips. These can be used while changing the mood of videos, changing the subject, passing the time, showing the change of direction, etc.
The dedicated transitions tab allows Wondershare Filmora users to apply different transitions quickly and easily. Let us go into detail about creating a smooth-cut transition effect in Wondershare Filmora in this step-by-step guide.
Steps to create a smooth cut transition effect in Wondershare Filmora
Wondershare Filmora is a popular video editing tool used by content creators, including social media influencers, marketers, content creators, etc. The following are the quick and detailed steps to create a smooth cut transition effect in Wondershare Filmora:
Free Download For Win 7 or later(64-bit)
Free Download For macOS 10.14 or later
Step1Download and launch Wondershare Filmora
Before even jumping to the smooth-cut transition effect in Wondershare Filmora, the first step is to download and launch it on your system. It is easy to download this software on Windows and Mac devices. The quick steps for downloading and launching Wondershare Filmora are as follows:
- Go to the official website of Wondershare Filmora .
- Go to the Download button located in the top right corner of the official website.

- The Filmora Installer will download quickly for your Windows or Mac system.
- Double-click on the setup and start the installation process. Agree on the terms and conditions menu thus prompted.
- Once Wondershare Filmora is installed, it will start and run automatically on your system.
Step2Import the footage
The first step in creating a smooth cut transition effect is to import the footage. All you need to do is use the drag-and-drop functionality of the Wondershare Filmora. You can import 2 footage to the video editor interface with the quick steps mentioned below.
- Start by dragging the two footage to the timeline using the drag and drop functionality.
- Now, select the footage in the video editor.
- The next step is to copy the layer of the footage and lock the current layer.
- Then, paste the current layer over the other layer of the footage.
- Move towards the end of this step by unlocking the layer. Then you need to hide the below layer.

Step3Go to the effects tab and apply preset settings
After importing the footage and applying different layers. The next step is to go to the Effects tab in the Wondershare Filmora. Then, the preset settings are applied to the footage. The quick steps for the same are:
- Start by applying the crop presets to the above-layer footage.
- Select the first footage in the video editor.
- Right-click on properties and open the effects menu.
- Search the settings and change the top and bottom settings to 30
- You can select to blur the edges of the footage by ticking on the option.
- Repeat the same steps for the second footage.

Step4Go to the Transitions tab
It is time to go to the transitions tab and start putting it in your video clip. The quick steps for the same are:
- Select the speed blur category located on the left side of the interface.
- Go to the search box and type “flip.”
- Start placing the transitions on the footage layers.
- Select the first transition, flip all three, and place it on the second layer of the footage.
- Select the second transition, flip all two, and place it on the first layer of the footage.
- Render this video part by unhiding the first layer and moving to the preview step.

Step5Lorem ipsum dolor sit amet eam quas malorum
It is time to preview the created video. The render preview option in the Wondershare Filmora ensures that there is no lag in the preview file on any system. It generates the rendered versions of the files placed on the timeline for a quick preview. In addition to it, it is easy to add a top to bottom transition in the video editing in this step only. The quick steps for the same are:
- Preview the created video file and check if there is a need to change the transition.
- If required to add the top to bottom transition, remove the existing transitions.
- Select the first footage and go to its properties menu.
- Go to the crop settings and reset these settings.
- Change the right and left parameters in the settings to 30.
- Repeat the same steps for the second footage.
- Select the second layer, and apply and flip all four effects.
- Select the first layer, and apply to flip all one effect.
- Render the video footage and go for a quick preview.

Conclusion
Hence, Wondershare Filmora users can quickly create a smooth cut transition effect in their videos. It is easy to download Wondershare Filmora on your Mac or Windows system. All you need to do is import the footage to the interface and go to the effects tab.
The next step is to go to the transitions tab. It is easy to apply these effects to the first and the second layer. It is easy to check the preview of the created video, and if required, users can go for adding top bottom transition here.
Reset the crop settings of the first footage and select the right and left parameters to 30. The same is done to the second footage. After adding the different effects to created video, it is easy to save and preview the final footage. Beginners and professionals can go for these steps to incorporate a smooth-cut transition effect into their next video.
Free Download For macOS 10.14 or later
Step1Download and launch Wondershare Filmora
Before even jumping to the smooth-cut transition effect in Wondershare Filmora, the first step is to download and launch it on your system. It is easy to download this software on Windows and Mac devices. The quick steps for downloading and launching Wondershare Filmora are as follows:
- Go to the official website of Wondershare Filmora .
- Go to the Download button located in the top right corner of the official website.
- The Filmora Installer will download quickly for your Windows or Mac system.
- Double-click on the setup and start the installation process. Agree on the terms and conditions menu thus prompted.
- Once Wondershare Filmora is installed, it will start and run automatically on your system.
Step2Import the footage
The first step in creating a smooth cut transition effect is to import the footage. All you need to do is use the drag-and-drop functionality of the Wondershare Filmora. You can import 2 footage to the video editor interface with the quick steps mentioned below.
- Start by dragging the two footage to the timeline using the drag and drop functionality.
- Now, select the footage in the video editor.
- The next step is to copy the layer of the footage and lock the current layer.
- Then, paste the current layer over the other layer of the footage.
- Move towards the end of this step by unlocking the layer. Then you need to hide the below layer.
Step3Go to the effects tab and apply preset settings
After importing the footage and applying different layers. The next step is to go to the Effects tab in the Wondershare Filmora. Then, the preset settings are applied to the footage. The quick steps for the same are:
- Start by applying the crop presets to the above-layer footage.
- Select the first footage in the video editor.
- Right-click on properties and open the effects menu.
- Search the settings and change the top and bottom settings to 30
- You can select to blur the edges of the footage by ticking on the option.
- Repeat the same steps for the second footage.
Step4Go to the Transitions tab
It is time to go to the transitions tab and start putting it in your video clip. The quick steps for the same are:
- Select the speed blur category located on the left side of the interface.
- Go to the search box and type “flip.”
- Start placing the transitions on the footage layers.
- Select the first transition, flip all three, and place it on the second layer of the footage.
- Select the second transition, flip all two, and place it on the first layer of the footage.
- Render this video part by unhiding the first layer and moving to the preview step.
Step5Lorem ipsum dolor sit amet eam quas malorum
It is time to preview the created video. The render preview option in the Wondershare Filmora ensures that there is no lag in the preview file on any system. It generates the rendered versions of the files placed on the timeline for a quick preview. In addition to it, it is easy to add a top to bottom transition in the video editing in this step only. The quick steps for the same are:
- Preview the created video file and check if there is a need to change the transition.
- If required to add the top to bottom transition, remove the existing transitions.
- Select the first footage and go to its properties menu.
- Go to the crop settings and reset these settings.
- Change the right and left parameters in the settings to 30.
- Repeat the same steps for the second footage.
- Select the second layer, and apply and flip all four effects.
- Select the first layer, and apply to flip all one effect.
- Render the video footage and go for a quick preview.
Conclusion
Hence, Wondershare Filmora users can quickly create a smooth cut transition effect in their videos. It is easy to download Wondershare Filmora on your Mac or Windows system. All you need to do is import the footage to the interface and go to the effects tab.
The next step is to go to the transitions tab. It is easy to apply these effects to the first and the second layer. It is easy to check the preview of the created video, and if required, users can go for adding top bottom transition here.
Reset the crop settings of the first footage and select the right and left parameters to 30. The same is done to the second footage. After adding the different effects to created video, it is easy to save and preview the final footage. Beginners and professionals can go for these steps to incorporate a smooth-cut transition effect into their next video.
Most-Used 3 Ways to Compress Video for Instagram Story, Feed, and IGTV
Did your high-quality 4K video become total garbage when uploaded to Instagram? If it’s a yes from your side, then what you need now is a video compressor for Instagram. This article will cover how to compress a video for Instagram while maintaining its quality with a professional video editing tool, online video editors, and mobile phone applications.
But first, let’s look for the things we need to know before compressing a video for Instagram.
Part 1: Before reducing video size for Instagram, things you need to know
If you want to use a video compressor for Instagram, you must know the specific requirements of an Instagram video. Instagram only accepts MP4, MOV, or GIF videos and has concrete limitations on almost every video aspect. But you don’t have to be tense because for your ease, we have compiled all those limitations on Story, Reel, Live, or feed videos into a tabular form. Here it is,
| Features | Feed Video (landscape, square, portrait) | Story | Reels | Live |
|---|---|---|---|---|
| Size guide | Max 60 sec | Max 15 sec | Max 90 sec | Max 60 min |
| Aspect ratio | 16:9 for landscape, 1:1 for square, 4:5 for portrait | 9:16 | 9:16 | 9:16 |
| Frame rate.( frame per sec) | 23 - 60 FPS | Min 30 FPS | Min 30 FPS | Min 30 FPS |
| File size | Max 4 GB | Max 4 GB | Max 4 GB | Max 4 GB |
| Upload video captions | Can upload a full caption and Up to 30 Hashtags | No caption Upto 10 hashtags per story. | Can upload a full caption and up to 30 Hashtags | Auto-generated captions uploaded if enabled |
| 60- second feed reviews | MP4/MOV/GIF | MP4/MOV/GIF | MP4/MOV | MP4/MOV |
| Minimum dimensions.(pixels) | 600×315 for landscape, 600×600 for square, 600×750 for portrait | 600 x 1067 | 600 x 1067 | 600 x 1067 |
| Maximum dimension(pixels) | 1080 x 608 for landscape, 1080 x 1080 for square, 1080 x 1350 for portrait | 1080 x 1920 | 1080 x 1920 | 1080 x 1920 |
That’s a lot of information, right? That’s why we have sorted out the best Instagram video compression settings recommended to make a high-quality video for Instagram, which are as.
Format:
Resolution: 720P or 1080P
Bitrate:
3Mbps-6Mbps
Frame rate:
30Fps
Now that you know all the specific requirements and the recommended video compression settings. Let us show you how to compress a video without losing quality for Instagram with a professional Video-Editing Tool.
Part 2: Compress Video Without Losing Quality for Instagram with a Professional Video-Editing Tool
Wondershare Filmora
Speaking of the simplest video compressor for Instagram on all recent Windows or macOS computers, Wondershare Filmora stands out as one of the best bets. In addition to video-editing, most users prefer this tool for compressing their videos before uploading them to Instagram. It is highly reliable and takes less time when compared to other methods and tools in the digital market.
Wondershare Filmora is not only trusted by a community of over 85 Million Users but is also an award-winning video editing tool in the market. Here are some awards and some customer reviews which it boasts of.
Free Download For Win 7 or later(64-bit)
Free Download For macOS 10.14 or later
Awards:
- G2 Leader Spring 2022: with a winning streak of 17 Quarters.
- Shorty Awards: “Best in Photo and Video” and “Audience Honor” awards on the 13th edition of shorty awards.
- Category Leaders 2022: “ Category Leaders in Video Editing” award.

Now some customer reviews.
Reviews
The evaluation of Wondershare Filmora by the people who have purchased or experienced it is almost always positive. This can be shown by the amazing reviews which people leave after using Wondershare Filmora. Here are some of the reviews about it.

Now, let’s move forward and see the key features provided byWondershare Filmora.
Main Features
WondrShare Filmora is one of the best Video Editing tools out there. Not only it’s an excellent video compressor for Instagram, but it also provides all the powerful editing tools one could want. Here are the main features which Wondershare Filmora provides.
- Filmora allows users to create GIF from all popular video formats like .wmv, .mp4, .mkv, .evo, .dat, .wav, .mpeg and .avi etc. so you need not to worry about compatibility issues.
- The best thing to know about the Filmora video editing software tool is that it allows users to edit GIF files with some basic editing tools like color correction, cropping, splitting, rotation, combining two or more frames, speeding up frame motion or slow down as per requirement.
- It allows you to edit files with text and other similar interesting elements.
- Moreover, you can also add some incredible effects to your videos by using Filmora.
- On top of that, its video compressing feature makes it an excellent video compressor for Instagram.
Now moving on to the Pros and Cons of using Wondershare Filmora.
Pros
- It is easy to use, even for beginners
- Multiple formats are supported
- Tutorials are available on youtube for their every feature
- Free trial is available for everyone
Cons
- Leaves a watermark (can be removed after buying the full version)
- Full features are available only in the premium version
- Latest versions operate slowly in weak capability computers
We’ve known that Wondershare Filmora is a great video compressor for Instagram. Let’s move to the step-by-step guide for using Wondershare Filmora to compress a video for Instagram.
Step1Download, install, and launch the program (buy the full version to enjoy its all features.)
Step2Change the Aspect Ratio from the first screen that appears and click on the “New Project” option.

Step3When the main screen appears, drag the video to the area shown below or click here to select the video from your storage to import the video to the software.

Step4Drag the video to the bottom area.

Step5Then click the “export” button above, and a new screen will appear.

Step6Change the video format from the left area to MP4 and click the “SETTINGS” button to change further settings.

Step7Then change the resolution, frame rate, and bit rate to the recommended values shown in part 1 of this article.

Step8Now the settings have been changed. Just click the export button to convert the video to the changed settings.

Easy right? Now let’s see how we can use an online video compressor for Instagram.
Part 3: Free Online Video Compressor to Resize Your Videos for Instagram
Although Wondershare Filmora is an incredible video compressor for Instagram, there are instances when someone’s computer doesn’t support it or if someone only uses video compressors once in a while.
If that is your case, you don’t need to buy expensive video compressors because we have made it easy for you. In this part of the article, we will discuss some outstanding free online video compressors to resize your videos for Instagram. So why wait? Let’s move on.
But there are myriad online video compressors, like VEED.IO, FreeConvert, Clipchamp, VideoSmaller, and Adobe Express. So which one to choose? Of course, it’s Adobe Express.
Adobe Express
Adobe Express is a free online tool for making quality images, videos, and texts for all your projects, all in one place.
On top of that, it enables you to quickly create standard social graphics, flyers, and logos without hassle. And the video editing tools in it make it an excellent video compressor for Instagram.
Let’s see some Pros and Cons of using Adobe Express as a video compressor for Instagram.
Pros
- Easy to use interface
- Free accounts are available and can also be upgraded to enjoy more amazing features
Cons
- Bitrate and framerate can’t be changed
Here are the step-by-step instructions to compress a video for Instagram.
Step1Go to Adobe Express and click the “start for free” button.

Step2Sign in using Google, Facebook, Apple, Email, or Adobe ID. Then the main screen of the Adobe Express will be shown.

Step3Click on the “ + “ sign in the top left corner.

Step4Here from the video editing tools section, select the “ Resize video .“

Step5Drag the video you want to compress here or open it from your storage.

Step6Now select the shape and resolution and click the Download button.

Step7Adobe Express will compress your video, and it will be downloaded automatically.

But What if someone wants to compress videos on their mobile phones? Is that possible? Of course, it is! Let us show you some amazing video compressors for Instagram on iPhone and Android.
Part 4: How to reduce video/mp4 size for Instagram on iPhone and Android
As the era of mobile phones is improving day by day, most social media applications, including Instagram, are used on either Android or iPhones. So if you took a high-quality 4K video from your mobile and are looking for a video compressor for Instagram, you don’t need to open your computer for this trivial matter. Because here are some of the best video compressor apps for android and video compressor apps for iOS.
All these have pros and cons, but we recommend using “Video Compress” to compress your high-quality video on Android or iPhone. And why is that? Because not only does it support all video formats but also provides the function of trimming, cropping, or rotating the video. Moreover, it also allows the audio removal to increase the video’s compression further.
Here are some Pros and Cons of using “Video Compress”
Pros
- Very simple to use
- On top of adjusting the quality between low and high, you can also make custom settings
- Can share the video directly from the app
Cons
- There is no search option; you must manually select the video from your storage
- No option for merging multiple videos into one
Here are the steps to compress video using Video Compress on Android phones.
Step1Download, Install and Launch the “Video Compress” from the AppStore.

Step2Open the folder containing the file, then select the video you want to compress.
Step3“Compress Video” will show you many options for editing your video. Press on the compress video option.

Step4Go to the Custom Settings and change the video resolution and bitrate to the ones recommended in Part 1 of this article.
Step5Finally, press the video compress icon on the bottom of the screen, and “Video Compress” will compress your video with the selected settings.

But there are some limitations, too, like it doesn’t change the aspect ratio and frame rate of the video, which are crucial for uploading it on Instagram. So we recommend using Wondershare Filmora if you are looking for a video compressor for Instagram.
Final Words
Compressing a high-quality video before uploading it on Instagram is necessary because of the concrete limitations of Instagram. In this article, we have gone over different video compressors for Instagram. Each of these video compressors can shrink the video without compromising its quality. So you can upload those videos on your Instagram feed, story, reels, or live videos effectively.
Did you use one of these video compressors for Instagram? Let us know your thoughts in the comments section below. Thanks for reading.
Part 1: Before reducing video size for Instagram, things you need to know
If you want to use a video compressor for Instagram, you must know the specific requirements of an Instagram video. Instagram only accepts MP4, MOV, or GIF videos and has concrete limitations on almost every video aspect. But you don’t have to be tense because for your ease, we have compiled all those limitations on Story, Reel, Live, or feed videos into a tabular form. Here it is,
| Features | Feed Video (landscape, square, portrait) | Story | Reels | Live |
|---|---|---|---|---|
| Size guide | Max 60 sec | Max 15 sec | Max 90 sec | Max 60 min |
| Aspect ratio | 16:9 for landscape, 1:1 for square, 4:5 for portrait | 9:16 | 9:16 | 9:16 |
| Frame rate.( frame per sec) | 23 - 60 FPS | Min 30 FPS | Min 30 FPS | Min 30 FPS |
| File size | Max 4 GB | Max 4 GB | Max 4 GB | Max 4 GB |
| Upload video captions | Can upload a full caption and Up to 30 Hashtags | No caption Upto 10 hashtags per story. | Can upload a full caption and up to 30 Hashtags | Auto-generated captions uploaded if enabled |
| 60- second feed reviews | MP4/MOV/GIF | MP4/MOV/GIF | MP4/MOV | MP4/MOV |
| Minimum dimensions.(pixels) | 600×315 for landscape, 600×600 for square, 600×750 for portrait | 600 x 1067 | 600 x 1067 | 600 x 1067 |
| Maximum dimension(pixels) | 1080 x 608 for landscape, 1080 x 1080 for square, 1080 x 1350 for portrait | 1080 x 1920 | 1080 x 1920 | 1080 x 1920 |
That’s a lot of information, right? That’s why we have sorted out the best Instagram video compression settings recommended to make a high-quality video for Instagram, which are as.
Format:
Resolution: 720P or 1080P
Bitrate:
3Mbps-6Mbps
Frame rate:
30Fps
Now that you know all the specific requirements and the recommended video compression settings. Let us show you how to compress a video without losing quality for Instagram with a professional Video-Editing Tool.
Part 2: Compress Video Without Losing Quality for Instagram with a Professional Video-Editing Tool
Wondershare Filmora
Speaking of the simplest video compressor for Instagram on all recent Windows or macOS computers, Wondershare Filmora stands out as one of the best bets. In addition to video-editing, most users prefer this tool for compressing their videos before uploading them to Instagram. It is highly reliable and takes less time when compared to other methods and tools in the digital market.
Wondershare Filmora is not only trusted by a community of over 85 Million Users but is also an award-winning video editing tool in the market. Here are some awards and some customer reviews which it boasts of.
Free Download For Win 7 or later(64-bit)
Free Download For macOS 10.14 or later
Awards:
- G2 Leader Spring 2022: with a winning streak of 17 Quarters.
- Shorty Awards: “Best in Photo and Video” and “Audience Honor” awards on the 13th edition of shorty awards.
- Category Leaders 2022: “ Category Leaders in Video Editing” award.
Now some customer reviews.
Reviews
The evaluation of Wondershare Filmora by the people who have purchased or experienced it is almost always positive. This can be shown by the amazing reviews which people leave after using Wondershare Filmora. Here are some of the reviews about it.
Now, let’s move forward and see the key features provided byWondershare Filmora.
Main Features
WondrShare Filmora is one of the best Video Editing tools out there. Not only it’s an excellent video compressor for Instagram, but it also provides all the powerful editing tools one could want. Here are the main features which Wondershare Filmora provides.
- Filmora allows users to create GIF from all popular video formats like .wmv, .mp4, .mkv, .evo, .dat, .wav, .mpeg and .avi etc. so you need not to worry about compatibility issues.
- The best thing to know about the Filmora video editing software tool is that it allows users to edit GIF files with some basic editing tools like color correction, cropping, splitting, rotation, combining two or more frames, speeding up frame motion or slow down as per requirement.
- It allows you to edit files with text and other similar interesting elements.
- Moreover, you can also add some incredible effects to your videos by using Filmora.
- On top of that, its video compressing feature makes it an excellent video compressor for Instagram.
Now moving on to the Pros and Cons of using Wondershare Filmora.
Pros
- It is easy to use, even for beginners
- Multiple formats are supported
- Tutorials are available on youtube for their every feature
- Free trial is available for everyone
Cons
- Leaves a watermark (can be removed after buying the full version)
- Full features are available only in the premium version
- Latest versions operate slowly in weak capability computers
We’ve known that Wondershare Filmora is a great video compressor for Instagram. Let’s move to the step-by-step guide for using Wondershare Filmora to compress a video for Instagram.
Step1Download, install, and launch the program (buy the full version to enjoy its all features.)
Step2Change the Aspect Ratio from the first screen that appears and click on the “New Project” option.
Step3When the main screen appears, drag the video to the area shown below or click here to select the video from your storage to import the video to the software.
Step4Drag the video to the bottom area.
Step5Then click the “export” button above, and a new screen will appear.
Step6Change the video format from the left area to MP4 and click the “SETTINGS” button to change further settings.
Step7Then change the resolution, frame rate, and bit rate to the recommended values shown in part 1 of this article.
Step8Now the settings have been changed. Just click the export button to convert the video to the changed settings.
Easy right? Now let’s see how we can use an online video compressor for Instagram.
Part 3: Free Online Video Compressor to Resize Your Videos for Instagram
Although Wondershare Filmora is an incredible video compressor for Instagram, there are instances when someone’s computer doesn’t support it or if someone only uses video compressors once in a while.
If that is your case, you don’t need to buy expensive video compressors because we have made it easy for you. In this part of the article, we will discuss some outstanding free online video compressors to resize your videos for Instagram. So why wait? Let’s move on.
But there are myriad online video compressors, like VEED.IO, FreeConvert, Clipchamp, VideoSmaller, and Adobe Express. So which one to choose? Of course, it’s Adobe Express.
Adobe Express
Adobe Express is a free online tool for making quality images, videos, and texts for all your projects, all in one place.
On top of that, it enables you to quickly create standard social graphics, flyers, and logos without hassle. And the video editing tools in it make it an excellent video compressor for Instagram.
Let’s see some Pros and Cons of using Adobe Express as a video compressor for Instagram.
Pros
- Easy to use interface
- Free accounts are available and can also be upgraded to enjoy more amazing features
Cons
- Bitrate and framerate can’t be changed
Here are the step-by-step instructions to compress a video for Instagram.
Step1Go to Adobe Express and click the “start for free” button.
Step2Sign in using Google, Facebook, Apple, Email, or Adobe ID. Then the main screen of the Adobe Express will be shown.
Step3Click on the “ + “ sign in the top left corner.
Step4Here from the video editing tools section, select the “ Resize video .“
Step5Drag the video you want to compress here or open it from your storage.
Step6Now select the shape and resolution and click the Download button.
Step7Adobe Express will compress your video, and it will be downloaded automatically.
But What if someone wants to compress videos on their mobile phones? Is that possible? Of course, it is! Let us show you some amazing video compressors for Instagram on iPhone and Android.
Part 4: How to reduce video/mp4 size for Instagram on iPhone and Android
As the era of mobile phones is improving day by day, most social media applications, including Instagram, are used on either Android or iPhones. So if you took a high-quality 4K video from your mobile and are looking for a video compressor for Instagram, you don’t need to open your computer for this trivial matter. Because here are some of the best video compressor apps for android and video compressor apps for iOS.
All these have pros and cons, but we recommend using “Video Compress” to compress your high-quality video on Android or iPhone. And why is that? Because not only does it support all video formats but also provides the function of trimming, cropping, or rotating the video. Moreover, it also allows the audio removal to increase the video’s compression further.
Here are some Pros and Cons of using “Video Compress”
Pros
- Very simple to use
- On top of adjusting the quality between low and high, you can also make custom settings
- Can share the video directly from the app
Cons
- There is no search option; you must manually select the video from your storage
- No option for merging multiple videos into one
Here are the steps to compress video using Video Compress on Android phones.
Step1Download, Install and Launch the “Video Compress” from the AppStore.
Step2Open the folder containing the file, then select the video you want to compress.
Step3“Compress Video” will show you many options for editing your video. Press on the compress video option.
Step4Go to the Custom Settings and change the video resolution and bitrate to the ones recommended in Part 1 of this article.
Step5Finally, press the video compress icon on the bottom of the screen, and “Video Compress” will compress your video with the selected settings.
But there are some limitations, too, like it doesn’t change the aspect ratio and frame rate of the video, which are crucial for uploading it on Instagram. So we recommend using Wondershare Filmora if you are looking for a video compressor for Instagram.
Final Words
Compressing a high-quality video before uploading it on Instagram is necessary because of the concrete limitations of Instagram. In this article, we have gone over different video compressors for Instagram. Each of these video compressors can shrink the video without compromising its quality. So you can upload those videos on your Instagram feed, story, reels, or live videos effectively.
Did you use one of these video compressors for Instagram? Let us know your thoughts in the comments section below. Thanks for reading.
Also read:
- How to Create a Text Effect Video with Filmora for 2024
- New 8 Websites to Find 3D Text PNG for 2024
- Updated 2024 Approved How to Add a Lower Third to Your Video
- New 2024 Approved Camtasia Review – Is It The Best Video Editor?
- 2024 Approved Make Transparent Background Video Today
- Updated 2024 Approved Detailed Tutorial to Resize Your Video in VLC
- New How to Make Strobe Light Text Effect?
- This Article Is Actually the Guide Regarding Editing the Videos Through VEED. As a Substitute, Wondershare Filmora Is Also Under Discussion that Is Also Available for the Same Purpose
- 2024 Approved How To Make An Interactive Quiz Video? Step-by-Step Guide
- Updated How to Do Perfect Match Paint 100 the Easy Way
- 7 Best GoPro Video Editors for Mac
- 2024 Approved How to Make Foggy Text Reflection Effect
- New How to Create Intro with Legend Intro Maker
- Efficient Ways to Manage Your Timeline for 2024
- Updated Attaining Slow Motion Video Trend Finding The Best CapCut Templates for 2024
- 2024 Approved Top 8 Memoji Makers to Make a Memoji on PC, Android & iPhone
- How to Perfectly Use Canva Color Match, In 2024
- 9 Best Sparkle Effects Photo and Video Editors You Should Know for 2024
- New Top 9 Sparkle Effects Photo and Video Editors You Should Know for 2024
- New How Can You Deny These Best 10 Free Speech to Text Software for 2024
- Add Zoom Blur Effect In Photoshop Step by Step for 2024
- Updated FLV Editors for Windows 11/10/8.1/8/7 Easily Edit FLV Videos on PC
- New Dollar-Store DIY Hacks to Use for Filmmaking on a Budget
- How to Be a YouTube Vlogger
- Updated In 2024, Best Ways to Slow Down Motion in CapCut
- New How to Create Your Own LUTs for Your Video with Filmora for 2024
- Updated 2024 Approved Step by Step to Add Border to Video Using Premiere Pro
- New How to Add Subtitles in VLC Media Play
- 2024 Approved 8 Frame Rate Video Converters You Must Try
- Adding Shake Effects to Your Video With Alight Motion for 2024
- New MP3 Cutter Download for Computer and Mobile for 2024
- How to Select and Use The Best BRAW LUTs
- 2024 Approved Want to Learn How to Make Gaming Montage Videos? You Have Come to the Right Place. This Guide Will Teach You All You Need to Know to Create Montages of Video Games and Share Them with Other Players
- Updated 8 Frame Rate Video Converters for a Professional Finish
- 2024 Approved How to Merge Videos in HandBrake? Expectation Vs. Reality
- VSDC Free Video Editor Review for 2024
- Top 10 Anime Movies of All Time
- Updated Expolring Top 6 Best Alternatives to Clownfish Voice Changer for 2024
- New How to Loop QuickTime Video for 2024
- Updated 2024 Approved 7 Best GoPro Video Editors for Mac
- 3 Best Tools to Hard Reset Honor 70 Lite 5G | Dr.fone
- How To Get Out of Recovery or DFU Mode on iPhone 12? | Dr.fone
- How to Unlock Your iPhone SE Passcode 4 Easy Methods (With or Without iTunes) | Dr.fone
- What You Need To Know To Improve Your Vivo Y17s Hard Reset | Dr.fone
- How to Unlock SIM Card on Xiaomi Redmi Note 12 5G online without jailbreak
- In 2024, Top 10 Fingerprint Lock Apps to Lock Your Xiaomi 13T Pro Phone
- 8 Workable Fixes to the SIM not provisioned MM#2 Error on Xiaomi Redmi Note 12T Pro | Dr.fone
- In 2024, About Xiaomi Civi 3 FRP Bypass
- Top 4 Ways to Trace Samsung Galaxy A05 Location | Dr.fone
- How to Stop Google Chrome from Tracking Your Location On Honor 90? | Dr.fone
- In 2024, Turning Off Two Factor Authentication On iPhone 6 Plus? 5 Tips You Must Know
- Will iSpoofer update On Xiaomi Redmi Note 12 Pro 5G | Dr.fone
- How to recover deleted photos from Oppo Find N3.
- How to rescue lost call logs from Poco F5 5G
- All About Factory Reset, What Is It and What It Does to Your Itel A60? | Dr.fone
- In 2024, How to Mirror Your Lenovo ThinkPhone Screen to PC with Chromecast | Dr.fone
- In 2024, How to Mirror PC Screen to ZTE Axon 40 Lite Phones? | Dr.fone
- Complete Fixes To Solve Apple iPhone X Randomly Asking for Apple ID Password | Dr.fone
- How to Unlock Vivo S18 PIN Code/Pattern Lock/Password
- In 2024, 3 Effective Methods to Fake GPS location on Android For your Google Pixel Fold | Dr.fone
- In 2024, How to Transfer Data from Infinix Hot 40 to Samsung Phone | Dr.fone
- How To Remove Flashlight From iPhone 7 Lock Screen
- How To Deal With the Itel P55+ Screen Black But Still Works? | Dr.fone
- In 2024, How To Use Allshare Cast To Turn On Screen Mirroring On Honor Magic V2 | Dr.fone
- In 2024, Best 3 Software to Transfer Files to/from Your Samsung Galaxy Z Flip 5 via a USB Cable | Dr.fone
- How to Put iPhone 12 or iPad on Recovery mode? (Step by Step Tutorial) | Stellar
- In 2024, Here are Some Pro Tips for Pokemon Go PvP Battles On Samsung Galaxy S23+ | Dr.fone
- 4 Methods to Turn off Life 360 On OnePlus Nord N30 SE without Anyone Knowing | Dr.fone
- In 2024, CatchEmAll Celebrate National Pokémon Day with Virtual Location On Tecno Spark 10 Pro | Dr.fone
- Fixes for Apps Keep Crashing on Realme C53 | Dr.fone
- How to Remove a Previously Synced Google Account from Your Xiaomi Redmi 13C 5G
- In 2024, 2 Ways to Monitor Oppo A1x 5G Activity | Dr.fone
- Title: New In 2024, How to Loop Video in Canva
- Author: Chloe
- Created at : 2024-04-24 07:08:35
- Updated at : 2024-04-25 07:08:35
- Link: https://ai-editing-video.techidaily.com/new-in-2024-how-to-loop-video-in-canva/
- License: This work is licensed under CC BY-NC-SA 4.0.
