
:max_bytes(150000):strip_icc():format(webp)/001_best-lgbt-movies-on-netflix-right-now-5069913-92c9bcd3792548908be32c420bc4fa27.jpg)
New In 2024, How to Make A Jaw-Dropping Time Lapse Video?
How to Make A Jaw-Dropping Time Lapse Video?
Are you looking for a handy tutorial that will give you a full-fledged time lapse video? Well, here’s some two cents of what would be the ideal guide that you shall refer to! Learn more about the complete steps involved in making your time lapse video. Find out more here:
Part 1: What is Time Lapse?
1. Technical basics of Time Lapse Photography and Videography
Time-lapse is a specialized type of shot that can be achieved in-camera, through editing, or a combination of both. Time-lapse is a technique where frames are shot much slower than a normal rate (e.g., 24 frames per minute instead of per second).
Professional time-lapses are a series of raw photos even though they are sometimes perceived as videos. In a nutshell, a time-lapse is a short video that processes by revealing the evolution of a series of events, invisible to the eye.
The simplest and most useful formula is time per frame (TPF), multiplied by frames per second (FPS), multiplied by 60 seconds. Using this formula will tell you how long to record to end up with your desired time lapse length or “recording time” (RT). TPF x FPS x 60 = RT
2. What is a Time-lapse video used for?
The use of time-lapse photography and video is an excellent storytelling technique since compelling stories are essential to effective marketing. A time-lapse can also offer excellent insight into the advancement of developmental projects.
① Scientific research
- Time-lapses may be utilized to spread the word about scientific investigations to a wide audience. You can use time-lapse photography to gain money by selling the material of interesting scientific investigations to documentary makers or instructional websites.
- Scientists can visualize processes that would be challenging or sometimes even impossible to study in real life, thanks to time-lapse photography
② Individual enjoyment
Time-lapses are also utilized by filmmakers for scenes requiring extended durations of time with little significant activity occurring during the shot (such as night slowly turning into day).
③ Commercial use
- Time-lapse videos are a wonderful instrument for enhancing the perception of your brand because they are. As a result, many consumers find it interesting.
- Time-lapse videos are the epitome of the old saying that “good things come in small packages” for any brand.
3. How to Make a Time-lapse video?
Start with a stable tripod or surface and adjust the settings on your phone camera or DSLR. Use slow shutter speed, use still mode, and don’t forget to use the timer. Find a stable surface and place your camera this way, you can get your hands on a creative time-lapse video.
Part 2: Record or Shoot Your Time-Lapse Video
1. Select Your Subject
The best way to create a time-lapse video is to pick your subject very carefully. Movement is the most crucial factor to consider while selecting a time-lapse subject. Any movement—whether it be caused by people, animals, vehicles, water, clouds, or anything else—can create an exciting and captivating time-lapse.
- Some of the iconic ideas of filming a time-lapse include:
- A stunning glimpse of the day and night cycle of life at sea.
- Construction of a building from ground till its completion
- Capturing the traffic movement
- Ice melting
- Sun setting
- A great shot of a galaxy
2. Prepare Right Equipment
Choose your equipment before heading out to capture time lapses. There are several options available for time-lapse cameras and applications, ranging from basic and affordable to sophisticated and pricy.
① Camera
You cannot make a time-lapse without owning a camera, whether it is a mobile phone, a compact, or a DSLR. The quality of the final result will be as good as the quality of the equipment you use.
- Smartphone camera apps (iPhone/Android)
All good smartphones now possess a built-in camera with good optical quality, for example: recently Apple Company launched its new iPhone 14 with a magnificent 48-megapixel camera. By using such cameras we have been able to produce really good pictures, although not in negative conditions, such as those with low-light, etc.
For apple: use IguanaLapse or TimeLapse to create your great time-lapses
For Android: use Time-Lapse – Lite
- Point-and-shoot cameras
Even though smartphone cameras have taken over in this digital era, it is still not possible to say that point-and-shoot cameras are not doing their magic. A point-and-shoot camera is really handy.
Some examples of point-and-shoot cameras which are best for creating fun time-lapse videos include Olympus Tough TG-6, Nikon Coolpix W300, Fujifilm XP140, Panasonic Lumix ZS70 / TZ90, and many others in the list.
- Action cameras
Action cameras, also known as action cams are compact, rugged, handheld, or mountable digital cameras that are designed to capture what you see when you are immersing in a movement. The action camera is usually mounted to your helmet, chest, handlebars of a bike or motorcycle, or tripod to record life.
The best action cameras for creating time-lapses include GoPro Hero11 Black, Insta360 ONE RS Twin Edition, DJI Action 2, DJI Pocket 2, and GoPro Hero9 Black.
- DSLR cameras
This is the best choice in terms of cost/benefit: it produces excellent results and high image quality. The best and top-rated DSLRs for creating terrific time-lapses include Nikon D850, Canon 80D, Canon EOS 90D, Sony A7 III, and others.
② Tripod/Gimbal/other stabilizers
Owning a solid and stable tripod is essential for the success of a time-lapse video. A good tripod will support the load without any problems and will keep the arsenal stable for the duration of the shooting session. The best way to use a tripod for filming a time-lapse is to use orient on a tripod that is quite high (at least 170cm).
Some best tripods used to record time-lapses include BONFOTO B671c, Patekfly Flexible Tripod, Sirui Easy Traveler ET-2204, and Vanguard Alta Pro 263AB 100.
A gimbal is a tool that uses motors and intelligent sensors to support and stabilize a camera. The best gimbal and other stabilizers used to film time-lapses include Moza Air 2, DJI RS 2, Zhiyun Crane-2S, Benro RedDog R1, iKan EC1 Beholder, and Feiyu AK4500.
③ Intervalometer/other camera shutter triggers
An intervalometer is a small device able to trigger the shutter of your camera every ‘n’ second, ‘n’ times (also infinite). It can be external, or as we saw earlier, integrated into the camera.
Some of the best intervalometer include Nikon Integrated Intervalometer. With a Nikon D3, you can go into Shooting Menu, and then activate” Interval Timer Shooting”.
3. List Pro Tips for Time-lapse Recording
- Make sure batteries are fully charged
- Set interval to match the movement in the scene
- Select music before shooting the time-lapse
- Use your backup camera
- Shoot in manual mode to avoid flicker
- Lock down focus
- Shoot in RAW format
- Add motion to the time-lapse
- Get comfortable, shoot longer
- Avoid bumping or moving the tripod
- Show shadow movement
- Use apps to plan your shots
- Shoot lots of images
Part 3: Edit Your Time Lapse Video
1. 3 Best Ways to Create Time Lapse from Photos
① Windows Photos App (Windows)
If you are using Windows, you probably are familiar with the general features of the Photos App. One of its distinguishing features is to import the photos and create a mind-blowing time-lapse out of those photos. To create time-lapse on your Windows Photos App, you must follow some simple steps:
- Open the Windows Photos app and import the pictures which you want to transform into a time-lapse.
- Go to Menu > Edit > Speed. For proper time-lapse, select a speed between 4x and 12x.
- Go to Save movie > save the video on your desktop or other device and you’re done with filming a great time-lapse video.
② QuickTime Player (Mac)
In your Apple devices (iPhones, iPads, and MacBook), you can create time-lapses by converting an image sequence to a movie or time-lapse video in QuickTime Player. For this, follow the simple steps and you will get a great time-lapse at the tip of your fingertips.
- Go to QuickTime App on your mac devices and open File > open image sequence.
- Select the image sequence folder and choose media.
- Adjust the quality of the movie by clicking on the options and choosing the resolution, frame rate, and video format.
- Click ‘open’ and time-lapse will be ready for access.
③ Filmora (Windows & Mac)
Through Wondershare Filmora software, it is now possible to drag your favorite image sequence into the timeline and transform it into a cool-looking time-lapse. If you’re looking for easy and efficient software to create attractive time-lapses, Filmora is your best go-to software. Using drag-and-drop, you can create time-lapse effects with Filmora’s built-in slow/fast motion effects. Filmora has over 150 free filters available for you if you wish to apply filters to your movie.
Filmora Video Editor creates a masterpiece for your video with the easiest interface for Windows & Mac users. Wondershare created the Filmora family of video editing and production software. Products on Filmora are available for a variety of users, from novice to expert. A timeline, preview window, and effects library are some of Filmora’s common features. These may all be accessed and managed using a drag-and-drop interface. Both Windows and macOS machines can use the Filmora software library.
How to Create a Time-lapse using Filmora
To create a time-lapse from photos in Filmora software, follow the mentioned steps:
Step 1: Download and install Wondershare Filmora
Go to google chrome and download the setup for Filmora. Install into your desktop.
Free Download For Win 7 or later(64-bit)
Free Download For macOS 10.14 or later
Step 2: Launch Filmora video editor
After downloading and installing, launch the Filmora timeline and import the photos to the media library.
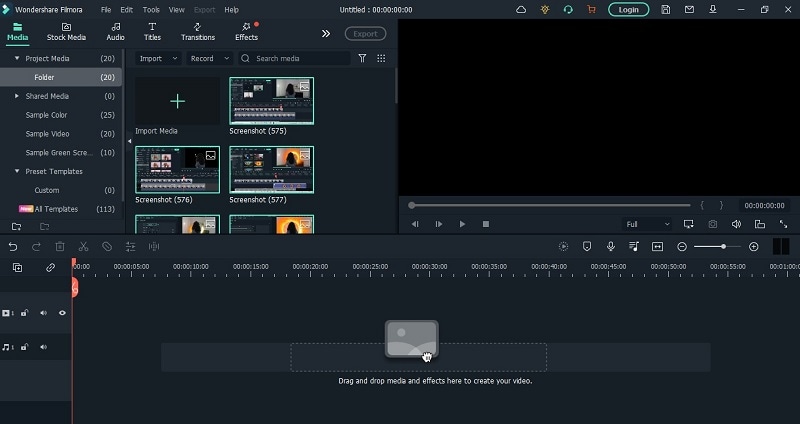
Step 3: Preview and adjust the photos.
Drag the images down to the timeline and move the pointer to reset and order the images according to your required time-lapse video. Don’t forget to resize and match the sizes of all the pictures so make a uniform time-lapse.

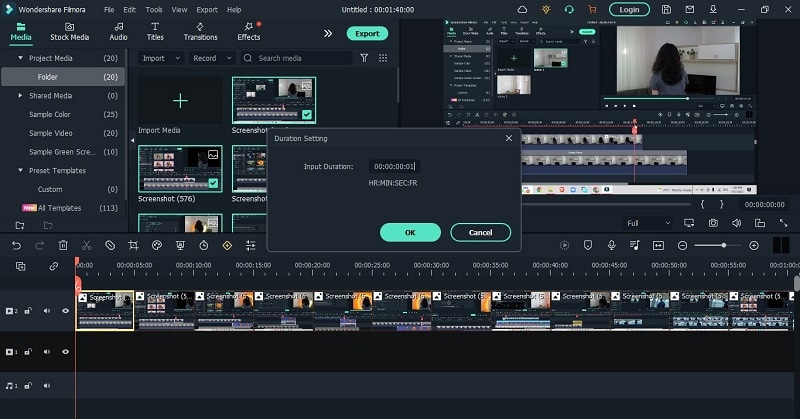
Step 4: Adjust the Speed
Select one of the photos in the timeline and right-click. Click on Speed and Duration > Custom Speed panel > Duration > change the duration of the photo to 00:00:00:01 and hit OK.
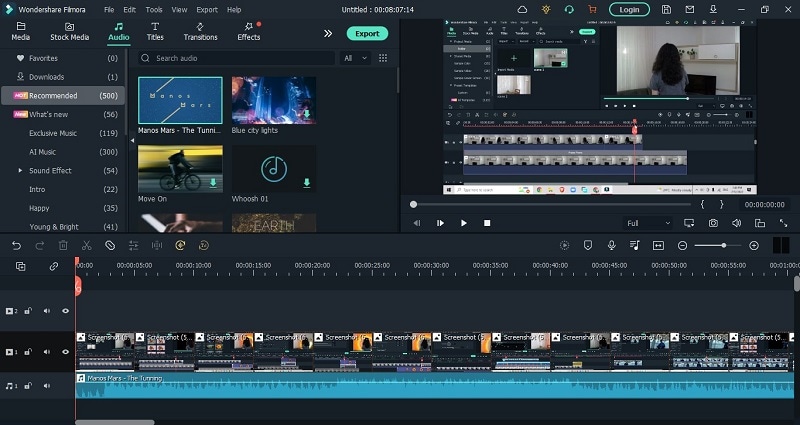
Step 5: Add effects and audio
Even though this step is optional, still it is recommended that to make your time-lapse more presentable, go to effects and choose your favorite pre-set. Go to Audio menu to choose from the music library or add your own custom audio by importing audio file into the timeline.
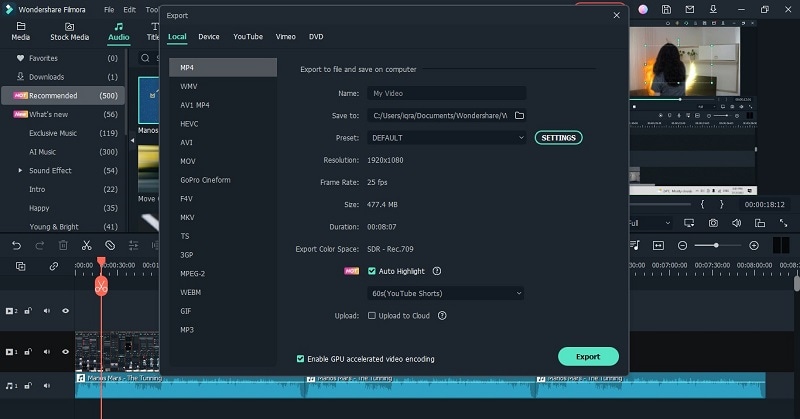
Step 6 Render and Export media
Export your file after rendering it in the full screen. Always check if there are any additional changes required before exporting the media file.

Step 7: Save into your desktop
Change the video format and video and audio parameters such as Bit Rate, Encoder, and Resolution of the video.
Other software for creating time-lapse
Besides Filmora, there are some interesting options for the users which involve:
o iMovie
o LRTimelapse
o Lightroom
o Adobe Premiere Pro
o After Effects
o Photoshop
2. 3 Best Ways to Convert Video to Time Lapse
① Filmora(Windows & Mac)
Filmora offers yet another very distinguishing feature through which it can convert video footage into an excellent time-lapse video. This feature of Filmora empowers the users and boosts their content and increases audience engagement as well.
In a few simple steps, you can get a creative time-lapse on your windows and mac devices.
- Download and install Filmora 11
- Launch Filmora timeline on your device and import the footage to the media library
- Drag your video onto the video column in the timeline. Select the loaded video and click the “Play” button. While playing the video, drag the slider bar at the start time and hit the “Split” icon to cut out the part you want to do time-lapse editing.
- Right-click on the video clip in the timeline to select Speed and Duration. Find the Speed option and drag the slider bar to the right to increase the speed.
- Click the Play button to preview the result. Filmora now supports up to 100x fast motion and 0.01x slow mo.
- Export your video
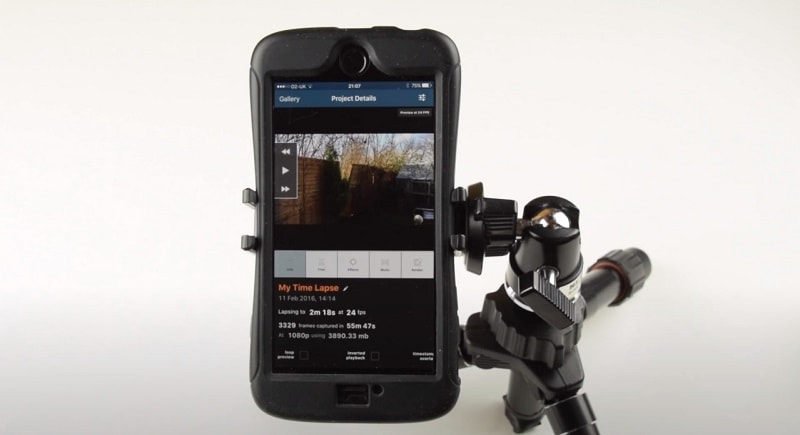
② Lapse It Pro (Android & iPhone)
One of the top apps for time-lapse photography is Lapse It Pro. A collection of further time lapses made by other people is available on Lapse It. You can post your videos and favorite those of others while using this social function, which also lets you watch other people’s videos. Through user control, the software makes the smartphone’s capacity to record time lapses as effective as possible.
The lapse It pro version is currently not free, although the Lapse its app is free and it is available on both, Android and Apple.
Steps to Use Lapse It Pro:
- Download the app on your android or apple device
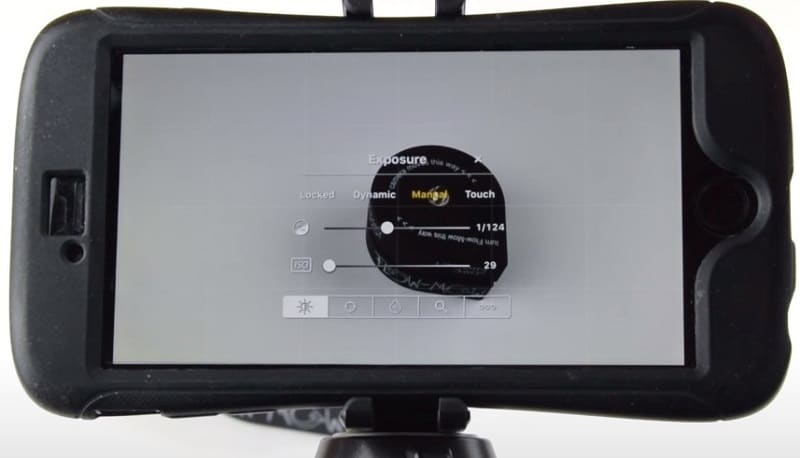
- Configure the time interval between the shots and set a time or photo-based limit while clicking pictures.
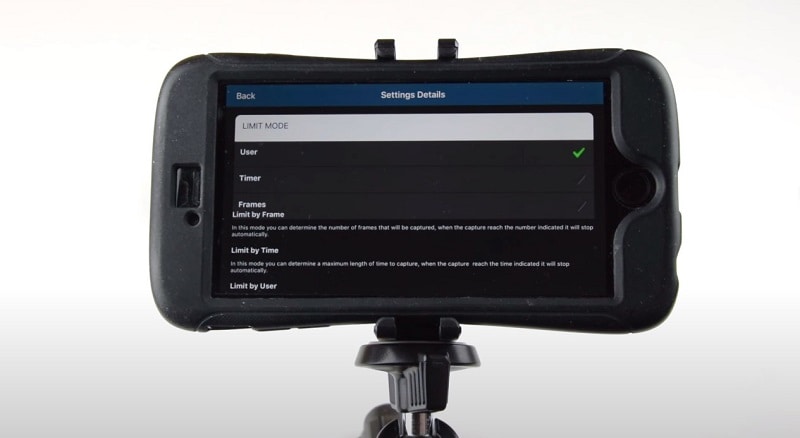
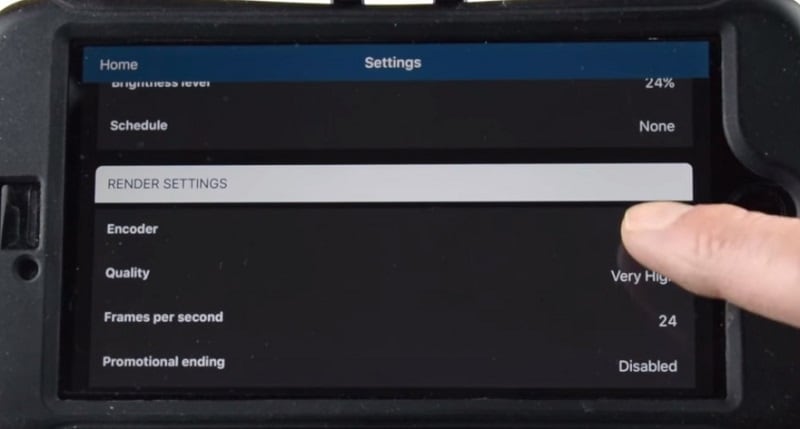
- Adjust the resolution of your camera before taking pictures.
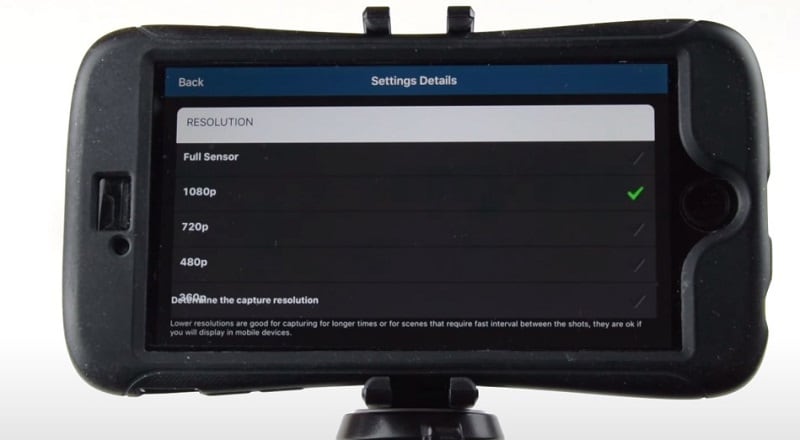
- Take a lot of pictures through the app using your device’s inbuilt camera
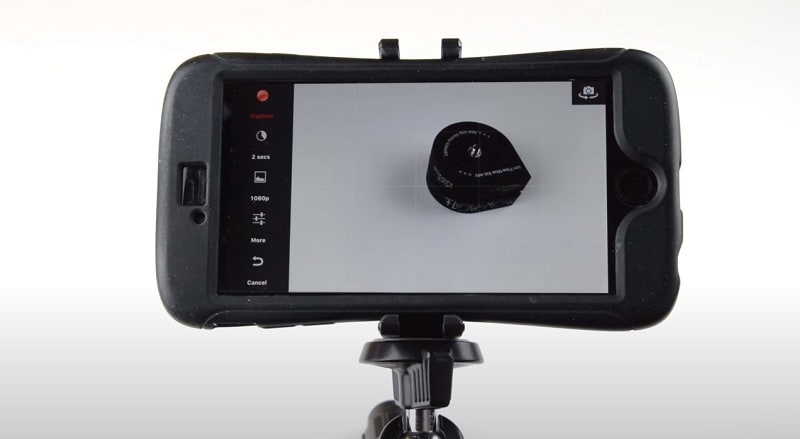
- Edit the order of the pictures
- Stitch the pictures together to form a time-lapse
- Add filters and adjust color settings
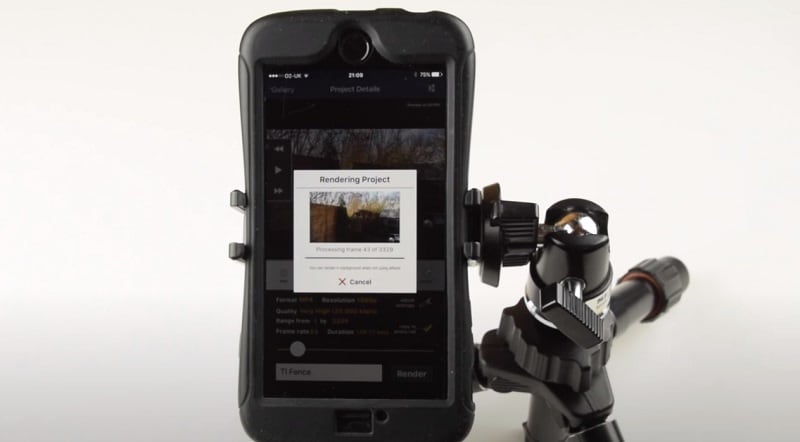
- Render and preview
- Export the file to your device
③ Invideo (Online)
InVideo is a do-it-yourself (DIY) video creation platform that enables users to turn their ideas into videos in real time. The platform lets users create, edit, preview, and share videos with team members. It’s a fantastic solution for combining your time-lapse footage into an amazing video project.
InVideo provides three distinct methods for creating videos:
- Text-to-Video: Upload your footage and let InVideo turn it into a series of scenes that you can customize
- Blank Templates: Start with a stripped-down template and craft an amazing video from scratch
- Premade Templates: Pick a template from an extensive library of premade templates
Steps to Use InVideo:
To create a time-lapse through InVideo, follow the mentioned steps:
Step 1. Download and install InVideo
Step 2. Sign up and sign in to your InVideo account
Step 3. Upload your footage to the ‘Add your media files here’ tab.
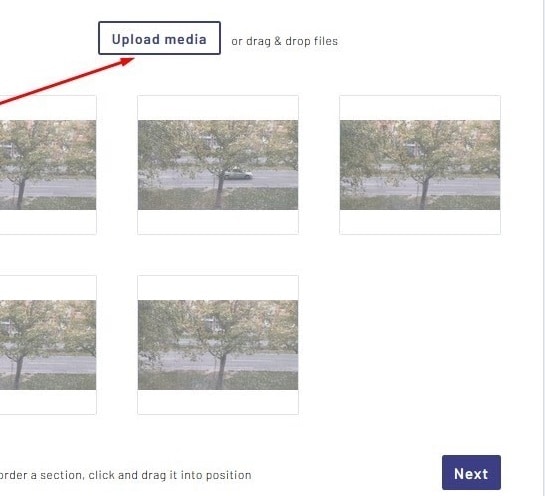
Step 4. Do not upload footage exceeding 200 MBs.
Step 5. Click ‘Next’ and you will be redirected to the Storyboard.
Step 6. Preview all your scenes in Storyboard mode. Rearrange them, add new ones in between, and delete any that you don’t want to use in your project. You can also duplicate scenes if necessary.
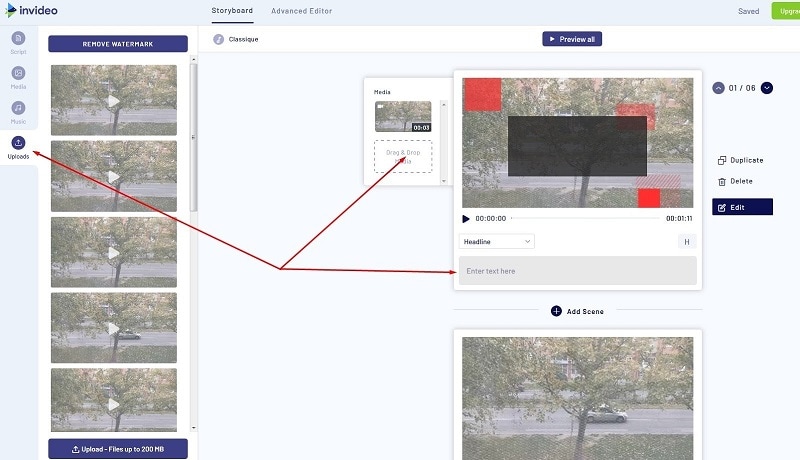
Step 7: You can also add captions to your scenes. To view all the captions you’ve created, go to the Scripts tab. You’ll be able to customize your captions further in the Advanced Editor mode.
Step 8. To add audio files to your video, go to the Music tab.
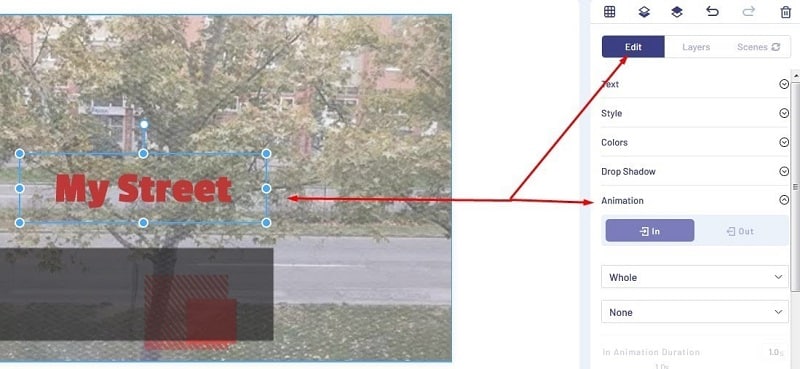
Step 9. Edit your video by clicking on Advanced Editor.

Step 10. Apply filters and review the timeline, export, save the video and you’re good to go.
3. Which Way is Right for You to Edit a Time-Lapse Video?
There are many ways to edit a time-lapse video, with varying degrees of success. Each application and software has its pros and cons. Although some best and most useful methods to create and edit time-lapse videos have been discussed earlier in this essay it is crucial to highlight that Filmora is regarded as software that possesses almost all the assets that we need while we edit our time-lapse videos.
Through Filmora, you can effortlessly make a pro-level time-lapse video either from still images or existing video. Most of the software would offer only one feature at a time so it is tremendous that Filmora lets you easily access multiple options to create a seamless time-lapse video in a spur of some minutes.
Besides multiple ways to create time-lapse, Filmora also offers basic & advanced editing features for time-lapse production. After creating a time-lapse in Filmora, you can drag through the multiple post-production editing features which include: Split Screen, Keyframing, Motion Tracking, Speed Ramping, Screen Recorder, Instant Mode, Pre-set Templates, and Auto Beat Sync. And many others.
Besides these ways of editing your time-lapses, Filmora also offers no disturbing pop-up ad experience while editing which provides a smooth editing platform for editors.
Part 4: Share & Enjoy the Best Time-Lapse Video
1. Share Your Quality Time-Lapse Video Across Social Platforms
Time-lapse & social media serve as the perfect combination in today’s times when social media publicity has become an incredibly important avenue for businesses. You can share your time lapses on different social media platforms including:
- YouTube
When people talk about today’s most popular social sharing websites, YouTube often gets left out of the conversation in favor of sites like Facebook and Twitter. But don’t be fooled: YouTube has a lot going for it.
By uploading your time-lapses on YouTube, you can create a YouTube link and share it with your friends and social circle so they can easily access your content, you can get found in search by uploading your own written transcript about the time-lapse, adding an end screen or cards to promote your time-lapse video, and add creative effects to your time-lapses with YouTube Enhancements.
- TikTok
TikTok is a social media platform for creating, sharing, and discovering short videos. The app is used by young people as an outlet to express themselves through singing, dancing, comedy, and lip-syncing, and allows users to create videos and share them across a community.
Since the duration of the time-lapse videos is mostly kept short, TikTok is the best app to approach if you want to increase your audience engagement.
The Meta app, Instagram is the most used app as per 2022 statistics. Through this app, people used to update their day-to-day routine and check-ins by uploading pictures. Now, the platform has added a ‘Reels’ section which plays the short videos to keep the audience hooked to the app, more than ever.
Upload your time-lapses on Instagram as Reels and see your content boost within hours.
2. Promote Your Time-Lapse Video on Popular Websites
Professional video editors and photographers who are looking for a paid platform to promote their business can access the most widely used and reliable websites which include the following:
- Shutterstock
With this app on your mobile phones and other devices, you can Transform Your Marketing Campaigns, Social Media, Websites, and Designs. Uploading your time-lapse content to earn good money on Shutterstock will work best in your favor.
- Pond5
Pond5 is the world’s largest marketplace for HD & 4K stock video, plus millions of music tracks, SFX, motion graphics, and images. Signing up and posting your time-lapse to promote your digital work can be a good choice if you’re looking for earning money online.
- Adobe Stock
Adobe Stock is a new service that provides designers and businesses with access to millions of high-quality, curated, royalty-free images and videos. This is also a good choice for professional photographers and videographers to post their time-lapses.
- Getty
Getty is an American visual media company and is a supplier of stock images, editorial photography, video, and music for business. By uploading your time lapses on this platform, you can be provided with exceptional opportunities to engage employees, entertain clients, and promote your brand.
3. Enjoy the Attractive Time-Lapse Video Examples
Over the internet, you will find numerous creatively designed time-lapses but a few of them still top the list. Some of the iconic time-lapses created to date include the following:
- Multiverse By Hiroshi Kondo, a mind-bending TimeLapse video of Taiwan
- Paris Day & Night by Teeter-Totter-Tam is a 5-minutes TimeLapse journey through one of the prettiest cities in the world, Paris from day to night.
- Solar Panel Installation from a Crane - David Dupuy
- Death Is the Road to Awe is a sample of TimeLapse video footage from that film shot in the American Southwest.
Part 5: FAQs – Time-Lapse Video Creation
① How to easily make a time-lapse video like a pro?
Most smartphone cameras have their time-lapse feature built in. To shoot your time-lapse video, simply open up the camera on your phone and select the “Time-Lapse” feature.
Place your phone in a secure spot where it won’t move around a lot. Then, tap the record button to start recording your time-lapse. When you’re done, tap it again. Your video will play back compressed into a shorter period for a time lapse effect.
PRO TIP: If you’re planning to make a landscape video, turn your phone so your time-lapse video is wide instead of tall
② What are the best time lapse editors or software?
The top five Best Free TimeLapse Software include:
- Wondershare Filmora- Windows and Mac
- Adobe Premiere Pro – Professional software
- Final Cut Pro – Mac software for time-lapse videos
- iMovie – User-friendly
- LRTimelapse – Sophisticated tool for more experienced users
③ Can I speed up or slow down a time-lapse video using Filmora?
Filmora also allows you to adjust the duration of the video clip to change the video speed. After importing the video clip to the timeline, right-click it and choose Speed and Duration to open the custom speed pop-up. Go to the Duration section and you will see the original duration of the video. Adjusting the duration of the video longer will add a slow-motion effect to the video. Changing the duration of the video to a shorter time will speed up the playback speed of the video. Just directly input the number in the field to speed up/slow down the video.
④ How to make my time-lapse video look better?
- Using a Slow Shutter
One solution to making your time lapses look more natural is to use a slow shutter so that each frame has a bit of motion.
- Blend in Video
Capture a time-lapse with fast movement and then mask in video with slow movement, maybe I could have the best of both worlds.
- Use filters
You can use Filters to spruce up the content with the time-lapse.
- Add Audio
Audio is an essential part if you want to leverage the content reach of your time-lapse video.
Conclusion
Time lapse videos are among the most powerful marketing tactics available in the mass media age of today. Similar to aerial photography, time-lapse videos can tell an engaging story for a low production cost, and they can be viewed fast by the audience. Filmora has helped the professionals as well as the beginners in the photography and videography to boost their content through online platforms.
This article will guide you through the most useful software and ways to promote your content and boost your audience engagement through creating mind-blowing time-lapses. Software like above mentioned ones take extremely little time and focus to comprehend the tale in a time lapse, which is a huge advantage in today’s competitive industry.
Free Download For macOS 10.14 or later
Step 2: Launch Filmora video editor
After downloading and installing, launch the Filmora timeline and import the photos to the media library.
Step 3: Preview and adjust the photos.
Drag the images down to the timeline and move the pointer to reset and order the images according to your required time-lapse video. Don’t forget to resize and match the sizes of all the pictures so make a uniform time-lapse.
Step 4: Adjust the Speed
Select one of the photos in the timeline and right-click. Click on Speed and Duration > Custom Speed panel > Duration > change the duration of the photo to 00:00:00:01 and hit OK.
Step 5: Add effects and audio
Even though this step is optional, still it is recommended that to make your time-lapse more presentable, go to effects and choose your favorite pre-set. Go to Audio menu to choose from the music library or add your own custom audio by importing audio file into the timeline.
Step 6 Render and Export media
Export your file after rendering it in the full screen. Always check if there are any additional changes required before exporting the media file.
Step 7: Save into your desktop
Change the video format and video and audio parameters such as Bit Rate, Encoder, and Resolution of the video.
Other software for creating time-lapse
Besides Filmora, there are some interesting options for the users which involve:
o iMovie
o LRTimelapse
o Lightroom
o Adobe Premiere Pro
o After Effects
o Photoshop
2. 3 Best Ways to Convert Video to Time Lapse
① Filmora(Windows & Mac)
Filmora offers yet another very distinguishing feature through which it can convert video footage into an excellent time-lapse video. This feature of Filmora empowers the users and boosts their content and increases audience engagement as well.
In a few simple steps, you can get a creative time-lapse on your windows and mac devices.
- Download and install Filmora 11
- Launch Filmora timeline on your device and import the footage to the media library
- Drag your video onto the video column in the timeline. Select the loaded video and click the “Play” button. While playing the video, drag the slider bar at the start time and hit the “Split” icon to cut out the part you want to do time-lapse editing.
- Right-click on the video clip in the timeline to select Speed and Duration. Find the Speed option and drag the slider bar to the right to increase the speed.
- Click the Play button to preview the result. Filmora now supports up to 100x fast motion and 0.01x slow mo.
- Export your video
② Lapse It Pro (Android & iPhone)
One of the top apps for time-lapse photography is Lapse It Pro. A collection of further time lapses made by other people is available on Lapse It. You can post your videos and favorite those of others while using this social function, which also lets you watch other people’s videos. Through user control, the software makes the smartphone’s capacity to record time lapses as effective as possible.
The lapse It pro version is currently not free, although the Lapse its app is free and it is available on both, Android and Apple.
Steps to Use Lapse It Pro:
- Download the app on your android or apple device
- Configure the time interval between the shots and set a time or photo-based limit while clicking pictures.
- Adjust the resolution of your camera before taking pictures.
- Take a lot of pictures through the app using your device’s inbuilt camera
- Edit the order of the pictures
- Stitch the pictures together to form a time-lapse
- Add filters and adjust color settings
- Render and preview
- Export the file to your device
③ Invideo (Online)
InVideo is a do-it-yourself (DIY) video creation platform that enables users to turn their ideas into videos in real time. The platform lets users create, edit, preview, and share videos with team members. It’s a fantastic solution for combining your time-lapse footage into an amazing video project.
InVideo provides three distinct methods for creating videos:
- Text-to-Video: Upload your footage and let InVideo turn it into a series of scenes that you can customize
- Blank Templates: Start with a stripped-down template and craft an amazing video from scratch
- Premade Templates: Pick a template from an extensive library of premade templates
Steps to Use InVideo:
To create a time-lapse through InVideo, follow the mentioned steps:
Step 1. Download and install InVideo
Step 2. Sign up and sign in to your InVideo account
Step 3. Upload your footage to the ‘Add your media files here’ tab.
Step 4. Do not upload footage exceeding 200 MBs.
Step 5. Click ‘Next’ and you will be redirected to the Storyboard.
Step 6. Preview all your scenes in Storyboard mode. Rearrange them, add new ones in between, and delete any that you don’t want to use in your project. You can also duplicate scenes if necessary.
Step 7: You can also add captions to your scenes. To view all the captions you’ve created, go to the Scripts tab. You’ll be able to customize your captions further in the Advanced Editor mode.
Step 8. To add audio files to your video, go to the Music tab.
Step 9. Edit your video by clicking on Advanced Editor.
Step 10. Apply filters and review the timeline, export, save the video and you’re good to go.
3. Which Way is Right for You to Edit a Time-Lapse Video?
There are many ways to edit a time-lapse video, with varying degrees of success. Each application and software has its pros and cons. Although some best and most useful methods to create and edit time-lapse videos have been discussed earlier in this essay it is crucial to highlight that Filmora is regarded as software that possesses almost all the assets that we need while we edit our time-lapse videos.
Through Filmora, you can effortlessly make a pro-level time-lapse video either from still images or existing video. Most of the software would offer only one feature at a time so it is tremendous that Filmora lets you easily access multiple options to create a seamless time-lapse video in a spur of some minutes.
Besides multiple ways to create time-lapse, Filmora also offers basic & advanced editing features for time-lapse production. After creating a time-lapse in Filmora, you can drag through the multiple post-production editing features which include: Split Screen, Keyframing, Motion Tracking, Speed Ramping, Screen Recorder, Instant Mode, Pre-set Templates, and Auto Beat Sync. And many others.
Besides these ways of editing your time-lapses, Filmora also offers no disturbing pop-up ad experience while editing which provides a smooth editing platform for editors.
Part 4: Share & Enjoy the Best Time-Lapse Video
1. Share Your Quality Time-Lapse Video Across Social Platforms
Time-lapse & social media serve as the perfect combination in today’s times when social media publicity has become an incredibly important avenue for businesses. You can share your time lapses on different social media platforms including:
- YouTube
When people talk about today’s most popular social sharing websites, YouTube often gets left out of the conversation in favor of sites like Facebook and Twitter. But don’t be fooled: YouTube has a lot going for it.
By uploading your time-lapses on YouTube, you can create a YouTube link and share it with your friends and social circle so they can easily access your content, you can get found in search by uploading your own written transcript about the time-lapse, adding an end screen or cards to promote your time-lapse video, and add creative effects to your time-lapses with YouTube Enhancements.
- TikTok
TikTok is a social media platform for creating, sharing, and discovering short videos. The app is used by young people as an outlet to express themselves through singing, dancing, comedy, and lip-syncing, and allows users to create videos and share them across a community.
Since the duration of the time-lapse videos is mostly kept short, TikTok is the best app to approach if you want to increase your audience engagement.
The Meta app, Instagram is the most used app as per 2022 statistics. Through this app, people used to update their day-to-day routine and check-ins by uploading pictures. Now, the platform has added a ‘Reels’ section which plays the short videos to keep the audience hooked to the app, more than ever.
Upload your time-lapses on Instagram as Reels and see your content boost within hours.
2. Promote Your Time-Lapse Video on Popular Websites
Professional video editors and photographers who are looking for a paid platform to promote their business can access the most widely used and reliable websites which include the following:
- Shutterstock
With this app on your mobile phones and other devices, you can Transform Your Marketing Campaigns, Social Media, Websites, and Designs. Uploading your time-lapse content to earn good money on Shutterstock will work best in your favor.
- Pond5
Pond5 is the world’s largest marketplace for HD & 4K stock video, plus millions of music tracks, SFX, motion graphics, and images. Signing up and posting your time-lapse to promote your digital work can be a good choice if you’re looking for earning money online.
- Adobe Stock
Adobe Stock is a new service that provides designers and businesses with access to millions of high-quality, curated, royalty-free images and videos. This is also a good choice for professional photographers and videographers to post their time-lapses.
- Getty
Getty is an American visual media company and is a supplier of stock images, editorial photography, video, and music for business. By uploading your time lapses on this platform, you can be provided with exceptional opportunities to engage employees, entertain clients, and promote your brand.
3. Enjoy the Attractive Time-Lapse Video Examples
Over the internet, you will find numerous creatively designed time-lapses but a few of them still top the list. Some of the iconic time-lapses created to date include the following:
- Multiverse By Hiroshi Kondo, a mind-bending TimeLapse video of Taiwan
- Paris Day & Night by Teeter-Totter-Tam is a 5-minutes TimeLapse journey through one of the prettiest cities in the world, Paris from day to night.
- Solar Panel Installation from a Crane - David Dupuy
- Death Is the Road to Awe is a sample of TimeLapse video footage from that film shot in the American Southwest.
Part 5: FAQs – Time-Lapse Video Creation
① How to easily make a time-lapse video like a pro?
Most smartphone cameras have their time-lapse feature built in. To shoot your time-lapse video, simply open up the camera on your phone and select the “Time-Lapse” feature.
Place your phone in a secure spot where it won’t move around a lot. Then, tap the record button to start recording your time-lapse. When you’re done, tap it again. Your video will play back compressed into a shorter period for a time lapse effect.
PRO TIP: If you’re planning to make a landscape video, turn your phone so your time-lapse video is wide instead of tall
② What are the best time lapse editors or software?
The top five Best Free TimeLapse Software include:
- Wondershare Filmora- Windows and Mac
- Adobe Premiere Pro – Professional software
- Final Cut Pro – Mac software for time-lapse videos
- iMovie – User-friendly
- LRTimelapse – Sophisticated tool for more experienced users
③ Can I speed up or slow down a time-lapse video using Filmora?
Filmora also allows you to adjust the duration of the video clip to change the video speed. After importing the video clip to the timeline, right-click it and choose Speed and Duration to open the custom speed pop-up. Go to the Duration section and you will see the original duration of the video. Adjusting the duration of the video longer will add a slow-motion effect to the video. Changing the duration of the video to a shorter time will speed up the playback speed of the video. Just directly input the number in the field to speed up/slow down the video.
④ How to make my time-lapse video look better?
- Using a Slow Shutter
One solution to making your time lapses look more natural is to use a slow shutter so that each frame has a bit of motion.
- Blend in Video
Capture a time-lapse with fast movement and then mask in video with slow movement, maybe I could have the best of both worlds.
- Use filters
You can use Filters to spruce up the content with the time-lapse.
- Add Audio
Audio is an essential part if you want to leverage the content reach of your time-lapse video.
Conclusion
Time lapse videos are among the most powerful marketing tactics available in the mass media age of today. Similar to aerial photography, time-lapse videos can tell an engaging story for a low production cost, and they can be viewed fast by the audience. Filmora has helped the professionals as well as the beginners in the photography and videography to boost their content through online platforms.
This article will guide you through the most useful software and ways to promote your content and boost your audience engagement through creating mind-blowing time-lapses. Software like above mentioned ones take extremely little time and focus to comprehend the tale in a time lapse, which is a huge advantage in today’s competitive industry.
11 Ways To Speed Up A Video On iPhone
As a content creator or a video editor, you may deal with many different aspects of editing. It may go from basic editing to VFX and so on. Speed ramping is also an important feature of editing. Creators who make cinematics or B-rolls often may have used this feature.
Changing the speed of the whole video doesn’t look good in most situations therefore speed ramping feature was created. Speed Ramping means gradually changing the speed of a clip over time. It isn’t a complex thing but doing it correctly in the right amount at the right time can change the feel of the whole video. It catches the attention of viewers through different scenes of a clip.
So, here we have mentioned some iPhone video editing softwares that can at least do basic speed changes. but most of them can also do advanced speed ramping. These are as follows:
Filmora Go:
It is available on IOS and Android both.
Want to do speed ramping? use Filmora Go. But are you a content creator and want to do more than just video editing? I would still recommend “Filmora Go”. Because it is such a versatile and easy-to-use software made by Wondershare. Like its PC software, it is also packed with many cool features such as chroma key, mask, keyframing, blending, e.t.c. It also supports multiple layers. It has built-in effects, transitions, and presets to speed up the editing process.
It is a paid video editor but you can try it for free, free trial includes most of the features but it leaves a watermark on export.
~Features:
- Has speed curves for smooth speed ramping.
- Supports multiple images and video layers.
- Have many presets and filters for fast pace editing.
- Have cool features like chroma key, masking, keyframing, e.t.c.
- Supports “Pixabay’s” stock library.
~Cons:
- Its UI doesn’t support editing in landscape orientation.
- It doesn’t support 4k video resolution.


~Steps:
Import: Open Filmora Go, Click “New project” to start a new project, or Choose the previous one from the “Draft” portion. Select videos or images to import to your timeline. Hold and drag the clip to change its arrangement.
Edit: You can add text, effects, stickers, layers, e.t.c. by clicking their icon, present on the bar at the bottom.
Click and Drag a clip from the corner to trim it.
Click the “PiP” icon to add image or video layers, you also can add multiple layers.
Select a clip to edit it. Different editing tools appear on the bottom bar. Here you can change its opacity, its speed, or add animations.
Click the diamond icon above the timeline to add keyframes. Zoom, move, or rotate the clip to add keyframes with the passage of time.
Speed Ramping: To Change the speed of a clip, select it then click the “Speed” icon on the bottom bar of the screen. Move the slider to change the speed of the whole clip. To do speed ramping, click the “curves” option to choose a preset or create your own. Click a preset to apply it, and click again to open its edit menu. drag the beats up and down to change speed or add or delete a beat if you want.
Effects: Click the “Effects” icon to open the effects menu. Select an effect to apply to your clip.
Click the white box between two clips to add transitions.
Export: Click the “Export” button to export your file. Select your desired resolution and frame rate to export your clip.


Some Free Video speeding Softwares for iPhone:
If you are short on budget or don’t want to spend much on video editing softwares then you can try these free softwares. They are free that doesn’t mean that they are useless, they are quite good for beginners or moderate users although some of them are designed for professionals also. If you don’t believe me, go and try it yourself. Apart from just changing the speed, they are good in other editing aspects also.
Adobe Premiere Rush:
It is available on IOS and Android both.
If you are looking for free but good speed ramping software then why go anywhere also when you have an amazing video editor made by a well-known software company “Adobe”. Like premiere pro, they have designed a compact version for phones named “Premiere Rush”.
It is a free video editor that has all the tools needed for video editing, from video effects to color grading and audio editing. Its UI is a bit similar to PC video editors. It is a free video editor with no watermarks. Although it takes some time to understand it. But once mastered, you can do editing quickly.
~Features:
- It is a free video editor with no watermark.
- It supports up to 4K resolution at 60fps.
- You can extract audio and can do voiceover directly from the software.
- It has hundreds of filters, overlays, and title designs.
- It has basic color grading tools.
- It also has a motion tracking feature. (in Paid version)
- It supports multiple audio, video, and text layers.


~Cons:
- It only runs on high-end devices. ( It is not supported in most mid-range phones)
- Not suitable for beginners. Its UI is quite hard to understand.
- Doesn’t have common features like the chroma key, masking, e.t.c.


~Price:
Its Premium version is available for 9.99/month. It includes some premium features. Or you can purchase the “All Apps Bundle” at $54.99/month for the annual plan.
~Steps:
Import: Open “Adobe Premiere Rush”, Click the “+” sign at the bottom to create a new project. in the media location, select the clips, then click the blue “create” button to start editing.
Click the blue “+” button at the bottom-left corner to add clips, audio, or graphics.
Hold and drag the clips upward to add them as a layer.
Edit: Scroll over a clip to select it. Clicking again shows a pop-up above the selected clip. Here you get 4 options: split, duplicate, separate audio, and delete.
A number of edit options appear on the bottom line of the screen:
Graphics: Click the “Graphics” button to add animated titles, transition graphics, and overlays as a layer. Select to customize its design.
Effects: Click the “Effects” button to add transitions or motion effect. Select a clip to apply transition at both ends. or select a corner of the clip to apply on it only. And change the duration of transition if you want.
Color: Here you can color grade your clips, Apply a preset or color grade manually by using sliders. You can also create your presets.
Transform: Here you can resize, rotate, crop, or change the position of the clip.
Audio: Here you can edit the audio, select a clip to edit its audio.
Speed Ramping: Click the “Speed” button to edit its speed. Select the range option to speed ramp a specific part of the clip. Select the ramp option to create a smooth speed curve. Or Set the clip duration to change its speed accordingly.
Export: To Export your clip, click the “Export” icon on top of the screen. Click “Quality Settings” to adjust export settings then click “Export” to save your file.
CapCut:
It is available on IOS and Android both.
If you are looking for a free but good speed ramping software to help you create slo-mo videos easily anywhere, anytime you want, then “CapCut” can be the right choice for you. It is a free mobile video editing software with many interesting features like keyframing, chroma-key, masking e.t.c. It also supports video and image layers. It has one of the best speed ramping features among other mobile video editors. It provides curves to smoothly speed ramp your clips. It can edit landscape, portrait, and even square video formats. It has many amazing effects and filters, it also has some stock clips.


~Features:
- It is completely free and has no watermarks.
- It supports up to 4K video resolution.
- Has curves for speed ramping.
- Has keyframes for animation.
- It has hundreds of effects, overlays, and titles.


~Cons:
- Its UI doesn’t support editing in landscape orientation.
- Lacks some common editing tools.
~Steps:
Import: Open Capcut, then click “New Project” to start a new project. Select files then click “Add” to import them. Click the white box with the “+” sign to add more clips. Hold and drag to rearrange the clips.
Click the “Add overlay” button to add photos or videos as layers.
Edit: On the bottom of the screen, you can find a bunch of tools for editing. From here you can add overlays, effects, filters, titles e.t.c to the timeline.
Select a clip to open the edit menu situated at the bottom of the screen. Here you can do the following tasks:
Split the clip; Change its speed, remove background, edit audio, do color correction, apply filters, stabilize the clip, e.t.c.
We have more edit features for the layers only which include: Spice (Blending), Animation, Masking, Chroma key, freeze frame, change opacity e.t.c.
Click the “Keyframe” icon (Diamond shaped) below the playback screen to apply keyframes to the layer. Pinch and zoom or rotate to transform the clip. Use the “Graphs” button in the edit menu to customize the keyframe animation.
Speed Ramping: To Change the speed of a clip, select it then click the “Speed” icon on the bottom bar of the screen. Move the slider to change the speed of the whole clip. To do speed ramping, click the “curves” option to choose a preset or create your own. Click a preset to apply it, and click again to open its edit menu. drag the beats up and down to change speed or add or delete a beat if you want.
Effects: Click the “+” sign between the two clips to add a transition between them, and drag the slider to change its duration.
Select the effects, filters, or titles icon to add them as a layer.
Export: Click the “Export” button on the top-right side of the screen to export your clip. Or click the button, left to the “Export” button to change its resolution and frame rate.
iMovie:
It is available on IOS and Mac.
If you are an Apple fan and own everything Apple then what’s better than getting your hands on a video editor designed by Apple. It is simple and easy to use. It has all the basic editing tools to enhance your video like crop, trim, transitions, effects, e.t.c. It also has a speed ramping feature which let you change the speed at different points of a clip. It’s AI mode “Magic Movie” lets you select clips and a style and software will make the final product for you.
Its “Storyboards” mode is a creative way of learning production and post-production skills. It lets you choose a theme from many famous Genres available, then it will guide you through the production process like capturing footage, arranging your shots, and creating cinematic titles to enhance your story.


~Features:
- It is free and easy to use.
- Let you do speed ramping by changing the speed of different parts of the clip .
- Supports Raw files.
- It’s AI mode creates videos for you on its own.
- The “Storyboarding” feature helps you through the production process.


~Cons:
- It only works on IOS and Mac.
- Not suitable for professional projects.
~Steps:
Import: Open “iMovie” then click “Start New Project” and select one of the 3 following modes to start editing:
- Magic Movie: Select the clips for editing, then click “Create Magic Movie” to let iMovie create a movie for you, which you can customize according to your liking.
- Storyboard: Click “Storyboard” then select Template and a genre or a style then click “Create” to start the project. iMovie will guide you and let you add the clip or title according to the pattern.
- Movie: In “Movie” mode, select the clips from the media browser then click “Create Movie” to start editing.
Edit: Select a clip to edit it. A bunch of tools will appear at the bottom of the screen.
Click the “scissors” icon to split, duplicate, delete the clip, or to detach the audio.
Click the “volume” icon to change the volume of the clip.
Click the “Title” icon to add a title design. Click the text (on the playback window) to edit it.
Click the “Filters” icon to apply it to the selected clip and move the slider to change its intensity.
Speed Ramping: Click the “Speed” icon to change its speed. Move the yellow slider to change the speed of the whole clip. Or click the “Add” button to add partitions (in yellow color) to the selected clip. Select a partition to change its speed only. And click the “Freeze” button to add a freeze-frame.
Effects: Select the black box between two clips to add a transition. Select a transition to apply it and change its time duration if you want.
Export: Click the “Done” button on the top-left corner of the screen to save the clip, then click the “Export” icon on the bottom of the screen to save your file.
Some Paid Video speeding Softwares for iPhone:
If you do most of your video editing from your phone and want to invest some money in it then you should check the softwares mentioned below. They are quite affordable and are worthy of investment. As they are packed with many cool features. But if you aren’t sure which software to use then don’t worry as most of these softwares have a free version to try on but they have some limited features and they provide a watermark on export. But it is a great option to get your hands on new software and once you are comfortable with it, you can purchase its premium version.
Kinemaster:
It is available on IOS and Android both.
If you want to do more than just trimming and cropping to your videos then you should try Kinemaster. For editors, who want to do some advanced-level video editing on their phone, then you must have Kinemaster on your phone. It is a paid software, which is packed with many useful features. It has many video and audio effects. It also has an amazing audio editor. It also has many title designs and basic color correction tools. It has hundreds of effects and transitions + more can be downloaded from its asset store. Its UI is suitable for beginners and content creators both. It is a paid software, but all its features are completely free to use, but the free version leaves a watermark on export.

~Features:
- It supports up to 4K resolution at 60fps. (depending on mobile configuration)
- Have amazing features like chroma key, keyframing, blend e.t.c
- Has built-in audio and video recorder.
- Supports multiple texts and video layers with different resolutions depending on the capability of the mobile phone.
- Has UI like a PC video editor and supports landscape orientation for editing.
- Have an asset store with 100s of free effects, transitions, and stock material.


~Cons:
- Can’t export 4K videos on most devices.
- Can’t apply keyframes and chroma key to the main video. (can be done on layers only)
~Price:
Its Premium version is available for $4.9/month or $39.9/year. It also includes all the premium assets.

~Steps:
Import: Open Kinemaster, then click “New Project” to start a new project. Select the desired aspect ratio then click “Create” to start editing. Or click the “import” button on top to import an existing file to continue editing.
Media Browser will be opened. Select the clips to add them to the timeline. Click the “X” button on the top-right corner to close the media browser.
Edit: Drag the clip from the corner to trim it. Select a clip to open its editing menu. Here you can change its speed, add filters, do color correction, edit its audio, e.t.c.
On the right side, you will see a bunch of icons. Click the “Layer” button to add a media file, text, or effect as a layer. Click the “Audio” button to add an audio file. Or click the “Rec” button to do a voice-over.
Click the “+” symbol between two clips to add a transition between them, then adjust its time duration if you want.
Speed Ramping: Select the “Speed” option to change its speed. Here you can only do linear speed change. To create a speed ramp effect, split the clip into different parts and then change their speed according to your liking. Apply a crossfade transition of about 0.1 sec to smooth the jump cut between clips.
Effects: Select a clip then click “Clip Graphics” to apply the effect to your clip. Your clip will be highlighted with a yellow box, adjust it to set the time duration of the effect.
Click the “Shop” icon to visit the Asset store. Here you can find many cool Effects, clip graphics, transitions, and sound effects. Download them to use in your project.
Click the Layer clip to edit it. Here you can do chroma key, keyframing, or apply animation.
Export: Click the “Export” icon on the top-right corner of the app to open the export screen. Select the desired resolution and frame rate then click “Save as video” to export it.
Power Director:
It is available on IOS and Android both.
It is a paid but quite advanced video editor available for androids and IOS both. Like its PC version mobile version is also packed with many great features. It is compact and easy to use. It supports multiple video and audio layers. Have many cool filters and transitions. Can also do basic color corrections. To complete post-production work it also has audio editing tools and effects. It also has hundreds of title designs. Its UI is easy to use and supports both portrait and landscape orientation for editing. Most of its features can be used for free with a watermark on export. To remove the watermark you need to purchase the premium version.


~Features:
- It supports up to 4K resolution at 60fps. (compatible on most devices)
- Supports both Portrait and Landscape orientation for editing.
- Supports Key framing and video stabilization also.
- Supports multiple audio and video layers.
- Can edit videos in different aspect ratios.
- Have a vast stock library.


~Cons:
- Can’t export 4K videos on many devices.
- Can apply keyframing and chroma key to layers only.
- Software lags sometimes.
~Price:
Its Premium version is available for $4.9/month or $29.9/year.
~Steps:
Import: Open “Power Director”. Click “New Project” then select Aspect Ratio to start editing. Select clips from the media library Then click the “blue tick” button to add them to the timeline. Click the “+” icon to import more clips. From the bottom bar (in portrait mode), Select the video, image, audio, or effect icon to add them as a layer. In Landscape Mode bar it is situated on the left side of the screen.
Edit: Select and drag the clip from the corner to trim it. Select a clip to open edit tools. From here you can do audio editing, color correction, cropping, stabilization, and speed change.
Here you get more features to edit a layer or an overlay such as chroma key, masking, transform keyframe, e.t.c. To do keyframing, select a layer, then click the “diamond” icon located on the right side above the timeline to add keyframes then rotate, zoom or change the position of the clip with time to add more keyframes. You can also do keyframing for other features like adjustment, mask, blend, and opacity.
Speed Ramping: To Change speed, select a clip or a layer click the “speed” button then move the slider to change its speed. To do speed ramping split the clip into small parts and change their speed respectively. Click the “ease-in” and “ease-out” buttons to smooth the jump between the clips.
Effects: Click the grey box between the clips to add a transition and move the slider to change its duration if you want.
Select a clip, then choose a filter or an effect to apply to the selected clip.
Export: To Export the finished product, click the “export” icon on the top-right side of the screen then click “Produce and Share” to select the video resolution or click the “Settings” icon to change the storage path and frame rate. Then click “Produce”.
LumaFusion:
It is available on IOS and Mac (with an m1 processor).
As a content creator, have you ever wished for creating your own cinematic masterpiece, but the thing holding you back is that you don’t have a powerful workstation or expensive software then don’t worry. You can do professional-level editing on your iPhone with the software named “LumaFusion. It is one of the most powerful and advanced video editors available for your iPhone or iPad.
It is a multi-track video editor with many useful features like the Chroma key, keyframing, color grading, and color LUTs. Have powerful color grading tools and an audio editor. It also has a lock and load stabilizer. You have to purchase the software before using it. It doesn’t have any free version to try.

Credits: Pic by Luma touch website.
~Features:
- It supports up to 4K video resolution at a max of 240 fps.
- Can also edit and export 360 videos.
- Have powerful color correction tools. You can also import your own color LUTs.
- Supports Keyframing on almost all the editing tools within the software.
- You can add some third-party audio plugins.
- Supports up to 6 audio and video layers.
- Have “Storyblock” stock library. (Many of its contents are free to use)
- Supports external monitor for display.

Credits: Pic by Luma touch website.
~Cons:
- Not available for Android devices.
- Being an advanced software, it doesn’t have masking and speed ramping features.
- Doesn’t have a free version to try on.
~Price:
It is available for purchase at $29.99.
~Steps:
Import: Click the “+” button on the bottom of the screen to start a new project. A small tab will appear, change the settings if you want, then click the “+” button on the top-right side of the tab to start your project.
Click the “flower icon” on the top-right side of the screen to open the source menu (Its icon changes depending on the present tab), Click “Photos” to open folders and files. Click and drag files to add them to the timeline. Click and drag the clips on the top of the primary clip to add them as a layer.
Edit: Click and drag the clips from the corner to trim them. On the bar at the bottom of the screen, you will find basic tools. Click the clip, to open editing tools on the same bar.
Click the “+” icon on the bottom bar or select “Titles” on the source menu to open the Titles menu. Drag and drop the titles to use them. Double-click the text to open the edit menu.
Double-click the clip to open the edit menu. Here you can transform the clip, change its speed, Stabilize your clips, do color grading, add an effect and perform audio editing.
Speed Ramping: In the edit mode, click the “speed and reverse” button and move the slider back or forth to change the speed of the whole video. To do speed ramping, split the video into parts and apply different speeds to create a speed ramp effect. This method is not perfect but it gets the job done.
Effects: Select the “Transitions” icon on the source menu to open the transition menu. Drag and drop a transition on a clip to use it.
Double click a clip to open the edit menu. Then in the “Color & Effects” tab select any effects and apply them to your clip.
To do keyframing, on the edit menu, click the “circle” icon on the bottom-right side below the display to start keyframing. then change the settings with time to add further keyframes.
Export: To Export your file, click the “Export” icon on the bottom-right corner of the screen to open the export menu then click the “movie” icon to select the file destination. Select the desired export settings then click the “Export” icon on the top of the menu to export your finished product.
Which One Should I Choose Free or Paid iPhone Video speeding Softwares?
It usually depends on your needs. If you just want a speed editor to make slow-mo or timelapse videos for your social media then you should go for free video editors, as they are easy to use and provide better speed ramping features than some paid video editors mentioned here.
But as a content creator if you want more features alongside speed ramping then you should go for paid softwares mentioned above. As mobile video editors are quite affordable and some of them have features like that of some PC softwares.
FAQs about Speed ramping feature and softwares:
- Q) What is Speed Ramping and where it is used?
Speed Ramping is different from just changing the speed of the whole clip. It means changing the speed of the video gradually, so the clip doesn’t feel jumpy.
It is done to give viewers a smooth experience between different parts of the clip. like the fast-forward clip is used to show the passage of time. and the slow-mo is used to emphasize something or produce tension, while a mix of both is used in ads and action scenes, e.t.c.
- Q) How to do Speed Ramping?
Speed Ramping methods vary from software to software. Either you can do it by adding keyframes and changing speed with time or you can add or adjust curves for speed change. If your software doesn’t support the speed ramping feature, you can split a clip into parts and apply speed change to them differently. For some of the best iPhone softwares, we have mentioned the speed ramping steps above.
- Q) What FPS is best for Slo-mo videos?
Shooting at 60 Fps is ideal as it gives a smooth and crisp video and you can make slow motion easily if required, you can slow it down up to 40% of its speed while maintaining the quality. It is supported in almost most devices nowadays. And if you want to create super slo-mo for your cinematics or product video then 120 or 240 fps is preferable. But higher fps often have disadvantages as it is harder to apply visual effects or masks. So choose the frame rate according to your requirements.
- Q) Does changing the speed of video affect its audio?
Yes, changing the speed of video affects the audio, It affects its pitch (tempo). Increasing its speed increases the pitch of the audio making it sound shrill while decreasing the speed of the video or making slow-mo decreases the pitch making it sound deep.
Although, some softwares provide the feature to maintain the pitch while changing the speed of the clip.
~Cons:
- Its UI doesn’t support editing in landscape orientation.
- It doesn’t support 4k video resolution.
~Steps:
Import: Open Filmora Go, Click “New project” to start a new project, or Choose the previous one from the “Draft” portion. Select videos or images to import to your timeline. Hold and drag the clip to change its arrangement.
Edit: You can add text, effects, stickers, layers, e.t.c. by clicking their icon, present on the bar at the bottom.
Click and Drag a clip from the corner to trim it.
Click the “PiP” icon to add image or video layers, you also can add multiple layers.
Select a clip to edit it. Different editing tools appear on the bottom bar. Here you can change its opacity, its speed, or add animations.
Click the diamond icon above the timeline to add keyframes. Zoom, move, or rotate the clip to add keyframes with the passage of time.
Speed Ramping: To Change the speed of a clip, select it then click the “Speed” icon on the bottom bar of the screen. Move the slider to change the speed of the whole clip. To do speed ramping, click the “curves” option to choose a preset or create your own. Click a preset to apply it, and click again to open its edit menu. drag the beats up and down to change speed or add or delete a beat if you want.
Effects: Click the “Effects” icon to open the effects menu. Select an effect to apply to your clip.
Click the white box between two clips to add transitions.
Export: Click the “Export” button to export your file. Select your desired resolution and frame rate to export your clip.
Some Free Video speeding Softwares for iPhone:
If you are short on budget or don’t want to spend much on video editing softwares then you can try these free softwares. They are free that doesn’t mean that they are useless, they are quite good for beginners or moderate users although some of them are designed for professionals also. If you don’t believe me, go and try it yourself. Apart from just changing the speed, they are good in other editing aspects also.
Adobe Premiere Rush:
It is available on IOS and Android both.
If you are looking for free but good speed ramping software then why go anywhere also when you have an amazing video editor made by a well-known software company “Adobe”. Like premiere pro, they have designed a compact version for phones named “Premiere Rush”.
It is a free video editor that has all the tools needed for video editing, from video effects to color grading and audio editing. Its UI is a bit similar to PC video editors. It is a free video editor with no watermarks. Although it takes some time to understand it. But once mastered, you can do editing quickly.
~Features:
- It is a free video editor with no watermark.
- It supports up to 4K resolution at 60fps.
- You can extract audio and can do voiceover directly from the software.
- It has hundreds of filters, overlays, and title designs.
- It has basic color grading tools.
- It also has a motion tracking feature. (in Paid version)
- It supports multiple audio, video, and text layers.
~Cons:
- It only runs on high-end devices. ( It is not supported in most mid-range phones)
- Not suitable for beginners. Its UI is quite hard to understand.
- Doesn’t have common features like the chroma key, masking, e.t.c.
~Price:
Its Premium version is available for 9.99/month. It includes some premium features. Or you can purchase the “All Apps Bundle” at $54.99/month for the annual plan.
~Steps:
Import: Open “Adobe Premiere Rush”, Click the “+” sign at the bottom to create a new project. in the media location, select the clips, then click the blue “create” button to start editing.
Click the blue “+” button at the bottom-left corner to add clips, audio, or graphics.
Hold and drag the clips upward to add them as a layer.
Edit: Scroll over a clip to select it. Clicking again shows a pop-up above the selected clip. Here you get 4 options: split, duplicate, separate audio, and delete.
A number of edit options appear on the bottom line of the screen:
Graphics: Click the “Graphics” button to add animated titles, transition graphics, and overlays as a layer. Select to customize its design.
Effects: Click the “Effects” button to add transitions or motion effect. Select a clip to apply transition at both ends. or select a corner of the clip to apply on it only. And change the duration of transition if you want.
Color: Here you can color grade your clips, Apply a preset or color grade manually by using sliders. You can also create your presets.
Transform: Here you can resize, rotate, crop, or change the position of the clip.
Audio: Here you can edit the audio, select a clip to edit its audio.
Speed Ramping: Click the “Speed” button to edit its speed. Select the range option to speed ramp a specific part of the clip. Select the ramp option to create a smooth speed curve. Or Set the clip duration to change its speed accordingly.
Export: To Export your clip, click the “Export” icon on top of the screen. Click “Quality Settings” to adjust export settings then click “Export” to save your file.
CapCut:
It is available on IOS and Android both.
If you are looking for a free but good speed ramping software to help you create slo-mo videos easily anywhere, anytime you want, then “CapCut” can be the right choice for you. It is a free mobile video editing software with many interesting features like keyframing, chroma-key, masking e.t.c. It also supports video and image layers. It has one of the best speed ramping features among other mobile video editors. It provides curves to smoothly speed ramp your clips. It can edit landscape, portrait, and even square video formats. It has many amazing effects and filters, it also has some stock clips.
~Features:
- It is completely free and has no watermarks.
- It supports up to 4K video resolution.
- Has curves for speed ramping.
- Has keyframes for animation.
- It has hundreds of effects, overlays, and titles.
~Cons:
- Its UI doesn’t support editing in landscape orientation.
- Lacks some common editing tools.
~Steps:
Import: Open Capcut, then click “New Project” to start a new project. Select files then click “Add” to import them. Click the white box with the “+” sign to add more clips. Hold and drag to rearrange the clips.
Click the “Add overlay” button to add photos or videos as layers.
Edit: On the bottom of the screen, you can find a bunch of tools for editing. From here you can add overlays, effects, filters, titles e.t.c to the timeline.
Select a clip to open the edit menu situated at the bottom of the screen. Here you can do the following tasks:
Split the clip; Change its speed, remove background, edit audio, do color correction, apply filters, stabilize the clip, e.t.c.
We have more edit features for the layers only which include: Spice (Blending), Animation, Masking, Chroma key, freeze frame, change opacity e.t.c.
Click the “Keyframe” icon (Diamond shaped) below the playback screen to apply keyframes to the layer. Pinch and zoom or rotate to transform the clip. Use the “Graphs” button in the edit menu to customize the keyframe animation.
Speed Ramping: To Change the speed of a clip, select it then click the “Speed” icon on the bottom bar of the screen. Move the slider to change the speed of the whole clip. To do speed ramping, click the “curves” option to choose a preset or create your own. Click a preset to apply it, and click again to open its edit menu. drag the beats up and down to change speed or add or delete a beat if you want.
Effects: Click the “+” sign between the two clips to add a transition between them, and drag the slider to change its duration.
Select the effects, filters, or titles icon to add them as a layer.
Export: Click the “Export” button on the top-right side of the screen to export your clip. Or click the button, left to the “Export” button to change its resolution and frame rate.
iMovie:
It is available on IOS and Mac.
If you are an Apple fan and own everything Apple then what’s better than getting your hands on a video editor designed by Apple. It is simple and easy to use. It has all the basic editing tools to enhance your video like crop, trim, transitions, effects, e.t.c. It also has a speed ramping feature which let you change the speed at different points of a clip. It’s AI mode “Magic Movie” lets you select clips and a style and software will make the final product for you.
Its “Storyboards” mode is a creative way of learning production and post-production skills. It lets you choose a theme from many famous Genres available, then it will guide you through the production process like capturing footage, arranging your shots, and creating cinematic titles to enhance your story.
~Features:
- It is free and easy to use.
- Let you do speed ramping by changing the speed of different parts of the clip .
- Supports Raw files.
- It’s AI mode creates videos for you on its own.
- The “Storyboarding” feature helps you through the production process.
~Cons:
- It only works on IOS and Mac.
- Not suitable for professional projects.
~Steps:
Import: Open “iMovie” then click “Start New Project” and select one of the 3 following modes to start editing:
- Magic Movie: Select the clips for editing, then click “Create Magic Movie” to let iMovie create a movie for you, which you can customize according to your liking.
- Storyboard: Click “Storyboard” then select Template and a genre or a style then click “Create” to start the project. iMovie will guide you and let you add the clip or title according to the pattern.
- Movie: In “Movie” mode, select the clips from the media browser then click “Create Movie” to start editing.
Edit: Select a clip to edit it. A bunch of tools will appear at the bottom of the screen.
Click the “scissors” icon to split, duplicate, delete the clip, or to detach the audio.
Click the “volume” icon to change the volume of the clip.
Click the “Title” icon to add a title design. Click the text (on the playback window) to edit it.
Click the “Filters” icon to apply it to the selected clip and move the slider to change its intensity.
Speed Ramping: Click the “Speed” icon to change its speed. Move the yellow slider to change the speed of the whole clip. Or click the “Add” button to add partitions (in yellow color) to the selected clip. Select a partition to change its speed only. And click the “Freeze” button to add a freeze-frame.
Effects: Select the black box between two clips to add a transition. Select a transition to apply it and change its time duration if you want.
Export: Click the “Done” button on the top-left corner of the screen to save the clip, then click the “Export” icon on the bottom of the screen to save your file.
Some Paid Video speeding Softwares for iPhone:
If you do most of your video editing from your phone and want to invest some money in it then you should check the softwares mentioned below. They are quite affordable and are worthy of investment. As they are packed with many cool features. But if you aren’t sure which software to use then don’t worry as most of these softwares have a free version to try on but they have some limited features and they provide a watermark on export. But it is a great option to get your hands on new software and once you are comfortable with it, you can purchase its premium version.
Kinemaster:
It is available on IOS and Android both.
If you want to do more than just trimming and cropping to your videos then you should try Kinemaster. For editors, who want to do some advanced-level video editing on their phone, then you must have Kinemaster on your phone. It is a paid software, which is packed with many useful features. It has many video and audio effects. It also has an amazing audio editor. It also has many title designs and basic color correction tools. It has hundreds of effects and transitions + more can be downloaded from its asset store. Its UI is suitable for beginners and content creators both. It is a paid software, but all its features are completely free to use, but the free version leaves a watermark on export.
~Features:
- It supports up to 4K resolution at 60fps. (depending on mobile configuration)
- Have amazing features like chroma key, keyframing, blend e.t.c
- Has built-in audio and video recorder.
- Supports multiple texts and video layers with different resolutions depending on the capability of the mobile phone.
- Has UI like a PC video editor and supports landscape orientation for editing.
- Have an asset store with 100s of free effects, transitions, and stock material.
~Cons:
- Can’t export 4K videos on most devices.
- Can’t apply keyframes and chroma key to the main video. (can be done on layers only)
~Price:
Its Premium version is available for $4.9/month or $39.9/year. It also includes all the premium assets.
~Steps:
Import: Open Kinemaster, then click “New Project” to start a new project. Select the desired aspect ratio then click “Create” to start editing. Or click the “import” button on top to import an existing file to continue editing.
Media Browser will be opened. Select the clips to add them to the timeline. Click the “X” button on the top-right corner to close the media browser.
Edit: Drag the clip from the corner to trim it. Select a clip to open its editing menu. Here you can change its speed, add filters, do color correction, edit its audio, e.t.c.
On the right side, you will see a bunch of icons. Click the “Layer” button to add a media file, text, or effect as a layer. Click the “Audio” button to add an audio file. Or click the “Rec” button to do a voice-over.
Click the “+” symbol between two clips to add a transition between them, then adjust its time duration if you want.
Speed Ramping: Select the “Speed” option to change its speed. Here you can only do linear speed change. To create a speed ramp effect, split the clip into different parts and then change their speed according to your liking. Apply a crossfade transition of about 0.1 sec to smooth the jump cut between clips.
Effects: Select a clip then click “Clip Graphics” to apply the effect to your clip. Your clip will be highlighted with a yellow box, adjust it to set the time duration of the effect.
Click the “Shop” icon to visit the Asset store. Here you can find many cool Effects, clip graphics, transitions, and sound effects. Download them to use in your project.
Click the Layer clip to edit it. Here you can do chroma key, keyframing, or apply animation.
Export: Click the “Export” icon on the top-right corner of the app to open the export screen. Select the desired resolution and frame rate then click “Save as video” to export it.
Power Director:
It is available on IOS and Android both.
It is a paid but quite advanced video editor available for androids and IOS both. Like its PC version mobile version is also packed with many great features. It is compact and easy to use. It supports multiple video and audio layers. Have many cool filters and transitions. Can also do basic color corrections. To complete post-production work it also has audio editing tools and effects. It also has hundreds of title designs. Its UI is easy to use and supports both portrait and landscape orientation for editing. Most of its features can be used for free with a watermark on export. To remove the watermark you need to purchase the premium version.
~Features:
- It supports up to 4K resolution at 60fps. (compatible on most devices)
- Supports both Portrait and Landscape orientation for editing.
- Supports Key framing and video stabilization also.
- Supports multiple audio and video layers.
- Can edit videos in different aspect ratios.
- Have a vast stock library.
~Cons:
- Can’t export 4K videos on many devices.
- Can apply keyframing and chroma key to layers only.
- Software lags sometimes.
~Price:
Its Premium version is available for $4.9/month or $29.9/year.
~Steps:
Import: Open “Power Director”. Click “New Project” then select Aspect Ratio to start editing. Select clips from the media library Then click the “blue tick” button to add them to the timeline. Click the “+” icon to import more clips. From the bottom bar (in portrait mode), Select the video, image, audio, or effect icon to add them as a layer. In Landscape Mode bar it is situated on the left side of the screen.
Edit: Select and drag the clip from the corner to trim it. Select a clip to open edit tools. From here you can do audio editing, color correction, cropping, stabilization, and speed change.
Here you get more features to edit a layer or an overlay such as chroma key, masking, transform keyframe, e.t.c. To do keyframing, select a layer, then click the “diamond” icon located on the right side above the timeline to add keyframes then rotate, zoom or change the position of the clip with time to add more keyframes. You can also do keyframing for other features like adjustment, mask, blend, and opacity.
Speed Ramping: To Change speed, select a clip or a layer click the “speed” button then move the slider to change its speed. To do speed ramping split the clip into small parts and change their speed respectively. Click the “ease-in” and “ease-out” buttons to smooth the jump between the clips.
Effects: Click the grey box between the clips to add a transition and move the slider to change its duration if you want.
Select a clip, then choose a filter or an effect to apply to the selected clip.
Export: To Export the finished product, click the “export” icon on the top-right side of the screen then click “Produce and Share” to select the video resolution or click the “Settings” icon to change the storage path and frame rate. Then click “Produce”.
LumaFusion:
It is available on IOS and Mac (with an m1 processor).
As a content creator, have you ever wished for creating your own cinematic masterpiece, but the thing holding you back is that you don’t have a powerful workstation or expensive software then don’t worry. You can do professional-level editing on your iPhone with the software named “LumaFusion. It is one of the most powerful and advanced video editors available for your iPhone or iPad.
It is a multi-track video editor with many useful features like the Chroma key, keyframing, color grading, and color LUTs. Have powerful color grading tools and an audio editor. It also has a lock and load stabilizer. You have to purchase the software before using it. It doesn’t have any free version to try.
Credits: Pic by Luma touch website.
~Features:
- It supports up to 4K video resolution at a max of 240 fps.
- Can also edit and export 360 videos.
- Have powerful color correction tools. You can also import your own color LUTs.
- Supports Keyframing on almost all the editing tools within the software.
- You can add some third-party audio plugins.
- Supports up to 6 audio and video layers.
- Have “Storyblock” stock library. (Many of its contents are free to use)
- Supports external monitor for display.
Credits: Pic by Luma touch website.
~Cons:
- Not available for Android devices.
- Being an advanced software, it doesn’t have masking and speed ramping features.
- Doesn’t have a free version to try on.
~Price:
It is available for purchase at $29.99.
~Steps:
Import: Click the “+” button on the bottom of the screen to start a new project. A small tab will appear, change the settings if you want, then click the “+” button on the top-right side of the tab to start your project.
Click the “flower icon” on the top-right side of the screen to open the source menu (Its icon changes depending on the present tab), Click “Photos” to open folders and files. Click and drag files to add them to the timeline. Click and drag the clips on the top of the primary clip to add them as a layer.
Edit: Click and drag the clips from the corner to trim them. On the bar at the bottom of the screen, you will find basic tools. Click the clip, to open editing tools on the same bar.
Click the “+” icon on the bottom bar or select “Titles” on the source menu to open the Titles menu. Drag and drop the titles to use them. Double-click the text to open the edit menu.
Double-click the clip to open the edit menu. Here you can transform the clip, change its speed, Stabilize your clips, do color grading, add an effect and perform audio editing.
Speed Ramping: In the edit mode, click the “speed and reverse” button and move the slider back or forth to change the speed of the whole video. To do speed ramping, split the video into parts and apply different speeds to create a speed ramp effect. This method is not perfect but it gets the job done.
Effects: Select the “Transitions” icon on the source menu to open the transition menu. Drag and drop a transition on a clip to use it.
Double click a clip to open the edit menu. Then in the “Color & Effects” tab select any effects and apply them to your clip.
To do keyframing, on the edit menu, click the “circle” icon on the bottom-right side below the display to start keyframing. then change the settings with time to add further keyframes.
Export: To Export your file, click the “Export” icon on the bottom-right corner of the screen to open the export menu then click the “movie” icon to select the file destination. Select the desired export settings then click the “Export” icon on the top of the menu to export your finished product.
Which One Should I Choose Free or Paid iPhone Video speeding Softwares?
It usually depends on your needs. If you just want a speed editor to make slow-mo or timelapse videos for your social media then you should go for free video editors, as they are easy to use and provide better speed ramping features than some paid video editors mentioned here.
But as a content creator if you want more features alongside speed ramping then you should go for paid softwares mentioned above. As mobile video editors are quite affordable and some of them have features like that of some PC softwares.
FAQs about Speed ramping feature and softwares:
- Q) What is Speed Ramping and where it is used?
Speed Ramping is different from just changing the speed of the whole clip. It means changing the speed of the video gradually, so the clip doesn’t feel jumpy.
It is done to give viewers a smooth experience between different parts of the clip. like the fast-forward clip is used to show the passage of time. and the slow-mo is used to emphasize something or produce tension, while a mix of both is used in ads and action scenes, e.t.c.
- Q) How to do Speed Ramping?
Speed Ramping methods vary from software to software. Either you can do it by adding keyframes and changing speed with time or you can add or adjust curves for speed change. If your software doesn’t support the speed ramping feature, you can split a clip into parts and apply speed change to them differently. For some of the best iPhone softwares, we have mentioned the speed ramping steps above.
- Q) What FPS is best for Slo-mo videos?
Shooting at 60 Fps is ideal as it gives a smooth and crisp video and you can make slow motion easily if required, you can slow it down up to 40% of its speed while maintaining the quality. It is supported in almost most devices nowadays. And if you want to create super slo-mo for your cinematics or product video then 120 or 240 fps is preferable. But higher fps often have disadvantages as it is harder to apply visual effects or masks. So choose the frame rate according to your requirements.
- Q) Does changing the speed of video affect its audio?
Yes, changing the speed of video affects the audio, It affects its pitch (tempo). Increasing its speed increases the pitch of the audio making it sound shrill while decreasing the speed of the video or making slow-mo decreases the pitch making it sound deep.
Although, some softwares provide the feature to maintain the pitch while changing the speed of the clip.
Top 10 Video Editing Online Makers Is Worth Your Attention
Which 10 Best Video Editing Online Makers is Worth Your Attention in 2022
An easy yet powerful editor
Numerous effects to choose from
Detailed tutorials provided by the official channel
In this article
01 [Best 10 Free Video Editing Software Online](#Part 1)
02 [Video Editing Online Q&A](#Part 2)
Part 1 Best 10 Free Video Editing Software Online
Video editing and customization is an essential aspect of graphic design and allied applications. Entering into the domain, the IT and software market presents a diverse range of solutions to work on the concern. While there are numerous software alternatives and programs to download and use, such utilities may sometime come up with a time consuming and rigorous editing process.
Another aspect that stops editors, especially beginners and newbies from picking the software alternatives is their high end working interface that may often be difficult to understand and navigate through. Sorting out all the aforesaid issues, there comes the extensive range of online and web based video editing utilities to perfectly cater to all the video customization needs in a spic and span process.
In the light of the aforesaid merits that you get to access with an online video editing program, let us try hands at having an insight into some of the best online alternatives to customize your videos in what follows next:
01Wave.video
Adaptable Systems: All common operating systems
Inaugurating the list, here is the Wave.video online editing website that you can work with to create, edit, share and host video footages and clips. The best utility of the program is that it caters a diverse range of film customization requirements, from personal, candid creations to high end professional editing needs of business enterprises, media enthusiasts, blogging and entrepreneurship platforms and a variety of other sectors.
Talking of the platform workability, you get to access a responsive and non-messy editing interface, with a convenient navigation for newbies and non tech savvy users. Going through the demos and informative articles, tutorials and blogs, you can design professionally sound presentations with utmost ease. The platform houses the widest video template library with over 400 million preset customizable stock videos to choose from.
The utility expands a range of customization choices to spark up your edits, such as including self-created logos, fonts and watermarks on the videos. Talking of video export options, the platform grants you the liberty to directly share your video edits across all popular media sharing handles and online storage accounts, like, Facebook, Twitter, YouTube, Dropbox, Google Drive, etc. in more than 30 different file formats.
You can also save the customized video to the local media gallery of your device in the MP4 file format. An exclusive video sharing feature of the site works to create an editable ‘Video Landing Page’ consisting of the created video edit, its title and a call-to-action button. You can also embed your creation to blogs and websites from the platforms. You can work with the program absolutely free of cost.
Pros
● Tons of stock videos, music and fun elements to complement your footage.
● Most convenient editing timeline for an enjoyable editing experience.
● The customization process is very fast.
Cons
● The video uploading process is quite time consuming.
● Some features have a confusing work pattern.
● The program leaves its watermark on the customized clips.
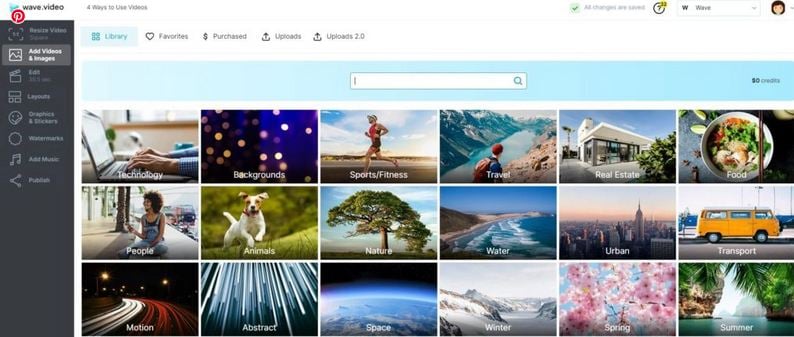
02InVideo
Adaptable Systems: All popular operating systems
The InVideo online editing tool is probably the best alternative you can get for a quick customization of your video footage. The utility houses a series of tools and features to create classic masterpieces of clip edits. The program’s library allows you to expand your graphic design creativity with its extensive variety of in built editing templates. The add-on elements are no less with an appealing range of masks, stickers and vector shapes to spark up your creations.
The tool has a paid collection of more than 3 million preset templates, which get reduced to a count of 1 million for free version users. This is however, a cumulative figure with an addition of premium features. The free template options, though limited, are appealing to work with. As far as the customization options are concerned, the utility recommends you to create your brand prior to beginning with the editing process.
You can set a brand by adding the name and logo of your company, along with specific colors to a preferred default template. This causes your brand elements to stay in the tool’s editing dashboard for an instant access in times of need. The tool allows you to create video edits in the vertical, square and wide aspect ratios, which you can switch between, while customizing the preset video template.
When it comes to exporting your creation, the free version of the tool limits you to a local save of the edits in your device’s media gallery in a 720 pixel resolution, along with a direct sharing facility for Facebook, Twitter and YouTube. The utility additionally leaves its watermark on the output video. The aforesaid limitations can however be overcome by availing a paid subscription of the online editing program.
Pros
● The program undergoes a regular update in line with user feedback.
● You are granted a complete control on the video customization process to add the elements of your choice.
● The program’s back end user support is highly active with a 24 x 7 chat service.
Cons
● You cannot add sound elements to the video edits.
● The tool’s Text-to-speech recognition abilities are somewhat of the mediocre level.
● The free version of the tool has a limited number of video export options.
03Adobe Spark
Adaptable Systems: All popular operating systems
Presently known as Adobe Creative Cloud Express, this one is a sophisticated video customization tool, suited best for experienced users to address the needs of creating professionally sound video, graphic and web page edits. The tool greets you with a quite upgraded interface, although the workability and template selection is not that complex. Working with the tool, you can create customized videos in landscape and square formats with respective aspect ratios of 16:9 and 1:1.
Talking of the customization options, you get to access and work with tons of preset video customization templates within the Adobe Stock library of the tool. The templates are free to use, but however, leave a watermark on the final edited output. As far as other editing elements are concerned, the tool presents a huge set of choices to match the feel, flavor, theme and style of your videos and graphic footages.
You are also allowed to edit a brand with the aforesaid tool, but catering to the concern however, requires a paid subscription of the utility. Moving into the tool’s creation export facility, you may face a downside with respect to the time constraint of the video upload process. The export interface takes a sufficient time to fetch a download of the customized video, while compressing the output file.
Pros
● The output quality of the customized video is quite impressive.
● The tool’s working interface is simple, with stepwise, onscreen usage instructions guiding you through the editing process.
● The utility is known to create excellent web design projects in a minimal amount of time.
Cons
● The software does not allow you to embed your video edits on blogs and websites.
● The video export process takes a considerable amount of time.
● The free version leaves the tool’s watermark on the customized video output.
04Animoto
Adaptable Platforms: All popular operating systems
Moving ahead with the list, there is the Animoto online video editor program that lets you work towards creating customized video edits in 2 separate modes, depending on your requirement niche. If you are keen on making customized video edits from personal or family centered events to share on social media handles, it would be great to pick the ‘Animoto Memories’ customization service. On the contrary, the ‘Animoto Marketing’ service is best suited to create professional video edits.
To have an in-depth understanding of the customization process within each of the editing modes, you can refer the inbuilt tutorials offered by the tool. The program interface additionally guides you through the customization process with stepwise on screen instructions when you are using the tool to create your first ever video edit. The interface is clean, responsive and easy to navigate.
Talking of the video customization facilities, you are allowed to access a refined audio and template library with a host of thematic choices to select and work upon. The tool lets you upload and edit video files from the local media gallery of your system, as well as import the same from a preferred online or external platform. You can even capture fresh video clips and begin editing them with the program.
The preset template library of the program houses a decent range of 60 different options to create amazing video edits that suit a diversity of purposes, like that of social and professional events, photography sessions, short content clips, recipes, YouTube ads and much more. You can work to customize the font, size, color and segments of the footage.
As of the editing formats, you are permitted to create landscape and square artworks in 16:9 and 1:1 aspect ratio respectively. When proceeding to export your creation, the tool presents before you with HD and SD resolutions, with 720 and 1080 pixels in the former, while 360 and 480 pixels in the latter. You can easily share your creations across popular media platforms and online storage accounts, or host them on websites, and also save them locally to your device.
Pros
● The tool caters to generate high quality edited video outputs.
● You can customize the videos with personalized tags.
● The program lets you create advertisement videos with ease.
Cons
● The editing process takes enough time to make you feel distracted.
● You cannot cancel the paid subscription at a later stage.
● The free version has a limited set of features, and premium version is too pricey.
05Flyr
Adaptable Platforms: All popular operating systems
For those who are keen on following social media trends, or looking for high end business presentation ideas, Flyr is the just perfect choice. The elegantly professional pre designed template options within the tool’s library are effortless dedicated towards helping you create top class customized video footages and presentations. With millions of HD video backgrounds and templates to pick from, this program literally has everything to address the most expanded editing requirements.
Moving towards the workability convenience, the program greets you with an elementary interface, and the simplest of customization processes. To edit videos with this online tool, all you need to do is, sign up to the utility, pick an editable template, add a desired text in the message field and scale up the video background, if required. You will however, get to access a limited number of templates with a one-time download facility, when using the tool’s free version.
Extending the dimensions of customization flexibilities, you can complement the video edits with vibrant shades of your choice to render them with a personalized appearance. You are further, allowed to make a choice among the portrait, landscape and square formats for generating the customized output footage. While permitting you to export the edited footage in a variety of file formats with a 1080 pixel HD or SD resolution, the tool facilitates a local save of the generated clip exclusively to its paid subscribers.
Pros
● The program comes to you with the simplest of interfaces to work with.
● You can export your creations in a diversity of aspect ratios and output formats.
● The tool has some AI based features to cater a quick and smart video output.
Cons
● The tool’s subscription plans cannot be customized.
● The free version of the program houses a restricted number of customization features.
● The output generation process may ask you to wait a bit longer than usual.
06Kizoa
Adaptable Systems: All popular operating systems
This one is a reliable online video editing app that caters to the most diverse customization requirements, all with its elementary set of utilities and features. Though the program interface may appear a bit chuncked up and messy, the featuristic viability of the platform is a convenient compensation of the same. Some of the choicest appeals of the program include a diverse range of clip aspect ratios and an instant video playback facility.
Compensating for its crowded interface to a further extent, Kizoa works to walk you through the footage customization process via step wise on screen instructions. If you ever find it difficult to navigate through the tool’s editing workspace, additional help is catered by a series of reminder prompts. As of the inbuilt customization utilities, the platform opens up a huge library of preset template options to pick and use.
The photo album and music library are however, a downside with about 20 default images and a limited number of royalty free audio tracks. While there is an additional range of surplus audio tracks, you are permitted to access the same only through a paid subscription of the program. Talking of the available video formats to work with editing your videos, you can pick from the 4:3, 3:2 and 16:9 landscape options, 9:16, 2:3 and 3:4 portrait choices, or a 1:1 square format.
Exploring the customization features to a deeper extent, you get to work with a decent and updated variety of fonts and color switches. When it comes to exporting your creation, the tool offers an expanded set of choices to present your artwork across popular social media and networking platforms and online media storage accounts, such as, Twitter, Facebook, YouTube, E-mail, Google Drive, etc.
You can additionally, download the edited footage to your device, host it on a on a website or blog, and burn the same to an external disk. The tool comes with a ‘Pay Once’ premium subscription to access hidden features.
Pros
● The tool backs up your editing queries with a 24 x 7 responsive customer support system.
● You can avail a lifetime membership of the program to avoid periodic renewal.
● The export facility of the tool is quite expanded.
Cons
● The tool often encounters content mismanagement.
● The working interface is quite crowded.
● Uploading videos to the program’s workspace is a time taking process.
07ClipChamp
Adaptable Systems: All popular operating systems
If you are a newbie in the arena of graphic and video editing applications, this one is a perfect choice to proceed with the task of video customization. The aforesaid online utility to edit clips and footages is extremely useful to the ones who have just landed into the creative domain and try hands at creating customized clips with an online aid. The tool facilitates you with a guided search and customization to let you create a visual masterpiece in a quick time span.
While the editing process is affordably simple, the working interface leaves nothing unturned to help you with a clean layout and prompting on screen instructions. The interface elements have a well-defined organization, displaying first things first, making it possible for you to conveniently design extensive video projects with a high end professional quality.
This online tool however, does not facilitate preset features and templates to free users. Although you can have a glimpse of the assorted range of sound effects, video templates, music tracks, animated themes and backgrounds, accessing the same essentially requires you to avail a paid subscription of the program. Additional customization features of the tool include an instant playback option, several title transitions and a decent font selection range.
As a free user of the tool, you are entitled to export your video edits in an affordably low resolution of 480 pixels. Premium users are however, benefited with a 720 pixel export facility, but the real element of surprise is that the platform does not allow a 1080 pixel export at all. While the tool does not present you with video export choices at all, you can anyway make a free download of your creation to the local media gallery of your system.
Pros
● The utility is one of the most preferred video customization programs for freelancers.
● The working interface has a calming and easy to go outlook.
● The program is quite suitable to be used by beginners.
Cons
● As reported by premium users, the media import process is not so welcoming.
● The project media gets stored in your device’s internal memory instead of a cloud space.
● Output quality for free users is disappointingly low.
08HippoVideo
Adaptable Systems: All popular operating systems
Launched as an extension to the Google Chrome web browser, the aforesaid online video editor program is chiefly designed to address the screen recording concerns of business and academic personnel, YouTubers and gamers. Ahead of the aforesaid facility, the tool is an excellent choice to sort out video customization needs as well. You can access the latter’s free tom use audio and image library to select and include these media into your video edits.
When addressing the concern of editing motion centered screen captures and video overlays, you can supplement the same with a single music piece, which is quite limiting. The program allows you to export your customized video edits to a variety of media sharing platforms, such as, Facebook, Twitter, LinkedIn, Google, etc., through a sign up to the respective website. If however, you wish to make a direct share, there is an option to use the HippoVideo integration of these media sites.
You can further, stock up your creations to online storage accounts, like, Vimeo, Google Drive, etc. If you wish to export the edited videos exclusively on Slack, the program lets you do that by generating a direct share link. There is also a choice to save the edits locally to your system. Talking of the output formats; the utility keeps you devoid of any aspect ratio options, but facilitates a 720 and 1080 pixel video output resolution for free and paid users respectively.
Pros
● The tool boasts of a responsive and dedicated customer support service.
● The program greets you with a welcoming interface that is handy to use and navigate through.
● The tool undergoes periodic bug fixes to further upgrade and improve its workability.
Cons
● The output video quality is visibly limited.
● The video upload process occasionally encounters an appreciable time lag.
● The Google Chrome extension often causes the program to crash down.
09WeVideo
Adaptable Systems: All popular operating systems
If you are looking for an affordable solution to customize videos online for academic purposes, this one is possibly the most suitable web based alternative that you can rely on. The tool facilitates the students with creating educational video edits within a protected cloud interface, under a convenient supervision of the educators. The tool further caters an extensive editing portability on your preferred time, device and place.
Your video edits remain safe with the tool, with the flexibility to avail them at your fingertips, as and when required. The seamless transition of the edits via a ‘Drag and Drop’ method creates the illusion of an instant playback. As of the preset editing facilities, you can at the most see teaser previews of the tool’s extensive media library that houses over 4.5 million images and 1 million music tracks as an unpaid user. You can however, pick one from the 22 free audio tracks.
Diving deeper into the customization features, the paid users get to work with transitions, text, overlays and music tracks. Picking up a preset template to create the video edits however, puts a limitation on the aforesaid self-customization flexibilities. Talking of the video formats, they are an absolute ‘No’ for the free users of the tool. The paid subscribers however, can switch between the 16:9 landscape and 1:1 square alternatives with the most economical purchase plan.
You can avail the free trial up to one customization and save your edited videos to the local media gallery of your system with the tool’s watermark. Exporting your creations to the popular media sharing platforms, like YouTube, Twitter, LinkedIn, Facebook, etc., relies on you paying for the utility. The watermark however remains with the paid subscription as well. The tool greatly compromises on the output video quality of the edits, with a mere 480 pixel resolution.
Pros
● Though a paid feature, the tool houses an extensive library of preset video, image and audio templates.
● The user interface is clean and responsive, with no messy presentation of elements around.
● The transition flow within the created edits is effortlessly smooth.
Cons
● The tool does not allow you to rotate and crop the video edits.
● Publishing the edits with the tool sometimes gets confusing due to the difficultly of locating the videos within the program library.
● Some of the customization features rendered by the tool are difficult to understand and work with.
10**Wondershare Filmora Video Editor **
Adaptable Systems: Windows and MacOS
If you have been wondering lately of picking the best free video editing software of all times to create high end graphic masterpieces with footage customization, the Wondershare Filmora video editing program is here to end your worries. The software conveniently lands among the most preferred graphic design tool across the globe to address a series of editing and creation requirements. An obvious cause of the above is the latter’s extensive collection of editing tools and features.
The software’s editing library is known to house an updated diversity of video customization tools and effects that you can play with to create classic pieces of video artworks. Ahead of the basic editing tools to cut, trim, crop and rotate videos, the Filmora library houses some of the latest and advanced video customization features, such as, green screen, split screen, auto synchronization, motion tracking, color match, and lots more.
For Win 7 or later (64-bit)
For macOS 10.12 or later
Diving a bit deeper into the expanse of editing features and effects, the software allows you to add a series of filters, animated elements, text customizations, lower thirds, titles, video and image combinations and graphic inclusions to the clip being edited. The program audio library is another content storehouse with a huge collection of free to use background music tracks to complement your videos with.
While you can customize and export videos in 4K resolution with Filmora, the software allows you to import and edit GIF videos. Additional utilities of the program are a noise attenuator to eliminate background noise, color tuner for adjusting the dynamic range and white balance, audio mixer and video stabilizer for respectively, changing the music track and removing camera shake effects, and a screen recorder for a high resolution capture of the webcam and system screens.
Pros
● The software comes with a good number of video editing tutorials that explain the usage pattern diverse range of features and effects.
● The video import and export process of the software is quick and efficient.
● The program is known to possess one of the best working interfaces to guide you throughout the video editing process.
Cons
● Importing media files can sometime pose format compatibility issues.
● The text customization features offered by the program are somewhat basic.
● You may encounter occasional software crashes while working with the program.
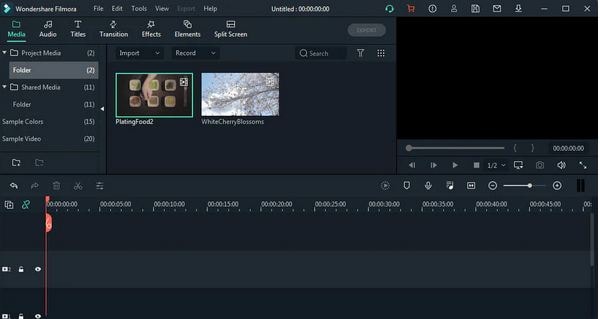
Part 2 Video Editing Online Q&A
● What is the fundamental concept behind online video editing?
When working with creating video footages, online editing comes at the end of the production agenda and is performed after the video has been customized at the offline level. As of today, the task of online video customization is efficiently taken care of by the most advanced and diverse range of video editing programs that work in line with nonlinear editing (NLE) systems.
● What is the main benefit of using online video editing tools to customize videos?
Online video editing programs grant you the liberty to customize your footages and clips without the compulsion of downloading heavy and expensive software packages. You are further allowed to access and use a diverse range of editing effects and features with absolutely no or minimal subscription cost.
● What are the essential applications of video editing?
Video editing refers to the art of creating a structured presentation of different elements within footages to showcase the required content in an engaging and interesting style. Talking of the content variations that can be edited, you can experiment with video essays, documentaries films and video advertisements.
● What are the prerequisites of a professional quality video edit?
When aiming to create a professionally sound video edit, take care of the final output quality and prefer a fine video resolution of 4K or 1080 pixels. You should additionally, prefer using a reliable video hosting website to facilitate a quick loading of your video, while using the same as an effective SEO strategy.
● What are the various categories of online video editing?
Speaking sin professional terms, you can categorize online video customization into 5 major types that are, mechanical editing, line editing, copy editing, structural editing and substantive, content or developmental editing. Using a mix and match of these customization categories renders a classic and fine quality video edit.
● Ending Thoughts →
● Editing videos online is a quick and smart way of transforming your videos, clips and footages into graphic artworks without the hustle of downloading extensive software.
● Browsing through the web, you can come across a plethora of online editing tools and platforms to create high quality video edits.
● When looking for a reliable video editing software alternative, you can make an intelligent choice by picking the Wondershare Filmora video editor program.
In this article
01 [Best 10 Free Video Editing Software Online](#Part 1)
02 [Video Editing Online Q&A](#Part 2)
Part 1 Best 10 Free Video Editing Software Online
Video editing and customization is an essential aspect of graphic design and allied applications. Entering into the domain, the IT and software market presents a diverse range of solutions to work on the concern. While there are numerous software alternatives and programs to download and use, such utilities may sometime come up with a time consuming and rigorous editing process.
Another aspect that stops editors, especially beginners and newbies from picking the software alternatives is their high end working interface that may often be difficult to understand and navigate through. Sorting out all the aforesaid issues, there comes the extensive range of online and web based video editing utilities to perfectly cater to all the video customization needs in a spic and span process.
In the light of the aforesaid merits that you get to access with an online video editing program, let us try hands at having an insight into some of the best online alternatives to customize your videos in what follows next:
01Wave.video
Adaptable Systems: All common operating systems
Inaugurating the list, here is the Wave.video online editing website that you can work with to create, edit, share and host video footages and clips. The best utility of the program is that it caters a diverse range of film customization requirements, from personal, candid creations to high end professional editing needs of business enterprises, media enthusiasts, blogging and entrepreneurship platforms and a variety of other sectors.
Talking of the platform workability, you get to access a responsive and non-messy editing interface, with a convenient navigation for newbies and non tech savvy users. Going through the demos and informative articles, tutorials and blogs, you can design professionally sound presentations with utmost ease. The platform houses the widest video template library with over 400 million preset customizable stock videos to choose from.
The utility expands a range of customization choices to spark up your edits, such as including self-created logos, fonts and watermarks on the videos. Talking of video export options, the platform grants you the liberty to directly share your video edits across all popular media sharing handles and online storage accounts, like, Facebook, Twitter, YouTube, Dropbox, Google Drive, etc. in more than 30 different file formats.
You can also save the customized video to the local media gallery of your device in the MP4 file format. An exclusive video sharing feature of the site works to create an editable ‘Video Landing Page’ consisting of the created video edit, its title and a call-to-action button. You can also embed your creation to blogs and websites from the platforms. You can work with the program absolutely free of cost.
Pros
● Tons of stock videos, music and fun elements to complement your footage.
● Most convenient editing timeline for an enjoyable editing experience.
● The customization process is very fast.
Cons
● The video uploading process is quite time consuming.
● Some features have a confusing work pattern.
● The program leaves its watermark on the customized clips.
02InVideo
Adaptable Systems: All popular operating systems
The InVideo online editing tool is probably the best alternative you can get for a quick customization of your video footage. The utility houses a series of tools and features to create classic masterpieces of clip edits. The program’s library allows you to expand your graphic design creativity with its extensive variety of in built editing templates. The add-on elements are no less with an appealing range of masks, stickers and vector shapes to spark up your creations.
The tool has a paid collection of more than 3 million preset templates, which get reduced to a count of 1 million for free version users. This is however, a cumulative figure with an addition of premium features. The free template options, though limited, are appealing to work with. As far as the customization options are concerned, the utility recommends you to create your brand prior to beginning with the editing process.
You can set a brand by adding the name and logo of your company, along with specific colors to a preferred default template. This causes your brand elements to stay in the tool’s editing dashboard for an instant access in times of need. The tool allows you to create video edits in the vertical, square and wide aspect ratios, which you can switch between, while customizing the preset video template.
When it comes to exporting your creation, the free version of the tool limits you to a local save of the edits in your device’s media gallery in a 720 pixel resolution, along with a direct sharing facility for Facebook, Twitter and YouTube. The utility additionally leaves its watermark on the output video. The aforesaid limitations can however be overcome by availing a paid subscription of the online editing program.
Pros
● The program undergoes a regular update in line with user feedback.
● You are granted a complete control on the video customization process to add the elements of your choice.
● The program’s back end user support is highly active with a 24 x 7 chat service.
Cons
● You cannot add sound elements to the video edits.
● The tool’s Text-to-speech recognition abilities are somewhat of the mediocre level.
● The free version of the tool has a limited number of video export options.
03Adobe Spark
Adaptable Systems: All popular operating systems
Presently known as Adobe Creative Cloud Express, this one is a sophisticated video customization tool, suited best for experienced users to address the needs of creating professionally sound video, graphic and web page edits. The tool greets you with a quite upgraded interface, although the workability and template selection is not that complex. Working with the tool, you can create customized videos in landscape and square formats with respective aspect ratios of 16:9 and 1:1.
Talking of the customization options, you get to access and work with tons of preset video customization templates within the Adobe Stock library of the tool. The templates are free to use, but however, leave a watermark on the final edited output. As far as other editing elements are concerned, the tool presents a huge set of choices to match the feel, flavor, theme and style of your videos and graphic footages.
You are also allowed to edit a brand with the aforesaid tool, but catering to the concern however, requires a paid subscription of the utility. Moving into the tool’s creation export facility, you may face a downside with respect to the time constraint of the video upload process. The export interface takes a sufficient time to fetch a download of the customized video, while compressing the output file.
Pros
● The output quality of the customized video is quite impressive.
● The tool’s working interface is simple, with stepwise, onscreen usage instructions guiding you through the editing process.
● The utility is known to create excellent web design projects in a minimal amount of time.
Cons
● The software does not allow you to embed your video edits on blogs and websites.
● The video export process takes a considerable amount of time.
● The free version leaves the tool’s watermark on the customized video output.
04Animoto
Adaptable Platforms: All popular operating systems
Moving ahead with the list, there is the Animoto online video editor program that lets you work towards creating customized video edits in 2 separate modes, depending on your requirement niche. If you are keen on making customized video edits from personal or family centered events to share on social media handles, it would be great to pick the ‘Animoto Memories’ customization service. On the contrary, the ‘Animoto Marketing’ service is best suited to create professional video edits.
To have an in-depth understanding of the customization process within each of the editing modes, you can refer the inbuilt tutorials offered by the tool. The program interface additionally guides you through the customization process with stepwise on screen instructions when you are using the tool to create your first ever video edit. The interface is clean, responsive and easy to navigate.
Talking of the video customization facilities, you are allowed to access a refined audio and template library with a host of thematic choices to select and work upon. The tool lets you upload and edit video files from the local media gallery of your system, as well as import the same from a preferred online or external platform. You can even capture fresh video clips and begin editing them with the program.
The preset template library of the program houses a decent range of 60 different options to create amazing video edits that suit a diversity of purposes, like that of social and professional events, photography sessions, short content clips, recipes, YouTube ads and much more. You can work to customize the font, size, color and segments of the footage.
As of the editing formats, you are permitted to create landscape and square artworks in 16:9 and 1:1 aspect ratio respectively. When proceeding to export your creation, the tool presents before you with HD and SD resolutions, with 720 and 1080 pixels in the former, while 360 and 480 pixels in the latter. You can easily share your creations across popular media platforms and online storage accounts, or host them on websites, and also save them locally to your device.
Pros
● The tool caters to generate high quality edited video outputs.
● You can customize the videos with personalized tags.
● The program lets you create advertisement videos with ease.
Cons
● The editing process takes enough time to make you feel distracted.
● You cannot cancel the paid subscription at a later stage.
● The free version has a limited set of features, and premium version is too pricey.
05Flyr
Adaptable Platforms: All popular operating systems
For those who are keen on following social media trends, or looking for high end business presentation ideas, Flyr is the just perfect choice. The elegantly professional pre designed template options within the tool’s library are effortless dedicated towards helping you create top class customized video footages and presentations. With millions of HD video backgrounds and templates to pick from, this program literally has everything to address the most expanded editing requirements.
Moving towards the workability convenience, the program greets you with an elementary interface, and the simplest of customization processes. To edit videos with this online tool, all you need to do is, sign up to the utility, pick an editable template, add a desired text in the message field and scale up the video background, if required. You will however, get to access a limited number of templates with a one-time download facility, when using the tool’s free version.
Extending the dimensions of customization flexibilities, you can complement the video edits with vibrant shades of your choice to render them with a personalized appearance. You are further, allowed to make a choice among the portrait, landscape and square formats for generating the customized output footage. While permitting you to export the edited footage in a variety of file formats with a 1080 pixel HD or SD resolution, the tool facilitates a local save of the generated clip exclusively to its paid subscribers.
Pros
● The program comes to you with the simplest of interfaces to work with.
● You can export your creations in a diversity of aspect ratios and output formats.
● The tool has some AI based features to cater a quick and smart video output.
Cons
● The tool’s subscription plans cannot be customized.
● The free version of the program houses a restricted number of customization features.
● The output generation process may ask you to wait a bit longer than usual.
06Kizoa
Adaptable Systems: All popular operating systems
This one is a reliable online video editing app that caters to the most diverse customization requirements, all with its elementary set of utilities and features. Though the program interface may appear a bit chuncked up and messy, the featuristic viability of the platform is a convenient compensation of the same. Some of the choicest appeals of the program include a diverse range of clip aspect ratios and an instant video playback facility.
Compensating for its crowded interface to a further extent, Kizoa works to walk you through the footage customization process via step wise on screen instructions. If you ever find it difficult to navigate through the tool’s editing workspace, additional help is catered by a series of reminder prompts. As of the inbuilt customization utilities, the platform opens up a huge library of preset template options to pick and use.
The photo album and music library are however, a downside with about 20 default images and a limited number of royalty free audio tracks. While there is an additional range of surplus audio tracks, you are permitted to access the same only through a paid subscription of the program. Talking of the available video formats to work with editing your videos, you can pick from the 4:3, 3:2 and 16:9 landscape options, 9:16, 2:3 and 3:4 portrait choices, or a 1:1 square format.
Exploring the customization features to a deeper extent, you get to work with a decent and updated variety of fonts and color switches. When it comes to exporting your creation, the tool offers an expanded set of choices to present your artwork across popular social media and networking platforms and online media storage accounts, such as, Twitter, Facebook, YouTube, E-mail, Google Drive, etc.
You can additionally, download the edited footage to your device, host it on a on a website or blog, and burn the same to an external disk. The tool comes with a ‘Pay Once’ premium subscription to access hidden features.
Pros
● The tool backs up your editing queries with a 24 x 7 responsive customer support system.
● You can avail a lifetime membership of the program to avoid periodic renewal.
● The export facility of the tool is quite expanded.
Cons
● The tool often encounters content mismanagement.
● The working interface is quite crowded.
● Uploading videos to the program’s workspace is a time taking process.
07ClipChamp
Adaptable Systems: All popular operating systems
If you are a newbie in the arena of graphic and video editing applications, this one is a perfect choice to proceed with the task of video customization. The aforesaid online utility to edit clips and footages is extremely useful to the ones who have just landed into the creative domain and try hands at creating customized clips with an online aid. The tool facilitates you with a guided search and customization to let you create a visual masterpiece in a quick time span.
While the editing process is affordably simple, the working interface leaves nothing unturned to help you with a clean layout and prompting on screen instructions. The interface elements have a well-defined organization, displaying first things first, making it possible for you to conveniently design extensive video projects with a high end professional quality.
This online tool however, does not facilitate preset features and templates to free users. Although you can have a glimpse of the assorted range of sound effects, video templates, music tracks, animated themes and backgrounds, accessing the same essentially requires you to avail a paid subscription of the program. Additional customization features of the tool include an instant playback option, several title transitions and a decent font selection range.
As a free user of the tool, you are entitled to export your video edits in an affordably low resolution of 480 pixels. Premium users are however, benefited with a 720 pixel export facility, but the real element of surprise is that the platform does not allow a 1080 pixel export at all. While the tool does not present you with video export choices at all, you can anyway make a free download of your creation to the local media gallery of your system.
Pros
● The utility is one of the most preferred video customization programs for freelancers.
● The working interface has a calming and easy to go outlook.
● The program is quite suitable to be used by beginners.
Cons
● As reported by premium users, the media import process is not so welcoming.
● The project media gets stored in your device’s internal memory instead of a cloud space.
● Output quality for free users is disappointingly low.
08HippoVideo
Adaptable Systems: All popular operating systems
Launched as an extension to the Google Chrome web browser, the aforesaid online video editor program is chiefly designed to address the screen recording concerns of business and academic personnel, YouTubers and gamers. Ahead of the aforesaid facility, the tool is an excellent choice to sort out video customization needs as well. You can access the latter’s free tom use audio and image library to select and include these media into your video edits.
When addressing the concern of editing motion centered screen captures and video overlays, you can supplement the same with a single music piece, which is quite limiting. The program allows you to export your customized video edits to a variety of media sharing platforms, such as, Facebook, Twitter, LinkedIn, Google, etc., through a sign up to the respective website. If however, you wish to make a direct share, there is an option to use the HippoVideo integration of these media sites.
You can further, stock up your creations to online storage accounts, like, Vimeo, Google Drive, etc. If you wish to export the edited videos exclusively on Slack, the program lets you do that by generating a direct share link. There is also a choice to save the edits locally to your system. Talking of the output formats; the utility keeps you devoid of any aspect ratio options, but facilitates a 720 and 1080 pixel video output resolution for free and paid users respectively.
Pros
● The tool boasts of a responsive and dedicated customer support service.
● The program greets you with a welcoming interface that is handy to use and navigate through.
● The tool undergoes periodic bug fixes to further upgrade and improve its workability.
Cons
● The output video quality is visibly limited.
● The video upload process occasionally encounters an appreciable time lag.
● The Google Chrome extension often causes the program to crash down.
09WeVideo
Adaptable Systems: All popular operating systems
If you are looking for an affordable solution to customize videos online for academic purposes, this one is possibly the most suitable web based alternative that you can rely on. The tool facilitates the students with creating educational video edits within a protected cloud interface, under a convenient supervision of the educators. The tool further caters an extensive editing portability on your preferred time, device and place.
Your video edits remain safe with the tool, with the flexibility to avail them at your fingertips, as and when required. The seamless transition of the edits via a ‘Drag and Drop’ method creates the illusion of an instant playback. As of the preset editing facilities, you can at the most see teaser previews of the tool’s extensive media library that houses over 4.5 million images and 1 million music tracks as an unpaid user. You can however, pick one from the 22 free audio tracks.
Diving deeper into the customization features, the paid users get to work with transitions, text, overlays and music tracks. Picking up a preset template to create the video edits however, puts a limitation on the aforesaid self-customization flexibilities. Talking of the video formats, they are an absolute ‘No’ for the free users of the tool. The paid subscribers however, can switch between the 16:9 landscape and 1:1 square alternatives with the most economical purchase plan.
You can avail the free trial up to one customization and save your edited videos to the local media gallery of your system with the tool’s watermark. Exporting your creations to the popular media sharing platforms, like YouTube, Twitter, LinkedIn, Facebook, etc., relies on you paying for the utility. The watermark however remains with the paid subscription as well. The tool greatly compromises on the output video quality of the edits, with a mere 480 pixel resolution.
Pros
● Though a paid feature, the tool houses an extensive library of preset video, image and audio templates.
● The user interface is clean and responsive, with no messy presentation of elements around.
● The transition flow within the created edits is effortlessly smooth.
Cons
● The tool does not allow you to rotate and crop the video edits.
● Publishing the edits with the tool sometimes gets confusing due to the difficultly of locating the videos within the program library.
● Some of the customization features rendered by the tool are difficult to understand and work with.
10**Wondershare Filmora Video Editor **
Adaptable Systems: Windows and MacOS
If you have been wondering lately of picking the best free video editing software of all times to create high end graphic masterpieces with footage customization, the Wondershare Filmora video editing program is here to end your worries. The software conveniently lands among the most preferred graphic design tool across the globe to address a series of editing and creation requirements. An obvious cause of the above is the latter’s extensive collection of editing tools and features.
The software’s editing library is known to house an updated diversity of video customization tools and effects that you can play with to create classic pieces of video artworks. Ahead of the basic editing tools to cut, trim, crop and rotate videos, the Filmora library houses some of the latest and advanced video customization features, such as, green screen, split screen, auto synchronization, motion tracking, color match, and lots more.
For Win 7 or later (64-bit)
For macOS 10.12 or later
Diving a bit deeper into the expanse of editing features and effects, the software allows you to add a series of filters, animated elements, text customizations, lower thirds, titles, video and image combinations and graphic inclusions to the clip being edited. The program audio library is another content storehouse with a huge collection of free to use background music tracks to complement your videos with.
While you can customize and export videos in 4K resolution with Filmora, the software allows you to import and edit GIF videos. Additional utilities of the program are a noise attenuator to eliminate background noise, color tuner for adjusting the dynamic range and white balance, audio mixer and video stabilizer for respectively, changing the music track and removing camera shake effects, and a screen recorder for a high resolution capture of the webcam and system screens.
Pros
● The software comes with a good number of video editing tutorials that explain the usage pattern diverse range of features and effects.
● The video import and export process of the software is quick and efficient.
● The program is known to possess one of the best working interfaces to guide you throughout the video editing process.
Cons
● Importing media files can sometime pose format compatibility issues.
● The text customization features offered by the program are somewhat basic.
● You may encounter occasional software crashes while working with the program.
Part 2 Video Editing Online Q&A
● What is the fundamental concept behind online video editing?
When working with creating video footages, online editing comes at the end of the production agenda and is performed after the video has been customized at the offline level. As of today, the task of online video customization is efficiently taken care of by the most advanced and diverse range of video editing programs that work in line with nonlinear editing (NLE) systems.
● What is the main benefit of using online video editing tools to customize videos?
Online video editing programs grant you the liberty to customize your footages and clips without the compulsion of downloading heavy and expensive software packages. You are further allowed to access and use a diverse range of editing effects and features with absolutely no or minimal subscription cost.
● What are the essential applications of video editing?
Video editing refers to the art of creating a structured presentation of different elements within footages to showcase the required content in an engaging and interesting style. Talking of the content variations that can be edited, you can experiment with video essays, documentaries films and video advertisements.
● What are the prerequisites of a professional quality video edit?
When aiming to create a professionally sound video edit, take care of the final output quality and prefer a fine video resolution of 4K or 1080 pixels. You should additionally, prefer using a reliable video hosting website to facilitate a quick loading of your video, while using the same as an effective SEO strategy.
● What are the various categories of online video editing?
Speaking sin professional terms, you can categorize online video customization into 5 major types that are, mechanical editing, line editing, copy editing, structural editing and substantive, content or developmental editing. Using a mix and match of these customization categories renders a classic and fine quality video edit.
● Ending Thoughts →
● Editing videos online is a quick and smart way of transforming your videos, clips and footages into graphic artworks without the hustle of downloading extensive software.
● Browsing through the web, you can come across a plethora of online editing tools and platforms to create high quality video edits.
● When looking for a reliable video editing software alternative, you can make an intelligent choice by picking the Wondershare Filmora video editor program.
This Article Shares Valuable Insight Into the Best Brand Story Videos. Also, It Highlights the Importance of a Video Maker in Your Brand Story Video Ad-Making Process and Why Filmora Should Be Your Go-To Choice
With the advent of streaming content accessible anytime, anywhere, conventional marketing has somewhat lost grip on its performance. Consumers are now savvy as they now take a step further, like using ad blockers or tuning out ads.
However, it doesn’t imply the end of advertising as a brand promotion tool altogether. Individuals still desire best-in-class deals and products and spend their money shopping. All they need is to get informed about the product or service more entertainingly and innovatively.
This is one of the reasons why many established brands are now shifting toward their brand storytelling. And there’s no better and highly effective way to portray your brand story than with video. Simply making a video resembling any conventional TV commercial ad with an irritating ‘Call Today’ voiceover won’t be enough to get results.
Modern-day consumers are much more educated and sophisticated than before. You must learn how many creative and successful brands are infusing their branding and storytelling strategies to engage their customers. If you’re reading this article, you’re aiming to build your own brand storytelling video and are wondering how to make it a successful one.
Take no worries as the further sections will clear all your doubts and give you the perfect answer. So, let’s start.

Source : https://www.pexels.com/photo/business-plan-printed-on-paper-on-a-clipboard-8970679/
- Spotify - All Ears On You
- Airbnb - The Story of a Symbol of Belonging
- Apple - Chase
- Nike - Most Powerful Brand Story Videos
- Bells - Reader
- Dove - You’re More Beautiful Than You Think
- El Gordo - The Spanish Christmas Lottery Ad 2021
Part I. The Most Successful Video Practises of Brand Storytelling
1. Spotify - All Ears On You
Since 2008, Spotify has continued gathering as much information (personal preferences, likes, and dislikes) about their audiences as possible. It has helped them set personalized ad campaigns that will best fit their customers’ interests.
One of their latest, popular campaigns is ‘All Ears On You.’ Take a glimpse of this video to check how the video ad appears. Launched in June, this campaign focuses on celebrating your weird listening habits. It leveraged the users’ in-app experience to let them be proud of their unique choices. This helped Spotify to strengthen its emotional relationship with its listeners.
Learn From Spotify’s Famous Marketing Practices:
- Get the Most Out of Big Data: The customer insights and data helped Spotify make precise, on-point ads. Your firm should also acquire customers’ data and later leverage it to amplify the user experience and make marketing campaigns more relatable.
- Leverage User-Generated Content: Your audience is more interested in what other customers think and say about your business. The most successful video ads don’t involve facts about the company but the customers instead. Make a video using clips where your customers tell a story about themselves and their experience with your brand.
- Utilize The Trending Hashtags & Topics: Social medial trends and news feed is what attracts today’s customers the most. Spotify’s advertisement team always wraps their ad campaigns into a package of top-events-and-stories. Find the most popular and trending hashtags and topics related to your business niche and incorporate them in your brand storytelling video.
Some other marketing practices that teach valuable lessons to businesses for brand video marketing include:
- Leveraging the mentions on social media platforms
- Going for a customer-centric marketing approach with personalized interactions
2. Airbnb - The Story of a Symbol of Belonging
The center of focus of Airbnb’s brand story revolves around the basic ideology of ‘belonging.’ The brand found its mission - to shape the world into a place where individuals can ‘belong anywhere.’
Their official tagline also turned out to be ‘Belong Anywhere,’ which eventually led to the development of their whole brand story and new logo. This symbol was created to make sure it’s instantly recognizable.
Valuable Storytelling Lessons From Airbnb’s Marketing Practices:
- Let Your Customers Be At The Heart Of Your Organization: After interviewing users, Airbnb found out that no one can better inform them about their company than the community of their regular users. The conversations and interviews with such users helped Airbnb to prepare its entire brand story. Thus, you should, too, keep your customers at your core.
- It’s Never Too Late To Discover Your Story: Although launched in 2008, the company Airbnb realized they’d need to discover their business mission to scale and progress. They are an example that it’s never too late for your brand to find the brand story.
- Content Is The King: Airbnb always keeps posting content on its own blog and YouTube channel. Most of their content is based on user experiences and revolves around stories from within the brand’s community. Such high-quality content helped them to engage with the customers more efficiently.
3. Apple - Chase
Chase recently announced via email their latest introduction to the market - Apple Pay. They introduced it in collaboration with Apple as the new mode to pay. Chase leveraged this email communication to inform people about their latest collaboration with Apple.
They also used email to reinforce their commitment to helping people to buy Apple products like the iPhone 14 pro with accessible funds. While ensuring to align with Apple’s marketing strategy for the Apple Pay service announcement (primarily based on social media), Chase put more emphasis on real-time media.
Their marketing practice used direct, real-time media to connect with the on-the-go audience seemingly ready to buy an Apple product with a quick source of funds. Their brand story ad focused more on the ‘on-the-go’ audience who would readily agree to make such a purchase.
4. Nike - Most Powerful Brand Story Videos
If you’ve watched a Nike video ad featuring LeBron James or others, you’ll know how much emphasis on emotions and inspiration. They don’t go for the direct marketing of their brand and products. Instead, they produce video ads with a powerful message drawn from a compelling storyline.
This makes Nike unique from numerous other brands as it has been an expert in brand storytelling for years now. Every piece of video ad from their collection triggers the audience’s feelings and emotions, which can only be met and satisfied by using Nike products.
There’s a lot of power within emotional branding, and Nike has shaped and transformed its whole marketing model into a storytelling form that motivates the audience to take action - ‘Just do it with Nike products. Some of the marketing strategies that have helped them grow over the years include the following:
- They promote the advantages of their product’s features rather than simply highlighting and promoting the features. This is called benefit-based marketing practice.
- They sell brand stories more than their products, which has always been their primary marketing strategy.
- Nike is very strong in the social media game. They leverage user-generated content to create their video ads.
- Collaborating with influencers like LeBron James and Cristiano Ronaldo has always been at the core of their marketing strategy.
5. Bells - Reader
The marketing manager of Bell - Thami Silwana - revealed that the idea behind the ‘Bells-Reader’ campaign is to assist men in acknowledging, comprehending, and speaking about their personal victories.
They realized that sometimes it could be troublesome for men to interact with one another and acknowledge their inside feeling and emotions when one of them have achieved something. Their tagline, ‘Give That Man a Bell, ’ best fits in terms of a man-to-man acknowledging something worth the celebration.
Here is what the video ad director Greg incorporated in the video to make it hit the marketing campaign’s motto:
Sentimentality:
- Greg incorporated an excellent blend of drama, emotion, and sentimentality in this two minutes video ad, which was as good as a two-hour Hollywood movie.
- The video hit the emotions on so many levels that you’ll feel like drinking a glass of whisky at the end of the ad.
- Your brand should also create a brand story video where you help your customers to acknowledge themselves by hitting their emotions at different levels.
- To know how just take a look at the ad yourself: https://www.youtube.com/watch .
6. Dove - You’re More Beautiful Than You Think
The Real Beauty Ad Campaign by Dove focuses on women’s natural charisma and beauty. The ad emphasizes promoting the self-esteem of every woman. In their ‘Dove Real Beauty Sketches’ video ad, you’ll find the events to be chosen, arranged, connected, and assessed as meaningful for a specific set of audience.
Although the video ad’s primary focus is women’s empowerment, it’s still a commercial that promotes Dove products. The ad ends with the phrase ‘you’re more beautiful than you think,’ and a Dove brand logo appears.
Significantly, Dove desires women to know that they are always encouraged, supported, and acknowledged for their real beauty. This storytelling helped Dove boost its product sales without making any direct references.
7. El Gordo - The Spanish Christmas Lottery Ad 2021
Conventionally, you’ll get to know about the arrival of Christmas in Spain when you’ll find the Spanish Christmas Lottery hitting the screens as a commercial. The Christmas Lottery’s 2021 ad version was recorded and created in the picturesque and snowy town of Elizondo.
The ad signifies the spirit of the Christmas festive season and amazingly resonates with the motto of El Gordo - the greatest prize is to share it. They used aesthetics and scenic beauty to allure the viewers and drive them into buying the lottery.
They used the marketing practice of hitting people’s emotions during Christmas when they could truly immerse themselves into enjoying things like winning the lottery.
Part 2. Need Pro-Quality Video Result From Your Video Maker? Try Filmora - The Best in the Market
If you seek pro-quality video results from your video maker for the ‘best-in-class’ brand story videos, use Filmora. It has emerged as the leading video-making tool for global marketers where you can create, edit, and save all sorts of ‘state-of-the-art,’ ‘next-level’ marketing brand videos.

Try Filmora to ensure brand awareness, advertise your business, introduce the audience to your brand and its products, and boost sales. One software, multiple benefits. Here are some features of Filmora that can effectively help you make your brand story videos.
- Numerous Resources: Filmora is an excellent platform to explore your inner creativity as it has thousands of video assets accessible to its users. The widespread availability of unique advanced and basic features will help you create the most appealing brand story video.
- Green Screen: Your brand storytelling videos will become bland if you miss out on adding a unique background. Thanks to the Green Screen feature by Filmora, it takes only a few simple clicks to add such attractive backgrounds to your videos.
- Split Screen: When making your brand story video, it’s more likely that you’ll want to show a comparison of two products side-by-side. In that case, the Split Screen feature from Filmora comes in handy. It lets you incorporate two or more video footage or clips in the video.
- Audio Ducking: Your brand story will involve several key pointers that you’ll want to highlight for the audience. With Filmora’s Audio Ducking feature, you can easily highlight the dialogues and speeches during the video. This will help you to emphasize those video parts so that the audience can hear them with clarity. Of course, the feature fades the background music for those speech and dialogue parts.
- Color Grading: The more appealing the brand story video, the more the viewers. That’s precisely what the color grading feature does for you. It allows you to adjust the tint, 3D Luts, temperature, and lights in all your marketing videos. Introduce mesmerizing cinematographic effects in your videos with Fimora’s ‘state-of-the-art’ color tuning features.
Telling your brand story via videos has just become simpler and faster than ever with Filmora. Try the software for magical results.
Free Download For Win 7 or later(64-bit)
Free Download For macOS 10.14 or later
Conclusion
Telling your brand story is more crucial than ever as it lets you reach new levels of personalization and establish deeper bonds and connections with your clients or customers.
With the ideal brand storytelling strategy and the best video maker tool, you can easily connect with the audience and let them know all about your brand, its products, and its purpose. So, get started today!
Free Download For Win 7 or later(64-bit)
Free Download For macOS 10.14 or later
Part I. The Most Successful Video Practises of Brand Storytelling
1. Spotify - All Ears On You
Since 2008, Spotify has continued gathering as much information (personal preferences, likes, and dislikes) about their audiences as possible. It has helped them set personalized ad campaigns that will best fit their customers’ interests.
One of their latest, popular campaigns is ‘All Ears On You.’ Take a glimpse of this video to check how the video ad appears. Launched in June, this campaign focuses on celebrating your weird listening habits. It leveraged the users’ in-app experience to let them be proud of their unique choices. This helped Spotify to strengthen its emotional relationship with its listeners.
Learn From Spotify’s Famous Marketing Practices:
- Get the Most Out of Big Data: The customer insights and data helped Spotify make precise, on-point ads. Your firm should also acquire customers’ data and later leverage it to amplify the user experience and make marketing campaigns more relatable.
- Leverage User-Generated Content: Your audience is more interested in what other customers think and say about your business. The most successful video ads don’t involve facts about the company but the customers instead. Make a video using clips where your customers tell a story about themselves and their experience with your brand.
- Utilize The Trending Hashtags & Topics: Social medial trends and news feed is what attracts today’s customers the most. Spotify’s advertisement team always wraps their ad campaigns into a package of top-events-and-stories. Find the most popular and trending hashtags and topics related to your business niche and incorporate them in your brand storytelling video.
Some other marketing practices that teach valuable lessons to businesses for brand video marketing include:
- Leveraging the mentions on social media platforms
- Going for a customer-centric marketing approach with personalized interactions
2. Airbnb - The Story of a Symbol of Belonging
The center of focus of Airbnb’s brand story revolves around the basic ideology of ‘belonging.’ The brand found its mission - to shape the world into a place where individuals can ‘belong anywhere.’
Their official tagline also turned out to be ‘Belong Anywhere,’ which eventually led to the development of their whole brand story and new logo. This symbol was created to make sure it’s instantly recognizable.
Valuable Storytelling Lessons From Airbnb’s Marketing Practices:
- Let Your Customers Be At The Heart Of Your Organization: After interviewing users, Airbnb found out that no one can better inform them about their company than the community of their regular users. The conversations and interviews with such users helped Airbnb to prepare its entire brand story. Thus, you should, too, keep your customers at your core.
- It’s Never Too Late To Discover Your Story: Although launched in 2008, the company Airbnb realized they’d need to discover their business mission to scale and progress. They are an example that it’s never too late for your brand to find the brand story.
- Content Is The King: Airbnb always keeps posting content on its own blog and YouTube channel. Most of their content is based on user experiences and revolves around stories from within the brand’s community. Such high-quality content helped them to engage with the customers more efficiently.
3. Apple - Chase
Chase recently announced via email their latest introduction to the market - Apple Pay. They introduced it in collaboration with Apple as the new mode to pay. Chase leveraged this email communication to inform people about their latest collaboration with Apple.
They also used email to reinforce their commitment to helping people to buy Apple products like the iPhone 14 pro with accessible funds. While ensuring to align with Apple’s marketing strategy for the Apple Pay service announcement (primarily based on social media), Chase put more emphasis on real-time media.
Their marketing practice used direct, real-time media to connect with the on-the-go audience seemingly ready to buy an Apple product with a quick source of funds. Their brand story ad focused more on the ‘on-the-go’ audience who would readily agree to make such a purchase.
4. Nike - Most Powerful Brand Story Videos
If you’ve watched a Nike video ad featuring LeBron James or others, you’ll know how much emphasis on emotions and inspiration. They don’t go for the direct marketing of their brand and products. Instead, they produce video ads with a powerful message drawn from a compelling storyline.
This makes Nike unique from numerous other brands as it has been an expert in brand storytelling for years now. Every piece of video ad from their collection triggers the audience’s feelings and emotions, which can only be met and satisfied by using Nike products.
There’s a lot of power within emotional branding, and Nike has shaped and transformed its whole marketing model into a storytelling form that motivates the audience to take action - ‘Just do it with Nike products. Some of the marketing strategies that have helped them grow over the years include the following:
- They promote the advantages of their product’s features rather than simply highlighting and promoting the features. This is called benefit-based marketing practice.
- They sell brand stories more than their products, which has always been their primary marketing strategy.
- Nike is very strong in the social media game. They leverage user-generated content to create their video ads.
- Collaborating with influencers like LeBron James and Cristiano Ronaldo has always been at the core of their marketing strategy.
5. Bells - Reader
The marketing manager of Bell - Thami Silwana - revealed that the idea behind the ‘Bells-Reader’ campaign is to assist men in acknowledging, comprehending, and speaking about their personal victories.
They realized that sometimes it could be troublesome for men to interact with one another and acknowledge their inside feeling and emotions when one of them have achieved something. Their tagline, ‘Give That Man a Bell, ’ best fits in terms of a man-to-man acknowledging something worth the celebration.
Here is what the video ad director Greg incorporated in the video to make it hit the marketing campaign’s motto:
Sentimentality:
- Greg incorporated an excellent blend of drama, emotion, and sentimentality in this two minutes video ad, which was as good as a two-hour Hollywood movie.
- The video hit the emotions on so many levels that you’ll feel like drinking a glass of whisky at the end of the ad.
- Your brand should also create a brand story video where you help your customers to acknowledge themselves by hitting their emotions at different levels.
- To know how just take a look at the ad yourself: https://www.youtube.com/watch .
6. Dove - You’re More Beautiful Than You Think
The Real Beauty Ad Campaign by Dove focuses on women’s natural charisma and beauty. The ad emphasizes promoting the self-esteem of every woman. In their ‘Dove Real Beauty Sketches’ video ad, you’ll find the events to be chosen, arranged, connected, and assessed as meaningful for a specific set of audience.
Although the video ad’s primary focus is women’s empowerment, it’s still a commercial that promotes Dove products. The ad ends with the phrase ‘you’re more beautiful than you think,’ and a Dove brand logo appears.
Significantly, Dove desires women to know that they are always encouraged, supported, and acknowledged for their real beauty. This storytelling helped Dove boost its product sales without making any direct references.
7. El Gordo - The Spanish Christmas Lottery Ad 2021
Conventionally, you’ll get to know about the arrival of Christmas in Spain when you’ll find the Spanish Christmas Lottery hitting the screens as a commercial. The Christmas Lottery’s 2021 ad version was recorded and created in the picturesque and snowy town of Elizondo.
The ad signifies the spirit of the Christmas festive season and amazingly resonates with the motto of El Gordo - the greatest prize is to share it. They used aesthetics and scenic beauty to allure the viewers and drive them into buying the lottery.
They used the marketing practice of hitting people’s emotions during Christmas when they could truly immerse themselves into enjoying things like winning the lottery.
Part 2. Need Pro-Quality Video Result From Your Video Maker? Try Filmora - The Best in the Market
If you seek pro-quality video results from your video maker for the ‘best-in-class’ brand story videos, use Filmora. It has emerged as the leading video-making tool for global marketers where you can create, edit, and save all sorts of ‘state-of-the-art,’ ‘next-level’ marketing brand videos.
Try Filmora to ensure brand awareness, advertise your business, introduce the audience to your brand and its products, and boost sales. One software, multiple benefits. Here are some features of Filmora that can effectively help you make your brand story videos.
- Numerous Resources: Filmora is an excellent platform to explore your inner creativity as it has thousands of video assets accessible to its users. The widespread availability of unique advanced and basic features will help you create the most appealing brand story video.
- Green Screen: Your brand storytelling videos will become bland if you miss out on adding a unique background. Thanks to the Green Screen feature by Filmora, it takes only a few simple clicks to add such attractive backgrounds to your videos.
- Split Screen: When making your brand story video, it’s more likely that you’ll want to show a comparison of two products side-by-side. In that case, the Split Screen feature from Filmora comes in handy. It lets you incorporate two or more video footage or clips in the video.
- Audio Ducking: Your brand story will involve several key pointers that you’ll want to highlight for the audience. With Filmora’s Audio Ducking feature, you can easily highlight the dialogues and speeches during the video. This will help you to emphasize those video parts so that the audience can hear them with clarity. Of course, the feature fades the background music for those speech and dialogue parts.
- Color Grading: The more appealing the brand story video, the more the viewers. That’s precisely what the color grading feature does for you. It allows you to adjust the tint, 3D Luts, temperature, and lights in all your marketing videos. Introduce mesmerizing cinematographic effects in your videos with Fimora’s ‘state-of-the-art’ color tuning features.
Telling your brand story via videos has just become simpler and faster than ever with Filmora. Try the software for magical results.
Free Download For Win 7 or later(64-bit)
Free Download For macOS 10.14 or later
Conclusion
Telling your brand story is more crucial than ever as it lets you reach new levels of personalization and establish deeper bonds and connections with your clients or customers.
With the ideal brand storytelling strategy and the best video maker tool, you can easily connect with the audience and let them know all about your brand, its products, and its purpose. So, get started today!
Free Download For Win 7 or later(64-bit)
Free Download For macOS 10.14 or later
Also read:
- New How to Put Emoji on Mac That Take Less Than 10 Mins
- Updated How to Create Realistic Fire Effects
- Updated Add Some Shake to Videos with Alight Motion
- Updated In 2024, How To Blur The Video Background in After Effects
- Top 10 Voice Over Generators Windows, Mac, Android, iPhone, and Onli
- In 2024, Beginners Guide to Green Screen Keying
- How to Do Masking in After Effects Alternative Provided for 2024
- In 2024, How to Put a Filter on a Video in iMovie
- Updated In This Article, We Will Review Movavi Video Editor and List Out Movavi Video Suites Features
- Updated In 2024, A Review of 3D LUT Mobile App - A Composite Application for Editing Media
- New Video in Text Cinematic Intro【Filmora Tutorial】
- New Camtasia Vs. Final Cut Pro for 2024
- Updated Explore the Potential of Slow-Motion Video for Different Industries. Read This Guide and Choose the Best Slow-Motion Camera App to Create Stunning Videos
- Updated Camtasia Review – Is It The Best Video Editor for 2024
- New In 2024, How to Make a Slideshow with Icecream Slideshow Maker
- Updated 3D Ray Traced Settings In After Effects for 2024
- Updated In 2024, How to Add Font Effect
- How to Color Grading in Final Cut Pro for 2024
- Cellular Network Not Available for Voice Calls On Oppo A59 5G | Dr.fone
- How to Change Credit Card on Your iPhone 12 Apple ID and Apple Pay
- In 2024, Still Using Pattern Locks with Oppo Reno 11 Pro 5G? Tips, Tricks and Helpful Advice
- Sim Unlock Vivo Y78 5G Phones without Code 2 Ways to Remove Android Sim Lock
- How To Remove Screen Lock PIN On Xiaomi Redmi A2 Like A Pro 5 Easy Ways
- 10 Free Location Spoofers to Fake GPS Location on your OnePlus Ace 3 | Dr.fone
- In 2024, How to Bypass Google FRP Lock on Lava Yuva 2 Devices
- The Magnificent Art of Pokemon Go Streaming On Realme C67 5G? | Dr.fone
- How to Bypass Apple iPhone XS Max Passcode Easily Video Inside
- How to Upgrade Apple iPhone 15 without Losing Data? | Dr.fone
- How Do I Restore Excel 2010 File ? | Stellar
- App Wont Open on Your Asus ROG Phone 7? Here Are All Fixes | Dr.fone
- How to Stop My Spouse from Spying on My Vivo Y27 5G | Dr.fone
- How to Fix Android.Process.Media Has Stopped on Oppo K11 5G | Dr.fone
- In 2024, The Ultimate Guide to Unlocking Apple Watch Or Apple iPhone 14 Pro from iCloud
- How to Repair corrupt MP4 and MOV files of Xiaomi Redmi Note 13 Pro 5G using Video Repair Utility on Mac?
- How To Restore Missing Contacts Files from Nokia C12 Plus.
- Title: New In 2024, How to Make A Jaw-Dropping Time Lapse Video?
- Author: Chloe
- Created at : 2024-04-24 07:08:36
- Updated at : 2024-04-25 07:08:36
- Link: https://ai-editing-video.techidaily.com/new-in-2024-how-to-make-a-jaw-dropping-time-lapse-video/
- License: This work is licensed under CC BY-NC-SA 4.0.
