:max_bytes(150000):strip_icc():format(webp)/GettyImages-1302402871-ea3debd2e3c64ec5a78a99e580b6a8d1.jpg)
New In 2024, How to Make Flying Objects in Wondershare Filmora

How to Make Flying Objects in Wondershare Filmora
Let us be honest here, you want to create fly objects in the air but don’t want to get into the witchcraft school. In that case, we have got your back!
In this article, you can learn how to make objects fly in the air! Technically you will not do that in real-time, but with the latest technology and editing tools at your disposal, you will exactly do that.
Use Wondershare Filmora to create the flying object effect. Scroll below to get the guide to the whole process of creation.
Part 1. What will you need to make a flying object?
This is not witchcraft, so we will abstain from using potions and herbs. Instead, to fly objects in our videos, we will use simple techniques that you may also be familiar with.
Video Cameras
The camera, in this scenario, will be the essential accessory as it will capture your video with the proper aspect ratio. This video camera can now be from a mobile phone or a high-quality DSLR. It will all depend upon your preference for quality and frame rate.

Tri-Pod or camera stands
Selecting the Tri-Pod is also crucial to your quality of video taking as it will ensure stability while capturing the video from the camera.

Stability is the key here, as the captured videos will be masked and combined in the later stages of the steps. To do so, consistently capturing the video in the same ratio is necessary. You can stabilize the video with a simple gorilla pod that you can get of good quality or a simple tripod.
The prop
The prop will be the object that we will be flying in the video. It could be a fluffy toy, a ball, a box, or anything you desire to be flying in your video.
![]()
Note: In this article, we are going to use a ball as a prop.

Wondershare Filmora
Now that we have all the physical requirements for the video, our next goal is to ensure that we have the correct video editing software. And what’s best than Wondershare Filmora? Obviously, there’s nothing!
Filmora allows you to edit your videos with ease and comfort. With its interactive UI, even a beginner feels easy to edit a video. With skills on hand, an expert can edit videos ranging from green screen effects to flying objects.
Free Download For Win 7 or later(64-bit)
Free Download For macOS 10.14 or later

Good presentation
Now, if you want your video to shine like the good ones, you will need to know how to present it. In this section, the requirement will be yourself. As you are not flying an object, you must act the part.
A good presentation will allow you to make the video more natural. Because no matter how skilled you are with video editing, a video with props will only be of quality until the subject acts their part with quality.
Part 2. How to capture the footage?
Before we get into how we edit our footage, we need to know how to shoot the video to edit. Follow the steps mentioned below:
- Set up your camera on a tripod or a gorilla pod.
- After setting up the camera, record an empty frame.
![]()
Note: An empty frame video will be the one you will use to mask the original clip.
Reference video
Start recording a five-second clip of the sofa where you will be sitting without yourself or the prop. Here you don’t need to add anything except the reference. Follow the guidelines below when making the reference video:
- The video should be plain.
- It should be simple.
- There should be no moving object or subject.

Main video
After shooting the empty frame video, move on to shooting the video with yourself in it. Follow the below to achieve something unique:
- Your focus should be on the prop.
- Use a thread or a rope to attach the prop to it. (In this case, we are using a ball.)
- Attach the ball to the thread and hand it on the roof.
- Record yourself now with the prop with your desired content or script.

After completing the video, simply stop recording. Now you will end up with two video clips.
Adding these two clips in the Wondershare Filmora , you can easily create the flying object effect. To do so, follow the steps explained in the section ahead.
Part 3. Stepwise guide to making flying objects in Wondershare Filmora
Now that we have looked into our requirements, let us dive into how we will apply our skills to achieve an object to fly in Wondershare Filmora .
Of course, without the software, our editing will not be possible, so download Wondershare Filmora from the steps explained below.
Free Download For Win 7 or later(64-bit)
Free Download For macOS 10.14 or later
Step1Open the Wondershare Filmora software
- Open the Wondershare Filmora software and Click on the New Project icon on the window.
- After you have clicked on the New Project icon, our main workplace will be launched.
- Here you can see various options.
- To get started, we need to import our video clips to edit them.

- Here, you can see two ways to import your clips in Wondershare Filmora.
- Shows you how to import by Right-Clicking on File and selecting the import media option.
- Shows you to drag and drop the file from your main directory simply.
You can choose whatever suits you the best!
Step2Add your clips to your timeline
Now that we have imported our videos into the timeline, our next step will be to add our videos to the timeline.
- Simply click on the imported clips on the import window.
- Then drag it to the timeline below.
- Doing so will create a working timeline you can view and edit as you go along the editing process.

Step3Size the reference video to the original video
Now, remember that we recorded a five-second clip that we will use to create the masking effect. You will need to size it to the original video for that to work. Doing so is simple and will require you to take some easy steps.
- First, click on the clip.
- Then, when it is selected, move on to the tab above to choose the speed option from the bar.
- Here, you will also see options such as cropping, Green screen, and color.
- Choose the option of speed.
- Then, a drop-down tile will pop up. Here you can see different options available to speed up your video.

- You can speed up your video and slow it down.
- For now, we will have to slow it down.
![]()
Note: Slowing it down will increase the time of the video clip and allow you to match it with the original video clip.
Don’t worry about the speed, as the video is already empty, and there will be no distractions to disturb our editing.
Step4Add the masking effect
Now that we have our video aligned with the reference video we are using. Let’s move to the next step.
This step will try to remove the thread attached to the ball; otherwise, it will show in the video, and our effect will be ruined. However, before we do that, we will need to know what masking is.
What is the Masking effect in Wondershare Filmora?
Have you ever seen the behind-the-scenes of those big-budget movies? Then you might have seen the actors and the stunt workers hanging from big ropes performing stunts in front of green screens.
Well, the directors capture the video in real-time. But they can do those big stunts on TV with editing and CGI, and one of the effects is “Masking.”
The masking effect allows you to mask the object on the screen with a reference video. So that’s how the ropes attached to the stuntmen get removed in the original videos.
How to add a masking effect?
Although there are numerous ways to do that, the one we will use in this video is to remove the thread. For this, follow the below steps:
- Simply go to the effect icon that you can see in the bar above.
- In the effects bar, move to the utility tab.
- You will see a window showing you the many effects Wondershare Filmora provides you from default.
- Select the shape mask tile.
- Now drag and drop it on the timeline below.

![]()
Note: You must ensure the effect is applied to the main video, not the reference video.
- When you drag the effect into the main video, you will notice a transparent shape added to the video. This is your Mask.
Step5Edit the masking effect
You must hide the thread attached to the ball with the masking effect. To do this, follow the below guidelines:
- Double-click on the effect added to the main video.
- You will notice another window pop up on the import library.
![]()
Note: In the pop-up window, you will see the multiple options and edits you can apply to the masking effect, such as Transform, Compositing, Motion tracking, and stabilization.

- Scroll down on the window and notice a video effect tab.
In the effect tab, you will have multiple options, such as the shape mask, X, Y, and scale and blur strength options, as shown below.
- Now adjust the mask to hide the string. It may be easy to invert the mask.
![]()
Note: That the borders of the mask are blurred. But you can also change them by inverting the mask, which turns the borders and the space between them.
Remember the invisibility cloak from Harry Potter? It works just like that, only with a solid shape.
- Now use the X and Y options to move the mask anywhere in the video.

Step6Hide the sharp borders
You may notice the shape of borders that do not blend with the background. To blend the borders with the background, follow the steps below:
- Simply Double-click on the effect in the timeline.
- Then, in the editing tab, find out the blur strength option.

- Simply drag the bar to increase the blur strength.
![]()
Note: Please keep looking in the window on the right. Check and increase the blur strength until you are satisfied with the result.
- Lastly, click on OK when you are done.
Step7Creating the popup effect
Now, if you want your object to appear out of thin air, you must create that pop-up effect. You can create the pop-up effect in simple and easy steps, as shown below:
- First, drag the timeline dragger to the point where you want the prop or the ball to pop up.
Your presentation should be accurate and precise!
Imagine you were doing a “swoosh“ action, similar to swinging a wand. Now you want your object to appear at that time.
Split the Video:
- Drag the timeline dragger to that point.
- Now press Ctrl+B to split both videos.
Add Popup Effect:
The masking effect will be applied from the start. Our goal is to hide the masking effect before the ball pop-ups. For this, follow the below steps:
- Go into the setting by Double-Clicking the masking effect on the original video.
- Then move the mask over the ball instead of on the thread. Doing so would make the ball disappear.

Final Results:
- Lastly, click on Ok when done.
Play the clip from the start, and you will notice the ball popping up according to your action.

Congratulations! You did it. You are now able to fly objects with the power of your mind.
Following the abovementioned steps, you can control objects and make them fly in the air. The catch is that you will have to use Wondershare Filmora . But, of course, this is not a witchcraft school now.
Free Download For Win 7 or later(64-bit)
Free Download For macOS 10.14 or later
Conclusion
Well, there comes a time when one needs to make flying objects. Wondershare Filmora is an excellent tool that will allow you to add the masking effect to create the illusion of flying objects in the air.
The video quality at the end will only depend upon how clearly you show during the editing process. Try the above steps and enjoy the results!

Wondershare Filmora
Now that we have all the physical requirements for the video, our next goal is to ensure that we have the correct video editing software. And what’s best than Wondershare Filmora? Obviously, there’s nothing!
Filmora allows you to edit your videos with ease and comfort. With its interactive UI, even a beginner feels easy to edit a video. With skills on hand, an expert can edit videos ranging from green screen effects to flying objects.
Free Download For Win 7 or later(64-bit)
Free Download For macOS 10.14 or later

Good presentation
Now, if you want your video to shine like the good ones, you will need to know how to present it. In this section, the requirement will be yourself. As you are not flying an object, you must act the part.
A good presentation will allow you to make the video more natural. Because no matter how skilled you are with video editing, a video with props will only be of quality until the subject acts their part with quality.
Part 2. How to capture the footage?
Before we get into how we edit our footage, we need to know how to shoot the video to edit. Follow the steps mentioned below:
- Set up your camera on a tripod or a gorilla pod.
- After setting up the camera, record an empty frame.
![]()
Note: An empty frame video will be the one you will use to mask the original clip.
Reference video
Start recording a five-second clip of the sofa where you will be sitting without yourself or the prop. Here you don’t need to add anything except the reference. Follow the guidelines below when making the reference video:
- The video should be plain.
- It should be simple.
- There should be no moving object or subject.

Main video
After shooting the empty frame video, move on to shooting the video with yourself in it. Follow the below to achieve something unique:
- Your focus should be on the prop.
- Use a thread or a rope to attach the prop to it. (In this case, we are using a ball.)
- Attach the ball to the thread and hand it on the roof.
- Record yourself now with the prop with your desired content or script.

After completing the video, simply stop recording. Now you will end up with two video clips.
Adding these two clips in the Wondershare Filmora , you can easily create the flying object effect. To do so, follow the steps explained in the section ahead.
Part 3. Stepwise guide to making flying objects in Wondershare Filmora
Now that we have looked into our requirements, let us dive into how we will apply our skills to achieve an object to fly in Wondershare Filmora .
Of course, without the software, our editing will not be possible, so download Wondershare Filmora from the steps explained below.
Free Download For Win 7 or later(64-bit)
Free Download For macOS 10.14 or later
Step1Open the Wondershare Filmora software
- Open the Wondershare Filmora software and Click on the New Project icon on the window.
- After you have clicked on the New Project icon, our main workplace will be launched.
- Here you can see various options.
- To get started, we need to import our video clips to edit them.

- Here, you can see two ways to import your clips in Wondershare Filmora.
- Shows you how to import by Right-Clicking on File and selecting the import media option.
- Shows you to drag and drop the file from your main directory simply.
You can choose whatever suits you the best!
Step2Add your clips to your timeline
Now that we have imported our videos into the timeline, our next step will be to add our videos to the timeline.
- Simply click on the imported clips on the import window.
- Then drag it to the timeline below.
- Doing so will create a working timeline you can view and edit as you go along the editing process.

Step3Size the reference video to the original video
Now, remember that we recorded a five-second clip that we will use to create the masking effect. You will need to size it to the original video for that to work. Doing so is simple and will require you to take some easy steps.
- First, click on the clip.
- Then, when it is selected, move on to the tab above to choose the speed option from the bar.
- Here, you will also see options such as cropping, Green screen, and color.
- Choose the option of speed.
- Then, a drop-down tile will pop up. Here you can see different options available to speed up your video.

- You can speed up your video and slow it down.
- For now, we will have to slow it down.
![]()
Note: Slowing it down will increase the time of the video clip and allow you to match it with the original video clip.
Don’t worry about the speed, as the video is already empty, and there will be no distractions to disturb our editing.
Step4Add the masking effect
Now that we have our video aligned with the reference video we are using. Let’s move to the next step.
This step will try to remove the thread attached to the ball; otherwise, it will show in the video, and our effect will be ruined. However, before we do that, we will need to know what masking is.
What is the Masking effect in Wondershare Filmora?
Have you ever seen the behind-the-scenes of those big-budget movies? Then you might have seen the actors and the stunt workers hanging from big ropes performing stunts in front of green screens.
Well, the directors capture the video in real-time. But they can do those big stunts on TV with editing and CGI, and one of the effects is “Masking.”
The masking effect allows you to mask the object on the screen with a reference video. So that’s how the ropes attached to the stuntmen get removed in the original videos.
How to add a masking effect?
Although there are numerous ways to do that, the one we will use in this video is to remove the thread. For this, follow the below steps:
- Simply go to the effect icon that you can see in the bar above.
- In the effects bar, move to the utility tab.
- You will see a window showing you the many effects Wondershare Filmora provides you from default.
- Select the shape mask tile.
- Now drag and drop it on the timeline below.

![]()
Note: You must ensure the effect is applied to the main video, not the reference video.
- When you drag the effect into the main video, you will notice a transparent shape added to the video. This is your Mask.
Step5Edit the masking effect
You must hide the thread attached to the ball with the masking effect. To do this, follow the below guidelines:
- Double-click on the effect added to the main video.
- You will notice another window pop up on the import library.
![]()
Note: In the pop-up window, you will see the multiple options and edits you can apply to the masking effect, such as Transform, Compositing, Motion tracking, and stabilization.

- Scroll down on the window and notice a video effect tab.
In the effect tab, you will have multiple options, such as the shape mask, X, Y, and scale and blur strength options, as shown below.
- Now adjust the mask to hide the string. It may be easy to invert the mask.
![]()
Note: That the borders of the mask are blurred. But you can also change them by inverting the mask, which turns the borders and the space between them.
Remember the invisibility cloak from Harry Potter? It works just like that, only with a solid shape.
- Now use the X and Y options to move the mask anywhere in the video.

Step6Hide the sharp borders
You may notice the shape of borders that do not blend with the background. To blend the borders with the background, follow the steps below:
- Simply Double-click on the effect in the timeline.
- Then, in the editing tab, find out the blur strength option.

- Simply drag the bar to increase the blur strength.
![]()
Note: Please keep looking in the window on the right. Check and increase the blur strength until you are satisfied with the result.
- Lastly, click on OK when you are done.
Step7Creating the popup effect
Now, if you want your object to appear out of thin air, you must create that pop-up effect. You can create the pop-up effect in simple and easy steps, as shown below:
- First, drag the timeline dragger to the point where you want the prop or the ball to pop up.
Your presentation should be accurate and precise!
Imagine you were doing a “swoosh“ action, similar to swinging a wand. Now you want your object to appear at that time.
Split the Video:
- Drag the timeline dragger to that point.
- Now press Ctrl+B to split both videos.
Add Popup Effect:
The masking effect will be applied from the start. Our goal is to hide the masking effect before the ball pop-ups. For this, follow the below steps:
- Go into the setting by Double-Clicking the masking effect on the original video.
- Then move the mask over the ball instead of on the thread. Doing so would make the ball disappear.

Final Results:
- Lastly, click on Ok when done.
Play the clip from the start, and you will notice the ball popping up according to your action.

Congratulations! You did it. You are now able to fly objects with the power of your mind.
Following the abovementioned steps, you can control objects and make them fly in the air. The catch is that you will have to use Wondershare Filmora . But, of course, this is not a witchcraft school now.
Free Download For Win 7 or later(64-bit)
Free Download For macOS 10.14 or later
Conclusion
Well, there comes a time when one needs to make flying objects. Wondershare Filmora is an excellent tool that will allow you to add the masking effect to create the illusion of flying objects in the air.
The video quality at the end will only depend upon how clearly you show during the editing process. Try the above steps and enjoy the results!
How To Change Speed of Video in Final Cut Pro?
When there are certain boring but necessary parts in your video, you need to speed them up. Similarly, you may need to reduce the duration of the entire video. Speeding up the video is your only option when you do not want to cut any part. You must have also observed that certain videos look funny when you speed them up. To speed up videos, you will need a video editor that does not degrade the video quality.
Final Cut Pro is a popular choice to speed up video without distorting the pitch. Many think that the video quality can degrade when they change the speed of the video clip. This concern can be taken care of when you alter the video speed with Final Cut Pro. Instead of changing the speed of the entire video, you can change the speed of specific parts. We will illustrate how to speed up the video using Final Cut Pro and suggest a better choice than FCP.
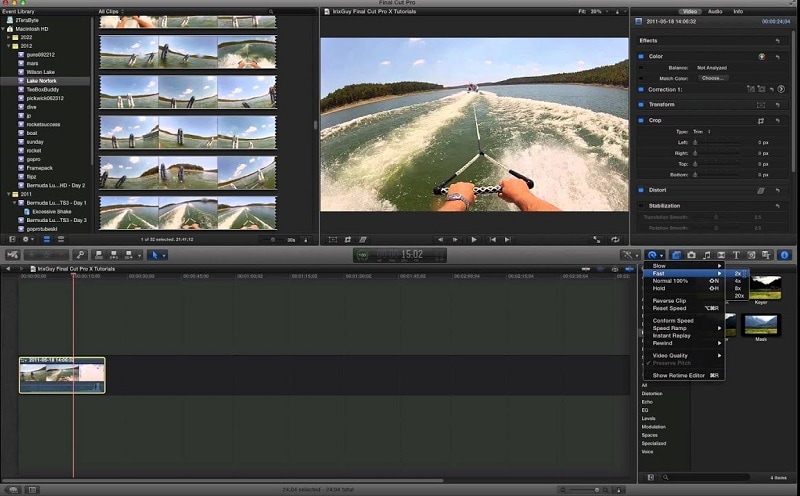
Part I. Speed Up Video using Final Cut Pro
Final Cut Pro by Apple is one of Mac users’ most popular video editors. Many video creators purchase MacBooks for editing their videos in Final Cut Pro. The video editor is suitable for beginners as well as professionals. FCP, as a video editor, is super fast in rendering and processing video while exporting. Here are the steps for the Final Cut Pro speed-up clip.
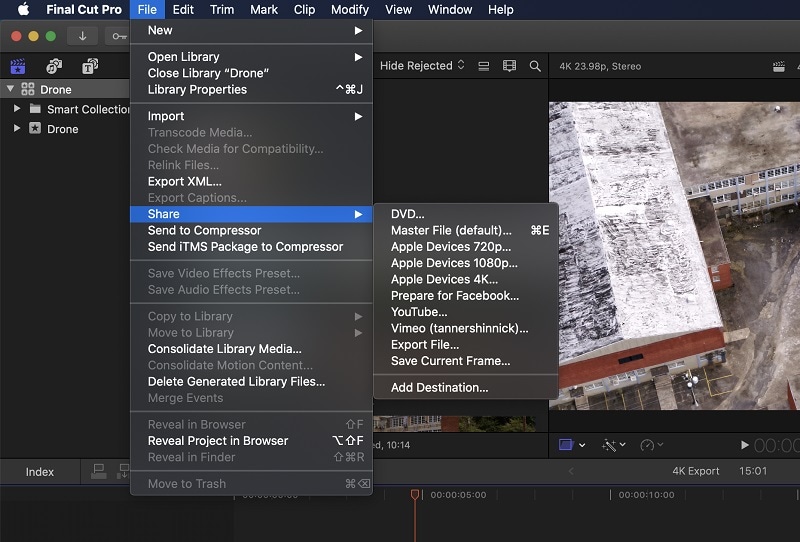
Step1 Open FCP. Navigate to File>New> and tap Project to start a new project.
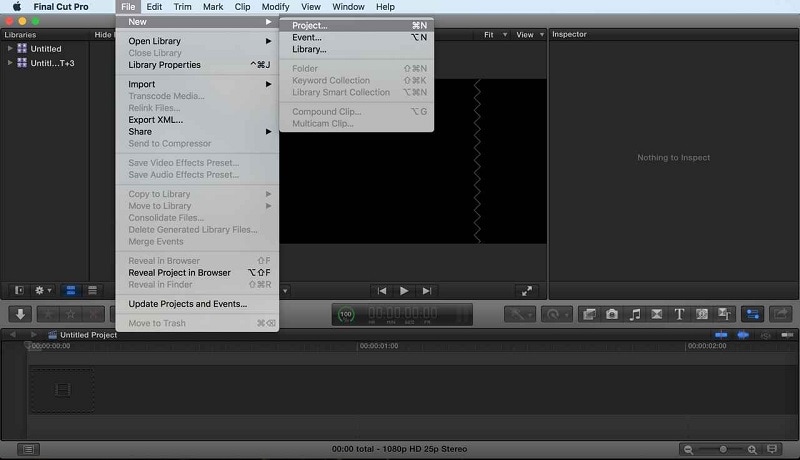
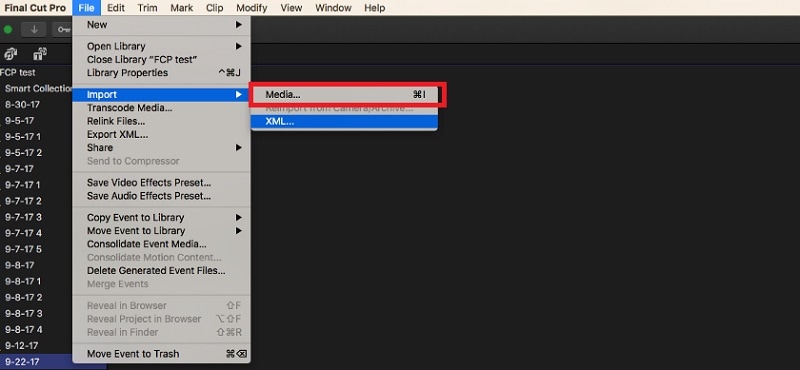
Step2 Go to File>Import> Media and fetch your video clip. After that, drag/drop the video clip into the timeline.
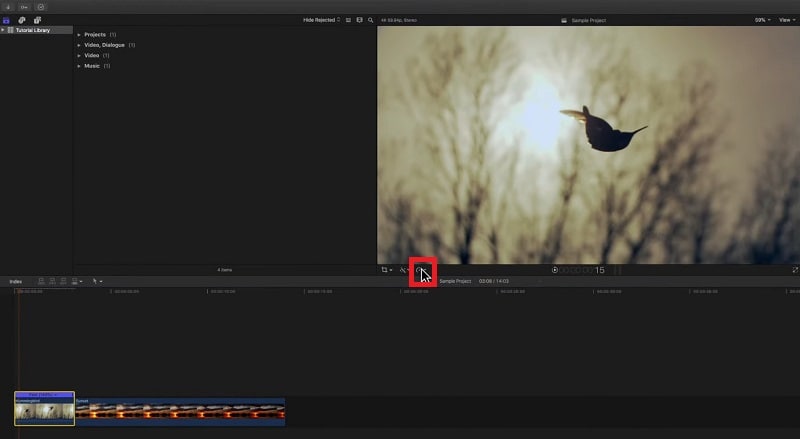
Step3 Choose the video clip from the timeline. Click on the Speedometer(Retime) icon at the top of the timeline.
Step4 Tap the Speedometer icon, to get the drop-drop menu. For the Final Cut Pro speed-up video, go to Fast and select the speed. You get to choose from 2X to 20X.
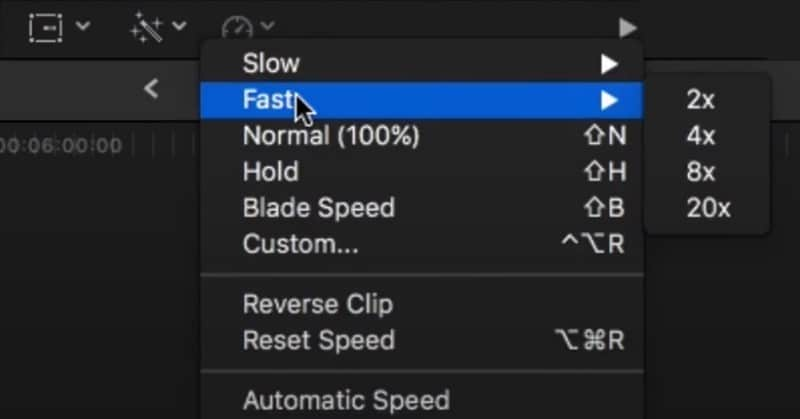
If you want to customize the speed-up rate, you can click on the Custom option. Enter any desired percentage speed.
Step5 Now, play the video.
Part II. Tips for Speeding Up Video in Final Cut Pro
You have to keep a few points in mind when you speed up videos in Final Cut Pro. This ensures that the video does not get distorted while speeding up a section. Here are some tips to follow to speed up the video in FCP.
Adjust The Pitch of Sped-Up Clips -
By default, Final Cut Pro preserves the pitch of the audio even when you change the speed of the video. However, you may want to change the pitch per the video’s speed. This is because you might want to make the audio sound funny. You need to turn off the Preserve Pitch option from Retime menu. Once you do that, the pitch of the sped-up clip adjusts itself as per the change in speed.
Speeding Up Video by Adjusting Frame Rate -
You can shoot at a low frame rate for the scene you want to speed up. The frame rate should be lower than the overall video project’s frame rate.
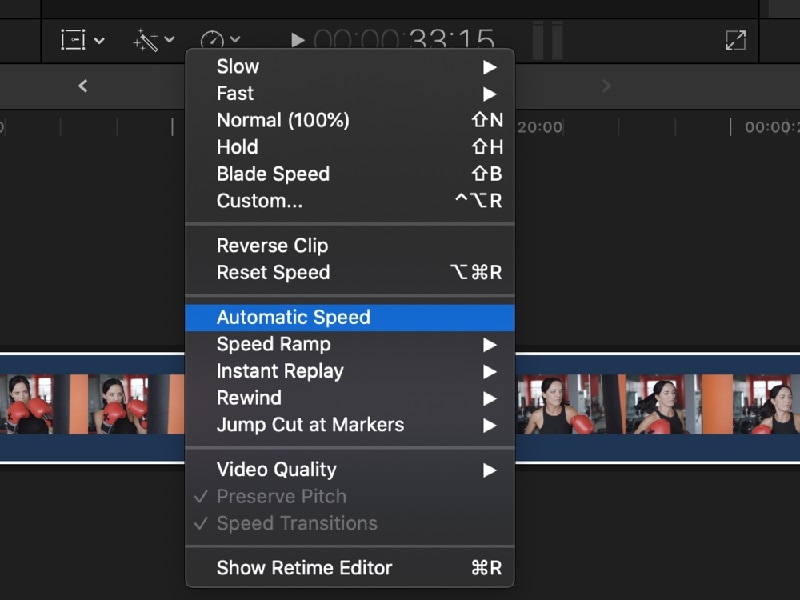
You can add the scene to your video project on the timeline. Then you need to choose Automatic Speed from Retime menu. This will increase the frame rate from the scene to the video project frame rate. Once the frame rate increases, the video will speed up automatically.
Smoothen Out the Sped-Up Video -
Sometimes, the overall video may look old when you speed up a particular portion. That is why there are two options available on Final Cut Pro. The first option is frame blending which is more suitable for the slow-motion clip.
The second option is the optical flow that smoothens out the sped-up clip. It adds in-between frames by analyzing the directional movement of pixels. You can find the option from Video Quality present in the Retime menu.
Part III. The Right Final Cut Pro Alternative for Changing Speed - Filmora
Final Cut Pro has a steep learning curve. Unless you have some experience in video editing, you will find the user interface slightly complicated. Besides, Final Cut Pro is only available for Mac users since it is an Apple product.
Many people look for a Final Cut Pro alternative to change the speed of the video. Wondershare Filmora is the best choice over Final Cut Pro to change the speed of video Final Cut Pro.
Wondershare Filmora is a professional video editor that is available for Windows and Mac users. The video editor is suitable for beginners as well as experienced video creators. The popularity of Filmora is due to its super intuitive user interface. You get almost all the features of FCP in Filmora.
In comparison, there are more video effects, elements, and stock media files available to enhance your videos. You get the latest effects from time to time so that you can have the trending elements in the video, you can also save the edited video in different video file formats as per your requirements, and even record video through a webcam and capture the screen using Filmora.
Several AI effects, stickers, and elements are available to enhance your videos. Most users find it easier to edit videos on Filmora over Final Cut Pro.
Free Download For Win 7 or later(64-bit)
Free Download For macOS 10.14 or later
How to Change Video Speed in Filmora?
Changing video speed in Filmora is super easy. You can speed up your video as per your requirements in a number of ways. That is why Filmora happens to be a better option than Final Cut Pro. We will illustrate all the different methods to change video speed in Filmora.
You can watch this video to understand how to change video speed in Filmora.
Method 1. The Simplest Way - Click “2x-100x” Speed Options
Just like Final Cut Pro, you can choose from preset speed options to change video speed. This is undoubtedly the easiest way to change video speed instantly. While Final Cut Pro offers 2X to 20X speed options, Filmora has 2X to 100X speed presets. Here are the steps to speed up video by choosing a preset speed option.
Step1 Download, install and simply Launch Filmora. Tap Create New Project option.

Step2 Go to File> Import Media> Import Media Files and choose the video file. The selected video will be imported into the Project Media folder. Alternatively, you can also use the drag/drop function.

Step3 Drag and drop the video file onto the timeline. Select the video clip from the timeline and click on the Speed (timer icon) option at the top of the timeline. If you want to speed up a portion of the video, you need to split the video clip.

Step4 From the menu, go to Fast and select any speed option as per your requirements. Thereafter, play the video to see the changes.

Step5 Press Export to save the video file in your desired file format.
Method 2. Use Uniform Speed to Change Speed
If you want to customize the video speed uniformly, there is a dedicated option called Uniform Speed in Filmora. This means you do not want to choose from the preset speed options. You may want to set the speed of the video to 3X, but it is not available in the preset options.
That is where Uniform Speed comes in handy, and you can set any speed from 0.01X to 100X. Here are the steps to follow.
Step1 Once you have dropped the video file onto the timeline, click on the Speed(timer) icon.
Step2 Click on the Uniform Speed option. This will open the Uniform Speed tab above the timeline.

Step3 Adjust the speed slider to set the desired speed as per your requirements. The duration will change as per the speed you set, and you can set the duration below the speed slider. Just like Final Cut Pro, you can turn on Ripple and Audio Pitch as per your preference.

Step4 Once you are satisfied with the speed, click on the Ok button. Thereafter, tap Export to save the edited video file.
Method 3. Use Speed Ramping to Change Speed
There is a unique way to change your video speed called speed ramping. You can speed up some parts and slow down the other parts, like crests and troughs in a graph.
The speed ramping feature comes with several graphical presets. You can choose from the presets and customize the speed as per your requirements. Check the steps to use speed ramping to change your video speed.
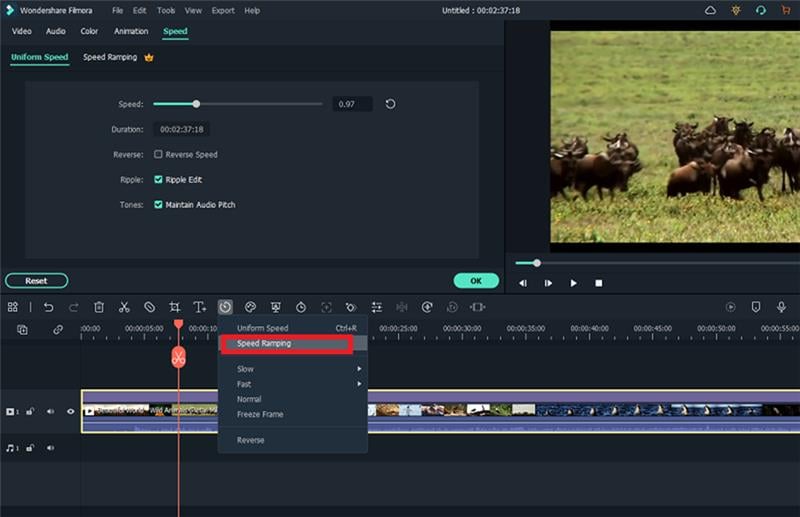
Step1 Drag and drop the video file onto the timeline. Click on the Speed(timer) icon at the top of the timeline.
Step2 Click on Speed Ramping option. This will open Speed Ramping above the timeline.

Step3 Select from the available preset as per your requirements. Otherwise, you can select Customize option and edit the nodes as needed.
Step4 Once satisfied with the result, click on the Ok button. Finally, tap Export
Conclusion
There are some videos where you may have to speed up certain parts. In detail, we have illustrated how to speed up the video in Final Cut Pro. However, if you do not have Final Cut Pro or are unsatisfied with FCP, Wondershare Filmora is a great choice. Most importantly, the steps for all the different methods are very simple for everyone to follow.
Free Download For macOS 10.14 or later
How to Change Video Speed in Filmora?
Changing video speed in Filmora is super easy. You can speed up your video as per your requirements in a number of ways. That is why Filmora happens to be a better option than Final Cut Pro. We will illustrate all the different methods to change video speed in Filmora.
You can watch this video to understand how to change video speed in Filmora.
Method 1. The Simplest Way - Click “2x-100x” Speed Options
Just like Final Cut Pro, you can choose from preset speed options to change video speed. This is undoubtedly the easiest way to change video speed instantly. While Final Cut Pro offers 2X to 20X speed options, Filmora has 2X to 100X speed presets. Here are the steps to speed up video by choosing a preset speed option.
Step1 Download, install and simply Launch Filmora. Tap Create New Project option.

Step2 Go to File> Import Media> Import Media Files and choose the video file. The selected video will be imported into the Project Media folder. Alternatively, you can also use the drag/drop function.

Step3 Drag and drop the video file onto the timeline. Select the video clip from the timeline and click on the Speed (timer icon) option at the top of the timeline. If you want to speed up a portion of the video, you need to split the video clip.

Step4 From the menu, go to Fast and select any speed option as per your requirements. Thereafter, play the video to see the changes.

Step5 Press Export to save the video file in your desired file format.
Method 2. Use Uniform Speed to Change Speed
If you want to customize the video speed uniformly, there is a dedicated option called Uniform Speed in Filmora. This means you do not want to choose from the preset speed options. You may want to set the speed of the video to 3X, but it is not available in the preset options.
That is where Uniform Speed comes in handy, and you can set any speed from 0.01X to 100X. Here are the steps to follow.
Step1 Once you have dropped the video file onto the timeline, click on the Speed(timer) icon.
Step2 Click on the Uniform Speed option. This will open the Uniform Speed tab above the timeline.

Step3 Adjust the speed slider to set the desired speed as per your requirements. The duration will change as per the speed you set, and you can set the duration below the speed slider. Just like Final Cut Pro, you can turn on Ripple and Audio Pitch as per your preference.

Step4 Once you are satisfied with the speed, click on the Ok button. Thereafter, tap Export to save the edited video file.
Method 3. Use Speed Ramping to Change Speed
There is a unique way to change your video speed called speed ramping. You can speed up some parts and slow down the other parts, like crests and troughs in a graph.
The speed ramping feature comes with several graphical presets. You can choose from the presets and customize the speed as per your requirements. Check the steps to use speed ramping to change your video speed.
Step1 Drag and drop the video file onto the timeline. Click on the Speed(timer) icon at the top of the timeline.
Step2 Click on Speed Ramping option. This will open Speed Ramping above the timeline.

Step3 Select from the available preset as per your requirements. Otherwise, you can select Customize option and edit the nodes as needed.

Step4 Once satisfied with the result, click on the Ok button. Finally, tap Export
Conclusion
There are some videos where you may have to speed up certain parts. In detail, we have illustrated how to speed up the video in Final Cut Pro. However, if you do not have Final Cut Pro or are unsatisfied with FCP, Wondershare Filmora is a great choice. Most importantly, the steps for all the different methods are very simple for everyone to follow.
[Tutorial] How To Add Motion Blur in Blender?
Motion blur effect, as a terminology, holds great significance in multiple industrial uses. From filmmaking to basic photography, the motion blur effect is consumed as a reality-setting standard, which defines its significance. Many platforms are providing this effect to enhance the creativity of their users. Blender is also known among these software providing such services while designing animations.
We will target a comprehensive guide on adding motion blur in Blender using the right way. Therefore, if you seek the appropriate way of adding motion blur in Blender, the following description is for you.
Part 1: What is Blender?
As we start our discussion, we will review Blender as a free and open-source software. Following this, we will continue realizing the benefits of adding motion blur through Blender:
Introduction to Blender
For those unaware of Blender, it is an open-source, free creativity software. You can find it as the perfect designing platform for your 3D content. This software has made itself accessible to the market with ease. This has made it quite famous among professionals, and is recommended for its high-quality, feature-rich design. From modeling to sculpting, Blender provides some great options to work with.
If you are up for editing some videos through Blender, it offers a great course of features, including motion blur. This Blender motion blur tutorial intends to bring you a similar insight into this great software. This will help you know the procedure of executing such facets to perfection.
Benefits of Using Motion Blur Effect
There are many benefits of using the motion blur effect in creative work. The following points are the highlights and benefits of adding the motion blur effect:
· Perfect For Idolizing Speed
The use of the motion blur effect is the best way to show the speed of the object. Using such effects gives the viewer an experience of the swiftness that is contained in the object.
· Resolves Flickering
Rather than trying out fast motion, you can add such effects to your 3D content to enhance the motion blur. This also helps get over problems, including strobing and flickering clips.
· Attenuates Real-Effect
One great thing about our human eye is its ability to bring motion blur in fast-moving objects. Since this is a real-life experience, the motion blur effect highlights this particular effect and brings the edited content closer to reality.
Part 2: How Do You Motion Blur An Object in Blender?
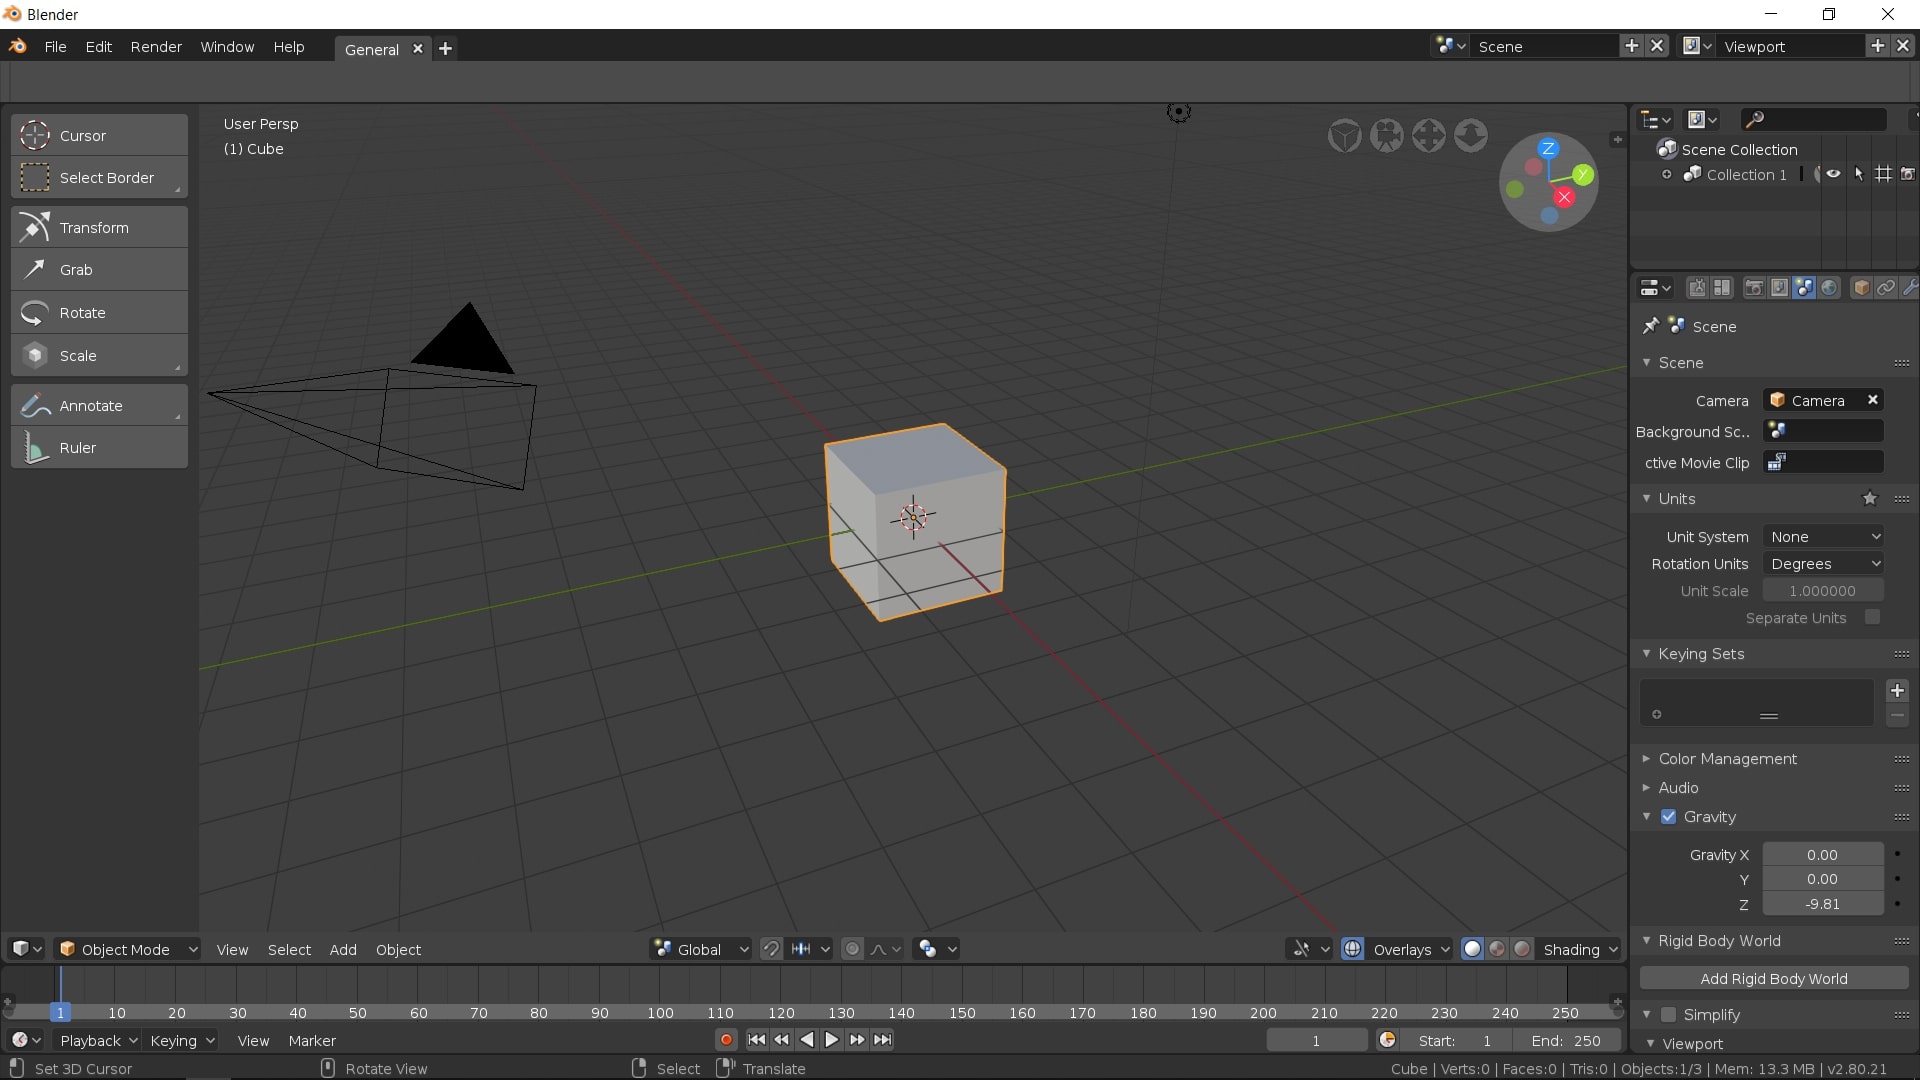
As stated before, Blender can be a great option for adding motion blur to objects. Many properties are involved in setting up the motion blur effect on an object. It includes defining the position, shutter, separation, and several other parameters. In this part, we will be looking for a guide on how to add motion blur in Blender:
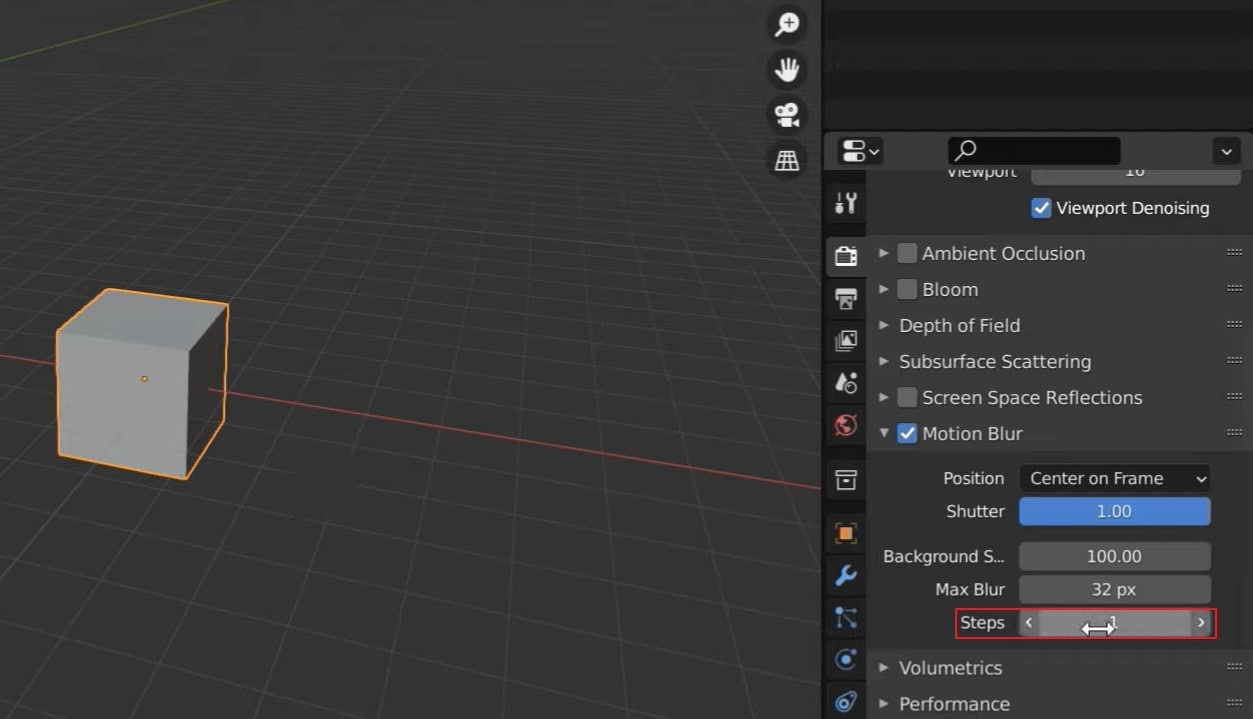
Step1 With the video opened on Blender, proceed to the “Render Properties.” Look to enable “Motion Blur” from the available options. Click on the arrowhead adjacent to it to access its advanced blur options.
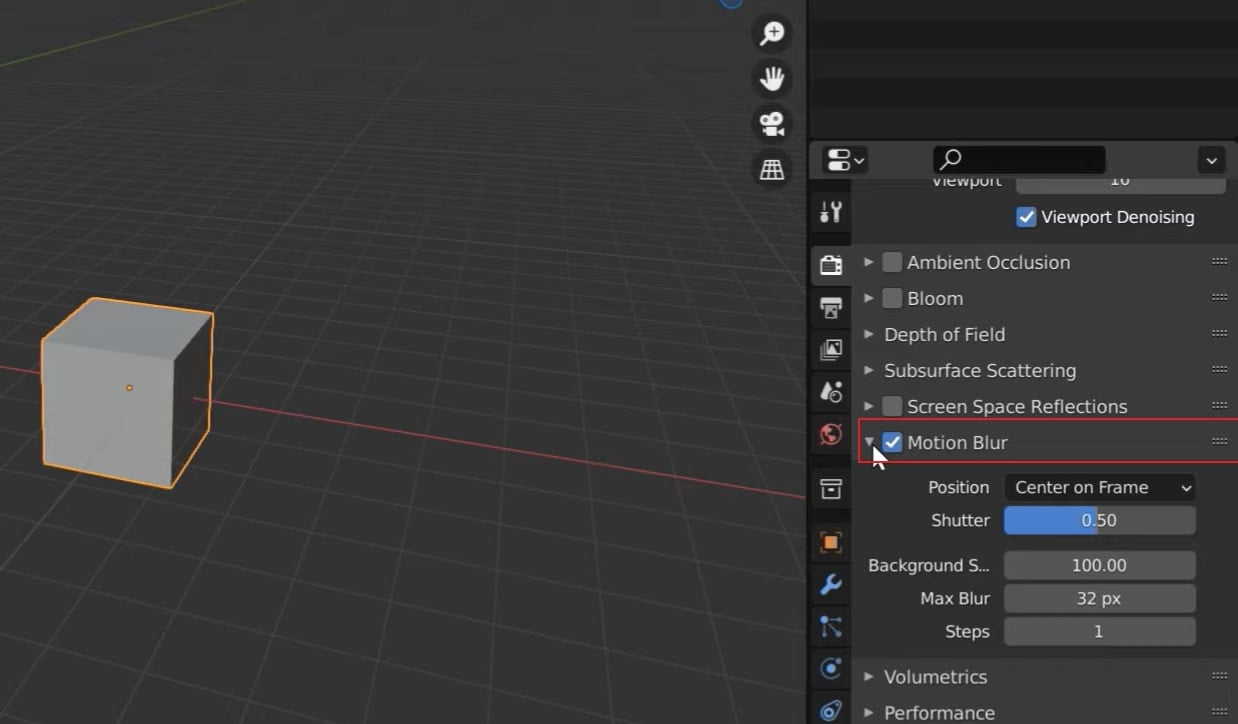
Step2 Start by setting its “Position” in the start, center, or end, according to the requirements. For those who are not sure of it, they can use “Center on Frame.” If the objects rapidly move in the video, reduce the “Shutter” value or vice versa.
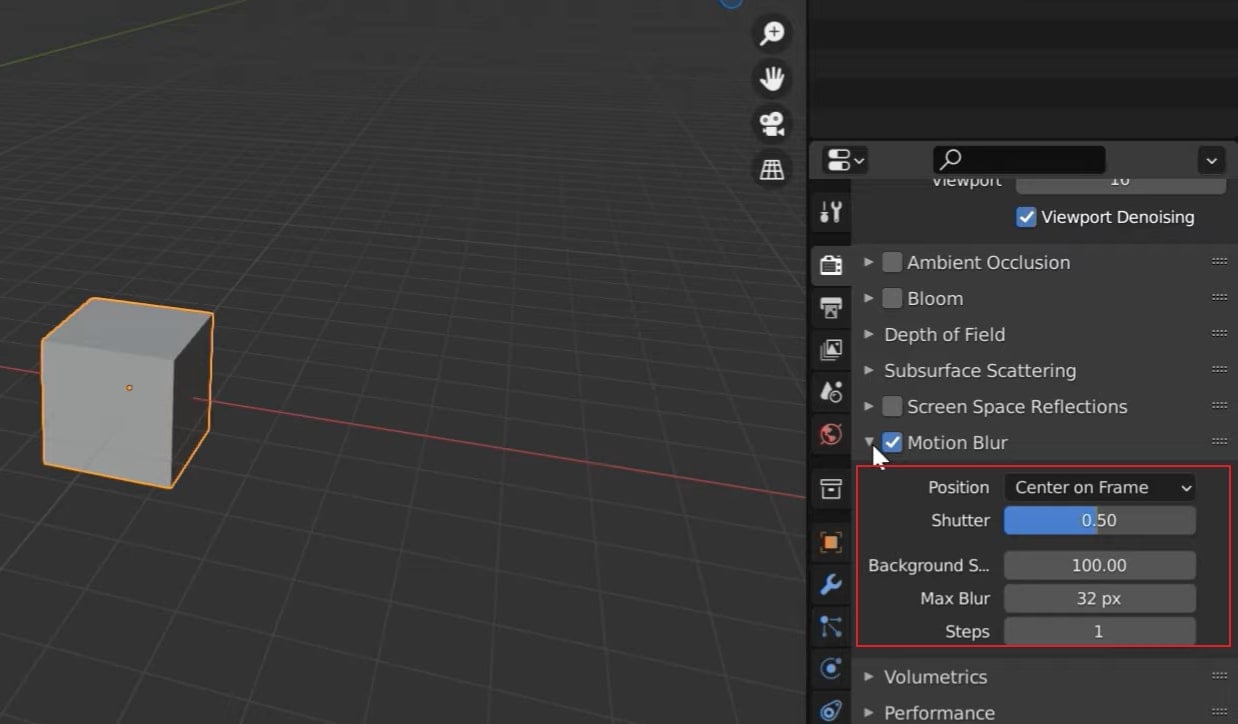
Step3 Following this, define the “Background Separation” according to how you require the foreground and background. Next, you will have to increase or decrease the “Max Blur” pixels to define the blur intensity in the video.
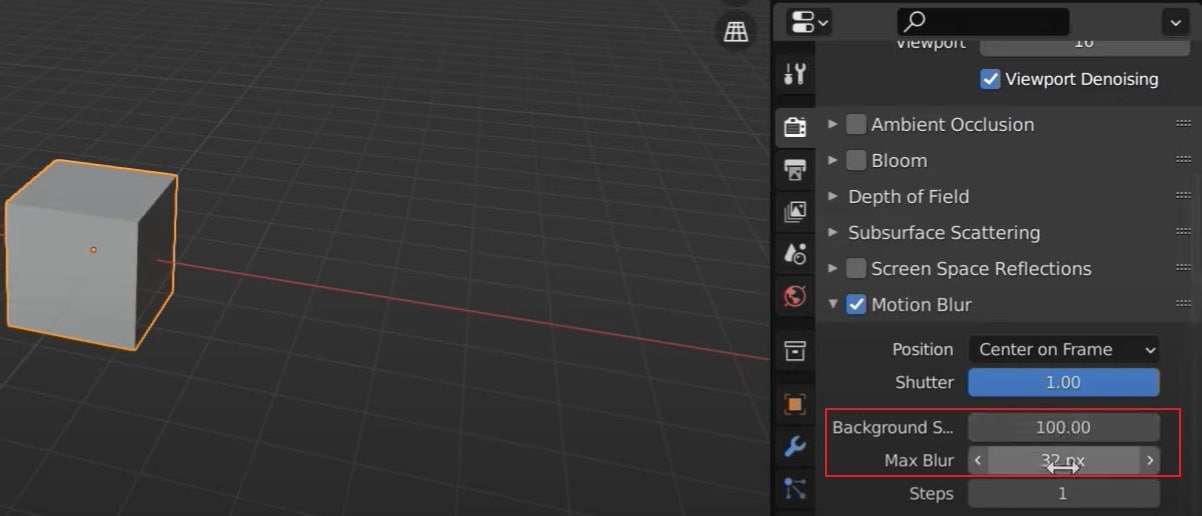
Step4 For objects with complex topology, you might have to increase the “Steps,” hence the “Shutter” time. For simple objects, the value remains unity. To apply the motion blur effect, use the F12 key for rendering the video.
Bonus Tips – Add Motion Blur to Animated Video with Filmora
Blender can become challenging to use, a no-go for basic video editors. This requires a simpler video editor that can help them add motion blurs. For applying this to a video, Wondershare Filmora is a great option. This video editor is known for its easy-going, conclusive, and diversifying features.
Free Download For Win 7 or later(64-bit)
Free Download For macOS 10.14 or later
Wondershare Filmora can be a real deal for users who are looking for high-quality video editing. A simple interface gives a perfect option to bring creativity to your work. If you wish to know more about Filmora, the following features will help you out:
- You can try out the Instant Mode offered on Filmora for creating videos in minutes.
- You can adjust the video speed to get better control of the keyframes. With the help of this feature, you can easily create cinematic effects.
- It also includes the feature of motion tracking to intensify your video creation.
- Filmora’s ability to blend in effects in the videos is one of its major highlights. There are multiple modes available in Filmora to make things interesting.
- Its AI Portrait mode helps identify humans in the video and helps them enhance their parameters.
How to Add Motion Blur to Animated Video with Wondershare Filmora
Since you are looking forward to a method explaining how to add motion blur to videos with Filmora, the following step-by-step guide is for you:
Step1 Launch Filmora and Import Animated Video
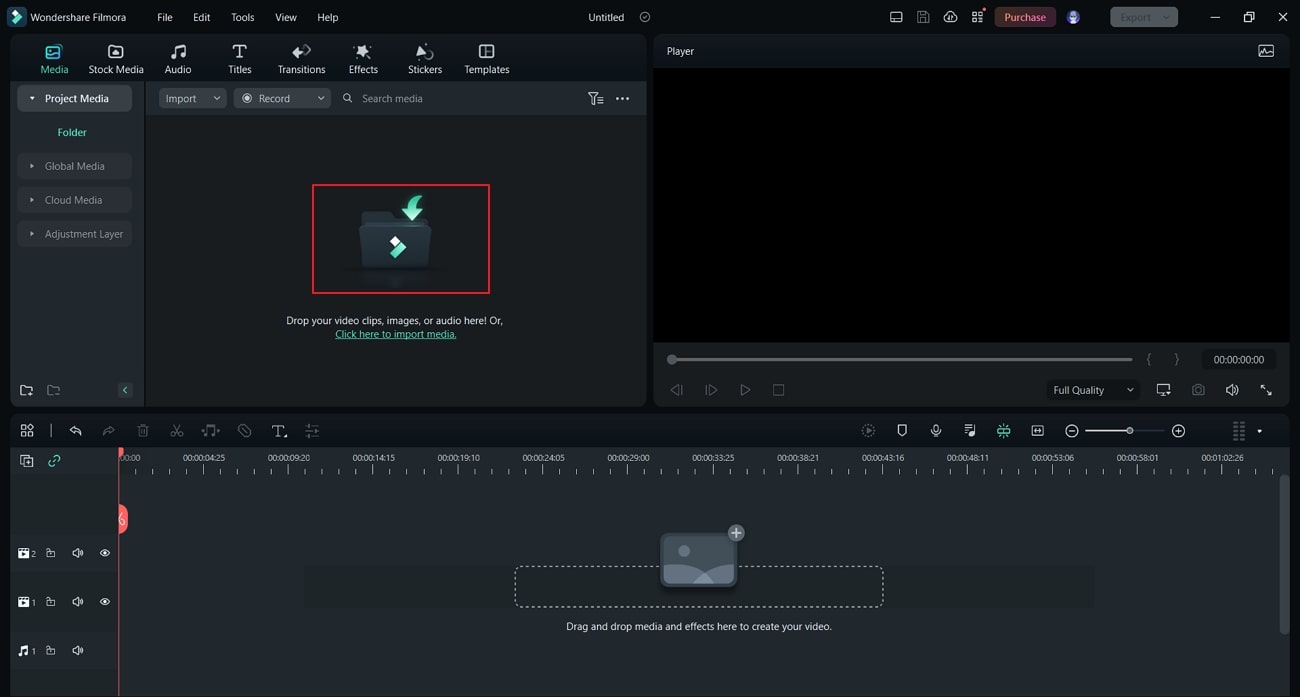
You must launch Wondershare Filmora after installing it successfully on your computer. Click the “Create New Project” button to lead to a new project screen. Here, tap on the “Folder” icon to import the animated video that is to be edited.
Step2 Split the Video to Set Platform for Adding the Effect
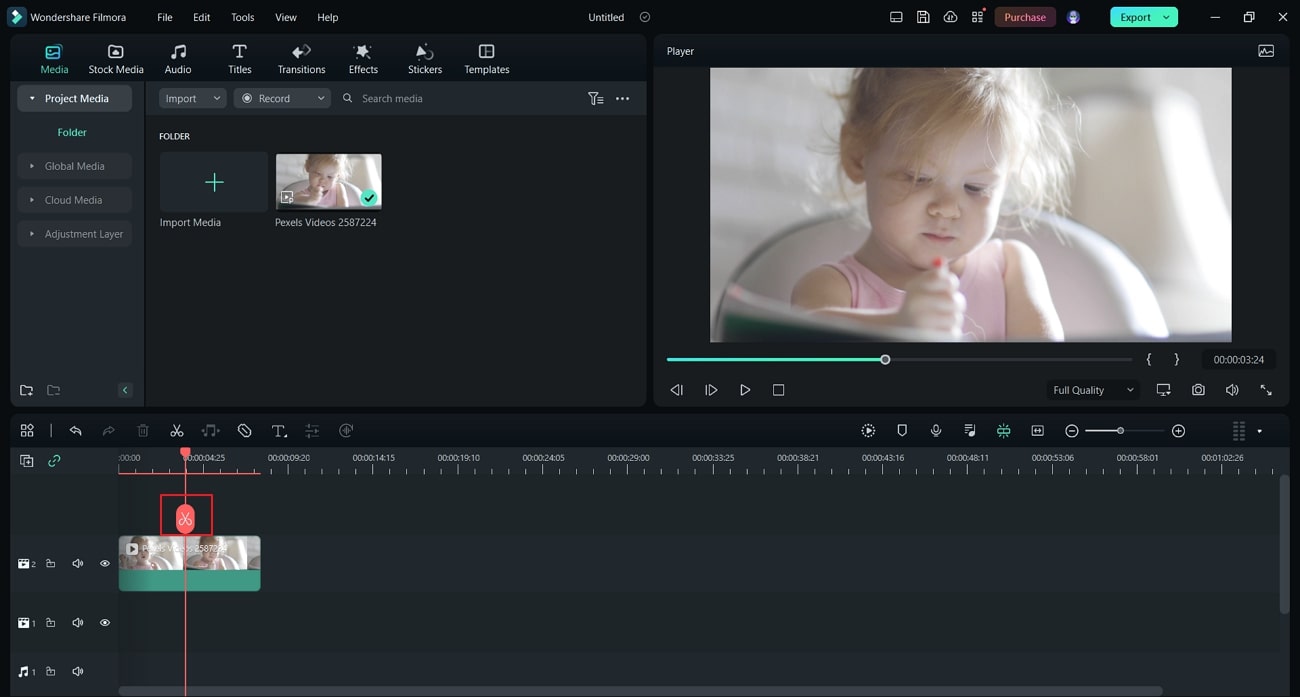
Once uploaded, drag and drop it on the timeline. Use the play head and adjust it to the point where you want to start the motion blur. Click the “Scissor” icon to split the clip from the specific point.
Step3 Look for the Blur Effect and Add
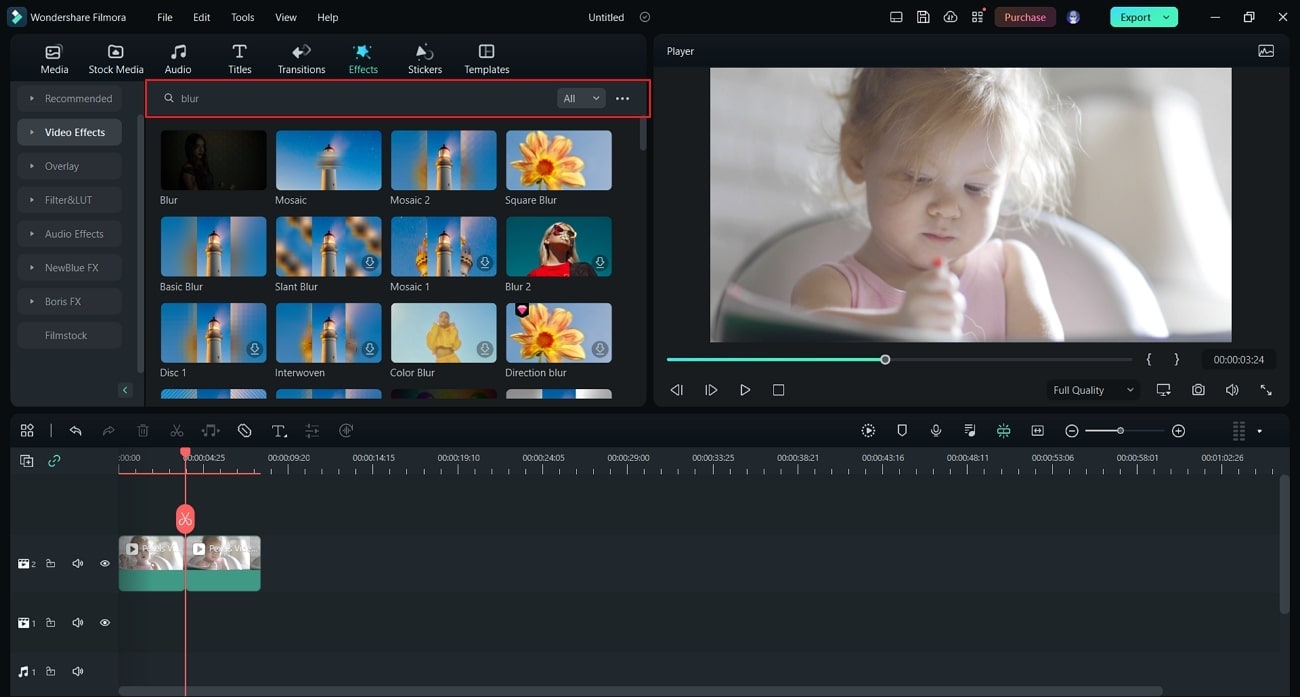
Move to the “Effects” tab from the top and look for “Video Effects” from the left section. Afterward, type “Blur” in the search bar of the effects. You will be led to a list of different blur options, which you can pick and add to the part of the video that was split.
Step4 Include Transition for Smoothness and Export Video
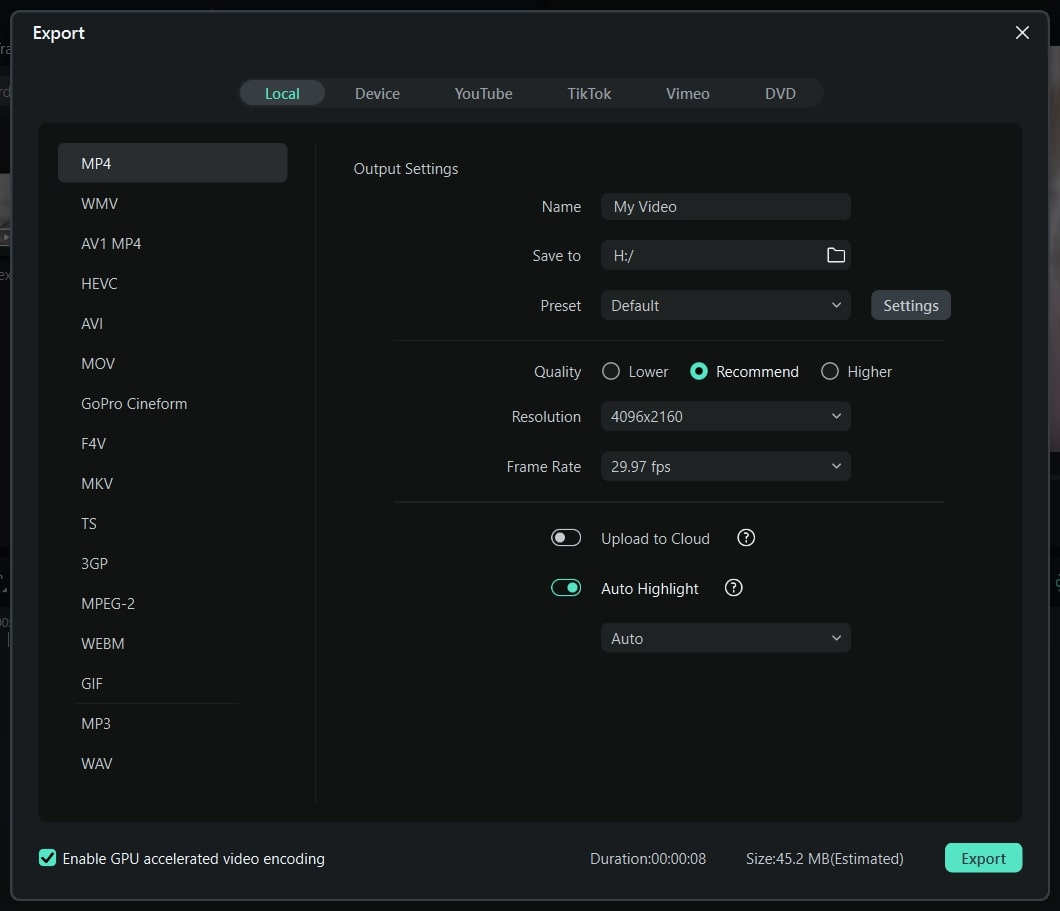
After adjusting the parameters, find the “Dissolve” transition from the “Transition” tab for smoothening the effect. Once done, you can export the edited clip by clicking the “Export” button and setting the parameters.
FAQ
What does motion blur do in Blender?
There are two different techniques adopted in the Blender motion blur effect. The first is recognized as the “Sample Motion Blur” technique, an advanced, slower, and controlled way of adding motion blur. The other technique, known as “Vector Blur,” is faster but has drawbacks, which do not look professional.
Conclusion
With that, a complete guide on how to add motion blur in Blender has been presented and explained. The provided technique will help you include the motion blur effect to perfection. For a more straightforward and quicker procedure, Wondershare Filmora gives a perfect experience of adding motion blur in animated videos. The article helps guide you toward selecting the best option in the market.
Free Download For macOS 10.14 or later
Wondershare Filmora can be a real deal for users who are looking for high-quality video editing. A simple interface gives a perfect option to bring creativity to your work. If you wish to know more about Filmora, the following features will help you out:
- You can try out the Instant Mode offered on Filmora for creating videos in minutes.
- You can adjust the video speed to get better control of the keyframes. With the help of this feature, you can easily create cinematic effects.
- It also includes the feature of motion tracking to intensify your video creation.
- Filmora’s ability to blend in effects in the videos is one of its major highlights. There are multiple modes available in Filmora to make things interesting.
- Its AI Portrait mode helps identify humans in the video and helps them enhance their parameters.
How to Add Motion Blur to Animated Video with Wondershare Filmora
Since you are looking forward to a method explaining how to add motion blur to videos with Filmora, the following step-by-step guide is for you:
Step1 Launch Filmora and Import Animated Video
You must launch Wondershare Filmora after installing it successfully on your computer. Click the “Create New Project” button to lead to a new project screen. Here, tap on the “Folder” icon to import the animated video that is to be edited.

Step2 Split the Video to Set Platform for Adding the Effect
Once uploaded, drag and drop it on the timeline. Use the play head and adjust it to the point where you want to start the motion blur. Click the “Scissor” icon to split the clip from the specific point.

Step3 Look for the Blur Effect and Add
Move to the “Effects” tab from the top and look for “Video Effects” from the left section. Afterward, type “Blur” in the search bar of the effects. You will be led to a list of different blur options, which you can pick and add to the part of the video that was split.

Step4 Include Transition for Smoothness and Export Video
After adjusting the parameters, find the “Dissolve” transition from the “Transition” tab for smoothening the effect. Once done, you can export the edited clip by clicking the “Export” button and setting the parameters.

FAQ
What does motion blur do in Blender?
There are two different techniques adopted in the Blender motion blur effect. The first is recognized as the “Sample Motion Blur” technique, an advanced, slower, and controlled way of adding motion blur. The other technique, known as “Vector Blur,” is faster but has drawbacks, which do not look professional.
Conclusion
With that, a complete guide on how to add motion blur in Blender has been presented and explained. The provided technique will help you include the motion blur effect to perfection. For a more straightforward and quicker procedure, Wondershare Filmora gives a perfect experience of adding motion blur in animated videos. The article helps guide you toward selecting the best option in the market.
The Complete Guide to Making Fortnite Montage
If you’re skilled at playing Fortnite, you’ll probably want to share your gameplay clips as montages with other players. The popularity of Fortnite montage videos is rapidly growing because millions of people play the game. Tons of people also like watching their peers play this online video game in the form of gaming montages. We’ll explain how to make a montage Fortnite that will get views when you upload it on social media platforms.
What Is Fortnite?
Fortnite is a popular online game developed by the American game studio Epic Games. The video game was released in 2017, and it’s available in three-game mode versions with the same game engine and gameplay. These are:
- Fortnite: Save the World: Set on contemporary Earth, Save the World is a co-op hybrid third-person shooter (TPS), tower defense (TD), and survival game. The game allows a maximum of four players to fight off creatures that look like zombies and defend objects with traps or fortifications they have built.
- Fortnite Battle Royale: This is a free-to-play (F2P) battle royale video game that allows up to one hundred players to fight against each other until only one person remains.
- Fortnite Creative: Released in 2018, Fortnite Creative allows players to create battle arenas and worlds. They can then share these predetermined structures with up to 16 other players for a range of multiplayer game modes that have customizable rules.
Since its release, Fortnite has become a worldwide phenomenon, with more than 350 million people playing the game across the globe. In the first year of Fortnite’s release, players downloaded its mobile version 78 million times.
The game became such a global hit because it’s free to play. It’s also available on most gaming platforms and features an engaging theme. Additionally, because Battle Royale allows up to 100 gamers to fight it out until they find the last man standing, this means the replayability of this online video game is infinite. What’s more? Each game is unique.
Fortnite has also become popular because users can purchase DLC (downloadable content) to enhance their gaming experience.
Things to Prepare before making a Fortnite Montage video
You have to prepare several things if you want to make an epic Fortnite montage video that will keep your audience watching. These include:
1. Fortnite Gaming Clips
Epic Games developed a system that allows you to save your best gameplay performances. You can then export the Fortnite replays that you have saved.
To save the beautiful moments of the game, you have to know where to find the Replays videos; this is how to find them:
- Head over to Career and select the Replays option. You’ll see all the replay clips, including their date, finish, and length.

Get Fortnite Video Clip
- Select the clips and watch them so that you can choose the ones you want to use in your Fortnite montage video.
Now that you know where the Replay videos are, you have to save them on your computer. You can only save the Replay videos on your PC using a screen capture tool that allows you to record the videos.
ApowerREC is one of the most popular tools that people use to record and download Fortnite’s Replays videos. This screen capture tool allows you to create high-quality Fortnite videos with a one-press shortcut.
To start using this software, follow the steps below:
- Launch the software and set some preferences by heading to Settings.
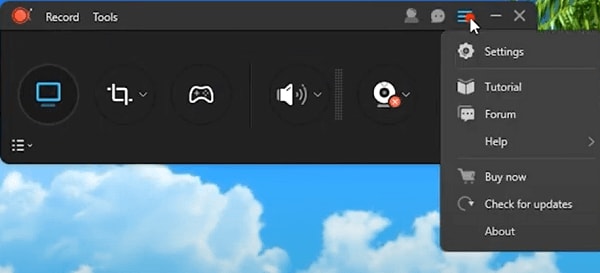
Record Fortnite video clip
- Set the video and audio quality, hotkeys, and more.
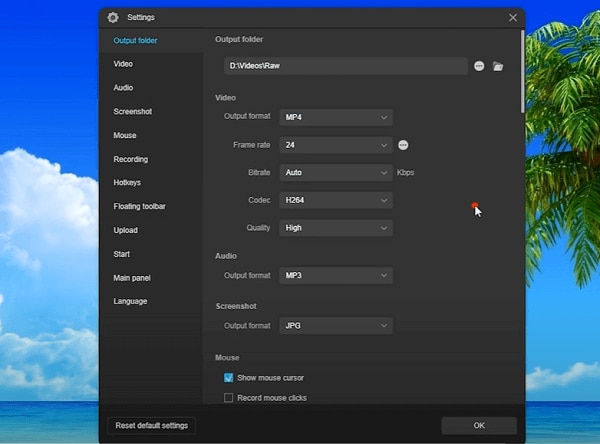
ApowerRec Setting
- To record the screen and sound, enable this option.
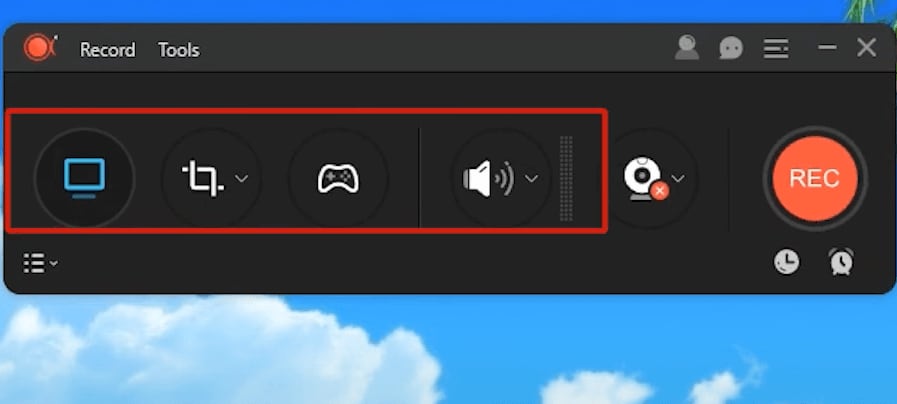
Enable option to record
- If you’ll be using a microphone, click on the speaker symbol and enable audio boost and noise cancellation.
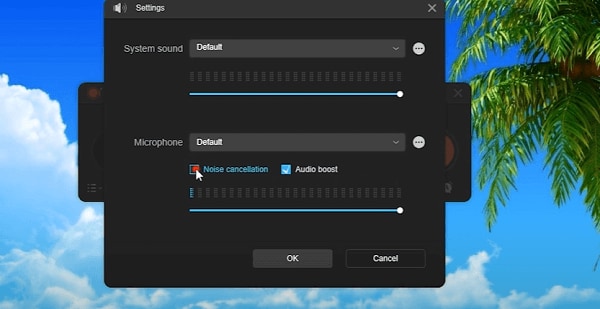
Audio Setting
- Set the recording mode that you want. You can use Regional mode or Game mode.
- Open your Fortnite game and got to the Replay videos.
- Play the Replay video you want.
- Click on Regional and set the recording frame along the area you want to record.
- Hit the Recording button to initiate the recording process.
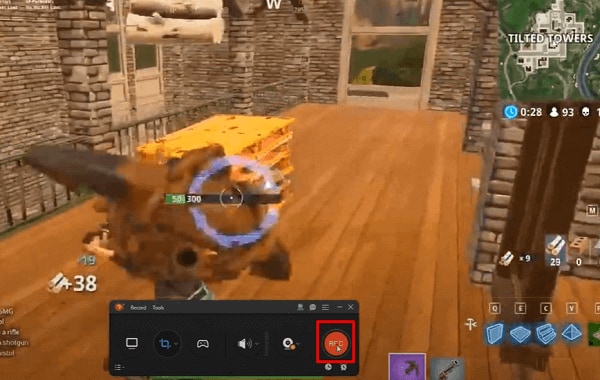
Start Recording
- You can add annotations as you prefer while the tool is recording the Replay video.
- Use the zoom function if you want to look closely at something.
- When you’re done, hit the stop button. The recorded file will pop up in the program’s recording list.
- Repeat the process for the rest of the video clips you want to use in your montage Fortnite.
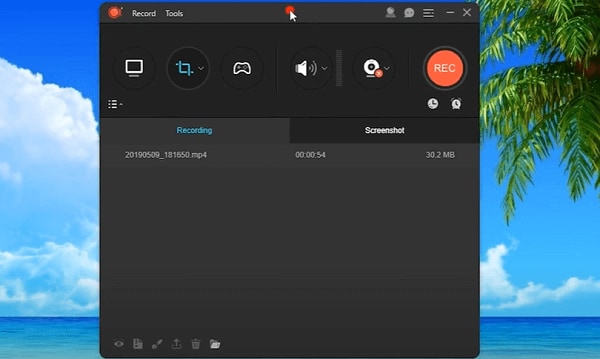
Complete Recording
2. Pick the Right Background Music
To make your Fortnite montage video engaging, you’ll need to choose background music that fits your montage videos. Music is one of the key elements in creating an exhilarating viewing experience for your audience.
Make sure you pick royalty-free music that fits the genre of your Fortnite montage video. Choose a song that expresses the themes and personality of the game.
You cannot use your favorite song from the radio, as your copyright law prohibits people from using the work of others without permission or paying a royalty.
If you are caught using copyrighted music, you might have to pay the music owner monetary damages. You can also go to jail because of copyright infringement.
There are loads of platforms that offer non-copyrighted music that you can use in your montage Fortnite. These include YouTube, Twitch, and Pixabay.
3. Choose the Correct Video Editing Software
Now that you have downloaded all the Fortnite video clips and saved them on your computer, you need to choose the correct video editing software. Here are three of the most reliable programs that you can use to make a montage Fortnite video.
Filmora
Filmora is a video editing software compatible with Windows and macOS devices. Filmora’s Template Mode allows you to create impressive Fortnite montage videos that will get more views on social media platforms.
You’ll find ready-made, stylish video templates that you can use to create epic gaming montage videos. It’s easy to use this tool, and you do not need any experience to create visually striking montage videos.
Wondershare Filmora11 Express Better
Achieve More
Grow Together
Free Download Free Download Learn More

Premiere Pro CC
Designed for the most demanding users, Premiere Pro CC is a comprehensive video editing program developed by Adobe Inc. The software includes audio editing functionality.
This Fortnite montage editor is a subscription-based version of Adobe Premiere Pro, and the CC represents “Creative Cloud.”
You can use Premiere Pro CC effects to add spice to your montage video. These include spark effects, glitch transitions, and light leak overlay.
VideoProc Vlogger
Developed by Digiarty, VideoProc Vlogger is a multitrack video editing software for Mac and Windows users. The program supports speed ramping effects. You can also use the audio analyzer if you want to mark out the beat and edit the highlight to match the energy of the music. You can also add audio and visual effects, text effects, glitch effects, and light glaring and flashy effects.
How to Make a Fortnite Montage with Filmora
It’s easy to make a Fortnite montage with Filmora. The software was designed to be user-friendly and save you time while creating montages. This Fortnite montage editor has tons of tools that make it the go-to software for players who want to share stunning gaming montages with other gamers on social media platforms.
Follow these steps to learn how to make a Fortnite montage video with Filmora:
Step1Import Media File
Choose the New Project option. Import your video clips to Filmora’s media library. You can do this by heading to File>Import Media> Import Media Files. You can then locate the video files on your computer and import them to the media library by selecting them and hitting the Open button.
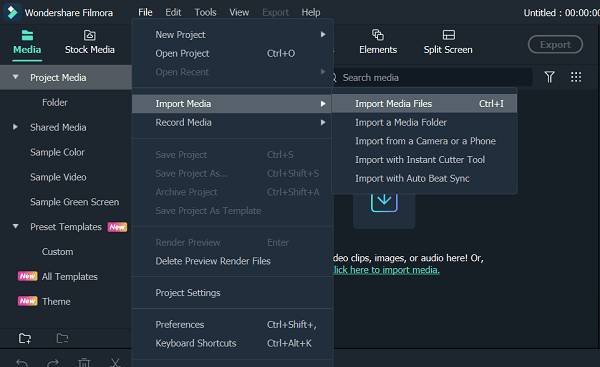
Import Media
Step2Add Effects to Your Footage
Select your videos and drag them from the media library then drop them on your timeline. Now, right-click on the video in the timeline to make some edits to your video. Essentially, you can trim, split, crop, and zoom your video. You can also add velocity effects.
Navigate to the Stock Media tab, where you can choose royalty-free music and use it as your background music.
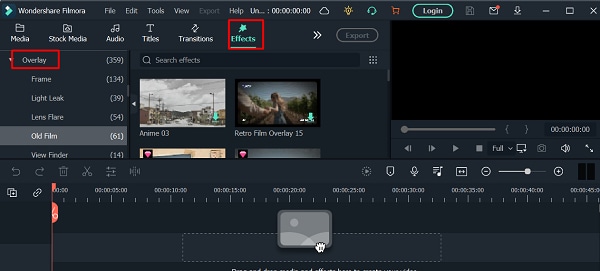
Go to the Effects tab, and select the Overlay option, where you can choose the overlay you want to add to your video. Filmora has tons of overlays that you can use to add emotions and set the tone in your Fortnite montage videos.
Add Effects
Step3Add Filters
Under the Effects tab, go to Filters to add filters to your montage video. The program has many filters that you can choose from, such as glitch, shake, and mosaic. Use these two effects to add transitions to your video clip.

Add Filters
Closing Thoughts:
To make a Fortnite montage video, you need to know how to save and download the clips you will use, get the right background music, and find a reliable montage editor. Use Filmora to edit Fortnite Tik Tok montage videos. The software has some cool effects that will make your gaming montage stand out and get more views.
Free Download Free Download Learn More

Premiere Pro CC
Designed for the most demanding users, Premiere Pro CC is a comprehensive video editing program developed by Adobe Inc. The software includes audio editing functionality.
This Fortnite montage editor is a subscription-based version of Adobe Premiere Pro, and the CC represents “Creative Cloud.”
You can use Premiere Pro CC effects to add spice to your montage video. These include spark effects, glitch transitions, and light leak overlay.
VideoProc Vlogger
Developed by Digiarty, VideoProc Vlogger is a multitrack video editing software for Mac and Windows users. The program supports speed ramping effects. You can also use the audio analyzer if you want to mark out the beat and edit the highlight to match the energy of the music. You can also add audio and visual effects, text effects, glitch effects, and light glaring and flashy effects.
How to Make a Fortnite Montage with Filmora
It’s easy to make a Fortnite montage with Filmora. The software was designed to be user-friendly and save you time while creating montages. This Fortnite montage editor has tons of tools that make it the go-to software for players who want to share stunning gaming montages with other gamers on social media platforms.
Follow these steps to learn how to make a Fortnite montage video with Filmora:
Step1Import Media File
Choose the New Project option. Import your video clips to Filmora’s media library. You can do this by heading to File>Import Media> Import Media Files. You can then locate the video files on your computer and import them to the media library by selecting them and hitting the Open button.

Import Media
Step2Add Effects to Your Footage
Select your videos and drag them from the media library then drop them on your timeline. Now, right-click on the video in the timeline to make some edits to your video. Essentially, you can trim, split, crop, and zoom your video. You can also add velocity effects.
Navigate to the Stock Media tab, where you can choose royalty-free music and use it as your background music.
Go to the Effects tab, and select the Overlay option, where you can choose the overlay you want to add to your video. Filmora has tons of overlays that you can use to add emotions and set the tone in your Fortnite montage videos.

Add Effects
Step3Add Filters
Under the Effects tab, go to Filters to add filters to your montage video. The program has many filters that you can choose from, such as glitch, shake, and mosaic. Use these two effects to add transitions to your video clip.

Add Filters
Closing Thoughts:
To make a Fortnite montage video, you need to know how to save and download the clips you will use, get the right background music, and find a reliable montage editor. Use Filmora to edit Fortnite Tik Tok montage videos. The software has some cool effects that will make your gaming montage stand out and get more views.
Also read:
- New 2024 Approved Best 8 AR Apps for Android and iOS | Help You See the World of AR
- 2024 Approved Create Amazing Slow-Motion Videos 8 Affordable Slow-Motion Cameras
- The Availability of the Slow-Motion Feature on the iPhone Is Often Debated. This Article Will Guide You on How to Slow Down a Video on iPhone
- Updated How To Trim Video In Premiere Pro in Different Ways for 2024
- In 2024, Interested in Adding a Cinematic Strobe Light Effect to Your Movie or Video Title? Follow the Steps Explained in Detail Here
- 2024 Approved Best Free Slow Motion Apps For Android and iPhone
- New In 2024, Easy Ways to Change Aspect Ratio in iMovie?
- Updated Progressive Solutions to Add VHS Effects to Video with Ease for 2024
- Updated How to Find Free Online Slideshow Maker with No Watermark
- Reversing Time Lapse Videos on iPhone Using Top Applications
- In 2024, All Things About Adding Effects In Kinemaster
- 2024 Approved How to Add Filter to Video Online
- New 2024 Approved How to Create OBS Slideshow
- New In 2024, As a Designer, Color Is the Most Powerful and the Most Diverse Tool at Your Disposal. Here Are Ten Matching Color Combinations to Get You Started on Your Next Project
- 3 In-Camera Transitions Tricks To Make Videos
- New Do You Want to Know How to Remove Audio From a Video without a Watermark? Keep Reading This Article Since We Have the Answers for You. Complete with the Guide on How to Do It
- In 2024, Denoise Video in Adobe Premiere Pro – Audio and Video Noise Removal
- Updated How to Crop a Video in Windows Media Player
- 2024 Approved Create Eye-Catching Slow-Motion Videos to Set Your Own Trend. For This Purpose, Read This Article to Find and Learn to Use CapCuts New Slow-Motion Templates
- New 2024 Approved Want Make a Slide Show Video? Heres How
- Top-Search The Best Game Screen Recording Tools for PC
- New In 2024, Top 7 MP4 Video Editors on Mac Edit MP4 Videos Easily
- New Why Your Transparent GIF Is Hard to Remove and How to Do With It
- Updated How to Add Subtitles in VLC Media Play for 2024
- New 2024 Approved How to Animate Your Designs With Canva GIF
- Updated In 2024, An Introduction to LUTs | Their Overview and Benefits
- In 2024, If You Are Looking for Reliable Solutions to Export Your Musical Slideshow Through a DVD Burning Process, Take a Breath, You Have Landed at the Right Place
- New 3 Ways to Create Motion Text Effects for Your Video for 2024
- New In 2024, A Guide to Effective Video Marketing
- Updated 7 Solutions to Cut Video on Mac without Using FFmpeg?
- New 2024 Approved Ultimate Guide on How to Plan and Storyboard a Music Video
- How Can I Control Speed of a Video for 2024
- New How to Share YouTube Video on Zoom for 2024
- Updated How to Create Loop Videos with Filmora for 2024
- New In 2024, How to Fade in Text in Adobe Premiere Pro
- 2024 Approved Getting Into The Details A Review of Kodak LUTs
- Understanding The Best Tools for Changing Sky Background for 2024
- How to Make A Slideshow Video (+Filmora Techniques)
- In 2024, How and Where to Find a Shiny Stone Pokémon For Realme GT 5 Pro? | Dr.fone
- Fixing Foneazy MockGo Not Working On Xiaomi 14 Ultra | Dr.fone
- Solutions to Spy on Xiaomi 13T with and without jailbreak | Dr.fone
- 3 Effective Ways to Unlock iCloud Account Without Password From iPhone 13 Pro
- How to Rescue Lost Photos from Asus ROG Phone 7 Ultimate?
- Want to Uninstall Google Play Service from Vivo V29 Pro? Here is How | Dr.fone
- How to Remove an AirTag from Your Apple ID Account On Apple iPhone X?
- Updated Top 10 Free Video Translators to Mitigate Translation Risks
- In 2024, Disabled iPhone 15 How to Unlock a Disabled iPhone 15?
- How to Change Location on TikTok to See More Content On your Honor 80 Pro Straight Screen Edition | Dr.fone
- 9 Solutions to Fix Nubia Red Magic 9 Pro+ System Crash Issue | Dr.fone
- In 2024, How to Send and Fake Live Location on Facebook Messenger Of your Apple iPhone SE (2020) | Dr.fone
- Fixes for Apps Keep Crashing on Vivo V27 Pro | Dr.fone
- Different Methods To Unlock Your iPhone 11 Pro Max
- How to Unlock iCloud lock on your Apple iPhone SE (2022) and iPad?
- In 2024, A How-To Guide on Bypassing the iPhone 15 Pro Max iCloud Lock
- Why Does My Samsung Galaxy S23 Keep Turning Off By Itself? 6 Fixes Are Here | Dr.fone
- Top 10 Best Spy Watches For your Realme C53 | Dr.fone
- In 2024, Fake Android Location without Rooting For Your Samsung Galaxy A15 4G | Dr.fone
- 6 Solutions to Fix Error 505 in Google Play Store on Oppo Reno 11 5G | Dr.fone
- Best Pokemons for PVP Matches in Pokemon Go For Vivo Y02T | Dr.fone
- In 2024, How to Track Realme GT 5 Pro Location by Number | Dr.fone
- How to Factory Reset Vivo V30 Lite 5G in 5 Easy Ways | Dr.fone
- Title: New In 2024, How to Make Flying Objects in Wondershare Filmora
- Author: Chloe
- Created at : 2024-04-24 07:08:30
- Updated at : 2024-04-25 07:08:30
- Link: https://ai-editing-video.techidaily.com/new-in-2024-how-to-make-flying-objects-in-wondershare-filmora/
- License: This work is licensed under CC BY-NC-SA 4.0.


