
:max_bytes(150000):strip_icc():format(webp)/TikTok-vs-YouTube-a42ac0c72a4f4b1d9da8b7ae85b4205e.jpg)
New In 2024, Making Slow Motion Videos in Premiere Pro A Review on The Best Methods
Making Slow Motion Videos in Premiere Pro: A Review on The Best Methods
Slow-motion videos can give your videos more depth, drama, and emotion. Your viewers will find your films more interesting if you use slow-motion effects. It can bring attention to a shot, produce an artistic effect, or relive a memorable scene. Slow-motion video has been used for decades to add dramatic effects to films and videos.
If you’re interested in how to do slow-mo in Premiere Pro, this article is your ultimate solution. Read the article and add artistic to dramatic slow-mo to your videos. You will eventually come to know how to do slow mo on Premiere Pro with ease.
Slow Motion Video Maker Slow your video’s speed with better control of your keyframes to create unique cinematic effects!
Make A Slow Motion Video Make A Slow Motion Video More Features

Part 1: What Are Some Potential Real-Life Use Cases of Having Slow Motion Videos?
Slow-motion movies can be utilized to record and examine events in greater depth. Before delving into how to make a slow-motion video in Premiere Pro, learn its use cases. Thus, below are a few applications of the slow motion in real life:
- Medical Research and Imaging: Slow-motion videos are used in medical research and education. They thoroughly examine surgical methods and practices. This promotes medical practice improvement and student’s better comprehension of concepts.
- Cinematography and Filmmaking: Filmmakers use slow motion to add dramatic and creative effects. It can arouse feelings, highlight particular movements, or produce a dreamlike mood. In commercials, these videos create sequences of the message you want to convey.
- Wildlife Observation: Slow-motion recordings can be very useful in animal research. They can be used to watch and record animal activity more closely. It gives researchers a better knowledge of the animal’s habits.
- Sports analysis: Slow-motion effect can analyze an athlete’s movement mechanics and give reviews. Coaches and athletes pinpoint areas where their technique needs to be improved.
- Product Testing and Quality Control: Video effects also prove useful in industries. It allows engineers to inspect high-speed operations and identify any flaws or malfunctions.
- **Crash Test Analysis:**Analyzing slow-motion video is essential for examining vehicle crash tests. It aids in improving car designs and evaluating the performance of safety systems.
Part 2: Performing Slow Mo in Adobe Premiere Pro: Using A Good Option
Adobe Premiere Pro’s editing interface makes its reputation high in the market. It is known as the industry standard tool because of its unparalleled features. Content developers and filmmakers can arrange and edit video files on it. It can also improve audio and image quality with its extensive editing toolkit.
Premier Pro offers many more functions than basic video editing. It offers some features that can change your content creation journey. Following are some of its basic features that you should know before learning Premiere Pro how to slow motion:
- Auto Reframe: This feature keeps the object of the image in the frame no matter which frame you choose. You can easily auto-frame a single clip or go for the entire video.
- Text-Based Editing: Text-based editing can give you more control over the transcript. It can deal with multi-channel audio recordings and remove gaps with a single click.
- Color Settings: Color settings allow you to adjust colors quickly and easily. It can check the result by combining multiple color selections into a single tab.
- Audio Auto-Tagging: This feature classifies audio files as either dialogue, music, or ambiance. It then provides access to the most useful tools for producing high-quality audio.
This guide will tell you how to make a slow-motion video on Premiere Pro. Follow the steps below to decrease the speed of your video across Adobe Premiere Pro:
Step 1
Import your video into the timeline and right-click on the icon you see with the video file on the timeline. From here, go to “Time-Remapping” and click on “Speed.” You will know the function has been activated when you see the white line on your timeline.

Step 2
Expand the timeline to see the ramping line. Now click on the ramping line by using the “Ctrl + click” command. You can also add keyframes by going to the toolkit on the left side of the screen and selecting the “Add Keyframe” button. Another option is the time remapping speed settings from the top and activating the keyframe.

Step 3
Move the timeline cursor to the right side and add another keyframe there. Now, double-click on the first keyframe and drag it to the right side just a bit. After that, drag the speed ramping line downwards to create a ramp. To change the length of keyframes more precisely, go to “Effects Control” from the top and manage its length.

Part 3: Quick Alternative: Wondershare Filmora and Slow-Motion Clips
You might have gotten the answer to “how to make slow-motion video in Premiere Pro” until now. But another question comes into mind: “How to make slow-mo videos easily ?” Using Adobe Premiere Pro can be tricky for starters, so they look for alternative tools. Filmora is a great option if you struggle with using Adobe Premier Pro.
The tool is easy to use and can process heavy videos, keeping its quality intact. With its AI features, the edits that used to take hours can now be done within minutes. The tool has amazing options for all kinds of media editing.
Step-by-Step Guide to Perform Slow Motion in Filmora Using Different Methods
Remarkable features of Filmora do not end here. If you want to know more about Filmora, you should download it, but first, learn how to add slow motion in reels. In this read, follow the guide below:
Free Download For Win 7 or later(64-bit)
Free Download For macOS 10.14 or later
Method 1: Using Uniform Speed
Using this method, you can slow down your video smartly with the help of AI. Some options in uniform speed will help you to automate the process while ensuring the quality of the content. Look at the steps below to add slo-mo to your video like a pro:
Step 1Import Media to the Timeline and Explore Uniform Speed
Install Filmora 13 on your device and open it to access “New Project” from the main interface. When you enter the editing window, import your file into the media panel.

Step 2Adjust the Speed and Other Use Advanced Options
Later, drag that file to the timeline and right-click on it to get a list. Select the “Uniform Speed” option from that list and head to the editing panel opened to the right. Under the “Speed,” there will be a slider. You have to move it to the left for slow-motion video. While adjusting speed with that slider, track video duration from the “Duration” section. Below that option, you can toggle the “Reverse Speed” option if required.

Otherwise, check the “Ripple Edit” and “Maintain Pitch” option for good. Now, extend the “AI Interpolation” menu and choose “Optical Flow.” It will let AI automatically adjust the video speed in slow motion with high quality.

Method 2: Using Speed Ramping
If you want to bring a professional look to Slow-motion videos, use Speed Ramping. It will ensure a smooth change in video speed when it increases or decreases. To add this refined touch to videos, look at the given steps:
Step 1Access the Speed Ramping Option in 2 Ways
Tap the “Speed Ramping” next to the “Uniform Speed” in the right-side panel. Optionally, you can right-click on your videos in the timeline. There, you will find the “Speed Ramping” option below the “Uniform Speed” option in the list.

Step 2Speed Ramping Your Videos and Get Render Preview
In the Speed Ramping Section, you will get 6 templates. Pick one or hit the “Customize” to design your own speed ramping in videos. Later, move to the toolbar of the timeline section and choose “Render Preview” next to the “Copilot” icon. It will bring a smooth playback of your speed ramping in videos.

Matchless Features of Wondershare Filmora
Wondershare Filmora offers a creative editing experience. It has a number of important features, some of which are discussed below:
AI Copilot: You can speed up your video editing process with the AI Copilot Editing function. It offers AI assistance anytime you need it and gives a quick response. This feature directs you towards the required feature with a button. To get assistance, users just have to prompt questions in natural language.
AI Text-Based Editing: You can edit your video content with the AI Text-Based Editing tool. This feature can transcribe your spoken words into editable text. Afterward, you can edit the text based on your preferences, and the changes in the video will be added. Moreover, Filmora allows you to save the generated text to reuse it in articles and blogs later.
AI Copywriting: If you are stuck creating a unique script, get help from AI copywriting in Filmora. It gives several video ideas to generate YouTube video titles and descriptions. This creative personal assistant will bring content aligning with your video goals. The generated script can be used to make videos from Filmora’s text-to-video feature.
Conclusion
Regular videos do not always generate the same level of response from viewers. Slow-mo videos can make a video more entertaining and improve the film’s narrative. It’s good to use when you want to draw attention to the most significant shot in a video. This article shows how to make slow motion in Premiere Pro and offers an amazing alternative. Thus, try to use Filmora and improve your editing experiences with ease.
Make A Slow Motion Video Make A Slow Motion Video More Features
Part 1: What Are Some Potential Real-Life Use Cases of Having Slow Motion Videos?
Slow-motion movies can be utilized to record and examine events in greater depth. Before delving into how to make a slow-motion video in Premiere Pro, learn its use cases. Thus, below are a few applications of the slow motion in real life:
- Medical Research and Imaging: Slow-motion videos are used in medical research and education. They thoroughly examine surgical methods and practices. This promotes medical practice improvement and student’s better comprehension of concepts.
- Cinematography and Filmmaking: Filmmakers use slow motion to add dramatic and creative effects. It can arouse feelings, highlight particular movements, or produce a dreamlike mood. In commercials, these videos create sequences of the message you want to convey.
- Wildlife Observation: Slow-motion recordings can be very useful in animal research. They can be used to watch and record animal activity more closely. It gives researchers a better knowledge of the animal’s habits.
- Sports analysis: Slow-motion effect can analyze an athlete’s movement mechanics and give reviews. Coaches and athletes pinpoint areas where their technique needs to be improved.
- Product Testing and Quality Control: Video effects also prove useful in industries. It allows engineers to inspect high-speed operations and identify any flaws or malfunctions.
- **Crash Test Analysis:**Analyzing slow-motion video is essential for examining vehicle crash tests. It aids in improving car designs and evaluating the performance of safety systems.
Part 2: Performing Slow Mo in Adobe Premiere Pro: Using A Good Option
Adobe Premiere Pro’s editing interface makes its reputation high in the market. It is known as the industry standard tool because of its unparalleled features. Content developers and filmmakers can arrange and edit video files on it. It can also improve audio and image quality with its extensive editing toolkit.
Premier Pro offers many more functions than basic video editing. It offers some features that can change your content creation journey. Following are some of its basic features that you should know before learning Premiere Pro how to slow motion:
- Auto Reframe: This feature keeps the object of the image in the frame no matter which frame you choose. You can easily auto-frame a single clip or go for the entire video.
- Text-Based Editing: Text-based editing can give you more control over the transcript. It can deal with multi-channel audio recordings and remove gaps with a single click.
- Color Settings: Color settings allow you to adjust colors quickly and easily. It can check the result by combining multiple color selections into a single tab.
- Audio Auto-Tagging: This feature classifies audio files as either dialogue, music, or ambiance. It then provides access to the most useful tools for producing high-quality audio.
This guide will tell you how to make a slow-motion video on Premiere Pro. Follow the steps below to decrease the speed of your video across Adobe Premiere Pro:
Step 1
Import your video into the timeline and right-click on the icon you see with the video file on the timeline. From here, go to “Time-Remapping” and click on “Speed.” You will know the function has been activated when you see the white line on your timeline.
Step 2
Expand the timeline to see the ramping line. Now click on the ramping line by using the “Ctrl + click” command. You can also add keyframes by going to the toolkit on the left side of the screen and selecting the “Add Keyframe” button. Another option is the time remapping speed settings from the top and activating the keyframe.
Step 3
Move the timeline cursor to the right side and add another keyframe there. Now, double-click on the first keyframe and drag it to the right side just a bit. After that, drag the speed ramping line downwards to create a ramp. To change the length of keyframes more precisely, go to “Effects Control” from the top and manage its length.
Part 3: Quick Alternative: Wondershare Filmora and Slow-Motion Clips
You might have gotten the answer to “how to make slow-motion video in Premiere Pro” until now. But another question comes into mind: “How to make slow-mo videos easily ?” Using Adobe Premiere Pro can be tricky for starters, so they look for alternative tools. Filmora is a great option if you struggle with using Adobe Premier Pro.
The tool is easy to use and can process heavy videos, keeping its quality intact. With its AI features, the edits that used to take hours can now be done within minutes. The tool has amazing options for all kinds of media editing.
Step-by-Step Guide to Perform Slow Motion in Filmora Using Different Methods
Remarkable features of Filmora do not end here. If you want to know more about Filmora, you should download it, but first, learn how to add slow motion in reels. In this read, follow the guide below:
Free Download For Win 7 or later(64-bit)
Free Download For macOS 10.14 or later
Method 1: Using Uniform Speed
Using this method, you can slow down your video smartly with the help of AI. Some options in uniform speed will help you to automate the process while ensuring the quality of the content. Look at the steps below to add slo-mo to your video like a pro:
Step 1Import Media to the Timeline and Explore Uniform Speed
Install Filmora 13 on your device and open it to access “New Project” from the main interface. When you enter the editing window, import your file into the media panel.
Step 2Adjust the Speed and Other Use Advanced Options
Later, drag that file to the timeline and right-click on it to get a list. Select the “Uniform Speed” option from that list and head to the editing panel opened to the right. Under the “Speed,” there will be a slider. You have to move it to the left for slow-motion video. While adjusting speed with that slider, track video duration from the “Duration” section. Below that option, you can toggle the “Reverse Speed” option if required.
Otherwise, check the “Ripple Edit” and “Maintain Pitch” option for good. Now, extend the “AI Interpolation” menu and choose “Optical Flow.” It will let AI automatically adjust the video speed in slow motion with high quality.
Method 2: Using Speed Ramping
If you want to bring a professional look to Slow-motion videos, use Speed Ramping. It will ensure a smooth change in video speed when it increases or decreases. To add this refined touch to videos, look at the given steps:
Step 1Access the Speed Ramping Option in 2 Ways
Tap the “Speed Ramping” next to the “Uniform Speed” in the right-side panel. Optionally, you can right-click on your videos in the timeline. There, you will find the “Speed Ramping” option below the “Uniform Speed” option in the list.
Step 2Speed Ramping Your Videos and Get Render Preview
In the Speed Ramping Section, you will get 6 templates. Pick one or hit the “Customize” to design your own speed ramping in videos. Later, move to the toolbar of the timeline section and choose “Render Preview” next to the “Copilot” icon. It will bring a smooth playback of your speed ramping in videos.
Matchless Features of Wondershare Filmora
Wondershare Filmora offers a creative editing experience. It has a number of important features, some of which are discussed below:
AI Copilot: You can speed up your video editing process with the AI Copilot Editing function. It offers AI assistance anytime you need it and gives a quick response. This feature directs you towards the required feature with a button. To get assistance, users just have to prompt questions in natural language.
AI Text-Based Editing: You can edit your video content with the AI Text-Based Editing tool. This feature can transcribe your spoken words into editable text. Afterward, you can edit the text based on your preferences, and the changes in the video will be added. Moreover, Filmora allows you to save the generated text to reuse it in articles and blogs later.
AI Copywriting: If you are stuck creating a unique script, get help from AI copywriting in Filmora. It gives several video ideas to generate YouTube video titles and descriptions. This creative personal assistant will bring content aligning with your video goals. The generated script can be used to make videos from Filmora’s text-to-video feature.
Conclusion
Regular videos do not always generate the same level of response from viewers. Slow-mo videos can make a video more entertaining and improve the film’s narrative. It’s good to use when you want to draw attention to the most significant shot in a video. This article shows how to make slow motion in Premiere Pro and offers an amazing alternative. Thus, try to use Filmora and improve your editing experiences with ease.
Boost Your Spirit: Creating Motivational Status Videos
The rise in social media’s popularity has brought about a fresh era of creating and enjoying content. Among this plethora of content, one category has managed to stand out prominently - motivational videos. These snippets of inspiration, often not more than a few minutes long, have become a staple of many users’ daily feeds. But what makes them so universally loved?
To begin with, let’s consider the times we live in. The modern world is fast-paced and filled with challenges and hurdles. This is where “motivational video status” or “motivation status video” comes into play. They serve as a brief pause, a moment of reflection, and a powerful jolt of motivation for many. They remind people of their worth, potential, and the strength they possess to overcome adversities. Plus, given their short length, they’re easily digestible, making them perfect for quick breaks.
Moreover, these videos are often shared during specific times of the year, such as the Republic Day. “Republic Day status videos,” for instance, fuse motivation with patriotism, making them a hit among the masses.
For content creators and marketers, the appeal lies in the sheer virality of these videos. A compelling “motivational status video download” can quickly gain traction, garnering thousands, if not millions, of views in a short span. With the right mix of powerful imagery, stirring words, and evocative music, these videos can resonate with a vast audience, driving engagement and shares.
Part 1: 6 Websites to Free Download Motivational Video Footage
Finding the right footage for crafting that perfect motivational video is crucial. The imagery must align with the message, ensuring it’s impactful. For those on the lookout, here are six renowned platforms where one can source high-quality footage for free or at a cost:
Adobe Stock
Adobe Stock is a treasure trove of high-quality videos. While it’s primarily a paid platform, the range and quality of clips available make it a top choice for professionals.
iStock
Another premium platform, iStock by Getty Images, offers a diverse collection of video clips. From breathtaking landscapes to poignant human moments, you’ll find a plethora of options here.
Shutterstock
Shutterstock is a household name in the world of digital media. With an extensive library, this platform provides clips that can cater to virtually any theme or mood you’re aiming for.
Videezy
For those on a budget, Videezy offers a mix of free and premium video clips. It’s a community-driven platform, so you’ll find a unique array of footage not available elsewhere.
Pixabay
Pixabay is an entirely free platform, making it perfect for beginners or those not looking to invest heavily. The site hosts a variety of footage, from nature scenes to urban landscapes.
Pexels
Similar to Pixabay, Pexels offers a rich collection of free video clips. With its user-friendly interface and diverse catalog, it’s a favorite among many content creators.
In essence, whether you’re crafting a “motivation status video download” for a broad audience or a personalized “motivational status video” for a niche group, these platforms have got you covered. Dive in, explore, and let your creativity flow!
Part 2: Using Filmora to Edit Motivational Video Footage
Filmora has steadily risen in popularity, becoming a go-to choice for many when it comes to video editing. Whether you have tons of experience or you’re just starting out in the world of video creation, Filmora provides a user-friendly interface along with a wide range of useful tools. Let’s delve into how you can use Filmora to craft that perfect “motivation status video.”
Step1 Importing Your Footage
Start by importing your selected motivational video footage from platforms like Pixabay, Pexels, or any of the previously mentioned sites. Exactly! Just click on the ‘Import’ button and choose the clips you’d like.
Step2 Trimming and Merging
Once imported, you may want to trim the videos or merge multiple clips to make your motivational status video coherent. Use Filmora’s easy drag-and-drop timeline for this purpose.
Step3 Adding Music
**”motivational video status”**without inspiring music is like a cake without frosting. Filmora boasts an extensive library of music tracks. Alternatively, import your own to perfectly match the tone of your video.
Step4 Text and Titles
If you’re aiming for a “Republic Day status videos”theme or any other, adding text or titles can amplify your message. Filmora offers a range of customizable text options, from sleek and professional to fun and quirky.
Create AI Captions For Win 7 or later(64-bit)
Create AI Captions For macOS 10.14 or later
Step5 Transitions and Effects
Give your**”motivation status video download”**a polished feel with smooth transitions between clips. Add effects like slow motion or color grading to enhance the visual appeal further.
Step6 Export and Share
Once satisfied, export your video in the desired format. With Filmora, you can also directly share your **”motivational status video download”**to various social media platforms, amplifying its reach.
Filmora’s versatility ensures that you not only create a compelling “motivation status video” but also enjoy the process. Its user-friendly tools are perfect for crafting videos that resonate and inspire.
Part 3: Summary
In the age of social media, where content is consumed voraciously, motivational videos have carved a unique niche. They inspire, uplift, and connect with audiences, offering solace in trying times or propelling one towards their goals. Platforms like Adobe Stock, iStock, and Shutterstock, among others, offer a goldmine of footage for crafting these videos. But the magic truly comes alive in the editing room.
Filmora, with its rich array of tools and features, stands out as an excellent choice for editing. Whether you’re crafting a poignant “Republic Day status video” or a general “motivation status video,” Filmora’s capabilities can help bring your vision to fruition.
While sourcing the right footage lays the foundation, it’s the editing that breathes life into a “motivational status video.” So, dive in, explore the world of video creation, and let your stories inspire the world.
How to Use Kahoot! On Zoom
In the educational game Kahoot! participants respond to multiple-choice questions based on trivia. Each participant uses their own controller to answer questions in the online game. There are several question kinds to pick from, allowing for complete customization of the test. Each player needs their own controller for Kahoot! The game questions will be shown in the Zoom/Google Meet window, but the answers must be entered using the controller. With the Kahoot!! app for Zoom, presenters may use play and friendly rivalry to increase participant engagement. Users may organize knowledge- and feedback-gathering pulse checks with staff members, encourage original thought with word clouds, and empower participants’ voices with surveys, open-ended questions, and other tools. Utilizing the brainstorm tool, organizations may crowdsource ideas and advance teamwork.
Engagement has emerged as a crucial component of successful learning, collaboration, and connection as the globe has increased the use of video communications in social and professional situations. Users may access, host, and play Kahoot!! games and educational information with other meeting participants using the Kahoot!! app for Zoom without ever leaving the Zoom Meeting or requiring a second device. Corporate executives may motivate their staff via speeches, meetings, and online activities. Meeting hosts will have immediate access to data and statistics from their Kahoot!! experience, allowing them to respond in real time to audience engagement with the material. Additionally, hosts may email the Kahoot!! games to all participants so they can practice and improve their scores, which will increase participant engagement and learning retention. Hosts can also distribute the Kahoot!! games as self-paced challenges with individuals who couldn’t attend in person.
Part 1: Key Features of Kahoot
What more is there to discuss, Kahoot!? Every pupil adores it. Many instructors and educators use it all around the world to make learning simple, enjoyable, and interesting. Everyone may use it since it is free and extremely simple to use. These are some of its attributes:
- Quizzes may be made in a matter of minutes.
- Develop games based on the abilities of the kids. Playing at home or in the Zoom is simple for them.
- Various templates are offered. You can choose one of them with confidence.
- Kahoot! has the ability to be organized into many folders according to topics or subjects.
- Additionally, multiple choice questions may be included by quiz makers.
- Teachers using Kahoot! may combine different questions into one format, such as quizzes, polls, riddles, and slides.
- Use Apple Schoolwork, Google Zooms, and Microsoft Teams to share student-centered tasks.
Part 2: How to Host a Kahoot! Session within a Zoom Meeting
With the Zoom app, Kahoot! may be viewed, hosted, and used. It’s amazing that Kahoot!!, one of the most well-known brands in quiz-based learning, still provides a free-to-use platform, making it very accessible to both instructors and students. It’s also a useful resource for a hybrid class that combines online and classroom instruction. Most devices will be able to use the cloud-based service using a web browser. This implies that students using computers, tablets, and cellphones in class or at home may access this. Participants in Zoom Meetings may play games and learn without having to leave the Zoom meeting or bring a second device.
Step1Sign up for Zoom ahead of time and get ready. On the other hand, launch the Kahoot! test in your web browser, then be ready to share your screen in Zoom.
Step2As the participants come, allow them in and check to see whether you and they can both hear each other. To access the Kahoot! quiz, make sure they have a device or another browser tab open.
Step3Open the Kahoot! test and share it using Zoom’s “Share Screen” feature. While your screen is shared, continue to host the Kahoot! as normal. To view participants next to your shared screen, we advise selecting Side-by-Side Mode.
Part 3: How to Participate in Kahoot! Sessions within a Zoom Meeting
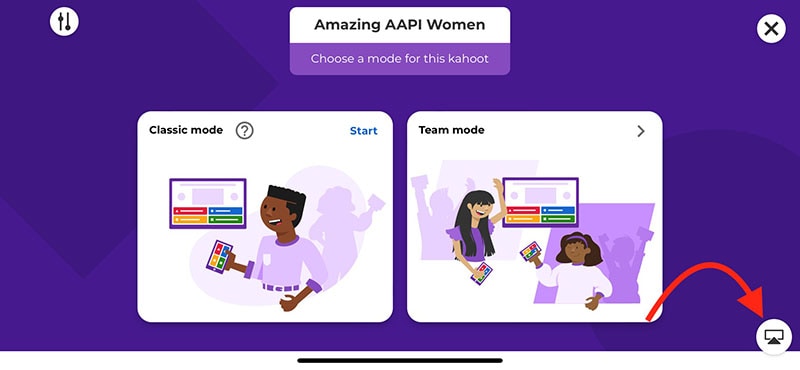
With more than 40 million ready-made games available on Kahoot!!, getting started is fast and simple. When time and resources are limited, hybrid or distant learning is ideal. After linking the Kahoot! to your Zoom account, you may utilize it. Use this app and start a meeting. Go to Apps on the toolbar and choose the program you wish to use. Select Who is Hosting to locate their host or to join a Kahoot! session being hosted by a friend or another player. Players may post a question to a shared screen on the Kahoot! platform. Kahoot!! just needs an account to be made in order to use it since it is free. Most devices may be used by students to access Kahoot!! from wherever there is an internet connection. This is how:
Step1Take the time to check that Zoom, Skype, Cisco Webex, or Google Hangout are operating and that your camera, microphone, and speaker are all operational.
Step2In the right-side panel, add the Kahoot!! app to your list of apps and click Join.
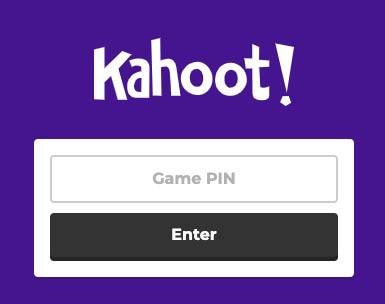
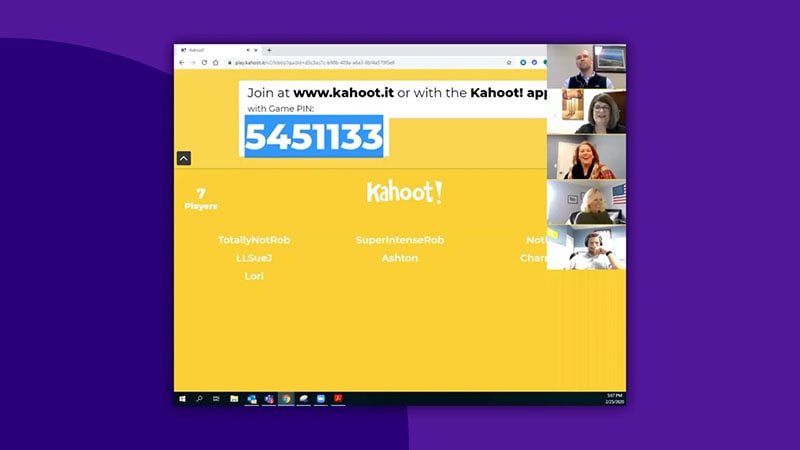
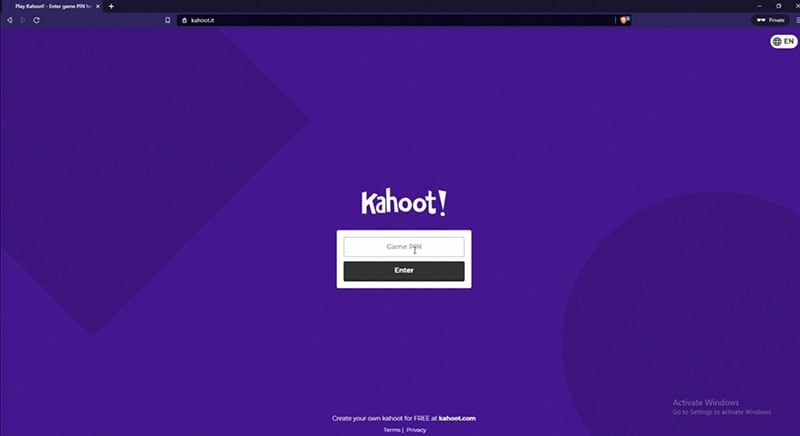
Step3The lobby will reveal your game PIN when you click the Play button, allowing the computer to show you a Kahoot! You may enter the game PIN and press Enter to join the Kahoot! session once the host shows their screen with you. To participate in a Kahoot! session, you don’t need a Kahoot! account.
Part 4: How to Record Zoom Meetings
Zoom is a conference tool that enables real-time, high-quality, low-latency communication. Filmora is an excellent video recorder for that reason, enabling users to capture on-screen activity such Zoom audio tracks and video conversations. Wondershare One of the most versatile and portable Zoom voice recorders is the Filmora. Even novices may easily utilize it due to its user-friendly UI. All you have to do is click the record button after choosing the proper audio source in the settings. The all-in-one video editing program Filmora allows you to record your screen with audio, a facecam, and a green screen effect. You can record the entire screen or just a portion of it, and you can perform a number of quick edits on your video using tools like trimming, cropping, changing the audio track’s volume, and so on.
How to Use Filmora to Record Zoom Lectures
Having said that, Filmora is a great Zoom recorder that can capture games, audio, and video conversations. This video recorder may be used to make video clip lessons in addition to recording movies, video games, and webcam footage. In addition to Zoom, it can also capture internet streaming audio. Here is information on how to record Zoom meetings using this software:
Step1Download and Install Filmora on your PC
To use this program for a number of tasks, including screen recording and recording editing, you must first download and install it on your computer. To achieve this, download the recording program by clicking the link below. Launch the program as soon as the download is finished to start the installation process, and then adhere to the on-screen directions to install and make this software available for usage.
Step2Choose the Record’s Ideal Position in the Zoom
Use it on your PC at this point. As soon as you start the program, a window interface with two choices for screen recording, editing already recorded videos, and generating videos will display. Choose the Recording option from the menu. When you click the record button, the program will direct you to the recording interface, where you can easily adjust the settings for your camera and audio. To add the microphone or Zoom sound in that particular field, use the necessary buttons as described below:
Step3Press the Record Button
It goes without saying that you must test your recording tools to ensure they are functional and capturing the highest quality audio. But once you’re ready, click the record button, which will allow you 3-5 seconds before starting to record the personalized screen of your PC as seen below:
Step4Export and Save Your Zoom Recording
You may now save the Zoom video for sharing on social media after making and modifying it. The following file types may be used to save the document: MP4, WMV, AVI, MOV, GIF, and MP3. The finest feature of Wondershare Filmora is the direct export and sharing of Zoom video recordings to YouTube; the only need is that you must be signed in to your YouTube account inside the application:
Because the MOV format is only available for online movies, you may also export your Zoom recordings to MP4 if you want to publish them to your YouTube channel. You are free to choose the format that best suits your needs. You may choose the encoder from a drop-down menu in the export options.
Conclusion
With the aid of several interesting tools and programs made accessible in this virtual environment, learning has now become enjoyable. Of them is Kahoot! In Zoom. It is an application that acts as a learning tool by providing fun games, tests, and a variety of other chances. In only a few minutes, quizzes may be made and distributed. Games and quizzes may be planned using this platform quite easily. The Kahoot! with Zoom will make it simpler than ever for corporate leaders to engage and encourage their team members with Kahoot!! engaging game-based learning experiences at a time when many organizations are staying virtual or planning for a hybrid model. Head towards recording Kahoot with Filmora to experience a smooth Kahoot! usage on Zoom. Plus, you can also share the gameplay afterwards.
In the educational game Kahoot! participants respond to multiple-choice questions based on trivia. Each participant uses their own controller to answer questions in the online game. There are several question kinds to pick from, allowing for complete customization of the test. Each player needs their own controller for Kahoot! The game questions will be shown in the Zoom/Google Meet window, but the answers must be entered using the controller. With the Kahoot!! app for Zoom, presenters may use play and friendly rivalry to increase participant engagement. Users may organize knowledge- and feedback-gathering pulse checks with staff members, encourage original thought with word clouds, and empower participants’ voices with surveys, open-ended questions, and other tools. Utilizing the brainstorm tool, organizations may crowdsource ideas and advance teamwork.
Engagement has emerged as a crucial component of successful learning, collaboration, and connection as the globe has increased the use of video communications in social and professional situations. Users may access, host, and play Kahoot!! games and educational information with other meeting participants using the Kahoot!! app for Zoom without ever leaving the Zoom Meeting or requiring a second device. Corporate executives may motivate their staff via speeches, meetings, and online activities. Meeting hosts will have immediate access to data and statistics from their Kahoot!! experience, allowing them to respond in real time to audience engagement with the material. Additionally, hosts may email the Kahoot!! games to all participants so they can practice and improve their scores, which will increase participant engagement and learning retention. Hosts can also distribute the Kahoot!! games as self-paced challenges with individuals who couldn’t attend in person.
Part 1: Key Features of Kahoot
What more is there to discuss, Kahoot!? Every pupil adores it. Many instructors and educators use it all around the world to make learning simple, enjoyable, and interesting. Everyone may use it since it is free and extremely simple to use. These are some of its attributes:
- Quizzes may be made in a matter of minutes.
- Develop games based on the abilities of the kids. Playing at home or in the Zoom is simple for them.
- Various templates are offered. You can choose one of them with confidence.
- Kahoot! has the ability to be organized into many folders according to topics or subjects.
- Additionally, multiple choice questions may be included by quiz makers.
- Teachers using Kahoot! may combine different questions into one format, such as quizzes, polls, riddles, and slides.
- Use Apple Schoolwork, Google Zooms, and Microsoft Teams to share student-centered tasks.
Part 2: How to Host a Kahoot! Session within a Zoom Meeting
With the Zoom app, Kahoot! may be viewed, hosted, and used. It’s amazing that Kahoot!!, one of the most well-known brands in quiz-based learning, still provides a free-to-use platform, making it very accessible to both instructors and students. It’s also a useful resource for a hybrid class that combines online and classroom instruction. Most devices will be able to use the cloud-based service using a web browser. This implies that students using computers, tablets, and cellphones in class or at home may access this. Participants in Zoom Meetings may play games and learn without having to leave the Zoom meeting or bring a second device.
Step1Sign up for Zoom ahead of time and get ready. On the other hand, launch the Kahoot! test in your web browser, then be ready to share your screen in Zoom.
Step2As the participants come, allow them in and check to see whether you and they can both hear each other. To access the Kahoot! quiz, make sure they have a device or another browser tab open.
Step3Open the Kahoot! test and share it using Zoom’s “Share Screen” feature. While your screen is shared, continue to host the Kahoot! as normal. To view participants next to your shared screen, we advise selecting Side-by-Side Mode.
Part 3: How to Participate in Kahoot! Sessions within a Zoom Meeting
With more than 40 million ready-made games available on Kahoot!!, getting started is fast and simple. When time and resources are limited, hybrid or distant learning is ideal. After linking the Kahoot! to your Zoom account, you may utilize it. Use this app and start a meeting. Go to Apps on the toolbar and choose the program you wish to use. Select Who is Hosting to locate their host or to join a Kahoot! session being hosted by a friend or another player. Players may post a question to a shared screen on the Kahoot! platform. Kahoot!! just needs an account to be made in order to use it since it is free. Most devices may be used by students to access Kahoot!! from wherever there is an internet connection. This is how:
Step1Take the time to check that Zoom, Skype, Cisco Webex, or Google Hangout are operating and that your camera, microphone, and speaker are all operational.
Step2In the right-side panel, add the Kahoot!! app to your list of apps and click Join.
Step3The lobby will reveal your game PIN when you click the Play button, allowing the computer to show you a Kahoot! You may enter the game PIN and press Enter to join the Kahoot! session once the host shows their screen with you. To participate in a Kahoot! session, you don’t need a Kahoot! account.
Part 4: How to Record Zoom Meetings
Zoom is a conference tool that enables real-time, high-quality, low-latency communication. Filmora is an excellent video recorder for that reason, enabling users to capture on-screen activity such Zoom audio tracks and video conversations. Wondershare One of the most versatile and portable Zoom voice recorders is the Filmora. Even novices may easily utilize it due to its user-friendly UI. All you have to do is click the record button after choosing the proper audio source in the settings. The all-in-one video editing program Filmora allows you to record your screen with audio, a facecam, and a green screen effect. You can record the entire screen or just a portion of it, and you can perform a number of quick edits on your video using tools like trimming, cropping, changing the audio track’s volume, and so on.
How to Use Filmora to Record Zoom Lectures
Having said that, Filmora is a great Zoom recorder that can capture games, audio, and video conversations. This video recorder may be used to make video clip lessons in addition to recording movies, video games, and webcam footage. In addition to Zoom, it can also capture internet streaming audio. Here is information on how to record Zoom meetings using this software:
Step1Download and Install Filmora on your PC
To use this program for a number of tasks, including screen recording and recording editing, you must first download and install it on your computer. To achieve this, download the recording program by clicking the link below. Launch the program as soon as the download is finished to start the installation process, and then adhere to the on-screen directions to install and make this software available for usage.
Step2Choose the Record’s Ideal Position in the Zoom
Use it on your PC at this point. As soon as you start the program, a window interface with two choices for screen recording, editing already recorded videos, and generating videos will display. Choose the Recording option from the menu. When you click the record button, the program will direct you to the recording interface, where you can easily adjust the settings for your camera and audio. To add the microphone or Zoom sound in that particular field, use the necessary buttons as described below:
Step3Press the Record Button
It goes without saying that you must test your recording tools to ensure they are functional and capturing the highest quality audio. But once you’re ready, click the record button, which will allow you 3-5 seconds before starting to record the personalized screen of your PC as seen below:
Step4Export and Save Your Zoom Recording
You may now save the Zoom video for sharing on social media after making and modifying it. The following file types may be used to save the document: MP4, WMV, AVI, MOV, GIF, and MP3. The finest feature of Wondershare Filmora is the direct export and sharing of Zoom video recordings to YouTube; the only need is that you must be signed in to your YouTube account inside the application:
Because the MOV format is only available for online movies, you may also export your Zoom recordings to MP4 if you want to publish them to your YouTube channel. You are free to choose the format that best suits your needs. You may choose the encoder from a drop-down menu in the export options.
Conclusion
With the aid of several interesting tools and programs made accessible in this virtual environment, learning has now become enjoyable. Of them is Kahoot! In Zoom. It is an application that acts as a learning tool by providing fun games, tests, and a variety of other chances. In only a few minutes, quizzes may be made and distributed. Games and quizzes may be planned using this platform quite easily. The Kahoot! with Zoom will make it simpler than ever for corporate leaders to engage and encourage their team members with Kahoot!! engaging game-based learning experiences at a time when many organizations are staying virtual or planning for a hybrid model. Head towards recording Kahoot with Filmora to experience a smooth Kahoot! usage on Zoom. Plus, you can also share the gameplay afterwards.
Step-By-Step Guide To Creating Halftone Effects In Photoshop
Halftone is a technique that uses dots to create a deliberate screen-like image and textured effect. In recent years, it has become trendy in digital design.
This effect is often used in magazines, newspapers, and other printed materials. When applied correctly, it can add depth and dimension to an image, resulting in a softer, more pleasing, and appealing look.
So, if you have ever wanted to add interesting effects and textures to your images, but weren’t sure where to start, then keep on reading to discover and learn everything you need to know regarding creating the halftone printing effect in Photoshop.
Without further ado, let’s get started!
What Are Halftone Effects?
Before we know how to create a halftone effect in Photoshop, let’s have a basic understanding of it first.
In the 19th century, William Henry Fox Talbot introduced the halftone screen printing effect to create the illusion of tones in black and white images.
The halftone originated from printers who previously only worked with cyan, magenta, yellow, and black (CMYK ). The solid colors were tiny dots placed together closely with continuous tones that remained unchanged. From the mixing and matching of these four colors, a wide range of colors emerged.
The effect is usually created by putting dots of ink on paper in different sizes and positions. This illusion uses optical bleeding to make the desired impression on the human eye. These color dots act like analog pixels that result in a recognizable image.
For instance, when you look at a pixelated picture and zoom it, you will see missing details. When you zoom out, the photo gets more minor and back to its original form.
Modern Definition and Usage
In the 21st century, the halftone is a static-visual technique applied in print and digital images to create continuous tone imagery using dots that vary in spacing and size to create a gradient effect.
Halftone produces a deliberate screen-like image distortion in different fields, such as pop art, graphic designing, and screen printing, to create nostalgic or vintage effects and make the images more captivating.
How To Use Photoshop To Create Halftone Printing Effect
Below we’ve provided detailed step-by-step guidance on creating a color halftone effect as well as black and white halftone printing effects in Photoshop:
1. How to Create Color Halftone Effect
If you want to create a color halftone effect in Photoshop, do the following steps in a sequence:
Step1 Launch the Photoshop software on your laptop/desktop, and drag and drop the image file on which you want to apply the Halftone effect.
Step2 Click “Filters” in the top toolbar and select the “Pixelate” option from the drop-down menu.
Step3 Click the “Color Halftone” option from the menu. On the new pop-up window, adjust the radius and channel to configure the appearance of the effect.

That’s about it! You have successfully created the color halftone effect in Photoshop.
2. How to Create Black and White Halftone Effect
Follow these steps to create black and white halftone printing effect:
Step1 Open your image in Adobe Photoshop and click the “Image” option from the top taskbar.
Step2 Now, click the “Mode” option from the drop-down menu and select “Greyscale” to convert your RGB image.

Step3 Again, open the image menu and click the “Mode” option. From the drop-down options, click “Bitmap…”

Step4 A dialogue box will open. Set the resolution to 1000, 1,500, or 2,000ppi to create smooth edges on your halftone. Next, click “Halftone Screen…” under the “Method” header and click “OK” to proceed further.
Now, you can adjust the frequency (Lines/Inch), angle (Degrees), and shape (Circle, Line, Cross, etc.) to determine how big your halftone dots are at the maximum diameter and their direction.
Step5 Finally, click “Files” from the top taskbar, scroll down, and select “Save As…” Save your file as PSD or TIFF and import it to InDesign to apply color.

Video Tutorial - How To Create Halftone Effect | Photoshop 2022
To help you better put the guidance into practice, we have prepared a video tutorial to deepen your understanding.
Two Concepts You Should Know In Creating Halftone Effect
Apart from the practical guidance, there are two important concepts you need to be aware of: radius and channels. Below, we’ve discussed both of them in detail to make things more understandable to you:
1. Radius
Radius refers to the size of the dots that make up the halftone image and is an important factor in determining the overall look of the photo.
You can adjust the sizes of the dots to change the gradient, spacing in between, and blur of the color and image. However, if you want a more subtle effect, you will need to use a smaller radius. For a more dramatic effect, like vintage comics, old ads, or DIY grunge zines., you will need to use a larger radius.
2. Channel
Channel refers to the number of values that are used to create the image. The more values you use, the more details will be visible.
The Channel setting of halftone effects affects how the dots are positioned and overlap. Each Channel is governed by a Screen Angle setting, which is listed in degrees. Changing the value modifies the angle at which Cyan, Magenta, Yellow, and Black dots are added to the pattern. When the dots overlap, a new color is created depending on the combination of the primary colors and black.
Conclusion
In this comprehensive guide, we’ve explored the halftone effect, how it originated and discussed its modern definition and usage. We’ve also provided step-by-step processes to help you create the halftone effect in Photoshop, both colored and black and white.
Furthermore, we discussed two important concepts (radius and channel) of the halftone screen printing effect to help you understand the technique in detail.
Hopefully, you’ve found this article helpful and can now add a new level of creativity to your images using the halftone effect in Adobe Photoshop.
Free Download For Win 7 or later(64-bit)
Free Download For macOS 10.14 or later
Also read:
- Updated 2024 Approved Facts About GIF Background You Didnt Know
- New Easily Sync Audio With Video With Filmora
- 2024 Approved Find The Best Free Canon LUTs
- Updated How to Do Perfect Match Paint 100 the Easy Way
- 2024 Approved For Converting GIF to MOV Format, You Dont Need to Search From A-Z. Here Is an Amazing Guide, that Gives You Complete Details About Both Offline and Online Gif-to-MOV Converters. Catch Them Below and Experience a Pro Editing Time
- Efficient Ways to Manage Your Timeline for 2024
- New In 2024, Text Animation Intro Tutorial in Filmora
- New This Article Discusses What Is Blender Video Editor, How to Download, Install and Use It, and Its Key Features. It Further Discusses Its Alternative for Editing Your Videos and More. Check Out Now
- Live Stream on YouTube Using Zoom
- Updated How to Time-Lapse a Video on iMovie
- Updated How To Make a Photo Collage in Microsoft Word
- 18 Video Editors Weve Tested Heres What We Learned for 2024
- New Easy Ways to Change Aspect Ratio in iMovie for 2024
- Detailed Steps to Rotate Videos in Blender for 2024
- 2024 Approved Best 10 Tools To Make Quiz Videos
- Updated 2024 Approved How to Make a Gaming Montage - Guide & Tips
- New 2024 Approved How to Create Educational Teaching Videos in An Outstanding Way?
- Updated 2024 Approved Camtasia Video Editor Review
- Updated 6 Best Methods to Make a Video Longer for 2024
- New In 2024, How to Make Split Screen Videos in Filmora
- Updated 2024 Approved KineMaster Templates 101 How to Get the Most Out of Video Templates
- Updated Ways to Make Sure Your Video Editing Course Is Worthing to Watch
- 2024 Approved Are You Tired of Spending Too Much Time on Video Editing? Learn the Most Effective Ways to Manage Your Timeline and Streamline Your Video Editing Process
- In 2024, Before & After Editing Trick - Filmora
- New Guide To Creating the Best Video Collages for 2024
- 2024 Approved Convert Time-Lapse to Normal Video
- Updated Best 5 PDF to GIF Converters You Should Know
- Discover Vintage LUTs Premiere Pro Free and Paid Options Available
- New In 2024, How to Combine Several Xvid Files Into One Windows, Mac,Android, iPhone & Online
- Updated In 2024, How to Speed Up Pictures on TikTok Slideshow
- 2024 Approved How to Edit Facebook Video Ads for E-Commerce Business
- Easy Guide to Overlay Videos in Premiere Pro
- 2024 Approved Recording Videos with Your Smartphones Is Fun and Fantastic. But Did You Know that Recording in Slo-Mo Has Become a Trend Nowadays? Read More to Learn About How to Convert Videos to Slow Motion Here
- Best 12 AI Video Generators to Pick
- New Easy Steps to Loop YouTube Videos on iPhone for 2024
- 2024 Approved Wondering How to Replace Sky in After Effects? Learn How
- Updated In 2024, Voice Changer for Discord | Use Voicemod on Discord
- Updated Do You Know How Boring a Video Can Be with Silent Moments? Some Tools with Silent Detection Features Help You Delete Those Moments
- New The Most Complete Guide to Make Fortnite Montage for 2024
- Updated In 2024, Full Guide to Discord Boost
- Updated In 2024, How to Concatenate Videos Using FFmpeg
- Updated Best AR Video App - Top 10 Picks
- Updated The Easiest Way to Make Time-Lapse Videos. Yes, You Can Make a Time-Lapse Video with Your Phone. It Powers a Very Simple and Easy Way to Make Time-Lapse Videos
- How to get the dragon scale and evolution-enabled pokemon On Apple iPhone 15 Pro Max? | Dr.fone
- In 2024, 3 Facts You Need to Know about Screen Mirroring Xiaomi Redmi Note 12T Pro | Dr.fone
- Here are Some Pro Tips for Pokemon Go PvP Battles On Apple iPhone SE | Dr.fone
- Does MP4 play on Motorola ?
- In 2024, Is GSM Flasher ADB Legit? Full Review To Bypass Your Xiaomi Redmi Note 12 Pro+ 5GFRP Lock
- How to Fake Snapchat Location without Jailbreak On Xiaomi Civi 3 | Dr.fone
- How To Remove Screen Lock PIN On Vivo Y100 Like A Pro 5 Easy Ways
- Still Using Pattern Locks with Itel P40+? Tips, Tricks and Helpful Advice
- Proven Ways to Fix There Was A Problem Parsing the Package on Oppo Reno 10 Pro+ 5G | Dr.fone
- In 2024, How to Cast Itel A60s Screen to PC Using WiFi | Dr.fone
- In 2024, 3 Methods to Mirror Tecno Spark 10C to Roku | Dr.fone
- In 2024, 5 Ways to Move Contacts From Realme 12 5G to iPhone (13/14/15) | Dr.fone
- A Working Guide For Pachirisu Pokemon Go Map On Apple iPhone SE | Dr.fone
- Why Is My Sony Xperia 10 V Offline? Troubleshooting Guide | Dr.fone
- Updated In 2024, Adobe Rigger Is AWESOME
- Title: New In 2024, Making Slow Motion Videos in Premiere Pro A Review on The Best Methods
- Author: Chloe
- Created at : 2024-04-24 07:08:37
- Updated at : 2024-04-25 07:08:37
- Link: https://ai-editing-video.techidaily.com/new-in-2024-making-slow-motion-videos-in-premiere-pro-a-review-on-the-best-methods/
- License: This work is licensed under CC BY-NC-SA 4.0.
