
New In 2024, MP3 Cutter Download for Computer and Mobile
MP3 Cutter Download for Computer and Mobile
MP3 cutter download is one of the most reliable tools for editing of music files in a fast and friendly way. MP3 cutter free download at the same time supports merging and cutting audio files like WAV, ACC, MP3 AC3, OPUS, OGG, among others. Cutter MP3 free download application is designed in a way to make editing of music so enjoyable, easy and fun. The application is usually free, it supports the split of large music files into shorter ones, the app can also be used to split a whole album to receive the original tracks without. MP3 cutter download is also used to support trimming by silent detection.
MP3 Cutter download is a free app for Android users available in the Audio File Players line of apps, part of Audio & Multimedia. The company that develops MP3 Cutter is called accountlab. The most current version released by the developer is 1.0. To upload MP3 Cutter on your Android operating system device, just click on the green Continue To App button to begin the installation process of this MP3 cutter application. The MP3 cutter download app has been listed on their website since 2021-10-21 and has had 1639 downloads. The app is made in such a way that it pre-checks a files safety before the download. Though for personal protection reasons, its recommended that one should scan the downloaded app using an antivirus before using the app. In some instances, there is a possibility of your antivirus detecting the MP3 cutter as malware, there is a contact page where one can connect to customer care for help.
1. MP3 Cutter Download for Windows
MP3 Cutter is a Windows desktop application that enables the user to cut and split a large MP3 or video to tiny audio pieces. While using the MP3 Cutter download for windows, you are capable of cutting and splitting a number of formats besides the MP3 like WAV, AMR, WMA, WMV, MPG4, AVI, MP4, 3GP, FLAC WMV, MOV and many more formats audio and video formats. The layout of bits generated from the audio data is called the audio coding format. A format can be compressed or depressed using an MP3 cutter for windows or any other right program. In some cases, the data can be a raw bit-stream in the audio coding format. However, it’s normally embedded in an audio data format with a specified storage layer. If you intend to cut such a file, you should do so without messing up the quality of the entire file. That’s exactly what MP3 Cutter download for windows does.
There are several reasons where someone would want to cut an MP3 file or a video file. For example, you may be having some nice audio tune or a video track that you may like to have as a ringtone, using an MP3 cutter for windows will enable you to extract the part you like most. The cut tune can be used for your morning alarm, SMS notification or ringtone. You can also use the cut a MP3 file for fixing files or broken and damaged songs. For example, you may have recorded a song from the radio then you realize there is a part that was not clearly captured or an information you don’t want, you’ll use MP3 cutter download to reorganize the music. Cutter download for MP3 allows you to manipulate your audio files without the degradation in their quality.
How to use Free MP3 Cutter Joiner
Step 1: Addition of a File
On the app’s interface, click the “Add “ button to enable you to import files. The chosen file will play automatically.
Step 2: Setting of a Start Point and End Point
By left clicking to drag the red line to quickly locate, then click on the button to set start point and end point
Tip: You can use the format hh:mm:ss.fff to directly input start point and end point in the blank edit control.
Step 3: Start Cuttting
You will simply click on the ‘CUT’ button to start cutting the file needed.
How to Join MP3 with Using Free MP3 Cutter Joiner
Step 1: Add File
You will be asked to click “Add “ button so as to enable you to import multi files.
Step 2: Click “Setting” button to set audio quality, channels, sample rate
Step 3: Start Join
Go to the button written join and click “Join” button to start the joining process.
2. MP3 Cutter Download for Android
MP3 Cutter download for Android is meant to help you to easily mix music, trim music, merge music and preciously clip out the wanted part of music and set it as a unique ringtone for every on the android device. Cutter MP3 download for android can be applied in the customization of your own alarm tone and other notifications. It also supports bitrate & volume adjustment to create the highest quality melody for you. Steps to follow while using MP3 Cutter Download for Android:
1. Make a choice of the music clip you want to cut from your phone/ SD card
2. Secondly make a selection of the length of music that you want to cut or trim
3. Edit and tag for the clip(Title, Format, Bitrate, Volume etc)
4. And lastly save as the cut music as a ringtone/Alarm/Notification or Share as desired
3. MP3 Cutter Download for iPhone
Are you looking for an app to make a ringtone on your iPhone device? MP3 cutter for iPhone is the best choice for you to make personalized ringtones, it supports aiff, m4a, mp3 and wav formats. A user can use this app to edit a recorded and it also supports trimming. Free MP3 cutter download for iPhone supports mp3, wav, aiff, m4a and other types of music formats. Mp3 download for iPhone is also referred to as music editor, ringtone cutter, alarm tone maker or notification tone creator in other instances.
MP3 download cutter for Iphone is the best application for cutting music. The cut mp3, m4a, and ringtone application will help you cut that favorite part of an audio tune or a music file. You can use the cut music as ringtone, notification tone or a music song and alarm tone. The cut pieces can be shared with friendly since the cut results are easily manageable.
Instead of buying or endlessly searching the web for a ringtone, you can rather easily make the desired ringtone yourself using the files already stored in your phone even those audios from a video. Our Online MP3 Cutter download for iPhone allows making custom ringtones from your favorite song, voice memo or video, it can then be exported in several formats. It can be used on iPhone and Android phones, Windows or Mac computers.
Below are the steps to follow while using an audio cutter for iPhone.
Step 1: Selecting a file
Open MP3 Cutter download for iPhone tool first. Then select the file you want to work with by clicking on “Choose file”. If you want to select it from Dropbox or Google Drive account where the file exists, tap on the small arrow.
If using a computer, you will just need to drag and drop the file onto the page.
Once you have selected your file, a progress bar will appear to show you the status of the upload. The speed of the upload will definitely depend on the file size or the available internet speed. It will be slower if the file is large or if the internet speed is slow.
Step 2: Editing the audio
As the representation of the audio bar appears, you can slide it to the left or to the right to choose the exact location to start cutting and where to end the ringtone clip. There is an additional feature that allows you to enter time stamps manually. The application also gives you an option of checking if you want to add a “Fade in” or “Fade out” effects.
When you are through with cropping the audio, you can decide on what file format to export. The app supports popular audio codecs such as MP3, AIFF, OGG and WAV. An Android device is capable of accepting a varied number of sound formats, but while exporting a file format, it is advisable to stick to OGG or MP3 formats.
After selecting the desired option, select “Cut” at the right bottom of the page.
Step 3: Preview and download your ringtone
The speed of processing an audio will be directly affected by the file size and the internet speed. After you shall have successfully completed the download, you can press on play button to preview or hear the audio file.
The completed file can be saved in downloads or it can alternatively be added to the Dropbox or sent to Google drive.
If you need tweaking or wants to edit a piece of audio, you’ll get back to the tool.
4. MP3 Cutter for Mac
Whether you are running a podcast or you are a musician who aspires to share audio files through Spotify, SoundCloud, YouTube, or any other platform and or a smartphone app, you need to do some editing to your MP3 files before the final product is ready. Having access to a reliable and feature-rich MP3 cutter for Mac enables you to edit the audio file in a manner that helps you in delivering the exceptional listening experience your audience expects.
It is the reason why it is important to wisely pick your MP3 cutter wisely while considering a variety of other factors. Some of these factors are reliability, cost, performance and ease of use.
Wondershare Filmora
It is feature-rich audio as well as a video editor that allows beginners to edit their audio and video files quickly and easily. It has been specially designed for audio editing amateurs with a simple and user-friendly layout that ensures there is an easy learning curve. With the help of Filmora, you can record your music and voice using a built-in feature and also use it to trim, merge, split, and cut your MP3 files.
Apart from that, you can also make necessary adjustments to volume, pitch, and speed ensuring that your audio has the clarity you need. You can use Filmora for personal use as well to create customized ringtones by cutting songs and add special sound effects to your presentation.
For Win 7 or later (64-bit)
For macOS 10.12 or later
Import audio file to Filmora. You can also import a video and then detach the MP3 file from it.

Right click on the audio and you’ll see a list out editing options, such as cut, reverse, speed change etc.
For macOS 10.12 or later
Import audio file to Filmora. You can also import a video and then detach the MP3 file from it.
Right click on the audio and you’ll see a list out editing options, such as cut, reverse, speed change etc.
For macOS 10.12 or later
Import audio file to Filmora. You can also import a video and then detach the MP3 file from it.
Right click on the audio and you’ll see a list out editing options, such as cut, reverse, speed change etc.
For macOS 10.12 or later
Import audio file to Filmora. You can also import a video and then detach the MP3 file from it.
Right click on the audio and you’ll see a list out editing options, such as cut, reverse, speed change etc.
Something About Skin Care Vlog Ideas
One of the best kinds of video ideas for all the beauty gurus that they can make and upload on their YouTube Channel is the Skin Care. Reviewing products such as cosmetics, skin care and hair care products or any kind of lifestyle grooming products can be really beneficial for your viewers. Product advertisement is all over there and people are really confused and they wonder whether it is worthy enough or not if it is effective or not. That is when they take the help of internet and video to find their answer.
In this Article I’ll share to you some of the Skin Care vlog ideas for you to start doing a skin care review on your YouTube channel. But before that I’ll share with you how important is skin care?
1. How Important is Skin Care?
Good skin care is important for the following reasons: It helps your skin stay in good condition
You’re shedding skin cells throughout the day, so it’s important to keep your skin glowing and in good condition. A skin care routine is not just to help you look good, it’s essential for your skin’s health
That is why most people now a days are looking for a video or a vlog about skin care.
Here are some ideas to make for Skin Care Vlogs
- Daily Skin Care Routine Vlogs
- Skin Care Product Reviewing Vlogs
- Skin Care Unboxing Vlogs
- Empty Skin Care Vlogs
- Skin Care recommendation Vlogs
2. Daily Skin Care Routine Vlogs
This vlog can give your viewers an information on what skin care you use daily. Here you can share how you use it step by step and you can also share what products you are using for them to have an idea.
This may share to your viewers how important a daily skin care to their skin because an effective skin care may help prevent acne, treat wrinkles and help keep skin looking best.
The goal of sharing your skin care routine is to inform your viewer or subscriber the importance of taking care of your skin daily and also the good product you may use.

Daily Skin Care Routine Vlogs
3. Skin Care Product Review Vlogs
This vlog will give your viewers more knowledge about the products.
Now a days most people get all the information they want in watching YouTube videos. People often watch skin care reviews on YouTube first before they decide to buy. So, you must clearly provide a correct and honest information about the product. In reviewing a product especially skin care, you need to help the viewers understand all the information contained in the products, you must be very specific when you explaining.

Skin Care Product Review Vlogs
4. Skin Care Unboxing Vlogs
For those unfamiliar with the format, unboxing videos are when YouTubers share the unpacking of a special products. Unboxing videos are one of several formats native to YouTube that have grown up along with the YouTube generation. People wanted to share their enthusiasm for their new purchases such as beauty products or skin care products. Influencer or content creator unpacks new consumer products on camera while discussing the respective product’s features, branding, packaging, and other relevant details.
From this Vlog your viewers will have an idea what products look like or what brand of products they will buy.
5. Empty Skin Care Vlogs
I have personally watch other content creator doing this kind of vlog and for me it helps viewers to know more about beauty guru favorites skin care or their thoughts after using this kind of products.
In this vlog you will share to your audience why did you run out of products? how is the product to you, your experience while using the products, is it worth it for them to buy and if given a chance will you buy this product again? Because it is also important for them to know if the products are ok with your skin, especially sometimes the brand owner is watching the vlogs for them to have an idea about your thoughts of their products.
6. Skin Care Recommendation Vlogs
As a skin care vlogger, I often make this kind of vlog, I really enjoy doing this vlog specially when the products are effective to me, I really excited to share this information to my viewers.
Here in this vlog, you can show or recommend products that have been effective for you. Just explain in every detail how you used it and why it was effective for you. Also don’t forget your proofs of using the products, specially show them the before and after photos.

Skin Care Recommendation Vlogs
7. Choosing a Video Editing Software for You
If you’re looking for editor software that can help your skin care vlogs stand out from your competition Wondershare Filmora is one the easy-to-use editing software, a beginner in video editing can easily create a stunning and creative video.
Wondershare Filmora Video Editor has action camera tools that can fix any problem with camera, share and add effects like slow motion and reverse. These tools can really help with product review vlogs especially when doing skin care reviews.
Free Download For Win 7 or later(64-bit)
Free Download For macOS 10.14 or later

Choosing a Video Editing Software for You
It allows noise cancellation in the background of your audio so that your viewers can better understand what you are saying about the products. Doing a skin care product review is in need a clear audio because viewers focus on what your thoughts or opinion about the product for them to have some ideas.

Doing A Skin Care Product Review
Filmora has the ability to blur video, which you can use especially when you display products in the viewer, you need to blur the background to focus on the products you are showing.

Focus On The Products You Are Showing
Filmora provide the user an extraordinary feature to edit and export videos up to a resolution of 4k.
Wrap Up
- When doing any skin care vlogs, don’t forget to advice your viewers to always do a skin test before using new products, because maybe this product is effective for me and not for you, so make it a habit to do a skin test first.
- Hope this skin care vlog ideas will help you to start your own skin care vlogs or to have an idea what content you may do to start a vlogging career.
Free Download For macOS 10.14 or later
Choosing a Video Editing Software for You
It allows noise cancellation in the background of your audio so that your viewers can better understand what you are saying about the products. Doing a skin care product review is in need a clear audio because viewers focus on what your thoughts or opinion about the product for them to have some ideas.
Doing A Skin Care Product Review
Filmora has the ability to blur video, which you can use especially when you display products in the viewer, you need to blur the background to focus on the products you are showing.
Focus On The Products You Are Showing
Filmora provide the user an extraordinary feature to edit and export videos up to a resolution of 4k.
Wrap Up
- When doing any skin care vlogs, don’t forget to advice your viewers to always do a skin test before using new products, because maybe this product is effective for me and not for you, so make it a habit to do a skin test first.
- Hope this skin care vlog ideas will help you to start your own skin care vlogs or to have an idea what content you may do to start a vlogging career.
How To Change Text Color In Premiere Pro
Being a Premiere Pro user, you might encounter the situation when a friend or family needs to know how to change text color in premiere. They simply need to clean up the video and put some text to it. Although adding text to Premiere Pro is quite easy, how to change the color of text in premiere pro? We’ll demonstrate how to do it using Adobe Premiere Pro. Also, we’ll examine how to alter the color of basic template components and assets. So, let’s find out the tricks.
In order to know how to change text color in premiere, you need to have a grip on the PR usage, however, if you lack that, here, we will add some lovely colors to the text in order to make it creative, As altering the text’s color is simple and entertaining, many Premiere Pro templates lack an integrated feature that makes it simple to alter an element’s color. For this purpose, we will also discuss how to adjust colors in Premiere Pro in this guide.
Part 1. How to Change Text Color in PR
Read this step-by-step guide to learn how to change color in Premiere Pro if you’ve ever been unsure of how to accomplish it. You may rapidly alter the color of any item in the frame by following the instructions below.
Step1Add the Text
Go to Window > Essential Graphics to add text. To input your text, use the Text Tool (T). This will be one of the layers in your project for text effects. To access its attributes, pick the Text layer on the Edit tab.
Step2Customize the Text
Locate the “change to color” command in the Effects panel (Shift+7). Drag the matching effect on your video when you see its name in the search window. Open the Effect Controls panel after that.

Step3Decide on the new color that you want
To sample the color you want to modify, go to the Change to Color section and choose the From eyedropper option. so that you may be sure to choose the optimal color average. The color will be adjusted to red by default. Once you are happy with the outcome, tweak Softness and Tolerance (Hue) settings as necessary.

Step4Export the Masterpiece
In Adobe Premiere, this is among the easiest methods for altering an object’s or background’s color. It will make it simpler to modify the color of the frame and enable you to build a beginning animation keyframe. Lastly, hit the Export button to save the project in PR as shown below:

Part 2. Alternative Way to Change Text Color
Learning how to change the color of text in premiere pro is a hard nut to crack. As Premiere Pro offers plethora of color correction tools that can help you transform your Premiere Pro text, yet doing so requires expert knowledge. In order to bring you an easy solution to that dilemma, in comparison, Filmora is a simple option to start with, particularly if you’re a beginner. You may use a text effect to make a video appear within the letters of your text for a unique look. Remember the Marvel Studios animation where you could see the movie scenes within the letters at the start of every Marvel movie?
Since the introduction of outstanding tool like Filmora, creating content has become fun and easy. It is now every content creator’s desire. Balance your tones, colors, and tints, however. It must be subtle enough to have an impact without being overt or too light. By selecting the fill tab, you may modify the text’s color to any shade you like.
Steps to Change Text Color in Filmora
Step1Launch Filmora
Open the application, then add your video to Premiere Pro. After that, just drag your movie into the timeline you want to fix the color of. Be sure to finish all editing tasks before starting your color correcting procedure.

Step2Add Effects on Text
You may apply the same color changes to many video segments by creating a new adjustment layer. When you need to apply the same effects to many clips, it saves time. Check the impact on each clip, however, since they can be too little or too much in some.

Step3Lighten up the Text with Colors
Investigate the filters to give your video more life. For more subtly striking effects, return to Adjust and make color grading tweaks. To bring out the features that have been hidden by background objects and lingering shadows, use the Adjust tool and move the Highlights slider. To get rid of the boring washed-out impression in the video, increase the contrast of the highlights.

Step4Share the Content
Select Export from the menu in the top right corner of the screen. Pick the proper video settings from the drop-down option. To relocate the issue-free product to your selected spot within your PC, customize the options from the Media library of software interface, as shown below.
Part 3. Related FAQs
1. How to change font in Premiere Pro?
The text layer that has to be changed should be chosen. By choosing Windows and then Essential Graphics, the Essential Graphics panel will be shown. To change the font to a style that is more appropriate for your project, use the drop-down menu under Text. You currently have a text layer over your video. From this point, you may precisely design your text layer.
2. What is the shortcut to change font color?
After selecting the proper Text tool, highlight the text you want to edit by putting the mouse over it, then clicking and dragging. You may input the new text while the highlighted text is highlighted. As you enter, the chosen text is replaced with the newly added content. To set the insertion point, click. Select the character or characters you wish to alter after that. Enter the desired text color.
3. How to add text effects in PR?
In the Effects & Presets tab, look for and search for text presets. Adobe Search may be used to browse animation presets. To apply a preset, drag & drop it from the Effects and Presets panel onto a text layer. Drag a visual effect onto a clip in a sequence to apply it. Additionally, you may choose only one clip from your sequence to see and modify its effect controls in the Effect Controls window.
The Bottom Line
Hopefully this guide would have answered the concern of how to change text color in Premiere. You may now do the assignment with ease by using these basic approaches. Further, with the help of this how to change text color in Adobe Premiere article, it’s simple to switch the colors of your texts as there’s an alternative and perhaps, the easiest solution namely Filmora available to do the task hassle-free. Let us know if you too find it a handy solution in contrast with Premiere Pro.
Free Download For Win 7 or later(64-bit)
Free Download For macOS 10.14 or later
Free Download For macOS 10.14 or later
How to Get Zoom on TV [Easy Solutions]
The modern workforce needs adaptable alternatives to the conventional room-to-room conferencing. The latest integrated online collaboration platform is called Zoom. What’s more, now you can get Zoom on TV. Being one of the most well-known conferencing programs, it offers reliable and efficient hosting of online meetings. In a same vein, you may set up conference rooms, do video seminars, and use instant messaging to receive real-time communications. Moreover, can you get zoom on your tv? Then the answer is Yes! The ideal technique to expand a small conference is to mirror it on TV using Zoom meetings. Additionally, sharing across all platforms and devices is possible. Sharing HD video, audio, and material from your desktop and mobile devices to conference rooms and phone systems is simple, dependable, and safe with Zoom Meetings.
Zoom is one of the top videos calling applications available, however, in terms of functionality, dependability, and stability. Special features include screen sharing for multi-user annotation and local and cloud recording with transcription. With just a single click, you may share any file with supported and encrypted settings for increased security and communicate across all platforms. Zoom has now come to represent meetings for those who do their business remotely. For almost all platforms, including Android, iOS, macOS, Windows, Smart TVs, etc., the Zoom app is officially accessible. For the query how to get zoom on portal tv? you may activate Zoom screen casting whether you’re using a Windows 10 or a Mac laptop with the Chrome browser. This section will be useful to you if you want to benefit from Zoom on a TV. You may thus do so. Continue reading the article to learn more about how to get zoom on tv.
Part 1: Get Zoom on TV with HDMI Cable
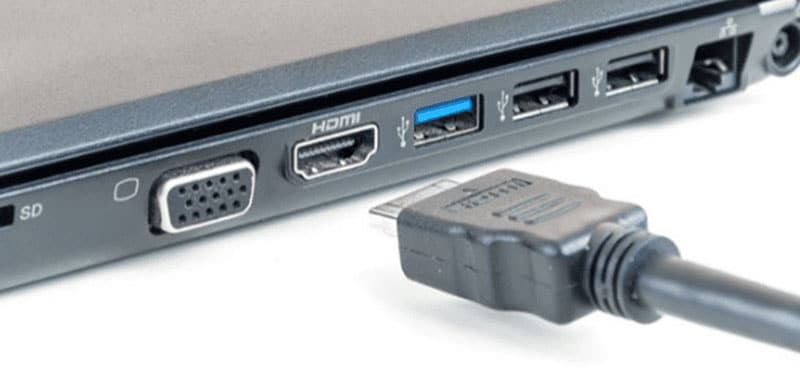
Although Zoom provides companies and bigger organizations with a professional solution like Zoom Rooms, if you’re at home, you don’t need to put anything on your TV to use Zoom. You may start using Zoom right away by simply connecting your Zoom device to your TV. Connect your TV to your laptop’s HDMI port if it has one. Simple as that, however if the laptop doesn’t figure it out on its own you may need to explain what is going on with the second display. Although more reliable, connecting via cable means your source device is linked to the TV and you can’t go for a stroll. It also means you don’t have to worry about the wireless connection fading.
Steps to Get Zoom on TV with HDMI
Step1Connect the HDMI End to the TV and the Other End to Your Device
You may use this in its place if you don’t have an HDMI but do have a USB-C port. To connect to the HDMI cable coming into your TV, you’ll need a dongle, but you’ll need to make sure it’s compatible.
Step2Turn On your TV
Turn on your TV, then switch the video source to the HDMI port you just connected in your device to using the TV remote.
Step3Launch Zoom Meeting
Start or join a meeting by using the Zoom app on your smartphone (available for Android, iOS, Windows, and macOS).
Part 2: Use AirPlay to Connect Zoom to TV
Using AirPlay mirroring, MacOS or iOS devices may share content with Zoom rooms. On MacOS and iOS, Airplay is used to communicate between the Zoom client and the Zoom room. There may be a great potential for your own business requirements if you can figure out how to utilize Airplay to Zoom mirror your screen to your Apple TV. By default, AirPlay sends audio to the Apple TV. Depending on how loud your speakers are set to play and where your input device’s microphone is located, this may cause echoing and ever-louder feedback loops. Without further ado, let’s look at some of the important strategies you may use to maximize live screen streaming on your Apple TV device.
Steps to Use AirPlay to Connect Zoom to TV
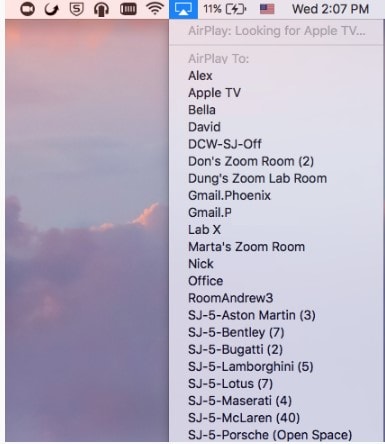
Step1Navigate to the Airplay Display in the Apple menu’s top right corner. Choose your Apple TV from the list of AirPlay Display options in the Displays preference pane. The “Show mirroring option in the menu bar when available” checkbox makes it easier to reach the AirPlay menu.

Step2Select Room Management > Zoom Rooms after logging into the Zoom online interface to manage your current Zoom Rooms. Then, modify the account settings and turn on Apple screen mirroring using the location hierarchy system.
Step3Turn on Apple Screen Mirroring by going to the Meetings tab. If this happens, you may need to activate it from the verification dialog box; otherwise, screen mirroring ought to start immediately on your device and let you see Zoom on your Apple TV. A shared password will be required of you.
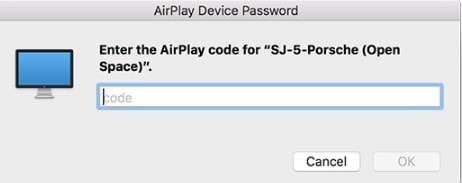
Step4Enter the passcode that is shown on the Zoom room’s screen. You may start using Airplay on your smartphone after enabling Apple screen mirroring.

Step5After that, turn off AirPlay Display by using the option in the preference pane or the system menu bar. To stop sharing, click Disconnect Airplay.
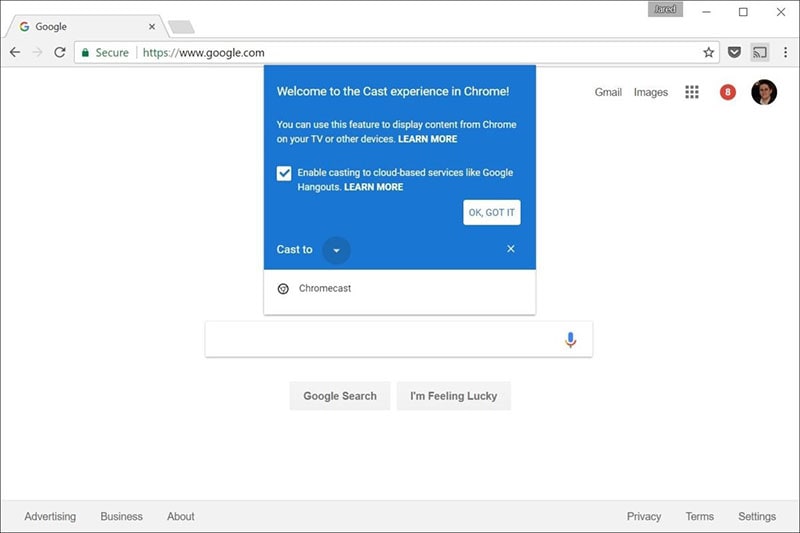
Part 3: Mirror Screen with Chromecast
The Chromecast gadgets from Google are well constructed. They should be able to cast more than just standard streaming services to your TV, logically speaking. Using a Chromecast device is one of the simplest methods to cast a Zoom conference to your TV. They are affordable, and any Google browser and the Google Home app for your Android or iOS smartphone both contain the cast capability. Between a device, such as your phone or computer, and the television, Chromecast offers the perfect connection. Chromecast makes it easy to cast Zoom meetings, particularly conferences with many of participants, since it can virtually reflect everything on your phone, tablet, or computer screen to your TV. For meetings with bigger attendance, it is advantageous to be able to cast Zoom meetings to almost any device, even a smart TV, using Chromecast.
Steps to Mirror Screen with Chromecast
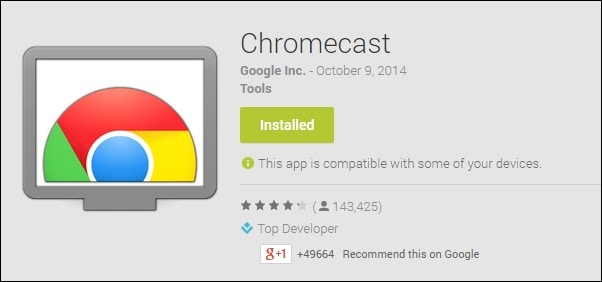
Step1Install the Chromecast
Connect your Google Chromecast to the same internet source as your casting device by plugging it in.
Step2Manage Cast Settings
Locate the casting option on your device and search for recipients. Get the Zoom Cloud Meetings app for iOS or Android. You’ll also need to download the third-party software if you use an iPad or iPhone. After that, sign up for a Zoom account and log in to get started.
Step3Start Mirroring Zoom
The screen of your phone will show up on your TV when you tap your Chromecast. The best view is obtained by turning your phone into landscape after opening Zoom as usual. Once you place a call from here, the video will cast to your TV. Go to the next screen and click Start Broadcasting. You may now start casting to your Chromecast device by opening the Zoom Cloud Meeting app.
You must download the third-party app if you use an iPhone or iPad. The Chromecast Streamer software will let you cast a Zoom meeting on your Chromecast device as Zoom doesn’t provide a casting option.
Conclusion
Zoom’s popularity has skyrocketed as a result of the Pandemic. Zoom has emerged as the preferred video conferencing solution as the bulk of the global workforce shifts to a “work from home” environment. Now that more individuals than ever before work from home, video conferencing has emerged as a vital tool for marketing and corporate communication. Mirroring Zoom meetings to TV has never been this simple. In light of this, we hope that this guide has helped you come up with some of the greatest ideas and approaches for your personal zoom sharing needs. We really hope that this information has been helpful to you if you’ve been interested in learning more about screen sharing your Zoom to TV. Thanks to these methods, you can now mirror any device platform on TV.
The modern workforce needs adaptable alternatives to the conventional room-to-room conferencing. The latest integrated online collaboration platform is called Zoom. What’s more, now you can get Zoom on TV. Being one of the most well-known conferencing programs, it offers reliable and efficient hosting of online meetings. In a same vein, you may set up conference rooms, do video seminars, and use instant messaging to receive real-time communications. Moreover, can you get zoom on your tv? Then the answer is Yes! The ideal technique to expand a small conference is to mirror it on TV using Zoom meetings. Additionally, sharing across all platforms and devices is possible. Sharing HD video, audio, and material from your desktop and mobile devices to conference rooms and phone systems is simple, dependable, and safe with Zoom Meetings.
Zoom is one of the top videos calling applications available, however, in terms of functionality, dependability, and stability. Special features include screen sharing for multi-user annotation and local and cloud recording with transcription. With just a single click, you may share any file with supported and encrypted settings for increased security and communicate across all platforms. Zoom has now come to represent meetings for those who do their business remotely. For almost all platforms, including Android, iOS, macOS, Windows, Smart TVs, etc., the Zoom app is officially accessible. For the query how to get zoom on portal tv? you may activate Zoom screen casting whether you’re using a Windows 10 or a Mac laptop with the Chrome browser. This section will be useful to you if you want to benefit from Zoom on a TV. You may thus do so. Continue reading the article to learn more about how to get zoom on tv.
Part 1: Get Zoom on TV with HDMI Cable
Although Zoom provides companies and bigger organizations with a professional solution like Zoom Rooms, if you’re at home, you don’t need to put anything on your TV to use Zoom. You may start using Zoom right away by simply connecting your Zoom device to your TV. Connect your TV to your laptop’s HDMI port if it has one. Simple as that, however if the laptop doesn’t figure it out on its own you may need to explain what is going on with the second display. Although more reliable, connecting via cable means your source device is linked to the TV and you can’t go for a stroll. It also means you don’t have to worry about the wireless connection fading.
Steps to Get Zoom on TV with HDMI
Step1Connect the HDMI End to the TV and the Other End to Your Device
You may use this in its place if you don’t have an HDMI but do have a USB-C port. To connect to the HDMI cable coming into your TV, you’ll need a dongle, but you’ll need to make sure it’s compatible.
Step2Turn On your TV
Turn on your TV, then switch the video source to the HDMI port you just connected in your device to using the TV remote.
Step3Launch Zoom Meeting
Start or join a meeting by using the Zoom app on your smartphone (available for Android, iOS, Windows, and macOS).
Part 2: Use AirPlay to Connect Zoom to TV
Using AirPlay mirroring, MacOS or iOS devices may share content with Zoom rooms. On MacOS and iOS, Airplay is used to communicate between the Zoom client and the Zoom room. There may be a great potential for your own business requirements if you can figure out how to utilize Airplay to Zoom mirror your screen to your Apple TV. By default, AirPlay sends audio to the Apple TV. Depending on how loud your speakers are set to play and where your input device’s microphone is located, this may cause echoing and ever-louder feedback loops. Without further ado, let’s look at some of the important strategies you may use to maximize live screen streaming on your Apple TV device.
Steps to Use AirPlay to Connect Zoom to TV
Step1Navigate to the Airplay Display in the Apple menu’s top right corner. Choose your Apple TV from the list of AirPlay Display options in the Displays preference pane. The “Show mirroring option in the menu bar when available” checkbox makes it easier to reach the AirPlay menu.
Step2Select Room Management > Zoom Rooms after logging into the Zoom online interface to manage your current Zoom Rooms. Then, modify the account settings and turn on Apple screen mirroring using the location hierarchy system.
Step3Turn on Apple Screen Mirroring by going to the Meetings tab. If this happens, you may need to activate it from the verification dialog box; otherwise, screen mirroring ought to start immediately on your device and let you see Zoom on your Apple TV. A shared password will be required of you.
Step4Enter the passcode that is shown on the Zoom room’s screen. You may start using Airplay on your smartphone after enabling Apple screen mirroring.
Step5After that, turn off AirPlay Display by using the option in the preference pane or the system menu bar. To stop sharing, click Disconnect Airplay.
Part 3: Mirror Screen with Chromecast
The Chromecast gadgets from Google are well constructed. They should be able to cast more than just standard streaming services to your TV, logically speaking. Using a Chromecast device is one of the simplest methods to cast a Zoom conference to your TV. They are affordable, and any Google browser and the Google Home app for your Android or iOS smartphone both contain the cast capability. Between a device, such as your phone or computer, and the television, Chromecast offers the perfect connection. Chromecast makes it easy to cast Zoom meetings, particularly conferences with many of participants, since it can virtually reflect everything on your phone, tablet, or computer screen to your TV. For meetings with bigger attendance, it is advantageous to be able to cast Zoom meetings to almost any device, even a smart TV, using Chromecast.
Steps to Mirror Screen with Chromecast
Step1Install the Chromecast
Connect your Google Chromecast to the same internet source as your casting device by plugging it in.
Step2Manage Cast Settings
Locate the casting option on your device and search for recipients. Get the Zoom Cloud Meetings app for iOS or Android. You’ll also need to download the third-party software if you use an iPad or iPhone. After that, sign up for a Zoom account and log in to get started.
Step3Start Mirroring Zoom
The screen of your phone will show up on your TV when you tap your Chromecast. The best view is obtained by turning your phone into landscape after opening Zoom as usual. Once you place a call from here, the video will cast to your TV. Go to the next screen and click Start Broadcasting. You may now start casting to your Chromecast device by opening the Zoom Cloud Meeting app.
You must download the third-party app if you use an iPhone or iPad. The Chromecast Streamer software will let you cast a Zoom meeting on your Chromecast device as Zoom doesn’t provide a casting option.
Conclusion
Zoom’s popularity has skyrocketed as a result of the Pandemic. Zoom has emerged as the preferred video conferencing solution as the bulk of the global workforce shifts to a “work from home” environment. Now that more individuals than ever before work from home, video conferencing has emerged as a vital tool for marketing and corporate communication. Mirroring Zoom meetings to TV has never been this simple. In light of this, we hope that this guide has helped you come up with some of the greatest ideas and approaches for your personal zoom sharing needs. We really hope that this information has been helpful to you if you’ve been interested in learning more about screen sharing your Zoom to TV. Thanks to these methods, you can now mirror any device platform on TV.
Also read:
- [New] Essential Oculus Rift Adventures for Gamers for 2024
- 5 Ways to Reset Oppo Reno 8T 5G Without Volume Buttons | Dr.fone
- Best SEO Service Providers in Hamburg, Germany - Top Recommendations & Expert Tips
- Best Ways to Blur Zoom Background for Free for 2024
- Easy Ways to Remove Motion Blur In Photoshop for 2024
- How to Remove Background From a Video in Premier Pro for 2024
- How to restore wiped music on Smart 7 HD
- How to Set Up Twitch Green Screen
- How to Upload Videos to Twitch? Heres a Guide for Beginner
- In 2024, Do You Want to Create a Motion Blur Effect in Your Videos? Read This Well-Described Guide to Learn How to Add Motion Blur on CapCut on iPhone and Android Devices
- In 2024, How to Upload Videos to Twitch? Heres a Guide for Beginner
- In 2024, Learn to Create Custom Sequence Presets in Premiere Pro for Efficient Video Editing. Ensure Consistency and Speed up Your Workflow with Personalized Settings
- In 2024, Optimizing Video Meetings with Tighter Focus Areas
- In 2024, Premium Hardware Hunt Cards for 4K Editors
- Minimize Memory Load: Best Lighter Browsing Apps Reviewed
- Next Week's iPhone Upgrade? Discover the Latest Anker Charger & Accessory Line - Expert Tips
- Top 10 Gratuitous Video Chats with Desktop Viewing for 2024
- Title: New In 2024, MP3 Cutter Download for Computer and Mobile
- Author: Chloe
- Created at : 2025-03-02 19:05:35
- Updated at : 2025-03-03 17:03:46
- Link: https://ai-editing-video.techidaily.com/new-in-2024-mp3-cutter-download-for-computer-and-mobile/
- License: This work is licensed under CC BY-NC-SA 4.0.