
:max_bytes(150000):strip_icc():format(webp)/GettyImages-1198110246-e12a30f2b10645edb984dc66113911c9.jpg)
New In 2024, The Ultimate Guide to GIF for Discord Profile
The Complete Guide to GIF for Discord Profile
The Ultimate Guide to GIF for Discord Profile
An easy yet powerful editor
Numerous effects to choose from
Detailed tutorials provided by the official channel
Discord is the future of digital communication. After all, it is a new platform with unique and amazing features that most people need. Discord is a digital platform where users communicate via video calls, audio calls, media, files, and text in private chats. It works under multiple operating systems, including Mac, Windows, Linux, iPadOS, Web browsers, and Android. In other words, it is excellent for various users with different devices.
Discord GIF profile pic is one of the most popular topics related to the platform. Of course, the platform is new; hence developing a discord animated profile pic can be a hustle to newbies. Fortunately, this article is here with the right questions and responses. Do you wish to learn how to get a discord animated profile picture? If yes, journey with us to learn about discord GIF profile pics and get animated profile pictures on discord. Read on!
In this article
01 [What’s GIF for Discord profile?](#Part 1)
02 [How to Get Animated Profile Picture without having Discord Nitro?](#Part 2)
03 [How to make Discord PFP a GIF?](#Part 3)
04 [How to Put a GIF in Discord profile Picture?](#Part 4)
Part 1 What’s GIF for Discord profile?
Before reviewing the meaning of a GIF in Discord, it is essential to understand what it generally means. Technically, GIF in full means Graphical Interchange Format referring to an image format. In other words, it is an animated image. The file size is probably the smallest, with images looping continuously in a soundless video without the user doing much.
In this case, we are talking about discord and gifs. That is the animated profile picture discord. Think about how you have profile images for different social media accounts. It is the same case, but you settle for a GIF discord profile instead of photos**.**
Why use GIF for Discord Profile?
It is no hush-hush that many people are gradually adopting the idea of gifs in their discord profiles. After all, gifs aren’t new, and they are everywhere. This fact leaves us wondering why you should use it and its effect on your account.
● GIFs are the best way to grab attention and create a connection with your friends. From its definition, gif contains loops that quickly get the attention you wish for your work.
● They display a friendly side that helps you create a connection with people.
● It gives your account more emotion and a sense of friendliness that leaves people wanting to communicate with you.
● Gifs are the current trend; hence, they indicate a direction. In other words, you pay attention to trends.
● It provides a sense of entertainment and youthfulness in your work.
GIFs are everywhere; hence, it is fantastic to adapt to the current trends that young people follow to keep up with technological evolutions. Create a GIF profile on discord and realize the fun you miss out on discord. And if you are yet to create a discord account, ensure that you join the platform and freely communicate with your friends.
Part 2 How to Get Animated Profile Picture without having Discord Nitro?
Are you a Discord user, or are you get to create an account? If yes, you are familiar with discord nitro and all the advantages that come with it. And if you are not a user, you probably are confused about discord Nitro. Let’s start with basic information on discord nitro and its use. Discord Nitro is the genre version of discord with multiple features, making it a worthy option. It enhances your experience with discord voice, text, video, and most importantly, creating profile pictures.
The Nitro version promotes animated discord profile pics. It is a great option but, what do you do when you can’t afford it? Is it still possible to get cool animated discord profile pics? Yes. You can comfortably get a profile discord GIF without Discord Nitro. And you are lucky since this section will cover this necessary topic.
Of course, we have to thank content writer Ubaid Ullah for the article on how to get Discord GIF profile without nitro. After all, it is one of our reference points.
Step 1: Create a GIF or download one that meets your taste from different websites. Currently, we have many sites offering free GIFs; hence you don’t have to worry about copyright issues. Some top websites to consider are Giphy, Gifer, etc.
Step 2: Look for a site that can translate a GIF document to the APNG file. Don’t worry about this step since you can always google the top options. We currently have the ezgif site but technology changes every day; hence you can expect rising websites.
Step 3: Let’s use the ezgif website. Upon accessing it, ensure that you settle for the APNG maker icon. It is on the top left of the website.

Step 4: Check on the Crossfade Frames option. Note that you need to choose images with at most thirty frames. Finally, click on the Make APNG option

Step 6: You can add multiple after-effects after creating the GIF to customize the final look
Step 7: Download the final file and save it on your PC with the name you wish
Step 8: Upload on Discord
Important things to note when uploading GIFs on Discord
● Discord only allows a file that is at least 8MBs. So, if yours isn’t, you can compress it via different websites.
● A gif with nitro is neater, but a GIF without nitro works better than having an image.
● Even without discord Nitro, you still have access to the cool animated discord profile pics if you have a discord server. Suppose you have an animated discord profile, and then we can only see one frame without discord nitro.
Part 3 How to make Discord PFP a GIF?
From the beginning of this piece until now, all we have discussed is getting or making a GIF. However, we will define the simplest way to make your profile pic a GIF in Discord in this case. Ensure that you read through this section.
Generally, discord nitro users are more privileged compared to normal discord users. Of course, the Nitro subscribers pay a fee to access these privileges. There are two options:
● Making your profile picture a GIF
● Utilizing the Tenor GIFs
● Uploading them from your files
02How to create your profile picture a GIF?
Step 1: Log into your Discord account

Step 2: Visit the user settings gear icon and go to edit profile to access your account details.
Step 3: Click on your current profile or click on the Change Avatar option
Step 5: Use the available GIF search engine or upload files from your device. It depends on whether you are a Nitro subscriber or a normal user. Select your GIF and go to the Apply option to save the file
Step 6: Move to the escape button to exit the settings, and you realize that your PFP is officially a GIF.
02Key points on discord GIF profile
● You only have access to the discord nitro profile GIFs if you are a nitro subscriber. Otherwise, you need to look for GIFs from different websites and upload them.
● The maximum resolution of a GIF is 128 by 128 pixels hence you need to be careful.
● The GIF file size for discord is at most 8MBs.
● You can create a GIF instead of uploading it from free websites.
Part 4 How to Put a GIF in Discord profile Picture?
Discord is quite a popular platform with millions of users worldwide. Thanks to the user-friendly interface it includes, this number is enormous, especially when you wish to edit your profile picture. In our case, we explain facts about having a GIF as a PFP in discord.
Like most social media platforms, this process is relatively easy. It only requires you to be a discord user, and it is better if you are a nitro subscriber. Why? Because the latter have the discord GIF options easing the process. Note that you can still add a GIF even without nitro.
The first point is to log into your account, go to setting and click on the edit your profile option. Upon clicking on the available PFP, you will automatically access a file dialogue that prompts you to include your GIF. Later save these changes and get a GIF profile in discord.
GIFs are like looping or repetitive short videos; hence they need editing. Fortunately, we have the Wondershare Filmora Video Editor editor, which includes multiple features which assist in editing your work. Filmora features scene detection, video stabilization, noise removal, text editor, etc. All these features work together to deliver high-quality discord profile GIFs.

Wondershare Filmora - Best Video Editor for Mac/Windows
5,481,435 people have downloaded it.
Build unique custom animations without breaking a sweat.
Focus on creating epic stories and leave the details to Filmora’s auto features.
Start a creative adventure with drag & drop effects and endless possibilities.
Filmora simplifies advanced features to save you time and effort.
Filmora cuts out repetition so you can move on to your next creative breakthrough.
● Ending Thoughts →
● It is possible to have unique GIFs in your Discord account as a normal discord user
●> Editing Discord profile is convenient for all
● There are countless websites available that can assist you in getting a good GIF
● Generally, discord is a powerful platform with millions of users. It is pretty new but has received positive feedback from people. Discord includes amazing unique features, including animated discord profile pictures. However, there is maximum confusion on setting discord gif profiles, which is the area that this article addresses. Clear all doubts on profile discord GIFs by reading the content above.
Discord is the future of digital communication. After all, it is a new platform with unique and amazing features that most people need. Discord is a digital platform where users communicate via video calls, audio calls, media, files, and text in private chats. It works under multiple operating systems, including Mac, Windows, Linux, iPadOS, Web browsers, and Android. In other words, it is excellent for various users with different devices.
Discord GIF profile pic is one of the most popular topics related to the platform. Of course, the platform is new; hence developing a discord animated profile pic can be a hustle to newbies. Fortunately, this article is here with the right questions and responses. Do you wish to learn how to get a discord animated profile picture? If yes, journey with us to learn about discord GIF profile pics and get animated profile pictures on discord. Read on!
In this article
01 [What’s GIF for Discord profile?](#Part 1)
02 [How to Get Animated Profile Picture without having Discord Nitro?](#Part 2)
03 [How to make Discord PFP a GIF?](#Part 3)
04 [How to Put a GIF in Discord profile Picture?](#Part 4)
Part 1 What’s GIF for Discord profile?
Before reviewing the meaning of a GIF in Discord, it is essential to understand what it generally means. Technically, GIF in full means Graphical Interchange Format referring to an image format. In other words, it is an animated image. The file size is probably the smallest, with images looping continuously in a soundless video without the user doing much.
In this case, we are talking about discord and gifs. That is the animated profile picture discord. Think about how you have profile images for different social media accounts. It is the same case, but you settle for a GIF discord profile instead of photos**.**
Why use GIF for Discord Profile?
It is no hush-hush that many people are gradually adopting the idea of gifs in their discord profiles. After all, gifs aren’t new, and they are everywhere. This fact leaves us wondering why you should use it and its effect on your account.
● GIFs are the best way to grab attention and create a connection with your friends. From its definition, gif contains loops that quickly get the attention you wish for your work.
● They display a friendly side that helps you create a connection with people.
● It gives your account more emotion and a sense of friendliness that leaves people wanting to communicate with you.
● Gifs are the current trend; hence, they indicate a direction. In other words, you pay attention to trends.
● It provides a sense of entertainment and youthfulness in your work.
GIFs are everywhere; hence, it is fantastic to adapt to the current trends that young people follow to keep up with technological evolutions. Create a GIF profile on discord and realize the fun you miss out on discord. And if you are yet to create a discord account, ensure that you join the platform and freely communicate with your friends.
Part 2 How to Get Animated Profile Picture without having Discord Nitro?
Are you a Discord user, or are you get to create an account? If yes, you are familiar with discord nitro and all the advantages that come with it. And if you are not a user, you probably are confused about discord Nitro. Let’s start with basic information on discord nitro and its use. Discord Nitro is the genre version of discord with multiple features, making it a worthy option. It enhances your experience with discord voice, text, video, and most importantly, creating profile pictures.
The Nitro version promotes animated discord profile pics. It is a great option but, what do you do when you can’t afford it? Is it still possible to get cool animated discord profile pics? Yes. You can comfortably get a profile discord GIF without Discord Nitro. And you are lucky since this section will cover this necessary topic.
Of course, we have to thank content writer Ubaid Ullah for the article on how to get Discord GIF profile without nitro. After all, it is one of our reference points.
Step 1: Create a GIF or download one that meets your taste from different websites. Currently, we have many sites offering free GIFs; hence you don’t have to worry about copyright issues. Some top websites to consider are Giphy, Gifer, etc.
Step 2: Look for a site that can translate a GIF document to the APNG file. Don’t worry about this step since you can always google the top options. We currently have the ezgif site but technology changes every day; hence you can expect rising websites.
Step 3: Let’s use the ezgif website. Upon accessing it, ensure that you settle for the APNG maker icon. It is on the top left of the website.
Step 4: Check on the Crossfade Frames option. Note that you need to choose images with at most thirty frames. Finally, click on the Make APNG option
Step 6: You can add multiple after-effects after creating the GIF to customize the final look
Step 7: Download the final file and save it on your PC with the name you wish
Step 8: Upload on Discord
Important things to note when uploading GIFs on Discord
● Discord only allows a file that is at least 8MBs. So, if yours isn’t, you can compress it via different websites.
● A gif with nitro is neater, but a GIF without nitro works better than having an image.
● Even without discord Nitro, you still have access to the cool animated discord profile pics if you have a discord server. Suppose you have an animated discord profile, and then we can only see one frame without discord nitro.
Part 3 How to make Discord PFP a GIF?
From the beginning of this piece until now, all we have discussed is getting or making a GIF. However, we will define the simplest way to make your profile pic a GIF in Discord in this case. Ensure that you read through this section.
Generally, discord nitro users are more privileged compared to normal discord users. Of course, the Nitro subscribers pay a fee to access these privileges. There are two options:
● Making your profile picture a GIF
● Utilizing the Tenor GIFs
● Uploading them from your files
02How to create your profile picture a GIF?
Step 1: Log into your Discord account
Step 2: Visit the user settings gear icon and go to edit profile to access your account details.
Step 3: Click on your current profile or click on the Change Avatar option
Step 5: Use the available GIF search engine or upload files from your device. It depends on whether you are a Nitro subscriber or a normal user. Select your GIF and go to the Apply option to save the file
Step 6: Move to the escape button to exit the settings, and you realize that your PFP is officially a GIF.
02Key points on discord GIF profile
● You only have access to the discord nitro profile GIFs if you are a nitro subscriber. Otherwise, you need to look for GIFs from different websites and upload them.
● The maximum resolution of a GIF is 128 by 128 pixels hence you need to be careful.
● The GIF file size for discord is at most 8MBs.
● You can create a GIF instead of uploading it from free websites.
Part 4 How to Put a GIF in Discord profile Picture?
Discord is quite a popular platform with millions of users worldwide. Thanks to the user-friendly interface it includes, this number is enormous, especially when you wish to edit your profile picture. In our case, we explain facts about having a GIF as a PFP in discord.
Like most social media platforms, this process is relatively easy. It only requires you to be a discord user, and it is better if you are a nitro subscriber. Why? Because the latter have the discord GIF options easing the process. Note that you can still add a GIF even without nitro.
The first point is to log into your account, go to setting and click on the edit your profile option. Upon clicking on the available PFP, you will automatically access a file dialogue that prompts you to include your GIF. Later save these changes and get a GIF profile in discord.
GIFs are like looping or repetitive short videos; hence they need editing. Fortunately, we have the Wondershare Filmora Video Editor editor, which includes multiple features which assist in editing your work. Filmora features scene detection, video stabilization, noise removal, text editor, etc. All these features work together to deliver high-quality discord profile GIFs.
Wondershare Filmora - Best Video Editor for Mac/Windows
5,481,435 people have downloaded it.
Build unique custom animations without breaking a sweat.
Focus on creating epic stories and leave the details to Filmora’s auto features.
Start a creative adventure with drag & drop effects and endless possibilities.
Filmora simplifies advanced features to save you time and effort.
Filmora cuts out repetition so you can move on to your next creative breakthrough.
● Ending Thoughts →
● It is possible to have unique GIFs in your Discord account as a normal discord user
●> Editing Discord profile is convenient for all
● There are countless websites available that can assist you in getting a good GIF
● Generally, discord is a powerful platform with millions of users. It is pretty new but has received positive feedback from people. Discord includes amazing unique features, including animated discord profile pictures. However, there is maximum confusion on setting discord gif profiles, which is the area that this article addresses. Clear all doubts on profile discord GIFs by reading the content above.
GIF to JPG Is as Simple as a Blink of an Eye
GIF to JPG is as Simple as a Blink of an Eye
An easy yet powerful editor
Numerous effects to choose from
Detailed tutorials provided by the official channel
We are a generation of people who are aware of all the tools that are catering to our needs. For all the procedures from basic to advance, now the tools are available helping us to deal with all such things.
Well, this read is for those who are in the editing field and always ready to try hands-on new animations. Every time it is not necessary that the file you have received is in the same format as required. In that case, the right tools are important to make the conversion.
By keeping the same in mind, we have presented this read for you. Here we discuss GIF to JPG converting tools or vice-versa. These tools will help you to get the task done as required, and you will not face any sort of problem at all. To know all the details keep reading till the last!
In this article
01 [How to Create GIF Animation from a Stack of JPGs](#Part 1)
02 [5 Ways to Convert GIF to Jpg [Online & Desktop]](#Part 2)
03 [5 Ways to Convert Jpg to GIF [Online & Desktop]](#Part 3)
Part 1 How to Create GIF Animation from a Stack of JPGs
Sometimes it happens that we have some pictures from our favorite even or so, and we are looking forward to combining all of them in one file. Undoubtedly, this conversion is easy but only when you are aware of the right steps. Until and unless you have no clue about the steps, the JPG to GIF conversion seems to be impossible. Let’s have a look at the steps you need to follow for it:
Step 1: Firstly, “choose the photos”. Until and unless you do not have the selected photos, you cannot initiate the conversion process.
Step 2: Choose the right tool. A tool is important to choose because, without it, you cannot be a part of the process. In this case, we are discussing ADOBE Photoshop.
Step 3: Upload all the photos that you have selected and move them to the timeline panel by clicking on the Windows option. Here you need to select “Create Video Timeline.”


Step 4: Do the editing as needed. You can simply add layers to the frame or change the basics of the particular image by clicking on it.

Step 5: Set up the loop timing and then click on “Save as GIF”


Part 2 Ways to Convert GIF to Jpg [Online & Desktop]
Well, in this section, we are discussing the best tools that cater to your needs of converting GIF to JPG easily. These tools are available in the form of extensions and also on desktops. It is on the user which format they want to consider. The tools to know are as follows:-
01Convertio
Convertio is a free online tool that converts GIF to JPG. It is easy to use, just upload the GIF and then download the converted JPG file. This tool is useful for those who want to share their animated GIFs on social media sites such as Facebook or Twitter that don’t accept animated GIFs. Furthermore, it is a perfect tool for marketers who want to use GIFs in their content, but they need the images to be in JPG format. However, it works like any other online converter, you upload your GIF, and it will generate an image of the same size as the original one.

02CloudConvert
CloudConvert is a cloud-based online conversion tool that converts files from one format to another. The service can convert GIFs to JPGs, PNGs, and other formats. Users are happy because CloudConvert is a reliable and easy-to-use tool that can help you convert files from one format to another. It has a simple interface with drag-and-drop features. It also offers an efficient way to convert large batches of files at once, without the need for uploading them on your device or using any additional software.

03FileZigZag
FileZigZag is an easy to use web app that converts GIFs to JPGs with just a few clicks. In the toolbar, you can upload the GIF of your choice and then convert it into one of three different resolutions: HD, Medium, or Low. The higher resolution will produce better quality but will take up more space on your hard drive. It is a free, open-source tool that can be used on both Windows and Mac computers.

04Aconvert
Aconvert is a tool that converts GIFs to JPGs. It’s a very simple and straightforward tool for converting GIFs to JPGs. It has two main features: Convert gif files to jpg files and Convert jpg files to gif files.
The first feature is self-explanatory: it will convert any gif file, even animated, into a jpg file. The second feature is also easy to use: you just have to drag and drop the desired jpg file onto the converter, and it will create a corresponding animated gif file of the same size as the original one.

05Ezgif
Ezgif is a free online tool that converts GIF to JPG. This tool was created by the team of developers at Ezgif in order to make converting GIFs as easy as possible. It’s a very simple and straightforward process, which makes it perfect for anyone who wants to convert GIFs but doesn’t want to spend time learning how it works. All you need to do is upload your GIF, choose the desired output format (JPG), and click convert.
It’s a free and easy to use tool that converts your animated GIFs into high-quality JPGs, PNGs, and WebP formats.

Part 3 5 Ways to Convert Jpg to GIF [Online & Desktop]
This section will help you to know about the best tools available to convert the JPG file into GIF. We all know it is not necessary that every time you have a GIF available suiting to the needs. In that case, these tools will help you. Well, the tools you can consider include-
01Filmora
Wondershare Filmora Video Editor is video editing software that helps users to create and share videos of their own. It provides an easy way to make videos from photos, videos, and music. Users can edit the video by adding text, filters, and other effects. This tool is a JPG to GIF converter as well that has been around for many years. It has evolved into a more sophisticated tool with time. This software has been used by professionals in many different fields such as marketing, design, photography, etc. Furthermore, it has a simple and intuitive interface which makes it easy to use.
Wondershare Filmora - Best Video Editor for Mac/Windows
5,481,435 people have downloaded it.
Build unique custom animations without breaking a sweat.
Focus on creating epic stories and leave the details to Filmora’s auto features.
Start a creative adventure with drag & drop effects and endless possibilities.
Filmora simplifies advanced features to save you time and effort.
Filmora cuts out repetition so you can move on to your next creative breakthrough.
02OnlineConverterFree
OnlineConverterFree is an online conversion tool that converts JPG images to GIF format. It is a free, easy-to-use, and powerful converter. Additionally, It can convert any of the following formats: JPEG, PNG, BMP, TIFF, and GIF.
It also has a preview function for checking the quality of the converted images before you download them. You just need to check that out so that you can analyze whether the same quality will suit your needs or not. Also, the conversion process is so fast that it can be used on large files without taking up too much time or space.

03MyGeodata Converter
MyGeodata Converter is a web-based tool that converts files from one format to another. It has the capability to convert between different formats like JPG, GIF, PNG, SVG, and more. The converter provides an easy way to convert JPG into the desired format. It also supports batch conversion of multiple files at the same time.
The interface of the tool is very simple, which means that even a layman will be able to use this tool.

04ConvertImage
ConvertImage is an online tool that converts images from one format to another. This tool is a JPG to GIF converter that can be used on the web. It has a drag and drop interface, which makes it easy to use for anyone who knows how to use a computer. Users can upload their photos from their computer or from any URL and then choose the desired output format.

05Pixillion image converter
Pixillion is a free online image converter that converts images between different formats.
It is one of the most popular converters available on the internet. It converts images between different formats and has a user-friendly interface. The Pixillion converter supports converting images from JPG to GIF, PNG, BMP, TIFF, and other formats. It also provides support for batch conversion of multiple files at once.

● Key Takeaways from This Episode →
● Converting GIF to JPG is a simple process.
● Filmora is an occupied tool for all conversions.
● Conversions are easy to do with the right set of tools.
We are a generation of people who are aware of all the tools that are catering to our needs. For all the procedures from basic to advance, now the tools are available helping us to deal with all such things.
Well, this read is for those who are in the editing field and always ready to try hands-on new animations. Every time it is not necessary that the file you have received is in the same format as required. In that case, the right tools are important to make the conversion.
By keeping the same in mind, we have presented this read for you. Here we discuss GIF to JPG converting tools or vice-versa. These tools will help you to get the task done as required, and you will not face any sort of problem at all. To know all the details keep reading till the last!
In this article
01 [How to Create GIF Animation from a Stack of JPGs](#Part 1)
02 [5 Ways to Convert GIF to Jpg [Online & Desktop]](#Part 2)
03 [5 Ways to Convert Jpg to GIF [Online & Desktop]](#Part 3)
Part 1 How to Create GIF Animation from a Stack of JPGs
Sometimes it happens that we have some pictures from our favorite even or so, and we are looking forward to combining all of them in one file. Undoubtedly, this conversion is easy but only when you are aware of the right steps. Until and unless you have no clue about the steps, the JPG to GIF conversion seems to be impossible. Let’s have a look at the steps you need to follow for it:
Step 1: Firstly, “choose the photos”. Until and unless you do not have the selected photos, you cannot initiate the conversion process.
Step 2: Choose the right tool. A tool is important to choose because, without it, you cannot be a part of the process. In this case, we are discussing ADOBE Photoshop.
Step 3: Upload all the photos that you have selected and move them to the timeline panel by clicking on the Windows option. Here you need to select “Create Video Timeline.”
Step 4: Do the editing as needed. You can simply add layers to the frame or change the basics of the particular image by clicking on it.
Step 5: Set up the loop timing and then click on “Save as GIF”
Part 2 Ways to Convert GIF to Jpg [Online & Desktop]
Well, in this section, we are discussing the best tools that cater to your needs of converting GIF to JPG easily. These tools are available in the form of extensions and also on desktops. It is on the user which format they want to consider. The tools to know are as follows:-
01Convertio
Convertio is a free online tool that converts GIF to JPG. It is easy to use, just upload the GIF and then download the converted JPG file. This tool is useful for those who want to share their animated GIFs on social media sites such as Facebook or Twitter that don’t accept animated GIFs. Furthermore, it is a perfect tool for marketers who want to use GIFs in their content, but they need the images to be in JPG format. However, it works like any other online converter, you upload your GIF, and it will generate an image of the same size as the original one.
02CloudConvert
CloudConvert is a cloud-based online conversion tool that converts files from one format to another. The service can convert GIFs to JPGs, PNGs, and other formats. Users are happy because CloudConvert is a reliable and easy-to-use tool that can help you convert files from one format to another. It has a simple interface with drag-and-drop features. It also offers an efficient way to convert large batches of files at once, without the need for uploading them on your device or using any additional software.
03FileZigZag
FileZigZag is an easy to use web app that converts GIFs to JPGs with just a few clicks. In the toolbar, you can upload the GIF of your choice and then convert it into one of three different resolutions: HD, Medium, or Low. The higher resolution will produce better quality but will take up more space on your hard drive. It is a free, open-source tool that can be used on both Windows and Mac computers.
04Aconvert
Aconvert is a tool that converts GIFs to JPGs. It’s a very simple and straightforward tool for converting GIFs to JPGs. It has two main features: Convert gif files to jpg files and Convert jpg files to gif files.
The first feature is self-explanatory: it will convert any gif file, even animated, into a jpg file. The second feature is also easy to use: you just have to drag and drop the desired jpg file onto the converter, and it will create a corresponding animated gif file of the same size as the original one.
05Ezgif
Ezgif is a free online tool that converts GIF to JPG. This tool was created by the team of developers at Ezgif in order to make converting GIFs as easy as possible. It’s a very simple and straightforward process, which makes it perfect for anyone who wants to convert GIFs but doesn’t want to spend time learning how it works. All you need to do is upload your GIF, choose the desired output format (JPG), and click convert.
It’s a free and easy to use tool that converts your animated GIFs into high-quality JPGs, PNGs, and WebP formats.
Part 3 5 Ways to Convert Jpg to GIF [Online & Desktop]
This section will help you to know about the best tools available to convert the JPG file into GIF. We all know it is not necessary that every time you have a GIF available suiting to the needs. In that case, these tools will help you. Well, the tools you can consider include-
01Filmora
Wondershare Filmora Video Editor is video editing software that helps users to create and share videos of their own. It provides an easy way to make videos from photos, videos, and music. Users can edit the video by adding text, filters, and other effects. This tool is a JPG to GIF converter as well that has been around for many years. It has evolved into a more sophisticated tool with time. This software has been used by professionals in many different fields such as marketing, design, photography, etc. Furthermore, it has a simple and intuitive interface which makes it easy to use.
Wondershare Filmora - Best Video Editor for Mac/Windows
5,481,435 people have downloaded it.
Build unique custom animations without breaking a sweat.
Focus on creating epic stories and leave the details to Filmora’s auto features.
Start a creative adventure with drag & drop effects and endless possibilities.
Filmora simplifies advanced features to save you time and effort.
Filmora cuts out repetition so you can move on to your next creative breakthrough.
02OnlineConverterFree
OnlineConverterFree is an online conversion tool that converts JPG images to GIF format. It is a free, easy-to-use, and powerful converter. Additionally, It can convert any of the following formats: JPEG, PNG, BMP, TIFF, and GIF.
It also has a preview function for checking the quality of the converted images before you download them. You just need to check that out so that you can analyze whether the same quality will suit your needs or not. Also, the conversion process is so fast that it can be used on large files without taking up too much time or space.
03MyGeodata Converter
MyGeodata Converter is a web-based tool that converts files from one format to another. It has the capability to convert between different formats like JPG, GIF, PNG, SVG, and more. The converter provides an easy way to convert JPG into the desired format. It also supports batch conversion of multiple files at the same time.
The interface of the tool is very simple, which means that even a layman will be able to use this tool.
04ConvertImage
ConvertImage is an online tool that converts images from one format to another. This tool is a JPG to GIF converter that can be used on the web. It has a drag and drop interface, which makes it easy to use for anyone who knows how to use a computer. Users can upload their photos from their computer or from any URL and then choose the desired output format.
05Pixillion image converter
Pixillion is a free online image converter that converts images between different formats.
It is one of the most popular converters available on the internet. It converts images between different formats and has a user-friendly interface. The Pixillion converter supports converting images from JPG to GIF, PNG, BMP, TIFF, and other formats. It also provides support for batch conversion of multiple files at once.
● Key Takeaways from This Episode →
● Converting GIF to JPG is a simple process.
● Filmora is an occupied tool for all conversions.
● Conversions are easy to do with the right set of tools.
Top 7 Easy Ways to Convert a Video to a GIF Online
Looking for the best video to gif online conversion tools? No worries, as we have done all the research work and have shortlisted the best tools that can assist you with the task. GIF is short and cute animated files that help in interestingly conveying a message. These short-animated visuals help in reaching and creating an impact on the target audience. So, if you have some videos, GIF animations can be created from them using a good converter tool which can be an online program or system software.
Online programs are preferred by the users owing to their simple and hassle-free use, support for basic features, and cost-saving options. So, here in this topic, we will discuss the top and easy ways to convert video to GIF online.

Part 1: Top 7 Easy Ways to Convert a Video to a GIF Online
Several online tools can be used for converting a video file into GIF, but all do not stand up to the tall claims it makes. So, if you are in search of an easy yet effective tool, shortlisted below are the top 7 tools for video into GIF online conversion.
1. Adobe Express
Powered by Adobe Premiere, this is an excellent online tool that allows converting videos in all key formats in GIF format. The free version allows adding videos for up to 1 hour and the processed files can be downloaded to the local system.
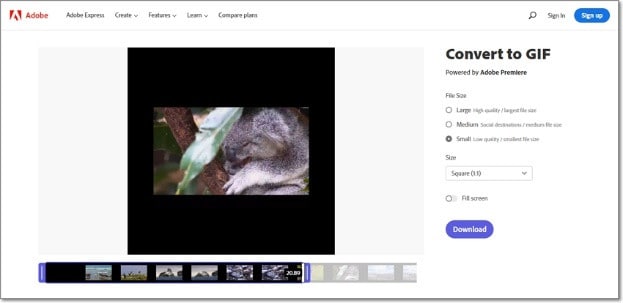
Key features
- Video files in all key formats can be converted to GIF.
- Allows selecting the aspect ratio and the file size of the target file.
- This video to GIF converter online tool support drag and drop feature.
- Allows trimming the video so that the file portion can be selected.
Pros:
- Simple and clean interface.
- Quick file processing.
- Allows selecting aspect ratio and file size.
Cons:
- Only one file at a time can be processed.
- Only desktop files can be added.
- To download the file, you need to free sign-up.
User Review:
A good online multi-platform service that works with interesting features. -TechRadar
This is one of the best programs that comes packed with wide range of features that can assist you in getting the target customized files.
2. Ezgif
Using this browser-based tool, local as well as online videos in key formats can be converted to GIFs. The interface is simple where you just need to add the file and the conversion will be done automatically.
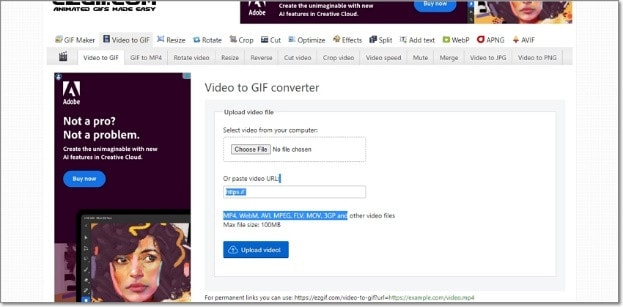
Key features
- GIF can be created from the local and online video files in all key formats.
- Choose the video part for creating the GIF file else by default, the first 5 seconds of the video are used.
Pros:
- All popular video formats like MP4, MPEG, FLV, MOV, and others are supported for conversion to GIF.
- Local, as well as file links in case of online files, can be added.
- Allows selecting the video part for which the GIF has to be created.
- Allows choosing the frame rate, and the size of the video.
This online GIF converter has an option to set static background.
Cons:
- File size limitation of 100 MB.
- Internet dependency.
User Review
“A website with many important and good tools that facilitates making your task easier. You get all features in one place. -Sasa011, Mywot.
This simple online tool is a pocket friendly option for converting your videos into GIF with added option for editing them. Supporting all key formats, the program supports additional tools as well.
3. Img2Go
Your videos on the system, cloud storage, as well as using URLs can be added to this online tool for conversion to GIF format. The look and the quality of GIFs can be adjusted by making changes in the file parameters.

Key features
- Convert all key video files like MP4, MOV, MPEG, and others to GIF.
- Customize the GIF look by editing the file size and applying the color filter.
- This online video to GIF converter allows to choose to enhance, sharpen, equalize, and edit files in other ways.
- Files to be converted can be added from the desktop, Google Drive, Dropbox, as well as URL.
- Processed files can be saved to the cloud storage in addition to the local system.
Pros:
- Multiple sources to add the video file.
- Customize the file parameters and enhance its look.
- Converted file is downloaded automatically to the local system.
Cons:
- Free version allows converting only 3 files at a time.
- Dependency on internet connectivity.
User review:
“This is the best online converter app I have discovered. It is really easy and fast to use. I absolutely recommend it and it really works.”-Maria Ancil, ChromeStats
When you need to convert only a few files at a time in a hassle-free manner consider this simple online tool. After the conversion is done, you would not have any hassles of file downloading as it is automatically saved to the system.
4. CloudConvert
Convert your videos in MP4, FLV, WebM, and other key formats to GIF using this browser-based tool that is simple and free to use. Multiple file parameters can be changed using the tool to get the desired file.

Key Features:
- Allows converting all key video formats.
- Files to be converted can be added from the desktop, URL, Dropbox, Google Drive, and OneDrive.
- Allows adjusting the fit, codec, resolution, aspect ratio, and fps.
- Option to trim the file and also add a watermark.
Pros:
- Files to be converted can be added from multiple sources.
- All key video formats supported.
- Option to control the video size, quality, and aspect ratio.
Cons:
- Free version allows only 25 conversions per day.
- Converted files need to be downloaded.
User Review
“Instant way of converting small-sized files online in many different formats.”
-Sushil, SoftwareAdvice
When conversion of cloud-based files is needed, this works a good online tool that also allows you to edit and change the key file parameters.
5. io
This is a free browser-based tool that allows creating of animated GIF files from videos. There are several video editing options also supported by the tool like split, cut, adding text, and more. You can even add a YouTube video or its link to create a GIF.

Key features:
- Free online tool for creating a GIF file.
- Support all key video formats like MP4, MOV, FLV, and others.
- Local, YouTube as well as videos from Dropbox can be added.
- Option to record the video and create its GIF.
- ‘Allows choosing the size, duration, background color, and several other file parameters.
Pros:
- Videos from multiple sources can be added.
- YouTube videos can also be converted to GIFs.
- Option to record the video and create its GIF.
- Support multiple video editing options.
Cons:
- Slow processing speed.
- Files processed through the free version have a watermark.
- Free version allows processing files under 10 minutes and of 250Mb in size.
User Review:
“It is just a perfect tool and easy to use. It supports a wide variety of media files.” - Koi, Trustpilot.
Option to convert the YouTube videos as well as the recorded videos make this tool different from the others. All popular file formats are supported and you can even customize and change the file parameters as per your requirements.
6. VistaCreate
This is another simple-to-use tool that allows converting all key video formats to a GIF file. The program allows setting various parameters as needed.
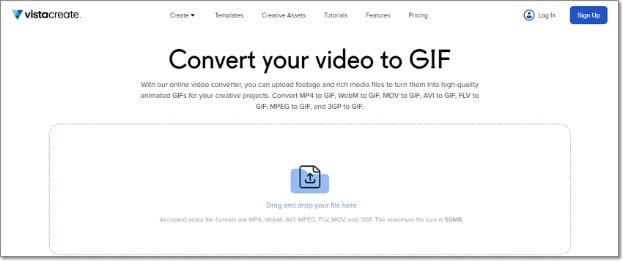
Key Features
- Convert MP4, WebM, AVI, MPEG, FLV, MOV, and 3GP to GIF.
- Support Drag and Drop feature.
- Videos up to 50MB can be processed.
- Allows choosing the video start and the end time for which GIF is to be created. If no time is selected, the first 5 seconds of the video are used.
Pros:
- Simple user interface.
- Allows selecting the video part for which GIF is to be created.
- Choose the frame rate and the speed.
Cons:
- Limited format support.
- Free version has a limitation of 50Mb file size.
- Processing speed is slow.
User Review:
“It is a simple and fast online tool that works. The program allows creating eye-catchy visuals and is free to use.”-Kshitij T, G2. Com
Simple to use, this online tool is apt when you need selected parts of the video for creating a GIF. Though it is compatible with a few selected formats, the process of conversion is simple.
7. XConvert
This online tool support conversion of wide range of file types and formats including videos to GIF. The supported video formats are MP4, WebM, MOV, and MKV. The tool also allows changing the target file parameters.

Key Features
- Free to use online tool with a simple interface.
- Allows converting MO4, MOV, WebM, and MKV videos to GIF.
- Frame Rate and resolution of the target GIF file can be selected.
- Allows adding local as well as files saved to the cloud storage.
Pros:
- Add videos from the desktop, Google Drive, and Dropbox.
- Choose the desired frame rate and resolution.
- Option to save the processed file to the system or Dropbox. Option to get the converted file download link.
Cons:
- Limited file support.
- Converted files need to be downloaded.
- Internet dependency.
User Review:
Portable, nice UI, cross-platform tool and has a lot of actions and run fast. -Roflpancake, Alternativeto
When simple conversion with basic file editing is needed, consider this online tool for your task. In addition to the local system, you can even save the files to your cloud storage.
Part 2: Comparison Table of the Best Video to GIF Converters
The table below compares the above 7 listed tools based on the formats supports, speed of file processing, and the watermark on the processed files.
| Features/Tool | Supported Format | Free Version with watermark or not | Speed of conversion |
|---|---|---|---|
| Adobe Express | All key video formats | No watermark | 2 (Fast) |
| Ezgif | All key formats including MP4, MPEG, FLV, MOV, and others. | No watermark. | 4 (Slow) |
| Img2Go | MP4, FLV, MOV, and all key video formats. | No Watermark | 2 (Fast) |
| CloudConvert | All popular video formats including MP4, MOV, FLV, MPEG, and more. | No Watermark | 2(Fast) |
| Veed.io | All key formats | Yes, free version has a watermark. | 5 (very Slow) |
| VistaCreate | MP4, WebM, AVI, MPEG, FLV, MOV, and 3GP. | No watermark | 5 (Very Slow) |
| XConvert | MP4, WebM, MOV, MKV. | No watermark | 3 (Average) |
Part 3: Best Solution to Convert Video to GIF on Windows/Mac
To convert videos to GIF on your Windows and Mac without worrying about any limitations or internet dependency, desktop software works as the best option. If you too have been looking for one such desktop program, we recommend Filmora Video Editor as the best choice. Though the software is used majorly for advanced video editing options, it is capable of performing a variety of other tasks as well including video to GIF conversion. The software allows file conversion through its export feature.
For Win 7 or later (64-bit)
For macOS 10.14 or later
Key Features
- Almost all video formats like MOV, MP4, MKV, FLV, and others can be converted to GIF.
- High-quality conversion at a fast speed.
- Support batch processing so that multiple files can be processed at a time.
- Allows editing and customizing videos using the built-in features of the software like effects, subtitles, crop, cut, and more.
Pros:
- The interface is simple which makes the software suitable even for beginners.
- Almost all popular video formats are supported.
- High-quality conversion in a hassle-free manner.
- Windows and Mac support.
Cons:
- Being a desktop software, it needs download and installation.
- Need to purchase the software subscription.
Steps to convert videos to GIF using Wondershare Filmora
Step 1. Launch the installed software on your system and the main interface select Create Project > New Project.

Step 2. Click on Import Media Files Here option under the Media tab to browse and add the local video file. Multiple files for batch processing can be added here.

Step 3. After the files are added, now it’s time to move them to the time and for this, you can simply drag and drop them to the bottom. Now at the timeline, using the built-in editing features, customization can be done as required.

Step 4. Finally, tap on the Export button and then choose GIF as the desired target format and also the location to save the converted files.

Conclusion
If one of the above-listed online tools serves your videos for GIF conversion purposes, it’s great. If not, you can use the Wondershare Filmora software. Once downloaded, the software can be used for several editing and other video-related tasks.
For macOS 10.14 or later
Key Features
- Almost all video formats like MOV, MP4, MKV, FLV, and others can be converted to GIF.
- High-quality conversion at a fast speed.
- Support batch processing so that multiple files can be processed at a time.
- Allows editing and customizing videos using the built-in features of the software like effects, subtitles, crop, cut, and more.
Pros:
- The interface is simple which makes the software suitable even for beginners.
- Almost all popular video formats are supported.
- High-quality conversion in a hassle-free manner.
- Windows and Mac support.
Cons:
- Being a desktop software, it needs download and installation.
- Need to purchase the software subscription.
Steps to convert videos to GIF using Wondershare Filmora
Step 1. Launch the installed software on your system and the main interface select Create Project > New Project.
Step 2. Click on Import Media Files Here option under the Media tab to browse and add the local video file. Multiple files for batch processing can be added here.
Step 3. After the files are added, now it’s time to move them to the time and for this, you can simply drag and drop them to the bottom. Now at the timeline, using the built-in editing features, customization can be done as required.
Step 4. Finally, tap on the Export button and then choose GIF as the desired target format and also the location to save the converted files.
Conclusion
If one of the above-listed online tools serves your videos for GIF conversion purposes, it’s great. If not, you can use the Wondershare Filmora software. Once downloaded, the software can be used for several editing and other video-related tasks.
How to Add Text Behind Objects in Video
Adding text behind objects in your videos can be a great way to start your videos. For example, you can do so to create an attractive intro or startup a video. So, if you hope to make a video like a pro, let’s learn how to add text behind objects in your videos by Filmora.

Part 1. What Are The Benefits of Adding Text Behind Objects in Videos?
Your videos must maintain quality to create content worthy of a huge audience. You may have a YouTube channel or be starting down the road. Then you must give this a try because
Give a cool look
Adding text behind an object in a video looks cool! Now, your object could be a silhouette of a person or a huge skyscraper. You can add a text tile behind the object, creating the illusion. Due to this, the text will be flying in real-time.
Show creativity
Blasting your channel with innovative and creative content is the key to building a big audience. But, of course, you can always opt for many ways to create a video showing your creativity. One of those ways is to add text behind your object.
You can create an attractive intro by adding text behind objects that captivate the viewer. It ensures that your subscribers stay tuned to your channel and your content.
Build up a solid audience
Every day can be a real struggle if you are a daily content creator on YouTube. The audience demands good content. But your daily videos can get boring if you do not use new methods to edit your videos.
You can add text behind videos to spice up your intros and hook your daily audience even more. That will show the audience that you are genuinely putting in the effort.
Part 2. What Will You Need To Add Text Behind Videos?
Now there are a few things that you will need to add text behind videos. First, take a look at the basic priorities to perform this feature.
1. A Static Object Video
Adding text behind an object can be tricky if the object isn’t static. For example, the effect will be ruined if an object moves around a lot in a video.
Our goal is to create a smooth text behind the video effect. And this can only be achieved if the target object remains static in the video and does not move about its position.
2. A Video Editing Software - Wondershare Filmora
Once you select a video source, you aim to add it to a video editor. For this purpose, Wondershare Filmora would be your best choice. Wondershare Filmora allows you to create innovative and attractive videos.
Free Download For Win 7 or later(64-bit)
Free Download For macOS 10.14 or later
It has a very engaging system UI, allowing even beginner users to get their hands on it instantly. You will learn how to add text behind your videos with a few simple steps.

Now that you know the requirements for the video, let’s move on to the step-by-step guide to add text to your video.
Part 3. Step-by-Step Guide To Add Text Behind Videos
We look at two examples of how to add text behind videos in Wondershare Filmora.
- A static video with an object that can be easily masked out.
- A video with high contrast and a clean background.
Add Text behind a Static Video
First, we will go with adding text behind a static object. For this, scroll more to get the step-by-step process.
Step1 Download Wondershare Filmora
If you are a beginner just starting in the video editing business, Wondershare Filmora is the best choice. Follow the steps below to download the free version of Wondershare Filmora:
- First, download the Wondershare Filmora on your PC or Mac.
- Open the setup and install the Wondershare Filmora.
After downloading the Wondershare Filmora software, let’s edit the video. Scroll below to learn how to start the editing process!
Step2 Add the Video to the Timeline
We will first look at the static video example. For this, follow the below instructions:
- You have to start by importing your video in the import library.
- From the import library, you can click on the video and drag it down below to the timeline.

![]()
Note: Adding video to the timelines will allow you to create a workspace to edit your video.
Now let’s move on to how we will add the text tile to our video.
Step3 Add the Text Tile
It is time to add the text tile you will animate behind the object. To do that, follow the steps mentioned as such.:
- Go to the Titles icon on the bar above the import library.
- A drop-down option will be available on the left side.
- Scroll down to the Plain text.
- Here, you can see many text tiles to add to your video.
- You can choose anyone you like.
- The most commonly used tile is the Basic 6.
- When you add the text tile to the timeline, you must ensure that the text is of equal length to the video.
- To do that, drag the right corner of the text tile and drag it to the right to match the length of the video.

Step4 Edit the Text Tile
After you have added the text tile you desire, you need to type in the text. For this article, we will keep it simple. We will be typing a simple statement such as “Hello, World.“
- Double-click the Text tile to open the settings menu.
- After the settings menu is opened, type in the text box on the import window.
You will notice changes on the main window that your text has changed.

- After the text appears, you can make the font look as desired.
- Look above the text window, and you will see the type of text font selected.
- Click on the drop-down option and choose whatever you like.
Let’s move on to animate the text tile.
Step5 Animate the text tile
After adding text, it is time to animate it. This animation will decide how your text will appear behind the target object.
- First, you must open the text settings by double-clicking on the text tile in the timeline.
- In the settings opened in the import window, you will have to click on the animation tab in the upper left corner, aside from the Preset
- Now scroll down to where you will see the Right Roll
- Click on Right Roll and then click on the OK in the bottom right corner of the import window.

![]()
Note: You may notice now that the text appears in front of our object. Don’t worry now! We are getting there. With a few simple steps, we will see the results.
Now let us move on to the more significant part of the editing, masking the object. Again, look ahead to see how you can mask the object!
Step6 Mask the Object
To mask our object, we will need to be technical. We will begin by adding the same footage of the static object on our timeline. Follow the steps mentioned below:
- Drag and drop the static object footage above the timeline text. Make sure the text stays in the middle of the sandwich.

- We will hide the video in the first track to simplify things. In addition, this will make our editing easier.
- We will have to look in the effects library to insert the masking effect.
- You can see the Effects icon on the bar at the top.
- Click on the Effects.
- You will see the search bar at the top of the import window.
- In the search bar, type in Image mask.
- Drag the Image mask effect on the video above the text tile.
Now the masking effect has been added. But we would have to adjust so that it stays upon our object.
- Double-click on the video and the settings option will open up.
- Go into the Effects
![]()
Note: You must select your target object’s mask shape exactly as its shape.
- We have to mask out a building, so that we will need a vertical rectangle.

- After you have selected the shape of your object, we will need to convert it to the object’s size so that it only masks the building.
- To do that, scroll down below the import window to the settings.
- Here you can see the X, Y, and width settings.
- First, move the width bar so that it matches the width of the building.

- Now drag the X bar until the mask is confined to the building. You would have created the mask only limited to the building.

- Once you complete this step, click OK in the bottom right corner.
- Now un-hide the original video that you imported in the beginning.
Finally, play the video in the main play window from the beginning.

You have successfully created a text behind the object effect. Now that you know how to add text behind static objects let us move to learn how to add text to a video that has high contrast and a clean background.
Add text behind a high contrast and clean background
Besides the text can be added behind a static object, it can also be added to a clean background with high contrast. But how is it? Let’s dive into it.
Step1 Import the video into the timeline
- Import the video from the location in your PC media.
- When imported, drag and drop it onto the timeline.

Step2 Add the text tile
To add the text to your video, follow the steps mentioned below.
- Click on the titles icon on the bar above the import window.
- On the left drop-down option, scroll down to the titles.
- Select the Plain text option.
- You will notice that multiple options will pop up in the import window.
- Select the text title that suits you best.
- After you have selected the text style, drag and drop it down above your video in the timeline.

- Our next step would be to add the text.
- Double-click on the text tile. Doing so will open the settings menu in the import window.
- Type in the text that you want. For reference, we will keep it simple such as, “Hello world.”
- You can also adjust the font of your text.
- Above the type box, a drop-down option will show you the range of fonts available.
- Select the font you desire.

Now that you have added the text, it is time to animate it.
Step3 Take a snapshot
After typing in the text, you will notice in the main play window that your text still appears in front of your object. Therefore, we want to take it behind the object. To do so, first, you will need to take a snapshot.
Follow the steps mentioned to take a snapshot:
- Hide the main video. You can see the Eye icon aside from your main video in the edit column on the left side of the timeline.
- Click on the Eye icon to hide the main video.
- In the main play window, you will notice that the screen turns black, which leaves only the text on the screen.

- In the main play screen, you can notice a small camera icon.
- This camera icon is used to take snapshots of your screen.
- Click on the camera icon to take a snapshot of your screen.
- Your snapshot will now be saved in the main import window.

Now that we have taken a snapshot, we will need to import it into the timeline. Scroll below for more.
Step4 Add the snapshot
After taking it, your goal is to import it into the timeline. To perform this action, perform the following steps:
- Before adding the snapshot to the timeline, we must delete the main text tile.
- Then drag and drop the snapshot from the import library into the timeline above the video.
- Make sure that the snapshot is aligned well with the length of the video.
- If it is longer than the video, drag it from the right to match the length of the video.
- If its length is smaller than the video, drag it to the right to increase its length.

After adding the snapshot, we will have to change its blending mode.
Step5 Change the blending of the snapshot
To create the effect of your text behind the video, you must alter the main text’s blending mode. In this case, it will be the snapshot we took.
![]()
Note: Changing the blending mode of the snapshot will allow it to blend with the transparent background and will create the effect of the text behind the object in the video.
Follow the steps mentioned below to change the blending of the snapshot:
- Double-click the snapshot.
- If you select the compositing tab, the blending options will pop up.
- From default, it would be set to Normal. Click on the Normal
- It will show a drop-down option.
- Scroll down below until you can see an option labeled Then click on Overlay.

- And press OK in the bottom right corner to confirm your changes.
The text can be blended with the background.
- Click on the Eye icon to un-hide the video from the timeline.
- Now play the video from the start from the main play screen to see the final changes.

Congratulations! The above steps allow you to add text behind objects in your videos.
Conclusion
Modern media is full of creative content. And if you are a content creator that wants to make it through the world of YouTube and video creating, you need to be the best. You can only be the best at what you do if you keep pushing the boundaries of your creativity.
Adding text behind objects could be the first step in making your intros shine with creativity and innovation. It allows you to maintain and build your viewing audience. The more the audience, the more your content gets watched!
Free Download For macOS 10.14 or later
It has a very engaging system UI, allowing even beginner users to get their hands on it instantly. You will learn how to add text behind your videos with a few simple steps.
Now that you know the requirements for the video, let’s move on to the step-by-step guide to add text to your video.
Part 3. Step-by-Step Guide To Add Text Behind Videos
We look at two examples of how to add text behind videos in Wondershare Filmora.
- A static video with an object that can be easily masked out.
- A video with high contrast and a clean background.
Add Text behind a Static Video
First, we will go with adding text behind a static object. For this, scroll more to get the step-by-step process.
Step1 Download Wondershare Filmora
If you are a beginner just starting in the video editing business, Wondershare Filmora is the best choice. Follow the steps below to download the free version of Wondershare Filmora:
- First, download the Wondershare Filmora on your PC or Mac.
- Open the setup and install the Wondershare Filmora.
After downloading the Wondershare Filmora software, let’s edit the video. Scroll below to learn how to start the editing process!
Step2 Add the Video to the Timeline
We will first look at the static video example. For this, follow the below instructions:
- You have to start by importing your video in the import library.
- From the import library, you can click on the video and drag it down below to the timeline.
![]()
Note: Adding video to the timelines will allow you to create a workspace to edit your video.
Now let’s move on to how we will add the text tile to our video.
Step3 Add the Text Tile
It is time to add the text tile you will animate behind the object. To do that, follow the steps mentioned as such.:
- Go to the Titles icon on the bar above the import library.
- A drop-down option will be available on the left side.
- Scroll down to the Plain text.
- Here, you can see many text tiles to add to your video.
- You can choose anyone you like.
- The most commonly used tile is the Basic 6.
- When you add the text tile to the timeline, you must ensure that the text is of equal length to the video.
- To do that, drag the right corner of the text tile and drag it to the right to match the length of the video.
Step4 Edit the Text Tile
After you have added the text tile you desire, you need to type in the text. For this article, we will keep it simple. We will be typing a simple statement such as “Hello, World.“
- Double-click the Text tile to open the settings menu.
- After the settings menu is opened, type in the text box on the import window.
You will notice changes on the main window that your text has changed.
- After the text appears, you can make the font look as desired.
- Look above the text window, and you will see the type of text font selected.
- Click on the drop-down option and choose whatever you like.
Let’s move on to animate the text tile.
Step5 Animate the text tile
After adding text, it is time to animate it. This animation will decide how your text will appear behind the target object.
- First, you must open the text settings by double-clicking on the text tile in the timeline.
- In the settings opened in the import window, you will have to click on the animation tab in the upper left corner, aside from the Preset
- Now scroll down to where you will see the Right Roll
- Click on Right Roll and then click on the OK in the bottom right corner of the import window.
![]()
Note: You may notice now that the text appears in front of our object. Don’t worry now! We are getting there. With a few simple steps, we will see the results.
Now let us move on to the more significant part of the editing, masking the object. Again, look ahead to see how you can mask the object!
Step6 Mask the Object
To mask our object, we will need to be technical. We will begin by adding the same footage of the static object on our timeline. Follow the steps mentioned below:
- Drag and drop the static object footage above the timeline text. Make sure the text stays in the middle of the sandwich.
- We will hide the video in the first track to simplify things. In addition, this will make our editing easier.
- We will have to look in the effects library to insert the masking effect.
- You can see the Effects icon on the bar at the top.
- Click on the Effects.
- You will see the search bar at the top of the import window.
- In the search bar, type in Image mask.
- Drag the Image mask effect on the video above the text tile.
Now the masking effect has been added. But we would have to adjust so that it stays upon our object.
- Double-click on the video and the settings option will open up.
- Go into the Effects
![]()
Note: You must select your target object’s mask shape exactly as its shape.
- We have to mask out a building, so that we will need a vertical rectangle.
- After you have selected the shape of your object, we will need to convert it to the object’s size so that it only masks the building.
- To do that, scroll down below the import window to the settings.
- Here you can see the X, Y, and width settings.
- First, move the width bar so that it matches the width of the building.
- Now drag the X bar until the mask is confined to the building. You would have created the mask only limited to the building.
- Once you complete this step, click OK in the bottom right corner.
- Now un-hide the original video that you imported in the beginning.
Finally, play the video in the main play window from the beginning.
You have successfully created a text behind the object effect. Now that you know how to add text behind static objects let us move to learn how to add text to a video that has high contrast and a clean background.
Add text behind a high contrast and clean background
Besides the text can be added behind a static object, it can also be added to a clean background with high contrast. But how is it? Let’s dive into it.
Step1 Import the video into the timeline
- Import the video from the location in your PC media.
- When imported, drag and drop it onto the timeline.
Step2 Add the text tile
To add the text to your video, follow the steps mentioned below.
- Click on the titles icon on the bar above the import window.
- On the left drop-down option, scroll down to the titles.
- Select the Plain text option.
- You will notice that multiple options will pop up in the import window.
- Select the text title that suits you best.
- After you have selected the text style, drag and drop it down above your video in the timeline.
- Our next step would be to add the text.
- Double-click on the text tile. Doing so will open the settings menu in the import window.
- Type in the text that you want. For reference, we will keep it simple such as, “Hello world.”
- You can also adjust the font of your text.
- Above the type box, a drop-down option will show you the range of fonts available.
- Select the font you desire.
Now that you have added the text, it is time to animate it.
Step3 Take a snapshot
After typing in the text, you will notice in the main play window that your text still appears in front of your object. Therefore, we want to take it behind the object. To do so, first, you will need to take a snapshot.
Follow the steps mentioned to take a snapshot:
- Hide the main video. You can see the Eye icon aside from your main video in the edit column on the left side of the timeline.
- Click on the Eye icon to hide the main video.
- In the main play window, you will notice that the screen turns black, which leaves only the text on the screen.
- In the main play screen, you can notice a small camera icon.
- This camera icon is used to take snapshots of your screen.
- Click on the camera icon to take a snapshot of your screen.
- Your snapshot will now be saved in the main import window.
Now that we have taken a snapshot, we will need to import it into the timeline. Scroll below for more.
Step4 Add the snapshot
After taking it, your goal is to import it into the timeline. To perform this action, perform the following steps:
- Before adding the snapshot to the timeline, we must delete the main text tile.
- Then drag and drop the snapshot from the import library into the timeline above the video.
- Make sure that the snapshot is aligned well with the length of the video.
- If it is longer than the video, drag it from the right to match the length of the video.
- If its length is smaller than the video, drag it to the right to increase its length.
After adding the snapshot, we will have to change its blending mode.
Step5 Change the blending of the snapshot
To create the effect of your text behind the video, you must alter the main text’s blending mode. In this case, it will be the snapshot we took.
![]()
Note: Changing the blending mode of the snapshot will allow it to blend with the transparent background and will create the effect of the text behind the object in the video.
Follow the steps mentioned below to change the blending of the snapshot:
- Double-click the snapshot.
- If you select the compositing tab, the blending options will pop up.
- From default, it would be set to Normal. Click on the Normal
- It will show a drop-down option.
- Scroll down below until you can see an option labeled Then click on Overlay.
- And press OK in the bottom right corner to confirm your changes.
The text can be blended with the background.
- Click on the Eye icon to un-hide the video from the timeline.
- Now play the video from the start from the main play screen to see the final changes.
Congratulations! The above steps allow you to add text behind objects in your videos.
Conclusion
Modern media is full of creative content. And if you are a content creator that wants to make it through the world of YouTube and video creating, you need to be the best. You can only be the best at what you do if you keep pushing the boundaries of your creativity.
Adding text behind objects could be the first step in making your intros shine with creativity and innovation. It allows you to maintain and build your viewing audience. The more the audience, the more your content gets watched!
Also read:
- New In 2024, How to Set Up Twitch Green Screen
- New How to Create Loop Videos with Filmora
- Updated In 2024, Cropping a Video in Final Cut Pro Step by Step
- Updated 2024 Approved Best Animated Text Generator
- 2024 Approved Have You Ever Wanted to Speed up or Slow Down a Video? Maybe It Was Too Long, or You Wanted to Draw Out an Exciting Part of the Video without Having to Watch the Boring Parts
- Updated In 2024, 5 Methods to Make a Fake Facetime Call Video
- 2024 Approved How to Rotate Video in iMovie with Alternative
- In 2024, How to Use Kahoot! On Zoom
- Updated 2024 Approved Recording Video in Slow Motion Some Considerable Points
- New Learn How to Make Interactive and Fun Video Collages Using Kapwing Collage Maker, an Easy-to-Use Tool for All Your Collage-Making Needs
- In 2024, 6 Instant Ways to Create Windows 10 Slideshow
- How To Use Voicemod On Discord Desktop+Mobile
- Updated 10 Innovative AR Teaching Examples to Tell You What Is AR in Teaching for 2024
- Looking for Final Cut Pro Alternative App for Your Android Smartphone or iPhone? Here Is the List of the Best FCP Alternative Apps for Android and iOS Users
- In 2024, The Ultimate Guide to Make a Text Collage
- New Best Text Animations In After Effects
- Updated Adobe Premiere Pro Rec 709 LUTs Finding The Best Choices
- 2024 Approved How to Create Photoshop GIF The Easy Way
- How to Edit Text in Premiere Pro
- New Discover How to Download Mobile Phone Green Screen Videos and Pictures for Free. Elevate Your Content with HD Quality Green Screen Frames
- Updated 2024 Approved All Things About Adding Effects In Kinemaster
- Vintage Film Effect 1990S - How to Make for 2024
- Updated 2024 Approved 10 Best Music Video Templates to Make Your Video Popular
- New Whats The Best Laptops For Video Editing
- New 2024 Approved How To Create A Green Screen Video In After Effects
- 2024 Approved How To Trim Video In Premiere Pro in Different Ways
- In 2024, Easy Ways to Manage Your Sony Xperia 1 V Location Settings | Dr.fone
- In 2024, How to Unlock Poco X6 PIN Code/Pattern Lock/Password
- 3 Effective Methods to Fake GPS location on Android For your Huawei Nova Y71 | Dr.fone
- How to share/fake gps on Uber for Samsung Galaxy F15 5G | Dr.fone
- Guide How To Unbrick a Bricked Xiaomi Redmi 13C 5G Phone | Dr.fone
- In 2024, Remove the Lock Screen Fingerprint Of Your Samsung Galaxy F15 5G
- How to Transfer Photos From Itel A05s to Samsung Galaxy S21 Ultra | Dr.fone
- How To Revive Your Bricked Asus ROG Phone 7 Ultimate in Minutes | Dr.fone
- In 2024, Hacks to do pokemon go trainer battles For Xiaomi Redmi Note 12 Pro 5G | Dr.fone
- Easy steps to recover deleted data from Tecno Spark Go (2024)
- How to Turn Off Google Location to Stop Tracking You on Apple iPhone 14 Pro Max | Dr.fone
- How to restore wiped music on Honor 90
- In 2024, 3 Facts You Need to Know about Screen Mirroring Poco X6 Pro | Dr.fone
- Is GSM Flasher ADB Legit? Full Review To Bypass Your Motorola Moto G13FRP Lock
- In 2024, How to Change Location on TikTok to See More Content On your Nokia C12 Plus | Dr.fone
- In 2024, How to Unlock Apple iPhone 6s Passcode Screen?
- Pokemon Go Error 12 Failed to Detect Location On Samsung Galaxy A24? | Dr.fone
- In 2024, Here Are Some Reliable Ways to Get Pokemon Go Friend Codes For Tecno Spark 10 5G | Dr.fone
- Title: New In 2024, The Ultimate Guide to GIF for Discord Profile
- Author: Chloe
- Created at : 2024-04-24 07:08:38
- Updated at : 2024-04-25 07:08:38
- Link: https://ai-editing-video.techidaily.com/new-in-2024-the-ultimate-guide-to-gif-for-discord-profile/
- License: This work is licensed under CC BY-NC-SA 4.0.
