
New In 2024, Top 8 Sites to Download Glitch Transition for Premiere Pro
Top 8 Sites to Download Glitch Transition for Premiere Pro
Glitch effects have made a comeback on the internet. You are free to use, download, and play with them. But the question that comes to everyone’s mind is which website is reliable for it? What are the best effects to download and use? We’ll go through 8 different websites where you can get free glitch transitions. Every website has its personality and Screen Glitchy Effects. So, let’s start looking at some of the top ones right away.
8 Best Sites to Download Glitch Transitions for Premiere Pro
1. Motion Array
You may create a variety of glitch effects with Motion Array. Adobe Premiere Pro and Adobe After Effects are among the best systems it supports. You may get some of the most excellent transitions and aesthetic effects with Adobe Premiere Pro, such as the vertical rhythmic glitchy start, geometric openers, and more.
You can make the most incredible shaky slideshow or even abstract promo slideshow. Download these fantastic effects like neon-colored glitch logos, quick glitch openers, and other bizarre effects.
2. Velosofy
Velosofy, is the next best place to download Glitch Effect for free. It features some of the most stylish effects like modern glitch intro templates, glitchy logo designs, and much more.
This site allows you to download an unlimited number of files. Other products supported by Velosofy include the well-known After Effects, Adobe Photoshop, and Premiere Pro.
3. Storyblocks
Storyblocks is the next in line. The site supports Adobe After Effects and Premiere Pro. Transitions, distortion, logo reveals, VHS, and more effects are available here. The Glitch Transition bundle includes greens and blues distortion.
Premiere Pro provides several packs containing various elements. Color Bars Data Glitches is Premiere Pro’s most impressive collection. It is a one-of-a-kind effect seen on Storyblocks, and there are plenty more like it. In addition, Storyblocks includes footage and background as well.

4. Placeit
Placeit is a website where anyone can download and use any glitch transition. Almost every application and piece of software is supported on the site. You have a long list of options on Placeit. Go ahead and select any of the numerous screen effects.
One can also make a slideshow with Placeit and its spectacular glitch effects. Add other astounding effects with a VHS feel to make the video look more impressive.

5. Adobe Stock
Adobe Stock is another excellent website that offers you free glitch transition. The site supports a variety of applications and has some incredible effects. You will like the effect that is “Simple & Bold”. As its name implies, the glitch effect is simple, yet it is highly bold because of the neon-bright colors.
Another astounding effect is 12 Glitchy Transition. The Anaglyph Glitch Effect is a photoshop effect that is perfect for video creators.

6. Motion Elements
You should never limit yourself to the basics when you have sites like Motion Elements. You may create a professional film by downloading and applying the various glitch art effects.
The site works well with multiple programs, including After Effects and Premiere Pro. It features some bizarre but entertaining templates like neon glitchy transitions.

7. MixKit
With Mixkit, you can create unique and spectacular screen glitch effects.
Mixkit supports Premiere Pro and After Effects. You can easily employ its mind-blowing color effects to give your material a whole distinct feel. It includes digital static transitions, urban glitch openers, logo animation, and other elements.

8. Videohive
Videohive has over 7000 glitch templates. Each of the 7000 effects is unique and mind-blowing.
On the other hand, Premiere Pro has some jaw-dropping aesthetic effects. You can use elegant and trendy ones like the urban opener, glitch transition, and many more on Premiere Pro. Videohive’s Trailer effect is its most attractive feature.
5 Newest Glitch Transition Packs for Premiere Pro
Are you looking to add some extra colorful movement to your movie? There are many aesthetic effects and transitions available to add to the videos. You can create high-level YouTube videos, birthday clips, and holiday vlogs with Glitch art.
We’ll help explore these transition packs in Premiere Pro. Be sure to go to the website and check out the tutorials of these packs. You’ll find various effects within them.
1. FILM CRUX Glitch Transitions Vol. 1
This new pack by Film Crux has 15 free drag-and-drop free glitch transitions. These are designed specifically for Adobe Premiere Pro. You can just download the file and drag it into your Premiere Pro ‘Presets’ folder on your computer. Add the effects and enjoy the animated video!!
2. Glitch Templates for Premiere Pro by Mixxit
Mixxit has 30 Free Premiere Pro Templates for Glitch. All these templates are free to download for Premiere Pro. You can find every type of transition you need. Edit and add textures, make the videos enjoyable with zoom and outs and different sound effects.
3. 95+ Glitch Transitions - Premiere Pro by flatpackfx
You can try any of these glitch transitions and transform your videos. Simply drag and drop your videos to use with Adobe Premiere Pro. Moviemakers and video editors can save time and create unique-looking transitions all inside of Premiere Pro.
4. FREE 30 Glitch Transitions Preset for Premiere Pro by EnamAlamin
You can make your videos exciting with these 30 animated glitch transitions. The sound effects are also available to add to the videos. You’ll find detailed tutorials on the website. You don’t need any plugins. Just Drag & Drop the movie on Premiere Pro.
5. 10 Free Glitch transitions for Premiere Pro by 911templates
You can get 10 free digital distortion effects on 911templates. Import the video on Adobe Premiere Pro and turn them into art masterpieces. These effects can help you create a stunning opening of the video and the striking transitions between shots.
With these 5 newest transition packs, you can edit your video in many ways. The film industry has been using these transitions to impact the viewers. So, choose the styles that go well with your movie and catch your eyes. These are seen commonly in horror films to keep the viewers engaged. You can even add them on TikTok videos and other product description videos.
Conclusion
Glitch Transitions is a fun way to “transition” from one shot to the other. Drag and drop any of these transitions over two or more clips on your timeline. You can insert these free transitions nicely for educational videos, YouTube videos, event movies, or even documentaries. It adds fun, energetic energy to the project.
These transitions can make your work appear more professional and add to the final movie. We hope this article can help you find free assets for your next video project.
How To Split Screen On Tiktok
TikTok is probably the most popular video-sharing app in the world right now. Many TikTokers have become famous for making videos that have a significant impact and encourage creativity and new ideas. One of the most popular TikTok trends is the split-screen effect. You’ve probably seen a lot of TikTok split-screen videos with cool effects that made you wonder how the user split their screen. Becoming skilled in using TikTok effects is not as difficult as it might look. It only requires a significant amount of practice. Read on as we show you how to make a TikTok split-screen video.
Using CapCut To Split Screen
CapCut is the official free TikTok Video Maker and Video Editor with Music for TikTok that is multifunctional. Its interface is quite similar and easy to use.
CapCut includes free advanced capabilities such as keyframe animation, stabilization, and Picture-in-Picture (PIP). These are in addition to its fundamental functions, such as video editing, adding stickers, text, and music.
Steps to Split Screen Video with CapCut On Android and IOS Devices
- To use the app, you need to install it first. iPhone and Android users can download CapCut. Navigate to the appropriate app store of your choice and download CapCut.
- After installation, launch the app.
- Then go ahead and grant CapCut permission to view your camera roll. Incorporating video clips into your project has never been easier. Go to the app’s main screen and select “New Project“ from the drop-down menu.
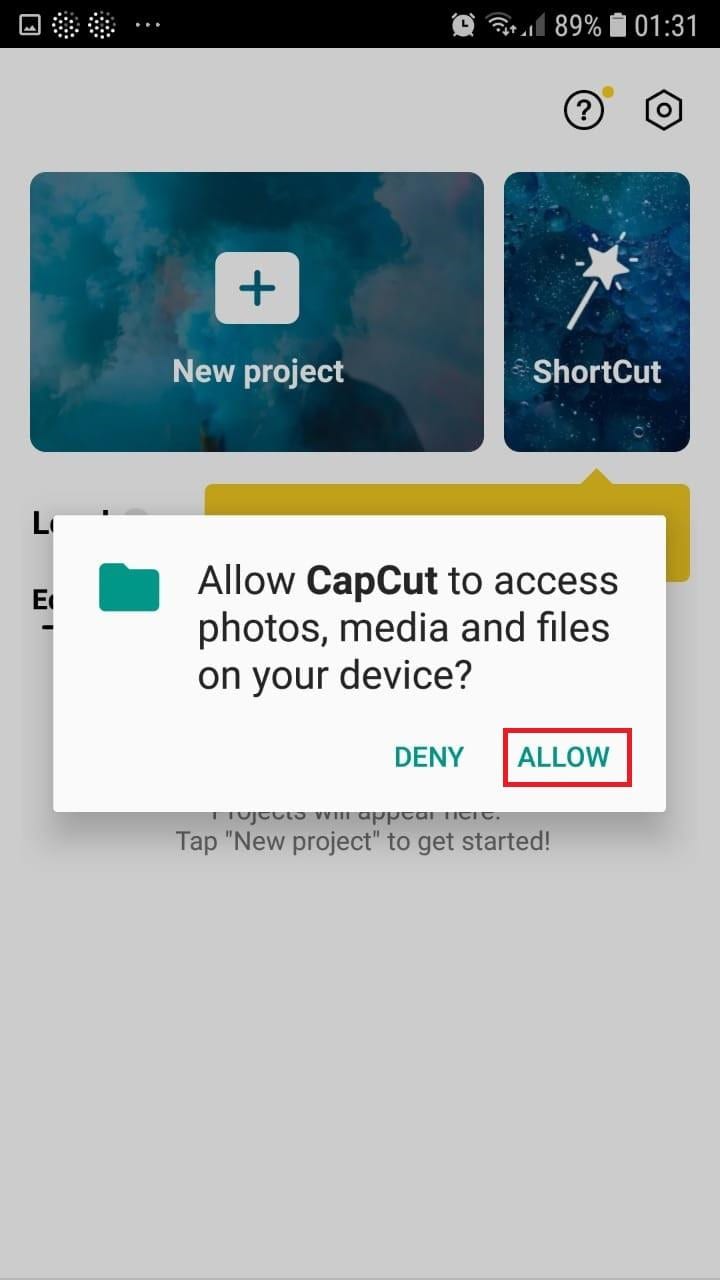
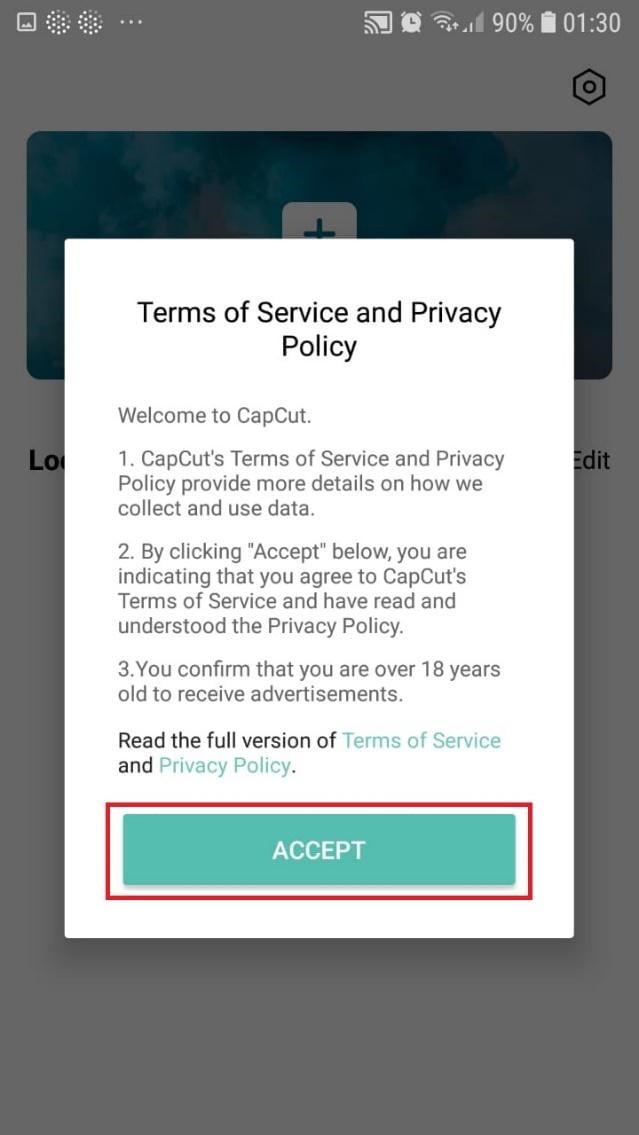
- To confirm your selection, click the green Accept This confirms that CapCut requires access to your photographs to function correctly. Tap on the button on the following pop-up window to gain access to all the photos. This is a one-time process that must be carried out the first time you launch the application.
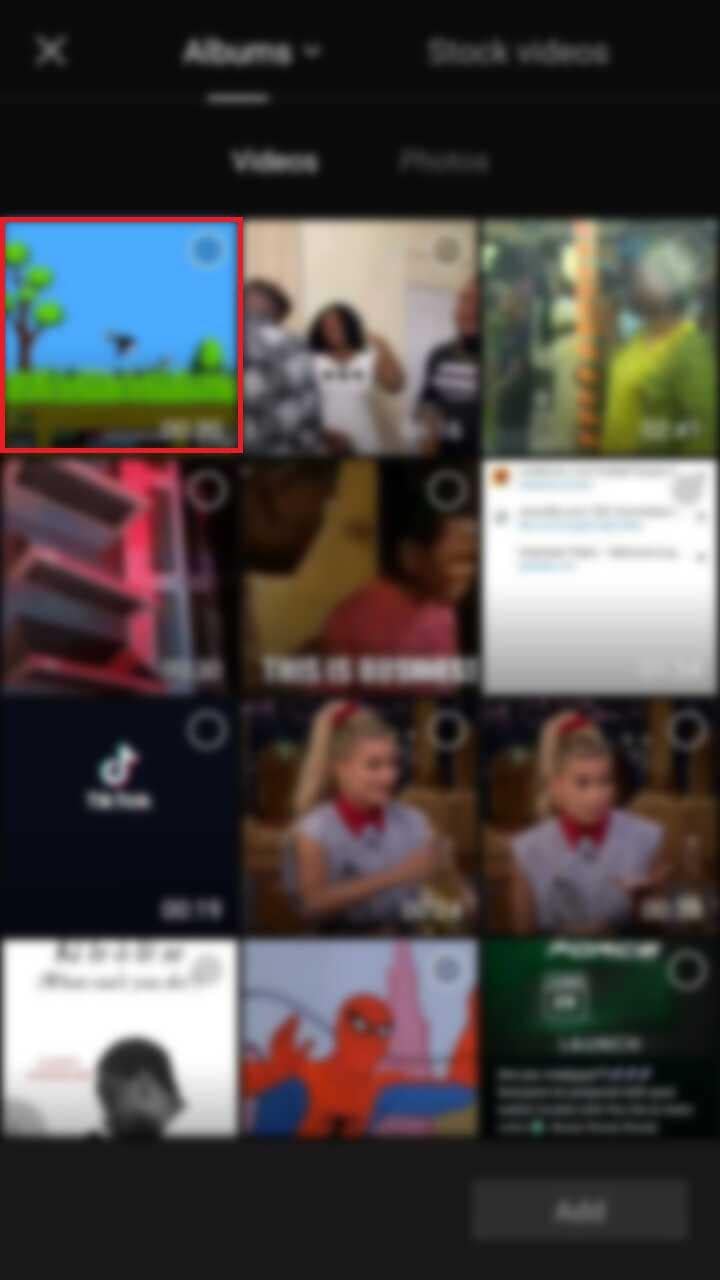
- Begin a New Project. After opening the app, press the “New Project“ icon to bring up a new screen showing your device’s videos.

- Choose a video clip. Locate the desired video clip for your project by scrolling through the pages displaying your camera roll. Tap the video’s thumbnail and then tap the “Add“ icon in the screen’s lower part.
- Get familiar with your workspace. Upon uploading your first clip, CapCut leads you to the primary workspace. This is where you will spend most of your time within the app. The preview panel, the timeline, and the toolbar are in order from top to bottom.
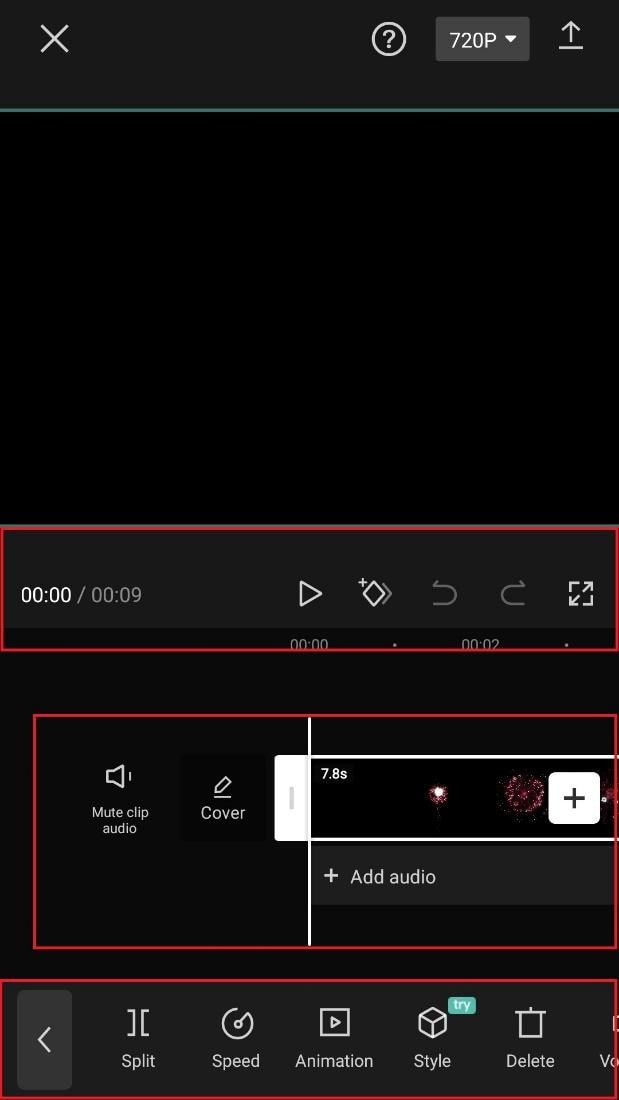
- View the toolbar and timeline. They represent your screen’s bottom half. The timeline, located below the preview panel, is where you’ll make all your adjustments. You can access all your video editing tools, including split, text, audio, effects, stickers, and more, on the toolbar at the bottom of your screen.
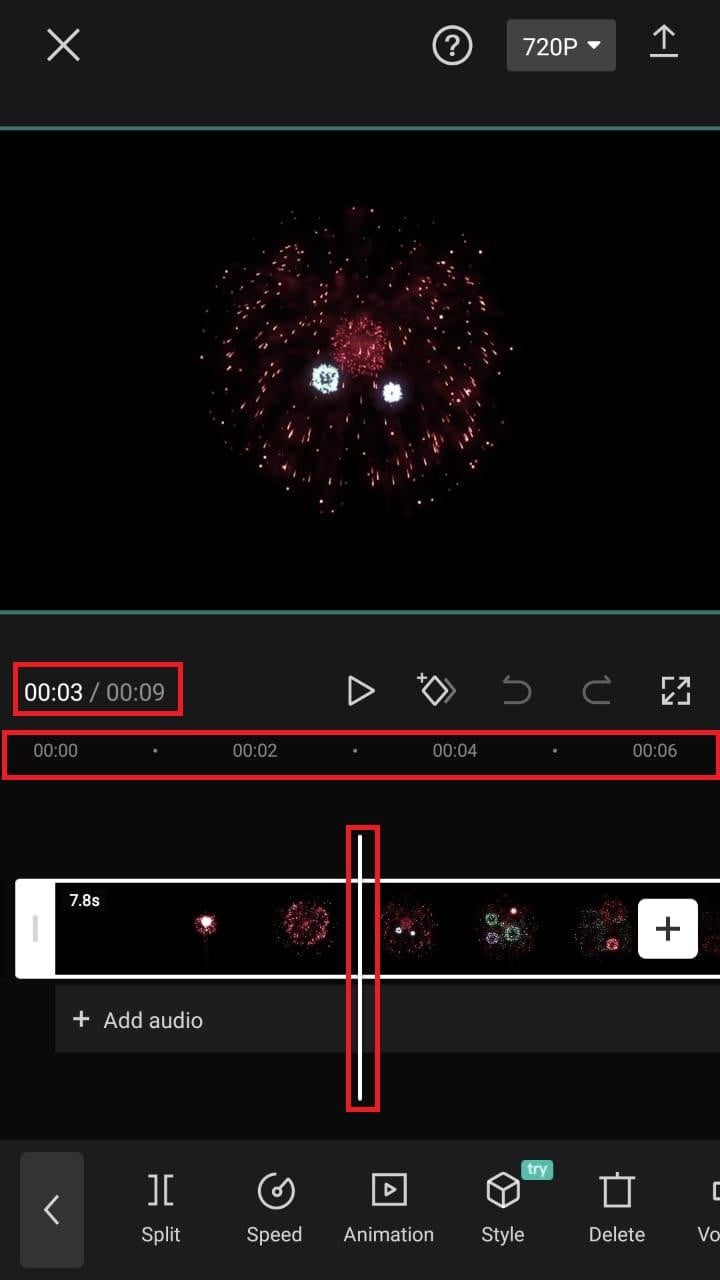
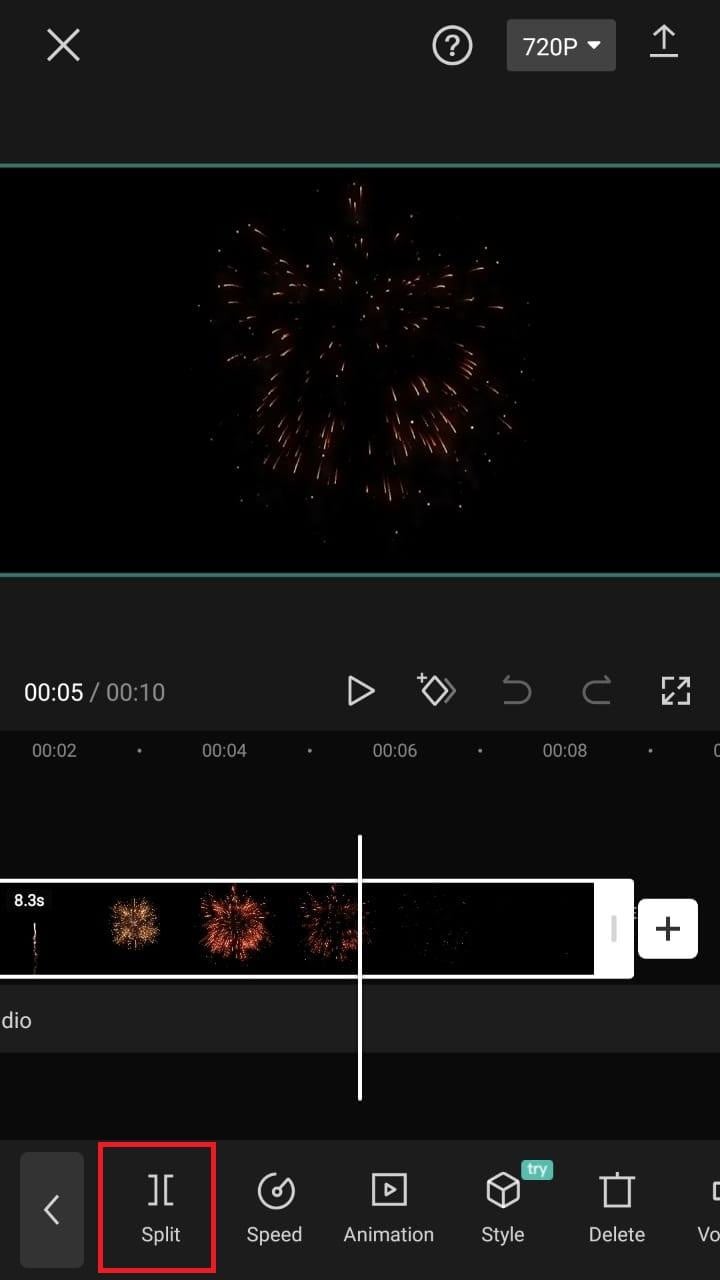
- Split video clips. To split a video clip in half, move the play head to the desired location on the timeline. Tap on your clip, then press the “Split“ toolbar icon. Your result now shows two different clips, not just one.
A Better Split-Screen Effect Video Editor
Filmora is one of the best free HD video makers and video editors with several functionalities, including text, backgrounds, filters, special effects, emoji, audio, and special effects.
Filmora is a feature-packed video editor which has a variety of tools to work with. With this video editor, producing memes, videos with images, pictures, music, stickers, and sound effects and editing videos for YouTube, Twitter, WhatsApp, Facebook, TikTok, and Instagram is simple and entertaining.
Free Download For Win 7 or later(64-bit)
Free Download For macOS 10.14 or later
Steps to Split Screen Video with Filmora
- Download Filmora from the App store
- After installation, launch it.
- Click on “Continue” to continue to use the app.

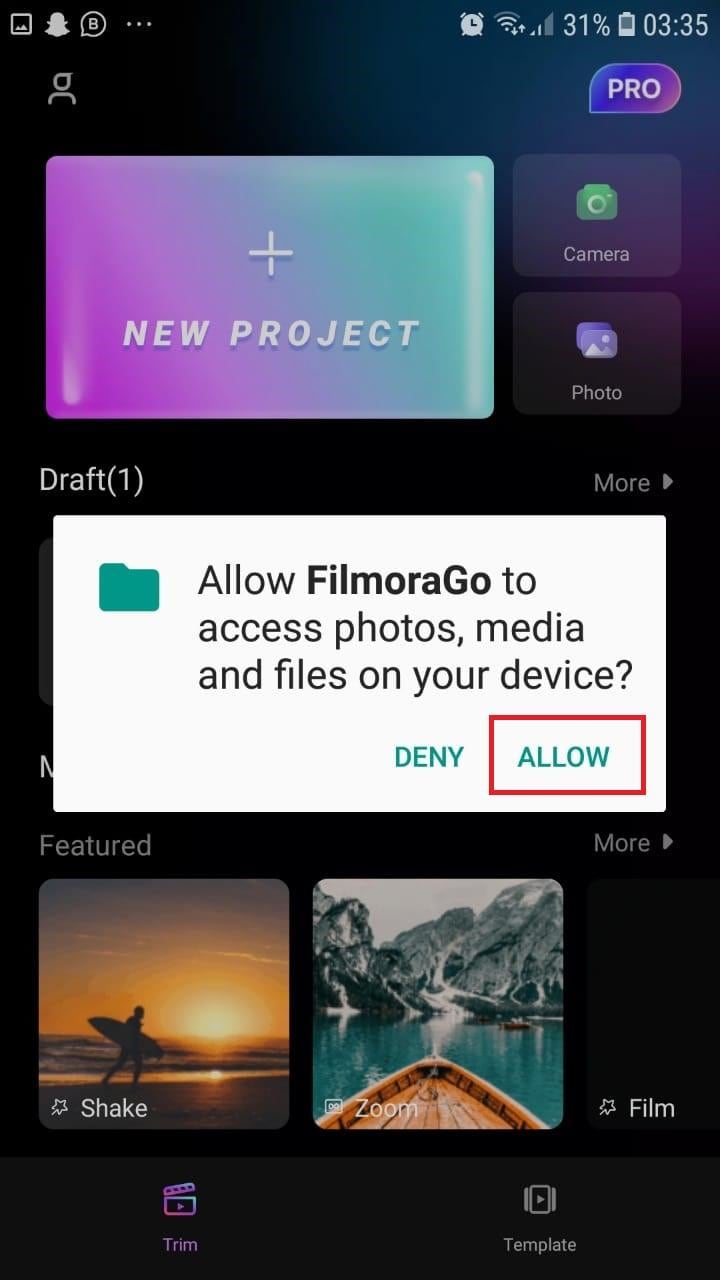
- Click on Allow to grant Filmora access to your photos and videos.
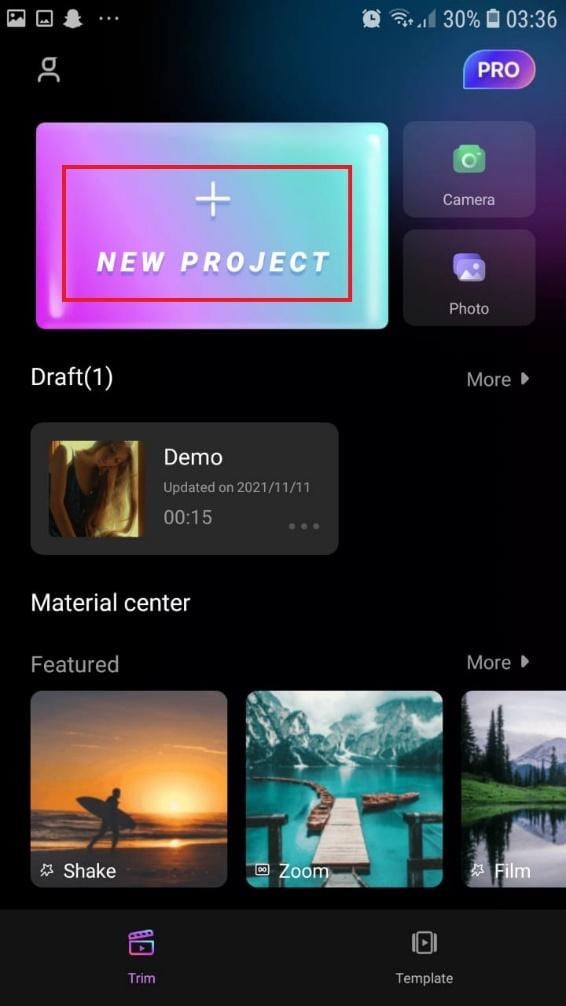
- You can now tap on “New Project” with the + Symbol.
- Select your desired video and tap on “Next” at the bottom right of your screen
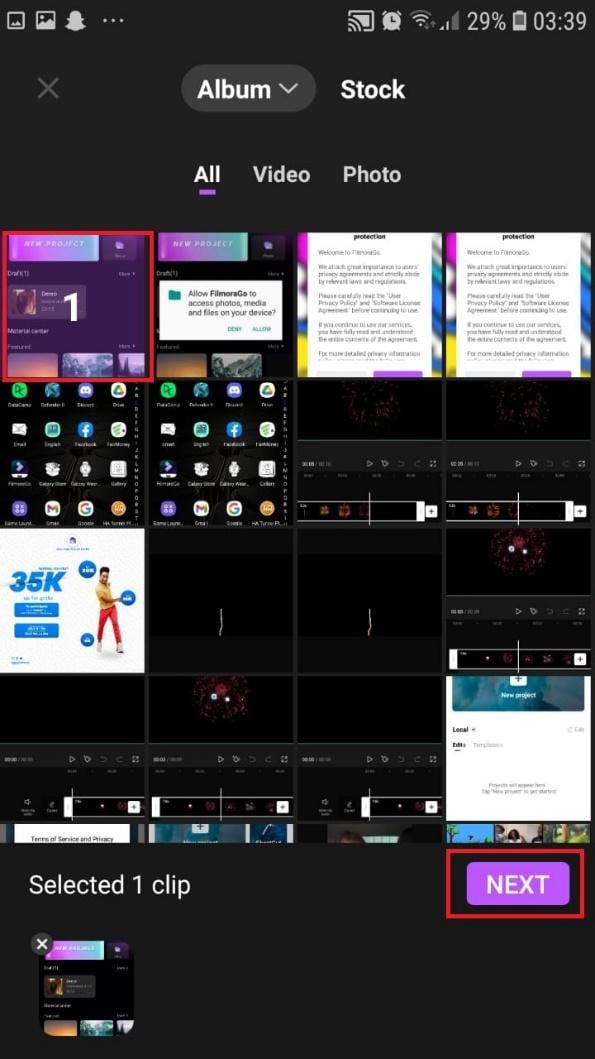
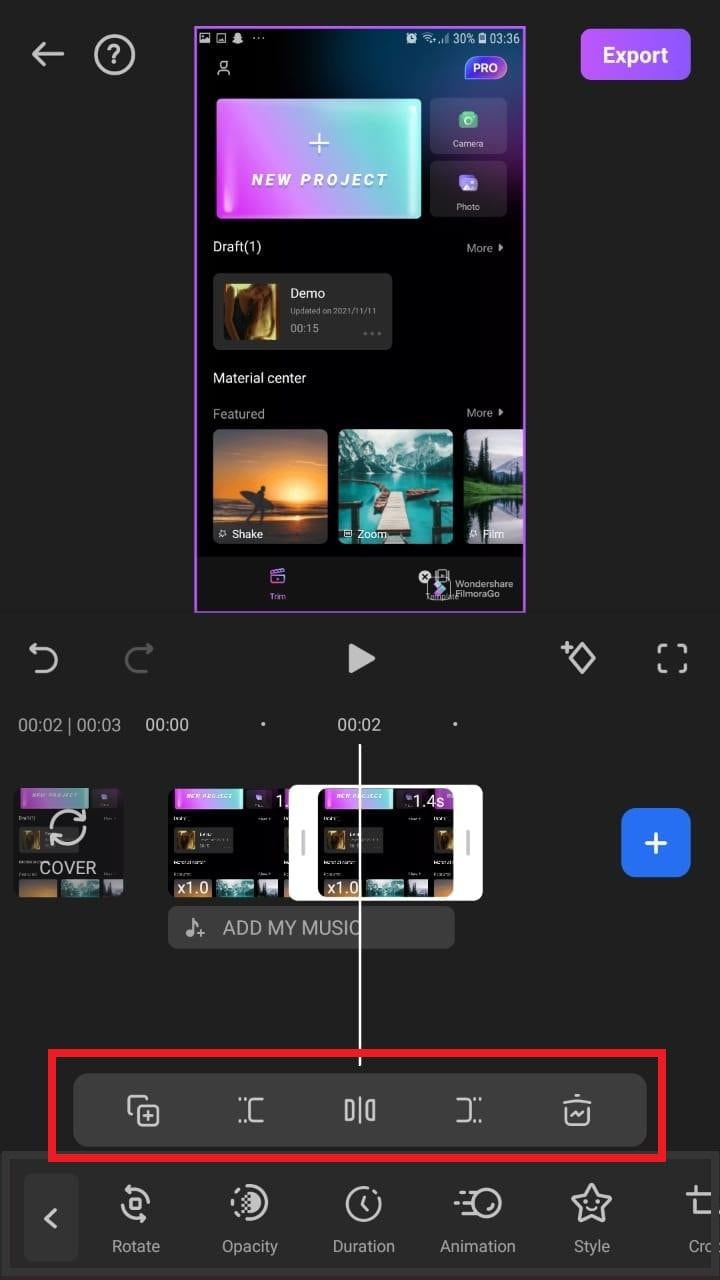
- You can select various options from the bottom of your screen to edit the selected video the way you like.

- Click on trim, and then you will see the different split-screen and collage feature options. Pick any that appeals to you.
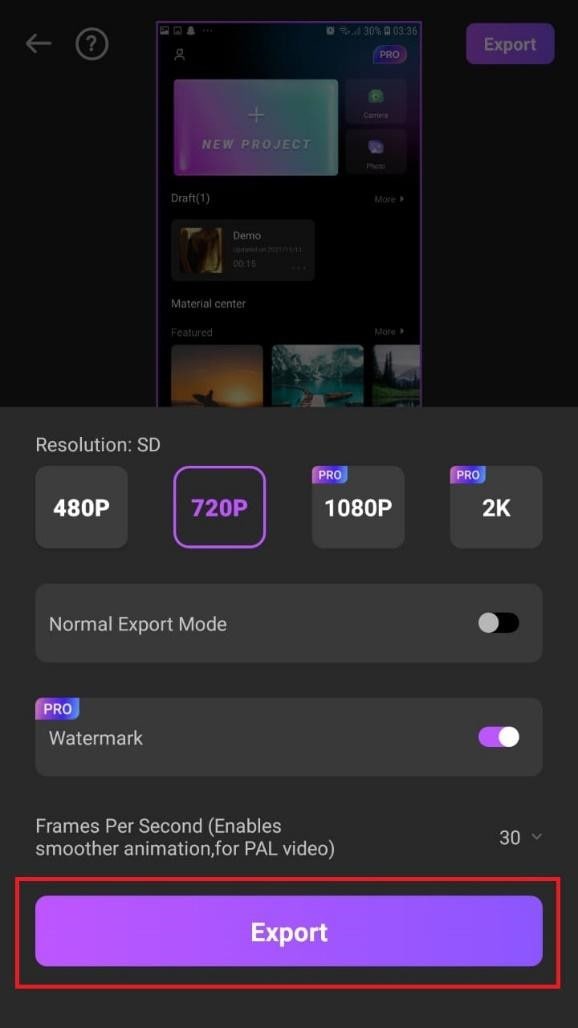
- When you are done with the editing, tap on “Export” at the top right of your screen.

- Go ahead and tap on “Export” on the next screen. Your video will be successfully exported and saved to your camera roll.
Using Filmora is very efficient in splitting your videos and making collage features for TikTok. It is a very simplified app available on both the Google Play Store and Apple Appstore.
Conclusion
TikTok is a platform that users use worldwide to create and share content. It could be pictures, videos, reels, or any other media type. Some people create videos for their audience on TikTok to educate them, while others do it to entertain them.
In any case, the goal is to build a more significant following on TikTok and garner greater attention from its users. You could even make money off the app.
One of the methods to impress your fans and explore multiple possibilities to build unique reels is to use the TikTok split-screen and collage feature effect available on TikTok. Although there are a few different ways to create a Split Screen on TikTok, the steps highlighted in this article are the most straightforward.
Free Download For macOS 10.14 or later
Steps to Split Screen Video with Filmora
- Download Filmora from the App store
- After installation, launch it.
- Click on “Continue” to continue to use the app.
- Click on Allow to grant Filmora access to your photos and videos.
- You can now tap on “New Project” with the + Symbol.
- Select your desired video and tap on “Next” at the bottom right of your screen
- You can select various options from the bottom of your screen to edit the selected video the way you like.
- Click on trim, and then you will see the different split-screen and collage feature options. Pick any that appeals to you.
- When you are done with the editing, tap on “Export” at the top right of your screen.
- Go ahead and tap on “Export” on the next screen. Your video will be successfully exported and saved to your camera roll.
Using Filmora is very efficient in splitting your videos and making collage features for TikTok. It is a very simplified app available on both the Google Play Store and Apple Appstore.
Conclusion
TikTok is a platform that users use worldwide to create and share content. It could be pictures, videos, reels, or any other media type. Some people create videos for their audience on TikTok to educate them, while others do it to entertain them.
In any case, the goal is to build a more significant following on TikTok and garner greater attention from its users. You could even make money off the app.
One of the methods to impress your fans and explore multiple possibilities to build unique reels is to use the TikTok split-screen and collage feature effect available on TikTok. Although there are a few different ways to create a Split Screen on TikTok, the steps highlighted in this article are the most straightforward.
How to Upload Videos to Twitch? Here’s a Guide for Beginner
Recently, Twitch announced that its users can now upload video to Twitch, and there is no need to broadcast or live stream on Twitch anymore. Uploading videos to Twitch can be an excellent way to share your videos with your audience.

Besides this, you don’t need to upload videos on other video-sharing sites. But if you are using this platform for the first time, then you must be wondering how to upload video to Twitch. Don’t worry, as we have got your back. Keep reading to explore the process, and it is quite easy.
Part 1: How to Upload Videos to Twitch?
- First of all, you need to open Twitch in any browser. Just type twitch.tv in the browser’s address bar and click on Enter. Then you need to log into your account.
- Once done, you can see your account with your profile picture in the screen’s top-right corner. You can find it next to the Get Bits option. Click on it to access the drop-down menu.

- Then you need to choose the Video Producer option available in the drop-down menu. A new page will open, and you can see the Creator Dashboard from where you can begin uploading your video or hosting a channel on twitch. If this option is unavailable, then you can’t upload your videos.
- Now, you need to click on the upload option. If you have not uploaded any video, you will find this area blank. You can just drag and drop your desired video to upload video to twitch.

- Choose the video that you want to upload and click on the Open option.
- Now, the upload process will begin. Wait for a few seconds to finish the process. Once done, click on the video, and the details window will come up.
- Here you need to edit your video’s metadata information. You can set a title, the category and a description for your video. Besides you can also edit the language and thumbnail here.
- After that, you can click on the Save Changes option that you can find in the upper right corner.
- Now you need to click on the Publish button to post your video on your channel. You can follow the process while hosting a channel on twitch to upload the videos.
Part 2: Why can’t you upload videos to twitch?
Well, it may be noted that not all Twitch users can upload video to twitch. For now, this feature is only available for Twitch partners and affiliates. So, first, you need to become an affiliate or partner, and then you can easily upload your videos. Besides, you should also keep the video upload guidelines in mind to avoid any issues.
- You can only upload video formats like 1080P videos, videos with up to 190mbps bit rate. The platform supports FLV, MOV, AVI and MP4 file formats.
- Besides, using one account, you can upload only 5 videos simultaneously. And within 24 hours, you can do a maximum of 100 uploads.
Now you know that only Twitch partners or affiliates can upload video to twitch, it is crucial for you to know how to become a Twitch affiliate or partner. Have a look at the below-given section for your answer.
Part 3: How to be a twitch affiliate or partner?
In general, streamers on Twitch can’t earn money from their content, and they can only make money from donations. However, if you have more followers, consistent viewers and hosting a channel on twitch regularly, then you can try to become a Twitch affiliate or partner. Some benefits that you can enjoy with this are:
- You will be able to sell your games
- You can get subscriptions.
- You will enjoy chargeback protection.
- It will be easier for you to get Twitch Bits.
- You can now earn revenue through advertisements.
To become an affiliate on Twitch, first of all, you need to monetize your content, i.e., stream. Now, let’s have a look at some requirements to become an affiliate.

- You must have at least 50 followers.
- Make sure you have completed a minimum of 500 total minutes broadcast within one month or in the last 30 days.
- In the last 30 days, you should have at least seven unique broadcast days.
- At least 3 viewers per stream in the last 30 days.
Steps to Become an Affiliate
- Visit the Twitch website and log into your account.
- Find the Notifications icon and click on it.
- There you can see the Get Started option. Click on it.
- Sign the affiliate agreement and then give your tax information.
- Then choose your payment location to complete the procedure.
Requirements For Becoming a Partner
Once you receive your affiliate status, you can become a partner. But there are some requirements that you need to keep in your mind.
- You must have 75 average unique viewers per day in the last 30 days.
- Have streamed or hosting a channel on twitch for 12 days in the last 30 days.
- You need to stream for 25 hours in 30 days.
Steps to Follow
- Visit Twitch and log into your account.
- Now click on your Profile icon and then click on the Creator Dashboard option.
- Click on the arrow mark located near Insights and then click on Achievements.
- Click on the Apply option located under the Patch to Partner tab.
Once applied, Twitch will reply to your application within 7 business days. Well, if you face rejection, then you need to build a stronger audience and apply for it again later.
What Do You Mean Stay Active?
Chat is an important part of Twitch, and it lets you interact with your fellow members of the community as well as streamers. By keeping your chat active, you can let others know that you are ready to interact with them. This, in turn, can help you to increase your followers.
Part 4: What’s The Alternative to Twitch for Creators?
1. YouTube Gaming
Well, even though YouTube Gaming lacks in-game overlays, it offers other features. The platform offers live gaming broadcasts, channels, chat rooms and more. Here the viewers don’t need to subscribe to watch the content.
2. Smashcast
If you are a gaming fan, you must have heard about Hitbox and Azubu. They came together to form Smashcast. This provides the users with perfect JavaScript and HTML integration. If you are a gaming partner, esports team, viewer, organizer or streamer, then this platform will be an excellent option for you. Compared to Twitch, Smashcast offers better quality esports streams.
3. Facebook Gaming

Facebook also has introduced its own gaming and streaming platform. Facebook Gaming comes with an easy-to-navigate interface. It has a chat room and also allows you to watch videos from different social media platforms, like Twitter, Instagram, and YouTube. Besides, it offers some amazing features, such as different monetization options, interactive live-streaming, simple streaming setup, stream analytics and more.
4. DLive
While YouTube and Twitch have some high bars for monetization, they don’t offer sufficient profit to the creators. DLive is here to solve that issue. This platform rewards content creators as well as viewers. It charges a flat fee and takes around 20 percent of total revenue. On the other hand, viewers also get rewards for their engagement.
5. Ustream
This platform offers more than just gaming video streams, such as sports news, live streams, talk shows, podcasts and more. Some reviews say Ustream provides users with a better and faster streaming service. Besides, it is available for different platforms, such as PS4, Mac, Windows, iOS, and Android.
6. Vimeo

Vimeo has all the features, such as a live chat system and other features that a streaming platform must have. You can easily access its analytic dashboard to know your audience in a better way. It also has many integrations such as Figma, Meta, WordPress, Shopify and more. So, uploading videos directly from your website to Vimeo will not be a challenging task.
FAQs
How Long Do My Videos Stay on Twitch?
The answer is that it depends. If you are a Twitch Prime user, Turbo user or a Twitch partner, then once you upload video to twitch, it will stay for 60 days. For regular broadcasters, their videos will remain active for 14 days. Just follow the above-mentioned steps to successfully upload your videos.
Can I Upload Videos to Twitch?
You can upload your video to twitch if you become a Twitch affiliate or Partner. Regular streamers don’t have this feature for now. Just meet the criteria required for this and apply for an affiliate. This can be a great way to promote your brand as you can leverage this amazing form of influenced marketing.
Free Download For Win 7 or later(64-bit)
Free Download For macOS 10.14 or later
Free Download For macOS 10.14 or later
How to Use Motion Tracking in Video Editing
Motion tracking makes it easier to follow the movement of objects and provide the sensed data to a program for additional processing. Motion tracking involves recording an object’s movements that match a previously stored motion template. This has a wide range of uses, including in robotics, entertainment, sports, the military, and the entertainment industry. Additionally, it is utilized in the creation of video games and films. While motion tracking is frequently referred to as match movement in the film and video game industries, motion tracking is frequently referred to as motion capture in other contexts.
With that said, let’s begin!
Part 1. Learning to Understand Motion Tracking
We need to ask the really crucial question now that we have a fundamental understanding of what it is. What in the world am I going to do with this? In order to do that, let’s quickly review some excellent applications for motion tracking. You could,
Utilize tracking information to stabilize motion
Add text or solids as additional compositional elements
Add 3D elements to 2D footage
Use effects or color gradation methods
Replace the screens on your computer, mobile device, or television
These are just a few examples of how motion tracking might be useful. You need to be able to track motion in compositions of any complexity.
Part 2. What software do you need?
There are numerous options for motion tracking applications. With advantages and downsides, we’ve compiled a list of the finest motion tracking programs. The following are the best video editors for motion tracking in our opinion:
Filmora
Wondershare created Filmora to enable you to fully express your creativity. FilmoraPro is the best option if you want to make some high-level modifications to your video. In addition to the pre-sets offered, it allows you to tweak the effects for a more expertly edited appearance.
![]()
Motion tracking is currently its best feature. You may track a skater as they race across the ice or follow a boat as it travels. Use the motion tracking feature to add drama to your videos. You won’t have to worry about getting lost because FilmoraPro features an amazingly simple UI. Simply click on the person or object you wish to track and choose Motion Track from the Effects menu.
Free Download For Win 7 or later(64-bit)
Free Download For macOS 10.14 or later
Blender
Open-source and cost-free motion tracking software is called Blender. It’s an excellent 3D creating tool. Modeling, rigging, animation, simulation, rendering, compositing, video editing, 2D animation, and of course motion tracking is all supported.

Kdenlive
A motion tracker was recently added to Kdenlive, an open source and free video editing tool, under its Effects section. This program analyzes an object’s tracking information and automatically generates a map of the object’s motion. Following that, you can align a title, an image, an icon, and any other 2D elements to the moving object using this track. Motion Tracker’s regularly updated algorithms are one of its key characteristics, which leads to a higher tracking success rate and faster tracking speed.

HitFilm Express
The free edition of HitFilm Express is a wonderful place to start if you’re learning the fundamentals of 2D motion tracking. To get superior tracking results, it offers two motion tracking types: Single Point for tracking simply position and Double Points for tracking position, scale, or rotation of an object. You can either steady the video with the tracking data or change the point with a CG object.

Its optical flow tracking technique is outstanding. It successfully tracks a moving item that changes into multiple shapes or is veiled for a few frames by figuring out the brightness flow of the moving object. Beginners can therefore save a great deal of time and effort when designing settings to deal with complex frames.
VEGAS Pro
In VEGAS Pro 18 and later, auto motion tracking is a freshly upgraded function. Despite its late birth, it included the Mocha masking and planar tracking technology, winner of an Academy Award. It enables you to accurately attach images and messages and even adjust for shifting perspective. You can hide faces, license information, and any private objects using this capability.

Adobe Premiere Pro
Because of its superior editing capabilities, Premiere Pro seems to be a requirement for anyone learning video editing. Premiere Pro, however, has a limited number of presets and automatic tools in order to provide consumers the most control.

When masking and blurring a face, motion tracking only works with the auto option. If not, you will need to enter and alter multiple keyframes to add text or resize the video, or you will need to install an extension to convert the mask’s tracks to any transformed parts.
PowerDirector
Due to its simplicity of use, PowerDirector is unquestionably among the greatest motion tracking programs currently available. It accomplishes complex effects without having an advanced learning curve, in contrast to other video editing tools. As demonstrated in the introductory video up top, a simple interface may be used to easily track and manage one or more motion-tracked items.

With this program, creating a simple motion track may be done in only three easy steps. This editor is for you if you want to finish the job swiftly and painlessly and are new to intermediate video editing.
Part 3. Differences between camera tracking and motion tracking?
Making the audience forget that there is a camera in the room is one of the primary goals of filmmaking. To engage the audience, tracking shots like camera tracking and motion tracking are helpful. Tracking shots provide filmmakers the chance to immerse their audience more deeply in the storyline of their characters. I discovered that there is some ambiguity around how motion tracking and camera tracking differ from one another. I’ll explain where the confusion might have originated and give you examples of how to use both strategies.
What distinguishes motion tracking from camera tracking? Their differences are due to how they view the course of action. From a camera’s perspective, motion tracking monitors an object’s movement. The scenario is more immersive thanks to camera tracking, which detects the movement of the camera and presents it as though you are in a virtual or augmented reality environment.
We’ll examine tracking’s development in the movie and its significance to the business. What it is and how it affects the cinematography industry. Along with the many software used for both motion tracking and camera tracking, we’ll also look at some of the popular applications for both.
Motion tracking
Motion tracking is similar to a car pursuit on the highway in an action movie. Let’s use a SimCity environment as another illustration: your Sim’s movement is monitored against the steady scene of your home. The frame is set on your Sim, regardless of what your Sim does.
Camera tracking
When the camera must move and the object being “tracked” must remain stationary, camera tracking might be utilized instead of motion tracking. Information from a recorded live shot taken with a live camera is used for camera tracking. Then, using this data, a parallel virtual camera is projected in a three-dimensional composition frame. fresh 3D pieces are added while scenes are recreated.
On the Internet of Vehicles, motion tracking will be crucial. IoV will project the motion of your vehicle along the 2D path. Then, utilizing the information about your surroundings, you are informed of any potential roadblocks.
The same basic idea underlies motion tracking and stabilization. Both follow a moving target. When stabilizing, you choose the location where you wish to remain concentrated and centered despite movement. You track the object you wish to concentrate on while moving when you use motion tracking.
Sports videos frequently use basketball and football and use motion tracking. wherein the player is surrounded by a circle as he circles the court or the field for basketball.
Conclusion
In video editing, techniques like motion tracking and camera tracking are frequently employed. Even though they are frequently compared, both employ various vantage angles to depict motion. By following the moving object’s movement throughout the frame, motion tracking maintains the moving object in focus. A post-production technique called camera tracking uses data from a pre-shot movie to project a parallel virtual camera that displays a 3D perspective. If motion tracking and camera tracking have anything in common, it’s the way they draw the viewer into the tale and make them feel like a part of it. This gives your audience a sense of immersion in the story and enables your movie to linger in their minds emotionally and visually long after the credits have rolled.
Part 1. Learning to Understand Motion Tracking
We need to ask the really crucial question now that we have a fundamental understanding of what it is. What in the world am I going to do with this? In order to do that, let’s quickly review some excellent applications for motion tracking. You could,
Utilize tracking information to stabilize motion
Add text or solids as additional compositional elements
Add 3D elements to 2D footage
Use effects or color gradation methods
Replace the screens on your computer, mobile device, or television
These are just a few examples of how motion tracking might be useful. You need to be able to track motion in compositions of any complexity.
Part 2. What software do you need?
There are numerous options for motion tracking applications. With advantages and downsides, we’ve compiled a list of the finest motion tracking programs. The following are the best video editors for motion tracking in our opinion:
Filmora
Wondershare created Filmora to enable you to fully express your creativity. FilmoraPro is the best option if you want to make some high-level modifications to your video. In addition to the pre-sets offered, it allows you to tweak the effects for a more expertly edited appearance.
![]()
Motion tracking is currently its best feature. You may track a skater as they race across the ice or follow a boat as it travels. Use the motion tracking feature to add drama to your videos. You won’t have to worry about getting lost because FilmoraPro features an amazingly simple UI. Simply click on the person or object you wish to track and choose Motion Track from the Effects menu.
Free Download For Win 7 or later(64-bit)
Free Download For macOS 10.14 or later
Blender
Open-source and cost-free motion tracking software is called Blender. It’s an excellent 3D creating tool. Modeling, rigging, animation, simulation, rendering, compositing, video editing, 2D animation, and of course motion tracking is all supported.
Kdenlive
A motion tracker was recently added to Kdenlive, an open source and free video editing tool, under its Effects section. This program analyzes an object’s tracking information and automatically generates a map of the object’s motion. Following that, you can align a title, an image, an icon, and any other 2D elements to the moving object using this track. Motion Tracker’s regularly updated algorithms are one of its key characteristics, which leads to a higher tracking success rate and faster tracking speed.
HitFilm Express
The free edition of HitFilm Express is a wonderful place to start if you’re learning the fundamentals of 2D motion tracking. To get superior tracking results, it offers two motion tracking types: Single Point for tracking simply position and Double Points for tracking position, scale, or rotation of an object. You can either steady the video with the tracking data or change the point with a CG object.
Its optical flow tracking technique is outstanding. It successfully tracks a moving item that changes into multiple shapes or is veiled for a few frames by figuring out the brightness flow of the moving object. Beginners can therefore save a great deal of time and effort when designing settings to deal with complex frames.
VEGAS Pro
In VEGAS Pro 18 and later, auto motion tracking is a freshly upgraded function. Despite its late birth, it included the Mocha masking and planar tracking technology, winner of an Academy Award. It enables you to accurately attach images and messages and even adjust for shifting perspective. You can hide faces, license information, and any private objects using this capability.
Adobe Premiere Pro
Because of its superior editing capabilities, Premiere Pro seems to be a requirement for anyone learning video editing. Premiere Pro, however, has a limited number of presets and automatic tools in order to provide consumers the most control.
When masking and blurring a face, motion tracking only works with the auto option. If not, you will need to enter and alter multiple keyframes to add text or resize the video, or you will need to install an extension to convert the mask’s tracks to any transformed parts.
PowerDirector
Due to its simplicity of use, PowerDirector is unquestionably among the greatest motion tracking programs currently available. It accomplishes complex effects without having an advanced learning curve, in contrast to other video editing tools. As demonstrated in the introductory video up top, a simple interface may be used to easily track and manage one or more motion-tracked items.
With this program, creating a simple motion track may be done in only three easy steps. This editor is for you if you want to finish the job swiftly and painlessly and are new to intermediate video editing.
Part 3. Differences between camera tracking and motion tracking?
Making the audience forget that there is a camera in the room is one of the primary goals of filmmaking. To engage the audience, tracking shots like camera tracking and motion tracking are helpful. Tracking shots provide filmmakers the chance to immerse their audience more deeply in the storyline of their characters. I discovered that there is some ambiguity around how motion tracking and camera tracking differ from one another. I’ll explain where the confusion might have originated and give you examples of how to use both strategies.
What distinguishes motion tracking from camera tracking? Their differences are due to how they view the course of action. From a camera’s perspective, motion tracking monitors an object’s movement. The scenario is more immersive thanks to camera tracking, which detects the movement of the camera and presents it as though you are in a virtual or augmented reality environment.
We’ll examine tracking’s development in the movie and its significance to the business. What it is and how it affects the cinematography industry. Along with the many software used for both motion tracking and camera tracking, we’ll also look at some of the popular applications for both.
Motion tracking
Motion tracking is similar to a car pursuit on the highway in an action movie. Let’s use a SimCity environment as another illustration: your Sim’s movement is monitored against the steady scene of your home. The frame is set on your Sim, regardless of what your Sim does.
Camera tracking
When the camera must move and the object being “tracked” must remain stationary, camera tracking might be utilized instead of motion tracking. Information from a recorded live shot taken with a live camera is used for camera tracking. Then, using this data, a parallel virtual camera is projected in a three-dimensional composition frame. fresh 3D pieces are added while scenes are recreated.
On the Internet of Vehicles, motion tracking will be crucial. IoV will project the motion of your vehicle along the 2D path. Then, utilizing the information about your surroundings, you are informed of any potential roadblocks.
The same basic idea underlies motion tracking and stabilization. Both follow a moving target. When stabilizing, you choose the location where you wish to remain concentrated and centered despite movement. You track the object you wish to concentrate on while moving when you use motion tracking.
Sports videos frequently use basketball and football and use motion tracking. wherein the player is surrounded by a circle as he circles the court or the field for basketball.
Conclusion
In video editing, techniques like motion tracking and camera tracking are frequently employed. Even though they are frequently compared, both employ various vantage angles to depict motion. By following the moving object’s movement throughout the frame, motion tracking maintains the moving object in focus. A post-production technique called camera tracking uses data from a pre-shot movie to project a parallel virtual camera that displays a 3D perspective. If motion tracking and camera tracking have anything in common, it’s the way they draw the viewer into the tale and make them feel like a part of it. This gives your audience a sense of immersion in the story and enables your movie to linger in their minds emotionally and visually long after the credits have rolled.
Also read:
- [New] Resolving OBS Fullscreen Not Functional
- [Updated] 2024 Approved Analyzing and Comparing Top Software Choices for Screens (OBS/Fraps)
- [Updated] 5 Steps to Transform Your Photo's Hues Right Away
- [Updated] In 2024, Revealing 10 Hidden Viewers of Stories
- 2024 Approved 15 Best Travel Vloggers That You Should Follow
- 2024 Approved How to Make Custom Lower Thirds with Filmora
- Easy Guide: Updating Your AMD Graphics Card Drivers Seamlessly
- Innovating AI Dialogues: 5 Best Online Classes
- New 2024 Approved 2 Effective Ways to Add Text Behind Objects
- New 2024 Approved Change Background Color in After Effects
- New 2024 Approved How to Remove Background From a Video in Premier Pro
- New Guide to Make Timelapse Video with iMovie
- Revamp Your Gaming Setup with Updated Logitec Drivers
- Seagate External Hard Drive Not Showing Up on Windows 11 [Solved]
- The Power of Music in Videos (+Filmora Editing Tricks)
- Updated 2024 Approved Final Cut Pro for iPad- Is It Available?
- Updated Streamline Your Workflow 6 Productivity-Boosting Adobe Premiere Pro Tips
- Title: New In 2024, Top 8 Sites to Download Glitch Transition for Premiere Pro
- Author: Chloe
- Created at : 2025-02-25 19:33:41
- Updated at : 2025-03-04 01:53:07
- Link: https://ai-editing-video.techidaily.com/new-in-2024-top-8-sites-to-download-glitch-transition-for-premiere-pro/
- License: This work is licensed under CC BY-NC-SA 4.0.