
:max_bytes(150000):strip_icc():format(webp)/espnplus-6d79c347f2df42d7a38cdb0ba9a2472b.jpg)
New In 2024, Ultimate Guide on How to Film Better in Public
Ultimate Guide on How to Film Better in Public
Filming in public and different locations can add a new dimension to any video. The possibilities are limitless, from the hustle and bustle of a busy city street to the tranquil beauty of a remote beach.
Suppose you’re a new vlogger and want to capture the perfect scene in public. Then this blog is for you. It will explain various tips and tricks to help you create the best videos, regardless of location. So let’s start and learn more about how to film better in public!
Part 1. What Gear Will You Need to Record a Better Video in Public?
While recording in public, you want to avoid setting and holding unnecessary camera gear. That’s why you should keep your gear as low-key as possible. The essential shooting gears that you are going to need are as follows:
A Good Camera
A good camera is essential to record a video in public because it will provide quality footage. It will also allow you to capture more detail and create more engaging videos. But if you use a phone instead, make sure it is the latest iPhone or other with high pixels camera.

A Tripod
A tripod is essential when recording video in public to ensure that your shots are stable and steady. Without a tripod, your camera can shake and create a distorted, blurry image that can ruin a shot. So having a secure tripod will help you capture professional-looking footage.

A Microphone
A microphone is essential for recording a video in public because it captures the sound in the environment, allowing the video to be recorded with better-quality audio. Without a microphone, the video would be recorded with distorted sound and would likely be challenging to understand.

Apart from the gear mentioned above, you can also bring an ND filter, extra batteries, and SD cards. Because If the battery runs out or the SD card becomes full, the video recording could be lost. The spare batteries and SD cards help to ensure that the video can be captured uninterrupted. Let’s see what we need further.
Part 2. What Do You Need to Accomplish With Your Video?
While recording a video in a busy location, you need to accomplish three things with your video to record it better. Which are as follows:
1. Clean Shots
When recording in a busy location, it is essential to try and capture clean shots. It can be done by using a wide-angle lens to get the full shot or zooming in to focus on a particular element.
2. Clean Audio
Getting a clean and clear sound when recording audio in a busy location is essential. A good quality microphone, an audio recorder, or external noise reduction can help minimize background noise and capture the desired audio.
3. Decent Lighting
In a busy location, decent lighting is as important as the other two factors. Look for natural light sources that can provide good light, even illumination. If these are unavailable, consider using portable lighting equipment or lamps to create a more flattering environment.
Now that we know what we need let’s see how to make a video.
Part 3. How to Get the Best Shot While Filming Outdoor?
Whether you are a vlogger, a YouTuber, or a student filmmaker, shooting a video in a busy area is always a challenge. You must be able to plan and execute your production in a way that minimizes disruption and produces quality footage. By following these instructions, we hope you can make a difference in a shot you record:
Step1 Scout the Location
Before recording, visit the location in advance to plan your shots. Take note of potential distractions or noise sources and plan your angles accordingly.

Step2 Choose the correct shooting time
The best time to record a video in a busy location is when the area is less crowded, such as early in the morning or late at night. Avoiding peak times and holidays is also a good idea.
Step3 Choose the right angle
Once you get to the location, you must find the right angle.
Select Background
Try to find a background that will best capture the atmosphere of the area and minimize any background noise.

Set the frame
If your frame is too broad, you will face potential distractions that could interfere with your video, such as people walking in and out of the frame.

Set your position
Instead of getting closer to your talent, get further away and zoom in this way, you leave space for other people in the location, and you can still get your shot!

Try to get your shot and then get out quickly so you don’t bother other people trying to get their photos.
Part 4. Best Way to Record Audio While Filming Outdoor
Audio is essential to any video production, and recording audio while filming outdoor scenes can be challenging.
Outdoor environments come with more variables to consider, such as wind, traffic noise, and other background noise, that can make capturing clear audio more difficult. Even if you use a high-quality mic, you still have chances of interruption.
If you get any such variable in the video you recorded, you can re-record the audio with the help of Wondershare Filmora . Let’s see how you can do it:
Free Download For Win 7 or later(64-bit)
Free Download For macOS 10.14 or later
Step1 First, select the clip you want to re-record and then drag it onto the timeline.
Step2 Right-click on the video you dragged and then click on the Detach Audio. After doing that, mute the lousy audio from the audio timeline.

Step3 Place the playhead at the clip’s start, click Record just above the import media section, and then click Record Voiceover.

Step4 Now select a recording device and then select the time for the countdown. For example, a 3-minute timer would be perfect.

Step5 Click record and try to re-record your line and match it up the best you can. To get the sound and sync right, you might need to attempt a few times, but in the end, it will improve the quality of your video.

This technique is used in almost every film you see, especially action sequences that also have dialogue. You can also use this technique with the help of Filmora and enhance your video with better audio quality.
Conclusion
We hope this blog has given you some tips for how to film better in public. Filming in public can be intimidating, but you can shoot professional footage with the proper techniques.
From understanding the legalities of filming in public to learning to be discreet and respectful of your environment, you can ensure your filming experience is positive and successful.
With these tips and some practice, you’ll be on your way to shooting great videos in public!
Let us know your favorite film location in the comments below.
Free Download For macOS 10.14 or later
Step1 First, select the clip you want to re-record and then drag it onto the timeline.
Step2 Right-click on the video you dragged and then click on the Detach Audio. After doing that, mute the lousy audio from the audio timeline.
Step3 Place the playhead at the clip’s start, click Record just above the import media section, and then click Record Voiceover.
Step4 Now select a recording device and then select the time for the countdown. For example, a 3-minute timer would be perfect.
Step5 Click record and try to re-record your line and match it up the best you can. To get the sound and sync right, you might need to attempt a few times, but in the end, it will improve the quality of your video.
This technique is used in almost every film you see, especially action sequences that also have dialogue. You can also use this technique with the help of Filmora and enhance your video with better audio quality.
Conclusion
We hope this blog has given you some tips for how to film better in public. Filming in public can be intimidating, but you can shoot professional footage with the proper techniques.
From understanding the legalities of filming in public to learning to be discreet and respectful of your environment, you can ensure your filming experience is positive and successful.
With these tips and some practice, you’ll be on your way to shooting great videos in public!
Let us know your favorite film location in the comments below.
How To Make Ninja Jump Effect with Filmora
Superpower scenes derived from movies are trending these days. Everyone wants to add these superpower effects to their clips. We have covered several of these tutorials, and here we are with a new one; the Super/Ninja Jump effect.
This effect is for the quick movement of a subject from one position to another. Naruto is the prime example where ninjas are made to move around by this effect. Anime creators use this ninja effect a lot.
This article includes tutorials on what to shoot and how to add the Super Jump effect using Wondershare Filmora . The use of tools like masking, time ramping, keyframing, and the new version addition, the Boris FX Pack, makes it super easy to get a perfect super jump effect.
Shots Required For Super Jump Effect
You can use either a mobile phone or a camera for shooting, but you have to keep these things in mind:
Keep the following important tips in mind while shooting clips using your phone or camera.
● Use Wide-Angle
Always use the wide-angle view to ensure everything is in focus with a good depth of field.
● The Camera Should Be Steady
Make sure that the phone or camera is on a steady surface to avoid any turbulence or frame shifting.
● Sufficient Light
Make sure there is sufficient light and ambiance. Once you have set your camera, these are the three shots you have to take:
Shot 1: Jump Into the Air at a Distance
The subject will jump into the air at a distance from the camera. He should jump as high as he can, folding his legs so his body is in a ball position while in the air. The distance should be proper—not very far away.

Shot 2: Jump and Act Like You Are Landing
The subject should jump and act like he is landing on the floor. This shot has to be taken directly in front of the camera.

Shot 3: Empty Background Clip
This is an empty background clip. This clip includes only background settings without the subject. We need this clip to make layers while editing.

How To Edit These Clips On Filmora?
Once the shots have been taken, we move towards editing these clips, and for this purpose, we are using Filmora. Here is a step-by-step guide for editing these shots.
Steps To Edit These Clips
The tools we are going to use in this editing are masking, time ramping, speed ramping, keyframing, the Boris FX effect, and many more.
Open Wondershare Filmora and Add Video Tracks
Steps
Step1 Select the empty background clip (shot 3) and place it on the first video track timeline.
Step2 Now place the jumping clip (shot 4) on the top.
Adding a Freeze Frame
A freeze frame is a type of still image that is created by simply freezing the action. Most of the time, this is used in the last shot of a movie to capture a moment in time. Here are the steps to adding a free frame.
Steps
Step1 Move the playhead up to the point where the subject’s body appears smallest.
Step2 Add a freeze frame at this point by right-clicking on the playhead and selecting the speed option.
Step3 Make a cut at the start of the freeze frame, keep it for 8 frames and delete the rest.

Masking of the Video Clips
Masking is a tool in editing software that allows you to hide, duplicate, show, or adjust footage by selecting a specific section of the video or using video overlays. The steps for adding the masking effect are given below:
Steps
Step1 Now click on the clip view to open the “settings” window.
Step2 Click on the “mask” section and select the circle mask and create the mask of the jumping subject.
Step3 Hide the first track clip so that mask can be viewed better and edited effectively.
Step4 Adjust the scale, position, and shape of the mask and make the edges smoother to match the object.

Boris Fx Effect
Boris FX is a video editing and visual effects software. Filmora supports six continuum units-professional quality effects plugins from award-winning developer Boris FX.
To add these effects to your videos, follow the steps below:
Steps
Step1 Go to the “effects” window and open the Boris FX effects.
Step2 Select the directional blur from the bcc blur category.
Step3 Drag the effect to the freeze frame.
Step4 Now clicking on freeze frame, its settings will open.
Step5 Adjust the degree and angle of blur to get a perfect mask object. Turn ON the first video track.
Step6 Add the landing clip (shot 2) on top of the first video track after the freezing frame.
Step7 Find the point where the subject starts to descend toward the floor. Cut the clip here and delete the previous part.
Step8 Move the clip next to the freeze frame clip.

Keyframing
Now we have to add animation in the freezing frame so that the masked shadow can be shown moving from the back towards the front, a speedy moving shadow. This is probably the most crucial step in editing.
Steps
Step1 Click on the freezing frame, and in the settings window, open “animation.”
Step2 Click on the customized option. Add the first keyframe at the start of the clip.
Step3 Now move two frames and add another keyframe with the position of the masked shadow as it is moving out of frame.
Step4 Now move two frames keeping the settings the same.
Step5 Add another keyframe at the end with your masked shadow appearing half from the top of the frame.
This step is a bit tricky to understand, but the most important. Once it is done, your animation will give the impression of an object moving like a flash from the back to the front of view.

Speed Ramping
Once the keyframing is done, your super jump effect is roughly ready. All you have to do now is synchronize the speed of jumping, moving shadow, and landing. Here we will use the “speed ramping” tool.
Steps
Step1 Click on the clip, and in the settings window, choose “speed.”
Step2 Click on customize and increase the speed of any frame or clip.
Step3 Move the play head on the frame that you intend to increase the speed of, and move the frame on the speed window to speed up that part.
Once you have done speed ramping on both clips, your editing is done. Now play the video and see how the clip looks and if your super jump effect is remarkable or not.

Final Words
Make sure you follow all these steps in the correct order. You can get Filmora from the Filmora website, but its cracked versions are also available. While editing, try to make the transitions and clips as smooth and synchronized as you can. Also, if you find this article helpful, do not forget to share these tips with your friends.
Free Download For Win 7 or later(64-bit)
Free Download For macOS 10.14 or later
Free Download For macOS 10.14 or later
Why Vimeo Slideshow Maker Become Popular
Why Vimeo Slideshow Maker Become Popular
An easy yet powerful editor
Numerous effects to choose from
Detailed tutorials provided by the official channel
Have you recently heard about Vimeo from any of your friends or colleagues? Or have you come through it and want to know more about it? Then here you can get all information needed about the platform. Vimeo slideshow creator is a wonderful tool launched by a group of filmmakers in 2004.

It has gained a lot of popularity over the past decade and appears as the competitor of largest video sharing giant YouTube. The platform has approximately 80 million users and 1 million subscribers. In some ways, Vimeo is even better than YouTube.
In this article
01 [What Is Vimeo for & Why It Become Popular](#Part 1)
02 [Tips for a Great Slideshow Video](#Part 2)
Part 1: What Is Vimeo for & Why It Become Popular
Vimeo is an online video streaming and editing tool which is designed for video creators and artists. The platform provides various tools to its users including monetization, marketing, collaboration, post-production, management, storage, etc. It provides a great user experience because it is ad-free. The mode of revenue for the owners of Vimeo is a software as a service (SaaS). They provide paid subscription plans for creating and editing videos, broadcasting tools, connecting with clients, etc.

It works in a “freemium” model. That means the users have limited access to the platform if they are using it for free. For example, a basic free membership allows the user to have access to a total of 5GB of storage and can upload 500MB on a weekly basis. As a free or paid member of Vimeo Slideshow maker, you can like, comment on videos, and at the same time save, watch, and upload them. Also, you can create playlists. What features you will be able to access totally depends on your membership level and plan.
Vimeo is becoming popular due to the following reasons:
01Vimeo offers better encoding and video quality
Vimeo is more focused on the quality of the video that gets uploaded on it. Its processing load is lighter and it follows strict guidelines to accept videos. The platform uses better encoding techniques to maximize the quality of the video.
02Vimeo offers greater prestige
Being on Vimeo is a matter of prestige. Vimeo videos are considered more professional as compared to Youtube. There is a limit on what kind of channels one can run on Vimeo.
03Vimeo has a more sophisticated audience
Because of the high quality of videos and its prestigious nature, Vimeo has a more sophisticated fan base. The content offered by the platform is more knowledgeable and determined. The audience here is more sophisticated. Also, the creators are more insightful, mature, and constructive.
04Vimeo offers greater artistic freedom
Vimeo always welcomes the creators with their videos to show their art. It offers artistic freedom to its users. The platform checks the artistic value of the video and talent of the creator and allows them to upload, unlike Youtube.
05Vimeo boasts unique features and customizations
There are certain unique features of YouTube which make it a great platform for its users.
● Plus, Pro, Business, Premium Plans
Vimeo is funded by its community and you have to purchase the plan to use it apart from the free features. Different Vimeo plans are:
Vimeo - $7/month
Pro - $20/month
Business - $50/month
Top-tier Vimeo Premium - $75/month.
● Make money with pay per view
Just like Google’s PPC program, Vimeo also features a pay per program view where viewers need to pay in order to watch certain videos. With this, you can sell your art anywhere in the country or worldwide and make money with it.
● Advanced analytics
The subscribers of Vimeo are offered different levels of analytics. You will get the analytics according to your subscription level. The analytics levels on Vimeo consist of Google Analytics integration, engagement graphs, custom reports, and a traffic dashboard.
● Web player branding
Vimeo allows the users to use their own branding and logo in their videos. It makes all the embedded videos share the same look and ends with an unsightly suggestions page.
● Domain-restricted embeds
Vimeo offers the users a feature of domain-restricted embeds. It means the users can set the domains to embed any particular or a set of videos. This feature lets you hide the video on Vimeo and make it visible on the allowed domain.
● Password protection
It is an extraordinary feature that Vimeo offers. The user can set a password for the particular video to restrict the video’s visibility. Only those people who will have access to the password will be able to watch that particular video.
● Replace video but keep URL
This one is also an amazing and unique feature of Vimeo. With this feature, you can replace any existing video with the new one by keeping the same URL. Also, it will keep the stats, comments, likes, etc as it is.
Part 2 Tips for a Great Slideshow Video
Videos are gaining much popularity these days. It is an easy way to connect with people and show emotions to them. In the same way, slideshow videos also are important in their place. Slides are the collection of traditional photos or negatives which are out of trend now. And slideshow videos are the perfect way to use those slides and relieve those faded memories with loved ones. Creating the slideshow video is also easy and can be done easily with the help of some tools. You don’t need to be professional, but the only need is to follow certain tips carefully. Here, we are sharing the essential tips to prepare a great slideshow video. Also, you will get to know about the best tool for video creation.
● Tell a story
Prepare the slideshow video in the form of storytelling. Whatever is the theme of your slideshow, prepare the script of the video right from the start. Make a meaningful and impressive story. Select and collect the raw materials according to the requirement.
● Keep it cohesive
The cohesion of photos or images is very important in a video slideshow. It is advised not to mix and match still photos and videos in 1 slideshow. Also, choose the photos belonging to the same color family. Mixing different varieties of photos divert the attention of the viewer. Also, one warm photo, then one cool and so on are not the efficient choices for a slideshow. All the images should appear as part of one color family and are similar to one another. Always maintain the quality of photos throughout the slideshow. Gradual jumps between grainy portrait mode photos and some screenshots, meanwhile photos of other modes lead to distracting the viewer and blurring their experience.
● Make it personal
Video slideshows are a powerful tool to show your personality and your personal message. The videos should contain your feelings. So, customize them and make them as personal as you can. Give your uniqueness to your slideshows. For this, you can customize the color palette, text, etc and make them unique and personal. So that the people with whom you share the videos may also feel your touch.
● Keep slideshow videos short
There might be different aims for creating a slideshow video. You might want to share it with loved ones or any of your friends’ circle. Or you might be wanting it to post as an ad on social media platforms such as Instagram, or Facebook. Whatever the purpose of your making the video, keep them concise and short. Short video clips are best for grabbing the attention of the viewers. Everyone does not find it interesting to watch long-form videos. If you are aiming to make a longer-form video slideshow which contains both images and video clips, then keep each photo for 3 to 5 seconds and each video clip a maximum of 20 seconds. It is recommended to maintain the user’s interest throughout.
● Create a storyboard to plan your slideshow video
As we have already discussed in the above point, the video should depict your story. Also, it should be in sync to make it more compelling. Creating a storyboard or outline is the perfect way to predict the right flow as well as choose the right elements for the video.
The storyboard helps to prepare a plan and develop the logical sequence of the photos. Also, if you want to add photos, video clips, texts, etc in a single slideshow, the storyboard can help to outline the sequence. With this, you will be able to create a video that will be logically correct.
● Add text to videos and images to convey your message clearly
Text or captions are very crucial to be added to the slideshow especially if you are preparing them for social media. People these days do watch the videos by keeping the sound off on social media. So, they will not be able to get your message without captions. Keep all your key messages highlighted in the video. The first few seconds of the video play an important role. It is the deciding factor whether the viewer will watch the whole video or will just bounce back. So, give a captivating hook to the slideshow to capture the viewer’s attention and make them hit the unmute button.
Wondershare Filmora Video Editor is an effective tool which can help you to create wonderful video slideshows. It provides all the functionalities which you need to make the slideshow convincing. You can make appealing videos to show your impressions to the viewers. It enables you to create slideshows with photos, videos, and captions. The color correction and gradient option in the Filmora allow you to change the look of the photos or old slides according to your choices. You can edit the slides with this tool, to make them cohesively right and create a slideshow out of them. In short, Filmora is the perfect way to make a slideshow video that can be interesting and engaging for the viewers.
For Win 7 or later (64-bit)
For macOS 10.12 or later

● Ending Thoughts →
● So, here we can conclude that Vimeo slideshow maker is an impressive platform. Despite having a smaller user base, it is gaining much popularity because of its unique features.
● Moreover, you can generate great videos by following the tips we have shared. By uploading those videos on Vimeo, you will be able to gain a decent audience base. If you are aiming to have a genuine and sophisticated fanbase for your videos, then Vimeo would be a great choice.
● Using Filmora will make your process of creating slideshows easy. The variety of features available by the tool will let you create wonderful storytelling out of your old memories.
Have you recently heard about Vimeo from any of your friends or colleagues? Or have you come through it and want to know more about it? Then here you can get all information needed about the platform. Vimeo slideshow creator is a wonderful tool launched by a group of filmmakers in 2004.
It has gained a lot of popularity over the past decade and appears as the competitor of largest video sharing giant YouTube. The platform has approximately 80 million users and 1 million subscribers. In some ways, Vimeo is even better than YouTube.
In this article
01 [What Is Vimeo for & Why It Become Popular](#Part 1)
02 [Tips for a Great Slideshow Video](#Part 2)
Part 1: What Is Vimeo for & Why It Become Popular
Vimeo is an online video streaming and editing tool which is designed for video creators and artists. The platform provides various tools to its users including monetization, marketing, collaboration, post-production, management, storage, etc. It provides a great user experience because it is ad-free. The mode of revenue for the owners of Vimeo is a software as a service (SaaS). They provide paid subscription plans for creating and editing videos, broadcasting tools, connecting with clients, etc.
It works in a “freemium” model. That means the users have limited access to the platform if they are using it for free. For example, a basic free membership allows the user to have access to a total of 5GB of storage and can upload 500MB on a weekly basis. As a free or paid member of Vimeo Slideshow maker, you can like, comment on videos, and at the same time save, watch, and upload them. Also, you can create playlists. What features you will be able to access totally depends on your membership level and plan.
Vimeo is becoming popular due to the following reasons:
01Vimeo offers better encoding and video quality
Vimeo is more focused on the quality of the video that gets uploaded on it. Its processing load is lighter and it follows strict guidelines to accept videos. The platform uses better encoding techniques to maximize the quality of the video.
02Vimeo offers greater prestige
Being on Vimeo is a matter of prestige. Vimeo videos are considered more professional as compared to Youtube. There is a limit on what kind of channels one can run on Vimeo.
03Vimeo has a more sophisticated audience
Because of the high quality of videos and its prestigious nature, Vimeo has a more sophisticated fan base. The content offered by the platform is more knowledgeable and determined. The audience here is more sophisticated. Also, the creators are more insightful, mature, and constructive.
04Vimeo offers greater artistic freedom
Vimeo always welcomes the creators with their videos to show their art. It offers artistic freedom to its users. The platform checks the artistic value of the video and talent of the creator and allows them to upload, unlike Youtube.
05Vimeo boasts unique features and customizations
There are certain unique features of YouTube which make it a great platform for its users.
● Plus, Pro, Business, Premium Plans
Vimeo is funded by its community and you have to purchase the plan to use it apart from the free features. Different Vimeo plans are:
Vimeo - $7/month
Pro - $20/month
Business - $50/month
Top-tier Vimeo Premium - $75/month.
● Make money with pay per view
Just like Google’s PPC program, Vimeo also features a pay per program view where viewers need to pay in order to watch certain videos. With this, you can sell your art anywhere in the country or worldwide and make money with it.
● Advanced analytics
The subscribers of Vimeo are offered different levels of analytics. You will get the analytics according to your subscription level. The analytics levels on Vimeo consist of Google Analytics integration, engagement graphs, custom reports, and a traffic dashboard.
● Web player branding
Vimeo allows the users to use their own branding and logo in their videos. It makes all the embedded videos share the same look and ends with an unsightly suggestions page.
● Domain-restricted embeds
Vimeo offers the users a feature of domain-restricted embeds. It means the users can set the domains to embed any particular or a set of videos. This feature lets you hide the video on Vimeo and make it visible on the allowed domain.
● Password protection
It is an extraordinary feature that Vimeo offers. The user can set a password for the particular video to restrict the video’s visibility. Only those people who will have access to the password will be able to watch that particular video.
● Replace video but keep URL
This one is also an amazing and unique feature of Vimeo. With this feature, you can replace any existing video with the new one by keeping the same URL. Also, it will keep the stats, comments, likes, etc as it is.
Part 2 Tips for a Great Slideshow Video
Videos are gaining much popularity these days. It is an easy way to connect with people and show emotions to them. In the same way, slideshow videos also are important in their place. Slides are the collection of traditional photos or negatives which are out of trend now. And slideshow videos are the perfect way to use those slides and relieve those faded memories with loved ones. Creating the slideshow video is also easy and can be done easily with the help of some tools. You don’t need to be professional, but the only need is to follow certain tips carefully. Here, we are sharing the essential tips to prepare a great slideshow video. Also, you will get to know about the best tool for video creation.
● Tell a story
Prepare the slideshow video in the form of storytelling. Whatever is the theme of your slideshow, prepare the script of the video right from the start. Make a meaningful and impressive story. Select and collect the raw materials according to the requirement.
● Keep it cohesive
The cohesion of photos or images is very important in a video slideshow. It is advised not to mix and match still photos and videos in 1 slideshow. Also, choose the photos belonging to the same color family. Mixing different varieties of photos divert the attention of the viewer. Also, one warm photo, then one cool and so on are not the efficient choices for a slideshow. All the images should appear as part of one color family and are similar to one another. Always maintain the quality of photos throughout the slideshow. Gradual jumps between grainy portrait mode photos and some screenshots, meanwhile photos of other modes lead to distracting the viewer and blurring their experience.
● Make it personal
Video slideshows are a powerful tool to show your personality and your personal message. The videos should contain your feelings. So, customize them and make them as personal as you can. Give your uniqueness to your slideshows. For this, you can customize the color palette, text, etc and make them unique and personal. So that the people with whom you share the videos may also feel your touch.
● Keep slideshow videos short
There might be different aims for creating a slideshow video. You might want to share it with loved ones or any of your friends’ circle. Or you might be wanting it to post as an ad on social media platforms such as Instagram, or Facebook. Whatever the purpose of your making the video, keep them concise and short. Short video clips are best for grabbing the attention of the viewers. Everyone does not find it interesting to watch long-form videos. If you are aiming to make a longer-form video slideshow which contains both images and video clips, then keep each photo for 3 to 5 seconds and each video clip a maximum of 20 seconds. It is recommended to maintain the user’s interest throughout.
● Create a storyboard to plan your slideshow video
As we have already discussed in the above point, the video should depict your story. Also, it should be in sync to make it more compelling. Creating a storyboard or outline is the perfect way to predict the right flow as well as choose the right elements for the video.
The storyboard helps to prepare a plan and develop the logical sequence of the photos. Also, if you want to add photos, video clips, texts, etc in a single slideshow, the storyboard can help to outline the sequence. With this, you will be able to create a video that will be logically correct.
● Add text to videos and images to convey your message clearly
Text or captions are very crucial to be added to the slideshow especially if you are preparing them for social media. People these days do watch the videos by keeping the sound off on social media. So, they will not be able to get your message without captions. Keep all your key messages highlighted in the video. The first few seconds of the video play an important role. It is the deciding factor whether the viewer will watch the whole video or will just bounce back. So, give a captivating hook to the slideshow to capture the viewer’s attention and make them hit the unmute button.
Wondershare Filmora Video Editor is an effective tool which can help you to create wonderful video slideshows. It provides all the functionalities which you need to make the slideshow convincing. You can make appealing videos to show your impressions to the viewers. It enables you to create slideshows with photos, videos, and captions. The color correction and gradient option in the Filmora allow you to change the look of the photos or old slides according to your choices. You can edit the slides with this tool, to make them cohesively right and create a slideshow out of them. In short, Filmora is the perfect way to make a slideshow video that can be interesting and engaging for the viewers.
For Win 7 or later (64-bit)
For macOS 10.12 or later
● Ending Thoughts →
● So, here we can conclude that Vimeo slideshow maker is an impressive platform. Despite having a smaller user base, it is gaining much popularity because of its unique features.
● Moreover, you can generate great videos by following the tips we have shared. By uploading those videos on Vimeo, you will be able to gain a decent audience base. If you are aiming to have a genuine and sophisticated fanbase for your videos, then Vimeo would be a great choice.
● Using Filmora will make your process of creating slideshows easy. The variety of features available by the tool will let you create wonderful storytelling out of your old memories.
Create Glitch Text Effect
Glitch text effect is a trending video effect whereby the texts get distorted for a few seconds. The effect is comparable to the glitch you face when your screen starts to malfunction, and the screen appears to be wavy and disoriented. A glitch text effect is better than a regular animated text effect as it helps to get the attention of the viewers immediately and get the message across clearly.
The glitch effect can be applied to the entire video as well as the text as per your preference. There are several video editors available where the glitch text effect comes pre-loaded. All you need to do is to apply it to the text and get it done in a few steps. We will illustrate how to add glitch text effect Premiere Pro. But we recommend Filmora for the best glitter text effect that you can add to your video instantly.
Part 1. Create Glitch Text in Video with Filmora
We have already stated that Wondershare Filmora is the best video editor for the best glitch text effect download and apply to your video in simple steps. Filmora is a premium video editor that is widely used by amateur and professional video editors. You can get all glitch text effect After Effects and add them to your video conveniently in comparison to After Effects.
As a matter of fact, there are literally unlimited video and text effects available, and you can find different types of glitch text effects to apply to your titles and texts. Filmora is available for both Windows and mac users. Here are the steps to create glitch text in video with Filmora.
Free Download For Win 7 or later(64-bit)
Free Download For macOS 10.14 or later
Step1 Download and install Filmora on your computer. Go to File> New Project from the menu bar to start video editing project.

Step2 Go to File> Import Media > Import Media Files to import the video clips where you want to add glitch text effect. Drop the clip into the Timeline to get started.

Step3 Go to Titles tab located at the top. From the left panel, click on Titles option. Search “glitch” in the search field and you will see all the glitch text effects that you can apply to the text in your video.
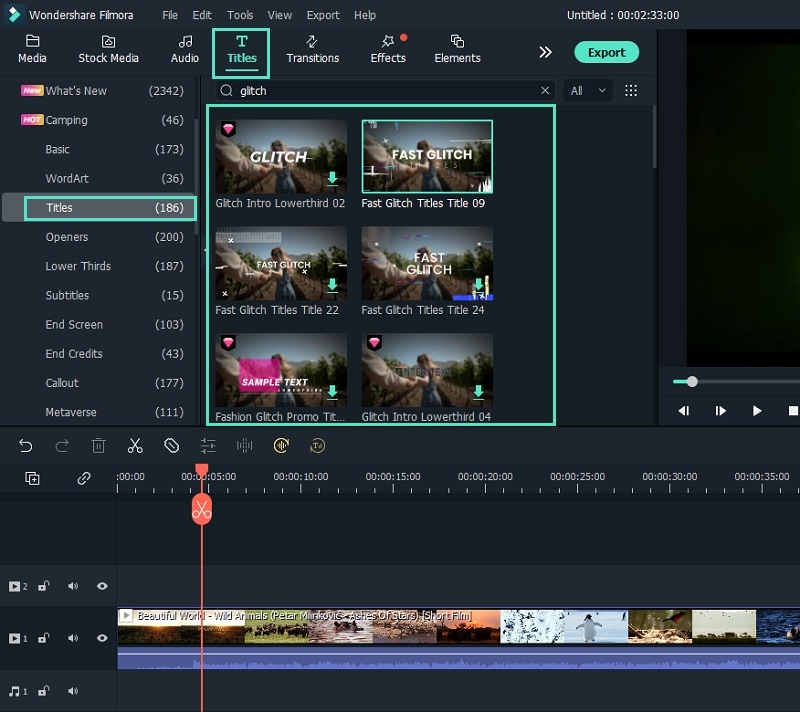
Step4 Select any glitch text effect and drop it into the Timeline above the video clip exactly where you want the text and the effect to appear.
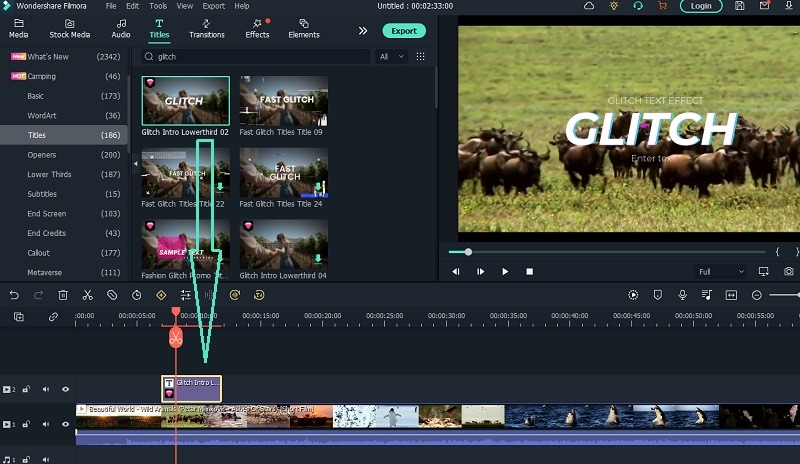
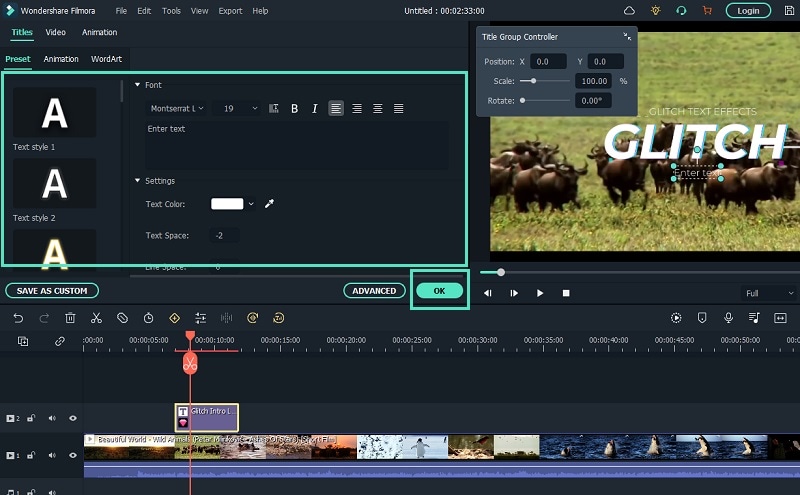
Step5 Double-click on the glitch text effect located on Timeline and edit the text, style, and other parameters as per your preference. Click on Ok and play the video to see your edited video with the glitch text effect.
Part 2. How to Make Glitch Text Effect with Premiere Pro
Adobe Premiere Pro is another renowned video editor where you can add glitch text effect to your video. Premiere Pro is strictly for professional video editors as the user interface is not as intuitive as Filmora . The learning curve is steep, and therefore, you need to go through the steps to add glitch text effect Premiere Pro. There are several glitch text effect presets available that you can apply to any text on your video to make them engaging. Here are the steps to make glitch text effect with Premiere Pro.
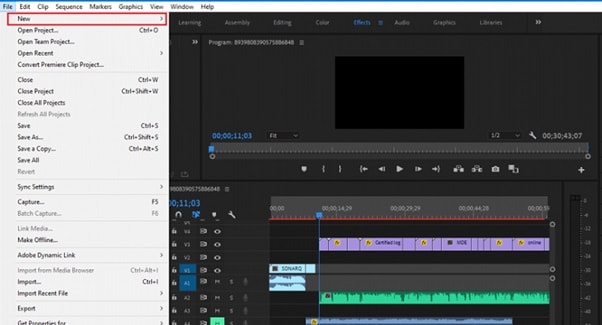
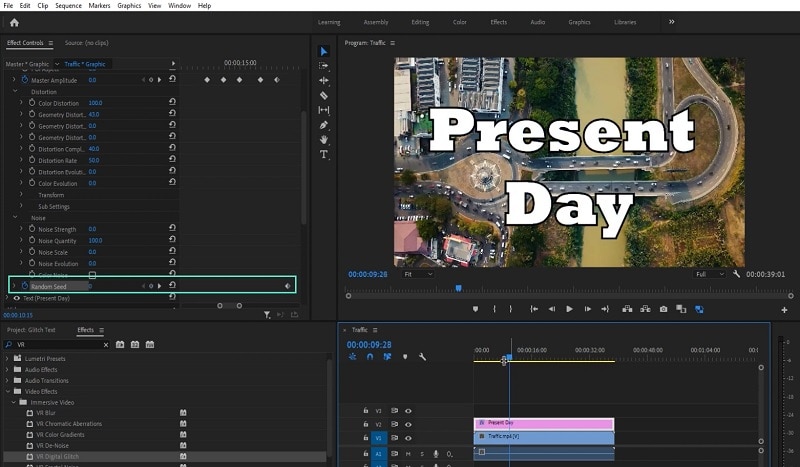
Step1 Launch Adobe Premiere Pro and go to New> Project to get started. Import your video and drop it into Timeline.
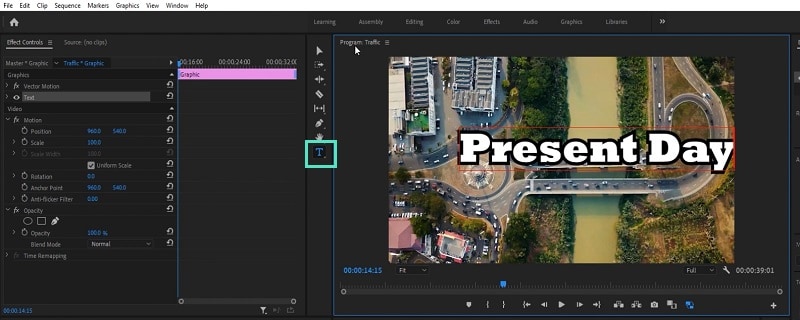
Step2 Use the Type tool to write any text on your video to add glitch text effect. You should have a text layer on Timeline.
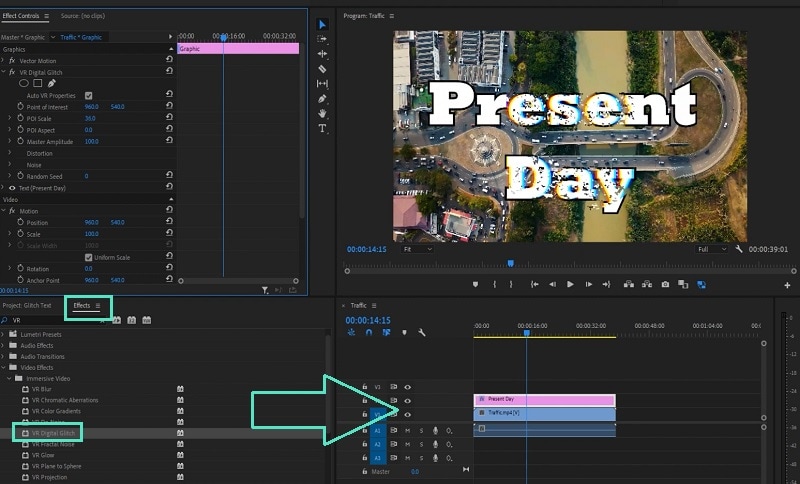
Step3 Go to Effects> Immersive Video> VR Digital Glitch option. Drag and drop the effect to text layer.
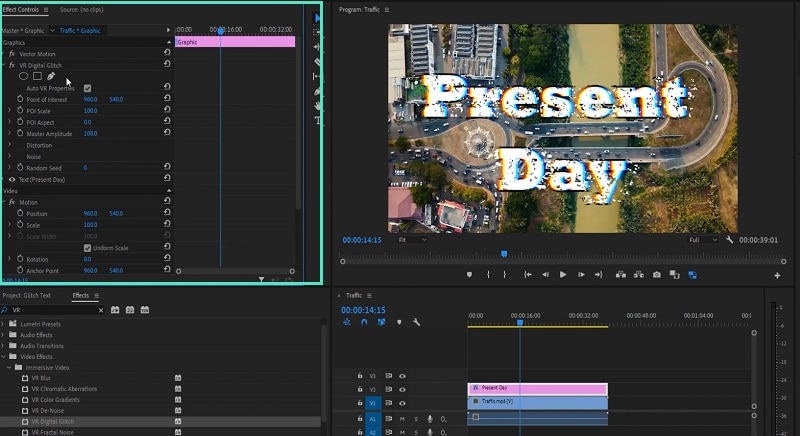
Step4 Under Effect Controls tab, you will find all the different parameters that you can adjust to get the glitch text effect perfectly.
Step5 Turn on Master Amplitude and add multiple keyframes as different points in the Timeline and change the distortion value to make the effect prominent.
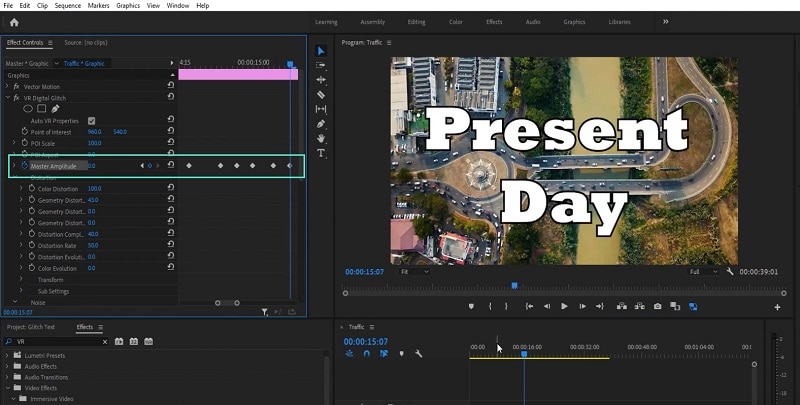
Step6 Go to the first keyframe and turn on Random Seed effect. Go to the last keyframe and turn on Random Seed effect and change the value to 75. Play the video to check the entire video with glitch text effect.
Part 3. Use VSDC Video Editor to Create Glitch Text
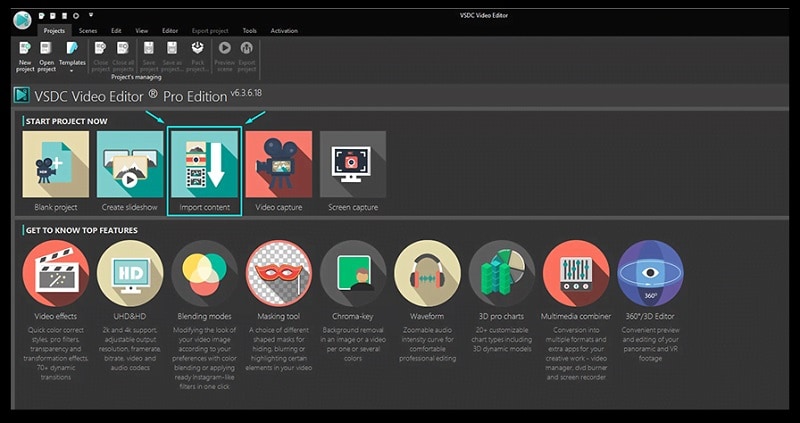
If you do not have any premium video editor on your computer and you do not want to purchase any premium video editor, you can still get glitter text effect free. You need to download and install VSDC free video editor on your computer. But the steps to create glitch text on VSDC video editor are slightly complicated as the user interface is not as intuitive as Filmora . Here are the steps to add free glitch text effect on your video.
Step1 Download and install VSDC video editor. Launch the editor and click on New Project to get started. Import your video to your project where you want to add glitch text effect.
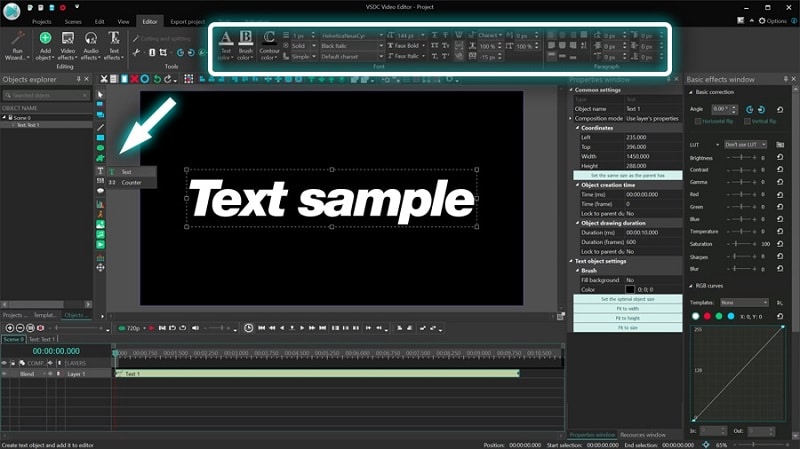
Step2 Use Type tool to write a text on the video. You can press Shift+T shortcut as well. After typing the text, adjust the text style as per your preference.
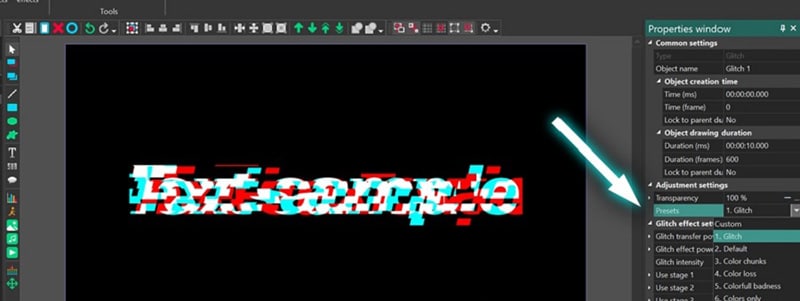
Step3 Double-click on the text layer on Timeline and go to Video Effects> Special FX and click on Glitch option.
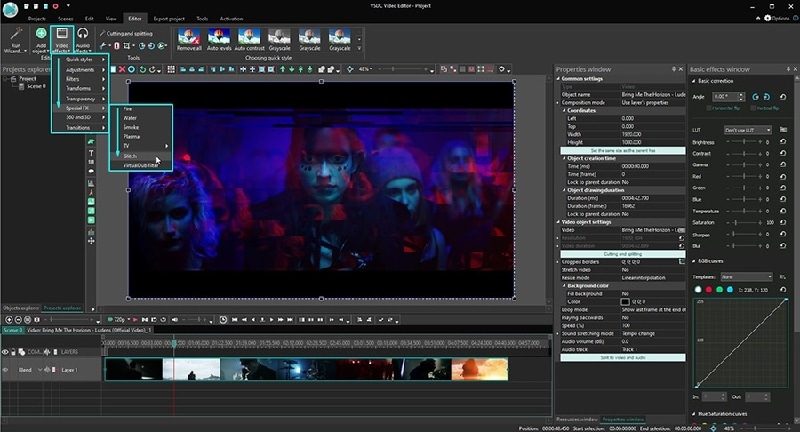
Step4 A window will appear where you can set the starting point, duration, and different parameters. Click on Ok button.
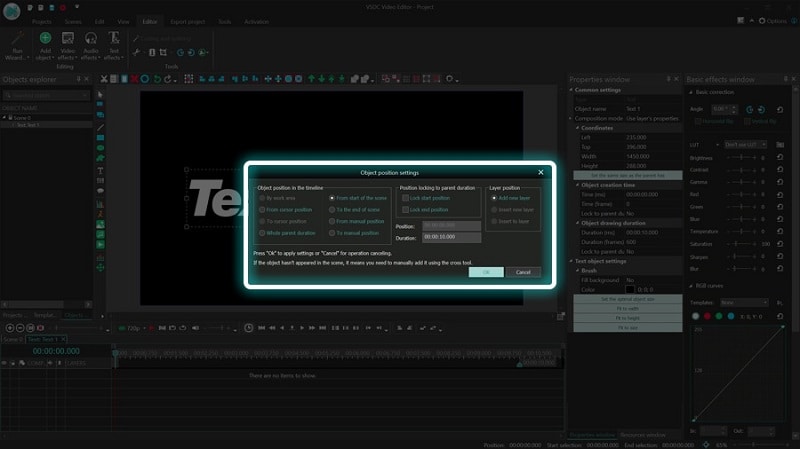
Step5 Go to Properties Windows and click on Presets to select different types of glitch text effects. You can also adjust the intensity of the text effects and other parameters as you feel.
Part 4. Related FAQs about Glitch Text
1. How do you animate glitch text?
If you want to animate glitch text for free, VSDC video editor is ideal as you can customize the effect on any text in simple steps. If you want to use a premium video editor, we recommend Filmora as there are various glitch text effects available to apply to any text on your video instantly.
2. How do you glitch text on video?
First, you have to import your video in your video editor. Type the desired text and set the style. Thereafter, go to glitch text effect presets available on the video editor and apply it to the text instantly. You can customize the glitch text effect as per your preference to make the animation more prominent.
3. How do you glitch text on Android?
You should first install Glitch Video Effect: Glitch FX app from Play Store. Edit your video on the app to add any text, and thereafter, add glitch text effect instantly. In fact, the glitch text effect is available in almost all popular video editor apps on Android due to the effect being trendy and viral.
Free Download For macOS 10.14 or later
Step1 Download and install Filmora on your computer. Go to File> New Project from the menu bar to start video editing project.
Step2 Go to File> Import Media > Import Media Files to import the video clips where you want to add glitch text effect. Drop the clip into the Timeline to get started.
Step3 Go to Titles tab located at the top. From the left panel, click on Titles option. Search “glitch” in the search field and you will see all the glitch text effects that you can apply to the text in your video.
Step4 Select any glitch text effect and drop it into the Timeline above the video clip exactly where you want the text and the effect to appear.
Step5 Double-click on the glitch text effect located on Timeline and edit the text, style, and other parameters as per your preference. Click on Ok and play the video to see your edited video with the glitch text effect.
Part 2. How to Make Glitch Text Effect with Premiere Pro
Adobe Premiere Pro is another renowned video editor where you can add glitch text effect to your video. Premiere Pro is strictly for professional video editors as the user interface is not as intuitive as Filmora . The learning curve is steep, and therefore, you need to go through the steps to add glitch text effect Premiere Pro. There are several glitch text effect presets available that you can apply to any text on your video to make them engaging. Here are the steps to make glitch text effect with Premiere Pro.
Step1 Launch Adobe Premiere Pro and go to New> Project to get started. Import your video and drop it into Timeline.
Step2 Use the Type tool to write any text on your video to add glitch text effect. You should have a text layer on Timeline.
Step3 Go to Effects> Immersive Video> VR Digital Glitch option. Drag and drop the effect to text layer.
Step4 Under Effect Controls tab, you will find all the different parameters that you can adjust to get the glitch text effect perfectly.
Step5 Turn on Master Amplitude and add multiple keyframes as different points in the Timeline and change the distortion value to make the effect prominent.
Step6 Go to the first keyframe and turn on Random Seed effect. Go to the last keyframe and turn on Random Seed effect and change the value to 75. Play the video to check the entire video with glitch text effect.
Part 3. Use VSDC Video Editor to Create Glitch Text
If you do not have any premium video editor on your computer and you do not want to purchase any premium video editor, you can still get glitter text effect free. You need to download and install VSDC free video editor on your computer. But the steps to create glitch text on VSDC video editor are slightly complicated as the user interface is not as intuitive as Filmora . Here are the steps to add free glitch text effect on your video.
Step1 Download and install VSDC video editor. Launch the editor and click on New Project to get started. Import your video to your project where you want to add glitch text effect.
Step2 Use Type tool to write a text on the video. You can press Shift+T shortcut as well. After typing the text, adjust the text style as per your preference.
Step3 Double-click on the text layer on Timeline and go to Video Effects> Special FX and click on Glitch option.
Step4 A window will appear where you can set the starting point, duration, and different parameters. Click on Ok button.
Step5 Go to Properties Windows and click on Presets to select different types of glitch text effects. You can also adjust the intensity of the text effects and other parameters as you feel.
Part 4. Related FAQs about Glitch Text
1. How do you animate glitch text?
If you want to animate glitch text for free, VSDC video editor is ideal as you can customize the effect on any text in simple steps. If you want to use a premium video editor, we recommend Filmora as there are various glitch text effects available to apply to any text on your video instantly.
2. How do you glitch text on video?
First, you have to import your video in your video editor. Type the desired text and set the style. Thereafter, go to glitch text effect presets available on the video editor and apply it to the text instantly. You can customize the glitch text effect as per your preference to make the animation more prominent.
3. How do you glitch text on Android?
You should first install Glitch Video Effect: Glitch FX app from Play Store. Edit your video on the app to add any text, and thereafter, add glitch text effect instantly. In fact, the glitch text effect is available in almost all popular video editor apps on Android due to the effect being trendy and viral.
Also read:
- Updated How to Make a GIF With Transparent Background for 2024
- Updated In Todays Article, We Are Going to Show You How Adding a Simple Lower Third to Your Video Can Add a Degree of Professionalism and Polish to Your Videos While Giving It a Higher Perceived Value
- Updated Best Ideas for Time Lapse Video for 2024
- Updated Do You Want to Know How to Remove Audio From a Video without a Watermark? Keep Reading This Article Since We Have the Answers for You. Complete with the Guide on How to Do It
- Updated Steps To Fade Audio In Premier Pro
- New In 2024, A Complete Guideline About QuickTime Player
- Create an Awesome Logo Reveal with Logo Intro Templates for 2024
- Are You Looking for Cool Ideas to Use Green Screen and How Setting up Your Green Screen? Keep Reading Since We Have the Answer for You
- Updated In 2024, Create A Freeze Frame Sequence In Your Videos
- Updated In 2024, Best Frame Rate for 4K Video
- New In 2024, Add Background to Video With/Without a Green Screen
- Updated Best Software or Website to Convert Video Format for 2024
- In 2024, Best Tips for Camtasia Freeze-Frame
- New Ultimate Guidelines to Help You Use VLC Media Player Better
- New In 2024, How to Create Your Own LUTs for Your Video
- Updated Use Mobile Phones to Shoot a Video Is Very Convenient Compare with Professional Cameras. In This Article, Well List You some Tips to Help Capture a High-Quality Video on Your Phone
- Updated 2024 Approved 2 Ways to Add Custom Subtitles to Netflix
- How to Spruce Up Your Telegram Profile
- Updated In 2024, Customize PowerPoint Slideshow Icon in Simple Ways
- New Unlock the Power of Shotcut The Ultimate Guide to Rotating Videos
- Best GIF to AVI Converters for 2024
- How To Make a Photo Collage in Microsoft Word for 2024
- Do You Intend to Include Motion Blur on Your Video Using Video Star? This Article Explains How to Use Motion Blur on Video Star with Exquisite Control for 2024
- 2024 Approved Want to Know the Simplest Way to Match the Colors of Your Photos in Photoshop? The Following Discussion Will Help Match Color in Photoshop, Almost Effortlessly
- New In 2024, List of Supported Whatsapp Video Format You May Want to Know
- New Have You Ever Heard of the Video Format for PowerPoint? Allow Us to Help You Learn More About PowerPoint. It Will Help You Make an Impression by Making Good Slides
- 2024 Approved Splitting Clips in Adobe After Effects Step by Step
- New 2024 Approved AI Features of Filmora - Silence Detection in Videos
- Updated How to Be a Good Podcast Host
- New Practical Way to Resize Video in Handbrake
- How Can Filmora Create an Audio Visualizer Project for a Song? All Steps, From Launching the App to Editing the Text, Are Detailed Here for 2024
- 2024 Approved Complete How-To Tutorials of Kapwing Collage Maker
- Updated Do You Wish to Know How FFmpeg Can Remove Audio From a Video? If Yes, Keep Scrolling This Guide to Remove Audio From Video with FFmpeg and Other Alternative Software
- New Adding Slow Motion in DaVinci Resolve A Comprehensive Overview for 2024
- New How to Add Miniature Effect in Video with Filmora
- In 2024, Ultimate Guide to Making Cinematography for Music Video
- New 10 Best Suggestions for AI Video Interviews
- New Powerpoint Supported Video Format and User Tips
- New Easy Ways to Add Text Overlay to Video
- Want to Make Professional-Looking Videos? Keep Reading to Give Your Videos a Cinematic Feel with the Audio Mixer of Filmora
- In 2024, Deleting White Background in Photoshop Is Hard?
- Best 5 PDF to GIF Converters You Should Know
- Updated Hard to Remove Black Background in After Effects? Heres the Best Way to Deal With It for 2024
- New 2 Methods to Cut Video in VLC on Windows
- 2024 Approved Do You Want to Know How to Make a Collage in Lightroom? It Doesnt Matter Whether You Are a Novice or a Professional; This Guide Will Teach You to Do It Well
- Updated 2024 Approved How to Achieve GoPro Slow Motion With Quality
- Useful Tips for Tiktok Video Aspect Ratio Included
- Top 6 MP4 Mergers to Join Videos Easily
- New Stunning Glitch Effect and Its Creation Steps for Premiere Pro
- Fixing The Slow Playback Issues in DaVinci Resolve
- How Many Attempts To Unlock Apple iPhone XS | Dr.fone
- 10 Easy-to-Use FRP Bypass Tools for Unlocking Google Accounts On Vivo X100
- How To Repair Apple iPhone 13 Pro iOS? | Dr.fone
- Ways to trade pokemon go from far away On Xiaomi Redmi A2? | Dr.fone
- In 2024, How Do You Unlock your iPhone 6? Learn All 4 Methods
- 3 Solutions to Find Your Xiaomi Mix Fold 3 Current Location of a Mobile Number | Dr.fone
- In 2024, How to use Pokemon Go Joystick on Oppo Reno 8T? | Dr.fone
- How to Transfer Videos from Samsung Galaxy F54 5G to iPad | Dr.fone
- In 2024, How To Remove Passcode From Apple iPhone 8? Complete Guide | Dr.fone
- Why Your Tecno Pova 5 Pro Screen Might be Unresponsive and How to Fix It | Dr.fone
- Title: New In 2024, Ultimate Guide on How to Film Better in Public
- Author: Chloe
- Created at : 2024-04-24 07:08:39
- Updated at : 2024-04-25 07:08:39
- Link: https://ai-editing-video.techidaily.com/new-in-2024-ultimate-guide-on-how-to-film-better-in-public/
- License: This work is licensed under CC BY-NC-SA 4.0.
