:max_bytes(150000):strip_icc():format(webp)/GettyImages-1345967858-4e7ba42433504ee899e05ceb500f3b68.jpg)
New Make Super Easy Coin Magic With Filmora

Make Super Easy Coin Magic With Filmora
Do you want to become a magician in your videos? Now, everyone can look like a magician with the magic of editing. This article will show you how to do a cool coin trick in Filmora 11 .
Part 1: What is the filmmaking technique “Cutting on action”
Cutting on action is a technique the editors use to cut in the middle of an action to another shot that matches the first shot’s action. Typically, the subject starts an action in one shot and continues the action in another, creating a smooth transition. For example, when you make the coin trick video, you need to cut on the tapping so it can trick the eyes, and the cut won’t be noticeable.
Part 2: Things You Need to Prepare for The Coin Magic Trick
- Glass and two coins

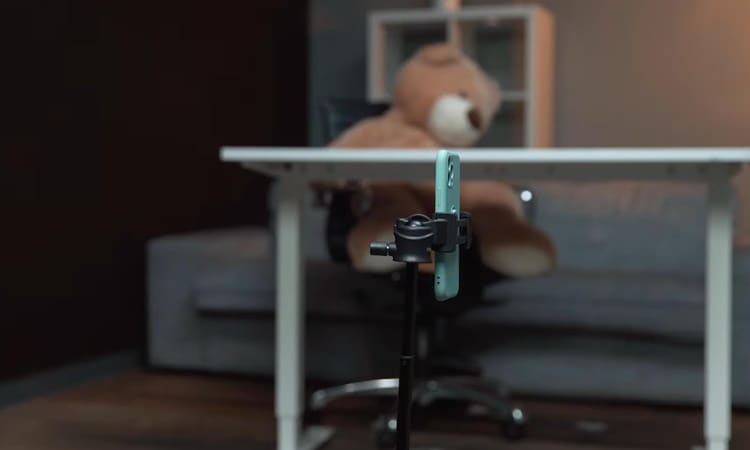
- Set the phone on a tripod. Because utilizing a tripod can significantly improve the recording’s stability.
Part 3: Start Filming
Step1 Firstly, you must show the coin and the bottom of the glass.
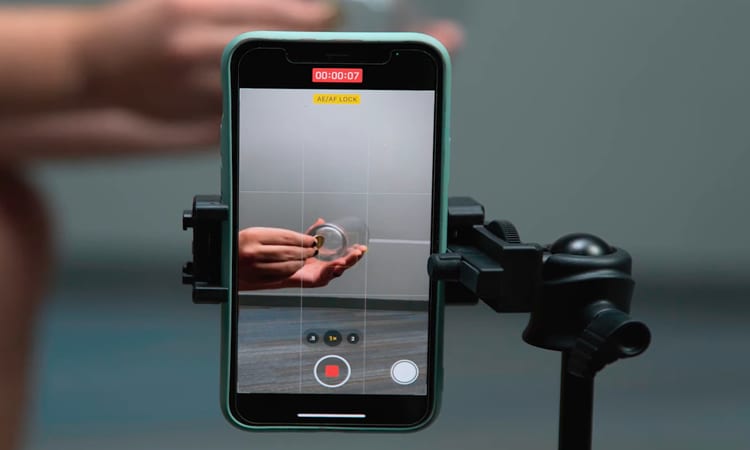
Step2 After that, you need to hold the coin with the fingers part of one hand and tap down on the coin. Make sure it looks like the coin is going through straight to the glass.
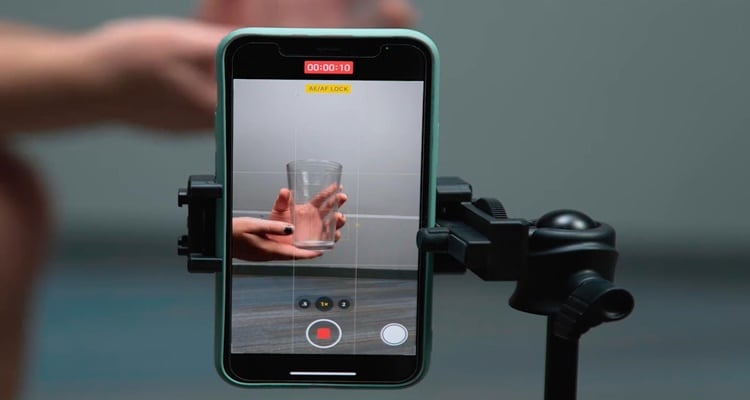
Step3 You need someone else to drop the other coin from the top. Meanwhile, you are pretending to tap a coin on the glass. You don’t need to worry about someone else hand in the frame. Since you can remove it easily with the masking feature in Filmora.

Step4 It would help if you had a second shot for a clean plate of the background. You can record background for 20 seconds.

Part 4: Bring the clips into Filmora 11
Step1 If you have not downloaded Filmora, you can visit filmora.wondershare.com to download Filmora’s new version.
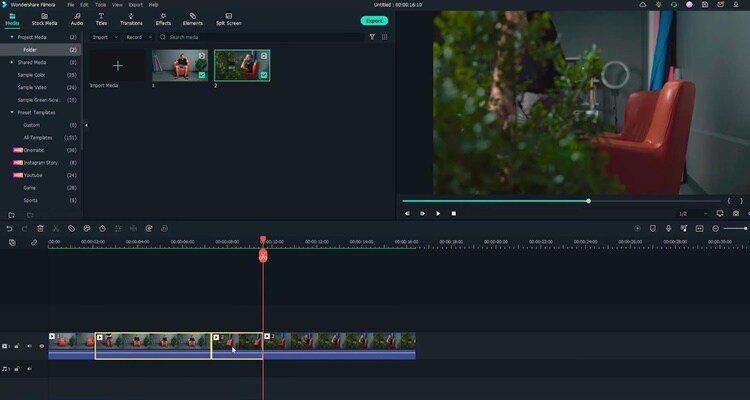
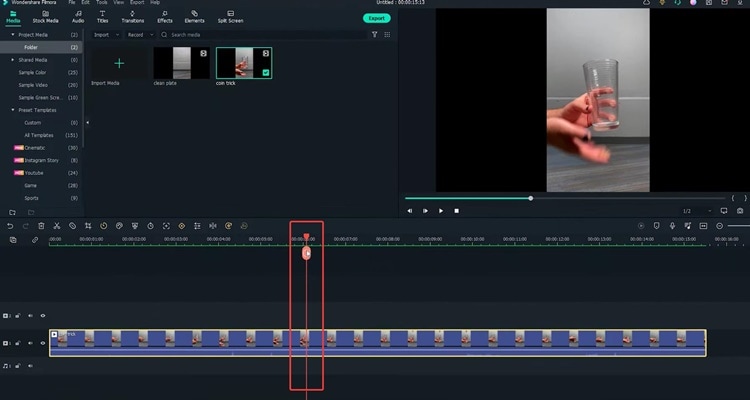
Step2 Drag and drop the clip onto the first track of the timeline.Afterward, move the playhead to the right and find the spot where you tapped the coin last time before your friend drops the other coin. Additionally, make sure it is in the middle of the tapping action and cut.
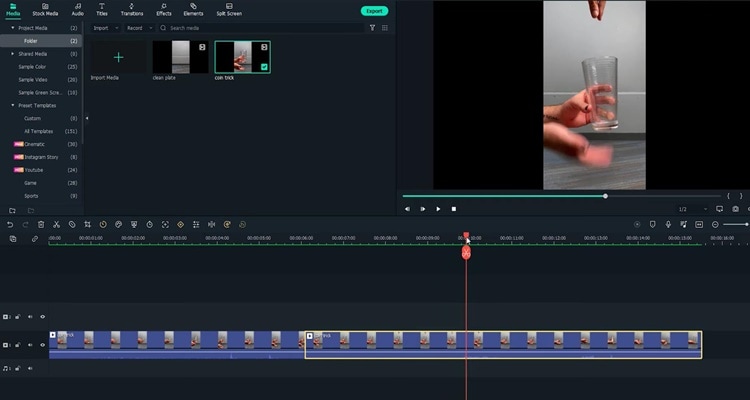
Step3 Then move the playhead to the right and find the spot where your friend drops the coin while you tap without the coin in your hand. Make sure it is in the middle of the tapping action, and the position of your hand roughly matches that in the last cut and make a cut.
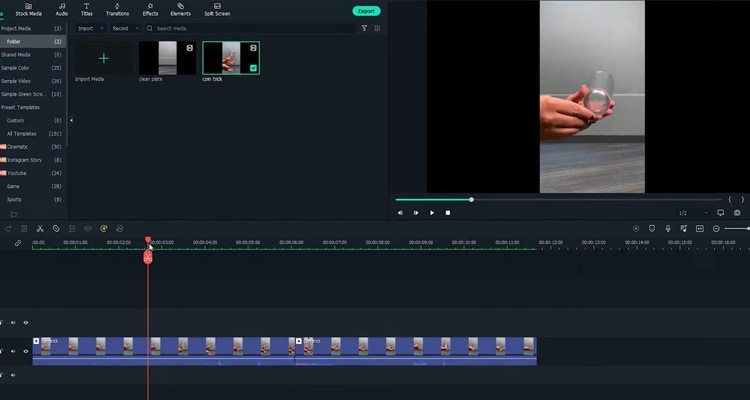
Step4 Now you need to delete the middle part and play it back. Indeed, cutting on action is the key to creating the illusion that the action is continued without editing.
Step5 Next, you must remove your friend’s hand in the frame with the Filmora masking feature. Afterwards. drag and drop the clean plate video onto the second track of the timeline.
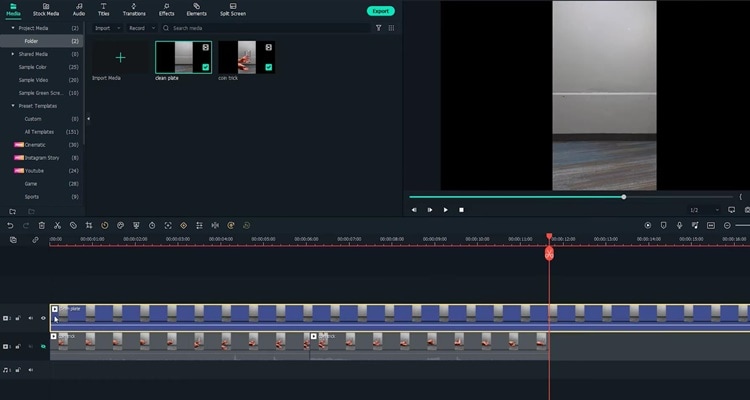
Step6 Next, double-click the clip to open the setting video. Find the Mask Section and select the single line.
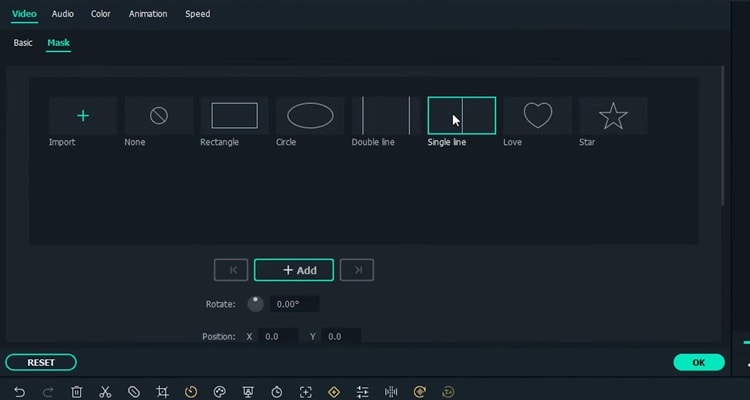
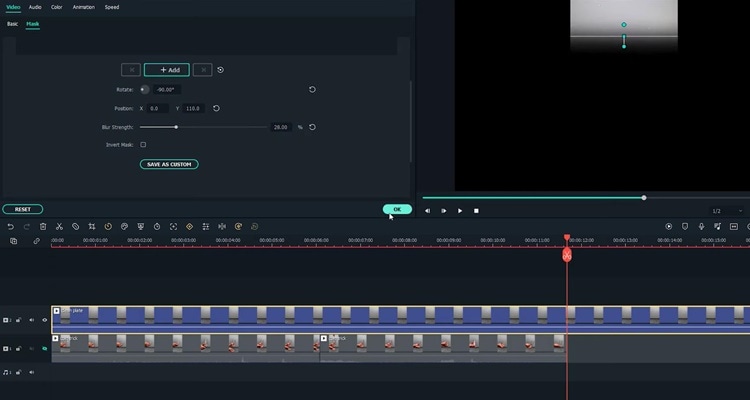
Step7 Here you can see the mask is applied.First, adjust the angle and position of the mask to only show the top part of the frame. Then you have to change the Blur Strength to add more blur to the edge of the mask.
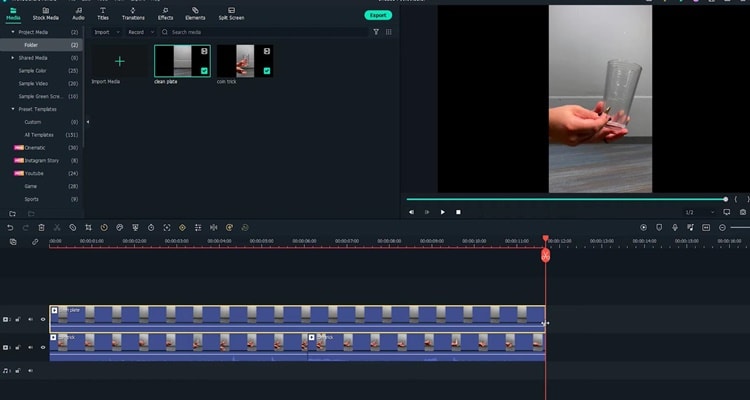
Step8 With the mask finalized, unhide the first video track and adjust the length of the clip on the timeline. Finally, playback the video and see how it looks.
Summary
That’s how to make a coin move through a glass-like MAGIC with the cutting on action editing technique. You can pay close attention to the steps above and follow each step for perfect results.
Free Download For Win 7 or later(64-bit)
Free Download For macOS 10.14 or later
Free Download For macOS 10.14 or later
Quickly Turn Any Video Into a Paper Rip Effect
Video editors use different effects to add creative flair to their projects. These effects can also create a transition between clips, make text or images stand out, or add movement to a static image.
One of the most fantastic effects is the paper rip effect. It can add a unique look to videos and a touch of creativity to any project. We will discuss the best software and techniques to achieve this effect quickly. So, let’s get started!
Part 1. What Is a Paper Rip Effect?
You must be wondering what is a paper rip effect in videos. It is a visual effect in which a piece of paper or other material appears torn apart or ripped. It is often used for transitions between shots or scenes in a video. Or, you can make the effect for your thumbnail.
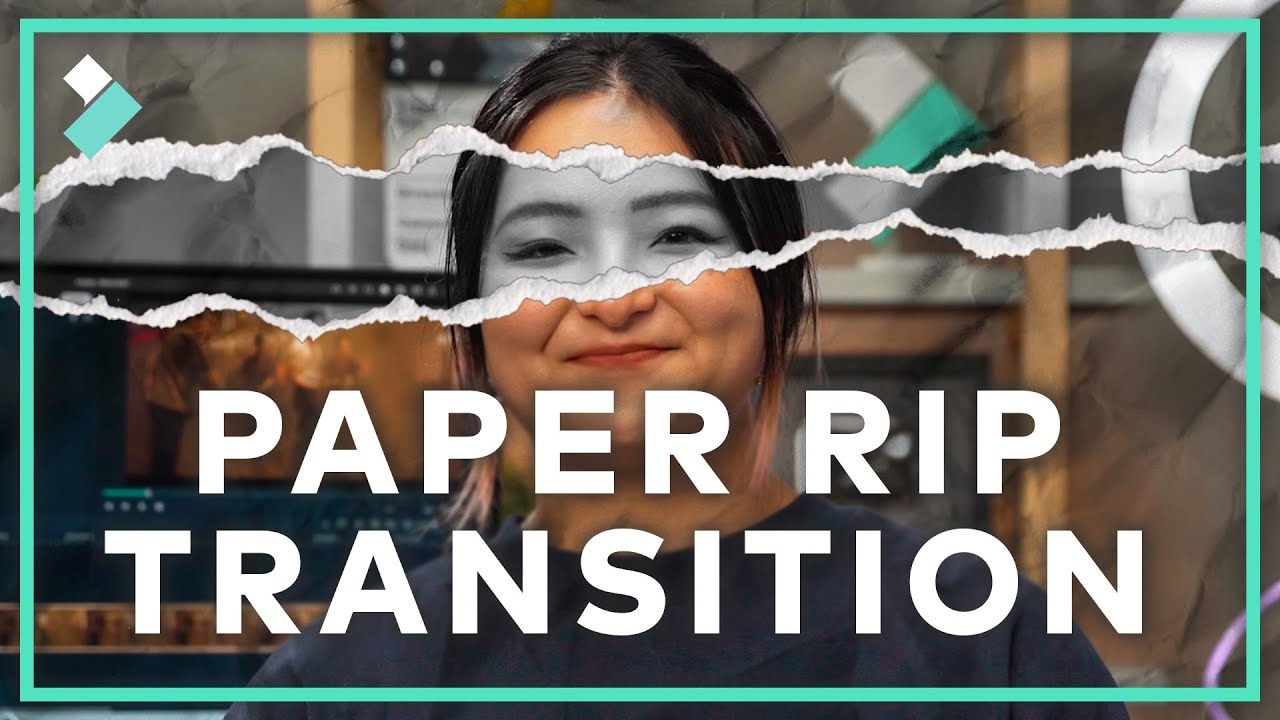
Now, as we have seen what a paper rip effect looks like, isn’t it cool? So let’s see which software we need to make the magic happen.
Part 2. How to Make a Paper Rip Effect
We here take Wondershare Filmora as our editing tool to make the paper rip effect. It has many practical features allow you to customize your video with special effects, transitions, and more.
Free Download For Win 7 or later(64-bit)
Free Download For macOS 10.14 or later
- Over 1,000 video effects, transitions, titles, etc., to spice up high-quality videos.
- Support speech-to-text that allows smooth conversion of voiceover to text.
- Over 2,000+ audio resources range from music and audio effects, and much more.
- The shortcut key saves you time while editing videos.
Stepwise Guide to Make the Paper Rip Effect
Step1 Download Wondershare Filmora from the official website. If you have already downloaded the Wondershare Filmora. Open it, and let’s start editing the video.
Step2 First, we need to find a photo of a white paper that you can easily download from the internet and two videos in which you want to add this effect. Then import these three files to the media gallery.

Step3 Drag and drop Clip 1 onto the timeline and move the playhead to the last frame of the clip.

Alt text: Paper rip effect.
Step4 Now right-click on Clip 1 to open the menu and select Add Freeze Frame.

Step5 After adding a freeze frame, cut here.

Step6 Drag and drop the paper photo onto the second video track of the timeline, and make sure it starts at the cut on the first video track.

Step7 Double-click the paper picture on the timeline to open the settings window and then open the Compositing menu. Then Change the Blending Mode from Normal to Multiply.

In the preview window, we can see that the freeze frame has the paper texture now!

Step8 Now you can use the new feature of Filmora to export this small portion of the video. First, click and drag the playhead to the start of the freeze frame and press “I” on the keyboard to set the IN POINT, then move the playhead to the end of this freeze frame and press “O” on the keyboard to set the OUT POINT.

![]()
Note: If you have the latest version, Filmora will automatically set the OUT POINT on the timeline.
Step9 Then click Export and choose Create Video. Let’s name it freeze frame 1 and click on Export.

It will only export the selected part on the timeline. Once the exporting process is completed, Right-Click on the timeline and Cancel the selected range.

Step10 Import the Freeze Frame 1 to the media folder and replace the Freeze Frame + Paper Photo with this clip. Then adjust the length of this clip to 1 second.
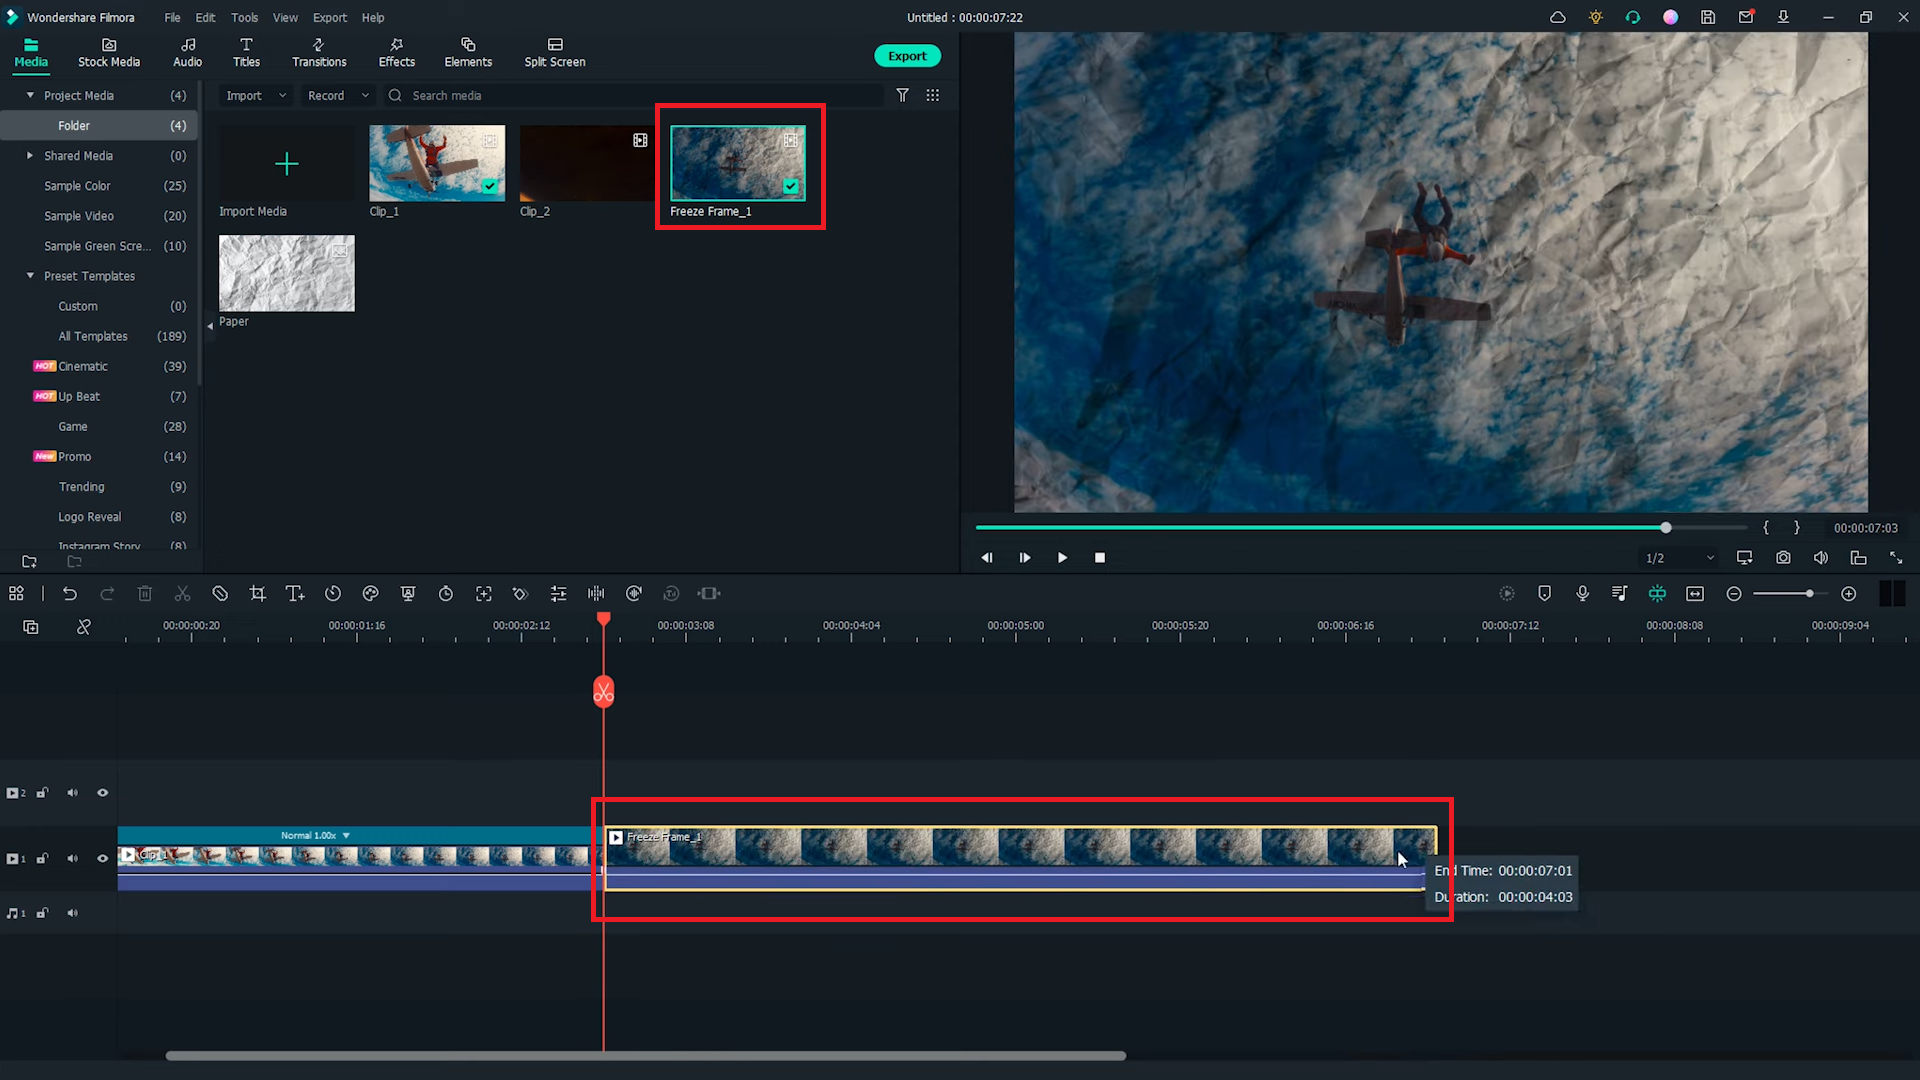
Step11 Now let’s make the second part of the transition effect. You should drag and Drop Clip 2 onto the timeline and move the playhead to the clip’s first frame. Then Add a Freeze Frame; you can also do it by pressing the Alt+F keys. Now click and drag the playhead to the end of the freeze frame and make a Cut.

Step12 Drag and drop the paper photo onto the second video track of the timeline and make sure it starts at the beginning of the freeze frame on the first video track. And again, change the blending mode to Multiply as well.

Step13 Select the range you want to export by setting IN and OUT points as we did before. Press the I key on the keyboard to set the in point, drag the playhead to the out point, and press the O key.

Step14 This time use the shortcut Control + E to open the export window. Again, let’s name it freeze frame 2 and then export it.
Step15 You can use the keyboard shortcut Shift + X to cancel the selected range. Then import freeze frame 2 into the media folder and replace the freeze frame + paper photo. Adjust the length of this new clip to about 1 second.

Step16 Now you can add several Filmora transitions to finish the effect. Go to the Transitions window and find Evaporate 2.

Step17 Drag and drop it onto the cut between clip 1 and freeze frame 1 and the cut between clip 2 and freeze frame 2. You can also adjust the length of the transition.

Step18 Then, find Torned Paper Transition 4 in the Transitions window. Drag and drop it to the cut between freeze frame 1 and freeze frame 2. Then choose Prefix mode in the transition setting video. Adjust the length if needed.

Finally, it’s done. Let’s play the video and see how the paper effect and transitions enhanced the video.

Conclusion
We hope this post has helped you achieve the desired effect on your video. With Filmora’s intuitive user interface, you can customize your paper rip effect with text, images, and more to create a truly unique and eye-catching video. So get creative and start turning your videos into paper rip effects today!
Free Download For macOS 10.14 or later
- Over 1,000 video effects, transitions, titles, etc., to spice up high-quality videos.
- Support speech-to-text that allows smooth conversion of voiceover to text.
- Over 2,000+ audio resources range from music and audio effects, and much more.
- The shortcut key saves you time while editing videos.
Stepwise Guide to Make the Paper Rip Effect
Step1 Download Wondershare Filmora from the official website. If you have already downloaded the Wondershare Filmora. Open it, and let’s start editing the video.
Step2 First, we need to find a photo of a white paper that you can easily download from the internet and two videos in which you want to add this effect. Then import these three files to the media gallery.

Step3 Drag and drop Clip 1 onto the timeline and move the playhead to the last frame of the clip.

Alt text: Paper rip effect.
Step4 Now right-click on Clip 1 to open the menu and select Add Freeze Frame.

Step5 After adding a freeze frame, cut here.

Step6 Drag and drop the paper photo onto the second video track of the timeline, and make sure it starts at the cut on the first video track.

Step7 Double-click the paper picture on the timeline to open the settings window and then open the Compositing menu. Then Change the Blending Mode from Normal to Multiply.

In the preview window, we can see that the freeze frame has the paper texture now!

Step8 Now you can use the new feature of Filmora to export this small portion of the video. First, click and drag the playhead to the start of the freeze frame and press “I” on the keyboard to set the IN POINT, then move the playhead to the end of this freeze frame and press “O” on the keyboard to set the OUT POINT.

![]()
Note: If you have the latest version, Filmora will automatically set the OUT POINT on the timeline.
Step9 Then click Export and choose Create Video. Let’s name it freeze frame 1 and click on Export.

It will only export the selected part on the timeline. Once the exporting process is completed, Right-Click on the timeline and Cancel the selected range.

Step10 Import the Freeze Frame 1 to the media folder and replace the Freeze Frame + Paper Photo with this clip. Then adjust the length of this clip to 1 second.

Step11 Now let’s make the second part of the transition effect. You should drag and Drop Clip 2 onto the timeline and move the playhead to the clip’s first frame. Then Add a Freeze Frame; you can also do it by pressing the Alt+F keys. Now click and drag the playhead to the end of the freeze frame and make a Cut.

Step12 Drag and drop the paper photo onto the second video track of the timeline and make sure it starts at the beginning of the freeze frame on the first video track. And again, change the blending mode to Multiply as well.

Step13 Select the range you want to export by setting IN and OUT points as we did before. Press the I key on the keyboard to set the in point, drag the playhead to the out point, and press the O key.

Step14 This time use the shortcut Control + E to open the export window. Again, let’s name it freeze frame 2 and then export it.
Step15 You can use the keyboard shortcut Shift + X to cancel the selected range. Then import freeze frame 2 into the media folder and replace the freeze frame + paper photo. Adjust the length of this new clip to about 1 second.

Step16 Now you can add several Filmora transitions to finish the effect. Go to the Transitions window and find Evaporate 2.

Step17 Drag and drop it onto the cut between clip 1 and freeze frame 1 and the cut between clip 2 and freeze frame 2. You can also adjust the length of the transition.

Step18 Then, find Torned Paper Transition 4 in the Transitions window. Drag and drop it to the cut between freeze frame 1 and freeze frame 2. Then choose Prefix mode in the transition setting video. Adjust the length if needed.

Finally, it’s done. Let’s play the video and see how the paper effect and transitions enhanced the video.

Conclusion
We hope this post has helped you achieve the desired effect on your video. With Filmora’s intuitive user interface, you can customize your paper rip effect with text, images, and more to create a truly unique and eye-catching video. So get creative and start turning your videos into paper rip effects today!
Best Audio Waveform Generator
For more than a century, sound waves and broadcasts have played an important role in shaping media as we know it. Here’s how to implement them into your social media strategy. They have become popular in short video animations used to promote audio on social media, commonly referred to as audiograms.
Before learning everything there is to know about audiograms and how to make them, let’s gain a better understanding of the significance of these patterns.
Part 1. What is an audio waveform?
A sound wave is the vibration of air molecules, which is how sound travels. The waveform describes the wave using a graph of how the air molecule is displaced over time.
Amplitude is the strength of a wave’s action; the higher the amplitude, the more the air molecules are displaced. This also translates into loudness for the human ear; increasing the amplitude of the wave will increase how loud it appears to us. Sine, triangle, square, and sawtooth waveforms are the most typical periodic waveforms.
Part 2. What is audio wave animation?
A waveform animation video is a short video clip that can be uploaded to social media that combines an audio file with a static background image and a straightforward waveform animation. Audio animations, an example of audio visualization, make for fantastic video content, which is increasingly valuable on ever-noisy social media platforms.
Part 3. Why do we use audio visualization?
We all know that there is a special way of feeling called synesthesia, which is both a psychological and a linguistic phenomenon. Similar to how you automatically link this rain scene with the sound of heavy rain when you see it. People’s newly awakened senses are more about the synthesis of sensory experience with actual life experience than they are entirely about actual information. Therefore, for clean audio, enhancing it with complementary visual animation effects will improve the user’s visual experience and, to some extent, offer additional information and impact to your audio.

Part 4. Best Audio Waveform Generator
Audio visualization can be presented in a variety of ways. The simplest kind of processing involves taking low-dimensional information like frequency, loudness, and rhythm and converting them into images in the form of colors, forms, strokes, etc. However, modern artificial intelligence technology can now extract high-dimensional visual attributes including style, tone, and emotion. But, for most non-technical players, such processes are obviously out of their league, therefore your best choice is to use a basic audio waveform generator. Following, we’ll suggest 10 desktop or online generators so you may quickly finish the audio visualization project and create your audio-related videos.
Audio Visualizer on Desktop
You may add audio spectrum visualizers to videos using a variety of tools. But one of the best software we recommend is Filmora audio visualizer because you can edit all sound effects on this platform with just one button. Filmora has audio keyframing and a built-in equalizer that can create unique sound effects and make the audio recording more appealing when you hear it.
Price: US$ 49.99/Year
Pros
- Filmora Audio Visualizer provides you with 25 types of audio and concludes circle audio spectrum.
- Easy to use for the beginner and there are more other audio features that you can easily use and start editing your file.
- It’s super affordable as compared to other audio editing software.
Cons
- Pattern shape can’t be defined by yourself, also doesn’t support your custom template
VJs and all other artists who like to combine sound and images during live performances can use the Performer edition of this cross-platform music visualization software. The Studio edition offers all the functions that are necessary to create music visualizations or music videos in real-time. You can use both editions of Magic to generate 2D and 3D graphics that respond to music or mix photos, 3D files, or videos. In addition, you can easily enter full-screen mode and project your videos using LED displays or projectors. Magic Music Visuals also allows its users to combine an unlimited number of audio inputs simultaneously, meaning you can effortlessly mix two or more tracks. This music visualization software allows you to export videos in mp4 and MOV files, but the length of the rendering process depends on the length of the video and the performance of the computer you are using.
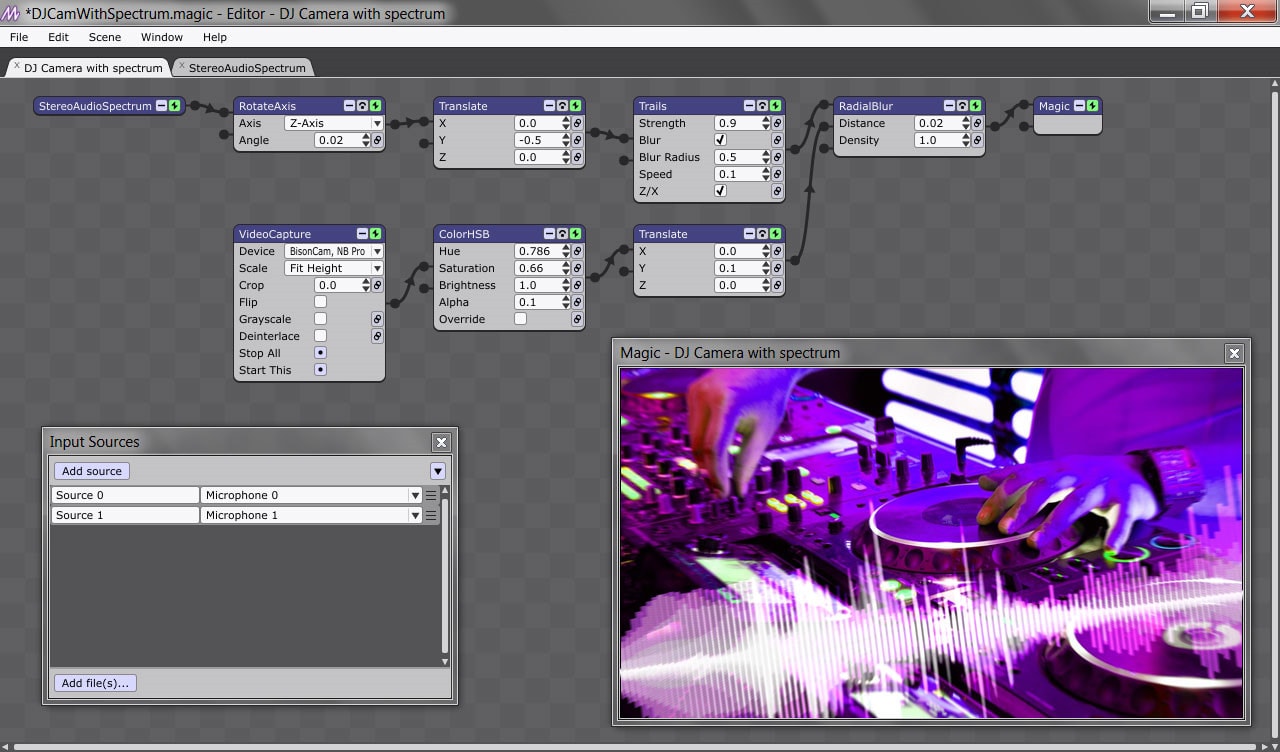
Price: Free demo available, $44.95 for a full version license
Pros
- Amazing Visual Effects
- Efficient Text Processing
- Lots of Blending modes
- Custom Color correction
Cons
- No Video Stabilization tool
- Audio waveform and hardware acceleration features are not available
Music visualization is just one of the countless video editing options offered by VDSC Video Editor Free. In addition to creating music-based videos, you can also use this video editing software product to stabilize videos recorded by action cameras, enhance colors in footage captured by a wide range of cameras and drones, create 3D graphics, or export high-quality videos. Resolution to your social media accounts directly from the software. The editor’s Audio Visualizer contains five hundred presets that you can use to create a captivating music video for your latest track. In addition to Spectrum, which displays sounds within a set color range, VDSC Video Editor also offers Audio Abstraction, which generates colorful abstract shapes based on the music you select. While visualizing audio with VDSC Audio Visualizer is a fun and simple process, video creators with no prior video editing experience may need some time to get used to the software’s interface.

Price: Free
Pros
- Every tool for video editing is available
- Amazing Visual Effects
- Efficient Text Processing
- Lots of Blending modes
- Custom Color correction
Cons
- Pro Editing Features are Missing
- No Video Stabilization tool
- Audio waveform and hardware acceleration features are not available
- Standard voiceover and masking tools
Audio Visualizer Online
- Media.io Music Visualizer Online
Want to add eye-catching visuals to your audio? Media.io Music Visualizer web app is the perfect app for you. You can add audio waveforms to any audio format, including M4A, M4R, MP3, OGG, AU, and many more. After loading the audio, this program allows you to add a captivating progression and a cover photo of your choice. Additionally, users of Media.io can trim, split, rearrange, and remove audio. You can even add subtitles, subtitles, and texts. If you’re fine with visualizing music, it lets you choose the aspect ratio before exporting to 1080P MP4. Just try it!
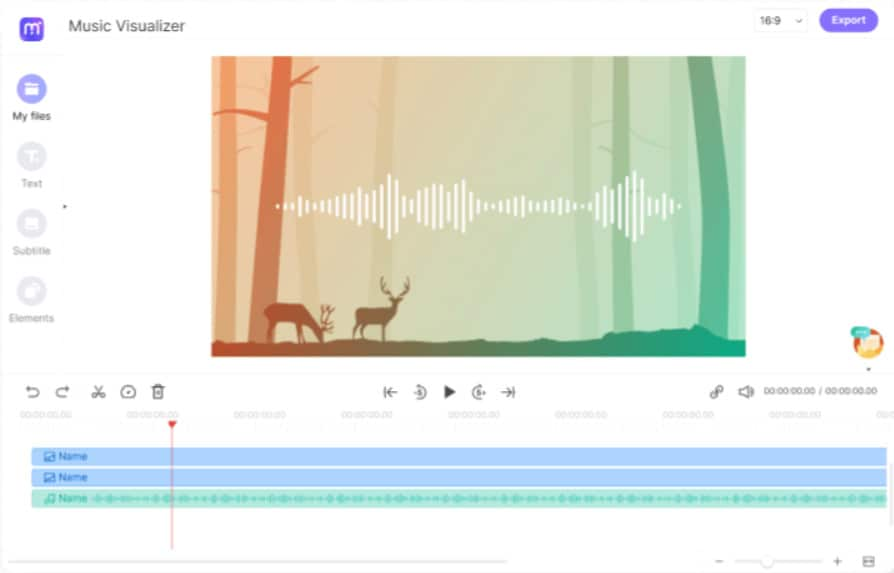
Price: Free
Pros
- It has consistently been upgraded and improved since its inception when it was pretty great already.
- The product is great based on how it was marketed, and it is a great tool. This is easily accomplished by use among three brands.
- An excellent experience with a great community of entrepreneurs and marketers supporting the ecosystem.
Cons
- It doesn’t have a direct publication on Instagram but offers 2 ways: via app notification (which can be annoying at times) or integration with Zapier, through a wizard.
Renderforest is a platform that enables users to design whole websites or upload visual assets for online use. However, to start visualizing your music with Renderforest, you must first register and create your account. Then just choose between visualization templates with text or photo holders, add the artist’s name and track title, then add a background photo or video. You can proceed to choose a visualization style that perfectly matches the music, chooses its color, and finally uploads the song you want to use in your video. Once done, you should simply click on the Preview icon and Renderforest will send you an email containing a video of the music visualization. Keep in mind that all videos created using the free version of the platform will be watermarked and cannot exceed the one-minute limit.

Price: Free version accessible; $9.99 is the starting price for subscriptions.
Pros
- It has got loads of beautiful templates to choose from, which could even fit perfectly into the kind of logo animation project you may have in mind.
- The effortless, natural, effective, rational, and impressive way to share your amazing ideas with the world. Just let your imagination go wild and keep going.
- A wide variety of templates and animations, with lots of customization available. And it offers amazing customer service.
Cons
- The only thing that is a downside is that there is a watermark by default, which can only be removed by paying.
- It is fairly expensive for the lack of many features.
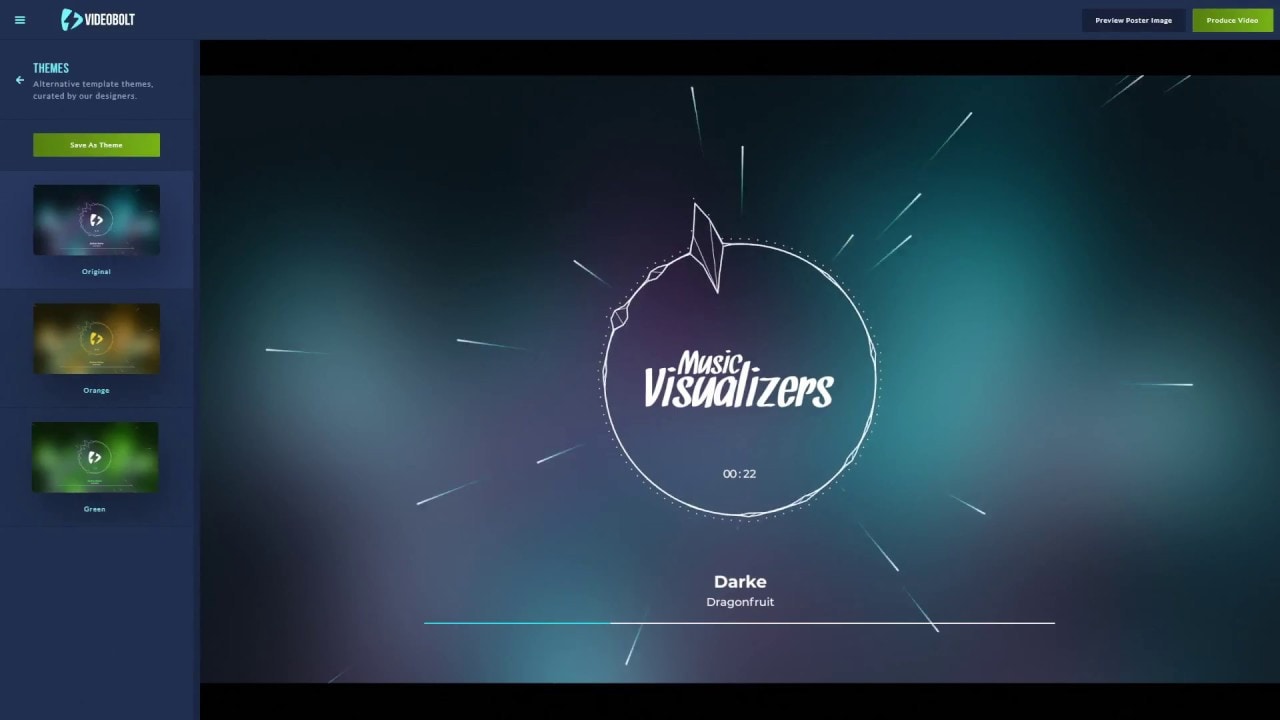
The collection of music visualization templates that this website offers is really impressive as you can choose from a wide variety of templates during the video creation process. However, you must purchase one of the available subscription plans to customize the template you’ve selected and export it without a watermark. After selecting a music visualization template, just click the Edit button below it and start working on your project. You can either upload a song from your computer or use SoundCloud to import the song you want to visualize into your project. You can improve the quality of your video by adding a cover or using a variation of the template you originally selected. The only downside is that you won’t be able to edit the videos produced by Videobolt Music Visualizer during the free trial period.
Price: Free trial available, subscription plans start from $7.99 per month
Pros
- The quality and ease to create awesome-looking intros have been an invaluable tool in my work. Simple to use with excellent assistance available.
- This tool has helped me make an awesome-looking music video and an intro as well.
- Particularly the quality of the final product and the ability to change the templates to compliment the client’s brand guidelines.
Cons
- The overall experience is poor, and their support is terrible.
- As someone with not that much money to spend, it is a bit costly.
- Sometimes it’s hard to find exactly what you need.
Conclusion
Filmora Audio Visualizer is one of the top-rated audio editing software tools due to its incredible features and interface. If you want to create amazing sound effects on your video, we highly recommend you download this software on your computer to enjoy all the amazing editing tools. Social media content creators, musicians, and VJs can produce stunning videos with any of the music visualizers we’ve listed in this article. What’s your favorite music visualizer to use to create videos based on music? Please let us know by leaving a comment below.
Free Download For Win 7 or later(64-bit)
Free Download For macOS 10.14 or later
Price: US$ 49.99/Year
Pros
- Filmora Audio Visualizer provides you with 25 types of audio and concludes circle audio spectrum.
- Easy to use for the beginner and there are more other audio features that you can easily use and start editing your file.
- It’s super affordable as compared to other audio editing software.
Cons
- Pattern shape can’t be defined by yourself, also doesn’t support your custom template
VJs and all other artists who like to combine sound and images during live performances can use the Performer edition of this cross-platform music visualization software. The Studio edition offers all the functions that are necessary to create music visualizations or music videos in real-time. You can use both editions of Magic to generate 2D and 3D graphics that respond to music or mix photos, 3D files, or videos. In addition, you can easily enter full-screen mode and project your videos using LED displays or projectors. Magic Music Visuals also allows its users to combine an unlimited number of audio inputs simultaneously, meaning you can effortlessly mix two or more tracks. This music visualization software allows you to export videos in mp4 and MOV files, but the length of the rendering process depends on the length of the video and the performance of the computer you are using.

Price: Free demo available, $44.95 for a full version license
Pros
- Amazing Visual Effects
- Efficient Text Processing
- Lots of Blending modes
- Custom Color correction
Cons
- No Video Stabilization tool
- Audio waveform and hardware acceleration features are not available
Music visualization is just one of the countless video editing options offered by VDSC Video Editor Free. In addition to creating music-based videos, you can also use this video editing software product to stabilize videos recorded by action cameras, enhance colors in footage captured by a wide range of cameras and drones, create 3D graphics, or export high-quality videos. Resolution to your social media accounts directly from the software. The editor’s Audio Visualizer contains five hundred presets that you can use to create a captivating music video for your latest track. In addition to Spectrum, which displays sounds within a set color range, VDSC Video Editor also offers Audio Abstraction, which generates colorful abstract shapes based on the music you select. While visualizing audio with VDSC Audio Visualizer is a fun and simple process, video creators with no prior video editing experience may need some time to get used to the software’s interface.

Price: Free
Pros
- Every tool for video editing is available
- Amazing Visual Effects
- Efficient Text Processing
- Lots of Blending modes
- Custom Color correction
Cons
- Pro Editing Features are Missing
- No Video Stabilization tool
- Audio waveform and hardware acceleration features are not available
- Standard voiceover and masking tools
Audio Visualizer Online
- Media.io Music Visualizer Online
Want to add eye-catching visuals to your audio? Media.io Music Visualizer web app is the perfect app for you. You can add audio waveforms to any audio format, including M4A, M4R, MP3, OGG, AU, and many more. After loading the audio, this program allows you to add a captivating progression and a cover photo of your choice. Additionally, users of Media.io can trim, split, rearrange, and remove audio. You can even add subtitles, subtitles, and texts. If you’re fine with visualizing music, it lets you choose the aspect ratio before exporting to 1080P MP4. Just try it!

Price: Free
Pros
- It has consistently been upgraded and improved since its inception when it was pretty great already.
- The product is great based on how it was marketed, and it is a great tool. This is easily accomplished by use among three brands.
- An excellent experience with a great community of entrepreneurs and marketers supporting the ecosystem.
Cons
- It doesn’t have a direct publication on Instagram but offers 2 ways: via app notification (which can be annoying at times) or integration with Zapier, through a wizard.
Renderforest is a platform that enables users to design whole websites or upload visual assets for online use. However, to start visualizing your music with Renderforest, you must first register and create your account. Then just choose between visualization templates with text or photo holders, add the artist’s name and track title, then add a background photo or video. You can proceed to choose a visualization style that perfectly matches the music, chooses its color, and finally uploads the song you want to use in your video. Once done, you should simply click on the Preview icon and Renderforest will send you an email containing a video of the music visualization. Keep in mind that all videos created using the free version of the platform will be watermarked and cannot exceed the one-minute limit.

Price: Free version accessible; $9.99 is the starting price for subscriptions.
Pros
- It has got loads of beautiful templates to choose from, which could even fit perfectly into the kind of logo animation project you may have in mind.
- The effortless, natural, effective, rational, and impressive way to share your amazing ideas with the world. Just let your imagination go wild and keep going.
- A wide variety of templates and animations, with lots of customization available. And it offers amazing customer service.
Cons
- The only thing that is a downside is that there is a watermark by default, which can only be removed by paying.
- It is fairly expensive for the lack of many features.
The collection of music visualization templates that this website offers is really impressive as you can choose from a wide variety of templates during the video creation process. However, you must purchase one of the available subscription plans to customize the template you’ve selected and export it without a watermark. After selecting a music visualization template, just click the Edit button below it and start working on your project. You can either upload a song from your computer or use SoundCloud to import the song you want to visualize into your project. You can improve the quality of your video by adding a cover or using a variation of the template you originally selected. The only downside is that you won’t be able to edit the videos produced by Videobolt Music Visualizer during the free trial period.

Price: Free trial available, subscription plans start from $7.99 per month
Pros
- The quality and ease to create awesome-looking intros have been an invaluable tool in my work. Simple to use with excellent assistance available.
- This tool has helped me make an awesome-looking music video and an intro as well.
- Particularly the quality of the final product and the ability to change the templates to compliment the client’s brand guidelines.
Cons
- The overall experience is poor, and their support is terrible.
- As someone with not that much money to spend, it is a bit costly.
- Sometimes it’s hard to find exactly what you need.
Conclusion
Filmora Audio Visualizer is one of the top-rated audio editing software tools due to its incredible features and interface. If you want to create amazing sound effects on your video, we highly recommend you download this software on your computer to enjoy all the amazing editing tools. Social media content creators, musicians, and VJs can produce stunning videos with any of the music visualizers we’ve listed in this article. What’s your favorite music visualizer to use to create videos based on music? Please let us know by leaving a comment below.
Free Download For Win 7 or later(64-bit)
Free Download For macOS 10.14 or later
LumaFusion Color Grading: Achieving It Through LUTs
LumaFusion is one of the best-known apps to enhance video quality without impacting the overlays. With this app, you can modify the video in several ways, such as applying LUTs to videos and synchronizing MultiCam clips. Yet, many users find it challenging to use LumaFusion to color grade the clips.
In this discussion, we will discuss color grading in LumaFusion and the procedure to use it. Moreover, we will also introduce an app that can streamline your workflow efficiency. The name of this app is Wondershare Filmora, and it will also help you to apply LUTs on computers.
Part 1: How Do LUTs Make Work Operation Easy?
Before getting into the free LUTs for LumaFusion, it is important to know the higher functionality of LUTs. If you are new to the field of video editing, you may have no idea how LUTs can improve your work operation. This section will help you to understand it without complications:
- Modern Styles and Looks: LUTs offers predefined and modernized styles and look that are created by specialists. As these LUTs have prebuilt color grading techniques along with file emulation, you can use them to increase the attractiveness of videos.
- Higher Workflow Efficiency: The prebuilt LUTs can make your work easier than ever. You can apply the LUTs to the videos in the simplest manner, along with saving time and effort.
- Compatibility of LUTs: There are no such device restrictions in LUTs, as you can use them on computers or mobile devices. Above all, LUTs are also compatible with several video editing software.
- Customization and Experimentation: While using the LUTs, you can customize them as per your needs without any problem. Other than this, you can also experiment the creativity and visual styles with LUTs.
Empower your videos with a new mood using different LUTs. Filmora now offers 100+ top-quality 3D LUTs cover a broad range of scenarios. Transform your videos with Filmora’s powerful 3D LUTs.
Apply LUT on Videos Apply LUT on Videos Learn More

Part 2: What Are the Potential Ways to Apply LUTs for LumaFusion?
There are considerable ways to apply LUTs in LumaFusion, but we plan to introduce the most straightforward ways. Don’t fret if you have no video editing skills. By following the below-given steps, you can experience the LumaFusion color grading:
Way 1: Apply LUTs Through Sharing
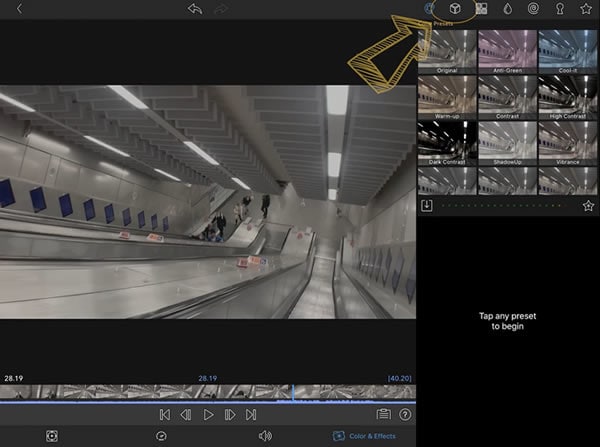
Step 1: Initially, import the video to LumaFusion and double-tap on a video in “Timeline.” Select the “Color and Effect” icon from the bottom and redirect to the “Cube” icon on the top.
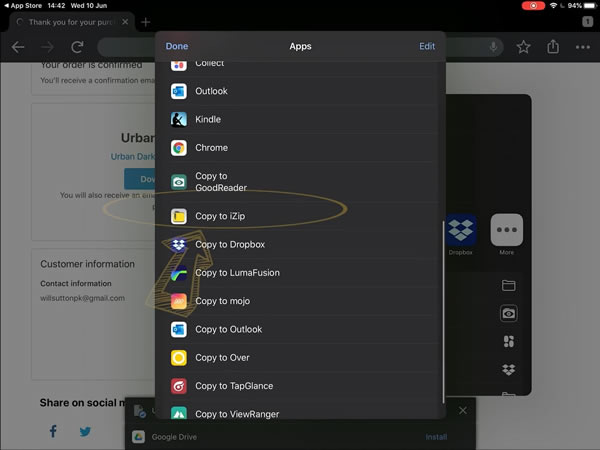
Step 2: Next, tap on the “Import” button, and once you are on the “Thank You” page, select the “Download Link” button. Following this, hit “Copy to ZIP,” and after this, the ZIP folders will be loaded in the app.
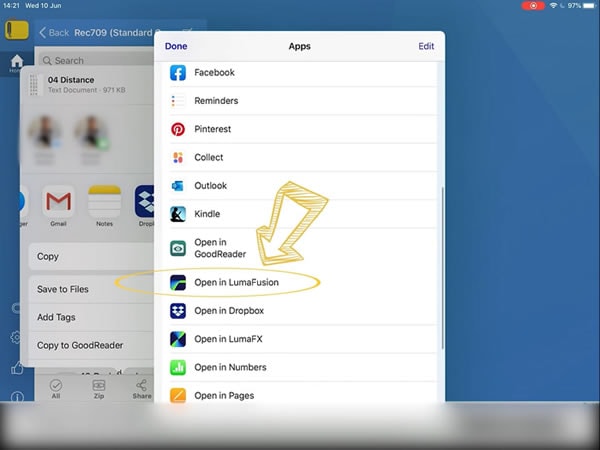
Step 3: To proceed, you have to “Unzip the Folder” and locate the LUTs of your choice. Once you find the LUT, press the “Share” icon and tap “Open in LumaFusion.” Following this, the LUT will be added in LumaFusion.
Way 2: Apply LUTs Through LUT Name
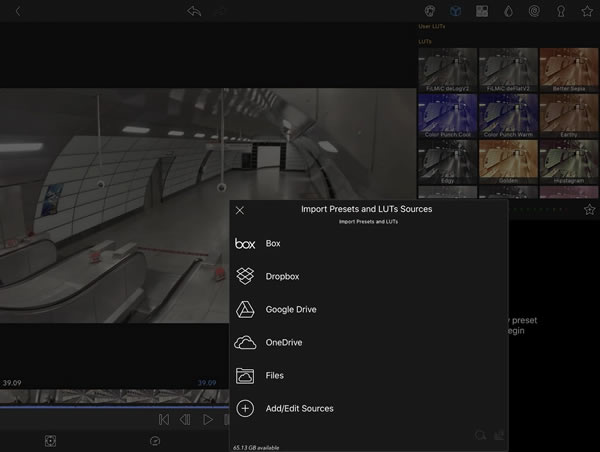
Step 1: Open the video with LumaFusion and select “Timeline.” Tap on the “Color and Effect” sign and select the “Import” button. Following this, you need to select a tool for importing LUTs from the options of Box, Dropbox, Google Drive, Files, or Add/Edit Source.
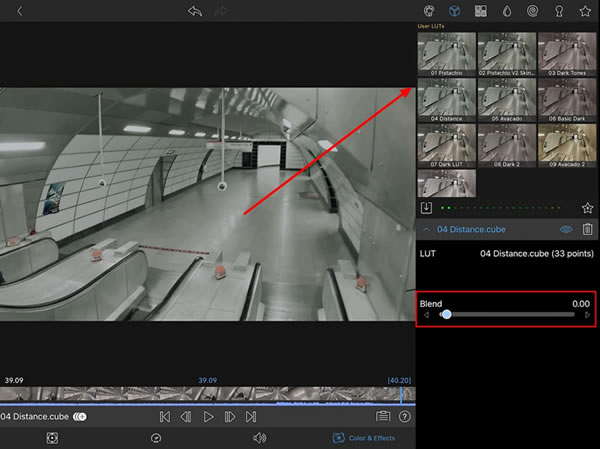
Step 2: After selecting the source, tap on “LUT name” to add it to LumaFusion. To proceed, press the “Share” button and wait a few moments. Once the LUT is added, you can manage its intensity from the “Blend” sliders.
Part 3: Some Best LUTs To Discover For Using in LumaFusion
Now that you know the higher functionality of LUTs and their application procedure, you must be wondering what LUTs are best for LumaFusion. There is no need to be anxious, as this part will introduce some of the free LUTs for LumaFusion. Look below to learn more about these exceptional video editing elements:
1. Color Grading Central Free LUTs
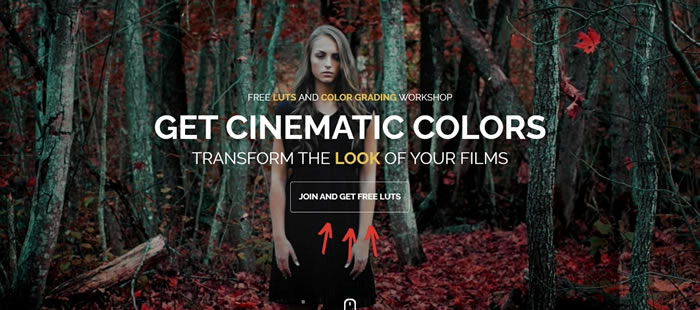
If you want to add the best color grading LumaFusion LUTs, you need to seek help from the color specialist. Thus, you can use the Color Grading free LUTs designed by CGC. Their site is enriched with high definition and optimized color combinate LUTs. You will never get disappointed by using these LUTs as they never impact the content of the videos.
2. Frank Glencairn Free LUT
If you are still a fan of vintage films in this modernized and vibrant-colored world, this LUT is for you. With this, you can add a fantastic and realistic vintage look to any video. Other than this, it is very popular among filmmakers for introducing a backstory scene in films. Not only professional, but you can also use it to give a retro look to your videos.
3. Reverse Tree Media Free LUTs
With this absolutely free LUT, you can upgrade the quality of your videos with little effort. It also has very modernized LUTs utility, such as the Black Bar layer. You can use this to enhance the video quality of several types of videos, such as TV series or movies. It is quite a perfect pick for sad or backstory scenes. In addition to this, it also has 8mm, 16mm, and 35mm overlays.
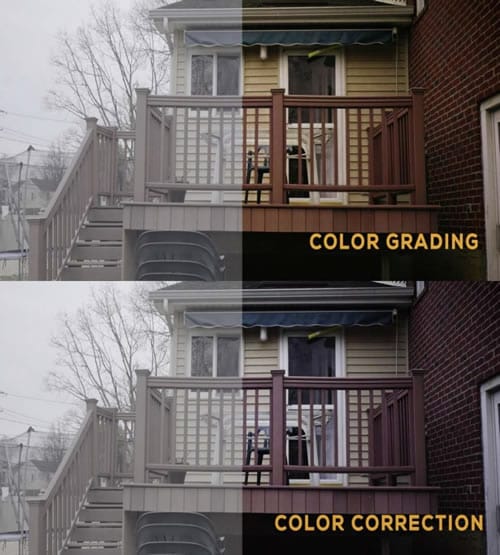
4. Kodachrome-K-Tone LUT
With the help of this LUT, you can feel yourself in the era of the early 90s. It has mass-marketed colors along with a subtractive method, which makes it a better option. Moreover, this LUT can also escalate the captivity of promotional videos. You can also use it for magazine photo editing. If you are working on a video captured in low light, this can also fix all the coloring issues for you.

5. SmallHD Free LUTs
Another frequently used LumaFusion LUTs is SmallHD-free LUTs which can maximize your video productivity effectively. It can enhance the classical appearance of the videos. You can use it for both pre and postproduction enhancements. These LUTs give you both dramatic and cinematic vibes. You can apply it to action, thriller, melodramatic or other videos.
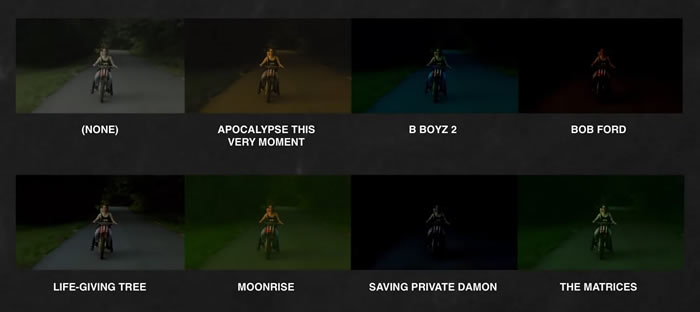
Part 4: Wondershare Filmora: Apply LUTs Easily on the Computer
Wondershare Filmora is a tool that gives you freedom of creativity without any complications. With this tool, you can modify your videos in several ways on Mac, Windows, or mobile devices. Filmora also has versatile video editing software to help new video editors in their professional journey. The AI tools present in Filmora have stunning effects on every user, as they can make your work easier than ever.
Add LUTs on Video For Win 7 or later(64-bit)
Add LUTs on Video For macOS 10.14 or later
For example, by using its AI Image, you can turn simple words into images. You can also split the screen and manage the keyframes of your video. One of the best things about Filmora is it lets you edit videos with full customization.

Key Features of Wondershare Filmora
- If you want to track the moments of the objects in the video, the Motion Tracking feature of Filmora got you covered. You can also add Mosaic effects to moving characters or objects in a video.
- There are diversified preset templates in Filmora through which you can make the video with a few taps. You are also free to create your own video template and share it with the world.
- With Filmora, you can edit multiple videos at once, as it supports the batch edit feature. Moreover, you can also add adjustment layers in the video to make non-destructive edits.
Conclusion
As this article states, you can turn simple videos into attractive ones with color-grading LumaFusion LUTs. There are several things that define the higher functionality of LUTs, and you can see the points above. Moreover, the instructions to apply LUTs with LumaFusion are also discussed above for the ease of users.
There are two ways available to achieve color grading, out of which you can select any one of your preferences. The other tool that can help you to apply LUTs on the computer is Wondershare Filmora . You can learn more about this from the above discussion.
Add LUTs on Video For Win 7 or later(64-bit)
Add LUTs on Video For macOS 10.14 or later
Apply LUT on Videos Apply LUT on Videos Learn More

Part 2: What Are the Potential Ways to Apply LUTs for LumaFusion?
There are considerable ways to apply LUTs in LumaFusion, but we plan to introduce the most straightforward ways. Don’t fret if you have no video editing skills. By following the below-given steps, you can experience the LumaFusion color grading:
Way 1: Apply LUTs Through Sharing
Step 1: Initially, import the video to LumaFusion and double-tap on a video in “Timeline.” Select the “Color and Effect” icon from the bottom and redirect to the “Cube” icon on the top.

Step 2: Next, tap on the “Import” button, and once you are on the “Thank You” page, select the “Download Link” button. Following this, hit “Copy to ZIP,” and after this, the ZIP folders will be loaded in the app.

Step 3: To proceed, you have to “Unzip the Folder” and locate the LUTs of your choice. Once you find the LUT, press the “Share” icon and tap “Open in LumaFusion.” Following this, the LUT will be added in LumaFusion.

Way 2: Apply LUTs Through LUT Name
Step 1: Open the video with LumaFusion and select “Timeline.” Tap on the “Color and Effect” sign and select the “Import” button. Following this, you need to select a tool for importing LUTs from the options of Box, Dropbox, Google Drive, Files, or Add/Edit Source.

Step 2: After selecting the source, tap on “LUT name” to add it to LumaFusion. To proceed, press the “Share” button and wait a few moments. Once the LUT is added, you can manage its intensity from the “Blend” sliders.

Part 3: Some Best LUTs To Discover For Using in LumaFusion
Now that you know the higher functionality of LUTs and their application procedure, you must be wondering what LUTs are best for LumaFusion. There is no need to be anxious, as this part will introduce some of the free LUTs for LumaFusion. Look below to learn more about these exceptional video editing elements:
1. Color Grading Central Free LUTs
If you want to add the best color grading LumaFusion LUTs, you need to seek help from the color specialist. Thus, you can use the Color Grading free LUTs designed by CGC. Their site is enriched with high definition and optimized color combinate LUTs. You will never get disappointed by using these LUTs as they never impact the content of the videos.

2. Frank Glencairn Free LUT
If you are still a fan of vintage films in this modernized and vibrant-colored world, this LUT is for you. With this, you can add a fantastic and realistic vintage look to any video. Other than this, it is very popular among filmmakers for introducing a backstory scene in films. Not only professional, but you can also use it to give a retro look to your videos.

3. Reverse Tree Media Free LUTs
With this absolutely free LUT, you can upgrade the quality of your videos with little effort. It also has very modernized LUTs utility, such as the Black Bar layer. You can use this to enhance the video quality of several types of videos, such as TV series or movies. It is quite a perfect pick for sad or backstory scenes. In addition to this, it also has 8mm, 16mm, and 35mm overlays.

4. Kodachrome-K-Tone LUT
With the help of this LUT, you can feel yourself in the era of the early 90s. It has mass-marketed colors along with a subtractive method, which makes it a better option. Moreover, this LUT can also escalate the captivity of promotional videos. You can also use it for magazine photo editing. If you are working on a video captured in low light, this can also fix all the coloring issues for you.

5. SmallHD Free LUTs
Another frequently used LumaFusion LUTs is SmallHD-free LUTs which can maximize your video productivity effectively. It can enhance the classical appearance of the videos. You can use it for both pre and postproduction enhancements. These LUTs give you both dramatic and cinematic vibes. You can apply it to action, thriller, melodramatic or other videos.

Part 4: Wondershare Filmora: Apply LUTs Easily on the Computer
Wondershare Filmora is a tool that gives you freedom of creativity without any complications. With this tool, you can modify your videos in several ways on Mac, Windows, or mobile devices. Filmora also has versatile video editing software to help new video editors in their professional journey. The AI tools present in Filmora have stunning effects on every user, as they can make your work easier than ever.
Add LUTs on Video For Win 7 or later(64-bit)
Add LUTs on Video For macOS 10.14 or later
For example, by using its AI Image, you can turn simple words into images. You can also split the screen and manage the keyframes of your video. One of the best things about Filmora is it lets you edit videos with full customization.

Key Features of Wondershare Filmora
- If you want to track the moments of the objects in the video, the Motion Tracking feature of Filmora got you covered. You can also add Mosaic effects to moving characters or objects in a video.
- There are diversified preset templates in Filmora through which you can make the video with a few taps. You are also free to create your own video template and share it with the world.
- With Filmora, you can edit multiple videos at once, as it supports the batch edit feature. Moreover, you can also add adjustment layers in the video to make non-destructive edits.
Conclusion
As this article states, you can turn simple videos into attractive ones with color-grading LumaFusion LUTs. There are several things that define the higher functionality of LUTs, and you can see the points above. Moreover, the instructions to apply LUTs with LumaFusion are also discussed above for the ease of users.
There are two ways available to achieve color grading, out of which you can select any one of your preferences. The other tool that can help you to apply LUTs on the computer is Wondershare Filmora . You can learn more about this from the above discussion.
Add LUTs on Video For Win 7 or later(64-bit)
Add LUTs on Video For macOS 10.14 or later
Also read:
- New Easy Guide to Zoom Video in VLC for 2024
- New Steps to Make a Neon Dance Effect With Filmora
- Updated 2024 Approved How Did AI Video Games Act More Human Than Human?
- Updated Unlocking the Power of DaVinci Resolve Scopes Enhance Your Color Grad
- 4 Methods How To Make a Recap Video for 2024
- Having GoPro Accessories Is Easy, but Editing on GoPro Quik Is Challenging. Read This Guide and, Stepwise, Learn to Use GoPro Slow-Motion for Perfect Shots
- Updated Best 12 AI Video Generators to Pick for 2024
- Updated In 2024, How to Add Video Transitions in Videos
- Best Ever Ways Make Tiktok Slideshow Solved
- New How to Remove Audio From Videos with FFmpeg?
- Updated 2024 Approved Final Cut Pro - How to Download and Install It
- In 2024, Looking for a Way to Learn How to Merge Videos in HandBrake? Theres a Better Solution Waiting for You Inside
- Updated Easy Steps to Create Intro Video with After Effects
- Updated 8 Top Premiere Pro Slideshow Templates
- New 10 Crazy-Cool Examples of AR Video for 2024
- An Ultimate Guide on the Significance of Music in Videos and How to Choose the Right Music for Your Videos with Wondershare Filmora for 2024
- Updated Powerpoint Slideshow Icon, Slide Sorter View Icon, Slideshow Icon Powerpoint, Slide Show View Icon
- Find a Solution for Effortless Sky Replacement Photoshop in This Comprehensive Guide. Also, Use the Easiest Video Editing Tool to Make Your Media Stunning for 2024
- Updated Detailed Guide to Resize Your Video in VLC for 2024
- Updated 15 Best Travel Vloggers That You Should Follow
- Updated 2024 Approved How To Make a Video by Mouse in Filmora?
- Updated 2024 Approved OBS Green Screen Guide
- Updated How to Use a Stabilization Tool in Filmora
- New 2024 Approved How to Make a Neon Dance Effect With Filmora
- Guide on How To Change Your Apple ID Email Address On Apple iPhone 14
- In 2024, Ultimate Guide from Itel A60s FRP Bypass
- Updated Best 10 Free and Best Text-to-Speech Generators for 2024
- 11 Ways to Fix it When My Vivo Y100i Power 5G Wont Charge | Dr.fone
- How to Downgrade Apple iPhone 15 Plus without Losing Anything? | Dr.fone
- In 2024, How To Open Your Apple iPhone 14 Pro Max Without a Home Button
- Complete Tutorial to Use GPS Joystick to Fake GPS Location On Infinix Note 30 Pro | Dr.fone
- In 2024, Additional Tips About Sinnoh Stone For Vivo S18e | Dr.fone
- How to Unlock Apple iPhone 6s with a Mask On
- How to Spy on Text Messages from Computer & Oppo A38 | Dr.fone
- In 2024, How to Change Location On Facebook Dating for your Apple iPhone SE (2022) | Dr.fone
- How to Recover Apple iPhone 13 Pro Max Data From iOS iTunes Backup? | Dr.fone
- In 2024, How to Transfer Contacts from Infinix Hot 30 5G to Outlook | Dr.fone
- In 2024, How to Change Location On Facebook Dating for your OnePlus 11R | Dr.fone
- Effective Ways To Fix Checkra1n Error 31 From iPhone 15 Pro
- The Magnificent Art of Pokemon Go Streaming On Vivo Y27 5G? | Dr.fone
- Full Guide to Unlock Your Vivo Y36
- Updated In 2024, The Most Recommended Natural AI Hindi Voice Generator
- Title: New Make Super Easy Coin Magic With Filmora
- Author: Chloe
- Created at : 2024-05-20 03:38:15
- Updated at : 2024-05-21 03:38:15
- Link: https://ai-editing-video.techidaily.com/new-make-super-easy-coin-magic-with-filmora/
- License: This work is licensed under CC BY-NC-SA 4.0.


