:max_bytes(150000):strip_icc():format(webp)/GettyImages-1353420724-65161751b9924195880d3273e327cb54.jpg)
New Mastering FFmpeg How to Merge Audio and Video with Ease

Mastering FFmpeg: How to Merge Audio and Video with Ease
Welcome to the world of video production! Whether you’re a beginner or an experienced video creator, one of the most important skills to master is merging audio and video seamlessly. In this article, we’ll focus on FFmpeg, a powerful command-line tool that can help you easily merge audio and video.
FFmpeg is open-source software that allows you to convert, edit, and stream multimedia files. It’s widely used by professionals and enthusiasts and has many capabilities, including merging audio and video files. This guide will walk you through merging audio and video using FFmpeg. So, whether you’re creating a YouTube video, a podcast, or a movie, you’ll have the skills to make it sound and look great.
Preparation
Are you ready to master the art of merging audio and video? Then let’s dive into the world of FFmpeg, a powerful and versatile tool that can help you achieve professional results.
With FFmpeg, you can record, convert, and stream audio and video files in any format, making it a complete and cross-platform solution. It’s also a great tool for decoding, encoding, transcoding, muxing, demuxing, streaming, filtering, and playing any media type.
But before we start merging video files using FFmpeg, it’s important to understand the basics of container formats and video codecs. These are the building blocks of your videos, and the specific types you’re working with will determine the method you’ll use to merge them. So, buckle up, and let’s get started!
How To Combine Video With Two Audio Using FFmpeg
Are you looking to add multiple audio tracks to your video? With FFmpeg, you can easily combine video with two audio streams. Whether creating a foreign-language version of your video or adding an alternate audio track, this method will help you achieve professional results. This section will guide you through combining video with two audio streams using FFmpeg’s command-line interface. So, let’s get started!
Mixing Two Audios Into a Video
Combining multiple audio tracks into one video can be done easily with FFmpeg’s command-line interface. In this example, we will combine two audio tracks into one video so that the voiceover will play over the background music. Here’s the step-by-step process:
Step1 Open your command prompt or terminal and navigate to the directory where your video and audio files are located.
Step2 Replace “video1.mp4“ and “audio1.mp3“ with the names of your actual video and audio files.
ffmpeg \
-i video1.mp4 -i audio1.mp3 \
Step3 The -c:v copy flag tells FFmpeg to copy the video stream from the source file without re-encoding it. This helps to speed up the process and avoid quality loss.
-c:v copy \
-filter_complex “ \
Step4 The command “amix=inputs=2:duration=longest“ tells amix to accept 2 inputs (0:a and 1:a) and combine them into an output stream called audio_out, with the duration of the longest input.
[0:a][1:a] amix=inputs=2:duration=longest [audio_out] \
Step5 Map the video stream (0:v) and the mixed audio stream (audio_out) into the final output video.
-map 0:v -map “[audio_out]“ \
Step6 The -y flag tells FFmpeg to overwrite the output file if it already exists.
-y output.mp4
Once complete, you’ll find the newly created video file with the mixed audio in the specified output location.
Mixing Two Audios Into a Video Adjusting Volume
We will be taking a step further and show you how to merge two audio tracks into a video while adjusting the volume of one of the audio tracks. This can be useful when you want to emphasize one audio track over the other, for example, to make the voiceover more prominent in a video.
And here’s the step-by-step process:
Step1 Start the command by specifying the input files.
ffmpeg \
-i video1.mp4 -i audio1.mp3 \
Step2 Use the filter_complex option to specify a filter graph.
-filter_complex “ \
[0:a] volume=0.5 [music];
Step3 Use the amix filter to take the “music“ stream and audio1.mp3 and mix them.
[music][1:a] amix=inputs=2:duration=longest [audio_out] \
“ \
Step4 Use the map option to specify which streams from the input files should be included in the output file.
-map 0:v -map “[audio_out]“ \
Step5 Specify the output file name as “output.mp4“ and the -y flag to overwrite the output file without asking for confirmation if it already exists.
-y output.mp4
Mixing Two Audios Into a Video With Delay
When creating videos, sometimes the audio needs to be synced with the video, or you want to add a delay to the audio track. Here’s how to add delay to an audio track using FFmpeg.
Step1 Use the adelay filter to add delay to the audio track.
[1:a] adelay=2100|2100 [voice];
Step2 Mix the delayed audio track with the original audio track
[0:a][voice] amix=inputs=2:duration=longest [audio_out]
Step3 Map the video and audio tracks to the output file
-map 0:v -map “[audio_out]“
Step4 Use the -y flag to overwrite the output file
-y output.mp4
The final command would look like this:
ffmpeg \
-i video1.mp4 -i audio1.mp3 \
-filter_complex “ \
[1:a] adelay=2100|2100 [voice]; \
[0:a][voice] amix=inputs=2:duration=longest [audio_out] \
“ \
-map 0:v -map “[audio_out]“ \
-y output.mp4
This command will delay the audio track by 2100 milliseconds and then mix it with the original audio track, resulting in a new video file with the delayed audio.
It May Interest You - Merge Audio and Video Files With Filmora
While FFmpeg is a powerful tool for merging audio and video files, its learning curve can be steep for some users. If you’re looking for an easier option, you may consider using video editing software like Filmora.
What Is Filmora?
Wondershare Filmora is a video editing software that allows users to create professional-looking videos easily. It offers a user-friendly interface, making it an excellent option for those needing a more extensive video editing experience.
Free Download For Win 7 or later(64-bit)
Free Download For macOS 10.14 or later
This software offers an intuitive interface and a wide range of features that make it easy to merge audio and video files, even for beginners. In addition, Filmora provides various options for editing and enhancing the audio and video files, giving you more control over the final output. Filmora is a great alternative to FFmpeg for those who want to merge audio and video files quickly and easily.
How To Combine Audio and Video Files Using Filmora
Filmora is a user-friendly video editing software that allows you to easily combine audio and video files to create a polished and professional final product. So here’s the step-by-step process of combining audio and video files using Filmora.
Step1 Import audio and video files into Filmora using drag-and-drop or the “Import Media“ button.

Step2 Place the media files in the timeline and align the video with the audio.

Step3 Replace the original audio by right-clicking the video, selecting “Detach Audio,” deleting the original audio, and replacing it with new audio.

Step4 Export the final video by selecting a format and clicking “Export,” or publish directly to YouTube or burn to DVD.

People Also Ask
Here are some frequently asked questions regarding the merging function of FFmpeg and other related topics:
Q1. How To Merge Image and Video in FFmpeg?
To merge an image and a video using FFmpeg, first, use the -loop option on the image to loop it for the duration of the video, then use the overlay filter to overlay the image on the video. The command would look like this:
ffmpeg -i video.mp4 -i image.jpg -filter_complex “[0:v][1:v] overlay=0:0” -pix_fmt yuv420p -c:a copy output.mp4
This command takes the input video and image, applies the overlay filter to overlay the image on the video starting at the top left corner (0:0), and outputs the result to output.mp4. The -pix_fmt yuv420p and -c:a copy options ensure compatibility with most devices.
Q2. Can I Merge 2 MP4 Files Into 1?
Yes, you can merge two MP4 files into one using Filmora. To do this, follow these steps:
Step1 Open Filmora and import the video files
Step2 Drag the videos to the timeline
Step3 Align the second video with the first without leaving any gaps
Step4 Click “Export“ and select desired settings
Step5 Click “Export“ again to save the combined video on your computer.
Q3. How Can I Merge the Video and Subtitle?
To merge video and subtitle in Filmora, follow these steps:
Step1 Open Filmora and import your SRT subtitle file.
Step2 Place the SRT file on the timeline and right-click on it. Select “Advanced Edit“ from the options.
Step3 Adjust the subtitle’s time code, text, color, font, and other settings. When finished, choose “Export Subtitle file“ to save the changes.
Still want to learn more tricks about adding subtitles to your video? Check out the video below:
Conclusion
Using FFmpeg and Filmora, you can easily combine video with audio, merge multiple video files, and add subtitles to your videos. Both tools offer different features and learning curves, so it’s important to understand what you need before choosing one. Filmora is a great option for beginners and those who want a user-friendly interface, while FFmpeg is a powerful command-line tool for advanced users.
- “-i INPUT_FILE.mp4“ flag specifies INPUT_FILE.mp4 as the input source.
- “-i AUDIO.wav,” tells FFmpeg to take AUDIO.wav as an input source.
- The “-c:v copy“ flag is a short form of “-codec:v copy,” which means to copy the video stream from the source files to the destination file.
- The “-c:a aac“ flag means selecting all the audio streams from the source files and then encoding them with the AAC encoder.
- “mp4“ specifies the name of the output file.
Step3 In case you don’t want any audio conversion, drop the aac part in the command and replace it with copy; the command would look like this:
ffmpeg -i INPUT_FILE.mp4 -i AUDIO.aac -c:v copy -c:a copy OUTPUT_FILE.mp4
-->
How To Combine Video With Two Audio Using FFmpeg
Are you looking to add multiple audio tracks to your video? With FFmpeg, you can easily combine video with two audio streams. Whether creating a foreign-language version of your video or adding an alternate audio track, this method will help you achieve professional results. This section will guide you through combining video with two audio streams using FFmpeg’s command-line interface. So, let’s get started!
Mixing Two Audios Into a Video
Combining multiple audio tracks into one video can be done easily with FFmpeg’s command-line interface. In this example, we will combine two audio tracks into one video so that the voiceover will play over the background music. Here’s the step-by-step process:
Step1 Open your command prompt or terminal and navigate to the directory where your video and audio files are located.
Step2 Replace “video1.mp4“ and “audio1.mp3“ with the names of your actual video and audio files.
ffmpeg \
-i video1.mp4 -i audio1.mp3 \
Step3 The -c:v copy flag tells FFmpeg to copy the video stream from the source file without re-encoding it. This helps to speed up the process and avoid quality loss.
-c:v copy \
-filter_complex “ \
Step4 The command “amix=inputs=2:duration=longest“ tells amix to accept 2 inputs (0:a and 1:a) and combine them into an output stream called audio_out, with the duration of the longest input.
[0:a][1:a] amix=inputs=2:duration=longest [audio_out] \
Step5 Map the video stream (0:v) and the mixed audio stream (audio_out) into the final output video.
-map 0:v -map “[audio_out]“ \
Step6 The -y flag tells FFmpeg to overwrite the output file if it already exists.
-y output.mp4
Once complete, you’ll find the newly created video file with the mixed audio in the specified output location.
Mixing Two Audios Into a Video Adjusting Volume
We will be taking a step further and show you how to merge two audio tracks into a video while adjusting the volume of one of the audio tracks. This can be useful when you want to emphasize one audio track over the other, for example, to make the voiceover more prominent in a video.
And here’s the step-by-step process:
Step1 Start the command by specifying the input files.
ffmpeg \
-i video1.mp4 -i audio1.mp3 \
Step2 Use the filter_complex option to specify a filter graph.
-filter_complex “ \
[0:a] volume=0.5 [music];
Step3 Use the amix filter to take the “music“ stream and audio1.mp3 and mix them.
[music][1:a] amix=inputs=2:duration=longest [audio_out] \
“ \
Step4 Use the map option to specify which streams from the input files should be included in the output file.
-map 0:v -map “[audio_out]“ \
Step5 Specify the output file name as “output.mp4“ and the -y flag to overwrite the output file without asking for confirmation if it already exists.
-y output.mp4
Mixing Two Audios Into a Video With Delay
When creating videos, sometimes the audio needs to be synced with the video, or you want to add a delay to the audio track. Here’s how to add delay to an audio track using FFmpeg.
Step1 Use the adelay filter to add delay to the audio track.
[1:a] adelay=2100|2100 [voice];
Step2 Mix the delayed audio track with the original audio track
[0:a][voice] amix=inputs=2:duration=longest [audio_out]
Step3 Map the video and audio tracks to the output file
-map 0:v -map “[audio_out]“
Step4 Use the -y flag to overwrite the output file
-y output.mp4
The final command would look like this:
ffmpeg \
-i video1.mp4 -i audio1.mp3 \
-filter_complex “ \
[1:a] adelay=2100|2100 [voice]; \
[0:a][voice] amix=inputs=2:duration=longest [audio_out] \
“ \
-map 0:v -map “[audio_out]“ \
-y output.mp4
This command will delay the audio track by 2100 milliseconds and then mix it with the original audio track, resulting in a new video file with the delayed audio.
It May Interest You - Merge Audio and Video Files With Filmora
While FFmpeg is a powerful tool for merging audio and video files, its learning curve can be steep for some users. If you’re looking for an easier option, you may consider using video editing software like Filmora.
What Is Filmora?
Wondershare Filmora is a video editing software that allows users to create professional-looking videos easily. It offers a user-friendly interface, making it an excellent option for those needing a more extensive video editing experience.
Free Download For Win 7 or later(64-bit)
Free Download For macOS 10.14 or later
This software offers an intuitive interface and a wide range of features that make it easy to merge audio and video files, even for beginners. In addition, Filmora provides various options for editing and enhancing the audio and video files, giving you more control over the final output. Filmora is a great alternative to FFmpeg for those who want to merge audio and video files quickly and easily.
How To Combine Audio and Video Files Using Filmora
Filmora is a user-friendly video editing software that allows you to easily combine audio and video files to create a polished and professional final product. So here’s the step-by-step process of combining audio and video files using Filmora.
Step1 Import audio and video files into Filmora using drag-and-drop or the “Import Media“ button.

Step2 Place the media files in the timeline and align the video with the audio.

Step3 Replace the original audio by right-clicking the video, selecting “Detach Audio,” deleting the original audio, and replacing it with new audio.

Step4 Export the final video by selecting a format and clicking “Export,” or publish directly to YouTube or burn to DVD.

People Also Ask
Here are some frequently asked questions regarding the merging function of FFmpeg and other related topics:
Q1. How To Merge Image and Video in FFmpeg?
To merge an image and a video using FFmpeg, first, use the -loop option on the image to loop it for the duration of the video, then use the overlay filter to overlay the image on the video. The command would look like this:
ffmpeg -i video.mp4 -i image.jpg -filter_complex “[0:v][1:v] overlay=0:0” -pix_fmt yuv420p -c:a copy output.mp4
This command takes the input video and image, applies the overlay filter to overlay the image on the video starting at the top left corner (0:0), and outputs the result to output.mp4. The -pix_fmt yuv420p and -c:a copy options ensure compatibility with most devices.
Q2. Can I Merge 2 MP4 Files Into 1?
Yes, you can merge two MP4 files into one using Filmora. To do this, follow these steps:
Step1 Open Filmora and import the video files
Step2 Drag the videos to the timeline
Step3 Align the second video with the first without leaving any gaps
Step4 Click “Export“ and select desired settings
Step5 Click “Export“ again to save the combined video on your computer.
Q3. How Can I Merge the Video and Subtitle?
To merge video and subtitle in Filmora, follow these steps:
Step1 Open Filmora and import your SRT subtitle file.
Step2 Place the SRT file on the timeline and right-click on it. Select “Advanced Edit“ from the options.
Step3 Adjust the subtitle’s time code, text, color, font, and other settings. When finished, choose “Export Subtitle file“ to save the changes.
Still want to learn more tricks about adding subtitles to your video? Check out the video below:
Conclusion
Using FFmpeg and Filmora, you can easily combine video with audio, merge multiple video files, and add subtitles to your videos. Both tools offer different features and learning curves, so it’s important to understand what you need before choosing one. Filmora is a great option for beginners and those who want a user-friendly interface, while FFmpeg is a powerful command-line tool for advanced users.
Create Your Slow Zoom TikTok in Minutes
Abundant Video Effects - Wondershare Filmora
Provide abundant video effects - A creative video editor
Powerful color correction and grading
Detailed tutorials are provided by the official channel
TikTok videos have become a very common approach to interacting with the social community on a large scale. While making such videos, you may find the need to have tools that can help you make the perfect video with a range of effects. If you want to emphasize a certain part of the video that has been recorded, you can look to zoom it in. However, who knew that you could use the slow zoom effect TikTok across it according to your ease?
This article introduces you to a comprehensive guide on how to do the slow zoom in effect on TikTok with the right set of methods.
In this article
Part 1: What is TikTok Slow Zoom?
Part 2: Create a Slow Zoom TikTok Video in Minutes
Part 3: Bonus | Create Slow Zoom Videos in Wondershare Filmora
Part 1: What is TikTok Slow Zoom?
As the name implies, the slow zoom TikTok effect refers to the gradual zoom that incurs onto a video that has been recorded across the platform. While showing something important across the zoom filter, slowing it down will help the viewers observe the details present across the area that is being zoomed. This particular effect can be used across the short TikTok videos to display important content within a matter of seconds.
Part 2: Create a Slow Zoom TikTok Video in Minutes
For this part, we shall be looking into the direct approaches to slow zoom TikTok that can be adopted to bring out the best for your recorded video within a matter of minutes.
Method 1: Create Face Zoom Video in TikTok
Step 1: For the first step, you need to record a video across TikTok or have it recorded within your smartphone while covering the requirements of the platform.
Step 2: To upload the video, click on the “+” icon and follow through the process to click on “Upload” to add a pre-recorded video.
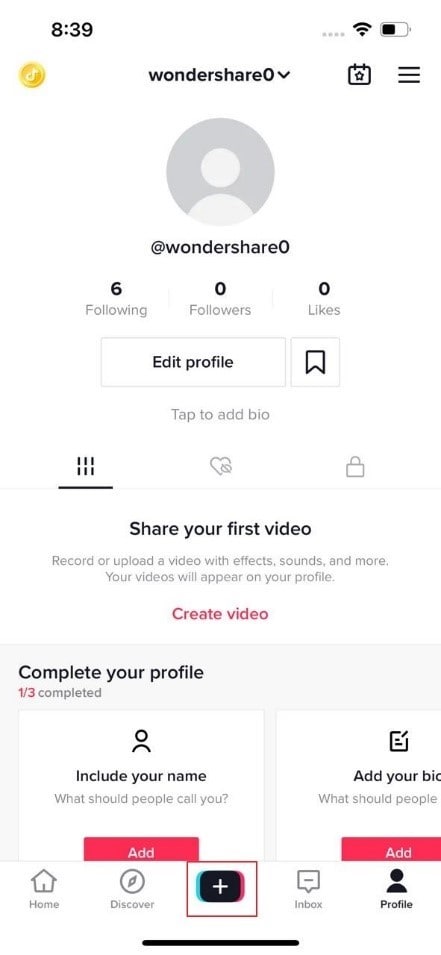
Step 3: As you’ve added the video, go to “Effects” and proceed into the “Time” section. Click on “Slo-mo” to add a slow-down effect to the video. Move into the “Visuals” section and find the “Zoom” effect in the list. Let the cursor go across the certain part where you want to slow zoom the video. Hold the effect until it is applied across the set portion.

Step 4: Once done, click on “Save” to preview the video and share the video by clicking “Next.” You can share it directly across WhatsApp, Instagram, or Facebook, as desired.

Method 2: Do Slow Zoom Easily by Finding a Slow Zoom Video
Step 1: Launch TikTok on your device and click on “Discover” on the bottom border of the screen. Type “Slow Zoom” across the search bar on the next window and locate the effects section to use the effect.

Step 2: Now, you can click on the effect to see how many people have created their videos using this TikTok effect. After that, click on “Try this effect” to shoot a similar video under the mentioned effect.

Step 3: You need to record the video by clicking on the red recording button. Once recorded, make other significant edits across the video and conclude by posting or sharing it to the appropriate platforms.
Part 3: Bonus | Create Slow Zoom Videos in Wondershare Filmora
Wondershare Filmora provides you with one of the best interfaces to perform the simplest tasks of editing slow zoom TikTok across its platform. Being one of the best third-party video editing tools in the market, Filmora ensures a complete editing platform for beginners and professionals through effective means.
While being known for its impressive editing skillset, the users can easily understand the process of using the slow zoom effect TikTok on a video. For this, you need to follow the simple steps provided below in detail.
Step 1: Launch Wondershare Filmora
Download and install the latest version of Wondershare Filmora on your computer. Launch the software and click on “New Project” to open a blank window.

Step 2: Import TikTok Video
Start by adding the TikTok video that needs to be edited across Wondershare Filmora. Click on the “Arrow” icon across the “Media” tab to import the required video. As you’ve added it, drag it across the timeline to start editing.

Step 3: Cut Down the Clip for Video Editing
At first, you need to clip the part of the video where you want to add the slow zoom effect TikTok. Place the red indicator across the pointer where you want to start the part and hit the split icon. Drag the indicator across the next frames to the point where you want to keep the audio. You will have a separate clip now.

Step 4: Specify Slow Speed of Clip
Select the clip and find the “Speed” icon across the menu above the timeline of the interface. Select the appropriate speed from the drop-down menu that appears on the screen. Go into the “Slow” section and select speeds like 0.5x to slow down the clip speed.

Step 5: Include Animation Keyframes
Proceed to add animation keyframes on the specific clip. Right-click on it and select “Add Animation” from the menu. Proceed into the “Animation” tab and find the “Customize” section across the screen. Move the indicator to the point where you want to add the first keyframe and hit “Add.” Move the indicator further across the clip to add the second keyframe across it. The reason for adding multiple keyframes is to set up the animation keyframe across the TikTok clip.

Step 6: Change the Scale Clip and Export
As you have made respective edits across the video, double click to open a new range of settings for it. Click on the “Transform” menu to open a list of different options. Locate the “Scale” option among them and manage the scaling of the clip through the slider percentages. Once done, click on the “Export” button to download the edited TikTok.

Conclusion
We have provided you with some of the best approaches that can be implemented to slow zoom TikTok video. With these methods, you will be able to make professional-level videos that can be managed within a matter of minutes. Get to know more about these tools by going through the above-mentioned guide.
TikTok videos have become a very common approach to interacting with the social community on a large scale. While making such videos, you may find the need to have tools that can help you make the perfect video with a range of effects. If you want to emphasize a certain part of the video that has been recorded, you can look to zoom it in. However, who knew that you could use the slow zoom effect TikTok across it according to your ease?
This article introduces you to a comprehensive guide on how to do the slow zoom in effect on TikTok with the right set of methods.
In this article
Part 1: What is TikTok Slow Zoom?
Part 2: Create a Slow Zoom TikTok Video in Minutes
Part 3: Bonus | Create Slow Zoom Videos in Wondershare Filmora
Part 1: What is TikTok Slow Zoom?
As the name implies, the slow zoom TikTok effect refers to the gradual zoom that incurs onto a video that has been recorded across the platform. While showing something important across the zoom filter, slowing it down will help the viewers observe the details present across the area that is being zoomed. This particular effect can be used across the short TikTok videos to display important content within a matter of seconds.
Part 2: Create a Slow Zoom TikTok Video in Minutes
For this part, we shall be looking into the direct approaches to slow zoom TikTok that can be adopted to bring out the best for your recorded video within a matter of minutes.
Method 1: Create Face Zoom Video in TikTok
Step 1: For the first step, you need to record a video across TikTok or have it recorded within your smartphone while covering the requirements of the platform.
Step 2: To upload the video, click on the “+” icon and follow through the process to click on “Upload” to add a pre-recorded video.

Step 3: As you’ve added the video, go to “Effects” and proceed into the “Time” section. Click on “Slo-mo” to add a slow-down effect to the video. Move into the “Visuals” section and find the “Zoom” effect in the list. Let the cursor go across the certain part where you want to slow zoom the video. Hold the effect until it is applied across the set portion.

Step 4: Once done, click on “Save” to preview the video and share the video by clicking “Next.” You can share it directly across WhatsApp, Instagram, or Facebook, as desired.

Method 2: Do Slow Zoom Easily by Finding a Slow Zoom Video
Step 1: Launch TikTok on your device and click on “Discover” on the bottom border of the screen. Type “Slow Zoom” across the search bar on the next window and locate the effects section to use the effect.

Step 2: Now, you can click on the effect to see how many people have created their videos using this TikTok effect. After that, click on “Try this effect” to shoot a similar video under the mentioned effect.

Step 3: You need to record the video by clicking on the red recording button. Once recorded, make other significant edits across the video and conclude by posting or sharing it to the appropriate platforms.
Part 3: Bonus | Create Slow Zoom Videos in Wondershare Filmora
Wondershare Filmora provides you with one of the best interfaces to perform the simplest tasks of editing slow zoom TikTok across its platform. Being one of the best third-party video editing tools in the market, Filmora ensures a complete editing platform for beginners and professionals through effective means.
While being known for its impressive editing skillset, the users can easily understand the process of using the slow zoom effect TikTok on a video. For this, you need to follow the simple steps provided below in detail.
Step 1: Launch Wondershare Filmora
Download and install the latest version of Wondershare Filmora on your computer. Launch the software and click on “New Project” to open a blank window.

Step 2: Import TikTok Video
Start by adding the TikTok video that needs to be edited across Wondershare Filmora. Click on the “Arrow” icon across the “Media” tab to import the required video. As you’ve added it, drag it across the timeline to start editing.

Step 3: Cut Down the Clip for Video Editing
At first, you need to clip the part of the video where you want to add the slow zoom effect TikTok. Place the red indicator across the pointer where you want to start the part and hit the split icon. Drag the indicator across the next frames to the point where you want to keep the audio. You will have a separate clip now.

Step 4: Specify Slow Speed of Clip
Select the clip and find the “Speed” icon across the menu above the timeline of the interface. Select the appropriate speed from the drop-down menu that appears on the screen. Go into the “Slow” section and select speeds like 0.5x to slow down the clip speed.

Step 5: Include Animation Keyframes
Proceed to add animation keyframes on the specific clip. Right-click on it and select “Add Animation” from the menu. Proceed into the “Animation” tab and find the “Customize” section across the screen. Move the indicator to the point where you want to add the first keyframe and hit “Add.” Move the indicator further across the clip to add the second keyframe across it. The reason for adding multiple keyframes is to set up the animation keyframe across the TikTok clip.

Step 6: Change the Scale Clip and Export
As you have made respective edits across the video, double click to open a new range of settings for it. Click on the “Transform” menu to open a list of different options. Locate the “Scale” option among them and manage the scaling of the clip through the slider percentages. Once done, click on the “Export” button to download the edited TikTok.

Conclusion
We have provided you with some of the best approaches that can be implemented to slow zoom TikTok video. With these methods, you will be able to make professional-level videos that can be managed within a matter of minutes. Get to know more about these tools by going through the above-mentioned guide.
TikTok videos have become a very common approach to interacting with the social community on a large scale. While making such videos, you may find the need to have tools that can help you make the perfect video with a range of effects. If you want to emphasize a certain part of the video that has been recorded, you can look to zoom it in. However, who knew that you could use the slow zoom effect TikTok across it according to your ease?
This article introduces you to a comprehensive guide on how to do the slow zoom in effect on TikTok with the right set of methods.
In this article
Part 1: What is TikTok Slow Zoom?
Part 2: Create a Slow Zoom TikTok Video in Minutes
Part 3: Bonus | Create Slow Zoom Videos in Wondershare Filmora
Part 1: What is TikTok Slow Zoom?
As the name implies, the slow zoom TikTok effect refers to the gradual zoom that incurs onto a video that has been recorded across the platform. While showing something important across the zoom filter, slowing it down will help the viewers observe the details present across the area that is being zoomed. This particular effect can be used across the short TikTok videos to display important content within a matter of seconds.
Part 2: Create a Slow Zoom TikTok Video in Minutes
For this part, we shall be looking into the direct approaches to slow zoom TikTok that can be adopted to bring out the best for your recorded video within a matter of minutes.
Method 1: Create Face Zoom Video in TikTok
Step 1: For the first step, you need to record a video across TikTok or have it recorded within your smartphone while covering the requirements of the platform.
Step 2: To upload the video, click on the “+” icon and follow through the process to click on “Upload” to add a pre-recorded video.

Step 3: As you’ve added the video, go to “Effects” and proceed into the “Time” section. Click on “Slo-mo” to add a slow-down effect to the video. Move into the “Visuals” section and find the “Zoom” effect in the list. Let the cursor go across the certain part where you want to slow zoom the video. Hold the effect until it is applied across the set portion.

Step 4: Once done, click on “Save” to preview the video and share the video by clicking “Next.” You can share it directly across WhatsApp, Instagram, or Facebook, as desired.

Method 2: Do Slow Zoom Easily by Finding a Slow Zoom Video
Step 1: Launch TikTok on your device and click on “Discover” on the bottom border of the screen. Type “Slow Zoom” across the search bar on the next window and locate the effects section to use the effect.

Step 2: Now, you can click on the effect to see how many people have created their videos using this TikTok effect. After that, click on “Try this effect” to shoot a similar video under the mentioned effect.

Step 3: You need to record the video by clicking on the red recording button. Once recorded, make other significant edits across the video and conclude by posting or sharing it to the appropriate platforms.
Part 3: Bonus | Create Slow Zoom Videos in Wondershare Filmora
Wondershare Filmora provides you with one of the best interfaces to perform the simplest tasks of editing slow zoom TikTok across its platform. Being one of the best third-party video editing tools in the market, Filmora ensures a complete editing platform for beginners and professionals through effective means.
While being known for its impressive editing skillset, the users can easily understand the process of using the slow zoom effect TikTok on a video. For this, you need to follow the simple steps provided below in detail.
Step 1: Launch Wondershare Filmora
Download and install the latest version of Wondershare Filmora on your computer. Launch the software and click on “New Project” to open a blank window.

Step 2: Import TikTok Video
Start by adding the TikTok video that needs to be edited across Wondershare Filmora. Click on the “Arrow” icon across the “Media” tab to import the required video. As you’ve added it, drag it across the timeline to start editing.

Step 3: Cut Down the Clip for Video Editing
At first, you need to clip the part of the video where you want to add the slow zoom effect TikTok. Place the red indicator across the pointer where you want to start the part and hit the split icon. Drag the indicator across the next frames to the point where you want to keep the audio. You will have a separate clip now.

Step 4: Specify Slow Speed of Clip
Select the clip and find the “Speed” icon across the menu above the timeline of the interface. Select the appropriate speed from the drop-down menu that appears on the screen. Go into the “Slow” section and select speeds like 0.5x to slow down the clip speed.

Step 5: Include Animation Keyframes
Proceed to add animation keyframes on the specific clip. Right-click on it and select “Add Animation” from the menu. Proceed into the “Animation” tab and find the “Customize” section across the screen. Move the indicator to the point where you want to add the first keyframe and hit “Add.” Move the indicator further across the clip to add the second keyframe across it. The reason for adding multiple keyframes is to set up the animation keyframe across the TikTok clip.

Step 6: Change the Scale Clip and Export
As you have made respective edits across the video, double click to open a new range of settings for it. Click on the “Transform” menu to open a list of different options. Locate the “Scale” option among them and manage the scaling of the clip through the slider percentages. Once done, click on the “Export” button to download the edited TikTok.

Conclusion
We have provided you with some of the best approaches that can be implemented to slow zoom TikTok video. With these methods, you will be able to make professional-level videos that can be managed within a matter of minutes. Get to know more about these tools by going through the above-mentioned guide.
TikTok videos have become a very common approach to interacting with the social community on a large scale. While making such videos, you may find the need to have tools that can help you make the perfect video with a range of effects. If you want to emphasize a certain part of the video that has been recorded, you can look to zoom it in. However, who knew that you could use the slow zoom effect TikTok across it according to your ease?
This article introduces you to a comprehensive guide on how to do the slow zoom in effect on TikTok with the right set of methods.
In this article
Part 1: What is TikTok Slow Zoom?
Part 2: Create a Slow Zoom TikTok Video in Minutes
Part 3: Bonus | Create Slow Zoom Videos in Wondershare Filmora
Part 1: What is TikTok Slow Zoom?
As the name implies, the slow zoom TikTok effect refers to the gradual zoom that incurs onto a video that has been recorded across the platform. While showing something important across the zoom filter, slowing it down will help the viewers observe the details present across the area that is being zoomed. This particular effect can be used across the short TikTok videos to display important content within a matter of seconds.
Part 2: Create a Slow Zoom TikTok Video in Minutes
For this part, we shall be looking into the direct approaches to slow zoom TikTok that can be adopted to bring out the best for your recorded video within a matter of minutes.
Method 1: Create Face Zoom Video in TikTok
Step 1: For the first step, you need to record a video across TikTok or have it recorded within your smartphone while covering the requirements of the platform.
Step 2: To upload the video, click on the “+” icon and follow through the process to click on “Upload” to add a pre-recorded video.

Step 3: As you’ve added the video, go to “Effects” and proceed into the “Time” section. Click on “Slo-mo” to add a slow-down effect to the video. Move into the “Visuals” section and find the “Zoom” effect in the list. Let the cursor go across the certain part where you want to slow zoom the video. Hold the effect until it is applied across the set portion.

Step 4: Once done, click on “Save” to preview the video and share the video by clicking “Next.” You can share it directly across WhatsApp, Instagram, or Facebook, as desired.

Method 2: Do Slow Zoom Easily by Finding a Slow Zoom Video
Step 1: Launch TikTok on your device and click on “Discover” on the bottom border of the screen. Type “Slow Zoom” across the search bar on the next window and locate the effects section to use the effect.

Step 2: Now, you can click on the effect to see how many people have created their videos using this TikTok effect. After that, click on “Try this effect” to shoot a similar video under the mentioned effect.

Step 3: You need to record the video by clicking on the red recording button. Once recorded, make other significant edits across the video and conclude by posting or sharing it to the appropriate platforms.
Part 3: Bonus | Create Slow Zoom Videos in Wondershare Filmora
Wondershare Filmora provides you with one of the best interfaces to perform the simplest tasks of editing slow zoom TikTok across its platform. Being one of the best third-party video editing tools in the market, Filmora ensures a complete editing platform for beginners and professionals through effective means.
While being known for its impressive editing skillset, the users can easily understand the process of using the slow zoom effect TikTok on a video. For this, you need to follow the simple steps provided below in detail.
Step 1: Launch Wondershare Filmora
Download and install the latest version of Wondershare Filmora on your computer. Launch the software and click on “New Project” to open a blank window.

Step 2: Import TikTok Video
Start by adding the TikTok video that needs to be edited across Wondershare Filmora. Click on the “Arrow” icon across the “Media” tab to import the required video. As you’ve added it, drag it across the timeline to start editing.

Step 3: Cut Down the Clip for Video Editing
At first, you need to clip the part of the video where you want to add the slow zoom effect TikTok. Place the red indicator across the pointer where you want to start the part and hit the split icon. Drag the indicator across the next frames to the point where you want to keep the audio. You will have a separate clip now.

Step 4: Specify Slow Speed of Clip
Select the clip and find the “Speed” icon across the menu above the timeline of the interface. Select the appropriate speed from the drop-down menu that appears on the screen. Go into the “Slow” section and select speeds like 0.5x to slow down the clip speed.

Step 5: Include Animation Keyframes
Proceed to add animation keyframes on the specific clip. Right-click on it and select “Add Animation” from the menu. Proceed into the “Animation” tab and find the “Customize” section across the screen. Move the indicator to the point where you want to add the first keyframe and hit “Add.” Move the indicator further across the clip to add the second keyframe across it. The reason for adding multiple keyframes is to set up the animation keyframe across the TikTok clip.

Step 6: Change the Scale Clip and Export
As you have made respective edits across the video, double click to open a new range of settings for it. Click on the “Transform” menu to open a list of different options. Locate the “Scale” option among them and manage the scaling of the clip through the slider percentages. Once done, click on the “Export” button to download the edited TikTok.

Conclusion
We have provided you with some of the best approaches that can be implemented to slow zoom TikTok video. With these methods, you will be able to make professional-level videos that can be managed within a matter of minutes. Get to know more about these tools by going through the above-mentioned guide.
How to Split Videos in Final Cut Pro
If you are looking for a video splitting ad merging software and you want someone to recommend you, it is more likely that they will consider referring Final Cut Pro. People, especially video editors prefer using Final Cut Pro for multiple reasons. Final Cut Pro features the most advanced organizing tools out of all the professional video editing software. Create Smart Collections that automatically compile content based on a set of specified criteria and tag entire clips or clip ranges with metadata for searching.
Considering its importance, this guide is to introduce different ways to split and merge video and answer the question that has been raised in your mind about whether there is any other software program that can be used as a Final Cut Pro alternative.
Part 1. How to split a clip in Final Cut Pro?
A great video editor, Final Cut Pro (or Final Cut Pro X), offers a variety of capabilities to enhance videos and supports a wide range of video formats. You may create post-production video editing from a variety of angles thanks to it.
One of the most fundamental video editing skills you’ll need to master is how to split clips in Final Cut Pro. After being divided in two, you can modify or reorganize one half of your clip without affecting the other.
Way 1: Split a Clip in the Timeline (shortcut: Command+B)
You can follow these steps to split a clip in the timeline:
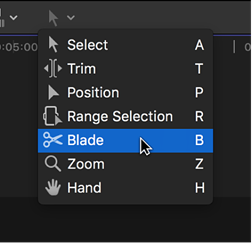
Step1The blade can be selected in Final Cut Pro by clicking the Tools pop-up menu in the timeline’s upper left corner (or press B).
Step2Then click and move the skimmer to the frame in the video you wish to cut from.

Step3You can split the video by following these two methods:
- Choose Trim > Join Clips after selecting one or both sides of the edit point (or press Delete).
- Choose Trim > Join Clips after selecting the clips on either side of the edit.

Way 2. Split several clips at the same time
You can follow these steps to split several clips at the same time:
Step1Move the skimmer to the desired cutting frame in the Final Cut Pro timeline.

Step2Deciding on Trim > Blade All (or press Shift+Command+B). At the skimmer position, all clips are removed.
Way 3. Split all clips at once
The Blade command allows you to simultaneously cut selected core storyline segments and related clips.
You can follow these steps to split all clips at once:
Step1Choose the videos you wish to cut from the timeline in Final Cut Pro.
Step2The skimmer should be moved to the desired cutting frame.
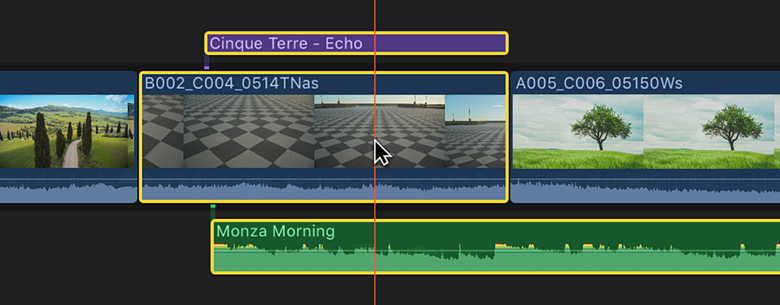
Step3Click Trim > Blade (or press Command+B). The skimmer position is used to cut the chosen clips.
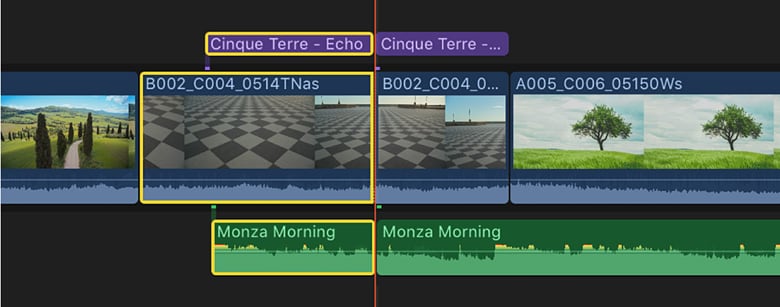
Tips: How to heal the sliced clips?
How should I recover if there is an error in the edited video? Here are 3 methods for you.
Way 1: Delete the cut point (by pressing Delete)
You can follow these steps to merge 2 clips by clicking delete:
Step1Move the mouse over the time point you want to remove, then select Delete directly to restore the original full video.

Way 2: Undo the action (by pressing Command + Z)
You can either click “Command + Z” to reverse the process if you want to link the clips back together to repair a clip in the timeline.
Way 3: merge 2 clips (by clicking " Join Clips")
Choose two neighboring portions, then select “Join Clips” from the drop-down option under “Trim” to join the individual clips together into one.
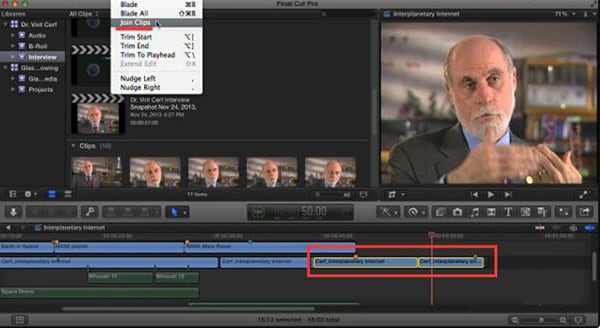
Tips: These 3 ways only work if the two clips come from the same clip.
Part 2. How to split a clip in alternative to Final Cut Pro?
Final Cut Pro is a more complex user to understand; It can sometimes corrupt your file if it isn’t saved properly, leading to all your work becoming lost. To save your work, you should do this every 5 minutes to ensure that your work doesn’t corrupt. There are limited export settings; you are limited in the formats and sizes you can export from FCPX; whereas before, you could export many codecs and formats out of FCP, you must complete more specific encoding in a compressor.
Therefore, the alternative to Final Cut Pro is Filmora because it allows you to edit, split or merge clips in one go.
Split a clip in the best alternative to FCP - Wondershare Filmora
Wondershare Filmora is a video editing program with a delightfully user-friendly interface that enables anyone to become an excellent video editor. With the help of a variety of strong editing tools and Wondershare Filmora, users may quickly and easily make outstanding videos.
To split audio and video without any problem, just follow these steps:
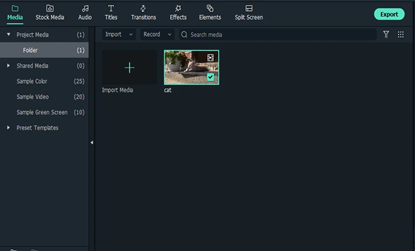
Step1To add video files to the Timeline for trimming, first click “Import“ on the main windows and choose the video files you want from your computer. You can also just drag and drop movies into the Media Library.
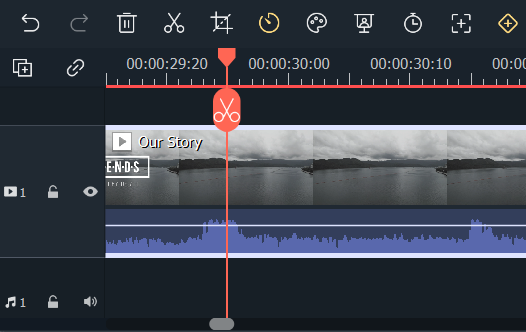
Step2Move the playhead over the unwanted section, then click the trash can symbol.
Step3Click “Export“ after you’re done trimming, then choose where you want to save the edited video.
Conclusion
We hope this article can help you learn how to split videos with Final Cut Pro, however, we still recommend more users choose Filmora . It is one of the widely preferred and commonly used video editing software programs as it introduces you to a world of editing tools allowing you in creating high-quality content. Although some of the features require in-app purchases, still Filmora provides access to a wide range of tools in the free version.
Free Download For Win 7 or later(64-bit)
Free Download For macOS 10.14 or later
Free Download For macOS 10.14 or later
Looking for Ways to Compress Your Videos for Instagram? Keep Reading to Know About some of the Best Video Compressors for Instagram
Did your high-quality 4K video become total garbage when uploaded to Instagram? If it’s a yes from your side, then what you need now is a video compressor for Instagram. This article will cover how to compress a video for Instagram while maintaining its quality with a professional video editing tool, online video editors, and mobile phone applications.
But first, let’s look for the things we need to know before compressing a video for Instagram.
Part 1: Before reducing video size for Instagram, things you need to know
If you want to use a video compressor for Instagram, you must know the specific requirements of an Instagram video. Instagram only accepts MP4, MOV, or GIF videos and has concrete limitations on almost every video aspect. But you don’t have to be tense because for your ease, we have compiled all those limitations on Story, Reel, Live, or feed videos into a tabular form. Here it is,
| Features | Feed Video (landscape, square, portrait) | Story | Reels | Live |
|---|---|---|---|---|
| Size guide | Max 60 sec | Max 15 sec | Max 90 sec | Max 60 min |
| Aspect ratio | 16:9 for landscape, 1:1 for square, 4:5 for portrait | 9:16 | 9:16 | 9:16 |
| Frame rate.( frame per sec) | 23 - 60 FPS | Min 30 FPS | Min 30 FPS | Min 30 FPS |
| File size | Max 4 GB | Max 4 GB | Max 4 GB | Max 4 GB |
| Upload video captions | Can upload a full caption and Up to 30 Hashtags | No caption Upto 10 hashtags per story. | Can upload a full caption and up to 30 Hashtags | Auto-generated captions uploaded if enabled |
| 60- second feed reviews | MP4/MOV/GIF | MP4/MOV/GIF | MP4/MOV | MP4/MOV |
| Minimum dimensions.(pixels) | 600×315 for landscape, 600×600 for square, 600×750 for portrait | 600 x 1067 | 600 x 1067 | 600 x 1067 |
| Maximum dimension(pixels) | 1080 x 608 for landscape, 1080 x 1080 for square, 1080 x 1350 for portrait | 1080 x 1920 | 1080 x 1920 | 1080 x 1920 |
That’s a lot of information, right? That’s why we have sorted out the best Instagram video compression settings recommended to make a high-quality video for Instagram, which are as.
Format:
Resolution: 720P or 1080P
Bitrate:
3Mbps-6Mbps
Frame rate:
30Fps
Now that you know all the specific requirements and the recommended video compression settings. Let us show you how to compress a video without losing quality for Instagram with a professional Video-Editing Tool.
Part 2: Compress Video Without Losing Quality for Instagram with a Professional Video-Editing Tool
Wondershare Filmora
Speaking of the simplest video compressor for Instagram on all recent Windows or macOS computers, Wondershare Filmora stands out as one of the best bets. In addition to video-editing, most users prefer this tool for compressing their videos before uploading them to Instagram. It is highly reliable and takes less time when compared to other methods and tools in the digital market.
Wondershare Filmora is not only trusted by a community of over 85 Million Users but is also an award-winning video editing tool in the market. Here are some awards and some customer reviews which it boasts of.
Free Download For Win 7 or later(64-bit)
Free Download For macOS 10.14 or later
Awards:
- G2 Leader Spring 2022: with a winning streak of 17 Quarters.
- Shorty Awards: “Best in Photo and Video” and “Audience Honor” awards on the 13th edition of shorty awards.
- Category Leaders 2022: “ Category Leaders in Video Editing” award.

Now some customer reviews.
Reviews
The evaluation of Wondershare Filmora by the people who have purchased or experienced it is almost always positive. This can be shown by the amazing reviews which people leave after using Wondershare Filmora. Here are some of the reviews about it.
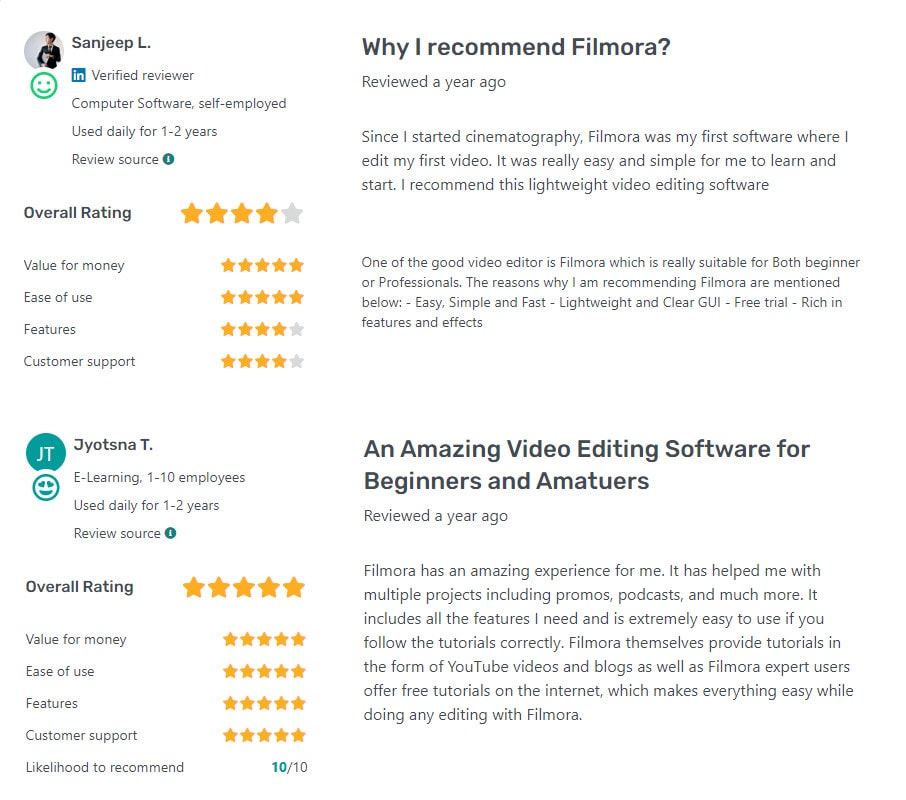
Now, let’s move forward and see the key features provided byWondershare Filmora.
Main Features
WondrShare Filmora is one of the best Video Editing tools out there. Not only it’s an excellent video compressor for Instagram, but it also provides all the powerful editing tools one could want. Here are the main features which Wondershare Filmora provides.
- Filmora allows users to create GIF from all popular video formats like .wmv, .mp4, .mkv, .evo, .dat, .wav, .mpeg and .avi etc. so you need not to worry about compatibility issues.
- The best thing to know about the Filmora video editing software tool is that it allows users to edit GIF files with some basic editing tools like color correction, cropping, splitting, rotation, combining two or more frames, speeding up frame motion or slow down as per requirement.
- It allows you to edit files with text and other similar interesting elements.
- Moreover, you can also add some incredible effects to your videos by using Filmora.
- On top of that, its video compressing feature makes it an excellent video compressor for Instagram.
Now moving on to the Pros and Cons of using Wondershare Filmora.
Pros
- It is easy to use, even for beginners
- Multiple formats are supported
- Tutorials are available on youtube for their every feature
- Free trial is available for everyone
Cons
- Leaves a watermark (can be removed after buying the full version)
- Full features are available only in the premium version
- Latest versions operate slowly in weak capability computers
We’ve known that Wondershare Filmora is a great video compressor for Instagram. Let’s move to the step-by-step guide for using Wondershare Filmora to compress a video for Instagram.
Step1Download, install, and launch the program (buy the full version to enjoy its all features.)
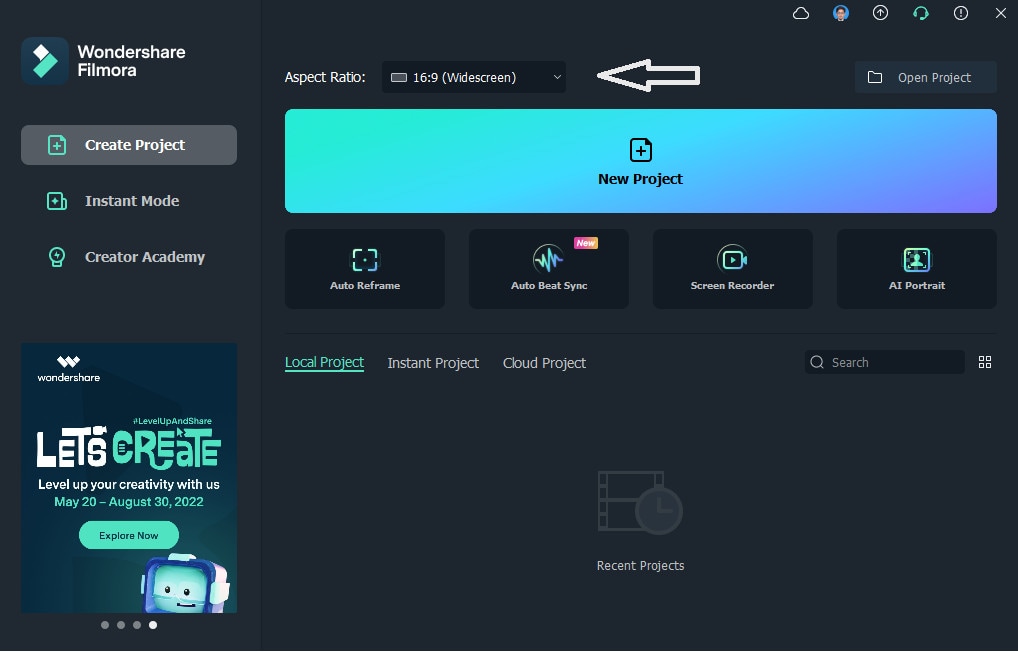
Step2Change the Aspect Ratio from the first screen that appears and click on the “New Project” option.
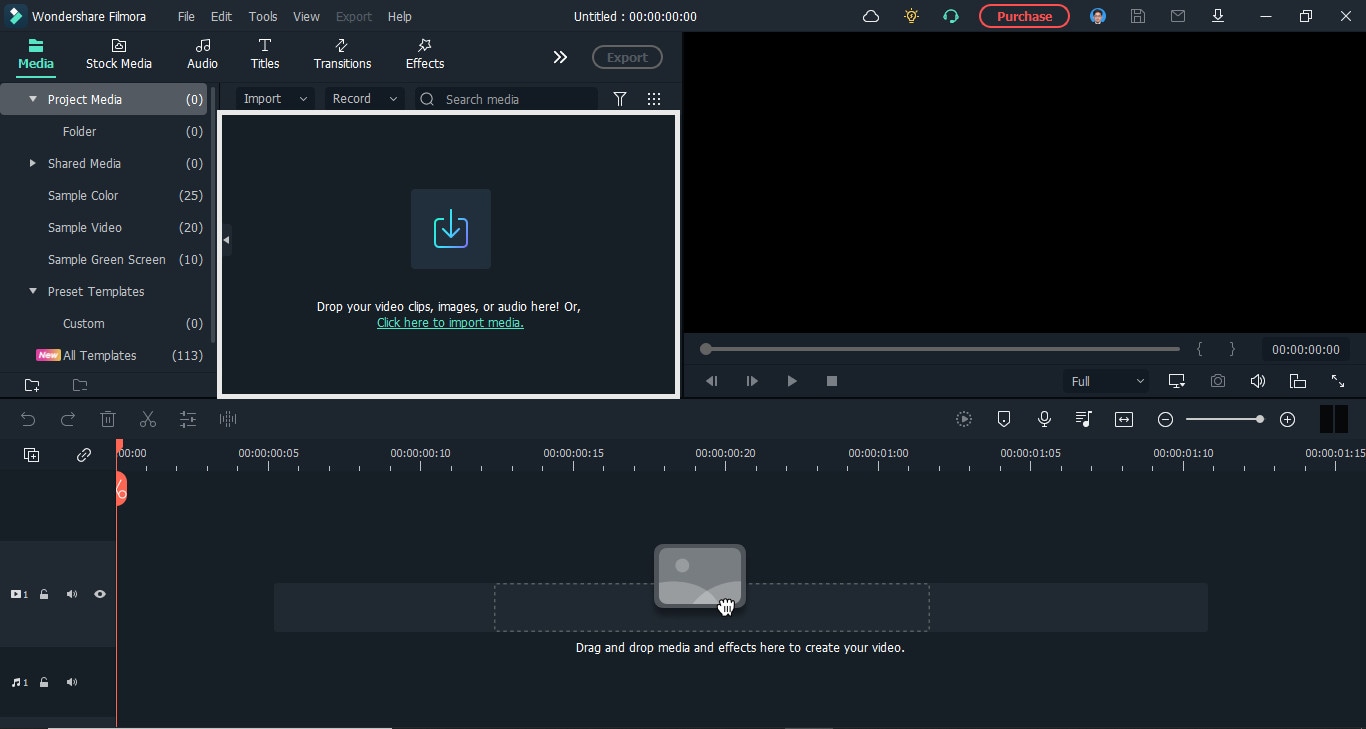
Step3When the main screen appears, drag the video to the area shown below or click here to select the video from your storage to import the video to the software.
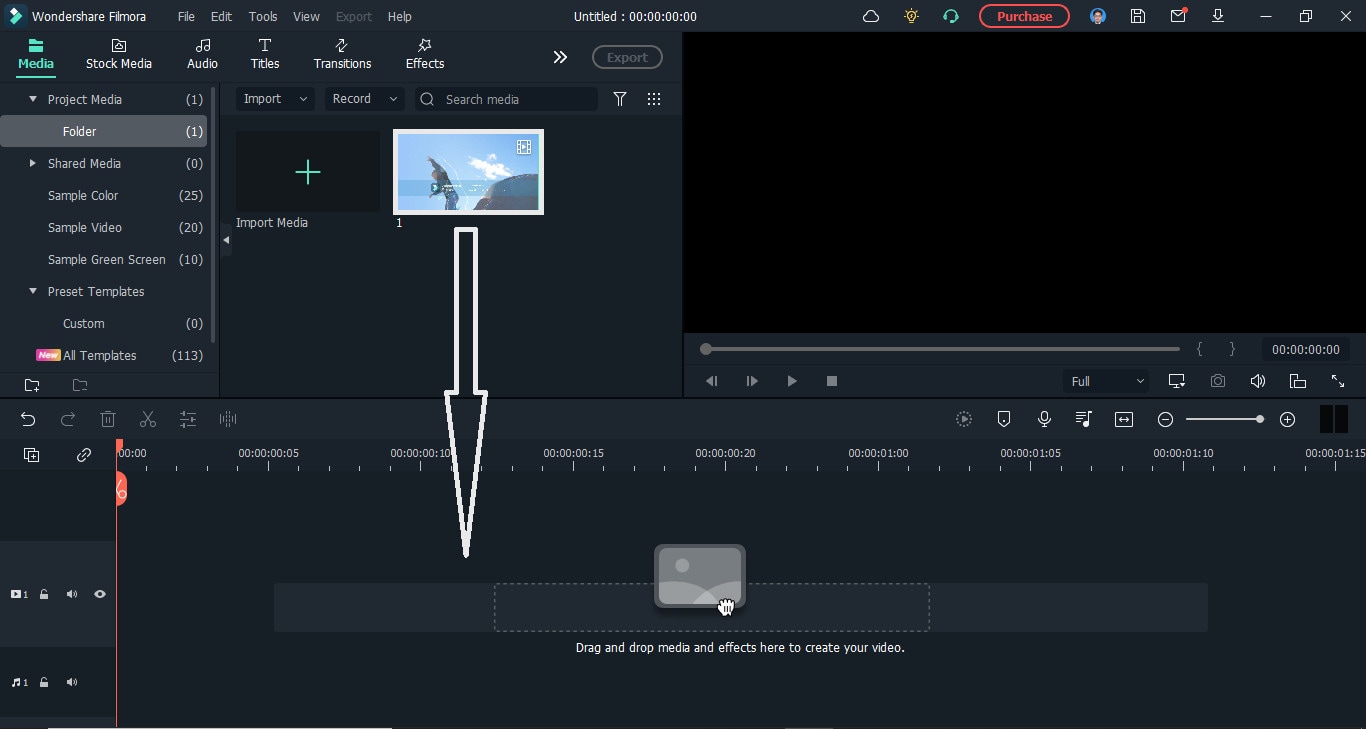
Step4Drag the video to the bottom area.
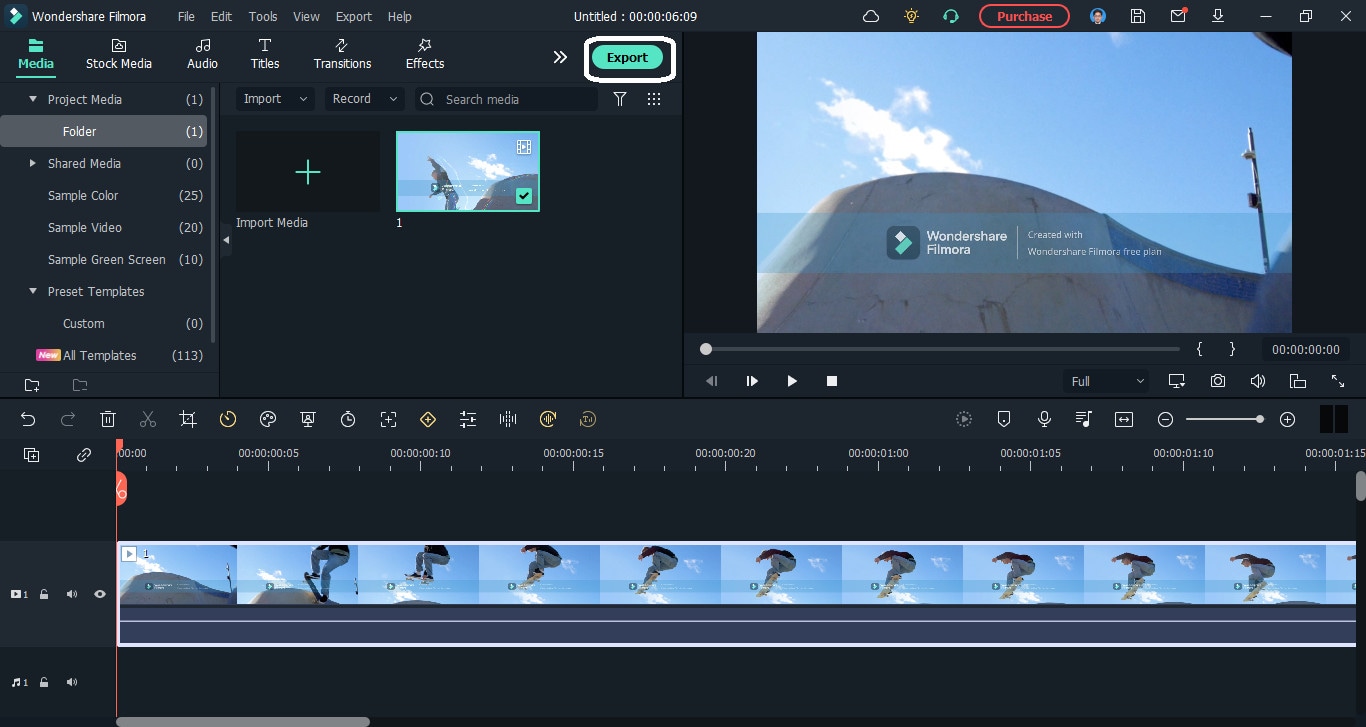
Step5Then click the “export” button above, and a new screen will appear.
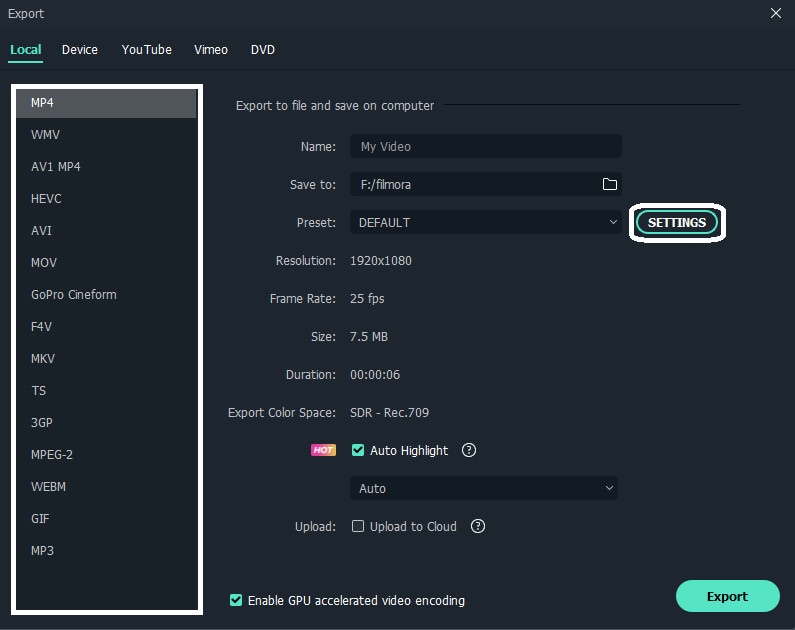
Step6Change the video format from the left area to MP4 and click the “SETTINGS” button to change further settings.
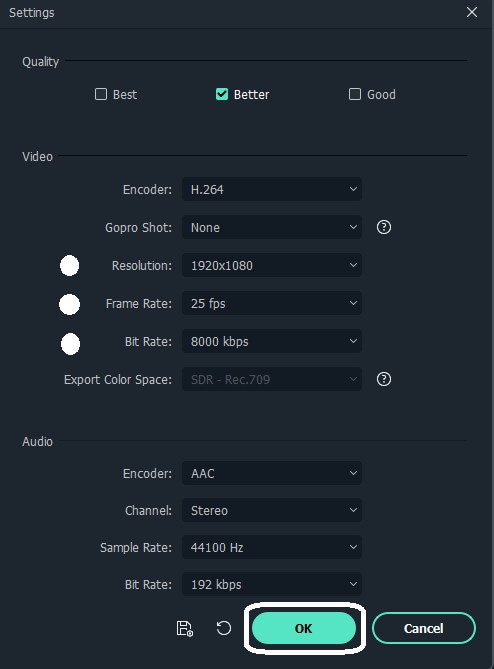
Step7Then change the resolution, frame rate, and bit rate to the recommended values shown in part 1 of this article.
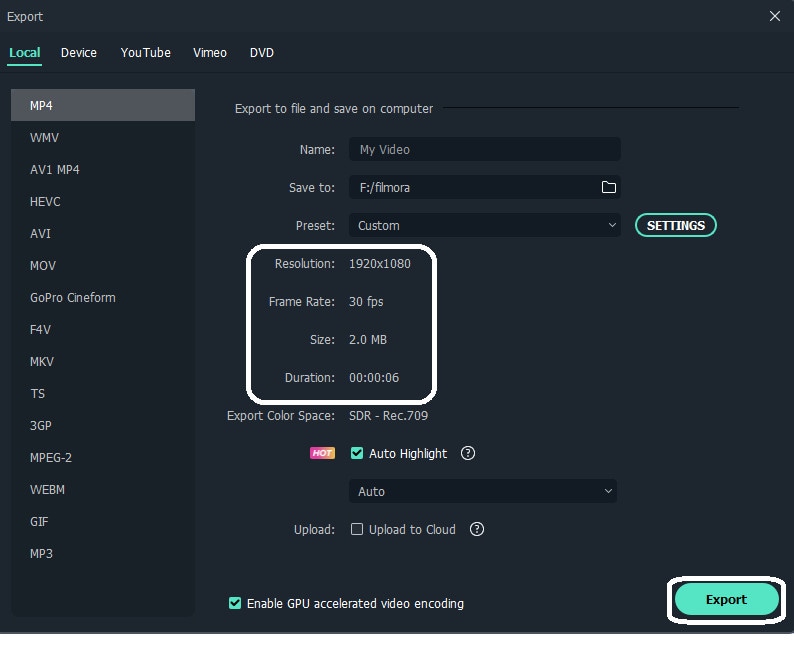
Step8Now the settings have been changed. Just click the export button to convert the video to the changed settings.
Easy right? Now let’s see how we can use an online video compressor for Instagram.
Part 3: Free Online Video Compressor to Resize Your Videos for Instagram
Although Wondershare Filmora is an incredible video compressor for Instagram, there are instances when someone’s computer doesn’t support it or if someone only uses video compressors once in a while.
If that is your case, you don’t need to buy expensive video compressors because we have made it easy for you. In this part of the article, we will discuss some outstanding free online video compressors to resize your videos for Instagram. So why wait? Let’s move on.
But there are myriad online video compressors, like VEED.IO, FreeConvert, Clipchamp, VideoSmaller, and Adobe Express. So which one to choose? Of course, it’s Adobe Express.
Adobe Express
Adobe Express is a free online tool for making quality images, videos, and texts for all your projects, all in one place.
On top of that, it enables you to quickly create standard social graphics, flyers, and logos without hassle. And the video editing tools in it make it an excellent video compressor for Instagram.
Let’s see some Pros and Cons of using Adobe Express as a video compressor for Instagram.
Pros
- Easy to use interface
- Free accounts are available and can also be upgraded to enjoy more amazing features
Cons
- Bitrate and framerate can’t be changed
Here are the step-by-step instructions to compress a video for Instagram.
Step1Go to Adobe Express and click the “start for free” button.

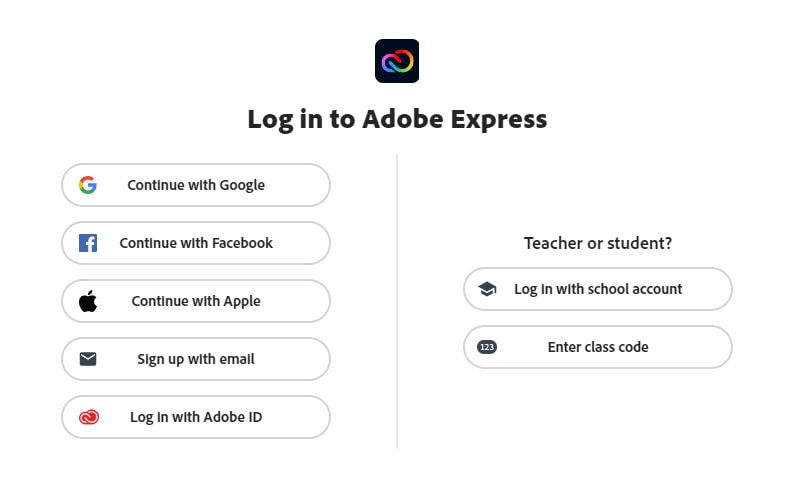
Step2Sign in using Google, Facebook, Apple, Email, or Adobe ID. Then the main screen of the Adobe Express will be shown.
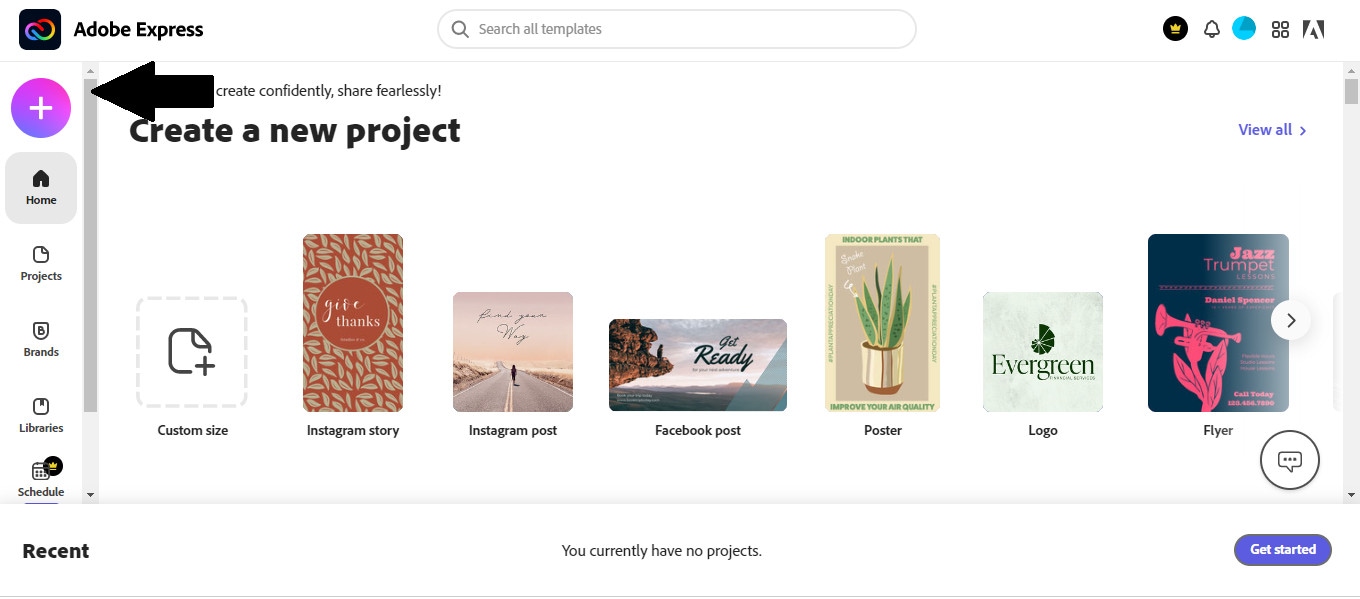
Step3Click on the “ + “ sign in the top left corner.
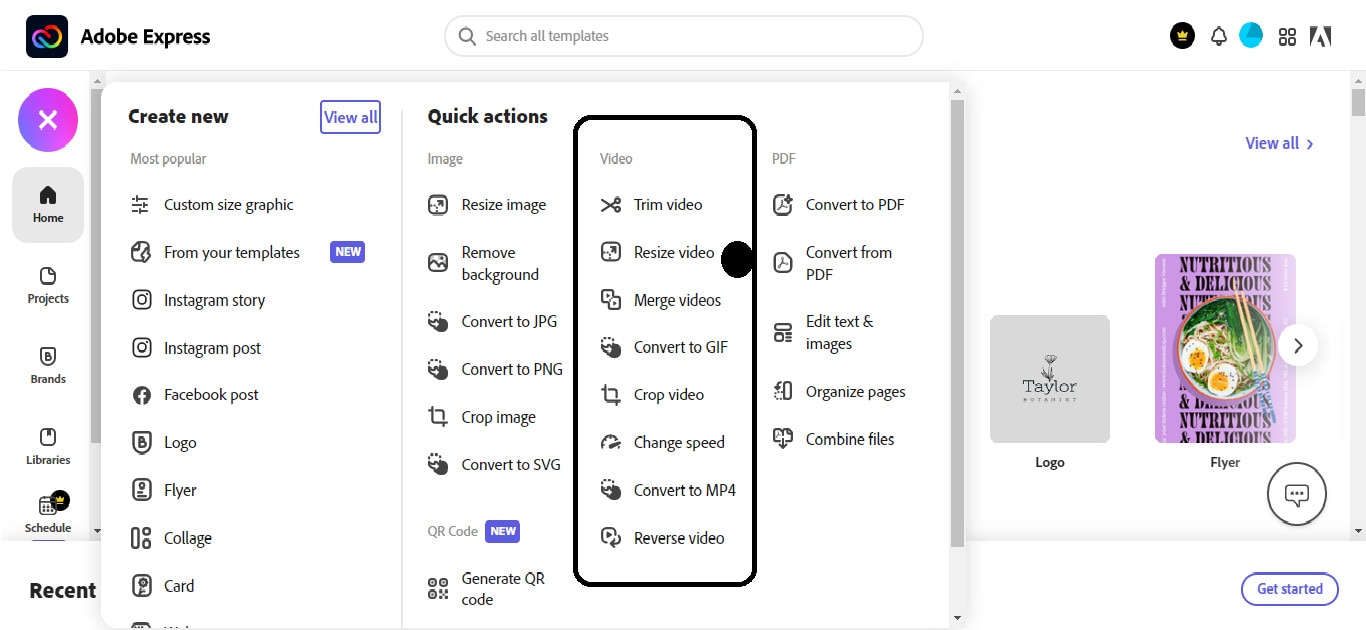
Step4Here from the video editing tools section, select the “ Resize video .“
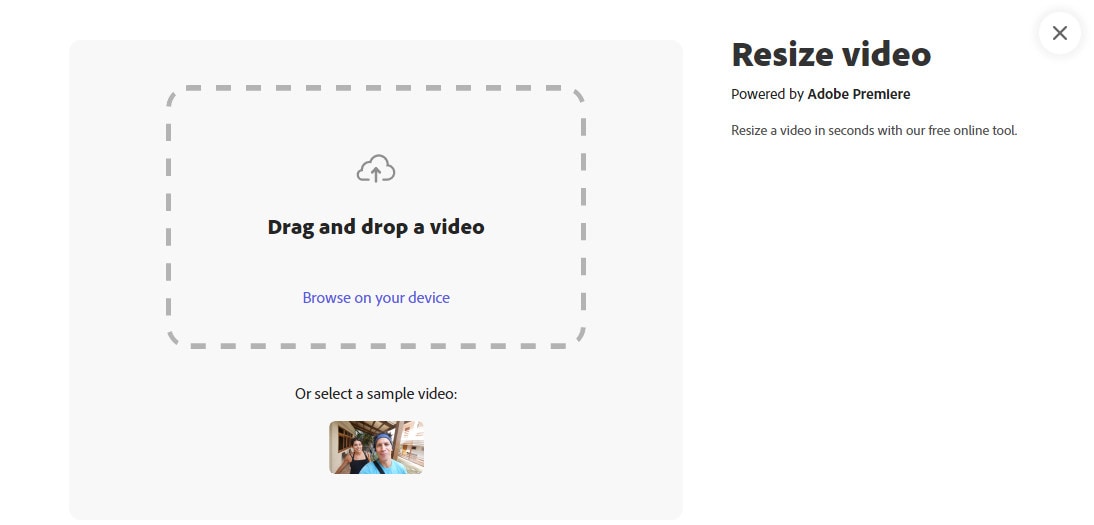
Step5Drag the video you want to compress here or open it from your storage.
Step6Now select the shape and resolution and click the Download button.
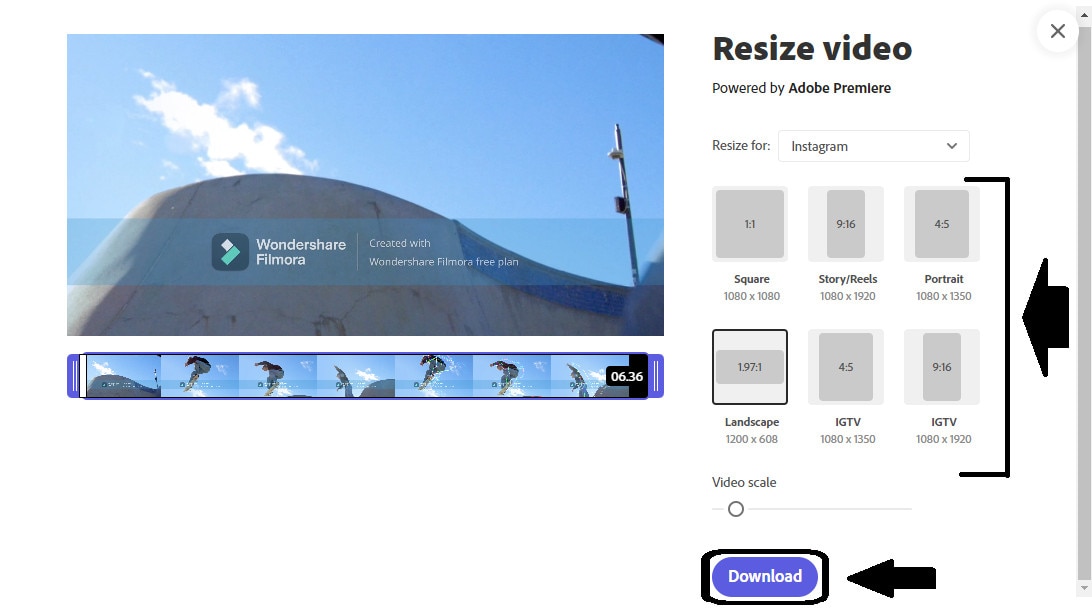
Step7Adobe Express will compress your video, and it will be downloaded automatically.
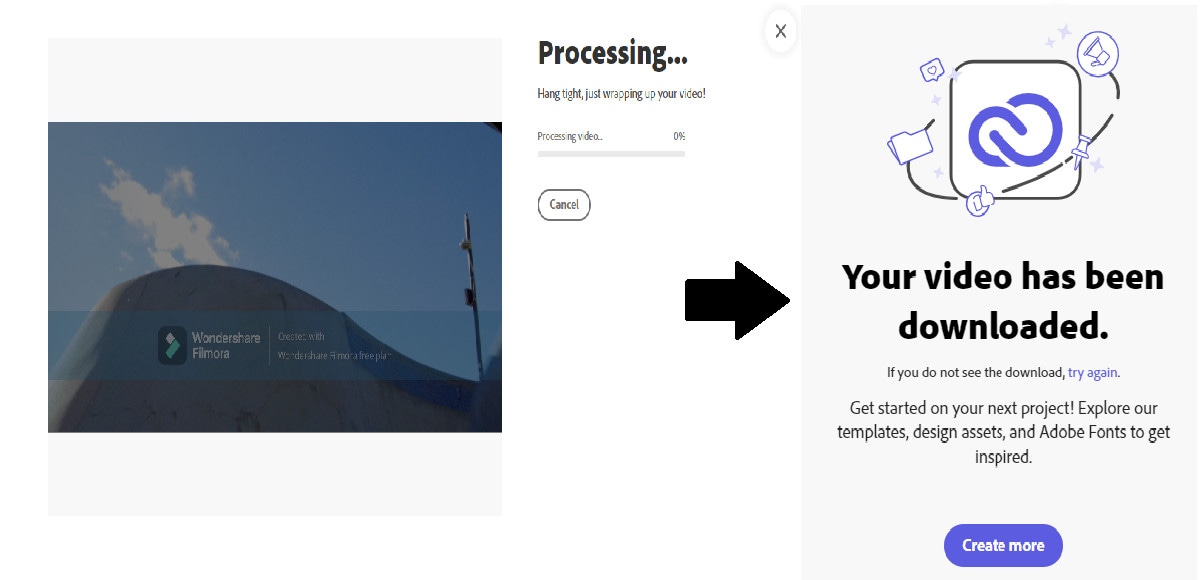
But What if someone wants to compress videos on their mobile phones? Is that possible? Of course, it is! Let us show you some amazing video compressors for Instagram on iPhone and Android.
Part 4: How to reduce video/mp4 size for Instagram on iPhone and Android
As the era of mobile phones is improving day by day, most social media applications, including Instagram, are used on either Android or iPhones. So if you took a high-quality 4K video from your mobile and are looking for a video compressor for Instagram, you don’t need to open your computer for this trivial matter. Because here are some of the best video compressor apps for android and video compressor apps for iOS.
All these have pros and cons, but we recommend using “Video Compress” to compress your high-quality video on Android or iPhone. And why is that? Because not only does it support all video formats but also provides the function of trimming, cropping, or rotating the video. Moreover, it also allows the audio removal to increase the video’s compression further.
Here are some Pros and Cons of using “Video Compress”
Pros
- Very simple to use
- On top of adjusting the quality between low and high, you can also make custom settings
- Can share the video directly from the app
Cons
- There is no search option; you must manually select the video from your storage
- No option for merging multiple videos into one
Here are the steps to compress video using Video Compress on Android phones.
Step1Download, Install and Launch the “Video Compress” from the AppStore.

Step2Open the folder containing the file, then select the video you want to compress.
Step3“Compress Video” will show you many options for editing your video. Press on the compress video option.

Step4Go to the Custom Settings and change the video resolution and bitrate to the ones recommended in Part 1 of this article.
Step5Finally, press the video compress icon on the bottom of the screen, and “Video Compress” will compress your video with the selected settings.

But there are some limitations, too, like it doesn’t change the aspect ratio and frame rate of the video, which are crucial for uploading it on Instagram. So we recommend using Wondershare Filmora if you are looking for a video compressor for Instagram.
Final Words
Compressing a high-quality video before uploading it on Instagram is necessary because of the concrete limitations of Instagram. In this article, we have gone over different video compressors for Instagram. Each of these video compressors can shrink the video without compromising its quality. So you can upload those videos on your Instagram feed, story, reels, or live videos effectively.
Did you use one of these video compressors for Instagram? Let us know your thoughts in the comments section below. Thanks for reading.
Part 1: Before reducing video size for Instagram, things you need to know
If you want to use a video compressor for Instagram, you must know the specific requirements of an Instagram video. Instagram only accepts MP4, MOV, or GIF videos and has concrete limitations on almost every video aspect. But you don’t have to be tense because for your ease, we have compiled all those limitations on Story, Reel, Live, or feed videos into a tabular form. Here it is,
| Features | Feed Video (landscape, square, portrait) | Story | Reels | Live |
|---|---|---|---|---|
| Size guide | Max 60 sec | Max 15 sec | Max 90 sec | Max 60 min |
| Aspect ratio | 16:9 for landscape, 1:1 for square, 4:5 for portrait | 9:16 | 9:16 | 9:16 |
| Frame rate.( frame per sec) | 23 - 60 FPS | Min 30 FPS | Min 30 FPS | Min 30 FPS |
| File size | Max 4 GB | Max 4 GB | Max 4 GB | Max 4 GB |
| Upload video captions | Can upload a full caption and Up to 30 Hashtags | No caption Upto 10 hashtags per story. | Can upload a full caption and up to 30 Hashtags | Auto-generated captions uploaded if enabled |
| 60- second feed reviews | MP4/MOV/GIF | MP4/MOV/GIF | MP4/MOV | MP4/MOV |
| Minimum dimensions.(pixels) | 600×315 for landscape, 600×600 for square, 600×750 for portrait | 600 x 1067 | 600 x 1067 | 600 x 1067 |
| Maximum dimension(pixels) | 1080 x 608 for landscape, 1080 x 1080 for square, 1080 x 1350 for portrait | 1080 x 1920 | 1080 x 1920 | 1080 x 1920 |
That’s a lot of information, right? That’s why we have sorted out the best Instagram video compression settings recommended to make a high-quality video for Instagram, which are as.
Format:
Resolution: 720P or 1080P
Bitrate:
3Mbps-6Mbps
Frame rate:
30Fps
Now that you know all the specific requirements and the recommended video compression settings. Let us show you how to compress a video without losing quality for Instagram with a professional Video-Editing Tool.
Part 2: Compress Video Without Losing Quality for Instagram with a Professional Video-Editing Tool
Wondershare Filmora
Speaking of the simplest video compressor for Instagram on all recent Windows or macOS computers, Wondershare Filmora stands out as one of the best bets. In addition to video-editing, most users prefer this tool for compressing their videos before uploading them to Instagram. It is highly reliable and takes less time when compared to other methods and tools in the digital market.
Wondershare Filmora is not only trusted by a community of over 85 Million Users but is also an award-winning video editing tool in the market. Here are some awards and some customer reviews which it boasts of.
Free Download For Win 7 or later(64-bit)
Free Download For macOS 10.14 or later
Awards:
- G2 Leader Spring 2022: with a winning streak of 17 Quarters.
- Shorty Awards: “Best in Photo and Video” and “Audience Honor” awards on the 13th edition of shorty awards.
- Category Leaders 2022: “ Category Leaders in Video Editing” award.

Now some customer reviews.
Reviews
The evaluation of Wondershare Filmora by the people who have purchased or experienced it is almost always positive. This can be shown by the amazing reviews which people leave after using Wondershare Filmora. Here are some of the reviews about it.

Now, let’s move forward and see the key features provided byWondershare Filmora.
Main Features
WondrShare Filmora is one of the best Video Editing tools out there. Not only it’s an excellent video compressor for Instagram, but it also provides all the powerful editing tools one could want. Here are the main features which Wondershare Filmora provides.
- Filmora allows users to create GIF from all popular video formats like .wmv, .mp4, .mkv, .evo, .dat, .wav, .mpeg and .avi etc. so you need not to worry about compatibility issues.
- The best thing to know about the Filmora video editing software tool is that it allows users to edit GIF files with some basic editing tools like color correction, cropping, splitting, rotation, combining two or more frames, speeding up frame motion or slow down as per requirement.
- It allows you to edit files with text and other similar interesting elements.
- Moreover, you can also add some incredible effects to your videos by using Filmora.
- On top of that, its video compressing feature makes it an excellent video compressor for Instagram.
Now moving on to the Pros and Cons of using Wondershare Filmora.
Pros
- It is easy to use, even for beginners
- Multiple formats are supported
- Tutorials are available on youtube for their every feature
- Free trial is available for everyone
Cons
- Leaves a watermark (can be removed after buying the full version)
- Full features are available only in the premium version
- Latest versions operate slowly in weak capability computers
We’ve known that Wondershare Filmora is a great video compressor for Instagram. Let’s move to the step-by-step guide for using Wondershare Filmora to compress a video for Instagram.
Step1Download, install, and launch the program (buy the full version to enjoy its all features.)
Step2Change the Aspect Ratio from the first screen that appears and click on the “New Project” option.

Step3When the main screen appears, drag the video to the area shown below or click here to select the video from your storage to import the video to the software.

Step4Drag the video to the bottom area.

Step5Then click the “export” button above, and a new screen will appear.

Step6Change the video format from the left area to MP4 and click the “SETTINGS” button to change further settings.

Step7Then change the resolution, frame rate, and bit rate to the recommended values shown in part 1 of this article.

Step8Now the settings have been changed. Just click the export button to convert the video to the changed settings.

Easy right? Now let’s see how we can use an online video compressor for Instagram.
Part 3: Free Online Video Compressor to Resize Your Videos for Instagram
Although Wondershare Filmora is an incredible video compressor for Instagram, there are instances when someone’s computer doesn’t support it or if someone only uses video compressors once in a while.
If that is your case, you don’t need to buy expensive video compressors because we have made it easy for you. In this part of the article, we will discuss some outstanding free online video compressors to resize your videos for Instagram. So why wait? Let’s move on.
But there are myriad online video compressors, like VEED.IO, FreeConvert, Clipchamp, VideoSmaller, and Adobe Express. So which one to choose? Of course, it’s Adobe Express.
Adobe Express
Adobe Express is a free online tool for making quality images, videos, and texts for all your projects, all in one place.
On top of that, it enables you to quickly create standard social graphics, flyers, and logos without hassle. And the video editing tools in it make it an excellent video compressor for Instagram.
Let’s see some Pros and Cons of using Adobe Express as a video compressor for Instagram.
Pros
- Easy to use interface
- Free accounts are available and can also be upgraded to enjoy more amazing features
Cons
- Bitrate and framerate can’t be changed
Here are the step-by-step instructions to compress a video for Instagram.
Step1Go to Adobe Express and click the “start for free” button.

Step2Sign in using Google, Facebook, Apple, Email, or Adobe ID. Then the main screen of the Adobe Express will be shown.

Step3Click on the “ + “ sign in the top left corner.

Step4Here from the video editing tools section, select the “ Resize video .“

Step5Drag the video you want to compress here or open it from your storage.

Step6Now select the shape and resolution and click the Download button.

Step7Adobe Express will compress your video, and it will be downloaded automatically.

But What if someone wants to compress videos on their mobile phones? Is that possible? Of course, it is! Let us show you some amazing video compressors for Instagram on iPhone and Android.
Part 4: How to reduce video/mp4 size for Instagram on iPhone and Android
As the era of mobile phones is improving day by day, most social media applications, including Instagram, are used on either Android or iPhones. So if you took a high-quality 4K video from your mobile and are looking for a video compressor for Instagram, you don’t need to open your computer for this trivial matter. Because here are some of the best video compressor apps for android and video compressor apps for iOS.
All these have pros and cons, but we recommend using “Video Compress” to compress your high-quality video on Android or iPhone. And why is that? Because not only does it support all video formats but also provides the function of trimming, cropping, or rotating the video. Moreover, it also allows the audio removal to increase the video’s compression further.
Here are some Pros and Cons of using “Video Compress”
Pros
- Very simple to use
- On top of adjusting the quality between low and high, you can also make custom settings
- Can share the video directly from the app
Cons
- There is no search option; you must manually select the video from your storage
- No option for merging multiple videos into one
Here are the steps to compress video using Video Compress on Android phones.
Step1Download, Install and Launch the “Video Compress” from the AppStore.

Step2Open the folder containing the file, then select the video you want to compress.
Step3“Compress Video” will show you many options for editing your video. Press on the compress video option.

Step4Go to the Custom Settings and change the video resolution and bitrate to the ones recommended in Part 1 of this article.
Step5Finally, press the video compress icon on the bottom of the screen, and “Video Compress” will compress your video with the selected settings.

But there are some limitations, too, like it doesn’t change the aspect ratio and frame rate of the video, which are crucial for uploading it on Instagram. So we recommend using Wondershare Filmora if you are looking for a video compressor for Instagram.
Final Words
Compressing a high-quality video before uploading it on Instagram is necessary because of the concrete limitations of Instagram. In this article, we have gone over different video compressors for Instagram. Each of these video compressors can shrink the video without compromising its quality. So you can upload those videos on your Instagram feed, story, reels, or live videos effectively.
Did you use one of these video compressors for Instagram? Let us know your thoughts in the comments section below. Thanks for reading.
Also read:
- Free Ways to Download Mobile Phone Green Screen Videos and Pictures No Copyright
- New 2024 Approved 100 Working Methods to Learn How to Rotate TikTok Video
- How to DIY VHS Overlay in After Effects for 2024
- New In 2024, Add Green Screen Effects in Final Cut Pro
- Updated How to Create a Smooth Cut Transition Effect for 2024
- New 7 Best Green Screen Software for Beginners on Mac
- Updated How to Windows Online Movie Maker Complete Guide
- Polish and Enshrine Your Music Videos with the Best Editing Software, Filmora. Add Cuts to Your Beat, Light Leaks, and Much More for 2024
- Is Augmented Reality Conferencing the Future of Workplace Collaboration, In 2024
- Updated Best 10 Tools to Convert a GIF Into a PDF for 2024
- 2024 Approved Top 10 Text to Robot Voice Generators Windows, Mac, Android, iPhone
- In 2024, Change Speed of a Video on iPhone
- New 4 Methods for Rotating Your GoPro Videos Professionally for 2024
- New 2024 Approved How to Uue Adobe Lightroom Color Grading
- New Learn Topaz Video Enhance AI Review and Achieve Powerful Video Conversion
- New Have You Ever Watched YouTube Live Streams? In Fact, You Can Also Start a Live Streaming on YouTube if You Want. Here Well Share some Tips to Live Stream on YouTube
- In 2024, Fixing Foneazy MockGo Not Working On Oppo A79 5G | Dr.fone
- 8 Quick Fixes Unfortunately, Snapchat has Stopped on Vivo S18 Pro | Dr.fone
- How to remove Google FRP Lock on Itel
- How to Fix Error 495 While Download/Updating Android Apps On Infinix Note 30 Pro | Dr.fone
- In 2024, Bypassing Google Account With vnROM Bypass For Xiaomi Mix Fold 3
- How to Analyze an Editorial Cartoon
- Updated Techniques for Creating Animated Logo That Few People Know About for 2024
- In 2024, How to Reset Apple ID and Apple Password From Apple iPhone 11
- What to Do if Google Play Services Keeps Stopping on Xiaomi Redmi Note 12 Pro 4G | Dr.fone
- How to Factory Reset Oppo Reno 11 5G If I Forgot Security Code or Password? | Dr.fone
- 3 Methods to Mirror OnePlus 12 to Roku | Dr.fone
- How To Change Country on App Store for iPhone 15 Pro Max With 7 Methods | Dr.fone
- In 2024, How to Unlock Samsung Galaxy A23 5G Pattern Lock if Forgotten? 6 Ways
- What is the best Pokemon for pokemon pvp ranking On Meizu 21? | Dr.fone
- Title: New Mastering FFmpeg How to Merge Audio and Video with Ease
- Author: Chloe
- Created at : 2024-04-24 07:08:13
- Updated at : 2024-04-25 07:08:13
- Link: https://ai-editing-video.techidaily.com/new-mastering-ffmpeg-how-to-merge-audio-and-video-with-ease/
- License: This work is licensed under CC BY-NC-SA 4.0.


