:max_bytes(150000):strip_icc():format(webp)/zenbook-17-fold-oled-72de5601b7334834a2962b7a8c7b4e9b-16fb2ba97f414911a71ffd37c82c541e.png)
New Mastering OpenCV Object Tracking A Comprehensive Guide for Beginners and Experts

Mastering OpenCV Object Tracking: A Comprehensive Guide for Beginners and Experts
OpenCV Tracking is a popular method used for tracking objects in a video in real-time. OpenCV is a powerful library used for image processing and computer vision applications.
From real-time video analysis to Augmented Reality, OpenCV Tracking has a wide range of uses and can help both private and public sectors to detect and track the desired object in an image or video.
In this comprehensive guide, we’ll explore OpenCV Tracking and its pre-built trackers**.** We will use the OpenCV library and Python to implement this Object Tracking application.
- What Is OpenCV
- The Pre-Built Algorithms OpenCV Offers For Object Tracking
- Implementation In Python And OpenCV
Part 1. What Is Object Tracking?
Object Tracking determines the location of an object in a video and can be used for a variety of purposes, including surveillance, security, traffic control, digital forensics, anomaly detection, gesture recognition, visual surveillance, human-computer interaction, augmented reality, and robot vision.
Even though it may seem easy for an average person, object tracking is quite complex for computers because they have to analyze a set of frames and estimate the object’s trajectory based on numbers instead of images.
Because of how complicated it is, Object Tracking is considered one of the most difficult tasks in computer vision. Even though it’s a challenge, it’s not impossible to accomplish.
And there are two levels of Object Tracking that you should learn about:
1. SOT & MOT
- Single Object Tracking (SOT): SOT is a tracking algorithm that creates advanced appearance models and/or motion models to manage difficult issues like out-of-plane rotations, illumination variations, or scale changes.
- Multiple Object Tracking (MOT): MOT tracks every part of a video and is mainly concerned with mid-level tasks and serves as a foundation for high-level tasks.
2. The Difference Between Tracking And Detection
After knowing what Object Tracking is, there is another concept you should also be aware of - Object Detection.
The Object Tracking and Object Detection are two important methods in computer vision. Object Tracking tracks the position of a given object in an image in real-time, while Object Detection identifies and localizes objects in an image or video. That is the difference.
Part 2. Types Of Object Tracking
Image Tracking
Image tracking allows users to interact with digital content more naturally and helps users move and interact with digital objects in the same manner as they will with real-world physical objects.
Image tracking can be used in various augmented reality (AR) applications, such as AR gaming, shopping, and navigation. Moreover, you can also use it for educational purposes, such as teaching anatomy or providing instructions for a difficult task.
Video Tracking
Video tracking is the process of tracking objects in a video sequence and can be used for various applications, such as detecting and counting objects in a scene, understanding their motions, and recognizing activities.
Part 3. What Are The Difficulties Of Object Tracking?
As what has been mentioned above, the use of object tracking is versatile. However, there are some challenges associated with Object Tracking, such as:
Background Clutter: The background can impact extracting an object’s features. If the background is more densely populated, detecting or tracking the object of interest can be more difficult.
Occlusion: This is a phenomenon where the object being tracked is affected by the background or foreground. This causes the tracking algorithm to get confused due to multiple objects coming close together, hence, losing track of the object.
Varying spatial scales: Varying spatial scales refer to the target object being of a different size or shape, which can confuse the algorithm, leading to errors.
Training and Tracking Speed: If the object is moving too fast or is too small, it can be difficult to track. Therefore, the tracking module has to be designed to track, identify, and localize objects in a matter of seconds.
Part 4. Stages Of The Object Tracking Process
After the introduction of object tracking technically, let’s learn about its mechanism of it from two sides: periods of the working process and the way it tracks.
1. Stages Of The Object Tracking Process
Following are the stages of the Object Tracking process:
Target Initialization
Target initialization is the first step in Object Tracking and involves defining the targets or objects of interest and drawing a bounding box around them in the initial frame. After that, the tracker has to detect the position of the object in the frame while drawing the bounding box.
Appearance Modeling
Appearance modeling is important for understanding how an object will look under different circumstances. If the object being tracked changes appearance due to different lighting, angle, or speed, the tracking algorithm may lose its information and the object itself. Therefore, it has to be conducted to let the algorithm detect the changes and distortion.
Motion Estimation
Motion estimation entails the capacity of the model to anticipate an object’s future position with precision.
Target Positioning
Motion estimation is a process of approximating the most likely region where an object could be present. After the object’s location is approximated, a visual model can be used to determine the target’s location more accurately.
2. Methods Of Object Tracking
Here’re some methods of Object Tracking:
OpenCV-Based Object Tracking
OpenCV Object Tracking method is widely used because it offers several built-in functions designed specifically for this purpose, such as GOTURN, MIL, MediandFlow, and CSRT. The tracker type you select will depend on your specific application design. Each tracker has its pros and cons, so there is not a single type of tracker ideal for all applications.
MDNet
Multi-Domain Convolutional Neural Network Tracker is a convolutional neural-based visual tracker and has won the VOT2015 challenge. Moreover, it is composed of domain-specific layers, branches, and multiple shared layers.
The MDNetT tracker is a deep neural network that is trained on numerous Object Tracking datasets. The tracker is designed to work in multiple domains, including video, text, and images.
DeepSort
DeepSort algorithm can track objects in real-time and uses YOLO v3 to compute the bounding boxes around the objects in a frame.
DeepSort uses Kalman filter from Simple Online and Realtime Tracking algorithm and an identification model, ReID to interlink bounding boxes and object tracks.
ROLO
ROLO is a novel Object Tracking method that uses recurrent neural networks (RNNs) to learn object-specific Spatio-temporal representations. This method works with YOLO, an object detection algorithm, and an LTSM for determining the trajectory of an object.
Part 5. The powerful backup: OpenCV
We have demonstrated how powerful OpenCV Tracking is and how it works. However, do you wonder what OpenCV is? How it supports the tracking goals being achieved? In this part, we will focus on OpenCV and help you better understand the the underlying mechanisms.
1. What Is OpenCV?
OpenCV is a powerful library that allows you to perform image processing, deep learning, machine learning, and computer vision tasks on live video feeds. Moreover, it can be used to detect objects, track their movements, and recognize faces.
It can help process the data that have videos and images and has been used in various applications, such as object recognition and detection, autonomous cars, robots, medical image analysis, automated surveillance, and anomaly detection.
2. The Pre-Built Algorithms OpenCV Offers For Object Tracking
There are 8 pre-built algorithms that OpenCV offers for Objects Tracking. All of them have their uniquility and here we will present their pros and cons for your better understadning.
| Tracker | Pros | Cons |
|---|---|---|
| BOOSTING Tracker | Track objects accurately. | Relatively slow. Unable to stop when an object is lost. |
| MIL Tracker | Strong resistance to noise. Gives accurate results. | Low speed. Unable to stop tracking once the object is lost. |
| KCF Tracker | High speed and accuracy. Stops tracking when the object is lost. | Inability to continue tracking objects once lost. |
| TLD Tracker | Resistance to overlapping and object scaling. | Unstable in object detection and tracking. Constantly loses object. |
| MEDIANFLOW Tracker | High accuracy and speed. Accurate in determining the object’s loss. | Loses object quickly due to high speed. |
| GOTURN Tracker | Shows resistance to obstructions and noise. | If the speed of an object is high, it shifts to another object. |
| MOSSE Tracker | Able to continue tracking after the object is lost. High speed. | Loses object easily if very high speed. |
| CSRT Tracker | Good resistance to overlapping. High accuracy. | Low speed. Unstable when an object is lost. |
3. Implementation In Python And OpenCV
Now, after theoretical explanation of OpenCV and OpenCV Tracking, let’s learn Object Tracking OpenCV Python with coding and our simple and step-by-step instructions:
Install The Dependencies
Install the pycharm app on your PC, and launch it. Create a new project and go to Terminal. Install the opencv-contrib-python package by pasting the following command into the Terminal.
Set Up the Trackers
Now, create a Jupyter-notebook and set up the trackers with this code:
Tasks:
- cv2. version returns the OpenCV library version number.
- Save the name of the eight trackers.
- Check the list for the version you are working on and create a tracker object based on the number.
Capture The Video Input
For capturing the video input, write the following lines of code:
Tasks:
- Use the VideoCapture class to capture a video via the webcam or get a saved one from your PC.
- In VideoCapture - line 2, give the path to your video.
- Comment on the second line to use the webcam for tracking and uncomment the third one.
Creating The Bounding Box And Initializing The Tracker
Define an initial random bounding box or select the choices for the object you want to track with the following code:
Start The Tracker And Check The Output
Finally, write the below code lines to start the tracker:
Tasks
- Read each video frame.
- Start the timer and, through the tracker, determine the trajectory of the object.
- Use the trajectory to draw the bounding box.
- The program will start tracking. Afterward, press the space bar to stop tracking.
Video – Object Tracking with Opencv and Python
Conclusion
In this article, we’ve discussed Object Tracking in detail and how it compares with Object Detection. Furthermore, we explored the methods used for tracking objects and provided complete guidance on the OpenCV Tracking method and its built-in functionalities.
Hopefully, you find this guide helpful, and you can now track objects in real-time without any issues.
Free Download For Win 7 or later(64-bit)
Free Download For macOS 10.14 or later
- Image Tracking
- Video Tracking
- What Are The Difficulties Of Object Tracking
- Stages Of The Object Tracking Process
- What Is OpenCV
- The Pre-Built Algorithms OpenCV Offers For Object Tracking
- Implementation In Python And OpenCV
Part 1. What Is Object Tracking?
Object Tracking determines the location of an object in a video and can be used for a variety of purposes, including surveillance, security, traffic control, digital forensics, anomaly detection, gesture recognition, visual surveillance, human-computer interaction, augmented reality, and robot vision.
Even though it may seem easy for an average person, object tracking is quite complex for computers because they have to analyze a set of frames and estimate the object’s trajectory based on numbers instead of images.
Because of how complicated it is, Object Tracking is considered one of the most difficult tasks in computer vision. Even though it’s a challenge, it’s not impossible to accomplish.
And there are two levels of Object Tracking that you should learn about:
1. SOT & MOT
- Single Object Tracking (SOT): SOT is a tracking algorithm that creates advanced appearance models and/or motion models to manage difficult issues like out-of-plane rotations, illumination variations, or scale changes.
- Multiple Object Tracking (MOT): MOT tracks every part of a video and is mainly concerned with mid-level tasks and serves as a foundation for high-level tasks.
2. The Difference Between Tracking And Detection
After knowing what Object Tracking is, there is another concept you should also be aware of - Object Detection.
The Object Tracking and Object Detection are two important methods in computer vision. Object Tracking tracks the position of a given object in an image in real-time, while Object Detection identifies and localizes objects in an image or video. That is the difference.
Part 2. Types Of Object Tracking
Image Tracking
Image tracking allows users to interact with digital content more naturally and helps users move and interact with digital objects in the same manner as they will with real-world physical objects.
Image tracking can be used in various augmented reality (AR) applications, such as AR gaming, shopping, and navigation. Moreover, you can also use it for educational purposes, such as teaching anatomy or providing instructions for a difficult task.
Video Tracking
Video tracking is the process of tracking objects in a video sequence and can be used for various applications, such as detecting and counting objects in a scene, understanding their motions, and recognizing activities.
Part 3. What Are The Difficulties Of Object Tracking?
As what has been mentioned above, the use of object tracking is versatile. However, there are some challenges associated with Object Tracking, such as:
Background Clutter: The background can impact extracting an object’s features. If the background is more densely populated, detecting or tracking the object of interest can be more difficult.
Occlusion: This is a phenomenon where the object being tracked is affected by the background or foreground. This causes the tracking algorithm to get confused due to multiple objects coming close together, hence, losing track of the object.
Varying spatial scales: Varying spatial scales refer to the target object being of a different size or shape, which can confuse the algorithm, leading to errors.
Training and Tracking Speed: If the object is moving too fast or is too small, it can be difficult to track. Therefore, the tracking module has to be designed to track, identify, and localize objects in a matter of seconds.
Part 4. Stages Of The Object Tracking Process
After the introduction of object tracking technically, let’s learn about its mechanism of it from two sides: periods of the working process and the way it tracks.
1. Stages Of The Object Tracking Process
Following are the stages of the Object Tracking process:
Target Initialization
Target initialization is the first step in Object Tracking and involves defining the targets or objects of interest and drawing a bounding box around them in the initial frame. After that, the tracker has to detect the position of the object in the frame while drawing the bounding box.
Appearance Modeling
Appearance modeling is important for understanding how an object will look under different circumstances. If the object being tracked changes appearance due to different lighting, angle, or speed, the tracking algorithm may lose its information and the object itself. Therefore, it has to be conducted to let the algorithm detect the changes and distortion.
Motion Estimation
Motion estimation entails the capacity of the model to anticipate an object’s future position with precision.
Target Positioning
Motion estimation is a process of approximating the most likely region where an object could be present. After the object’s location is approximated, a visual model can be used to determine the target’s location more accurately.
2. Methods Of Object Tracking
Here’re some methods of Object Tracking:
OpenCV-Based Object Tracking
OpenCV Object Tracking method is widely used because it offers several built-in functions designed specifically for this purpose, such as GOTURN, MIL, MediandFlow, and CSRT. The tracker type you select will depend on your specific application design. Each tracker has its pros and cons, so there is not a single type of tracker ideal for all applications.
MDNet
Multi-Domain Convolutional Neural Network Tracker is a convolutional neural-based visual tracker and has won the VOT2015 challenge. Moreover, it is composed of domain-specific layers, branches, and multiple shared layers.
The MDNetT tracker is a deep neural network that is trained on numerous Object Tracking datasets. The tracker is designed to work in multiple domains, including video, text, and images.
DeepSort
DeepSort algorithm can track objects in real-time and uses YOLO v3 to compute the bounding boxes around the objects in a frame.
DeepSort uses Kalman filter from Simple Online and Realtime Tracking algorithm and an identification model, ReID to interlink bounding boxes and object tracks.
ROLO
ROLO is a novel Object Tracking method that uses recurrent neural networks (RNNs) to learn object-specific Spatio-temporal representations. This method works with YOLO, an object detection algorithm, and an LTSM for determining the trajectory of an object.
Part 5. The powerful backup: OpenCV
We have demonstrated how powerful OpenCV Tracking is and how it works. However, do you wonder what OpenCV is? How it supports the tracking goals being achieved? In this part, we will focus on OpenCV and help you better understand the the underlying mechanisms.
1. What Is OpenCV?
OpenCV is a powerful library that allows you to perform image processing, deep learning, machine learning, and computer vision tasks on live video feeds. Moreover, it can be used to detect objects, track their movements, and recognize faces.
It can help process the data that have videos and images and has been used in various applications, such as object recognition and detection, autonomous cars, robots, medical image analysis, automated surveillance, and anomaly detection.
2. The Pre-Built Algorithms OpenCV Offers For Object Tracking
There are 8 pre-built algorithms that OpenCV offers for Objects Tracking. All of them have their uniquility and here we will present their pros and cons for your better understadning.
| Tracker | Pros | Cons |
|---|---|---|
| BOOSTING Tracker | Track objects accurately. | Relatively slow. Unable to stop when an object is lost. |
| MIL Tracker | Strong resistance to noise. Gives accurate results. | Low speed. Unable to stop tracking once the object is lost. |
| KCF Tracker | High speed and accuracy. Stops tracking when the object is lost. | Inability to continue tracking objects once lost. |
| TLD Tracker | Resistance to overlapping and object scaling. | Unstable in object detection and tracking. Constantly loses object. |
| MEDIANFLOW Tracker | High accuracy and speed. Accurate in determining the object’s loss. | Loses object quickly due to high speed. |
| GOTURN Tracker | Shows resistance to obstructions and noise. | If the speed of an object is high, it shifts to another object. |
| MOSSE Tracker | Able to continue tracking after the object is lost. High speed. | Loses object easily if very high speed. |
| CSRT Tracker | Good resistance to overlapping. High accuracy. | Low speed. Unstable when an object is lost. |
3. Implementation In Python And OpenCV
Now, after theoretical explanation of OpenCV and OpenCV Tracking, let’s learn Object Tracking OpenCV Python with coding and our simple and step-by-step instructions:
Install The Dependencies
Install the pycharm app on your PC, and launch it. Create a new project and go to Terminal. Install the opencv-contrib-python package by pasting the following command into the Terminal.
Set Up the Trackers
Now, create a Jupyter-notebook and set up the trackers with this code:
Tasks:
- cv2. version returns the OpenCV library version number.
- Save the name of the eight trackers.
- Check the list for the version you are working on and create a tracker object based on the number.
Capture The Video Input
For capturing the video input, write the following lines of code:
Tasks:
- Use the VideoCapture class to capture a video via the webcam or get a saved one from your PC.
- In VideoCapture - line 2, give the path to your video.
- Comment on the second line to use the webcam for tracking and uncomment the third one.
Creating The Bounding Box And Initializing The Tracker
Define an initial random bounding box or select the choices for the object you want to track with the following code:
Start The Tracker And Check The Output
Finally, write the below code lines to start the tracker:
Tasks
- Read each video frame.
- Start the timer and, through the tracker, determine the trajectory of the object.
- Use the trajectory to draw the bounding box.
- The program will start tracking. Afterward, press the space bar to stop tracking.
Video – Object Tracking with Opencv and Python
Conclusion
In this article, we’ve discussed Object Tracking in detail and how it compares with Object Detection. Furthermore, we explored the methods used for tracking objects and provided complete guidance on the OpenCV Tracking method and its built-in functionalities.
Hopefully, you find this guide helpful, and you can now track objects in real-time without any issues.
Free Download For Win 7 or later(64-bit)
Free Download For macOS 10.14 or later
How to Edit a TikTok Video After Posting
If you are planning to start your own business but have limited marketing resources, use TikTok. Your marketing expense will be minimized, and you will reach a large audience quickly. You can easily create the product video on TikTok and save it in a draft for later use. Many thinks adding TikTok back to the feed from the draft is complicated, but it is not.
Additionally, you can make as many videos on TikTok as you want and share them across the globe. It is also possible to make changes in the posted TikTok videos to enhance engagement. This article will help you learn how to edit a TikTok video after posting.

Part 1: Editing Your TikTok Posted Video
Sometimes you want to make changes to the uploaded TikTok videos because they are not gaining more likes. You don’t have to make it again from scratch because it is possible to edit TikTok videos even after uploading. You can then follow the underneath steps to learn how to edit a TikTok video after posting:
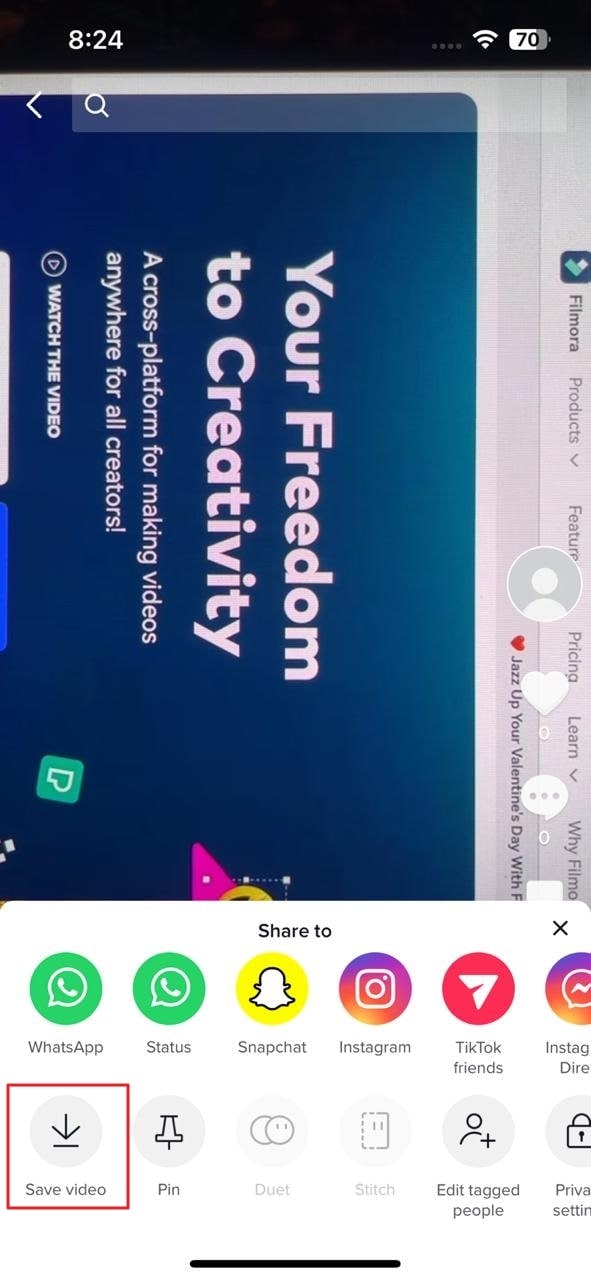
Step 1: Open your TikTok profile and select the video you want to edit. Tap the “Three Dots” icon present in the right panel. Press the “Save Video” icon. After successfully saving the video, locate and select the “Delete” option to remove the video from your profile.
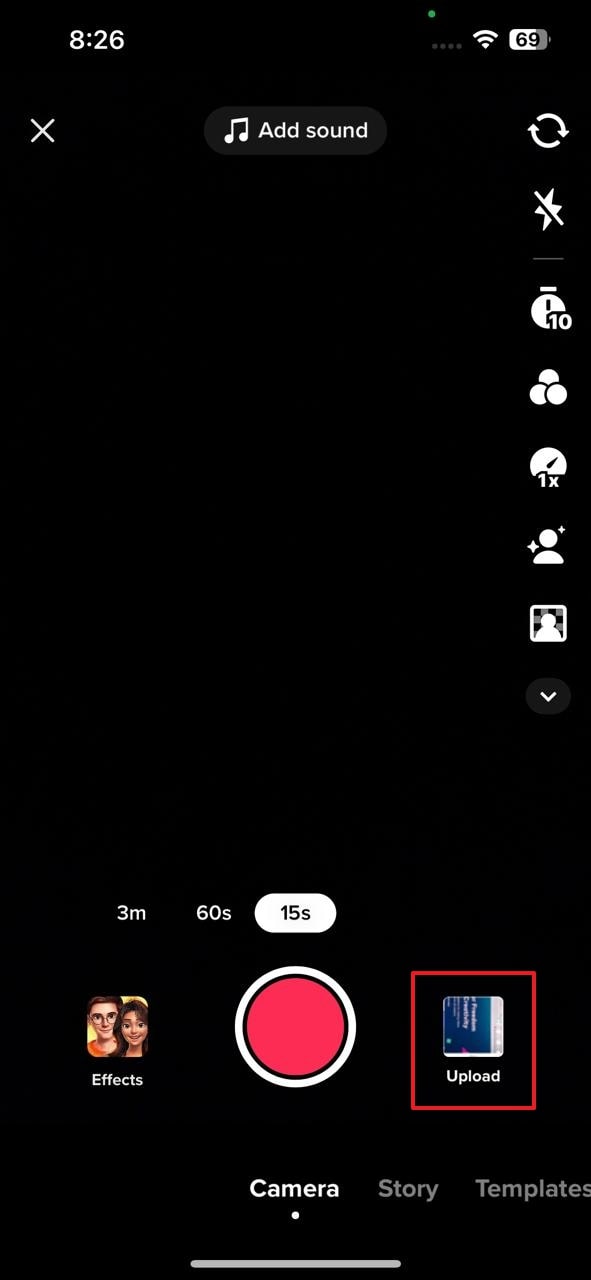
Step 2: Now tap on the “Plus” sign and select the “Upload” option. Choose the video which you have recently saved and then click the “Next” button.
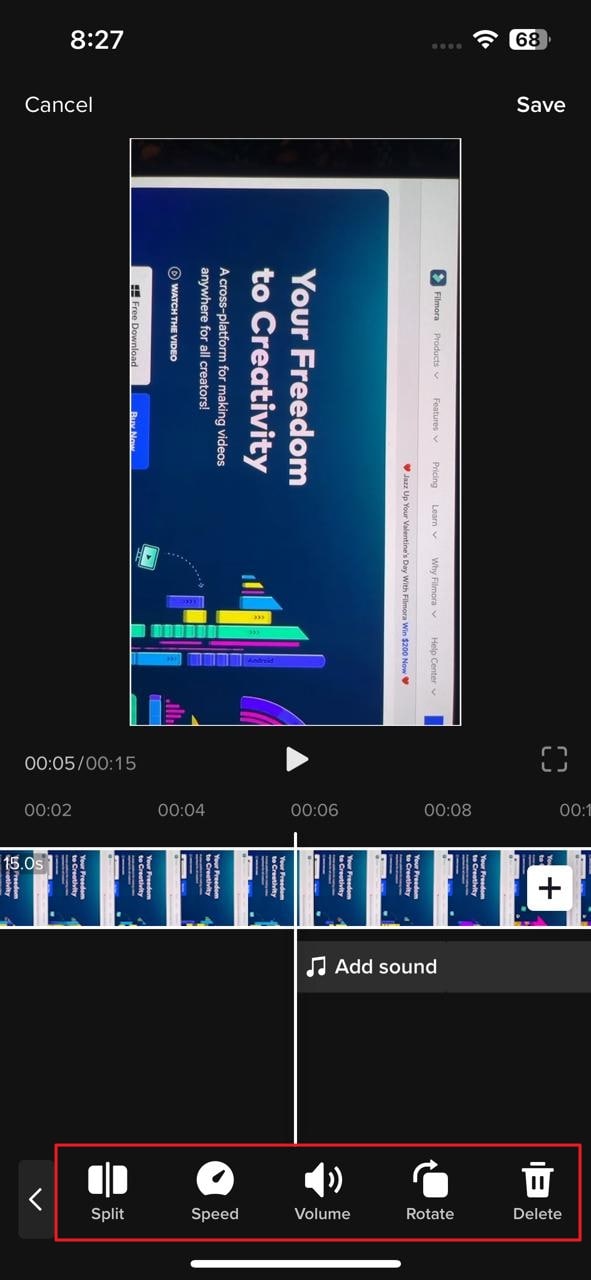
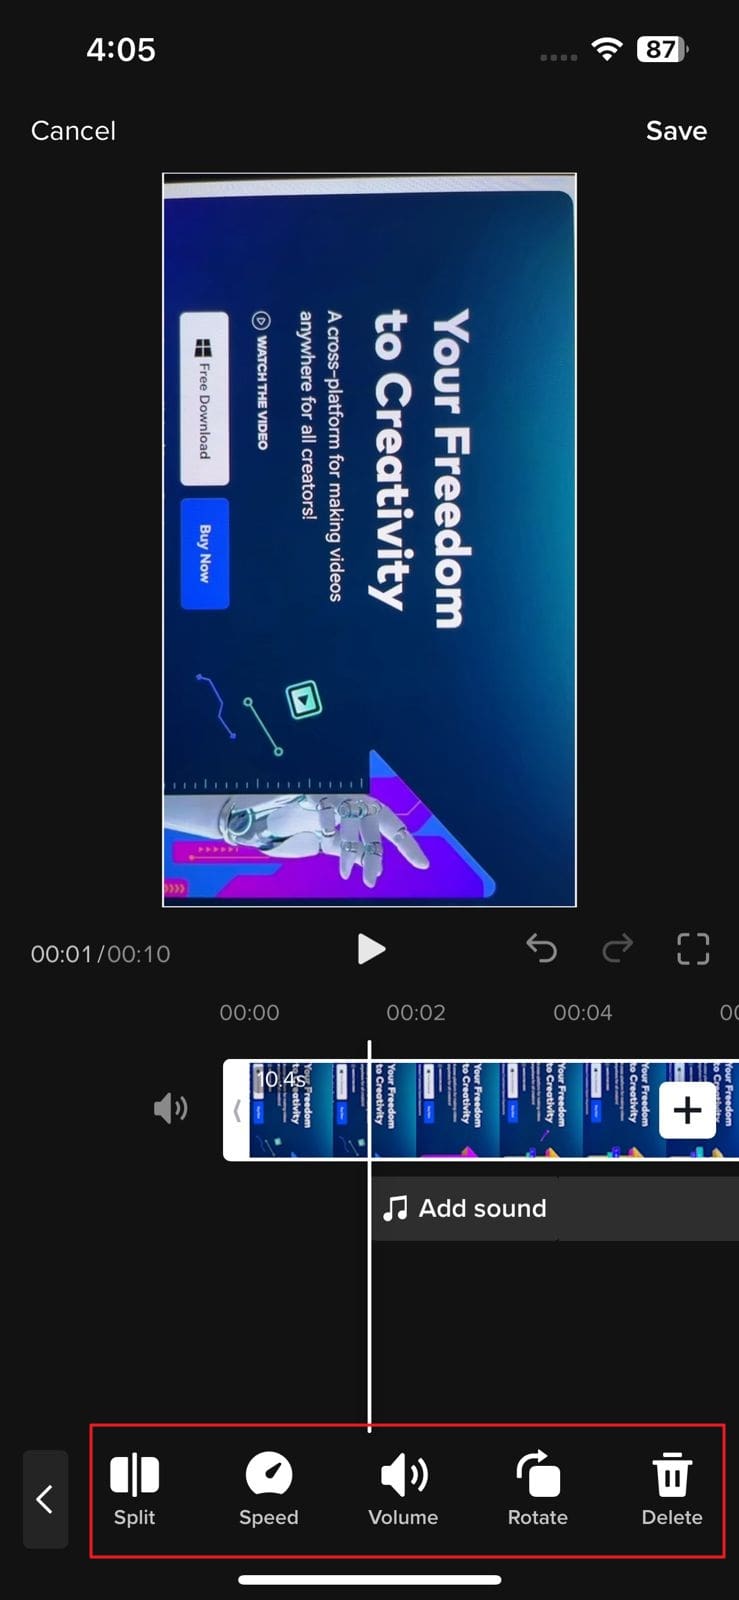
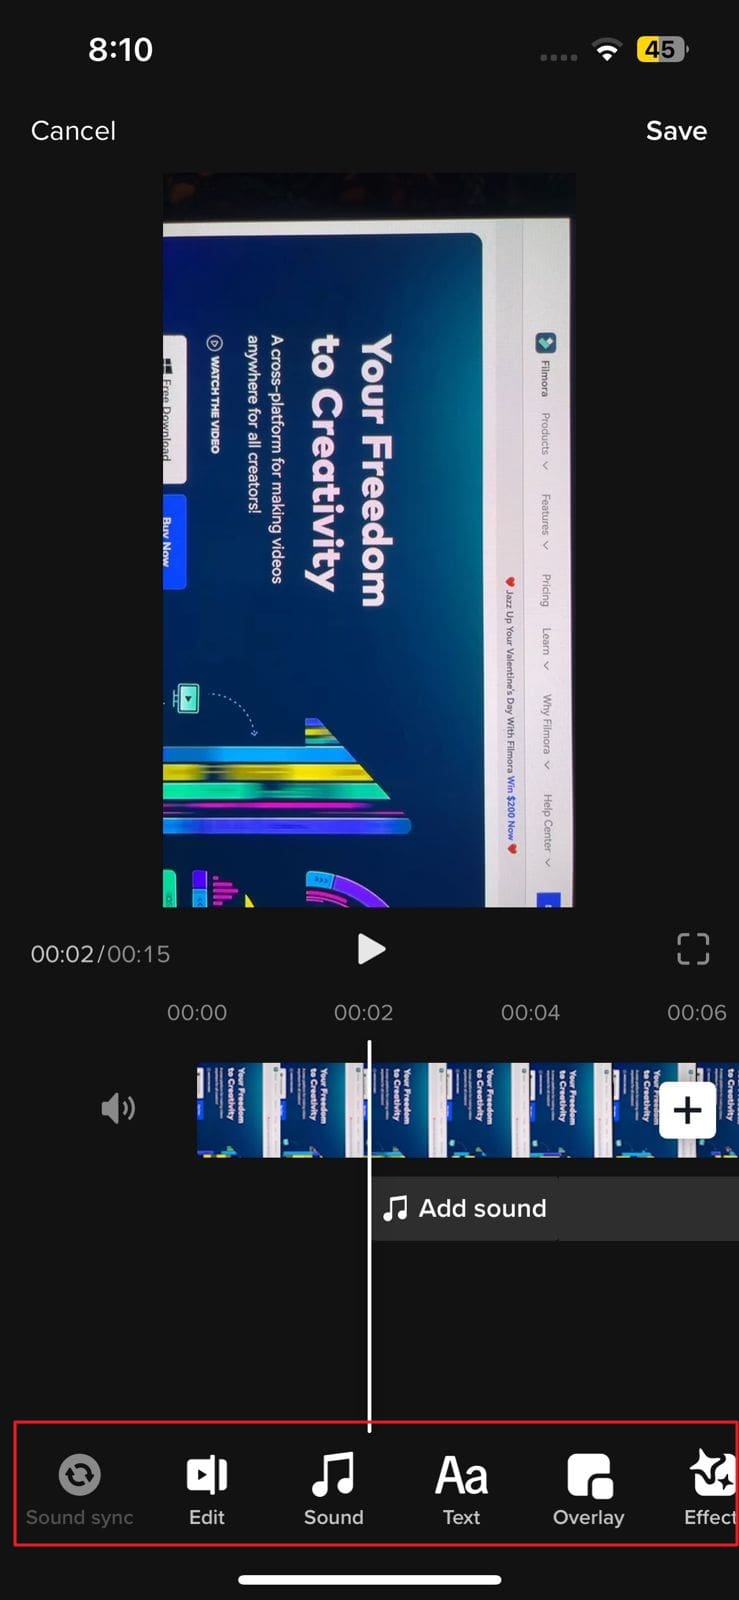
Step 3: Select the “Edit” icon in the right panel to start editing. Tap on the timeline video to enable editing options like split, speed, volume, rotate and delete. More editing options, such as sound, text, overlay, and effect, will appear when you unselect the timeline video.
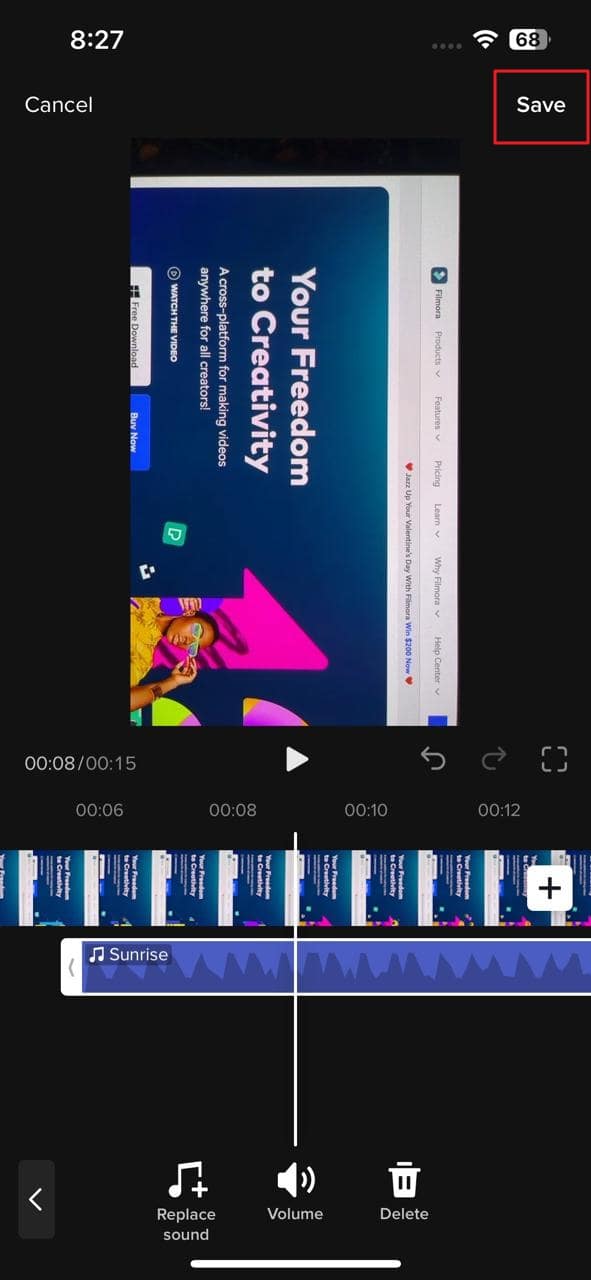
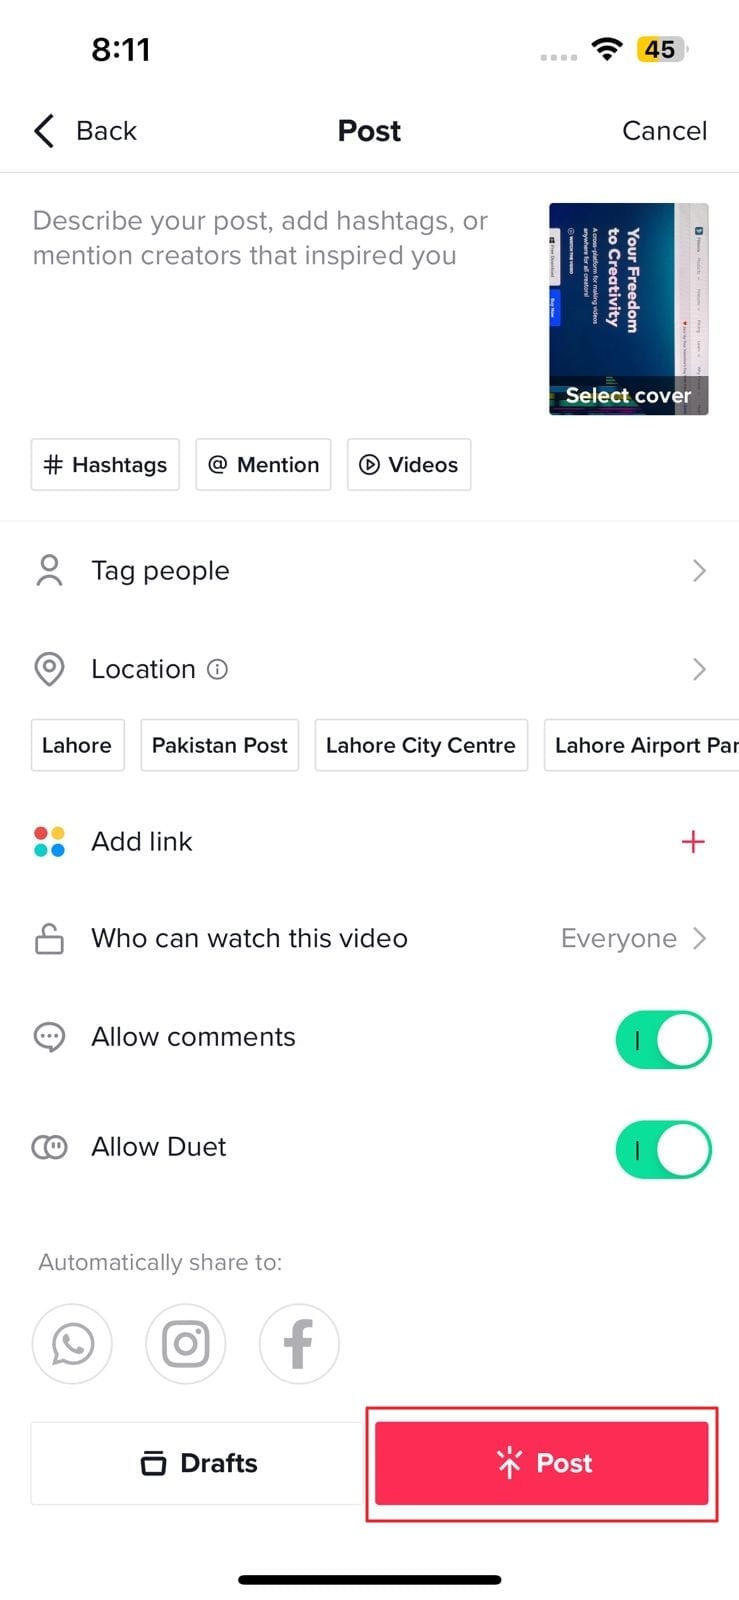
Step 4: After editing the video, save the changes using the “Save” option present at the top. Now hit the “Next” button to add desired hashtags and use the “Post” button to publish your video.
Part 2: Editing a Draft
From the above part, it is clear how you can edit videos in different ways by using the TikTok app. If you don’t want to publicize your video, it is possible to store the video as a draft. TikTok doesn’t require you to make your videos public. Moreover, it is possible to edit videos stored in the TikTok drafts.
You don’t have to worry about how to put a TikTok back from the draft because it is a simple procedure, and anyone can perform it in no time. We have provided simple steps for editing a draft using the TikTok app:
Step 1: Launch TikTok mobile app on your smartphone and open your “Profile.” Afterward, select the draft you want to edit from the “Drafts” menu.

Step 2: Press the “Edit” icon to edit the draft. Different editing options will appear when you select the draft video present in the timeline. Adjust the speed, volume, and orientation of the draft video through the features available in the bottom toolbar.
Step 3: Now tap again to unselect the draft. A wide range of options will appear that can be used for adding sound, text, and effects to the video. Use them according to your requirement.
Step 4: After making changes to the draft, tap the “Save” option and hit the “Next” button. Write a description of the post if you want and press the “Post” button.
Part 3: Using a Third-Party Video Editor to Make a New Video or Edit an Old One
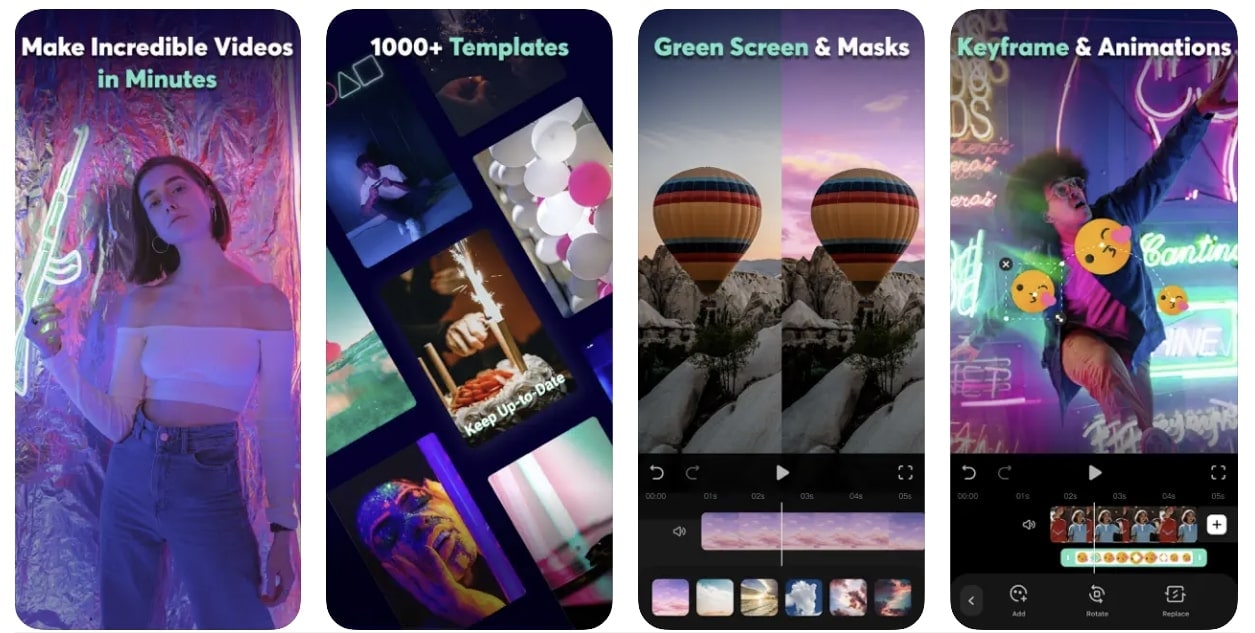
Although TikTok provides the option of editing, however, they are very few tools to make the required changes to the video. You can go for the Wondershare Filmora mobile app, as it gives more advanced editing options.
Filmora is a powerful application used by more than 100 million users for making trending videos for social media accounts. This award-winner video editor can make surprising changes in your clips through its filters, effects, and transitions.
download filmora app for ios ](https://app.adjust.com/b0k9hf2%5F4bsu85t ) download filmora app for android ](https://app.adjust.com/b0k9hf2%5F4bsu85t )
Amazing Features of Filmora
If you are confused about why you should use Filmora to edit a TikTok after posting, read these fantastic features of Filmora that are discussed below:
1. Speed Ramping
TikTok videos can be made more cinematic by adjusting their speed. Filmora presents speed ramping options such as Bullet, Montage, or Jump Cut to professionally adjust the speed of the video. You can also create your speed ramping effect and save it for later use. Don’t worry about the audio pitch during speed ramping because Filmora automatically adjusts the pitch of video sound.
2. Title Editing
You can add up to the mark titles to your TikTok videos to convey your main theme. These titles can be added in the form of text or animations, each having different colors and styles. Its title feature is loaded with varying styles of text that can be used to catch viewers’ attention.
3. Stickers and Effects
Multiple effects options are available on the Filmora video editor to give the video an exclusive look. These effects help you to enhance your video beauty and make you more confident on TikTok. You can also use the stickers option to beautify your TikTok video. Those people who make TikTok can engage children by adding GIFs or emojis in videos with this app.
4. Music Library
Filmora also allows its users to add music to the video. You can use its royal-free music library or add your voice. The volume of the soundtrack can easily be adjusted through its volume adjustment feature. You can also extract the music from a video and split the audio to eliminate the unnecessary part. Moreover, its beat detection feature is highly advanced and adjusts the beat according to the video.
Steps to Use Filmora Mobile App to Edit TikTok Videos
Are you interested in making further edits to your TikTok video? Simply follow the underneath steps to avail the editing features of this app to edit a TikTok after posting:
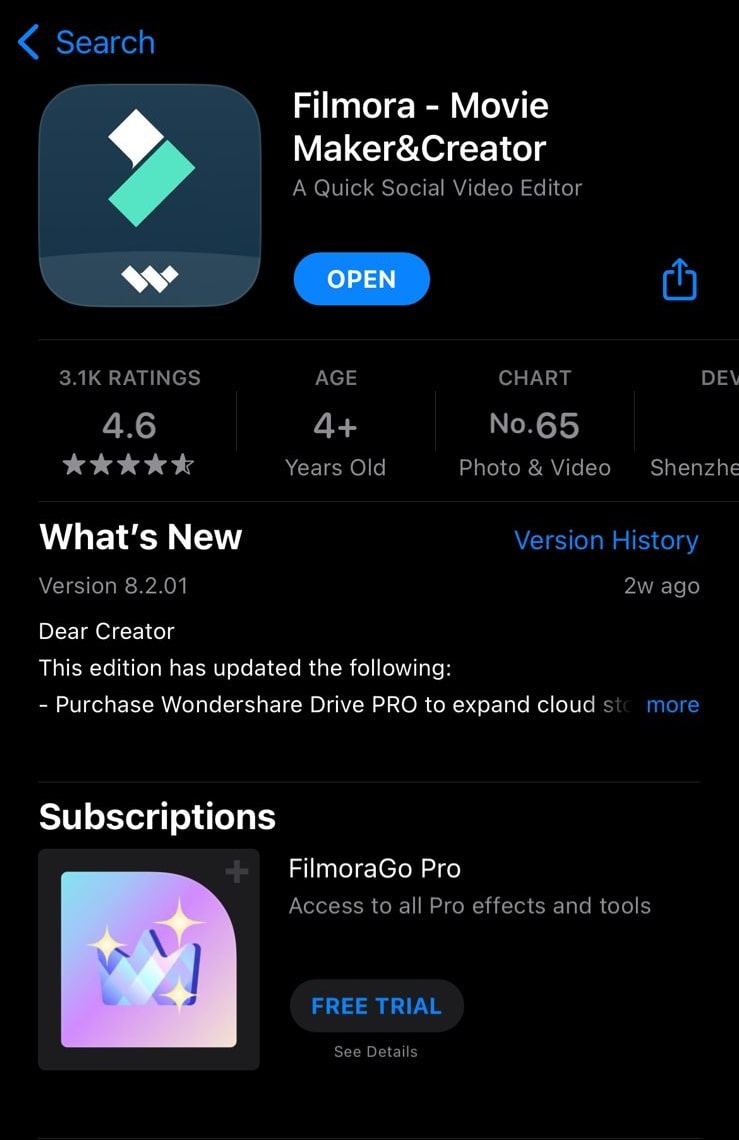
Step 1: Download Wondershare Filmora
Download Wondershare Filmora and launch it on your smartphone. While doing so, make sure you have a strong internet connection.
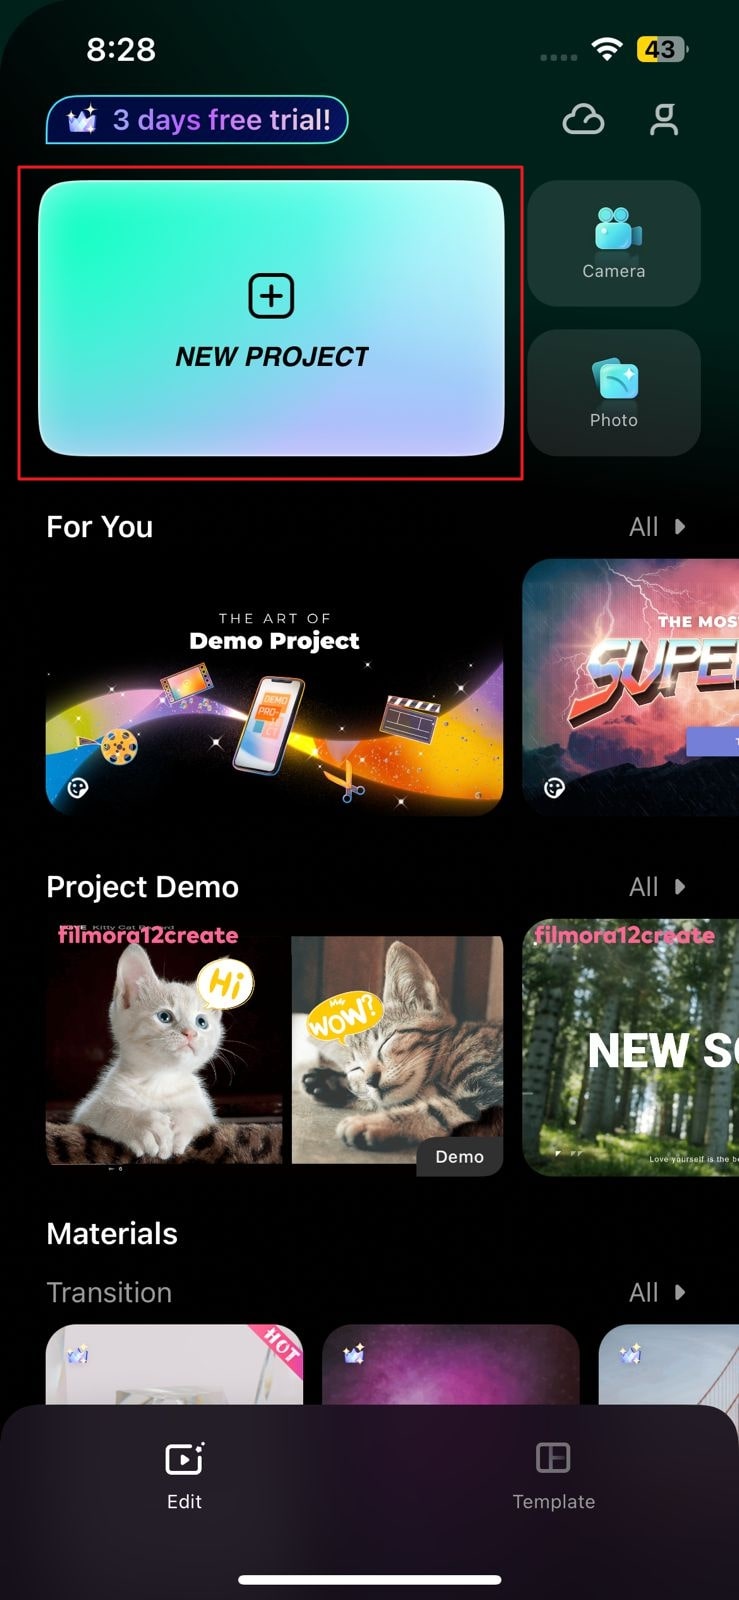
Step 2: Import the Video
Go to the “New Project” tab present at the top and then select the “Video” button. All the videos on your device will appear; just choose the one you want to edit for TikTok. Following this, press the “Import” button.
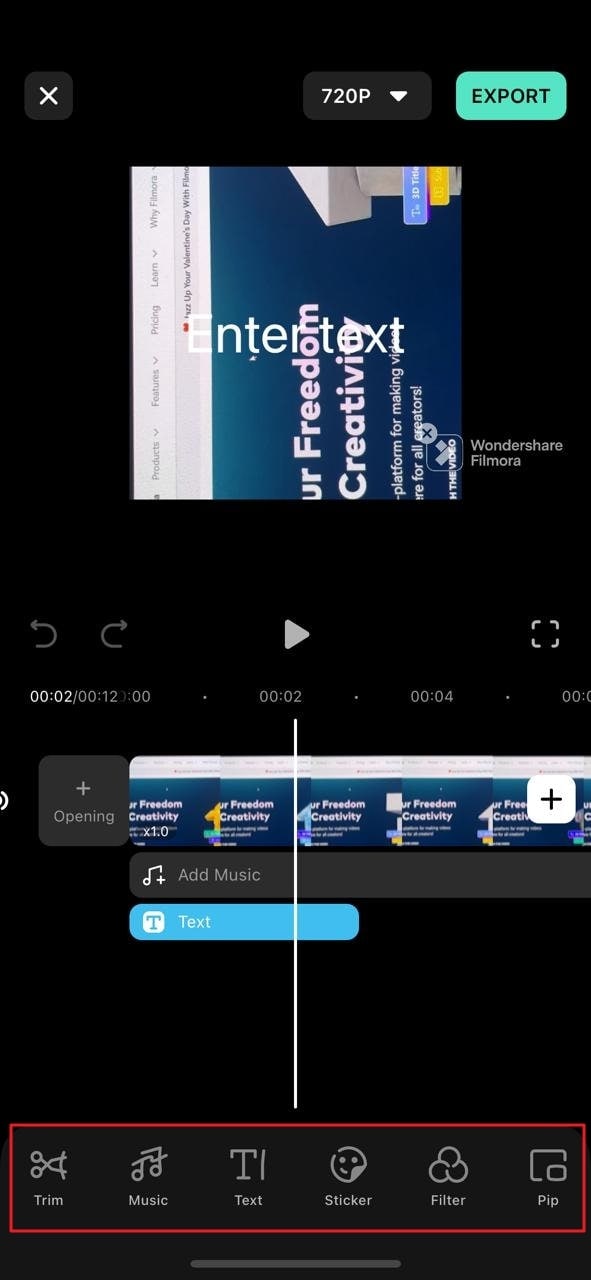
Step 3: Edit the TikTok Video
After importing process completes, multiple options for editing will appear. You can add music, text, or stickers to the video. Different filters and effects can also be used to make the video more trending.
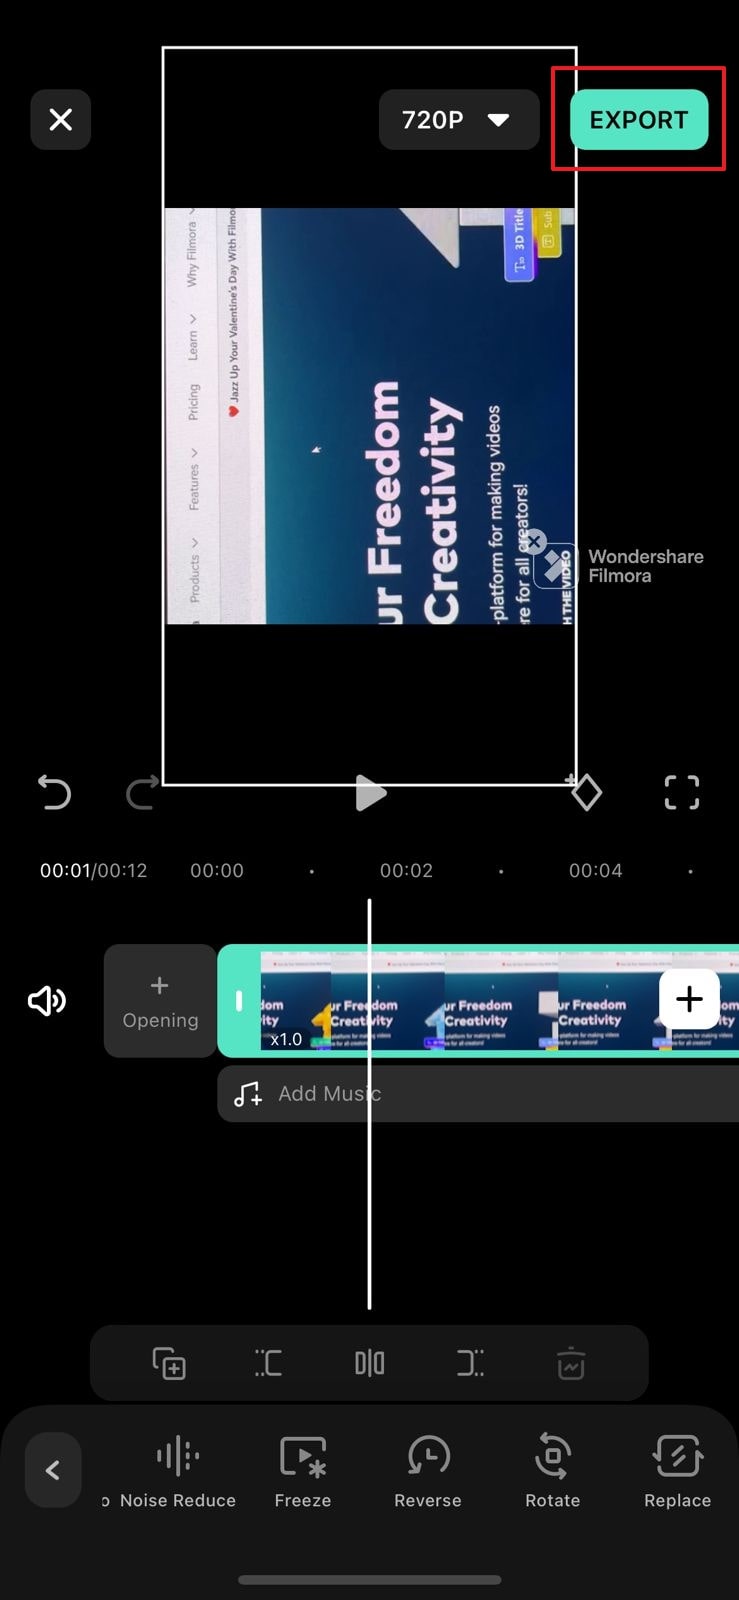
Step 4: Use More Editing Options
Now, select the video clip from the timeline to find more editing options like crop, precut, mask, adjust, and many more. The tool also provides fade-in and fade-out options to give an artistic touch to the video. Once all the changes have been made, select the video resolution and export the TikTok video.
Conclusion
This article has answered all the queries related to “can you edit a posted TikTok.” To cut a long story short, Filmora is the best video editing tool that can be used for making amazing videos for TikTok. Anyone can create breathtaking video clips from this innovative video editing mobile app in no time. So, folks, increase your TikTok following by editing videos through Filmora.

Amazing Features of Filmora
If you are confused about why you should use Filmora to edit a TikTok after posting, read these fantastic features of Filmora that are discussed below:
1. Speed Ramping
TikTok videos can be made more cinematic by adjusting their speed. Filmora presents speed ramping options such as Bullet, Montage, or Jump Cut to professionally adjust the speed of the video. You can also create your speed ramping effect and save it for later use. Don’t worry about the audio pitch during speed ramping because Filmora automatically adjusts the pitch of video sound.
2. Title Editing
You can add up to the mark titles to your TikTok videos to convey your main theme. These titles can be added in the form of text or animations, each having different colors and styles. Its title feature is loaded with varying styles of text that can be used to catch viewers’ attention.
3. Stickers and Effects
Multiple effects options are available on the Filmora video editor to give the video an exclusive look. These effects help you to enhance your video beauty and make you more confident on TikTok. You can also use the stickers option to beautify your TikTok video. Those people who make TikTok can engage children by adding GIFs or emojis in videos with this app.
4. Music Library
Filmora also allows its users to add music to the video. You can use its royal-free music library or add your voice. The volume of the soundtrack can easily be adjusted through its volume adjustment feature. You can also extract the music from a video and split the audio to eliminate the unnecessary part. Moreover, its beat detection feature is highly advanced and adjusts the beat according to the video.
Steps to Use Filmora Mobile App to Edit TikTok Videos
Are you interested in making further edits to your TikTok video? Simply follow the underneath steps to avail the editing features of this app to edit a TikTok after posting:
Step 1: Download Wondershare Filmora
Download Wondershare Filmora and launch it on your smartphone. While doing so, make sure you have a strong internet connection.

Step 2: Import the Video
Go to the “New Project” tab present at the top and then select the “Video” button. All the videos on your device will appear; just choose the one you want to edit for TikTok. Following this, press the “Import” button.

Step 3: Edit the TikTok Video
After importing process completes, multiple options for editing will appear. You can add music, text, or stickers to the video. Different filters and effects can also be used to make the video more trending.

Step 4: Use More Editing Options
Now, select the video clip from the timeline to find more editing options like crop, precut, mask, adjust, and many more. The tool also provides fade-in and fade-out options to give an artistic touch to the video. Once all the changes have been made, select the video resolution and export the TikTok video.

Conclusion
This article has answered all the queries related to “can you edit a posted TikTok.” To cut a long story short, Filmora is the best video editing tool that can be used for making amazing videos for TikTok. Anyone can create breathtaking video clips from this innovative video editing mobile app in no time. So, folks, increase your TikTok following by editing videos through Filmora.
15 Best Free Cinematic LUTs for Your Film
Create High-Quality Video - Wondershare Filmora
An easy and powerful YouTube video editor
Numerous video and audio effects to choose from
Detailed tutorials are provided by the official channel
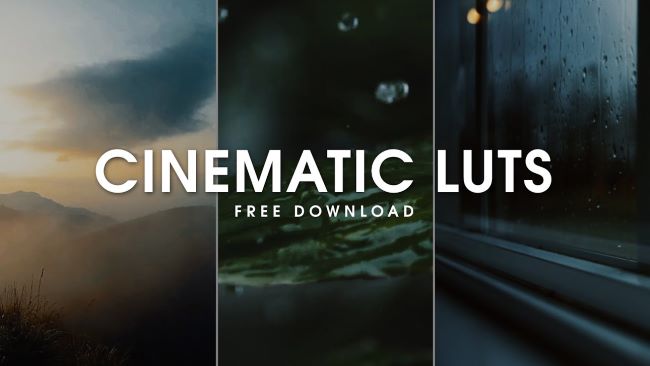
A significant way of creating cinematic looks for your project is by using LUTs. And with a single click, you will transform your footage into an absolute masterpiece. By using free LUTs, not only will you save on cost but also on the hassle and bustle of having to color grade your film.
LUTs function to create a uniform color throughout a film while enhancing or preserving skin tones. You don’t have to use all the LUTs in this world to create splendid films. Besides, most professional video editors and colorists prefer to work with a handful of LUTs and create stunning films. By going through this article, you will come to learn about 15 free cinematic LUTs for your film.
In this article
01 How Cinematic LUTs Affect Your Film
02 15 Free Cinematic LUTs for Your Film
03 Edit Your Film with Filmora and its Cinematic LUTs
How Cinematic LUTs Affect Your Film
When it comes to marketing, videos often tend to play a huge role. And to market your brand effectively, you need to have top-notch videos. It doesn’t mean that you should go and study to become a colorist or a video editor. Besides, there are professional colorists and video editors who gave in their time and effort to design powerful LUTs and offer them for free.
You can use those free LUTs to create mesmerizing videos and photos for your projects. And depending on the nature of your project, you will find here a free LUT that will work best for you.
There are two types of LUTs;
- 1. Conversion LUTs
Conversion LUTs function by correcting the Log color space back to the standard color space. Professional colorists often use this LUT to obtain a high dynamic range by maintaining more details in the highlights and shadows. - 2. Creative LUTs
Creative LUTs are essentially used in bringing out the creative colors of footage. Color styles in creative LUT are of a wide range, such as moody, cinematic, vintage, and summer, among others.
Creative LUTs is the one that is often used in many cases.

Filmora 3D LUT
Empower your videos with a new mood using different LUTs
Filmora now offers 800+ top-quality LUTs cover a broad range of scenarios. Transform your videos with Filmora’s powerful 3D LUTs.
Apply LUT on Videos Apply LUT on Videos Learn More >
15 Free Cinematic LUTs for Your Film
A good LUT is one that can be applied to several setups and different lighting situations. Besides, it doesn’t mean that a single LUT should be applied to every project; instead, it should be able to produce several perfect matches to your project.
Here are some of the top-tier free cinematic LUTs that you can apply to your film.
1. 40 Free Instagram LUTs
Create amazing Instagram footage using these 40 free LUTs. Besides, you can use these free LUTs in a couple of applications, including Adobe Premiere Pro, Wondershare Filmora, Photoshop, and Da Vinci Resolve.
After applying these LUTs, you can carry out bits of basic corrections such as brightness and contrast to your footage.
2. 3 Eyes and Teeth Whitening LUTs
Eye and teeth whitening LUTs are often used in movies and quality photos. Whiten the color of your teeth and eyes using these three free LUTs.
These LUTs are very simple to use, and when you effectively incorporate them, you are assured of creating magnificent photos.

3. 70 Free Hollywood Film LUTs
Do you have a project file and want it to appear like the ones in Hollywood films? You need not to worry since here are 70 eye-catching LUTs that you can add to your project and get that ‘Hollywood” look you’ve always wanted.
4. Free Summer LUTs
Summer clips perfectly match the orange, teal look. Here, you will get summer LUTs that will work perfectly with your project.
You can use these LUTs in Adobe Premiere, Wondershare Filmora, Da Vinci Resolve, and Lightroom.
5. Free Moody Green LUTs
Footages taken in the jungle work ideally with the moody green LUTs. Here are some of the amazing LUTs you can incorporate into your project.
6. Moody Blue LUTs
When it comes to appreciating nature, moody blue LUTs tend to be the perfect resort. Create cinematic scenes for your videos using these LUTs for free.
The LUTs here are protected with a password, what you do is to watch that video to completion, and you will come across the password.
7. 3 Free Urban Dark Cinematic LUTs
Often in many movies, you will come across urban scenes that are moody, dark, and portrayed as something out-of-this-world. You can also create such scenes with these three free urban dark cinematic LUTs.
You can use these three free cinema LUTs to your Wondershare Filmora or Adobe Premiere.
8. 10 Free Winter LUTs
Footages shot in winter outdoors don’t just work with any LUTs. Besides, there are LUTs designed explicitly for winter footage, and here are the ten best winters LUTs.
Download the LUTs and apply one that you find the perfect match for your project.
9. 20 Free Travel LUTs
When traveling, you may capture several photos and videos that are not very appealing – This may hinder you from sharing them with your friends or family. Besides, you don’t have to discard those footage since you can give them a new mind-blowing look using these 20 free travel LUTs.
To access all the 20 LUTs, you only need to subscribe to their YouTube channel, and you are good to go.
10. Free Korean Tone LUT
Korean movies are enticing because of their unique, bewildering LUT mood. You can also employ this LUT to your footage and leave your followers jaw-dropping.
Here, this free LUT pack is protected, and the only catch is to watch the YouTube video and get the password.
11. 5 Free Wedding LUTs
Wedding footages often require that romantic mood. Get the best five free wedding LUTs here.
The LUT file pack here is protected by a password. So to access the password, watch the YouTube video to completion and access it. Often, it is displayed in the top-right corner of the clip.
12. Free Sunset LUTs
Sunsets footages go simultaneously with the golden light or dark violet colors. Here, you will access the free sunset LUTs that you can incorporate into your project.
After downloading the file, you will realize it is protected. What you do is only watch this YouTube video and access the password.
13. Vintage LUTs
One of the commonly used LUTs in movies is the vintage LUTs. Access over 28 free vintage LUTs here and give your footage that brilliant vintage appearance.
14. Free Warm LUT
Warm LUTs do create a sensational atmosphere in the footage. Incorporate this LUT into your footage and get jaw-dropping results.
After downloading this free LUT pack, input the password displayed in the top-right corner of this YouTube video.
15. Free Music LUTs
In music, fans are always allured by the quality of the video. Besides, you may also gain or lose fans through your video quality. Improve the quality of your music video using this free LUT pack.
To download it for free, input 0$ under the payout bar and click “Buy Now.” Complete the other forms and download your music LUT for free.

Edit Your Film with Filmora and its Cinematic LUTs
Wondershare Filmora is an award-winning video editing software that allows its users to create stunning videos through its wide array of powerful video editing tools. The platform is well aware of all your video editing needs and provides easy-to-use functionalities that include LUTs.
For Win 7 or later (64-bit)
For macOS 10.14 or later
Use LUTs in Wondershare Filmora to express your intended video ideas.
Here are the simple steps on how to edit your film with Filmora:
Step 1. Download Wondershare Filmora
First, download Wondershare Fimora to your computer and allow it to run.
Step 2. Add your Footage to the Timeline
Load your video to Filmora. Drag and drop them to your timeline.
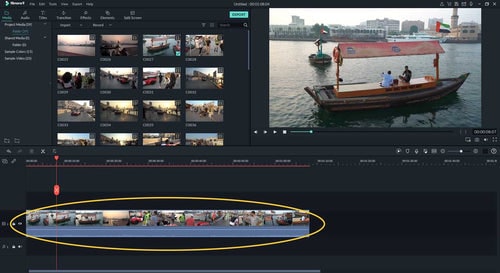
Step 3. Access your LUT Library
To access your LUT library, open “Color Correction.” Then click on “3D LUT.”
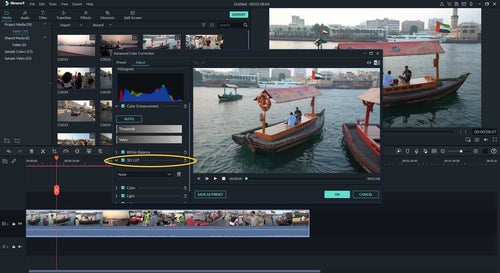
Step 4. Add your preferred LUT to your Project video
After clicking on “3D LUT,” a drop-down list showing all the available LUTs will be displayed. Scroll and select your preferred LUT.
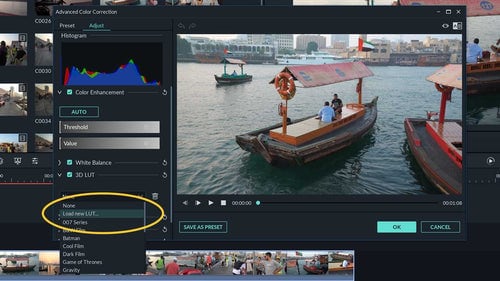
When you want to apply your LUTs in Filmora, click on “Load new LUT,” which is still under “3D LUTs.” You will be directed to your computer storage space to select the folder containing your LUTs.
After selecting your preferred LUT folder, hit the “OK” button to apply.
Conclusion
● Worry no more when you have a small budget and a tight deadline for your project. Depending on your project’s type, nature, and requirements, create bewildering footage using the above 15 LUTs. After applying your favorite LUT, carry out small basic adjustments such as the white balance, brightness, and contrast to your footage when necessary. By doing so, you are going to leave your clients and viewers ground rooted.
● A few of these free LUTs have a catch: watching the YouTube video and getting a password for unlocking their free LUT pack. The password is often displayed on the top-right corners of the YouTube videos.
A significant way of creating cinematic looks for your project is by using LUTs. And with a single click, you will transform your footage into an absolute masterpiece. By using free LUTs, not only will you save on cost but also on the hassle and bustle of having to color grade your film.
LUTs function to create a uniform color throughout a film while enhancing or preserving skin tones. You don’t have to use all the LUTs in this world to create splendid films. Besides, most professional video editors and colorists prefer to work with a handful of LUTs and create stunning films. By going through this article, you will come to learn about 15 free cinematic LUTs for your film.

In this article
01 How Cinematic LUTs Affect Your Film
02 15 Free Cinematic LUTs for Your Film
03 Edit Your Film with Filmora and its Cinematic LUTs
How Cinematic LUTs Affect Your Film
When it comes to marketing, videos often tend to play a huge role. And to market your brand effectively, you need to have top-notch videos. It doesn’t mean that you should go and study to become a colorist or a video editor. Besides, there are professional colorists and video editors who gave in their time and effort to design powerful LUTs and offer them for free.
You can use those free LUTs to create mesmerizing videos and photos for your projects. And depending on the nature of your project, you will find here a free LUT that will work best for you.
There are two types of LUTs;
- 1. Conversion LUTs
Conversion LUTs function by correcting the Log color space back to the standard color space. Professional colorists often use this LUT to obtain a high dynamic range by maintaining more details in the highlights and shadows. - 2. Creative LUTs
Creative LUTs are essentially used in bringing out the creative colors of footage. Color styles in creative LUT are of a wide range, such as moody, cinematic, vintage, and summer, among others.
Creative LUTs is the one that is often used in many cases.

Filmora 3D LUT
Empower your videos with a new mood using different LUTs
Filmora now offers 800+ top-quality LUTs cover a broad range of scenarios. Transform your videos with Filmora’s powerful 3D LUTs.
Apply LUT on Videos Apply LUT on Videos Learn More >
15 Free Cinematic LUTs for Your Film
A good LUT is one that can be applied to several setups and different lighting situations. Besides, it doesn’t mean that a single LUT should be applied to every project; instead, it should be able to produce several perfect matches to your project.
Here are some of the top-tier free cinematic LUTs that you can apply to your film.
1. 40 Free Instagram LUTs
Create amazing Instagram footage using these 40 free LUTs. Besides, you can use these free LUTs in a couple of applications, including Adobe Premiere Pro, Wondershare Filmora, Photoshop, and Da Vinci Resolve.
After applying these LUTs, you can carry out bits of basic corrections such as brightness and contrast to your footage.
2. 3 Eyes and Teeth Whitening LUTs
Eye and teeth whitening LUTs are often used in movies and quality photos. Whiten the color of your teeth and eyes using these three free LUTs.
These LUTs are very simple to use, and when you effectively incorporate them, you are assured of creating magnificent photos.

3. 70 Free Hollywood Film LUTs
Do you have a project file and want it to appear like the ones in Hollywood films? You need not to worry since here are 70 eye-catching LUTs that you can add to your project and get that ‘Hollywood” look you’ve always wanted.
4. Free Summer LUTs
Summer clips perfectly match the orange, teal look. Here, you will get summer LUTs that will work perfectly with your project.
You can use these LUTs in Adobe Premiere, Wondershare Filmora, Da Vinci Resolve, and Lightroom.
5. Free Moody Green LUTs
Footages taken in the jungle work ideally with the moody green LUTs. Here are some of the amazing LUTs you can incorporate into your project.
6. Moody Blue LUTs
When it comes to appreciating nature, moody blue LUTs tend to be the perfect resort. Create cinematic scenes for your videos using these LUTs for free.
The LUTs here are protected with a password, what you do is to watch that video to completion, and you will come across the password.
7. 3 Free Urban Dark Cinematic LUTs
Often in many movies, you will come across urban scenes that are moody, dark, and portrayed as something out-of-this-world. You can also create such scenes with these three free urban dark cinematic LUTs.
You can use these three free cinema LUTs to your Wondershare Filmora or Adobe Premiere.
8. 10 Free Winter LUTs
Footages shot in winter outdoors don’t just work with any LUTs. Besides, there are LUTs designed explicitly for winter footage, and here are the ten best winters LUTs.
Download the LUTs and apply one that you find the perfect match for your project.
9. 20 Free Travel LUTs
When traveling, you may capture several photos and videos that are not very appealing – This may hinder you from sharing them with your friends or family. Besides, you don’t have to discard those footage since you can give them a new mind-blowing look using these 20 free travel LUTs.
To access all the 20 LUTs, you only need to subscribe to their YouTube channel, and you are good to go.
10. Free Korean Tone LUT
Korean movies are enticing because of their unique, bewildering LUT mood. You can also employ this LUT to your footage and leave your followers jaw-dropping.
Here, this free LUT pack is protected, and the only catch is to watch the YouTube video and get the password.
11. 5 Free Wedding LUTs
Wedding footages often require that romantic mood. Get the best five free wedding LUTs here.
The LUT file pack here is protected by a password. So to access the password, watch the YouTube video to completion and access it. Often, it is displayed in the top-right corner of the clip.
12. Free Sunset LUTs
Sunsets footages go simultaneously with the golden light or dark violet colors. Here, you will access the free sunset LUTs that you can incorporate into your project.
After downloading the file, you will realize it is protected. What you do is only watch this YouTube video and access the password.
13. Vintage LUTs
One of the commonly used LUTs in movies is the vintage LUTs. Access over 28 free vintage LUTs here and give your footage that brilliant vintage appearance.
14. Free Warm LUT
Warm LUTs do create a sensational atmosphere in the footage. Incorporate this LUT into your footage and get jaw-dropping results.
After downloading this free LUT pack, input the password displayed in the top-right corner of this YouTube video.
15. Free Music LUTs
In music, fans are always allured by the quality of the video. Besides, you may also gain or lose fans through your video quality. Improve the quality of your music video using this free LUT pack.
To download it for free, input 0$ under the payout bar and click “Buy Now.” Complete the other forms and download your music LUT for free.

Edit Your Film with Filmora and its Cinematic LUTs
Wondershare Filmora is an award-winning video editing software that allows its users to create stunning videos through its wide array of powerful video editing tools. The platform is well aware of all your video editing needs and provides easy-to-use functionalities that include LUTs.
For Win 7 or later (64-bit)
For macOS 10.14 or later
Use LUTs in Wondershare Filmora to express your intended video ideas.
Here are the simple steps on how to edit your film with Filmora:
Step 1. Download Wondershare Filmora
First, download Wondershare Fimora to your computer and allow it to run.
Step 2. Add your Footage to the Timeline
Load your video to Filmora. Drag and drop them to your timeline.

Step 3. Access your LUT Library
To access your LUT library, open “Color Correction.” Then click on “3D LUT.”

Step 4. Add your preferred LUT to your Project video
After clicking on “3D LUT,” a drop-down list showing all the available LUTs will be displayed. Scroll and select your preferred LUT.

When you want to apply your LUTs in Filmora, click on “Load new LUT,” which is still under “3D LUTs.” You will be directed to your computer storage space to select the folder containing your LUTs.
After selecting your preferred LUT folder, hit the “OK” button to apply.
Conclusion
● Worry no more when you have a small budget and a tight deadline for your project. Depending on your project’s type, nature, and requirements, create bewildering footage using the above 15 LUTs. After applying your favorite LUT, carry out small basic adjustments such as the white balance, brightness, and contrast to your footage when necessary. By doing so, you are going to leave your clients and viewers ground rooted.
● A few of these free LUTs have a catch: watching the YouTube video and getting a password for unlocking their free LUT pack. The password is often displayed on the top-right corners of the YouTube videos.
A significant way of creating cinematic looks for your project is by using LUTs. And with a single click, you will transform your footage into an absolute masterpiece. By using free LUTs, not only will you save on cost but also on the hassle and bustle of having to color grade your film.
LUTs function to create a uniform color throughout a film while enhancing or preserving skin tones. You don’t have to use all the LUTs in this world to create splendid films. Besides, most professional video editors and colorists prefer to work with a handful of LUTs and create stunning films. By going through this article, you will come to learn about 15 free cinematic LUTs for your film.

In this article
01 How Cinematic LUTs Affect Your Film
02 15 Free Cinematic LUTs for Your Film
03 Edit Your Film with Filmora and its Cinematic LUTs
How Cinematic LUTs Affect Your Film
When it comes to marketing, videos often tend to play a huge role. And to market your brand effectively, you need to have top-notch videos. It doesn’t mean that you should go and study to become a colorist or a video editor. Besides, there are professional colorists and video editors who gave in their time and effort to design powerful LUTs and offer them for free.
You can use those free LUTs to create mesmerizing videos and photos for your projects. And depending on the nature of your project, you will find here a free LUT that will work best for you.
There are two types of LUTs;
- 1. Conversion LUTs
Conversion LUTs function by correcting the Log color space back to the standard color space. Professional colorists often use this LUT to obtain a high dynamic range by maintaining more details in the highlights and shadows. - 2. Creative LUTs
Creative LUTs are essentially used in bringing out the creative colors of footage. Color styles in creative LUT are of a wide range, such as moody, cinematic, vintage, and summer, among others.
Creative LUTs is the one that is often used in many cases.

Filmora 3D LUT
Empower your videos with a new mood using different LUTs
Filmora now offers 800+ top-quality LUTs cover a broad range of scenarios. Transform your videos with Filmora’s powerful 3D LUTs.
Apply LUT on Videos Apply LUT on Videos Learn More >
15 Free Cinematic LUTs for Your Film
A good LUT is one that can be applied to several setups and different lighting situations. Besides, it doesn’t mean that a single LUT should be applied to every project; instead, it should be able to produce several perfect matches to your project.
Here are some of the top-tier free cinematic LUTs that you can apply to your film.
1. 40 Free Instagram LUTs
Create amazing Instagram footage using these 40 free LUTs. Besides, you can use these free LUTs in a couple of applications, including Adobe Premiere Pro, Wondershare Filmora, Photoshop, and Da Vinci Resolve.
After applying these LUTs, you can carry out bits of basic corrections such as brightness and contrast to your footage.
2. 3 Eyes and Teeth Whitening LUTs
Eye and teeth whitening LUTs are often used in movies and quality photos. Whiten the color of your teeth and eyes using these three free LUTs.
These LUTs are very simple to use, and when you effectively incorporate them, you are assured of creating magnificent photos.

3. 70 Free Hollywood Film LUTs
Do you have a project file and want it to appear like the ones in Hollywood films? You need not to worry since here are 70 eye-catching LUTs that you can add to your project and get that ‘Hollywood” look you’ve always wanted.
4. Free Summer LUTs
Summer clips perfectly match the orange, teal look. Here, you will get summer LUTs that will work perfectly with your project.
You can use these LUTs in Adobe Premiere, Wondershare Filmora, Da Vinci Resolve, and Lightroom.
5. Free Moody Green LUTs
Footages taken in the jungle work ideally with the moody green LUTs. Here are some of the amazing LUTs you can incorporate into your project.
6. Moody Blue LUTs
When it comes to appreciating nature, moody blue LUTs tend to be the perfect resort. Create cinematic scenes for your videos using these LUTs for free.
The LUTs here are protected with a password, what you do is to watch that video to completion, and you will come across the password.
7. 3 Free Urban Dark Cinematic LUTs
Often in many movies, you will come across urban scenes that are moody, dark, and portrayed as something out-of-this-world. You can also create such scenes with these three free urban dark cinematic LUTs.
You can use these three free cinema LUTs to your Wondershare Filmora or Adobe Premiere.
8. 10 Free Winter LUTs
Footages shot in winter outdoors don’t just work with any LUTs. Besides, there are LUTs designed explicitly for winter footage, and here are the ten best winters LUTs.
Download the LUTs and apply one that you find the perfect match for your project.
9. 20 Free Travel LUTs
When traveling, you may capture several photos and videos that are not very appealing – This may hinder you from sharing them with your friends or family. Besides, you don’t have to discard those footage since you can give them a new mind-blowing look using these 20 free travel LUTs.
To access all the 20 LUTs, you only need to subscribe to their YouTube channel, and you are good to go.
10. Free Korean Tone LUT
Korean movies are enticing because of their unique, bewildering LUT mood. You can also employ this LUT to your footage and leave your followers jaw-dropping.
Here, this free LUT pack is protected, and the only catch is to watch the YouTube video and get the password.
11. 5 Free Wedding LUTs
Wedding footages often require that romantic mood. Get the best five free wedding LUTs here.
The LUT file pack here is protected by a password. So to access the password, watch the YouTube video to completion and access it. Often, it is displayed in the top-right corner of the clip.
12. Free Sunset LUTs
Sunsets footages go simultaneously with the golden light or dark violet colors. Here, you will access the free sunset LUTs that you can incorporate into your project.
After downloading the file, you will realize it is protected. What you do is only watch this YouTube video and access the password.
13. Vintage LUTs
One of the commonly used LUTs in movies is the vintage LUTs. Access over 28 free vintage LUTs here and give your footage that brilliant vintage appearance.
14. Free Warm LUT
Warm LUTs do create a sensational atmosphere in the footage. Incorporate this LUT into your footage and get jaw-dropping results.
After downloading this free LUT pack, input the password displayed in the top-right corner of this YouTube video.
15. Free Music LUTs
In music, fans are always allured by the quality of the video. Besides, you may also gain or lose fans through your video quality. Improve the quality of your music video using this free LUT pack.
To download it for free, input 0$ under the payout bar and click “Buy Now.” Complete the other forms and download your music LUT for free.

Edit Your Film with Filmora and its Cinematic LUTs
Wondershare Filmora is an award-winning video editing software that allows its users to create stunning videos through its wide array of powerful video editing tools. The platform is well aware of all your video editing needs and provides easy-to-use functionalities that include LUTs.
For Win 7 or later (64-bit)
For macOS 10.14 or later
Use LUTs in Wondershare Filmora to express your intended video ideas.
Here are the simple steps on how to edit your film with Filmora:
Step 1. Download Wondershare Filmora
First, download Wondershare Fimora to your computer and allow it to run.
Step 2. Add your Footage to the Timeline
Load your video to Filmora. Drag and drop them to your timeline.

Step 3. Access your LUT Library
To access your LUT library, open “Color Correction.” Then click on “3D LUT.”

Step 4. Add your preferred LUT to your Project video
After clicking on “3D LUT,” a drop-down list showing all the available LUTs will be displayed. Scroll and select your preferred LUT.

When you want to apply your LUTs in Filmora, click on “Load new LUT,” which is still under “3D LUTs.” You will be directed to your computer storage space to select the folder containing your LUTs.
After selecting your preferred LUT folder, hit the “OK” button to apply.
Conclusion
● Worry no more when you have a small budget and a tight deadline for your project. Depending on your project’s type, nature, and requirements, create bewildering footage using the above 15 LUTs. After applying your favorite LUT, carry out small basic adjustments such as the white balance, brightness, and contrast to your footage when necessary. By doing so, you are going to leave your clients and viewers ground rooted.
● A few of these free LUTs have a catch: watching the YouTube video and getting a password for unlocking their free LUT pack. The password is often displayed on the top-right corners of the YouTube videos.
A significant way of creating cinematic looks for your project is by using LUTs. And with a single click, you will transform your footage into an absolute masterpiece. By using free LUTs, not only will you save on cost but also on the hassle and bustle of having to color grade your film.
LUTs function to create a uniform color throughout a film while enhancing or preserving skin tones. You don’t have to use all the LUTs in this world to create splendid films. Besides, most professional video editors and colorists prefer to work with a handful of LUTs and create stunning films. By going through this article, you will come to learn about 15 free cinematic LUTs for your film.

In this article
01 How Cinematic LUTs Affect Your Film
02 15 Free Cinematic LUTs for Your Film
03 Edit Your Film with Filmora and its Cinematic LUTs
How Cinematic LUTs Affect Your Film
When it comes to marketing, videos often tend to play a huge role. And to market your brand effectively, you need to have top-notch videos. It doesn’t mean that you should go and study to become a colorist or a video editor. Besides, there are professional colorists and video editors who gave in their time and effort to design powerful LUTs and offer them for free.
You can use those free LUTs to create mesmerizing videos and photos for your projects. And depending on the nature of your project, you will find here a free LUT that will work best for you.
There are two types of LUTs;
- 1. Conversion LUTs
Conversion LUTs function by correcting the Log color space back to the standard color space. Professional colorists often use this LUT to obtain a high dynamic range by maintaining more details in the highlights and shadows. - 2. Creative LUTs
Creative LUTs are essentially used in bringing out the creative colors of footage. Color styles in creative LUT are of a wide range, such as moody, cinematic, vintage, and summer, among others.
Creative LUTs is the one that is often used in many cases.

Filmora 3D LUT
Empower your videos with a new mood using different LUTs
Filmora now offers 800+ top-quality LUTs cover a broad range of scenarios. Transform your videos with Filmora’s powerful 3D LUTs.
Apply LUT on Videos Apply LUT on Videos Learn More >
15 Free Cinematic LUTs for Your Film
A good LUT is one that can be applied to several setups and different lighting situations. Besides, it doesn’t mean that a single LUT should be applied to every project; instead, it should be able to produce several perfect matches to your project.
Here are some of the top-tier free cinematic LUTs that you can apply to your film.
1. 40 Free Instagram LUTs
Create amazing Instagram footage using these 40 free LUTs. Besides, you can use these free LUTs in a couple of applications, including Adobe Premiere Pro, Wondershare Filmora, Photoshop, and Da Vinci Resolve.
After applying these LUTs, you can carry out bits of basic corrections such as brightness and contrast to your footage.
2. 3 Eyes and Teeth Whitening LUTs
Eye and teeth whitening LUTs are often used in movies and quality photos. Whiten the color of your teeth and eyes using these three free LUTs.
These LUTs are very simple to use, and when you effectively incorporate them, you are assured of creating magnificent photos.

3. 70 Free Hollywood Film LUTs
Do you have a project file and want it to appear like the ones in Hollywood films? You need not to worry since here are 70 eye-catching LUTs that you can add to your project and get that ‘Hollywood” look you’ve always wanted.
4. Free Summer LUTs
Summer clips perfectly match the orange, teal look. Here, you will get summer LUTs that will work perfectly with your project.
You can use these LUTs in Adobe Premiere, Wondershare Filmora, Da Vinci Resolve, and Lightroom.
5. Free Moody Green LUTs
Footages taken in the jungle work ideally with the moody green LUTs. Here are some of the amazing LUTs you can incorporate into your project.
6. Moody Blue LUTs
When it comes to appreciating nature, moody blue LUTs tend to be the perfect resort. Create cinematic scenes for your videos using these LUTs for free.
The LUTs here are protected with a password, what you do is to watch that video to completion, and you will come across the password.
7. 3 Free Urban Dark Cinematic LUTs
Often in many movies, you will come across urban scenes that are moody, dark, and portrayed as something out-of-this-world. You can also create such scenes with these three free urban dark cinematic LUTs.
You can use these three free cinema LUTs to your Wondershare Filmora or Adobe Premiere.
8. 10 Free Winter LUTs
Footages shot in winter outdoors don’t just work with any LUTs. Besides, there are LUTs designed explicitly for winter footage, and here are the ten best winters LUTs.
Download the LUTs and apply one that you find the perfect match for your project.
9. 20 Free Travel LUTs
When traveling, you may capture several photos and videos that are not very appealing – This may hinder you from sharing them with your friends or family. Besides, you don’t have to discard those footage since you can give them a new mind-blowing look using these 20 free travel LUTs.
To access all the 20 LUTs, you only need to subscribe to their YouTube channel, and you are good to go.
10. Free Korean Tone LUT
Korean movies are enticing because of their unique, bewildering LUT mood. You can also employ this LUT to your footage and leave your followers jaw-dropping.
Here, this free LUT pack is protected, and the only catch is to watch the YouTube video and get the password.
11. 5 Free Wedding LUTs
Wedding footages often require that romantic mood. Get the best five free wedding LUTs here.
The LUT file pack here is protected by a password. So to access the password, watch the YouTube video to completion and access it. Often, it is displayed in the top-right corner of the clip.
12. Free Sunset LUTs
Sunsets footages go simultaneously with the golden light or dark violet colors. Here, you will access the free sunset LUTs that you can incorporate into your project.
After downloading the file, you will realize it is protected. What you do is only watch this YouTube video and access the password.
13. Vintage LUTs
One of the commonly used LUTs in movies is the vintage LUTs. Access over 28 free vintage LUTs here and give your footage that brilliant vintage appearance.
14. Free Warm LUT
Warm LUTs do create a sensational atmosphere in the footage. Incorporate this LUT into your footage and get jaw-dropping results.
After downloading this free LUT pack, input the password displayed in the top-right corner of this YouTube video.
15. Free Music LUTs
In music, fans are always allured by the quality of the video. Besides, you may also gain or lose fans through your video quality. Improve the quality of your music video using this free LUT pack.
To download it for free, input 0$ under the payout bar and click “Buy Now.” Complete the other forms and download your music LUT for free.

Edit Your Film with Filmora and its Cinematic LUTs
Wondershare Filmora is an award-winning video editing software that allows its users to create stunning videos through its wide array of powerful video editing tools. The platform is well aware of all your video editing needs and provides easy-to-use functionalities that include LUTs.
For Win 7 or later (64-bit)
For macOS 10.14 or later
Use LUTs in Wondershare Filmora to express your intended video ideas.
Here are the simple steps on how to edit your film with Filmora:
Step 1. Download Wondershare Filmora
First, download Wondershare Fimora to your computer and allow it to run.
Step 2. Add your Footage to the Timeline
Load your video to Filmora. Drag and drop them to your timeline.

Step 3. Access your LUT Library
To access your LUT library, open “Color Correction.” Then click on “3D LUT.”

Step 4. Add your preferred LUT to your Project video
After clicking on “3D LUT,” a drop-down list showing all the available LUTs will be displayed. Scroll and select your preferred LUT.

When you want to apply your LUTs in Filmora, click on “Load new LUT,” which is still under “3D LUTs.” You will be directed to your computer storage space to select the folder containing your LUTs.
After selecting your preferred LUT folder, hit the “OK” button to apply.
Conclusion
● Worry no more when you have a small budget and a tight deadline for your project. Depending on your project’s type, nature, and requirements, create bewildering footage using the above 15 LUTs. After applying your favorite LUT, carry out small basic adjustments such as the white balance, brightness, and contrast to your footage when necessary. By doing so, you are going to leave your clients and viewers ground rooted.
● A few of these free LUTs have a catch: watching the YouTube video and getting a password for unlocking their free LUT pack. The password is often displayed on the top-right corners of the YouTube videos.
Making Slow Motion Videos in Final Cut Pro: The Best Methods
The slow-motion effect has been used for years to add dramatic effects to movies. An important scene is always highlighted and looks better with a slow-motion effect. Applying slow motion is beneficial, too, as it can give you a better preview of the scene. The effect is easily accessible in many video editing applications.
How would you find an app that gives good final cut slow-motion results? This article has got you all covered on that. Here, you will find the Final Cut Pro slow-motion effect that works fantastic without ruining your video’s quality. So, follow the article to learn more about using FCP slow motion.
Slow Motion Video Maker Slow your video’s speed with better control of your keyframes to create unique cinematic effects!
Make A Slow Motion Video Make A Slow Motion Video More Features

Part 1: What Makes a Perfect Slow-Motion Video?
An ideal FCP slow-motion video requires careful attention to technical details and aesthetics. Below are some essential things to think about bringing perfection in slow-motion videos:
- Resolution: A slow-motion video with visual appeal and a high resolution is crucial. This is especially vital if you intend to crop or zoom in on the video while editing.
- Storytelling: Make sure the slow-motion clip supports the idea you’re attempting to portray. Your scenes will have more impact if you tell them with a thoughtful narrative.
- Editing: Try different speeds when editing your clip to achieve the best impact. Consider including sound effects or music to accompany the slow-motion images.
- Timing: Select the appropriate times to record in slow motion. You shouldn’t slow down your entire video. Instead, you can apply the effect to draw attention to acts or feelings.
- Frame Rate: Slow-motion videos are usually shot at a greater frame rate. Frame rates of 60, 120, 240, or even higher are common as they make the video look smoother.
- Shutter Speed: For precise and sharp results, use a fast shutter speed camera. This lessens the likelihood of motion blur in every slow-motion frame.
Part 2: Learning All Essential Techniques to Perform Slow Motion in Final Cut Pro X
Apple created Final Cut Pro , and it is only accessible to macOS users. Professional video editors can utilize the software’s array of capabilities. The tool offers incredible video editing functions. Its features are tailored to handle high-resolution video material. The tool has an AI object tracker that detects faces and objects. Its cinematic mode helps you create professional videos.
Final cut slow motion gives a dramatic and intense effect to your videos. You can create an entirely different video with the power of its editing features. Slow-mo Final Cut Pro gives high-resolution results. Follow the steps below to use this tool for slow-motion effects. However, you can choose any method that seems suitable and convenient to you:
Method 1
Import your video into the app and drag it into the timeline. Click on the video and select the “Speed Meter” icon from the timeline. If you want to access the retime menu directly, use the “Command+R” command. Now, select the “Slow” option, and from here, you can select the slow speed percentage at which you want your clip.

Method 2
Bring your video into the timeline and click on it. Select the “Speed Meter” icon; now, choose the “Custom” option. You can access customized settings directly using the “Control+Option+R” command to apply FCPX slow motion. Once you have opened the customization menu, manually set the speed rate and duration to how much you want.

Method 3
Drag the timeline cursor to where you want to make a speed change, select “Speed Meter,” and hit “Blade Speed” to create a cut and separate the clip. Make as many cuts as you want to, depending on how many speed changes you require. Now click on the clip whose speed you want changed and select “Custom” from the “Speed Meter” icon. Customize your clips’ speed rate and duration and save the video once you’re done.

Part 3: Wondershare Filmora: A Multi-Purpose Solution to Making Effective Slow-Motion Videos
Final Cut Pro can be difficult for beginners to understand. The tool has a variety of tutorials available online, but it’s still hard for many users to follow them. In this case, Wondershare Filmora is a great option for slow motion and other effects. It is an excellent alternative to final cut slow motion. Filmora offers many more wonderful features that will surely amaze you.
It can assist you in generating engaging content despite just cutting, trimming, and editing videos. With AI integration, this platform can automate your editing tasks.
Free Download For Win 7 or later(64-bit)
Free Download For macOS 10.14 or later
Step By Step Guide to Make Slow Motion Videos in Filmora
Unlike Final Cut Pro’s slow motion, Wondershare Filmora is more straightforward to operate. Follow the step-by-step guide below to apply slow-motion effects to your video.
Method 1: Uniform Speed
If you want to adjust the speed and retain its high quality, use the uniform speed option. You can access this option by following the stepwise method below. Using the advanced features, you don’t need any other tool to ensure the video’s original worth:
Step 1Import Your Project and Start a New Project
After launching Filmora, head to its “New Project” option from the home screen. You will enter the main editing screen this way. Import your project in the media panel and then drag it to the timeline.

Step 2Explore Uniform Speed and Adjust the Speed
Go to your video in the timeline and right-click on it. Now, explore the “Uniform Speed” option and tap on it to get an editing panel at the right. From that panel, move the “Speed” slider to the right and get a slow-motion video preview. You can see the “Duration” of the video after slowing it down and adjusting it accordingly.

Step 3Use Advanced Features to Ensure Quality of Videos
Move down and toggle the “Reverse Speed” option if required. You can enable the “Maintain Pitch” and “Ripple Edit” options to enhance the video automatically. Lastly, extend the “AI Frame Interpolation” menu using its downward symbol and choose “Optical Flow.” It will ensure that the video will remain slow with high quality.

Method 2: Speed Ramping
This method aims to bring smooth transitions in slow-motion videos. Instead of an abrupt change, a gradual increase in speed can impose a professional look. So, there are the steps to access this feature and get a preview of smooth playback.
Step 1Discover the Speed Ramping Feature
Access the Speed Ramping option next to the “Uniform Speed” in the right-side editing panel. Alternatively, you can right-click on the video and look for the “Speed Ramping” option from the list.

Step 2Pick a Template for Speed Ramping or Customize It
From the speed ramping section, you can choose any template from 6 options. Also, users can pick the “Customize” option to adjust the speed ramping as desired.

Step 3Use the Render Preview Option for Smooth Playback
To get a high-quality preview of your videos, look for Render Preview. In this regard, go to the top toolbar of the timeline section on the right side. Click the “Render Preview” icon next to the “Copilot Editor.” Wait for a while and get a smooth playback of your slow-motion video.

Integral Features of Filmora
Slowing down videos is easier than slow-mo Final Cut Pro. Filmora automates the process with an optical flow, ensuring the project’s high quality with one click. Without any wait, learn more about some top-rated features in the given section.
1. AI Thumbnail Creator
The AI Thumbnail Creator of Filmora makes thumbnail creation a matter of seconds. The tool is a treasure for YouTubers as it creates appealing thumbnails to attract viewers. It works with machine learning algorithms to detect the 3 best shots out of your video for thumbnail. Besides, there are over 58 thumbnail templates that can be customized after picking the right one.
2. AI Copilot Editing
AI Copilot is your personal assistant who guides you through everything related to Filmora. You can ask about any editing queries, and the AI will tell you the whole procedure within a second. It will also provide you with navigation towards the right feature. The tool is a big help for beginners; it makes using Filmora much faster and easier.
3. Motion Tracking
If you love giving an artistic touch to your videos, then motion tracking is exactly what you need. This feature automatically tracks the object throughout the video. You can add graphics, stickers, or even blur an object in the video. Furthermore, it allows you to add text with the tracked objects, like a name title with a running athlete.
4. Auto Reframe
With the help of the Auto Reframe feature, you can use one video on all social media platforms. The tool reframes your video in such a way that the main object doesn’t get removed. AI allows you to turn your landscape video into a vertical with a 19:6 aspect ratio. It saves you time and the trouble of creating different videos for every platform.
Conclusion
Slow-motion videos have become a trend due to social media, but they have been an essential film factor forever. Because of the rising demand for this effect, developers added the feature to their software. Many apps are developed to provide a slow-motion effect, which makes it tricky to choose one.
This article addresses your problem by showing you the use of final cut slow-motion. You have discovered a much simpler, faster, and effective platform, Wondershare Filmora. With proven statements in this article, it’s been easier to try Filmora and explore it fully instantly.
Make A Slow Motion Video Make A Slow Motion Video More Features

Part 1: What Makes a Perfect Slow-Motion Video?
An ideal FCP slow-motion video requires careful attention to technical details and aesthetics. Below are some essential things to think about bringing perfection in slow-motion videos:
- Resolution: A slow-motion video with visual appeal and a high resolution is crucial. This is especially vital if you intend to crop or zoom in on the video while editing.
- Storytelling: Make sure the slow-motion clip supports the idea you’re attempting to portray. Your scenes will have more impact if you tell them with a thoughtful narrative.
- Editing: Try different speeds when editing your clip to achieve the best impact. Consider including sound effects or music to accompany the slow-motion images.
- Timing: Select the appropriate times to record in slow motion. You shouldn’t slow down your entire video. Instead, you can apply the effect to draw attention to acts or feelings.
- Frame Rate: Slow-motion videos are usually shot at a greater frame rate. Frame rates of 60, 120, 240, or even higher are common as they make the video look smoother.
- Shutter Speed: For precise and sharp results, use a fast shutter speed camera. This lessens the likelihood of motion blur in every slow-motion frame.
Part 2: Learning All Essential Techniques to Perform Slow Motion in Final Cut Pro X
Apple created Final Cut Pro , and it is only accessible to macOS users. Professional video editors can utilize the software’s array of capabilities. The tool offers incredible video editing functions. Its features are tailored to handle high-resolution video material. The tool has an AI object tracker that detects faces and objects. Its cinematic mode helps you create professional videos.
Final cut slow motion gives a dramatic and intense effect to your videos. You can create an entirely different video with the power of its editing features. Slow-mo Final Cut Pro gives high-resolution results. Follow the steps below to use this tool for slow-motion effects. However, you can choose any method that seems suitable and convenient to you:
Method 1
Import your video into the app and drag it into the timeline. Click on the video and select the “Speed Meter” icon from the timeline. If you want to access the retime menu directly, use the “Command+R” command. Now, select the “Slow” option, and from here, you can select the slow speed percentage at which you want your clip.

Method 2
Bring your video into the timeline and click on it. Select the “Speed Meter” icon; now, choose the “Custom” option. You can access customized settings directly using the “Control+Option+R” command to apply FCPX slow motion. Once you have opened the customization menu, manually set the speed rate and duration to how much you want.

Method 3
Drag the timeline cursor to where you want to make a speed change, select “Speed Meter,” and hit “Blade Speed” to create a cut and separate the clip. Make as many cuts as you want to, depending on how many speed changes you require. Now click on the clip whose speed you want changed and select “Custom” from the “Speed Meter” icon. Customize your clips’ speed rate and duration and save the video once you’re done.

Part 3: Wondershare Filmora: A Multi-Purpose Solution to Making Effective Slow-Motion Videos
Final Cut Pro can be difficult for beginners to understand. The tool has a variety of tutorials available online, but it’s still hard for many users to follow them. In this case, Wondershare Filmora is a great option for slow motion and other effects. It is an excellent alternative to final cut slow motion. Filmora offers many more wonderful features that will surely amaze you.
It can assist you in generating engaging content despite just cutting, trimming, and editing videos. With AI integration, this platform can automate your editing tasks.
Free Download For Win 7 or later(64-bit)
Free Download For macOS 10.14 or later
Step By Step Guide to Make Slow Motion Videos in Filmora
Unlike Final Cut Pro’s slow motion, Wondershare Filmora is more straightforward to operate. Follow the step-by-step guide below to apply slow-motion effects to your video.
Method 1: Uniform Speed
If you want to adjust the speed and retain its high quality, use the uniform speed option. You can access this option by following the stepwise method below. Using the advanced features, you don’t need any other tool to ensure the video’s original worth:
Step 1Import Your Project and Start a New Project
After launching Filmora, head to its “New Project” option from the home screen. You will enter the main editing screen this way. Import your project in the media panel and then drag it to the timeline.

Step 2Explore Uniform Speed and Adjust the Speed
Go to your video in the timeline and right-click on it. Now, explore the “Uniform Speed” option and tap on it to get an editing panel at the right. From that panel, move the “Speed” slider to the right and get a slow-motion video preview. You can see the “Duration” of the video after slowing it down and adjusting it accordingly.

Step 3Use Advanced Features to Ensure Quality of Videos
Move down and toggle the “Reverse Speed” option if required. You can enable the “Maintain Pitch” and “Ripple Edit” options to enhance the video automatically. Lastly, extend the “AI Frame Interpolation” menu using its downward symbol and choose “Optical Flow.” It will ensure that the video will remain slow with high quality.

Method 2: Speed Ramping
This method aims to bring smooth transitions in slow-motion videos. Instead of an abrupt change, a gradual increase in speed can impose a professional look. So, there are the steps to access this feature and get a preview of smooth playback.
Step 1Discover the Speed Ramping Feature
Access the Speed Ramping option next to the “Uniform Speed” in the right-side editing panel. Alternatively, you can right-click on the video and look for the “Speed Ramping” option from the list.

Step 2Pick a Template for Speed Ramping or Customize It
From the speed ramping section, you can choose any template from 6 options. Also, users can pick the “Customize” option to adjust the speed ramping as desired.

Step 3Use the Render Preview Option for Smooth Playback
To get a high-quality preview of your videos, look for Render Preview. In this regard, go to the top toolbar of the timeline section on the right side. Click the “Render Preview” icon next to the “Copilot Editor.” Wait for a while and get a smooth playback of your slow-motion video.

Integral Features of Filmora
Slowing down videos is easier than slow-mo Final Cut Pro. Filmora automates the process with an optical flow, ensuring the project’s high quality with one click. Without any wait, learn more about some top-rated features in the given section.
1. AI Thumbnail Creator
The AI Thumbnail Creator of Filmora makes thumbnail creation a matter of seconds. The tool is a treasure for YouTubers as it creates appealing thumbnails to attract viewers. It works with machine learning algorithms to detect the 3 best shots out of your video for thumbnail. Besides, there are over 58 thumbnail templates that can be customized after picking the right one.
2. AI Copilot Editing
AI Copilot is your personal assistant who guides you through everything related to Filmora. You can ask about any editing queries, and the AI will tell you the whole procedure within a second. It will also provide you with navigation towards the right feature. The tool is a big help for beginners; it makes using Filmora much faster and easier.
3. Motion Tracking
If you love giving an artistic touch to your videos, then motion tracking is exactly what you need. This feature automatically tracks the object throughout the video. You can add graphics, stickers, or even blur an object in the video. Furthermore, it allows you to add text with the tracked objects, like a name title with a running athlete.
4. Auto Reframe
With the help of the Auto Reframe feature, you can use one video on all social media platforms. The tool reframes your video in such a way that the main object doesn’t get removed. AI allows you to turn your landscape video into a vertical with a 19:6 aspect ratio. It saves you time and the trouble of creating different videos for every platform.
Conclusion
Slow-motion videos have become a trend due to social media, but they have been an essential film factor forever. Because of the rising demand for this effect, developers added the feature to their software. Many apps are developed to provide a slow-motion effect, which makes it tricky to choose one.
This article addresses your problem by showing you the use of final cut slow-motion. You have discovered a much simpler, faster, and effective platform, Wondershare Filmora. With proven statements in this article, it’s been easier to try Filmora and explore it fully instantly.
Also read:
- Updated Looking for a Way to Edit Your Profile Picture for Telegram? Heres an Easy and Quick Guide on How to Change, Delete and Hide Your Profile Picture with Simple Steps
- New In 2024, Create a Brand Video to Make Your Business Shine
- 6 Instant Mp4 to GIF Online Tools for You
- New In 2024, 10 Apps to Make Videos with Pictures and Music
- 2024 Approved Read on to Learn About Multi Object Tracking, Its Types, and Requirements. Youll Also Learn About the Different Approaches Toward Object Tracking
- New In 2024, 8 Best Video Editor with Useful Masking
- New 2024 Approved The Best Way To Color Grading & Color Correction in Filmora
- Updated Do You Know About some Efficient Slow-Motion Video Editors? Read This Article to Find Out the Best Slow-Motion Video Editing Tools that You Can Try
- New Minecraft Pixel Art A Complete Guide for Die-Hard Fans
- Updated How to Make Loop Video in PowerPoint for 2024
- 2024 Approved What Is an Eye Zoom Transition Effect? Its a Close-Up Video Effect Allowing Viewers to Transit to the Next Clip From the Eye
- New In 2024, How To Quick Guide for Making Google Slideshows
- Updated 10 Apps to Make Videos with Pictures and Music for 2024
- Updated You Can Make Attractive Videos by Adding Text Behind Objects. This Article Will Explain How to Use Wondershare Filmora to Create These Videos
- New To Closely Observe the Content on Screen, We Often Zoom in to Catch the Details. This Article Will Provide You with a Brief Note on How to Zoom in on YouTube Videos Quickly on Your Devices
- 2024 Approved To Closely Observe the Content on Screen, We Often Zoom in to Catch the Details. This Article Will Provide You with a Brief Note on How to Zoom in on YouTube Videos Quickly on Your Devices
- New Create a Brand Video to Make Your Business Shine
- In 2024, LumaFusion – One of the Best Video Editors for iOS
- 2024 Approved Detailed Tutorial to Crop Video in KineMaster
- Looking Into How Slow Mo Guys Have Changed the Dynamics of Slow-Motion for 2024
- Learn How to Add Dynamic Shake Effects to Your Videos Using Alight Motion. Our Step-by-Step Guide Makes It Easy to Create Cinematic Footage
- Updated How Does Sonys S&Q Feature Help Recording Slow-Motion Video
- Updated 5 Methods to Make a Fake Facetime Call Video
- Updated A Roster of 8 Best Color Match Generators for 2024
- Updated 6 Top Online MP4 Croppers
- In 2024, Tutorial | How to Make a Smooth Speed Ramping in Premiere Pro?
- Updated In 2024, Guide to Making Cinematography for Music Video
- How to Create a Dynamic Text Animation in Filmora — Step-By-Step
- Updated Best 10 Options Slow Down Video Online with Perfection
- New Have You Ever Tried to Remove the Transparent Background of Gif and Failed? This Blog Will Help You with This Issue. Also, We Will Discuss How to Create Animated Gifs and the Best Tools for Them
- Updated M31 LUT (Teal and Orange LUT) Free Download
- How to Transfer Photos From Tecno Spark 10 5G to Samsung Galaxy S21 Ultra | Dr.fone
- How to Hide/Fake Snapchat Location on Your Samsung Galaxy M34 5G | Dr.fone
- How to Transfer Data from Vivo Y78+ (T1) Edition to Samsung Phone | Dr.fone
- In 2024, Delete Gmail Account With/Without Password On Vivo V30 Pro
- In 2024, Fixing Foneazy MockGo Not Working On Honor X9b | Dr.fone
- Updated Best 10 Animated DP for WhatsApp
- The Best Methods to Unlock the iPhone Locked to Owner for iPhone XS | Dr.fone
- Meizu Data Retrieval tool – restore lost data from Meizu 21
- In 2024, Android Unlock Code Sim Unlock Your Meizu 21 Phone and Remove Locked Screen
- Trouble with Apple iPhone SE (2020) Swipe-Up? Try These 11 Solutions | Dr.fone
- How To Upgrade or Downgrade iPhone 13 Pro Max Without Losing Anything? | Dr.fone
- Can Life360 Track You When Your Oppo Reno 11 Pro 5G is off? | Dr.fone
- About Lava Yuva 2 Pro FRP Bypass
- In 2024, 3 Solutions to Find Your Samsung Galaxy F15 5G Current Location of a Mobile Number | Dr.fone
- The Ultimate Guide to Get the Rare Candy on Pokemon Go Fire Red On Tecno Camon 20 Premier 5G | Dr.fone
- In 2024, 5 Ways to Track Samsung Galaxy S24+ without App | Dr.fone
- The Complete Guide to Honor Magic5 Ultimate FRP Bypass Everything You Need to Know
- 9 Best Free Android Monitoring Apps to Monitor Phone Remotely For your Oppo A56s 5G | Dr.fone
- 8 Solutions to Fix Find My Friends Location Not Available On Samsung Galaxy A25 5G | Dr.fone
- In 2024, How to Screen Mirroring Tecno Spark Go (2023) to PC? | Dr.fone
- In 2024, Remove Device Supervision From your iPhone 14 Pro
- New 2024 Approved 15 Best Video to GIF App on iPhone and Android
- 7 Ways to Unlock a Locked Nokia C12 Pro Phone
- Title: New Mastering OpenCV Object Tracking A Comprehensive Guide for Beginners and Experts
- Author: Chloe
- Created at : 2024-05-20 03:38:16
- Updated at : 2024-05-21 03:38:16
- Link: https://ai-editing-video.techidaily.com/new-mastering-opencv-object-tracking-a-comprehensive-guide-for-beginners-and-experts/
- License: This work is licensed under CC BY-NC-SA 4.0.


