New Motion Blur Photo With GIMP Step-By-Step Guide for 2024
Motion Blur Photo With GIMP: Step-By-Step Guide
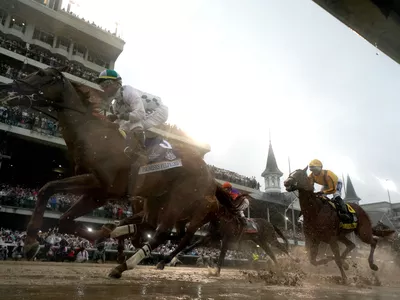
GIMP is a cross-platform image editing software that you can use to edit photos and create graphics. The software is available for Linux, Windows, and macOS and can add a motion blur effect (A sense of movement in the photo), making your pictures look more realistic and professional.
So to help you tone your skills, we’ve written a comprehensive guide on how to apply the GIMP motion blur effect to your photos!
Part I. What Is GIMP?
GIMP software, a GNU Image Manipulation Program, is an open-source raster graphics editor used for image editing and retouching, converting between different image formats, free-form drawing, and more.
GIMP is frequently used as a Photoshop alternative. The software boasts a wide range of features, including support for layers, masks, color management, and third-party plugins.
Key Features
Here are some key features of the GIMP software:
- Quickly hide panels and menus to let you switch to a full-screen mode to preview pictures
- Fixes distorted images
- Available for Windows, Linux, Mac OS, and other operating systems
- Automatic image enhancement tool
- Lets you remove all the panels and tools from the workflow except the one you are working with.
- Released under a license called GNU General Public License v3 and later, which makes it free to use and distribute
- Add overlays and crop or resize an image
- Wide range of file formats that it can read and write, making it a versatile tool for working with images
Part II. How To Add The Motion Blur Effect To Your Photos in GIMP?
Below we’ve provided the step-by-step tutorial to add a motion blur effect to your photos in GIMP:
Step1 In the first step, launch a browser on your device, head to the GIMP website , and download the installation file according to your operating system. Now, click the downloaded installer, install the software on your system and launch it.

Step2 In the next step, click “File” on the GIMP dashboard, and select “Open” to access the Open Image window. Select your image file from your system and click “Open” to import the file.

Step3 Next, click the “Filters” option from the top toolbar, select “Blur,” and choose “Motion Blur” from the drop-down menu. A dialogue box will now open where you can preview the effect and adjust the settings, including Blur Type, Blur Center, and Blur Parameters.

Step4 Once you are satisfied with your changes, click “OK” to apply the effect to the image, and make some other edits if needed. Finally, click “File” from the top toolbar, choose “Export As,” click “File Type” to select the format, and select the “Export” option to save your file.
Bonus Tips – The Alternative To GIMP To Create Motion Blur Effect
GIMP is a popular image editor that you can use to create motion blur effects. However, some users find it difficult to use the software for this purpose.
To simplify the process, we recommend usingWondershare Filmora an all-in-one editing software that offers multiple advanced features to help you quickly enhance your project.
Free Download For Win 7 or later(64-bit)
Free Download For macOS 10.14 or later
Here’s why Filmora is the best alternative to GIMP for creating motion blur effects:
- A user-friendly interface where you can quickly create the motion blur effect without spending hours learning the process
- Advanced video editing tools, such as keyframing, speed ramping, green screen, title editing, motion tracking, screen recorder, and preset templates
- Royalty-free music library where you can access millions of music and soundtracks
- Adds the motion blur effect to your videos as well as images
- Comes with multiple parameters to adjust the effect on your clip or image
To add the radial blur effect to images using Filmora, here are the quick and easy-to-follow steps:
Step1 Download the Filmora software on your PC, launch it, and click “Create New Project” on the main panel. Use the “Click Here to Import your Media File” option to import your photo and drag and drop it into the timeline.

Step2 Now, head to the “Effects” tab from the taskbar. Use the search option to find the Blur effect. Afterward, drag & drop it in the timeline and adjust it on your selected clip.

Step3 Please note that motion blur is now a dynamic effect on the image. That means you can add multiple photos and make them into a slideshow with a blur effect transition. Or, press the “Play” icon to preview your photo and pause the clip where you think motion blur works best.
Step4 Click the effect in the timeline to open its settings. Now, play your clip to preview and adjust the parameters as you want to smooth down the motion effect.
Step5 Once satisfied with the outcome, click the “Export” option, go to the “Local” tab, select a file format to save the images, and click “Export” again to save your project.

Filmora offers many export options, such as your device, YouTube, Vimeo, and DVD, with just a few clicks.
Last Words
In this detailed tutorial, we’ve discussed what GIMP is and its key features. We’ve provided a step-by-step guide to walk you through the process of creating the motion blur effect using the GIMP software.
In addition, we’ve provided a bonus tip to recommend Filmora as the best alternative to GIMP for creating the motion blur effect.
Hopefully, you found this article helpful in resolving your queries, and you can now add a smooth motion blur effect to your images.
Free Download For macOS 10.14 or later
Here’s why Filmora is the best alternative to GIMP for creating motion blur effects:
- A user-friendly interface where you can quickly create the motion blur effect without spending hours learning the process
- Advanced video editing tools, such as keyframing, speed ramping, green screen, title editing, motion tracking, screen recorder, and preset templates
- Royalty-free music library where you can access millions of music and soundtracks
- Adds the motion blur effect to your videos as well as images
- Comes with multiple parameters to adjust the effect on your clip or image
To add the radial blur effect to images using Filmora, here are the quick and easy-to-follow steps:
Step1 Download the Filmora software on your PC, launch it, and click “Create New Project” on the main panel. Use the “Click Here to Import your Media File” option to import your photo and drag and drop it into the timeline.
Step2 Now, head to the “Effects” tab from the taskbar. Use the search option to find the Blur effect. Afterward, drag & drop it in the timeline and adjust it on your selected clip.
Step3 Please note that motion blur is now a dynamic effect on the image. That means you can add multiple photos and make them into a slideshow with a blur effect transition. Or, press the “Play” icon to preview your photo and pause the clip where you think motion blur works best.
Step4 Click the effect in the timeline to open its settings. Now, play your clip to preview and adjust the parameters as you want to smooth down the motion effect.
Step5 Once satisfied with the outcome, click the “Export” option, go to the “Local” tab, select a file format to save the images, and click “Export” again to save your project.
Filmora offers many export options, such as your device, YouTube, Vimeo, and DVD, with just a few clicks.
Last Words
In this detailed tutorial, we’ve discussed what GIMP is and its key features. We’ve provided a step-by-step guide to walk you through the process of creating the motion blur effect using the GIMP software.
In addition, we’ve provided a bonus tip to recommend Filmora as the best alternative to GIMP for creating the motion blur effect.
Hopefully, you found this article helpful in resolving your queries, and you can now add a smooth motion blur effect to your images.
This Article Will Show You How to Make a Tattoo Disappear on Your Body Magically
Do you have any tattoos that you don’t like anymore? Have you ever wished you had the superpower to make unwanted tattoos vanish? Then, keep reading this article since this article will provide you with how to use masking and colour correction to make a tattoo disappear in Filmora .
Part 1: What You’ll Need to Getting ready
Step1 The first thing you need is a video clip of your arm. Next, place the camera on a tripod, and tilt down to show the table from the top.

Step2 After that, put the arm on the tableand keep it still while filming. Meanwhile, have another hand perform on the other side of the frame and pretend to use magic to remove the tattoo.

Step3 Next, you need a picture of a tattoo. Indeed, it would be better to have the tattoo in the same position on the arm so it can match the video clip we just filmed.

After preparing everything, you need to go to Filmora 11 and start editing. If you haven’t downloaded Filmora already, you can visit filmora.wondershare.com.

Part 2: Editing Tutorial
Step1 First, drag and drop the arm video clip onto the first video track and the tattoo picture on the second video track.

Step2 Add a mask around the tattoo part from the picture. You must hide the first video track to see the mask clearly.Then, double-click on the picture on the timeline and go to the setting window on the top left. Find the Mask Section and select the circle shape. Now you can see the mask is applied.

Step3 Adjust the position and size of the mask to reveal only the tattoo part. Then you must change the “Blur Strength” to add more blur to the edge of the mask.

Step4 With the mask finalized,unhide the first video track with the arm video clip. Next, adjust the position and size of the tattoo and make it fit the arm clip.

Step5 Go to do colour correction on the tattoo image so that it matches better with the arm skin. Double-click on the tattoo on the timeline and go to the setting window on the top left. Find the “Color” Section and open the “Tone” menu. First, you have to adjust the brightness first.

Step6 Afterwards, open the “White Balance”menu and adjust the temperature. Indeed, you can also adjust the contrast and saturation if needed. Once done, click “OK.” The tattoo should look like it blends into the arm video.

Part 3: Make the tattoo disappear
Step1 Move the play head to where you want the tattoo fades, and adjust the length of the tattoo picture there.

Step2 Next, find the “Evaporate 1” from the “Transitions” window. Drag and drop it to the end of the tattoo clip.

Step3 Adjust the length if needed. Finally, Let’s playback and see how it looks!

Summary
That’s how to make a tattoo disappear in Filmora 11. With Filmora 11, you can get as many new tattoos as possible. Indeed, you can follow all the steps above carefully to get the perfect result.
Free Download For Win 7 or later(64-bit)
Free Download For macOS 10.14 or later
Free Download For macOS 10.14 or later
Camtasia Review – Is It The Best Video Editor?
If you are planning to record your screen and create a tutorial video, you will need a screen recording application. After capturing your video, you need to edit your videos so that you can remove unnecessary parts and add texts and titles wherever necessary. You will need a video editor with screen recorder, and Camtasia video editor is a suitable choice.
Camtasia lets you capture your gameplay as well as create software demo videos. You can choose from video templates and themes to create professional-quality videos as per your requirements. You can add transitions, effects, and annotations to make the videos attractive and engaging. But is Camtasia editor really the best one or is there a better alternative available? Find out from our Camtasia review.
Part 1. How to Download and Install Camtasia?
TechSmith Camtasia is compatible with both Windows 10 or above and Mac 10.14 or above. Camtasia is not a lightweight video editor as it demands 8GB of RAM. As far as the processor goes, it requires at least a 6th Gen Core i3 processor or M1 Apple processor. Therefore, if you have a low-end computer, you may experience lag and crash.
Camtasia is a premium video editor, and you can download its free trial version before opting for its premium version. The price plans differ for individuals, businesses, education, and government organizations. Here are the steps to download and install Camtasia free trial version.
Step 1: Open the web browser on your computer and visit “www.techsmith.com/download/camtasia” .
Step 2: Click on Windows Download or Mac Download as per your operating system.

Step 3: Wait for some time for the installer software to get downloaded. Thereafter, click on the installer file to install Camtasia following the on-screen instructions.
Step 4: After installation, launch Camtasia and click on New Recording option to capture your screen. If you want to edit an existing video, you need to click on New Project option.

Step 5: If you have clicked on New Recording option, you will get a widget where you need to select your screen to start capturing. You can also select external webcam and microphone. Once you are ready to recording, Click on Rec red button.

Part 2. Key Features of Camtasia
Camtasia is a versatile video editor that competes with all the premium video editors in the market. Hence, there is no dearth of features and functionalities in Camtasia editor, and we are going to highlight the key features that you should be aware of.
Recording – Camtasia lets you capture your screen as well as webcam video easily. You can also record system audio as well as external mic audio. This is useful in recording gameplay with live reaction, tutorial, and training videos as well as presentation videos. You can capture any specific region of the screen as well as use greenscreen effect for webcam videos.
Templates – Camtasia is tailor-made for creating video tutorials, how-to videos, software demo videos, presentation and instructional videos, and training videos. This is why it comes with video templates that users can use immediately to create any specific type of video instantly. In fact, you can customize these templates and create your own theme so that the videos get personalized branding.
Presets and Transitions – There are loads of presents and transitions that you can include in your video to uplift the video content and quality. You can also create custom styles and configure them for regular use in your videos. Transitions are extremely useful to avoid pauses and put them in between slides.
PowerPoint Integration – You can turn your slides on PowerPoint into video instantly with Camtasia. Camtasia comes with PowerPoint integration through which you can import slides in Camtasia and create a video out of it with transitions and other effects. Alternatively, you can record your presentation in PowerPoint in video format.
Annotations and Interactivity – Camtasia lets you create videos where the viewers can interact and take actions. There are options for callouts, quizzes, textboxes, and much more so that the viewers can engage themselves in the video. Besides, you can use arrows, shapes, and other objects to highlight parts in your video for better explanation.
Audio and Cursor Effects – Camtasia has a wide range of audio effects that you apply to your audio recordings or import audio files. Besides, there are options for background noise removal, adjusting gain and pitch, compression, and emphasize. Similarly, you can highlight your cursor movement, spotlight the area as well as magnify when required.
Part 3. How to Edit Videos with Camtasia?
Camtasia is essentially a video editor where you can all types of videos as per your requirements. Camtasia has a robust timeline where you can import different types of video and audio files and arrange them sequentially. You can have multiple layers on top of another such as texts, shapes, photos, voiceover, and other media files as required. Camtasia has a powerful canvas where you can preview your edited video as well as resize and rotate the edited video. Here are the steps to edit videos with Camtasia.
Step 1: Open Camtasia and click on New Project. Sign into your Camtasia account to start editing your recorded video.
Step 2: Go to Media and click on Import Media. Import all the media files starting from video clips to audio clips and even photos.

Step 3: From Media Bin, drag and drop the media files to the timeline. Keep the video files in one track, audio files in another track, and likewise. Arrange them properly so that they are placed sequentially. You can trim them directly from the timeline and stretch the music file to cover the entire video as required.

Step 4: Go to Annotation to add shapes, texts, arrows, and callouts. Go to Transitions and drag and drop transitions of your choice in between video clips on the timeline as you think perfect.

Step 5: Go to Audio Effects to enhance the audio of the video. Moreover, you can check and apply animations, behaviors(text effects), cursor effects, visual effects as well as interactivity as you think relevant.
Step 6: On the canvas, check out how your edited video looks like. Once you are satisfied, click on Export button to save the video on your hard drive.

Part 4. Camtasia Alternative to Edit Videos
There are various reasons why people look for a better alternative to Camtasia after trying out its free trial. First of all, you need a high-end computer for Camtasia to run smoothly. Second, there are limited effects and animations available for a premium video editor. Users have also reported crashes and bugs while editing high-resolution videos. We recommend Wondershare Filmora as the best alternative to Camtasia edit video.
Filmora is a premium video editor with video capturing option just like Camtasia. Filmora scores over Camtasia as it has minimum system requirements, and there are loads of visual and audio effects including the trending ones. Besides, there are stock media files that you can include in your video. Moreover, Filmora supports more file formats for importing and exporting. Here are the steps to edit videos on Filmora.
For Win 7 or later (64-bit)
For macOS 10.12 or later
Step 1: Download and install Filmora on your computer. Filmora is available for Windows and Mac.
Step 2: Launch Filmora and click on New Project. Drag and drop all your media files into Project Media folder.
Step 3: Drag and place the video files one by one on the timeline as per your requirements. Place audio files in the same way on a different track.

Step 4: Go to Transitions located at the top bar and drag and drop any transition in between video clips and photos wherever required. You can also insert Titles, Effects, and Elements from the top bar.

Step 5: Go to Audio located at the top bar, and drag and drop audio effects on the audio files on the timeline. You can also check the Stock Media and use them in your video as required.
Step 6: Play the video once everything is done, and click on Export button to save the video file on your hard drive.

Part 5. FAQs about Camtasia
1. Can I use Camtasia for free?
You can download the free trial version of Camtasia and use it for a limited number of days. The free version has all the features unlocked, but the output video will have Camtasia watermark.
2. Is Camtasia good for video editing?
Camtasia is good for video editing if your video belongs to training and tutorial videos. There are templates and annotations available that are tailor-made to edit how-to videos and add interactivity for the viewers. However, for an all-rounder video editor, we recommend Filmora over Camtasia.
3. How do I trim a video in Camtasia?
Once your import the video and place it on the timeline, use green and red to select the part that you want to trim. Once the selection is done, click on Cut(scissor) icon. The portion will be cut, and you can paste it anywhere if required. Lastly, join the parts of the video on the timeline after trimming any part out.
4. Can I record my screen with Camtasia?
Yes, Camtasia allows you to record your screen, webcam, or both simultaneously. You can also capture system audio or record your own voiceover. This feature is useful for creating tutorials, demos, or presentations.
5. How do I export my videos from Camtasia?
Once you have finished editing your videos, you can export them in various formats, such as MP4, WMV, MOV, and AVI. Camtasia also allows you to customize the video settings, such as resolution, frame rate, and bitrate. You can also upload your videos directly to YouTube, Vimeo, or Screencast.com from Camtasia.
For macOS 10.12 or later
Step 1: Download and install Filmora on your computer. Filmora is available for Windows and Mac.
Step 2: Launch Filmora and click on New Project. Drag and drop all your media files into Project Media folder.
Step 3: Drag and place the video files one by one on the timeline as per your requirements. Place audio files in the same way on a different track.
Step 4: Go to Transitions located at the top bar and drag and drop any transition in between video clips and photos wherever required. You can also insert Titles, Effects, and Elements from the top bar.
Step 5: Go to Audio located at the top bar, and drag and drop audio effects on the audio files on the timeline. You can also check the Stock Media and use them in your video as required.
Step 6: Play the video once everything is done, and click on Export button to save the video file on your hard drive.
Part 5. FAQs about Camtasia
1. Can I use Camtasia for free?
You can download the free trial version of Camtasia and use it for a limited number of days. The free version has all the features unlocked, but the output video will have Camtasia watermark.
2. Is Camtasia good for video editing?
Camtasia is good for video editing if your video belongs to training and tutorial videos. There are templates and annotations available that are tailor-made to edit how-to videos and add interactivity for the viewers. However, for an all-rounder video editor, we recommend Filmora over Camtasia.
3. How do I trim a video in Camtasia?
Once your import the video and place it on the timeline, use green and red to select the part that you want to trim. Once the selection is done, click on Cut(scissor) icon. The portion will be cut, and you can paste it anywhere if required. Lastly, join the parts of the video on the timeline after trimming any part out.
4. Can I record my screen with Camtasia?
Yes, Camtasia allows you to record your screen, webcam, or both simultaneously. You can also capture system audio or record your own voiceover. This feature is useful for creating tutorials, demos, or presentations.
5. How do I export my videos from Camtasia?
Once you have finished editing your videos, you can export them in various formats, such as MP4, WMV, MOV, and AVI. Camtasia also allows you to customize the video settings, such as resolution, frame rate, and bitrate. You can also upload your videos directly to YouTube, Vimeo, or Screencast.com from Camtasia.
Making Slow Motion Videos in Premiere Pro: A Review on The Best Method
Slow-motion videos can give your videos more depth, drama, and emotion. Your viewers will find your films more interesting if you use slow-motion effects. It can bring attention to a shot, produce an artistic effect, or relive a memorable scene. Slow-motion video has been used for decades to add dramatic effects to films and videos.
If you’re interested in how to do slow-mo in Premiere Pro, this article is your ultimate solution. Read the article and add artistic to dramatic slow-mo to your videos. You will eventually come to know how to do slow mo on Premiere Pro with ease.
Slow Motion Video Maker Slow your video’s speed with better control of your keyframes to create unique cinematic effects!
Make A Slow Motion Video Make A Slow Motion Video More Features

Part 1: What Are Some Potential Real-Life Use Cases of Having Slow Motion Videos?
Slow-motion movies can be utilized to record and examine events in greater depth. Before delving into how to make a slow-motion video in Premiere Pro, learn its use cases. Thus, below are a few applications of the slow motion in real life:
- Medical Research and Imaging: Slow-motion videos are used in medical research and education. They thoroughly examine surgical methods and practices. This promotes medical practice improvement and student’s better comprehension of concepts.
- Cinematography and Filmmaking: Filmmakers use slow motion to add dramatic and creative effects. It can arouse feelings, highlight particular movements, or produce a dreamlike mood. In commercials, these videos create sequences of the message you want to convey.
- Wildlife Observation: Slow-motion recordings can be very useful in animal research. They can be used to watch and record animal activity more closely. It gives researchers a better knowledge of the animal’s habits.
- Sports analysis: Slow-motion effect can analyze an athlete’s movement mechanics and give reviews. Coaches and athletes pinpoint areas where their technique needs to be improved.
- Product Testing and Quality Control: Video effects also prove useful in industries. It allows engineers to inspect high-speed operations and identify any flaws or malfunctions.
- **Crash Test Analysis:**Analyzing slow-motion video is essential for examining vehicle crash tests. It aids in improving car designs and evaluating the performance of safety systems.
Part 2: Performing Slow Mo in Adobe Premiere Pro: Using A Good Option
Adobe Premiere Pro’s editing interface makes its reputation high in the market. It is known as the industry standard tool because of its unparalleled features. Content developers and filmmakers can arrange and edit video files on it. It can also improve audio and image quality with its extensive editing toolkit.
Premier Pro offers many more functions than basic video editing. It offers some features that can change your content creation journey. Following are some of its basic features that you should know before learning Premiere Pro how to slow motion:
- Auto Reframe: This feature keeps the object of the image in the frame no matter which frame you choose. You can easily auto-frame a single clip or go for the entire video.
- Text-Based Editing: Text-based editing can give you more control over the transcript. It can deal with multi-channel audio recordings and remove gaps with a single click.
- Color Settings: Color settings allow you to adjust colors quickly and easily. It can check the result by combining multiple color selections into a single tab.
- Audio Auto-Tagging: This feature classifies audio files as either dialogue, music, or ambiance. It then provides access to the most useful tools for producing high-quality audio.
This guide will tell you how to make a slow-motion video on Premiere Pro. Follow the steps below to decrease the speed of your video across Adobe Premiere Pro:
Step 1
Import your video into the timeline and right-click on the icon you see with the video file on the timeline. From here, go to “Time-Remapping” and click on “Speed.” You will know the function has been activated when you see the white line on your timeline.

Step 2
Expand the timeline to see the ramping line. Now click on the ramping line by using the “Ctrl + click” command. You can also add keyframes by going to the toolkit on the left side of the screen and selecting the “Add Keyframe” button. Another option is the time remapping speed settings from the top and activating the keyframe.

Step 3
Move the timeline cursor to the right side and add another keyframe there. Now, double-click on the first keyframe and drag it to the right side just a bit. After that, drag the speed ramping line downwards to create a ramp. To change the length of keyframes more precisely, go to “Effects Control” from the top and manage its length.

Part 3: Quick Alternative: Wondershare Filmora and Slow-Motion Clips
You might have gotten the answer to “how to make slow-motion video in Premiere Pro” until now. But another question comes into mind: “How to make slow-mo videos easily ?” Using Adobe Premiere Pro can be tricky for starters, so they look for alternative tools. Filmora is a great option if you struggle with using Adobe Premier Pro.
The tool is easy to use and can process heavy videos, keeping its quality intact. With its AI features, the edits that used to take hours can now be done within minutes. The tool has amazing options for all kinds of media editing.
Step-by-Step Guide to Perform Slow Motion in Filmora Using Different Methods
Remarkable features of Filmora do not end here. If you want to know more about Filmora, you should download it, but first, learn how to add slow motion in reels. In this read, follow the guide below:
Free Download For Win 7 or later(64-bit)
Free Download For macOS 10.14 or later
Method 1: Using Uniform Speed
Using this method, you can slow down your video smartly with the help of AI. Some options in uniform speed will help you to automate the process while ensuring the quality of the content. Look at the steps below to add slo-mo to your video like a pro:
Step 1Import Media to the Timeline and Explore Uniform Speed
Install Filmora 13 on your device and open it to access “New Project” from the main interface. When you enter the editing window, import your file into the media panel.

Step 2Adjust the Speed and Other Use Advanced Options
Later, drag that file to the timeline and right-click on it to get a list. Select the “Uniform Speed” option from that list and head to the editing panel opened to the right. Under the “Speed,” there will be a slider. You have to move it to the left for slow-motion video. While adjusting speed with that slider, track video duration from the “Duration” section. Below that option, you can toggle the “Reverse Speed” option if required.

Otherwise, check the “Ripple Edit” and “Maintain Pitch” option for good. Now, extend the “AI Interpolation” menu and choose “Optical Flow.” It will let AI automatically adjust the video speed in slow motion with high quality.

Method 2: Using Speed Ramping
If you want to bring a professional look to Slow-motion videos, use Speed Ramping. It will ensure a smooth change in video speed when it increases or decreases. To add this refined touch to videos, look at the given steps:
Step 1Access the Speed Ramping Option in 2 Ways
Tap the “Speed Ramping” next to the “Uniform Speed” in the right-side panel. Optionally, you can right-click on your videos in the timeline. There, you will find the “Speed Ramping” option below the “Uniform Speed” option in the list.

Step 2Speed Ramping Your Videos and Get Render Preview
In the Speed Ramping Section, you will get 6 templates. Pick one or hit the “Customize” to design your own speed ramping in videos. Later, move to the toolbar of the timeline section and choose “Render Preview” next to the “Copilot” icon. It will bring a smooth playback of your speed ramping in videos.

Matchless Features of Wondershare Filmora
Wondershare Filmora offers a creative editing experience. It has a number of important features, some of which are discussed below:
AI Copilot: You can speed up your video editing process with the AI Copilot Editing function. It offers AI assistance anytime you need it and gives a quick response. This feature directs you towards the required feature with a button. To get assistance, users just have to prompt questions in natural language.
AI Text-Based Editing: You can edit your video content with the AI Text-Based Editing tool. This feature can transcribe your spoken words into editable text. Afterward, you can edit the text based on your preferences, and the changes in the video will be added. Moreover, Filmora allows you to save the generated text to reuse it in articles and blogs later.
AI Copywriting: If you are stuck creating a unique script, get help from AI copywriting in Filmora. It gives several video ideas to generate YouTube video titles and descriptions. This creative personal assistant will bring content aligning with your video goals. The generated script can be used to make videos from Filmora’s text-to-video feature.
Conclusion
Regular videos do not always generate the same level of response from viewers. Slow-mo videos can make a video more entertaining and improve the film’s narrative. It’s good to use when you want to draw attention to the most significant shot in a video. This article shows how to make slow motion in Premiere Pro and offers an amazing alternative. Thus, try to use Filmora and improve your editing experiences with ease.
Make A Slow Motion Video Make A Slow Motion Video More Features
Part 1: What Are Some Potential Real-Life Use Cases of Having Slow Motion Videos?
Slow-motion movies can be utilized to record and examine events in greater depth. Before delving into how to make a slow-motion video in Premiere Pro, learn its use cases. Thus, below are a few applications of the slow motion in real life:
- Medical Research and Imaging: Slow-motion videos are used in medical research and education. They thoroughly examine surgical methods and practices. This promotes medical practice improvement and student’s better comprehension of concepts.
- Cinematography and Filmmaking: Filmmakers use slow motion to add dramatic and creative effects. It can arouse feelings, highlight particular movements, or produce a dreamlike mood. In commercials, these videos create sequences of the message you want to convey.
- Wildlife Observation: Slow-motion recordings can be very useful in animal research. They can be used to watch and record animal activity more closely. It gives researchers a better knowledge of the animal’s habits.
- Sports analysis: Slow-motion effect can analyze an athlete’s movement mechanics and give reviews. Coaches and athletes pinpoint areas where their technique needs to be improved.
- Product Testing and Quality Control: Video effects also prove useful in industries. It allows engineers to inspect high-speed operations and identify any flaws or malfunctions.
- **Crash Test Analysis:**Analyzing slow-motion video is essential for examining vehicle crash tests. It aids in improving car designs and evaluating the performance of safety systems.
Part 2: Performing Slow Mo in Adobe Premiere Pro: Using A Good Option
Adobe Premiere Pro’s editing interface makes its reputation high in the market. It is known as the industry standard tool because of its unparalleled features. Content developers and filmmakers can arrange and edit video files on it. It can also improve audio and image quality with its extensive editing toolkit.
Premier Pro offers many more functions than basic video editing. It offers some features that can change your content creation journey. Following are some of its basic features that you should know before learning Premiere Pro how to slow motion:
- Auto Reframe: This feature keeps the object of the image in the frame no matter which frame you choose. You can easily auto-frame a single clip or go for the entire video.
- Text-Based Editing: Text-based editing can give you more control over the transcript. It can deal with multi-channel audio recordings and remove gaps with a single click.
- Color Settings: Color settings allow you to adjust colors quickly and easily. It can check the result by combining multiple color selections into a single tab.
- Audio Auto-Tagging: This feature classifies audio files as either dialogue, music, or ambiance. It then provides access to the most useful tools for producing high-quality audio.
This guide will tell you how to make a slow-motion video on Premiere Pro. Follow the steps below to decrease the speed of your video across Adobe Premiere Pro:
Step 1
Import your video into the timeline and right-click on the icon you see with the video file on the timeline. From here, go to “Time-Remapping” and click on “Speed.” You will know the function has been activated when you see the white line on your timeline.
Step 2
Expand the timeline to see the ramping line. Now click on the ramping line by using the “Ctrl + click” command. You can also add keyframes by going to the toolkit on the left side of the screen and selecting the “Add Keyframe” button. Another option is the time remapping speed settings from the top and activating the keyframe.
Step 3
Move the timeline cursor to the right side and add another keyframe there. Now, double-click on the first keyframe and drag it to the right side just a bit. After that, drag the speed ramping line downwards to create a ramp. To change the length of keyframes more precisely, go to “Effects Control” from the top and manage its length.
Part 3: Quick Alternative: Wondershare Filmora and Slow-Motion Clips
You might have gotten the answer to “how to make slow-motion video in Premiere Pro” until now. But another question comes into mind: “How to make slow-mo videos easily ?” Using Adobe Premiere Pro can be tricky for starters, so they look for alternative tools. Filmora is a great option if you struggle with using Adobe Premier Pro.
The tool is easy to use and can process heavy videos, keeping its quality intact. With its AI features, the edits that used to take hours can now be done within minutes. The tool has amazing options for all kinds of media editing.
Step-by-Step Guide to Perform Slow Motion in Filmora Using Different Methods
Remarkable features of Filmora do not end here. If you want to know more about Filmora, you should download it, but first, learn how to add slow motion in reels. In this read, follow the guide below:
Free Download For Win 7 or later(64-bit)
Free Download For macOS 10.14 or later
Method 1: Using Uniform Speed
Using this method, you can slow down your video smartly with the help of AI. Some options in uniform speed will help you to automate the process while ensuring the quality of the content. Look at the steps below to add slo-mo to your video like a pro:
Step 1Import Media to the Timeline and Explore Uniform Speed
Install Filmora 13 on your device and open it to access “New Project” from the main interface. When you enter the editing window, import your file into the media panel.
Step 2Adjust the Speed and Other Use Advanced Options
Later, drag that file to the timeline and right-click on it to get a list. Select the “Uniform Speed” option from that list and head to the editing panel opened to the right. Under the “Speed,” there will be a slider. You have to move it to the left for slow-motion video. While adjusting speed with that slider, track video duration from the “Duration” section. Below that option, you can toggle the “Reverse Speed” option if required.
Otherwise, check the “Ripple Edit” and “Maintain Pitch” option for good. Now, extend the “AI Interpolation” menu and choose “Optical Flow.” It will let AI automatically adjust the video speed in slow motion with high quality.
Method 2: Using Speed Ramping
If you want to bring a professional look to Slow-motion videos, use Speed Ramping. It will ensure a smooth change in video speed when it increases or decreases. To add this refined touch to videos, look at the given steps:
Step 1Access the Speed Ramping Option in 2 Ways
Tap the “Speed Ramping” next to the “Uniform Speed” in the right-side panel. Optionally, you can right-click on your videos in the timeline. There, you will find the “Speed Ramping” option below the “Uniform Speed” option in the list.
Step 2Speed Ramping Your Videos and Get Render Preview
In the Speed Ramping Section, you will get 6 templates. Pick one or hit the “Customize” to design your own speed ramping in videos. Later, move to the toolbar of the timeline section and choose “Render Preview” next to the “Copilot” icon. It will bring a smooth playback of your speed ramping in videos.
Matchless Features of Wondershare Filmora
Wondershare Filmora offers a creative editing experience. It has a number of important features, some of which are discussed below:
AI Copilot: You can speed up your video editing process with the AI Copilot Editing function. It offers AI assistance anytime you need it and gives a quick response. This feature directs you towards the required feature with a button. To get assistance, users just have to prompt questions in natural language.
AI Text-Based Editing: You can edit your video content with the AI Text-Based Editing tool. This feature can transcribe your spoken words into editable text. Afterward, you can edit the text based on your preferences, and the changes in the video will be added. Moreover, Filmora allows you to save the generated text to reuse it in articles and blogs later.
AI Copywriting: If you are stuck creating a unique script, get help from AI copywriting in Filmora. It gives several video ideas to generate YouTube video titles and descriptions. This creative personal assistant will bring content aligning with your video goals. The generated script can be used to make videos from Filmora’s text-to-video feature.
Conclusion
Regular videos do not always generate the same level of response from viewers. Slow-mo videos can make a video more entertaining and improve the film’s narrative. It’s good to use when you want to draw attention to the most significant shot in a video. This article shows how to make slow motion in Premiere Pro and offers an amazing alternative. Thus, try to use Filmora and improve your editing experiences with ease.
Also read:
- [New] 2024 Approved Streamlining Your Media Mastering MP4 & Other Formats in VLC
- [Updated] In 2024, LinkedIn Luminaries Chatting with Snapchat
- [Updated] In 2024, Maximizing Your Monetary Gains on Social Media with Snapchat
- [Updated] YouTube to WebM Top-Tier Conversion Applications Reviewed for 2024
- 2024 Approved Track Mattes The Ultimate Guide For After Effects
- Comprehensive Guide to the EVA AI Chatbot From Ex Journey – Don't Miss This
- Impulsive Purchase: Unraveling My Unexpected Decision to Acquire an Apple Watch on Amazon
- In 2024, Kdenlive Is a Free, Open-Source Video Editing Software Application. Kdenlive Is a Powerful Video Editor that Can Be Used to Create Professional-Quality Videos
- New 2024 Approved Creative Ways to Add Green Screen Effects In Photoshop
- New How to Create Your Own LOL Montage Video for 2024
- New In 2024, 3 Best Effects to Appear on Camera Made with Filmora
- New In 2024, Legend Intro Maker – Create Intro Video with Ease
- New Learn How to Create Inspiring Motivational Videos Using AI. Explore Tools Like Midjourney, Runway Gen2, Chat-GPT, and Filmora AI for Seamless Content Creation. Start Your Journey
- Optimal 5 Displays for Immersive PS5 Gaming
- Reactivating Your iPhone: What to Do If You Can't Remember the Lock Screen Code
- Troubleshooting Guide: How to Fix Your Non-Responsive Apple Watch Display
- Updated 2024 Approved 3 Best Motion Blur Plugins for Adobe After Effects
- Title: New Motion Blur Photo With GIMP Step-By-Step Guide for 2024
- Author: Chloe
- Created at : 2025-02-25 05:34:31
- Updated at : 2025-03-04 02:00:09
- Link: https://ai-editing-video.techidaily.com/new-motion-blur-photo-with-gimp-step-by-step-guide-for-2024/
- License: This work is licensed under CC BY-NC-SA 4.0.