
:max_bytes(150000):strip_icc():format(webp)/samsung-unveils-new-products-at-its-annual-unpacked-event-1200186175-0a17180ae84e47f488f43d3afbb7daa6.jpg)
New Motion Tracking Never Goes Out of Trend, so Do You Wish to Make Your Videos Trendy with This? No Issue because Here We Will Guide You on How to Do Motion Tracking
Motion Tracking Never Goes Out of Trend, so Do You Wish to Make Your Videos Trendy with This? No Issue because Here We Will Guide You on How to Do Motion Tracking
One of the powerful editing features offered by several premium-grade video editors is motion tracking. It not only boosts the overall video quality but also helps ensuring the object is engaged throughout the video. Many users fail to apply the motion tracking effect to the videos because they don’t use a reliable tool. The primary motive of this discussion is to provide you with the best-in-class motion tracker.
Not only will we tell you the name of the software, but we will also guide you through the procedure of doing this. Moreover, many of you don’t know what motion tracking is. So, this article will also provide significant information about this.
Part 1: What Is Motion Tracking in Video Editing?
Motion tracking helps you analyze the movements of different objects in your video content. This process involves various tasks that can be very helpful in video editing. For example, tracking and identifying the position of elements over time. The main purpose of motion tracking is to add graphics. Moreover, you can also add digital effects to the tracked objects.
You will need special software or video editing tools to perform this process. Here’s how you can understand the motion tracking process with ease:
Selection of Object
The editor can select the object that he wants to track in an effective manner. This object can be a person or any moving element that needs tracking. Moreover, it can also be a moving vehicle or a logo as well. Tracking these moving elements in the frame can allow the editor to improve the areas which have high contrast or distinct features.
Tracking Points
Selecting the object allows the software to identify specific points in the frame. These points can have distinct features or a high contrast that may affect the video quality. With the help of video motion tracking, the editor can note down these areas and improve them to enhance the viewer experience.
Data Mapping
Once the software tracks the movements, it can be very useful for the editor. This is because it calculates the changes in position and rotation of each point. Moreover, it also maps the tracked data into a visual representation for the coordinating system. Using this system, the movements of the objects can be recreated in a 3D space.
Using Effects and Refinement
After obtaining the motion tracking data, the video editor can apply different effects on the object. These effects can include adding graphics and text to the scene. Moreover, it can also help in animation or compositing visual elements. To ensure the accurate alignment of the effects, the editor may need to use extra tracking techniques or manual adjustments.
Start Motion Tracking For Win 7 or later(64-bit)
Start Motion Tracking For macOS 10.14 or later


Part 2: How to Perform Motion Tracking in Adobe After Effects?
As you have gained knowledge about motion tracking, there are many platforms that offer this feature. Adobe After Effects is a video editing platform that can help you perform video motion tracking. If you are a user of this tool, you can learn the steps to motion track your video below:
Step 1: Open Adobe After Effects on your computer and import your video files to the timeline of the platform. Add the object you wish to motion track on Adobe After Effects.
![]()
Step 2: Lead to the “Layer” tab from the top and select the “New” option from the drop-down menu. Continue to select “Null Object” to add a layer to the timeline.
![]()
Step 3: Select the video clip and continue to the “Animation” tab from the top. Select “Track Motion” from the drop-down menu that appears. This will generate a box for selecting the object for motion tracking. You can extend the box and drag it anywhere in the video clip. To check the motion tracking object, click the “Analyze Forward” button on the bottom-right corner of the screen.
![]()
Step 4: As the object is analyzed, click the “Edit Target” button to open a new screen. Continue to change the layer to “Null Object” and click “OK.” Continue to select “Apply” and click “OK” against the pop-up menu that opens. This is how Adobe After Effects applies the motion tracker.
![]()
Part 3: Wondershare Filmora: A Comprehensive Solution to Video Editing
Do you know that there is a video editing platform that makes all video motion tracking process easy? Wondershare Filmora presents a coherent video editing system for its users with high-quality outputs. The platform integrates some of the greatest features and makes it useful for all users. Even if you are a rookie in video editing, this video editing platform can help you make the best of videos.
Start Motion Tracking For Win 7 or later(64-bit)
Start Motion Tracking For macOS 10.14 or later
Motion Tracking is possible with Wondershare Filmora, which is entirely automated. All you have to do is click a button, and the process will execute. Wondershare Filmora helps users apply different effects and track them within the videos. Instead of objects, you can increase your video motion tracking into effects and other elements.
![]()
Features of Wondershare Filmora Video Editor
To know more about this video editing platform, look into the prominent features offered by Filmora. There is much that this software provides apart from motion tracking videos. This will help you generate a better understanding of this best motion-tracking software.
Auto Beat Sync
You can synchronize your audio and videos across this automated video editor. Filmora provides an auto beat sync function that helps users create videos that can be synchronized. Smoothen your videos and make them look professional with a single click. This does not leave behind any noise or echo within the videos .
Text-to-Speech Function
Wondershare Filmora features a dedicated AI text-to-speech functionality. This helps in the automatic conversion of text into speech across the video editor. Users have to add text which will be converted to speech. In this way, creating voiceovers is not only easy but also quick.
Speed Ramping
While you can motion-track your videos, the platform also provides a speed ramping system. Adjusting the speed uniformly or through ramping is effective with Filmora, as it makes it simple to cover. You can adjust the speeds using sliders and graphs.
Part 4: Guide: Perform Paper Motion Tracking With High Quality Using Wondershare Filmora
Filmora is a popular video editing platform among video editors for motion track videos. It offers exquisite features along with a smooth and sleek interface. You can also ensure the best quality integration of motion tracking in videos with Filmora. Do you wish to learn the steps to perform motion tracking with this best motion tracking software? Worry no more because the below-given steps will help you in this matter:
Start Motion Tracking For Win 7 or later(64-bit)
Start Motion Tracking For macOS 10.14 or later
Step 1: Import Video in Filmora
To get started, launch Filmora on your device, select “New Project,” and choose the “Click here to import media” option. To proceed, add the video you want to apply motion tracking. Once the video is visible in the “Import Media” section, drag it to “Timeline.”
![]()
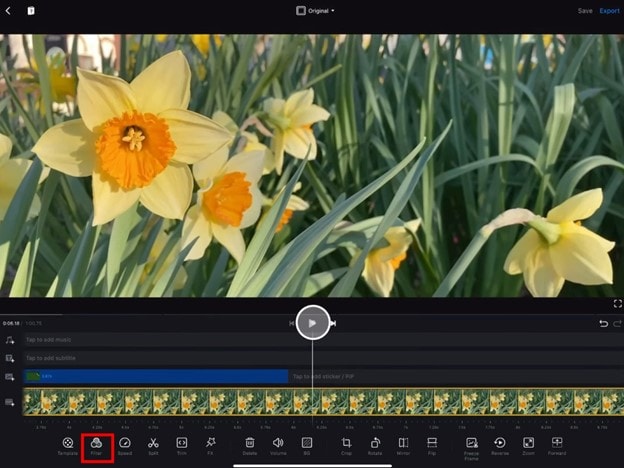
Step 2: Add Motion Tracking in the Video
Select the video in “Timeline” and click the “Motion Tracking” button from the “Toolbar” present above the “Timeline.” Conversely, double-click the video and choose the “Video” tab from the editing settings.
![]()
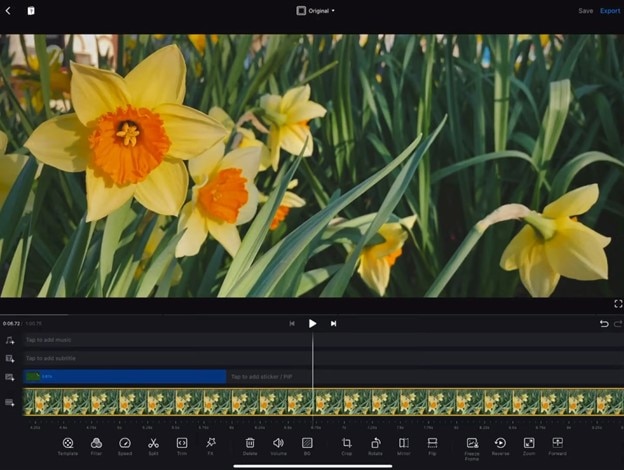
Step 3: Customize Motion Tracking and Initiate It
To enable the box customization, double-click the “Motion Tracking Box.” Drag the “Motion Tracking Box” on the moving object and cover the whole object in the box. You can also adjust the duration of motion tracking by trimming the video in the timeline. Once done, click the “Click to start Motion Track” button and wait a few moments.
![]()
Step 4: Add Elements or Effects to the Video
Next, select “OK” from the prompt window and go to the “Element” section. Choose an “Element” and drag it into “Timeline” above your video section. To adjust the element, you must double-click on it. There is no restriction on using an element, as you can add “Effects” or other things.
You need to revert to the “Motion Tracking” section and select the drop-down appearing against the option. Choose the name of your “Effect” or “Element” that you’ve applied to before. The particular motion track will be enhanced through an effect or element.
![]()
Step 5: Export Motion Tracked Video in Device
For exporting video, click the “Export” button and personalize the “Export Settings.” Finally, tap “Export” and save the video on your device.
![]()
Conclusion
This article has pointed out the prominence of motion tracking in video editing. An idea for performing video motion tracking in Adobe After Effects has been provided. The article has offered Wondershare Filmora as the ideal solution to this requirement.
You can embed the motion tracking function and perform all the processes within a few seconds. If you have an object that you want to focus on in a video, trying motion tracking is the best option for this.
Start Motion Tracking For Win 7 or later(64-bit)
Start Motion Tracking For macOS 10.14 or later
Part 2: How to Perform Motion Tracking in Adobe After Effects?
As you have gained knowledge about motion tracking, there are many platforms that offer this feature. Adobe After Effects is a video editing platform that can help you perform video motion tracking. If you are a user of this tool, you can learn the steps to motion track your video below:
Step 1: Open Adobe After Effects on your computer and import your video files to the timeline of the platform. Add the object you wish to motion track on Adobe After Effects.
![]()
Step 2: Lead to the “Layer” tab from the top and select the “New” option from the drop-down menu. Continue to select “Null Object” to add a layer to the timeline.
![]()
Step 3: Select the video clip and continue to the “Animation” tab from the top. Select “Track Motion” from the drop-down menu that appears. This will generate a box for selecting the object for motion tracking. You can extend the box and drag it anywhere in the video clip. To check the motion tracking object, click the “Analyze Forward” button on the bottom-right corner of the screen.
![]()
Step 4: As the object is analyzed, click the “Edit Target” button to open a new screen. Continue to change the layer to “Null Object” and click “OK.” Continue to select “Apply” and click “OK” against the pop-up menu that opens. This is how Adobe After Effects applies the motion tracker.
![]()
Part 3: Wondershare Filmora: A Comprehensive Solution to Video Editing
Do you know that there is a video editing platform that makes all video motion tracking process easy? Wondershare Filmora presents a coherent video editing system for its users with high-quality outputs. The platform integrates some of the greatest features and makes it useful for all users. Even if you are a rookie in video editing, this video editing platform can help you make the best of videos.
Start Motion Tracking For Win 7 or later(64-bit)
Start Motion Tracking For macOS 10.14 or later
Motion Tracking is possible with Wondershare Filmora, which is entirely automated. All you have to do is click a button, and the process will execute. Wondershare Filmora helps users apply different effects and track them within the videos. Instead of objects, you can increase your video motion tracking into effects and other elements.
![]()
Features of Wondershare Filmora Video Editor
To know more about this video editing platform, look into the prominent features offered by Filmora. There is much that this software provides apart from motion tracking videos. This will help you generate a better understanding of this best motion-tracking software.
Auto Beat Sync
You can synchronize your audio and videos across this automated video editor. Filmora provides an auto beat sync function that helps users create videos that can be synchronized. Smoothen your videos and make them look professional with a single click. This does not leave behind any noise or echo within the videos .
Text-to-Speech Function
Wondershare Filmora features a dedicated AI text-to-speech functionality. This helps in the automatic conversion of text into speech across the video editor. Users have to add text which will be converted to speech. In this way, creating voiceovers is not only easy but also quick.
Speed Ramping
While you can motion-track your videos, the platform also provides a speed ramping system. Adjusting the speed uniformly or through ramping is effective with Filmora, as it makes it simple to cover. You can adjust the speeds using sliders and graphs.
Part 4: Guide: Perform Paper Motion Tracking With High Quality Using Wondershare Filmora
Filmora is a popular video editing platform among video editors for motion track videos. It offers exquisite features along with a smooth and sleek interface. You can also ensure the best quality integration of motion tracking in videos with Filmora. Do you wish to learn the steps to perform motion tracking with this best motion tracking software? Worry no more because the below-given steps will help you in this matter:
Start Motion Tracking For Win 7 or later(64-bit)
Start Motion Tracking For macOS 10.14 or later
Step 1: Import Video in Filmora
To get started, launch Filmora on your device, select “New Project,” and choose the “Click here to import media” option. To proceed, add the video you want to apply motion tracking. Once the video is visible in the “Import Media” section, drag it to “Timeline.”
![]()
Step 2: Add Motion Tracking in the Video
Select the video in “Timeline” and click the “Motion Tracking” button from the “Toolbar” present above the “Timeline.” Conversely, double-click the video and choose the “Video” tab from the editing settings.
![]()
Step 3: Customize Motion Tracking and Initiate It
To enable the box customization, double-click the “Motion Tracking Box.” Drag the “Motion Tracking Box” on the moving object and cover the whole object in the box. You can also adjust the duration of motion tracking by trimming the video in the timeline. Once done, click the “Click to start Motion Track” button and wait a few moments.
![]()
Step 4: Add Elements or Effects to the Video
Next, select “OK” from the prompt window and go to the “Element” section. Choose an “Element” and drag it into “Timeline” above your video section. To adjust the element, you must double-click on it. There is no restriction on using an element, as you can add “Effects” or other things.
You need to revert to the “Motion Tracking” section and select the drop-down appearing against the option. Choose the name of your “Effect” or “Element” that you’ve applied to before. The particular motion track will be enhanced through an effect or element.
![]()
Step 5: Export Motion Tracked Video in Device
For exporting video, click the “Export” button and personalize the “Export Settings.” Finally, tap “Export” and save the video on your device.
![]()
Conclusion
This article has pointed out the prominence of motion tracking in video editing. An idea for performing video motion tracking in Adobe After Effects has been provided. The article has offered Wondershare Filmora as the ideal solution to this requirement.
You can embed the motion tracking function and perform all the processes within a few seconds. If you have an object that you want to focus on in a video, trying motion tracking is the best option for this.
How to Use 3D Camera Tracking Effects in After Effects
Adobe After Effects is an ever-growing product, with new features introduced almost every year. One of these features is the 3D Camera Tracking, which allows you to take your motion graphic effects to the next level.
Camera Tracking is extracting the camera movement from a recorded video sequence. This process allows filmmakers to add computer-generated elements to a live action shot, track objects throughout a shot for compositing, and estimate camera movements for virtual reality applications.
In this article, we will explore what Camera Tracking is and Motion Tracking in After Effect. We’ll also show you how to use 3D Camera Tracking in After Effects on a Windows PC.
Part 1. What Is Camera Tracking
Camera Tracking is a process that determines the movement of a video clip. This information can be used to add certain effects to the video, such as objects that seem to follow the camera or text that appears to be stationary in the frame.
Camera Tracking is a relatively simple process, but it can be time-consuming. However, the results are often worth the effort, as it can add a whole new level of realism to your footage clips.
For example, you have taken a video clip of a zoo and want to add an object to it while making sure it gives a realistic look. This is where the Camera Tracking feature can help you make a smooth transition and add the element as if it was there.
Part 2. Why Use Camera Tracking?
Now that you know what Camera Tracking is, let’s have a look at some benefits of using it:
- Add a 3D object or element to a 2D video clip.
- Embed objects, texts, etc., to a video.
- Stabilize a shaky camera/video clip.
- Create special effects.
- Apply color grading.
- Replace a TV or PC screen with some information.
Thus, if you need some basic compositions or advanced ones, the Camera Tracking feature will help you track your videos, embed anything you want, or create special effects to make your clip different.
Part 3. Motion Tracking In After Effects
The Motion Tracking capability is Adobe After Effects’ feature that allows you to track the movement of the camera/an object in a video clip and use the data to add effects to objects.
Motion tracking can be used for various effects, like creating realistic text animations or adding special effects to objects in a video.
There are four main types of Motion Tracking in After Effects, each with its own advantages and disadvantages:
Single Point Tracking
Single Point tracking tracks a single position in a video clip. You can use it for composing a video clip with a single point of focus, and it is suitable for following the movement of an object with right-left or up-down motion.
Advantage: Single Point Tracking is perfect for tracking a single position or motion of a single object.
Disadvantage: No scale or rotation properties and needs a clear contrast point for effective results.
Two Point Tracking
Two Point Tracking is a feature that allows you to track two points in a footage clip and can be used for scale, motion, and rotation tracking.
Advantage: Two Point Tracking can track scale and rotation along with the motion.
Disadvantage: It doesn’t give effective results with a shaky video clip.
Four Point Tracking
The Four Point Tracking feature lets you track four different points (corners) in your footage and apply the tracking data to a layer in your composition.
The four points can be placed at the screen’s corners in your shot, and new footage is applied to cover the screen.
Advantage: Directly pins the data to each corner of the image.
Disadvantage: Cannot be used to create a 3D object.
3D Camera Tracking
With 3D camera tracking, you can track the movement of a camera in a video and place 3D elements in the scene that match the camera’s movement. This is a great way to add realism to your graphics and make them look like they’re part of the scene.
Advantage: 3D Camera Tracking can help you add shapes, texts, or 3D objects to 2D footage.
Disadvantage: A bit tricky and needs an expert grip on the tool to use effectively.
Part 4. How To Use 3D Camera Tracking In After Effects Of Windows
Here’s a simple and quick rundown of how to use 3D camera tracking in After Effects:
Step1Import Your Video Footage
Launch Adobe After Effects, create a new composition, and import your footage. Once your clip is uploaded, click the Window Menu. Scroll down and choose “Tracker.”
![]()
Here you will see four tracking options:
- Track Camera
- Warp Stabilizer
- Track Motion
- Stabilize Motion
![]()
Click “Track Camera” to add the 3D Camera Tracker effect to your selected layer. After Effects will start analyzing the layer, show the percentage, and count the total frames of clips tracked.
![]()
Note: The dots that appear on your video clips cannot be rendered out, as they are strictly referential.

Step2Establish The Tracking Points
You have to select the tracking points and a plane to which it must be tracked. To do this, hover over the tracking point references in the After Effect compositions window. Between the three tracking points, a triangle will form, and a red “target” will appear to help you better visualize the plane.
Now, you have to find a tracking point that lays the red “target” parallel to your selected plane. Next, select the triangle that lines up best for your surface. Move the arrow away to disable the picker and stop the red “target.”
![]()
Step3Add The Text To Your Video Clip
Once you define the plane, it’s time to add text to your video clip. To do this, right-click on the triangle you have set previously, and a window will appear, allowing you to create new layers.
Click “Create Text” to place the text on your tracked video clip. A new text layer will be added using the tracking data.

Step4Align Text On Tracked Footage
Now you have to align your text. In the timeline, locate the tracked text layer and click the arrow to the left to unveil all the editable properties for the layer.
Click the “Transform” option to use the transform options and use the layer lines to adjust the X, Y, and Scale values afterward.
![]()
Note: You can select your layer and press the S, P, R, or T keys to adjust the scale, position, rotation, and opacity, respectively.
Your text will now be added to your video footage. The method is similar to adding solid or null to your clips. However, the exact steps might differ a little.
Video - Learn 3D Camera Tracking In After Effects
Conclusion
In this article, we’ve discussed what Camera Tracking is and why to use it. We also provided information regarding Motion Tracking, its four types, and their advantages and disadvantages.
Furthermore, we walked you through the step-by-step process of using 3D Camera Tracking in Adobe After Effects for Windows.
We hope this guide helps you to add text to your video footage without much effort, and you now have complete knowledge of the Camera Tracking feature.
Free Download For Win 7 or later(64-bit)
Free Download For macOS 10.14 or later
Step2Establish The Tracking Points
You have to select the tracking points and a plane to which it must be tracked. To do this, hover over the tracking point references in the After Effect compositions window. Between the three tracking points, a triangle will form, and a red “target” will appear to help you better visualize the plane.
Now, you have to find a tracking point that lays the red “target” parallel to your selected plane. Next, select the triangle that lines up best for your surface. Move the arrow away to disable the picker and stop the red “target.”
![]()
Step3Add The Text To Your Video Clip
Once you define the plane, it’s time to add text to your video clip. To do this, right-click on the triangle you have set previously, and a window will appear, allowing you to create new layers.
Click “Create Text” to place the text on your tracked video clip. A new text layer will be added using the tracking data.
Step4Align Text On Tracked Footage
Now you have to align your text. In the timeline, locate the tracked text layer and click the arrow to the left to unveil all the editable properties for the layer.
Click the “Transform” option to use the transform options and use the layer lines to adjust the X, Y, and Scale values afterward.
![]()
Note: You can select your layer and press the S, P, R, or T keys to adjust the scale, position, rotation, and opacity, respectively.
Your text will now be added to your video footage. The method is similar to adding solid or null to your clips. However, the exact steps might differ a little.
Video - Learn 3D Camera Tracking In After Effects
Conclusion
In this article, we’ve discussed what Camera Tracking is and why to use it. We also provided information regarding Motion Tracking, its four types, and their advantages and disadvantages.
Furthermore, we walked you through the step-by-step process of using 3D Camera Tracking in Adobe After Effects for Windows.
We hope this guide helps you to add text to your video footage without much effort, and you now have complete knowledge of the Camera Tracking feature.
Free Download For Win 7 or later(64-bit)
Free Download For macOS 10.14 or later
How to Use LUTs in VN Editor – Complete Guide and Best LUTs Download
Hello and welcome to another article full of information and excitement. The topic of this article is LUT for the VN editor. So it will be exciting for those who want to use LUTs in their video to make them look nice and well. As we will discuss today that what is VN editor and how you can add LUTs to your videos using it on the devices it is compatible for. Moreover, where you can download some fantastic LUTs like moody LUTs, which help your videos to look nice, and which software you should use for this purpose if you are running a device on which the VN editor is not compatible. So let’s begin!
Part 1. What is VN editor?
VN editor is one of the best choices for video editing on mobiles and Mac. Fast editing, transitions, effects, filters, colors, subtitles, music, and many other features make the VN video editing app a great tool for producing and editing videos. It aims to make editing shorter and more feature-rich, empowering everyone to take control of their own lives. You cannot only produce great videos but good films as well. In the following, we will discuss how you can add LUTs to your videos using it.

Part 2. How to use LUTs in VN editor?
First, we must know that it is compatible with which platforms. So, it is now available for Android, iOS, and Mac OS only. However, you can also use it on Windows with some Android or iOS emulators, but it is not a very continent way in our suggestions. Even after doing this, it does not work well on your Windows. Maybe you will face some glitches or malfunctioning problems. So it is better to use it on only those platforms for which it is primarily available. Please read the instructions below since we will go through how to use LUTs in it later on.
On Mac:
First of all, we will learn how you can do it on Mac:
- Download the VN Editor for Mac and open it.
- Add your video and then tap the filters option.
- Now choose custom filters and then select the LUTs pack.

- Select the desired LUT and apply.
On Mobile:
Secondly, we will discuss how we can do this on our mobiles (Android or iOS). The procedure on both devices (Android or iOS) is almost comparable. Therefore, we will discuss the steps from the perspective of both of these here:
- First, download the VN editor from your mobile app store (Android or iOS) and the LUTs pack you want to use in your video.
- After downloading them on your mobile, open the VN editor application.
- Create a new project and add your video to it.

- Then click on the Filters option and select add external or custom filters option next to the existing filters.
- It will take you to the File manager of your mobile, from which you have to find the folder in which you have stored your LUTs.
- After finding them, you can select those LUTs you want to use in your video and then click on the done or select button.
- Your downloaded LUTs start showing in the VN editor, and you can use them in your videos as you want.
Part 3. Best LUTs resource for VN video editor
1. Presets Store
Presets Store is an online platform that helps you with various Filters, LUTs, and other presets. So you can download LUTs for your videos for the VN editor using it. However, it’s not a free service. You have to pay for the LUTs you want to download from here. You can visit their YouTube channel to follow the latest LUTs, Filters and other presets on this platform.
2. Apna Editz
Apna Editz is another online platform you can use for this purpose. It also provides you with a fantastic variety of Presets like LUTs, Filters, and many other similar effects, which you can use in your video using the VN editor. The main Pros of this recommendation are that it’s a free website. So you can download LUTs for your videos from it for free. Keep an eye on their YouTube channel to be updated about the latest LUTs.
3. Lut Preset
Lut Preset is another alternative to all the above ones. You can get almost all your favorite LUTs for VN editor for free here and then use them in your videos as you want. They also share the latest LUTs on their YouTube Channel.
4. Pencil Hub
Pencil Hub is also a good option in this concern. However, it does not have too much variety of VN LUTs, but you can still use it to download some of the best LUTs for VN editors. To get informed of their every new effect and LUTs, their YouTube channel is the primary source.
5. YRP EDITZ
YRP ETIDZ is another good option if you are still looking for some fantastic VN LUTs. They, too not have a large variety of presets and LUTs. However, if you want some most commonly used LUTs for VN Editor, then they are a good option. You’ll notify of their most website updates by checking their YouTube channel.
Part 4. How to add LUTs to the best alternative to the VN editor?
VN Editor is undoubtedly an excellent choice to add LUTs to your videos. However, the VN editor is best suitable for mobile devices. To enhance your LUTs and effects, it would be great if you used some desktop software. Wondershare Filmora offers a great variety of built-in LUTs to choose from. Let’s look at how we can use Filmora to add LUTs:
- Add your video and tap the tools, then click the Color option.
- Now select the Color Correction option and then choose 3D LUT.
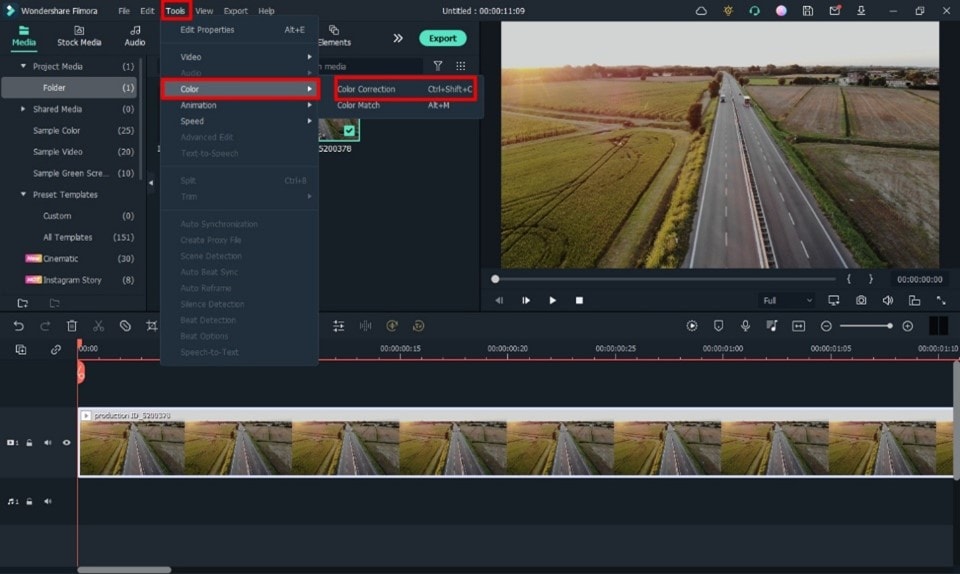
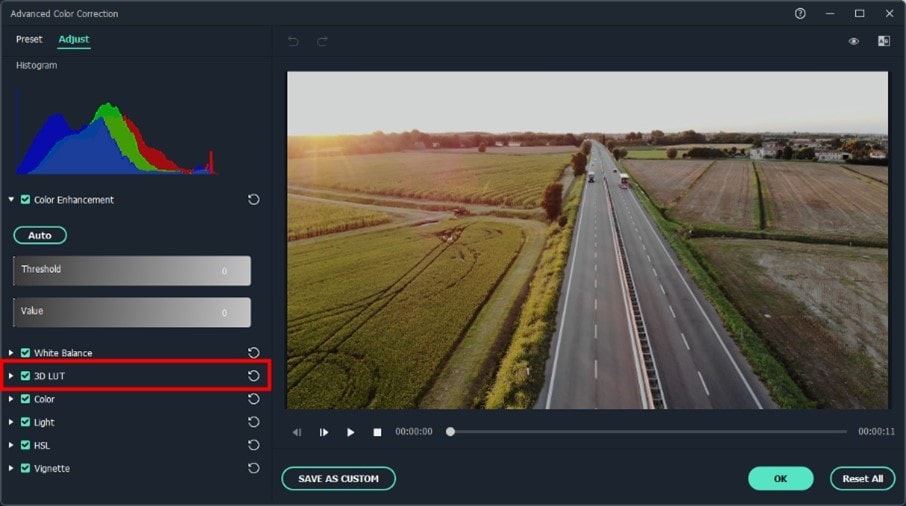
- Click the drop-down menu and select the Load new LUT option. Here you can import other downloaded preset LUTs to use
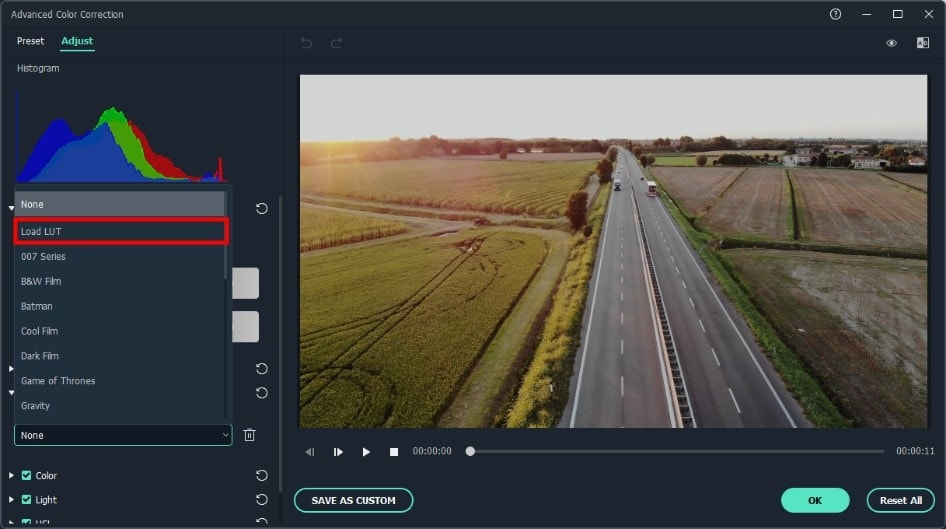
- Choose the LUT and click OK. Your new fantastic video is ready now.

Closing Thoughts
This post recommends several lut resources and demonstrates how to import them if you are a devoted user of VN editor and want to learn how to utilize it for video color grading. The more potent desktop editor Wondershare Filmora, which offers a range of built-in LUT sources and supports color grading settings, is of course recommended if you want to take your videos to the next level. Thanks for reading.
Free Download For Win 7 or later(64-bit)
Free Download For macOS 10.14 or later
2. Apna Editz
Apna Editz is another online platform you can use for this purpose. It also provides you with a fantastic variety of Presets like LUTs, Filters, and many other similar effects, which you can use in your video using the VN editor. The main Pros of this recommendation are that it’s a free website. So you can download LUTs for your videos from it for free. Keep an eye on their YouTube channel to be updated about the latest LUTs.
3. Lut Preset
Lut Preset is another alternative to all the above ones. You can get almost all your favorite LUTs for VN editor for free here and then use them in your videos as you want. They also share the latest LUTs on their YouTube Channel.
4. Pencil Hub
Pencil Hub is also a good option in this concern. However, it does not have too much variety of VN LUTs, but you can still use it to download some of the best LUTs for VN editors. To get informed of their every new effect and LUTs, their YouTube channel is the primary source.
5. YRP EDITZ
YRP ETIDZ is another good option if you are still looking for some fantastic VN LUTs. They, too not have a large variety of presets and LUTs. However, if you want some most commonly used LUTs for VN Editor, then they are a good option. You’ll notify of their most website updates by checking their YouTube channel.
Part 4. How to add LUTs to the best alternative to the VN editor?
VN Editor is undoubtedly an excellent choice to add LUTs to your videos. However, the VN editor is best suitable for mobile devices. To enhance your LUTs and effects, it would be great if you used some desktop software. Wondershare Filmora offers a great variety of built-in LUTs to choose from. Let’s look at how we can use Filmora to add LUTs:
- Add your video and tap the tools, then click the Color option.
- Now select the Color Correction option and then choose 3D LUT.
- Click the drop-down menu and select the Load new LUT option. Here you can import other downloaded preset LUTs to use
- Choose the LUT and click OK. Your new fantastic video is ready now.
Closing Thoughts
This post recommends several lut resources and demonstrates how to import them if you are a devoted user of VN editor and want to learn how to utilize it for video color grading. The more potent desktop editor Wondershare Filmora, which offers a range of built-in LUT sources and supports color grading settings, is of course recommended if you want to take your videos to the next level. Thanks for reading.
Free Download For Win 7 or later(64-bit)
Free Download For macOS 10.14 or later
Create Amazing Slow-Motion Videos: 8 Affordable Slow-Motion Cameras
Budget slow-motion cameras are not just for filmmakers but are for everyone who loves making eye-catching videos and pictures. These specialized cheap slow mo cameras let us slow down time and see things in smooth frames that we normally can’t. However, not everyone can afford such fancy cameras, which are usually expensive. So, we will talk about affordable slow-motion cameras and their importance in videography.
Slow Motion Video Maker Slow your video’s speed with better control of your keyframes to create unique cinematic effects!
Make A Slow Motion Video Make A Slow Motion Video More Features

Part 1: Some Great Cheap Slow-Motion Cameras One Can Go Across
If you are looking for some cameras that are budget-friendly but still manage to capture those cool, slow-motion moments, this article will help you with it. We will enlist some of the best inexpensive slow-motion cameras you can buy for detailed videography without worrying about your money.
- DJI Pocket 2
- Insta360 One X2
- GoPro HERO11
- Sony Cyber-Shot DSC-RX100 VII
- Canon EOS R50
- Nikon Z6 II
- Canon PowerShot G5 X Mark II
- Fujifilm X-S20
1. DJI Pocket 2
Another budget-friendly camera named DJI Pocket 2 Creative Combo is a small camera perfect for videographers. It fits right in your pocket and is easy for any adventure. The camera has a special feature that keeps videos steady, even when you’re moving. Moreover, its smart tracking feature keeps your subjects in focus no matter how they move. Plus, it takes great pictures with a good sensor and shoots super clear 4K videos at 60 frames per second.
Average Price: $344

2. Insta360 One X2
Insta360 One X2 is a versatile, pocket-sized camera that is your all-in-one filming solution. With this affordable slow-motion camera, you can capture 360-degree footage. You can also use stable wide-angle shots to capture scenes from far away. With its Flow State Stabilization, your videos stay steady without the need for a gimbal. Also, with its 100MB bitrate video recording, you can experience smoother slow-mo videos.
Average Price: $300

3. GoPro HERO11
GoPro HERO11 Black allows you to shoot high-res 5.3K video at 60 fps and 4K at 120 fps. You can capture life’s action in stunning detail with its slow-motion feature. Also, thanks to Hyper Smooth 5.0 stabilization, your footage stays buttery smooth. Whether you’re a pro or a newbie, the one-button controls make it easy to use. All the features of this cheap slow-motion camera are packed into a compact and waterproof design for epic adventures.
Average Price: $299

4. Sony Cyber-Shot DSC-RX100 VII
The Sony RX100 VII is a really powerful slow-motion camera. It’s got a 20.1MP sensor that takes awesome pictures. With its Zeiss Vario-Sonar T lens, it can zoom to a great extent, allowing the capture of scenes with lots of details. Also, it focuses quickly, like in 0.02 seconds, and can shoot up to 20 frames per second without any delays. It can shoot 4K videos and has features like Interval Shooting and image stabilization, making it perfect for pro-quality videos.
Average Price: $950

5. Canon EOS R50
The Canon EOS R50 with an RF-S18-45mm STM Lens is a camera designed for filmmakers. The camera can shoot 4K videos and even super clear Full HD videos at 120 frames per second. Another handy thing is its auto-assist feature that helps with different photo settings. The focusing system is accurate and can quickly focus on different objects. And when the light isn’t great, it has a built-in flash that helps take better slow-motion videos at night.
Average Price: $699

6. Nikon Z6 II
Nikon Z6 II captures smooth slow-motion at Full HD/120p. It also provides a stunning 4K Ultra HD/60p video for a professional look. With an impressive 24.5 MP sensor, it excels in low-light conditions. You can stay powered on the go with the convenience of charging via USB-C while shooting. So, enjoy the lightweight and compact design of this affordable slow-motion camera for easy portability.
Average Price: $1500

7. Canon PowerShot G5 X Mark II
Canon PowerShot G5 X Mark II has a good 20.1-megapixel 1.0-inch Stacked CMOS Sensor that makes pictures look amazing. It also has a 5x Optical Zoom Lens with Optical Image Stabilizer, so it’s great for taking different kinds of clear and sharp photos. Plus, you can shoot awesome videos with this cheap slow-mo camera at 120 frames per second. This feature makes this camera an ideal choice for professional videography.
Average Price: $949

8. Fujifilm X-S20
The Fujifilm X-S20 is an in-expensive slow-motion camera known for its advanced features. With a 26.1MP sensor, this camera captures high-quality images and videos. The 3.0-inch vari-angle touchscreen is user-friendly to allow even beginners to shoot professional videos. Moreover, it is ideal for aesthetic video recording, as it can capture footage in an impressive 6.2K resolution.
Average Price: $1299

Part 2: Make Perfect Slow-Motion Videos with The Best Desktop Application
Let’s discuss making slow-motion videos without using any particular camera. You heard it right! It is possible to generate a slow-motion video filmed by any smartphone camera. You just have to install Wondershare Filmora on your system and import the video into it. This tool is capable of slowing down video smoothly with the help of its advanced AI features.
Wondershare Filmora also helps you to generate AI music and scripts that enhance your productivity. Moreover, it runs without any lagging, allowing you to continue the editing process seamlessly. Explore more features of Filmora below.
Steps Involved to Slow Down Video Professionally with Speed Ramping
In this section, we will learn how to edit your video to slow down using Filmora. Wondershare Filmora has a feature named Speed Ramping that allows you to slow down different parts of a video. Let’s discover how this can be achieved in a step-wise fashion.
Free Download For Win 7 or later(64-bit)
Free Download For macOS 10.14 or later
Step 1Activate Filmora and Import the Video
To begin, open Wondershare Filmora and create a new project, followed by importing your video. Subsequently, click the “+” icon on the video and choose the “Match to Media” option to ensure your project settings match the video’s resolution.

Step 2Make the Video to Slow Down
Add the video to the timeline and select the “Speed” icon. Then, pick a preset like 0.5x from the “Slow” menu to slow down the entire clip. On the other hand, you can also right-click the video, go to “Speed,” then “Uniform Speed,” and drag the slider left for slow motion.

Step 3Applying Speed Ramping on Specific Parts of Video
To create slow motion in specific parts of your video, go to the “Speed Ramping” window and choose the “Custom” option. Make adjustments to the speed by moving points below the line.

Step 4Freeze a Frame in the Video
If you want to freeze a frame, position the play head where you want to freeze it and select the “Add Freeze Frame” option. Set the freeze duration in the “Freeze Time Field” and adjust its position as needed. Click “OK” to save the changes.

Key Features of Wondershare Filmora
Filmora is a versatile video editing software that allows you to perform various tasks easily. This software is being used by professionals because of its innovative features. Some of these advanced features are listed below:
1. AI Copilot Editing
AI Copilot Editing is an innovative way to edit videos. It doesn’t just help; it also checks for mistakes and tells you if something’s wrong. This eliminates various errors and helps you edit smoothly. AI Copilot Editing changes how we edit videos, using smart tech to give helpful support for a smoother and more accurate editing experience.
2. AI Music Generator
The AI Music Generator changes how music gets made and helps create complete music tracks super-fast. You can choose different music styles and genres easily. Whether you need music for movies, for vlogs, or tunes for ads, this tool has you covered. This music can make your projects better and match exactly what you’re aiming for in your content.
3. AI Thumbnail Creator
The Automatic Thumbnail Generator makes creating video thumbnails super easy. It looks at your video and picks out three great shots for you to choose from. You can easily edit these shots to match what you want. You can also add text, titles, or cool graphics to the thumbnails. There are 58 different thumbnail styles to pick from, so you can find one that fits your video.
4. Screen Recorder
The Screen Recorder is an amazing tool that lets you record anything on your computer screen. It can also include your webcam footage while recording. You can capture both the sounds from your microphone and computer at the same time. It’s great for making videos of games, tutorials, or content for YouTube. Plus, it comes with editing tools and effects to make your recordings better before sharing them.
Conclusion
In conclusion, making awesome slow-motion videos doesn’t have to be hard if you’re on a budget. There are lots of affordable slow-mo cameras out there that can shoot great footage. Even then, you can always rely on the Filmora tool that can help create a slow-motion video. In this software, the Speed Ramping feature turns your raw videos into appealing slow-motion ones.
Whether you’ve got a cheap camera or editing tools, the most important thing is your imagination and how you see things.
Make A Slow Motion Video Make A Slow Motion Video More Features
Part 1: Some Great Cheap Slow-Motion Cameras One Can Go Across
If you are looking for some cameras that are budget-friendly but still manage to capture those cool, slow-motion moments, this article will help you with it. We will enlist some of the best inexpensive slow-motion cameras you can buy for detailed videography without worrying about your money.
- DJI Pocket 2
- Insta360 One X2
- GoPro HERO11
- Sony Cyber-Shot DSC-RX100 VII
- Canon EOS R50
- Nikon Z6 II
- Canon PowerShot G5 X Mark II
- Fujifilm X-S20
1. DJI Pocket 2
Another budget-friendly camera named DJI Pocket 2 Creative Combo is a small camera perfect for videographers. It fits right in your pocket and is easy for any adventure. The camera has a special feature that keeps videos steady, even when you’re moving. Moreover, its smart tracking feature keeps your subjects in focus no matter how they move. Plus, it takes great pictures with a good sensor and shoots super clear 4K videos at 60 frames per second.
Average Price: $344
2. Insta360 One X2
Insta360 One X2 is a versatile, pocket-sized camera that is your all-in-one filming solution. With this affordable slow-motion camera, you can capture 360-degree footage. You can also use stable wide-angle shots to capture scenes from far away. With its Flow State Stabilization, your videos stay steady without the need for a gimbal. Also, with its 100MB bitrate video recording, you can experience smoother slow-mo videos.
Average Price: $300
3. GoPro HERO11
GoPro HERO11 Black allows you to shoot high-res 5.3K video at 60 fps and 4K at 120 fps. You can capture life’s action in stunning detail with its slow-motion feature. Also, thanks to Hyper Smooth 5.0 stabilization, your footage stays buttery smooth. Whether you’re a pro or a newbie, the one-button controls make it easy to use. All the features of this cheap slow-motion camera are packed into a compact and waterproof design for epic adventures.
Average Price: $299
4. Sony Cyber-Shot DSC-RX100 VII
The Sony RX100 VII is a really powerful slow-motion camera. It’s got a 20.1MP sensor that takes awesome pictures. With its Zeiss Vario-Sonar T lens, it can zoom to a great extent, allowing the capture of scenes with lots of details. Also, it focuses quickly, like in 0.02 seconds, and can shoot up to 20 frames per second without any delays. It can shoot 4K videos and has features like Interval Shooting and image stabilization, making it perfect for pro-quality videos.
Average Price: $950
5. Canon EOS R50
The Canon EOS R50 with an RF-S18-45mm STM Lens is a camera designed for filmmakers. The camera can shoot 4K videos and even super clear Full HD videos at 120 frames per second. Another handy thing is its auto-assist feature that helps with different photo settings. The focusing system is accurate and can quickly focus on different objects. And when the light isn’t great, it has a built-in flash that helps take better slow-motion videos at night.
Average Price: $699
6. Nikon Z6 II
Nikon Z6 II captures smooth slow-motion at Full HD/120p. It also provides a stunning 4K Ultra HD/60p video for a professional look. With an impressive 24.5 MP sensor, it excels in low-light conditions. You can stay powered on the go with the convenience of charging via USB-C while shooting. So, enjoy the lightweight and compact design of this affordable slow-motion camera for easy portability.
Average Price: $1500
7. Canon PowerShot G5 X Mark II
Canon PowerShot G5 X Mark II has a good 20.1-megapixel 1.0-inch Stacked CMOS Sensor that makes pictures look amazing. It also has a 5x Optical Zoom Lens with Optical Image Stabilizer, so it’s great for taking different kinds of clear and sharp photos. Plus, you can shoot awesome videos with this cheap slow-mo camera at 120 frames per second. This feature makes this camera an ideal choice for professional videography.
Average Price: $949
8. Fujifilm X-S20
The Fujifilm X-S20 is an in-expensive slow-motion camera known for its advanced features. With a 26.1MP sensor, this camera captures high-quality images and videos. The 3.0-inch vari-angle touchscreen is user-friendly to allow even beginners to shoot professional videos. Moreover, it is ideal for aesthetic video recording, as it can capture footage in an impressive 6.2K resolution.
Average Price: $1299
Part 2: Make Perfect Slow-Motion Videos with The Best Desktop Application
Let’s discuss making slow-motion videos without using any particular camera. You heard it right! It is possible to generate a slow-motion video filmed by any smartphone camera. You just have to install Wondershare Filmora on your system and import the video into it. This tool is capable of slowing down video smoothly with the help of its advanced AI features.
Wondershare Filmora also helps you to generate AI music and scripts that enhance your productivity. Moreover, it runs without any lagging, allowing you to continue the editing process seamlessly. Explore more features of Filmora below.
Steps Involved to Slow Down Video Professionally with Speed Ramping
In this section, we will learn how to edit your video to slow down using Filmora. Wondershare Filmora has a feature named Speed Ramping that allows you to slow down different parts of a video. Let’s discover how this can be achieved in a step-wise fashion.
Free Download For Win 7 or later(64-bit)
Free Download For macOS 10.14 or later
Step 1Activate Filmora and Import the Video
To begin, open Wondershare Filmora and create a new project, followed by importing your video. Subsequently, click the “+” icon on the video and choose the “Match to Media” option to ensure your project settings match the video’s resolution.
Step 2Make the Video to Slow Down
Add the video to the timeline and select the “Speed” icon. Then, pick a preset like 0.5x from the “Slow” menu to slow down the entire clip. On the other hand, you can also right-click the video, go to “Speed,” then “Uniform Speed,” and drag the slider left for slow motion.
Step 3Applying Speed Ramping on Specific Parts of Video
To create slow motion in specific parts of your video, go to the “Speed Ramping” window and choose the “Custom” option. Make adjustments to the speed by moving points below the line.
Step 4Freeze a Frame in the Video
If you want to freeze a frame, position the play head where you want to freeze it and select the “Add Freeze Frame” option. Set the freeze duration in the “Freeze Time Field” and adjust its position as needed. Click “OK” to save the changes.
Key Features of Wondershare Filmora
Filmora is a versatile video editing software that allows you to perform various tasks easily. This software is being used by professionals because of its innovative features. Some of these advanced features are listed below:
1. AI Copilot Editing
AI Copilot Editing is an innovative way to edit videos. It doesn’t just help; it also checks for mistakes and tells you if something’s wrong. This eliminates various errors and helps you edit smoothly. AI Copilot Editing changes how we edit videos, using smart tech to give helpful support for a smoother and more accurate editing experience.
2. AI Music Generator
The AI Music Generator changes how music gets made and helps create complete music tracks super-fast. You can choose different music styles and genres easily. Whether you need music for movies, for vlogs, or tunes for ads, this tool has you covered. This music can make your projects better and match exactly what you’re aiming for in your content.
3. AI Thumbnail Creator
The Automatic Thumbnail Generator makes creating video thumbnails super easy. It looks at your video and picks out three great shots for you to choose from. You can easily edit these shots to match what you want. You can also add text, titles, or cool graphics to the thumbnails. There are 58 different thumbnail styles to pick from, so you can find one that fits your video.
4. Screen Recorder
The Screen Recorder is an amazing tool that lets you record anything on your computer screen. It can also include your webcam footage while recording. You can capture both the sounds from your microphone and computer at the same time. It’s great for making videos of games, tutorials, or content for YouTube. Plus, it comes with editing tools and effects to make your recordings better before sharing them.
Conclusion
In conclusion, making awesome slow-motion videos doesn’t have to be hard if you’re on a budget. There are lots of affordable slow-mo cameras out there that can shoot great footage. Even then, you can always rely on the Filmora tool that can help create a slow-motion video. In this software, the Speed Ramping feature turns your raw videos into appealing slow-motion ones.
Whether you’ve got a cheap camera or editing tools, the most important thing is your imagination and how you see things.
Also read:
- New 2024 Approved Steps to Remove Background Noise From Video Sony Vegas
- New How to Create Vintage Film Effect 1920S
- 2024 Approved 7 Best MP4 Editors on Mac Edit MP4 in Mac
- Updated What If YouTube Zoom to Fill Not Working, In 2024
- In 2024, Top 10 Free Spanish Text To Speech Converter Websites
- 2024 Approved 10 Best Meme Text to Speech Tools Windows, Mac, Android, iPhone
- Updated Easy Ways to Create Procreate GIFs
- Updated Create True 3D Text Effects Using After Effects
- Updated In 2024, How to Create Text Animation for Videos
- Updated Have You Ever Wondered How to Add Camera Shake to Video in Adobe After Effects? Let Us Share with You some Tips and Tricks on How to Do Just That
- New In This Article, We Will Be Discussing How to Crop a Video on Android, but Since Most Android Devices Dont Have This Option, You Will Need to Do It Externally, by Downloading and Using Different Apps
- New Looking for the Simple Steps to Add a Filter to Your Video in Premiere Pro? Here Are the Complete Steps Along with the List of Free Premiere Filter Presets to Use
- 2024 Approved 3 Ways to Combine 2 or 3 Videos Into 1
- Updated In 2024, How to Create Video Contents That Convert Sales
- New 10 Apps to Make Videos with Pictures and Music
- 2024 Approved Weve Picked up the Best Online as Well as Offline MOV to GIF Converters . These Converters Are Easy to Use and Have No Limitations on Size. Get Your One
- New In 2024, 3GP Video Format What Is 3GP Format And How To Play It?
- Updated 2024 Approved How to Loop YouTube Videos on iPhone
- 2024 Approved How to Convert Videos to Slow Motion? Complete Guide
- How To Add Motion Blur In Davinci Resolve, In 2024
- New 6 Free Tools To Radial Blur Photos Online
- New How to Make a Movie with Windows Movie Maker?
- Updated In 2024, 2 Methods to Cut Video in VLC on Windows
- New Create Slow Motion Videos Using Final Cut Pro with Ease for 2024
- In 2024, Dubbing Videos With Voiceovers | Wondershare Filmora Tutorial
- New Slow-Motion Edits Are Pretty Mesmerizing, and Weve All Imagined Ourselves in One of Those Visually Appealing, Slowed-Down Movies. Well Teach You How to Make a Smooth Slo-Mo Video Using Twixtor in This Article. Stay Tuned Until the End
- Updated 10 Innovative AR Teaching Examples to Tell You What Is AR in Teaching for 2024
- Updated How to Use Blender Green Screen
- New Ideas to Make A Perfect Café Vlog for 2024
- New In 2024, What Are the Best Video Background Changers Online?
- New 15 Stunning GIF Splitter Examples You Need to Bookmark
- How To Create A Green Screen Video In After Effects for 2024
- New In 2024, A Comprehensive Review of LUTs Finding LUTs Made by Danny Gevirtz
- 2024 Approved Perfecting the Art of Slowing Down Video on Instagram
- Updated How to Put a Filter on a Video in iMovie
- In 2024, What is the best Pokemon for pokemon pvp ranking On Motorola Defy 2? | Dr.fone
- Fixing Foneazy MockGo Not Working On Vivo Y77t | Dr.fone
- How to Transfer Photos from Motorola Moto G 5G (2023) to New Android? | Dr.fone
- How To Reset iPhone 7 Plus Without iTunes? | Dr.fone
- How To Transfer WhatsApp From iPhone 15 Pro Max to other iPhone 15 Pro Max devices? | Dr.fone
- How to Delete iCloud Account with or without Password from your iPhone 14 Pro Max/Windows/Mac
- In 2024, How To Remove Flashlight From Apple iPhone 12 Pro Lock Screen
- How to Fake Snapchat Location without Jailbreak On Lava Yuva 3 Pro | Dr.fone
- In 2024, How to Get and Use Pokemon Go Promo Codes On Oppo Find X6 | Dr.fone
- All Things You Need to Know about Wipe Data/Factory Reset For Realme 12+ 5G | Dr.fone
- How To Unlock a Xiaomi 13T Easily?
- In 2024, How to Track WhatsApp Messages on Samsung Galaxy S23 FE Without Them Knowing? | Dr.fone
- Recover your pictures after Vivo V29 has been deleted.
- Wondering the Best Alternative to Hola On Honor 80 Pro Straight Screen Edition? Here Is the Answer | Dr.fone
- How To Upgrade or Downgrade Apple iPhone 14 Plus Without iTunes? | Dr.fone
- How to Unlock Realme GT Neo 5 SE Phone with Broken Screen
- 7 Solutions to Fix Chrome Crashes or Wont Open on Lava Yuva 2 | Dr.fone
- Does Life360 Notify When You Log Out On Motorola Moto G34 5G? | Dr.fone
- In 2024, How to Transfer from Apple iPhone 12 Pro to Samsung Galaxy S20? | Dr.fone
- Top 15 Augmented Reality Games Like Pokémon GO To Play On Realme 12 5G | Dr.fone
- In 2024, How and Where to Find a Shiny Stone Pokémon For Honor 90 Pro? | Dr.fone
- Title: New Motion Tracking Never Goes Out of Trend, so Do You Wish to Make Your Videos Trendy with This? No Issue because Here We Will Guide You on How to Do Motion Tracking
- Author: Chloe
- Created at : 2024-04-24 07:08:22
- Updated at : 2024-04-25 07:08:22
- Link: https://ai-editing-video.techidaily.com/new-motion-tracking-never-goes-out-of-trend-so-do-you-wish-to-make-your-videos-trendy-with-this-no-issue-because-here-we-will-guide-you-on-how-to-do-motion-/
- License: This work is licensed under CC BY-NC-SA 4.0.
