
:max_bytes(150000):strip_icc():format(webp)/how-to-make-a-song-your-ringtone-on-android-4777573-5d571b57c5a5436e91ebb7fcae1c2b6b.jpg)
New OBS Green Screen Guide
OBS Green Screen Guide
OBS Studio is a free and open-source app for screen-casting and live streaming. Written in C/C++ and built with Qt, OBS Studio provides real-time capture, scene composition, recording, encoding, and broadcasting via the Real Time Messaging Protocol (RTMP).It can stream Videos to any RTMP supporting destination including YouTube, Twitch, Instagram and Facebook.
You only need one green screen software – OBS. The reason why OBS is the most recommended for streaming is because once you have set it up properly, you can do literally anything you can think of with the software (either with or without added plug-ins).
Chroma Key Settings in OBS
Chroma keying has become incredibly popular nowadays. People use it not just for gaming, but also in Zoom conferences, live interviews, talk shows, etc. Although it may feel complicated at first glance, setting up Chroma Key in OBS Studio is actually incredibly easy.
Have a look at the simple steps you need to take to set up a green screen in OBS:
- Make sure you have the following equipment prepared: a solid green background, webcam or video camera, lighting, and OBS Studio.
- Download the latest stable version of OBS Studio from the official website and install the software. Open OBS and let the Auto-Configuration Wizard optimize the software’s settings based on your hardware.
- Now you can add a video source.
- Right-click on the video source you’ve created and select Filter.
- Click the + button under the Effects Filters section and select Chroma Key.
- Type in a name for this effect layer.
- After you add a chroma key, OBS will automatically create and adjust the baseline settings for the filter. You can experiment with the sliders and settle when you are satisfied with the result.
- Make sure you aren’t wearing any green or reflective material. You can double-check the performance on the preview screen.
- If things are working smoothly, you are all set to start streaming with the green screen on.
Pro tip:
You can follow the instructions above and live stream to multiple platforms at once with Restream. Multistreaming to platforms like YouTube, Facebook, Twitter, Twitch, and LinkedIn allows you to drastically increase the audience reach and grow your followers.
How to make OBS green screen settings better
Using green screens for filmmaking isn’t the most complicated or difficult thing in the world but it certainly has its pitfalls. If you ask any experienced filmmaker what to look out for when using a green screen, chances are they’re going to mention lighting about a billion times and that’s for good reason.
Tips on How to make OBS green screen settings better
- Evenly light your green screen so you can get a good key.
- Watch out for light flares. Use some a matte box or your trusty paw to block out any unwanted light.
- When lighting, try to create as much separation between your subject and the green screen as you can.
- Shutter speed: Minimize motion blur by raising your shutter speed to 1/80 or 1/100
- Aperture: Setting your aperture to f4 or f5.6 will give you slightly more depth of field, which will blur and smooth out your green screen.
- Format: Set your camera to the best recording format it has.
- ISO: Try to avoid high ISOs.
Filmora
If you’re just starting out with video editing, or just want a simple program that works, Wondershare Filmora might be what you’re looking for. It has the essential tools, and anyone can learn to use it easily.
Wondershare Filmora is the one of best video editing software with cool features that compares to other competing video editing Softwares. Many video editing programs claim to offer professional results; Filmora is one of a few consumer-level tools that actually delivers.
For Win 7 or later (64-bit)
For macOS 10.12 or later
Installation Steps
- Click the icon in the center of the Media Library to add files directly.
- Go File > Import Media > Import Media Files.
- Drag and drop to the Media Library directly.
While importing a media file, Wondershar Filmora may ask you if you wish to create a proxy file to accelerate the editing process. Select “Yes” to have a fast video editing experience.
You can also import video clips using your Touch Bar controls if your computer has Touch Bar.

Record a media file
Apart from the videos shot by your digital devices, you can also directly import media files by recording video from your webcam, capturing the computer screen, or recording a voice-over.
Record computer screen:
Click the “Record” option, and choose “Record PC Screen” to get the built-in Wondershare Screen Recorder. Hit the red button to get started. If you want to stop the recording, you can hit F9.
Record videos from webcam:
Also, click the “Record” option, and choose “Record from Webcam”. In the pop-up Video Recording window, click the red button to start recording and click it again to stop recording. Then click OK to save the recorded video file.
Record voice-over:
Choose “Record a voiceover” under the Record menu. It would be better to connect a microphone to your Mac for a better result. Hit the Record button, and it leaves you 3 seconds to get ready.
All the recorded media files will be saved into Media Library automatically and you can drag them to the Timeline for editing.
Pro tip:
You can follow the instructions above and live stream to multiple platforms at once with Restream. Multistreaming to platforms like YouTube, Facebook, Twitter, Twitch, and LinkedIn allows you to drastically increase the audience reach and grow your followers.
How to make OBS green screen settings better
Using green screens for filmmaking isn’t the most complicated or difficult thing in the world but it certainly has its pitfalls. If you ask any experienced filmmaker what to look out for when using a green screen, chances are they’re going to mention lighting about a billion times and that’s for good reason.
Tips on How to make OBS green screen settings better
- Evenly light your green screen so you can get a good key.
- Watch out for light flares. Use some a matte box or your trusty paw to block out any unwanted light.
- When lighting, try to create as much separation between your subject and the green screen as you can.
- Shutter speed: Minimize motion blur by raising your shutter speed to 1/80 or 1/100
- Aperture: Setting your aperture to f4 or f5.6 will give you slightly more depth of field, which will blur and smooth out your green screen.
- Format: Set your camera to the best recording format it has.
- ISO: Try to avoid high ISOs.
Filmora
If you’re just starting out with video editing, or just want a simple program that works, Wondershare Filmora might be what you’re looking for. It has the essential tools, and anyone can learn to use it easily.
Wondershare Filmora is the one of best video editing software with cool features that compares to other competing video editing Softwares. Many video editing programs claim to offer professional results; Filmora is one of a few consumer-level tools that actually delivers.
For Win 7 or later (64-bit)
For macOS 10.12 or later
Installation Steps
- Click the icon in the center of the Media Library to add files directly.
- Go File > Import Media > Import Media Files.
- Drag and drop to the Media Library directly.
While importing a media file, Wondershar Filmora may ask you if you wish to create a proxy file to accelerate the editing process. Select “Yes” to have a fast video editing experience.
You can also import video clips using your Touch Bar controls if your computer has Touch Bar.
Record a media file
Apart from the videos shot by your digital devices, you can also directly import media files by recording video from your webcam, capturing the computer screen, or recording a voice-over.
Record computer screen:
Click the “Record” option, and choose “Record PC Screen” to get the built-in Wondershare Screen Recorder. Hit the red button to get started. If you want to stop the recording, you can hit F9.
Record videos from webcam:
Also, click the “Record” option, and choose “Record from Webcam”. In the pop-up Video Recording window, click the red button to start recording and click it again to stop recording. Then click OK to save the recorded video file.
Record voice-over:
Choose “Record a voiceover” under the Record menu. It would be better to connect a microphone to your Mac for a better result. Hit the Record button, and it leaves you 3 seconds to get ready.
All the recorded media files will be saved into Media Library automatically and you can drag them to the Timeline for editing.
How to Do Perfect Match Paint 100% the Easy Way
How to Do Perfect Match Paint 100% the Easy Way
An easy yet powerful editor
Numerous effects to choose from
Detailed tutorials provided by the official channel
You always have to be highly precise and appropriate when choosing the color for your wall. If you are not accurate enough, you might not choose the right shade, which would never look good on your walls. But, to help you match the paint colors perfectly, we have discussed three methods.
And lastly, we have also introduced a video editing tool Perfect Match Paint that will help you match the color in your videos as well. So, you can have the perfect desired color on your walls and also in your videos!
In this article
01 [How to Match Paint Color Without a Sample](#Part 1)
02 [Need to Color Match in Video? There’s an App for That…](#Part 2)
Part 1 How to Match Paint Color Without a Sample
We will be discussing three methods in which you will get the perfect answer to the question of how can I match my paint color perfectly. So, let us jump right into the first method without further delay.
01Method 1 Perfect Match Paint without a sample
The following steps will help you attain Perfect Match Paint without the necessity of a sample.
Step Clean the print area
The first and the most essential step is to make the area where you will be painting clean and tidy. As time passes, fingerprints, marks, dust, and many other things accumulate and make the area dirty. And if you do not clean the same, then the paint you do on it becomes much darker, dull, and gives a shabby outlook.
Use a damp sponge, and if possible, it is better to use soap on the sponge. And most importantly, you will have to let the area dry out completely before you put it on to test the paint. Moreover, the new paint adheres much better than before when you clean the area.

Step Scraping off
The next step requires you to use a utility knife. And with that utility knife, you will have to scrap an inch or 2.5 cm of your wall paint. It is because, when you have a sample, you can easily bring that to the store for paint matching near me. Use a plastic bag to secure the sample price. It will prevent the paint of the sample to smudge or getting any marks or destruction.
And after you find paint colors that match the ones you need, try to dab a little of that paint on the sample. As a result, you will precisely know how perfectly the new shade of paint matches with the new one. It ensures optimum precision and can be the best way to match paint.

Step Bring the object if possible
The best way to maintain absolute precision in the match is by bringing an object to the store. You can also opt for a car paint match near me. If you bring the object with the color for matching, it ensures perfect matching and 10precision. Nowadays, the technology is highly advanced and will help you obtain the best paint match.
02Method 2 Using a sample
Since we have discussed the steps for matching paint without the sample, you must know how to match color with the help of samples. So, here are the steps for doing so.
Step 1: Click a Picture of the original hue
This step is necessary for better precision and matching the color as perfectly as possible. Clock a picture of the original color sample. The color in the photo might not be absolutely precise. But it can help to a large extent to match the color as perfectly as possible. You can easily take the sample to any renowned color matching store, like, dupli color paint match and have the perfect color matching done.
And it is better to not one picture or from just one angel. It will be best to take numerous snaps and that too, from different angles, sides and lighting conditions. It will help you get the original color shades in different angles, shades and lights, and it increases the possibility of matching the color as impeccably as possible.
Step 2: Bring home more than one sample
You will see numerous samples of paints that you feel will match the color you brought from your home as a sample of the original color. You might not be sure which sample perfectly matches the original sample color at that exact moment. However, if you find a sample that seems t match perfectly, you must not make your decision right at that moment. Because in the store, the lighting, angles, and many other factors play a hugely influential role in enhancing the shades of the sample colors.
So, the color you see in the store often does not remain the same in natural light settings; it might get a bit darker or lighter. So, it is always better to bring home those samples that you feel match the original shade of the sample you brought. This increases the possibility of being the most precise and impeccable in matching the colors.

Step 3: stick the sample and compare.
This is the final step for matching the colors of paint with the help of a sample. After bringing home the samples that you found similar to the original sample, tape them to the wall. Take a sample at a time and use a tap to place them on the wall. You can also tape all the samples side by side, leaving enough gap between them.
It helps better compare and matches the sample’s colors and the wall. A common thing that occurs is that in the daytime, you find one color matching perfectly, whereas, in the nighttime, some other sample color is matching perfectly. In such an instance, it is best to ask the store if they can give you the shade by mixing both the colors: the color that perfectly matched with the sample in the daytime and the color that perfectly matched with the sample in the time.

Step 4: Paint the samples on the wall
It is an optional step, and you can opt for this step if you are not getting a hundred per cent confidence in choosing the correct color. Try to paint the colors of the samples that you are finding similar to the wall. Since the wall already has the original color, when you paint the sample colors on it, the sample colors clearly distinguish which samples match more impeccably with the actual color.

03Method 3 with the help of apps
Since the technology has advanced in the most progressive way possible, you can easily match the paint colors through an application. So now, we will be listing down the steps that will help you match the paints with the help of mobile applications. The steps are given as follows.
Step 1 Install the application
You will find numerous mobile applications meant for matching paint colors. Opt for the ones you find the best and most efficient. Download it and install it on your phone. If you have used a renowned brand for painting, you can use their application. For example, you can use Asian paints color matching if you have used their brand of paints before.

Step 2 Scan the shade
Now, even the original paint shade. There are factors such as lighting, angel and shadow that you must remover to consider while you scan the color of the original sample.

Step 3 Paint the sample
To be most precise and sure, paint the sample of the paint you have chosen. It will be a way of double-checking your division and ensuring a perfect paint match.

Step 4 Use a color scanner
It is another optional step, but there will be absolutely no doubt in the precision of paint matching if you use it. You can either borrow or buy a paint scanner. If you are not planning to paint again soon, it is best to borrow the paint scanner.

Part 2 Need to Color Match in Video? There’s an App for That
Right now, we talked about mobile apps that can help you match paint colors for your walls. Well, you can ever match colors in the videos that you capture! Yes, that is possible in the highest quality and most effortlessly. And color match paint from photos can be likely through the best video editing tool- Wondershare Filmora Video Editor . More precisely, it has numerous features; one among them is the “Color Match: a feature which makes this possible.
The “Color Match” feature of Filmora allows you to extract a clip from the video where you want to match the colors and then carries out the process most effortlessly. You can apply any color you wish to within a few minutes.
For Win 7 or later (64-bit)
For macOS 10.12 or later
You can use this incredible tool on any device, and it will work equally proficiently and help you create fantastic videos!
● Key Takeaways from This Episode →
● How to match paint colors without samples
● Two more methods of matching paint colors
● We introduced Filmora and its feature of “Color Match” that can help you match the colors of your videos most profoundly.
You always have to be highly precise and appropriate when choosing the color for your wall. If you are not accurate enough, you might not choose the right shade, which would never look good on your walls. But, to help you match the paint colors perfectly, we have discussed three methods.
And lastly, we have also introduced a video editing tool Perfect Match Paint that will help you match the color in your videos as well. So, you can have the perfect desired color on your walls and also in your videos!
In this article
01 [How to Match Paint Color Without a Sample](#Part 1)
02 [Need to Color Match in Video? There’s an App for That…](#Part 2)
Part 1 How to Match Paint Color Without a Sample
We will be discussing three methods in which you will get the perfect answer to the question of how can I match my paint color perfectly. So, let us jump right into the first method without further delay.
01Method 1 Perfect Match Paint without a sample
The following steps will help you attain Perfect Match Paint without the necessity of a sample.
Step Clean the print area
The first and the most essential step is to make the area where you will be painting clean and tidy. As time passes, fingerprints, marks, dust, and many other things accumulate and make the area dirty. And if you do not clean the same, then the paint you do on it becomes much darker, dull, and gives a shabby outlook.
Use a damp sponge, and if possible, it is better to use soap on the sponge. And most importantly, you will have to let the area dry out completely before you put it on to test the paint. Moreover, the new paint adheres much better than before when you clean the area.
Step Scraping off
The next step requires you to use a utility knife. And with that utility knife, you will have to scrap an inch or 2.5 cm of your wall paint. It is because, when you have a sample, you can easily bring that to the store for paint matching near me. Use a plastic bag to secure the sample price. It will prevent the paint of the sample to smudge or getting any marks or destruction.
And after you find paint colors that match the ones you need, try to dab a little of that paint on the sample. As a result, you will precisely know how perfectly the new shade of paint matches with the new one. It ensures optimum precision and can be the best way to match paint.
Step Bring the object if possible
The best way to maintain absolute precision in the match is by bringing an object to the store. You can also opt for a car paint match near me. If you bring the object with the color for matching, it ensures perfect matching and 10precision. Nowadays, the technology is highly advanced and will help you obtain the best paint match.
02Method 2 Using a sample
Since we have discussed the steps for matching paint without the sample, you must know how to match color with the help of samples. So, here are the steps for doing so.
Step 1: Click a Picture of the original hue
This step is necessary for better precision and matching the color as perfectly as possible. Clock a picture of the original color sample. The color in the photo might not be absolutely precise. But it can help to a large extent to match the color as perfectly as possible. You can easily take the sample to any renowned color matching store, like, dupli color paint match and have the perfect color matching done.
And it is better to not one picture or from just one angel. It will be best to take numerous snaps and that too, from different angles, sides and lighting conditions. It will help you get the original color shades in different angles, shades and lights, and it increases the possibility of matching the color as impeccably as possible.
Step 2: Bring home more than one sample
You will see numerous samples of paints that you feel will match the color you brought from your home as a sample of the original color. You might not be sure which sample perfectly matches the original sample color at that exact moment. However, if you find a sample that seems t match perfectly, you must not make your decision right at that moment. Because in the store, the lighting, angles, and many other factors play a hugely influential role in enhancing the shades of the sample colors.
So, the color you see in the store often does not remain the same in natural light settings; it might get a bit darker or lighter. So, it is always better to bring home those samples that you feel match the original shade of the sample you brought. This increases the possibility of being the most precise and impeccable in matching the colors.
Step 3: stick the sample and compare.
This is the final step for matching the colors of paint with the help of a sample. After bringing home the samples that you found similar to the original sample, tape them to the wall. Take a sample at a time and use a tap to place them on the wall. You can also tape all the samples side by side, leaving enough gap between them.
It helps better compare and matches the sample’s colors and the wall. A common thing that occurs is that in the daytime, you find one color matching perfectly, whereas, in the nighttime, some other sample color is matching perfectly. In such an instance, it is best to ask the store if they can give you the shade by mixing both the colors: the color that perfectly matched with the sample in the daytime and the color that perfectly matched with the sample in the time.
Step 4: Paint the samples on the wall
It is an optional step, and you can opt for this step if you are not getting a hundred per cent confidence in choosing the correct color. Try to paint the colors of the samples that you are finding similar to the wall. Since the wall already has the original color, when you paint the sample colors on it, the sample colors clearly distinguish which samples match more impeccably with the actual color.
03Method 3 with the help of apps
Since the technology has advanced in the most progressive way possible, you can easily match the paint colors through an application. So now, we will be listing down the steps that will help you match the paints with the help of mobile applications. The steps are given as follows.
Step 1 Install the application
You will find numerous mobile applications meant for matching paint colors. Opt for the ones you find the best and most efficient. Download it and install it on your phone. If you have used a renowned brand for painting, you can use their application. For example, you can use Asian paints color matching if you have used their brand of paints before.
Step 2 Scan the shade
Now, even the original paint shade. There are factors such as lighting, angel and shadow that you must remover to consider while you scan the color of the original sample.
Step 3 Paint the sample
To be most precise and sure, paint the sample of the paint you have chosen. It will be a way of double-checking your division and ensuring a perfect paint match.
Step 4 Use a color scanner
It is another optional step, but there will be absolutely no doubt in the precision of paint matching if you use it. You can either borrow or buy a paint scanner. If you are not planning to paint again soon, it is best to borrow the paint scanner.
Part 2 Need to Color Match in Video? There’s an App for That
Right now, we talked about mobile apps that can help you match paint colors for your walls. Well, you can ever match colors in the videos that you capture! Yes, that is possible in the highest quality and most effortlessly. And color match paint from photos can be likely through the best video editing tool- Wondershare Filmora Video Editor . More precisely, it has numerous features; one among them is the “Color Match: a feature which makes this possible.
The “Color Match” feature of Filmora allows you to extract a clip from the video where you want to match the colors and then carries out the process most effortlessly. You can apply any color you wish to within a few minutes.
For Win 7 or later (64-bit)
For macOS 10.12 or later
You can use this incredible tool on any device, and it will work equally proficiently and help you create fantastic videos!
● Key Takeaways from This Episode →
● How to match paint colors without samples
● Two more methods of matching paint colors
● We introduced Filmora and its feature of “Color Match” that can help you match the colors of your videos most profoundly.
How To Add Text In After Effects
In almost every video you come across, you will see text added to the video in different parts. There are various reasons why adding text to videos becomes a necessity. First of all, you can highlight the underlying message or key points in your video. Along with audio and video, the viewers will have another cue point in the form of text that they can retain in their memory for longer. You add animated texts to video to make the video interesting to watch and break the monotony of visual cues only.
Besides, you may have to want credits and add intro as well as outro to your video where adding text is almost a necessity. Text can help your viewer get the context of your video and make sense of the content. After Effects is a popular video editor thanks to its visual effects, text animation animations, and instant video enhancement tools. We will illustrate the different ways of adding text in After Effects in simple steps.
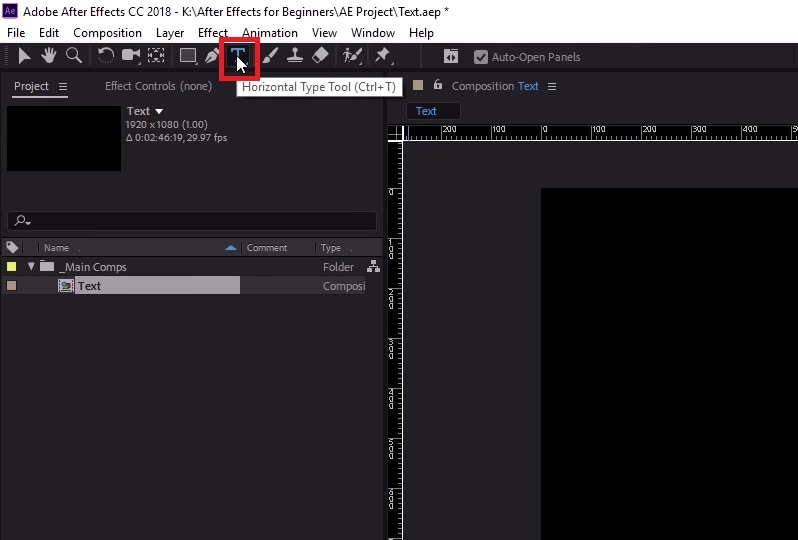
Part 1. Add Text in After Effects with Horizontal Type Tool
Once you have imported your video clip into the Timeline, there are several ways you can add text to your video. First of all, you can right-click on the Timeline and select New> Text to create an empty text layer and add any text you want. Similarly, you can go to Layer> New> Text option to do the same. But the easiest way of adding text in After Effects is by using Horizontal Type Tool. Here are the steps on how you can add text in AE with the type tool.
Step1Once you have imported your video into the Timeline, click on Horizontal Type Tool located in the top bar to add any text. You can press Ctrl+T(Windows) or Command+H(Mac) to get it instantly.
Step2Click on the video where you want to place the text and type your desired text there. After you are done adding your text, press Enter key in Num pad to exit out of the text field in the video.
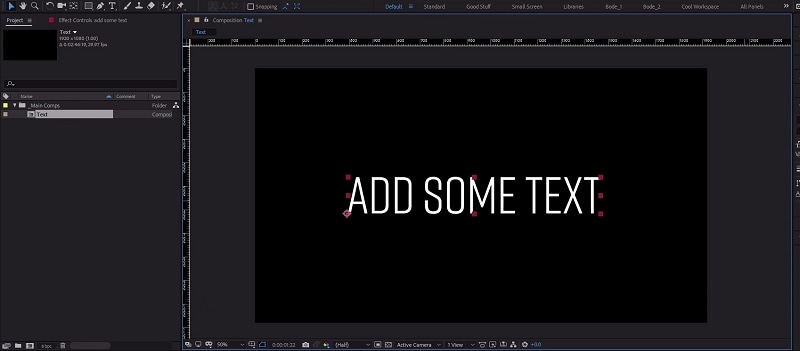
Step3This will automatically create a text layer on Timeline. You can now move the text and place it anywhere you want. You can also modify the text style and add animation which we will illustrate in the next section.
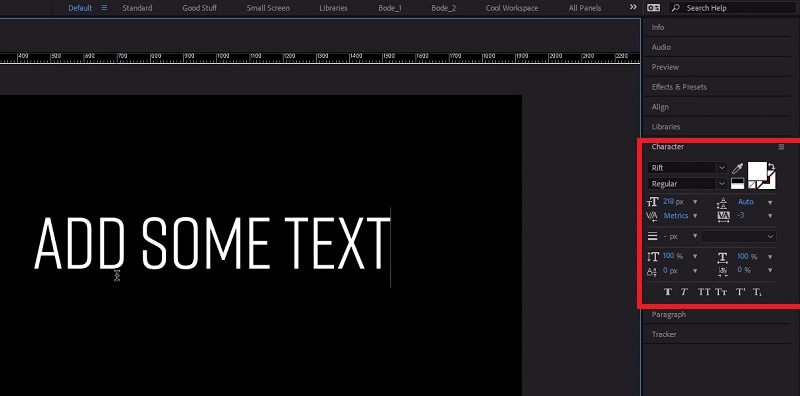
Part 2. Use the Character Panel to Edit Text in AE
When you select Type tool and add your desired text, you get a default style for the text. It is most likely that you have to modify the text style such as changing color, font, and size to fit in your video seamlessly. That is when you have to visit the Character Panel. Character Panel is where you get to edit the font of the text you have typed, increase or decrease the font size, change the font color, and much more. Apart from that, you can increase the spacing between lines when your text is a paragraph instead of a few words. Here are the steps to use Character Panel to edit text in AE.
Step1Once you have typed your text using Horizontal Type tool on the video, click on the text.
Step2Go to Character panel located in the right side of the screen. If it is minimized, click on the panel to expand it.
Step3The first option in the panel is the font of the text. By the side of the font is the text color. You can use the color picker tool to choose any color as per your preference.
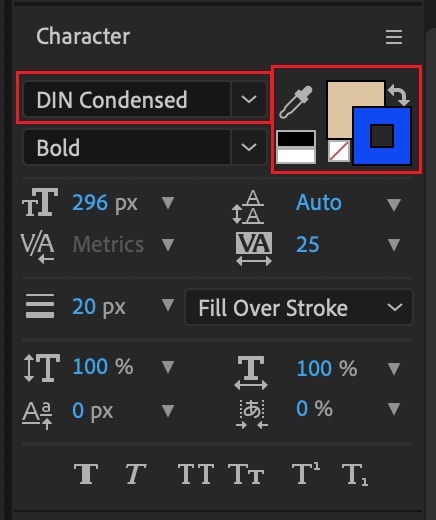
Step4Below the font, you can select the font style such as regular, bold, italics, and likewise. The subsequent part is to change the font size and adjust vertical spacing between lines and horizontal spacing between characters.
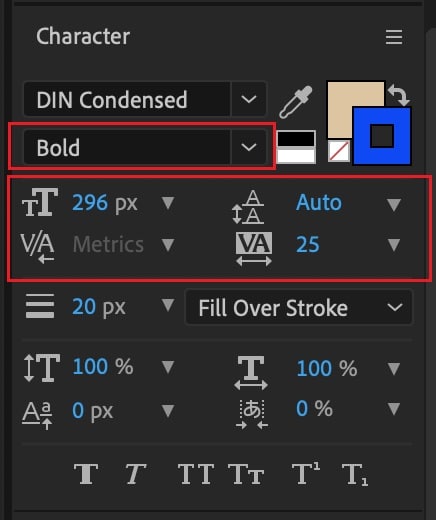
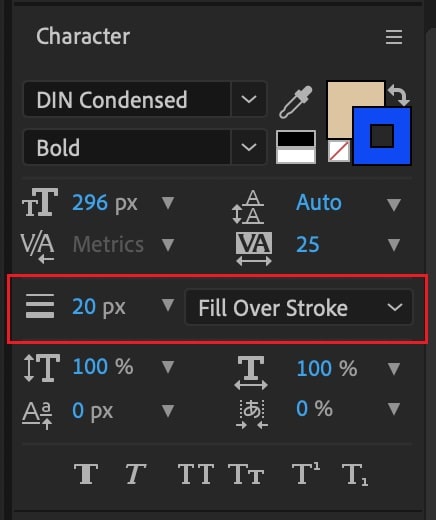
Step5The next section deals with Stroke option as well as fill the text option. You can fill the background of the text with any desired color.
Part 3. Add Animated Text to Video with Animation Presets
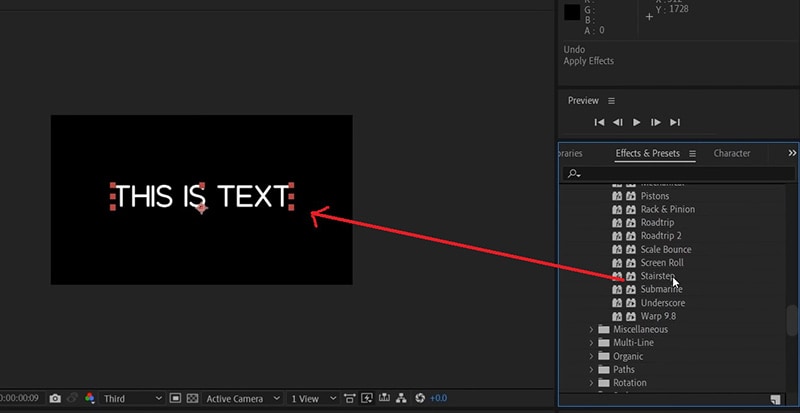
Now that you have added a static text and set the text format as per your preference, it is time to animate the text. A static text in a video does not look appealing, and animated texts make the video eye-catching instantly. You can use text animation presets in After Effects to add animated text to video. Here are the steps to add animated text to video with animation presets and effects.
Step1Click on the text on your video that you want to animate. Go to Effects and Presets panel located on the right side.
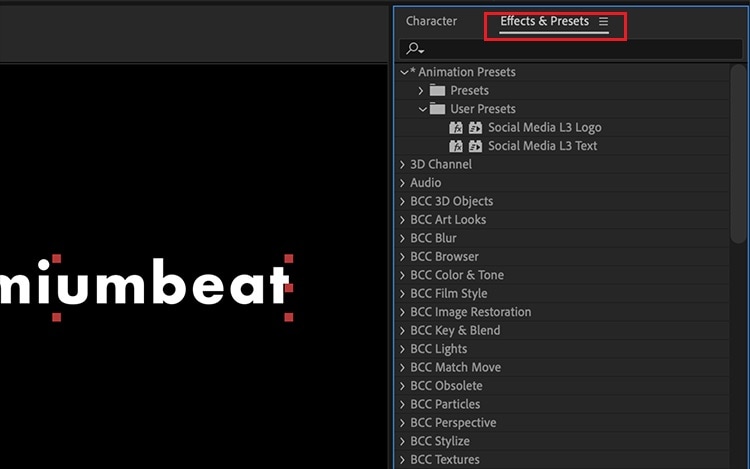
Step2Under Effects and Presets panel, Click on Text option. This will open all the different categories of animation presets available that you can apply to the text on your video.
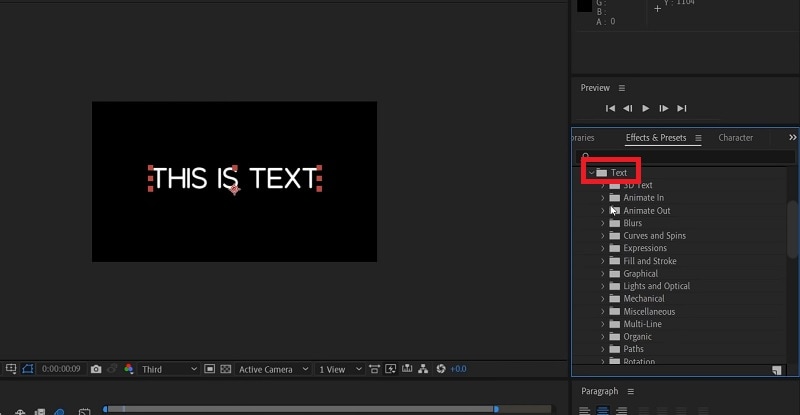
Step3Select any desired animation that you want to apply to the text and drag and drop the animation on the text in the composition window. Play the video and watch the applied animation on the text.
Part 4. Alternative Way to Add Text to Videos
If you are not comfortable with After Effects as a video editor, we recommend Wondershare as the best AE alternative. This is because the user interface of Filmora is super simple and there are loads of text effects and animations available to enhance your video content. Filmora is a professional video editor that is extremely popular among amateur and professional video editors. The application is available for both Windows and Mac users. Here are the steps for adding animated text to video using Filmora.
Step1Install Wondershare Filmora on your computer and launch the application. Click on New Project option on the welcome screen. Otherwise, you can go to File> New Project option.

Step2Go to File> Import Media> Import Media Files to import your video file. You can also drop the video file directly into Project Media folder.

Step3Drag and drop the video file from Project Media folder into the Timeline. If you have multiple video clips, you need to arrange them sequentially on the Timeline.
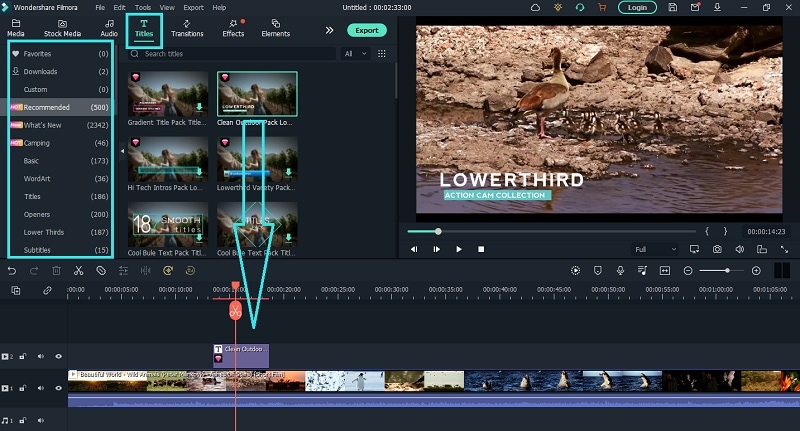
Step4To add text to your video, go to Titles located at the top bar. Check the left panel where you can see different categories of text effects. Select any desired text effect and drop into the Timeline. Make sure that the text layer is above the video layer on Timeline. You can shift the text layer on Timeline to place it where you want it to appear. You can also stretch the duration of the text effect as per your requirements.
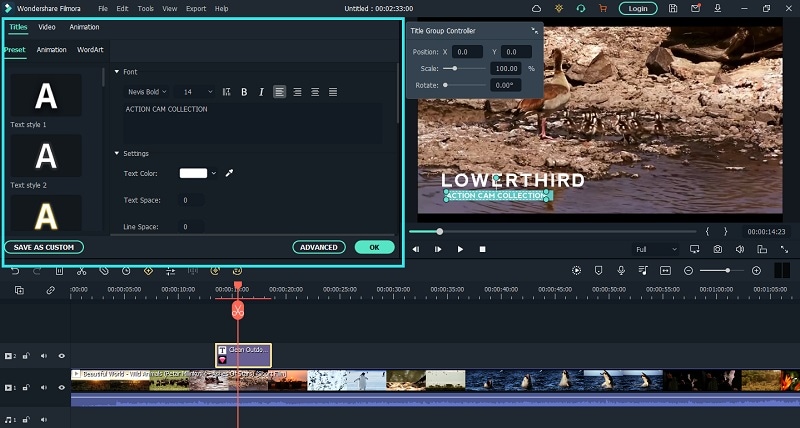
Step5You can edit the text effect by double clicking on the text layer on Timeline. Under Preset tab, you can change the text, font type and size, text color and much more. For further customization, you can click on Advanced button. At last, click on OK button to save the edits done.
The Bottom Line
If you want to add animated text to photo and video, After Effects is a great editor you can use. We have illustrated how you can add text and customize the text and finally, animate it as per your preference. However, if you are looking for AE alternative, we recommend Wondershare Filmora where you can add text to video instantly and choose from a wide range of text effects and animations.
Free Download For Win 7 or later(64-bit)
Free Download For macOS 10.14 or later
Wondering How to Rotate a Video in Windows at Any Desired Angle and Save It Permanently? Find Out All the Different Ways to Rotate Videos Temporarily as Well as Permanently
There are times where you may need to rotate a video into landscape if the video is shot in portrait. This is because watching a video in portrait orientation on a computer is horrible as the video screen size is compressed and the two sides have black screen. Instead, you can rotate video Windows into landscape, you can watch the same video comfortably. Besides, there are times when the entire video is shot at a certain angle as the video device was not properly aligned.
If you are a Windows user, rotating a video in Windows through Windows Media Player is not possible. However, Windows 10 comes with Photos app that contains a video editor to rotate a video and save it permanently. If you use VLC Media Player, you can rotate any video temporarily as well permanently at any desired angle. You can also rotate a video online without installing any software. In this article, we will illustrate how to rotate a video in Windows.
Way 1. Use Photos App
If you are a Windows 10, you can use the pre-installed Photos app to rotate a video and save it permanently. Photos app comes with an inbuilt video editor where rotating a video in Windows 10 is so easy. If you are using an older version of Windows, you can relate Photos app with Windows Movie Maker. Anyway, here are the steps to rotate any video on Photos app.
Step 1: From Start menu, search for “Photos” and open Photos app.

Step 2: Select Video Editor option which is available at the top of the screen. Once, Video Editor opens, click on New Video Project button.

Step 3: Put a name for the project and click on Ok. Thereafter, click on Add button and select the video file from your hard drive that you want to rotate.

Step 4: Drag and drop the video file into Timeline. Thereafter, Click on Rotate icon to turn the video by 90 degrees. You can click again to rotate the video further by 90 degrees again.

Step 5: Once done, click on Finish Video option and save the video file in the destination folder.
Way 2. Use Filmora
The best software on how to rotate a video in Windows 10 to Windows 7 is Wondershare Filmora . It is a professional video editor and there are loads of features to edit the video including rotation. You can make a video more attractive and crisp to publish on professional platforms like YouTube. Here are the steps to rotate a video on Filmora.
Step 1: Download and install Filmora. Open the software and import the video file that you want to rotate. Then drag and drop it on Timeline.
For Win 7 or later (64-bit)
For macOS 10.12 or later
Step 2: From Video Editing panel, expand Transform option and use the slider on Rotate option to rotate the video at any angle. Once done, click on OK button.

Step 3: Go to Export option and click on Export button. The new video files with its new rotation will be saved in the destination folder.

Way 3. Use VLC Media Player
Most Windows users generally install VLC Media Player to watch movies. This is because Windows Media Player supports only limited file formats. Most movie files that you download online are supported by VLC but not on Windows Media Player. Here are the steps on how to rotate a video in Windows temporarily using VLC Media Player.
Step 1: Open VLC Media Player. Go to Media menu and click on Open File option. Select the video file from your hard drive that you want to rotate.
Step 2: Once the video opens, go to Tools menu and click on Effects and Filters option.

Step 3: On Adjustments and Effects window, click on Video Effects tab.
Step 4: Under Video Effects tab, click on Geometry tab.
Step 5: Turn of Transform checkbox and click on drop-down menu to select the required option. You can rotate the video by 90 degrees, 180 degrees and 270 degrees.

Step 6: To rotate the video at any desired angle, turn on Rotate checkbox and select the desired angle.

Step 7: Finally, click on Save and then Close button.

Please note that when you rotate a video temporarily, it is for a one-time watch only. When you open the video again in any other media player, it will have the original orientation.
Way 4. Use EZGIF Online Tool
If you have short video files and you want to upload them on social media platforms, you can convert them into GIF files. You can convert any video file to EZGIF. Therefore, instead of video files, if you want to rotate GIF files, EZGIF is highly useful as an online tool. In fact, you can also convert GIF files into MP4 files. Here are the steps to follow to rotate short video files using EZGIF online tool.
Step 1: Open your web browser and open Ezgif.com.
Step 2: Click on Video to GIF option.
Step 3: Click on Choose File button and select the short video file from your hard drive.

Step 4: Click on Upload Video button and wait for the conversion. Thereafter, download the GIF file.
Step 5: To rotate the GIF file, go to Rotate option. Click on Choose File button.

Step 6: Select the GIF file and click on Upload.
Step 7: You can select from provided rotation options or mention rotation angle explicitly and click on Apply Rotation button.

Wait for the rotation effect and download the file on your hard drive.
FAQs about Rotate Video in Windows 10
1. How do I rotate a video in Windows 10?
To rotate a video in Windows 10, you can use the built-in Photos app. Open the app and select the video you want to rotate. Click on the Edit & Create button at the top of the screen and select Rotate left or Rotate right to adjust the video orientation.
2. Can I rotate a video in Windows Media Player?
No, you can’t rotate a video in Windows Media Player. This feature is only available in the Photos app. However, you can use a third-party video editing software to rotate your videos.
3. How do I save the rotated video?
After rotating the video in the Photos app, click on the Save a copy button at the top of the screen. You can then choose the destination folder and file name for the newly rotated video.
4. What should I do if the video is upside down after rotating it?
If the video is upside down after rotating it, you may have rotated it in the wrong direction. Try rotating it in the opposite direction and see if that fixes the issue. If not, you may need to use a third-party video editing software to rotate the video.
5. Can I rotate a video without losing quality?
Rotating a video can sometimes result in a loss of quality, especially if the video is compressed or low-resolution. However, using a good video editing software can help minimize the loss of quality. Make sure to save the rotated video in the same format and resolution as the original file to avoid further loss of quality.
Conclusion
We have provided you all the possible ways to rotate video Windows. If you want to rotate with pre-installed software, you have Photos app. If you have VLC Media Player installed, you can do the rotation temporarily and permanently. You can also use Ezgif online tool to rotate animated files without installing any
For macOS 10.12 or later
Step 2: From Video Editing panel, expand Transform option and use the slider on Rotate option to rotate the video at any angle. Once done, click on OK button.
Step 3: Go to Export option and click on Export button. The new video files with its new rotation will be saved in the destination folder.
Way 3. Use VLC Media Player
Most Windows users generally install VLC Media Player to watch movies. This is because Windows Media Player supports only limited file formats. Most movie files that you download online are supported by VLC but not on Windows Media Player. Here are the steps on how to rotate a video in Windows temporarily using VLC Media Player.
Step 1: Open VLC Media Player. Go to Media menu and click on Open File option. Select the video file from your hard drive that you want to rotate.
Step 2: Once the video opens, go to Tools menu and click on Effects and Filters option.
Step 3: On Adjustments and Effects window, click on Video Effects tab.
Step 4: Under Video Effects tab, click on Geometry tab.
Step 5: Turn of Transform checkbox and click on drop-down menu to select the required option. You can rotate the video by 90 degrees, 180 degrees and 270 degrees.
Step 6: To rotate the video at any desired angle, turn on Rotate checkbox and select the desired angle.
Step 7: Finally, click on Save and then Close button.
Please note that when you rotate a video temporarily, it is for a one-time watch only. When you open the video again in any other media player, it will have the original orientation.
Way 4. Use EZGIF Online Tool
If you have short video files and you want to upload them on social media platforms, you can convert them into GIF files. You can convert any video file to EZGIF. Therefore, instead of video files, if you want to rotate GIF files, EZGIF is highly useful as an online tool. In fact, you can also convert GIF files into MP4 files. Here are the steps to follow to rotate short video files using EZGIF online tool.
Step 1: Open your web browser and open Ezgif.com.
Step 2: Click on Video to GIF option.
Step 3: Click on Choose File button and select the short video file from your hard drive.
Step 4: Click on Upload Video button and wait for the conversion. Thereafter, download the GIF file.
Step 5: To rotate the GIF file, go to Rotate option. Click on Choose File button.
Step 6: Select the GIF file and click on Upload.
Step 7: You can select from provided rotation options or mention rotation angle explicitly and click on Apply Rotation button.
Wait for the rotation effect and download the file on your hard drive.
FAQs about Rotate Video in Windows 10
1. How do I rotate a video in Windows 10?
To rotate a video in Windows 10, you can use the built-in Photos app. Open the app and select the video you want to rotate. Click on the Edit & Create button at the top of the screen and select Rotate left or Rotate right to adjust the video orientation.
2. Can I rotate a video in Windows Media Player?
No, you can’t rotate a video in Windows Media Player. This feature is only available in the Photos app. However, you can use a third-party video editing software to rotate your videos.
3. How do I save the rotated video?
After rotating the video in the Photos app, click on the Save a copy button at the top of the screen. You can then choose the destination folder and file name for the newly rotated video.
4. What should I do if the video is upside down after rotating it?
If the video is upside down after rotating it, you may have rotated it in the wrong direction. Try rotating it in the opposite direction and see if that fixes the issue. If not, you may need to use a third-party video editing software to rotate the video.
5. Can I rotate a video without losing quality?
Rotating a video can sometimes result in a loss of quality, especially if the video is compressed or low-resolution. However, using a good video editing software can help minimize the loss of quality. Make sure to save the rotated video in the same format and resolution as the original file to avoid further loss of quality.
Conclusion
We have provided you all the possible ways to rotate video Windows. If you want to rotate with pre-installed software, you have Photos app. If you have VLC Media Player installed, you can do the rotation temporarily and permanently. You can also use Ezgif online tool to rotate animated files without installing any
Also read:
- 2024 Approved Top 10 Text to Robot Voice Generators Windows, Mac, Android, iPhone
- 2024 Approved Ultimate Guide To Make A Political Video
- New 2024 Approved Change Aspect Ratio of Video
- 2024 Approved Convert Your Videos to 60 FPS Using These Excellent Tools
- 2024 Approved How to Add Zoom Blur Effect In Photoshop
- Updated In 2024, Add Flesh to Your Video Content Before Posting Them for Your Audience to See Using Meme Texts. Use the Tutorial Guide Shared in This Post
- In 2024, Best Audio Waveform Generator
- New 2024 Approved Easy Way to Apply Green Screen to YouTube Videos
- This Article Discusses What Is Hitfilm Express, How to Download, Install and Use It, and Its Key Features. It Further Discusses Its Alternative for Editing Your Videos and More. Check Out Now
- New Top 9 AMV Makers for Computer
- In 2024, Do You Want to Know All About Video Frame Rates and Speed? Wondershare Filmora Will Help You to Get More Information on This Matter
- Updated In 2024, How to Convert Images Into Video - Kapwing Tutorial
- Add Some Shake to Videos with Alight Motion for 2024
- 2024 Approved Understanding The Best Tools for Changing Sky Background
- Updated In 2024, 8 Best Sites to Get Glitch Transition for Premiere Pro
- Updated In 2024, Top Online Video Background Changers Transform Your Videos with Ease
- How to Mirror PC Screen to Nokia 150 (2023) Phones? | Dr.fone
- How To Transfer WhatsApp From Apple iPhone XR to other iPhone 11 Pro Max devices? | Dr.fone
- 7 Fixes for Unfortunately, Phone Has Stopped on Vivo Y17s | Dr.fone
- In 2024, How to Change Google Play Location On Oppo A1 5G | Dr.fone
- Fixing Foneazy MockGo Not Working On Vivo Y55s 5G (2023) | Dr.fone
- How to Unlock Apple ID On your iPhone 8 without Security Questions?
- Lock Your Vivo Y200 Phone in Style The Top 5 Gesture Lock Screen Apps
- Complete guide for recovering video files on Vivo V30
- What You Need To Know To Improve Your Samsung Galaxy F15 5G Hard Reset | Dr.fone
- New 2024 Approved The Ultimate Guide to Online Video Marketing
- In 2024, How Can Honor X8bMirror Share to PC? | Dr.fone
- How to Restore Deleted Infinix Note 30 5G Photos An Easy Method Explained.
- Ways to trade pokemon go from far away On Nokia 150 (2023)? | Dr.fone
- In 2024, Ultimate guide to get the meltan box pokemon go For Poco F5 5G | Dr.fone
- Title: New OBS Green Screen Guide
- Author: Chloe
- Created at : 2024-05-20 03:38:16
- Updated at : 2024-05-21 03:38:16
- Link: https://ai-editing-video.techidaily.com/new-obs-green-screen-guide/
- License: This work is licensed under CC BY-NC-SA 4.0.
