
New Practical Ways to Resize Video in Handbrake

Practical Ways to Resize Video in Handbrake
Videos are a great medium to share thoughts, concepts, guides, and memories, but regardless of how far technology has come getting them online can pose an issue sometimes. These obstacles often tend to be because either a video clip is too long or the amount of data in it is so high that the service just cannot upload the file to its servers and make it available for the intended receiver.
To solve this issue, users often need to resize a video so that the data cap, which behaved as a restriction, is no longer applicable. Now, there exist multiple software that can do this, and most video editor programs include the ability to export videos in less data-hungry sizes or formats.
So, if you ever face a similar issue, here is a guide on how you can resize videos via Handbrake and Wondershare Filmora. The former is a lightweight tool perfect for batch resizing videos, while the latter is a powerful free video editing software.
How to resize video with Handbrake
Open Handbrake and follow the steps listed below.
Once open, the software will present you with options to either import a single video file for resize or a whole batch via folder selection.
Note: If you do not have Handbrake, you can download it by visiting the official website. Also, you will need Windows .NET Framework 6.0 to use Handbrake. If your system does not have the correct config Handbrake will let you know and fail to launch.
Once you have imported the video file, the software will present you with two choices.
- Option 1: Use a preset available in the application — the best choice for beginners to choose for beginners.
- Option 2: Set a custom resolution via the Dimensions Tab.
Note: To ensure the resize is perfect, find out which file format plays best with the end location of your video and convert the video clip to that version.

How your screen will look once you have imported a video file.
How to Resize Video via Option 1
Step 1: Import Video File by choosing
- Single Import, or
- Batch Import

Step 2: Choose a Preset in Handbrake.

Step 3: Click on Start Encode after choosing the desired preset.

Step 4: Wait for the Encode to finish. The application shows progress in a bar at the bottom of the screen.

Step 5: Click on Browse in the bottom right corner to enter the Save File dialogue. At this point, you can set a file name and select a new save location.


How to Resize Video via Option 2
Step 1: Import Video File by choosing
- Single Import, or
- Batch Import

Step 2: Click on the Dimensions Tab to open up a dialog box that will let you edit video resolution.


The Dimensions Dialog Box
Step 3: Modify resolution to ensure the clip you get is in the right setup.
Note: If you see 1920 x 1080 on your screen, the first number (1920) stands for the width of the video file, while the second number (1080) stands for the height.

Tip
The one thing to keep in mind while using Option 2 is to ensure that the aspect ratio of the video file is maintained; this will prevent the final video from looking like its skewed and prevent it from becoming too tall or too wide
Via Option 2 you can also add borders to the final video if desired, while resizing it to your liked resolution.
An easier way to resize video with Wondershare Filmora
While the resize feature in Handbrake is capable of working on multiple video files at once, the user interface of the application may seem daunting to some. Hence, if you’re just starting to learn, we recommend accessing more user-friendly software, say Wondershare Filmora Video Editor . You can resize videos in the video editor by following the steps we have detailed below.
For Win 7 or later (64-bit)
For macOS 10.14 or later
Just keep in mind, when using WonderShare Filmora the resize option appears at the end of the video editing process — during the export action.
Step 1: Import a video file into Wondershare Filmora.

Step 2: Drag the video file onto the timeline and then choose Export from the top bar.
Author’s Notes: Here, I recommend using the Export to Device option as having a local copy which you then manually upload to services like YouTube is a process that you can have more control over.

Step 3: Choose the video file format (marked in Red) and then choose the resolution you require (marked in Yellow).

Tip
If you press on the settings tab (marked in Yellow, in the image above) and choose custom you can modify more aspects of your video file. Including the configuration used by the audio components.

Choose Custom under the Settings Option to customise Video Details with more precision
Step 4: Click on Export once you’ve decided on the resolution.

With this you will now have a video file that has been resized to a size or converted to a format that will hopefully function well with your desired platform.
Note: You can also reset the resolution of an entire project before hand in Wondershare Filmora by choosing the right configuration from the Project Settings option, found under the File Tab.

The Bottom Line
Having read this piece, you may have noticed that software capable of resizing videos can prove quite useful. Wondershare Filmora is this, plus a lot more, its convenient and intuitive user interface is also something we believe will feel welcoming to users. Speaking of Handbrake, while effective and great for batch encoding — if you want to resize more than one video we recommend having Handbrake handy — its bare-bones interface can be intimidating. Regardless, both programs are convenient to utilize and perfectly capable of doing the task at hand with relative ease.
How your screen will look once you have imported a video file.
How to Resize Video via Option 1
Step 1: Import Video File by choosing
- Single Import, or
- Batch Import

Step 2: Choose a Preset in Handbrake.

Step 3: Click on Start Encode after choosing the desired preset.

Step 4: Wait for the Encode to finish. The application shows progress in a bar at the bottom of the screen.

Step 5: Click on Browse in the bottom right corner to enter the Save File dialogue. At this point, you can set a file name and select a new save location.


How to Resize Video via Option 2
Step 1: Import Video File by choosing
- Single Import, or
- Batch Import

Step 2: Click on the Dimensions Tab to open up a dialog box that will let you edit video resolution.


The Dimensions Dialog Box
Step 3: Modify resolution to ensure the clip you get is in the right setup.
Note: If you see 1920 x 1080 on your screen, the first number (1920) stands for the width of the video file, while the second number (1080) stands for the height.

Tip
The one thing to keep in mind while using Option 2 is to ensure that the aspect ratio of the video file is maintained; this will prevent the final video from looking like its skewed and prevent it from becoming too tall or too wide
Via Option 2 you can also add borders to the final video if desired, while resizing it to your liked resolution.
An easier way to resize video with Wondershare Filmora
While the resize feature in Handbrake is capable of working on multiple video files at once, the user interface of the application may seem daunting to some. Hence, if you’re just starting to learn, we recommend accessing more user-friendly software, say Wondershare Filmora Video Editor . You can resize videos in the video editor by following the steps we have detailed below.
For Win 7 or later (64-bit)
For macOS 10.14 or later
Just keep in mind, when using WonderShare Filmora the resize option appears at the end of the video editing process — during the export action.
Step 1: Import a video file into Wondershare Filmora.

Step 2: Drag the video file onto the timeline and then choose Export from the top bar.
Author’s Notes: Here, I recommend using the Export to Device option as having a local copy which you then manually upload to services like YouTube is a process that you can have more control over.

Step 3: Choose the video file format (marked in Red) and then choose the resolution you require (marked in Yellow).

Tip
If you press on the settings tab (marked in Yellow, in the image above) and choose custom you can modify more aspects of your video file. Including the configuration used by the audio components.

Choose Custom under the Settings Option to customise Video Details with more precision
Step 4: Click on Export once you’ve decided on the resolution.

With this you will now have a video file that has been resized to a size or converted to a format that will hopefully function well with your desired platform.
Note: You can also reset the resolution of an entire project before hand in Wondershare Filmora by choosing the right configuration from the Project Settings option, found under the File Tab.

The Bottom Line
Having read this piece, you may have noticed that software capable of resizing videos can prove quite useful. Wondershare Filmora is this, plus a lot more, its convenient and intuitive user interface is also something we believe will feel welcoming to users. Speaking of Handbrake, while effective and great for batch encoding — if you want to resize more than one video we recommend having Handbrake handy — its bare-bones interface can be intimidating. Regardless, both programs are convenient to utilize and perfectly capable of doing the task at hand with relative ease.
How your screen will look once you have imported a video file.
How to Resize Video via Option 1
Step 1: Import Video File by choosing
- Single Import, or
- Batch Import

Step 2: Choose a Preset in Handbrake.

Step 3: Click on Start Encode after choosing the desired preset.

Step 4: Wait for the Encode to finish. The application shows progress in a bar at the bottom of the screen.

Step 5: Click on Browse in the bottom right corner to enter the Save File dialogue. At this point, you can set a file name and select a new save location.


How to Resize Video via Option 2
Step 1: Import Video File by choosing
- Single Import, or
- Batch Import

Step 2: Click on the Dimensions Tab to open up a dialog box that will let you edit video resolution.


The Dimensions Dialog Box
Step 3: Modify resolution to ensure the clip you get is in the right setup.
Note: If you see 1920 x 1080 on your screen, the first number (1920) stands for the width of the video file, while the second number (1080) stands for the height.

Tip
The one thing to keep in mind while using Option 2 is to ensure that the aspect ratio of the video file is maintained; this will prevent the final video from looking like its skewed and prevent it from becoming too tall or too wide
Via Option 2 you can also add borders to the final video if desired, while resizing it to your liked resolution.
An easier way to resize video with Wondershare Filmora
While the resize feature in Handbrake is capable of working on multiple video files at once, the user interface of the application may seem daunting to some. Hence, if you’re just starting to learn, we recommend accessing more user-friendly software, say Wondershare Filmora Video Editor . You can resize videos in the video editor by following the steps we have detailed below.
For Win 7 or later (64-bit)
For macOS 10.14 or later
Just keep in mind, when using WonderShare Filmora the resize option appears at the end of the video editing process — during the export action.
Step 1: Import a video file into Wondershare Filmora.

Step 2: Drag the video file onto the timeline and then choose Export from the top bar.
Author’s Notes: Here, I recommend using the Export to Device option as having a local copy which you then manually upload to services like YouTube is a process that you can have more control over.

Step 3: Choose the video file format (marked in Red) and then choose the resolution you require (marked in Yellow).

Tip
If you press on the settings tab (marked in Yellow, in the image above) and choose custom you can modify more aspects of your video file. Including the configuration used by the audio components.

Choose Custom under the Settings Option to customise Video Details with more precision
Step 4: Click on Export once you’ve decided on the resolution.

With this you will now have a video file that has been resized to a size or converted to a format that will hopefully function well with your desired platform.
Note: You can also reset the resolution of an entire project before hand in Wondershare Filmora by choosing the right configuration from the Project Settings option, found under the File Tab.

The Bottom Line
Having read this piece, you may have noticed that software capable of resizing videos can prove quite useful. Wondershare Filmora is this, plus a lot more, its convenient and intuitive user interface is also something we believe will feel welcoming to users. Speaking of Handbrake, while effective and great for batch encoding — if you want to resize more than one video we recommend having Handbrake handy — its bare-bones interface can be intimidating. Regardless, both programs are convenient to utilize and perfectly capable of doing the task at hand with relative ease.
How your screen will look once you have imported a video file.
How to Resize Video via Option 1
Step 1: Import Video File by choosing
- Single Import, or
- Batch Import

Step 2: Choose a Preset in Handbrake.

Step 3: Click on Start Encode after choosing the desired preset.

Step 4: Wait for the Encode to finish. The application shows progress in a bar at the bottom of the screen.

Step 5: Click on Browse in the bottom right corner to enter the Save File dialogue. At this point, you can set a file name and select a new save location.


How to Resize Video via Option 2
Step 1: Import Video File by choosing
- Single Import, or
- Batch Import

Step 2: Click on the Dimensions Tab to open up a dialog box that will let you edit video resolution.


The Dimensions Dialog Box
Step 3: Modify resolution to ensure the clip you get is in the right setup.
Note: If you see 1920 x 1080 on your screen, the first number (1920) stands for the width of the video file, while the second number (1080) stands for the height.

Tip
The one thing to keep in mind while using Option 2 is to ensure that the aspect ratio of the video file is maintained; this will prevent the final video from looking like its skewed and prevent it from becoming too tall or too wide
Via Option 2 you can also add borders to the final video if desired, while resizing it to your liked resolution.
An easier way to resize video with Wondershare Filmora
While the resize feature in Handbrake is capable of working on multiple video files at once, the user interface of the application may seem daunting to some. Hence, if you’re just starting to learn, we recommend accessing more user-friendly software, say Wondershare Filmora Video Editor . You can resize videos in the video editor by following the steps we have detailed below.
For Win 7 or later (64-bit)
For macOS 10.14 or later
Just keep in mind, when using WonderShare Filmora the resize option appears at the end of the video editing process — during the export action.
Step 1: Import a video file into Wondershare Filmora.

Step 2: Drag the video file onto the timeline and then choose Export from the top bar.
Author’s Notes: Here, I recommend using the Export to Device option as having a local copy which you then manually upload to services like YouTube is a process that you can have more control over.

Step 3: Choose the video file format (marked in Red) and then choose the resolution you require (marked in Yellow).

Tip
If you press on the settings tab (marked in Yellow, in the image above) and choose custom you can modify more aspects of your video file. Including the configuration used by the audio components.

Choose Custom under the Settings Option to customise Video Details with more precision
Step 4: Click on Export once you’ve decided on the resolution.

With this you will now have a video file that has been resized to a size or converted to a format that will hopefully function well with your desired platform.
Note: You can also reset the resolution of an entire project before hand in Wondershare Filmora by choosing the right configuration from the Project Settings option, found under the File Tab.

The Bottom Line
Having read this piece, you may have noticed that software capable of resizing videos can prove quite useful. Wondershare Filmora is this, plus a lot more, its convenient and intuitive user interface is also something we believe will feel welcoming to users. Speaking of Handbrake, while effective and great for batch encoding — if you want to resize more than one video we recommend having Handbrake handy — its bare-bones interface can be intimidating. Regardless, both programs are convenient to utilize and perfectly capable of doing the task at hand with relative ease.
How to Make Falling Text Effect in Filmora?
Indeed, there are different elements of a video that has the potential to make it stand out to viewers. The title you add to the video, content information in the slides, and other elements are some parts that capture one’s interest.
But seeing only the text in single lines or paragraphs can get repetitive and unappealing, especially with so many videos having the same style. In this context, the fun falling text effect is a unique and exciting approach to making your titles in videos engaging. It creates a fun look when the viewer clicks into the video and is met with this styling title effect.
On Wondershare Filmora , there is a feature available for users to apply this effect to videos in a more straightforward sequence of steps than other editors. Yet, knowing how it works is still valid, even for experienced editing professionals. In this post, we shall detail all of the steps that go into creating this effect in videos, with examples.
Launch Filmora on the Device
Before getting started with the editing steps, you need to download and install this third-party editing software into your device. Filmora works on both Mac and Windows-based computers. (Download here:
Free Download For Win 7 or later(64-bit)
Free Download For macOS 10.14 or later
After switching on your device and going to your preferred browser, search for Wonderhsare Filmora’s official website. Upon accessing it, you will see the “Download” button at the top of the screen. Click on it, and the respective Filmora installer will download into your device instantly, depending on your OS type.
Then, you have to double-click on the installer file you will find in the Downloads folder. This will open the software installation problem window. Click on the Install button and then tap the Agree option for the terms & conditions that appear next on the screen. After that, the software will begin installing automatically.
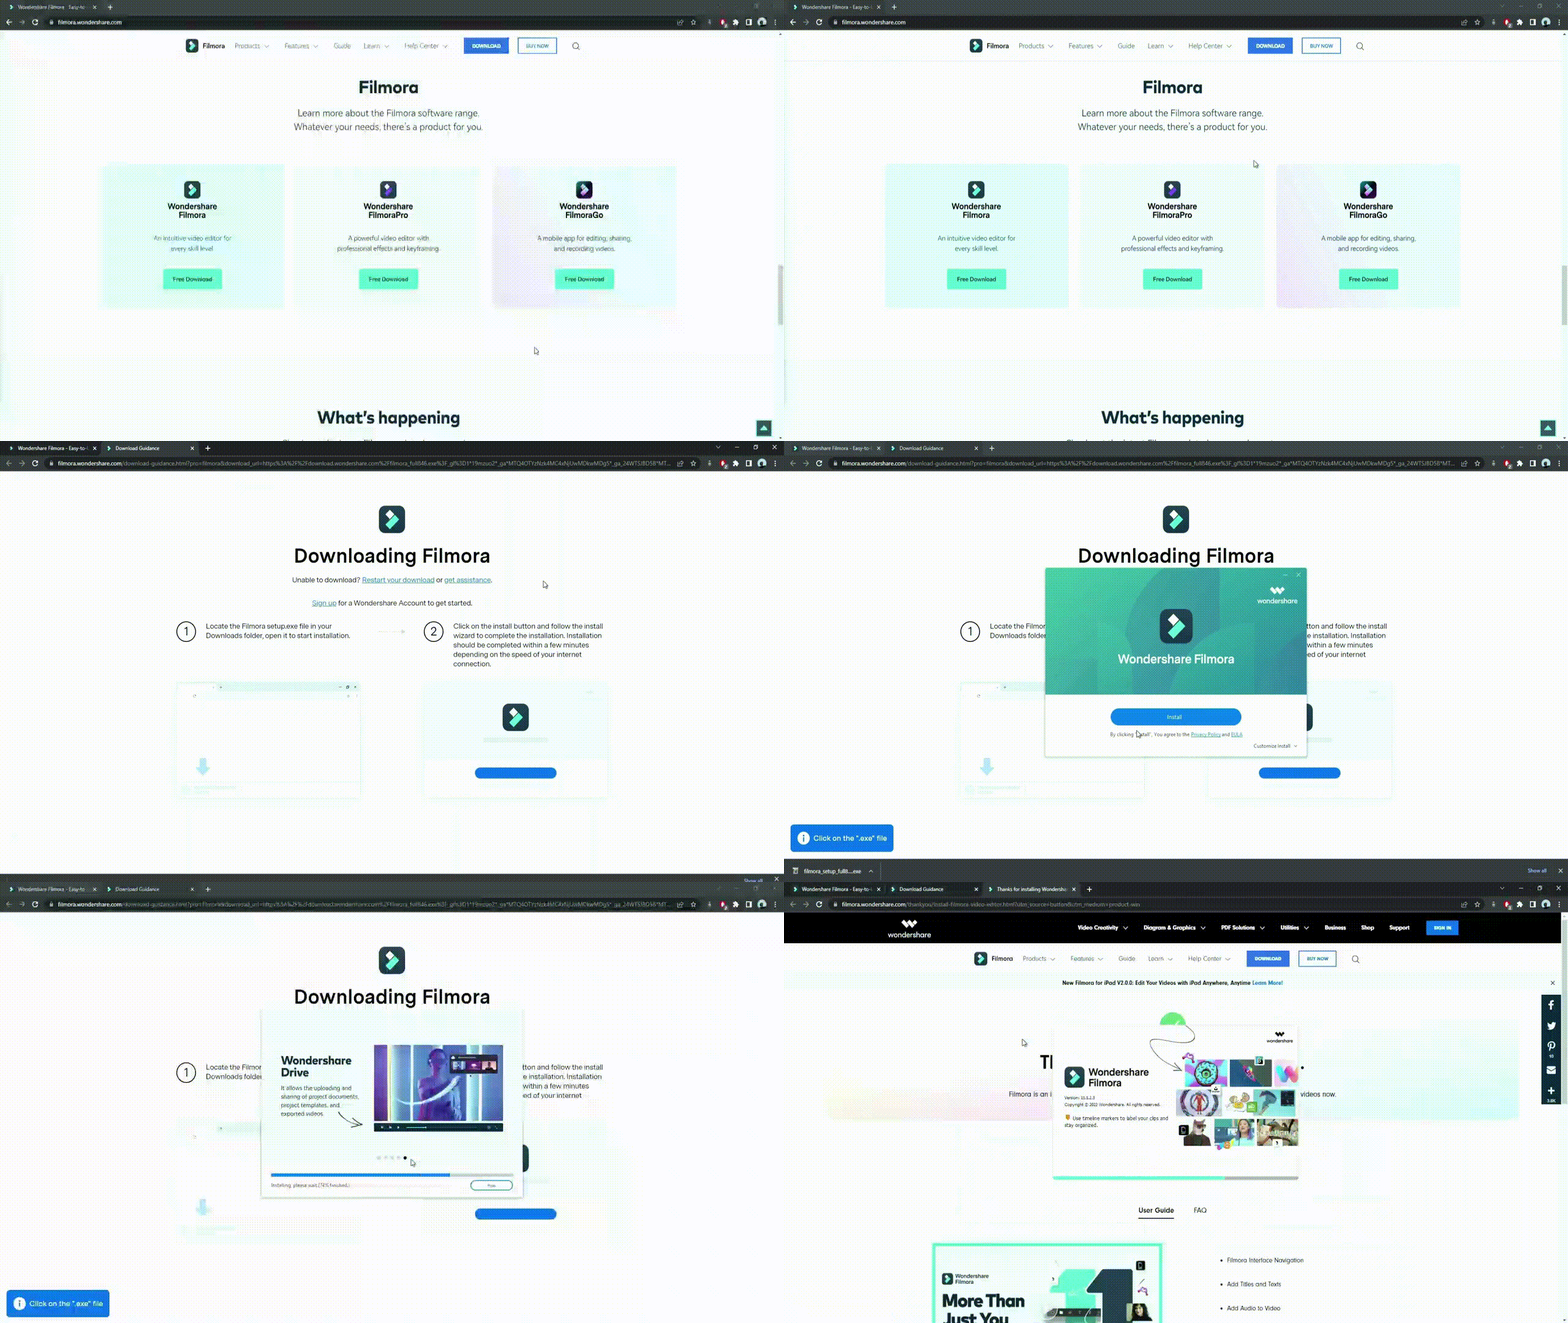
Finally, press the Start Now button on the installation complete prompt window. The software will then launch automatically.
Adjust the project settings
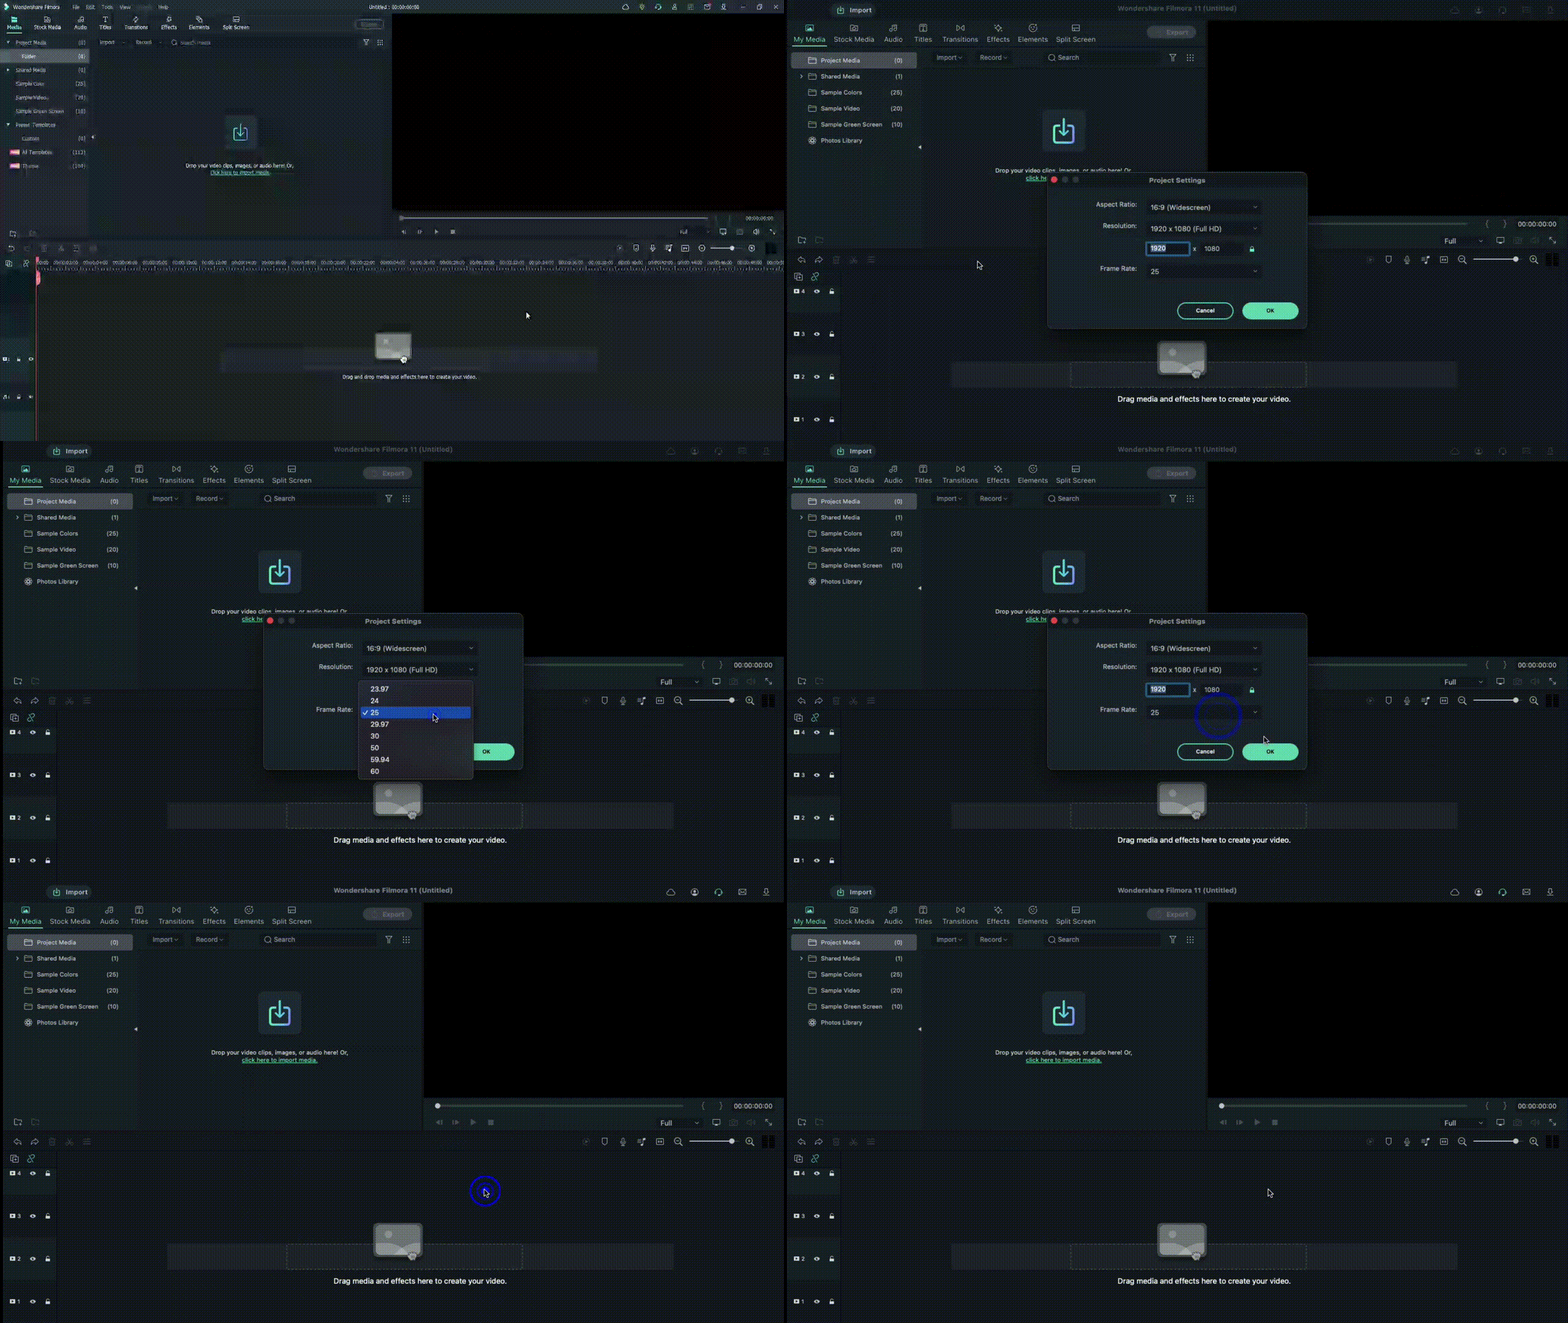
After the software launches on your device, you should tap on the Create New Project button. Before you add the video file you will edit from your device through; you should take time to change some aspects of the project settings.
For this, click on the File tab at the top-most toolbar in the editor window. You should click on the Project Settings option from the drop-down menu, which will open the dialog box. Under the resolution option, you will see the Frame Rate element. Click on the drop-down menu and adjust the video’s frame rate to 25 FPS. After you are done, tap the OK button.
Add the Title
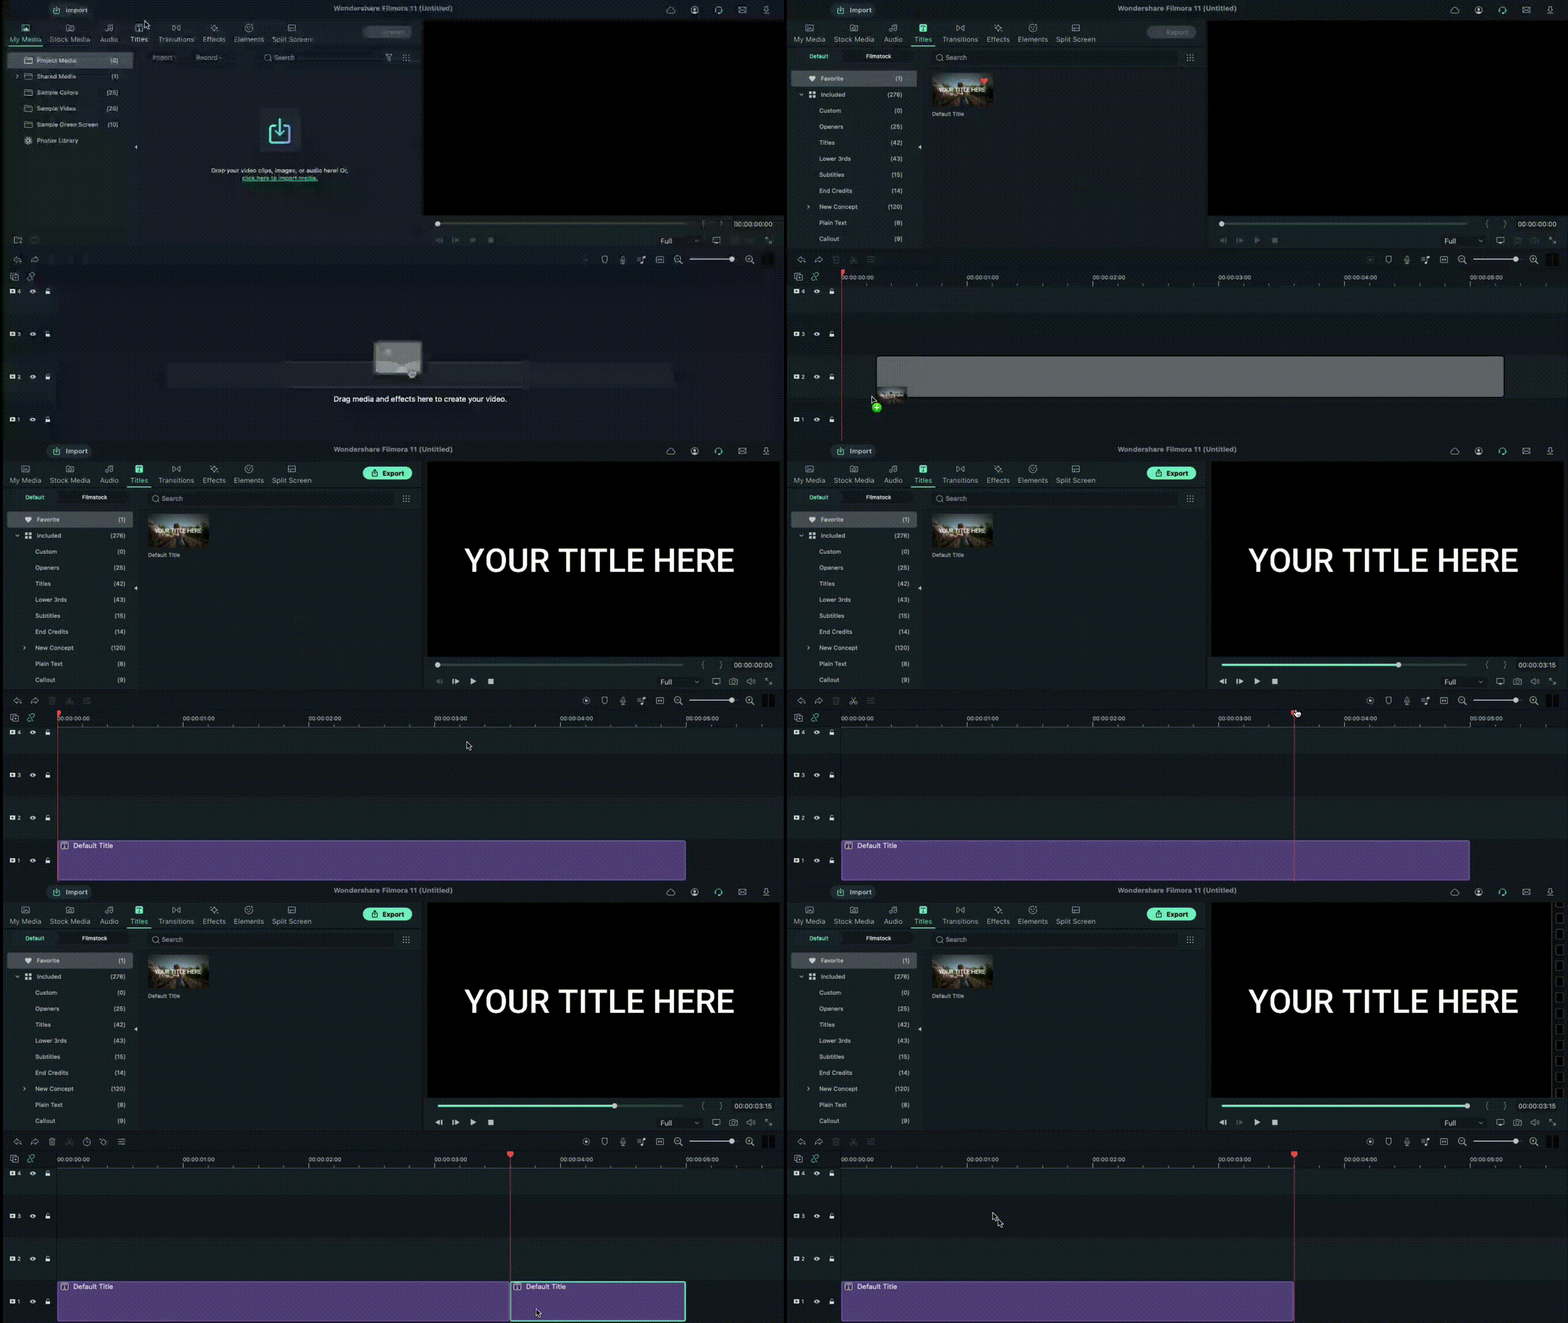
Following this, you must click on the Titles tab at the top toolbar on the editor. Different title templates, like Custom, Openers, End Credits, etc., will appear. Choose the default title of your liking and download it.
Next, hold the title that appears in the library window and then drag it to the first layer of the editing timeline. Clip the title short by moving the play head to the 3-second and 15 frames mark and shape the title to that length. Then, delete the rest of the part.
Edit the Title
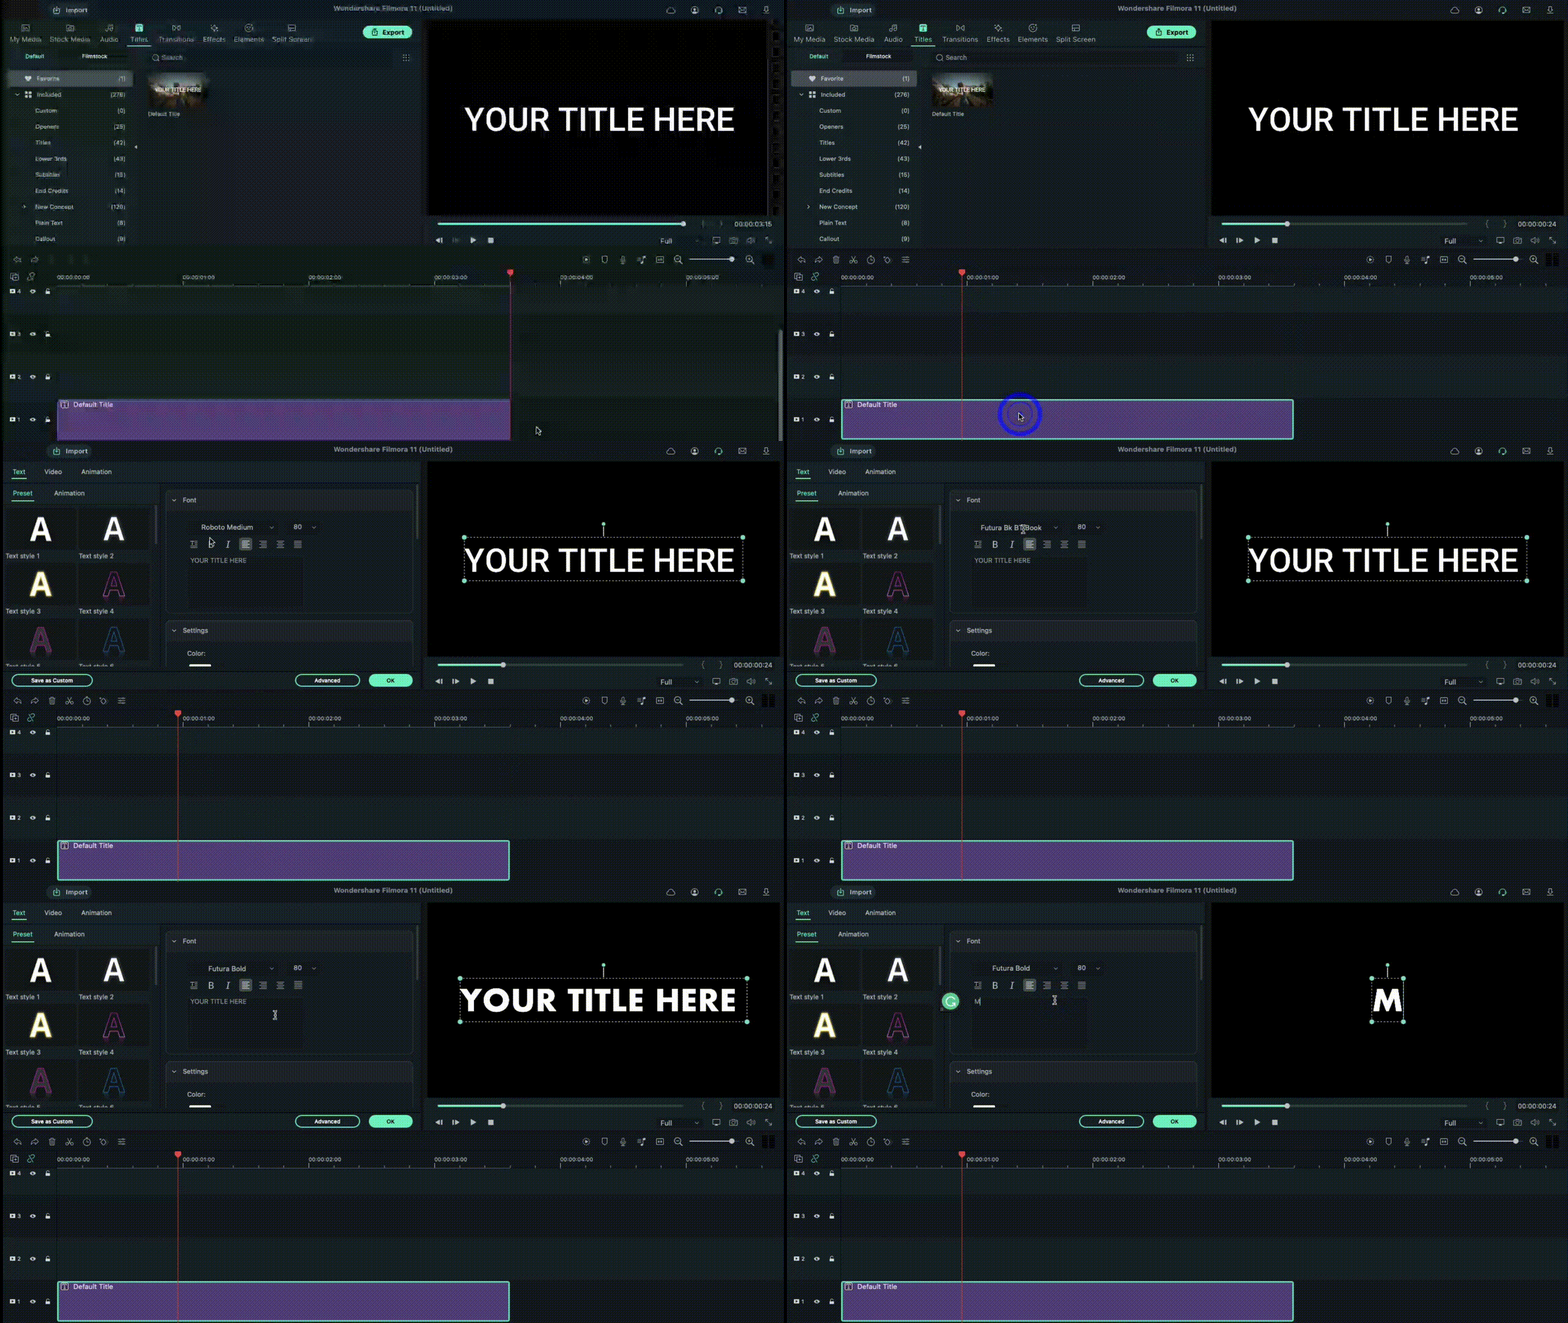
After this, you have to double-click on the top of the default title in your Track 1 timeline. A window will appear for editing the title. Click on the Text tab in this window and tap on the Font options. You should change the font of your title to Futura Bold or any other option that you would prefer.
Animate the characters
When this part is done, in the text field, add the first letter of the text you will add to your animated introduction. After inserting the first letter only, click on the Animation tab next. Following that, you have to move the playhead on your timeline to the very front. You will see the Position parameter in the Animation settings and change the number in the Y axis until it goes out of the top frame of the video.
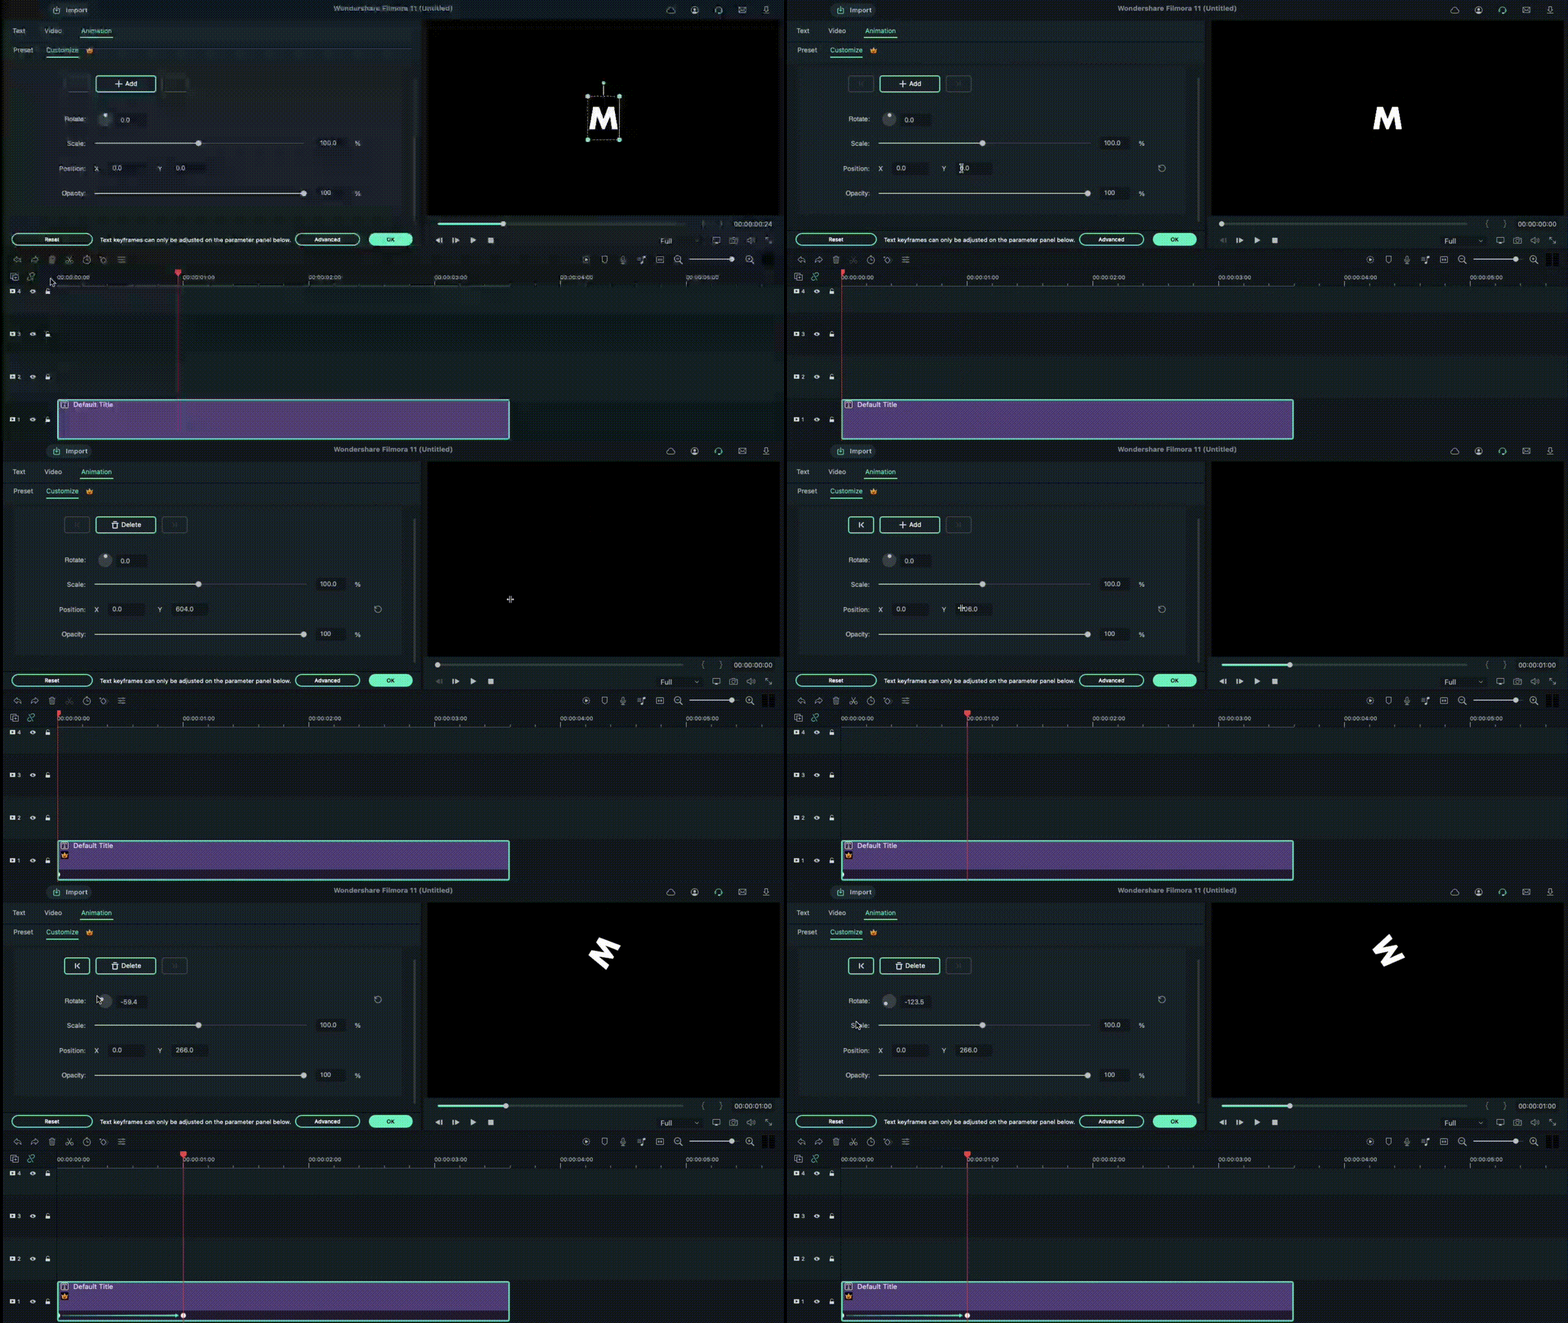
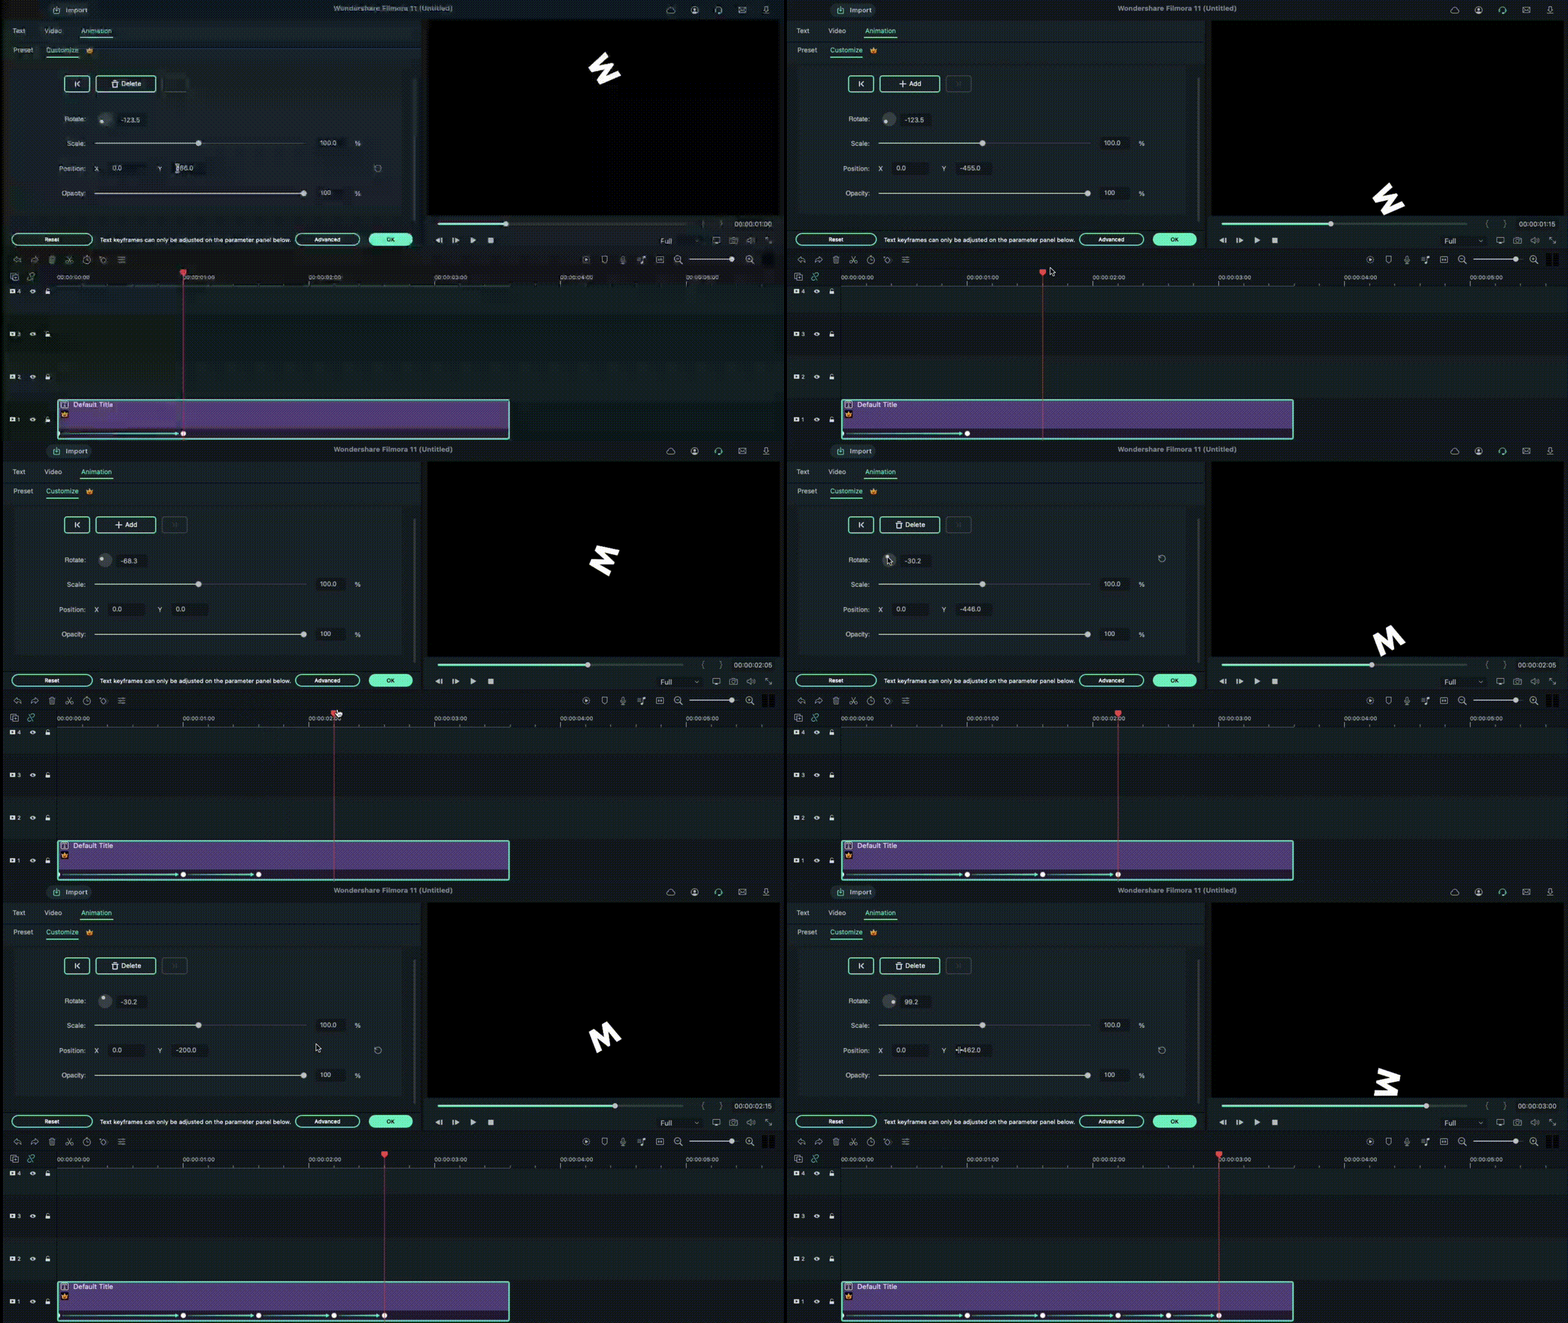
Next, you must move the play head to the 1-second position in the timeline. Here, you must change the number Y axis to a lower position and adjust the Rotate element as per your preference. After that, move the playhead again to 15 frames from the 1-second mark. It would be best if you changed the Y-axis position digit to 0 and adjusted the Rotation value slightly.
Following that, move the playhead again by 15 frames ahead. Rotate the letter again and change the Y-axis value until the letter rests at the bottom of the screen. Again, you have to move the play head on the timeline to 10 frames ahead and adjust the Y-axis and Rotation values to a higher point. Then, continue the step like this at ten frames forward, this time making the character move to the ground again. Press the OK button to complete.
Repeat for the next letters
After you are done with this editing process for the first letter, hold the default title in the library and drag and drop it into Track 2 on the timeline. Adjust the starting point for this layer to frame five from the beginning, and move the file to that starting point. In the end, cut the title length at the same position as layer one was, at 3.15 seconds.
Follow the process explained in the previous section for the first letter, i.e., moving the playhead at specific frames and changing the Y-axis and Rotation value multiple times.
After editing the second letter in the title, repeat the process of holding and dragging the default title to Track 3 in the timeline and adjusting starting position at the 10th frame. Again, follow the process of animating the letter like for Letter 1 and Letter 2. Continue doing this process for multiple more letters in your title text.
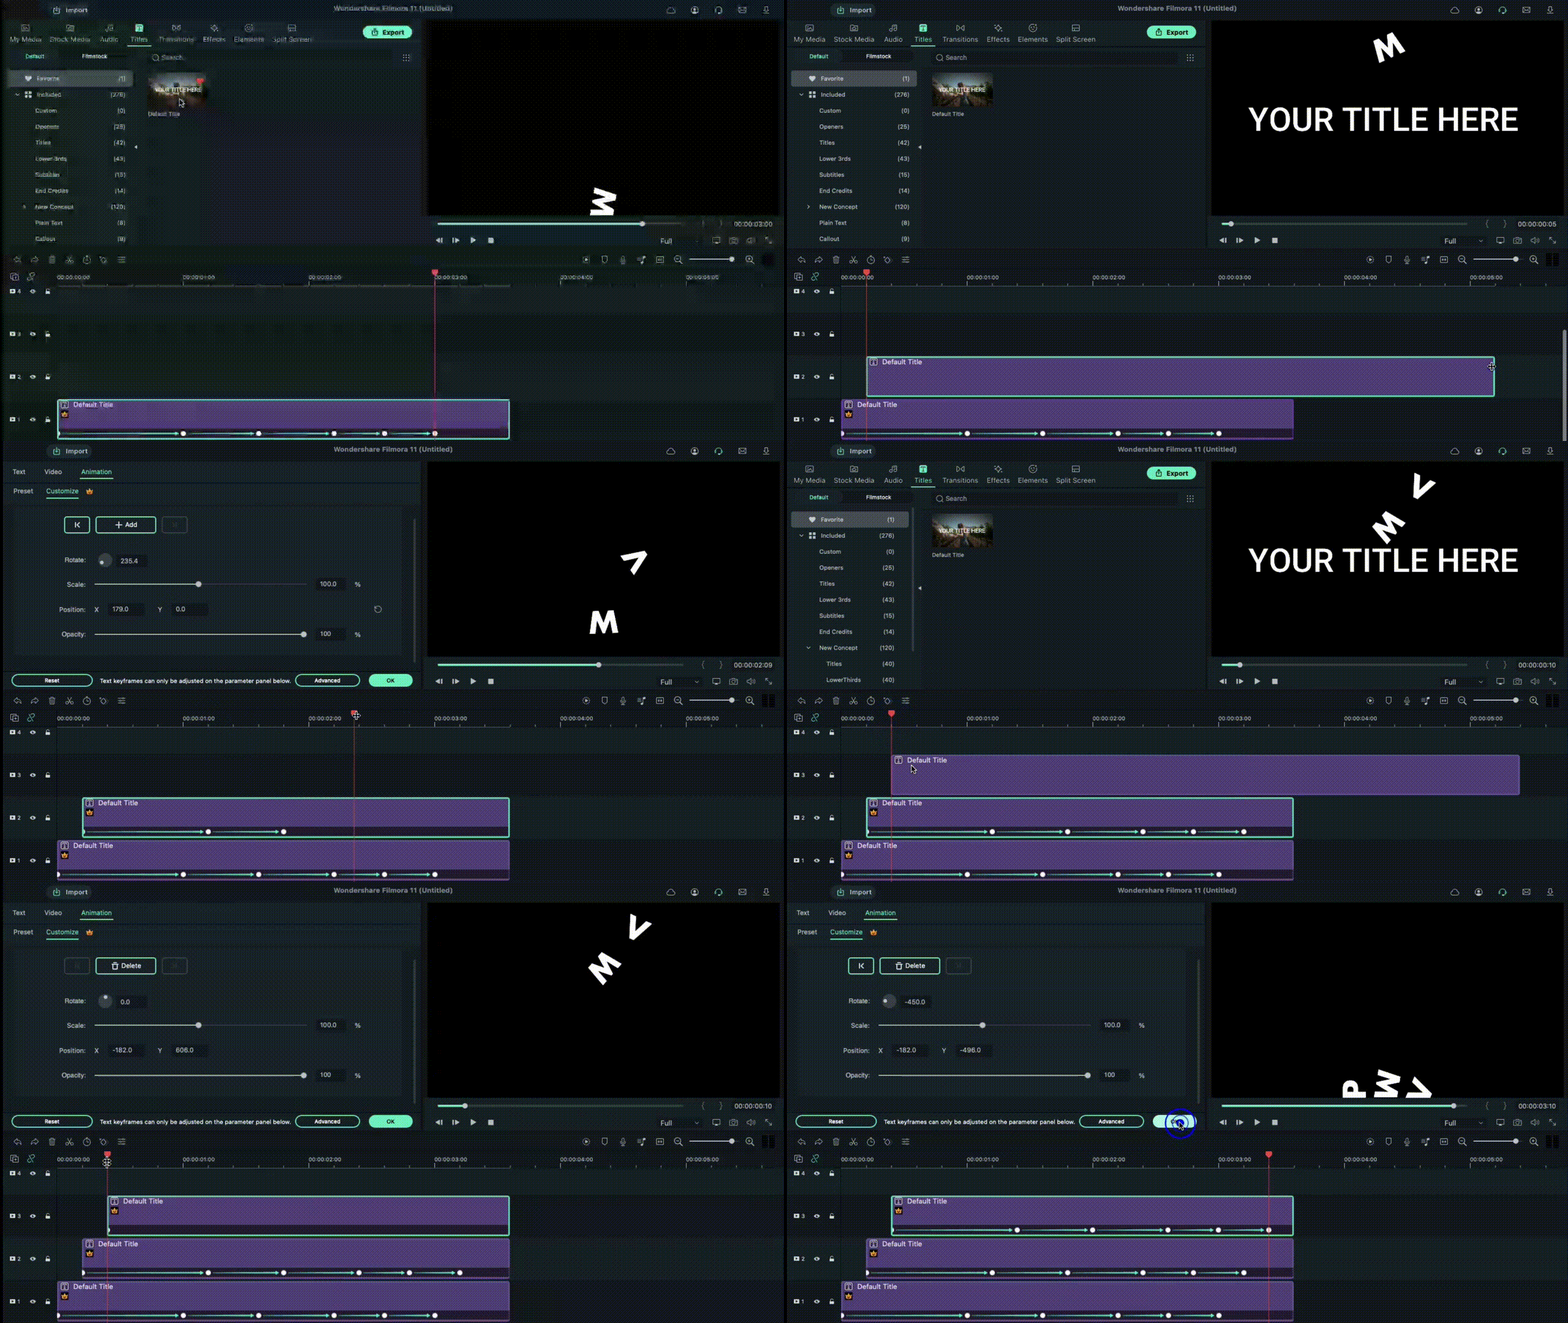
Tap on the Play button under the Preview screen to see how the letters have the falling text effect.
Add Screenshot
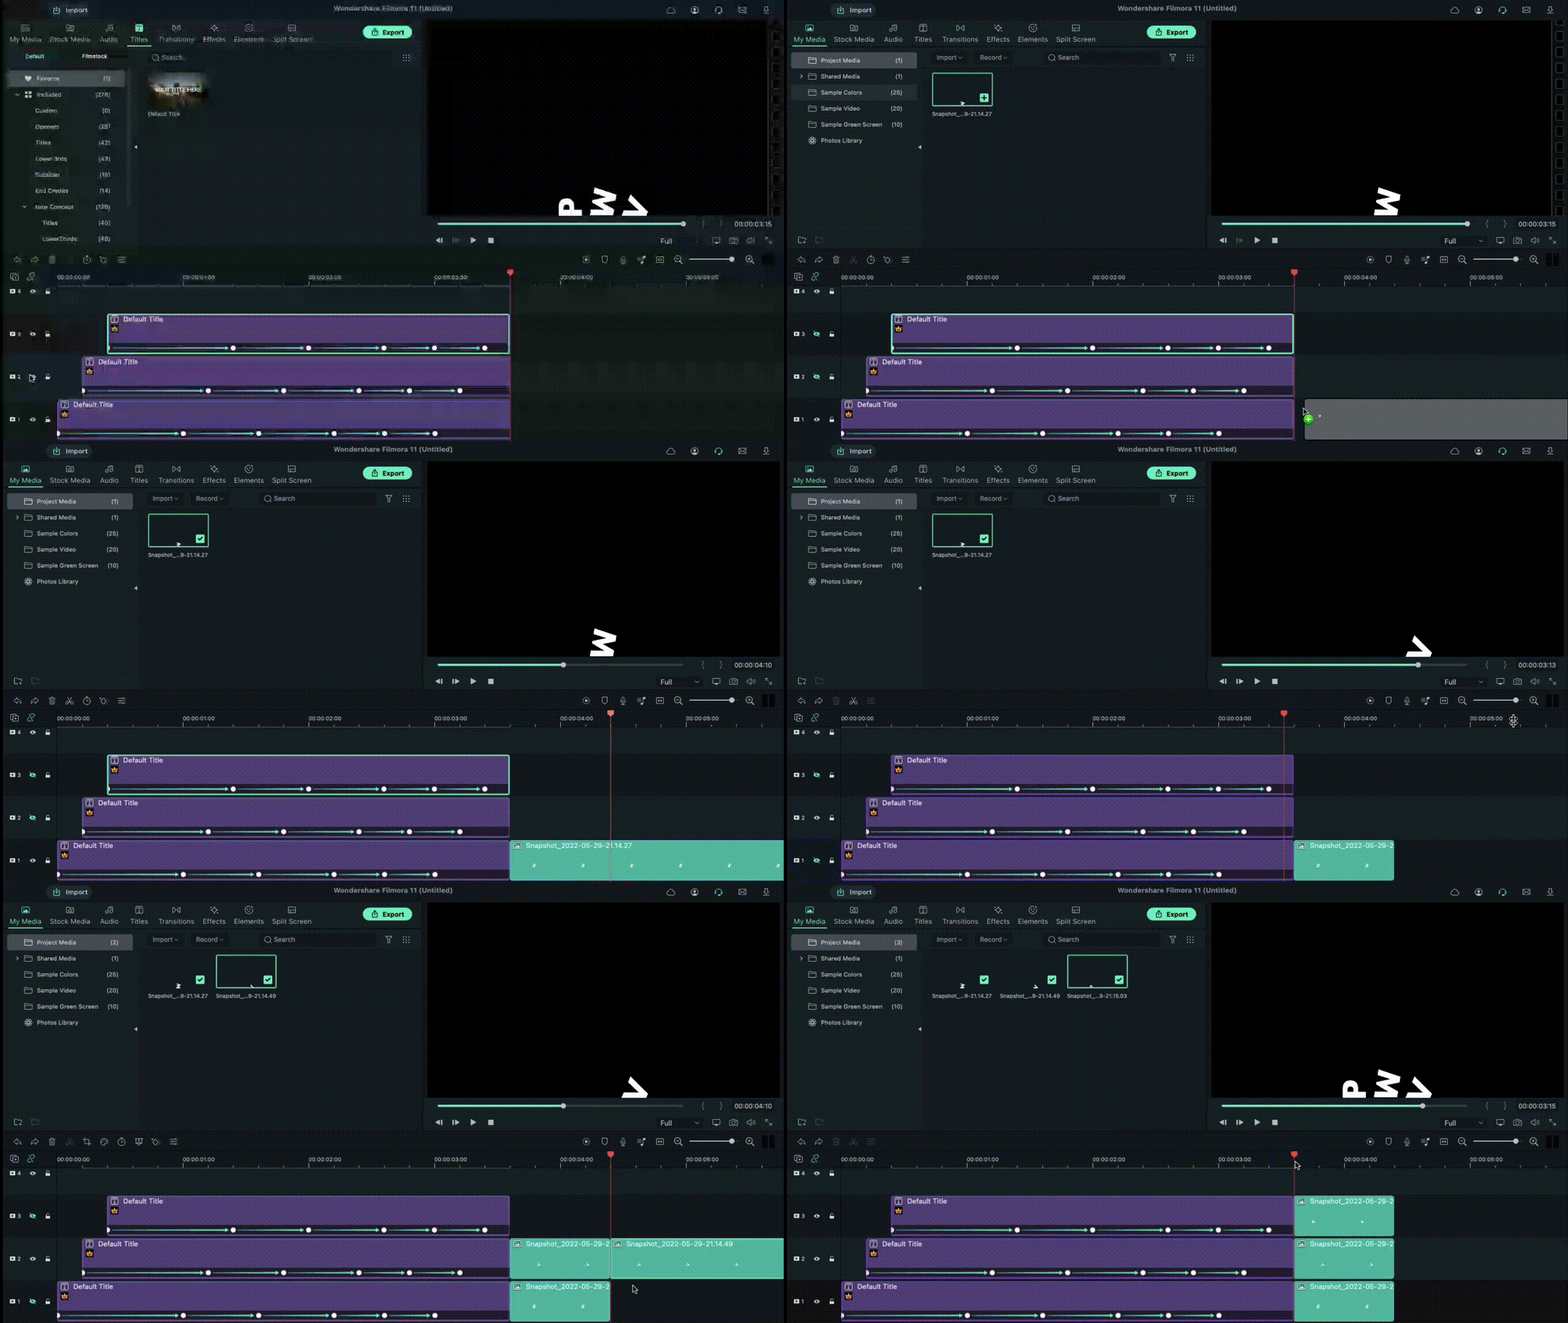
Next, you have to click on the hide button for Tracks 2 and up. Tap on the Snapshot icon in the editing timeline of the first letter. Then, when it appears in the library window, click on it and move it beside the Track 1 Title file that you were editing. Move the play head to the 1-second position of this file in the timeline.
Hide Track 1 again and click the Unhide button on Track 2. Repeat the snapshot function and add it to Layer 2. Adjust the end as per Track 1. After this, follow these steps for the subsequent letters as well.
Adjust Keyframing
Follow the animation process for all of the title clips and screenshots you did before. Move the play head to the point where the Tracks end and the Screenshots on the timeline start. Choose the first letter and click on the Keyframe icon in the editing window under Animation. Then, make adjustments to the values of Position, Rotation, etc.
Continue this keyframing step for all of the letters in sequence. After you are done here, click on the Render Preview icon on the right-hand side of the toolbar above the editing timeline. See how the falling text effects line up.
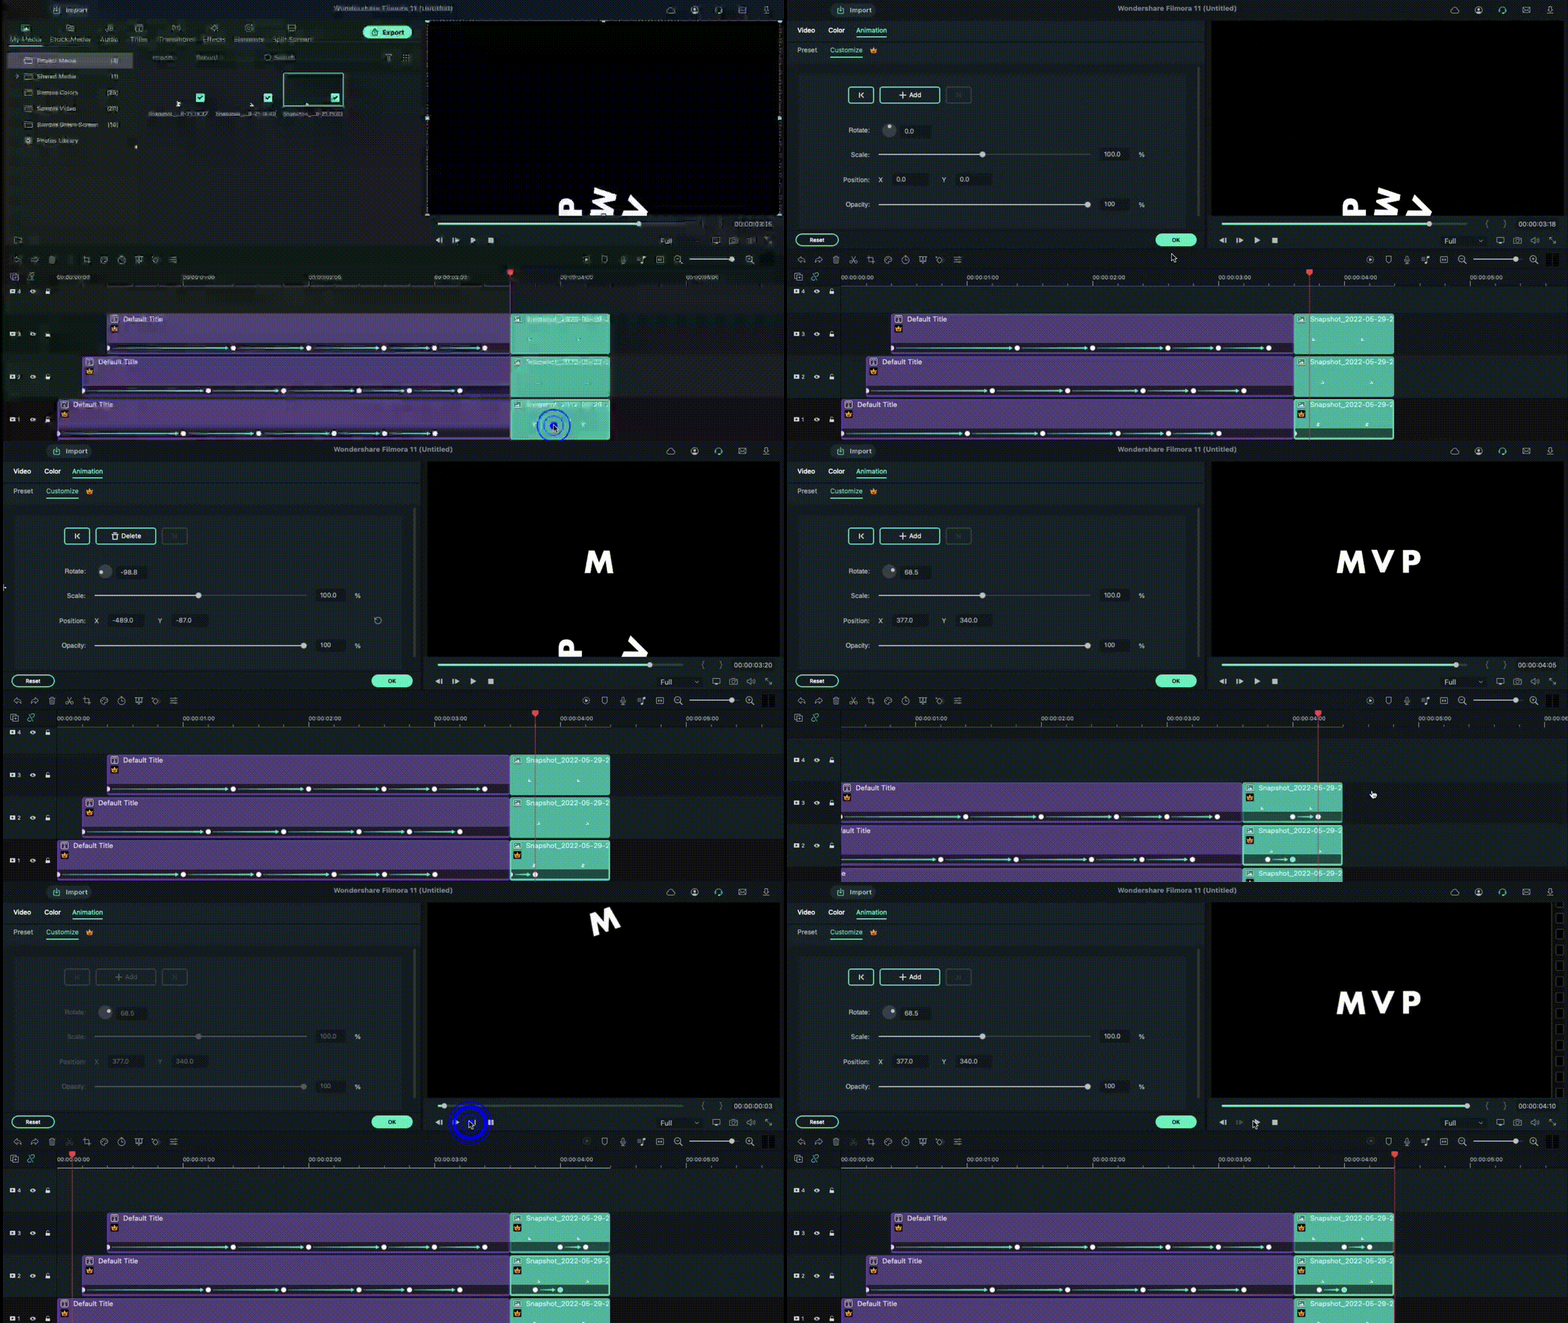
After that, you can export the final file to your device or do further editing work through the Export button.
Final Words
Indeed, adding the falling text effect should allow you to create a stunning, dynamic, and engaging video project. While the feature is available in many other editing software, you can expect a better user experience on Filmora, especially as a beginner-level user.
The UI on this software is simple to navigate, with all features easily accessible. Besides the falling text customization benefits, you will also use other effects, filters, and title presets in videos with some simple taps. So, install it soon and give it a try.
Free Download For macOS 10.14 or later
After switching on your device and going to your preferred browser, search for Wonderhsare Filmora’s official website. Upon accessing it, you will see the “Download” button at the top of the screen. Click on it, and the respective Filmora installer will download into your device instantly, depending on your OS type.
Then, you have to double-click on the installer file you will find in the Downloads folder. This will open the software installation problem window. Click on the Install button and then tap the Agree option for the terms & conditions that appear next on the screen. After that, the software will begin installing automatically.

Finally, press the Start Now button on the installation complete prompt window. The software will then launch automatically.
Adjust the project settings
After the software launches on your device, you should tap on the Create New Project button. Before you add the video file you will edit from your device through; you should take time to change some aspects of the project settings.
For this, click on the File tab at the top-most toolbar in the editor window. You should click on the Project Settings option from the drop-down menu, which will open the dialog box. Under the resolution option, you will see the Frame Rate element. Click on the drop-down menu and adjust the video’s frame rate to 25 FPS. After you are done, tap the OK button.

Add the Title
Following this, you must click on the Titles tab at the top toolbar on the editor. Different title templates, like Custom, Openers, End Credits, etc., will appear. Choose the default title of your liking and download it.
Next, hold the title that appears in the library window and then drag it to the first layer of the editing timeline. Clip the title short by moving the play head to the 3-second and 15 frames mark and shape the title to that length. Then, delete the rest of the part.

Edit the Title
After this, you have to double-click on the top of the default title in your Track 1 timeline. A window will appear for editing the title. Click on the Text tab in this window and tap on the Font options. You should change the font of your title to Futura Bold or any other option that you would prefer.

Animate the characters
When this part is done, in the text field, add the first letter of the text you will add to your animated introduction. After inserting the first letter only, click on the Animation tab next. Following that, you have to move the playhead on your timeline to the very front. You will see the Position parameter in the Animation settings and change the number in the Y axis until it goes out of the top frame of the video.

Next, you must move the play head to the 1-second position in the timeline. Here, you must change the number Y axis to a lower position and adjust the Rotate element as per your preference. After that, move the playhead again to 15 frames from the 1-second mark. It would be best if you changed the Y-axis position digit to 0 and adjusted the Rotation value slightly.
Following that, move the playhead again by 15 frames ahead. Rotate the letter again and change the Y-axis value until the letter rests at the bottom of the screen. Again, you have to move the play head on the timeline to 10 frames ahead and adjust the Y-axis and Rotation values to a higher point. Then, continue the step like this at ten frames forward, this time making the character move to the ground again. Press the OK button to complete.

Repeat for the next letters
After you are done with this editing process for the first letter, hold the default title in the library and drag and drop it into Track 2 on the timeline. Adjust the starting point for this layer to frame five from the beginning, and move the file to that starting point. In the end, cut the title length at the same position as layer one was, at 3.15 seconds.
Follow the process explained in the previous section for the first letter, i.e., moving the playhead at specific frames and changing the Y-axis and Rotation value multiple times.
After editing the second letter in the title, repeat the process of holding and dragging the default title to Track 3 in the timeline and adjusting starting position at the 10th frame. Again, follow the process of animating the letter like for Letter 1 and Letter 2. Continue doing this process for multiple more letters in your title text.

Tap on the Play button under the Preview screen to see how the letters have the falling text effect.
Add Screenshot
Next, you have to click on the hide button for Tracks 2 and up. Tap on the Snapshot icon in the editing timeline of the first letter. Then, when it appears in the library window, click on it and move it beside the Track 1 Title file that you were editing. Move the play head to the 1-second position of this file in the timeline.
Hide Track 1 again and click the Unhide button on Track 2. Repeat the snapshot function and add it to Layer 2. Adjust the end as per Track 1. After this, follow these steps for the subsequent letters as well.

Adjust Keyframing
Follow the animation process for all of the title clips and screenshots you did before. Move the play head to the point where the Tracks end and the Screenshots on the timeline start. Choose the first letter and click on the Keyframe icon in the editing window under Animation. Then, make adjustments to the values of Position, Rotation, etc.
Continue this keyframing step for all of the letters in sequence. After you are done here, click on the Render Preview icon on the right-hand side of the toolbar above the editing timeline. See how the falling text effects line up.

After that, you can export the final file to your device or do further editing work through the Export button.
Final Words
Indeed, adding the falling text effect should allow you to create a stunning, dynamic, and engaging video project. While the feature is available in many other editing software, you can expect a better user experience on Filmora, especially as a beginner-level user.
The UI on this software is simple to navigate, with all features easily accessible. Besides the falling text customization benefits, you will also use other effects, filters, and title presets in videos with some simple taps. So, install it soon and give it a try.
Best LUTs for Vlog: A 2024 Overview
Color grading and color correction are essential tools in post-production videos and photos. Many tools can be used for this purpose, such as LUTs. LUTs, or Look Up Tables, are among the most popular color grading and correction tools. It can help to apply a specific color grade or look at your videos and photos.
However, you can choose from different LUT styles if you are a vlogger or a traveler. There are many LUTs vlog options available to choose from, each with a unique look and feel. This article will provide you with different vlog LUTs options that you can try.
- Best LUTs for Vlog to Use in 2024 Editing
- How Has Wondershare Filmora Changed the Dynamics of LUTs in Video Editing?
Part 1: How Can LUTs Help in Vlogging?
If you want to make your vlogs look more professional, try using LUTs. These tables can help you correct the color of your footage easily and quickly while you’re on the go. You can use LUTs for vlogs to fix issues like your clips’ white balance and exposure. Furthermore, many other uses of LUTs for vlogging are discussed below.
Consistency
Consistency is the key when it comes to vlogging. You want your vlog to have a consistent look and feel thorough. With LUTs, you can ensure that the color grading of all your clips is the same. It gives your vlog a cohesive look and makes it stand out from others in the same genre.
Creative Look
Vlog LUTs also allow you to add a unique and creative look to your vlogs. You can set the mood of your vlog by adjusting the colors and tones to match the overall tone of your content. It helps you create a recognizable brand and establish your unique style.
Time-Saving
If you’re short on time, LUTs can help you vlog more efficiently. They save time, allowing you to focus on the storytelling aspect of your vlog. LUTs can also help you to edit your videos and publish them online quickly. It lets you stay on top of trends and maintain an active presence on social media.
Lighting Correction
Sometimes, capturing footage under mixed lighting conditions can be challenging. LUTs can help you to correct this and create a cohesive look for your vlog. You can even use LUTs on mobile editing apps to quickly edit your vlogs to publish them on the go.
Part 2: Best LUTs for Vlog to Use in 2024 Editing
Besides benefits and uses, the real part is to choose the best LUTs for vlogging. With so many LUTs vlog options, choosing a good one takes time and effort. Here are some of the best LUTs that you can use for vlogs.
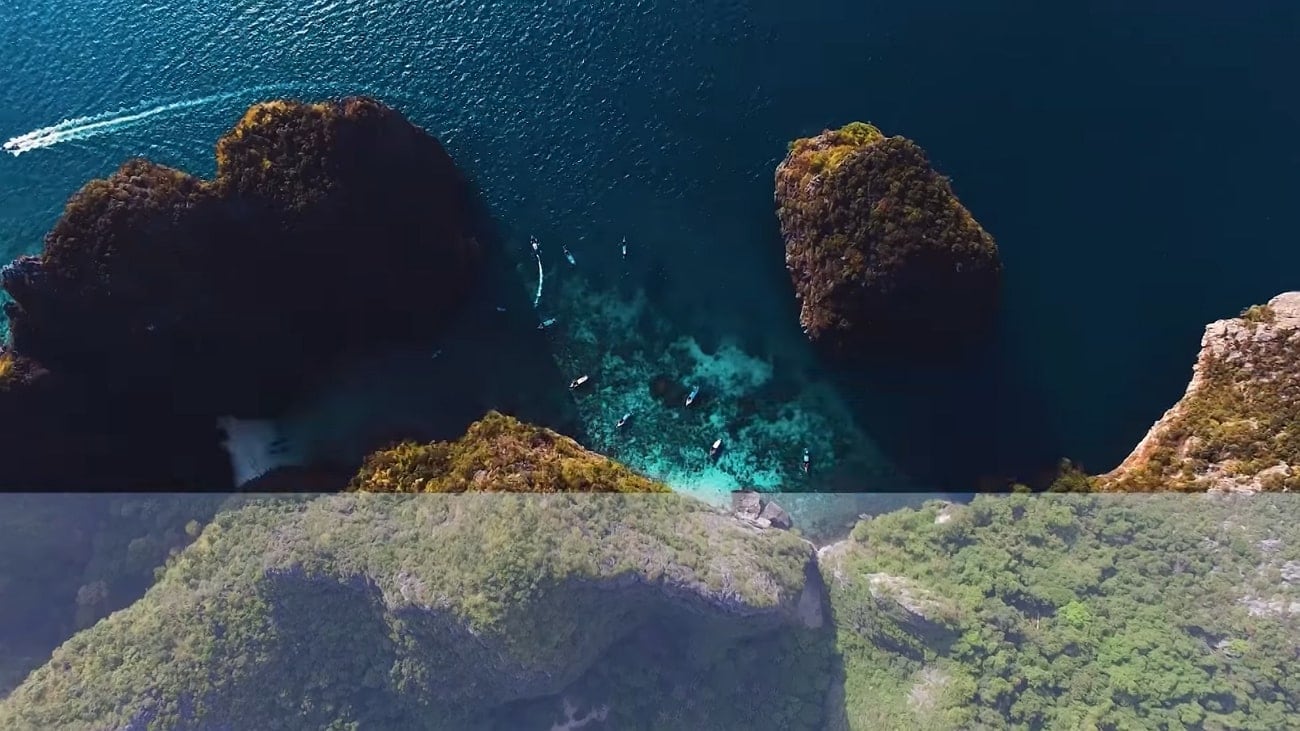
1. Artist Found LUTs Collection
Are you a vlogger looking for a LUT that can help enhance the colors and brightness of your videos? The Artist Found LUTs Collection is a great option. This LUT is perfect for giving your vlogs a professional look that will capture the attention of your viewers. Furthermore, you can make your videos brighter and more vibrant with this LUTs pack.
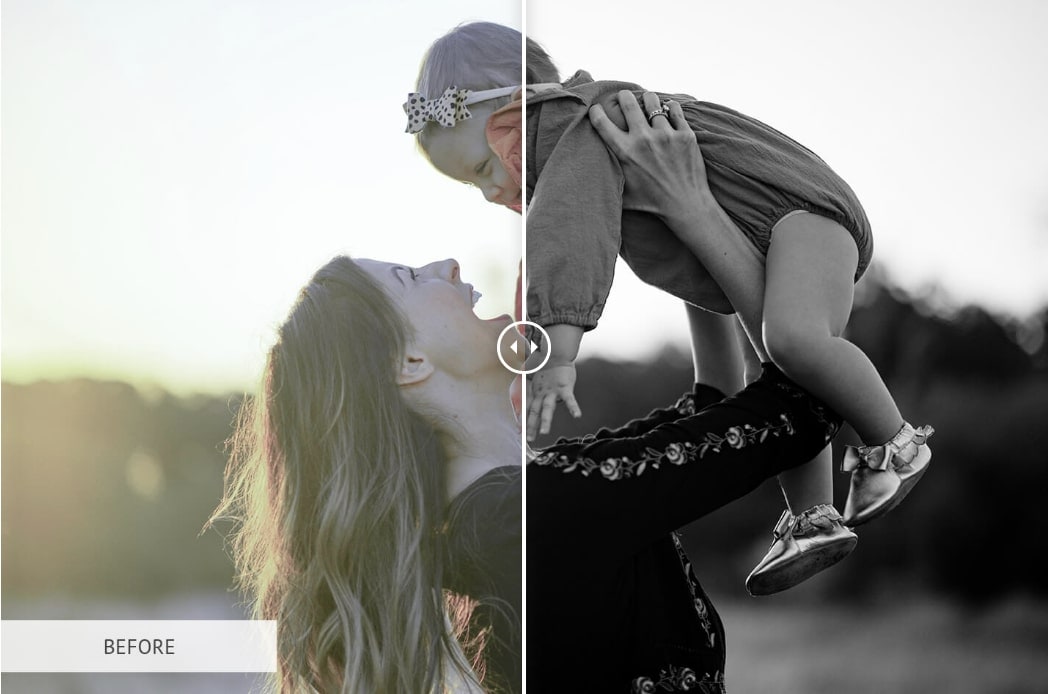
2. B&W
B&W is the best LUT for vlog that can be a great addition to your vlogging toolkit. This LUT allows you to transform your videos into black and white. It gives your vlogs and videos a more serious and dramatic look. You can add a touch of nostalgia and a vintage feel to your videos, giving them an artistic feel. With B&W, you can create a timeless and classic look for your vlogs, making them more memorable and impactful.
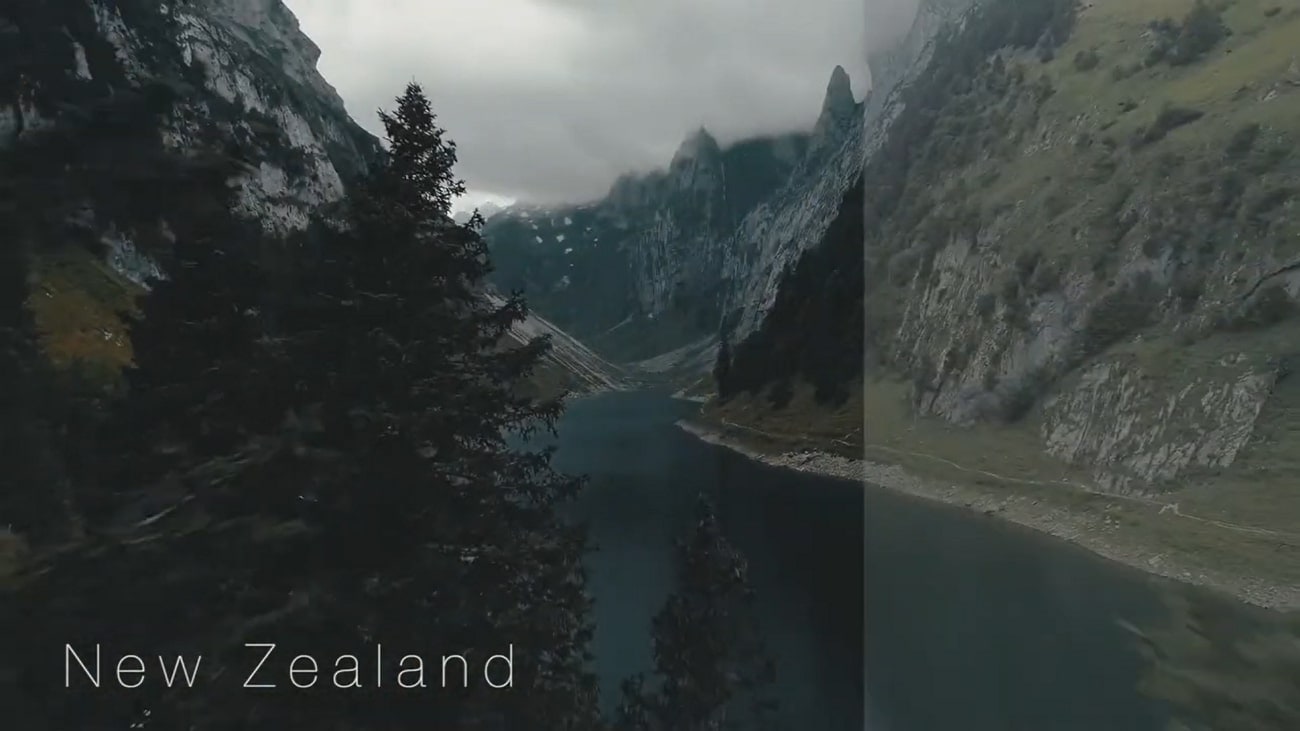
3. Travel Video LUTs by Matteo Martignago
If you’re looking for a LUT to use in your travel vlogs, consider the Travel Video LUTs by Matteo Martignago. In this LUT pack, you’ll find five different LUTs, each with its unique look and feel. Moreover, this pack has warm and cold LUTs, giving you multiple options. The warm LUTs give your videos a cozy feel, while the cold LUTs can create a sense of adventure and excitement.
4. BRIGHT INSTA LUTS
Bright Insta LUTs is the suitable LUT vlog pack for you if you’re a makeup or fashion vlogger. This LUT pack gives your makeup or fashion vlogs a bright and vibrant look. With 20 different LUTs, for instance, you can experiment with various color palettes and find the perfect look for your videos. These LUTs can help you achieve a bright, vibrant, and exposed feel for better fashion and makeup vlogs.
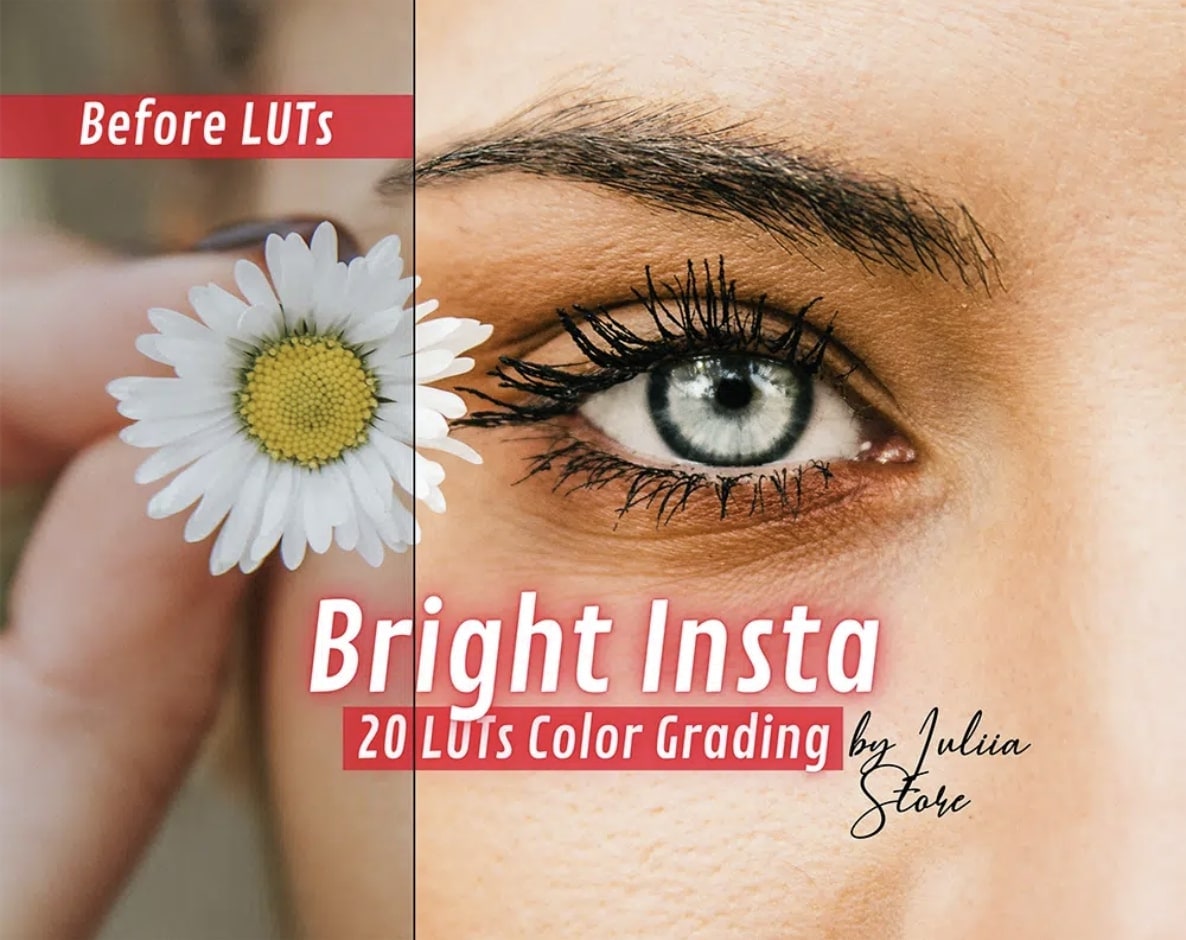
5. Kurt Von Studios Retro Film LUTs
Kurt Von Studios Retro Film LUTs is a great tool for outdoor vloggers who want to add a vintage feel to their videos. It creates a cinematic look with earthy tones and rusty textures that give your content an authentic vintage feel. With this LUT, you can achieve a retro-style feel, adding character to your vlogs and making them more visually appealing.

6. Limit Color
Give your indoor vlogs and podcasts more feel by using Limit Color. This vlog LUT adds an artistic touch to your footage by limiting the color and light in your videos. It creates darker shadows and underexposed colors by focusing on the subject. Similarly, it helps to create a dramatic look that adds emotion to your vlogs and podcasts.
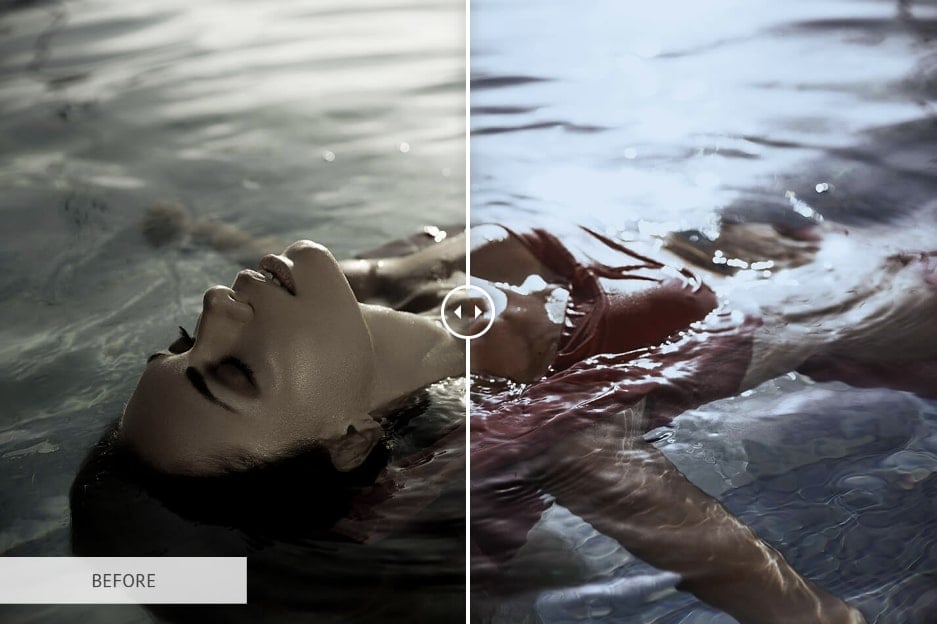
Part 3: How Has Wondershare Filmora Changed the Dynamics of LUTs in Video Editing?
Wondershare Filmora is an excellent video editing software option if you’re a vlogger. The most important element in vlogging is its lighting and color composition. With its latest update, you can use different LUTs to enhance your vlogs. Filmora provides over 200+ LUTs, including many free vlog LUTs, to help you achieve your videos’ desired look and feel.
Apart from LUTs, you can also make color adjustments and corrections to your vlogs. Moreover, you can adjust brightness, contrast, saturation, and hue to create a perfect vlog. If you’re a travel vlogger, you can make certain adjustments to give your vlogs an earthy and warm feel. You can also use different in-built filters and effects to create the perfect ambiance for your travel vlogs.

Key Features
- With this powerful AI video editing tool, you can use its motion tracking feature. This feature tracks the subject in motion so that you can add creative effects to your videos.
- Wondershare Filmora has over 1000 video templates available. You can choose any desired template that suits the style and mood of your vlog.
- This tool provides you with more control with its speed ramping feature. Using this feature, you can increase or decrease the speed of your videos at any point.
Empower your videos with a new mood using different LUTs. Filmora now offers 100+ top-quality 3D LUTs cover a broad range of scenarios. Transform your videos with Filmora’s powerful 3D LUTs.
Apply LUT on Videos Apply LUT on Videos Learn More

Conclusion
To sum up, LUTs are not an option but more of becoming a necessity, especially for vloggers. LUTs not only color-grade your videos but also add depth and perspective to your videos. Your content looks more engaging and interactive with the correct colors and lighting. However, you can use the best LUTs for vlogs even in the Wondershare Filmora tool. This tool lets you create and edit creative vlogs in no time.
Part 1: How Can LUTs Help in Vlogging?
If you want to make your vlogs look more professional, try using LUTs. These tables can help you correct the color of your footage easily and quickly while you’re on the go. You can use LUTs for vlogs to fix issues like your clips’ white balance and exposure. Furthermore, many other uses of LUTs for vlogging are discussed below.
Consistency
Consistency is the key when it comes to vlogging. You want your vlog to have a consistent look and feel thorough. With LUTs, you can ensure that the color grading of all your clips is the same. It gives your vlog a cohesive look and makes it stand out from others in the same genre.
Creative Look
Vlog LUTs also allow you to add a unique and creative look to your vlogs. You can set the mood of your vlog by adjusting the colors and tones to match the overall tone of your content. It helps you create a recognizable brand and establish your unique style.
Time-Saving
If you’re short on time, LUTs can help you vlog more efficiently. They save time, allowing you to focus on the storytelling aspect of your vlog. LUTs can also help you to edit your videos and publish them online quickly. It lets you stay on top of trends and maintain an active presence on social media.
Lighting Correction
Sometimes, capturing footage under mixed lighting conditions can be challenging. LUTs can help you to correct this and create a cohesive look for your vlog. You can even use LUTs on mobile editing apps to quickly edit your vlogs to publish them on the go.
Part 2: Best LUTs for Vlog to Use in 2024 Editing
Besides benefits and uses, the real part is to choose the best LUTs for vlogging. With so many LUTs vlog options, choosing a good one takes time and effort. Here are some of the best LUTs that you can use for vlogs.
1. Artist Found LUTs Collection
Are you a vlogger looking for a LUT that can help enhance the colors and brightness of your videos? The Artist Found LUTs Collection is a great option. This LUT is perfect for giving your vlogs a professional look that will capture the attention of your viewers. Furthermore, you can make your videos brighter and more vibrant with this LUTs pack.

2. B&W
B&W is the best LUT for vlog that can be a great addition to your vlogging toolkit. This LUT allows you to transform your videos into black and white. It gives your vlogs and videos a more serious and dramatic look. You can add a touch of nostalgia and a vintage feel to your videos, giving them an artistic feel. With B&W, you can create a timeless and classic look for your vlogs, making them more memorable and impactful.

3. Travel Video LUTs by Matteo Martignago
If you’re looking for a LUT to use in your travel vlogs, consider the Travel Video LUTs by Matteo Martignago. In this LUT pack, you’ll find five different LUTs, each with its unique look and feel. Moreover, this pack has warm and cold LUTs, giving you multiple options. The warm LUTs give your videos a cozy feel, while the cold LUTs can create a sense of adventure and excitement.

4. BRIGHT INSTA LUTS
Bright Insta LUTs is the suitable LUT vlog pack for you if you’re a makeup or fashion vlogger. This LUT pack gives your makeup or fashion vlogs a bright and vibrant look. With 20 different LUTs, for instance, you can experiment with various color palettes and find the perfect look for your videos. These LUTs can help you achieve a bright, vibrant, and exposed feel for better fashion and makeup vlogs.

5. Kurt Von Studios Retro Film LUTs
Kurt Von Studios Retro Film LUTs is a great tool for outdoor vloggers who want to add a vintage feel to their videos. It creates a cinematic look with earthy tones and rusty textures that give your content an authentic vintage feel. With this LUT, you can achieve a retro-style feel, adding character to your vlogs and making them more visually appealing.

6. Limit Color
Give your indoor vlogs and podcasts more feel by using Limit Color. This vlog LUT adds an artistic touch to your footage by limiting the color and light in your videos. It creates darker shadows and underexposed colors by focusing on the subject. Similarly, it helps to create a dramatic look that adds emotion to your vlogs and podcasts.

Part 3: How Has Wondershare Filmora Changed the Dynamics of LUTs in Video Editing?
Wondershare Filmora is an excellent video editing software option if you’re a vlogger. The most important element in vlogging is its lighting and color composition. With its latest update, you can use different LUTs to enhance your vlogs. Filmora provides over 200+ LUTs, including many free vlog LUTs, to help you achieve your videos’ desired look and feel.
Apart from LUTs, you can also make color adjustments and corrections to your vlogs. Moreover, you can adjust brightness, contrast, saturation, and hue to create a perfect vlog. If you’re a travel vlogger, you can make certain adjustments to give your vlogs an earthy and warm feel. You can also use different in-built filters and effects to create the perfect ambiance for your travel vlogs.

Key Features
- With this powerful AI video editing tool, you can use its motion tracking feature. This feature tracks the subject in motion so that you can add creative effects to your videos.
- Wondershare Filmora has over 1000 video templates available. You can choose any desired template that suits the style and mood of your vlog.
- This tool provides you with more control with its speed ramping feature. Using this feature, you can increase or decrease the speed of your videos at any point.
Empower your videos with a new mood using different LUTs. Filmora now offers 100+ top-quality 3D LUTs cover a broad range of scenarios. Transform your videos with Filmora’s powerful 3D LUTs.
Apply LUT on Videos Apply LUT on Videos Learn More

Conclusion
To sum up, LUTs are not an option but more of becoming a necessity, especially for vloggers. LUTs not only color-grade your videos but also add depth and perspective to your videos. Your content looks more engaging and interactive with the correct colors and lighting. However, you can use the best LUTs for vlogs even in the Wondershare Filmora tool. This tool lets you create and edit creative vlogs in no time.
How to DIY VHS Overlay in After Effects?
The 90s generation is familiar with Video Home System video. Today, Moviemakers use VHS static overlay to give their videos an antique and vintage look.
The VHS glitch overlay has become increasingly popular as it changes the video’s theme, tone, and whole look. Let’s see how we can add DIY VHS overlay in after effects-
Part 1:Step by Step DIY VHS Overlay in After Effects?
The retro “VHS Look” has become relatively trendy in recent years. The memories associated with the popular VHS trend has helped the trend make a comeback. Creating this effect in After Effects may seem to be a complicated process if you have not tried it before. But we have made it easier for you to add VHS overlay in Adobe After Effects. Follow the steps to add it in after effects-
Before you begin, download and install VHS preset if you haven’t already. Remember that VHS preset only works with After Effects CC 2018 and up. So, make sure you have the recent version of After Effects or the one not older than the 2018 version.
Step 1: To create a VHS look on your video, drop any video of your choice into the project panel and give it a name, let’s say, “VCR static overlay”. Set the width and height to 1920 and 1080 px, respectively.
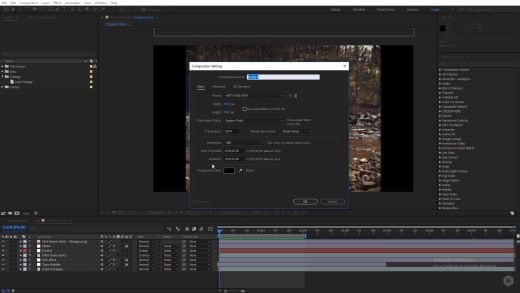
Step 2: Right-click on your video and select New Comp from Selection. Drag your video to a new composition and then go to Lumetri Color < Basic Correction. Add some contrast. You can set it to 50 or any other number of your choice. Then bring the white level down to -55.
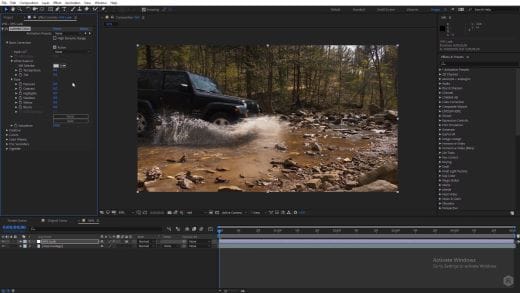
Then open the Creative tab. Increase the faded film to 40. Set sharpening to -70. Bring vibrance to -30.
Note: Here, I changed the number to get the effect I wanted. You can change the numbers and set the values as per your requirements.
Now, click on the Curves option. Drag down the white curve and then align it with the original curve. Move the green curve up a bit and bring down the blue curve. Then comes the Vignette tab. Open it and set the number to -1.
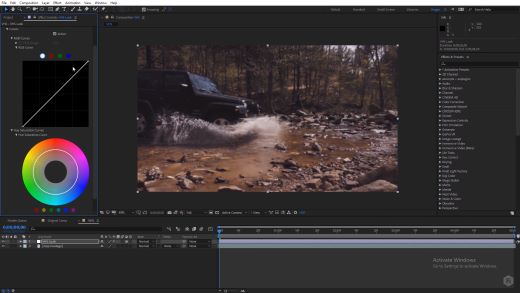
Step 3: Now, we will give our video a subtle RGB spit appearance. For that, we need to use the Channel Blur effect twice. First, go to Effect < Blur & Sharpen < Channel Blur. Set red blurriness to 20. Turn on the repeat edge pixels. Then change the Blur Dimensions from horizontal and vertical to vertical.
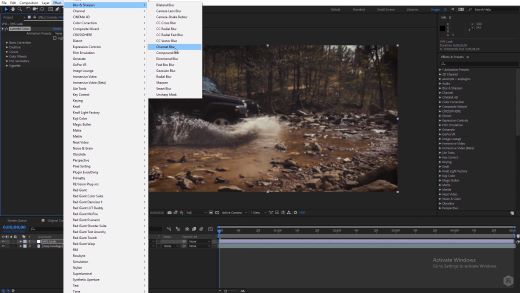
Step 4: Again, go to Effect < Blur & Sharpen < Channel Blur. Set blue blurriness to 30. Repeat the process of checking the repeat edge pixels box. Change the Blue Dimensions from horizontal and vertical to horizontal.
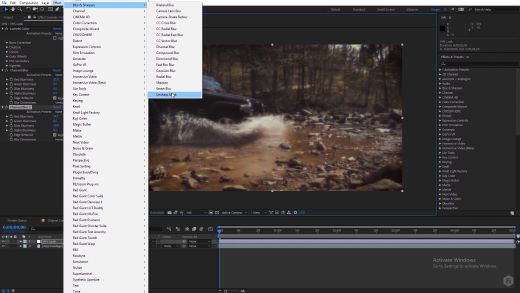
Step 5: Next comes giving the video artificial sharpening look using Unsharp Mask. So, go to Effect < Blur & Sharpen < Unsharp Mask. Under the Unmask Mask menu, set the amount to 100 and the radius to 10.
Step 6: To add a font to your video, simply search VHS font on Google. Look for the one you want to use in your video and download it. To give your video that authentic VHS-style look, we suggest downloading free VCR OSD Mono font and installing the font on your system.
Step 7: Go to Layer < New < Solid and choose any color. We chose white. Now, under Effects & Presets, search for a number. Drag it to the white solid. Choose the font VCR OSD Mono. You can change the number to time or date. You can also add time manually. Select the text tool, go to the source text, hold alt, and click on the stopwatch. Write “timeToCurrentFormat() and time will be displayed on the video. Let us say we want to see the date on the video instead of time. So, change the time to date. Drag the date to the bottom right of the video to give it the look of an old VHS tape.
If you are a beginner and want a simple VHS effect, you can follow these easy steps and create the VHS video that will transport you back to the 90s.
BONUS TIP: How to Add VHS Overlays and Glitch Effects to Make Retro Videos in Filmora Video Editor?
Do you remember the look of the VHS and miss it? You can bring your memories back! With Wondershare Filmora, you can add this effect easily to your videos. Adding a VHS overlay transparent brings drama and creates an atmosphere of distortion. It can significantly change the appearance and feel of your video.
So, if you want to create professional-looking VHS overlay free, the only thing you need is Filmora video editing software . Filmora allows you to add three different overlay VHS effects that you can use along with other overlays to create retro videos.
For Win 7 or later (64-bit)
For macOS 10.12 or later
Do you want to add retro videos on Filmora? It is simple!
To create a VHS overlay video, you should first download the Filmora app for free if you haven’t! Let’s learn how the effect can transform your video. You will have to choose various effects and values to get the final VHS overlay video. These effects can be added to any lyric video, intro, outro, and many others.
Let’s look at the steps:
Open your draft in Filmora software and select sample colors from the Media tab on the top left.
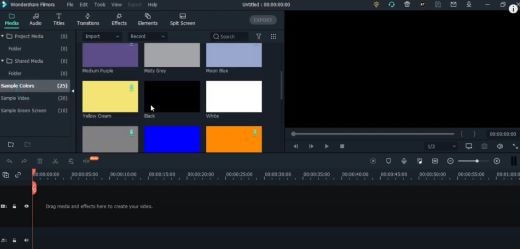
You can drag and drop the photo on a track on the timeline. Then adjust the trim handles to change the duration to match the section of the video to be transformed.
In sequence, add these three overlays by dragging them from the Effects panel at the top to their own individual tracks on the timeline: VHS Distortion Bad (alpha = 25), VHS Distortion (alpha = 35), and VHS Rewind (alpha = 10).
You can also add effects like Strong Glitch, Chromatic Aberration, Glitch Distortion, Distort, etc., to enhance the vintage look of the video.
When finished, click export and choose the format and target folder to save the processed file with the added effects.
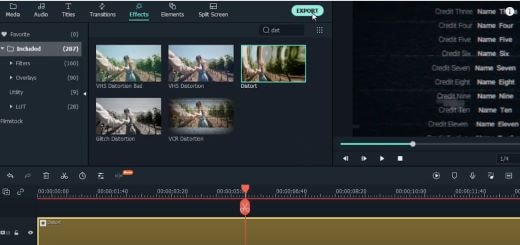
The smart generation has access to HD videos and high-tech devices, yet VHS is an exciting concept for them. The videos created with this effect resemble those from the 90s era. You have to customize everything when you add a VHS effect, including the title, background noise, overlay, and credits.
By choosing a video-editing software like Wondershare Filmora, users can make such videos and add retro glitch overlay professionally. You can also access Filmstock to download any video effects, stock media, templates, or sound effects for Filmora.
Conclusion
Video editing is now easy and fun. The trend of VCR overlay is now back as VHR overlay. With Wondershare Filmora, you can easily create classic videos with 90’s effects. Take your video editing to the next big level with Filmora Video Editor. We can help you make the best use of this tool to create glitch effect videos and add a VHS tape overlay.
Versatile Video Editor - Wondershare Filmora
An easy yet powerful editor
Numerous effects to choose from
Detailed tutorials provided by the official channel
For macOS 10.12 or later
Do you want to add retro videos on Filmora? It is simple!
To create a VHS overlay video, you should first download the Filmora app for free if you haven’t! Let’s learn how the effect can transform your video. You will have to choose various effects and values to get the final VHS overlay video. These effects can be added to any lyric video, intro, outro, and many others.
Let’s look at the steps:
Open your draft in Filmora software and select sample colors from the Media tab on the top left.

You can drag and drop the photo on a track on the timeline. Then adjust the trim handles to change the duration to match the section of the video to be transformed.
In sequence, add these three overlays by dragging them from the Effects panel at the top to their own individual tracks on the timeline: VHS Distortion Bad (alpha = 25), VHS Distortion (alpha = 35), and VHS Rewind (alpha = 10).
You can also add effects like Strong Glitch, Chromatic Aberration, Glitch Distortion, Distort, etc., to enhance the vintage look of the video.
When finished, click export and choose the format and target folder to save the processed file with the added effects.

The smart generation has access to HD videos and high-tech devices, yet VHS is an exciting concept for them. The videos created with this effect resemble those from the 90s era. You have to customize everything when you add a VHS effect, including the title, background noise, overlay, and credits.
By choosing a video-editing software like Wondershare Filmora, users can make such videos and add retro glitch overlay professionally. You can also access Filmstock to download any video effects, stock media, templates, or sound effects for Filmora.
Conclusion
Video editing is now easy and fun. The trend of VCR overlay is now back as VHR overlay. With Wondershare Filmora, you can easily create classic videos with 90’s effects. Take your video editing to the next big level with Filmora Video Editor. We can help you make the best use of this tool to create glitch effect videos and add a VHS tape overlay.
Versatile Video Editor - Wondershare Filmora
An easy yet powerful editor
Numerous effects to choose from
Detailed tutorials provided by the official channel
For macOS 10.12 or later
Do you want to add retro videos on Filmora? It is simple!
To create a VHS overlay video, you should first download the Filmora app for free if you haven’t! Let’s learn how the effect can transform your video. You will have to choose various effects and values to get the final VHS overlay video. These effects can be added to any lyric video, intro, outro, and many others.
Let’s look at the steps:
Open your draft in Filmora software and select sample colors from the Media tab on the top left.

You can drag and drop the photo on a track on the timeline. Then adjust the trim handles to change the duration to match the section of the video to be transformed.
In sequence, add these three overlays by dragging them from the Effects panel at the top to their own individual tracks on the timeline: VHS Distortion Bad (alpha = 25), VHS Distortion (alpha = 35), and VHS Rewind (alpha = 10).
You can also add effects like Strong Glitch, Chromatic Aberration, Glitch Distortion, Distort, etc., to enhance the vintage look of the video.
When finished, click export and choose the format and target folder to save the processed file with the added effects.

The smart generation has access to HD videos and high-tech devices, yet VHS is an exciting concept for them. The videos created with this effect resemble those from the 90s era. You have to customize everything when you add a VHS effect, including the title, background noise, overlay, and credits.
By choosing a video-editing software like Wondershare Filmora, users can make such videos and add retro glitch overlay professionally. You can also access Filmstock to download any video effects, stock media, templates, or sound effects for Filmora.
Conclusion
Video editing is now easy and fun. The trend of VCR overlay is now back as VHR overlay. With Wondershare Filmora, you can easily create classic videos with 90’s effects. Take your video editing to the next big level with Filmora Video Editor. We can help you make the best use of this tool to create glitch effect videos and add a VHS tape overlay.
Versatile Video Editor - Wondershare Filmora
An easy yet powerful editor
Numerous effects to choose from
Detailed tutorials provided by the official channel
For macOS 10.12 or later
Do you want to add retro videos on Filmora? It is simple!
To create a VHS overlay video, you should first download the Filmora app for free if you haven’t! Let’s learn how the effect can transform your video. You will have to choose various effects and values to get the final VHS overlay video. These effects can be added to any lyric video, intro, outro, and many others.
Let’s look at the steps:
Open your draft in Filmora software and select sample colors from the Media tab on the top left.

You can drag and drop the photo on a track on the timeline. Then adjust the trim handles to change the duration to match the section of the video to be transformed.
In sequence, add these three overlays by dragging them from the Effects panel at the top to their own individual tracks on the timeline: VHS Distortion Bad (alpha = 25), VHS Distortion (alpha = 35), and VHS Rewind (alpha = 10).
You can also add effects like Strong Glitch, Chromatic Aberration, Glitch Distortion, Distort, etc., to enhance the vintage look of the video.
When finished, click export and choose the format and target folder to save the processed file with the added effects.

The smart generation has access to HD videos and high-tech devices, yet VHS is an exciting concept for them. The videos created with this effect resemble those from the 90s era. You have to customize everything when you add a VHS effect, including the title, background noise, overlay, and credits.
By choosing a video-editing software like Wondershare Filmora, users can make such videos and add retro glitch overlay professionally. You can also access Filmstock to download any video effects, stock media, templates, or sound effects for Filmora.
Conclusion
Video editing is now easy and fun. The trend of VCR overlay is now back as VHR overlay. With Wondershare Filmora, you can easily create classic videos with 90’s effects. Take your video editing to the next big level with Filmora Video Editor. We can help you make the best use of this tool to create glitch effect videos and add a VHS tape overlay.
Versatile Video Editor - Wondershare Filmora
An easy yet powerful editor
Numerous effects to choose from
Detailed tutorials provided by the official channel
Also read:
- 2024 Approved Easy Way to Apply Green Screen to YouTube Videos
- Updated Learn More About the Video Editing Interface of Wondershare Filmora
- Updated 2024 Approved All About GIF Keyboard That You May Want to Know
- New 2024 Approved What Is Animated GIF | GIF Example & Advantages of GIF
- Updated How to Splice Videos Together on iPhone for 2024
- Updated Powerpoint Supported Video Format and User Tips
- Mastering DaVinci Resolve Scopes A Comprehensive Guide
- 2024 Approved How To Fade Audio In Kinemaster
- In 2024, How To Make a Photo Collage in Microsoft Word
- Updated What Is Animated GIF | GIF Example & Advantages of GIF
- Updated How Much Wedding Videographer Cost for 2024
- New 2024 Approved How to Brighten a Video in Windows 10 | Step-By-Step Guide
- Updated In 2024, How to Create Intro with Renderforest
- New 2024 Approved Create Your Own Subscribe Channel Graphics
- A Guide to Adding Audio in Wondershare Filmora
- 2024 Approved Looking for the Tools that Can Let You Blend Images Perfectly for Creating an Awesome Collage? Shortlisted for You Are the Best Bend Collage Program for an Effortless Task
- Updated This Article Will Explore in Detail How You Can Use the Features Available in Wondershare Filmora to Export the Video by Changing the Resolution of the Footage
- 5 Tried-And-True Methods to GIF Making
- What Is a Transparent Logo and Why Do You Need It
- In 2024, Gifs Can Convey Your Emotions in a Way that Words Cannot, so They Are Becoming a Popular Way to Express Yourself, and You Must Know How to Make a Gif and You Wont Believe that Its Not Difficult to Do
- In 2024, Are You Aware that You Can Create Your Own Lower Thirds for Video? Read This Article for a Tutorial on How to Customize One
- Updated In 2024, Complete Tutorial to Make an Impressive Countdown Timer Video
- In 2024, Looking for the Best Way to Create Stunning Video Animations? Here, We Look at some of the Best Animated Video Maker Solutions to Use
- Best Frame Rate for 4K Video
- New How to Brighten Video in Premiere Pro for 2024
- Updated Want to Know the Simplest Way to Match the Colors of Your Photos in Photoshop? The Following Discussion Will Help Match Color in Photoshop, Almost Effortlessly
- Updated In 2024, Cropping a Video in Davinci Resolve Step by Step
- Updated 6 Instant Ways to Create Windows 10 Slideshow for 2024
- How to Convert Time-Lapse to Normal Video for 2024
- In 2024, “Create. Edit. Share. Transform Your Videos with KineMaster! Powerful Tools, Easy to Use.” – a Few Words We Read when We Come up with the Official Web-Site of KineMaster, a Mobile Video Editing Application
- New Introduction to LUTs Their Overview and Benefits
- New What Is TS Format and How To Play TS Files?
- Best iPhone LUTs App to Use for 2024
- In 2024, Learn About How You Can Create a Smooth Speed Ramp with Premiere Pro. Also, Find Alternative Software “WonderShare Filmora” For the Same Purpose with a Much Easier User Interface
- 2024 Approved Top 10 Video Editing Online Makers Is Worth Your Attention
- The Quicktime Software with Its Latest Version Gives You an Option to Change the Speed of an Audio or Video File. It Makes It Easy to Watch the Slow-Motion Video or Fast-Forward the Audio
- 2024 Approved Some of the Top Sites to Replace a Sky Background in Videos
- Updated How to Use Frame Blending in Adobe Premiere Pro
- Updated How to Loop a Video on Android for 2024
- In 2024, Top 10 Best Spy Watches For your Xiaomi Redmi Note 12 5G | Dr.fone
- Unlocking the Power of Smart Lock A Beginners Guide for Nubia Red Magic 9 Pro Users
- In 2024, Ultimate Guide to Catch the Regional-Located Pokemon For Apple iPhone 6 Plus | Dr.fone
- What You Want To Know About Two-Factor Authentication for iCloud On your iPhone 7 Plus
- About OnePlus Ace 3 FRP Bypass
- In 2024, How To Remove Screen Lock PIN On Xiaomi Redmi 12 Like A Pro 5 Easy Ways
- In 2024, How to Transfer Contacts from Vivo V27 Pro to Outlook | Dr.fone
- How to Nokia C22 Get Deleted Phone Number Back with Ease and Safety
- New 2024 Approved Top 10 Solutions for Movie Subtitle Translation Making Things Perfect
- In 2024, How To Stream Anything From Google Pixel 8 Pro to Apple TV | Dr.fone
- Unlock iPhone 14 Pro screen lock without password
- Recover Deleted iPhone 13 mini WhatsApp Attachments on Mac and Windows | Stellar
- 11 Proven Solutions to Fix Google Play Store Not Working Issue on Motorola Moto G84 5G | Dr.fone
- How To Unlock Any Xiaomi Redmi 12 Phone Password Using Emergency Call
- Best Ways on How to Unlock/Bypass/Swipe/Remove Realme C67 5G Fingerprint Lock
- In 2024, What Does Enter PUK Code Mean And Why Did The Sim Get PUK Blocked On Lava Yuva 2 Pro Device
- Updated Detailed Guide on Video Speech to Text Conversion for 2024
- How to recover old music from your Y36
- Will iSpoofer update On Tecno Camon 30 Pro 5G | Dr.fone
- Full Guide on Mirroring Your Realme Narzo 60x 5G to Your PC/Mac | Dr.fone
- In 2024, Complete Review & Guide to Techeligible FRP Bypass and More For Realme C33 2023
- Looking For A Location Changer On Tecno Camon 30 Pro 5G? Look No Further | Dr.fone
- Title: New Practical Ways to Resize Video in Handbrake
- Author: Chloe
- Created at : 2024-06-09 16:15:22
- Updated at : 2024-06-10 16:15:22
- Link: https://ai-editing-video.techidaily.com/new-practical-ways-to-resize-video-in-handbrake/
- License: This work is licensed under CC BY-NC-SA 4.0.


