

New Read and Learn How to Convert a Slow-Motion Video to Normal in This Guide. Besides, Find the Best Desktop Solution to Adjust Video Speed Quickly and Easily
Read and Learn How to Convert a Slow-Motion Video to Normal in This Guide. Besides, Find the Best Desktop Solution to Adjust Video Speed Quickly and Easily
Maintain consistency in your projects by adding all video clips simultaneously. Sometimes, you have to include a slow-motion video due to its content. In such cases, convert them into a normal video for an even flow in the media. Turning slow-motion videos into the normal is essential in several cases. Unfortunately, many people don’t know how to make a slow-mo video at normal speed.
To address this concern, we have enlisted perfect ways to make slow-mo to usual video. Read this guide and learn how to convert a slow-motion video to normal step-wise. Besides, you will also find some online and desktop solutions to make the best choice.
Slow Motion Video Maker Slow your video’s speed with better control of your keyframes to create unique cinematic effects!
Make A Slow Motion Video Make A Slow Motion Video More Features

Part 1: Android User’s Solution: Converting Slow Motion Video to Normal
Android cameras can record slow-motion videos and turn them into normal as well. For this purpose, you have to upload your clips on Google Photos. Let’s discover how to convert slow-motion video to normal in Google Photos for Android. Remember that these steps might vary across different Android models.
Step 1
Enter your Google Photos app and pick one of your intended Slow-motion videos. While previewing it, look for the “Slow Motion” option at the top and touch it.

Step 2
Read the instructions from the displayed pop-up and hit the “OK.” Drag the two sliders and enclose them from both ends. Your slow-motion video is converted into the normal one.

Part 2: iOS User’s Solution: Converting Slow Motion Video to Normal
iPhone also offers a built-in option to change the speed of videos. Almost all iPhone series follow the same steps to change the video speed. Thus, you can quickly learn how to make slow-motion videos at regular speed, regardless of the version. Without further delay, make a slow-motion video and read the given steps:
Step 1
Unlock your iPhone and open the “Photos” app from the main screen. There, reach the “Albums” icon from the bottom and scroll until you get the “Slo-mo” option. Click on it and get a preview of your slow-motion video.

Step 2
Now, hit “Edit” from the top right side and find an editing screen. From the bottom, enclose the sliders from both sides and tap the “Done” button. This way, you will get a standard video instantly saved on your iPhone.

Part 3: Online Solution: Converting Slow Motion Video to Normal
Use this online tool if you cannot perform slow-motion to normal video conversion. Clideo is an online platform that allows you to change the video speed without causing playback issues. It offers a high level of security where only you can access your files. Some of its additional editing options allow you to pick an output format. Besides, users can keep their media sound or mute while making the conversion.
This tool supports MP4, MPG, VOB, MOV, and WMV media file formats. The following is a step-by-step guide to using this online solution:
Step 1
Access the official site of Clideo Stop Motion Maker and click the “Choose File” button. Browse your slow-motion video and press the “Open” button. Now, wait for a while until it gets uploaded on the site.

Step 2
Afterward, set the “Speed” from three given options. Choose to set the video to “Medium” speed. Moreover, you can also set the “Clip Rate” of the video as per requirements.

Step 3
When you get the desired outcome, click the “Export” button from the bottom-right corner. You will get a preview of the video on the next screen. Tap on the downward “ Download “ symbol and pick the file export destination. You can simply hit “Download” to get the file in your system.

Part 4: Desktop Recommendation: Converting Slow Motion Video to Normal Using Wondershare Filmora
In the above sections, you have learned how to turn slow-mo into normal. Now, it is time to look for an effective offline solution. That’s where you can count on Wondershare Filmora , which is the simplest but powerful video editor. Fortunately, it can speed up and slow down videos within the highest quality. Filmora provides more advanced editing options than the above solutions.
Free Download For Win 7 or later(64-bit)
Free Download For macOS 10.14 or later
Steps to Perform Slow Motion and Speed Up Videos to Normal with Filmora
Unlike other tools, Filmora can quickly convert your video speed to your desired extent. Head below and transform your video easily with this step-by-step guide.
Step 1Install Filmora and Export Your Media to Start a Project
Successfully launch Filmora in your system and access its home screen. Click on the “New Project” option to initiate media editing. Bring your video to the timeline after importing it into the media panel. To import the file, press the “Ctrl + I” keys using your keyboard.

Step 2Slow Down or Speed Up the Video with Optical Flow
Right-click on your slow-motion video in the timeline to get an extended list. From that list, tap the “Uniform Speed” option and find an editing panel on the right. Now, drag the “Speed” slider right to speed up the video. You can move it to the left side to slow down the video. To ensure a smooth quality, extend the “AI Frame Interpolation” menu and pick the “Optical Flow.”

Step 3Save the File Through the Export Button
Press the Space bar from your keyboard and preview the video. Navigate toward the “Export” button at the top right corner. You can adjust the export parameters and tap “Export” to save the file on your device.

Other Exceptional Features of Filmora
Filmora is more than a simple video editing app. AI integration can generate music, images, and scripts to embrace creativity in your content. Read the following points to learn more about Filmora’s incredible features.
- AI Vocal Remover: If you want to dub a video, use this feature to remove existing vocals. It can separate music and vocal soundtracks while keeping their quality high. Once AI removes vocals, you can quickly edit or remove unwanted elements from the tracks.
- AI Text to Video: Content creators can get instant engagement in their content with this feature. Users just have to write their ideas and let AI transform them into a visual story. They can later customize fonts, styles, and other elements to achieve desired results.
- AI Smart Masking: Professionals can improve their multi-dimensional scenes using this option. It enables multi-layer overlay editing that isolates subjects. Users can freeze frames and perform auto-correction for visual enhancements of the projects.
Conclusion
In short, slow-motion to normal video conversion is possible and serves fruitful purposes. In this regard, iPhone and Android offer built-in options that are explained earlier. Besides, you get familiar with how to convert a slow-motion video to normal using an online tool. For an effective desktop solution, try using Filmora, which is a top-notch video editor so far.
Make A Slow Motion Video Make A Slow Motion Video More Features
Part 1: Android User’s Solution: Converting Slow Motion Video to Normal
Android cameras can record slow-motion videos and turn them into normal as well. For this purpose, you have to upload your clips on Google Photos. Let’s discover how to convert slow-motion video to normal in Google Photos for Android. Remember that these steps might vary across different Android models.
Step 1
Enter your Google Photos app and pick one of your intended Slow-motion videos. While previewing it, look for the “Slow Motion” option at the top and touch it.
Step 2
Read the instructions from the displayed pop-up and hit the “OK.” Drag the two sliders and enclose them from both ends. Your slow-motion video is converted into the normal one.
Part 2: iOS User’s Solution: Converting Slow Motion Video to Normal
iPhone also offers a built-in option to change the speed of videos. Almost all iPhone series follow the same steps to change the video speed. Thus, you can quickly learn how to make slow-motion videos at regular speed, regardless of the version. Without further delay, make a slow-motion video and read the given steps:
Step 1
Unlock your iPhone and open the “Photos” app from the main screen. There, reach the “Albums” icon from the bottom and scroll until you get the “Slo-mo” option. Click on it and get a preview of your slow-motion video.
Step 2
Now, hit “Edit” from the top right side and find an editing screen. From the bottom, enclose the sliders from both sides and tap the “Done” button. This way, you will get a standard video instantly saved on your iPhone.
Part 3: Online Solution: Converting Slow Motion Video to Normal
Use this online tool if you cannot perform slow-motion to normal video conversion. Clideo is an online platform that allows you to change the video speed without causing playback issues. It offers a high level of security where only you can access your files. Some of its additional editing options allow you to pick an output format. Besides, users can keep their media sound or mute while making the conversion.
This tool supports MP4, MPG, VOB, MOV, and WMV media file formats. The following is a step-by-step guide to using this online solution:
Step 1
Access the official site of Clideo Stop Motion Maker and click the “Choose File” button. Browse your slow-motion video and press the “Open” button. Now, wait for a while until it gets uploaded on the site.
Step 2
Afterward, set the “Speed” from three given options. Choose to set the video to “Medium” speed. Moreover, you can also set the “Clip Rate” of the video as per requirements.
Step 3
When you get the desired outcome, click the “Export” button from the bottom-right corner. You will get a preview of the video on the next screen. Tap on the downward “ Download “ symbol and pick the file export destination. You can simply hit “Download” to get the file in your system.
Part 4: Desktop Recommendation: Converting Slow Motion Video to Normal Using Wondershare Filmora
In the above sections, you have learned how to turn slow-mo into normal. Now, it is time to look for an effective offline solution. That’s where you can count on Wondershare Filmora , which is the simplest but powerful video editor. Fortunately, it can speed up and slow down videos within the highest quality. Filmora provides more advanced editing options than the above solutions.
Free Download For Win 7 or later(64-bit)
Free Download For macOS 10.14 or later
Steps to Perform Slow Motion and Speed Up Videos to Normal with Filmora
Unlike other tools, Filmora can quickly convert your video speed to your desired extent. Head below and transform your video easily with this step-by-step guide.
Step 1Install Filmora and Export Your Media to Start a Project
Successfully launch Filmora in your system and access its home screen. Click on the “New Project” option to initiate media editing. Bring your video to the timeline after importing it into the media panel. To import the file, press the “Ctrl + I” keys using your keyboard.
Step 2Slow Down or Speed Up the Video with Optical Flow
Right-click on your slow-motion video in the timeline to get an extended list. From that list, tap the “Uniform Speed” option and find an editing panel on the right. Now, drag the “Speed” slider right to speed up the video. You can move it to the left side to slow down the video. To ensure a smooth quality, extend the “AI Frame Interpolation” menu and pick the “Optical Flow.”
Step 3Save the File Through the Export Button
Press the Space bar from your keyboard and preview the video. Navigate toward the “Export” button at the top right corner. You can adjust the export parameters and tap “Export” to save the file on your device.
Other Exceptional Features of Filmora
Filmora is more than a simple video editing app. AI integration can generate music, images, and scripts to embrace creativity in your content. Read the following points to learn more about Filmora’s incredible features.
- AI Vocal Remover: If you want to dub a video, use this feature to remove existing vocals. It can separate music and vocal soundtracks while keeping their quality high. Once AI removes vocals, you can quickly edit or remove unwanted elements from the tracks.
- AI Text to Video: Content creators can get instant engagement in their content with this feature. Users just have to write their ideas and let AI transform them into a visual story. They can later customize fonts, styles, and other elements to achieve desired results.
- AI Smart Masking: Professionals can improve their multi-dimensional scenes using this option. It enables multi-layer overlay editing that isolates subjects. Users can freeze frames and perform auto-correction for visual enhancements of the projects.
Conclusion
In short, slow-motion to normal video conversion is possible and serves fruitful purposes. In this regard, iPhone and Android offer built-in options that are explained earlier. Besides, you get familiar with how to convert a slow-motion video to normal using an online tool. For an effective desktop solution, try using Filmora, which is a top-notch video editor so far.
Detailed Steps to Rotate Videos in Windows Media Player
Video Editing and the emotion the final product evokes is dependent on many aspects, be it the source clips, the cuts introduced or the way of presentation. But to get to the end, there are several steps involved in the production process, and not every instance of it is perfect. But we all know, editing does often help iron out any kinks, with its ability to solve basic problems, like footage that is askew, or upside down. Thus with the steps listed in this article we will help you understand how you can rotate videos to ensure your edited project looks as intended.
This particular article considers the pre-installed Windows Media Player and WonderShare Filmora.
Note: We documented the steps in this guide with Windows Media Player (on a device running Windows 10 ) and WonderShare Filmora.
How to Rotate Videos with Windows Media Player?
Imagine you’re in a situation where you have gone ahead and finished the filming portion of a project on your smartphone but realise that the capture footage is upside down. Fortunately, this sort of a scenario is a common occurrence and it has quite a simple fix. If you look around the gallery app on your phone, you should be able to rotate the footage there itself, but if you’ve already moved it over to your laptop, hopping into a video editor can get this done in a jiffy.
Unfortunately, if you were planning to do this with the pre-installed Windows Media Player, you will not be able to rotate the clip. The software is only capable of being used as a Media Player that can help keep track of stored videos in a neat and easy to view format. It also has the ability to burn inserted discs, although we doubt any modern laptop comes with a disc drive.
Hence, to rotate video and still ensure its compatible with Windows Media Player, you can use free tools like VLC Media Player or Wondershare Filmora. The steps on how to use Wondershare Filmora to rotate video clips have been elaborated ahead in this article.
TIPS FOR WINDOWS MEDIA PLAYER
In case you want to use Windows Media Player as your default software to manage stored content, read this section to understand how you can control displayed video libraries.
While Windows Media Player will pull all compatible files present in the Default Video Library, you can customise the information made available by using the Organises Function.
To configure the Videos Section to display specific content follow the steps listed below.
- Click on Organize.
- Then move onto Manage Libraries
- Now click on Videos.

Click on Add to enter File Explorer and choose a new folder to add to this section.

Once you add the new folder, the screen will update itself with all the video files present in the folder.

An alternate way to Rotate Video with Wondershare Filmora
With Windows Media Player only being a playback tool, we feel free software like Filmora Video Editor are a great option to have installed on your device.
In Wondershare Filmora, footage rotation can only be done via the Edit Option — in my experience this straightforward approach felt quite simple and intuitive. And in case you wish to incorporate Keyframes into the rotation step, the feature is available near the Timeline.
The emphasis on accessibility for every function in Filmora, provides a significant advantage. The use of modern iconography also betters the familiarity users may have with the software. These factors make Wondershare Filmora a great option to consider. If you do not already have Wondershare Filmora, you can download the software by visiting the official website.
Now, the steps we have listed below will help you learn how to use the rotate function in Wondershare Filmora and get the desired output.
For Win 7 or later (64-bit)
For macOS 10.14 or later
Open a new video project in Filmora and follow the steps listed below.
Step 1: Import a Media File for editing into the newly created Video Project.

Step 2: Drag and drop the selected video clip on your Timeline and select it with your mouse to activate it for the next set of interactions.

Step 3: Choose the Edit Option, which we have marked in Red. Doing this will bring up the Edit Window on your screen.

Step 4: Click on the checkbox next to Transform and then use the Rotation Slider to modify the orientation.

Now that you’ve read this portion of the guide, you may have realised the simple nature of Wondershare Filmora.
BONUS – KEYFRAMING IN WONDERSHARE FILMORA
While the steps we listed above showed how to perform rotation with just a few clicks. You can make the end product more dynamic with the use of Keyframes.
Definition: Keyframes in Video Editing is a software-based tool that will let you configure start and end points on the timeline, within which you can configure different clip properites. The set of changes that you create will occur gradually as the playhead continues through the playback. Some properties that can be modified with this method are zoom, rotation, colors, positions, etc.
Click on the Keyframe Button (marked in Green) to access the Keyframe Menu in Wondershare Filmora.

The Bottom Line
Rotating video is unfortunately impossible in Windows Media Player, thus the access and ability to free software like Wondershare Filmora is a huge positive for the creative community. Speaking of how rotation is done in Filmora, the intuitive number-based system is a huge positive, as there are some software which prefer using swivels. The integration of Keyframes into a free tool is also welcome.
This marks the end of our guide on how to rotate video in Windows Media Player and Wondershare Filmora. Once again, if you wish to not use a proper video editing tool, you can consider alternate players like VLC, which can rotate footage.
Click on Add to enter File Explorer and choose a new folder to add to this section.
Once you add the new folder, the screen will update itself with all the video files present in the folder.
An alternate way to Rotate Video with Wondershare Filmora
With Windows Media Player only being a playback tool, we feel free software like Filmora Video Editor are a great option to have installed on your device.
In Wondershare Filmora, footage rotation can only be done via the Edit Option — in my experience this straightforward approach felt quite simple and intuitive. And in case you wish to incorporate Keyframes into the rotation step, the feature is available near the Timeline.
The emphasis on accessibility for every function in Filmora, provides a significant advantage. The use of modern iconography also betters the familiarity users may have with the software. These factors make Wondershare Filmora a great option to consider. If you do not already have Wondershare Filmora, you can download the software by visiting the official website.
Now, the steps we have listed below will help you learn how to use the rotate function in Wondershare Filmora and get the desired output.
For Win 7 or later (64-bit)
For macOS 10.14 or later
Open a new video project in Filmora and follow the steps listed below.
Step 1: Import a Media File for editing into the newly created Video Project.
Step 2: Drag and drop the selected video clip on your Timeline and select it with your mouse to activate it for the next set of interactions.
Step 3: Choose the Edit Option, which we have marked in Red. Doing this will bring up the Edit Window on your screen.
Step 4: Click on the checkbox next to Transform and then use the Rotation Slider to modify the orientation.
Now that you’ve read this portion of the guide, you may have realised the simple nature of Wondershare Filmora.
BONUS – KEYFRAMING IN WONDERSHARE FILMORA
While the steps we listed above showed how to perform rotation with just a few clicks. You can make the end product more dynamic with the use of Keyframes.
Definition: Keyframes in Video Editing is a software-based tool that will let you configure start and end points on the timeline, within which you can configure different clip properites. The set of changes that you create will occur gradually as the playhead continues through the playback. Some properties that can be modified with this method are zoom, rotation, colors, positions, etc.
Click on the Keyframe Button (marked in Green) to access the Keyframe Menu in Wondershare Filmora.
The Bottom Line
Rotating video is unfortunately impossible in Windows Media Player, thus the access and ability to free software like Wondershare Filmora is a huge positive for the creative community. Speaking of how rotation is done in Filmora, the intuitive number-based system is a huge positive, as there are some software which prefer using swivels. The integration of Keyframes into a free tool is also welcome.
This marks the end of our guide on how to rotate video in Windows Media Player and Wondershare Filmora. Once again, if you wish to not use a proper video editing tool, you can consider alternate players like VLC, which can rotate footage.
How to Create Sports Intro and YouTube Endscreen?
Are you deep into sports? Have you created a sports channel on YouTube but are still clueless? You do not need to panic. The article has got you covered.
There is an extensive range of sports channels on YouTube struggling and surviving. It includes gaming, exercise, athletics, basketball, hockey, and tennis sports. A promising sports background music in the intro and outro makes it appealing for the audience. Hence, the article will focus on three platforms for exercise downloading impeccable background music.
The step-by-step guide to creating an outstanding sports intro will also be sketched out. So, what are we waiting for? Time to commence this!
In this article
01 How to Create an Epic Sports Intro?
02 How to Edit a Sport Style YouTube Outro or End Screen?
03 3 Recommended Sites to Download Background Music for Exercise Videos
Part 1: How to Create an Epic Sports Intro?
Do you own a sports channel? Continue exploring the section to know more!
A sports channel needs a promising intro to keep the audience interested in the content. An exceptional intro to a sports channel with great music enables you to gain subscribers. The sub-section would cover an extensive procedure to make a startling sports intro with yoga background music or other sport. So, let us start? Shall we?
For Win 7 or later (64-bit)
For macOS 10.12 or later
Step 1: Open Wondershare Filmora from your computer. Now, head to the “Audio” panel to drop a powerful track to the timeline. Use the “Media” panel to import the sports video clips for your intro.

Step 2: Keep the highlights and trim the clips to be in sync with the music. After the editing is concluded, shift your focus to the “Titles.” Move to the Titles panel and use title animations for the “Energy Sports” pack.

Step 3: Drag and drop the titles on the top of the footage. It would be best to match the duration of the video clips with the titles. Now, double-click the title to rename it according to your need.

Step 4: To make the ending more powerful, right-click on the last video clip and click on “Speed and Duration.” Enhance the speed to make it engaging. Moving on, navigate to the “Effects” panel.

Step 5: From there, pick the “Shake” filter and drag and drop the “Chaos 1” to the last clip. Similarly, click on the “Distortion” filter to drop the “Chromatic Aberration” effect onto the last clip.

Step 6: Now, it is time to add transitions to create a smooth connection between the clips. Click on “Transitions” and then “Energy Sports” pack. Drag and drop both transitions in between the clips. A creative and captivating sports intro has been created with solid sports background music.

Part 2: How to Edit a Sport Style YouTube Outro or End Screen?
Communicating with the users about a channel doesn’t have to be with words. The background music for exercise expresses the aims of a channel more perfectly. The same goes for a profound sport-style outro which tells the audience that we are ending on a high note.
The sub-section takes the opportunity to offer a step-by-step to edit a sport-style YouTube end screen. So, come with us as we explore it together! Let us go!
For Win 7 or later (64-bit)
For macOS 10.12 or later
Step 1: To begin, launch Wondershare. Import the targeted video clips that you need as an engaging YouTube outro. After that, click on “Split Screen.” Please choose your favorite split-screen design and drag it to the timeline.

Step 2: Use the imported videos to drag them on the preview window in the split-screen design as selected. You can adjust the scale and position through the mouse click. Now, drag and drop the video onto the timeline and trim it as needed.

Step 3: Head to the “Effects” tab and search for blur in the space bar. Drag and drop the square blur to the second part of the video. Adjust the blur intensity as required. Import another video and add it to the timeline.

Step 4: Insert dissolved transitions between the first two cuts to smooth the process. Now, it is time to add an avatar image. Import the profile picture to the timeline above the second track. Head to the utility category under the “Effects” tab and drag the “Image Mask” to the image on the timeline.

Step 5: Double click on it to alter the masking width so that the circle mask can fit on the image. Scale down the picture and set it to the center of the frame. Navigate to the “Elements” panel and pick the YouTube subscribe button. Drag it to the third track afterward.

Step 6: Place the location on the preview window as you need. Now, move to the social media category in the “Titles” to choose the perfect one and add it to the timeline above the last clip. The user is instructed to add a transition at the beginning of the clip. Rename the social media names of your sports channel, and you are done with the process.

Part 3: 3 Recommended Sites to Download Background Music for Exercise Videos
Sports background music is one of the significant ways to keep the audience motivated for sports and exercise. It helps enhance the subscribers’ multifold. Therefore, the importance of promising yoga background music cannot be neglected.
Mixkit
Mixkit is a renowned place to access royalty-free marketplaces, bringing revolution to the market and content creators. It is extremely workable to download background music for exercise in seconds. Based on genre, mood, and tag, you can search for a suitable music track.
The trap sport workout, motivating mornings, positive energy, super strong, and the greatest comeback is one of the most exemplary tracks from Mixkit. The audio can be listened to before making the decision. The genre offers ambient, cinematic, funk, hip-hop, acoustic, classical, and electronica.

TunePocket
Changing the narrative of music platforms, TunePocket pretty much takes the lead. The filter results make the process flawless. You can tailor the search results by playing with category, mood, genres, instruments, length, and tempo.
The duration of each sports background music is also mentioned to give the content creators an idea. Power dance workout, workout fitness motivation, summer western dance, young gamers, and sports power electro, and techno blast are some examples of outstanding music tracks.

Envato Elements
The next on the list is Envato Elements making wonders in the business. The search filters are refined as the user deems necessary. Online exercise, motivational EDM, fitness, workout, corporate meditation, and exercise are some amazing examples of royalty-free music. The search results can be tailored according to relevancy and popularity.

Concluding Remarks
There is an awful load of sports channels on YouTube. The content creators are trying their best to beat the competitors. It is crucial to access energetic background music for exercise to make intro and outro engaging.
The article recommended three apps to download sports background music. The step-by-step guide to creating an inspiring sports intro and editing sports style YouTube outro via Filmora.
Wondershare Filmora
Get started easily with Filmora’s powerful performance, intuitive interface, and countless effects!
Try It Free Try It Free Try It Free Learn More >

02 How to Edit a Sport Style YouTube Outro or End Screen?
03 3 Recommended Sites to Download Background Music for Exercise Videos
Part 1: How to Create an Epic Sports Intro?
Do you own a sports channel? Continue exploring the section to know more!
A sports channel needs a promising intro to keep the audience interested in the content. An exceptional intro to a sports channel with great music enables you to gain subscribers. The sub-section would cover an extensive procedure to make a startling sports intro with yoga background music or other sport. So, let us start? Shall we?
For Win 7 or later (64-bit)
For macOS 10.12 or later
Step 1: Open Wondershare Filmora from your computer. Now, head to the “Audio” panel to drop a powerful track to the timeline. Use the “Media” panel to import the sports video clips for your intro.
Step 2: Keep the highlights and trim the clips to be in sync with the music. After the editing is concluded, shift your focus to the “Titles.” Move to the Titles panel and use title animations for the “Energy Sports” pack.
Step 3: Drag and drop the titles on the top of the footage. It would be best to match the duration of the video clips with the titles. Now, double-click the title to rename it according to your need.
Step 4: To make the ending more powerful, right-click on the last video clip and click on “Speed and Duration.” Enhance the speed to make it engaging. Moving on, navigate to the “Effects” panel.
Step 5: From there, pick the “Shake” filter and drag and drop the “Chaos 1” to the last clip. Similarly, click on the “Distortion” filter to drop the “Chromatic Aberration” effect onto the last clip.
Step 6: Now, it is time to add transitions to create a smooth connection between the clips. Click on “Transitions” and then “Energy Sports” pack. Drag and drop both transitions in between the clips. A creative and captivating sports intro has been created with solid sports background music.
Part 2: How to Edit a Sport Style YouTube Outro or End Screen?
Communicating with the users about a channel doesn’t have to be with words. The background music for exercise expresses the aims of a channel more perfectly. The same goes for a profound sport-style outro which tells the audience that we are ending on a high note.
The sub-section takes the opportunity to offer a step-by-step to edit a sport-style YouTube end screen. So, come with us as we explore it together! Let us go!
For Win 7 or later (64-bit)
For macOS 10.12 or later
Step 1: To begin, launch Wondershare. Import the targeted video clips that you need as an engaging YouTube outro. After that, click on “Split Screen.” Please choose your favorite split-screen design and drag it to the timeline.
Step 2: Use the imported videos to drag them on the preview window in the split-screen design as selected. You can adjust the scale and position through the mouse click. Now, drag and drop the video onto the timeline and trim it as needed.
Step 3: Head to the “Effects” tab and search for blur in the space bar. Drag and drop the square blur to the second part of the video. Adjust the blur intensity as required. Import another video and add it to the timeline.
Step 4: Insert dissolved transitions between the first two cuts to smooth the process. Now, it is time to add an avatar image. Import the profile picture to the timeline above the second track. Head to the utility category under the “Effects” tab and drag the “Image Mask” to the image on the timeline.
Step 5: Double click on it to alter the masking width so that the circle mask can fit on the image. Scale down the picture and set it to the center of the frame. Navigate to the “Elements” panel and pick the YouTube subscribe button. Drag it to the third track afterward.
Step 6: Place the location on the preview window as you need. Now, move to the social media category in the “Titles” to choose the perfect one and add it to the timeline above the last clip. The user is instructed to add a transition at the beginning of the clip. Rename the social media names of your sports channel, and you are done with the process.
Part 3: 3 Recommended Sites to Download Background Music for Exercise Videos
Sports background music is one of the significant ways to keep the audience motivated for sports and exercise. It helps enhance the subscribers’ multifold. Therefore, the importance of promising yoga background music cannot be neglected.
Mixkit
Mixkit is a renowned place to access royalty-free marketplaces, bringing revolution to the market and content creators. It is extremely workable to download background music for exercise in seconds. Based on genre, mood, and tag, you can search for a suitable music track.
The trap sport workout, motivating mornings, positive energy, super strong, and the greatest comeback is one of the most exemplary tracks from Mixkit. The audio can be listened to before making the decision. The genre offers ambient, cinematic, funk, hip-hop, acoustic, classical, and electronica.
TunePocket
Changing the narrative of music platforms, TunePocket pretty much takes the lead. The filter results make the process flawless. You can tailor the search results by playing with category, mood, genres, instruments, length, and tempo.
The duration of each sports background music is also mentioned to give the content creators an idea. Power dance workout, workout fitness motivation, summer western dance, young gamers, and sports power electro, and techno blast are some examples of outstanding music tracks.
Envato Elements
The next on the list is Envato Elements making wonders in the business. The search filters are refined as the user deems necessary. Online exercise, motivational EDM, fitness, workout, corporate meditation, and exercise are some amazing examples of royalty-free music. The search results can be tailored according to relevancy and popularity.
Concluding Remarks
There is an awful load of sports channels on YouTube. The content creators are trying their best to beat the competitors. It is crucial to access energetic background music for exercise to make intro and outro engaging.
The article recommended three apps to download sports background music. The step-by-step guide to creating an inspiring sports intro and editing sports style YouTube outro via Filmora.
Wondershare Filmora
Get started easily with Filmora’s powerful performance, intuitive interface, and countless effects!
Try It Free Try It Free Try It Free Learn More >
Trailer Guide for Creators and Developers
Trailers are a popular means to showcase a product you are about to release to the market. Teasers and trailers are traditionally created for movies, but have eventually evolved to include book trailers, game trailers, and app trailers. In this article, we will explain the key details of a trailer, highlight some examples, and show you how to create an effective trailer.
Part 1. What is a Trailer?
A trailer is a type of video commercial advertisement made to advertise and inform audiences about a specific program or item. To persuade customers to view or use the product, it includes a brief series of previews of the entire material. It also serves as a means of creating anticipation for a show or product that is about to hit the market.

Trailers were originally made for cinema movies. Nowadays, trailers are created for different forms of media like shows, apps, programs, video games, and book videos. A typical traditional trailer lasts between 1 to 3 minutes.
Part 2. What Are the Similarities and Differences Between a Teaser and Trailer?
Teasers and trailers can often be confused with each other. After all, they pretty much have the same objective.
Both are created for the purpose of advertising an upcoming show, product, or service. Teasers and trailers are similarly shown to audiences prior to the release of the thing they are advertising. They are meant to show a small portion of the full experience to create curiosity and excitement towards a targeted market. Both videos are typically short in length - taking up only a maximum of 3 minutes in duration.

The differences between them lie in their content, timeline, and duration. A teaser is much shorter than a trailer - the former runs for only 20-30 seconds while the latter can go between 1-3 minutes in length. This is because teasers are typically made before or during the production process of a movie or feature, whilst trailers are commonly made at the end.
For films, movies, and shows, teasers generally capture only a single part of that media. It focuses on the most intense or impactful scene. Trailers are formed from a series of clips depicting striking scenes derived from the beginning, middle, and end of the show. These scenes are normally arranged in a nonlinear structure, allowing viewers to have a general understanding of the story without revealing the entirety of the plot.
Part 3. Examples of good trailers
An excellent trailer is one who can effectively attract and maintain the audience’s attention. It satisfies its objective of showcasing striking and captivating pieces of the main product and entices viewers to experience its entirety. Here are some examples of trailers who have well fulfilled the criteria of a good trailer.
1. The Suicide Squad
The Suicide Squad is a fresh take featuring DC’s anti-heroes assemble in a single chaotic and unconventional team. James Gunn’s iteration on these characters is brought to life in the trailer with a majestic cast including John Cena, Idris Elba, Margot Robbie, and David Dastmalchian. Several key scenes are shown, highlighting its standout characters in the process while portraying the movie’s setting.
2. Raya and the Last Dragon
The trailer starts out innocently and comes with an adorable and surprising twist. The brief 2-minute trailer is packed with relevant scenes that depict the character’s quest without revealing too much. Many action-packed scenes and emotional interactions are satisfactorily squeezed into the trailer. Excitement builds further with Tamara Bubble’s “I’m That Good” playing in the background on the last minute of the video.
3. Men (2022)
Ingenious combination of sound effects and background music play a distinct role in this 2022 trailer. The female lead’s voice echoing from a tunnel, the haunting piano keys gradually building up the suspense, and the common but cleverly used horror audio effects create a chilling ensemble of haunting scenes in the movie. The sounds gradually rise up as more aggressive and energized scenes flash on the screen, and eventually end back into the sombre intro that leaves the audience with questions.
4. The Farewell
Lulu Wang’s dramatic comedy The Farewell is all about a family hiding the truth of a family member’s terminal illness from the person herself. What makes the trailer special is that it steers away from the sad, melancholic direction and veers toward a feel-good movie vibe. The conflict, struggle, and the beliefs featured in the movie are depicted in the trailer. However, the clever placement of interactions and the uplifting music tug at the audience’s heartstrings and urge them to want to see more.
5. Pokémon Go
Pokémon has become a culture to several generations. Becoming a Pokémon trainer is a secret dream that almost all of us have, even as adults. Niantic’s collaboration with the Pokémon franchise brings people closer to that reality by introducing its AR and location-powered app Pokémon Go. The trailer shows people of all ages living out their trainer dreams in the real world and interacting with Pokémon. The different features of the game are dramatized in a real-life setting, inciting more excitement, and pulling out the nostalgia from its market. The trailer keeps the actual app showcase to a minimum, instead focusing on once again selling that dream to audiences and bringing out the inner child in everyone.
Part 4. How to bring your trailer to the next level?
While it may seem intimidating to create a trailer for your upcoming product, there is no need to worry. It is now easier than ever to create a well-crafted trailer by taking advantage of a program’s tools and templates.
- Stock media
Filmora makes it easy to craft a trailer with only a few clicks. Make use of the program’s media library to gain access to a wealth of resources like stock photos, videos, music, and audio files.
- Keyframing
Keyframing lets you smoothly transition from one scene to another, making it an effective tool for trailers. It is particularly appealing for shows that highlight motion like sports, dancing, and action. Experiment with more than 80 preset templates and create smooth scene transitions with ease.
- Speed Ramping
Speed Ramping is a feature that works perfectly with keyframing. Increase the energy and dynamics in your trailer with 6 preset speed types. You can also customize these templates. There is also no need for concern about the audio - Filmora lets you maintain the audio pitch even when using these features.
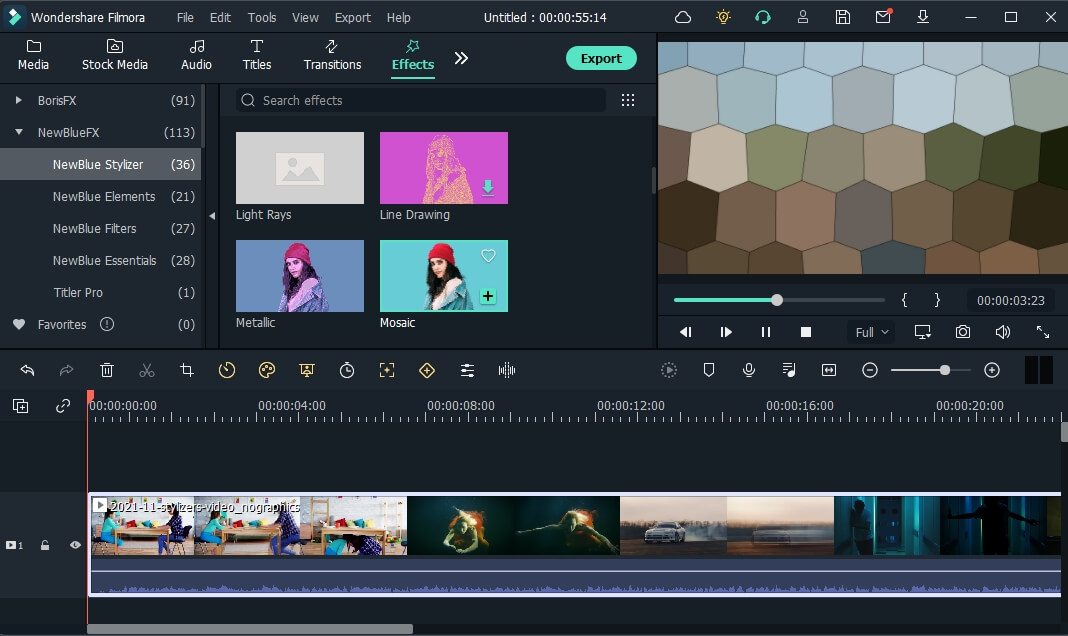
- FX Effects
The program also offers many effects and filters for an extra element in your trailer. The Borix FX is an example of that. Designed in collaboration with the award-winning developer of the same name, Boris FX and its extension Continuum features a wide array of tasteful effects for your convenience. There are over 91 customizable and adjustable presets including types like blurs, stylization, and lights. NewBlue is another option that carries choices of filters, titlers, and stylizers.
Filmora offers different features, tools, and effects to explore that can help make your trailer editing objectives easier and more convenient. Save time and resources by taking advantage of its powerful yet easy-to-use tools.
Free Download For Win 7 or later(64-bit)
Free Download For macOS 10.14 or later
2. Raya and the Last Dragon
The trailer starts out innocently and comes with an adorable and surprising twist. The brief 2-minute trailer is packed with relevant scenes that depict the character’s quest without revealing too much. Many action-packed scenes and emotional interactions are satisfactorily squeezed into the trailer. Excitement builds further with Tamara Bubble’s “I’m That Good” playing in the background on the last minute of the video.
3. Men (2022)
Ingenious combination of sound effects and background music play a distinct role in this 2022 trailer. The female lead’s voice echoing from a tunnel, the haunting piano keys gradually building up the suspense, and the common but cleverly used horror audio effects create a chilling ensemble of haunting scenes in the movie. The sounds gradually rise up as more aggressive and energized scenes flash on the screen, and eventually end back into the sombre intro that leaves the audience with questions.
4. The Farewell
Lulu Wang’s dramatic comedy The Farewell is all about a family hiding the truth of a family member’s terminal illness from the person herself. What makes the trailer special is that it steers away from the sad, melancholic direction and veers toward a feel-good movie vibe. The conflict, struggle, and the beliefs featured in the movie are depicted in the trailer. However, the clever placement of interactions and the uplifting music tug at the audience’s heartstrings and urge them to want to see more.
5. Pokémon Go
Pokémon has become a culture to several generations. Becoming a Pokémon trainer is a secret dream that almost all of us have, even as adults. Niantic’s collaboration with the Pokémon franchise brings people closer to that reality by introducing its AR and location-powered app Pokémon Go. The trailer shows people of all ages living out their trainer dreams in the real world and interacting with Pokémon. The different features of the game are dramatized in a real-life setting, inciting more excitement, and pulling out the nostalgia from its market. The trailer keeps the actual app showcase to a minimum, instead focusing on once again selling that dream to audiences and bringing out the inner child in everyone.
Part 4. How to bring your trailer to the next level?
While it may seem intimidating to create a trailer for your upcoming product, there is no need to worry. It is now easier than ever to create a well-crafted trailer by taking advantage of a program’s tools and templates.
- Stock media
Filmora makes it easy to craft a trailer with only a few clicks. Make use of the program’s media library to gain access to a wealth of resources like stock photos, videos, music, and audio files.
- Keyframing
Keyframing lets you smoothly transition from one scene to another, making it an effective tool for trailers. It is particularly appealing for shows that highlight motion like sports, dancing, and action. Experiment with more than 80 preset templates and create smooth scene transitions with ease.
- Speed Ramping
Speed Ramping is a feature that works perfectly with keyframing. Increase the energy and dynamics in your trailer with 6 preset speed types. You can also customize these templates. There is also no need for concern about the audio - Filmora lets you maintain the audio pitch even when using these features.
- FX Effects
The program also offers many effects and filters for an extra element in your trailer. The Borix FX is an example of that. Designed in collaboration with the award-winning developer of the same name, Boris FX and its extension Continuum features a wide array of tasteful effects for your convenience. There are over 91 customizable and adjustable presets including types like blurs, stylization, and lights. NewBlue is another option that carries choices of filters, titlers, and stylizers.
Filmora offers different features, tools, and effects to explore that can help make your trailer editing objectives easier and more convenient. Save time and resources by taking advantage of its powerful yet easy-to-use tools.
Free Download For Win 7 or later(64-bit)
Free Download For macOS 10.14 or later
Also read:
- 8 Ways To Live Stream Pre-Recorded Video for 2024
- New Do You Know CapCut Has some Amazing Slow-Motion Templates You Can Utilize? Read This Article to Access the Slow-Motion CapCut Templates Link
- Updated Zoom In and Zoom Out on YouTube
- Updated 2024 Approved Easy Way to Inset Text in Video
- Updated 2024 Approved Add Green Screen Video on TikTok
- New In 2024, Top 8 Sites to Download Glitch Transition for Premiere Pro
- New Best 8 AR Apps for Android and iOS | Help You See the World of AR
- 2024 Approved How to Make a Slideshow GIF?
- In 2024, Best Ways to Add Photos to Tik Tok Video
- New 11 Ways To Speed Up A Video On iPhone
- Updated 2024 Approved How to Create a Slideshow GIF?
- Updated In 2024, How to Make a Vacation Slideshow in 5 Minutes
- Now, You Can Also Apply the Stranger Things Upside Down Effect to Your Video! This Effect Combines Camera Tricks and Video Editing Within Filmora to Transition From the Normal World Into the Upside Down for 2024
- How to Add Green Screen in OBS for 2024
- In 2024, How to Create Cooking Video Intro and Outro for YouTube Channel?
- Updated Discover the Essential Steps for Editing a Music Video in This Guide. Learn About Aspect Ratio and the First Cut Process to Create a Visually Captivating Video
- New 2024 Approved Top iOS Solutions Finding Premium Slow Motion Apps For Video Creation
- New Best Way to Freeze-Frame in Final Cut Pro for 2024
- New 2024 Approved How to Create a Dynamic Text Animation in Filmora — Step-By-Step
- 2024 Approved 6 Free Tools To Radial Blur Photos Online
- You Can Match Paint Colors From Pictures for Your Wall, as Well as for Your Videos. And to Know How to Do Both, We Have Laid Down the Following Discussion
- What Is the Best FPS for YouTube Videos for 2024
- In 2024, Methods on How to Speed Up Video on Splice
- 2024 Approved Looking for Exciting Methods to Create Alluring GIFs Worthy of Making a Mass Appeal? Heres All About GIF Design You Will Ever Want to Know and Learn
- 4K Videos Are the in Thing because of Their Flexibility and High Resolution. Stick Around to Learn How to Choose the Best Frame Rate for 4K Videos for 2024
- Updated 10 Best Free Spanish Text To Speech Converter Websites for 2024
- LumaFusion – What Is It and the Best Alternative to Use for 2024
- New How To Make An Interactive Quiz Video? Step-by-Step Guide
- 2024 Approved How to Make Subtitle Videos
- Final Cut Pro - How to Download and Install It, In 2024
- Updated 8 Ways To Live Stream Pre-Recorded Video
- How PGSharp Save You from Ban While Spoofing Pokemon Go On Nokia G22? | Dr.fone
- Catch or Beat Sleeping Snorlax on Pokemon Go For Tecno Spark 20 Pro+ | Dr.fone
- How to Access Your iPhone 6 When You Forget the Passcode? | Dr.fone
- How Do You Unlock your Apple iPhone SE? Learn All 4 Methods | Dr.fone
- In 2024, How to Transfer Contacts from Oppo K11 5G to Other Android Devices Devices? | Dr.fone
- In 2024, How Can We Unlock Our Realme 11 Pro+ Phone Screen?
- How to Exit Android Factory Mode On Oppo A38? | Dr.fone
- In 2024, How to Migrate Android Data From Vivo X100 to New Android Phone? | Dr.fone
- In 2024, Complete Tutorial to Use VPNa to Fake GPS Location On Apple iPhone SE (2020) | Dr.fone
- In 2024, How Can I Catch the Regional Pokémon without Traveling On Lava Blaze 2 5G | Dr.fone
- In 2024, How To Unlock Any Vivo T2 5G Phone Password Using Emergency Call
- Complete Review & Guide to Techeligible FRP Bypass and More For Xiaomi 14 Pro
- Ways to trade pokemon go from far away On Vivo Y100 5G? | Dr.fone
- Updated In 2024, Top 5 Udemy Subtitle Translation Tools for Seamless Auto Translations
- How to Fix Error 495 While Download/Updating Android Apps On Vivo S18 | Dr.fone
- In 2024, iPogo will be the new iSpoofer On Vivo Y28 5G? | Dr.fone
- In 2024, Easiest Guide How to Clone Realme GT 5 Phone? | Dr.fone
- Dose Life360 Notify Me When Someone Checks My Location On Asus ROG Phone 7? | Dr.fone
- In 2024, A Quick Guide to Samsung Galaxy A15 5G FRP Bypass Instantly
- In 2024, A Step-by-Step Guide on Using ADB and Fastboot to Remove FRP Lock on your Tecno Spark 10 4G
- How to get back lost contacts from Honor V Purse.
- How to Unlock Apple iPhone 14 Pro Max Without Passcode?
- In 2024, How Can Poco X5 ProMirror Share to PC? | Dr.fone
- In 2024, A Guide Infinix Smart 8 Plus Wireless and Wired Screen Mirroring | Dr.fone
- Restore Missing App Icon on Realme Narzo 60 5G Step-by-Step Solutions | Dr.fone
- 8 Best Apps for Screen Mirroring Lava Blaze 2 5G PC | Dr.fone
- Hacks to do pokemon go trainer battles For Apple iPhone 8 Plus | Dr.fone
- How to Use Life360 on Windows PC For Vivo T2 5G? | Dr.fone
- In 2024, Fake Android Location without Rooting For Your Motorola Edge 2023 | Dr.fone
- Best Fixes For Oppo A18 Hard Reset | Dr.fone
- Title: New Read and Learn How to Convert a Slow-Motion Video to Normal in This Guide. Besides, Find the Best Desktop Solution to Adjust Video Speed Quickly and Easily
- Author: Chloe
- Created at : 2024-06-09 16:15:23
- Updated at : 2024-06-10 16:15:23
- Link: https://ai-editing-video.techidaily.com/new-read-and-learn-how-to-convert-a-slow-motion-video-to-normal-in-this-guide-besides-find-the-best-desktop-solution-to-adjust-video-speed-quickly-and-easil/
- License: This work is licensed under CC BY-NC-SA 4.0.
