:max_bytes(150000):strip_icc():format(webp)/asian-woman-talking-into-microphone-722208887-5b2a989730371300373a0447.jpg)
New ReVisionFX ReelSmart Motion Blur Plugin For Premiere Pro

ReVisionFX ReelSmart Motion Blur Plugin For Premiere Pro
Premiere Pro is an exceptional tool for editing videos flawlessly by using various advanced features. For instance, you can use Adobe Premiere Pro to add extraordinary effects to your videos, such as motion blur. However, if you want a more smooth and flawless effect, you can use a plugin known as ReelSmart Motion Blur. By reading this article, you can learn about the ReelSmart Motion Blur Plugin Premiere Pro and its related instructions for usage.
Part 1: What is ReVisionFX ReelSmart Motion Blur?
You must be wondering why it’s essential to use the motion blur plugin for Premiere Pro. The reason is that using a plugin like ReelSmart Motion Blur can offer more advanced capabilities and options to create professional results. The ReelSmart Motion Blur plugin uses advanced algorithms to track each pixel automatically. As a result, it provides a more compelling and natural outlook to the video. Hence, you can easily apply the motion blur effect to your videos using RSMB without hard work.
Key Features
- Offers Automatic Tracking: To provide accurate and precise results, RSMB uses automatic tracking. This function allows the plugin to track every pixel automatically from one frame to another efficiently.
- Ability to Adjust Blur: You can add refinements by adjusting the amount of blur according to your preference. By doing so, you can generate the desired final output easily.
- Removing Motion Blur: Apart from adding and adjusting the motion blur effect, you can also remove the blur effect using RSMB effortlessly.
- Add Motion Blur to 360 Videos: RSMB is also capable of adding a motion blur to 360 videos properly. It can recognize the edges of sides along with the top and bottom to create a motion blur effect appropriately.
Part 2: Is It Worth Trying ReelSmart Motion Blur Pro?
As we have discussed the regular version of ReelSmart Motion Blur, now we will also shed light on its Pro version. To help you in choosing the best version, we will draw a comparison between the regular and pro versions of RSMB in this section.
Pricing Price
| Regular Version | Pro Version |
|---|---|
| $104.95 | $164.95 |
Supported Hosts
| ReelSmart Motion Blur | Regular Version | Pro Version |
|---|---|---|
| Adobe: After Effects, Premiere Pro | Adobe: After Effects, Premiere Pro | |
| Apple: Final Cut Pro, Motion | Apple: Final Cut Pro, Motion | |
| / | Avid: Media Composer | |
| OFX: Catalyst Edit, DaVinci Resolve, Final Cut Pro, HitFilm, Movie Studio, Natron, and Vegas Pro | Supports all Regular version Hosts Plus the Following:OFX: Baselight, Flame, Fusion Studio, Smoke, Nucoda, Scratch, Nuke, and Silhouette |
New Features
- Separates the Object: RSMB Pro has the additional capability to isolate the background and foreground effectively. It utilizes a specified matte that can help in object separation to create motion blur with great precision. (Not available with Movie Studio, Vegas Pro, Catalyst Edit, Smoke, Media Composer, Flame, or Nucoda)
- Blur with Motion Vectors: If you have imported a 3D animation video, the pro version can blur the motion vectors provided by you. Thus, it can work on a 3D animation system perfectly. (Not available with Vegas Pro, DaVinci Resolve, Movie Studio, Media Composer, Catalyst Edit, or Nucoda)
- RGB+A Tracking: This option is used to recognize and track dark images with mattes by using the alpha channel. You can use this option for masked or CG stuff. (Not available with Media Composer)
- Use of Tracking Points: To help the RSMB’s calculation of motion vectors, you can provide tracking points. By defining the tracking points, you can tell RSMB about the movement of one pixel from one frame to another efficiently. (Not available with Vegas Pro, Media Composer, Catalyst Edit, DaVinci Resolve, Smoke, Flame, Movie Studio, or Nucoda)
- Spline Guidance: If RSMB encounters problems related to tracking, you can draw and animate shapes to tell about the object’s movement. Thus, it can help the RSMB find the object movement easily. (Not available with Premiere Pro, Nucoda, Vegas Pro, HitFilm, Movie Studio, Smoke, Sihouette, Flame, Scratch, Nuke, Motion, Media Composer, DaVinci Resolve, Catalyst Edit, FCPX)
Rating
- 7 out of 5
Our Verdict
The new features in the pro version of RSMB are really compelling and beneficial. However, there are various restrictions when it comes to the supported hosts of the pro version. So, if you are using any common software for video editing that is not recognized by the pro version, we will recommend you use the regular version of RSMB. The regular version of RSMB is cost-effective and works proficiently.
Part 3: How to Use ReelSmart Motion Blur Plugin in Premiere Pro?
Are you eager to know how to use the Premiere Pro motion blur plugin? Read and follow the steps provided below to craft flawless results.
Step1 Import Video Clip
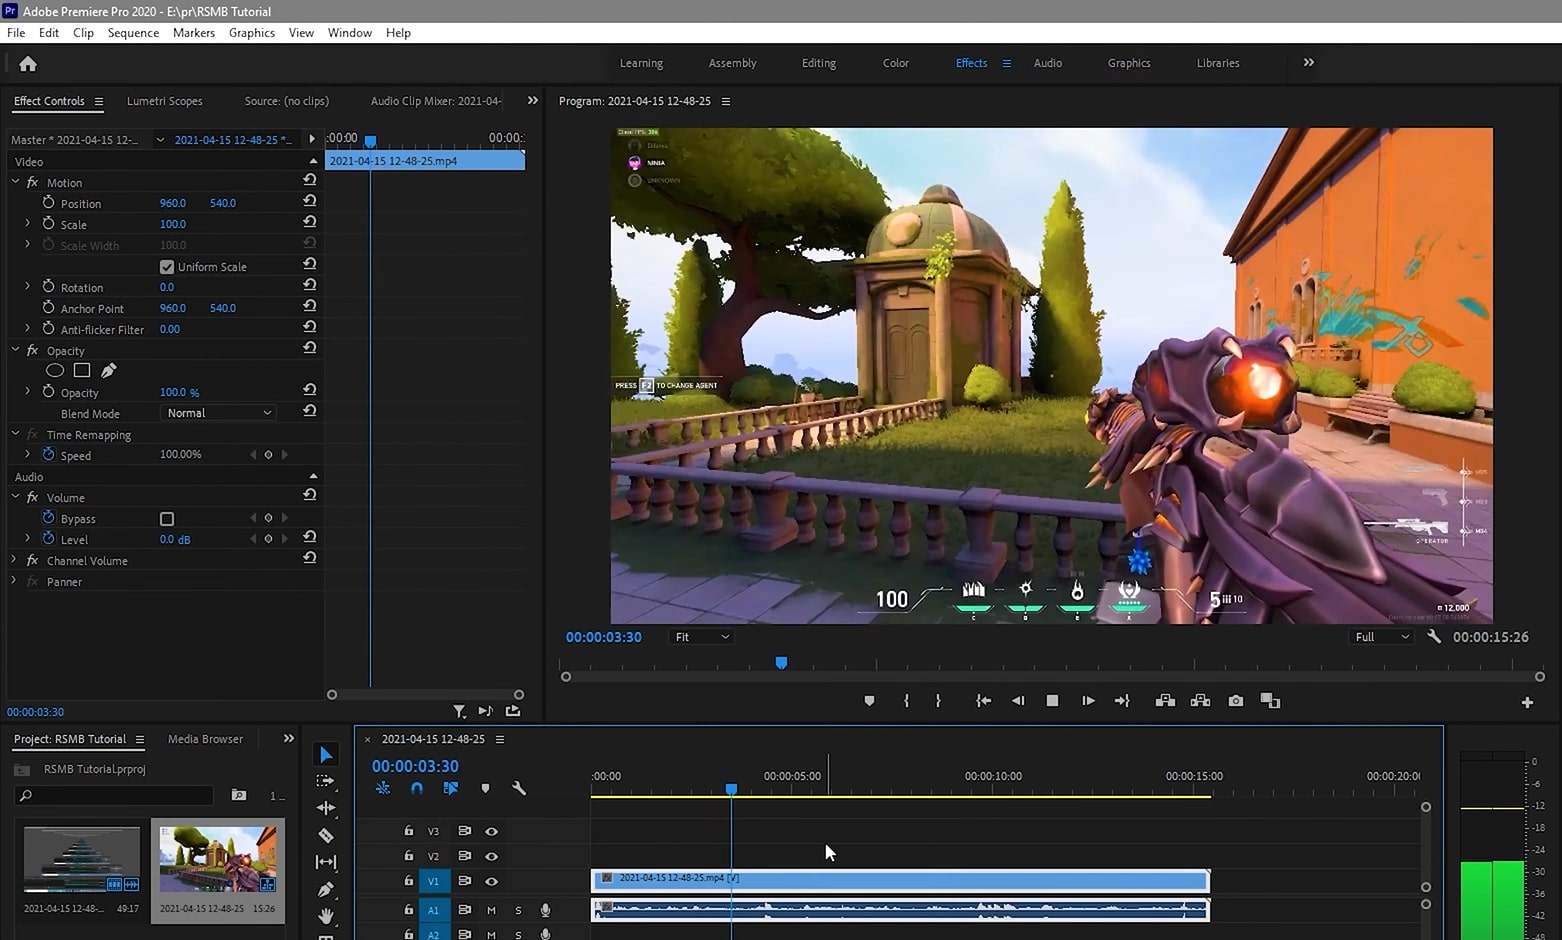
Open Adobe Premiere Pro in your system and start with a new project. On the newly displayed window, import the video clip by browsing through your computer. After importing the desired video file, make sure to drag and drop it into the timeline to begin editing.
Step2 Search for RSMB Effect
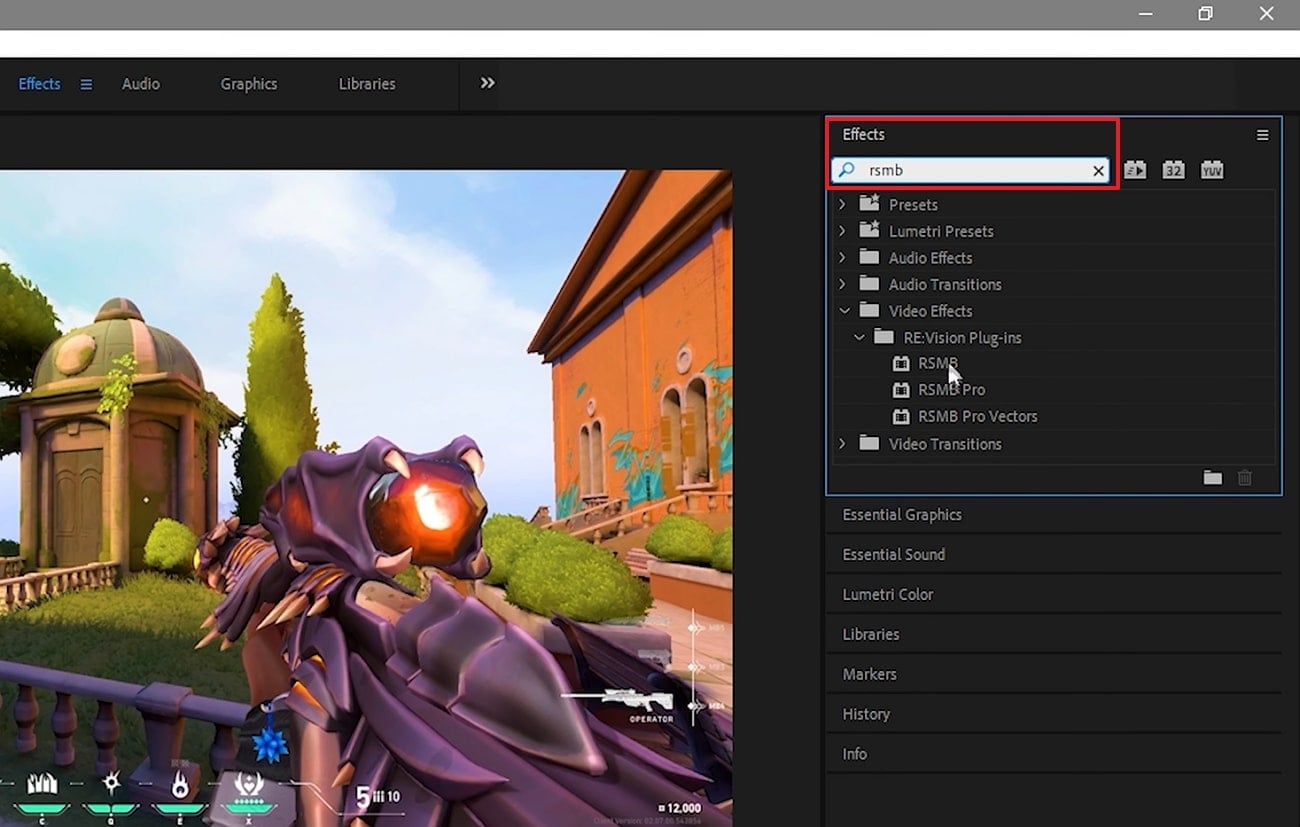
Once you have dropped the video into the timeline, navigate to the “Effects” tab given on the right side. On the search box, type “RSMB.” From the fetched results, select RSMB and apply it to the above layer of your video clip in the timeline.
Step3 Adjust the Plugin Settings
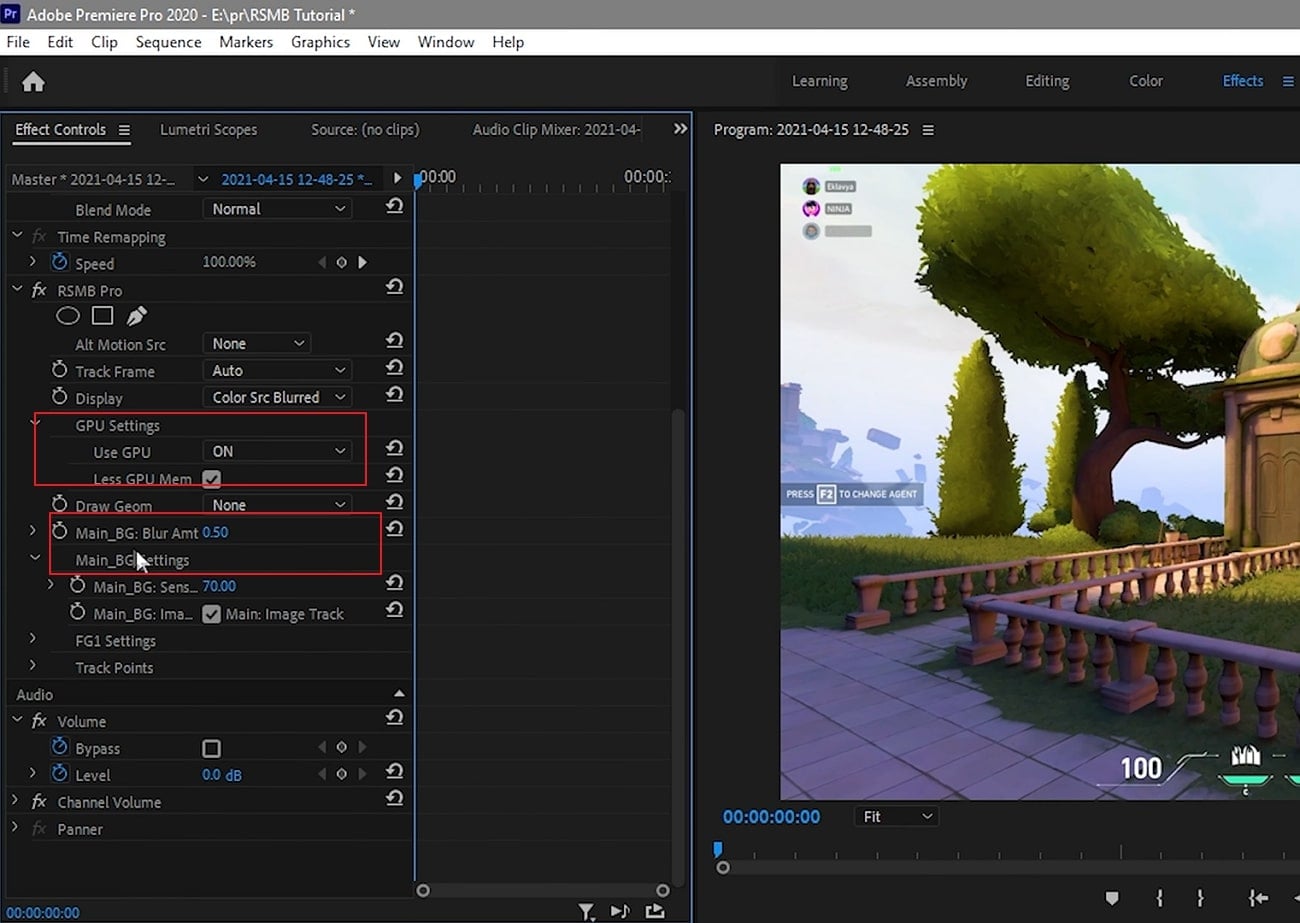
Now head to the settings on the left side and enable the GPU settings. Moreover, you can increase the blur amount to 1 or 1.5. By doing so, you can create a smoother look in your video. Once done with the settings, make sure to render your video to produce a smooth finish. Once done with rendering, you can preview and save the video easily.
Conclusion
Motion blur effect can drastically transform your video clip. If you are using Premiere Pro to add motion blur, we will recommend you use the plugin called ReVisionFX ReelSmart Motion Blur. If you are unaware of the motion blur plugin Premiere Pro, this article has fetched all the related details. This article has provided all the significance and instructions to use the RSMB plugin.
Supported Hosts
| ReelSmart Motion Blur | Regular Version | Pro Version |
|---|---|---|
| Adobe: After Effects, Premiere Pro | Adobe: After Effects, Premiere Pro | |
| Apple: Final Cut Pro, Motion | Apple: Final Cut Pro, Motion | |
| / | Avid: Media Composer | |
| OFX: Catalyst Edit, DaVinci Resolve, Final Cut Pro, HitFilm, Movie Studio, Natron, and Vegas Pro | Supports all Regular version Hosts Plus the Following:OFX: Baselight, Flame, Fusion Studio, Smoke, Nucoda, Scratch, Nuke, and Silhouette |
New Features
- Separates the Object: RSMB Pro has the additional capability to isolate the background and foreground effectively. It utilizes a specified matte that can help in object separation to create motion blur with great precision. (Not available with Movie Studio, Vegas Pro, Catalyst Edit, Smoke, Media Composer, Flame, or Nucoda)
- Blur with Motion Vectors: If you have imported a 3D animation video, the pro version can blur the motion vectors provided by you. Thus, it can work on a 3D animation system perfectly. (Not available with Vegas Pro, DaVinci Resolve, Movie Studio, Media Composer, Catalyst Edit, or Nucoda)
- RGB+A Tracking: This option is used to recognize and track dark images with mattes by using the alpha channel. You can use this option for masked or CG stuff. (Not available with Media Composer)
- Use of Tracking Points: To help the RSMB’s calculation of motion vectors, you can provide tracking points. By defining the tracking points, you can tell RSMB about the movement of one pixel from one frame to another efficiently. (Not available with Vegas Pro, Media Composer, Catalyst Edit, DaVinci Resolve, Smoke, Flame, Movie Studio, or Nucoda)
- Spline Guidance: If RSMB encounters problems related to tracking, you can draw and animate shapes to tell about the object’s movement. Thus, it can help the RSMB find the object movement easily. (Not available with Premiere Pro, Nucoda, Vegas Pro, HitFilm, Movie Studio, Smoke, Sihouette, Flame, Scratch, Nuke, Motion, Media Composer, DaVinci Resolve, Catalyst Edit, FCPX)
Rating
- 7 out of 5
Our Verdict
The new features in the pro version of RSMB are really compelling and beneficial. However, there are various restrictions when it comes to the supported hosts of the pro version. So, if you are using any common software for video editing that is not recognized by the pro version, we will recommend you use the regular version of RSMB. The regular version of RSMB is cost-effective and works proficiently.
Part 3: How to Use ReelSmart Motion Blur Plugin in Premiere Pro?
Are you eager to know how to use the Premiere Pro motion blur plugin? Read and follow the steps provided below to craft flawless results.
Step1 Import Video Clip
Open Adobe Premiere Pro in your system and start with a new project. On the newly displayed window, import the video clip by browsing through your computer. After importing the desired video file, make sure to drag and drop it into the timeline to begin editing.

Step2 Search for RSMB Effect
Once you have dropped the video into the timeline, navigate to the “Effects” tab given on the right side. On the search box, type “RSMB.” From the fetched results, select RSMB and apply it to the above layer of your video clip in the timeline.

Step3 Adjust the Plugin Settings
Now head to the settings on the left side and enable the GPU settings. Moreover, you can increase the blur amount to 1 or 1.5. By doing so, you can create a smoother look in your video. Once done with the settings, make sure to render your video to produce a smooth finish. Once done with rendering, you can preview and save the video easily.

Conclusion
Motion blur effect can drastically transform your video clip. If you are using Premiere Pro to add motion blur, we will recommend you use the plugin called ReVisionFX ReelSmart Motion Blur. If you are unaware of the motion blur plugin Premiere Pro, this article has fetched all the related details. This article has provided all the significance and instructions to use the RSMB plugin.
Focusing On The Best Ways To Convert Slow-Motion Video to Normal
Maintain consistency in your projects by adding all video clips simultaneously. Sometimes, you have to include a slow-motion video due to its content. In such cases, convert them into a normal video for an even flow in the media. Turning slow-motion videos into the normal is essential in several cases. Unfortunately, many people don’t know how to make a slow-mo video at normal speed.
To address this concern, we have enlisted perfect ways to make slow-mo to usual video. Read this guide and learn how to convert a slow-motion video to normal step-wise. Besides, you will also find some online and desktop solutions to make the best choice.
Slow Motion Video Maker Slow your video’s speed with better control of your keyframes to create unique cinematic effects!
Make A Slow Motion Video Make A Slow Motion Video More Features

Part 1: Android User’s Solution: Converting Slow Motion Video to Normal
Android cameras can record slow-motion videos and turn them into normal as well. For this purpose, you have to upload your clips on Google Photos. Let’s discover how to convert slow-motion video to normal in Google Photos for Android. Remember that these steps might vary across different Android models.
Step 1
Enter your Google Photos app and pick one of your intended Slow-motion videos. While previewing it, look for the “Slow Motion” option at the top and touch it.

Step 2
Read the instructions from the displayed pop-up and hit the “OK.” Drag the two sliders and enclose them from both ends. Your slow-motion video is converted into the normal one.

Part 2: iOS User’s Solution: Converting Slow Motion Video to Normal
iPhone also offers a built-in option to change the speed of videos. Almost all iPhone series follow the same steps to change the video speed. Thus, you can quickly learn how to make slow-motion videos at regular speed, regardless of the version. Without further delay, make a slow-motion video and read the given steps:
Step 1
Unlock your iPhone and open the “Photos” app from the main screen. There, reach the “Albums” icon from the bottom and scroll until you get the “Slo-mo” option. Click on it and get a preview of your slow-motion video.

Step 2
Now, hit “Edit” from the top right side and find an editing screen. From the bottom, enclose the sliders from both sides and tap the “Done” button. This way, you will get a standard video instantly saved on your iPhone.

Part 3: Online Solution: Converting Slow Motion Video to Normal
Use this online tool if you cannot perform slow-motion to normal video conversion. Clideo is an online platform that allows you to change the video speed without causing playback issues. It offers a high level of security where only you can access your files. Some of its additional editing options allow you to pick an output format. Besides, users can keep their media sound or mute while making the conversion.
This tool supports MP4, MPG, VOB, MOV, and WMV media file formats. The following is a step-by-step guide to using this online solution:
Step 1
Access the official site of Clideo Stop Motion Maker and click the “Choose File” button. Browse your slow-motion video and press the “Open” button. Now, wait for a while until it gets uploaded on the site.

Step 2
Afterward, set the “Speed” from three given options. Choose to set the video to “Medium” speed. Moreover, you can also set the “Clip Rate” of the video as per requirements.

Step 3
When you get the desired outcome, click the “Export” button from the bottom-right corner. You will get a preview of the video on the next screen. Tap on the downward “ Download “ symbol and pick the file export destination. You can simply hit “Download” to get the file in your system.

Part 4: Desktop Recommendation: Converting Slow Motion Video to Normal Using Wondershare Filmora
In the above sections, you have learned how to turn slow-mo into normal. Now, it is time to look for an effective offline solution. That’s where you can count on Wondershare Filmora , which is the simplest but powerful video editor. Fortunately, it can speed up and slow down videos within the highest quality. Filmora provides more advanced editing options than the above solutions.
Free Download For Win 7 or later(64-bit)
Free Download For macOS 10.14 or later
Steps to Perform Slow Motion and Speed Up Videos to Normal with Filmora
Unlike other tools, Filmora can quickly convert your video speed to your desired extent. Head below and transform your video easily with this step-by-step guide.
Step 1Install Filmora and Export Your Media to Start a Project
Successfully launch Filmora in your system and access its home screen. Click on the “New Project” option to initiate media editing. Bring your video to the timeline after importing it into the media panel. To import the file, press the “Ctrl + I” keys using your keyboard.

Step 2Slow Down or Speed Up the Video with Optical Flow
Right-click on your slow-motion video in the timeline to get an extended list. From that list, tap the “Uniform Speed” option and find an editing panel on the right. Now, drag the “Speed” slider right to speed up the video. You can move it to the left side to slow down the video. To ensure a smooth quality, extend the “AI Frame Interpolation” menu and pick the “Optical Flow.”

Step 3Save the File Through the Export Button
Press the Space bar from your keyboard and preview the video. Navigate toward the “Export” button at the top right corner. You can adjust the export parameters and tap “Export” to save the file on your device.

Other Exceptional Features of Filmora
Filmora is more than a simple video editing app. AI integration can generate music, images, and scripts to embrace creativity in your content. Read the following points to learn more about Filmora’s incredible features.
- AI Vocal Remover: If you want to dub a video, use this feature to remove existing vocals. It can separate music and vocal soundtracks while keeping their quality high. Once AI removes vocals, you can quickly edit or remove unwanted elements from the tracks.
- AI Text to Video: Content creators can get instant engagement in their content with this feature. Users just have to write their ideas and let AI transform them into a visual story. They can later customize fonts, styles, and other elements to achieve desired results.
- AI Smart Masking: Professionals can improve their multi-dimensional scenes using this option. It enables multi-layer overlay editing that isolates subjects. Users can freeze frames and perform auto-correction for visual enhancements of the projects.
Conclusion
In short, slow-motion to normal video conversion is possible and serves fruitful purposes. In this regard, iPhone and Android offer built-in options that are explained earlier. Besides, you get familiar with how to convert a slow-motion video to normal using an online tool. For an effective desktop solution, try using Filmora, which is a top-notch video editor so far.
Make A Slow Motion Video Make A Slow Motion Video More Features

Part 1: Android User’s Solution: Converting Slow Motion Video to Normal
Android cameras can record slow-motion videos and turn them into normal as well. For this purpose, you have to upload your clips on Google Photos. Let’s discover how to convert slow-motion video to normal in Google Photos for Android. Remember that these steps might vary across different Android models.
Step 1
Enter your Google Photos app and pick one of your intended Slow-motion videos. While previewing it, look for the “Slow Motion” option at the top and touch it.

Step 2
Read the instructions from the displayed pop-up and hit the “OK.” Drag the two sliders and enclose them from both ends. Your slow-motion video is converted into the normal one.

Part 2: iOS User’s Solution: Converting Slow Motion Video to Normal
iPhone also offers a built-in option to change the speed of videos. Almost all iPhone series follow the same steps to change the video speed. Thus, you can quickly learn how to make slow-motion videos at regular speed, regardless of the version. Without further delay, make a slow-motion video and read the given steps:
Step 1
Unlock your iPhone and open the “Photos” app from the main screen. There, reach the “Albums” icon from the bottom and scroll until you get the “Slo-mo” option. Click on it and get a preview of your slow-motion video.

Step 2
Now, hit “Edit” from the top right side and find an editing screen. From the bottom, enclose the sliders from both sides and tap the “Done” button. This way, you will get a standard video instantly saved on your iPhone.

Part 3: Online Solution: Converting Slow Motion Video to Normal
Use this online tool if you cannot perform slow-motion to normal video conversion. Clideo is an online platform that allows you to change the video speed without causing playback issues. It offers a high level of security where only you can access your files. Some of its additional editing options allow you to pick an output format. Besides, users can keep their media sound or mute while making the conversion.
This tool supports MP4, MPG, VOB, MOV, and WMV media file formats. The following is a step-by-step guide to using this online solution:
Step 1
Access the official site of Clideo Stop Motion Maker and click the “Choose File” button. Browse your slow-motion video and press the “Open” button. Now, wait for a while until it gets uploaded on the site.

Step 2
Afterward, set the “Speed” from three given options. Choose to set the video to “Medium” speed. Moreover, you can also set the “Clip Rate” of the video as per requirements.

Step 3
When you get the desired outcome, click the “Export” button from the bottom-right corner. You will get a preview of the video on the next screen. Tap on the downward “ Download “ symbol and pick the file export destination. You can simply hit “Download” to get the file in your system.

Part 4: Desktop Recommendation: Converting Slow Motion Video to Normal Using Wondershare Filmora
In the above sections, you have learned how to turn slow-mo into normal. Now, it is time to look for an effective offline solution. That’s where you can count on Wondershare Filmora , which is the simplest but powerful video editor. Fortunately, it can speed up and slow down videos within the highest quality. Filmora provides more advanced editing options than the above solutions.
Free Download For Win 7 or later(64-bit)
Free Download For macOS 10.14 or later
Steps to Perform Slow Motion and Speed Up Videos to Normal with Filmora
Unlike other tools, Filmora can quickly convert your video speed to your desired extent. Head below and transform your video easily with this step-by-step guide.
Step 1Install Filmora and Export Your Media to Start a Project
Successfully launch Filmora in your system and access its home screen. Click on the “New Project” option to initiate media editing. Bring your video to the timeline after importing it into the media panel. To import the file, press the “Ctrl + I” keys using your keyboard.

Step 2Slow Down or Speed Up the Video with Optical Flow
Right-click on your slow-motion video in the timeline to get an extended list. From that list, tap the “Uniform Speed” option and find an editing panel on the right. Now, drag the “Speed” slider right to speed up the video. You can move it to the left side to slow down the video. To ensure a smooth quality, extend the “AI Frame Interpolation” menu and pick the “Optical Flow.”

Step 3Save the File Through the Export Button
Press the Space bar from your keyboard and preview the video. Navigate toward the “Export” button at the top right corner. You can adjust the export parameters and tap “Export” to save the file on your device.

Other Exceptional Features of Filmora
Filmora is more than a simple video editing app. AI integration can generate music, images, and scripts to embrace creativity in your content. Read the following points to learn more about Filmora’s incredible features.
- AI Vocal Remover: If you want to dub a video, use this feature to remove existing vocals. It can separate music and vocal soundtracks while keeping their quality high. Once AI removes vocals, you can quickly edit or remove unwanted elements from the tracks.
- AI Text to Video: Content creators can get instant engagement in their content with this feature. Users just have to write their ideas and let AI transform them into a visual story. They can later customize fonts, styles, and other elements to achieve desired results.
- AI Smart Masking: Professionals can improve their multi-dimensional scenes using this option. It enables multi-layer overlay editing that isolates subjects. Users can freeze frames and perform auto-correction for visual enhancements of the projects.
Conclusion
In short, slow-motion to normal video conversion is possible and serves fruitful purposes. In this regard, iPhone and Android offer built-in options that are explained earlier. Besides, you get familiar with how to convert a slow-motion video to normal using an online tool. For an effective desktop solution, try using Filmora, which is a top-notch video editor so far.
Are You Searching for the Best Canon LUT Download? This Article Provides the Best Recommendations for Creating the Best Professional Videos
LUTs (look-up tables) enhance color grading within photos and videos. After all, they are special editing tools for upscaling visual content. There are different types of LUTs with unique characteristics and styling. One of these categories is Canon cinematic LUTs, an exceptional 3D LUT preset. In this article, you’ll find information about Canon LUTs with the best recommendations.
- Part 2: Top-Best Free Canon LUTs To Consider in 2024
- Part 3: Using The Most Effective LUTs in Wondershare Filmora
Part 1: What are 3D LUTs?
LUTs are important editing tools for upgrading color schemas of visual content. The 3D LUTs are special LUT presets used in color correction and enhancement. 3D LUT is a mathematical table that maps input and output colors. It helps adjust the color tones, textures, and intensity in an optimized way. So, while selecting any 3D LUT filter, it’s applied in a calculated way.
The 3D LUT is equipped with three-dimensional visual art that determines brightness, hue, and saturation. It has depicted its use cases in industries like gaming and film production. Thus, they play a crucial role in matching color content from different cameras. This develops more consistency with customized looks and appealing visualization.
Part 2: Top-Best Free Canon LUTs To Consider in 2024
The Internet is overloaded with amazing download Canon LUTs. Meanwhile, choosing the right LUTs for your task can be difficult. Don’t worry; you will find the list of best Canon LUTs here:
1.Cinema Canon C-Log3
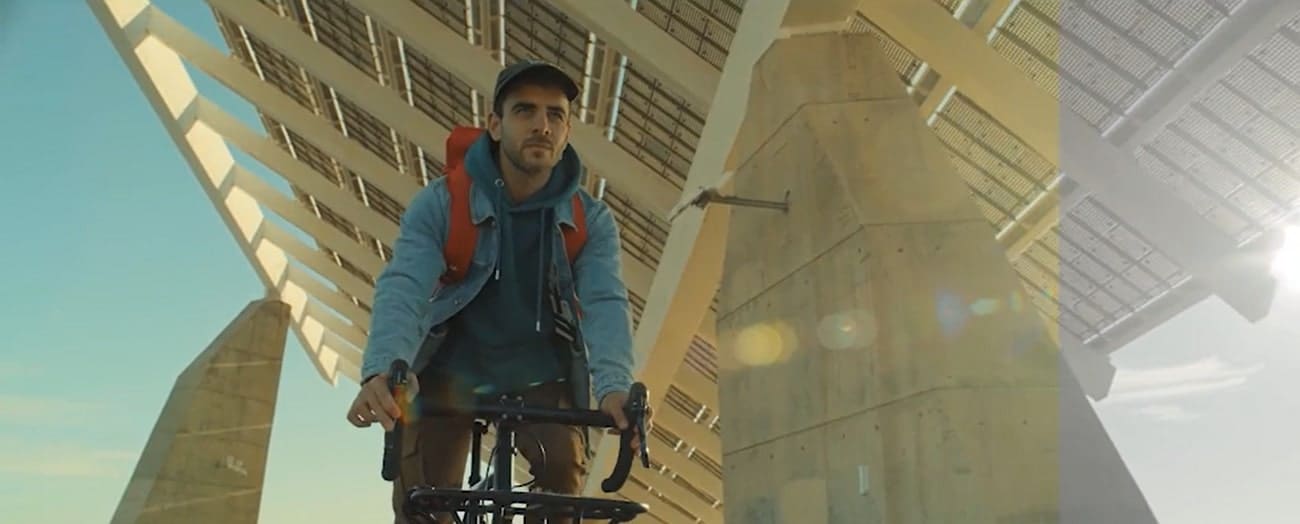
Take your video concept to the next level with cinema Canon C-Log3 LUT. In this LUT pack, you will find 25 Cinema Rec 709 and 25 Cinema C-Log3 LUTs. If you’ve videos, clips, presentations, or social videos, this LUT pack is ideal. Such LUTs are very easy to use. You only need to drag or import them into your videos.
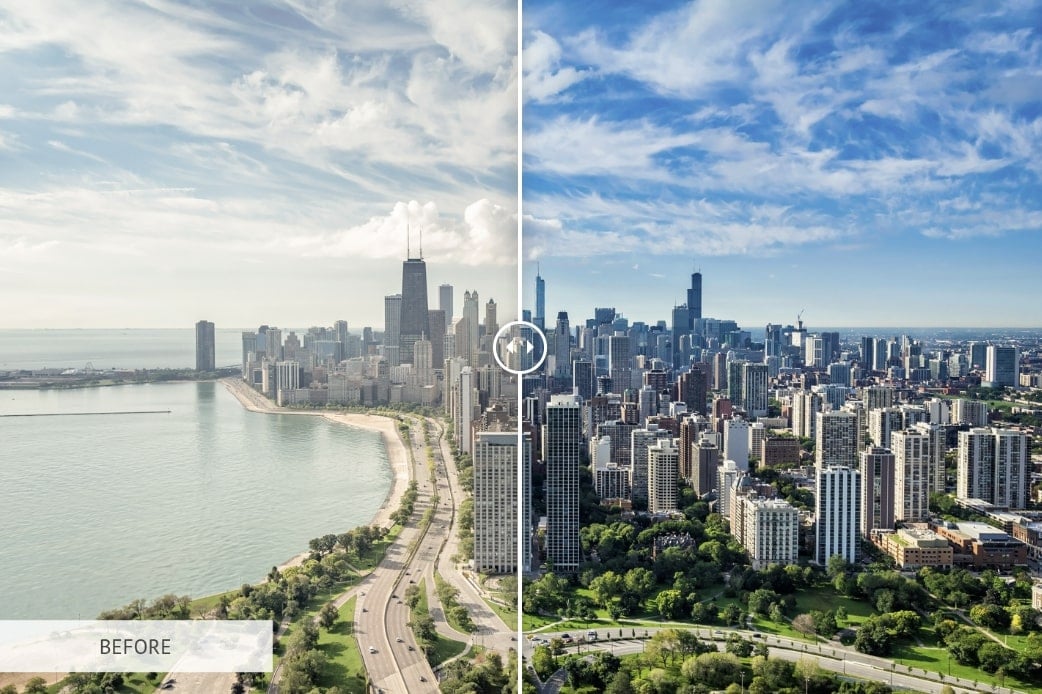
2. City Building
Transform your city building with this free Canon LUT pack. There are exciting LUT preset filters for providing new looks into tall building structures. The combination of weather, greenery, traffic, and buildings demands upgraded looks, for which such LUTs are ideal. With special color orientation, this LUTs pack will optimize color schemes within the city.
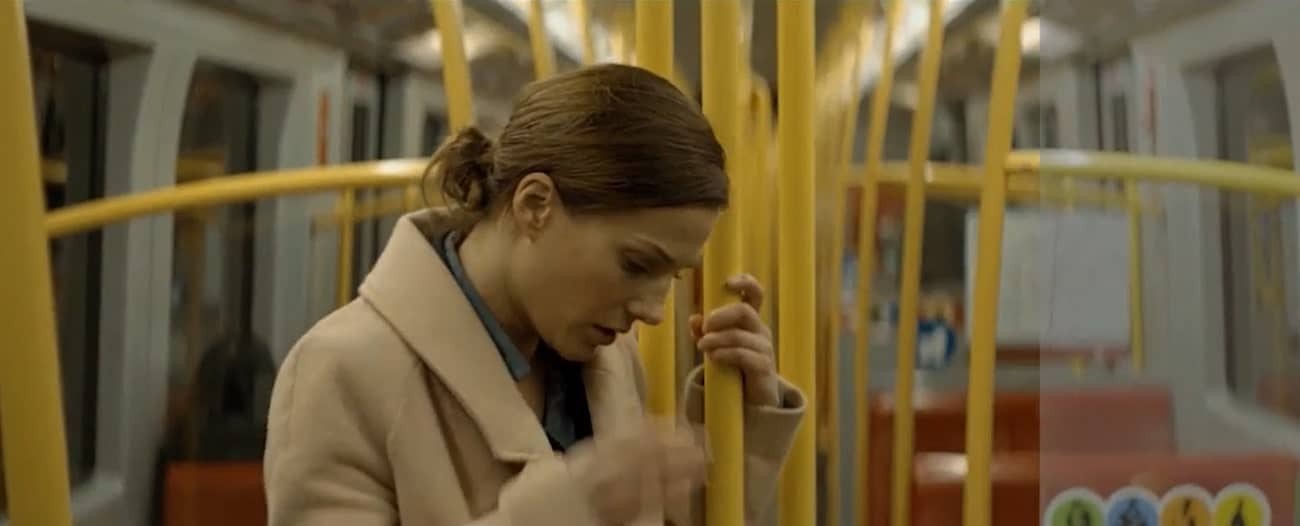
3. Canon C-Log Blockbuster
Add special blockbusting looks to your important video clips. With the Canon C-Log Blockbuster LUTs pack, upgrade your videos with a cinematic touch. There are 20 Blockbuster C-Log LUTs that will extend the color grading of your videos. This also improves the quality of your clips, bringing more engagement. Thus, you can make your documentaries and social clips more enchanting.
4. Slight Warmth
Blend unique sunlight touch to your outdoor visual media with these free Canon LUTs. It helps you improve the standards of your images and videos with evening sunshine. Your important outdoor moments will become captured in attractive visual media with pleasing tranquility. The available LUT filter possesses a warm color gradient to initiate creativity.

5. Film Canon C-Log2
Using the film Canon C-Log2 pack, you will find amazing LUT color presets. You can use these LUT filters within your documented or personal clips and movies. Find some prominent LUTs, including the 22 Canon C-Log2 and 22 Rec 709 LUTs in the pack. All these LUTs are special and unique, with extensive color gradients. You can import the preset file or drag it into the video for magical effects.
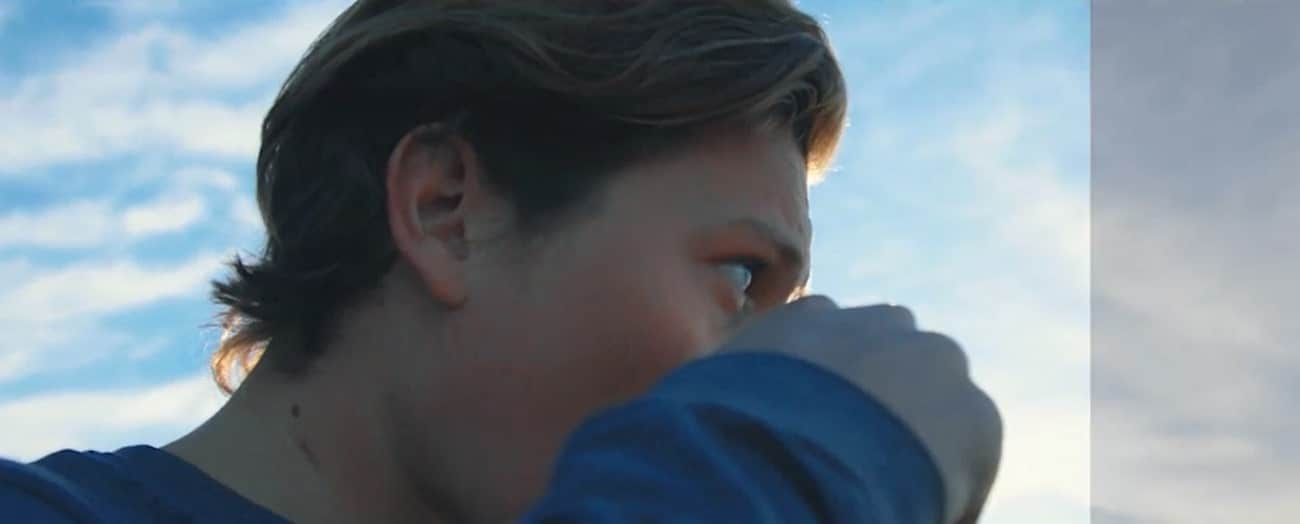
6. Sun Flare
Are your captured images or recorded videos in a dull location? There is an option to transform quality using this sun flare Canon LUT. With its bright color presets, this LUT can correct colors within dull visual content. This way, the color schemes would be upgraded with more light and brightness. So, don’t worry, even if your picture is captured within a dull environment.

7. Vintage
You need not have any darker blueish effects on your outdoor visual media anymore. With vintage Canon LUT download, enhance color grading in an optimized way. The vintage LUT is backed with special color, tone, and style. When you apply these LUTs to your photo or video, the quality will improve. You will witness color enhancement in a quick time.
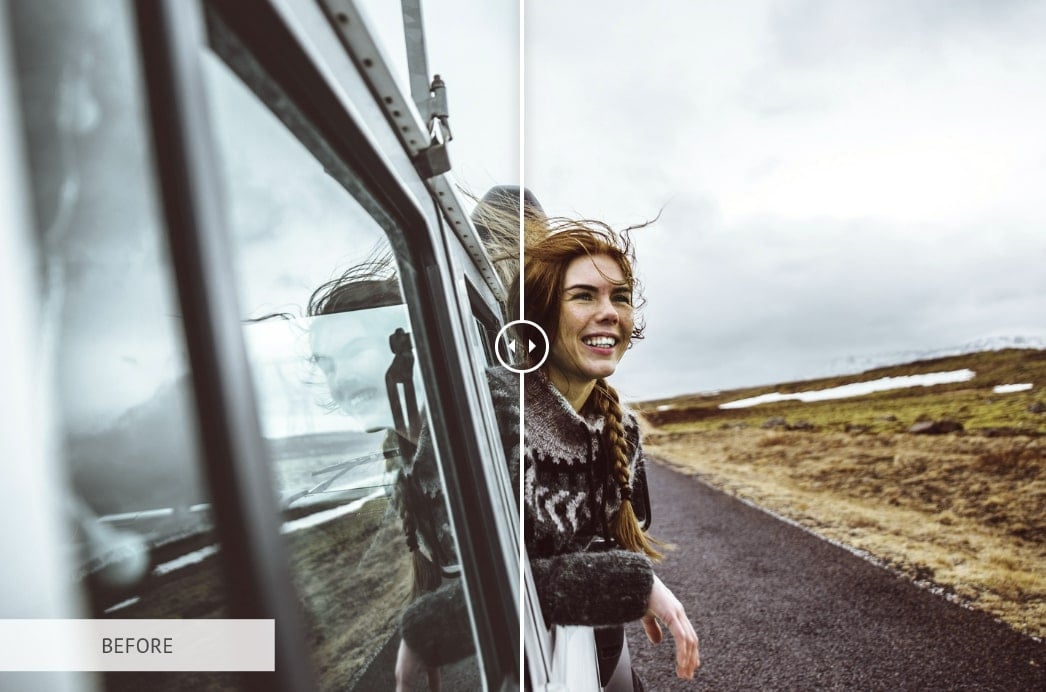
8. Blue Skies
The sky is blue as the water. Thus, if your visual content has natural landmarks, provide blue touch. After all, blueish effects will enlighten your visual content in an appealing way. With next-level color grading, you will feel special emotions and feelings vibes. The LUTs are easy to use and integrate into your images or videos.
9. Filmic Style
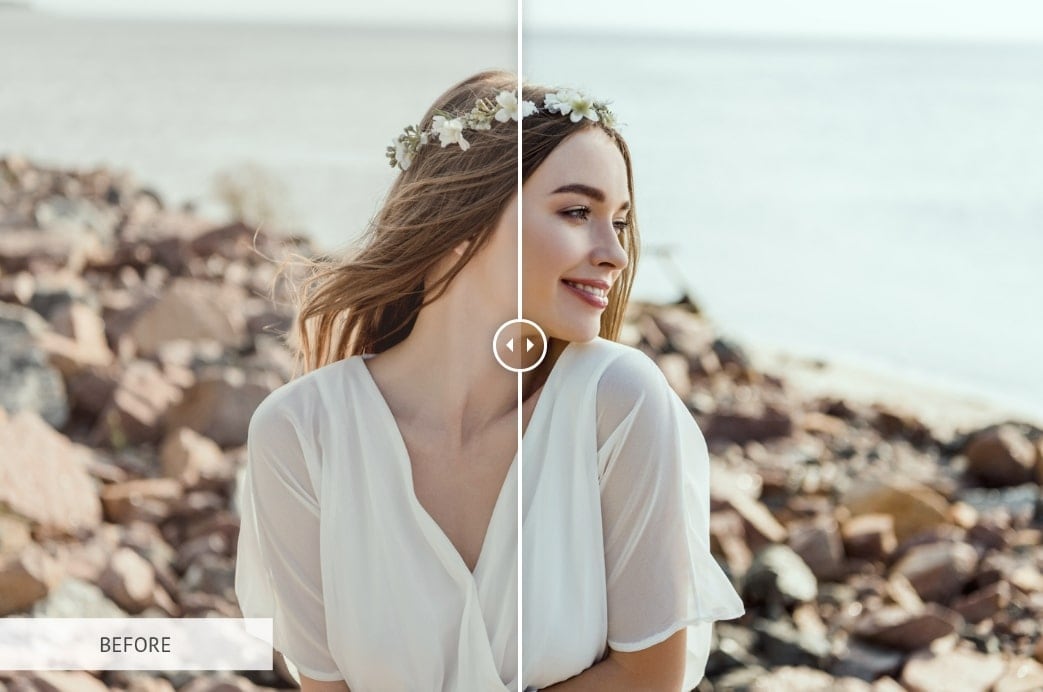
Blend extraordinary filmy looks into your graphical media with Filmic Style Canon LUT. This LUT is special because it leverages top-level color grading with resolution enhancements. The colors of your visual content will rise, and quality will also improve. So if you’re inspired by the cinematic display, this LUT provides optimized colors.

10. City Film
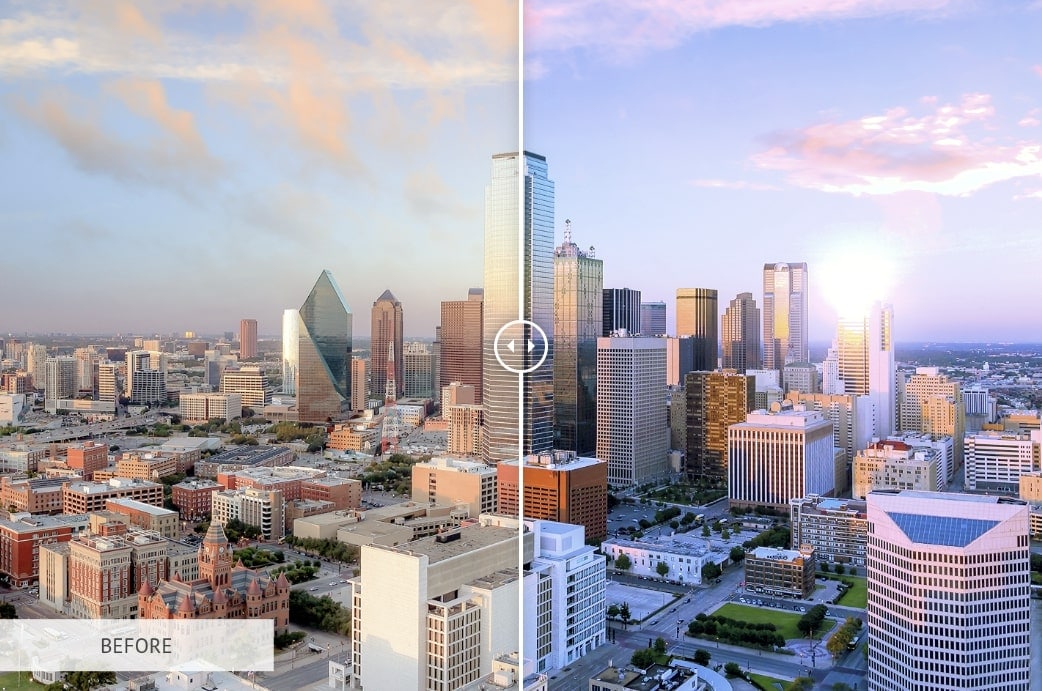
An aerial picture of your city determines its beauty. But the sandy or dusty atmosphere can ruin picture quality. Using this Canon LUT, you can upscale your city picture. There are unique color gradients that eliminate dust for clarity within the image. Meanwhile, with the correct color combination, you’ll see a clean environment overall.
11. Dusty Light
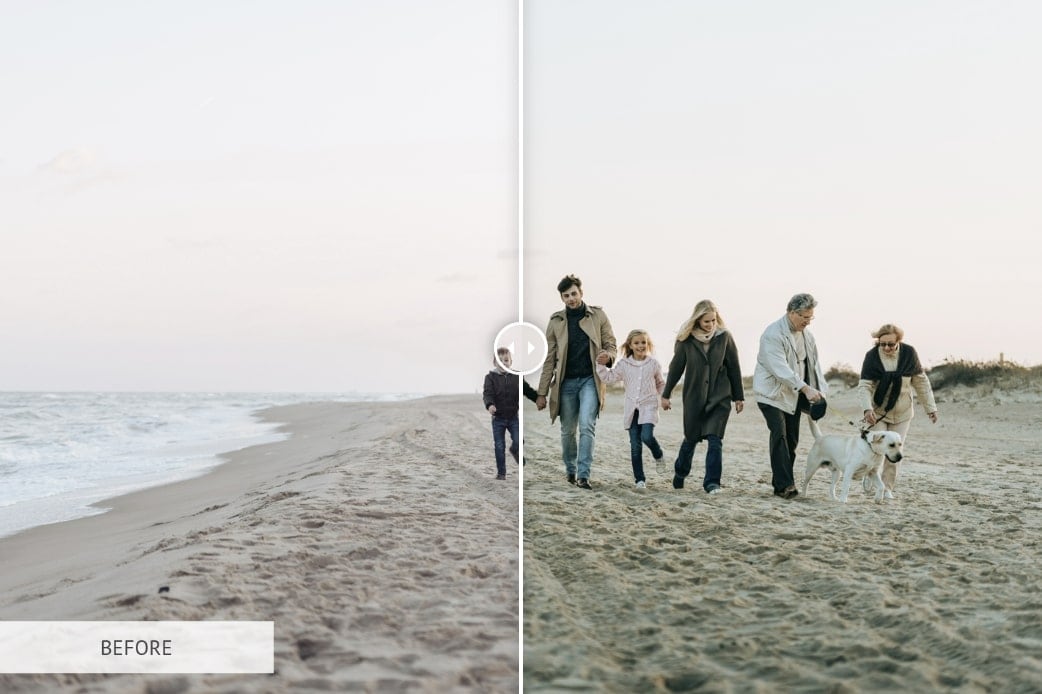
Sometimes interior images look more attractive in dusty lighting. This LUT pack comes with diverse filter presets that add brownish dusty looks. Thus, your visual content will be enhanced with optimized resolutions within dusty lighting. The Canon LUT will adjust the color schemes within your visual content. Hence, you will have a visually appealing image with outstanding dusty contrast.

12. Tinted Shades
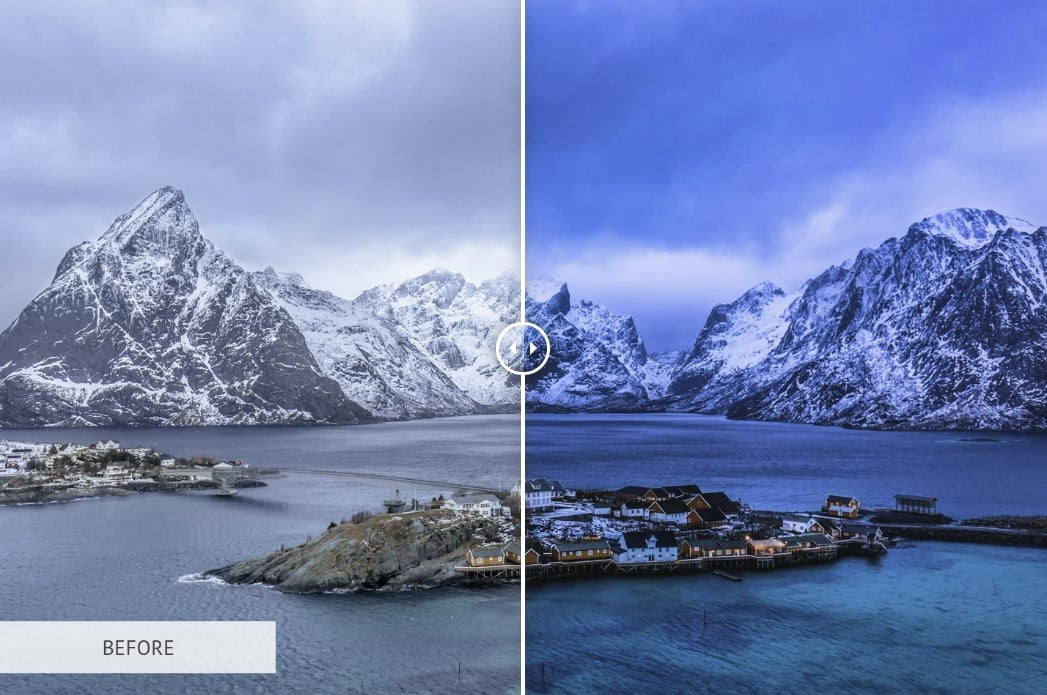
Make your outings more attractive with stylish tints. By using this free Canon LUT, you can add faded tints to your images or videos. Meanwhile, the tinted shades will provide impressive looks within a dull atmosphere. For outdoor photography, this LUT is ideal because of its dark hues and saturated colors. The filter combines a range of color tools for the best output.
13. W&B
Black and white is a vintage color combination that is beyond levels. With this LUTs pack, you can improvise your visual content with a W&B touch. This means LUTs will replace color gradients with stylish black-and-white displays. Meanwhile, the LUT will adjust hue, saturation, contrast, and brightness. As a final result, you will receive attractive W&B content.

14. Pink Grade
Red-brownish mountains look impressive in their original colors. A pink-grade LUT filter can bring originality to your captured videos or photos. This way, the LUT will accurately apply pink color grading with consistency. The mountain which you captured will start looking great again. Pink color schemes are also more attractive when it comes to outdoor visual content.

15. Landscape
Landscapes look great in their clean yet natural colors. But if your photography or videography goes wrong, landscapes may look poor. In this scenario, using a landscape Canon LUT is a great thing to have. After all, the LUT has useful color preset filters that will provide refreshing looks. The greenery will be restored, and the blue sky will be back.

16. Landscape
The bright yet exceptional blue color of the sea is always mind-blowing. If you want to use the blueish sea filter effect, download this Canon cinematic LUTs. There are special filter effects that will enhance resoLUTions and optimize color schemas. The colors are transformed while keeping blueish sea effects in the process. The end result is always amazing, with naturally appealing graphics.
Part 3: Using The Most Effective LUTs in Wondershare Filmora
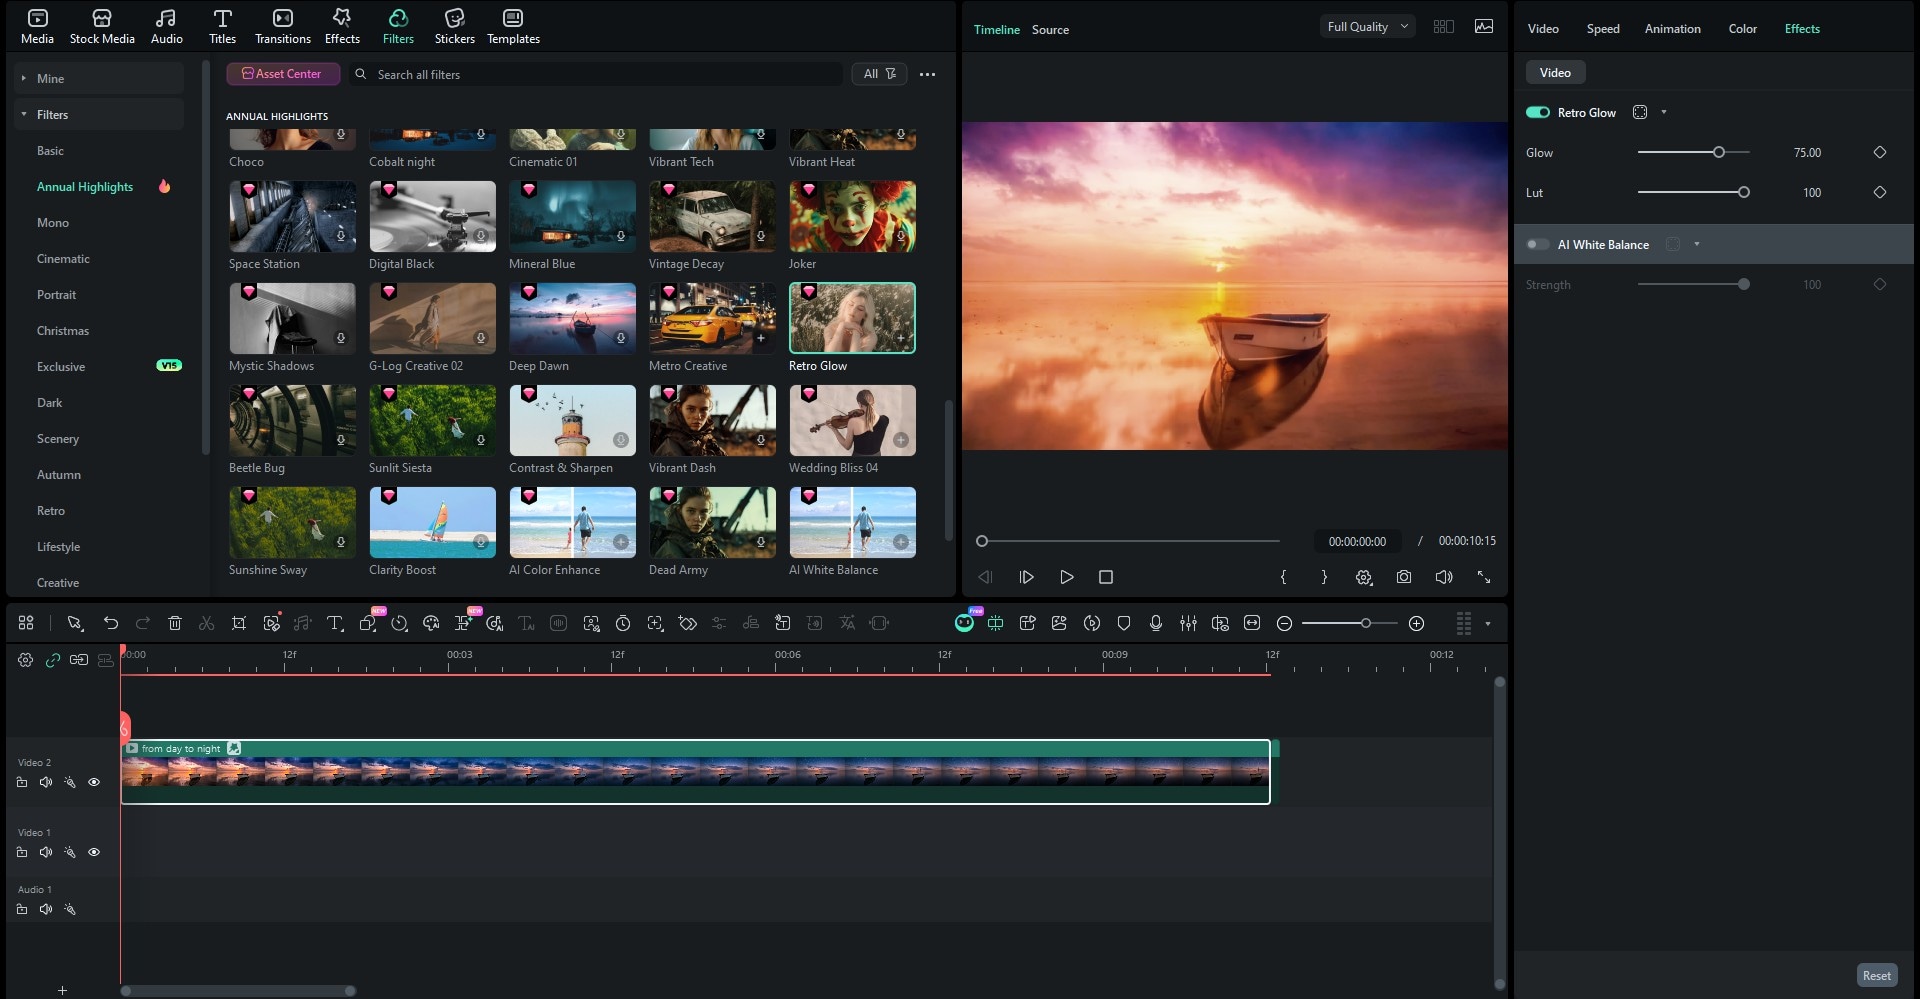
In this digital age, the use of technology is revolutionizing video editing. An example is 3D Canon LUTs for upscaling and enhancing visual colors in media. The Canon LUTs are special because of their improvised color grading and schemas. Using Wondershare Filmora , you can download Canon LUTs within a range of filter presets. There are, in total, 200+ LUT filter presets to fulfill your video editing needs within this video editor by default.
In contrast, you can use Wondershare Filmora for other video editing tasks as well. You can edit your video, add music tracks, or correct background noises. You can also add different effects, stickers, and transitions. Let’s discover more useful features of Filmora.
Top Features of Wondershare Filmora
- Stock Media: Filmora has the availability of 10 billion+ free stock media. So you if don’t have your pictures and videos, stock media can provide them. There are different categories of unique visual media.
- Extended Plug-ins: For a better editing experience, you can add countless filter plug-ins. This includes NewBlue, BorisFX, and many others. With plug-ins, you can add a more extensive color enhancement.
- Motion Tracking: The presence of motion tracking allows tracking of object movement in the video. Thus, you can pin media files, text, or graphics to that motion. Your content will look visually appealing with the use of this specific feature.
- Speed Ramping: Using Filmora, you can change the speed of your video through speed ramping. The speed could be changed uniformly or speedily. It depends on your video requirements.
Empower your videos with a new mood using different LUTs. Filmora now offers 100+ top-quality 3D LUTs cover a broad range of scenarios. Transform your videos with Filmora’s powerful 3D LUTs.
Apply LUT on Videos Apply LUT on Videos Learn More

Conclusion
Like other LUTs, Canon LUTs are also special and unique in their kind. They provide 3D cinematic looks with visually attractive color corrections. Meanwhile, in this article, you found the best Canon LUTs for editing visual media. You also learned about Wondershare Filmora, the best video editing and enhancement tool. The provided details of this video editing tool will make it easy for you to adapt to the 200+ available presets on the platform.
Part 1: What are 3D LUTs?
LUTs are important editing tools for upgrading color schemas of visual content. The 3D LUTs are special LUT presets used in color correction and enhancement. 3D LUT is a mathematical table that maps input and output colors. It helps adjust the color tones, textures, and intensity in an optimized way. So, while selecting any 3D LUT filter, it’s applied in a calculated way.
The 3D LUT is equipped with three-dimensional visual art that determines brightness, hue, and saturation. It has depicted its use cases in industries like gaming and film production. Thus, they play a crucial role in matching color content from different cameras. This develops more consistency with customized looks and appealing visualization.
Part 2: Top-Best Free Canon LUTs To Consider in 2024
The Internet is overloaded with amazing download Canon LUTs. Meanwhile, choosing the right LUTs for your task can be difficult. Don’t worry; you will find the list of best Canon LUTs here:
1.Cinema Canon C-Log3
Take your video concept to the next level with cinema Canon C-Log3 LUT. In this LUT pack, you will find 25 Cinema Rec 709 and 25 Cinema C-Log3 LUTs. If you’ve videos, clips, presentations, or social videos, this LUT pack is ideal. Such LUTs are very easy to use. You only need to drag or import them into your videos.

2. City Building
Transform your city building with this free Canon LUT pack. There are exciting LUT preset filters for providing new looks into tall building structures. The combination of weather, greenery, traffic, and buildings demands upgraded looks, for which such LUTs are ideal. With special color orientation, this LUTs pack will optimize color schemes within the city.

3. Canon C-Log Blockbuster
Add special blockbusting looks to your important video clips. With the Canon C-Log Blockbuster LUTs pack, upgrade your videos with a cinematic touch. There are 20 Blockbuster C-Log LUTs that will extend the color grading of your videos. This also improves the quality of your clips, bringing more engagement. Thus, you can make your documentaries and social clips more enchanting.

4. Slight Warmth
Blend unique sunlight touch to your outdoor visual media with these free Canon LUTs. It helps you improve the standards of your images and videos with evening sunshine. Your important outdoor moments will become captured in attractive visual media with pleasing tranquility. The available LUT filter possesses a warm color gradient to initiate creativity.

5. Film Canon C-Log2
Using the film Canon C-Log2 pack, you will find amazing LUT color presets. You can use these LUT filters within your documented or personal clips and movies. Find some prominent LUTs, including the 22 Canon C-Log2 and 22 Rec 709 LUTs in the pack. All these LUTs are special and unique, with extensive color gradients. You can import the preset file or drag it into the video for magical effects.

6. Sun Flare
Are your captured images or recorded videos in a dull location? There is an option to transform quality using this sun flare Canon LUT. With its bright color presets, this LUT can correct colors within dull visual content. This way, the color schemes would be upgraded with more light and brightness. So, don’t worry, even if your picture is captured within a dull environment.

7. Vintage
You need not have any darker blueish effects on your outdoor visual media anymore. With vintage Canon LUT download, enhance color grading in an optimized way. The vintage LUT is backed with special color, tone, and style. When you apply these LUTs to your photo or video, the quality will improve. You will witness color enhancement in a quick time.

8. Blue Skies
The sky is blue as the water. Thus, if your visual content has natural landmarks, provide blue touch. After all, blueish effects will enlighten your visual content in an appealing way. With next-level color grading, you will feel special emotions and feelings vibes. The LUTs are easy to use and integrate into your images or videos.

9. Filmic Style
Blend extraordinary filmy looks into your graphical media with Filmic Style Canon LUT. This LUT is special because it leverages top-level color grading with resolution enhancements. The colors of your visual content will rise, and quality will also improve. So if you’re inspired by the cinematic display, this LUT provides optimized colors.

10. City Film
An aerial picture of your city determines its beauty. But the sandy or dusty atmosphere can ruin picture quality. Using this Canon LUT, you can upscale your city picture. There are unique color gradients that eliminate dust for clarity within the image. Meanwhile, with the correct color combination, you’ll see a clean environment overall.

11. Dusty Light
Sometimes interior images look more attractive in dusty lighting. This LUT pack comes with diverse filter presets that add brownish dusty looks. Thus, your visual content will be enhanced with optimized resolutions within dusty lighting. The Canon LUT will adjust the color schemes within your visual content. Hence, you will have a visually appealing image with outstanding dusty contrast.

12. Tinted Shades
Make your outings more attractive with stylish tints. By using this free Canon LUT, you can add faded tints to your images or videos. Meanwhile, the tinted shades will provide impressive looks within a dull atmosphere. For outdoor photography, this LUT is ideal because of its dark hues and saturated colors. The filter combines a range of color tools for the best output.

13. W&B
Black and white is a vintage color combination that is beyond levels. With this LUTs pack, you can improvise your visual content with a W&B touch. This means LUTs will replace color gradients with stylish black-and-white displays. Meanwhile, the LUT will adjust hue, saturation, contrast, and brightness. As a final result, you will receive attractive W&B content.

14. Pink Grade
Red-brownish mountains look impressive in their original colors. A pink-grade LUT filter can bring originality to your captured videos or photos. This way, the LUT will accurately apply pink color grading with consistency. The mountain which you captured will start looking great again. Pink color schemes are also more attractive when it comes to outdoor visual content.

15. Landscape
Landscapes look great in their clean yet natural colors. But if your photography or videography goes wrong, landscapes may look poor. In this scenario, using a landscape Canon LUT is a great thing to have. After all, the LUT has useful color preset filters that will provide refreshing looks. The greenery will be restored, and the blue sky will be back.

16. Landscape
The bright yet exceptional blue color of the sea is always mind-blowing. If you want to use the blueish sea filter effect, download this Canon cinematic LUTs. There are special filter effects that will enhance resoLUTions and optimize color schemas. The colors are transformed while keeping blueish sea effects in the process. The end result is always amazing, with naturally appealing graphics.

Part 3: Using The Most Effective LUTs in Wondershare Filmora
In this digital age, the use of technology is revolutionizing video editing. An example is 3D Canon LUTs for upscaling and enhancing visual colors in media. The Canon LUTs are special because of their improvised color grading and schemas. Using Wondershare Filmora , you can download Canon LUTs within a range of filter presets. There are, in total, 200+ LUT filter presets to fulfill your video editing needs within this video editor by default.
In contrast, you can use Wondershare Filmora for other video editing tasks as well. You can edit your video, add music tracks, or correct background noises. You can also add different effects, stickers, and transitions. Let’s discover more useful features of Filmora.

Top Features of Wondershare Filmora
- Stock Media: Filmora has the availability of 10 billion+ free stock media. So you if don’t have your pictures and videos, stock media can provide them. There are different categories of unique visual media.
- Extended Plug-ins: For a better editing experience, you can add countless filter plug-ins. This includes NewBlue, BorisFX, and many others. With plug-ins, you can add a more extensive color enhancement.
- Motion Tracking: The presence of motion tracking allows tracking of object movement in the video. Thus, you can pin media files, text, or graphics to that motion. Your content will look visually appealing with the use of this specific feature.
- Speed Ramping: Using Filmora, you can change the speed of your video through speed ramping. The speed could be changed uniformly or speedily. It depends on your video requirements.
Empower your videos with a new mood using different LUTs. Filmora now offers 100+ top-quality 3D LUTs cover a broad range of scenarios. Transform your videos with Filmora’s powerful 3D LUTs.
Apply LUT on Videos Apply LUT on Videos Learn More

Conclusion
Like other LUTs, Canon LUTs are also special and unique in their kind. They provide 3D cinematic looks with visually attractive color corrections. Meanwhile, in this article, you found the best Canon LUTs for editing visual media. You also learned about Wondershare Filmora, the best video editing and enhancement tool. The provided details of this video editing tool will make it easy for you to adapt to the 200+ available presets on the platform.
How to Create Intro Video with Filmora
If you’re just starting out as a YouTuber, you should have an introductory video, especially when people don’t know you that well yet. When you want to start a YouTube career one of the things you need to think about is How to make a YouTube intro video.
Whether you’re a beginner or a pro, knowing how to create a video intro for YouTube can help you introduce your audience to your content, pique their interest and boost your brand. Stand out and engage your audience with quick and easy YouTube intro animations. Not sure how to make a YouTube intro? We’ve built this guide on how to make a video intro using Wondershare Filmora an editing software.
- Start by introducing yourself
- Get into details
- Add a call to action
- Add personalization to your video
- Video length
What is Intro Video
There are also different ways of using the intro video, it can be used in business, in YouTube channels and others.
Introductory videos are short videos which you personally introduce yourself, your business, your brands and your brand’s mission and show your personality to your audience.
Introductory videos can help you stand out from the competition and gain favorability because you’re talking to your users on a personal level. People love seeing faces behind a brand, having an introductory video will ensure that people remember you.
YouTube intro videos are short, introductory clips that play at the beginning of a YouTube channel. They usually include the tittle of the YouTube channel, brand features like logos and colors animation and an accompanying snippet of music.
As the word suggest, intro are visuals that mark the beginning of a video. Likewise, outro are the closing visuals that appear at the end of the video. The two are widely used in educational, entertaining, business videos, webcasts, podcast, corporate presentations and the like. There are several reasons why an intro are vital elements of any professional video.
It goes without saying that intros should not be too complicated or to confusing. Other wise they will fail in their purpose and will drive the audience away. Instead, they should be simply but thoughtfully designed.
YouTube intro Videos usually include:
- Memorable background music
- Text and titles
- Stickers and GIFs
- Emojis

Goal of a Video Introduction to Follow
Making intro video is not just only in doing a YouTube channel but you can also use this guide for any businesses like brand presentation, educational etc.
Step1 Start by introducing yourself.
Step2 Get into details.
Step3 Add a call to action.
Step4 Add personalization to your video.
Step5 Video Length.
1. Start by introducing yourself
You can always start your intro by introducing yourself but don’t just state your name and what
you do, tell them why you do it, what your core values are and what motivates and dives you to
do this kind of career. Because you all know doing vlog on YouTube is a job, work, and a career.
Share emotions with your audience, and help them relate to you. Doing so is going to help you stand out immediately from the crowd and get audiences interested enough to watch the remainder of your video’s content.
2. Get into details
Tip is always direct to the point, add a few facts about yourself, like your interest or previous experiences or who you are as a person. If you are a business owner and would want to talk about your business you can always share how it started.
If we are talking about the YouTube intro video. Every good YouTube intro video usually includes beneficial information for subscribers and viewers. Add any short important text that you feel is necessary from the video titles, your YouTube channel name, and social media handles. Keep your informative text in a consistent format and branding style.
3. Add a call to action
if you have successfully maintained the interest of your viewer until the very end of your video, use this opportunity to invite them to engage with your content more. It’s worth including a call to action in each video. Take a full advantage of YouTube to provide your audience with your social media channels and maybe a link or two to your other videos that might interest them,
4. Add personalization to your video
Even though an intro can be more than logo animation, the latter should still be a part of it. Otherwise, there’s a sense that something is messing. Include eye catchy visuals effects to your videos to stands out, so that people can easily remember your YouTube channel.

5. Video length
A long intro, even if it’s spectacular, can get boring once your audience has seen it a few times. An ideal length for intros is up to 8-10 seconds only. Just enough time to deliver your message and branding, and hook audiences in for the rest of the video. Any longer than that, and you might lose viewers who are waiting to see the video that they clicked on.
In the era of social media, tempting distractions and short attention spans, it’s critical to keep your content as short and sharp as you can.
How to Create Intro Video using Filmora
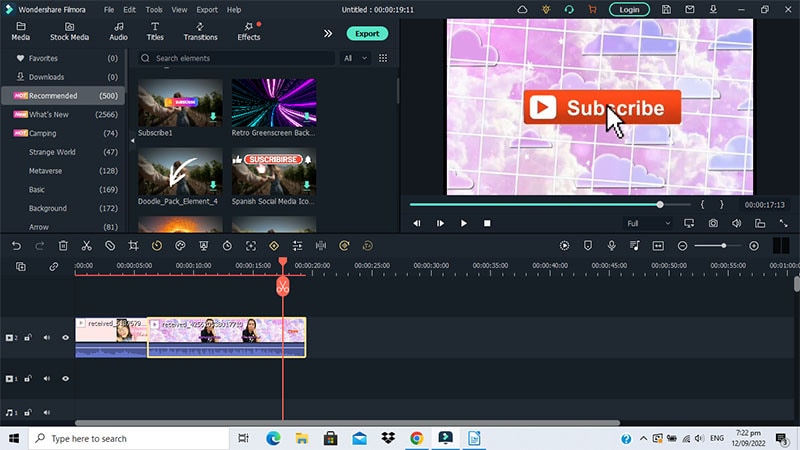
Wondershare Filmora is an editing software that is available to download in google. This software is easy to use and includes products for a range of users from beginner to intermediate. Common features of Filmora include a timeline, preview window and effects library that you can use to create a nice and creative introduction video for your YouTube channel.
Free Download For Win 7 or later(64-bit)
Free Download For macOS 10.14 or later
Free trails are available to demo the product before purchasing. Pricing options for the various programs are available on the official Filmora website.
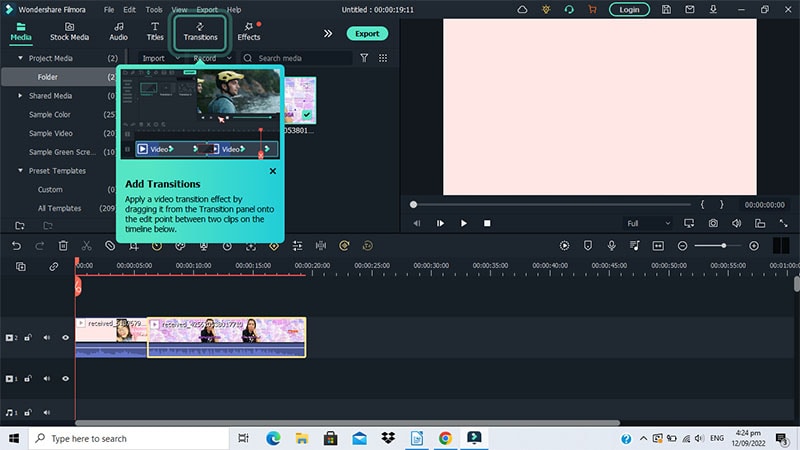
Start your own design from scratch or you can search for a YouTube video template
Select the best video that you like to be your intro, either create a video introducing yourself or just a video with some creative effects.
First you can check the Stock Media and go click some GIFs find your best fit and start customizing. You can always download some free template online that you think much better to used.
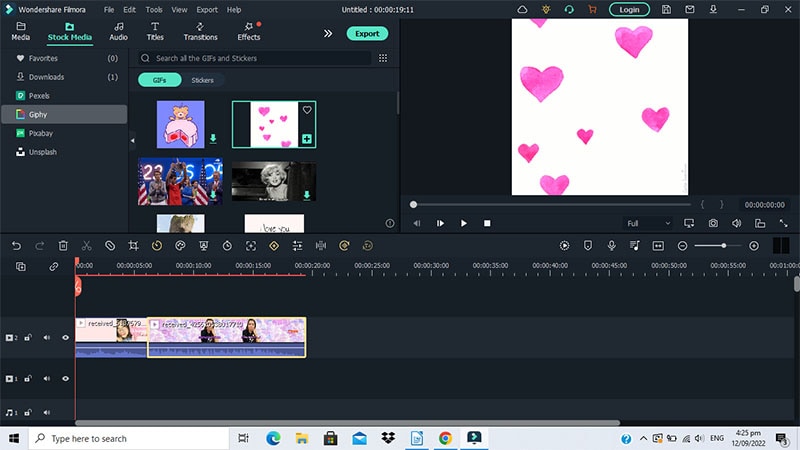
Add ready made animated graphic stickers to your YouTube intro videos by dragging and dropping them into design. Just choose “Elements” and then “Stickers” to browse a library of options.
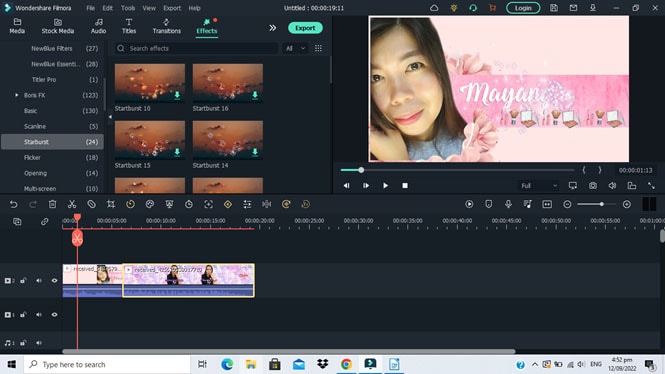
Change the image on your YouTube intro video by uploading your own or choosing from millions of free photos, graphics, and illustration in Filmora library.
Start editing your videos to make them look seamless and professional on any platforms. Whether it’s on a widescreen, tablet, or mobile device. Click some effects to add some creative design on your intro videos.
You can split, resize trim or cut your videos to tailor it to your needs.
Change the text and insert your own channel title and tagline. You can also change the font style, color, and size to better suit your brand look.
Finally, add music to your YouTube intro video by uploading a clip from a stock music of Filmora library. You can also make your own YouTube intro music using instrument or digital tools
Conclusion
Hope with these tips, you’ll be able to create quality video introductions that draw the audience in and help them get to know you better. Introduce your brand, explain your business, and connect with your prospective customers like never before. Whether your intro clips start off your YouTube videos or plays after the teaser clip, YouTube intro videos can be a valuable tool for any creator.
Remember your video doesn’t have to be a high-budget production or you don’t have to spend a lot of money on making a creative video. You could create a video that works with pretty much of any smartphone today. Have fun creating your introductions videos, set a positive mind and positive creation will come out.
What is Intro Video
There are also different ways of using the intro video, it can be used in business, in YouTube channels and others.
Introductory videos are short videos which you personally introduce yourself, your business, your brands and your brand’s mission and show your personality to your audience.
Introductory videos can help you stand out from the competition and gain favorability because you’re talking to your users on a personal level. People love seeing faces behind a brand, having an introductory video will ensure that people remember you.
YouTube intro videos are short, introductory clips that play at the beginning of a YouTube channel. They usually include the tittle of the YouTube channel, brand features like logos and colors animation and an accompanying snippet of music.
As the word suggest, intro are visuals that mark the beginning of a video. Likewise, outro are the closing visuals that appear at the end of the video. The two are widely used in educational, entertaining, business videos, webcasts, podcast, corporate presentations and the like. There are several reasons why an intro are vital elements of any professional video.
It goes without saying that intros should not be too complicated or to confusing. Other wise they will fail in their purpose and will drive the audience away. Instead, they should be simply but thoughtfully designed.
YouTube intro Videos usually include:
- Memorable background music
- Text and titles
- Stickers and GIFs
- Emojis

Goal of a Video Introduction to Follow
Making intro video is not just only in doing a YouTube channel but you can also use this guide for any businesses like brand presentation, educational etc.
Step1 Start by introducing yourself.
Step2 Get into details.
Step3 Add a call to action.
Step4 Add personalization to your video.
Step5 Video Length.
1. Start by introducing yourself
You can always start your intro by introducing yourself but don’t just state your name and what
you do, tell them why you do it, what your core values are and what motivates and dives you to
do this kind of career. Because you all know doing vlog on YouTube is a job, work, and a career.
Share emotions with your audience, and help them relate to you. Doing so is going to help you stand out immediately from the crowd and get audiences interested enough to watch the remainder of your video’s content.
2. Get into details
Tip is always direct to the point, add a few facts about yourself, like your interest or previous experiences or who you are as a person. If you are a business owner and would want to talk about your business you can always share how it started.
If we are talking about the YouTube intro video. Every good YouTube intro video usually includes beneficial information for subscribers and viewers. Add any short important text that you feel is necessary from the video titles, your YouTube channel name, and social media handles. Keep your informative text in a consistent format and branding style.
3. Add a call to action
if you have successfully maintained the interest of your viewer until the very end of your video, use this opportunity to invite them to engage with your content more. It’s worth including a call to action in each video. Take a full advantage of YouTube to provide your audience with your social media channels and maybe a link or two to your other videos that might interest them,
4. Add personalization to your video
Even though an intro can be more than logo animation, the latter should still be a part of it. Otherwise, there’s a sense that something is messing. Include eye catchy visuals effects to your videos to stands out, so that people can easily remember your YouTube channel.

5. Video length
A long intro, even if it’s spectacular, can get boring once your audience has seen it a few times. An ideal length for intros is up to 8-10 seconds only. Just enough time to deliver your message and branding, and hook audiences in for the rest of the video. Any longer than that, and you might lose viewers who are waiting to see the video that they clicked on.
In the era of social media, tempting distractions and short attention spans, it’s critical to keep your content as short and sharp as you can.
How to Create Intro Video using Filmora
Wondershare Filmora is an editing software that is available to download in google. This software is easy to use and includes products for a range of users from beginner to intermediate. Common features of Filmora include a timeline, preview window and effects library that you can use to create a nice and creative introduction video for your YouTube channel.
Free Download For Win 7 or later(64-bit)
Free Download For macOS 10.14 or later
Free trails are available to demo the product before purchasing. Pricing options for the various programs are available on the official Filmora website.

Start your own design from scratch or you can search for a YouTube video template
Select the best video that you like to be your intro, either create a video introducing yourself or just a video with some creative effects.
First you can check the Stock Media and go click some GIFs find your best fit and start customizing. You can always download some free template online that you think much better to used.

Add ready made animated graphic stickers to your YouTube intro videos by dragging and dropping them into design. Just choose “Elements” and then “Stickers” to browse a library of options.

Change the image on your YouTube intro video by uploading your own or choosing from millions of free photos, graphics, and illustration in Filmora library.
Start editing your videos to make them look seamless and professional on any platforms. Whether it’s on a widescreen, tablet, or mobile device. Click some effects to add some creative design on your intro videos.
You can split, resize trim or cut your videos to tailor it to your needs.
Change the text and insert your own channel title and tagline. You can also change the font style, color, and size to better suit your brand look.
Finally, add music to your YouTube intro video by uploading a clip from a stock music of Filmora library. You can also make your own YouTube intro music using instrument or digital tools

Conclusion
Hope with these tips, you’ll be able to create quality video introductions that draw the audience in and help them get to know you better. Introduce your brand, explain your business, and connect with your prospective customers like never before. Whether your intro clips start off your YouTube videos or plays after the teaser clip, YouTube intro videos can be a valuable tool for any creator.
Remember your video doesn’t have to be a high-budget production or you don’t have to spend a lot of money on making a creative video. You could create a video that works with pretty much of any smartphone today. Have fun creating your introductions videos, set a positive mind and positive creation will come out.
Also read:
- Updated How Can You Create Outstanding Educational Teaching Videos for 2024
- OpenCV Object Tracking The Complete Guide
- New 2024 Approved A Full Review of Leeming LUT Pro
- New How to Create a Custom Slide Show in PowerPoint
- How to Find Free Online Slideshow Maker with No Watermark for 2024
- How to Trim/Crop Video in Microsoft Powerpoint for 2024
- New Updated 8 Ways to Merge SRT with MP4 for 2024
- In 2024, Are You Searching for Professional Subtitle Apps? Read This Article to Explore Various Compatible Subtitle Apps that You Can Run on Multiple Platforms
- How to Use Twixtor Effect to Add Slow-Motion Effect to Video for 2024
- New Easy Way to Inset Text in Video for 2024
- Updated Top 10 Anime Movies of All Time
- Updated In 2024, How to Use Frame Blending in Adobe Premiere Pro
- Updated Good Slideshow Makers Sometimes Cost High and Free Slideshow Makers Provide Slideshows with the Watermark. How to Cope with This Problem? This Article Gives Solutions
- New In 2024, Text Animation Intro Tutorial in Filmora
- Updated Leading Applications to Create Fast Motion in iPhone
- Add Subtitles To Videos With Kapwing Step by Step for 2024
- Updated 2024 Approved Google Meet Green Screen
- New In 2024, Create Risograph Effect In Photoshop A Beginners Guide
- New In 2024, How to Crop a Video in Davinci Resolve Step by Step
- This Article Is a Guide on How to Download and Install Final Cut Pro, Its Key Features, and More. It Also Discusses an Alternative Option to It so the Creators or Editors Can Opt for Editing Videos Accordingly
- Updated A Guide To Motion Tracking Using The Best Video Editors
- Updated In 2024, Guide To Using Free Luts for OBS
- 2024 Approved Wondering About Vimeo Slideshow Maker? Know Everything About the Platform Which Is Gaining Much Popularity. Also, Browse some Tips to Create Appealing Video Slideshows
- New Which 10 Best Video Editing Online Makers Is Worth Your Attention for 2024
- New 2024 Approved 2 Methods to Crop a Video Using After Effects
- Best GIF to AVI Converters (Online + Software Solutions) for 2024
- With Looping Videos, People Stay on Your Site Longer, Boosting Engagement. With Video Being Watched on Mobile over 3X More than Any Other Content, Its an Essential Part of Mobile Advertising
- Updated In 2024, 7 Solutions to Edit GoPro Video on Mac
- Best 5 AI Music Video Examples and Makers to Make Them for 2024
- In 2024, How To Split Videos in Premier Pro
- Change Speed of a Video on iPhone
- New In 2024, How to Make Text Reveal Effect Easily
- In 2024, How to Add Filter to Video Online
- A Complete Guide to the Best Brand Story Videos for 2024
- New In 2024, How to Fade in Text in Adobe Premiere Pro
- How Does the YouTube AI Algorithm Work
- 2024 Approved Do You Want to Create a Zoom Motion Blur Effect Using Photoshop? If You Are Unaware of How to Do This, Read This Article to Learn Simple yet Authentic Instructions
- New Do You Want Your Music Videos to Look Like Professional Music Videos? You Can Always Choose From Music Videos LUTs to Give Your Videos a Cinematic Touch
- New In 2024, A Normal Video Brings More Editing Opportunities than a Slow-Motion One. This Text Explores How to Convert Slow Motion Video to Normal on iPhone
- In 2024, Top 15 Slow Motion CapCut Templates to Work With
- Updated Do You Want to Slow Down Your TikTok Video and Zoom on a Specific Part? This Is No Longer a Difficult Task as This Video Comes up with the Right Set of Methods that Can Be Used to Implement the Slow Zoom Effect TikTok
- Updated In 2024, How to Color Grade Your Picture in LightRoom
- Steps to Rotate Videos Using Handbrake for 2024
- New In 2024, Best 5 PDF to GIF Converters You Should Know
- Video Maker with Song
- Updated 2024 Approved How to Clone Yourself in Videos with Filmora?
- How To Speed Up Video With Lightworks Video Editor
- Updated 2024 Approved 8 Best Free Title Maker You Must Try and Put to Use
- In 2024, How to Use Canva Color Match
- 20 Fantastic Video Background Templates to Make Your Video Go Viral
- How to Screen Mirroring Vivo X90S? | Dr.fone
- Top 11 Free Apps to Check IMEI on Oppo A58 4G Phones
- How To Deal With the Huawei Nova Y91 Screen Black But Still Works? | Dr.fone
- In 2024, Top 6 Apps/Services to Trace Any Apple iPhone 11 Pro Max Location By Mobile Number | Dr.fone
- In 2024, Tips and Tricks for Setting Up your Oppo Find N3 Flip Phone Pattern Lock
- In 2024, How to get the dragon scale and evolution-enabled pokemon On Xiaomi Redmi Note 12 Pro 5G? | Dr.fone
- 5 Hassle-Free Solutions to Fake Location on Find My Friends Of Samsung Galaxy M14 5G | Dr.fone
- In 2024, How to Fix Pokemon Go Route Not Working On Samsung Galaxy F34 5G? | Dr.fone
- Why does the pokemon go battle league not available On Vivo V27 Pro | Dr.fone
- Is your WebSite Auditor free?
- Solutions to restore deleted files from Xiaomi Redmi K70 Pro
- In 2024, How To Leave a Life360 Group On Lava Blaze Curve 5G Without Anyone Knowing? | Dr.fone
- How to Hard Reset Honor X50 Without Password | Dr.fone
- Android Unlock Code Sim Unlock Your Vivo S17e Phone and Remove Locked Screen
- How to Bypass FRP from Honor?
- In 2024, 10 Free Location Spoofers to Fake GPS Location on your Lenovo ThinkPhone | Dr.fone
- In 2024, How to Reset a Realme 10T 5G Phone that is Locked?
- In 2024, Overview of the Best Xiaomi Redmi 13C Screen Mirroring App | Dr.fone
- How to Find iSpoofer Pro Activation Key On Xiaomi 13 Ultra? | Dr.fone
- Ultimate Guide from Apple iPhone 15 Pro Max iCloud Activation Lock Bypass
- Forgotten The Voicemail Password Of Infinix Smart 7? Try These Fixes
- Why Apple Account Disabled From your iPhone 14 Plus? How to Fix
- How to Transfer Data from Google Pixel 7a to Samsung Phone | Dr.fone
- Honor Magic5 Ultimate Bootloop Problem, How to Fix it Without Data Loss | Dr.fone
- How To Unlink Apple ID From Apple iPhone 7
- In 2024, Additional Tips About Sinnoh Stone For Motorola G24 Power | Dr.fone
- How to Delete iCloud Account From iPhone 15 Pro Max without Password?
- How Can Motorola Moto G Stylus 5G (2023)Mirror Share to PC? | Dr.fone
- How To Reset iPhone 12 mini? | Dr.fone
- How to Stop My Spouse from Spying on My OnePlus Nord N30 5G | Dr.fone
- How To Repair iOS System Issues of iPhone XS Max? | Dr.fone
- In 2024, The Best Android Unlock Software For Vivo S18 Pro Device Top 5 Picks to Remove Android Locks
- 3 Best Tools to Hard Reset Infinix Note 30 5G | Dr.fone
- How to Come up With the Best Pokemon Team On Realme C67 5G? | Dr.fone
- 3 Easy Methods to Unlock iCloud Locked iPhone 8 Plus/iPad/iPod
- Prevent Cross-Site Tracking on Vivo V30 and Browser | Dr.fone
- Easy Methods How To Transfer Pictures From Apple iPhone 7 to PC | Dr.fone
- Life360 Circle Everything You Need to Know On Oppo F25 Pro 5G | Dr.fone
- new In 2024, Best 10 Hindi Video Translators with Step-by-Step Guidance
- How to Change your Samsung Galaxy XCover 6 Pro Tactical Edition Location on Twitter | Dr.fone
- In 2024, How to Transfer Contacts from Vivo V29 Pro To Phone | Dr.fone
- In 2024, FRP Hijacker by Hagard Download and Bypass your Vivo V27 Pro FRP Locks
- Top 7 Skype Hacker to Hack Any Skype Account On your Vivo S17e | Dr.fone
- In 2024, 3 Ways to Erase iPhone 14 Pro Max When Its Locked Within Seconds | Dr.fone
- How to Create Funny Talking Avatars Using Oddcast Text to Speech
- In 2024, AddROM Bypass An Android Tool to Unlock FRP Lock Screen For your Huawei
- Title: New ReVisionFX ReelSmart Motion Blur Plugin For Premiere Pro
- Author: Chloe
- Created at : 2024-04-24 07:08:14
- Updated at : 2024-04-25 07:08:14
- Link: https://ai-editing-video.techidaily.com/new-revisionfx-reelsmart-motion-blur-plugin-for-premiere-pro/
- License: This work is licensed under CC BY-NC-SA 4.0.


