:max_bytes(150000):strip_icc():format(webp)/001_best-movies-on-hulu-right-now-5025149-3c80b5664f6541b4a0698333fc447251.jpg)
New Shoot Video with Virtual Green Screen

Shoot Video with Virtual Green Screen
We have seen video creators on YouTube using green screen effects to beautify their background to make the video look professional and eye-catching. The same is applicable for gamers who live stream their gameplay on Twitch. Instead of physically hanging green screens in the background, some video creators opt for virtual green screens. Yes, it is possible to shoot videos with a virtual green background, and you do not have to buy screen greens and deal with the problem of hanging them in the background.
The concept of using virtual greenscreen is rather new, but it is getting popular among amateur video creators who do not want to invest in purchasing green screens initially. When you use a virtual background to shoot your video, the actual physical background is replaced completely with a virtual green background. Thereafter, you have to replace this virtual background with anything by using a video editor. In this article, we will illustrate how to use a virtual green screen to shoot video.
1. Free Virtual Green Screen
In order to shoot a video with green virtual background, you cannot shoot your video with your regular camera app. Otherwise, your physical background will get recorded, and replacing that through video editor is going to be time-consuming. Therefore, there are specific apps available through which you have to shoot your video so that your physical background gets completely replaced by virtual greenscreen in real-time.
Snap Camera from Snapchat is a free app through which you can shoot your video to get a virtual green background. The app comes with a Green Screen filter that makes this virtual background effect possible. However, you will need a camera recording app that can record your video with green screen effects from Snap Camera. We will be using OBS Studio for recording the video which is also available for free. Snap Camera is compatible with Windows 10 and Mac 10.11+, and hence, you can use it to shoot video from your computer webcam. Here are the steps to follow –
Step 1: Download and install Snap Camera app on your computer.
Step 2: Set up your webcam perfectly so that its angle is direct to your face.
Step 3: Open Snap Camera app and you will see yourself on the app through your webcam. Select the appropriate Lens(filter) and you have to select Green Screen Snap Filter.

Step 4: You should see a green virtual background by now. Now, you have to launch OBS Studio (webcam recording software).
Step 5: Go to Sources and click on “+” icon and select Video Capture Device option.

Step 6: While configuration the new device, select Snap Camera as Device. This will enable green screen virtual backgrounds and you can start recording. After recording is done, save the file on your hard drive.

Now that you have recorded the video with green virtual background without green screen, it is time to edit the virtual greenscreen out with the video editor.
2. Best Way To Apply Green Screen Effect To Your Recorded Video
The best video editor to add green effect to your recorded video with virtual green screen is Wondershare Filmora. There are loads of video editors available with green screen feature but Filmora has the simplest steps to add green screen effects. That is why you do not have to be an expert video editor to add green screen effects to your video.
Apart from green screen effects, you can enhance the video quality by adjusting different parameters and adding other video effects to make the video interesting. Here are the steps to follow to add green screen effects to the recorded video with green virtual background.
For Win 7 or later (64-bit)
For macOS 10.12 or later
Step 1: Download and install Wondershare Filmora. Launch the video editor and select Create New Project option to get started.
Step 2: Import the recorded video with virtual green screen and drag it onto the Timeline.
Step 3: Get the stunning photo or video effect with which you want to replace the virtual background without green screen in the recorded video. Put it directly on the Timeline.
Please note that your recorded green screen video is above the replacement video on the Timeline.

Step 4: Double-click on the recorded video and you will see a panel on the upper-left side. From that panel, turn on Chroma Key option. We have already stated that green screen effect is technically referred to as Chroma Key.
Now you will the superimposed version of the replacement video effect on the green screen background of your recorded video.

Step 5: You can adjust several parameters available to fine tune the green screen effect. When you are done, click on Ok button.
Conclusion
You can now have virtual background without green screen purchase on your video. All you need is a proper application to replace your physical background with a virtual green screen and record the entire video. We have recommended free Snap Camera app and OBS Studio for this job. Then you need to edit the green screen virtual backgrounds with a video editor for which we have recommended Wondershare Filmora.
For macOS 10.12 or later
Step 1: Download and install Wondershare Filmora. Launch the video editor and select Create New Project option to get started.
Step 2: Import the recorded video with virtual green screen and drag it onto the Timeline.
Step 3: Get the stunning photo or video effect with which you want to replace the virtual background without green screen in the recorded video. Put it directly on the Timeline.
Please note that your recorded green screen video is above the replacement video on the Timeline.

Step 4: Double-click on the recorded video and you will see a panel on the upper-left side. From that panel, turn on Chroma Key option. We have already stated that green screen effect is technically referred to as Chroma Key.
Now you will the superimposed version of the replacement video effect on the green screen background of your recorded video.

Step 5: You can adjust several parameters available to fine tune the green screen effect. When you are done, click on Ok button.
Conclusion
You can now have virtual background without green screen purchase on your video. All you need is a proper application to replace your physical background with a virtual green screen and record the entire video. We have recommended free Snap Camera app and OBS Studio for this job. Then you need to edit the green screen virtual backgrounds with a video editor for which we have recommended Wondershare Filmora.
For macOS 10.12 or later
Step 1: Download and install Wondershare Filmora. Launch the video editor and select Create New Project option to get started.
Step 2: Import the recorded video with virtual green screen and drag it onto the Timeline.
Step 3: Get the stunning photo or video effect with which you want to replace the virtual background without green screen in the recorded video. Put it directly on the Timeline.
Please note that your recorded green screen video is above the replacement video on the Timeline.

Step 4: Double-click on the recorded video and you will see a panel on the upper-left side. From that panel, turn on Chroma Key option. We have already stated that green screen effect is technically referred to as Chroma Key.
Now you will the superimposed version of the replacement video effect on the green screen background of your recorded video.

Step 5: You can adjust several parameters available to fine tune the green screen effect. When you are done, click on Ok button.
Conclusion
You can now have virtual background without green screen purchase on your video. All you need is a proper application to replace your physical background with a virtual green screen and record the entire video. We have recommended free Snap Camera app and OBS Studio for this job. Then you need to edit the green screen virtual backgrounds with a video editor for which we have recommended Wondershare Filmora.
For macOS 10.12 or later
Step 1: Download and install Wondershare Filmora. Launch the video editor and select Create New Project option to get started.
Step 2: Import the recorded video with virtual green screen and drag it onto the Timeline.
Step 3: Get the stunning photo or video effect with which you want to replace the virtual background without green screen in the recorded video. Put it directly on the Timeline.
Please note that your recorded green screen video is above the replacement video on the Timeline.

Step 4: Double-click on the recorded video and you will see a panel on the upper-left side. From that panel, turn on Chroma Key option. We have already stated that green screen effect is technically referred to as Chroma Key.
Now you will the superimposed version of the replacement video effect on the green screen background of your recorded video.

Step 5: You can adjust several parameters available to fine tune the green screen effect. When you are done, click on Ok button.
Conclusion
You can now have virtual background without green screen purchase on your video. All you need is a proper application to replace your physical background with a virtual green screen and record the entire video. We have recommended free Snap Camera app and OBS Studio for this job. Then you need to edit the green screen virtual backgrounds with a video editor for which we have recommended Wondershare Filmora.
Splitting a Video in VSDC [Step by Step]
VSDC is a proper editor for freely available videos and has various controls. It is such a tool that anyone can easily use without appropriate training. It provides accessibility to the huge library of audio and video effects. VSDC is highly supportive of the famous video and file formats. That’s why it also helps convert the video and audio files from one format to another instantly.
There is also a feature for burning the built-in disk in this editor. Most people enjoy the benefits of this free editor, particularly for educational reasons. There is also a possibility of creating videos to advertise the specific product. Easy to share on Facebook, Twitter, YouTube and others. VDSC can extend the content format and present it to the target audience.
The actual discussion is regarding the splitting of the video by using the VSDC. Also, recommendation of using Wondershare Filmora as the better substitute in place of VSDC.
How is it possible to split the videos in VSDC?
VSDC is a complete open-source program for all users. But the whole interface is not as simple as the Wondershare Filmora. After setting the preview of your video file, this video player starts working independently just for you. Let’s look at different methods for splitting the clips in VSDC.
Part1 - Splitting of the clip into 2 parts just by a single click:
Step 1:
Click multiple times on the icon of the VSCD present on the desktop screen. Later, click on the “Import Content”, then you are able to search a specific video file from the folder of your computer. While determining the videos, the project’s settings are visible, so it is easy to customize the parameters according to your wish.

Step 2:
The video file you select is in the centre position. Even you can preview first and keep moving the play head and handle in such a way that you select the part that is not in need. When you are prepared, hit the button of “Cut out fragment” in the menu of “Tools” in the tab of “Editor”.

Step 3:
Right-click on the video clip to get the option of “Cutting and Splitting” in the object menu. Or you can even press on the right side of the “Properties window”. Then the pop-up window appears that helps you editing your video in VSDC video editor. Select the particular area you don’t want by clicking on the “Cut Area” icon. Also, the restoration is possible when you click on the “Remove Area of Deleting” button.

Step 4:
At this moment, you can export the video that you have edited. Save it on your PC directly with some format. It is easy to transfer the videos to the smartphone or even uploading on the web.
Part2 - Splitting of the clip from markers while exporting the video file:
A splitting tool is also available in VSDC when you want to use different video parts after applying the effects. After adding the video file from the “Export project” tab, and then click on the “Set markers”. Click “Apply Changes” when all the markers are ready for splitting the clips. Option for exporting the video is present so you can save it in the format of your choice. It is simple to save the video’s parts that are created from the markers.

Part3 - Splitting of one clip into more than one scene and applying the effect on them:
For applying different effects on various parts of your video, split it. In this method, add the video file in the timeline and right-click. From the drop-down menu, select “Properties”, and then a window appears. Keep scrolling downward, click on the button of light-green colour “Cutting and Splitting” button.

When the window pops up, click on the “Apply changes” button, and the video automatically gets split. Every part of the video is present on the timeline after one another.

An easier way to split the video
No doubt, VSDC is a good option for editing the videos, but Filmora Video Editor has more features and better software for splitting the video. It fulfils the requirements of various users, whether it is for personal or business purposes. Also, the stylizing of the video is possible, including the quality, resolution, speed and other parameters.
For Win 7 or later (64-bit)
For macOS 10.14 or later
Features
- Removing the noise
- Colour tunning
- Detecting of the scenes
- Video stabilization
- Audio equalizer
- Splitting, rotating and trimming of the video clips
Wondershare Filmora is always helpful in splitting, trimming and different options available for editing the videos. Following are the steps for using these features:
Step 1. Click on “Import” to bring the source file to the timeline.
Step 2. It is essential to select the clip in the timeline and move the play head on the right side. Click on the “Split” scissor icon visible on the toolbar. It helps in separating the videos into different parts.

Step 3. Save the video clip according to the format of your own choice. Simply click on “Export” and select the format from the tab “Format”. It is leftwards of the window. There is a whole list of the formats.

It would help if you used the Wondershare Filmora for splitting the video clips into parts without losing their quality. There is a number of effects and features that will definitely attract you. It is definitely suitable for making outstanding videos and images.
Wondershare Filmora has undoubtedly received many positive reviews compared to other editing software. You use the latest version of Wondershare Filmora to avail of its maximum features as it includes more than 25 sound and transitional effects. Keyframing is also possible. Go for it and start editing on it today.
Step 2:
The video file you select is in the centre position. Even you can preview first and keep moving the play head and handle in such a way that you select the part that is not in need. When you are prepared, hit the button of “Cut out fragment” in the menu of “Tools” in the tab of “Editor”.

Step 3:
Right-click on the video clip to get the option of “Cutting and Splitting” in the object menu. Or you can even press on the right side of the “Properties window”. Then the pop-up window appears that helps you editing your video in VSDC video editor. Select the particular area you don’t want by clicking on the “Cut Area” icon. Also, the restoration is possible when you click on the “Remove Area of Deleting” button.

Step 4:
At this moment, you can export the video that you have edited. Save it on your PC directly with some format. It is easy to transfer the videos to the smartphone or even uploading on the web.
Part2 - Splitting of the clip from markers while exporting the video file:
A splitting tool is also available in VSDC when you want to use different video parts after applying the effects. After adding the video file from the “Export project” tab, and then click on the “Set markers”. Click “Apply Changes” when all the markers are ready for splitting the clips. Option for exporting the video is present so you can save it in the format of your choice. It is simple to save the video’s parts that are created from the markers.

Part3 - Splitting of one clip into more than one scene and applying the effect on them:
For applying different effects on various parts of your video, split it. In this method, add the video file in the timeline and right-click. From the drop-down menu, select “Properties”, and then a window appears. Keep scrolling downward, click on the button of light-green colour “Cutting and Splitting” button.

When the window pops up, click on the “Apply changes” button, and the video automatically gets split. Every part of the video is present on the timeline after one another.

An easier way to split the video
No doubt, VSDC is a good option for editing the videos, but Filmora Video Editor has more features and better software for splitting the video. It fulfils the requirements of various users, whether it is for personal or business purposes. Also, the stylizing of the video is possible, including the quality, resolution, speed and other parameters.
For Win 7 or later (64-bit)
For macOS 10.14 or later
Features
- Removing the noise
- Colour tunning
- Detecting of the scenes
- Video stabilization
- Audio equalizer
- Splitting, rotating and trimming of the video clips
Wondershare Filmora is always helpful in splitting, trimming and different options available for editing the videos. Following are the steps for using these features:
Step 1. Click on “Import” to bring the source file to the timeline.
Step 2. It is essential to select the clip in the timeline and move the play head on the right side. Click on the “Split” scissor icon visible on the toolbar. It helps in separating the videos into different parts.

Step 3. Save the video clip according to the format of your own choice. Simply click on “Export” and select the format from the tab “Format”. It is leftwards of the window. There is a whole list of the formats.

It would help if you used the Wondershare Filmora for splitting the video clips into parts without losing their quality. There is a number of effects and features that will definitely attract you. It is definitely suitable for making outstanding videos and images.
Wondershare Filmora has undoubtedly received many positive reviews compared to other editing software. You use the latest version of Wondershare Filmora to avail of its maximum features as it includes more than 25 sound and transitional effects. Keyframing is also possible. Go for it and start editing on it today.
Step 2:
The video file you select is in the centre position. Even you can preview first and keep moving the play head and handle in such a way that you select the part that is not in need. When you are prepared, hit the button of “Cut out fragment” in the menu of “Tools” in the tab of “Editor”.

Step 3:
Right-click on the video clip to get the option of “Cutting and Splitting” in the object menu. Or you can even press on the right side of the “Properties window”. Then the pop-up window appears that helps you editing your video in VSDC video editor. Select the particular area you don’t want by clicking on the “Cut Area” icon. Also, the restoration is possible when you click on the “Remove Area of Deleting” button.

Step 4:
At this moment, you can export the video that you have edited. Save it on your PC directly with some format. It is easy to transfer the videos to the smartphone or even uploading on the web.
Part2 - Splitting of the clip from markers while exporting the video file:
A splitting tool is also available in VSDC when you want to use different video parts after applying the effects. After adding the video file from the “Export project” tab, and then click on the “Set markers”. Click “Apply Changes” when all the markers are ready for splitting the clips. Option for exporting the video is present so you can save it in the format of your choice. It is simple to save the video’s parts that are created from the markers.

Part3 - Splitting of one clip into more than one scene and applying the effect on them:
For applying different effects on various parts of your video, split it. In this method, add the video file in the timeline and right-click. From the drop-down menu, select “Properties”, and then a window appears. Keep scrolling downward, click on the button of light-green colour “Cutting and Splitting” button.

When the window pops up, click on the “Apply changes” button, and the video automatically gets split. Every part of the video is present on the timeline after one another.

An easier way to split the video
No doubt, VSDC is a good option for editing the videos, but Filmora Video Editor has more features and better software for splitting the video. It fulfils the requirements of various users, whether it is for personal or business purposes. Also, the stylizing of the video is possible, including the quality, resolution, speed and other parameters.
For Win 7 or later (64-bit)
For macOS 10.14 or later
Features
- Removing the noise
- Colour tunning
- Detecting of the scenes
- Video stabilization
- Audio equalizer
- Splitting, rotating and trimming of the video clips
Wondershare Filmora is always helpful in splitting, trimming and different options available for editing the videos. Following are the steps for using these features:
Step 1. Click on “Import” to bring the source file to the timeline.
Step 2. It is essential to select the clip in the timeline and move the play head on the right side. Click on the “Split” scissor icon visible on the toolbar. It helps in separating the videos into different parts.

Step 3. Save the video clip according to the format of your own choice. Simply click on “Export” and select the format from the tab “Format”. It is leftwards of the window. There is a whole list of the formats.

It would help if you used the Wondershare Filmora for splitting the video clips into parts without losing their quality. There is a number of effects and features that will definitely attract you. It is definitely suitable for making outstanding videos and images.
Wondershare Filmora has undoubtedly received many positive reviews compared to other editing software. You use the latest version of Wondershare Filmora to avail of its maximum features as it includes more than 25 sound and transitional effects. Keyframing is also possible. Go for it and start editing on it today.
Step 2:
The video file you select is in the centre position. Even you can preview first and keep moving the play head and handle in such a way that you select the part that is not in need. When you are prepared, hit the button of “Cut out fragment” in the menu of “Tools” in the tab of “Editor”.

Step 3:
Right-click on the video clip to get the option of “Cutting and Splitting” in the object menu. Or you can even press on the right side of the “Properties window”. Then the pop-up window appears that helps you editing your video in VSDC video editor. Select the particular area you don’t want by clicking on the “Cut Area” icon. Also, the restoration is possible when you click on the “Remove Area of Deleting” button.

Step 4:
At this moment, you can export the video that you have edited. Save it on your PC directly with some format. It is easy to transfer the videos to the smartphone or even uploading on the web.
Part2 - Splitting of the clip from markers while exporting the video file:
A splitting tool is also available in VSDC when you want to use different video parts after applying the effects. After adding the video file from the “Export project” tab, and then click on the “Set markers”. Click “Apply Changes” when all the markers are ready for splitting the clips. Option for exporting the video is present so you can save it in the format of your choice. It is simple to save the video’s parts that are created from the markers.

Part3 - Splitting of one clip into more than one scene and applying the effect on them:
For applying different effects on various parts of your video, split it. In this method, add the video file in the timeline and right-click. From the drop-down menu, select “Properties”, and then a window appears. Keep scrolling downward, click on the button of light-green colour “Cutting and Splitting” button.

When the window pops up, click on the “Apply changes” button, and the video automatically gets split. Every part of the video is present on the timeline after one another.

An easier way to split the video
No doubt, VSDC is a good option for editing the videos, but Filmora Video Editor has more features and better software for splitting the video. It fulfils the requirements of various users, whether it is for personal or business purposes. Also, the stylizing of the video is possible, including the quality, resolution, speed and other parameters.
For Win 7 or later (64-bit)
For macOS 10.14 or later
Features
- Removing the noise
- Colour tunning
- Detecting of the scenes
- Video stabilization
- Audio equalizer
- Splitting, rotating and trimming of the video clips
Wondershare Filmora is always helpful in splitting, trimming and different options available for editing the videos. Following are the steps for using these features:
Step 1. Click on “Import” to bring the source file to the timeline.
Step 2. It is essential to select the clip in the timeline and move the play head on the right side. Click on the “Split” scissor icon visible on the toolbar. It helps in separating the videos into different parts.

Step 3. Save the video clip according to the format of your own choice. Simply click on “Export” and select the format from the tab “Format”. It is leftwards of the window. There is a whole list of the formats.

It would help if you used the Wondershare Filmora for splitting the video clips into parts without losing their quality. There is a number of effects and features that will definitely attract you. It is definitely suitable for making outstanding videos and images.
Wondershare Filmora has undoubtedly received many positive reviews compared to other editing software. You use the latest version of Wondershare Filmora to avail of its maximum features as it includes more than 25 sound and transitional effects. Keyframing is also possible. Go for it and start editing on it today.
How to Use 3D Camera Tracking Effects in After Effects
Adobe After Effects is an ever-growing product, with new features introduced almost every year. One of these features is the 3D Camera Tracking, which allows you to take your motion graphic effects to the next level.
Camera Tracking is extracting the camera movement from a recorded video sequence. This process allows filmmakers to add computer-generated elements to a live action shot, track objects throughout a shot for compositing, and estimate camera movements for virtual reality applications.
In this article, we will explore what Camera Tracking is and Motion Tracking in After Effect. We’ll also show you how to use 3D Camera Tracking in After Effects on a Windows PC.
Part 1. What Is Camera Tracking
Camera Tracking is a process that determines the movement of a video clip. This information can be used to add certain effects to the video, such as objects that seem to follow the camera or text that appears to be stationary in the frame.
Camera Tracking is a relatively simple process, but it can be time-consuming. However, the results are often worth the effort, as it can add a whole new level of realism to your footage clips.
For example, you have taken a video clip of a zoo and want to add an object to it while making sure it gives a realistic look. This is where the Camera Tracking feature can help you make a smooth transition and add the element as if it was there.
Part 2. Why Use Camera Tracking?
Now that you know what Camera Tracking is, let’s have a look at some benefits of using it:
- Add a 3D object or element to a 2D video clip.
- Embed objects, texts, etc., to a video.
- Stabilize a shaky camera/video clip.
- Create special effects.
- Apply color grading.
- Replace a TV or PC screen with some information.
Thus, if you need some basic compositions or advanced ones, the Camera Tracking feature will help you track your videos, embed anything you want, or create special effects to make your clip different.
Part 3. Motion Tracking In After Effects
The Motion Tracking capability is Adobe After Effects’ feature that allows you to track the movement of the camera/an object in a video clip and use the data to add effects to objects.
Motion tracking can be used for various effects, like creating realistic text animations or adding special effects to objects in a video.
There are four main types of Motion Tracking in After Effects, each with its own advantages and disadvantages:
Single Point Tracking
Single Point tracking tracks a single position in a video clip. You can use it for composing a video clip with a single point of focus, and it is suitable for following the movement of an object with right-left or up-down motion.
Advantage: Single Point Tracking is perfect for tracking a single position or motion of a single object.
Disadvantage: No scale or rotation properties and needs a clear contrast point for effective results.
Two Point Tracking
Two Point Tracking is a feature that allows you to track two points in a footage clip and can be used for scale, motion, and rotation tracking.
Advantage: Two Point Tracking can track scale and rotation along with the motion.
Disadvantage: It doesn’t give effective results with a shaky video clip.
Four Point Tracking
The Four Point Tracking feature lets you track four different points (corners) in your footage and apply the tracking data to a layer in your composition.
The four points can be placed at the screen’s corners in your shot, and new footage is applied to cover the screen.
Advantage: Directly pins the data to each corner of the image.
Disadvantage: Cannot be used to create a 3D object.
3D Camera Tracking
With 3D camera tracking, you can track the movement of a camera in a video and place 3D elements in the scene that match the camera’s movement. This is a great way to add realism to your graphics and make them look like they’re part of the scene.
Advantage: 3D Camera Tracking can help you add shapes, texts, or 3D objects to 2D footage.
Disadvantage: A bit tricky and needs an expert grip on the tool to use effectively.
Part 4. How To Use 3D Camera Tracking In After Effects Of Windows
Here’s a simple and quick rundown of how to use 3D camera tracking in After Effects:
Step1Import Your Video Footage
Launch Adobe After Effects, create a new composition, and import your footage. Once your clip is uploaded, click the Window Menu. Scroll down and choose “Tracker.”
![]()
Here you will see four tracking options:
- Track Camera
- Warp Stabilizer
- Track Motion
- Stabilize Motion
![]()
Click “Track Camera” to add the 3D Camera Tracker effect to your selected layer. After Effects will start analyzing the layer, show the percentage, and count the total frames of clips tracked.
![]()
Note: The dots that appear on your video clips cannot be rendered out, as they are strictly referential.
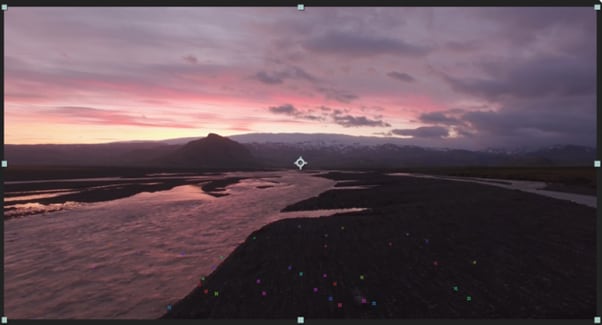
Step2Establish The Tracking Points
You have to select the tracking points and a plane to which it must be tracked. To do this, hover over the tracking point references in the After Effect compositions window. Between the three tracking points, a triangle will form, and a red “target” will appear to help you better visualize the plane.
Now, you have to find a tracking point that lays the red “target” parallel to your selected plane. Next, select the triangle that lines up best for your surface. Move the arrow away to disable the picker and stop the red “target.”
![]()
Step3Add The Text To Your Video Clip
Once you define the plane, it’s time to add text to your video clip. To do this, right-click on the triangle you have set previously, and a window will appear, allowing you to create new layers.
Click “Create Text” to place the text on your tracked video clip. A new text layer will be added using the tracking data.
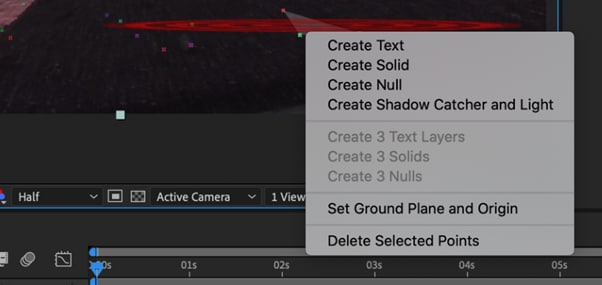
Step4Align Text On Tracked Footage
Now you have to align your text. In the timeline, locate the tracked text layer and click the arrow to the left to unveil all the editable properties for the layer.
Click the “Transform” option to use the transform options and use the layer lines to adjust the X, Y, and Scale values afterward.
![]()
Note: You can select your layer and press the S, P, R, or T keys to adjust the scale, position, rotation, and opacity, respectively.
Your text will now be added to your video footage. The method is similar to adding solid or null to your clips. However, the exact steps might differ a little.
Video - Learn 3D Camera Tracking In After Effects
Conclusion
In this article, we’ve discussed what Camera Tracking is and why to use it. We also provided information regarding Motion Tracking, its four types, and their advantages and disadvantages.
Furthermore, we walked you through the step-by-step process of using 3D Camera Tracking in Adobe After Effects for Windows.
We hope this guide helps you to add text to your video footage without much effort, and you now have complete knowledge of the Camera Tracking feature.
Free Download For Win 7 or later(64-bit)
Free Download For macOS 10.14 or later

Step2Establish The Tracking Points
You have to select the tracking points and a plane to which it must be tracked. To do this, hover over the tracking point references in the After Effect compositions window. Between the three tracking points, a triangle will form, and a red “target” will appear to help you better visualize the plane.
Now, you have to find a tracking point that lays the red “target” parallel to your selected plane. Next, select the triangle that lines up best for your surface. Move the arrow away to disable the picker and stop the red “target.”
![]()
Step3Add The Text To Your Video Clip
Once you define the plane, it’s time to add text to your video clip. To do this, right-click on the triangle you have set previously, and a window will appear, allowing you to create new layers.
Click “Create Text” to place the text on your tracked video clip. A new text layer will be added using the tracking data.

Step4Align Text On Tracked Footage
Now you have to align your text. In the timeline, locate the tracked text layer and click the arrow to the left to unveil all the editable properties for the layer.
Click the “Transform” option to use the transform options and use the layer lines to adjust the X, Y, and Scale values afterward.
![]()
Note: You can select your layer and press the S, P, R, or T keys to adjust the scale, position, rotation, and opacity, respectively.
Your text will now be added to your video footage. The method is similar to adding solid or null to your clips. However, the exact steps might differ a little.
Video - Learn 3D Camera Tracking In After Effects
Conclusion
In this article, we’ve discussed what Camera Tracking is and why to use it. We also provided information regarding Motion Tracking, its four types, and their advantages and disadvantages.
Furthermore, we walked you through the step-by-step process of using 3D Camera Tracking in Adobe After Effects for Windows.
We hope this guide helps you to add text to your video footage without much effort, and you now have complete knowledge of the Camera Tracking feature.
Free Download For Win 7 or later(64-bit)
Free Download For macOS 10.14 or later
3 Actionable Ways to Create Countdown Animation for Videos
Many online marketers find that the animated countdown timer is the perfect way to bring a visual element to their videos while maintaining the quality and effectiveness of the video itself.
There are many ways to show a countdown timer on videos using animated GIFs. But they can be hard to implement or could cost a lot of money. You can use some free services, but they are limited in terms of features.
But not to worry, this post will go through a detailed process of creating an animated timer with 3 different methods. Before that, let’s discuss the benefits of using a timer for videos.
- Method 1: Make a Countdown Animation with a Professional Video Editing Software
- Method 2: Generate the timer with Free Online Countdown Timer Video Generators
- Method 3: Make a Countdown Timer with a Graphic Design Platform
- Cool Countdown
- Fitness Countdown
- Cinematic Countdown
- Neon Countdown
- Cyber Countdown
- Digital Countdown Pack
- Big Metal Countdown
- Glitch Countdown Transition
- Countdown To New Year
- Flashing Light Countdown
What are the benefits of using a countdown timer for videos/live streams?
Countdowns are a great way to get your message across and get your viewers excited about your product or service. A countdown timer provides a very simple visual cue to help motivate yourself and your audience to start watching the video.
It also works well with vlogs and YouTube, seamlessly transitioning from one part of your video to the next. This works best when your video isn’t about the product itself (but rather a review, a demo, or something else that lends itself well to a countdown).
As you can see, the Vlogger uses a countdown timer at the beginning of his video. Vlogger uses a countdown timer to make it appear as if the time is running out because it adds urgency and suspense. As a viewer, you’ll want to hurry up and watch this video, so you don’t miss out on anything.
Let’s now dive deep into methods of creating countdown animation for videos.
Method 1: Make a Countdown Animation with a Professional Video Editing Software
The most common trend today is video content creation, and it’s everywhere. Videos are not only entertaining, but they have a significant impact on audience retention.
With a video editor, you can create compelling content that will entice your viewers to watch the whole thing. Moreover, it can also help you get started by adding captions, transitions, effects, etc.
If you’re ready to make your next project more engaging and interactive, you can try the best video editing software, Wondershare Filmora !
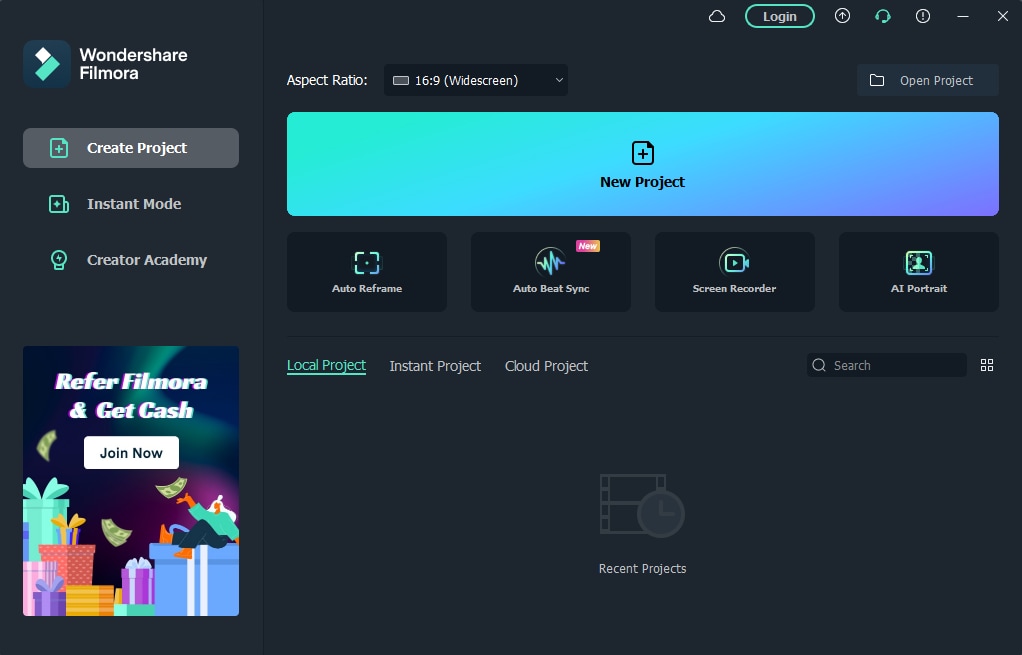
Wondershare Filmora is the industry standard when it comes to editing video. The video editing software industry is filled with features that promise to be faster, smarter, and easier to use than others.
Moreover, Wondershare has Filmstock effects that have revolutionized the world of video creators.
Filmstock is a collection of videos ready to be used with Filmora that contains more than 1,000 free stock footage clips of various scenes and locations, plus video effects, transitions, and titles, to make creating professional-quality videos faster and easier.
Let’s see some of its features that help us make animation countdown timers easily.
- Rich effects for you to choose customizing countdown animation at ease.
- You’re not stuck with traditional slow motion in your videos; you can add dynamism and energy to your videos with smooth animations.
- It has various countdown animation templates simplify the whole process, just drag-and-drop, everything gets done.
How to make a countdown animation with Filmora
You’re looking for an animated countdown timer for your website or your very first YouTube video, but you want one that stands out. You don’t want your visitors to think it’s generic or boring, so you’re thinking about how to make your countdown timer more interesting.
That’s where Filmora comes in. It’s an amazing tool that makes it easy to create countdown animations on websites or videos for almost any purpose. Let’s look at how to create your own cool, creative countdown timers using Filmora.
Free Download For Win 7 or later(64-bit)
Free Download For macOS 10.14 or later
Step1 Open Filmora and import the background video file from the media section.
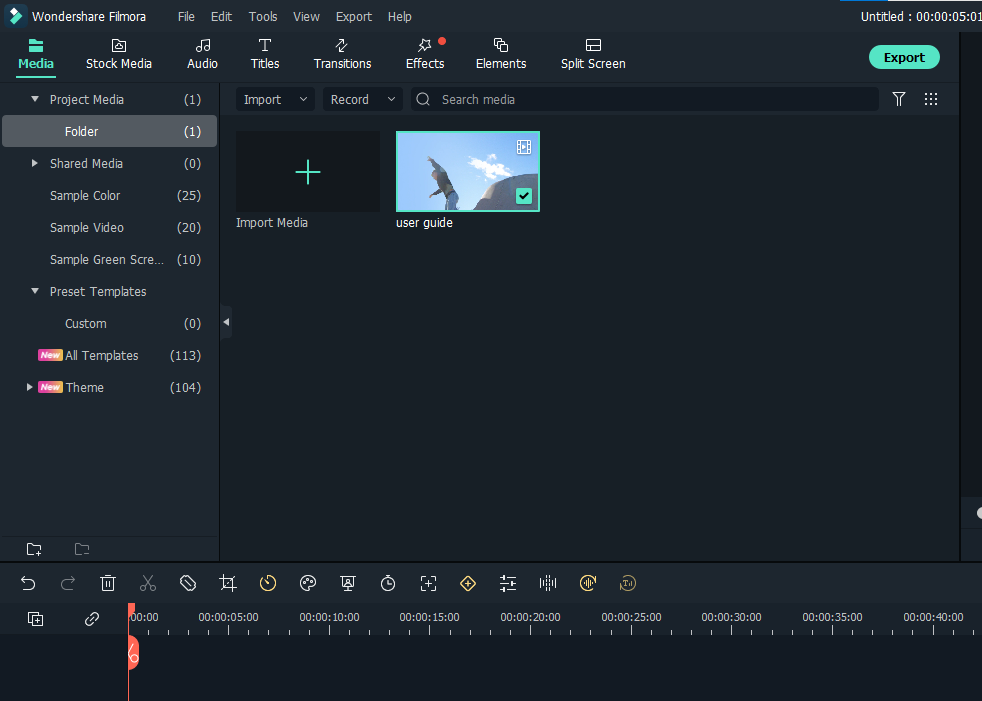
Step2 After importing the video, go to elements options from the top tab.
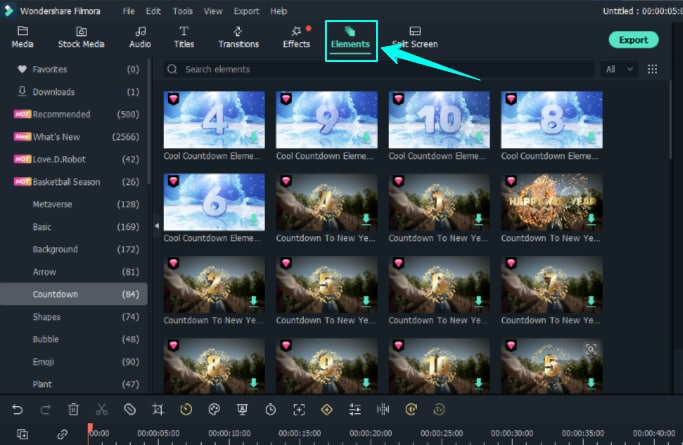
Step3 After choosing elements, you’ll see the countdown tab on your left. Click on the countdown and choose any animation. You can adjust the animation duration, size, and audio.
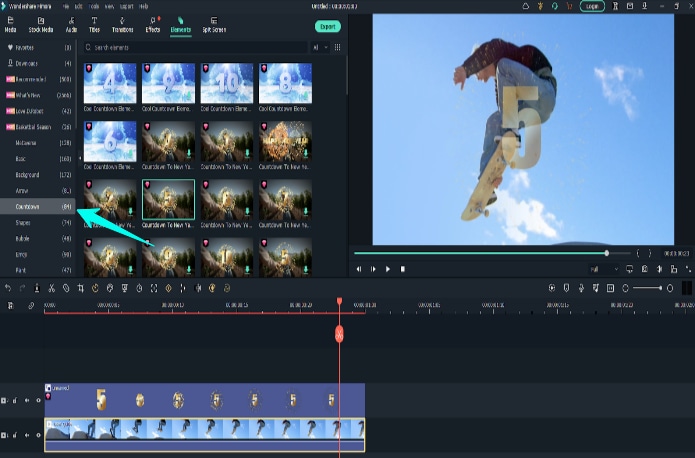
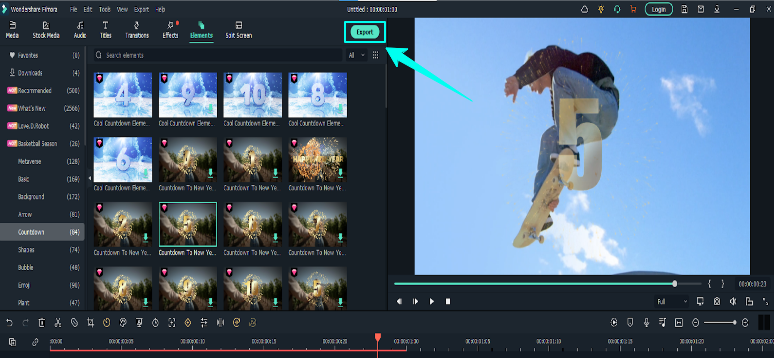
Step4 Adjust the animation duration according to the background video, and finally, export your animated countdown timer.
Pros and Cons of using Video Editing Software to make a countdown animation
Pros
- You can save any countdown effects project as a project to be used in future videos
- You can create a vision of your brand concept in your way
- Free templates are available according to your brand and target audience
- More stable
Cons
- Standard out-of-the-box video editing software isn’t enough to create a professional-quality video
Method 2: Generate the timer with Free Online Countdown Timer Video Generators
If you’re trying to catch your audience’s attention by giving them a reason to ‘countdown’ to something, then you’ll want to use a countdown timer with some great free online countdown videos.
There are many countdown timer websites like;Biteable ,Kapwing ,Movavi ,and MakeWebVideo . But we’ve rounded up the best countdown video generator site you’ll ever see:
FlexClip

FlexClip is a powerful yet easy-to-use online video editor. Its music library is versatile and high-quality. It lets you pick and add favorite tracks without infringing worries. Apply interesting editing to make your videos look better by adding transitions, filters, text, and more.
FlexClip’s biggest advantage is its extensive amount of free media assets. Whether you’re a master or rookie with FlexClip, you’re capable of producing excellent videos with music. You can be a video guru or a video beginner. You’re capable of producing awesome videos with great sound using FlexClip.
Key Features:
- Provides a complete set of video-making processes.
- A diverse range of royalty-free music selection
- Loads of handy editing tools
- Thousands of ready-made templates
- Multiple advanced features like adding text, emoji, effects, and more
How to make a countdown animation with FlexClip
The FlexClip countdown creator is a leading video editor with many powerful features. To make your countdown video, click the Create a Video button below.
Step1 Set Your Countdown Video Background
Set your timer to how long you want your message to start your countdown. Usually, it’s 10 seconds.
Then add scenes and adjust the duration of scenes to make them all length. You can use the background color to make it more appealing to your audience.
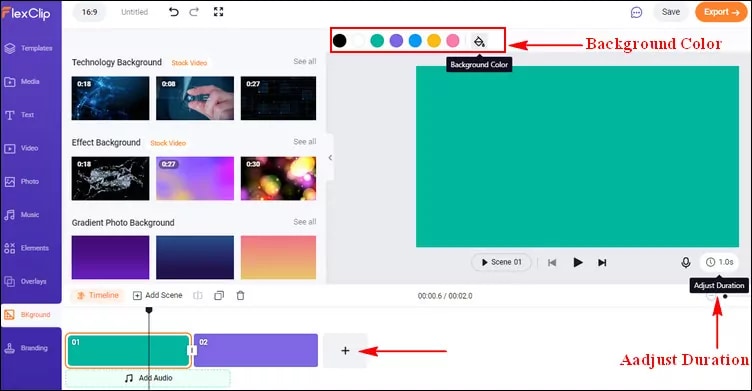
Step2 Highlight Your Countdown with Animated Elements
Using the amazing elements, you can make your countdown interactive and much more fun. Just go to the sidebar and switch to the Elements options. Apply the elements you want, then customize them on size, position, and color.
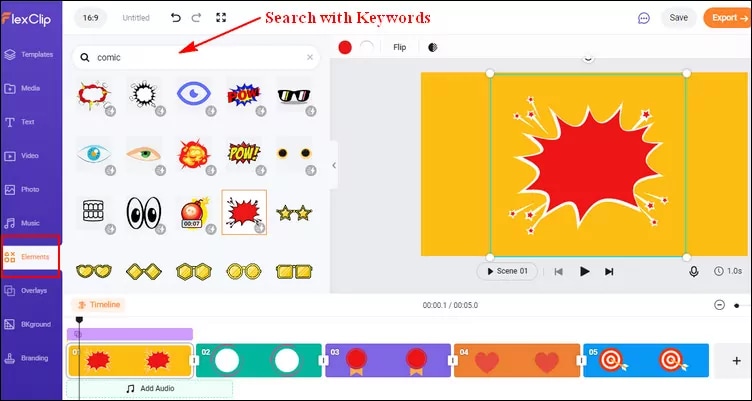
Step3 Add the Number to Your Countdown
Now, add the numbers for the countdown, e.g., if you want a 10-second countdown, type in the number “10”. You can pick a basic text effect and manually enter the number.
After you’ve created the number, go to the timeline and control how long the number will appear and when it will disappear.
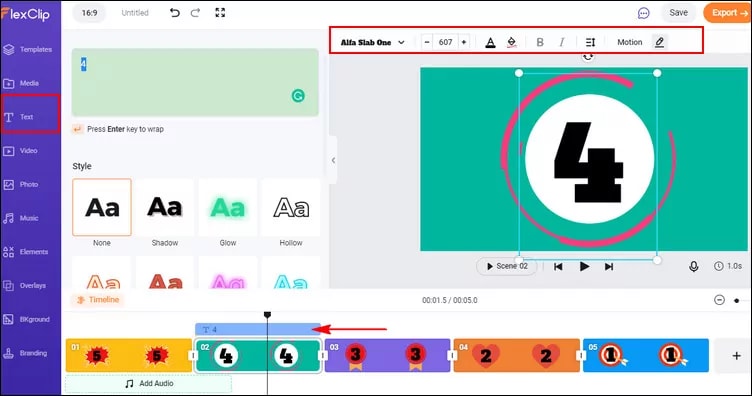
Step4 Add Music or Sound Effects to Your Countdown Video
FlexClip lets you upload your audio files from a local folder, or you can select one from FlexClip’s library. Once you’re done adding the countdown music, you can trim the duration, set it to start and end at any time, and use the fade-in/out effect to make the music match your countdown. Plus, you can also adjust the volume to make the music softer.
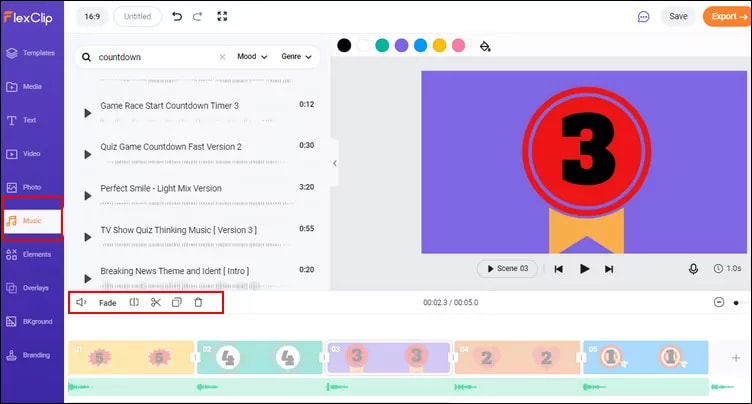
Step5 Preview and Export Your Countdown Video
You can preview it to see how the countdown video will look in the end, finally, hit export, and you’re done!
Method 3: Make a Countdown Timer with a Graphic Design Platform
Today’s graphic design platforms give designers more options than ever before, but many designers struggle to make the most of these resources. Let us share some tips and tricks on designing a countdown timer using the tools available through Canva, a graphic design platform.
Canva
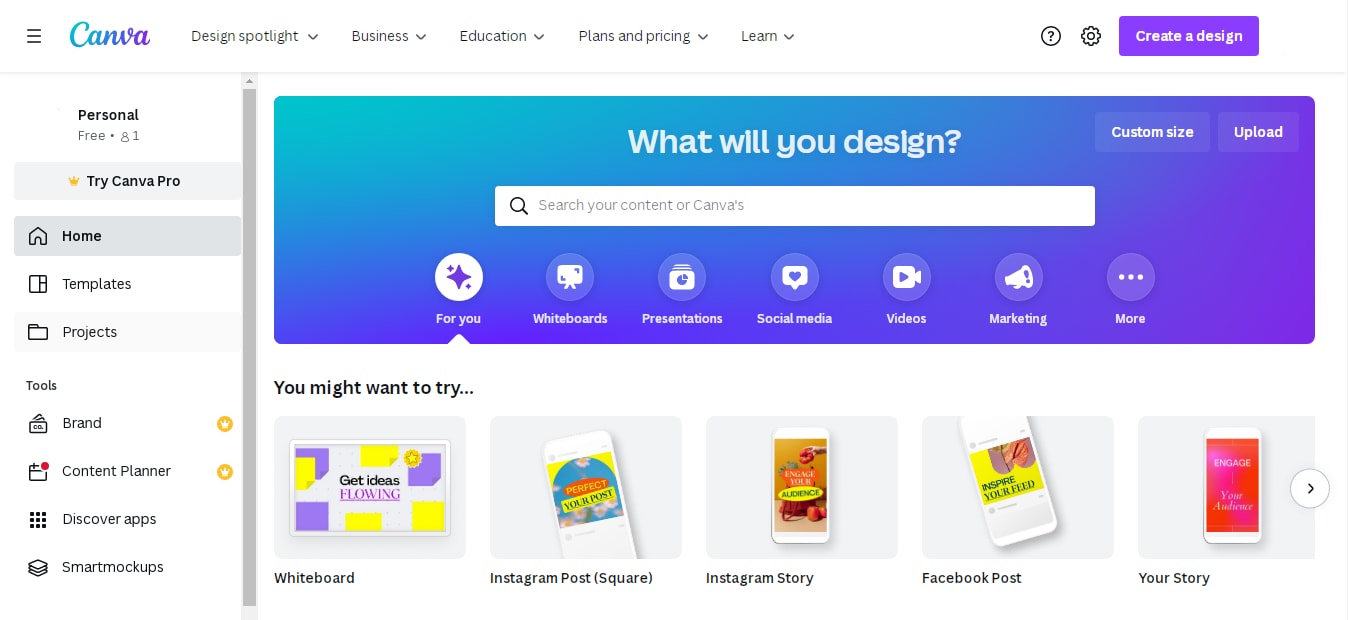
Many types of graphic design software are available, and Canva is one of the best. While its critics may disagree, Canva is an undeniable tool to help millions of business owners and marketers improve their social media graphics and redesign their brand image without needing to learn graphic design.
Key Features:
- Drag and drop feature
- Free templates
- Background Removal Tool
- Canva Brand Kit
- Magic Resizing
How to make a countdown animation with Canva
Canva offers a range of great-looking countdown templates that’ll help you create one in just a few minutes. And if you need a simple countdown animation, you can download one of their free templates. Let’s make it from scratch:
Step1 Select The Background
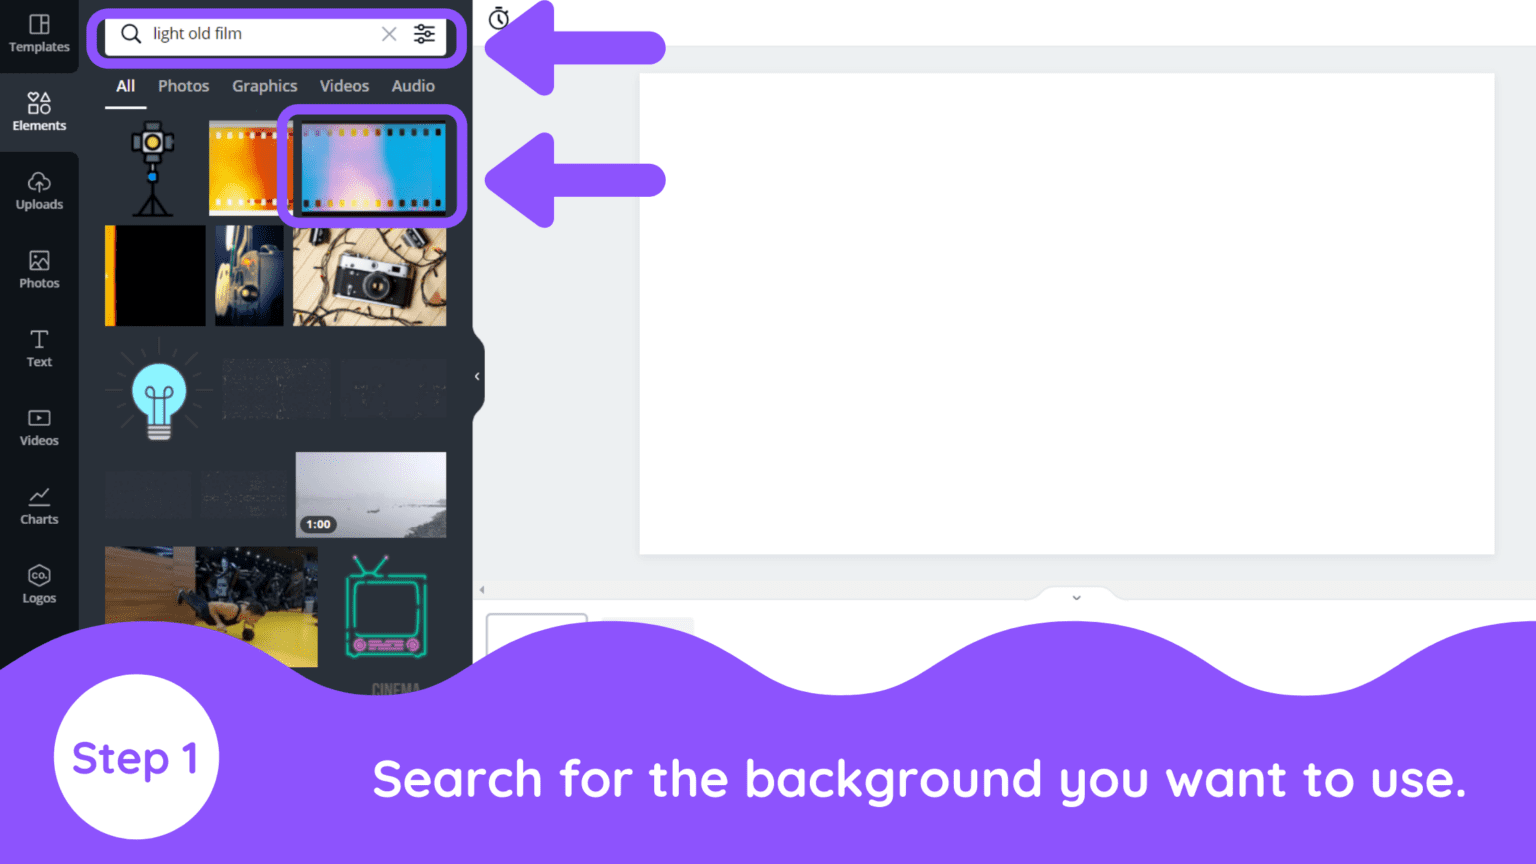
With Canva, you get a wide range of free backgrounds. Click on the button labeled “Search.” Now choose the “light old film” background element and click Add.
Step2 Enter Your Text (Number)
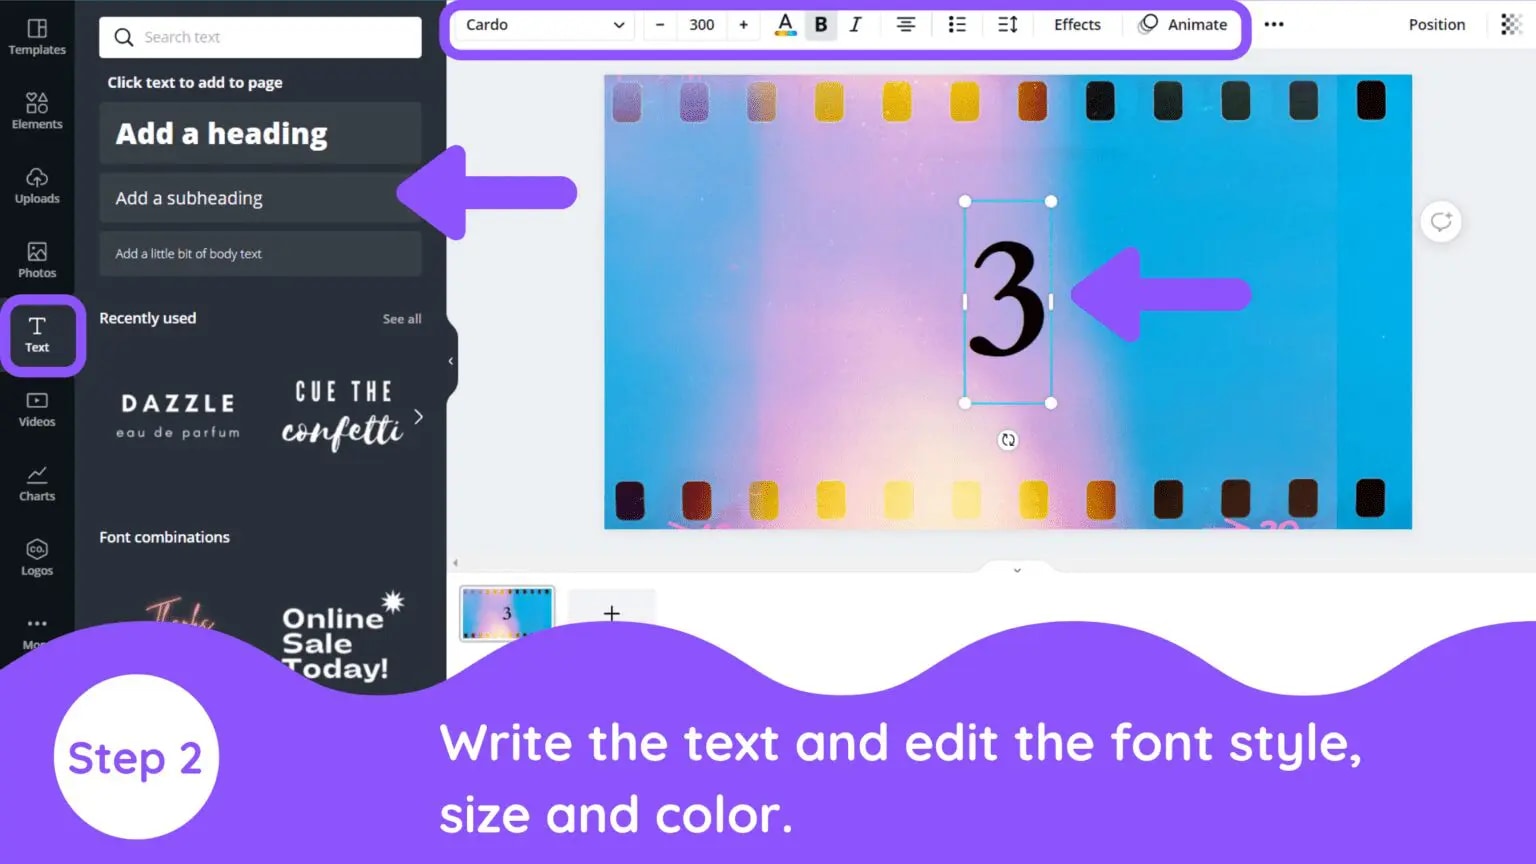
Then select the text tab and choose any font style, color, and size.
Step3 Animate Text
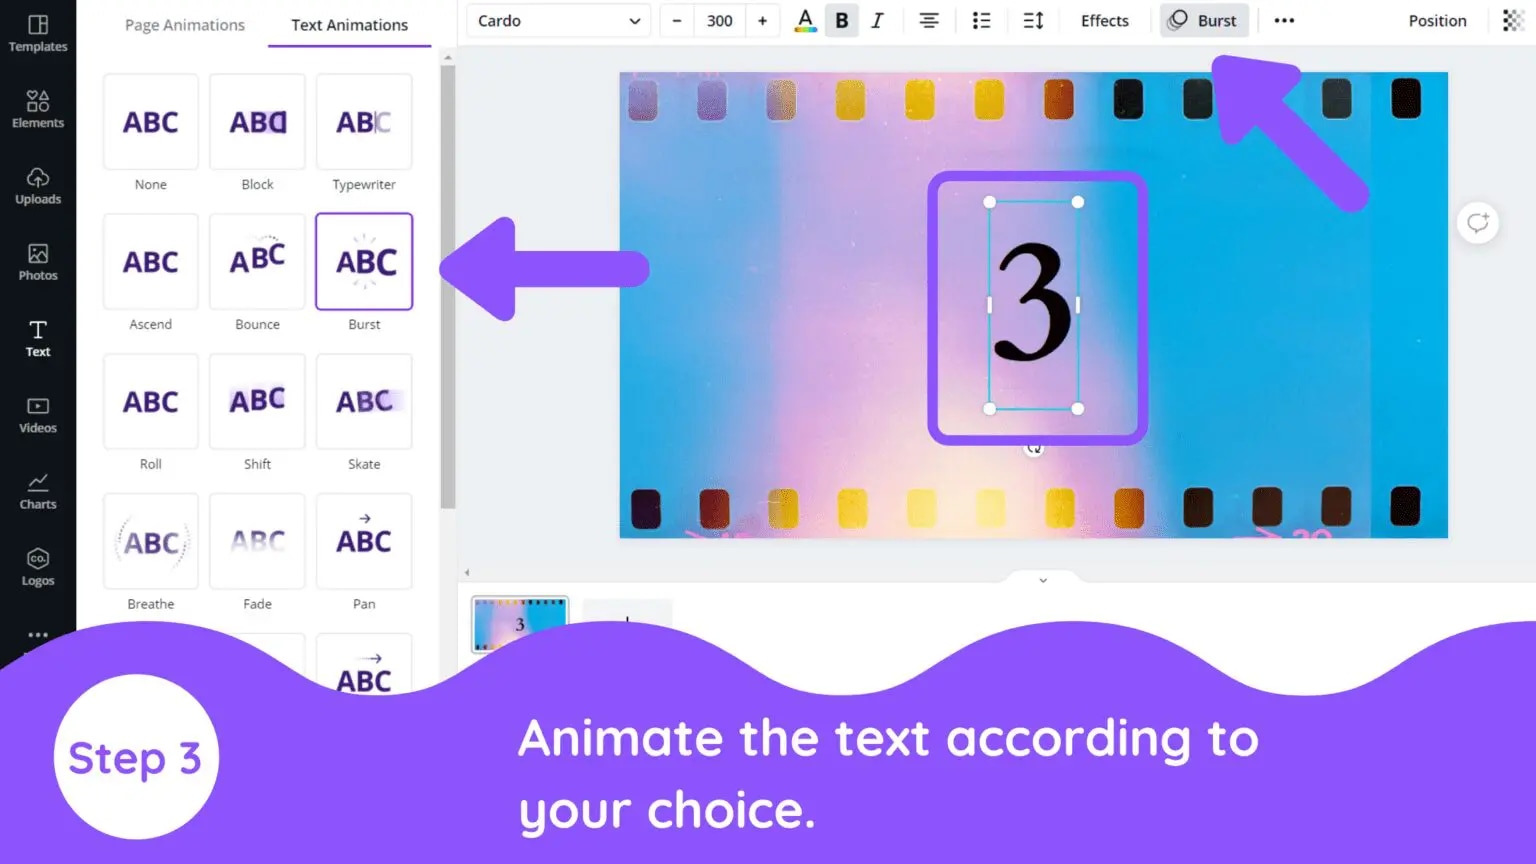
Next, select the font again, and then, at the top, there’s an option for Text Animation.
Adding text animation to your countdown timer will make it more realistic and match your background better than a straight-up countdown timer.
Step4 Edit The Page Timing
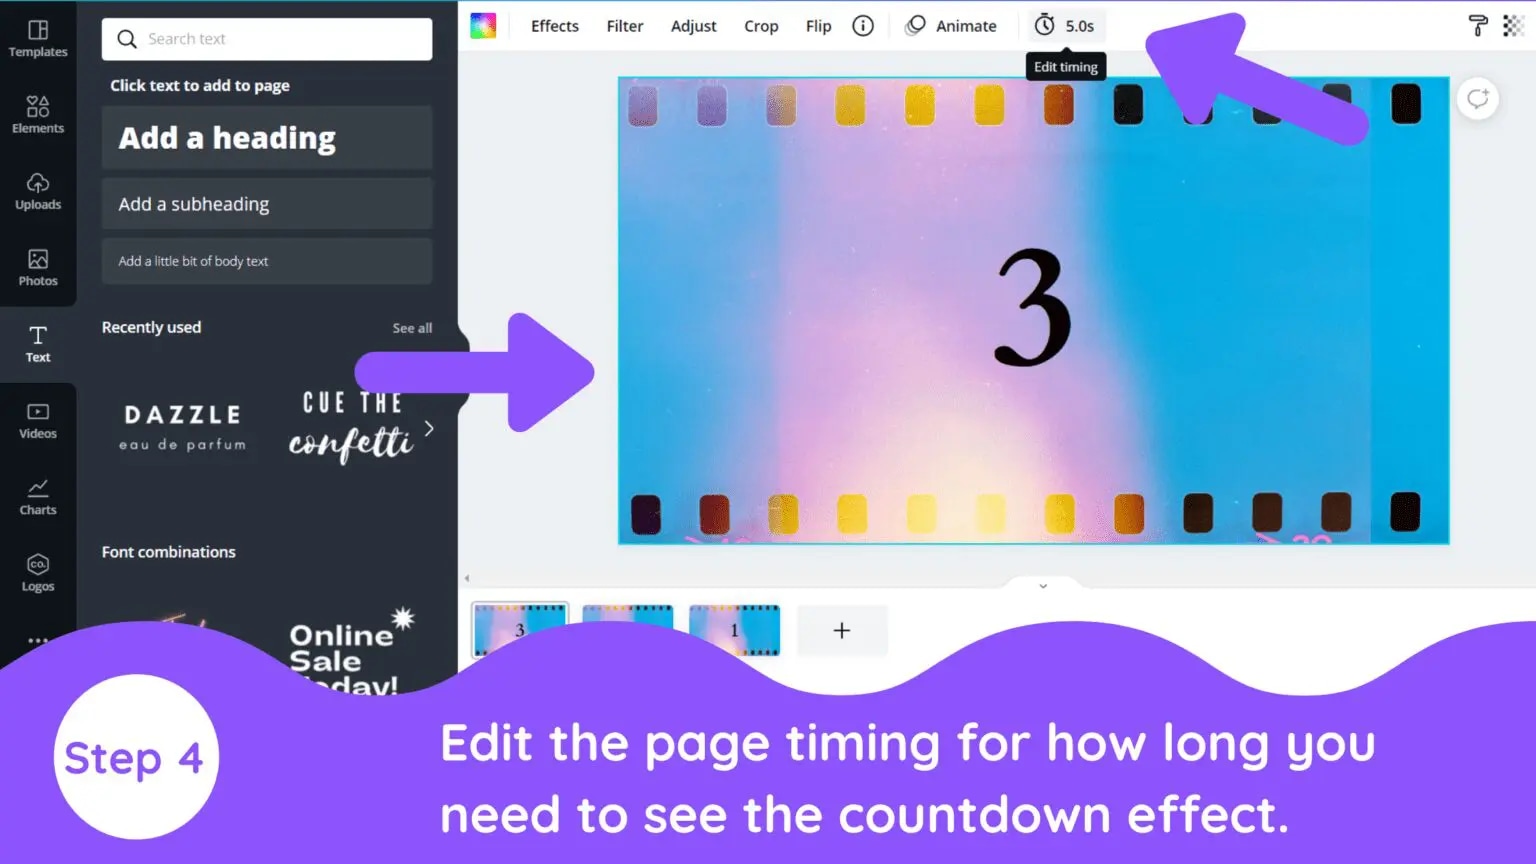
Next, click on the “Edit Timing” option. You can set the timer for each page as per your choice
Step5 Duplicate The Page
Now, select the duplicate page option and change the number of duplicate pages from 3 to 2,1, with the same design and formatting.
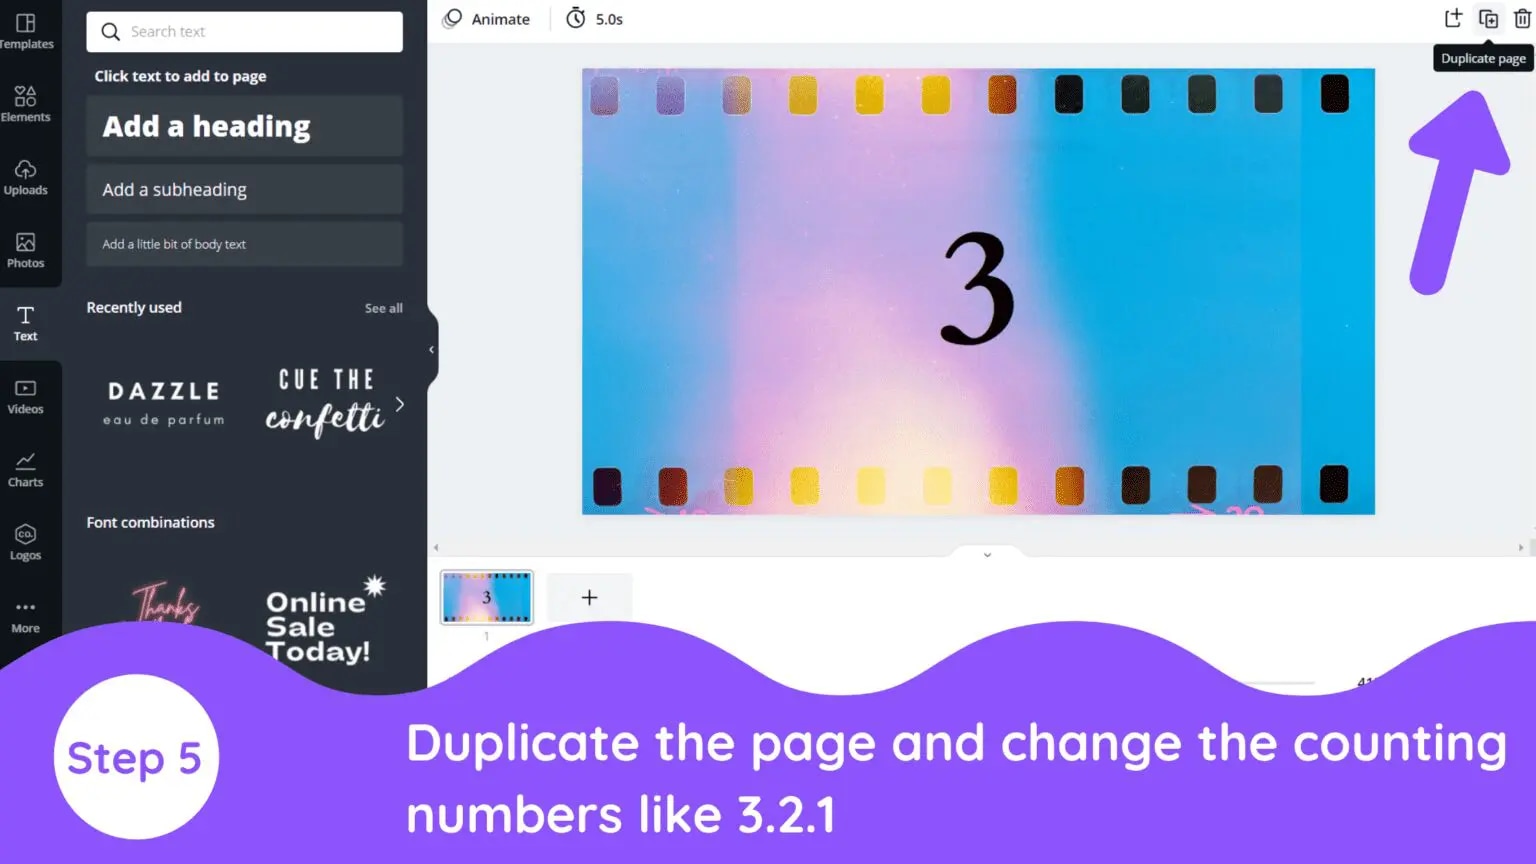
Step6 Export / Download Video
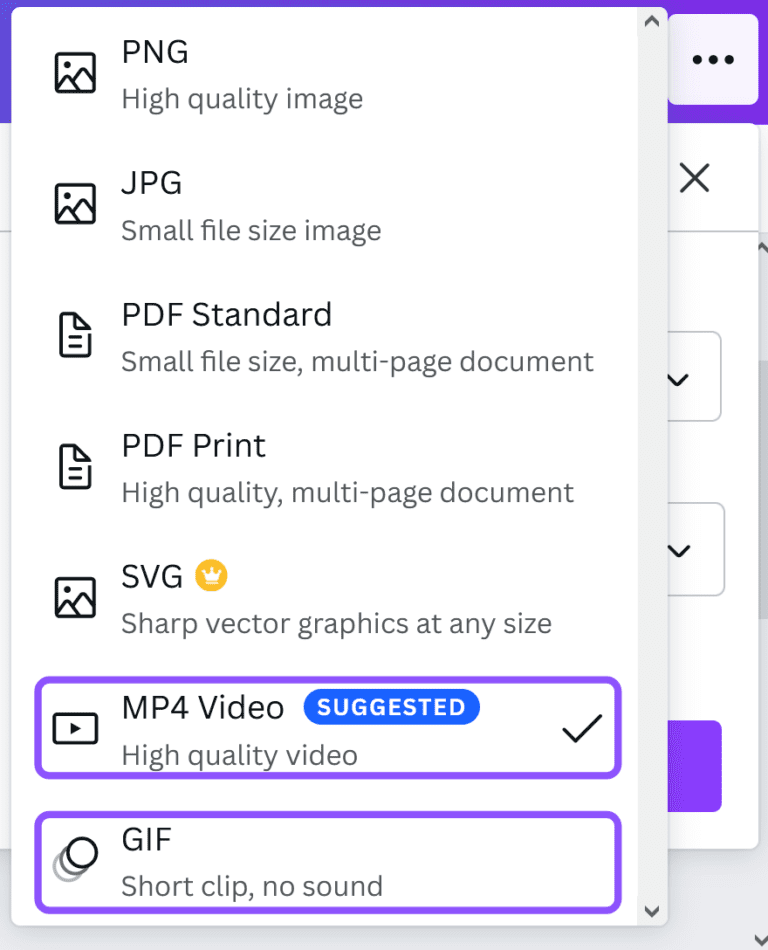
You’re finally done! Click the Download button to export your design.
The background of this photo is not a static image, so you cannot select the JPG, PNG, or SVG. You must choose an MP4 video or a GIF when creating an animation.
Top 10 animated countdown effects to make your video like a Pro
Animated countdown effects are a great way to add some “pizzazz” to a simple video. They look awesome and are extremely effective in creating a memorable video. When used well, they can add some excitement to a boring video. We’ll go over the top 10 animated countdown effects from Filmstock
1. Cool Countdown

2. Fitness Countdown
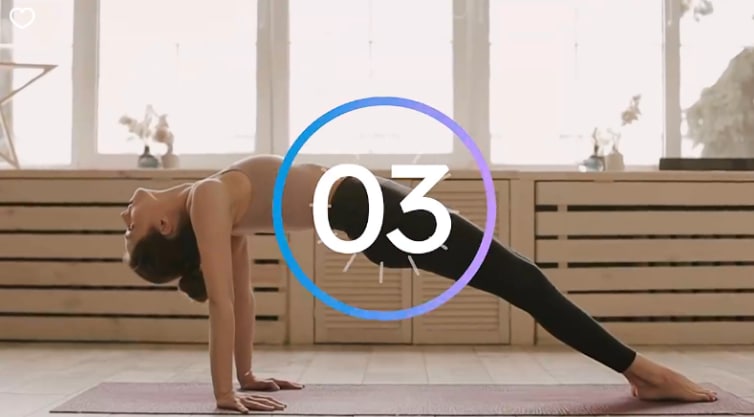
3. Cinematic Countdown
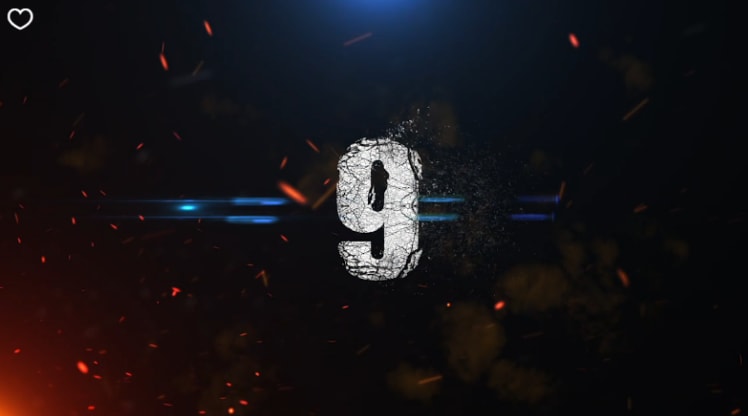
4. Neon Countdown
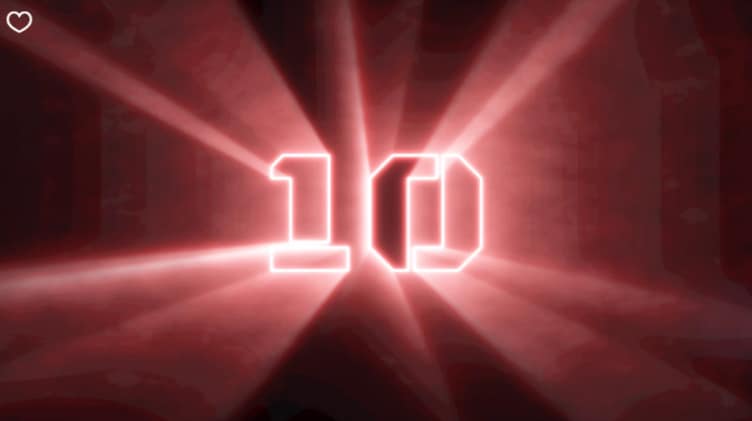
5. Cyber Countdown

6. Digital Countdown Pack
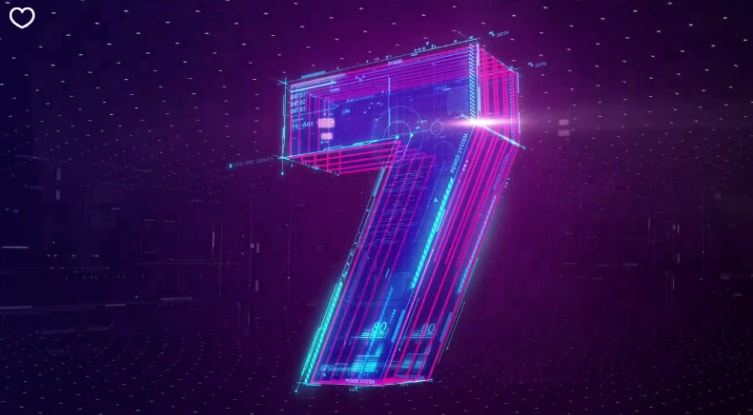
7. Big Metal Countdown
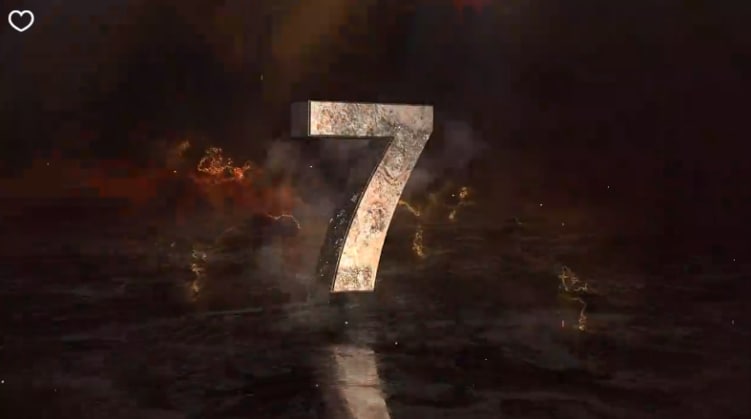
8. Glitch Countdown Transition
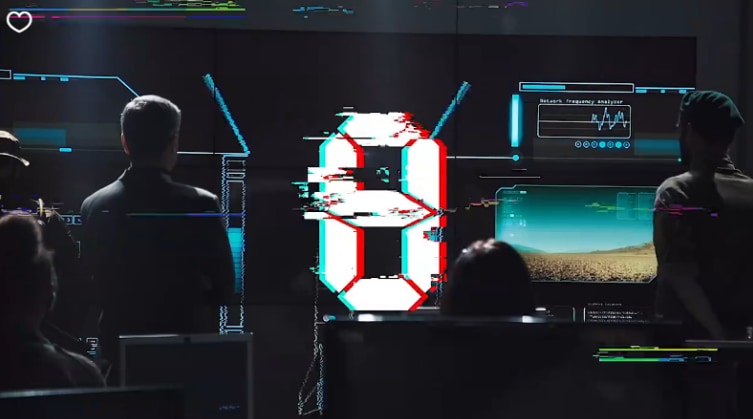
9. Countdown To New Year
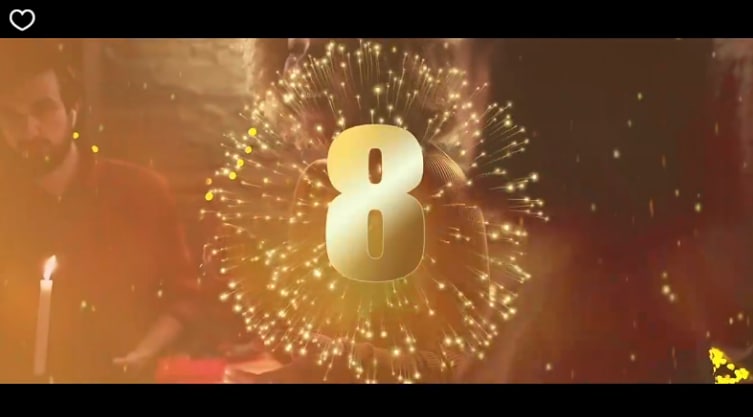
10. Flashing Light Countdown

How to use these effects in Wondershare Filmora
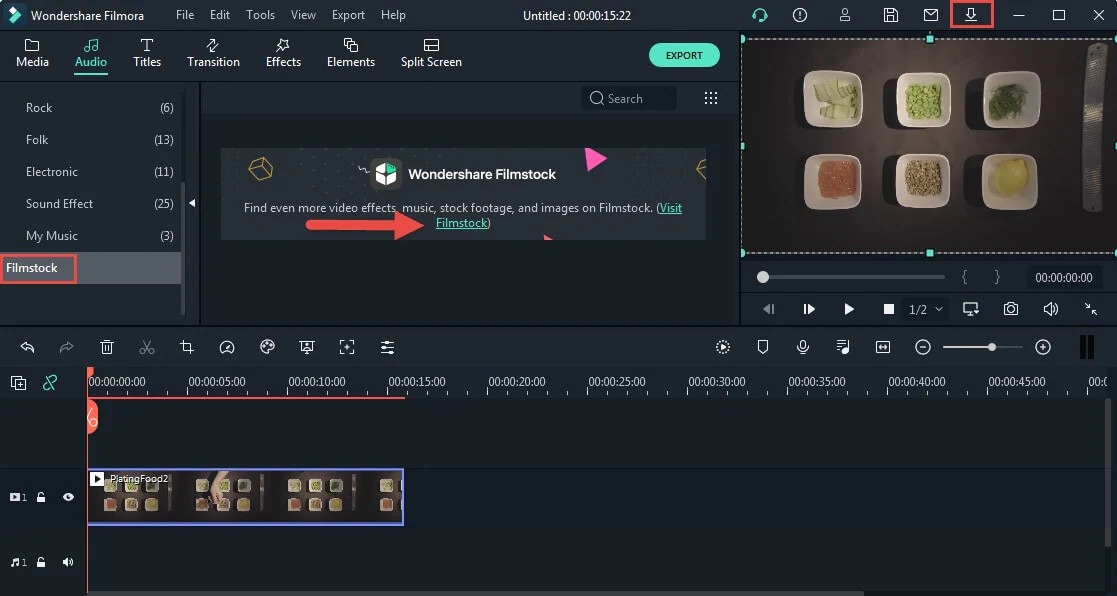
You can access Filmstock directly from the Filmora application or by visiting the website:
- Create a new project by clicking Filmora Video Editor in the menu.
- Select the audio effects tab, or go to the Audio tab, title tab. You will see the film stock option.
- Click the Visit Filmstock button, and you will be taken to the Filmstock website.
Free Download For Win 7 or later(64-bit)
Free Download For macOS 10.14 or later
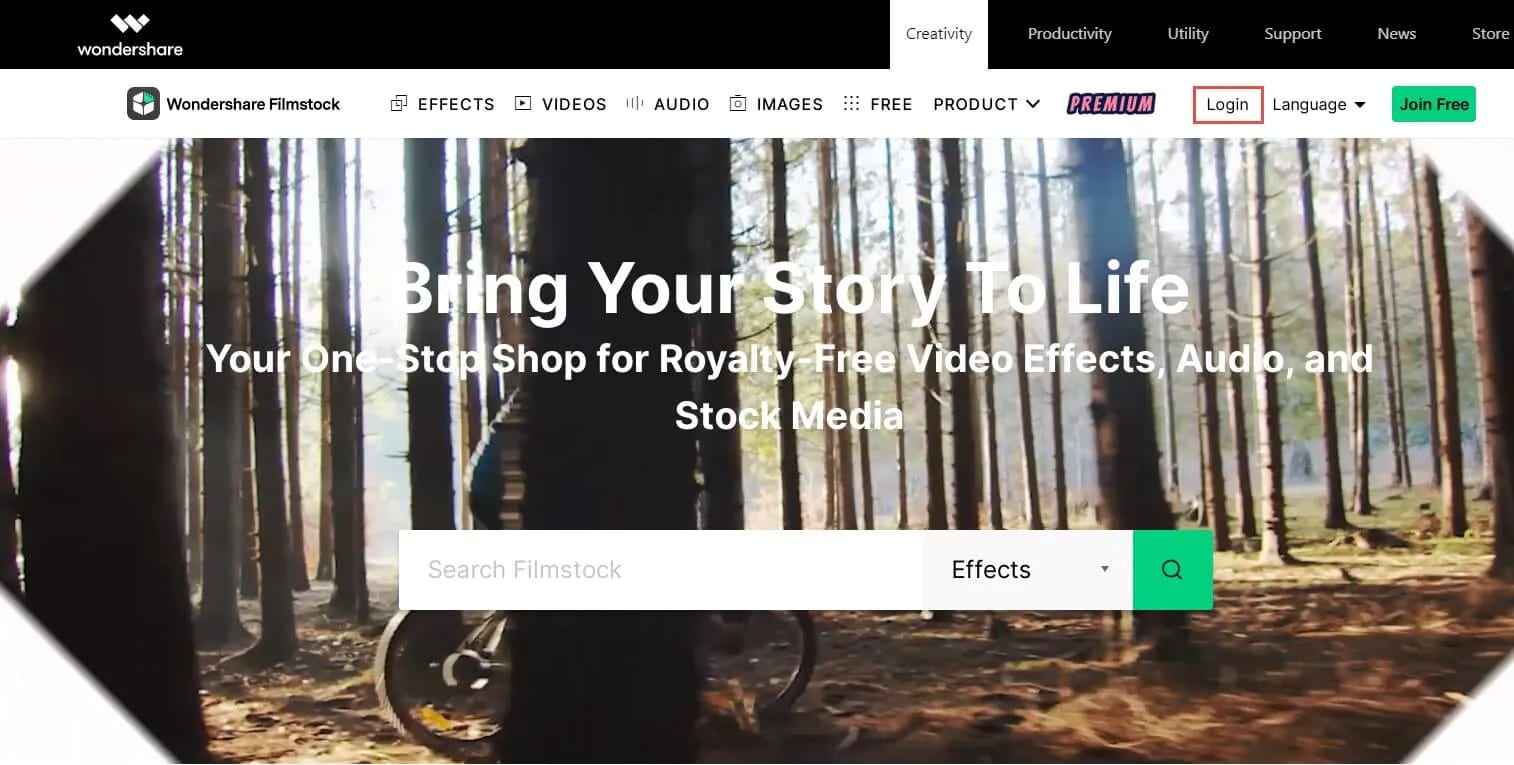
- Log in to Filmstock using your Wondershare account.
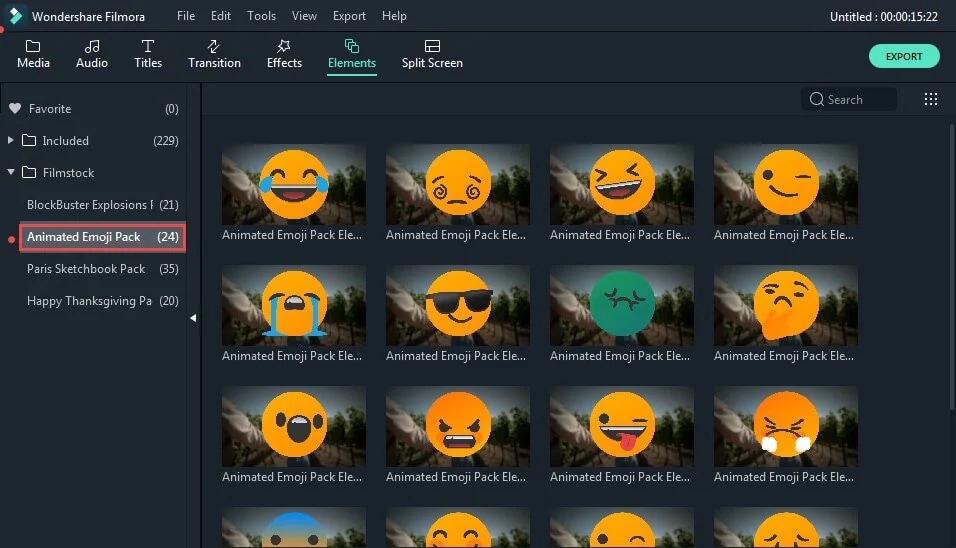
- After the download, the new effects will be added to your project in the appropriate section (Audio, Title, Transitions, and Elements). You’ll also be able to preview each effect from this window.
![]()
Note: it is highly recommended to log in to Filmstock and Filmora with the same Wondershare ID.
Final Words
A countdown is a powerful tool to add suspense to your videos. It gives your audience more incentive to watch your video all the way through. Get this article, as it is the ultimate guide to making your countdown animations, plus the best video editing software, Wondershare Filmora.
Wondershare Filmora is an excellent place to be creative and make some terrific countdown timers that can improve your viewers’ overall experience. Use their templates to create a strong and engaging online presence. Your audience won’t be able to resist the mesmerizing, hypnotizing, and enthralling effects of Wondershare Filmora.
Free Download For Win 7 or later(64-bit)
Free Download For macOS 10.14 or later
- Cool Countdown
- Fitness Countdown
- Cinematic Countdown
- Neon Countdown
- Cyber Countdown
- Digital Countdown Pack
- Big Metal Countdown
- Glitch Countdown Transition
- Countdown To New Year
- Flashing Light Countdown
What are the benefits of using a countdown timer for videos/live streams?
Countdowns are a great way to get your message across and get your viewers excited about your product or service. A countdown timer provides a very simple visual cue to help motivate yourself and your audience to start watching the video.
It also works well with vlogs and YouTube, seamlessly transitioning from one part of your video to the next. This works best when your video isn’t about the product itself (but rather a review, a demo, or something else that lends itself well to a countdown).
As you can see, the Vlogger uses a countdown timer at the beginning of his video. Vlogger uses a countdown timer to make it appear as if the time is running out because it adds urgency and suspense. As a viewer, you’ll want to hurry up and watch this video, so you don’t miss out on anything.
Let’s now dive deep into methods of creating countdown animation for videos.
Method 1: Make a Countdown Animation with a Professional Video Editing Software
The most common trend today is video content creation, and it’s everywhere. Videos are not only entertaining, but they have a significant impact on audience retention.
With a video editor, you can create compelling content that will entice your viewers to watch the whole thing. Moreover, it can also help you get started by adding captions, transitions, effects, etc.
If you’re ready to make your next project more engaging and interactive, you can try the best video editing software, Wondershare Filmora !

Wondershare Filmora is the industry standard when it comes to editing video. The video editing software industry is filled with features that promise to be faster, smarter, and easier to use than others.
Moreover, Wondershare has Filmstock effects that have revolutionized the world of video creators.
Filmstock is a collection of videos ready to be used with Filmora that contains more than 1,000 free stock footage clips of various scenes and locations, plus video effects, transitions, and titles, to make creating professional-quality videos faster and easier.
Let’s see some of its features that help us make animation countdown timers easily.
- Rich effects for you to choose customizing countdown animation at ease.
- You’re not stuck with traditional slow motion in your videos; you can add dynamism and energy to your videos with smooth animations.
- It has various countdown animation templates simplify the whole process, just drag-and-drop, everything gets done.
How to make a countdown animation with Filmora
You’re looking for an animated countdown timer for your website or your very first YouTube video, but you want one that stands out. You don’t want your visitors to think it’s generic or boring, so you’re thinking about how to make your countdown timer more interesting.
That’s where Filmora comes in. It’s an amazing tool that makes it easy to create countdown animations on websites or videos for almost any purpose. Let’s look at how to create your own cool, creative countdown timers using Filmora.
Free Download For Win 7 or later(64-bit)
Free Download For macOS 10.14 or later
Step1 Open Filmora and import the background video file from the media section.

Step2 After importing the video, go to elements options from the top tab.

Step3 After choosing elements, you’ll see the countdown tab on your left. Click on the countdown and choose any animation. You can adjust the animation duration, size, and audio.

Step4 Adjust the animation duration according to the background video, and finally, export your animated countdown timer.

Pros and Cons of using Video Editing Software to make a countdown animation
Pros
- You can save any countdown effects project as a project to be used in future videos
- You can create a vision of your brand concept in your way
- Free templates are available according to your brand and target audience
- More stable
Cons
- Standard out-of-the-box video editing software isn’t enough to create a professional-quality video
Method 2: Generate the timer with Free Online Countdown Timer Video Generators
If you’re trying to catch your audience’s attention by giving them a reason to ‘countdown’ to something, then you’ll want to use a countdown timer with some great free online countdown videos.
There are many countdown timer websites like;Biteable ,Kapwing ,Movavi ,and MakeWebVideo . But we’ve rounded up the best countdown video generator site you’ll ever see:
FlexClip

FlexClip is a powerful yet easy-to-use online video editor. Its music library is versatile and high-quality. It lets you pick and add favorite tracks without infringing worries. Apply interesting editing to make your videos look better by adding transitions, filters, text, and more.
FlexClip’s biggest advantage is its extensive amount of free media assets. Whether you’re a master or rookie with FlexClip, you’re capable of producing excellent videos with music. You can be a video guru or a video beginner. You’re capable of producing awesome videos with great sound using FlexClip.
Key Features:
- Provides a complete set of video-making processes.
- A diverse range of royalty-free music selection
- Loads of handy editing tools
- Thousands of ready-made templates
- Multiple advanced features like adding text, emoji, effects, and more
How to make a countdown animation with FlexClip
The FlexClip countdown creator is a leading video editor with many powerful features. To make your countdown video, click the Create a Video button below.
Step1 Set Your Countdown Video Background
Set your timer to how long you want your message to start your countdown. Usually, it’s 10 seconds.
Then add scenes and adjust the duration of scenes to make them all length. You can use the background color to make it more appealing to your audience.

Step2 Highlight Your Countdown with Animated Elements
Using the amazing elements, you can make your countdown interactive and much more fun. Just go to the sidebar and switch to the Elements options. Apply the elements you want, then customize them on size, position, and color.

Step3 Add the Number to Your Countdown
Now, add the numbers for the countdown, e.g., if you want a 10-second countdown, type in the number “10”. You can pick a basic text effect and manually enter the number.
After you’ve created the number, go to the timeline and control how long the number will appear and when it will disappear.

Step4 Add Music or Sound Effects to Your Countdown Video
FlexClip lets you upload your audio files from a local folder, or you can select one from FlexClip’s library. Once you’re done adding the countdown music, you can trim the duration, set it to start and end at any time, and use the fade-in/out effect to make the music match your countdown. Plus, you can also adjust the volume to make the music softer.

Step5 Preview and Export Your Countdown Video
You can preview it to see how the countdown video will look in the end, finally, hit export, and you’re done!
Method 3: Make a Countdown Timer with a Graphic Design Platform
Today’s graphic design platforms give designers more options than ever before, but many designers struggle to make the most of these resources. Let us share some tips and tricks on designing a countdown timer using the tools available through Canva, a graphic design platform.
Canva

Many types of graphic design software are available, and Canva is one of the best. While its critics may disagree, Canva is an undeniable tool to help millions of business owners and marketers improve their social media graphics and redesign their brand image without needing to learn graphic design.
Key Features:
- Drag and drop feature
- Free templates
- Background Removal Tool
- Canva Brand Kit
- Magic Resizing
How to make a countdown animation with Canva
Canva offers a range of great-looking countdown templates that’ll help you create one in just a few minutes. And if you need a simple countdown animation, you can download one of their free templates. Let’s make it from scratch:
Step1 Select The Background
With Canva, you get a wide range of free backgrounds. Click on the button labeled “Search.” Now choose the “light old film” background element and click Add.

Step2 Enter Your Text (Number)
Then select the text tab and choose any font style, color, and size.

Step3 Animate Text
Next, select the font again, and then, at the top, there’s an option for Text Animation.
Adding text animation to your countdown timer will make it more realistic and match your background better than a straight-up countdown timer.

Step4 Edit The Page Timing
Next, click on the “Edit Timing” option. You can set the timer for each page as per your choice

Step5 Duplicate The Page
Now, select the duplicate page option and change the number of duplicate pages from 3 to 2,1, with the same design and formatting.

Step6 Export / Download Video
You’re finally done! Click the Download button to export your design.
The background of this photo is not a static image, so you cannot select the JPG, PNG, or SVG. You must choose an MP4 video or a GIF when creating an animation.

Top 10 animated countdown effects to make your video like a Pro
Animated countdown effects are a great way to add some “pizzazz” to a simple video. They look awesome and are extremely effective in creating a memorable video. When used well, they can add some excitement to a boring video. We’ll go over the top 10 animated countdown effects from Filmstock
1. Cool Countdown

2. Fitness Countdown

3. Cinematic Countdown

4. Neon Countdown

5. Cyber Countdown

6. Digital Countdown Pack

7. Big Metal Countdown

8. Glitch Countdown Transition

9. Countdown To New Year

10. Flashing Light Countdown

How to use these effects in Wondershare Filmora
You can access Filmstock directly from the Filmora application or by visiting the website:
- Create a new project by clicking Filmora Video Editor in the menu.
- Select the audio effects tab, or go to the Audio tab, title tab. You will see the film stock option.
- Click the Visit Filmstock button, and you will be taken to the Filmstock website.
Free Download For Win 7 or later(64-bit)
Free Download For macOS 10.14 or later

- Log in to Filmstock using your Wondershare account.

- After the download, the new effects will be added to your project in the appropriate section (Audio, Title, Transitions, and Elements). You’ll also be able to preview each effect from this window.

![]()
Note: it is highly recommended to log in to Filmstock and Filmora with the same Wondershare ID.
Final Words
A countdown is a powerful tool to add suspense to your videos. It gives your audience more incentive to watch your video all the way through. Get this article, as it is the ultimate guide to making your countdown animations, plus the best video editing software, Wondershare Filmora.
Wondershare Filmora is an excellent place to be creative and make some terrific countdown timers that can improve your viewers’ overall experience. Use their templates to create a strong and engaging online presence. Your audience won’t be able to resist the mesmerizing, hypnotizing, and enthralling effects of Wondershare Filmora.
Free Download For Win 7 or later(64-bit)
Free Download For macOS 10.14 or later
Also read:
- New In 2024, Video Inspiration for Birthday Slideshow
- Mastering FFmpeg How to Merge Audio and Video with Ease
- 2024 Approved Troubleshoot Snapchat Camera Zoomed in Issue 4 Tips
- New In 2024, Step by Step to Add Border to Video Using Premiere Pro
- Updated EasyHDR Review Is This a Good Choice to Create HDR
- New The Top 10 AI Video Analytics Companies at a Glance
- How to Change Aspect Ratio of Video for 2024
- In 2024, Change Aspect Ratio of Video
- Updated Simple Tricks Make 3D GIF Production of Inspiration Pop up Constantly for 2024
- Top 12 Best Freeze Frame Video Editing Examples
- In 2024, How To Track and Blur Faces in Premiere Pro
- In 2024, Best Video Editing Courses Online with Certificate
- In 2024, Best Applications That Can Help Apply The Best VHS Camera Effect
- Updated Top Best Free LUTs For Premiere Pro
- Updated 2024 Approved How to Resize FLV Videos Efficiently Windows, Mac,Android, iPhone & Online
- New Do You Like Clouds or Sky and Want to Use Them as a Video Background? Explore This Article to Learn About the Sky Change Video in Filmora
- New Learn How Video Montages Were Used over Film History with Examples and the Types of Videos for Shorter Montages. Plus, Learn About the Best Software for It
- Effective 10 Ways to Convert YouTube to MOV at Ease PC & Online
- Updated 2024 Approved How to Create an Adobe Slideshow the Easy Way
- 2024 Approved How to Merge Audio and Video Using FFmpeg
- In 2024, Step by Step to Cut a Video in QuickTime
- In 2024, In Todays Article, We Are Going to Show You How Adding a Simple Lower Third to Your Video Can Add a Degree of Professionalism and Polish to Your Videos While Giving It a Higher Perceived Value
- Updated Do You Also Use Android to Create and Edit Videos? Read About the Efectum Video Effects Editor, Which Is Available in Your App Stores for Seamless Editing
- New This Article Discusses What Is Hitfilm Express, How to Download, Install and Use It, and Its Key Features. It Further Discusses Its Alternative for Editing Your Videos and More. Check Out Now
- How to Fix Unfortunately, Contacts Has Stopped Error on Tecno Camon 20 Pro 5G | Dr.fone
- New In 2024, Top 10 3D Text Animation Templates
- In 2024, How to Fix Locked Apple ID from Apple iPhone 12
- 8 Quick Fixes Unfortunately, Snapchat has Stopped on Infinix Smart 8 HD | Dr.fone
- In 2024, Top 10 Fingerprint Lock Apps to Lock Your Vivo Y27 5G Phone
- Easy steps to recover deleted call history from Lava Yuva 2
- How to Fake GPS on Android without Mock Location For your Oppo K11x | Dr.fone
- How to Mirror PC Screen to Infinix Note 30 5G Phones? | Dr.fone
- In 2024, Top 4 SIM Location Trackers To Easily Find Your Lost Motorola Moto G04 Device
- Will the iPogo Get You Banned and How to Solve It On Infinix Smart 8 Plus | Dr.fone
- Tutorial to Change Vivo Y02T IMEI without Root A Comprehensive Guide
- In 2024, How Motorola Moto G34 5G Mirror Screen to PC? | Dr.fone
- Complete Tutorial to Use VPNa to Fake GPS Location On Apple iPhone SE | Dr.fone
- 4 Ways to Transfer Music from Apple iPhone 14 Pro Max to iPod touch | Dr.fone
- Recover your photos after ROG Phone 7 has been deleted.
- Full guide to iPhone 15 Pro Max iCloud Bypass
- How To Unlink Apple ID From iPhone 13 Pro
- Realme GT 5 Pro Not Connecting to Wi-Fi? 12 Quick Ways to Fix | Dr.fone
- In 2024, 4 Feasible Ways to Fake Location on Facebook For your Oppo Find X6 | Dr.fone
- Protecting Your Privacy How To Remove Apple ID From Apple iPhone 14 Pro
- In 2024, 9 Best Free Android Monitoring Apps to Monitor Phone Remotely For your Vivo V29e | Dr.fone
- Title: New Shoot Video with Virtual Green Screen
- Author: Chloe
- Created at : 2024-04-24 07:08:14
- Updated at : 2024-04-25 07:08:14
- Link: https://ai-editing-video.techidaily.com/new-shoot-video-with-virtual-green-screen/
- License: This work is licensed under CC BY-NC-SA 4.0.

