:max_bytes(150000):strip_icc():format(webp)/001_2654847-5b99b903c9e77c005077d0d8.jpg)
New Step by Step to Cut Videos in Adobe Premiere Pro

Step by Step to Cut Videos in Adobe Premiere Pro
Video editing is an essential skill in a world that has a growing focus on creative fields. And if you work with videos, knowing which clips to use and where to cut is essential in conveying your story and increasing its impact. So, if you are a beginner and want to familiarise yourself with steps and terms used in video editing, in this article, we will go through the steps you will need to cut your video file in Adobe Premiere Pro and Wondershare Filmora.
This guide uses Adobe Premiere Pro 2022 and Wondershare Filmora X.
How to cut video in Adobe Premiere Pro?
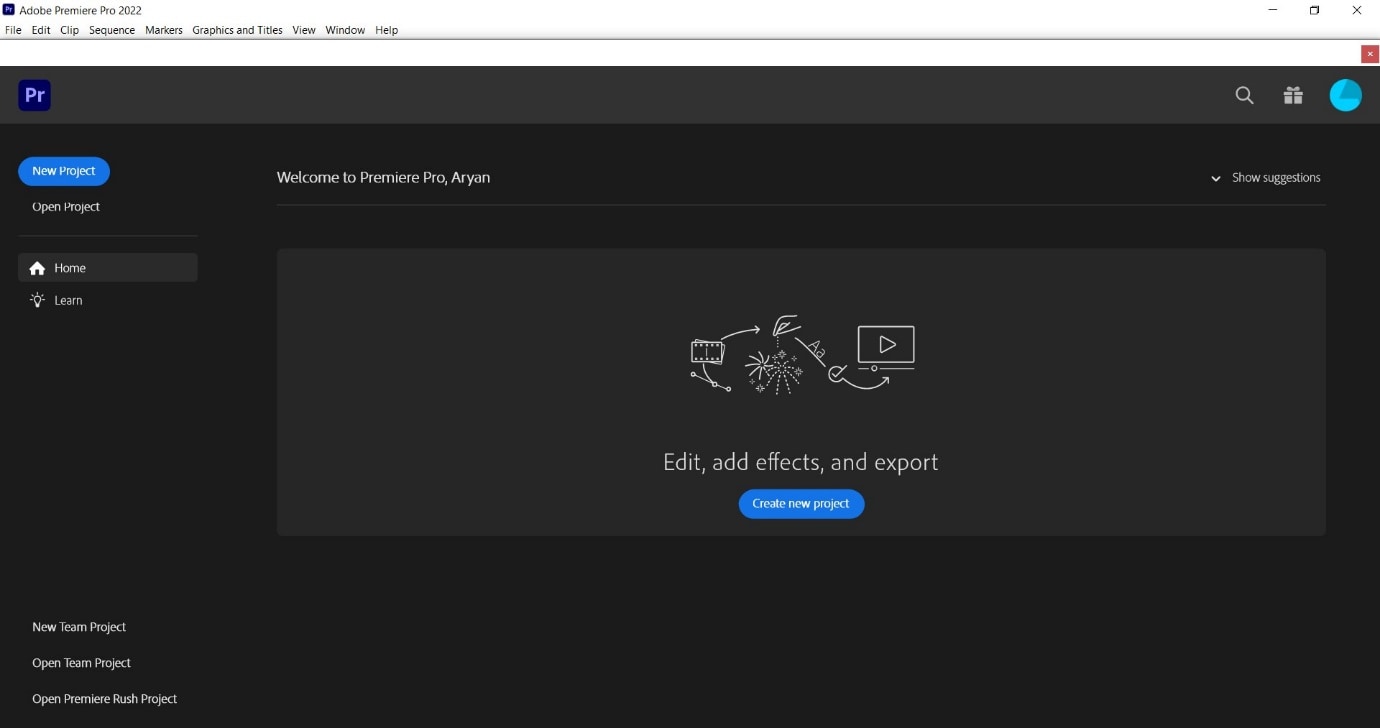
Once you have Adobe Premiere Pro open on your computer, follow the steps listed below.
Step 1: Create a new project in Premiere Pro.
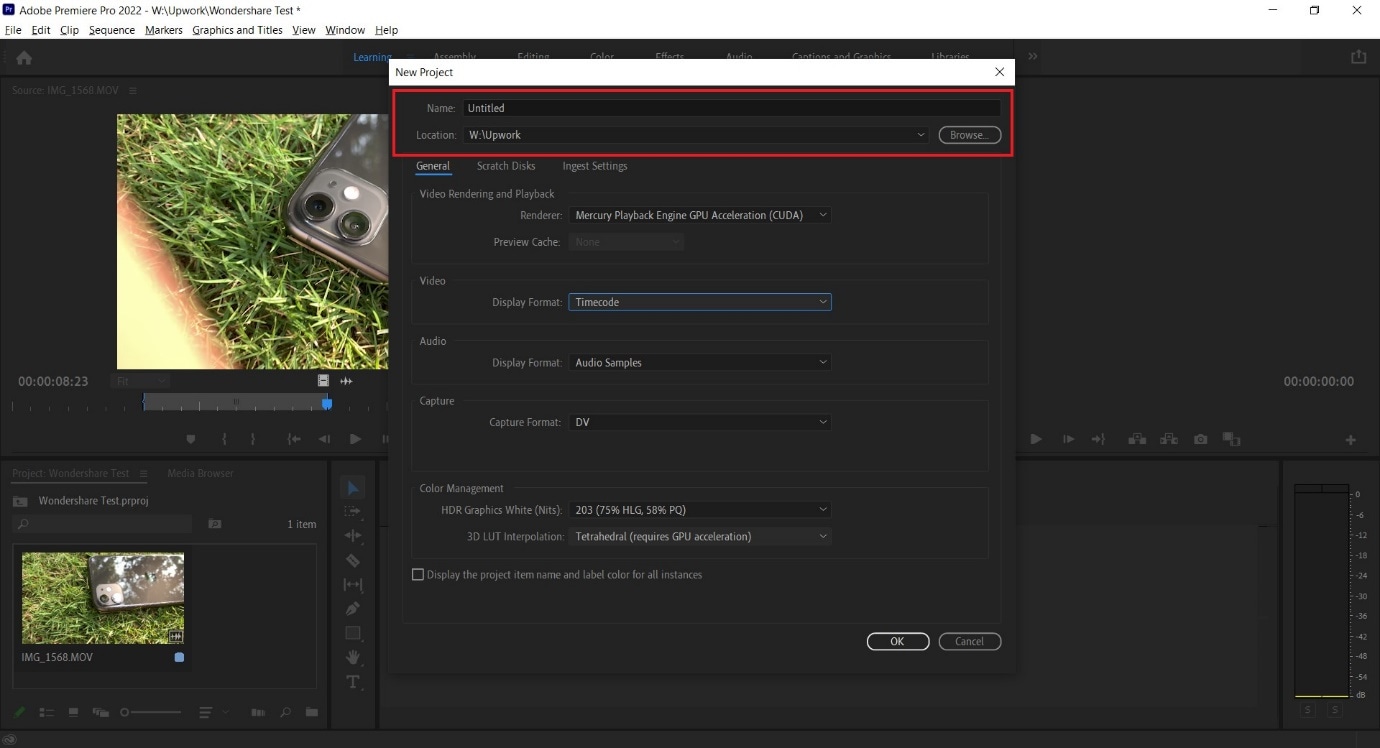
During project creation, we recommend keeping an eye on the file name set and the storage location; this can help reduce the time spent in locating the Premiere Project.
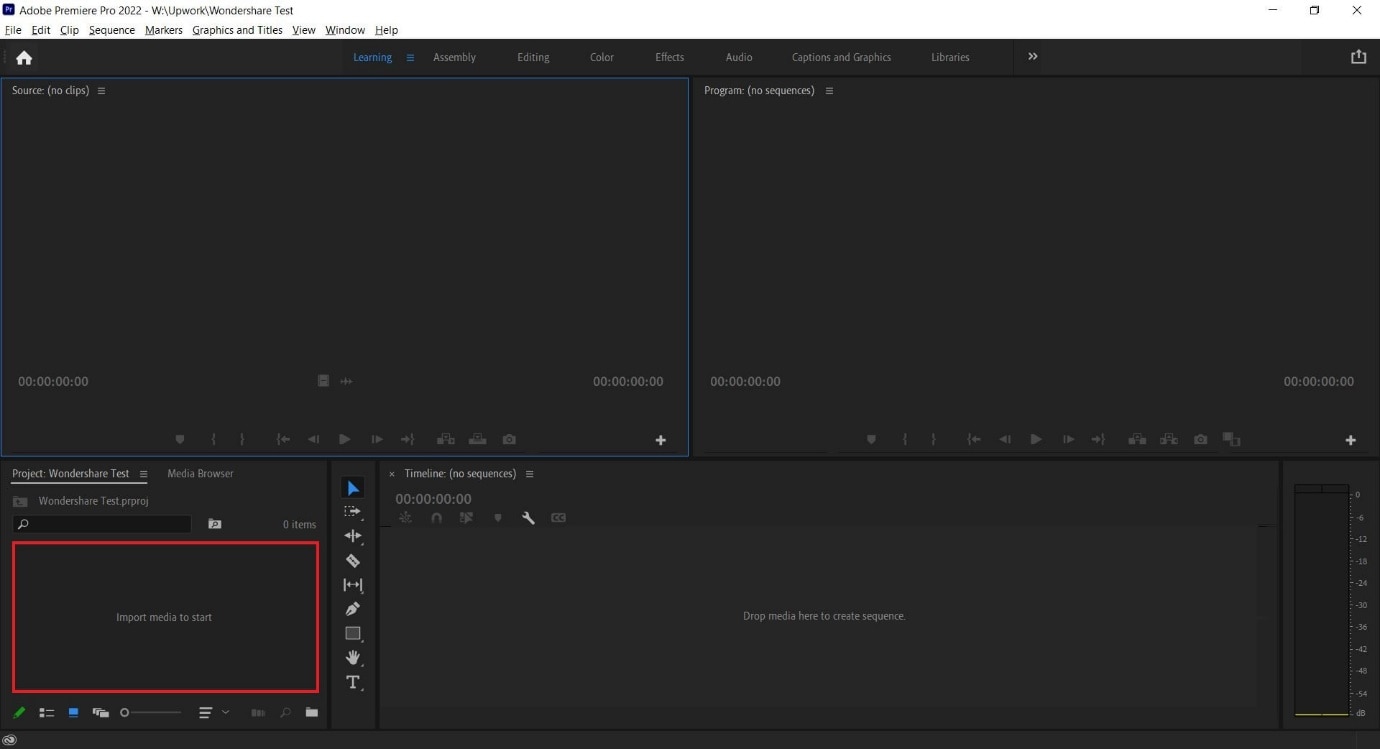
Step 2: Import a video file into Premiere Pro with a double click in the marked area and choose the file from its stored location.
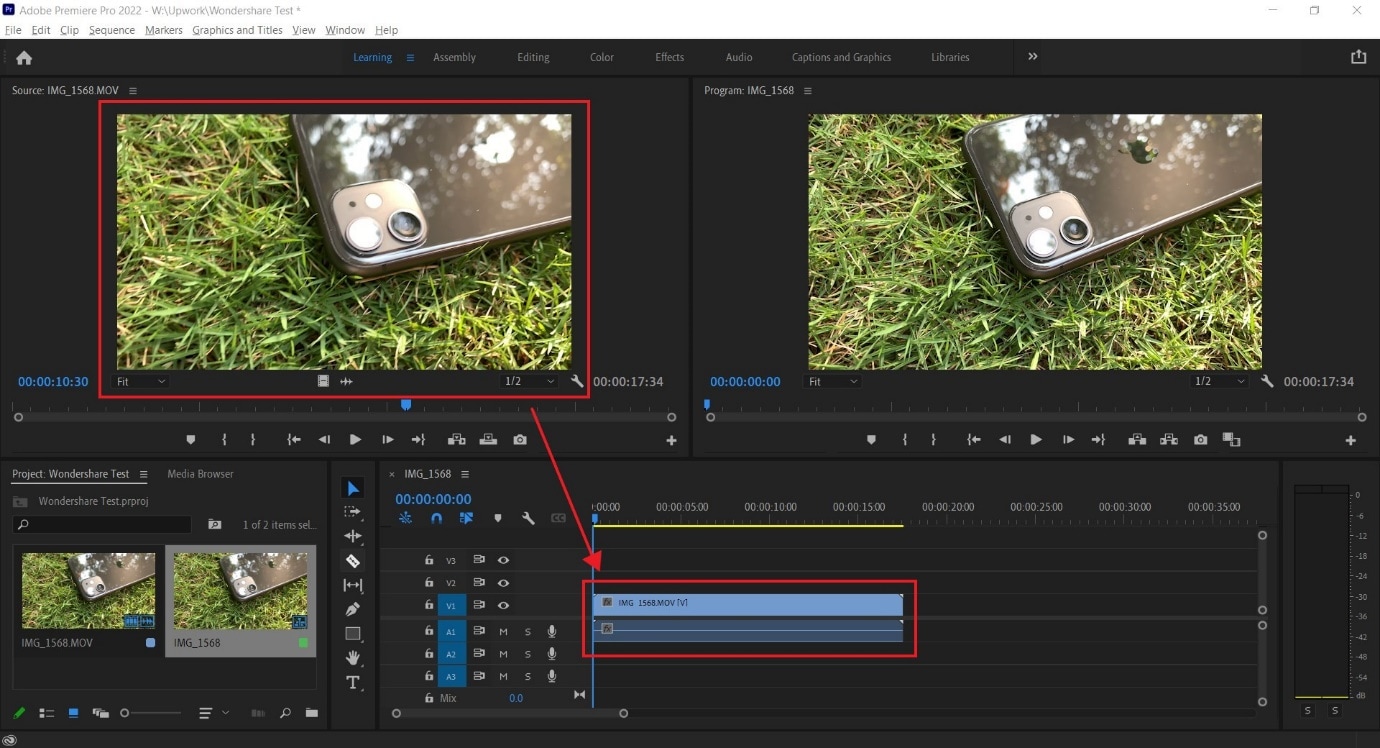
Step 3: Double click on any imported media to activate it and send it to the Source Window.
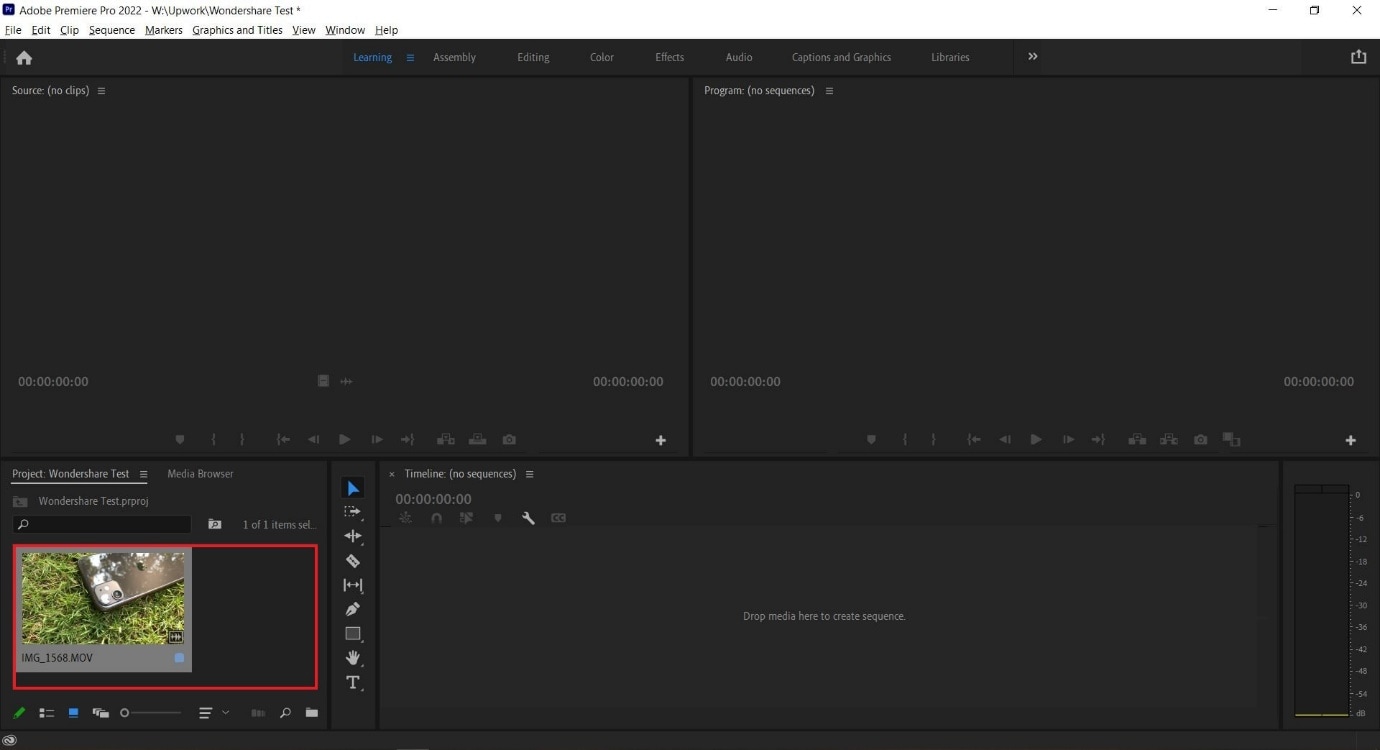
You can continue to import more media by double-clicking within the marked area. For better organization, users can also create Bins, which are folders within a Premiere Pro File that are often in use to sort out imported media.
Users can create Bins with a right-click in the red box marked area (refer to image above).
Step 4: Select either the whole clip or a part of it from the Source Window and drag it onto the Timeline.
Step 5: Select the Razor Tool from the Tools Window. Now, pick the point where you want to introduce a cut and confirm with your left mouse button; this will split your video track into two parts.
Make a second cut where desired, following which you can move around the newly generated clip or delete it.
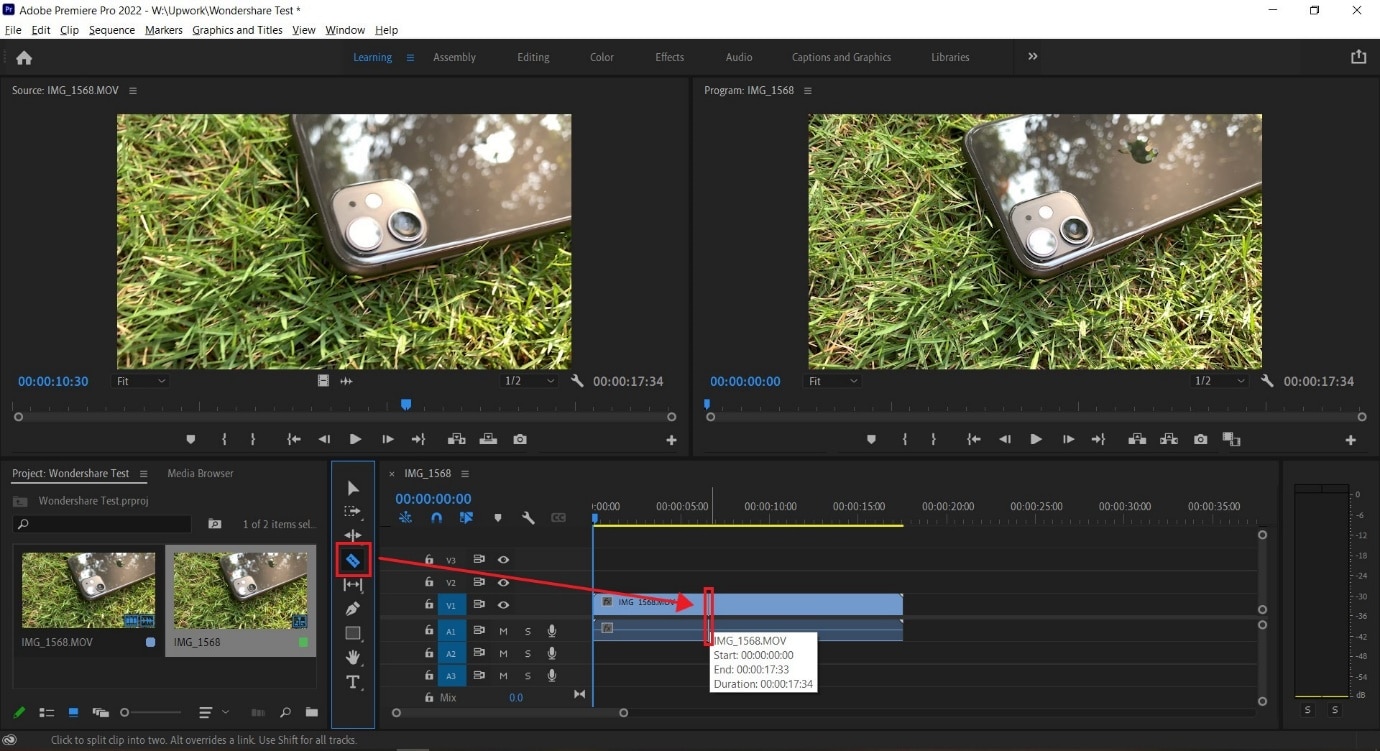
**Tip:**You can also select the Razor Tool by pressing C on the keyboard_._
We also recommend using the Snap in Timeline feature (activated with (S) on your keyboard or by choosing the magnet option), which will match your mouse pointer with the Playhead to ensure your cut will match the exact frame shown on your screen.
-—————————————————————————————————————————————-
Some more tips for Adobe Premiere Pro:
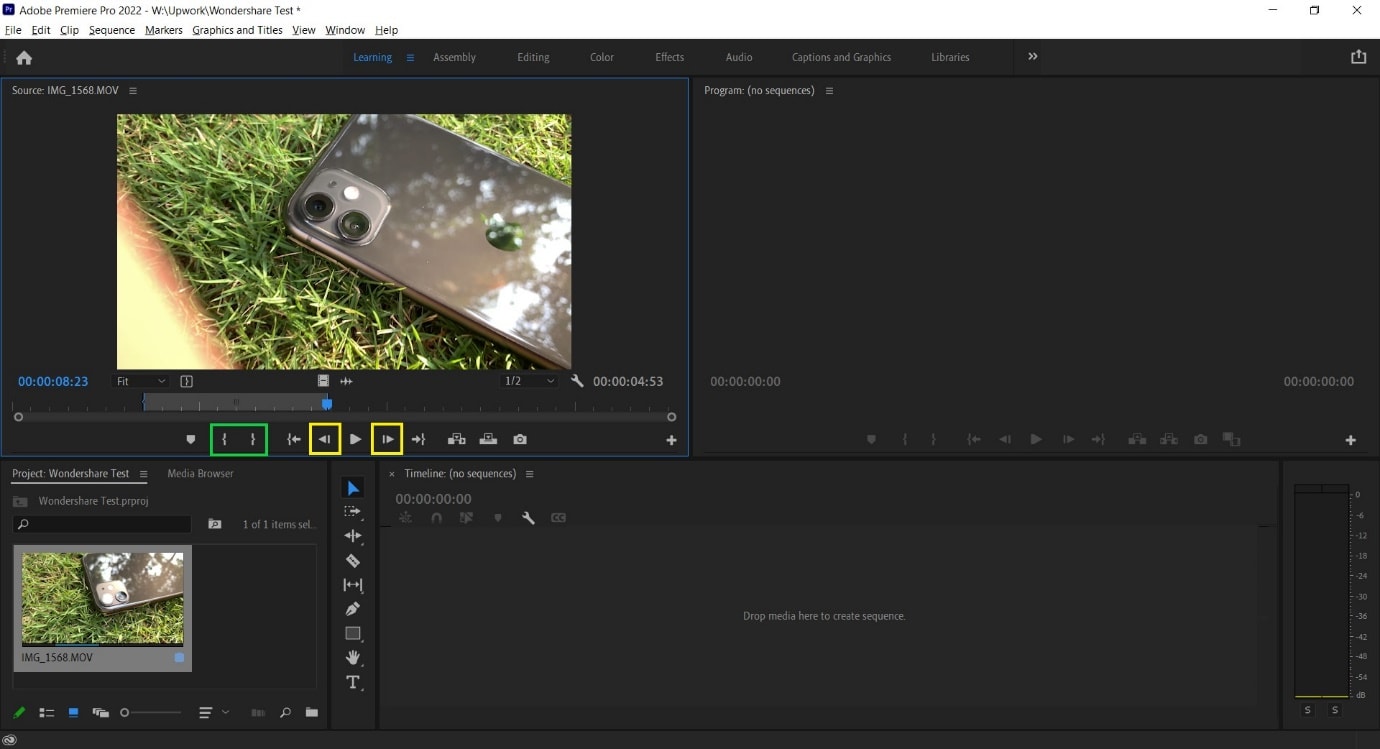
- Using the I and O keys on your keyboard while playing a video in the Source Window will allow you to set an In Pointand an Out Point. These markers will allow you to move a specific part of your video file into the Timeline, thus, reducing the amount of time spent making the right cut.
We have tagged the Mark In and Mark Out buttons with a Green Box in the image below.
- Clicking on the Step Frame Buttons [marked in Yellow] will also help increase the accuracy of your cut by allowing you to select the exact moment you desire.
- You can also mark a Point of Interest in your video file with the help of Markers in Premiere Pro. These afford you the ability to come back to the moment at a later time and see why it interested you in the first place, as editing sessions can often take hours at an end.
An alternative way to cut video with Wondershare Filmora
In Wondershare Filmora Video Editor , the steps to cut a video are simplified and don’t require as many steps as seen earlier. Opening the application throws you straight into a project, and following this, you can import a video file and begin editing. From the process you will learn below, it is easy to assume that Wondershare Filmora is more convenient for beginners and provides software features that match paid professional software.
For Win 7 or later (64-bit)
For macOS 10.14 or later
Note: If you don’t have Wondershare Filmora installed, you can get the video editor by visiting its official website . Once the setup program download completes, execute it and begin the installation process.
Once you have the editing software open, follow the steps listed below.
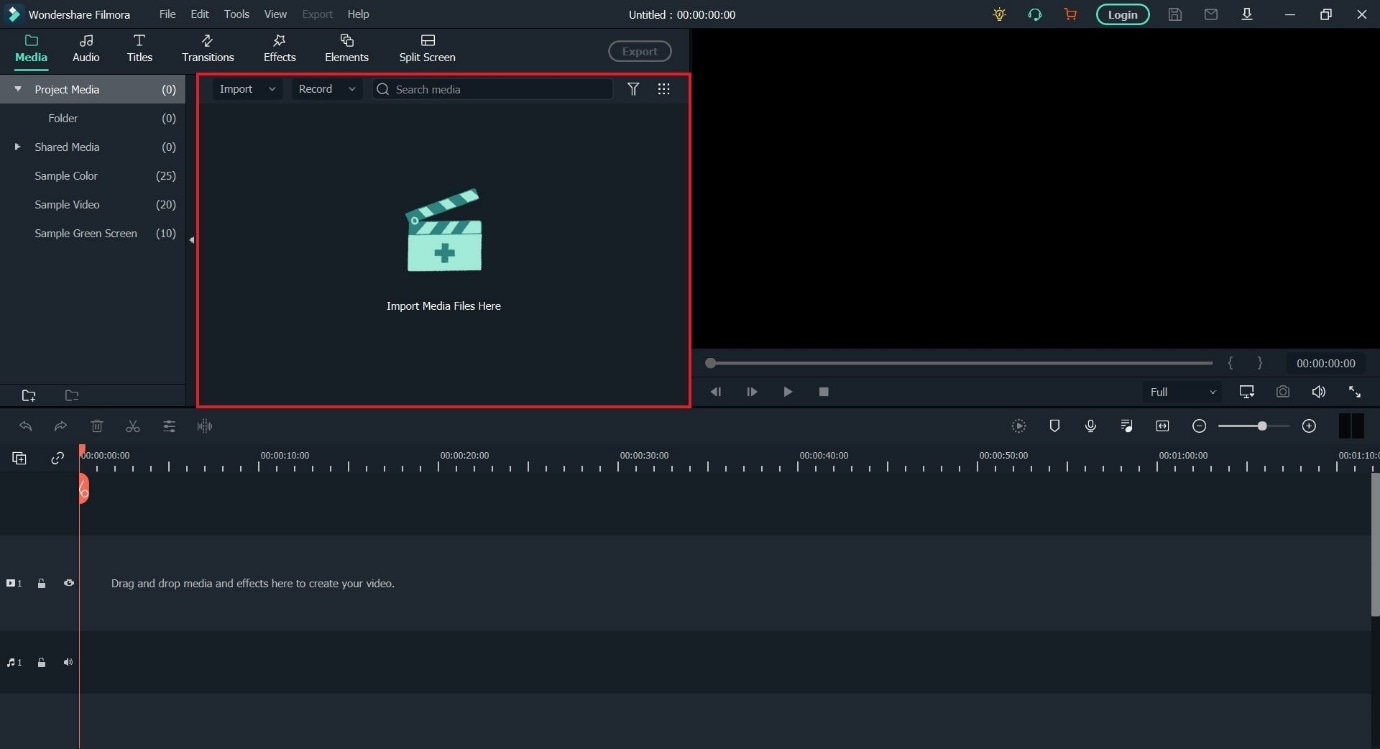
Step 1: Import a video file by clicking on the import window.
The default project setting for Filmora X is 1920x1080 at 25 frames per second. Users can change this to match their video file by going into Project Settings under the File tab or by accepting the automatic prompt that appears when dragging the video file onto the Timeline.
Note: If you have a PC with weak hardware, Wondershare Filmora gives you the option to create Video Proxies that will reduce the load on your computer by creating smaller clips that are lower in size, resulting in a smoother and faster experience. You can also do this in Premiere Pro, but Filmora does it for you automatically once given permission.
Step 2: Drag the video file onto the Timeline to begin previewing it in the Playback Window and commence editing operations.
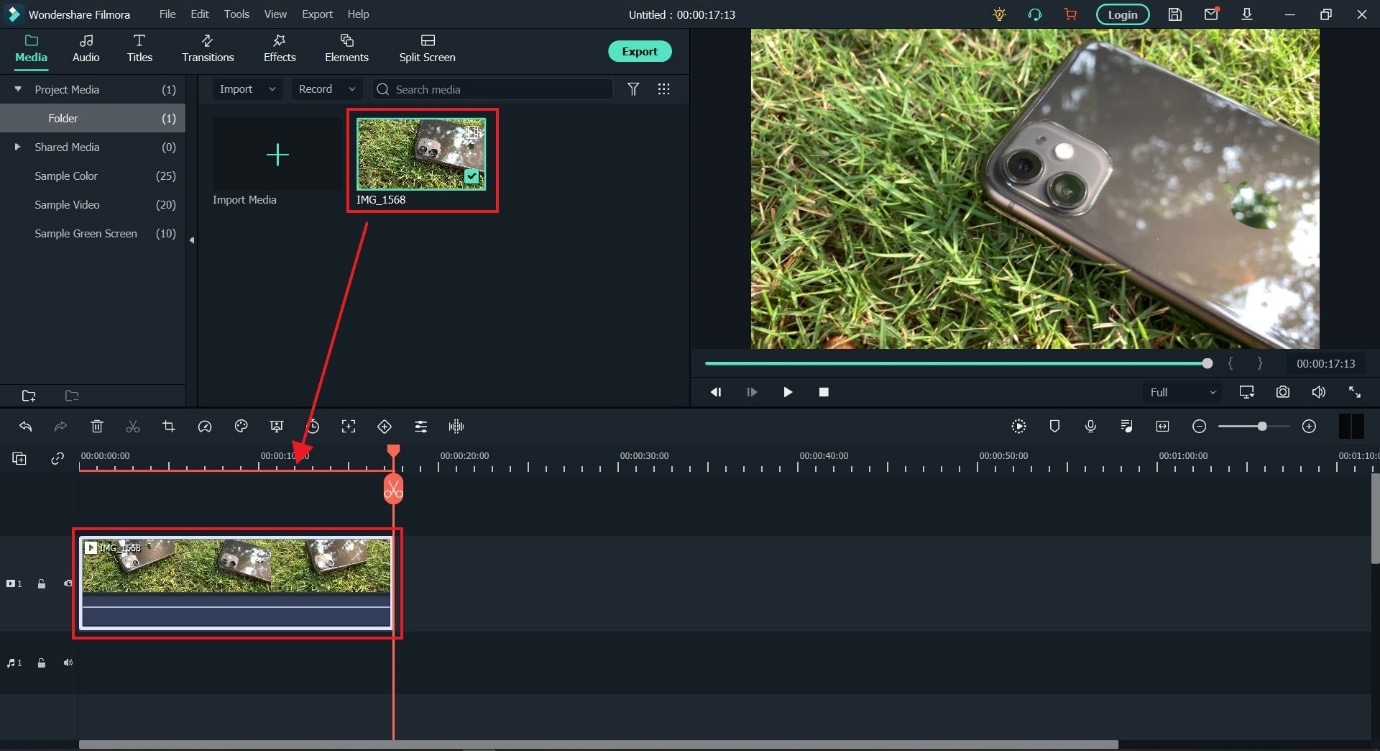
Step 3: Locate where you want to cut in the video file and click on the orange scissors option to split the video file.
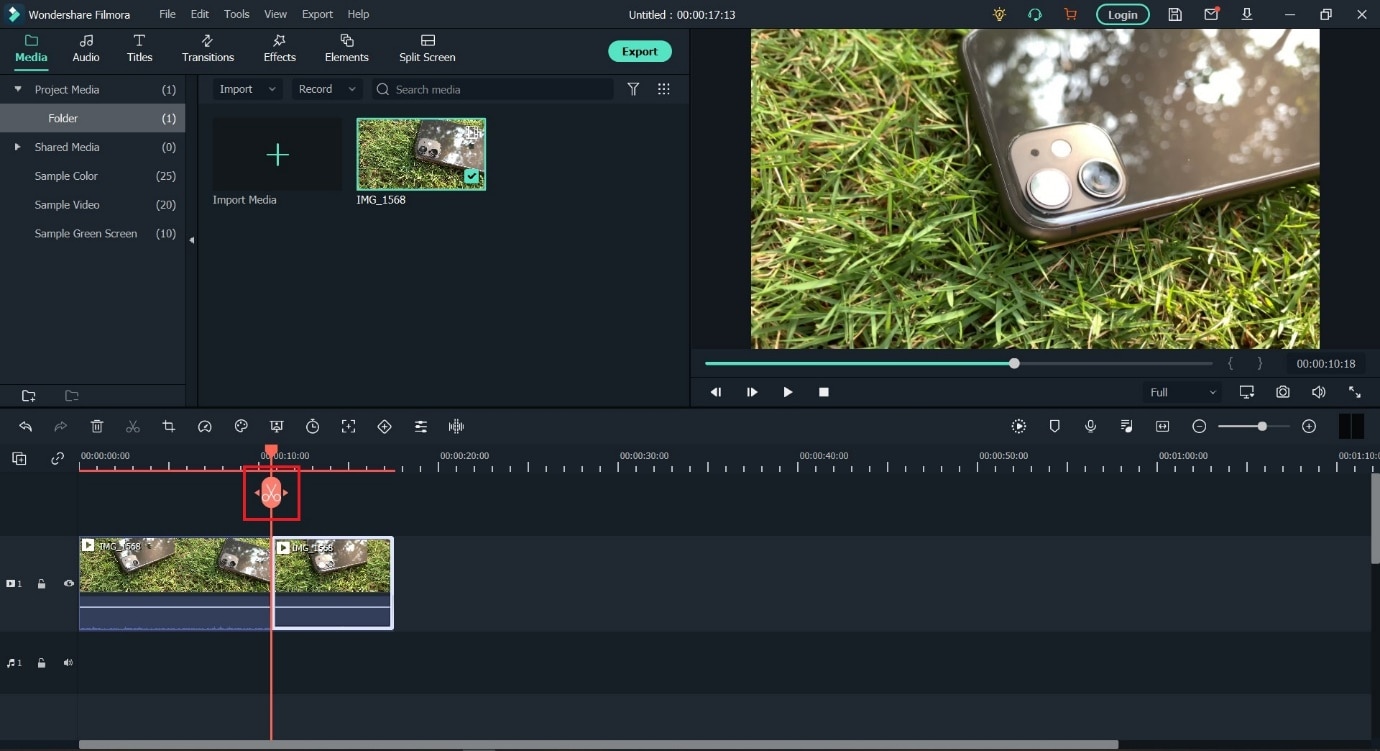
Tip: You can also use the keyboard shortcut (CTRL+B) to cut without using a mouse click, in case you make use of a trackpad while editing.
The Bottom Line
As said earlier, knowing where to cut is essential in improving the feel of your video, and we hope this guide showed you exactly how to perform the actions to create your best project. If you are a beginner, the simplistic approach of Wondershare Filmora will be more welcoming and easier to navigate. In addition, the software is also free to download, with added features that you can activate by paying a monthly, yearly, or one-time fee. Adobe Premiere Pro is an option worth considering if you plan on using third-party plugins and other applications from the Creative Cloud Suite.
During project creation, we recommend keeping an eye on the file name set and the storage location; this can help reduce the time spent in locating the Premiere Project.

Step 2: Import a video file into Premiere Pro with a double click in the marked area and choose the file from its stored location.

Step 3: Double click on any imported media to activate it and send it to the Source Window.

You can continue to import more media by double-clicking within the marked area. For better organization, users can also create Bins, which are folders within a Premiere Pro File that are often in use to sort out imported media.
Users can create Bins with a right-click in the red box marked area (refer to image above).
Step 4: Select either the whole clip or a part of it from the Source Window and drag it onto the Timeline.

Step 5: Select the Razor Tool from the Tools Window. Now, pick the point where you want to introduce a cut and confirm with your left mouse button; this will split your video track into two parts.
Make a second cut where desired, following which you can move around the newly generated clip or delete it.

**Tip:**You can also select the Razor Tool by pressing C on the keyboard_._
We also recommend using the Snap in Timeline feature (activated with (S) on your keyboard or by choosing the magnet option), which will match your mouse pointer with the Playhead to ensure your cut will match the exact frame shown on your screen.
-—————————————————————————————————————————————-
Some more tips for Adobe Premiere Pro:
- Using the I and O keys on your keyboard while playing a video in the Source Window will allow you to set an In Pointand an Out Point. These markers will allow you to move a specific part of your video file into the Timeline, thus, reducing the amount of time spent making the right cut.
We have tagged the Mark In and Mark Out buttons with a Green Box in the image below.
- Clicking on the Step Frame Buttons [marked in Yellow] will also help increase the accuracy of your cut by allowing you to select the exact moment you desire.
- You can also mark a Point of Interest in your video file with the help of Markers in Premiere Pro. These afford you the ability to come back to the moment at a later time and see why it interested you in the first place, as editing sessions can often take hours at an end.

An alternative way to cut video with Wondershare Filmora
In Wondershare Filmora Video Editor , the steps to cut a video are simplified and don’t require as many steps as seen earlier. Opening the application throws you straight into a project, and following this, you can import a video file and begin editing. From the process you will learn below, it is easy to assume that Wondershare Filmora is more convenient for beginners and provides software features that match paid professional software.
For Win 7 or later (64-bit)
For macOS 10.14 or later
Note: If you don’t have Wondershare Filmora installed, you can get the video editor by visiting its official website . Once the setup program download completes, execute it and begin the installation process.
Once you have the editing software open, follow the steps listed below.
Step 1: Import a video file by clicking on the import window.
The default project setting for Filmora X is 1920x1080 at 25 frames per second. Users can change this to match their video file by going into Project Settings under the File tab or by accepting the automatic prompt that appears when dragging the video file onto the Timeline.

Note: If you have a PC with weak hardware, Wondershare Filmora gives you the option to create Video Proxies that will reduce the load on your computer by creating smaller clips that are lower in size, resulting in a smoother and faster experience. You can also do this in Premiere Pro, but Filmora does it for you automatically once given permission.
Step 2: Drag the video file onto the Timeline to begin previewing it in the Playback Window and commence editing operations.

Step 3: Locate where you want to cut in the video file and click on the orange scissors option to split the video file.

Tip: You can also use the keyboard shortcut (CTRL+B) to cut without using a mouse click, in case you make use of a trackpad while editing.
The Bottom Line
As said earlier, knowing where to cut is essential in improving the feel of your video, and we hope this guide showed you exactly how to perform the actions to create your best project. If you are a beginner, the simplistic approach of Wondershare Filmora will be more welcoming and easier to navigate. In addition, the software is also free to download, with added features that you can activate by paying a monthly, yearly, or one-time fee. Adobe Premiere Pro is an option worth considering if you plan on using third-party plugins and other applications from the Creative Cloud Suite.
During project creation, we recommend keeping an eye on the file name set and the storage location; this can help reduce the time spent in locating the Premiere Project.

Step 2: Import a video file into Premiere Pro with a double click in the marked area and choose the file from its stored location.

Step 3: Double click on any imported media to activate it and send it to the Source Window.

You can continue to import more media by double-clicking within the marked area. For better organization, users can also create Bins, which are folders within a Premiere Pro File that are often in use to sort out imported media.
Users can create Bins with a right-click in the red box marked area (refer to image above).
Step 4: Select either the whole clip or a part of it from the Source Window and drag it onto the Timeline.

Step 5: Select the Razor Tool from the Tools Window. Now, pick the point where you want to introduce a cut and confirm with your left mouse button; this will split your video track into two parts.
Make a second cut where desired, following which you can move around the newly generated clip or delete it.

**Tip:**You can also select the Razor Tool by pressing C on the keyboard_._
We also recommend using the Snap in Timeline feature (activated with (S) on your keyboard or by choosing the magnet option), which will match your mouse pointer with the Playhead to ensure your cut will match the exact frame shown on your screen.
-—————————————————————————————————————————————-
Some more tips for Adobe Premiere Pro:
- Using the I and O keys on your keyboard while playing a video in the Source Window will allow you to set an In Pointand an Out Point. These markers will allow you to move a specific part of your video file into the Timeline, thus, reducing the amount of time spent making the right cut.
We have tagged the Mark In and Mark Out buttons with a Green Box in the image below.
- Clicking on the Step Frame Buttons [marked in Yellow] will also help increase the accuracy of your cut by allowing you to select the exact moment you desire.
- You can also mark a Point of Interest in your video file with the help of Markers in Premiere Pro. These afford you the ability to come back to the moment at a later time and see why it interested you in the first place, as editing sessions can often take hours at an end.

An alternative way to cut video with Wondershare Filmora
In Wondershare Filmora Video Editor , the steps to cut a video are simplified and don’t require as many steps as seen earlier. Opening the application throws you straight into a project, and following this, you can import a video file and begin editing. From the process you will learn below, it is easy to assume that Wondershare Filmora is more convenient for beginners and provides software features that match paid professional software.
For Win 7 or later (64-bit)
For macOS 10.14 or later
Note: If you don’t have Wondershare Filmora installed, you can get the video editor by visiting its official website . Once the setup program download completes, execute it and begin the installation process.
Once you have the editing software open, follow the steps listed below.
Step 1: Import a video file by clicking on the import window.
The default project setting for Filmora X is 1920x1080 at 25 frames per second. Users can change this to match their video file by going into Project Settings under the File tab or by accepting the automatic prompt that appears when dragging the video file onto the Timeline.

Note: If you have a PC with weak hardware, Wondershare Filmora gives you the option to create Video Proxies that will reduce the load on your computer by creating smaller clips that are lower in size, resulting in a smoother and faster experience. You can also do this in Premiere Pro, but Filmora does it for you automatically once given permission.
Step 2: Drag the video file onto the Timeline to begin previewing it in the Playback Window and commence editing operations.

Step 3: Locate where you want to cut in the video file and click on the orange scissors option to split the video file.

Tip: You can also use the keyboard shortcut (CTRL+B) to cut without using a mouse click, in case you make use of a trackpad while editing.
The Bottom Line
As said earlier, knowing where to cut is essential in improving the feel of your video, and we hope this guide showed you exactly how to perform the actions to create your best project. If you are a beginner, the simplistic approach of Wondershare Filmora will be more welcoming and easier to navigate. In addition, the software is also free to download, with added features that you can activate by paying a monthly, yearly, or one-time fee. Adobe Premiere Pro is an option worth considering if you plan on using third-party plugins and other applications from the Creative Cloud Suite.
During project creation, we recommend keeping an eye on the file name set and the storage location; this can help reduce the time spent in locating the Premiere Project.

Step 2: Import a video file into Premiere Pro with a double click in the marked area and choose the file from its stored location.

Step 3: Double click on any imported media to activate it and send it to the Source Window.

You can continue to import more media by double-clicking within the marked area. For better organization, users can also create Bins, which are folders within a Premiere Pro File that are often in use to sort out imported media.
Users can create Bins with a right-click in the red box marked area (refer to image above).
Step 4: Select either the whole clip or a part of it from the Source Window and drag it onto the Timeline.

Step 5: Select the Razor Tool from the Tools Window. Now, pick the point where you want to introduce a cut and confirm with your left mouse button; this will split your video track into two parts.
Make a second cut where desired, following which you can move around the newly generated clip or delete it.

**Tip:**You can also select the Razor Tool by pressing C on the keyboard_._
We also recommend using the Snap in Timeline feature (activated with (S) on your keyboard or by choosing the magnet option), which will match your mouse pointer with the Playhead to ensure your cut will match the exact frame shown on your screen.
-—————————————————————————————————————————————-
Some more tips for Adobe Premiere Pro:
- Using the I and O keys on your keyboard while playing a video in the Source Window will allow you to set an In Pointand an Out Point. These markers will allow you to move a specific part of your video file into the Timeline, thus, reducing the amount of time spent making the right cut.
We have tagged the Mark In and Mark Out buttons with a Green Box in the image below.
- Clicking on the Step Frame Buttons [marked in Yellow] will also help increase the accuracy of your cut by allowing you to select the exact moment you desire.
- You can also mark a Point of Interest in your video file with the help of Markers in Premiere Pro. These afford you the ability to come back to the moment at a later time and see why it interested you in the first place, as editing sessions can often take hours at an end.

An alternative way to cut video with Wondershare Filmora
In Wondershare Filmora Video Editor , the steps to cut a video are simplified and don’t require as many steps as seen earlier. Opening the application throws you straight into a project, and following this, you can import a video file and begin editing. From the process you will learn below, it is easy to assume that Wondershare Filmora is more convenient for beginners and provides software features that match paid professional software.
For Win 7 or later (64-bit)
For macOS 10.14 or later
Note: If you don’t have Wondershare Filmora installed, you can get the video editor by visiting its official website . Once the setup program download completes, execute it and begin the installation process.
Once you have the editing software open, follow the steps listed below.
Step 1: Import a video file by clicking on the import window.
The default project setting for Filmora X is 1920x1080 at 25 frames per second. Users can change this to match their video file by going into Project Settings under the File tab or by accepting the automatic prompt that appears when dragging the video file onto the Timeline.

Note: If you have a PC with weak hardware, Wondershare Filmora gives you the option to create Video Proxies that will reduce the load on your computer by creating smaller clips that are lower in size, resulting in a smoother and faster experience. You can also do this in Premiere Pro, but Filmora does it for you automatically once given permission.
Step 2: Drag the video file onto the Timeline to begin previewing it in the Playback Window and commence editing operations.

Step 3: Locate where you want to cut in the video file and click on the orange scissors option to split the video file.

Tip: You can also use the keyboard shortcut (CTRL+B) to cut without using a mouse click, in case you make use of a trackpad while editing.
The Bottom Line
As said earlier, knowing where to cut is essential in improving the feel of your video, and we hope this guide showed you exactly how to perform the actions to create your best project. If you are a beginner, the simplistic approach of Wondershare Filmora will be more welcoming and easier to navigate. In addition, the software is also free to download, with added features that you can activate by paying a monthly, yearly, or one-time fee. Adobe Premiere Pro is an option worth considering if you plan on using third-party plugins and other applications from the Creative Cloud Suite.
Complete Tutorial to Make an Impressive Countdown Timer Video
Countdown timers are a fool-proof way of arousing curiosity in your audience, making them excited about what is to come next. A countdown timer video could include minutes, seconds, or even days.
If you’re tempted to create a timer video but are clueless about it, you’re at the right place. From customizing your countdown video to make one on your mobile devices, this blog features everything you need to know.
Let’s begin!
Part 1: Get an Impactful Countdown Timer Video Generator
Countdown videos are beneficial in various ways, such as encouraging viewers to participate in the video or preparing them to watch the clip from start to end without losing its essence.
If you want your audience to engage with your countdown time video clip or even live streams, think about using innovative software, such as Wondershare Filmora . Not only it’s easy to use, but it offers a wide variety of features, too.
One of the user-friendly software, Filmora - as a countdown timer video generator, can help you create a visually interesting countdown video with sound - thanks to the following aspects:
Powerful Features
The software comes with animated elements, music library and filters, and supports communication through a wide variety of lower thirds, titles, and openers.
Easy to Operate
Its intuitive interface needs only simple drag and drop to import files and start editing.
Extensive Media Stock
It offers royalty-free music, imagery, and templates, so you can create videos without worrying over copyright issues.
Various Video Templates
It comes with various timer templates ranging from casual ones for holidays to aesthetics-added variety for events.
Part 2: How to Customize a Countdown Timer Video
After exploring Filmora and its intuitive interface, it’s safe to say it’ll make the entire countdown timer video production easier than you think. Not only its various templates help you choose an aesthetically pleasing one, but its features enable you add elements, sound effects, and more.
However, when it comes to creating a customized countdown timer video, Filmora can become your go-to software, too. Don’t believe us? See, this following steps below and try it yourself.
How to Customize a Countdown Timer Video with Wondershare Filmora
Following steps can help you produce a customized countdown timer for any video.
1) Set your Countdown Video Background
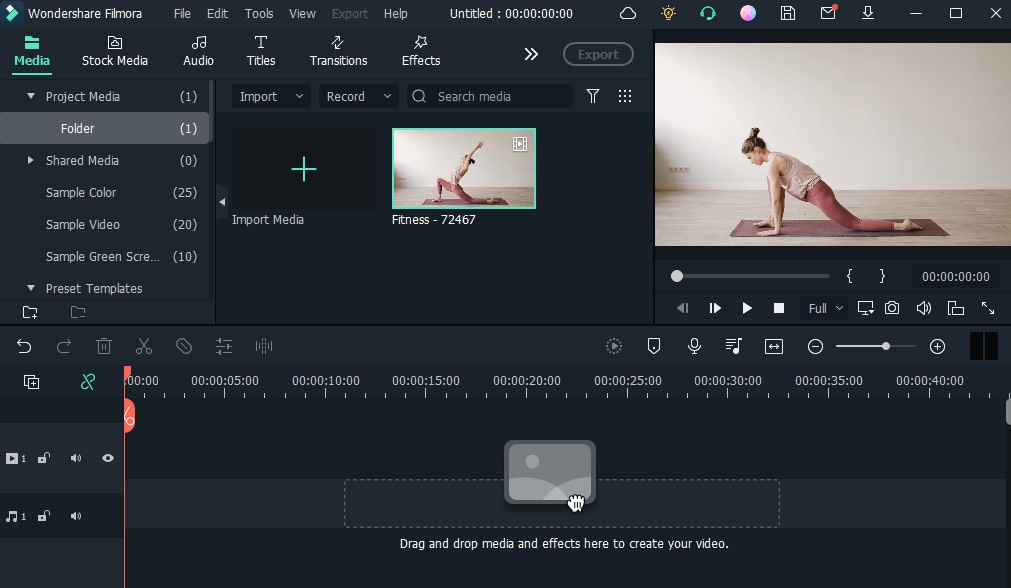
First things first, start Filmora software on your desktop. Once opened, go to media section and import the video. Now that your video is imported, let’s move on to the next step.
2) Highlight your Countdown with Animated Elements

To incorporate elements to your countdown timer video, click on the Elements button located at the top right corner. You can choose from a variety of elements to make your clip visually interesting.
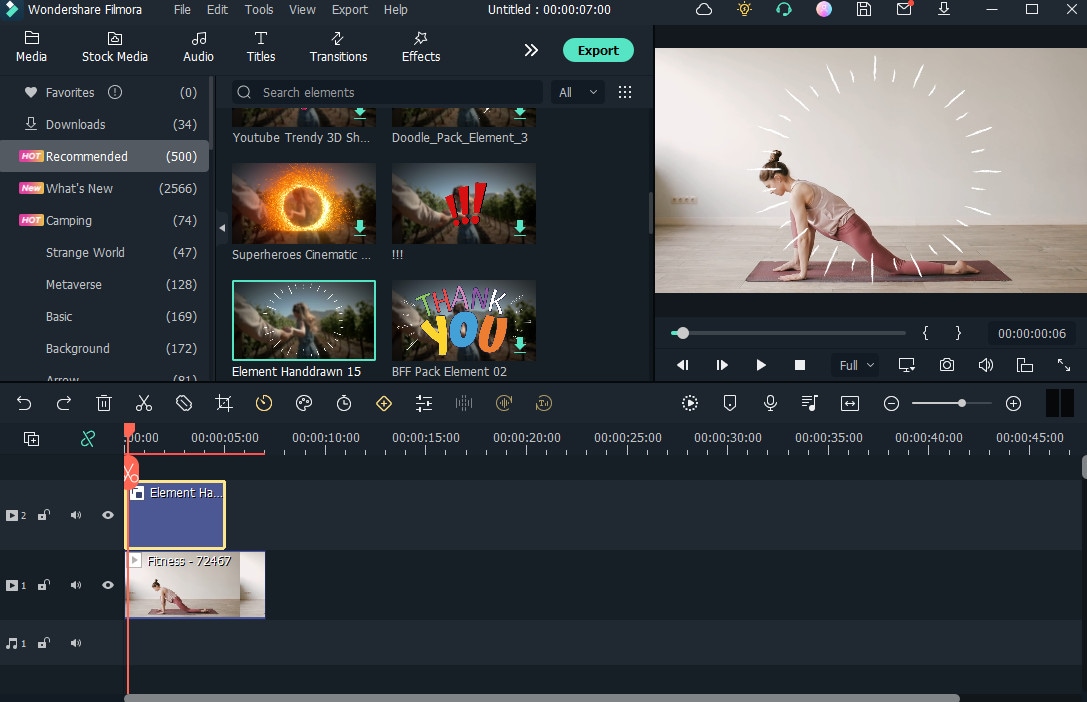
Remember, you can also adjust these elements the way you want. For example, if you’ve selected “Element hand-drawn 15”, only double-clicking it will enable you to either resize or relocate it, such as keeping it to the top right corner of your video.

3) Add the Number to your Countdown
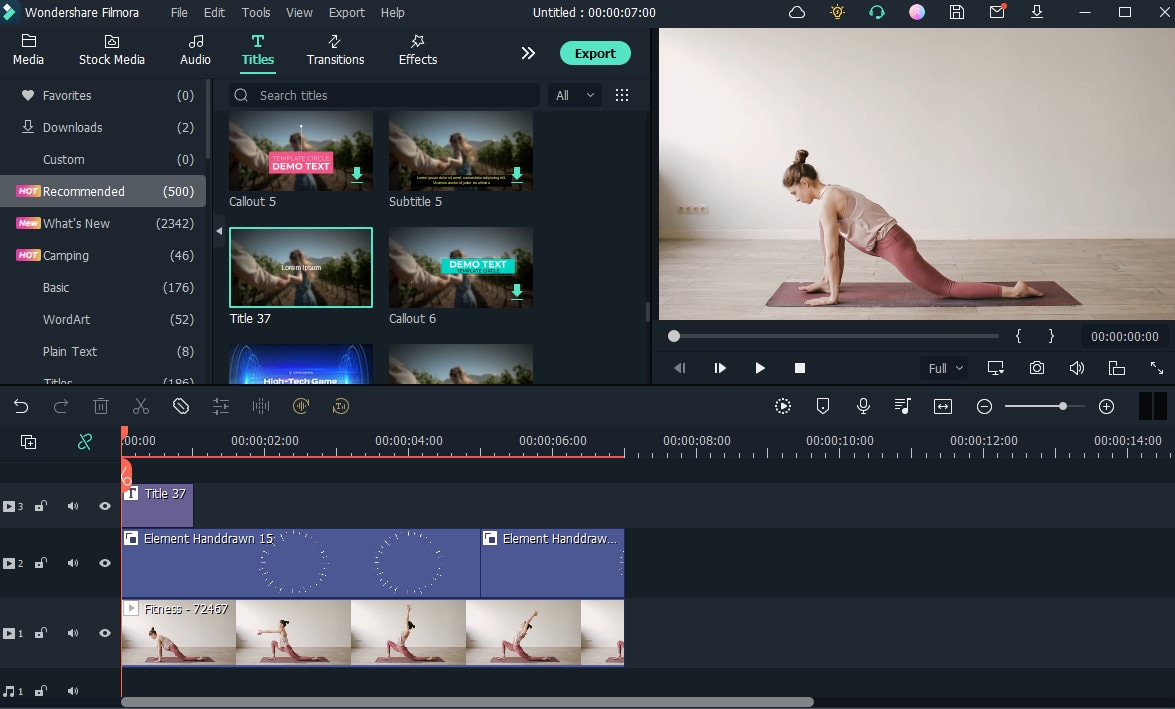
Next, you need to add numbers to your countdown which is a crucial step. So click on the Title tab, located at the top, it’ll show you multiple options to choose from. Once selected, drag and drop it to Filmora timeline and place it above the elements overlay.
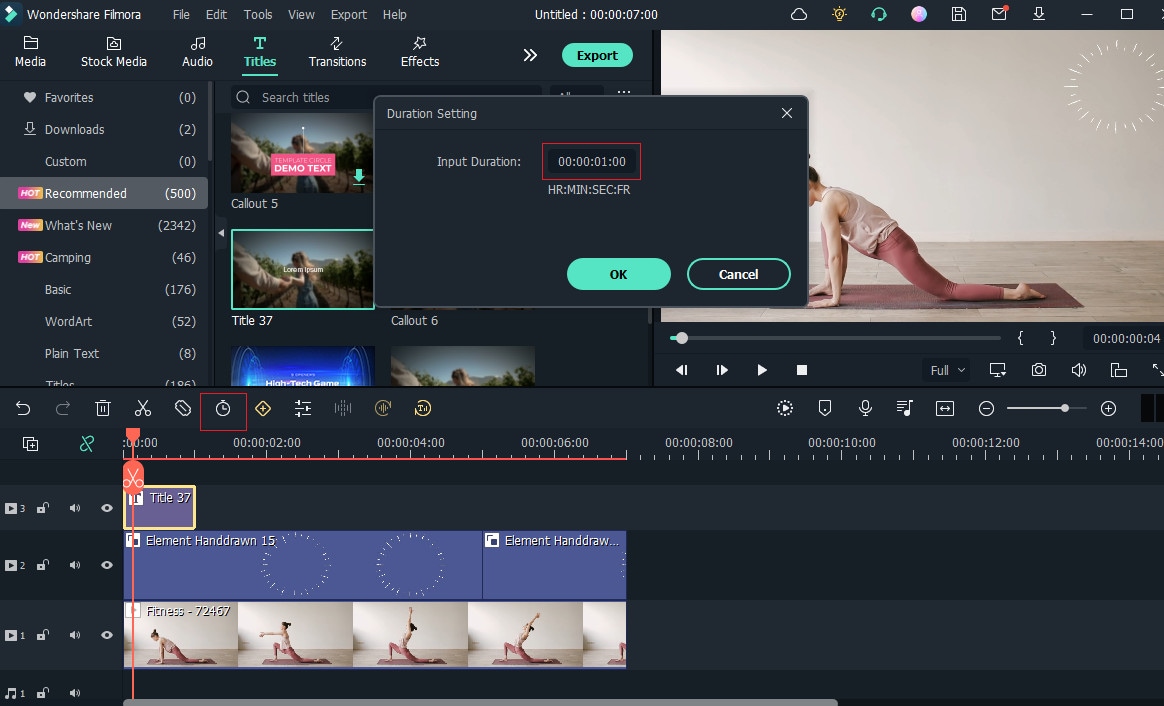
You also need to decide number duration, feel free to changge it to one second.
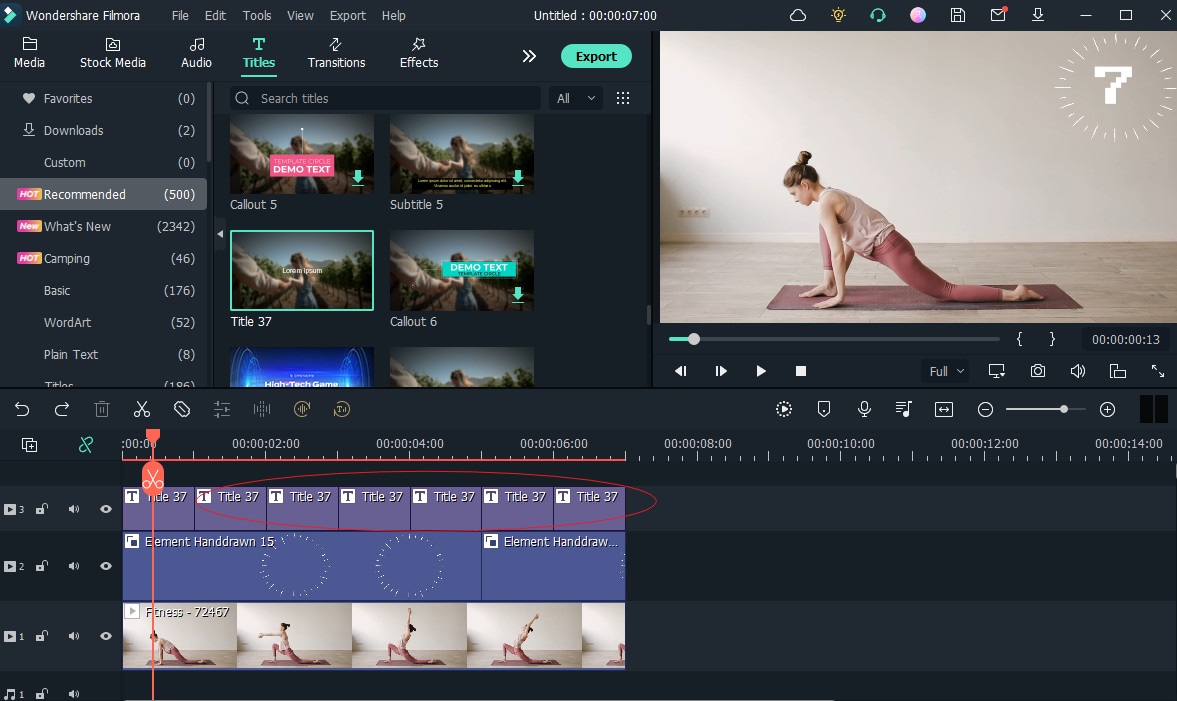
Then, choose the text. And copy and paste countdowns according to your requirements.
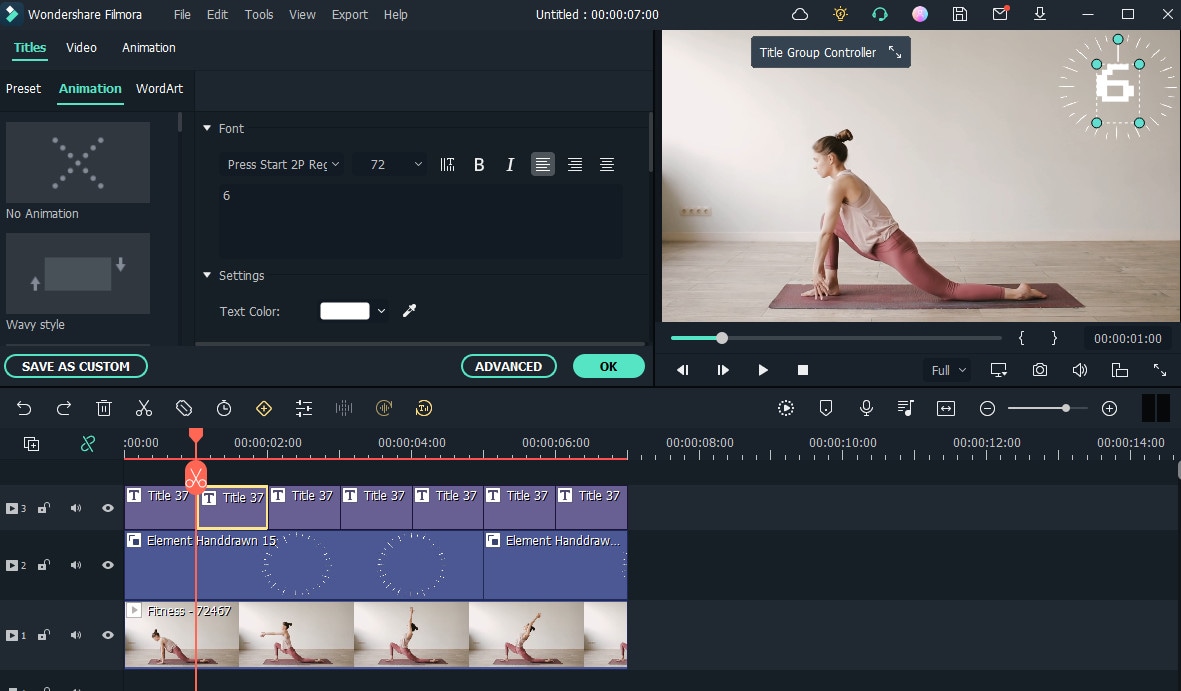
Later, double click on the text, so you can change the number.
4) Make your Countdown Video with Sound
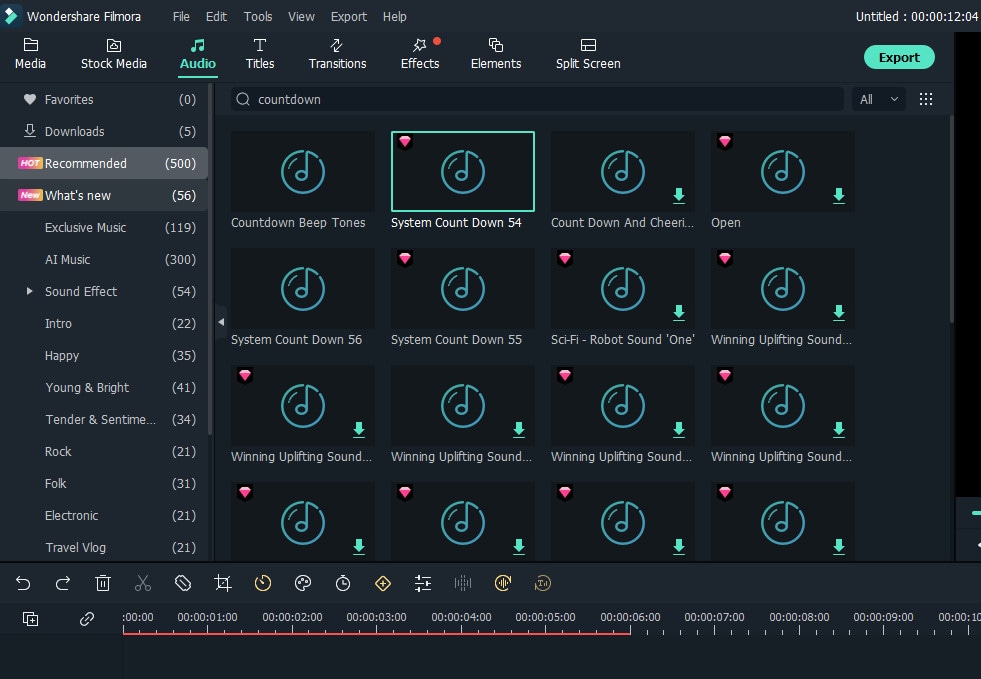
Click on the audio button located on the top section to make the countdown video with sound. It’ll show you several audio options. Choose the one you link and insert it to your clip.
5) Preview and Export Your Countdown Video
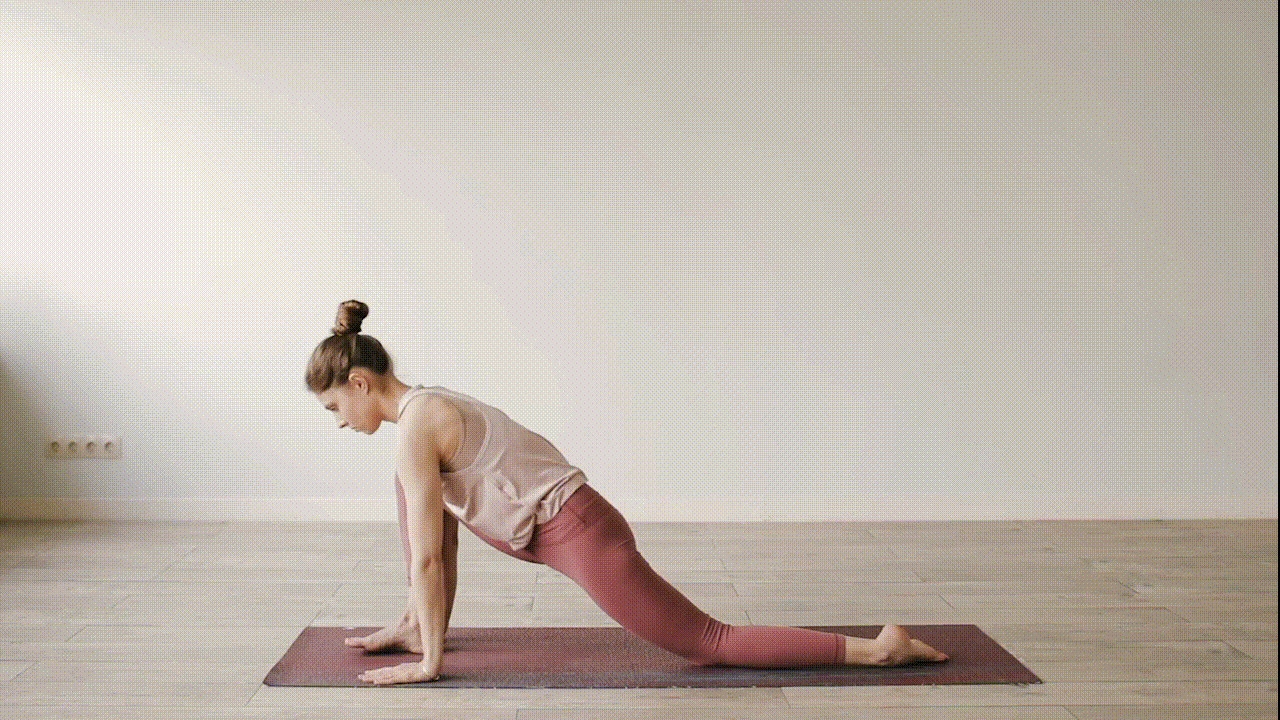
Last but not the least, previewing your video before exporting it is incredibly. While you watch it, ensure it has elements, countdown numbers and audio placed accordingly. And that the video plays in flow.
Once you find it’s good to go, click on the Export button located on the top right corner to export your countdown video clip.
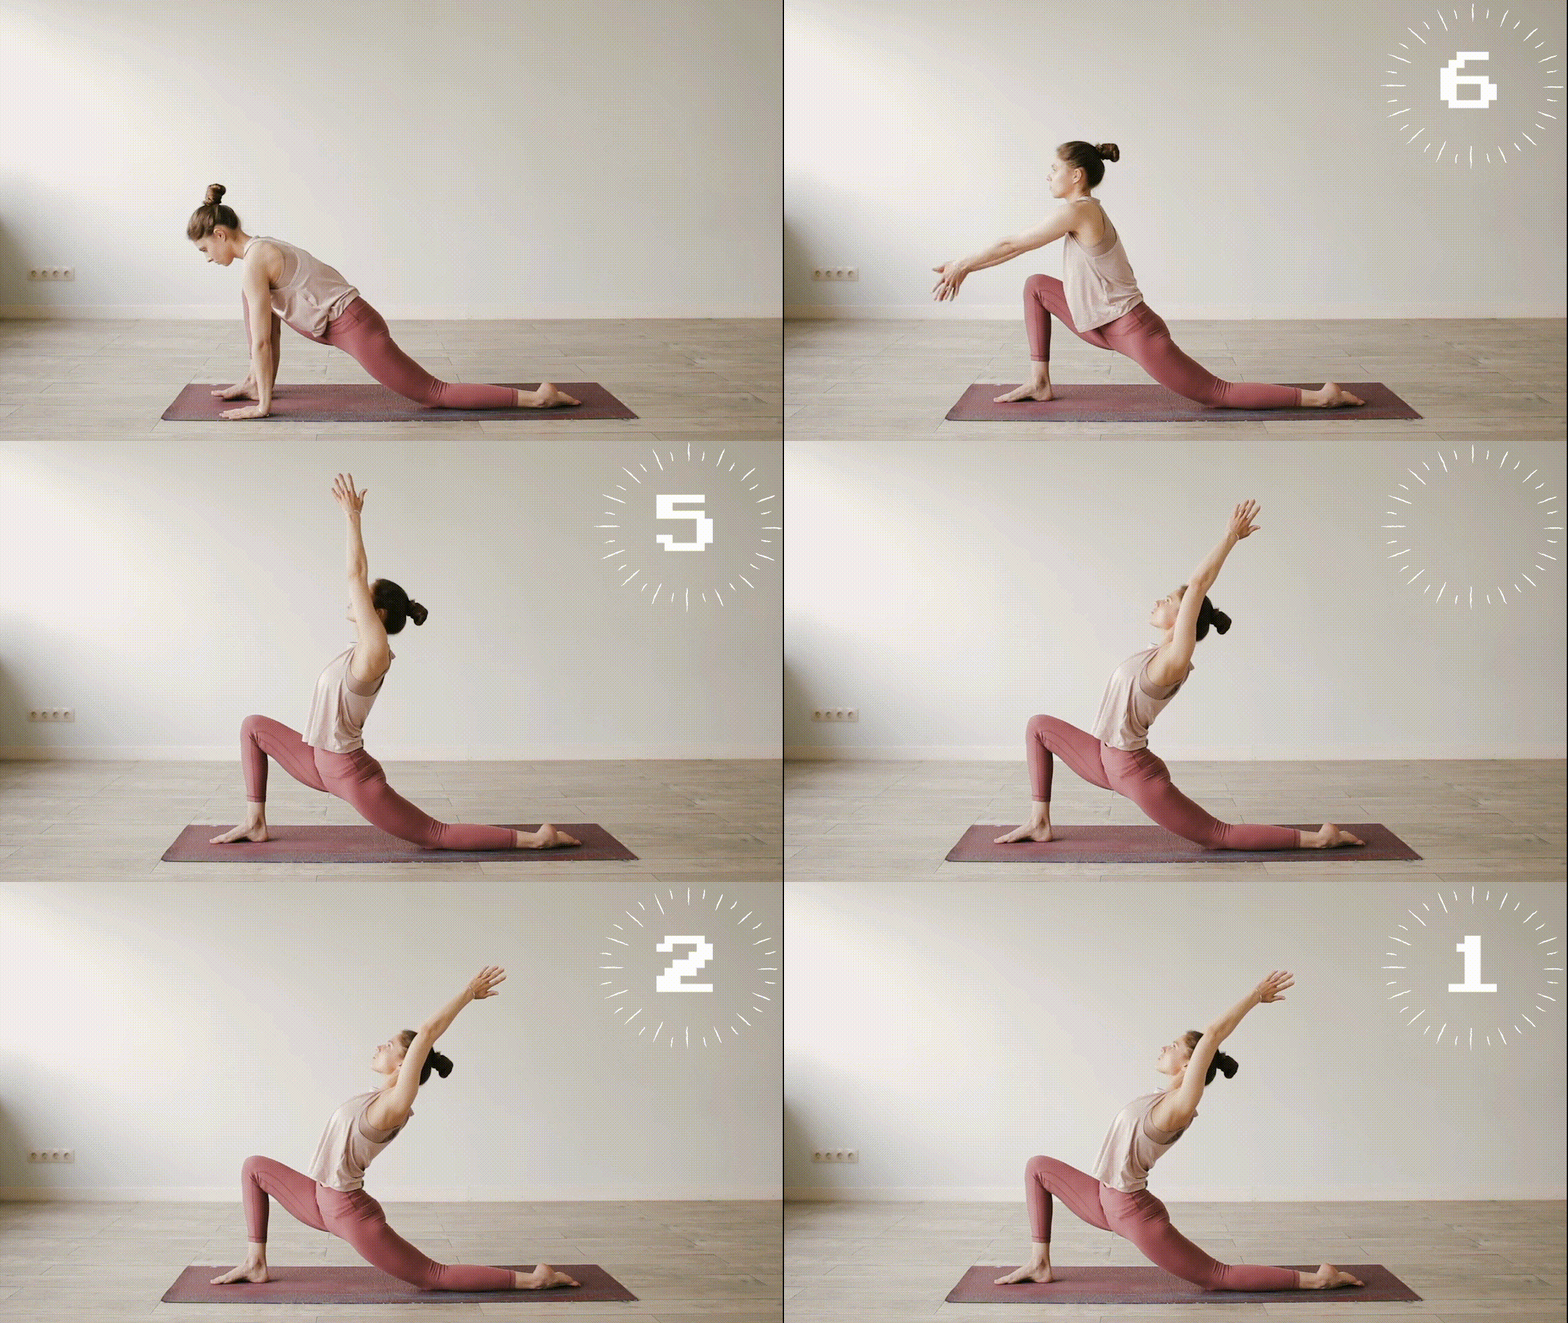
Pro Tips: The Easiest Way to Put a Countdown Time On a Video
Filmstock can not only become your go-to resource when you need relevant yet interesting templates for countdown timer videos, but all the resource assets can be directly applied in Filmora or After Effect.
Be it a Holiday themed video or you’re making an important announcement, Filmstock has enough and high quality templates to get the job done quickly and easily.
Here’re five countdown templates you might want to try.
1) Countdown Template to Welcome New Year

Transitioning into a new year has always been fun and exciting. You never know what the next 12 months have in store for you. And to celebrate this joyful eve, people, brands, or companies opt for various activities.
If you’re planning to release a new video in accordance with New Year, the idea of putting up the countdown timer sounds great. Remember, Filmstock has sort this out for you with its stunning New Year template.
2) Countdown Template for Fitness Videos
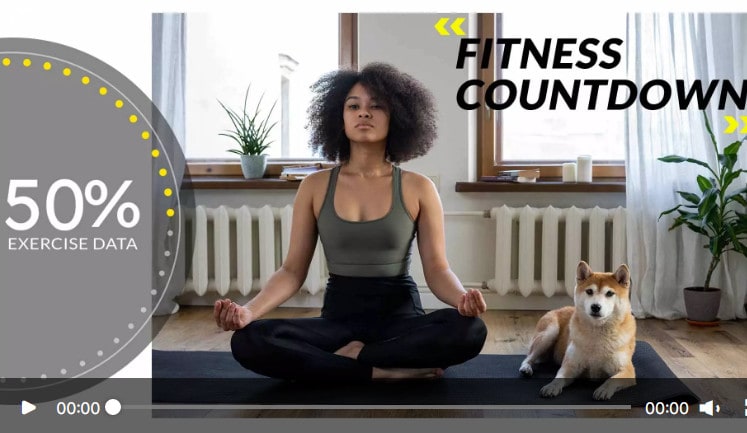
Add some twist to your fitness vidoes with a countdown timer. Sports or exercise videos are an effective way to showcase your expertise, your gym, or you being conducting a class. You can compile various clips and incorporate a countdown timer in the start of the video to make your videos engaging.
The ideas are endless when it comes to creating a visually interesting video content related to fitness or sports. You can further elevate it effectiveness with Filmstock’s template for this niche.
3) Countdown Template for Merry Vlogmas Pack

Who doesn’t love holiday season? The cold weather, warm beverages, and overall environment make everyone feel festive. Considering the vibe, you can create countdown timer videos with ease using Filmstock template.
During the holidays, brands or companies often use video content to promote products or extend wishes for the seasons. Many Youtubers also make vlogmas to celebrate Christmas. If you aim to create video content related to that, adding this Merry Vlogmas inspired countdown timer sounds like a cool idea.
4) Countdown Template for Cartoon Ranking Pack
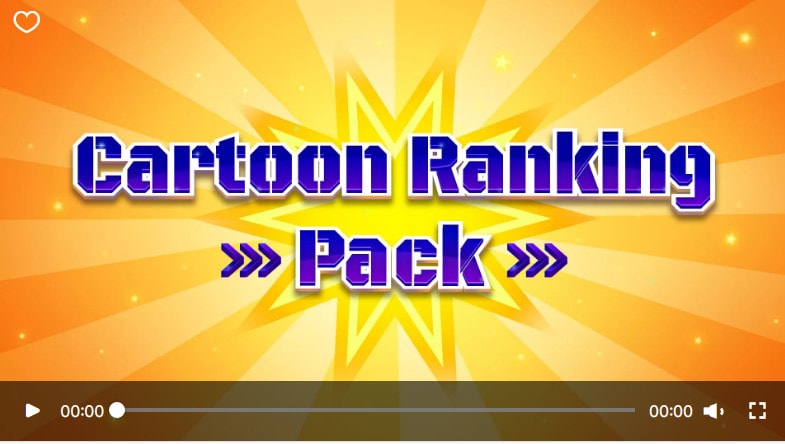
Whether you want to share top 10 tennis players in the history or top 5 science facts, Filmstock can provide a relevant countdown template.
Since this type of video idea is unique and carries important information, it should keep viewers hooked from the start. And cartoon ranking pack template can help you do that.
5) Countdown Template for Digital Use
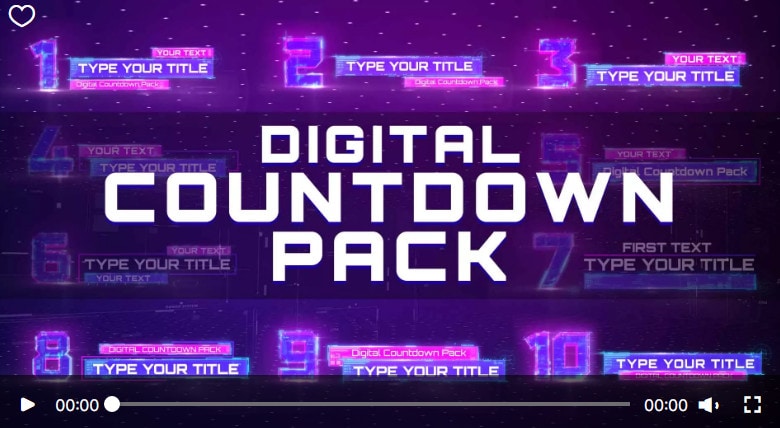
Do you have a cool idea for your social media videos or you want to use graphical elements with text in your video clips? Whatever ideas you’ve got in your mind. Digital countdown pack is perfect to make your video more fun and more engrossing.
Why you should be using this template? Because its effects and lowerthirds can make video listcles and social media videos worth watching.
Here’s how you can incorporate a countdown timer effect from Filmstock in a video clip quickly with Wondershare Filmora .
Free Download For Win 7 or later(64-bit)
Free Download For macOS 10.14 or later
Step1Import the Video
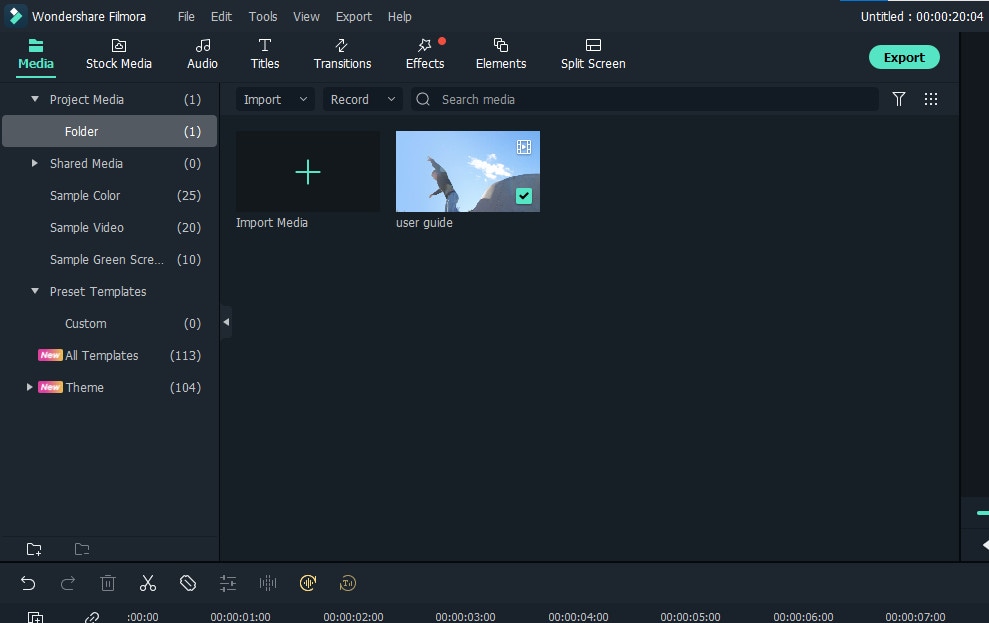
Open Filmora and go to the media section. Now click on the video file to import it.
Step2Search and Select Countdown Effects
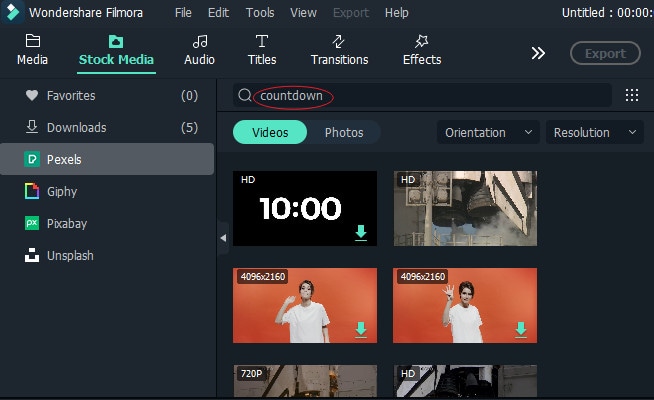
Next, go to the Stock Media section located on the top bar. Upon searching countdown, you’ll see various templates, 4K, HD, or 720p for the countdown timer. Choose one, and change its position according to your requirements, using the timeline.
Step3Export the Video
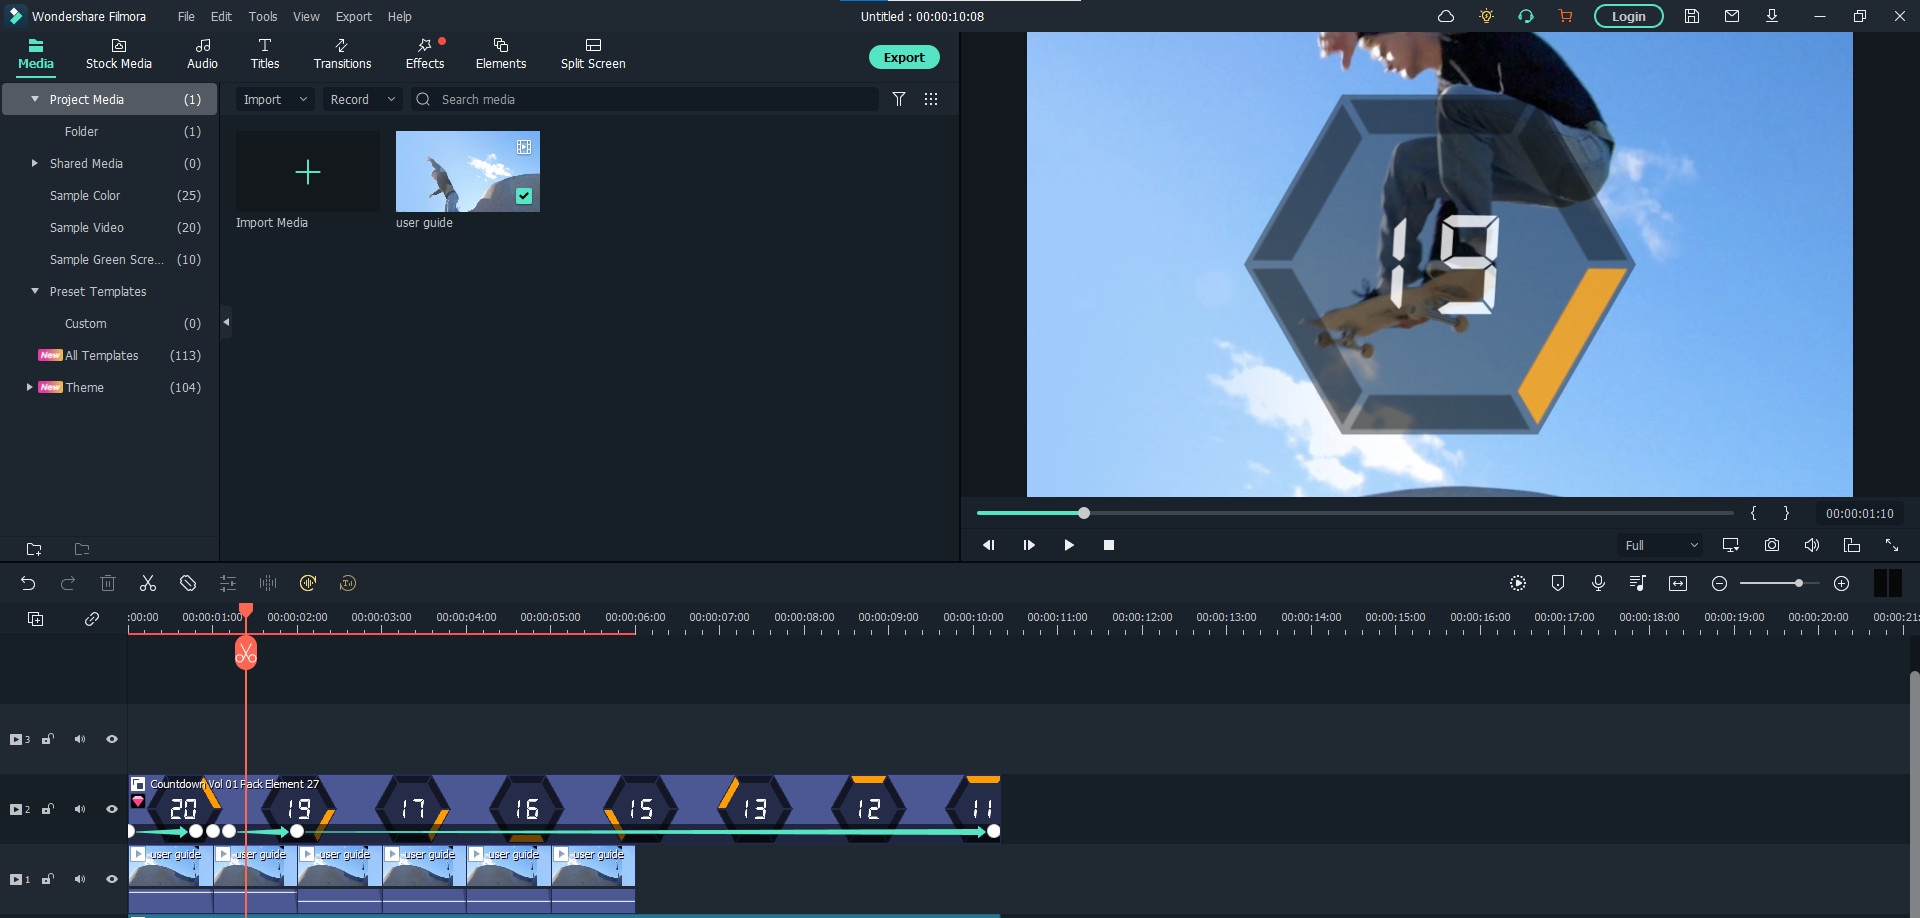
And the last step includes exporting your countdown time video.
Part 3: How Do I Make A Countdown Timer Video Using iMovie?
Now that you’re familiar with creating a countdown timer video using Filmora . But, worry not, if you want to do it with iMovie.
iMovie enables you edit professional-grade videos. Using it, you can incorporate titles, transitions, and sounds in just a few simple steps. You can further modify your video with the help of tools, such as splitting or clip trimming.
How-to Steps to Use iMovie to Make a Countdown Timer Video
Follow this quick how-to guide and create a functional countdown timer in one go.
Step1Access Clock on your Device
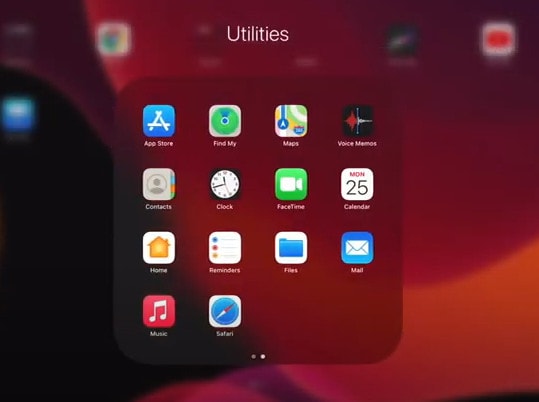
You can use iPad, iPhone or computer to create a countdown timer. But whatever device you use, your first step is to go to your clock.
Step2Go to Timer
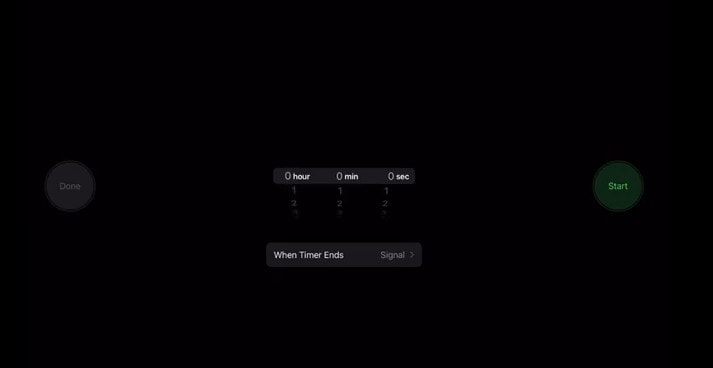
After accessing the clock, go to the timer in it.
Step3Set the Amount of Time
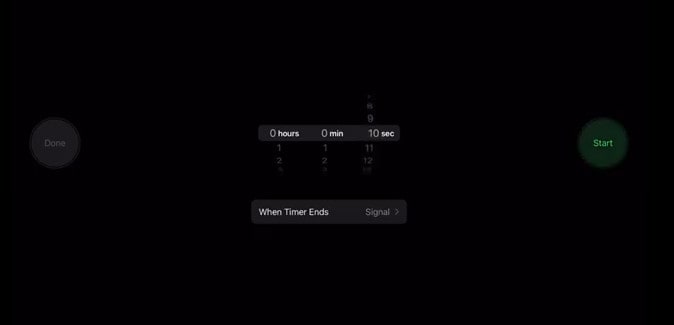
Once you’ve reached timer, decide the amount of time. For example, this example creates timer for 10 seconds. Set the amount of time in terms of hours, minutes, and seconds.
Step4Screen Record your Timer
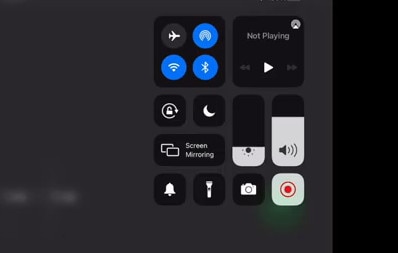
While you’re creating the countdown timer, ensure to recording screen so you can use it on your video. You should be screen recording since step one.
Step5Start the Clock
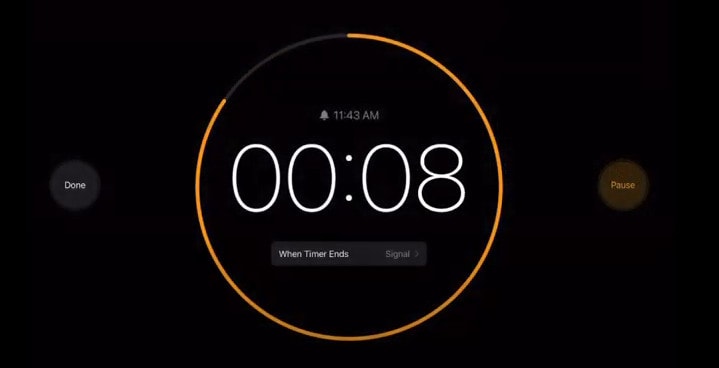
After start recording your screen, wait for the clock to complete 10 seconds.
Step6Access the File
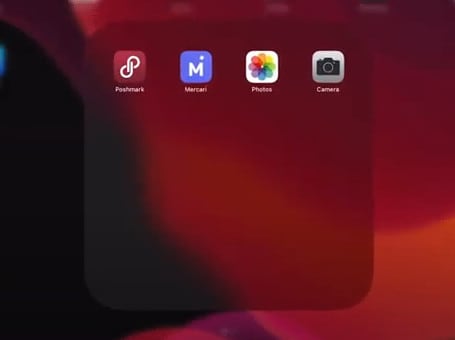
Once the countdown finishes, go to “Photos” on your device to access the file.
Step7Edit the File
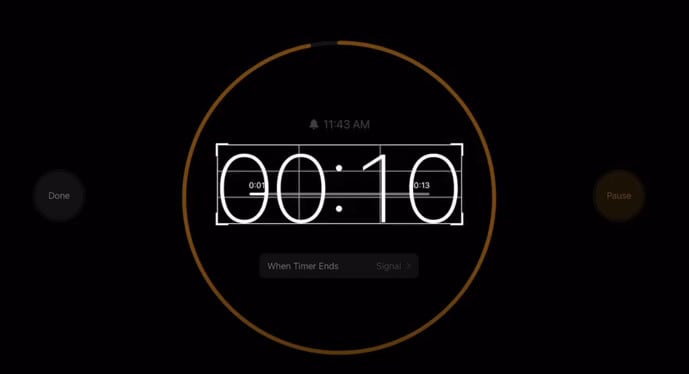
After accessing the countdown timer file, crop and edit it the way you want. For example, crop out extra numbers or other distractions, or adjust size, etc.
Step8Save the Edited File
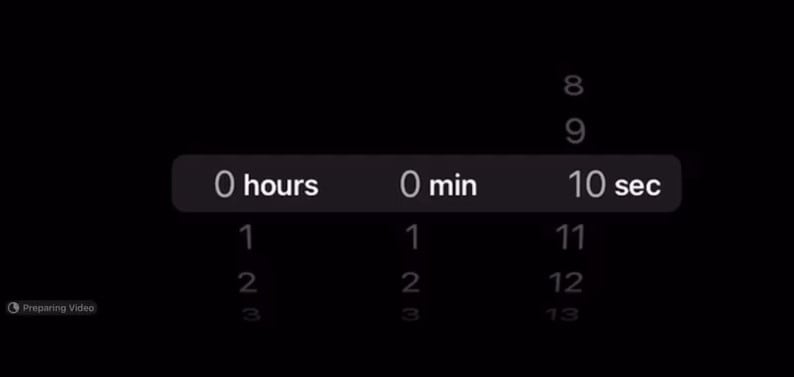
Next, you need to save this edited file. While you save it, it’ll show “Preparing Video” on the bottom corner.
Step9Final Look of Countdown Timer
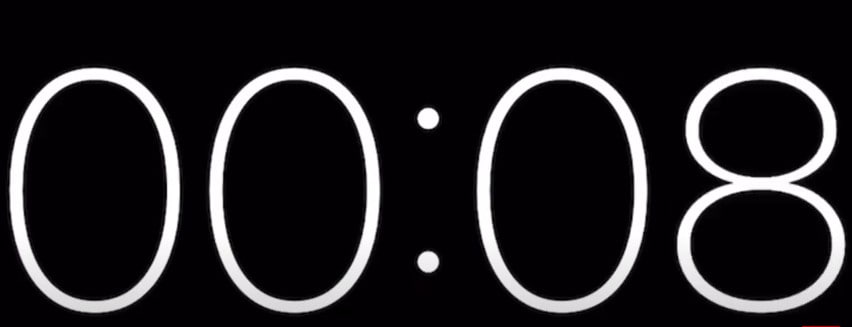
The final image of your countdown timer should look this in the above image. At this point, this countdown timer is good to use wherever you want.
Video Guide for Better Understanding
To get a clear idea on each step, you can also watch the following video and create an awesome timer with ease.
Make A Countdown Timer For You Tube videos Using ipad iphone imovie (how To)
Final Words
Be it a countdow for New Year’s Eve or for a promotional video, it keeps your audience on their toes and spark the curiosity in them to find more. Although it seems like a time-consuming task to create an entire video just for the countdown, using Filmora as a countdown video maker can ease the process.
The software is beginner-friendly and offers a various features. From adjusting sound to choosing one template from various options, it can help compile a visually appealing countdown timer video.
You can even get a customized one following this guide. And when you need to make one using iMovie, the steps mentioned above can help you do that, too.
Free Download For Win 7 or later(64-bit)
Free Download For macOS 10.14 or later
Free Download For macOS 10.14 or later
Step1Import the Video

Open Filmora and go to the media section. Now click on the video file to import it.
Step2Search and Select Countdown Effects

Next, go to the Stock Media section located on the top bar. Upon searching countdown, you’ll see various templates, 4K, HD, or 720p for the countdown timer. Choose one, and change its position according to your requirements, using the timeline.
Step3Export the Video

And the last step includes exporting your countdown time video.
Part 3: How Do I Make A Countdown Timer Video Using iMovie?
Now that you’re familiar with creating a countdown timer video using Filmora . But, worry not, if you want to do it with iMovie.
iMovie enables you edit professional-grade videos. Using it, you can incorporate titles, transitions, and sounds in just a few simple steps. You can further modify your video with the help of tools, such as splitting or clip trimming.
How-to Steps to Use iMovie to Make a Countdown Timer Video
Follow this quick how-to guide and create a functional countdown timer in one go.
Step1Access Clock on your Device

You can use iPad, iPhone or computer to create a countdown timer. But whatever device you use, your first step is to go to your clock.
Step2Go to Timer

After accessing the clock, go to the timer in it.
Step3Set the Amount of Time

Once you’ve reached timer, decide the amount of time. For example, this example creates timer for 10 seconds. Set the amount of time in terms of hours, minutes, and seconds.
Step4Screen Record your Timer

While you’re creating the countdown timer, ensure to recording screen so you can use it on your video. You should be screen recording since step one.
Step5Start the Clock

After start recording your screen, wait for the clock to complete 10 seconds.
Step6Access the File

Once the countdown finishes, go to “Photos” on your device to access the file.
Step7Edit the File

After accessing the countdown timer file, crop and edit it the way you want. For example, crop out extra numbers or other distractions, or adjust size, etc.
Step8Save the Edited File

Next, you need to save this edited file. While you save it, it’ll show “Preparing Video” on the bottom corner.
Step9Final Look of Countdown Timer

The final image of your countdown timer should look this in the above image. At this point, this countdown timer is good to use wherever you want.
Video Guide for Better Understanding
To get a clear idea on each step, you can also watch the following video and create an awesome timer with ease.
Make A Countdown Timer For You Tube videos Using ipad iphone imovie (how To)
Final Words
Be it a countdow for New Year’s Eve or for a promotional video, it keeps your audience on their toes and spark the curiosity in them to find more. Although it seems like a time-consuming task to create an entire video just for the countdown, using Filmora as a countdown video maker can ease the process.
The software is beginner-friendly and offers a various features. From adjusting sound to choosing one template from various options, it can help compile a visually appealing countdown timer video.
You can even get a customized one following this guide. And when you need to make one using iMovie, the steps mentioned above can help you do that, too.
Free Download For Win 7 or later(64-bit)
Free Download For macOS 10.14 or later
Step-By-Step Guide To Creating Halftone Effects In Photoshop
Halftone is a technique that uses dots to create a deliberate screen-like image and textured effect. In recent years, it has become trendy in digital design.
This effect is often used in magazines, newspapers, and other printed materials. When applied correctly, it can add depth and dimension to an image, resulting in a softer, more pleasing, and appealing look.
So, if you have ever wanted to add interesting effects and textures to your images, but weren’t sure where to start, then keep on reading to discover and learn everything you need to know regarding creating the halftone printing effect in Photoshop.
Without further ado, let’s get started!
What Are Halftone Effects?
Before we know how to create a halftone effect in Photoshop, let’s have a basic understanding of it first.
In the 19th century, William Henry Fox Talbot introduced the halftone screen printing effect to create the illusion of tones in black and white images.
The halftone originated from printers who previously only worked with cyan, magenta, yellow, and black (CMYK ). The solid colors were tiny dots placed together closely with continuous tones that remained unchanged. From the mixing and matching of these four colors, a wide range of colors emerged.
The effect is usually created by putting dots of ink on paper in different sizes and positions. This illusion uses optical bleeding to make the desired impression on the human eye. These color dots act like analog pixels that result in a recognizable image.
For instance, when you look at a pixelated picture and zoom it, you will see missing details. When you zoom out, the photo gets more minor and back to its original form.
Modern Definition and Usage
In the 21st century, the halftone is a static-visual technique applied in print and digital images to create continuous tone imagery using dots that vary in spacing and size to create a gradient effect.
Halftone produces a deliberate screen-like image distortion in different fields, such as pop art, graphic designing, and screen printing, to create nostalgic or vintage effects and make the images more captivating.
How To Use Photoshop To Create Halftone Printing Effect
Below we’ve provided detailed step-by-step guidance on creating a color halftone effect as well as black and white halftone printing effects in Photoshop:
1. How to Create Color Halftone Effect
If you want to create a color halftone effect in Photoshop, do the following steps in a sequence:
Step1 Launch the Photoshop software on your laptop/desktop, and drag and drop the image file on which you want to apply the Halftone effect.
Step2 Click “Filters” in the top toolbar and select the “Pixelate” option from the drop-down menu.
Step3 Click the “Color Halftone” option from the menu. On the new pop-up window, adjust the radius and channel to configure the appearance of the effect.
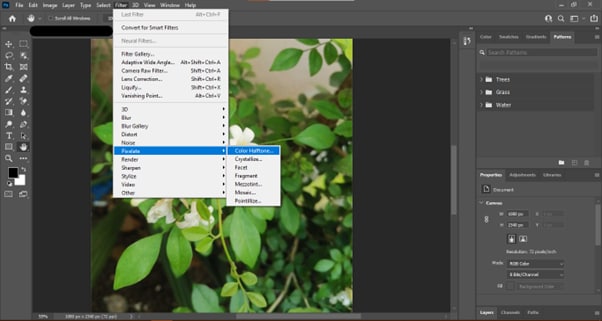
That’s about it! You have successfully created the color halftone effect in Photoshop.
2. How to Create Black and White Halftone Effect
Follow these steps to create black and white halftone printing effect:
Step1 Open your image in Adobe Photoshop and click the “Image” option from the top taskbar.
Step2 Now, click the “Mode” option from the drop-down menu and select “Greyscale” to convert your RGB image.
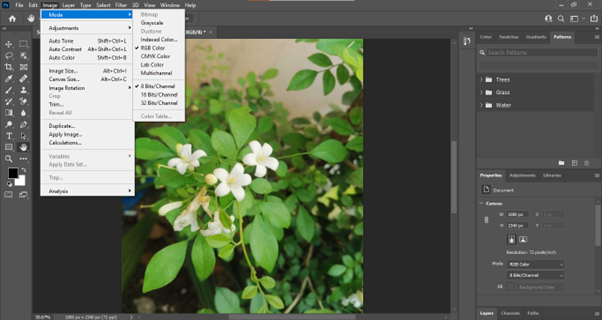
Step3 Again, open the image menu and click the “Mode” option. From the drop-down options, click “Bitmap…”
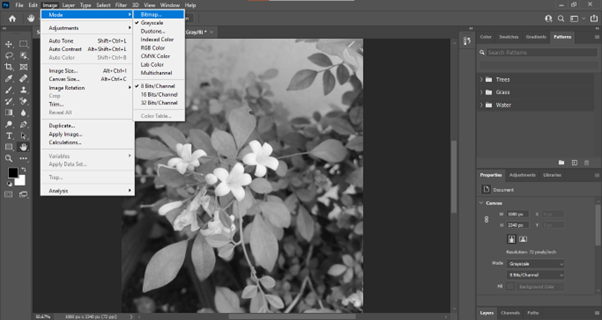
Step4 A dialogue box will open. Set the resolution to 1000, 1,500, or 2,000ppi to create smooth edges on your halftone. Next, click “Halftone Screen…” under the “Method” header and click “OK” to proceed further.
Now, you can adjust the frequency (Lines/Inch), angle (Degrees), and shape (Circle, Line, Cross, etc.) to determine how big your halftone dots are at the maximum diameter and their direction.
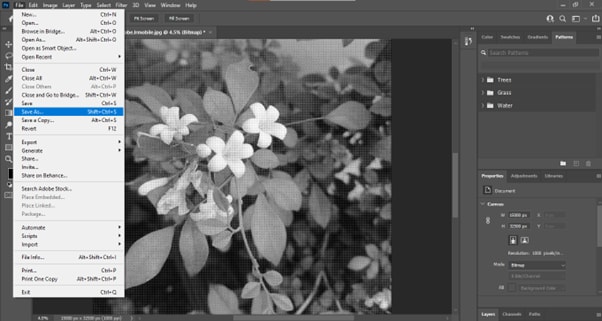
Step5 Finally, click “Files” from the top taskbar, scroll down, and select “Save As…” Save your file as PSD or TIFF and import it to InDesign to apply color.
Video Tutorial - How To Create Halftone Effect | Photoshop 2022
To help you better put the guidance into practice, we have prepared a video tutorial to deepen your understanding.
Two Concepts You Should Know In Creating Halftone Effect
Apart from the practical guidance, there are two important concepts you need to be aware of: radius and channels. Below, we’ve discussed both of them in detail to make things more understandable to you:
1. Radius
Radius refers to the size of the dots that make up the halftone image and is an important factor in determining the overall look of the photo.
You can adjust the sizes of the dots to change the gradient, spacing in between, and blur of the color and image. However, if you want a more subtle effect, you will need to use a smaller radius. For a more dramatic effect, like vintage comics, old ads, or DIY grunge zines., you will need to use a larger radius.
2. Channel
Channel refers to the number of values that are used to create the image. The more values you use, the more details will be visible.
The Channel setting of halftone effects affects how the dots are positioned and overlap. Each Channel is governed by a Screen Angle setting, which is listed in degrees. Changing the value modifies the angle at which Cyan, Magenta, Yellow, and Black dots are added to the pattern. When the dots overlap, a new color is created depending on the combination of the primary colors and black.
Conclusion
In this comprehensive guide, we’ve explored the halftone effect, how it originated and discussed its modern definition and usage. We’ve also provided step-by-step processes to help you create the halftone effect in Photoshop, both colored and black and white.
Furthermore, we discussed two important concepts (radius and channel) of the halftone screen printing effect to help you understand the technique in detail.
Hopefully, you’ve found this article helpful and can now add a new level of creativity to your images using the halftone effect in Adobe Photoshop.
Free Download For Win 7 or later(64-bit)
Free Download For macOS 10.14 or later
How to Add a Green Screen to Zoom
If you are a regular user of Zoom app because you have to attend meetings and video conferences every now and then, you should know how to create a green screen for Zoom calls. There are going to be times when you would not want to show what is in your background because it might look distracting. Besides, changing the background from time to time breaks the monotony of your Zoom calls.
Zoom app allows you to change your background and set any available virtual background. However, the effect of virtual background may not be accurate and smooth unless you have a uniform background color. If you use green screen background for Zoom, you can replace it with any virtual background that will look very realistic to your audiences. We will illustrate how to create a green screen background for Zoom.
Part 1. How to add green screen to Zoom on computer?
Regular Zoom users prefer arranging and attending video conferences from their computers. Zoom desktop app makes it more convenient to attend Zoom conference with a wider screen and better visibility. Make sure you have a uniform green screen in your background before attending Zoom call so that you can replace it with any available virtual background on Zoom. Here are the steps on how to create a green screen for Zoom app on your computer.
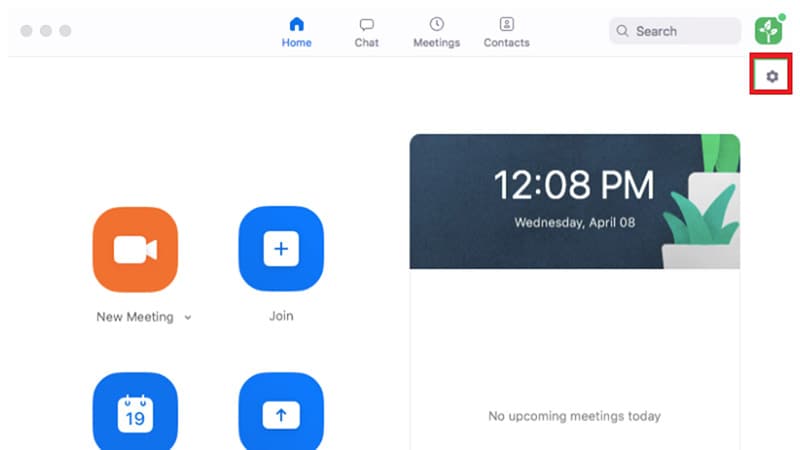
Step1Open Zoom app and make sure you are logged into your account. Adjust the webcam so that only you and your green screen should be visible in the frame.
Step2Click on Settings (gear icon) located in the top-right corner.
Step3Once Settings window opens, click on Virtual background option on the left panel.
Step4Turn on the option “I have a green screen” located at the bottom. Thereafter, choose a virtual background with which you want to replace the green screen in your video.
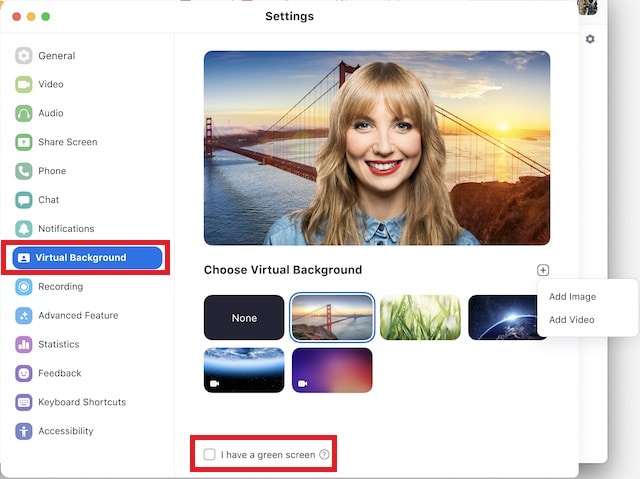
Step5Apart from the present virtual background, you can add photo or video to replace green screen background.
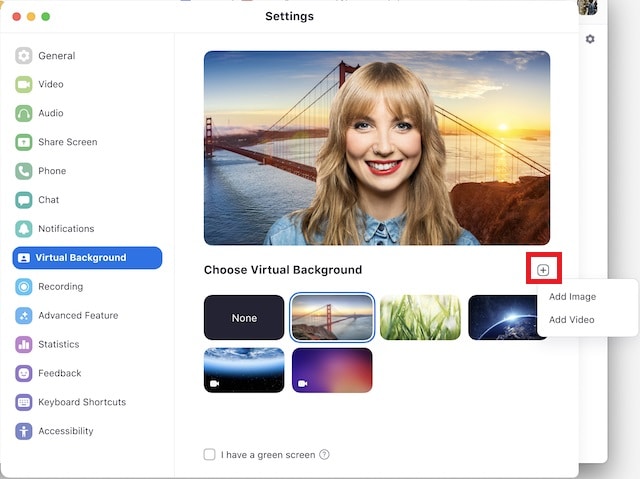
Step6Close Settings window and you will see that your green screen is replaced by your selected virtual background.
Part 2. How to add green screen to Zoom on mobile?
If you are an occasional Zoom user, you are more likely to use your smartphone to attend Zoom conferences. If you want green screen effect on your Zoom call, make sure you have a sizeable green screen in your background. This is because even if you happen to move your phone during the meeting, green screen background should come in the video frame all the time.
It is recommended to use a tripod to keep your smartphone fixed in one spot for better and consistent green screen effect. Here are the steps to answer your question how do you add a green screen to Zoom app on your mobile phone. The steps are the same for Android and iOS users.
Step1Open Zoom app on your smartphone and make sure you are signed into your account.
Step2Start a Zoom meeting and tap on More option located in the bottom-right corner.

Step3Tap on Virtual background and you can select any preset virtual background.
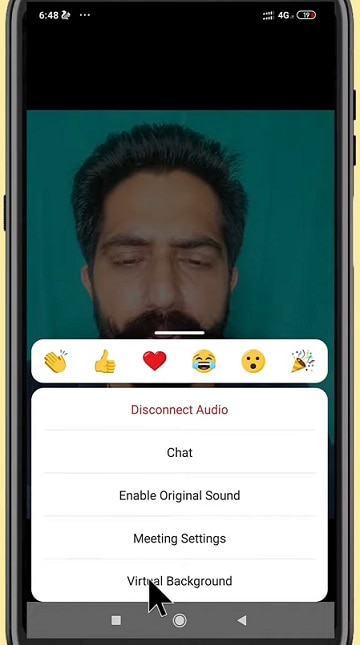
Step4If you want to replace green screen with a customized background, tap on “+” icon and select any photo or video from your phone.

Step5Tap on Close option and the selected virtual background will be applied to your Zoom video.
Part 3. Tips to use green screen on Zoom video
Here are some important tips to use green screen on Zoom video for a better outcome.
Buy Large Green Screen - Since you are going to invest in buying green screen, you should buy a large green screen instead of buying two. Firstly, when you have one large green screen, you can set it up without any wrinkles or overlaps.
Secondly, a large green screen means greater surface area, and even when you slightly change the angle of your camera, your background will still have green screen instead of the exterior wall showing up and ruining virtual background effect.
Buy Green Screen Stand - Along with green screen, you should buy a sizeable green screen stand. A regular green screen stand contains two vertical supports at both ends and one horizontal support where you hand the green screen.
You can buy it according to the size of green screen you have bought. And you need to buy stand because you cannot fix the green screen on the wall properly. If you use any other means, there are going to be wrinkles and uneven virtual background effect.
Green Screen Quality - You can purchase any shade of green screen, but we recommend you opt for vibrant green color for a better outcome. Most importantly, the color should be even across the surface, and there should not be light and dark patches to dampen the virtual background effect and make it look unrealistic. That is why you should not compromise with quality.
Avoid Green Objects - You should not wear anything green. If your green screen has a lighter shade, you can wear deep color dresses and vice versa. Most importantly, you should not keep anything that is green while attending Zoom attending as it will disturb the green screen effect and it will look embarrassing. If you need to keep any green objects in your Zoom meetings, you should have blue screen instead of green screen.
Focus On Lighting - Lighting is extremely important when you want to use green screen. You should place the light so that it spreads evenly across the green screen. Otherwise, there are going to be light and dark patches, and the effect can get disturbed. Make sure you do not cast any shadow on the green screen by positioning the green screen accordingly.
Select A Proper Background - Last but not least, when you change your green screen to any virtual background photo or video, make sure you keep your audiences in mind. If you are attending a meeting, you should keep a professional-looking background. The background should not be distracting and match the theme of your meeting.
Conclusion
We have answered your question, “How do you add a green screen to zoom?” You can use green screen on your Zoom desktop app as well as smartphone app. This will help you to make your usual background cover up with green screen and replace green screen with any virtual background. Keep in mind all the tips we have provided you so that the green screen effect is perfect.
Free Download For Win 7 or later(64-bit)
Free Download For macOS 10.14 or later
Also read:
- 2024 Approved How to Make a Video by Mouse with Filmora
- New Color Correction Basics (S-LOG Footage)
- Updated 2024 Approved A Vacation Slideshow Is a Great Way to Relive the Vacation Memories and Also Share Them with Your Loved Ones. If You Are Looking for Ways to Create a Slideshow in Just a Few Minutes, We Will Help You with the Best Tool
- New How to Make Tutorial Video with Filmora
- Updated In 2024, A Guide to Color Grade Your Picture in LightRoom
- New Do You Know You Dont Need a PC or Mac to Apply LUTs on Your Media? You Can Use Many Smartphone Apps to Apply LUTs, Such as 3DLUT Mobile App
- Updated In 2024, How to Create Cinematic Style Videos? Easy Guide for Beginners
- 2024 Approved Gimp Green Screen
- New How to Be a YouTube Vlogger for 2024
- New How to Find a High-Quality Video Marketing Agency, In 2024
- New 2024 Approved 6 Best MP4 Mergers to Join Videos Easily
- How To Fix Slow Playback Issues in DaVinci Resolve Finding the Best Solutions
- In 2024, The Best Laptops For Video Editing
- Updated Some Facts That Few People Know on How to Make Transparent Background in Canva
- 2024 Approved Guide Cropping and Combining Content in Wondershare Filmora Latest
- Updated Makeup Video Is One of the Video Types that Many Vloggers Are Creating. If You Are Also the One Who Wants to Share Makeup Experiences in Videos, Then You Can Follow the Guide Below to Make a Makeup Video with Simple Steps
- Everything That You Need to Know About Video Montages- Ideas, Techniques, and Software
- In 2024, Learn How to Create Animated Titles and Text in the Filmora Video Editor. This Is a Simple Step-by-Step Tutorial for Any Skill Level
- New How to Create One Click Video Reverse Effect in Filmora
- New 2024 Approved Steps to Remove Background Noise From Video Sony Vegas
- Explore Your Skills in Dimensional Graphic Editing and Animation with Blender. The Software Lands Among the Best Platforms for Art Enthusiasts with Its Stunning Transparent Backgrounds
- New In 2024, Fixing The Slow Playback Issues in DaVinci Resolve
- New In 2024, How to Make Vintage Film Effect 1950S
- New 2024 Approved Complete How-To Tutorials of Kapwing Collage Maker
- Updated 8 Frame Rate Video Converters for a Professional Finish
- New Do You Want to Remove Unnecessary Sound From Your Video? We Are Providing You the List of the Best Software to Remove Audio From Video for Mac and Apple
- New Easy Steps to Make Glitch Effect with Filmora
- Tips & Tricks To Perfectly Use the Audio Mixer in Filmora
- In 2024, Want to Learn How to Create the Random Letter Reveal Intro? Read Through the Stages of Preparing This Effect via Filmora in This Guide
- Discord Is the Future of Networking. After All, It Is Here to Stay. Have You Heard of the Discord Animated Avatar? If Yes, You Understand Its Power and if Not, Ensure You Study This Article for More Information
- New In 2024, How To Edit Youtube Videos In Simple Steps
- How to Make Discord GIF PFP? Solved
- Updated 2024 Approved Full Guide to Discord Boost
- All You Need To Know About Mega Greninja For Xiaomi Redmi Note 12 Pro 4G | Dr.fone
- 5 Ways to Track Vivo S17 without App | Dr.fone
- In 2024, How to Reset Apple ID and Apple Password On iPhone 13 Pro Max
- How to Rescue Lost Contacts from Realme GT Neo 5 SE?
- Detailed guide of ispoofer for pogo installation On Realme 11 5G | Dr.fone
- Everything You Need to Know about Lock Screen Settings on your Itel A70
- 11 Ways to Fix it When My Infinix Hot 30 5G Wont Charge | Dr.fone
- In 2024, How To Make Your Memoji Talk? Get Creative With Your Messaging
- In 2024, How to Transfer Contacts from OnePlus 11R to iPhone XS/11 | Dr.fone
- In 2024, 10 Best Work Memes to Have Fun in Work Days
- Android Screen Stuck General Honor X9a Partly Screen Unresponsive | Dr.fone
- FRP Hijacker by Hagard Download and Bypass your OnePlus Nord 3 5G FRP Locks
- How Realme GT Neo 5 SE Mirror Screen to PC? | Dr.fone
- 9 Solutions to Fix Process System Isnt Responding Error on Asus ROG Phone 8 | Dr.fone
- The Easiest Methods to Hard Reset Itel P55 | Dr.fone
- Title: New Step by Step to Cut Videos in Adobe Premiere Pro
- Author: Chloe
- Created at : 2024-04-24 07:08:14
- Updated at : 2024-04-25 07:08:14
- Link: https://ai-editing-video.techidaily.com/new-step-by-step-to-cut-videos-in-adobe-premiere-pro/
- License: This work is licensed under CC BY-NC-SA 4.0.

