:max_bytes(150000):strip_icc():format(webp)/SDC18_Keynote_OneUI-5be8d33f46e0fb002d108acf.jpg)
New Steps to Create Gold Text Effects After Effects

Steps to Create Gold Text Effects After Effects
Have you always wanted to create the gold text effect in After effects but you don’t know how? This polished effect can make your video’s title stand out and is one of the best ways to create a stunning title for YouTube and Instagram clips. In this article, we will be looking at how to create the gold text using After Effects.
Steps to Create Gold Text Effects After Effects
Follow these steps to create a gold text effect in your After Effects video project;
Step1Start by creating an environment. To do that just right-click and choose “New Comp” and click “OK” to create one.
Step2Then we need to add fractal noise. To do that, click on “Effects and Presets” and type in “fractal” to choose “Fractal Noise.” You can double-click on it or drag it to the comp.
Step3Once this is done, you will need to do a little bit of housekeeping on the contrast and brightness. Increase the “Contrast” and reduce the “Brightness.”
Then go to the “Sub Settings” and reduce the “Sub Influence” down to zero.
Go to “Transform Option” and decrease the scale just a little bit. Then increase the “Scale Height” just a little.
Step4The next step is to add color to the scene. To do that, right-click on the layer and choose “New > Solid.” Select the gold color and click “OK.” Do the same with the second layer.
Step5Now you want to blend both colors by choosing a blending mode. Hold the “Shift” key and “hyphen” or “=” sign on the keyboard and choose “Overlay.”
Step6To make the color stronger, go to “Layer > Solid Settings” and choose a color.
Step7Go back to “Comp 3.” Right-click on it and select “New > Light” to add a new point of light.
Step8Go back to the project panel to click on “Comp 4” to add the environment. Right-click on the Comp 4 layer and make it an environment layer.
Step9In the options that appear, set “Appears in Reflections” to “Only” and you can then increase and decrease the color saturation until you have the desired result.
Free Gold Text Effects Template to Use
As you can see from the steps above, creating your gold text effects can be quite difficult. The good news is that you can download pre-made titles that you can simply edit. The following are some of the best to choose from;
- Christmas Title Template
Link: https://mixkit.co/free-after-effects-templates/christmas-title-template-819/
Despite the name, this is an ideal title for elegant projects or when you want your title to stand out. The typography is beautiful and elegant making it the most ideal template for fashion-themed videos. The template is easily customizable in After Effects and you can even change the color you want.

- Fashion Instagram Story
Link: https://mixkit.co/free-after-effects-templates/fashion-instagram-story-551/
This is the most ideal template to choose if you want a gold text effect that is accompanied by an image. Again, this is a very elegant theme that is ideal for YouTube and Instagram videos in the fashion and entertainment genres. It is also fully customizable in After Effects, allowing you to change the color, text, and image.

- Wedding Invitation Opener
Link: https://mixkit.co/free-after-effects-templates/wedding-invitation-opener-803/
This free gold text template is also completely customizable and comes with various text effects that you can include in the text. It is elegant and includes shadow effects that make the text stands out more. But you can remove the shadow effects if they don’t suit your project.

- Golden Luxury Titles
Link: https://motionarray.com/after-effects-templates/golden-luxury-titles-116934/
If you are looking for a gold text title that stands out in terms of design, animation, and color, consider Golden Luxury Titles. It comes with 9 editable layers that you can use to modify the title in any way. It is the most ideal title for movies, teasers, TV shows, and more.

- Emotional Awards Opener
Link: https://motionarray.com/after-effects-templates/emotional-awards-opener-356434/
This is a sparkling and glistering stylish design that can be very useful for movies and TV shows. This attention-grabbing title template has over 18 editable text layers to allow you to customize the title in various ways.

Alternative Way to Create Video Gold
Adobe After Effects is a very good video editor, but one of the things that can make it inaccessible to many users is that it can be very difficult to use. Thankfully, there is another very effective video editor that you can use to create gold text that is much easier to use.
This is the Wondershare Filmora , one of the best video editors in the market. Before we look at how you can use Filmora to create the perfect gold metal texture on your text, let’s first look at some of its main features;
- You can use Filmora to edit videos at a very high resolution including 4K videos
- It can be used to remove the background and noise from the video very easily
- You can edit both video and audio in the same project
- Up to 5 text tracks and 10 music tracks can be added to the same timeline and the same project
- It is very easy to use with a simple and intuitive user interface
Here’s how to use Filmora to create a gold metal texture for your text;
Step1Install Wondershare Filmora on your Computer
Download the Filmora setup file to your computer and double-click on it to start installing the program to your computer.
Open the program once the installation is complete.
Step2Create a New Project
If you are starting from the beginning, you may need to create a new project.
To do that, click on “File > New Project” in the menu bar to start a new project.
If there was a project that you were already working on, click on “Open Project” on the main window and then click “File > Open Project” or “File > Open Recent” in the menu bar.
Step3Add A Title to the Timeline
To add a gold texture effect to a title on your video, we will first of all need to add a title to the project.
To do that, go click on the “Titles” tab at the top and drag one of the default titles to the timeline.
Once it is in the timeline, double-click on the title and edit it. Type in anything you want to appear in the title.

Select the font that you want to use and choose a specific font size to use. These are all your preferences and will depend on your project.
Move the title to the second track in the timeline as you get ready to begin adding the colors.
Step4Start Adding Colors
Go to “Media” at the top and click on “Sample Colors.” Drag the black color image to the track directly below the title timeline.

Then take a snapshot of this newly created image by clicking on the “camera” icon next to the playhead.
Change the Font of the Title to something else more elegant like “Montez” and take another snapshot by clicking on the same camera icon.

Step5Add the Gold Effect
Delete everything from the timeline. Don’t worry you took a photo of all the text layers and the effects added to each.
You will then need to find an image of a gold background. You can find these on any good background image site. Download a good clear image and upload it into Filmora.
Now drag and drop the gold background image to the second track in the timeline. Double click on the background image.
Select “Compositing” and then in the “Blending Mode” drop-down menu, choose “Darken.” Click OK.”

Hide the first layer in the timeline and select the gold background image layer. Click on “Animation” and then select “Customize.”
To create the customized effect that we need, click on the image and drag it from the right to the left side.

Move the playhead to the end of the image to insert another keyframe and then click on the restore icon to restore the size of the image.

Click “OK” and show the track above the timeline. You will now see that the gold texture effect has been applied to your title. You can also add the second snapshot with the varying font for further effect.
Step6Save the Project
Once you are done, you can go ahead and save the project or continue working on other aspects of the video as desired.
Free Download For Win 7 or later(64-bit)
Free Download For macOS 10.14 or later
Doable Ways to Make Transparent Background in Procreate
Doable Ways to Make Transparent Background in Procreate
An easy yet powerful editor
Numerous effects to choose from
Detailed tutorials provided by the official channel
Figuring out the crucial steps to make the canvas excellent is one of the loveliest things users are performing for exporting the closing Procreate-projects. Once after getting expert with things trick you can be able to position the canvas surprisingly on great back for a memorable moment. You can make the most of it for your procreate mission that you have created.
Out of many essentials tools you have ever used for experiencing the benefits of equipment & skills, the Procreate is a kind of solution that comes with one of the most trustworthy as well as brilliant capability to erase the undesired background from the pictures. It is more than a general tool and there are some specified approaches to do so, but in today possible scenario, you can easily focus around choice of right selections to erase a background at ease. People can explore the chances of creating various attractive methods to work in the PNG structure after removing the desired background.
In this article
01 [How to Delete a White Background with Procreate for the IPad?](#Part 1)
02 [How to Make Transparent Background with Procreate for iPhone?](#Part 2)
03 [How to Create Popping Thumbnails or Profile Photos](#Part 3)
Part 1 How to Delete a White Background with Procreate for the IPad?

In case you are facing discoloration problem too then it is always a better idea to cast image with desired background and remove the objects.
Now turning your background with a lovely image or your own is just a matter of few clicks. With great transparent background procreate, you will be heading towards the satisfaction of obtaining transparent background. With few crucial steps you can stay from the other competitors or it will make your posts viral. With stepwise guidelines on removing the background as well as replacing it with a transparent one in Procreate is what you need the most today.
When it comes to deleting the white-background with a Procreate, then with great selection of tools you can easily create amazing performance for your post. If you are still in a dilemma to make use of the white coloured Background. After tapping on the top-left corner of the screen, you can open-up brilliant level of opportunities to make the most out of it. Are you ready to begin? Next you will learn about how to turn the background into a desired canvas for all your Instagram stories.
The following steps will provide you a quick walkthrough of entire process, stepwise:-
Step 1: First you are required to open the picture with Procreate. Get your desired image for the edit or open your picture & turn-off the overall visibility of background layer by layers-icon, tap it, it is presented on the top-right corner. Here, you will see layer labelled as the background, you need to uncheck the layer’s box for turning-off overall visibility at the bottom of Layers menu.
It is an important step to perform as if you want to deleting any white background from the image otherwise background will be treated as transparent with white-background showing through, thus you will experience no changes to the document. You are not required to remove background from image procreate if your image is not having a background layer.
Step 2: Create the selection at around white area of an image & delete background
For you to perform the step of procreate remove white background, you are required to make selection around white area. For this, open-up the selection-menu and it is placed in the form round icon named ‘S’ at the top-left-corner of the screen. At this menu, choose auto & Add. To create such level of perfection in selection, just hold & tap over any area of white-background at this screen. You can also increase threshold of your selection by moving the fingers/stylus at the right. For the opposite process, you can move the same to the left.You need to adjust the desired threshold until selection-area on your screen lines-up in accordance with an edges of the subject. You are now heading towards the process of make background transparent procreatefor your desired image quickly.
With your current selection still in active state, just tap on wrench-icon it the top-left area of your screen, then navigate to Add-menu, and here tap on the Cut option. Congrats, you have effectively deleted the background from an image.
**Step 3:**Just release the selection in the form of tapping on Selection-menu icon and repeat the process again for negative space-areas & at last clean-up stray-pixels with through an Eraser. You can repeat the process further from the step-2 in case any stray pixels still remains there as it is a normal situation to face while removing the pixels background with ‘remove background on procreate’ option.You can also take the Eraser & then manually erase those stray-pixels in there is any.
Step 4: Export your final work as PNG-file to preserve the transparency
After finishing the task of deleting background from the picture you can easily export your work to a desirable file format. The image you want to export can be in the form of PNG to retain the transparency. Other useful formats you can choose is JPEG but this doesn’tsupport transparency. So, be wise & be careful while choose your file formats.You are now having procreate export transparent backgroundand can also place the same to any sort of backdrop like an app, website, or any other workspace.
Part 2 How to Make Transparent Background with Procreate for iPhone?

Let’s dive-in quickly into the process of making the background transparent with procreate, if you are an iPhone User.
● GO Into an option of Canvas
It is up-to you whether you want to create a new canvas or want to work-upon already saved canvas. In your device through procreate app, you can do the same without any worries.
● Tap onto the option of Layers Panel
This option is located at the top-right corner of your toolbar. This option looks similar to the two-squares on the top of one another.
● Replace dull looking background with transparent background
You can quickly go down to the layers-panel placed at the bottom to choose the background color.Transparent background in procreateis always a good option to consider.
● Put uncheck before the box
At the right of toolbar you can be able to see words ‘Background color’ and if it is checked then you need to uncheck it. Now your goal to make the background completely transparent with procreate make background transparent tool, will be achieved. Now your background is completely transparent and ready to use.
Part 3 How to Create Popping Thumbnails or Profile Photos

There are various tools available in the market to make a popping thumbnail for your YouTube or Instagram pages. Thumbnail maker like Filmora can be an interesting option to choose as it is quick and effective. You can also customized as well as download the thumbnails at no cost with the same. However, they comes with certain limitations like overall size of the image to be downloaded. For better versions you can use premium tools. With better creativity and great imagination you can make the thumbnail as crisp as possible.
● Upload your desired photo to Filmora’s thumbnail maker templates.
You can easily create your video thumbnail, but you need some inspiration and for that you can make use of amazing tool like Filmora. With access to more than 50 free templates you can achieve your goal of making popping thumbnails.
● Adding text, clipart, or perfect quality of background can give it a boost
After picking your template, one can make use of thumbnail to stand out different in terms of adding text, clipart or background. For adding custom background to your thumbnail you can make use of procreate that can remove the background with procreateremove white backgroundfeatures and give you better featured image with nice background. Also to clarify the objectives of your thumbnail you can add titles, and also consider placing the same on the top of any dark color background if your thumbnail is light in color. For making the background darker just choose remove white background procreateas discussed above.
● Just Download your finished product to your device
After polishing the thumbnails with creative stuff, you can download the same to your device or export it to your smartphone.
Voila, you just have create your own custom popping thumbnail. With remove background on procreate, you can never feel disappointed.
****Wondershare Filmora Video Editor App to Remove Unwanted Background Easily**
For Win 7 or later (64-bit)
For macOS 10.12 or later
In case you are searching for any professional tool to remove het background and replace the one with any of your favorite picture then there is a tool for you to consider. With greater different functionalities, you can make any Instagram post or story interesting through the help of Fillmora App. This has set of brilliant solutions to provide with most brilliant picture and video editing features. It is interesting, fun-loving as well as attractive enough to turn any moments extraordinary.
Handy features to enjoy:-
● You can make use of this tool to create custom thumbnails for your YouTube or Instagram page.
● Great varieties of templates for making popping thumbnails
● Greater capability to beautifully construct picture editing animations
● Varieties of Effects for every age group
● Attractive filters, GIFs packs and images to turn any dull looking background into an amazing moment.
● Delete white background quickly
● Right selection of tools to make the editing effective
● Flawless features to crop, cut-up, cut, trim & mix operations.
● Single click operation to turn the images into a beauty mode
● Options to save your creations into your device or virtual space
● Share your creations to your community, to your friends via Facebook, Instagram, YouTube, and Twitter quickly.
It is a greater idea to try this app for making use of its image editing features for deleting the white background in an easy manner.
● Ending Thoughts →
● With great varieties of features it is now very easy for you to create some automated selections in just single tap.
● Deleting the white background through a pro-tool like Procreate is smart, quick & seamless process.
● You are not going to get confused, even if you are using it for the very first time.
● It is the trend that every Instagram user is following for posting better images with nice background options.
Figuring out the crucial steps to make the canvas excellent is one of the loveliest things users are performing for exporting the closing Procreate-projects. Once after getting expert with things trick you can be able to position the canvas surprisingly on great back for a memorable moment. You can make the most of it for your procreate mission that you have created.
Out of many essentials tools you have ever used for experiencing the benefits of equipment & skills, the Procreate is a kind of solution that comes with one of the most trustworthy as well as brilliant capability to erase the undesired background from the pictures. It is more than a general tool and there are some specified approaches to do so, but in today possible scenario, you can easily focus around choice of right selections to erase a background at ease. People can explore the chances of creating various attractive methods to work in the PNG structure after removing the desired background.
In this article
01 [How to Delete a White Background with Procreate for the IPad?](#Part 1)
02 [How to Make Transparent Background with Procreate for iPhone?](#Part 2)
03 [How to Create Popping Thumbnails or Profile Photos](#Part 3)
Part 1 How to Delete a White Background with Procreate for the IPad?

In case you are facing discoloration problem too then it is always a better idea to cast image with desired background and remove the objects.
Now turning your background with a lovely image or your own is just a matter of few clicks. With great transparent background procreate, you will be heading towards the satisfaction of obtaining transparent background. With few crucial steps you can stay from the other competitors or it will make your posts viral. With stepwise guidelines on removing the background as well as replacing it with a transparent one in Procreate is what you need the most today.
When it comes to deleting the white-background with a Procreate, then with great selection of tools you can easily create amazing performance for your post. If you are still in a dilemma to make use of the white coloured Background. After tapping on the top-left corner of the screen, you can open-up brilliant level of opportunities to make the most out of it. Are you ready to begin? Next you will learn about how to turn the background into a desired canvas for all your Instagram stories.
The following steps will provide you a quick walkthrough of entire process, stepwise:-
Step 1: First you are required to open the picture with Procreate. Get your desired image for the edit or open your picture & turn-off the overall visibility of background layer by layers-icon, tap it, it is presented on the top-right corner. Here, you will see layer labelled as the background, you need to uncheck the layer’s box for turning-off overall visibility at the bottom of Layers menu.
It is an important step to perform as if you want to deleting any white background from the image otherwise background will be treated as transparent with white-background showing through, thus you will experience no changes to the document. You are not required to remove background from image procreate if your image is not having a background layer.
Step 2: Create the selection at around white area of an image & delete background
For you to perform the step of procreate remove white background, you are required to make selection around white area. For this, open-up the selection-menu and it is placed in the form round icon named ‘S’ at the top-left-corner of the screen. At this menu, choose auto & Add. To create such level of perfection in selection, just hold & tap over any area of white-background at this screen. You can also increase threshold of your selection by moving the fingers/stylus at the right. For the opposite process, you can move the same to the left.You need to adjust the desired threshold until selection-area on your screen lines-up in accordance with an edges of the subject. You are now heading towards the process of make background transparent procreatefor your desired image quickly.
With your current selection still in active state, just tap on wrench-icon it the top-left area of your screen, then navigate to Add-menu, and here tap on the Cut option. Congrats, you have effectively deleted the background from an image.
**Step 3:**Just release the selection in the form of tapping on Selection-menu icon and repeat the process again for negative space-areas & at last clean-up stray-pixels with through an Eraser. You can repeat the process further from the step-2 in case any stray pixels still remains there as it is a normal situation to face while removing the pixels background with ‘remove background on procreate’ option.You can also take the Eraser & then manually erase those stray-pixels in there is any.
Step 4: Export your final work as PNG-file to preserve the transparency
After finishing the task of deleting background from the picture you can easily export your work to a desirable file format. The image you want to export can be in the form of PNG to retain the transparency. Other useful formats you can choose is JPEG but this doesn’tsupport transparency. So, be wise & be careful while choose your file formats.You are now having procreate export transparent backgroundand can also place the same to any sort of backdrop like an app, website, or any other workspace.
Part 2 How to Make Transparent Background with Procreate for iPhone?

Let’s dive-in quickly into the process of making the background transparent with procreate, if you are an iPhone User.
● GO Into an option of Canvas
It is up-to you whether you want to create a new canvas or want to work-upon already saved canvas. In your device through procreate app, you can do the same without any worries.
● Tap onto the option of Layers Panel
This option is located at the top-right corner of your toolbar. This option looks similar to the two-squares on the top of one another.
● Replace dull looking background with transparent background
You can quickly go down to the layers-panel placed at the bottom to choose the background color.Transparent background in procreateis always a good option to consider.
● Put uncheck before the box
At the right of toolbar you can be able to see words ‘Background color’ and if it is checked then you need to uncheck it. Now your goal to make the background completely transparent with procreate make background transparent tool, will be achieved. Now your background is completely transparent and ready to use.
Part 3 How to Create Popping Thumbnails or Profile Photos

There are various tools available in the market to make a popping thumbnail for your YouTube or Instagram pages. Thumbnail maker like Filmora can be an interesting option to choose as it is quick and effective. You can also customized as well as download the thumbnails at no cost with the same. However, they comes with certain limitations like overall size of the image to be downloaded. For better versions you can use premium tools. With better creativity and great imagination you can make the thumbnail as crisp as possible.
● Upload your desired photo to Filmora’s thumbnail maker templates.
You can easily create your video thumbnail, but you need some inspiration and for that you can make use of amazing tool like Filmora. With access to more than 50 free templates you can achieve your goal of making popping thumbnails.
● Adding text, clipart, or perfect quality of background can give it a boost
After picking your template, one can make use of thumbnail to stand out different in terms of adding text, clipart or background. For adding custom background to your thumbnail you can make use of procreate that can remove the background with procreateremove white backgroundfeatures and give you better featured image with nice background. Also to clarify the objectives of your thumbnail you can add titles, and also consider placing the same on the top of any dark color background if your thumbnail is light in color. For making the background darker just choose remove white background procreateas discussed above.
● Just Download your finished product to your device
After polishing the thumbnails with creative stuff, you can download the same to your device or export it to your smartphone.
Voila, you just have create your own custom popping thumbnail. With remove background on procreate, you can never feel disappointed.
****Wondershare Filmora Video Editor App to Remove Unwanted Background Easily**
For Win 7 or later (64-bit)
For macOS 10.12 or later
In case you are searching for any professional tool to remove het background and replace the one with any of your favorite picture then there is a tool for you to consider. With greater different functionalities, you can make any Instagram post or story interesting through the help of Fillmora App. This has set of brilliant solutions to provide with most brilliant picture and video editing features. It is interesting, fun-loving as well as attractive enough to turn any moments extraordinary.
Handy features to enjoy:-
● You can make use of this tool to create custom thumbnails for your YouTube or Instagram page.
● Great varieties of templates for making popping thumbnails
● Greater capability to beautifully construct picture editing animations
● Varieties of Effects for every age group
● Attractive filters, GIFs packs and images to turn any dull looking background into an amazing moment.
● Delete white background quickly
● Right selection of tools to make the editing effective
● Flawless features to crop, cut-up, cut, trim & mix operations.
● Single click operation to turn the images into a beauty mode
● Options to save your creations into your device or virtual space
● Share your creations to your community, to your friends via Facebook, Instagram, YouTube, and Twitter quickly.
It is a greater idea to try this app for making use of its image editing features for deleting the white background in an easy manner.
● Ending Thoughts →
● With great varieties of features it is now very easy for you to create some automated selections in just single tap.
● Deleting the white background through a pro-tool like Procreate is smart, quick & seamless process.
● You are not going to get confused, even if you are using it for the very first time.
● It is the trend that every Instagram user is following for posting better images with nice background options.
Figuring out the crucial steps to make the canvas excellent is one of the loveliest things users are performing for exporting the closing Procreate-projects. Once after getting expert with things trick you can be able to position the canvas surprisingly on great back for a memorable moment. You can make the most of it for your procreate mission that you have created.
Out of many essentials tools you have ever used for experiencing the benefits of equipment & skills, the Procreate is a kind of solution that comes with one of the most trustworthy as well as brilliant capability to erase the undesired background from the pictures. It is more than a general tool and there are some specified approaches to do so, but in today possible scenario, you can easily focus around choice of right selections to erase a background at ease. People can explore the chances of creating various attractive methods to work in the PNG structure after removing the desired background.
In this article
01 [How to Delete a White Background with Procreate for the IPad?](#Part 1)
02 [How to Make Transparent Background with Procreate for iPhone?](#Part 2)
03 [How to Create Popping Thumbnails or Profile Photos](#Part 3)
Part 1 How to Delete a White Background with Procreate for the IPad?

In case you are facing discoloration problem too then it is always a better idea to cast image with desired background and remove the objects.
Now turning your background with a lovely image or your own is just a matter of few clicks. With great transparent background procreate, you will be heading towards the satisfaction of obtaining transparent background. With few crucial steps you can stay from the other competitors or it will make your posts viral. With stepwise guidelines on removing the background as well as replacing it with a transparent one in Procreate is what you need the most today.
When it comes to deleting the white-background with a Procreate, then with great selection of tools you can easily create amazing performance for your post. If you are still in a dilemma to make use of the white coloured Background. After tapping on the top-left corner of the screen, you can open-up brilliant level of opportunities to make the most out of it. Are you ready to begin? Next you will learn about how to turn the background into a desired canvas for all your Instagram stories.
The following steps will provide you a quick walkthrough of entire process, stepwise:-
Step 1: First you are required to open the picture with Procreate. Get your desired image for the edit or open your picture & turn-off the overall visibility of background layer by layers-icon, tap it, it is presented on the top-right corner. Here, you will see layer labelled as the background, you need to uncheck the layer’s box for turning-off overall visibility at the bottom of Layers menu.
It is an important step to perform as if you want to deleting any white background from the image otherwise background will be treated as transparent with white-background showing through, thus you will experience no changes to the document. You are not required to remove background from image procreate if your image is not having a background layer.
Step 2: Create the selection at around white area of an image & delete background
For you to perform the step of procreate remove white background, you are required to make selection around white area. For this, open-up the selection-menu and it is placed in the form round icon named ‘S’ at the top-left-corner of the screen. At this menu, choose auto & Add. To create such level of perfection in selection, just hold & tap over any area of white-background at this screen. You can also increase threshold of your selection by moving the fingers/stylus at the right. For the opposite process, you can move the same to the left.You need to adjust the desired threshold until selection-area on your screen lines-up in accordance with an edges of the subject. You are now heading towards the process of make background transparent procreatefor your desired image quickly.
With your current selection still in active state, just tap on wrench-icon it the top-left area of your screen, then navigate to Add-menu, and here tap on the Cut option. Congrats, you have effectively deleted the background from an image.
**Step 3:**Just release the selection in the form of tapping on Selection-menu icon and repeat the process again for negative space-areas & at last clean-up stray-pixels with through an Eraser. You can repeat the process further from the step-2 in case any stray pixels still remains there as it is a normal situation to face while removing the pixels background with ‘remove background on procreate’ option.You can also take the Eraser & then manually erase those stray-pixels in there is any.
Step 4: Export your final work as PNG-file to preserve the transparency
After finishing the task of deleting background from the picture you can easily export your work to a desirable file format. The image you want to export can be in the form of PNG to retain the transparency. Other useful formats you can choose is JPEG but this doesn’tsupport transparency. So, be wise & be careful while choose your file formats.You are now having procreate export transparent backgroundand can also place the same to any sort of backdrop like an app, website, or any other workspace.
Part 2 How to Make Transparent Background with Procreate for iPhone?

Let’s dive-in quickly into the process of making the background transparent with procreate, if you are an iPhone User.
● GO Into an option of Canvas
It is up-to you whether you want to create a new canvas or want to work-upon already saved canvas. In your device through procreate app, you can do the same without any worries.
● Tap onto the option of Layers Panel
This option is located at the top-right corner of your toolbar. This option looks similar to the two-squares on the top of one another.
● Replace dull looking background with transparent background
You can quickly go down to the layers-panel placed at the bottom to choose the background color.Transparent background in procreateis always a good option to consider.
● Put uncheck before the box
At the right of toolbar you can be able to see words ‘Background color’ and if it is checked then you need to uncheck it. Now your goal to make the background completely transparent with procreate make background transparent tool, will be achieved. Now your background is completely transparent and ready to use.
Part 3 How to Create Popping Thumbnails or Profile Photos

There are various tools available in the market to make a popping thumbnail for your YouTube or Instagram pages. Thumbnail maker like Filmora can be an interesting option to choose as it is quick and effective. You can also customized as well as download the thumbnails at no cost with the same. However, they comes with certain limitations like overall size of the image to be downloaded. For better versions you can use premium tools. With better creativity and great imagination you can make the thumbnail as crisp as possible.
● Upload your desired photo to Filmora’s thumbnail maker templates.
You can easily create your video thumbnail, but you need some inspiration and for that you can make use of amazing tool like Filmora. With access to more than 50 free templates you can achieve your goal of making popping thumbnails.
● Adding text, clipart, or perfect quality of background can give it a boost
After picking your template, one can make use of thumbnail to stand out different in terms of adding text, clipart or background. For adding custom background to your thumbnail you can make use of procreate that can remove the background with procreateremove white backgroundfeatures and give you better featured image with nice background. Also to clarify the objectives of your thumbnail you can add titles, and also consider placing the same on the top of any dark color background if your thumbnail is light in color. For making the background darker just choose remove white background procreateas discussed above.
● Just Download your finished product to your device
After polishing the thumbnails with creative stuff, you can download the same to your device or export it to your smartphone.
Voila, you just have create your own custom popping thumbnail. With remove background on procreate, you can never feel disappointed.
****Wondershare Filmora Video Editor App to Remove Unwanted Background Easily**
For Win 7 or later (64-bit)
For macOS 10.12 or later
In case you are searching for any professional tool to remove het background and replace the one with any of your favorite picture then there is a tool for you to consider. With greater different functionalities, you can make any Instagram post or story interesting through the help of Fillmora App. This has set of brilliant solutions to provide with most brilliant picture and video editing features. It is interesting, fun-loving as well as attractive enough to turn any moments extraordinary.
Handy features to enjoy:-
● You can make use of this tool to create custom thumbnails for your YouTube or Instagram page.
● Great varieties of templates for making popping thumbnails
● Greater capability to beautifully construct picture editing animations
● Varieties of Effects for every age group
● Attractive filters, GIFs packs and images to turn any dull looking background into an amazing moment.
● Delete white background quickly
● Right selection of tools to make the editing effective
● Flawless features to crop, cut-up, cut, trim & mix operations.
● Single click operation to turn the images into a beauty mode
● Options to save your creations into your device or virtual space
● Share your creations to your community, to your friends via Facebook, Instagram, YouTube, and Twitter quickly.
It is a greater idea to try this app for making use of its image editing features for deleting the white background in an easy manner.
● Ending Thoughts →
● With great varieties of features it is now very easy for you to create some automated selections in just single tap.
● Deleting the white background through a pro-tool like Procreate is smart, quick & seamless process.
● You are not going to get confused, even if you are using it for the very first time.
● It is the trend that every Instagram user is following for posting better images with nice background options.
Figuring out the crucial steps to make the canvas excellent is one of the loveliest things users are performing for exporting the closing Procreate-projects. Once after getting expert with things trick you can be able to position the canvas surprisingly on great back for a memorable moment. You can make the most of it for your procreate mission that you have created.
Out of many essentials tools you have ever used for experiencing the benefits of equipment & skills, the Procreate is a kind of solution that comes with one of the most trustworthy as well as brilliant capability to erase the undesired background from the pictures. It is more than a general tool and there are some specified approaches to do so, but in today possible scenario, you can easily focus around choice of right selections to erase a background at ease. People can explore the chances of creating various attractive methods to work in the PNG structure after removing the desired background.
In this article
01 [How to Delete a White Background with Procreate for the IPad?](#Part 1)
02 [How to Make Transparent Background with Procreate for iPhone?](#Part 2)
03 [How to Create Popping Thumbnails or Profile Photos](#Part 3)
Part 1 How to Delete a White Background with Procreate for the IPad?

In case you are facing discoloration problem too then it is always a better idea to cast image with desired background and remove the objects.
Now turning your background with a lovely image or your own is just a matter of few clicks. With great transparent background procreate, you will be heading towards the satisfaction of obtaining transparent background. With few crucial steps you can stay from the other competitors or it will make your posts viral. With stepwise guidelines on removing the background as well as replacing it with a transparent one in Procreate is what you need the most today.
When it comes to deleting the white-background with a Procreate, then with great selection of tools you can easily create amazing performance for your post. If you are still in a dilemma to make use of the white coloured Background. After tapping on the top-left corner of the screen, you can open-up brilliant level of opportunities to make the most out of it. Are you ready to begin? Next you will learn about how to turn the background into a desired canvas for all your Instagram stories.
The following steps will provide you a quick walkthrough of entire process, stepwise:-
Step 1: First you are required to open the picture with Procreate. Get your desired image for the edit or open your picture & turn-off the overall visibility of background layer by layers-icon, tap it, it is presented on the top-right corner. Here, you will see layer labelled as the background, you need to uncheck the layer’s box for turning-off overall visibility at the bottom of Layers menu.
It is an important step to perform as if you want to deleting any white background from the image otherwise background will be treated as transparent with white-background showing through, thus you will experience no changes to the document. You are not required to remove background from image procreate if your image is not having a background layer.
Step 2: Create the selection at around white area of an image & delete background
For you to perform the step of procreate remove white background, you are required to make selection around white area. For this, open-up the selection-menu and it is placed in the form round icon named ‘S’ at the top-left-corner of the screen. At this menu, choose auto & Add. To create such level of perfection in selection, just hold & tap over any area of white-background at this screen. You can also increase threshold of your selection by moving the fingers/stylus at the right. For the opposite process, you can move the same to the left.You need to adjust the desired threshold until selection-area on your screen lines-up in accordance with an edges of the subject. You are now heading towards the process of make background transparent procreatefor your desired image quickly.
With your current selection still in active state, just tap on wrench-icon it the top-left area of your screen, then navigate to Add-menu, and here tap on the Cut option. Congrats, you have effectively deleted the background from an image.
**Step 3:**Just release the selection in the form of tapping on Selection-menu icon and repeat the process again for negative space-areas & at last clean-up stray-pixels with through an Eraser. You can repeat the process further from the step-2 in case any stray pixels still remains there as it is a normal situation to face while removing the pixels background with ‘remove background on procreate’ option.You can also take the Eraser & then manually erase those stray-pixels in there is any.
Step 4: Export your final work as PNG-file to preserve the transparency
After finishing the task of deleting background from the picture you can easily export your work to a desirable file format. The image you want to export can be in the form of PNG to retain the transparency. Other useful formats you can choose is JPEG but this doesn’tsupport transparency. So, be wise & be careful while choose your file formats.You are now having procreate export transparent backgroundand can also place the same to any sort of backdrop like an app, website, or any other workspace.
Part 2 How to Make Transparent Background with Procreate for iPhone?

Let’s dive-in quickly into the process of making the background transparent with procreate, if you are an iPhone User.
● GO Into an option of Canvas
It is up-to you whether you want to create a new canvas or want to work-upon already saved canvas. In your device through procreate app, you can do the same without any worries.
● Tap onto the option of Layers Panel
This option is located at the top-right corner of your toolbar. This option looks similar to the two-squares on the top of one another.
● Replace dull looking background with transparent background
You can quickly go down to the layers-panel placed at the bottom to choose the background color.Transparent background in procreateis always a good option to consider.
● Put uncheck before the box
At the right of toolbar you can be able to see words ‘Background color’ and if it is checked then you need to uncheck it. Now your goal to make the background completely transparent with procreate make background transparent tool, will be achieved. Now your background is completely transparent and ready to use.
Part 3 How to Create Popping Thumbnails or Profile Photos

There are various tools available in the market to make a popping thumbnail for your YouTube or Instagram pages. Thumbnail maker like Filmora can be an interesting option to choose as it is quick and effective. You can also customized as well as download the thumbnails at no cost with the same. However, they comes with certain limitations like overall size of the image to be downloaded. For better versions you can use premium tools. With better creativity and great imagination you can make the thumbnail as crisp as possible.
● Upload your desired photo to Filmora’s thumbnail maker templates.
You can easily create your video thumbnail, but you need some inspiration and for that you can make use of amazing tool like Filmora. With access to more than 50 free templates you can achieve your goal of making popping thumbnails.
● Adding text, clipart, or perfect quality of background can give it a boost
After picking your template, one can make use of thumbnail to stand out different in terms of adding text, clipart or background. For adding custom background to your thumbnail you can make use of procreate that can remove the background with procreateremove white backgroundfeatures and give you better featured image with nice background. Also to clarify the objectives of your thumbnail you can add titles, and also consider placing the same on the top of any dark color background if your thumbnail is light in color. For making the background darker just choose remove white background procreateas discussed above.
● Just Download your finished product to your device
After polishing the thumbnails with creative stuff, you can download the same to your device or export it to your smartphone.
Voila, you just have create your own custom popping thumbnail. With remove background on procreate, you can never feel disappointed.
****Wondershare Filmora Video Editor App to Remove Unwanted Background Easily**
For Win 7 or later (64-bit)
For macOS 10.12 or later
In case you are searching for any professional tool to remove het background and replace the one with any of your favorite picture then there is a tool for you to consider. With greater different functionalities, you can make any Instagram post or story interesting through the help of Fillmora App. This has set of brilliant solutions to provide with most brilliant picture and video editing features. It is interesting, fun-loving as well as attractive enough to turn any moments extraordinary.
Handy features to enjoy:-
● You can make use of this tool to create custom thumbnails for your YouTube or Instagram page.
● Great varieties of templates for making popping thumbnails
● Greater capability to beautifully construct picture editing animations
● Varieties of Effects for every age group
● Attractive filters, GIFs packs and images to turn any dull looking background into an amazing moment.
● Delete white background quickly
● Right selection of tools to make the editing effective
● Flawless features to crop, cut-up, cut, trim & mix operations.
● Single click operation to turn the images into a beauty mode
● Options to save your creations into your device or virtual space
● Share your creations to your community, to your friends via Facebook, Instagram, YouTube, and Twitter quickly.
It is a greater idea to try this app for making use of its image editing features for deleting the white background in an easy manner.
● Ending Thoughts →
● With great varieties of features it is now very easy for you to create some automated selections in just single tap.
● Deleting the white background through a pro-tool like Procreate is smart, quick & seamless process.
● You are not going to get confused, even if you are using it for the very first time.
● It is the trend that every Instagram user is following for posting better images with nice background options.
Best Ideas on Using Filmora Green Screen
Green screener chroma key is commonly used in film, tv shows, and social media videos nowadays. This article will show you how to light film and edit a green screen. Additionally, you can have some fun ideas with a chroma key. Therefore, keep reading this article to know all the information.
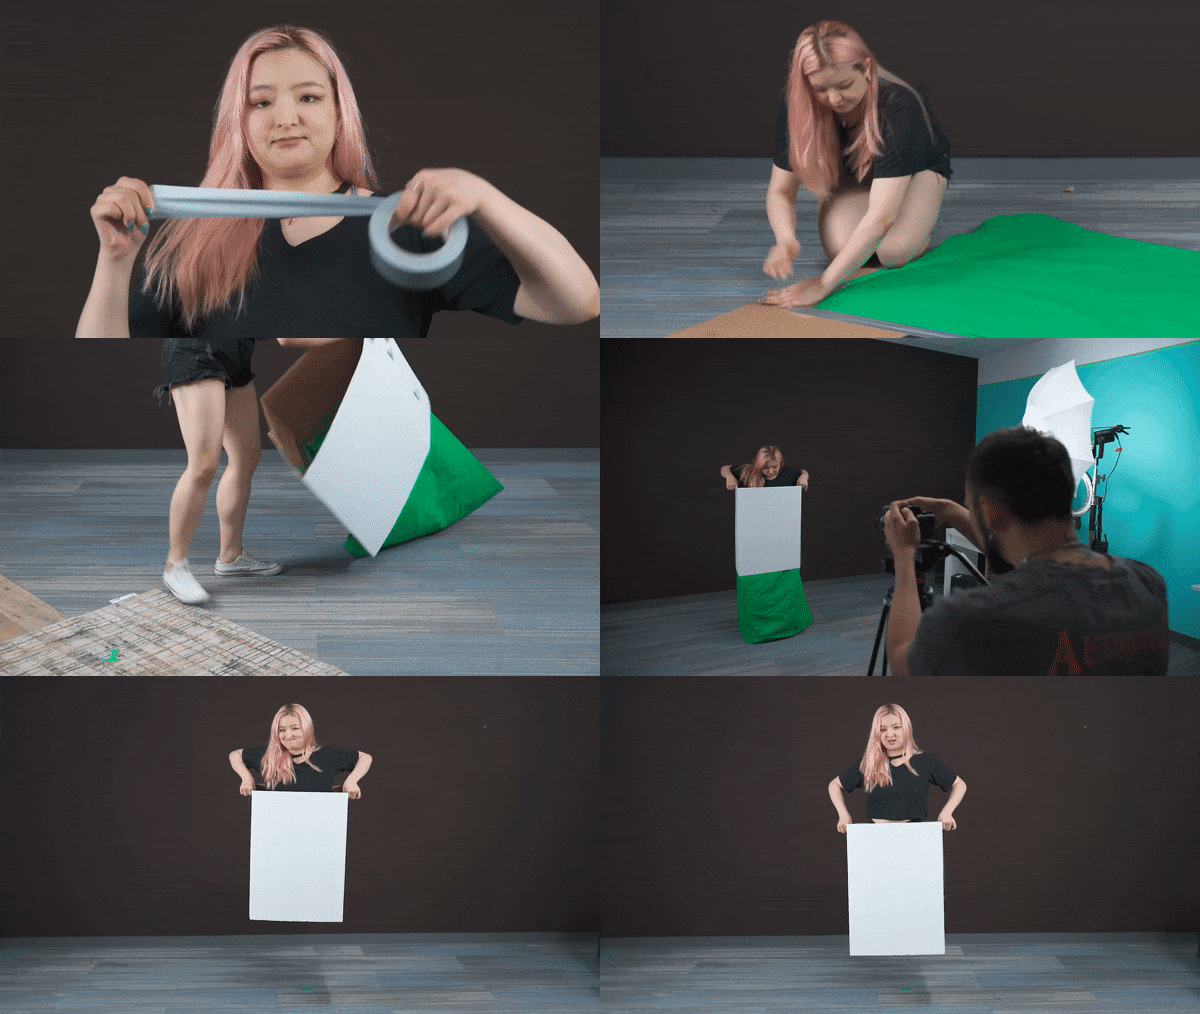
Part 1: Cool Ideas to Use Green Screen
1. The Magic Box
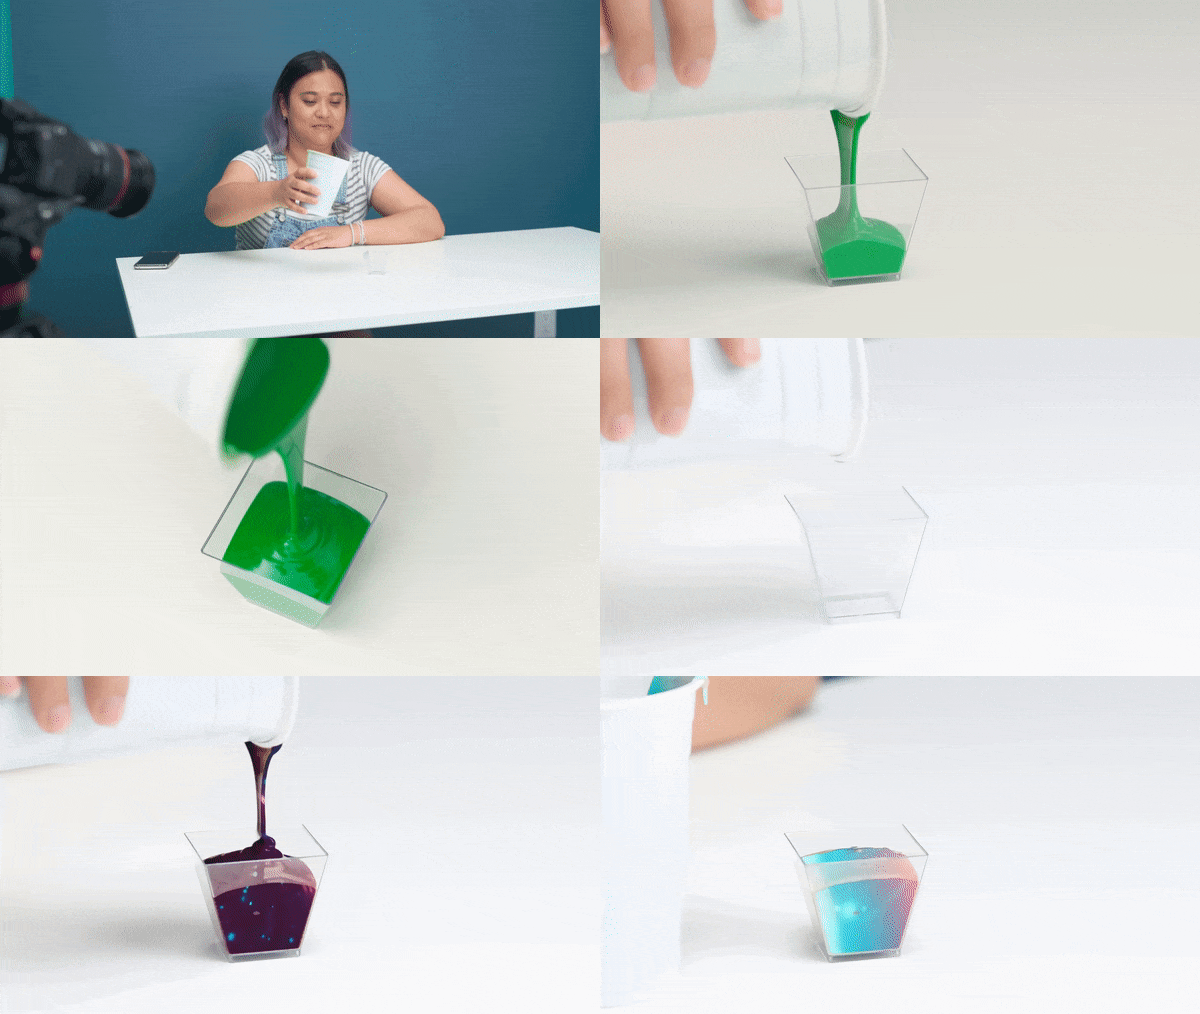
2. Liquid Transformation
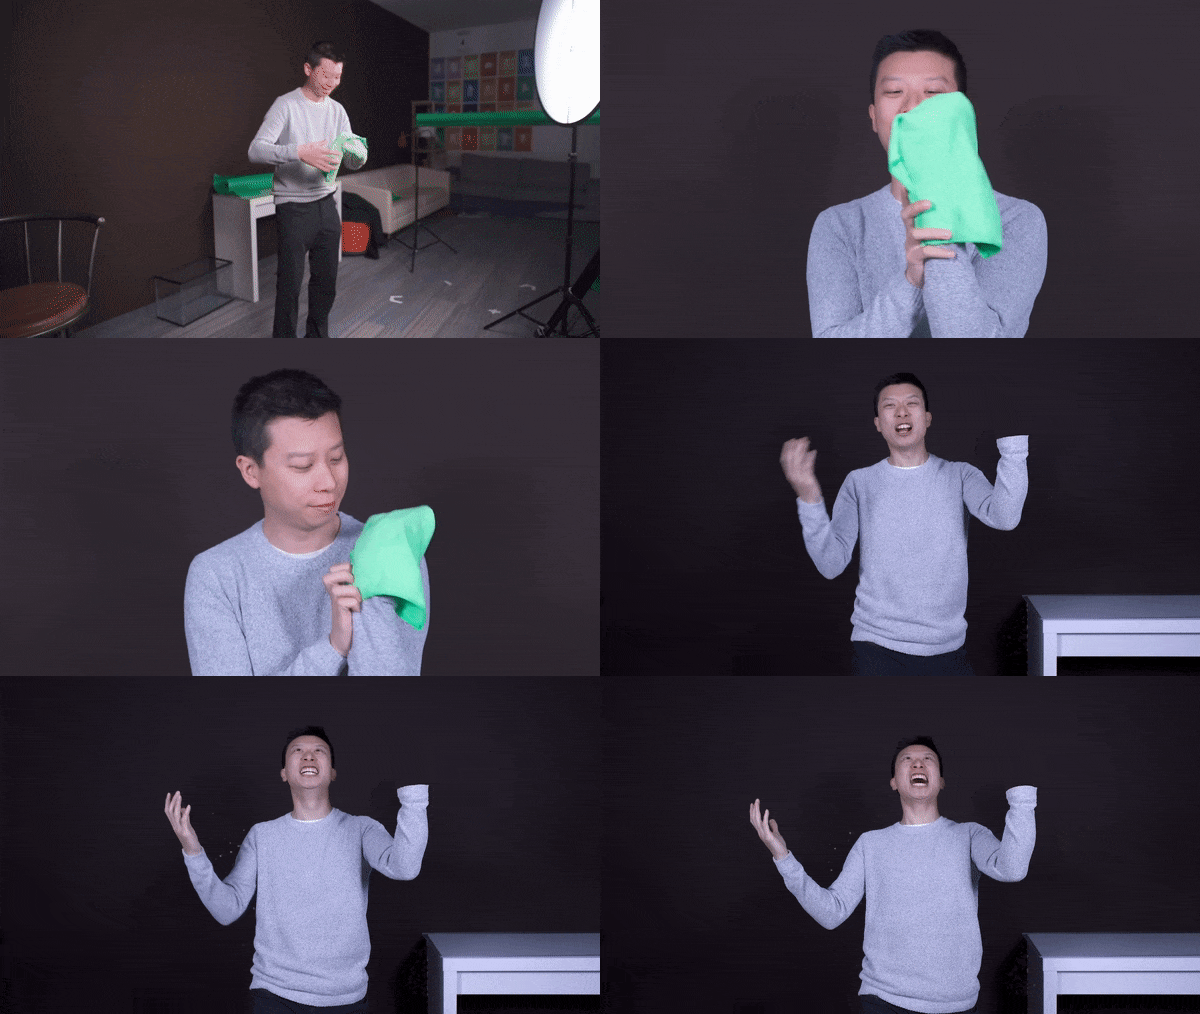
3. Key Out a Body Part
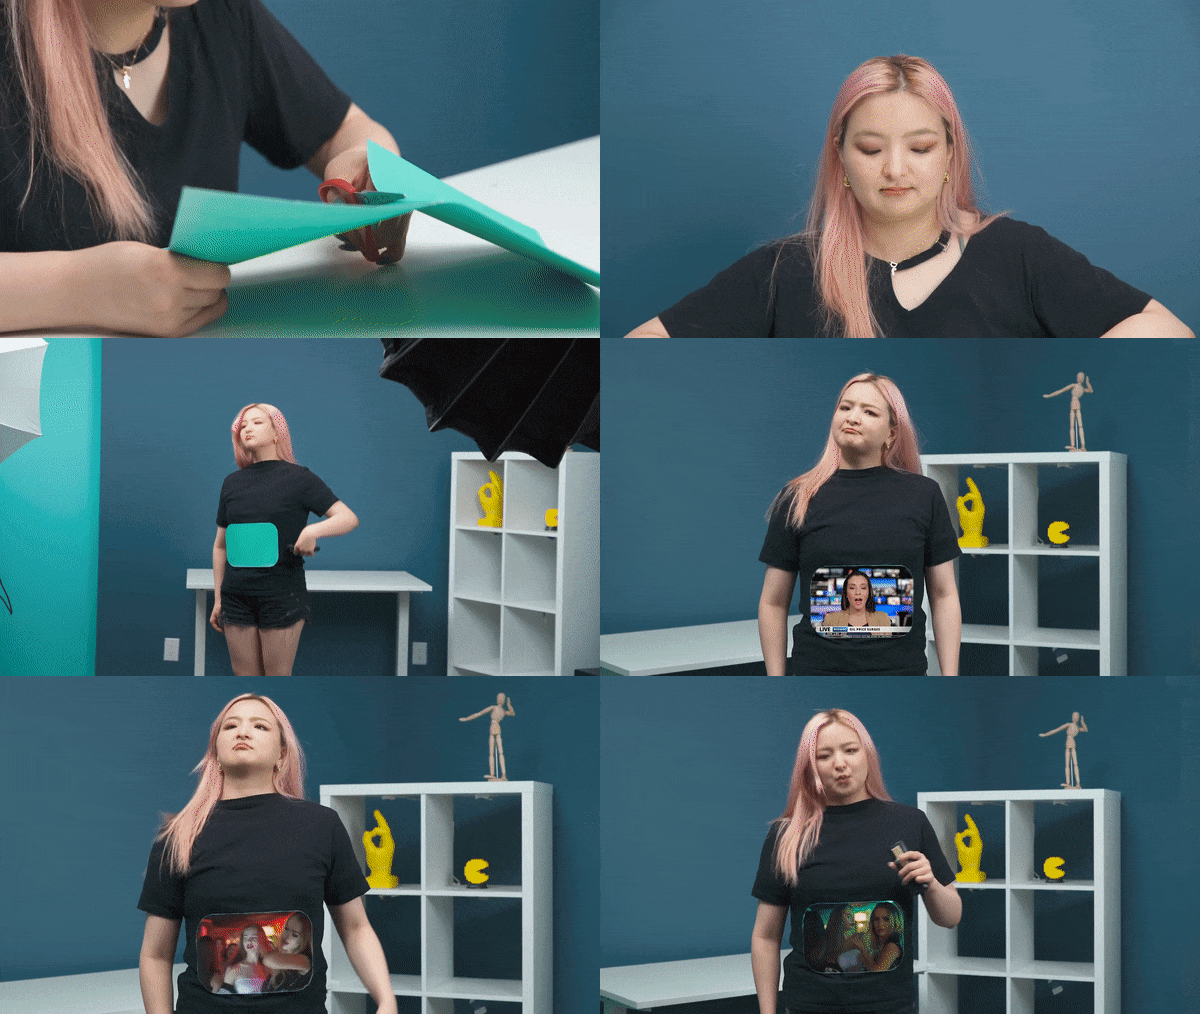
4. T-shirt TV Screen
Part 2: Setting Up The Green Screen
Filming with the green screen is getting easier and easier. Anyone can do it, but before you get started, we will share some do’s and don’ts to help you get the best results.
In fact, there are many ways to set up a green screen, but the most cost-efficient way is with a green screen fabric. If you are using a green fabric as a DIY green screen, make sure you steam or iron it out, whether taping it to a wall or hanging it off the rack. Keep in mind the green screen should not leave any wrinkles.
It is because wrinkles will make lighting the green screen a nightmare, and uneven lighting will leave you with shadows and disappointing results. It would help if you also pulled the green screen tight to get a seamless background. The better you do with the setup, the easier it will be the key it out later
Part 3: Lighting a Green Screen
It doesn’t matter how nice your green screen is. You won’t get good results if you don’t light it properly. When you light a green screen, be aware of these things.
- Make sure there are at least six feet of space between you and your green screen; therefore, you’re not casting a shadow that cannot be keyed out later.
- Remember, any shadow on the green screen is bad. The lighting on the screen should be flat, even, and one-dimensional meaning. Please don’t place the screen leaning at an angle since they’ll make it harder to light evenly.
- Do light yourself and your background separately. It will ensure your subject wouldn’t bleed into the green, which will create a halo around them.
- After you key out the green screen and lighting, your subjects should emulate the lighting from your final footage. For example, if you know sunlight is coming from the left light, your subject is from the left direction as well.
Part 4. Keying out your green screen
Once your footage is good, go into Filmora and import it into your timeline, then double-click it to find the chroma key menu. However, don’t stop there. Clicking the chroma key button is not enough to guarantee perfectly keyed footage, so play around with the offset tolerance edge thickness and edge feather. Lastly, adjust it to make sure your edit looks as good as possible.
Free Download For Win 7 or later(64-bit)
Free Download For macOS 10.14 or later
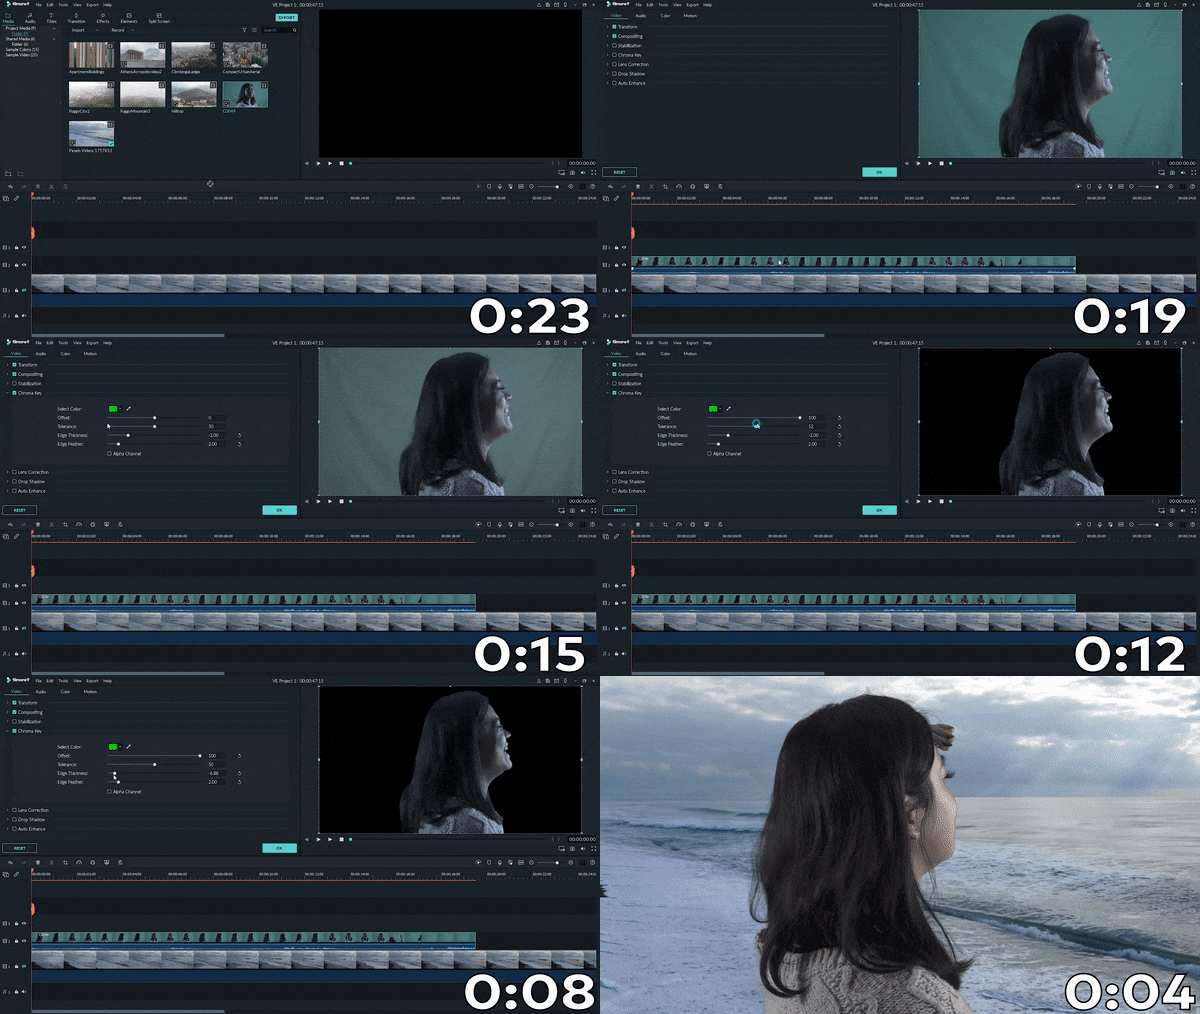
Summary
Aside from a video background, there are many things you can use chrome key effects on. For example, you can make liquid transformation, you can make a magic box, etc. In the meantime, it doesn’t matter how good your green screen, it won’t have a good results if are not light it properly. You can use Filmora to keying out your green screen. It just take a few clicks to be able keying out your green screen by following the tutorial above.
Free Download For macOS 10.14 or later

Summary
Aside from a video background, there are many things you can use chrome key effects on. For example, you can make liquid transformation, you can make a magic box, etc. In the meantime, it doesn’t matter how good your green screen, it won’t have a good results if are not light it properly. You can use Filmora to keying out your green screen. It just take a few clicks to be able keying out your green screen by following the tutorial above.
This Article Can Help You Know How to Crop Video in After Effects and on the Alternative by Using Wondershare Filmora. I Know that It May Seem Confusing to Compare These Two at First. But, I’ll Provide an Explanation to Get the Cropped Video that You Want
Cropping a video is part of the process of video edting. Not all video editing software can be obtained freely. There are some that you need to spend to get the professional output that you aim for. After Effects,a member of the Adobe tools that exist can enhance your videos to another level. This article can help you know how to crop video in After Effects and on the alternative by using Wondershare Filmora. I know that it may seem confusing to compare these two at first. But, I’ll provide an explanation to get the cropped video that you want.
Method 1: Cropping a Video using After Effects
After Effects is a professional motion graphics tool that can create outputs that are beyond the limits of reality. Like the other Adobe tools, this comes with a subscription fee to be able to maximize this product. But, is the price worth the risk? The “ Adobe” brand is known for its quality applications and customer’s satisfaction.
Let’s start with using this tool. The situation is that you want to crop your video using Adobe After Effects but you don’t know how to start. Search for the application on your computer. Launch it, then click the New Project. If you have files from your storage then select the New Composition Footage.
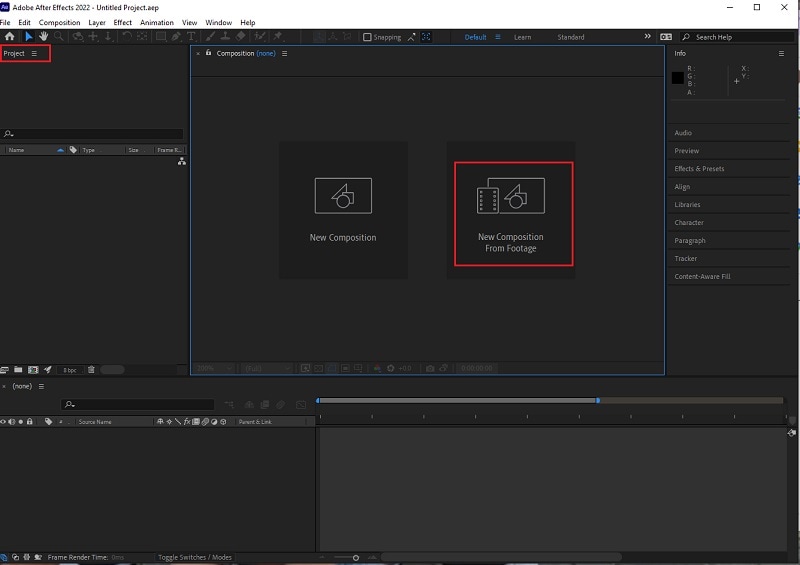
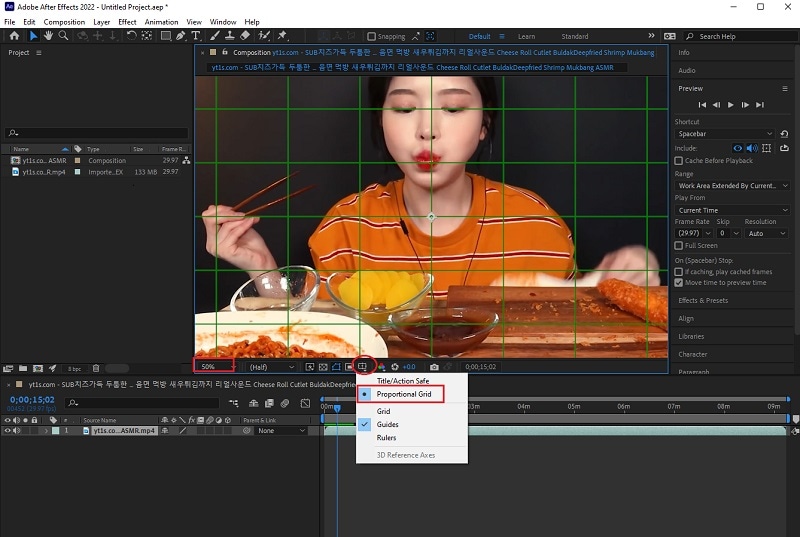
Check if the video is already in the interface. Find the Magnifying tab and zoom out the video into 50%. After that, click the Grid icon and Proportional Grid.
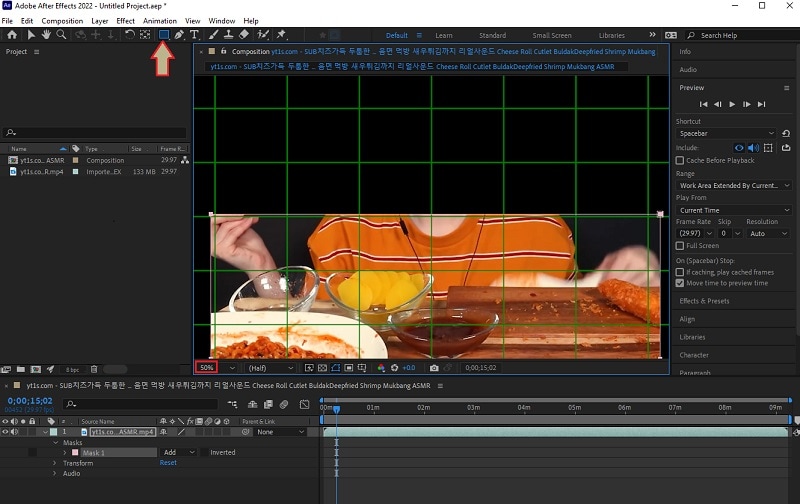
Click the Square icon, it is located beside the Pencil icon at the top section. The shape’s purpose is to crop the video section that you want to remain. If you’re done cutting then you should unclick the Proportional grid, and the video’s magnification should be 100%. Afterwards, you can check the pixel aspect ratio correction in the After Effects. You need to go through the video before saving your project. This is to avoid unnecessary errors that will make the process troublesome.
Already satisfied with the cropped video? Then, select File, Export and finally Add to Render Queue. Check on the Render Settings (located bottom of the interface) to ensure high quality output. Following that, hit the Output To part and decide the destination and folder where you want it to be.
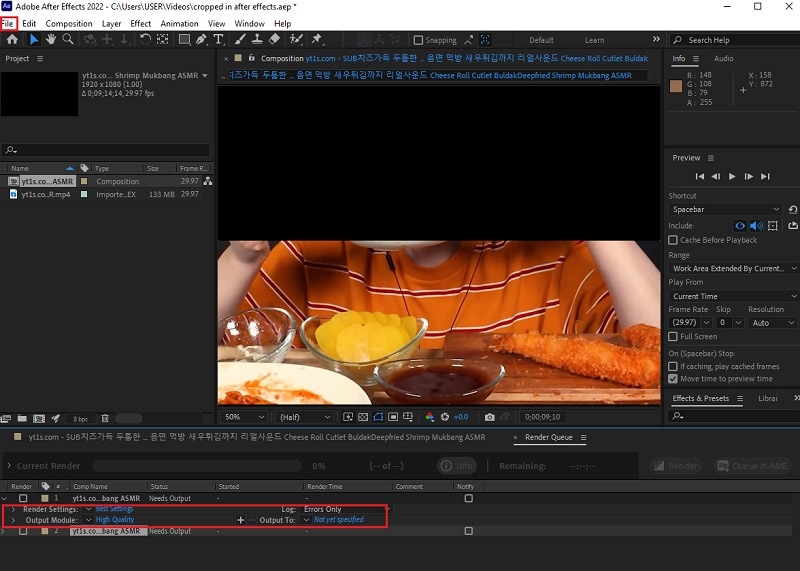
Watch your cropped video and go ahead and repeat this with your other videos. After practicing this process many times, this will come to you as easy. If you get lost while following the instructions go back to this guide until it becomes a part of your memory.
Congratulations on making your first cropped video using After Effects! What was your experience while following through the guide? I hope that the information presented here is easy to understand and implement.
Even though it is not a free application, I hope you have experienced the advantages of using this compared to other tools. Did it come as a surprise for you that you can crop a video not just in Adobe Premiere but also in After Effects as well?
I hope that fear will not hinder you from trying this tool to crop your videos.
Method 2: Cropping a Video using Wondershare Filmora
If you didn’t know there is also an awesome video editing software called Wondershare Filmora Video Editor .
You can try it by searching the internet and downloading it on your computer. If simplicity is your priority then this may suit you perfectly. If you’re still hesitant then read the reviews and watch how others are using it.
There is no need to worry if you have a tight budget as downloading this would be free. You just need to go to the official site. Do not be scared of trying with something unfamiliar. I will guide you with using it and utilizing it to get the result that you dream of.
Wondershare Filmora just like the others that exist are video editors that will turn your raw videos into the vision that you like. Thanks to these applications, the gruesome process of manually cutting it by hand and permanently altering the footage are gone. You can make how many changes that you want without damaging the original video.
For Win 7 or later (64-bit)
For macOS 10.14 or later
Are you done installing the application? If you have any encountered issues with installing it, you can contact customer support.
Not only does it have a straightforward and simple interface but it is also packed with useful tools that can turn your video into another level. But, you should not be overwhelmed by the number of icons and features that exist. Take a deep breath and proceed to opening it in your computer.

Preparation is a must especially if you have multiple videos on your computer. A good tip would be renaming them by the sequence you plan to have. And, you could also place them in folders to avoid repetition and double copies. Once you’re done, you can drag and drop your video or
click the Import.

Go ahead and select the video clip that you want to crop. Then, click the Crop tool and choose if you want the Crop or Pan & Zoom. Yes, you have options on what kind of crop you want it to be.

An alternative way is by right clicking the video clip .Under the Video tab you can select the Crop and Zoom or Crop to Fit then adjust to your preferred ratio.
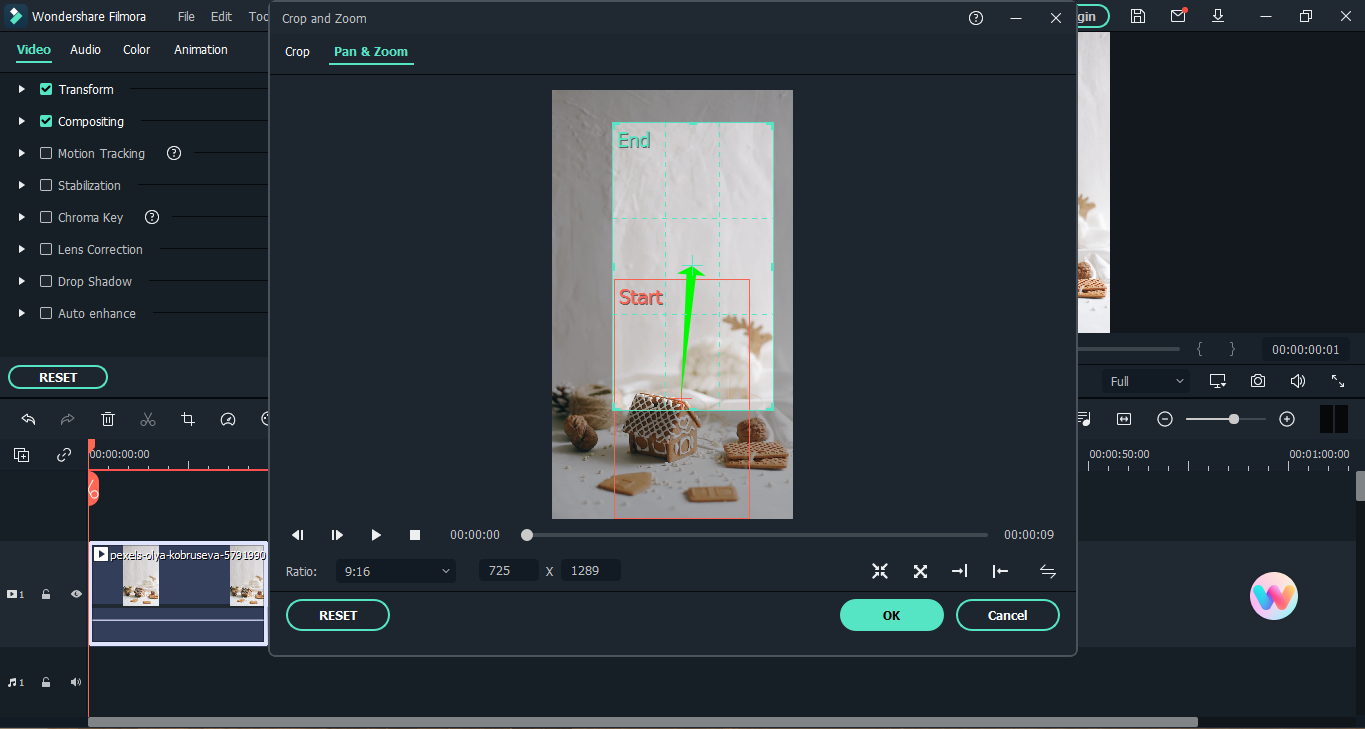
You can review the cropped video to think through if this is the portion that you want to be included. Unlike other applications, you can go back and adjust it to your liking.
If you’re finally satisfied then you can export it. Choose the output format and you can also rename the file. Clicking the settings button will offer you additional options of your video output.
After all that, you have the cropped video that you can either upload or repurpose in another content. Did you enjoy the process of cropping it in Wondershare Filmora?
Remember, that you have the option to batch crop multiple video clips on this so no need to manually crop and export it. You can see the big picture and monitor if the flow makes sense to you.
Don’t you think that the subscription is worth it? There is a trial that you could check out to test its capabilities and awesomeness.
The Bottom Line
You are once again done with the process of checking out these two applications. After Effects and Wondershare Filmora have a different process when it comes to cropping videos. I hope that you had a clearer understanding on which of these two would suit your video editing needs. The interface also could change your mind depending if you want simplicity or a challenge. Price is also a factor that can affect your willingness to use these applications. But, this guide clearly shows you that it is worth paying for.
What are your thoughts on both of these tools? Did you find this information to be helpful?
Check if the video is already in the interface. Find the Magnifying tab and zoom out the video into 50%. After that, click the Grid icon and Proportional Grid.

Click the Square icon, it is located beside the Pencil icon at the top section. The shape’s purpose is to crop the video section that you want to remain. If you’re done cutting then you should unclick the Proportional grid, and the video’s magnification should be 100%. Afterwards, you can check the pixel aspect ratio correction in the After Effects. You need to go through the video before saving your project. This is to avoid unnecessary errors that will make the process troublesome.

Already satisfied with the cropped video? Then, select File, Export and finally Add to Render Queue. Check on the Render Settings (located bottom of the interface) to ensure high quality output. Following that, hit the Output To part and decide the destination and folder where you want it to be.

Watch your cropped video and go ahead and repeat this with your other videos. After practicing this process many times, this will come to you as easy. If you get lost while following the instructions go back to this guide until it becomes a part of your memory.
Congratulations on making your first cropped video using After Effects! What was your experience while following through the guide? I hope that the information presented here is easy to understand and implement.
Even though it is not a free application, I hope you have experienced the advantages of using this compared to other tools. Did it come as a surprise for you that you can crop a video not just in Adobe Premiere but also in After Effects as well?
I hope that fear will not hinder you from trying this tool to crop your videos.
Method 2: Cropping a Video using Wondershare Filmora
If you didn’t know there is also an awesome video editing software called Wondershare Filmora Video Editor .
You can try it by searching the internet and downloading it on your computer. If simplicity is your priority then this may suit you perfectly. If you’re still hesitant then read the reviews and watch how others are using it.
There is no need to worry if you have a tight budget as downloading this would be free. You just need to go to the official site. Do not be scared of trying with something unfamiliar. I will guide you with using it and utilizing it to get the result that you dream of.
Wondershare Filmora just like the others that exist are video editors that will turn your raw videos into the vision that you like. Thanks to these applications, the gruesome process of manually cutting it by hand and permanently altering the footage are gone. You can make how many changes that you want without damaging the original video.
For Win 7 or later (64-bit)
For macOS 10.14 or later
Are you done installing the application? If you have any encountered issues with installing it, you can contact customer support.
Not only does it have a straightforward and simple interface but it is also packed with useful tools that can turn your video into another level. But, you should not be overwhelmed by the number of icons and features that exist. Take a deep breath and proceed to opening it in your computer.

Preparation is a must especially if you have multiple videos on your computer. A good tip would be renaming them by the sequence you plan to have. And, you could also place them in folders to avoid repetition and double copies. Once you’re done, you can drag and drop your video or
click the Import.

Go ahead and select the video clip that you want to crop. Then, click the Crop tool and choose if you want the Crop or Pan & Zoom. Yes, you have options on what kind of crop you want it to be.

An alternative way is by right clicking the video clip .Under the Video tab you can select the Crop and Zoom or Crop to Fit then adjust to your preferred ratio.

You can review the cropped video to think through if this is the portion that you want to be included. Unlike other applications, you can go back and adjust it to your liking.
If you’re finally satisfied then you can export it. Choose the output format and you can also rename the file. Clicking the settings button will offer you additional options of your video output.
After all that, you have the cropped video that you can either upload or repurpose in another content. Did you enjoy the process of cropping it in Wondershare Filmora?
Remember, that you have the option to batch crop multiple video clips on this so no need to manually crop and export it. You can see the big picture and monitor if the flow makes sense to you.
Don’t you think that the subscription is worth it? There is a trial that you could check out to test its capabilities and awesomeness.
The Bottom Line
You are once again done with the process of checking out these two applications. After Effects and Wondershare Filmora have a different process when it comes to cropping videos. I hope that you had a clearer understanding on which of these two would suit your video editing needs. The interface also could change your mind depending if you want simplicity or a challenge. Price is also a factor that can affect your willingness to use these applications. But, this guide clearly shows you that it is worth paying for.
What are your thoughts on both of these tools? Did you find this information to be helpful?
Check if the video is already in the interface. Find the Magnifying tab and zoom out the video into 50%. After that, click the Grid icon and Proportional Grid.

Click the Square icon, it is located beside the Pencil icon at the top section. The shape’s purpose is to crop the video section that you want to remain. If you’re done cutting then you should unclick the Proportional grid, and the video’s magnification should be 100%. Afterwards, you can check the pixel aspect ratio correction in the After Effects. You need to go through the video before saving your project. This is to avoid unnecessary errors that will make the process troublesome.

Already satisfied with the cropped video? Then, select File, Export and finally Add to Render Queue. Check on the Render Settings (located bottom of the interface) to ensure high quality output. Following that, hit the Output To part and decide the destination and folder where you want it to be.

Watch your cropped video and go ahead and repeat this with your other videos. After practicing this process many times, this will come to you as easy. If you get lost while following the instructions go back to this guide until it becomes a part of your memory.
Congratulations on making your first cropped video using After Effects! What was your experience while following through the guide? I hope that the information presented here is easy to understand and implement.
Even though it is not a free application, I hope you have experienced the advantages of using this compared to other tools. Did it come as a surprise for you that you can crop a video not just in Adobe Premiere but also in After Effects as well?
I hope that fear will not hinder you from trying this tool to crop your videos.
Method 2: Cropping a Video using Wondershare Filmora
If you didn’t know there is also an awesome video editing software called Wondershare Filmora Video Editor .
You can try it by searching the internet and downloading it on your computer. If simplicity is your priority then this may suit you perfectly. If you’re still hesitant then read the reviews and watch how others are using it.
There is no need to worry if you have a tight budget as downloading this would be free. You just need to go to the official site. Do not be scared of trying with something unfamiliar. I will guide you with using it and utilizing it to get the result that you dream of.
Wondershare Filmora just like the others that exist are video editors that will turn your raw videos into the vision that you like. Thanks to these applications, the gruesome process of manually cutting it by hand and permanently altering the footage are gone. You can make how many changes that you want without damaging the original video.
For Win 7 or later (64-bit)
For macOS 10.14 or later
Are you done installing the application? If you have any encountered issues with installing it, you can contact customer support.
Not only does it have a straightforward and simple interface but it is also packed with useful tools that can turn your video into another level. But, you should not be overwhelmed by the number of icons and features that exist. Take a deep breath and proceed to opening it in your computer.

Preparation is a must especially if you have multiple videos on your computer. A good tip would be renaming them by the sequence you plan to have. And, you could also place them in folders to avoid repetition and double copies. Once you’re done, you can drag and drop your video or
click the Import.

Go ahead and select the video clip that you want to crop. Then, click the Crop tool and choose if you want the Crop or Pan & Zoom. Yes, you have options on what kind of crop you want it to be.

An alternative way is by right clicking the video clip .Under the Video tab you can select the Crop and Zoom or Crop to Fit then adjust to your preferred ratio.

You can review the cropped video to think through if this is the portion that you want to be included. Unlike other applications, you can go back and adjust it to your liking.
If you’re finally satisfied then you can export it. Choose the output format and you can also rename the file. Clicking the settings button will offer you additional options of your video output.
After all that, you have the cropped video that you can either upload or repurpose in another content. Did you enjoy the process of cropping it in Wondershare Filmora?
Remember, that you have the option to batch crop multiple video clips on this so no need to manually crop and export it. You can see the big picture and monitor if the flow makes sense to you.
Don’t you think that the subscription is worth it? There is a trial that you could check out to test its capabilities and awesomeness.
The Bottom Line
You are once again done with the process of checking out these two applications. After Effects and Wondershare Filmora have a different process when it comes to cropping videos. I hope that you had a clearer understanding on which of these two would suit your video editing needs. The interface also could change your mind depending if you want simplicity or a challenge. Price is also a factor that can affect your willingness to use these applications. But, this guide clearly shows you that it is worth paying for.
What are your thoughts on both of these tools? Did you find this information to be helpful?
Check if the video is already in the interface. Find the Magnifying tab and zoom out the video into 50%. After that, click the Grid icon and Proportional Grid.

Click the Square icon, it is located beside the Pencil icon at the top section. The shape’s purpose is to crop the video section that you want to remain. If you’re done cutting then you should unclick the Proportional grid, and the video’s magnification should be 100%. Afterwards, you can check the pixel aspect ratio correction in the After Effects. You need to go through the video before saving your project. This is to avoid unnecessary errors that will make the process troublesome.

Already satisfied with the cropped video? Then, select File, Export and finally Add to Render Queue. Check on the Render Settings (located bottom of the interface) to ensure high quality output. Following that, hit the Output To part and decide the destination and folder where you want it to be.

Watch your cropped video and go ahead and repeat this with your other videos. After practicing this process many times, this will come to you as easy. If you get lost while following the instructions go back to this guide until it becomes a part of your memory.
Congratulations on making your first cropped video using After Effects! What was your experience while following through the guide? I hope that the information presented here is easy to understand and implement.
Even though it is not a free application, I hope you have experienced the advantages of using this compared to other tools. Did it come as a surprise for you that you can crop a video not just in Adobe Premiere but also in After Effects as well?
I hope that fear will not hinder you from trying this tool to crop your videos.
Method 2: Cropping a Video using Wondershare Filmora
If you didn’t know there is also an awesome video editing software called Wondershare Filmora Video Editor .
You can try it by searching the internet and downloading it on your computer. If simplicity is your priority then this may suit you perfectly. If you’re still hesitant then read the reviews and watch how others are using it.
There is no need to worry if you have a tight budget as downloading this would be free. You just need to go to the official site. Do not be scared of trying with something unfamiliar. I will guide you with using it and utilizing it to get the result that you dream of.
Wondershare Filmora just like the others that exist are video editors that will turn your raw videos into the vision that you like. Thanks to these applications, the gruesome process of manually cutting it by hand and permanently altering the footage are gone. You can make how many changes that you want without damaging the original video.
For Win 7 or later (64-bit)
For macOS 10.14 or later
Are you done installing the application? If you have any encountered issues with installing it, you can contact customer support.
Not only does it have a straightforward and simple interface but it is also packed with useful tools that can turn your video into another level. But, you should not be overwhelmed by the number of icons and features that exist. Take a deep breath and proceed to opening it in your computer.

Preparation is a must especially if you have multiple videos on your computer. A good tip would be renaming them by the sequence you plan to have. And, you could also place them in folders to avoid repetition and double copies. Once you’re done, you can drag and drop your video or
click the Import.

Go ahead and select the video clip that you want to crop. Then, click the Crop tool and choose if you want the Crop or Pan & Zoom. Yes, you have options on what kind of crop you want it to be.

An alternative way is by right clicking the video clip .Under the Video tab you can select the Crop and Zoom or Crop to Fit then adjust to your preferred ratio.

You can review the cropped video to think through if this is the portion that you want to be included. Unlike other applications, you can go back and adjust it to your liking.
If you’re finally satisfied then you can export it. Choose the output format and you can also rename the file. Clicking the settings button will offer you additional options of your video output.
After all that, you have the cropped video that you can either upload or repurpose in another content. Did you enjoy the process of cropping it in Wondershare Filmora?
Remember, that you have the option to batch crop multiple video clips on this so no need to manually crop and export it. You can see the big picture and monitor if the flow makes sense to you.
Don’t you think that the subscription is worth it? There is a trial that you could check out to test its capabilities and awesomeness.
The Bottom Line
You are once again done with the process of checking out these two applications. After Effects and Wondershare Filmora have a different process when it comes to cropping videos. I hope that you had a clearer understanding on which of these two would suit your video editing needs. The interface also could change your mind depending if you want simplicity or a challenge. Price is also a factor that can affect your willingness to use these applications. But, this guide clearly shows you that it is worth paying for.
What are your thoughts on both of these tools? Did you find this information to be helpful?
Also read:
- How to Make a Slideshow on iPhone for 2024
- How to Change Aspect Ratio of Video for 2024
- In 2024, How to Get Motion Blur in Roblox?
- Updated How to Make Video Fade to Black in Movie Maker Easily
- Updated In 2024, Learning The Details Of How To Replace Sky in Lightroom
- Updated How to Loop YouTube Videos on iPhone
- How to Use 3D Camera Tracking Effects in After Effects for 2024
- Updated How to Loop a Video on Android for 2024
- 2024 Approved Looking for the Best Free Video Editing Software Reddit to Make Your Video Perfectly? Check Out Our List of the Best Video Editors for Reddit and You Can Choose Any of Them
- Updated 2024 Approved How to Create a Light Sweep (Shine) Effect with Filmora
- 6 Best MP4 Mergers to Join Videos Easily
- Planning and Storyboarding Is the Most Important Part of Creating a Music Video. Here Are some Easy Tips for Planning and Storyboarding a Music Video in Filmora
- New Reviewing Efectum App For Smartphone Users Create Slow Motion Videos
- 2024 Approved Explore the Advanced Tools to Help You Reshape the Art of Sky Replacement in Digital Imagery. Discover Methods to Enhance Your Visual Narratives Through AI
- New 2024 Approved Finding the Best Voice Changers for WhatsApp Free and Paid
- New Top 5 Video Filter Software Improve Your Videos with Filters for 2024
- Updated MP3 Cutter Download for Computer and Mobile for 2024
- Updated 2 Effective Ways to Easily Convert VTT to SRT for 2024
- Updated How to Livestream Zoom on Facebook?
- In 2024, Five Thoughts on Discord Create Accounts How-To Questions
- New 2024 Approved 4 Ways to Merge MP4 and MP3
- Updated Looking for a Legitimate Tutorial to Create and Add Text Effects in Adobe Premiere Pro? Here Are the Simple Steps for Premiere Pro Text Effects and Find an Alternative Way
- Updated 15 Best Free MP4 Video Rotators Windows,Mac, Android, iPhone & Online for 2024
- Detailed Tutorial to Rotate Videos in Cyberlink PowerDirector for 2024
- Updated In 2024, Guide To Scaling and Setting Videos in Filmora | Tutorial
- In 2024, How to Make A Tattoo Disappear Like A Magic
- In 2024, Find Out About MAGIX Vegas Pro Pricing Plan and Features to See How the Software Can Help You with Your Video Editing Tasks
- Updated Best AR Video Apps
- Updated 2024 Approved Best Audio Waveform Generator
- Updated Free Green Screen Mobile Frame Downloads for 2024
- New Turn Your Text Into a Podcast Made Possible (+ EASY Editing Tips) for 2024
- A Complete Guideline About QuickTime Player
- New You May Want to Change the Speed of Certain Portions of Your Video. This Article Enlightens You on How to Splice and Speed up the Video in Simple Ways
- 2024 Approved Best Audio Plug-Ins For Video Editors
- In 2024, How to Unlock Itel A70 Pattern Lock if Forgotten? 6 Ways
- Reset iTunes Backup Password Of Apple iPhone X Prevention & Solution
- What Pokémon Evolve with A Dawn Stone For Realme 11 5G? | Dr.fone
- In 2024, How to Get and Use Pokemon Go Promo Codes On Motorola G24 Power | Dr.fone
- Unlock Realme 12 Pro 5G Phone Password Without Factory Reset Full Guide Here
- Full Guide to Hard Reset Your Vivo Y78+ (T1) Edition | Dr.fone
- In 2024, Template | Wondershare Virbo
- Play Store Stuck on Downloading Of Oppo A79 5G? 7 Ways to Resolve | Dr.fone
- Free electronic signature - For .wpd file
- Easy Guide to Vivo G2 FRP Bypass With Best Methods
- How to Factory Reset Sony Xperia 1 V in 5 Easy Ways | Dr.fone
- Apply These Techniques to Improve How to Detect Fake GPS Location On Oppo A2 | Dr.fone
- In 2024, How to enter the iSpoofer discord server On Apple iPhone 12 | Dr.fone
- In 2024, How Do I Stop Someone From Tracking My Vivo S18e? | Dr.fone
- Best Fixes For Xiaomi Mix Fold 3 Hard Reset | Dr.fone
- In 2024, How To Bypass the Required Apple Store Verification For iPhone 14 Pro | Dr.fone
- In 2024, A Step-by-Step Guide on Using ADB and Fastboot to Remove FRP Lock on your Oppo A59 5G
- Here are Some Pro Tips for Pokemon Go PvP Battles On Motorola Defy 2 | Dr.fone
- In 2024, Ultimate Guide from Apple iPhone 6 Plus iCloud Activation Lock Bypass
- Why does the pokemon go battle league not available On Honor Magic 5 Pro | Dr.fone
- How to Rescue Lost Pictures from Galaxy A34 5G?
- In 2024, Easily Unlock Your Asus ROG Phone 7 Ultimate Device SIM
- In 2024, Still Using Pattern Locks with Xiaomi Redmi Note 12 Pro 4G? Tips, Tricks and Helpful Advice
- Title: New Steps to Create Gold Text Effects After Effects
- Author: Chloe
- Created at : 2024-05-20 03:38:18
- Updated at : 2024-05-21 03:38:18
- Link: https://ai-editing-video.techidaily.com/new-steps-to-create-gold-text-effects-after-effects/
- License: This work is licensed under CC BY-NC-SA 4.0.

