
New Steps to Rotate Videos in Lightworks for 2024

Steps to Rotate Videos in Lightworks
Lightworks is a professional non-linear video editing software application developed by EditShare. It supports Windows and Linux, and macOS.
Lightworks has a very simple and intuitive user interface. The basic workflow is: import your media files into the project, then edit them using the various tools available. When you’re finished, export your project as a video file.
Lightworks can be used for a variety of purposes, including creating videos for social media, corporate videos, documentaries, and more. It’s also been used to edit some major Hollywood films, such as The Wolf of Wall Street and The King’s Speech.
In this article, we will discuss how to rotate videos in the Lightworks application. Below is a way to rotate videos in Lightworks manually, here, we will use the Z-axis rotation.
Step-by-step on how to rotate videos in Lightworks
How to Manually Rotate a Video in Lightworks
To manually rotate a video in Lightworks, follow these steps:
Step 1: Import your video into the project.
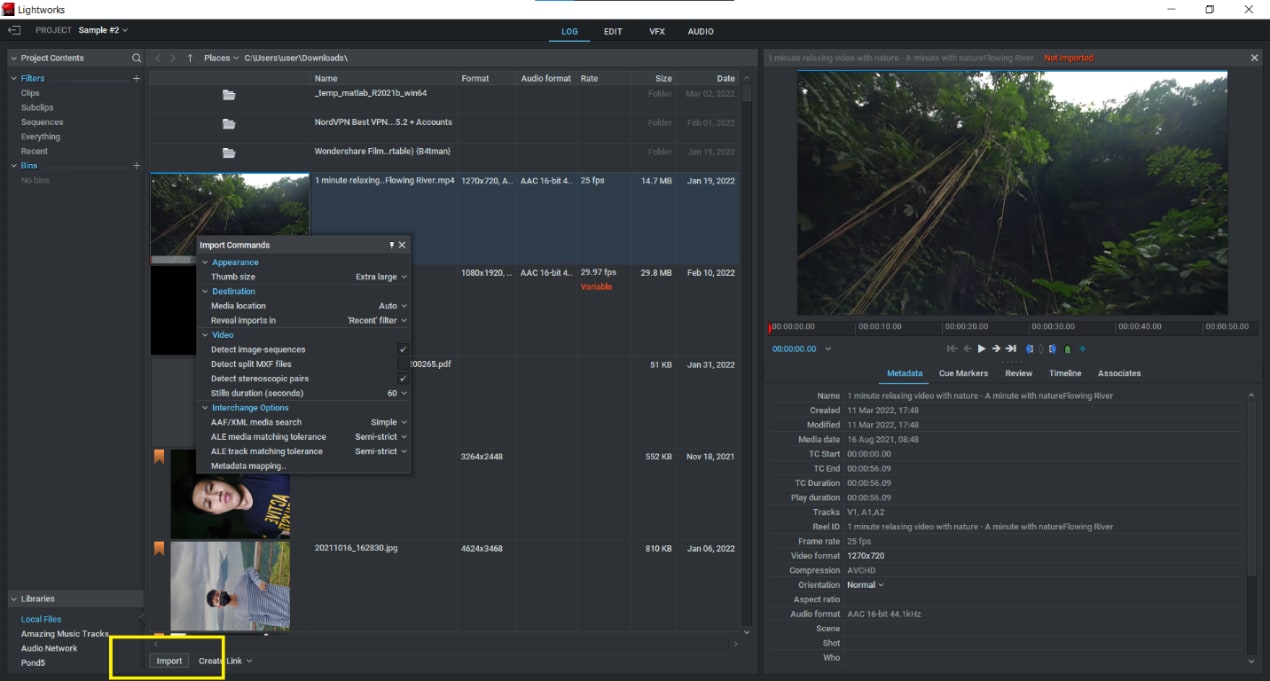
Step 2: Choose the portion of the video you want to rotate; if you want to rotate the entire movie, simply choose the entire video instead of a specific portion.

Step 3: Click on the “VFX” tab and go to the “3D DVE” section.
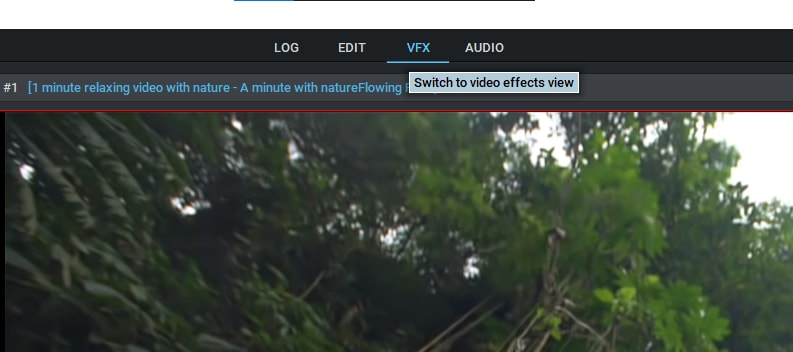
Step 4: Choose the Z axis and rotate the video to the desired degree. You can also modify the orientation of the video by entering a value in the box provided in front of the Z-axis.

Step 5: Click on the Enter in the keyboard button.
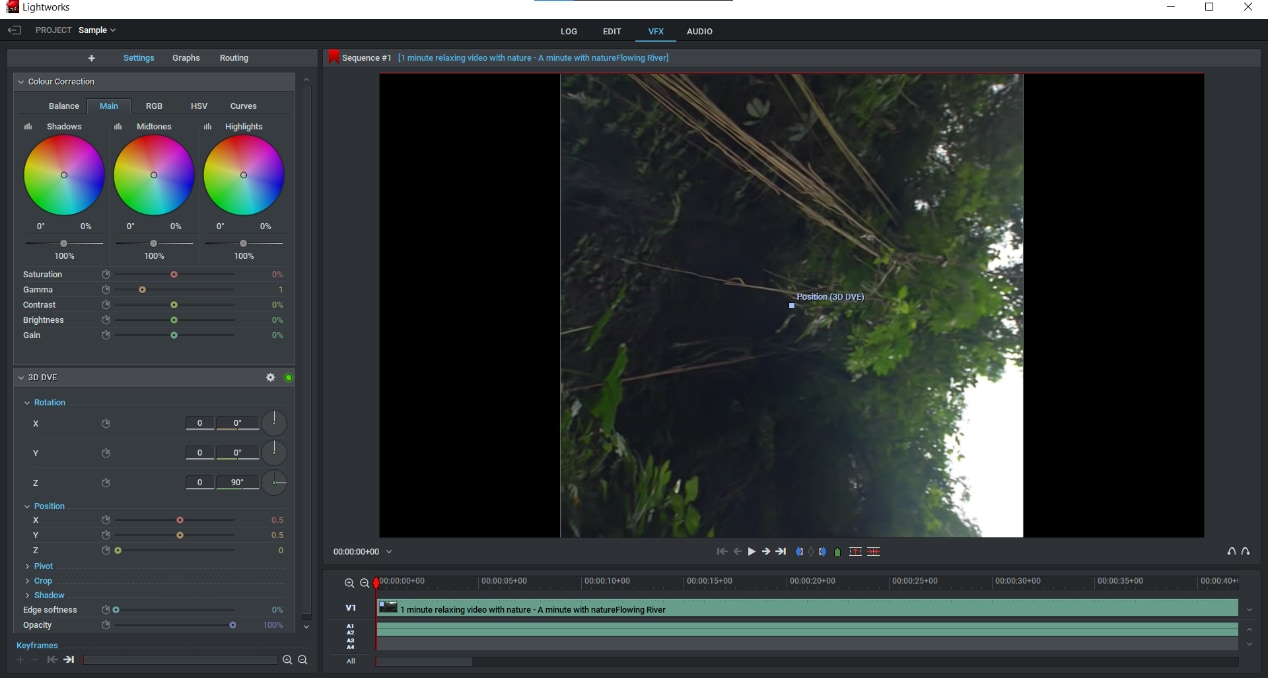
Your video will now be rotated by the selected number of degrees.
How to Rotate Videos in Filmora
On the other hand, Lightworks has an alternative video editing tool which is Filmora Video Editor . If you are looking for a lightweight video editor with an easy-to-use interface, then Filmora is the best option for you. It offers powerful features such as motion graphics, text editing, and audio editing, while still being very easy to use.
You can try it for free by downloading the trial version from the Filmora website. Filmora also offers a wide range of export options, so you can easily share your videos with others. You can export your video as an MP4 or MOV file, or upload it directly to YouTube or Facebook.
For Win 7 or later (64-bit)
For macOS 10.14 or later
Step-by-step on how to rotate videos in Filmora
How to Manually Rotate a Video in Filmora
To rotate videos in Filmora manually…
Step 1: Import your video into the project.
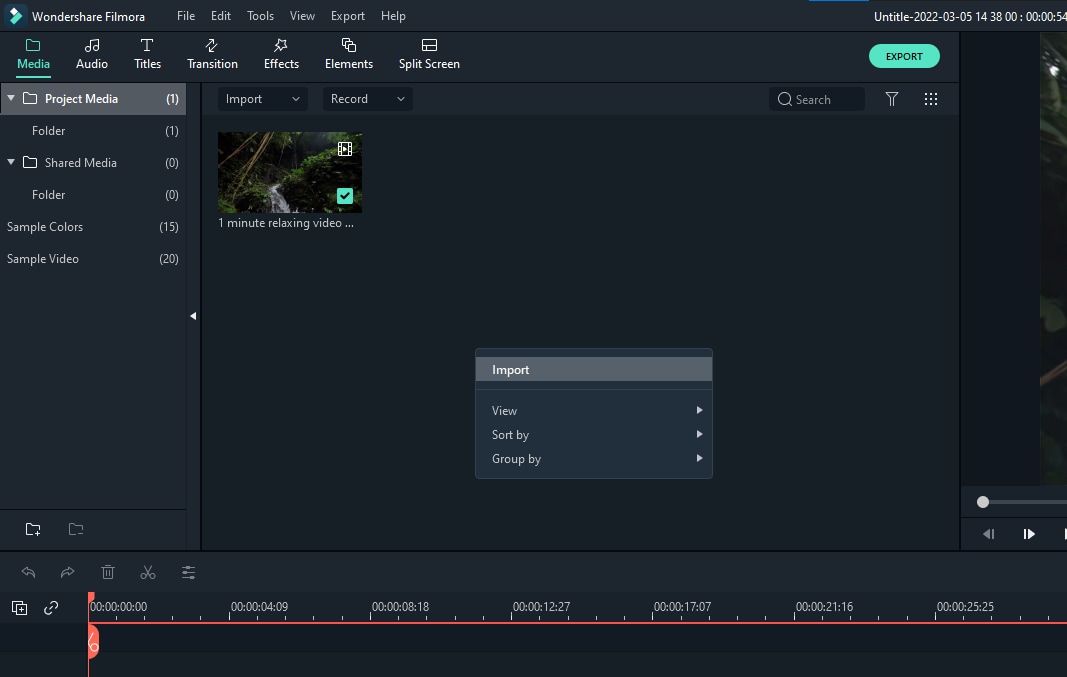
Step 2: Click the video clip you want to rotate.
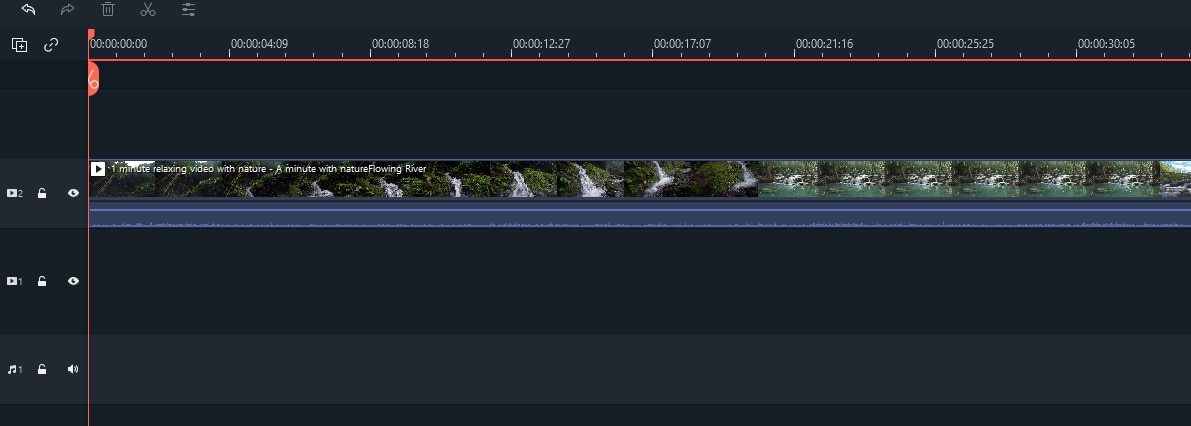
Step 3: Click on the “Edit” tool above the timeline and go to the “Transform” section. Then, select the “Rotate” option.
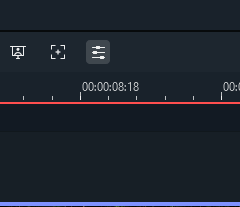
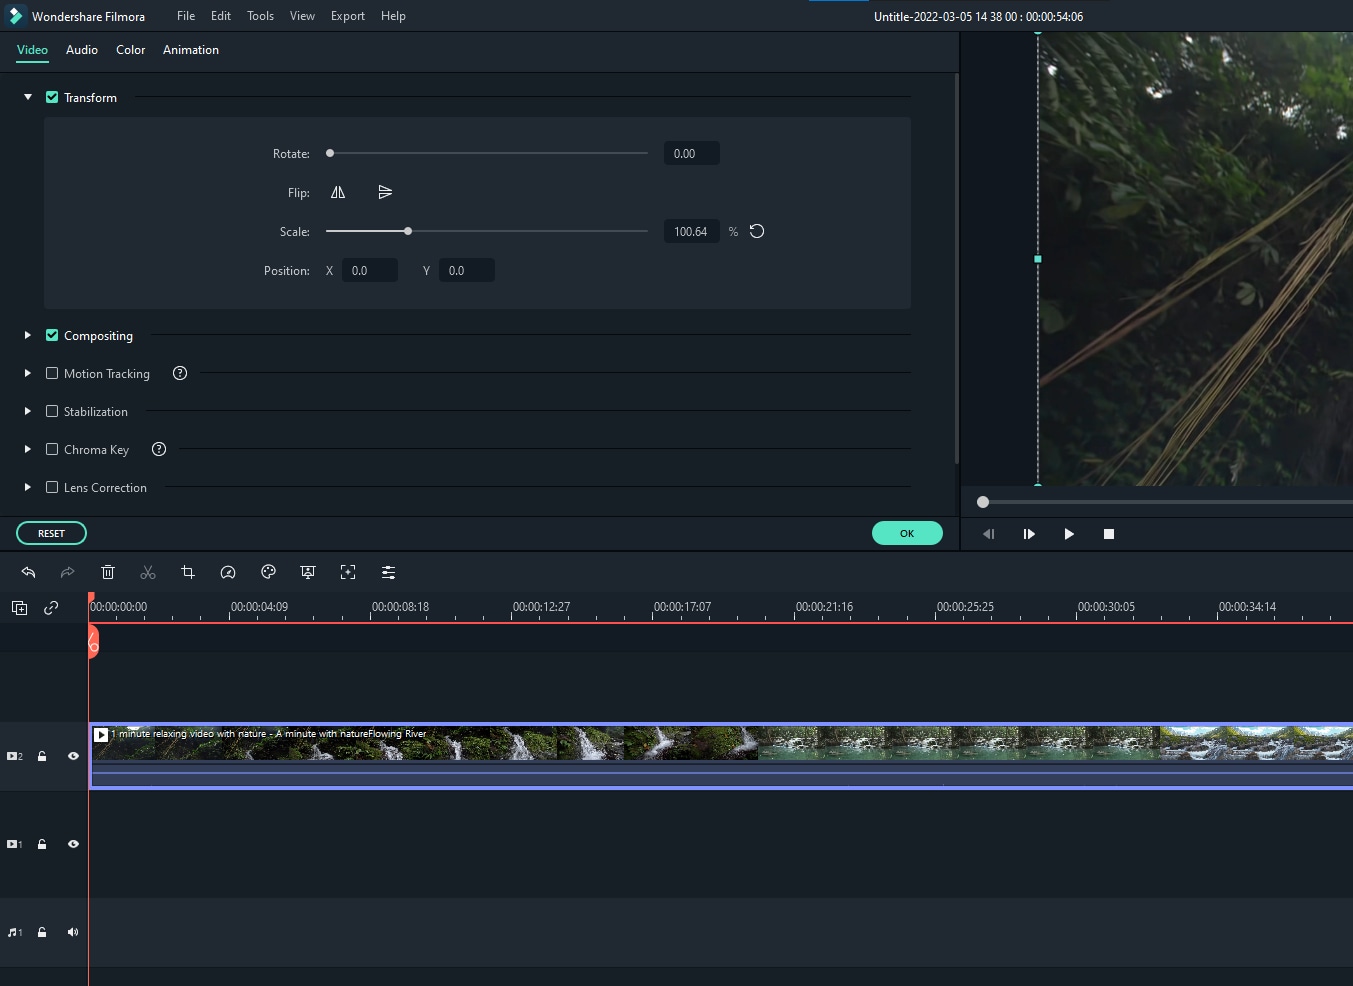
Step 4: Select the desired rotation option.

Step 5: Click on the “Ok” button.
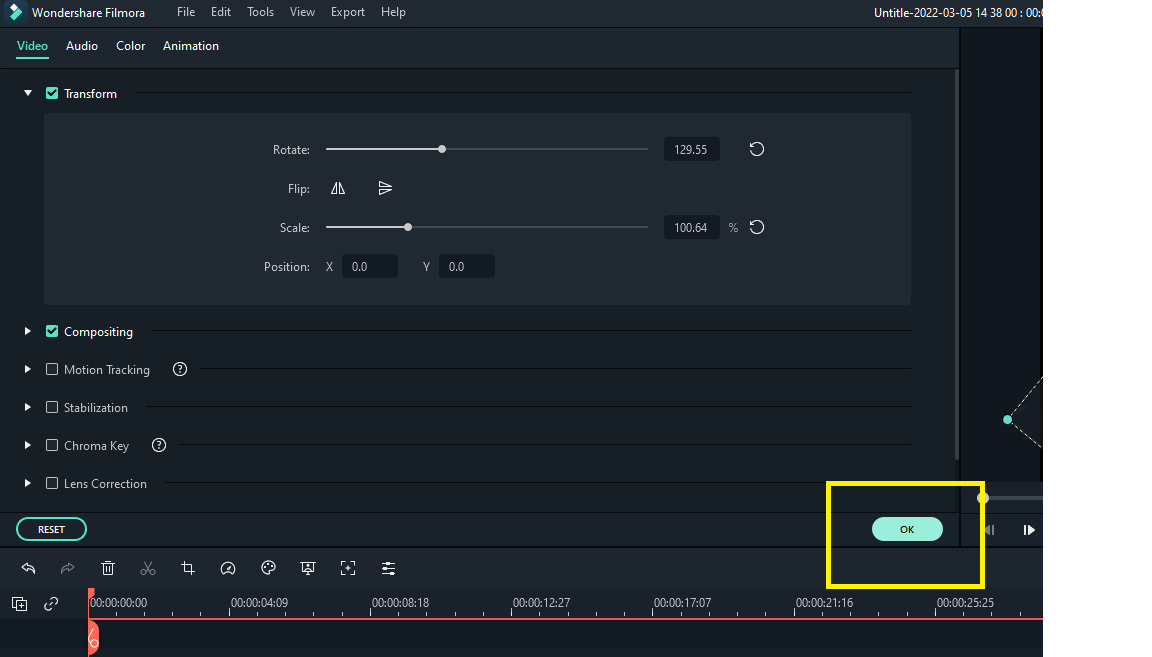
Your video will now be rotated by the selected number of degrees.
In conclusion, Lightworks is a powerful video editing application that offers a lot of features and options. If you’re looking for something with all the features you need, then it’s a great choice. However, if you’re on a tight budget, there are other applications available that may be more suitable for your needs.
Filmora is a lightweight video editor that is easy to use and offers powerful features such as motion graphics, text editing, and audio editing. You can try it for free by downloading the trial version from the Filmora website.
Step 2: Choose the portion of the video you want to rotate; if you want to rotate the entire movie, simply choose the entire video instead of a specific portion.

Step 3: Click on the “VFX” tab and go to the “3D DVE” section.

Step 4: Choose the Z axis and rotate the video to the desired degree. You can also modify the orientation of the video by entering a value in the box provided in front of the Z-axis.

Step 5: Click on the Enter in the keyboard button.

Your video will now be rotated by the selected number of degrees.
How to Rotate Videos in Filmora
On the other hand, Lightworks has an alternative video editing tool which is Filmora Video Editor . If you are looking for a lightweight video editor with an easy-to-use interface, then Filmora is the best option for you. It offers powerful features such as motion graphics, text editing, and audio editing, while still being very easy to use.
You can try it for free by downloading the trial version from the Filmora website. Filmora also offers a wide range of export options, so you can easily share your videos with others. You can export your video as an MP4 or MOV file, or upload it directly to YouTube or Facebook.
For Win 7 or later (64-bit)
For macOS 10.14 or later
Step-by-step on how to rotate videos in Filmora
How to Manually Rotate a Video in Filmora
To rotate videos in Filmora manually…
Step 1: Import your video into the project.

Step 2: Click the video clip you want to rotate.

Step 3: Click on the “Edit” tool above the timeline and go to the “Transform” section. Then, select the “Rotate” option.


Step 4: Select the desired rotation option.

Step 5: Click on the “Ok” button.

Your video will now be rotated by the selected number of degrees.
In conclusion, Lightworks is a powerful video editing application that offers a lot of features and options. If you’re looking for something with all the features you need, then it’s a great choice. However, if you’re on a tight budget, there are other applications available that may be more suitable for your needs.
Filmora is a lightweight video editor that is easy to use and offers powerful features such as motion graphics, text editing, and audio editing. You can try it for free by downloading the trial version from the Filmora website.
Step 2: Choose the portion of the video you want to rotate; if you want to rotate the entire movie, simply choose the entire video instead of a specific portion.

Step 3: Click on the “VFX” tab and go to the “3D DVE” section.

Step 4: Choose the Z axis and rotate the video to the desired degree. You can also modify the orientation of the video by entering a value in the box provided in front of the Z-axis.

Step 5: Click on the Enter in the keyboard button.

Your video will now be rotated by the selected number of degrees.
How to Rotate Videos in Filmora
On the other hand, Lightworks has an alternative video editing tool which is Filmora Video Editor . If you are looking for a lightweight video editor with an easy-to-use interface, then Filmora is the best option for you. It offers powerful features such as motion graphics, text editing, and audio editing, while still being very easy to use.
You can try it for free by downloading the trial version from the Filmora website. Filmora also offers a wide range of export options, so you can easily share your videos with others. You can export your video as an MP4 or MOV file, or upload it directly to YouTube or Facebook.
For Win 7 or later (64-bit)
For macOS 10.14 or later
Step-by-step on how to rotate videos in Filmora
How to Manually Rotate a Video in Filmora
To rotate videos in Filmora manually…
Step 1: Import your video into the project.

Step 2: Click the video clip you want to rotate.

Step 3: Click on the “Edit” tool above the timeline and go to the “Transform” section. Then, select the “Rotate” option.


Step 4: Select the desired rotation option.

Step 5: Click on the “Ok” button.

Your video will now be rotated by the selected number of degrees.
In conclusion, Lightworks is a powerful video editing application that offers a lot of features and options. If you’re looking for something with all the features you need, then it’s a great choice. However, if you’re on a tight budget, there are other applications available that may be more suitable for your needs.
Filmora is a lightweight video editor that is easy to use and offers powerful features such as motion graphics, text editing, and audio editing. You can try it for free by downloading the trial version from the Filmora website.
Step 2: Choose the portion of the video you want to rotate; if you want to rotate the entire movie, simply choose the entire video instead of a specific portion.

Step 3: Click on the “VFX” tab and go to the “3D DVE” section.

Step 4: Choose the Z axis and rotate the video to the desired degree. You can also modify the orientation of the video by entering a value in the box provided in front of the Z-axis.

Step 5: Click on the Enter in the keyboard button.

Your video will now be rotated by the selected number of degrees.
How to Rotate Videos in Filmora
On the other hand, Lightworks has an alternative video editing tool which is Filmora Video Editor . If you are looking for a lightweight video editor with an easy-to-use interface, then Filmora is the best option for you. It offers powerful features such as motion graphics, text editing, and audio editing, while still being very easy to use.
You can try it for free by downloading the trial version from the Filmora website. Filmora also offers a wide range of export options, so you can easily share your videos with others. You can export your video as an MP4 or MOV file, or upload it directly to YouTube or Facebook.
For Win 7 or later (64-bit)
For macOS 10.14 or later
Step-by-step on how to rotate videos in Filmora
How to Manually Rotate a Video in Filmora
To rotate videos in Filmora manually…
Step 1: Import your video into the project.

Step 2: Click the video clip you want to rotate.

Step 3: Click on the “Edit” tool above the timeline and go to the “Transform” section. Then, select the “Rotate” option.


Step 4: Select the desired rotation option.

Step 5: Click on the “Ok” button.

Your video will now be rotated by the selected number of degrees.
In conclusion, Lightworks is a powerful video editing application that offers a lot of features and options. If you’re looking for something with all the features you need, then it’s a great choice. However, if you’re on a tight budget, there are other applications available that may be more suitable for your needs.
Filmora is a lightweight video editor that is easy to use and offers powerful features such as motion graphics, text editing, and audio editing. You can try it for free by downloading the trial version from the Filmora website.
How to Add Text to Video
If you are making an instructional or explainer video, you will often find that you need to add text to various sections of the video. Depending on the tool you use, the process of adding text to a video can be simple or complicated.
In this article, we will share with you the different options you have when you want to add text elements to a video project.
Add Text to a Video Online
One of the easiest ways that you can add text to any video is to use a free online solution. There are many online tools to choose from but VEED is a free solution that is easy to use and offers a wide range of features to choose from.
Here’s how you can use VEED to add text to your video;
Step1Go to https://www.veed.io/ on any browser to access the video editing tool. Click on “Upload Your Video” to open a new project. In the new project screen that appears, tap on “Upload a file” to add your video.

Step2Once the video is open, click on the “Text” tab on the left and then select the type of text you want to add to the video.

Step3Type in your text and then use the options below the text box to choose the font style, size, and color of the text. You can also use the duration icons below the text to indicate where you want the text to appear during playback.

Step4When you’re happy with the changes, click on the “Export” button at the top to save the changes and download the video.
Add Text to Video on Computer
While online tools like VEED can come in handy when you want to make simple changes to a video, you will often find that they don’t have the necessary features to customize the text in various ways. For that, we recommend Wondershare Filmora, a desktop editing suite that has a lot of useful features.
Filmora combines its wealth of editing features and a simple user interface to make it one of the most effective video editors in the market. Here’s how you can add text to any video using Filmora.
Step1Download and install Wondershare Filmora onto your computer. Open the program and then click on the “Import” button to start. You can also just drag and drop the video to the main window to open it.
Step2Once the video is open in Filmora, you will need to drag it to the timeline panel before you can start to edit it.

Step3Click on the “Titles” tab at the top to open the text and title presets that you will need to add text to the document. Filmora offers more than 200 text effects to choose from. Just double-click on one of the presents to select it and then the preview window to see it in real-time.

Step4If you like the preset that you have selected, place the cursor on the position in the timeline where you would like to add the text and then drag and drop the title track above the video in the timeline.

Step5If you would like to change the duration of the text simply drag the edge of the timeline until you get the length that you desire. Filmora also allows you to edit and customize the text. To do that, double-click on the “Title” time frame to get some customization options.
Step6Once you are happy with all the changes you have made, click on “Export” and choose an output format to save and export your video.

Add text to Video on iPhone
One of the easiest ways to edit a video on an iPhone is to use iMovie. This simple and effective solution can help you edit videos on your iPhone in numerous ways including adding text and subtitles. The following are simple steps to help you use iMovie to add text to a video on an iPhone;
Step1Open the video clip that you would like to add text to. Once the video is open, click on the Text icon from the options at the bottom of the screen.
![]()
Step2Select the style you would like to use from the list of templates.

Step3A sample text will appear on the screen. Tap on it and then select “Edit” to enter the desired text. Tap “Done” once you are done typing.

Step4To move the text to the desired location, simply tap on it again and reposition it. You also have the option to increase or decrease the size of the text as desired using the pinch motion. If you want to change the color or font, tap on the “T” that will appear below the clip and choose “Aa” to change the font or the multicolored circle to change color.

You also have numerous other options in terms of effects including text-shadow. Just tap on the “three-dot icon” to access these features.
Add Text to Video on Android
The best way to add a video on Android devices is to use third-party apps. The good news is that there are several very useful video editing apps that you can use for this purpose. In this guide, we will show you how you can add text to a video on Android using two of the most effective solution.
Using the PowerDirector by Cyberlink
PowerDirector is a video editing app that allows you to edit various aspects of the video including adding text to the video. Available on the Google Play Store, this app has a wealth of additional features that include trimming, rotating clips, and even adjusting the color, brightness, and saturation.
Here’s how you can use PowerDirector to add text to your video;
Step1Install PowerDirector on your device. Open it and tap “New Project” at the top. Select an aspect ratio depending on the video project you are working on and enter a project name.

Step2Select the video that you would like to edit from the folders that show up on the screen. The video will be added to the main timeline of the project.
Step3Select the video layer and then tap on the layer mask from the left sidebar. Select the text tab at the top and then choose the text style that you want to add to the video. Tap on the “+” button inside the style to add the text style you have selected.

Step4Type in the text that you want to add to the video on the text box and then tap on the “T” icon at the top-right corner of the text box to customize the text.
You can use PowerDirector to change the font, color, and text size or even add effects like Text shadow.

Step5When you’re done editing the video, tap on the “Export” icon at the top-right corner of the screen and choose if you would like to save the video on the device or share it via a social media app.

Free Download For Win 7 or later(64-bit)
Free Download For macOS 10.14 or later
Free Download For macOS 10.14 or later
Easily Sync Audio With Video With Filmora
Syncing audio with video is an integral part of video editing for any video creator. But believe me; it’s not such a difficult task if you know what to do. The point is IF YOU KNOW WHAT TO DO.
That’s why in this brief guide, we’ll show you the simplest way to sync audio with video using a fantastic video editor easily. But wait a minute, some of you might be confused about why we even need to sync separate audio & video when a single camera can record both. So let’s first answer this simple question.
Part 1: Why Do We Need to Sync Separate Audio & Video?
Creating great video needs extraordinary video graphics, content, and top-notch audio. And you can’t expect a single camera to achieve all these goals. That’s why all professional video creators use a specialized camera for recording with a separate audio recording device.
You might think it’s an exaggeration, but this small change can have massive effects on the quality of your video. Especially the background noise removal effect of separate external microphones.
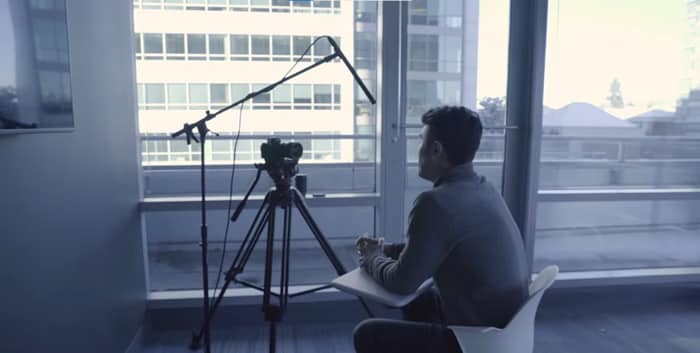
But the downside of using this method is that after the recording is complete, you must sync these audio and video files. And if you don’t do it right, all the effort goes to the drain within a split second. Well, nobody wants to watch a video with an audio lag. Isn’t it?
Correctly synching an audio file with a video is easier than you think. You just need to prepare beforehand and use a suitable video editing tool. So considering these factors, let’s first see what preparations we need. After that, we’ll recommend a top-class video editing tool to achieve this goal in detailed steps. Why are we still waiting? Let’s begin our journey.
Part 2: Preparation for Syncing Audio With Video During Recording
You must make some preparations to sync an audio file with a video properly. It’s to have a sound spike to match the footage properly with the separate audio file. And it might look disturbing, but even a simple Clap might do the job.
And if you want a professional way, just imagine the clapper board. You must have seen it in the film industry. This clapper board is used not only to mark the shot but also to create a sound spike when it claps. We use this audio spike as a reference to sync the audio files with the video.

Every time you cut your shot, remember to clap on camera again the next time you roll. It’s best to clap before you say “Action” or speak so that it’s easy to find and sync when editing. But if you forget, you can also clap at the end of the shot before you cut. That is called a Tail Slate!!!
After you’ve recorded your video like this, the next step is pretty simple. The video editor we recommend is no other than the world’s leading tool in the market, Wondershare Filmora. Let’s move forward and see how to sync audio with video using Filmora .
Part 3: How To Sync Audio With Video Using Filmora
Before we dive into the step-by-step guide, here’s a brief overview of Filmora.
Wondershare Filmora
Filmora is one of the most used video editors that can help all video creators to deliver the best they can. This incredible software from Wondershare contains multiple features that can polish any video.
Free Download For Win 7 or later(64-bit)
Free Download For macOS 10.14 or later
Moreover, the vast arsenal of video effects, images, short clips, AI avatars, and many other things are also available. You just have to pick out the one you like and add it to your video with just a single click.
On top of that, you can also adjust the audio files like audio ducking, silent detection, audio mixing, and synching audio with the video files.

As far as the audio synching is concerned, you can do it either manually or with auto synchronization. And we will explain both of these processes in a stepwise manner to give you complete mastery over your audio synching. Let’s start with the manual process first.
Steps To Manually Sync Audio With Video Using Filmora
Step1Download & install
If you haven’t downloaded the latest version of Filmora yet, click the button below to download it without any cost. And after the download is completed, you can install it on your device right away.
Free Download For Win 7 or later(64-bit)
Free Download For macOS 10.14 or later
Step2Import your files
The next step is to import all the files. Launch the Filmora and click on the “New Project” button from the opening interface.

When a new project is created, you’ll see an “Import Media” section on it. Click on this section to browse your audio and video files from the computer. Or you can also drag and drop these files here to import them.

Step3Prepare your files
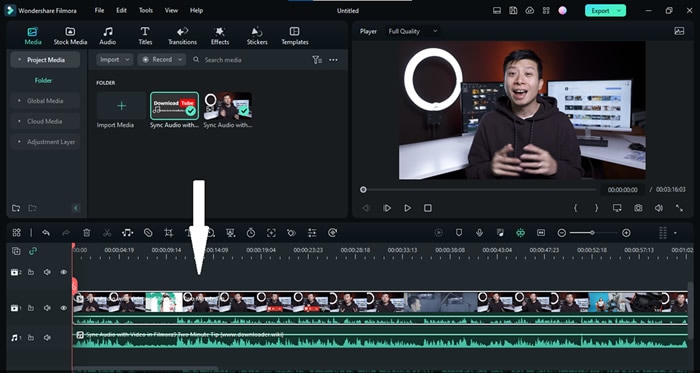
Now, it’s time to prepare our files for synchronization. First, drag the video file down to the timeline from the “Import Media” section. After that, drag the audio file in the same way below the video on the panel.
Step4Sync the audio & video files using the audio spike
Now that the video and audio files are on the timeline, you’ll have to find the moment you clap your hands. Look at the waveform from the in-camera audio and the independent audio track. At the moment you clap, we’ll see a spike.
Bonus Tip: If you can’t find the audio spike, zoom the panel to make it easier.
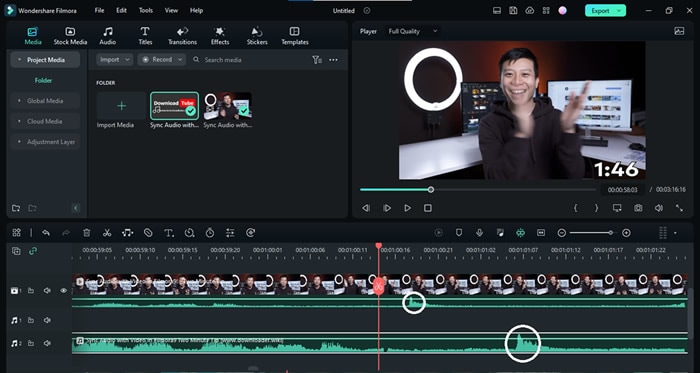
Now take the independent audio clip and align it so that both the spikes match.
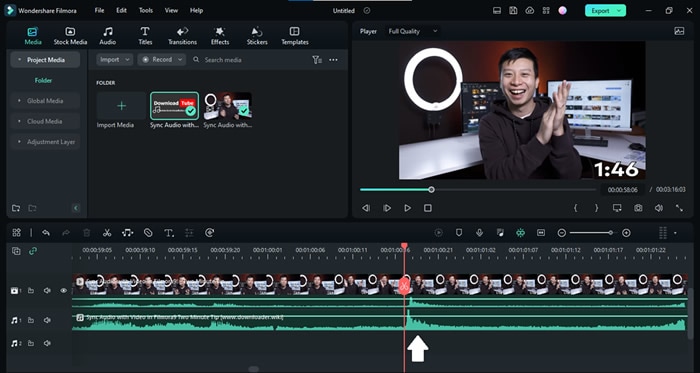
That’s it! We just need to remove the in-camera audio now. Let’s see how to do it now.
Step5Remove the audio from the video footage
To detach the audio in the video footage, right-click on this file and select the “Detach Audio” option. Or you can also use the “Ctrl+Alt+D” as the hotkey.
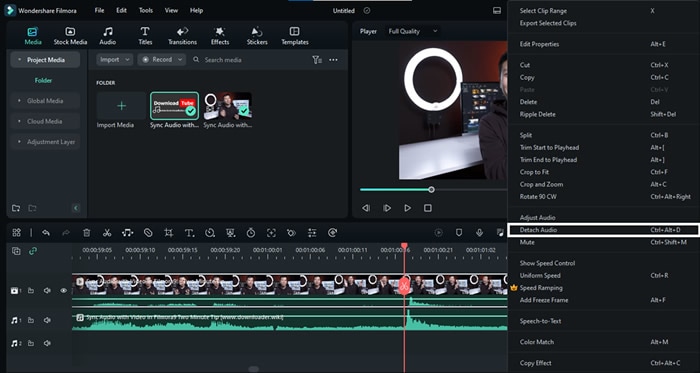
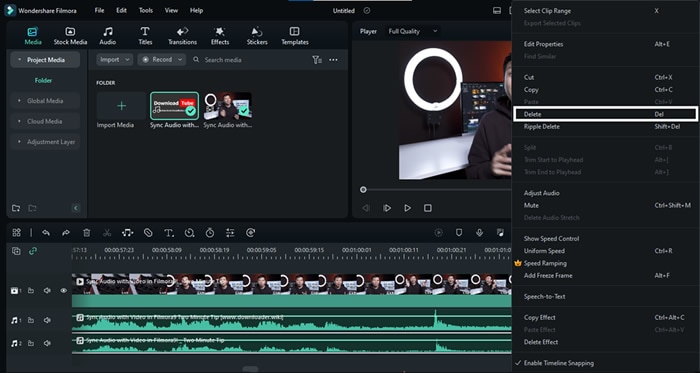
Once the audio file has been separated, you can move forward and delete it. To delete this audio, right-click on it and select “Delete.”
Step6Enjoy your video with the new audio track
So here we go. Our video file has been synced with the high-quality audio file. You can now hit the Export button to get this edited file. But wait a minute. Didn’t we say we’ll show you a method to automatically sync audio with video? Let’s start this method now.
Steps To Automatically Sync Audio With Video Using Filmora
Did you find the above method troubling? Well, be assured because Wondershare Filmora can also automatically sync your audio file with video in a single click. Here are the steps to achieve this feat.
Free Download For Win 7 or later(64-bit)
Free Download For macOS 10.14 or later
Step1Prepare your files
This method’s starting process is the same as the previous one. You’ll need to download the Filmora and prepare your file on the timeline by importing them on a New Project.
Step2Select both audio & video files
Once you’ve got everything ready, select both your audio and files from the timeline.
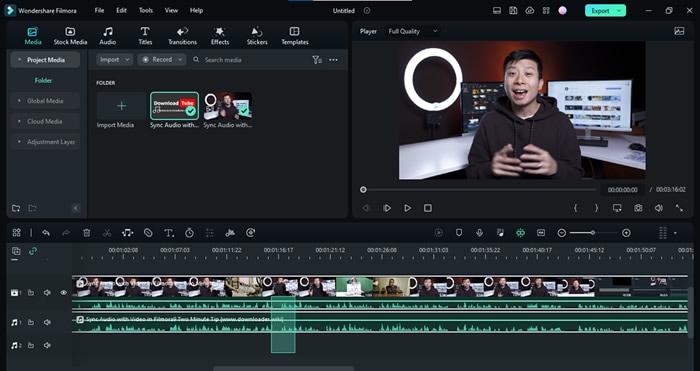
Step3Click on the auto synchronization icon
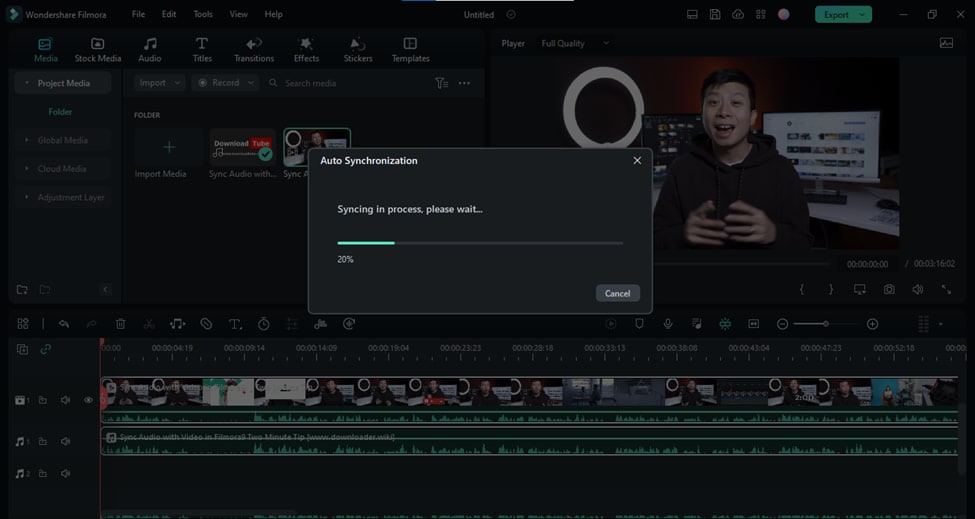
When you select these files, you’ll see that the “Auto Synchronization” icon has appeared on the toolbar below the Import Media section. Click on this icon and wait for the magic.
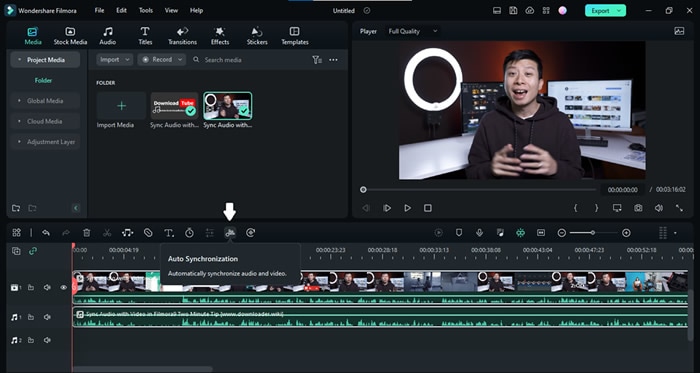
Remember that you need a Premium ID of Wondershare Filmora to use the Auto Synchronization option.
Step4Wait until the syncing is completed
Filmora will start synchronizing your files, and you’ll see the “Synchronization in process” prompt on the screen. Wait until the process is completed.
Step5Finish your editing
You can finish your editing when the separate audio file perfectly aligns with the video file. Delete the audio from the in-camera video file and hit the “Export” button.
Congratulations! We have successfully synced separate audio and video files. Now let’s take a look at some hot FAQs before we end our guide.
Part 4: FAQs About Synching Audio With Video
Is auto synchronization better than manual syncing?
Well, auto synchronization is no doubt easier than manual syncing. But that doesn’t mean you don’t need the manual process anymore. Many situations may arise where you may be left with no choice but to use the manual syncing of separate audio and video files. So make sure to properly learn both these methods, and each one of them will definitely come in handy someday.
How can we sync audio & video for free?
Syncing audio and video files for free is not a difficult task. Download the Filmora right now, and after installation, you can freely sync any Audio file with its corresponding video file by using the manual method described above.
Conclusion
For any video creator, knowing how to sync audio with video is a must. That’s because most creators record audio and video separately for higher quality.
This brief guide has covered all the details about how to sync audio and video files using an outstanding video editor, Wondershare Filmora . We hope it comes in handy.
Free Download For Win 7 or later(64-bit)
Free Download For macOS 10.14 or later
Free Download For macOS 10.14 or later
Moreover, the vast arsenal of video effects, images, short clips, AI avatars, and many other things are also available. You just have to pick out the one you like and add it to your video with just a single click.
On top of that, you can also adjust the audio files like audio ducking, silent detection, audio mixing, and synching audio with the video files.

As far as the audio synching is concerned, you can do it either manually or with auto synchronization. And we will explain both of these processes in a stepwise manner to give you complete mastery over your audio synching. Let’s start with the manual process first.
Steps To Manually Sync Audio With Video Using Filmora
Step1Download & install
If you haven’t downloaded the latest version of Filmora yet, click the button below to download it without any cost. And after the download is completed, you can install it on your device right away.
Free Download For Win 7 or later(64-bit)
Free Download For macOS 10.14 or later
Step2Import your files
The next step is to import all the files. Launch the Filmora and click on the “New Project” button from the opening interface.

When a new project is created, you’ll see an “Import Media” section on it. Click on this section to browse your audio and video files from the computer. Or you can also drag and drop these files here to import them.

Step3Prepare your files
Now, it’s time to prepare our files for synchronization. First, drag the video file down to the timeline from the “Import Media” section. After that, drag the audio file in the same way below the video on the panel.

Step4Sync the audio & video files using the audio spike
Now that the video and audio files are on the timeline, you’ll have to find the moment you clap your hands. Look at the waveform from the in-camera audio and the independent audio track. At the moment you clap, we’ll see a spike.
Bonus Tip: If you can’t find the audio spike, zoom the panel to make it easier.

Now take the independent audio clip and align it so that both the spikes match.

That’s it! We just need to remove the in-camera audio now. Let’s see how to do it now.
Step5Remove the audio from the video footage
To detach the audio in the video footage, right-click on this file and select the “Detach Audio” option. Or you can also use the “Ctrl+Alt+D” as the hotkey.

Once the audio file has been separated, you can move forward and delete it. To delete this audio, right-click on it and select “Delete.”

Step6Enjoy your video with the new audio track
So here we go. Our video file has been synced with the high-quality audio file. You can now hit the Export button to get this edited file. But wait a minute. Didn’t we say we’ll show you a method to automatically sync audio with video? Let’s start this method now.
Steps To Automatically Sync Audio With Video Using Filmora
Did you find the above method troubling? Well, be assured because Wondershare Filmora can also automatically sync your audio file with video in a single click. Here are the steps to achieve this feat.
Free Download For Win 7 or later(64-bit)
Free Download For macOS 10.14 or later
Step1Prepare your files
This method’s starting process is the same as the previous one. You’ll need to download the Filmora and prepare your file on the timeline by importing them on a New Project.
Step2Select both audio & video files
Once you’ve got everything ready, select both your audio and files from the timeline.

Step3Click on the auto synchronization icon
When you select these files, you’ll see that the “Auto Synchronization” icon has appeared on the toolbar below the Import Media section. Click on this icon and wait for the magic.

Remember that you need a Premium ID of Wondershare Filmora to use the Auto Synchronization option.
Step4Wait until the syncing is completed
Filmora will start synchronizing your files, and you’ll see the “Synchronization in process” prompt on the screen. Wait until the process is completed.

Step5Finish your editing
You can finish your editing when the separate audio file perfectly aligns with the video file. Delete the audio from the in-camera video file and hit the “Export” button.
Congratulations! We have successfully synced separate audio and video files. Now let’s take a look at some hot FAQs before we end our guide.
Part 4: FAQs About Synching Audio With Video
Is auto synchronization better than manual syncing?
Well, auto synchronization is no doubt easier than manual syncing. But that doesn’t mean you don’t need the manual process anymore. Many situations may arise where you may be left with no choice but to use the manual syncing of separate audio and video files. So make sure to properly learn both these methods, and each one of them will definitely come in handy someday.
How can we sync audio & video for free?
Syncing audio and video files for free is not a difficult task. Download the Filmora right now, and after installation, you can freely sync any Audio file with its corresponding video file by using the manual method described above.
Conclusion
For any video creator, knowing how to sync audio with video is a must. That’s because most creators record audio and video separately for higher quality.
This brief guide has covered all the details about how to sync audio and video files using an outstanding video editor, Wondershare Filmora . We hope it comes in handy.
Free Download For Win 7 or later(64-bit)
Free Download For macOS 10.14 or later
Create a Stunning Light Sweep Effect in Filmora. Use Simple and Easy Steps to Export a High-Quality Video that Will Impress Even Pro Video Editors
Preparation
What you need to prepare:
- A computer (Windows or macOS)
- Your video materials.
- Filmora video editor
Step 1
If you haven’t already, go ahead and download the Filmora video editor . Install it and run the application on your computer.
Step 2
Create a New Project by clicking on the big blue button. Immediately after, go to File → Project Settings. Here, make sure the project is in full resolution and 60 fps.

Step 3
Select the Titles tab and drag the Default Title to the Timeline.

Step 4
Double-click on the Default Title inside the Timeline and go to Advanced. Here, you can change the text, pick a new font, change its size, and so on. Make sure you change the Color Type to Gradient Fill. Choose a color of your own liking. When you’re done customizing it, click on OK.

Step 5
Right-click on the Default Title clip and select Copy. Then, right-click anywhere on the Timeline and select Paste. After this, drag the copy of that clip on the Track above it.

Step 6
Double-click on the copied Title, go to Advanced, and change the Color Type to Color Fill. Click OK.

Step 7
Next, take a snapshot of the new title. Then, delete the copied Title clip from your Timeline. After this, drag the snapshot into the Timeline.

Step 8
Double-click on the Snapshot clip and go to the Mask tab. From here, select the Rectangle mask. Then, rotate it as you see in the image below. Don’t click on OK yet.

Step 9
Now, look at the settings panel on the left and scroll down. First, change its Rotation to 40. Then, drag the Blur bar to 15. Finally, move the Rectangle mask to the left side like in the image below. Don’t click OK yet.

Step 10
Now, move the Playhead to the starting position on the Timeline. Then, click on the “**+Add**” button to add a keyframe. Next, move the Playhead a few seconds forward and move the Rectangle mask all the way to the right side of the text. Click OK.

Step 11
You are finally done. You can review, Render, and Export the video now to use it as you wish. Congratulations on creating a light sweep effect in Filmora.
Summary
What you’ve learned:
- How to create a modern light sweep effect in the Filmora video editor
- How to use Masks in Filmora
- Edit titles like a pro
What you need to prepare:
- A computer (Windows or macOS)
- Your video materials.
- Filmora video editor
Step 1
If you haven’t already, go ahead and download the Filmora video editor . Install it and run the application on your computer.
Step 2
Create a New Project by clicking on the big blue button. Immediately after, go to File → Project Settings. Here, make sure the project is in full resolution and 60 fps.

Step 3
Select the Titles tab and drag the Default Title to the Timeline.

Step 4
Double-click on the Default Title inside the Timeline and go to Advanced. Here, you can change the text, pick a new font, change its size, and so on. Make sure you change the Color Type to Gradient Fill. Choose a color of your own liking. When you’re done customizing it, click on OK.

Step 5
Right-click on the Default Title clip and select Copy. Then, right-click anywhere on the Timeline and select Paste. After this, drag the copy of that clip on the Track above it.

Step 6
Double-click on the copied Title, go to Advanced, and change the Color Type to Color Fill. Click OK.

Step 7
Next, take a snapshot of the new title. Then, delete the copied Title clip from your Timeline. After this, drag the snapshot into the Timeline.

Step 8
Double-click on the Snapshot clip and go to the Mask tab. From here, select the Rectangle mask. Then, rotate it as you see in the image below. Don’t click on OK yet.

Step 9
Now, look at the settings panel on the left and scroll down. First, change its Rotation to 40. Then, drag the Blur bar to 15. Finally, move the Rectangle mask to the left side like in the image below. Don’t click OK yet.

Step 10
Now, move the Playhead to the starting position on the Timeline. Then, click on the “**+Add**” button to add a keyframe. Next, move the Playhead a few seconds forward and move the Rectangle mask all the way to the right side of the text. Click OK.

Step 11
You are finally done. You can review, Render, and Export the video now to use it as you wish. Congratulations on creating a light sweep effect in Filmora.
Summary
What you’ve learned:
- How to create a modern light sweep effect in the Filmora video editor
- How to use Masks in Filmora
- Edit titles like a pro
What you need to prepare:
- A computer (Windows or macOS)
- Your video materials.
- Filmora video editor
Step 1
If you haven’t already, go ahead and download the Filmora video editor . Install it and run the application on your computer.
Step 2
Create a New Project by clicking on the big blue button. Immediately after, go to File → Project Settings. Here, make sure the project is in full resolution and 60 fps.

Step 3
Select the Titles tab and drag the Default Title to the Timeline.

Step 4
Double-click on the Default Title inside the Timeline and go to Advanced. Here, you can change the text, pick a new font, change its size, and so on. Make sure you change the Color Type to Gradient Fill. Choose a color of your own liking. When you’re done customizing it, click on OK.

Step 5
Right-click on the Default Title clip and select Copy. Then, right-click anywhere on the Timeline and select Paste. After this, drag the copy of that clip on the Track above it.

Step 6
Double-click on the copied Title, go to Advanced, and change the Color Type to Color Fill. Click OK.

Step 7
Next, take a snapshot of the new title. Then, delete the copied Title clip from your Timeline. After this, drag the snapshot into the Timeline.

Step 8
Double-click on the Snapshot clip and go to the Mask tab. From here, select the Rectangle mask. Then, rotate it as you see in the image below. Don’t click on OK yet.

Step 9
Now, look at the settings panel on the left and scroll down. First, change its Rotation to 40. Then, drag the Blur bar to 15. Finally, move the Rectangle mask to the left side like in the image below. Don’t click OK yet.

Step 10
Now, move the Playhead to the starting position on the Timeline. Then, click on the “**+Add**” button to add a keyframe. Next, move the Playhead a few seconds forward and move the Rectangle mask all the way to the right side of the text. Click OK.

Step 11
You are finally done. You can review, Render, and Export the video now to use it as you wish. Congratulations on creating a light sweep effect in Filmora.
Summary
What you’ve learned:
- How to create a modern light sweep effect in the Filmora video editor
- How to use Masks in Filmora
- Edit titles like a pro
What you need to prepare:
- A computer (Windows or macOS)
- Your video materials.
- Filmora video editor
Step 1
If you haven’t already, go ahead and download the Filmora video editor . Install it and run the application on your computer.
Step 2
Create a New Project by clicking on the big blue button. Immediately after, go to File → Project Settings. Here, make sure the project is in full resolution and 60 fps.

Step 3
Select the Titles tab and drag the Default Title to the Timeline.

Step 4
Double-click on the Default Title inside the Timeline and go to Advanced. Here, you can change the text, pick a new font, change its size, and so on. Make sure you change the Color Type to Gradient Fill. Choose a color of your own liking. When you’re done customizing it, click on OK.

Step 5
Right-click on the Default Title clip and select Copy. Then, right-click anywhere on the Timeline and select Paste. After this, drag the copy of that clip on the Track above it.

Step 6
Double-click on the copied Title, go to Advanced, and change the Color Type to Color Fill. Click OK.

Step 7
Next, take a snapshot of the new title. Then, delete the copied Title clip from your Timeline. After this, drag the snapshot into the Timeline.

Step 8
Double-click on the Snapshot clip and go to the Mask tab. From here, select the Rectangle mask. Then, rotate it as you see in the image below. Don’t click on OK yet.

Step 9
Now, look at the settings panel on the left and scroll down. First, change its Rotation to 40. Then, drag the Blur bar to 15. Finally, move the Rectangle mask to the left side like in the image below. Don’t click OK yet.

Step 10
Now, move the Playhead to the starting position on the Timeline. Then, click on the “**+Add**” button to add a keyframe. Next, move the Playhead a few seconds forward and move the Rectangle mask all the way to the right side of the text. Click OK.

Step 11
You are finally done. You can review, Render, and Export the video now to use it as you wish. Congratulations on creating a light sweep effect in Filmora.
Summary
What you’ve learned:
- How to create a modern light sweep effect in the Filmora video editor
- How to use Masks in Filmora
- Edit titles like a pro
Also read:
- [New] How to Become an Instagram Influencer A Complete Guide for 2024
- 2024 Approved Hyperlapse VS Timelapse Videos
- 3 Methods to Mirror Tecno Spark 20 Pro to Roku | Dr.fone
- 4 Methods to Turn off Life 360 On Infinix Zero 30 5G without Anyone Knowing | Dr.fone
- Discover Simple Steps to Access Firefox Configuration Options - A Guide by YL Software
- Global Restrictions on Digital Assets: A Look Into Countries Banning Cryptocurrencies – YL Computing | YL Software
- In 2024, Beaming Brilliance for Android Video Creation
- New A Countdown Effect Is Widely Used in Gaming and Report Videos. So How to Create Your Own Countdown Video? This Article Will Tell You some Ideas About Contdown Video Editing for 2024
- New How Do You Create In-Camera Transitions in Your Videos? A Complete Guide for Beginners to Create These Transitions Using Their Camera at Home
- New How to Make a TikTok Loop Video
- New In 2024, Adobe Lightroom Color Grading Tutorial
- New In This Article Let Me Share with You How to Start a Vlog? Ideas and Any Tips for You to Start Your Own Vlogging Channel
- Next-Gen Recording Techniques Fusing Webcam and Slideshows for 2024
- Sharpening Vision In-Depth HDR Techniques in PhotoShop for 2024
- Studio Masterclass Journey Extended XVideoExplore
- Title: New Steps to Rotate Videos in Lightworks for 2024
- Author: Chloe
- Created at : 2025-03-01 23:29:26
- Updated at : 2025-03-04 08:44:03
- Link: https://ai-editing-video.techidaily.com/new-steps-to-rotate-videos-in-lightworks-for-2024/
- License: This work is licensed under CC BY-NC-SA 4.0.