:max_bytes(150000):strip_icc():format(webp)/ipad-pro-pencil-56a533763df78cf77286e0e0.png)
New Take Your Video Editing to the Next Level with Video Scopes

Take Your Video Editing to the Next Level with Video Scopes
All video editors have been there. You edit and color-correct your video project only to find out that the final product is not what you expected. The contract and colors dramatically shift when viewed on a different device. In most cases, this is caused by improperly calibrated monitors, but it could also be your eyes playing tricks on you. Video scopes help in preventing this problem ensuring that the color in your video is consistent across devices. With video editing scope, you get the exact representation of the elements that make up your image, including lightness and color values. In this article, we explain what video scopes are and how you can use them in your editing projects.
Color Correction Editor An easy-to-use video editor helps you make color correction and color grading experience for videos!
Free Download Use Vectorscope in Filmora Try Color Correction

Part 1. Introduction to Video Scopes: What are They and Why You Should Use them
When grading and color correcting your videos, it is important to accurately assess your video signal. This allows you to know whether you’re crushing the blacks in the night shot or clipping the whites in the clouds. You also get to know the exact saturation and hue your logo has. Video scopes are simply monitoring tools and measurements that are used during video editing to analyze and optimize the technical quality of video signals.
Video scopes are important because your monitor may not be properly calibrated. It will likely give you inaccurate results and cannot be trusted with the video editing process. Since our eyes will naturally adapt to the image, they cannot be trusted either. However, video scopes never lie and will let you know the exact status of your video. In fact, the scope of video editing is beneficial in several ways:
- Increased Accuracy: Color correction and grading require accurate information that cannot be guaranteed by our eyes. Video scopes are highly accurate, confirming the true color and assuring you are making the correct adjustments
- Reliability: Video scopes provide reliable verification by ensuring you are not influenced by perception or what may appear as the right color grading.
- Professional Editing: The use of scopes in video editing is professional and allows you to make precise corrections of colors.
- Matching Color Between Shots: You can easily use video scopes to match your work and access various shots.
Video scopes are indeed useful in video editing. They give you the extra reassurance that your color grading and correction are accurate and representative of what you want. While they may sound intimidating for beginners, video scopes are a useful addition to video editing once you learn how to interpret them.
Part 2. Essential Video Scopes for Beginners: A List of the Most Common Ones
Scope in video editing can be a lifesaver, especially when you know what you are doing. Some are readily available for adjustment while recording, but the post-production ones are equally important. They ensure you are making the right adjustments without being interfered with by the appearance of your monitor. The scope of video editing ensures that our video will look the same across all devices. Here are the most commonly used video scopes:
1. Waveform Scopes
Waveform video scope allows you to see how dark or light your image is. In other words, the waveform represents the luminance distribution across your image, allowing you to easily identify the bright and dark elements of your image. The lightness of the picture of the image is represented as a waveform. The rule of thumb is that black is 0 while white is 100 when you are editing HD. Levels below 0 at the bottom of the scope and those above 100 near the top of the scope will be clipped. So, you have to keep your levels within the 0-100 range, which is also the true Standard Dynamic Range (SDR) video. With Ultra-HD standard, the whites can go up to 10,000, which is the High Dynamic Range.
2. Histogram
The histogram video scope allows you to see the tonal value of your clip. Most people associate histograms with still photography, but it is also useful for video work. Specifically, the histogram represents the highlights, shadows, and midtones of your image. For a standard 8-bit image, pure white has a value of 255 while dark black has a value of 0. The histogram gives you the distribution of colored pixels in every value of lightness or darkness. Although other video scopes like the waveform and vectorscope will do much of the work, a histogram is still a useful measure in video editing.
3. RGB Parade
This is one of the most common post-production video scopes. The RGB parade allows you to see all three colors in one scope. It shows the waveform of the three colors side by side, and not on top of each other. This way, the RGB parade measures the saturation of the colors red, green, and blue in an image. It becomes clear which colors are more saturated compared to others in different areas of the image. To achieve a well-balanced image, keep each color within the lower and upper limits of the video scope. This ensures that the colors are not under or over-saturated.
4. Vector Scopes
This is another common visual post-production scope. It measures the color and color saturation of your image or video on a six-point color wheel. When working with vector scopes, you have two options to choose from: YUV and HLS vector scopes. The YUV vector scopes display the saturation and hue of the colors in the image on the circular graph. The colors in the graph include red, blue, magenta, yellow, and cyan-green. Color becomes more saturated the further it is from the center. On the other hand, the HLS vector scopes show saturation and hue, but in a more detailed picture of the number of pixels that fall into each area of the video scope.
Part 3. Unlock the Power of Video Scopes with Filmora
The use of scope in video editing will up your game and improve the overall quality of your videos. They give you an effective way of balancing and correcting colors. For pro video scopes for Mac and Windows, Wondashare Filmora is a great choice. The professional video editor comes with four types of video scopes that provide exceptional results. In addition to a histogram, Filmora V13 offers more options for color balancing and correcting. Let’s have a look at how to use video scopes on Filmora.
Free Download For Win 7 or later(64-bit)
Free Download For macOS 10.14 or later
Using Video Scopes in Filmora
Filmora has made it easy for users to utilize video scopes in their editing projects. Once you have launched Filmora and started a New Project, video scopes are easily accessible via the highlighted icon.
The four video scopes offered by Filmora allow you to achieve specific color adjustments in your video projects. Let’s have a look at how each can be used in video editing.
1. Parade RGB
The parade RGB video scope is used to change the color channel of your visual images from RBG to YCbCr or YRGB. It displays the red, green, and blue channels of the video signal, which can be helpful when you are identifying areas of the video that are too dark or too bright. You can also use the parade to check the color balance of the video.
2. Waveform
The Waveform video scope in Filmora is used to adjust the color channels of your images or videos in different ways. It displays the brightness of the video signal, allowing you to heck the contrast level.
3. Vectorscope
The vectorscope helps to identify and adjust the skin tone of your subjects. It displays the color saturation of the video signal, helping you identify areas that are too saturated or desaturated. This way, you can easily check the skin tones in the video.
4. Histogram
The histogram, and video scope display multiple adjustments graphically while adjusting color channels. It displays the distribution of brightness values in the video, allowing you to check the overall brightness level.
Conclusion
Video scopes are important measures for tracing color elements when color correcting and enhancing your video. For an accurate and easy way of using video scopes in your projects, we highly recommend Wondershar Filmora. With the recent upgrades on Filmora, users now have access to pro video scopes that give you professional editing experience. Explore the four available video scopes, including waveform and Histogram. Parade, and vectorscope to achieve better color grading and quality of your videos.
Free Download Use Vectorscope in Filmora Try Color Correction

Part 1. Introduction to Video Scopes: What are They and Why You Should Use them
When grading and color correcting your videos, it is important to accurately assess your video signal. This allows you to know whether you’re crushing the blacks in the night shot or clipping the whites in the clouds. You also get to know the exact saturation and hue your logo has. Video scopes are simply monitoring tools and measurements that are used during video editing to analyze and optimize the technical quality of video signals.
Video scopes are important because your monitor may not be properly calibrated. It will likely give you inaccurate results and cannot be trusted with the video editing process. Since our eyes will naturally adapt to the image, they cannot be trusted either. However, video scopes never lie and will let you know the exact status of your video. In fact, the scope of video editing is beneficial in several ways:
- Increased Accuracy: Color correction and grading require accurate information that cannot be guaranteed by our eyes. Video scopes are highly accurate, confirming the true color and assuring you are making the correct adjustments
- Reliability: Video scopes provide reliable verification by ensuring you are not influenced by perception or what may appear as the right color grading.
- Professional Editing: The use of scopes in video editing is professional and allows you to make precise corrections of colors.
- Matching Color Between Shots: You can easily use video scopes to match your work and access various shots.
Video scopes are indeed useful in video editing. They give you the extra reassurance that your color grading and correction are accurate and representative of what you want. While they may sound intimidating for beginners, video scopes are a useful addition to video editing once you learn how to interpret them.
Part 2. Essential Video Scopes for Beginners: A List of the Most Common Ones
Scope in video editing can be a lifesaver, especially when you know what you are doing. Some are readily available for adjustment while recording, but the post-production ones are equally important. They ensure you are making the right adjustments without being interfered with by the appearance of your monitor. The scope of video editing ensures that our video will look the same across all devices. Here are the most commonly used video scopes:
1. Waveform Scopes
Waveform video scope allows you to see how dark or light your image is. In other words, the waveform represents the luminance distribution across your image, allowing you to easily identify the bright and dark elements of your image. The lightness of the picture of the image is represented as a waveform. The rule of thumb is that black is 0 while white is 100 when you are editing HD. Levels below 0 at the bottom of the scope and those above 100 near the top of the scope will be clipped. So, you have to keep your levels within the 0-100 range, which is also the true Standard Dynamic Range (SDR) video. With Ultra-HD standard, the whites can go up to 10,000, which is the High Dynamic Range.
2. Histogram
The histogram video scope allows you to see the tonal value of your clip. Most people associate histograms with still photography, but it is also useful for video work. Specifically, the histogram represents the highlights, shadows, and midtones of your image. For a standard 8-bit image, pure white has a value of 255 while dark black has a value of 0. The histogram gives you the distribution of colored pixels in every value of lightness or darkness. Although other video scopes like the waveform and vectorscope will do much of the work, a histogram is still a useful measure in video editing.
3. RGB Parade
This is one of the most common post-production video scopes. The RGB parade allows you to see all three colors in one scope. It shows the waveform of the three colors side by side, and not on top of each other. This way, the RGB parade measures the saturation of the colors red, green, and blue in an image. It becomes clear which colors are more saturated compared to others in different areas of the image. To achieve a well-balanced image, keep each color within the lower and upper limits of the video scope. This ensures that the colors are not under or over-saturated.
4. Vector Scopes
This is another common visual post-production scope. It measures the color and color saturation of your image or video on a six-point color wheel. When working with vector scopes, you have two options to choose from: YUV and HLS vector scopes. The YUV vector scopes display the saturation and hue of the colors in the image on the circular graph. The colors in the graph include red, blue, magenta, yellow, and cyan-green. Color becomes more saturated the further it is from the center. On the other hand, the HLS vector scopes show saturation and hue, but in a more detailed picture of the number of pixels that fall into each area of the video scope.
Part 3. Unlock the Power of Video Scopes with Filmora
The use of scope in video editing will up your game and improve the overall quality of your videos. They give you an effective way of balancing and correcting colors. For pro video scopes for Mac and Windows, Wondashare Filmora is a great choice. The professional video editor comes with four types of video scopes that provide exceptional results. In addition to a histogram, Filmora V13 offers more options for color balancing and correcting. Let’s have a look at how to use video scopes on Filmora.
Free Download For Win 7 or later(64-bit)
Free Download For macOS 10.14 or later
Using Video Scopes in Filmora
Filmora has made it easy for users to utilize video scopes in their editing projects. Once you have launched Filmora and started a New Project, video scopes are easily accessible via the highlighted icon.
The four video scopes offered by Filmora allow you to achieve specific color adjustments in your video projects. Let’s have a look at how each can be used in video editing.
1. Parade RGB
The parade RGB video scope is used to change the color channel of your visual images from RBG to YCbCr or YRGB. It displays the red, green, and blue channels of the video signal, which can be helpful when you are identifying areas of the video that are too dark or too bright. You can also use the parade to check the color balance of the video.
2. Waveform
The Waveform video scope in Filmora is used to adjust the color channels of your images or videos in different ways. It displays the brightness of the video signal, allowing you to heck the contrast level.
3. Vectorscope
The vectorscope helps to identify and adjust the skin tone of your subjects. It displays the color saturation of the video signal, helping you identify areas that are too saturated or desaturated. This way, you can easily check the skin tones in the video.
4. Histogram
The histogram, and video scope display multiple adjustments graphically while adjusting color channels. It displays the distribution of brightness values in the video, allowing you to check the overall brightness level.
Conclusion
Video scopes are important measures for tracing color elements when color correcting and enhancing your video. For an accurate and easy way of using video scopes in your projects, we highly recommend Wondershar Filmora. With the recent upgrades on Filmora, users now have access to pro video scopes that give you professional editing experience. Explore the four available video scopes, including waveform and Histogram. Parade, and vectorscope to achieve better color grading and quality of your videos.
How to Slow Down a Video on iPhone and Android The Easy Way
How to edit a video to slow motion on iPhone and Android? Slow motion is an important part of video editing. You would be enhancing your feature-length films or simply preparing cool stuff for posting on social media. By slowing down some or all the scenes of your video, you make it appear cool and more interesting. The slo mo allows viewers to notice specific details of your videos or focus on what you want them to. To show you how to make slow motion video in Android and iPhone, we are going to introduce a versatile video editing app that works well on both platforms. This article will provide the step-by-step process on how to edit video to slow motion on iPhone and Android using Wondershare Filmora.
Slow Motion Maker Slow your video’s speed with better control of your keyframes to create unique cinematic effects!
Free Download Free Download Learn More

Part 1. How to Make Slow Motion Videos on iPhone With Filmora : 2 Ways
Creating slo mo videos is a staple in video editing, which helps make videos more cinematic and engaging. Understanding how to edit iPhone slow motion video will help you to create quality videos on the go. It also gives you more freedom in how you tell your visual story or keeping the attention of your viewers throughout the video.
Free Download For Win 7 or later(64-bit)
Free Download For macOS 10.14 or later
When you slow motion a video, you make it easier for your viewers to observe details in every minute. This is also an effective way to add emotional weight or a dramatic flair to your videos. Let’s explore how to edit a video slow motion on iPhone with Wondershare Filmora.
Step 1: Download Wondershare Filmora
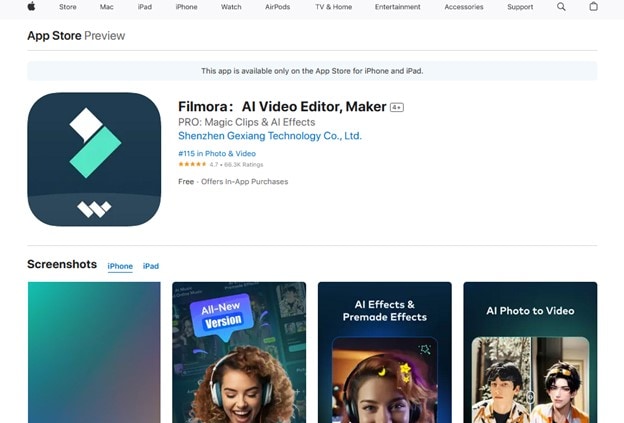
Open the App Store on your phone. Search for Wondershare Filmora, download and launch the app on your phone. Follow the instructions on the screen to create a Filmora account or log in to an existing one to start using the app.
Step 2: Import Video to Filmora
Once you open the Filmora app, tap the + button and import the video you want to edit from your photo library.

Step 3: Slow Down the Video
Once you have imported the video, slow it down to your desired speed. You have two ways to achieve this with Filmora for iPhone:
Method 1Use the Uniform Speed Slider
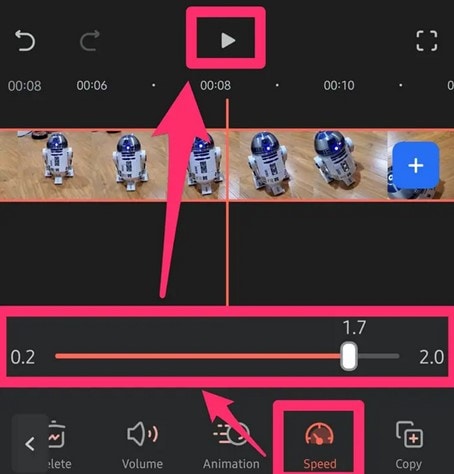
Tap on the video clip, and at the bottom of the screen, select the speed slider. Adjust the slider to the right or left to adjust the speed of your video. Then tap Done, and save your video.
Method 2Use the Speed Ramping Feature
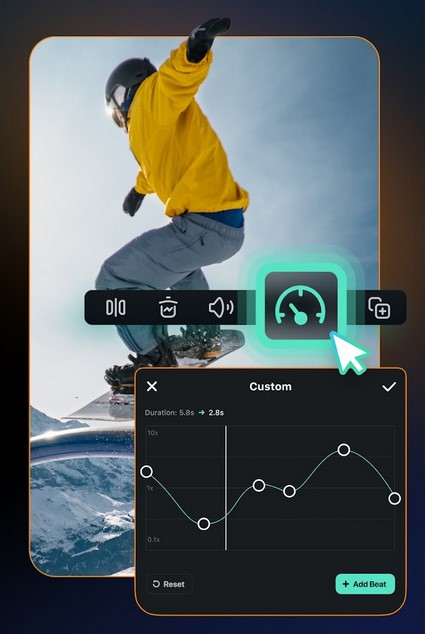
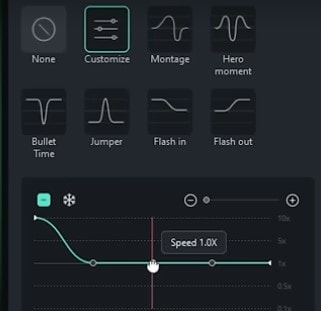
The speed ramping feature will gradually change the speed of your video. When done right, speed ramps in a video add a cinematic feel and look. Tap on the video clip. Then tap on the Speed Ramping feature at the bottom of the screen. Use the graph that appears to set the speed ramp for your video. You may choose the presets already available or customize the speed based on your own desired setting. Tap Done when you are satisfied and save the video.
Part 2. How to Make Slow Motion Videos on Android with Filmora : 2 Ways
The Android operating systems does allow you to slow down or speed up video. However, third-party apps like Wondershare Filmors provide more versatile and better outcomes. The app helps you quickly change the playback speed of a video. It is a great choice for anyone wondering how to make slow motion video in Android.
You can opt for speeding up or slowing down the video based on what you specifically want to achieve. There is also the option to use the Speed Ramp feature which allows you to customize different speed rates for the same clip. In some circumstances, combining the two features can produce exceptional results in your video editing projects. Let’s have a look at how you can use this app on your Android phone.
Free Download For Win 7 or later(64-bit)
Free Download For macOS 10.14 or later
Step 1: Download and Install Filmora
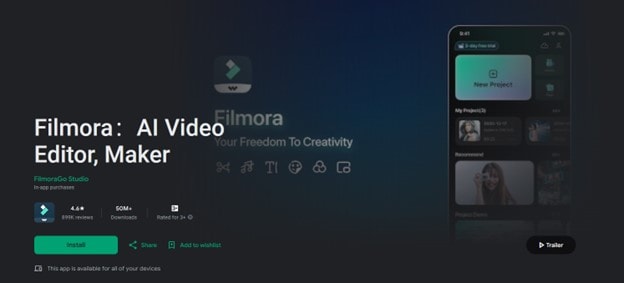
Search for Wondershare Filmora in the Google Play Store. The app is available for Android devices running Android 7.0 or higher, making it compatible with a wide range of devices. Download and install the Filmora: AI Video Editor and Maker app on your Android phone. Start the app and follow the instructions to create a new or sign into an existing account.
Step 2: Import Your Video into Filmora
Once you start the Filmora app on your Android device, tap the + button and select the video you want to import. This will add the video files in Filmora to start editing its specific components, including speed.

Step 3: Adjust the Speed with Filmora
Filmora for Android offers two methods to edit the speed of your video. You can use the speed slider for direct editing or the Speed Ramping feature for a more creative approach.
Method 1Use the Uniform Speed Slider
Tap the video that you have imported. Then, select the speed slider at the bottom of the screen. Adjust the speed of the video by dragging the speed slider to the left or right. Once satisfied, tap the Check button and save your video.

Method 2Use the Speed Ramping Feature
With the Speed Ramping feature, adjust the speed of your Android video gradually in a more creative manner. You may slow it down at the beginning or the end while accelerating the middle. This makes the video fun and more engaging to your audience.
To use this feature on Filmora for Android, tap on the video clip and select the Speed Ramping icon at the bottom of the screen. Use the graph that appears to adjust how you want the video to slow down or speed up when playing it back. Tap on the Check button once done and save your video.
Conclusion
Creating slow-motion videos is a vital skill in video editing. It improves visual storytelling and keeps your audience more engaging by focusing on the most important aspects of your videos. Wondering how to edit slo mo video on iPhone and Android devices, Wondershare Filmora offers an intuitive feature to do this. The user-friendly tool is effective in slowing down videos on both iPhone and Android phones. Download the app App Store for iPhone and Play Store for Android to enhance your slow-motion videos and unleash the creativity of mobile phone video editing.
Free Download Free Download Learn More

Part 1. How to Make Slow Motion Videos on iPhone With Filmora : 2 Ways
Creating slo mo videos is a staple in video editing, which helps make videos more cinematic and engaging. Understanding how to edit iPhone slow motion video will help you to create quality videos on the go. It also gives you more freedom in how you tell your visual story or keeping the attention of your viewers throughout the video.
Free Download For Win 7 or later(64-bit)
Free Download For macOS 10.14 or later
When you slow motion a video, you make it easier for your viewers to observe details in every minute. This is also an effective way to add emotional weight or a dramatic flair to your videos. Let’s explore how to edit a video slow motion on iPhone with Wondershare Filmora.
Step 1: Download Wondershare Filmora
Open the App Store on your phone. Search for Wondershare Filmora, download and launch the app on your phone. Follow the instructions on the screen to create a Filmora account or log in to an existing one to start using the app.

Step 2: Import Video to Filmora
Once you open the Filmora app, tap the + button and import the video you want to edit from your photo library.

Step 3: Slow Down the Video
Once you have imported the video, slow it down to your desired speed. You have two ways to achieve this with Filmora for iPhone:
Method 1Use the Uniform Speed Slider
Tap on the video clip, and at the bottom of the screen, select the speed slider. Adjust the slider to the right or left to adjust the speed of your video. Then tap Done, and save your video.

Method 2Use the Speed Ramping Feature
The speed ramping feature will gradually change the speed of your video. When done right, speed ramps in a video add a cinematic feel and look. Tap on the video clip. Then tap on the Speed Ramping feature at the bottom of the screen. Use the graph that appears to set the speed ramp for your video. You may choose the presets already available or customize the speed based on your own desired setting. Tap Done when you are satisfied and save the video.

Part 2. How to Make Slow Motion Videos on Android with Filmora : 2 Ways
The Android operating systems does allow you to slow down or speed up video. However, third-party apps like Wondershare Filmors provide more versatile and better outcomes. The app helps you quickly change the playback speed of a video. It is a great choice for anyone wondering how to make slow motion video in Android.
You can opt for speeding up or slowing down the video based on what you specifically want to achieve. There is also the option to use the Speed Ramp feature which allows you to customize different speed rates for the same clip. In some circumstances, combining the two features can produce exceptional results in your video editing projects. Let’s have a look at how you can use this app on your Android phone.
Free Download For Win 7 or later(64-bit)
Free Download For macOS 10.14 or later
Step 1: Download and Install Filmora
Search for Wondershare Filmora in the Google Play Store. The app is available for Android devices running Android 7.0 or higher, making it compatible with a wide range of devices. Download and install the Filmora: AI Video Editor and Maker app on your Android phone. Start the app and follow the instructions to create a new or sign into an existing account.

Step 2: Import Your Video into Filmora
Once you start the Filmora app on your Android device, tap the + button and select the video you want to import. This will add the video files in Filmora to start editing its specific components, including speed.

Step 3: Adjust the Speed with Filmora
Filmora for Android offers two methods to edit the speed of your video. You can use the speed slider for direct editing or the Speed Ramping feature for a more creative approach.
Method 1Use the Uniform Speed Slider
Tap the video that you have imported. Then, select the speed slider at the bottom of the screen. Adjust the speed of the video by dragging the speed slider to the left or right. Once satisfied, tap the Check button and save your video.

Method 2Use the Speed Ramping Feature
With the Speed Ramping feature, adjust the speed of your Android video gradually in a more creative manner. You may slow it down at the beginning or the end while accelerating the middle. This makes the video fun and more engaging to your audience.
To use this feature on Filmora for Android, tap on the video clip and select the Speed Ramping icon at the bottom of the screen. Use the graph that appears to adjust how you want the video to slow down or speed up when playing it back. Tap on the Check button once done and save your video.

Conclusion
Creating slow-motion videos is a vital skill in video editing. It improves visual storytelling and keeps your audience more engaging by focusing on the most important aspects of your videos. Wondering how to edit slo mo video on iPhone and Android devices, Wondershare Filmora offers an intuitive feature to do this. The user-friendly tool is effective in slowing down videos on both iPhone and Android phones. Download the app App Store for iPhone and Play Store for Android to enhance your slow-motion videos and unleash the creativity of mobile phone video editing.
How to Add a Lower Third to Your Video
Preparation
What you need to prepare:
- A computer (Windows or macOS)
- Your video materials.
- Filmora video editor
Step 1
Download and Install the Filmora video editor . After it’s done installing, let the app run automatically and click on “New Project”.
Step 2
Go to My Media and click on “Import Media” to load your photos or images into the video editor.

Step 3
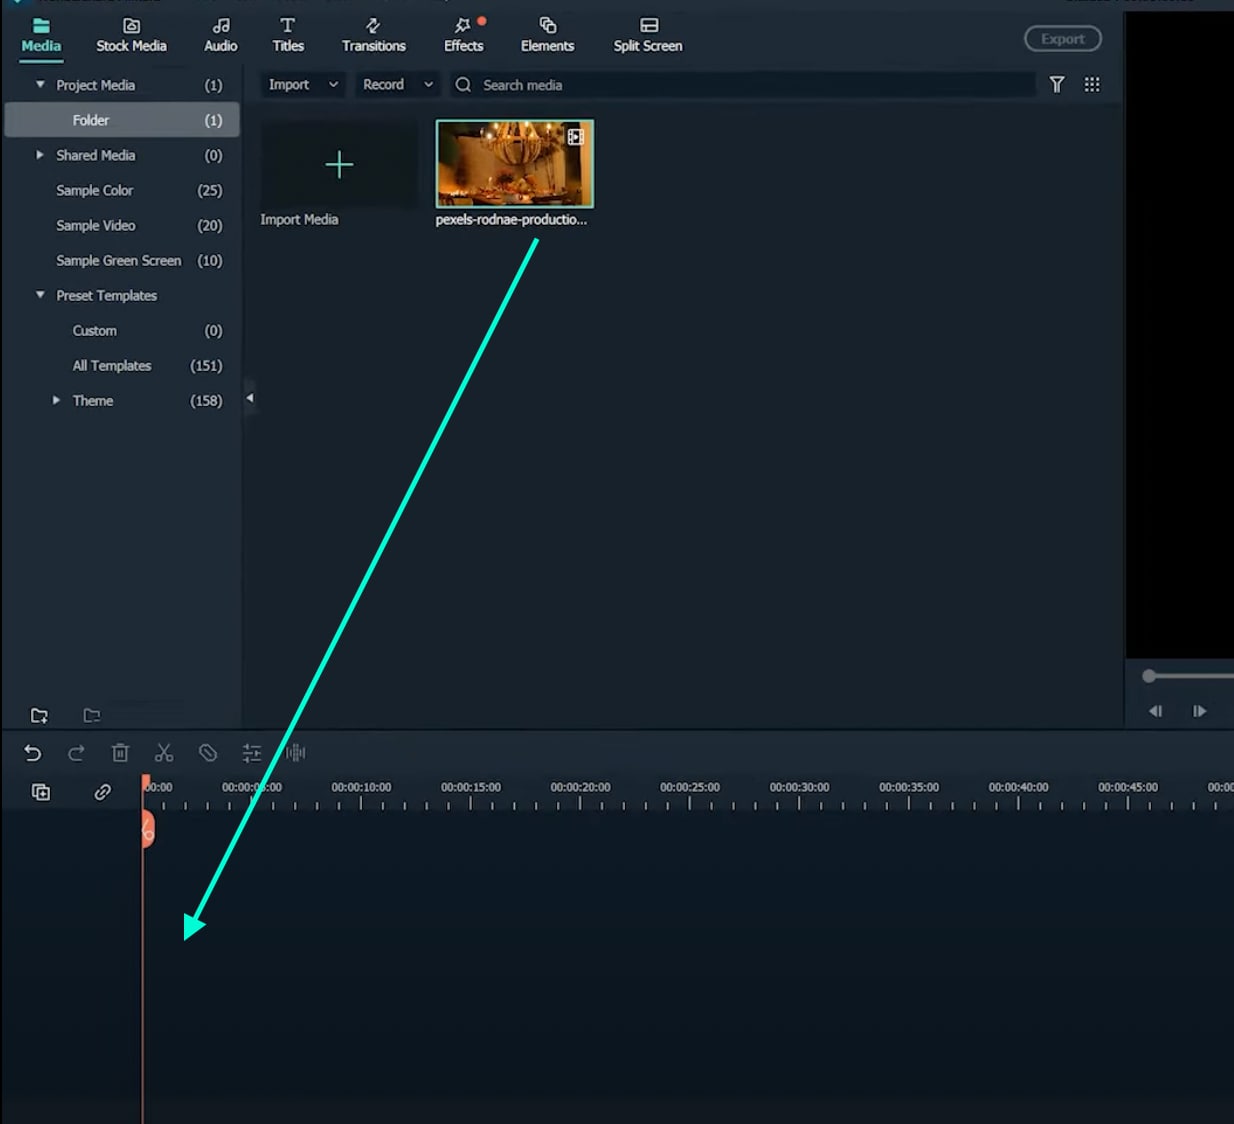
Drag the media you want to use to the Timeline.
Step 4
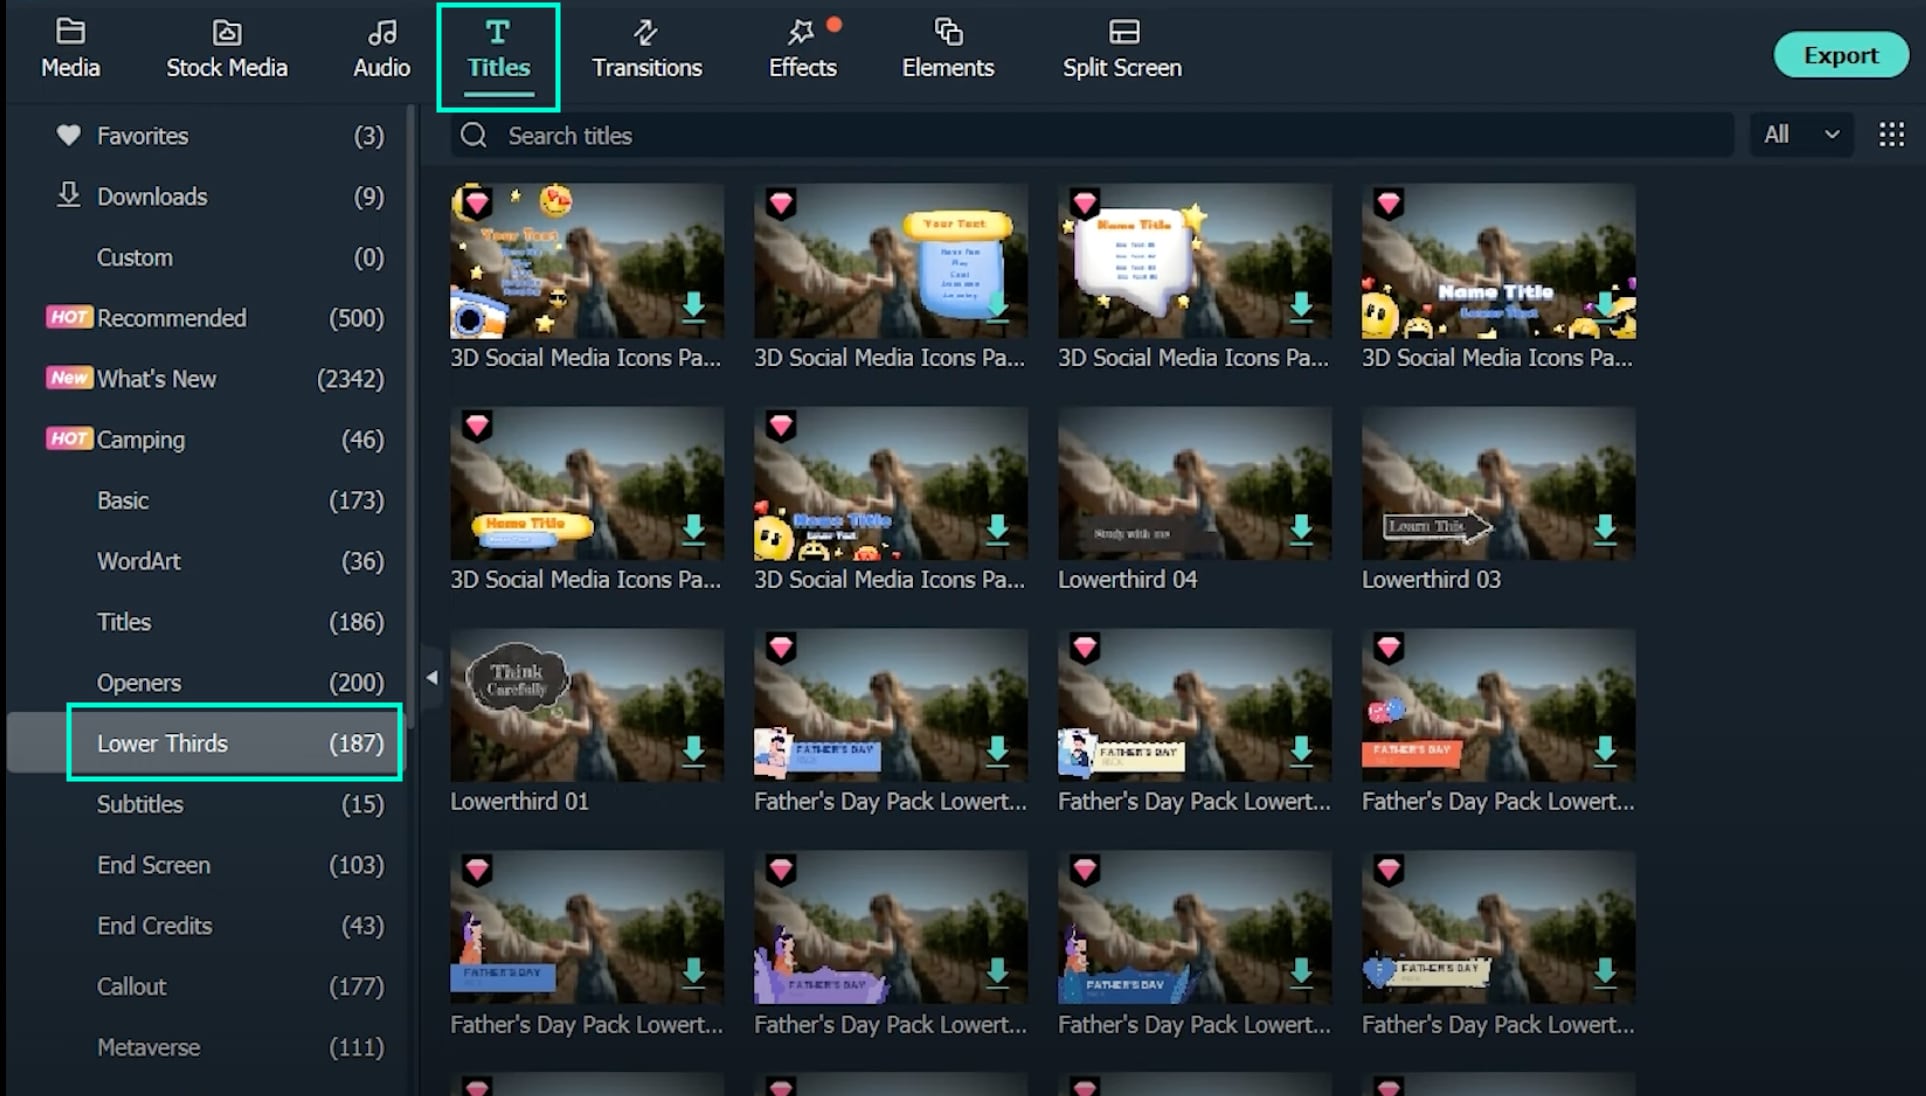
Head over to Titles → Lower Thirds. Then, drag the one you like to use to the Timeline and place it above the clip you imported earlier.
Step 5
Double-click on the Lower Third Title clip. Then, edit the text inside the new panel that pops up. Here, you can change its size, color, font, and a few other features. When you’re done, click OK.

Step 6
All that’s left to do now is to watch the final preview and Export the video. Render the video first and then hit the blue Export button. Congratulations on adding a lower-third animated title to your video in Filmora.

Summary
What you’ve learned:
- How to add and create unique titles in Filmora
- Edit and customize text in the Filmora video editor
- How to open a new project in Filmora and export it when you’re done
What you need to prepare:
- A computer (Windows or macOS)
- Your video materials.
- Filmora video editor
Step 1
Download and Install the Filmora video editor . After it’s done installing, let the app run automatically and click on “New Project”.
Step 2
Go to My Media and click on “Import Media” to load your photos or images into the video editor.

Step 3
Drag the media you want to use to the Timeline.

Step 4
Head over to Titles → Lower Thirds. Then, drag the one you like to use to the Timeline and place it above the clip you imported earlier.

Step 5
Double-click on the Lower Third Title clip. Then, edit the text inside the new panel that pops up. Here, you can change its size, color, font, and a few other features. When you’re done, click OK.

Step 6
All that’s left to do now is to watch the final preview and Export the video. Render the video first and then hit the blue Export button. Congratulations on adding a lower-third animated title to your video in Filmora.

Summary
What you’ve learned:
- How to add and create unique titles in Filmora
- Edit and customize text in the Filmora video editor
- How to open a new project in Filmora and export it when you’re done
What you need to prepare:
- A computer (Windows or macOS)
- Your video materials.
- Filmora video editor
Step 1
Download and Install the Filmora video editor . After it’s done installing, let the app run automatically and click on “New Project”.
Step 2
Go to My Media and click on “Import Media” to load your photos or images into the video editor.

Step 3
Drag the media you want to use to the Timeline.

Step 4
Head over to Titles → Lower Thirds. Then, drag the one you like to use to the Timeline and place it above the clip you imported earlier.

Step 5
Double-click on the Lower Third Title clip. Then, edit the text inside the new panel that pops up. Here, you can change its size, color, font, and a few other features. When you’re done, click OK.

Step 6
All that’s left to do now is to watch the final preview and Export the video. Render the video first and then hit the blue Export button. Congratulations on adding a lower-third animated title to your video in Filmora.

Summary
What you’ve learned:
- How to add and create unique titles in Filmora
- Edit and customize text in the Filmora video editor
- How to open a new project in Filmora and export it when you’re done
What you need to prepare:
- A computer (Windows or macOS)
- Your video materials.
- Filmora video editor
Step 1
Download and Install the Filmora video editor . After it’s done installing, let the app run automatically and click on “New Project”.
Step 2
Go to My Media and click on “Import Media” to load your photos or images into the video editor.

Step 3
Drag the media you want to use to the Timeline.

Step 4
Head over to Titles → Lower Thirds. Then, drag the one you like to use to the Timeline and place it above the clip you imported earlier.

Step 5
Double-click on the Lower Third Title clip. Then, edit the text inside the new panel that pops up. Here, you can change its size, color, font, and a few other features. When you’re done, click OK.

Step 6
All that’s left to do now is to watch the final preview and Export the video. Render the video first and then hit the blue Export button. Congratulations on adding a lower-third animated title to your video in Filmora.

Summary
What you’ve learned:
- How to add and create unique titles in Filmora
- Edit and customize text in the Filmora video editor
- How to open a new project in Filmora and export it when you’re done
Start Making Procreate GIFs and Take Your Editing Creativity to the Next Level
Easy Ways to Make Procreate GIFs
An easy yet powerful editor
Numerous effects to choose from
Detailed tutorials provided by the official channel
Stay tuned for a complete know-how into making Procreate GIFs.
In this article
01 [How Animation Works in Procreate](#Part 1)
02 [How to Make Animated Gifs in Procreate](#Part 2)
Part 1 How Animation Works in Procreate
GIFs are known to be the top ranked and most intuitive trendsetters in the world of infotainment and media service tools. Be it for fun or a targeted market influence, you can depend on GIFs for a variety of information solutions. Moving to the creative aspect, the experimentation belt with creating GIFs is huge. From making simple static and animated GIFs to creating professionally sound market promotion tools; you can play with your editing skills to extract just anything from these quick snippets.
Having said that, let’s take a dive into creating animated Procreate GIFs. Being a relatively new dimension of GIF editing, a merge of the two produces matchless and classic results. Read through the further article to get a complete guide for working on GIF creation and editing with Procreate.
● Underlying Concept
Before you begin creating a Procreate GIF, let’s get a bit familiar with the concept behind this GIF creation utility. This one is an excellent and advanced means of exploring your skills in digital drawing and animations. It is one of the easiest GIF maker software that helps you to become a pro in animation creativity even if you are beginner and for the ones already into the skill, Procreate is simply heaven.
Procreate allows you to work with animation in its ‘Animation Assist’ tool, where you get a generous workspace with the perfect editing canvas to experiment with a plethora of tools, effects and filters to create exciting GIFs with basic and complex animation craft.
The software allows frame-by-frame animation that refers to working with different frames of a particular illustration, while making minimal changes in each frame. Once you finish, your final creation gets played in a motion loop.
Part 1 How to Make Animated Gifs in Procreate
As is already stated, Procreate is among the most affordable GIF creator and editing software. Creating GIFs here is a few minute stuff within a span of counted steps. Let’s have a broader see through of the creation process. Take the following quick steps and get started to make your exclusive Procreate GIF:
● Step 1: Select an Artwork
Launch the software in your device to reach the Procreate welcome screen, where you need to select an existing static GIF to work on from your device. You can also create a fresh one if you like. Having done that, make a right swipe on the ‘Canvas’ icon and select ‘Duplicate’. This creates a copy of your artwork, preserving all of its layers, so that you are free to make changes or stick to the original one according to your preference.
If you want to use a specific section of your image to animate, you can use the crop tool to remove unwanted portions. Next, you need to put together the specific layers you wish to animate and also remove any unwanted layers you don’t want to use.
● Step 2: Enable Animation Assist Tool
From the Procreate tool gallery at the top, click on the ‘Wrench’ icon and select ‘Canvas’ from the ’Actions’ menu that drops down. In the interface that appears, enable the ‘Animation Assist’ tool with a right toggle. This will cause the ‘Animation Toolbar’ to appear at the bottom of the interface.
● Step 3: Add Frames and Make Image Adjustments
At this instant, you need to make additional adjustments in your selected image and create a copy of the image frames. To get this done, navigate to the ‘Animation Assist Toolbar’ and long press the ‘Add Frame’ button. A duplicate frame will now appear on the screen. Within this frame, you need to move the image elements that you wish to animate. To do this, select an element and drag it to a convenient spot of your choice.
While you go through with object movement, the software simultaneously shows you a semi-transparent preview of your creation through its unique ‘Onion-skin’ feature. You can enjoy playing your animation at this very stage, or continue to create something more exciting.
● Step 4: Enjoying? Let’s Continue.
Repeat Step 3 to create long and smooth GIFs with additional frames. Take caution to create a copy of your latest frame (not the original one), in case you need to make any adjustments later on. Consider playing your GIF to see if you need to add extra frames or implement further changes.
Step 5: Almost There.
You may notice a jerky movement of your final image frames. This is on account of the ‘Default Play’ feature of the Procreate software that initiates a run of your creation from the beginning to end and loops on the same fashion.
To set this right, navigate to the ‘Settings’ tool of the ‘Animation Assist Toolbar’ and tap ‘Ping-Pong’ on the opening interface. Your animated Gif will now play in a forward to backward loop, resulting in a smooth frame movement.
● Step 6: Time to Share.
Once you are happy with your artwork, you can share it across different media platforms. To export your creation, navigate to the Procreate tool gallery and tap the ‘Wrench’ icon and select ‘Share’. In the ‘Sharing Options’ menu, you will be asked to make a format selection. You can share your creation in either of the GIF, PNG or MP4 formats.
You may even require a size modification in the created file with respect to specific sharing platforms. You can either select a web compatible resolution to shrink your file, or create a copy of the file to resize the same.
Once you get familiar with Procreate and its GIF creation basics, you have the liberty to explore the huge effects library offered by the software to give your animated GIFs the classy, professional touch. So why wait? Just get the software and start a never ending spree of Procreating GIFs.
Procreate is undoubtedly an excellent tool for creating animated GIFs, but if you are looking for alternatives, another software to rely on is Wondershare Filmora Video Editor GIF creator.

Wondershare Filmora - Best Video Editor for Mac/Windows
5,481,435 people have downloaded it.
Build unique custom animations without breaking a sweat.
Focus on creating epic stories and leave the details to Filmora’s auto features.
Start a creative adventure with drag & drop effects and endless possibilities.
Filmora simplifies advanced features to save you time and effort.
Filmora cuts out repetition so you can move on to your next creative breakthrough.
● Filmora GIF Maker
Launched by Wondershare, this one is something you can blindly count upon for creating stunning animated GIFs from image and video files. Packed with tons of amazing features, Filmora is an inventory of audio-visual effects and filters that never runs out of fresh and appealing choices. Available to you as free and clean GIF generator software, this is easily compatible to almost any smart device. Working with Filmora will certainly make you admit that creating GIFs was never easier.
To start creating GIFs with this awesome tool, here’s what you need to do:
● Step 1: Import Necessary Media Files
Either a funny video or a group of stunning still images, you can choose any suitable media to make GIFs in Filmora. All you need to do is import the desired files from your PC or smartphone to the software’s timeline.
● Step 2: Timeline Dragging
Once you are done with importing the required files, you need to drag and drop the same to the ‘Editor Timeline’ of the GIF maker tool, where can improvise them to your heart’s content.
● Step 3: Time to Edit.
The Filmora effects library is simply heaven for the ones with creative instincts. Getting a liberty to browse and apply a glut of effects and filters, you are at the perfect place to create professionally sound and next level animated GIFs. Try hands on creating classy backgrounds with overlays, crop and trim clips to the perfect shot, make frame and time adjustments, add text to intensify your message, or pick up just anything you like, to create magic with your creativity.
● Step 4: Show it to the World.
When finally satisfied, save your artwork file to your device using the .gif extension and receive compliments from friends and peers by sharing it on your Instagram or other social media handles.
● Key Takeaways from This Episode →
● Animated GIFs are among the latest social media frenzy. These short, moving clips are nothing less than a complete entertainment roll-on. When it comes to creating animated GIFs, you can certainly take the Procreate software as a worthy choice.
● This one is a super easy and exciting means of working on animation GIFs that are by default, captivating for every onlooker. Talking of competing alternatives, you can trust on Wondershare Filmora, a handy, quick and clean solution to animated GIF creation.
Stay tuned for a complete know-how into making Procreate GIFs.
In this article
01 [How Animation Works in Procreate](#Part 1)
02 [How to Make Animated Gifs in Procreate](#Part 2)
Part 1 How Animation Works in Procreate
GIFs are known to be the top ranked and most intuitive trendsetters in the world of infotainment and media service tools. Be it for fun or a targeted market influence, you can depend on GIFs for a variety of information solutions. Moving to the creative aspect, the experimentation belt with creating GIFs is huge. From making simple static and animated GIFs to creating professionally sound market promotion tools; you can play with your editing skills to extract just anything from these quick snippets.
Having said that, let’s take a dive into creating animated Procreate GIFs. Being a relatively new dimension of GIF editing, a merge of the two produces matchless and classic results. Read through the further article to get a complete guide for working on GIF creation and editing with Procreate.
● Underlying Concept
Before you begin creating a Procreate GIF, let’s get a bit familiar with the concept behind this GIF creation utility. This one is an excellent and advanced means of exploring your skills in digital drawing and animations. It is one of the easiest GIF maker software that helps you to become a pro in animation creativity even if you are beginner and for the ones already into the skill, Procreate is simply heaven.
Procreate allows you to work with animation in its ‘Animation Assist’ tool, where you get a generous workspace with the perfect editing canvas to experiment with a plethora of tools, effects and filters to create exciting GIFs with basic and complex animation craft.
The software allows frame-by-frame animation that refers to working with different frames of a particular illustration, while making minimal changes in each frame. Once you finish, your final creation gets played in a motion loop.
Part 1 How to Make Animated Gifs in Procreate
As is already stated, Procreate is among the most affordable GIF creator and editing software. Creating GIFs here is a few minute stuff within a span of counted steps. Let’s have a broader see through of the creation process. Take the following quick steps and get started to make your exclusive Procreate GIF:
● Step 1: Select an Artwork
Launch the software in your device to reach the Procreate welcome screen, where you need to select an existing static GIF to work on from your device. You can also create a fresh one if you like. Having done that, make a right swipe on the ‘Canvas’ icon and select ‘Duplicate’. This creates a copy of your artwork, preserving all of its layers, so that you are free to make changes or stick to the original one according to your preference.
If you want to use a specific section of your image to animate, you can use the crop tool to remove unwanted portions. Next, you need to put together the specific layers you wish to animate and also remove any unwanted layers you don’t want to use.
● Step 2: Enable Animation Assist Tool
From the Procreate tool gallery at the top, click on the ‘Wrench’ icon and select ‘Canvas’ from the ’Actions’ menu that drops down. In the interface that appears, enable the ‘Animation Assist’ tool with a right toggle. This will cause the ‘Animation Toolbar’ to appear at the bottom of the interface.
● Step 3: Add Frames and Make Image Adjustments
At this instant, you need to make additional adjustments in your selected image and create a copy of the image frames. To get this done, navigate to the ‘Animation Assist Toolbar’ and long press the ‘Add Frame’ button. A duplicate frame will now appear on the screen. Within this frame, you need to move the image elements that you wish to animate. To do this, select an element and drag it to a convenient spot of your choice.
While you go through with object movement, the software simultaneously shows you a semi-transparent preview of your creation through its unique ‘Onion-skin’ feature. You can enjoy playing your animation at this very stage, or continue to create something more exciting.
● Step 4: Enjoying? Let’s Continue.
Repeat Step 3 to create long and smooth GIFs with additional frames. Take caution to create a copy of your latest frame (not the original one), in case you need to make any adjustments later on. Consider playing your GIF to see if you need to add extra frames or implement further changes.
Step 5: Almost There.
You may notice a jerky movement of your final image frames. This is on account of the ‘Default Play’ feature of the Procreate software that initiates a run of your creation from the beginning to end and loops on the same fashion.
To set this right, navigate to the ‘Settings’ tool of the ‘Animation Assist Toolbar’ and tap ‘Ping-Pong’ on the opening interface. Your animated Gif will now play in a forward to backward loop, resulting in a smooth frame movement.
● Step 6: Time to Share.
Once you are happy with your artwork, you can share it across different media platforms. To export your creation, navigate to the Procreate tool gallery and tap the ‘Wrench’ icon and select ‘Share’. In the ‘Sharing Options’ menu, you will be asked to make a format selection. You can share your creation in either of the GIF, PNG or MP4 formats.
You may even require a size modification in the created file with respect to specific sharing platforms. You can either select a web compatible resolution to shrink your file, or create a copy of the file to resize the same.
Once you get familiar with Procreate and its GIF creation basics, you have the liberty to explore the huge effects library offered by the software to give your animated GIFs the classy, professional touch. So why wait? Just get the software and start a never ending spree of Procreating GIFs.
Procreate is undoubtedly an excellent tool for creating animated GIFs, but if you are looking for alternatives, another software to rely on is Wondershare Filmora Video Editor GIF creator.

Wondershare Filmora - Best Video Editor for Mac/Windows
5,481,435 people have downloaded it.
Build unique custom animations without breaking a sweat.
Focus on creating epic stories and leave the details to Filmora’s auto features.
Start a creative adventure with drag & drop effects and endless possibilities.
Filmora simplifies advanced features to save you time and effort.
Filmora cuts out repetition so you can move on to your next creative breakthrough.
● Filmora GIF Maker
Launched by Wondershare, this one is something you can blindly count upon for creating stunning animated GIFs from image and video files. Packed with tons of amazing features, Filmora is an inventory of audio-visual effects and filters that never runs out of fresh and appealing choices. Available to you as free and clean GIF generator software, this is easily compatible to almost any smart device. Working with Filmora will certainly make you admit that creating GIFs was never easier.
To start creating GIFs with this awesome tool, here’s what you need to do:
● Step 1: Import Necessary Media Files
Either a funny video or a group of stunning still images, you can choose any suitable media to make GIFs in Filmora. All you need to do is import the desired files from your PC or smartphone to the software’s timeline.
● Step 2: Timeline Dragging
Once you are done with importing the required files, you need to drag and drop the same to the ‘Editor Timeline’ of the GIF maker tool, where can improvise them to your heart’s content.
● Step 3: Time to Edit.
The Filmora effects library is simply heaven for the ones with creative instincts. Getting a liberty to browse and apply a glut of effects and filters, you are at the perfect place to create professionally sound and next level animated GIFs. Try hands on creating classy backgrounds with overlays, crop and trim clips to the perfect shot, make frame and time adjustments, add text to intensify your message, or pick up just anything you like, to create magic with your creativity.
● Step 4: Show it to the World.
When finally satisfied, save your artwork file to your device using the .gif extension and receive compliments from friends and peers by sharing it on your Instagram or other social media handles.
● Key Takeaways from This Episode →
● Animated GIFs are among the latest social media frenzy. These short, moving clips are nothing less than a complete entertainment roll-on. When it comes to creating animated GIFs, you can certainly take the Procreate software as a worthy choice.
● This one is a super easy and exciting means of working on animation GIFs that are by default, captivating for every onlooker. Talking of competing alternatives, you can trust on Wondershare Filmora, a handy, quick and clean solution to animated GIF creation.
Stay tuned for a complete know-how into making Procreate GIFs.
In this article
01 [How Animation Works in Procreate](#Part 1)
02 [How to Make Animated Gifs in Procreate](#Part 2)
Part 1 How Animation Works in Procreate
GIFs are known to be the top ranked and most intuitive trendsetters in the world of infotainment and media service tools. Be it for fun or a targeted market influence, you can depend on GIFs for a variety of information solutions. Moving to the creative aspect, the experimentation belt with creating GIFs is huge. From making simple static and animated GIFs to creating professionally sound market promotion tools; you can play with your editing skills to extract just anything from these quick snippets.
Having said that, let’s take a dive into creating animated Procreate GIFs. Being a relatively new dimension of GIF editing, a merge of the two produces matchless and classic results. Read through the further article to get a complete guide for working on GIF creation and editing with Procreate.
● Underlying Concept
Before you begin creating a Procreate GIF, let’s get a bit familiar with the concept behind this GIF creation utility. This one is an excellent and advanced means of exploring your skills in digital drawing and animations. It is one of the easiest GIF maker software that helps you to become a pro in animation creativity even if you are beginner and for the ones already into the skill, Procreate is simply heaven.
Procreate allows you to work with animation in its ‘Animation Assist’ tool, where you get a generous workspace with the perfect editing canvas to experiment with a plethora of tools, effects and filters to create exciting GIFs with basic and complex animation craft.
The software allows frame-by-frame animation that refers to working with different frames of a particular illustration, while making minimal changes in each frame. Once you finish, your final creation gets played in a motion loop.
Part 1 How to Make Animated Gifs in Procreate
As is already stated, Procreate is among the most affordable GIF creator and editing software. Creating GIFs here is a few minute stuff within a span of counted steps. Let’s have a broader see through of the creation process. Take the following quick steps and get started to make your exclusive Procreate GIF:
● Step 1: Select an Artwork
Launch the software in your device to reach the Procreate welcome screen, where you need to select an existing static GIF to work on from your device. You can also create a fresh one if you like. Having done that, make a right swipe on the ‘Canvas’ icon and select ‘Duplicate’. This creates a copy of your artwork, preserving all of its layers, so that you are free to make changes or stick to the original one according to your preference.
If you want to use a specific section of your image to animate, you can use the crop tool to remove unwanted portions. Next, you need to put together the specific layers you wish to animate and also remove any unwanted layers you don’t want to use.
● Step 2: Enable Animation Assist Tool
From the Procreate tool gallery at the top, click on the ‘Wrench’ icon and select ‘Canvas’ from the ’Actions’ menu that drops down. In the interface that appears, enable the ‘Animation Assist’ tool with a right toggle. This will cause the ‘Animation Toolbar’ to appear at the bottom of the interface.
● Step 3: Add Frames and Make Image Adjustments
At this instant, you need to make additional adjustments in your selected image and create a copy of the image frames. To get this done, navigate to the ‘Animation Assist Toolbar’ and long press the ‘Add Frame’ button. A duplicate frame will now appear on the screen. Within this frame, you need to move the image elements that you wish to animate. To do this, select an element and drag it to a convenient spot of your choice.
While you go through with object movement, the software simultaneously shows you a semi-transparent preview of your creation through its unique ‘Onion-skin’ feature. You can enjoy playing your animation at this very stage, or continue to create something more exciting.
● Step 4: Enjoying? Let’s Continue.
Repeat Step 3 to create long and smooth GIFs with additional frames. Take caution to create a copy of your latest frame (not the original one), in case you need to make any adjustments later on. Consider playing your GIF to see if you need to add extra frames or implement further changes.
Step 5: Almost There.
You may notice a jerky movement of your final image frames. This is on account of the ‘Default Play’ feature of the Procreate software that initiates a run of your creation from the beginning to end and loops on the same fashion.
To set this right, navigate to the ‘Settings’ tool of the ‘Animation Assist Toolbar’ and tap ‘Ping-Pong’ on the opening interface. Your animated Gif will now play in a forward to backward loop, resulting in a smooth frame movement.
● Step 6: Time to Share.
Once you are happy with your artwork, you can share it across different media platforms. To export your creation, navigate to the Procreate tool gallery and tap the ‘Wrench’ icon and select ‘Share’. In the ‘Sharing Options’ menu, you will be asked to make a format selection. You can share your creation in either of the GIF, PNG or MP4 formats.
You may even require a size modification in the created file with respect to specific sharing platforms. You can either select a web compatible resolution to shrink your file, or create a copy of the file to resize the same.
Once you get familiar with Procreate and its GIF creation basics, you have the liberty to explore the huge effects library offered by the software to give your animated GIFs the classy, professional touch. So why wait? Just get the software and start a never ending spree of Procreating GIFs.
Procreate is undoubtedly an excellent tool for creating animated GIFs, but if you are looking for alternatives, another software to rely on is Wondershare Filmora Video Editor GIF creator.

Wondershare Filmora - Best Video Editor for Mac/Windows
5,481,435 people have downloaded it.
Build unique custom animations without breaking a sweat.
Focus on creating epic stories and leave the details to Filmora’s auto features.
Start a creative adventure with drag & drop effects and endless possibilities.
Filmora simplifies advanced features to save you time and effort.
Filmora cuts out repetition so you can move on to your next creative breakthrough.
● Filmora GIF Maker
Launched by Wondershare, this one is something you can blindly count upon for creating stunning animated GIFs from image and video files. Packed with tons of amazing features, Filmora is an inventory of audio-visual effects and filters that never runs out of fresh and appealing choices. Available to you as free and clean GIF generator software, this is easily compatible to almost any smart device. Working with Filmora will certainly make you admit that creating GIFs was never easier.
To start creating GIFs with this awesome tool, here’s what you need to do:
● Step 1: Import Necessary Media Files
Either a funny video or a group of stunning still images, you can choose any suitable media to make GIFs in Filmora. All you need to do is import the desired files from your PC or smartphone to the software’s timeline.
● Step 2: Timeline Dragging
Once you are done with importing the required files, you need to drag and drop the same to the ‘Editor Timeline’ of the GIF maker tool, where can improvise them to your heart’s content.
● Step 3: Time to Edit.
The Filmora effects library is simply heaven for the ones with creative instincts. Getting a liberty to browse and apply a glut of effects and filters, you are at the perfect place to create professionally sound and next level animated GIFs. Try hands on creating classy backgrounds with overlays, crop and trim clips to the perfect shot, make frame and time adjustments, add text to intensify your message, or pick up just anything you like, to create magic with your creativity.
● Step 4: Show it to the World.
When finally satisfied, save your artwork file to your device using the .gif extension and receive compliments from friends and peers by sharing it on your Instagram or other social media handles.
● Key Takeaways from This Episode →
● Animated GIFs are among the latest social media frenzy. These short, moving clips are nothing less than a complete entertainment roll-on. When it comes to creating animated GIFs, you can certainly take the Procreate software as a worthy choice.
● This one is a super easy and exciting means of working on animation GIFs that are by default, captivating for every onlooker. Talking of competing alternatives, you can trust on Wondershare Filmora, a handy, quick and clean solution to animated GIF creation.
Stay tuned for a complete know-how into making Procreate GIFs.
In this article
01 [How Animation Works in Procreate](#Part 1)
02 [How to Make Animated Gifs in Procreate](#Part 2)
Part 1 How Animation Works in Procreate
GIFs are known to be the top ranked and most intuitive trendsetters in the world of infotainment and media service tools. Be it for fun or a targeted market influence, you can depend on GIFs for a variety of information solutions. Moving to the creative aspect, the experimentation belt with creating GIFs is huge. From making simple static and animated GIFs to creating professionally sound market promotion tools; you can play with your editing skills to extract just anything from these quick snippets.
Having said that, let’s take a dive into creating animated Procreate GIFs. Being a relatively new dimension of GIF editing, a merge of the two produces matchless and classic results. Read through the further article to get a complete guide for working on GIF creation and editing with Procreate.
● Underlying Concept
Before you begin creating a Procreate GIF, let’s get a bit familiar with the concept behind this GIF creation utility. This one is an excellent and advanced means of exploring your skills in digital drawing and animations. It is one of the easiest GIF maker software that helps you to become a pro in animation creativity even if you are beginner and for the ones already into the skill, Procreate is simply heaven.
Procreate allows you to work with animation in its ‘Animation Assist’ tool, where you get a generous workspace with the perfect editing canvas to experiment with a plethora of tools, effects and filters to create exciting GIFs with basic and complex animation craft.
The software allows frame-by-frame animation that refers to working with different frames of a particular illustration, while making minimal changes in each frame. Once you finish, your final creation gets played in a motion loop.
Part 1 How to Make Animated Gifs in Procreate
As is already stated, Procreate is among the most affordable GIF creator and editing software. Creating GIFs here is a few minute stuff within a span of counted steps. Let’s have a broader see through of the creation process. Take the following quick steps and get started to make your exclusive Procreate GIF:
● Step 1: Select an Artwork
Launch the software in your device to reach the Procreate welcome screen, where you need to select an existing static GIF to work on from your device. You can also create a fresh one if you like. Having done that, make a right swipe on the ‘Canvas’ icon and select ‘Duplicate’. This creates a copy of your artwork, preserving all of its layers, so that you are free to make changes or stick to the original one according to your preference.
If you want to use a specific section of your image to animate, you can use the crop tool to remove unwanted portions. Next, you need to put together the specific layers you wish to animate and also remove any unwanted layers you don’t want to use.
● Step 2: Enable Animation Assist Tool
From the Procreate tool gallery at the top, click on the ‘Wrench’ icon and select ‘Canvas’ from the ’Actions’ menu that drops down. In the interface that appears, enable the ‘Animation Assist’ tool with a right toggle. This will cause the ‘Animation Toolbar’ to appear at the bottom of the interface.
● Step 3: Add Frames and Make Image Adjustments
At this instant, you need to make additional adjustments in your selected image and create a copy of the image frames. To get this done, navigate to the ‘Animation Assist Toolbar’ and long press the ‘Add Frame’ button. A duplicate frame will now appear on the screen. Within this frame, you need to move the image elements that you wish to animate. To do this, select an element and drag it to a convenient spot of your choice.
While you go through with object movement, the software simultaneously shows you a semi-transparent preview of your creation through its unique ‘Onion-skin’ feature. You can enjoy playing your animation at this very stage, or continue to create something more exciting.
● Step 4: Enjoying? Let’s Continue.
Repeat Step 3 to create long and smooth GIFs with additional frames. Take caution to create a copy of your latest frame (not the original one), in case you need to make any adjustments later on. Consider playing your GIF to see if you need to add extra frames or implement further changes.
Step 5: Almost There.
You may notice a jerky movement of your final image frames. This is on account of the ‘Default Play’ feature of the Procreate software that initiates a run of your creation from the beginning to end and loops on the same fashion.
To set this right, navigate to the ‘Settings’ tool of the ‘Animation Assist Toolbar’ and tap ‘Ping-Pong’ on the opening interface. Your animated Gif will now play in a forward to backward loop, resulting in a smooth frame movement.
● Step 6: Time to Share.
Once you are happy with your artwork, you can share it across different media platforms. To export your creation, navigate to the Procreate tool gallery and tap the ‘Wrench’ icon and select ‘Share’. In the ‘Sharing Options’ menu, you will be asked to make a format selection. You can share your creation in either of the GIF, PNG or MP4 formats.
You may even require a size modification in the created file with respect to specific sharing platforms. You can either select a web compatible resolution to shrink your file, or create a copy of the file to resize the same.
Once you get familiar with Procreate and its GIF creation basics, you have the liberty to explore the huge effects library offered by the software to give your animated GIFs the classy, professional touch. So why wait? Just get the software and start a never ending spree of Procreating GIFs.
Procreate is undoubtedly an excellent tool for creating animated GIFs, but if you are looking for alternatives, another software to rely on is Wondershare Filmora Video Editor GIF creator.

Wondershare Filmora - Best Video Editor for Mac/Windows
5,481,435 people have downloaded it.
Build unique custom animations without breaking a sweat.
Focus on creating epic stories and leave the details to Filmora’s auto features.
Start a creative adventure with drag & drop effects and endless possibilities.
Filmora simplifies advanced features to save you time and effort.
Filmora cuts out repetition so you can move on to your next creative breakthrough.
● Filmora GIF Maker
Launched by Wondershare, this one is something you can blindly count upon for creating stunning animated GIFs from image and video files. Packed with tons of amazing features, Filmora is an inventory of audio-visual effects and filters that never runs out of fresh and appealing choices. Available to you as free and clean GIF generator software, this is easily compatible to almost any smart device. Working with Filmora will certainly make you admit that creating GIFs was never easier.
To start creating GIFs with this awesome tool, here’s what you need to do:
● Step 1: Import Necessary Media Files
Either a funny video or a group of stunning still images, you can choose any suitable media to make GIFs in Filmora. All you need to do is import the desired files from your PC or smartphone to the software’s timeline.
● Step 2: Timeline Dragging
Once you are done with importing the required files, you need to drag and drop the same to the ‘Editor Timeline’ of the GIF maker tool, where can improvise them to your heart’s content.
● Step 3: Time to Edit.
The Filmora effects library is simply heaven for the ones with creative instincts. Getting a liberty to browse and apply a glut of effects and filters, you are at the perfect place to create professionally sound and next level animated GIFs. Try hands on creating classy backgrounds with overlays, crop and trim clips to the perfect shot, make frame and time adjustments, add text to intensify your message, or pick up just anything you like, to create magic with your creativity.
● Step 4: Show it to the World.
When finally satisfied, save your artwork file to your device using the .gif extension and receive compliments from friends and peers by sharing it on your Instagram or other social media handles.
● Key Takeaways from This Episode →
● Animated GIFs are among the latest social media frenzy. These short, moving clips are nothing less than a complete entertainment roll-on. When it comes to creating animated GIFs, you can certainly take the Procreate software as a worthy choice.
● This one is a super easy and exciting means of working on animation GIFs that are by default, captivating for every onlooker. Talking of competing alternatives, you can trust on Wondershare Filmora, a handy, quick and clean solution to animated GIF creation.
Also read:
- Efficient Ways to Change Slow Motion Video to Normal on iPhone
- New A Review of 3D LUT Mobile App - A Composite Application for Editing Media
- In 2024, Create a Kickass COD Warzone Thumbnail for Free
- New In 2024, How to Add Customized Transitions to OBS
- New 2024 Approved How to Combine Multiple Videos Into One on Instagram
- Updated In 2024, 4 Methods for Rotating Your GoPro Videos Professionally
- In 2024, Add Zoom Blur Effect In Photoshop Step by Step
- How to Color Correct in OBS
- In 2024, How to Trim Video in QuickTime Player on Your Mac
- 2024 Approved What Is First Impression Review Video
- In 2024, Something That You Should Know About MP4 Video Format
- 2024 Approved 2 Easy Methods | How To Zoom In On TikTok Videos?
- 2024 Approved How to Choose A Nice GoPro for Vlogging?
- Difference Between Time Lapse and Hyperlapse
- Updated In 2024, How to Convert Videos to Slow Motion? Complete Guide
- In 2024, Green Screens Are a Fun Way for Creators to Bring Their Personality to Their Stream, Allowing Them to Dynamically Alter Their Stream Background and Make Their Content Appear Even More Engaging and Polished
- New Now, You Can Also Apply the Stranger Things Upside Down Effect to Your Video! This Effect Combines Camera Tricks and Video Editing Within Filmora to Transition From the Normal World Into the Upside Down
- How to Make Eye Zoom Transition Effect with Filmora
- 2024 Approved Using Track Matte and Tracking in Adobe After Effects Reviewing All Possibilities
- New Creative Ways to Add Green Screen Effects In Photoshop for 2024
- New How to Add Text to Video for 2024
- New How to Create a Glitch Text Effect, In 2024
- In 2024, Forgotten The Voicemail Password Of Oppo Find N3 Flip? Try These Fixes
- In 2024, How Do You Get Sun Stone Evolutions in Pokémon For Lava Storm 5G? | Dr.fone
- How to Transfer Data from Poco C51 to BlackBerry | Dr.fone
- Detailed Guide on Removing iPhone 7 Activation Lock without Previous Owner?
- In 2024, How to Detect and Remove Spyware on Motorola Moto G14? | Dr.fone
- In 2024, Top 5 Car Locator Apps for Motorola Moto G84 5G | Dr.fone
- 2024 Approved What Is AI API?
- How To Deal With the Oppo Reno 10 Pro+ 5G Screen Black But Still Works? | Dr.fone
- Quick Fixes for Why Is My Samsung Galaxy M34 Black and White | Dr.fone
- What is Geo-Blocking and How to Bypass it On Asus ROG Phone 8 Pro? | Dr.fone
- In 2024, Here are Some Pro Tips for Pokemon Go PvP Battles On Apple iPhone 6s Plus | Dr.fone
- How to find lost iPhone 11 Pro Backup files on Windows PC? | Stellar
- In 2024, How to Change Credit Card from Your iPhone 13 mini Apple ID and Apple Pay
- How To Unlock SIM Cards Of Lava Blaze 2 Pro Without PUK Codes
- In 2024, How to Lock Apps on Vivo X100 to Protect Your Individual Information
- Life360 Learn How Everything Works On Vivo V29 | Dr.fone
- Title: New Take Your Video Editing to the Next Level with Video Scopes
- Author: Chloe
- Created at : 2024-05-20 03:38:18
- Updated at : 2024-05-21 03:38:18
- Link: https://ai-editing-video.techidaily.com/new-take-your-video-editing-to-the-next-level-with-video-scopes/
- License: This work is licensed under CC BY-NC-SA 4.0.


