:max_bytes(150000):strip_icc():format(webp)/ScreenShot2018-12-08at3.04.00PM-5c0c23f6c9e77c00018eae4e.png)
New Text Animation Intro Tutorial in Filmora

Text Animation Intro Tutorial in Filmora
Preparation
What you need to prepare:
- A computer (Windows or macOS)
- Your video materials.
- Filmora video editor
Step 1
Download and Install the Filmora video editor . Then, click on New Project once the program starts.
Step 2
Go to Titles and drag the Default Title to the Timeline. Then, double-click on the Default Title clip to open its settings. Here, type in your text → change the text color to Black → click OK → take a snapshot.

Step 3
Double-click on the Default Title once more and simply change the text color to anything other than black this time. Then, click OK and take another snapshot. After this, delete the Default Title from the Timeline.
Step 4
Next, go to Sample Color and drag the White color to the Timeline. Increase the White Color clip’s duration to 10 seconds by dragging the tail of the clip to the right.

Step 5
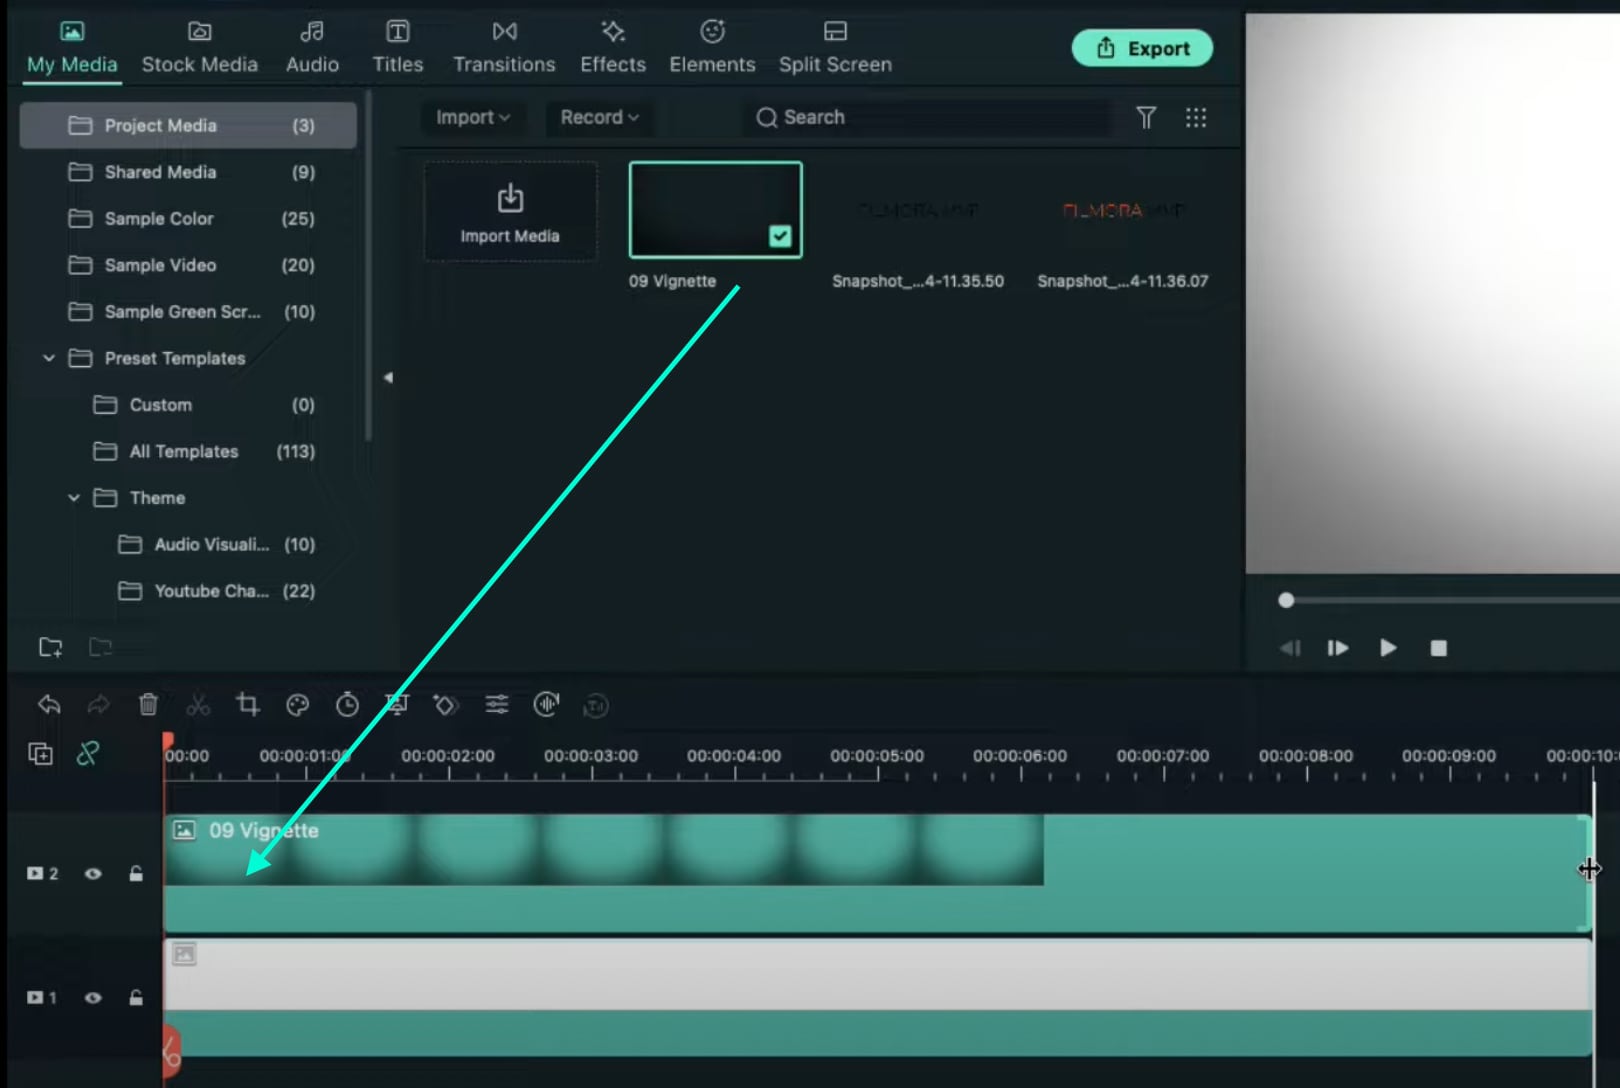
For the next step, you need to download a simple Vignette png image . Then, import the Vignette image into Filmora. Go to My Media and click on Import Media. Import it and drag the image to the Timeline. Then, move that clip to Track 3.
Step 6
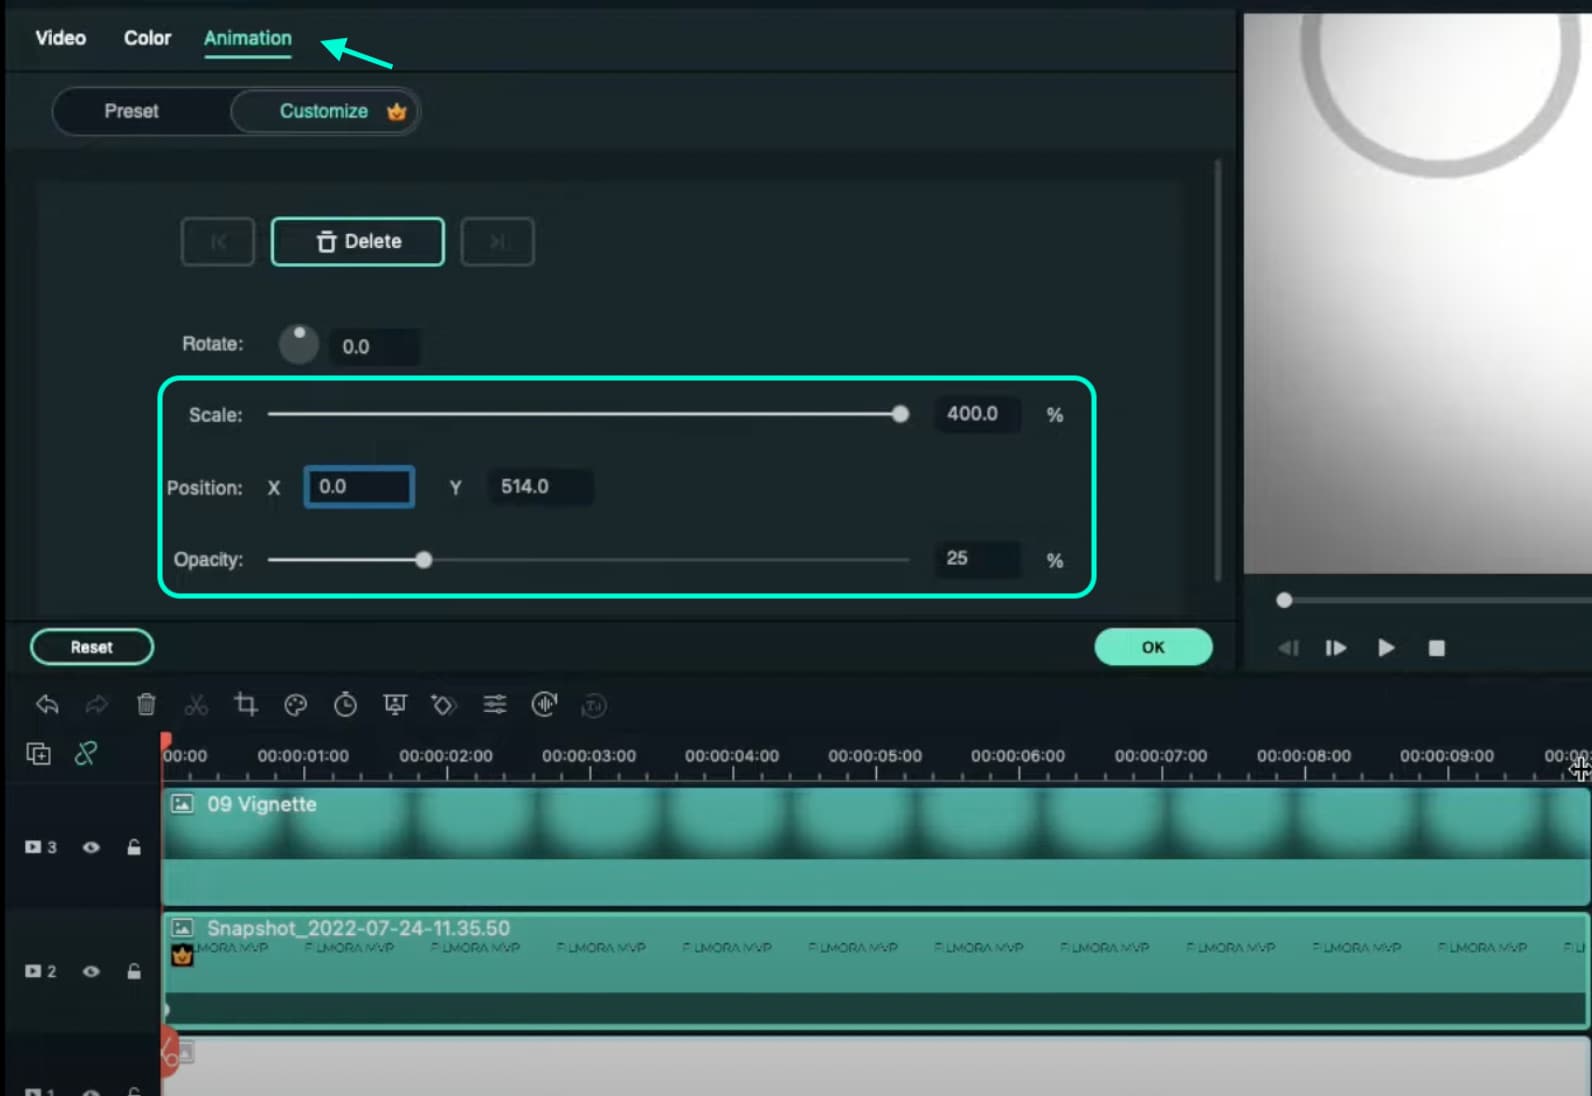
Drop the Black snapshot you took earlier to Track 2. Double-click on it, go to Animation, and apply these settings. After this, move the Playhead to the end of the clip and change the X-axis value to “-800”.
Step 7
Go to Effects and drag the Square Blur effect to Track 4 on the Timeline. Increase its duration to match the other clips. Then, click on the effect and change its Size bar value to 4. Click OK.

Step 8
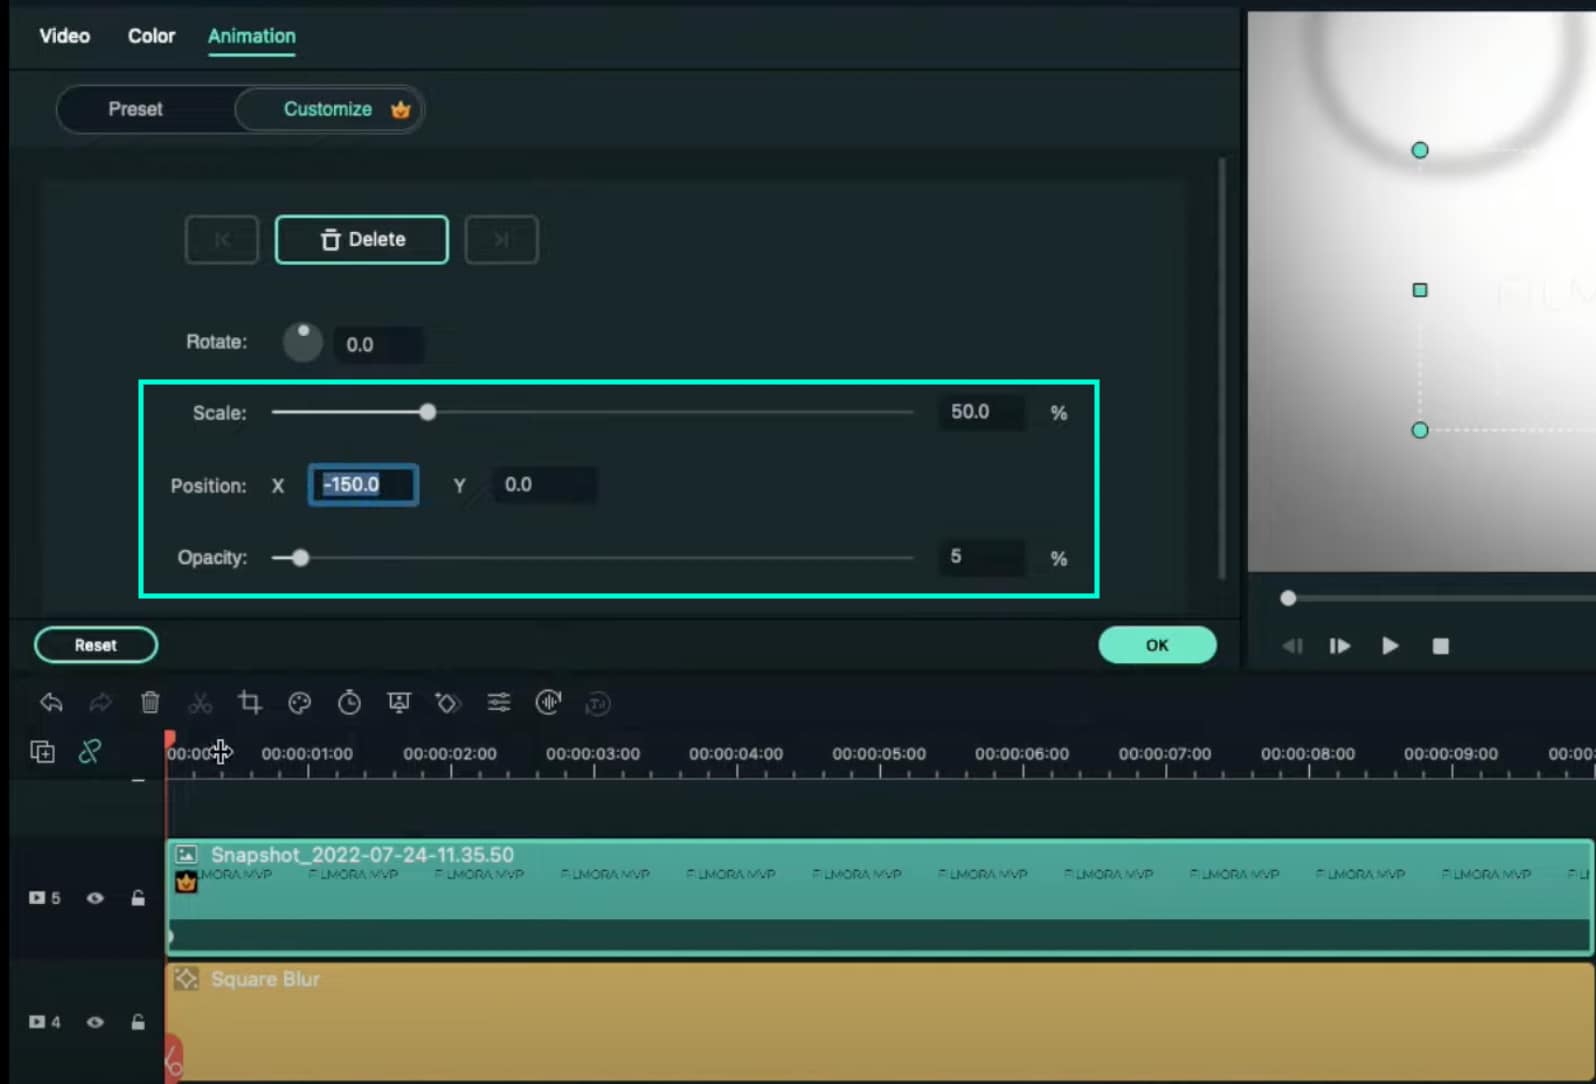
Place the Playhead at the beginning of the clip. Go to My Media and drag the Black snapshot to Track 5. Double-click on it → go to Animation and change the settings to look like this. Then, move the Playhead to 9 seconds. Here, change the X-axis to “150” and the Scale to 75%.
Step 9
Now, place the Playhead at the starting point and drag the colored snapshot in Track 6. Double-click on it and change the Scale to 50%. Then, move the Playhead to 9 seconds again and change the Scale to 75%. Click OK.
Step 10
Go to Sample Color and drag “Gradient 4” to Track 7 on the Timeline. Double-click on it → go to the Video tab → change the Blending Mode to Overlay → decrease the Opacity to 25%. Click OK.

Step 11
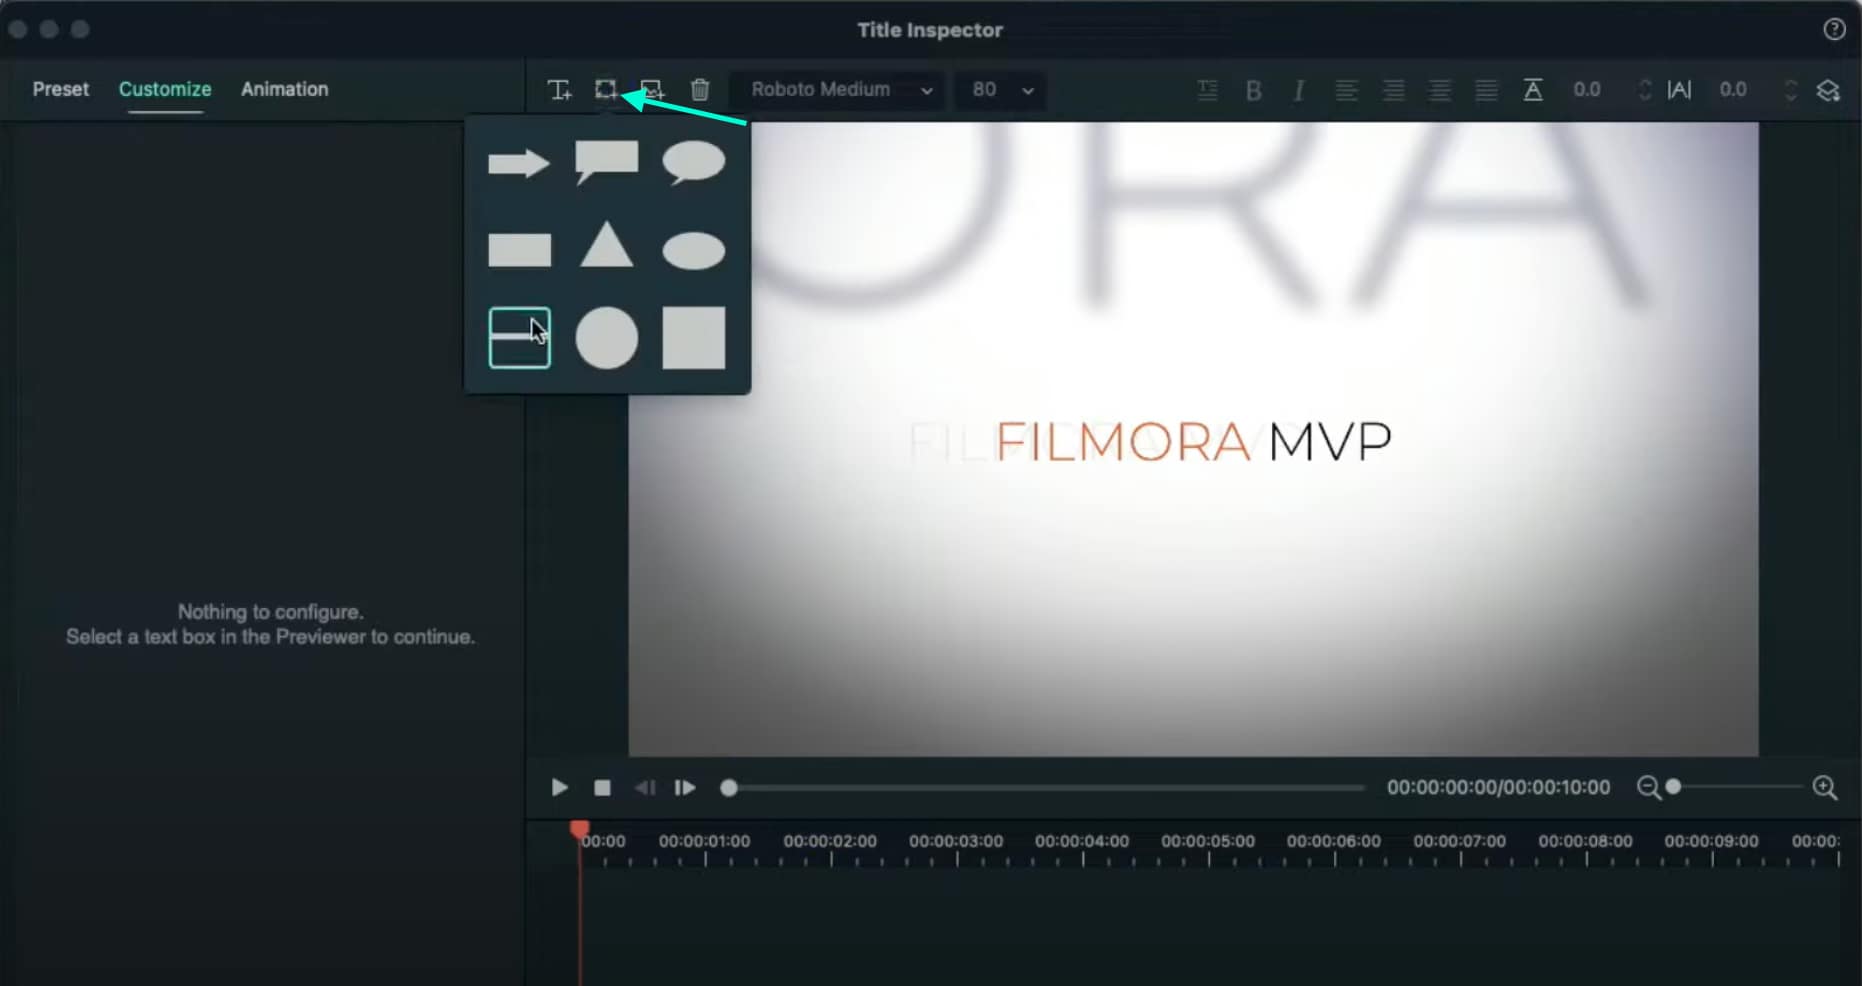
Drag a Default Title to Track 8 and double-click on it to open its Advanced settings. From here, delete the yellow text clip located under the video. Then, insert a Line shape.
Step 12
Increase the Line’s length to be almost as long as the screen. Then adjust its position until half of the Line is visible on the screen. Like this.
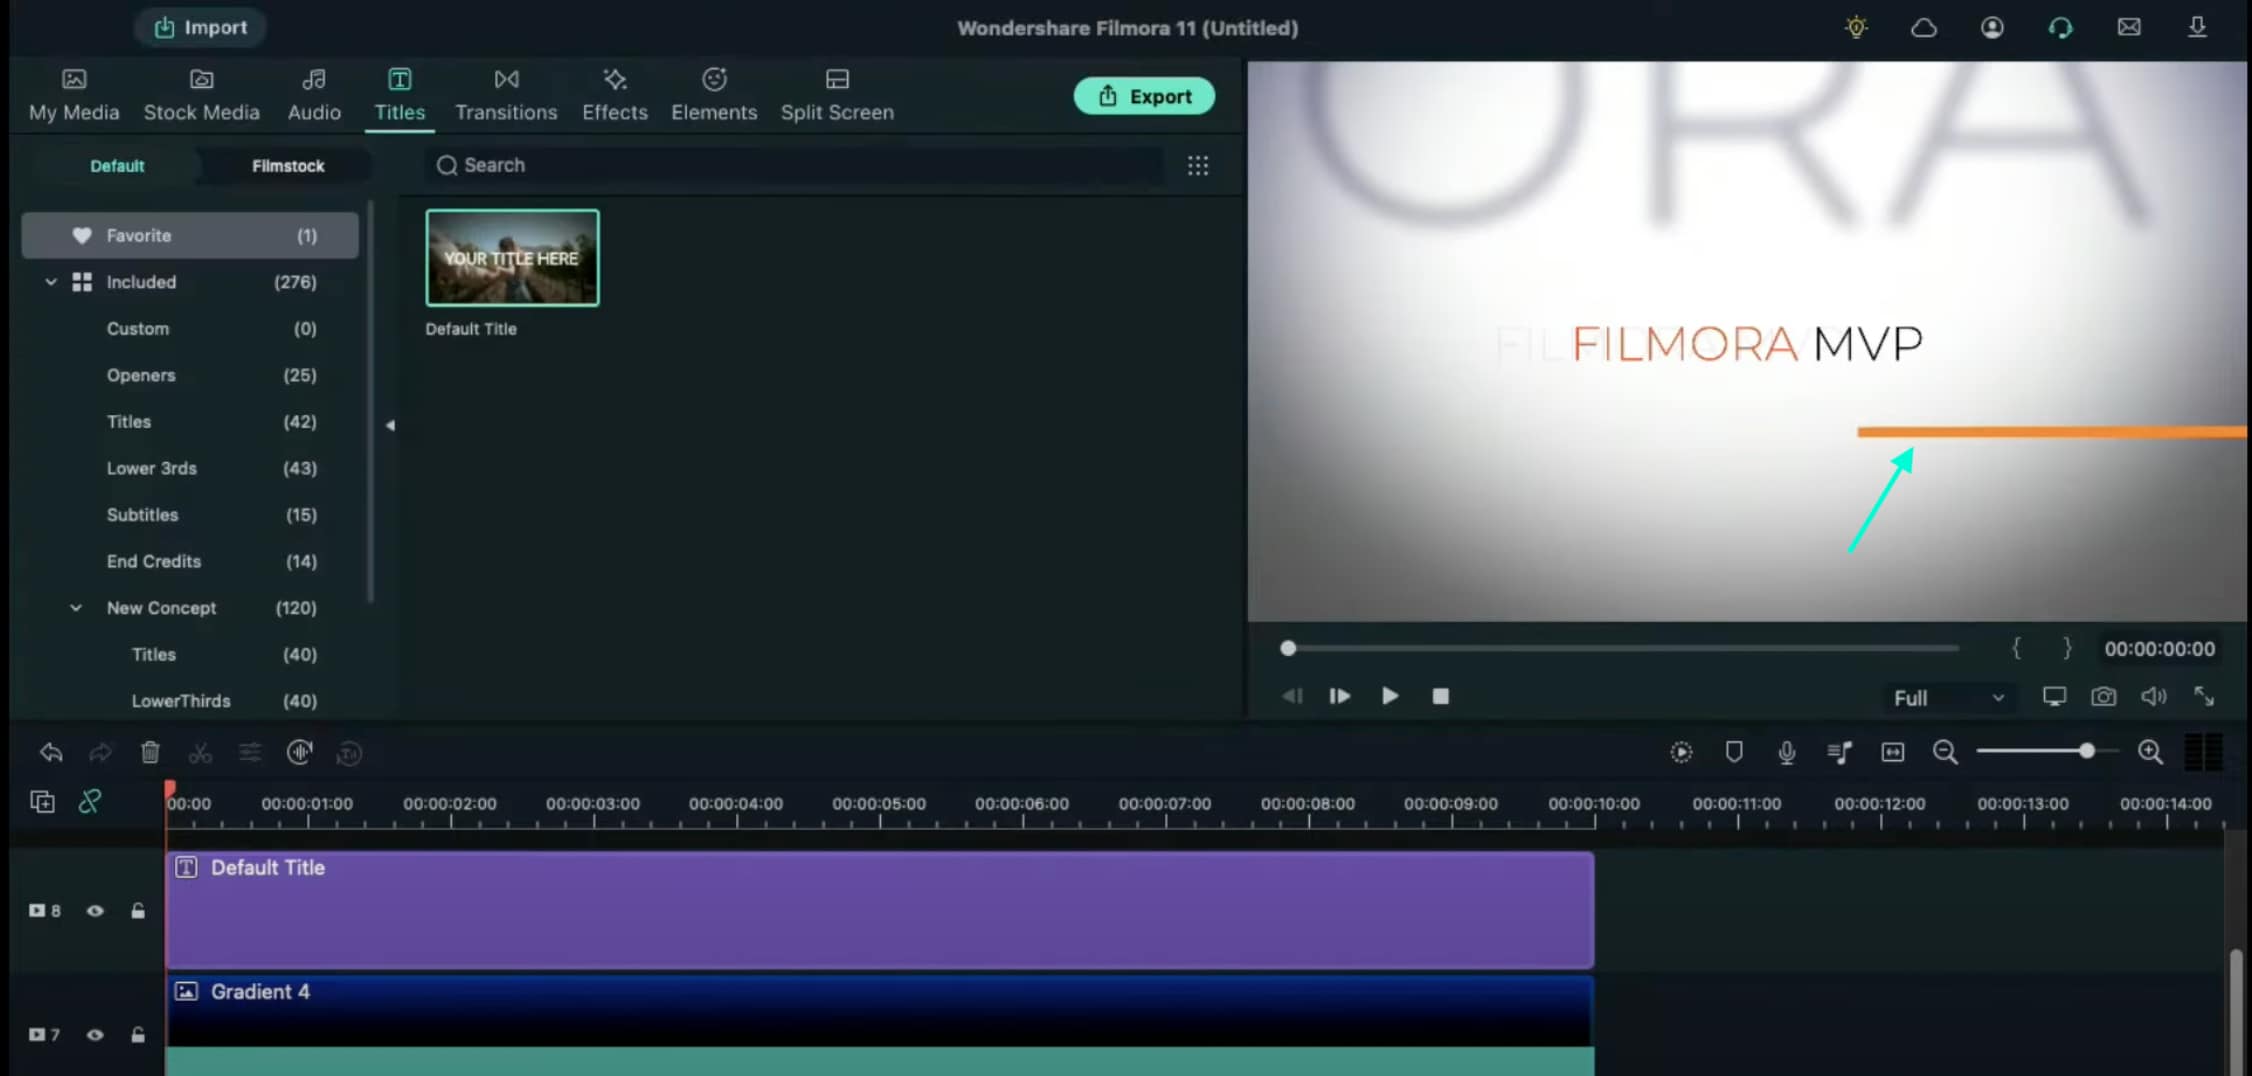
Step 13
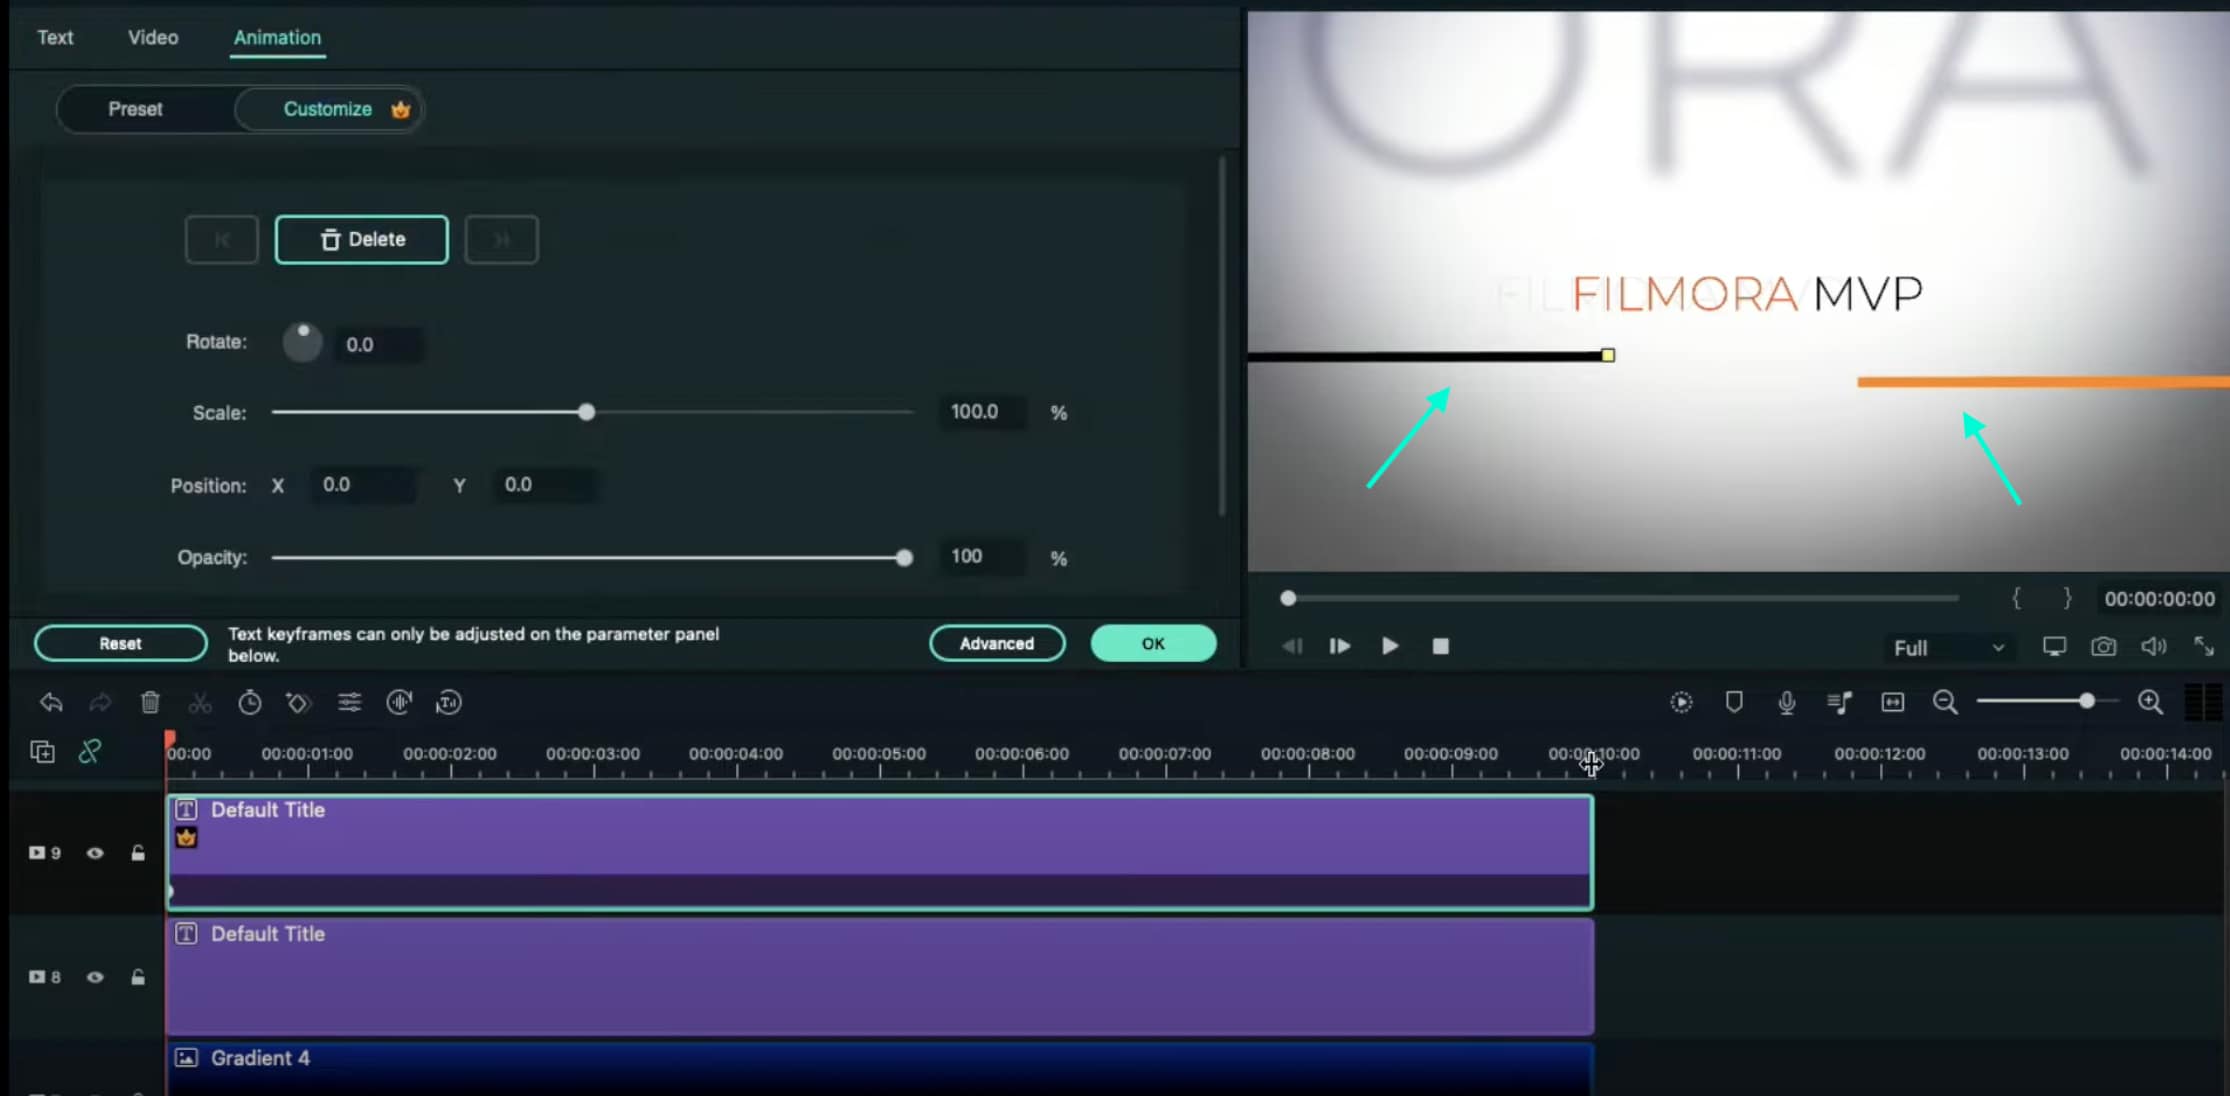
Copy this Default Title and paste it into Track 9. Open its Advanced settings and change the Line color to something different than the previous one. Then, move it to the other side of the screen, slightly above the previous line. Click OK.
Step 14
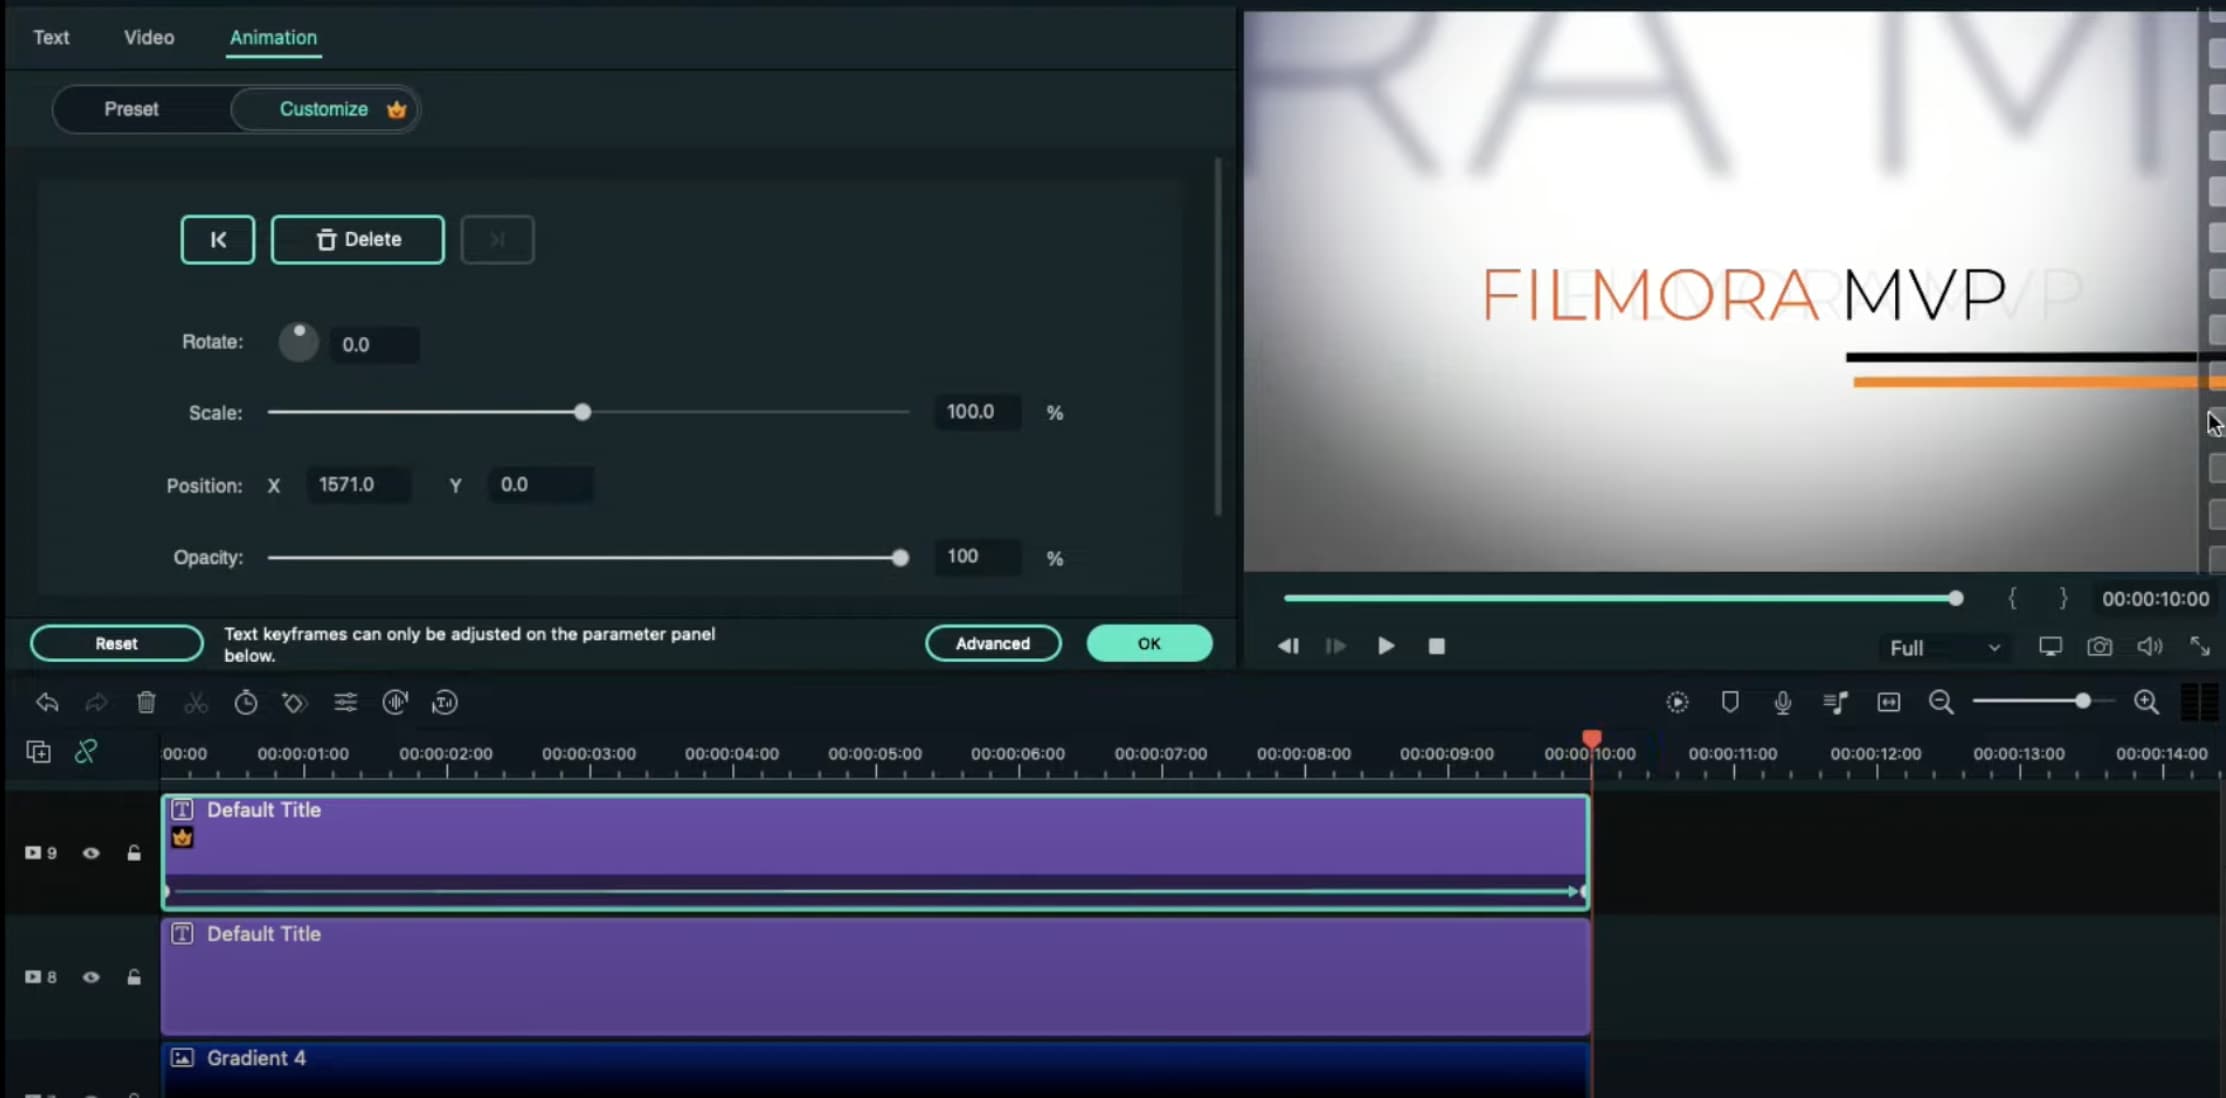
Now, select the Default Title on Track 9, double-click it, and go to the Animation tab. Move the Playhead at the starting point of the Timeline and add a keyframe. Then, move the Playhead to the end of the clip. Drag the X-axis position to the right until the Line shape moves all the way to the right side of the screen.
Do the same for the Default Title on Track 8. But this time, drag the X-axis position toward the other side. When you’re done, press OK.
Step 15
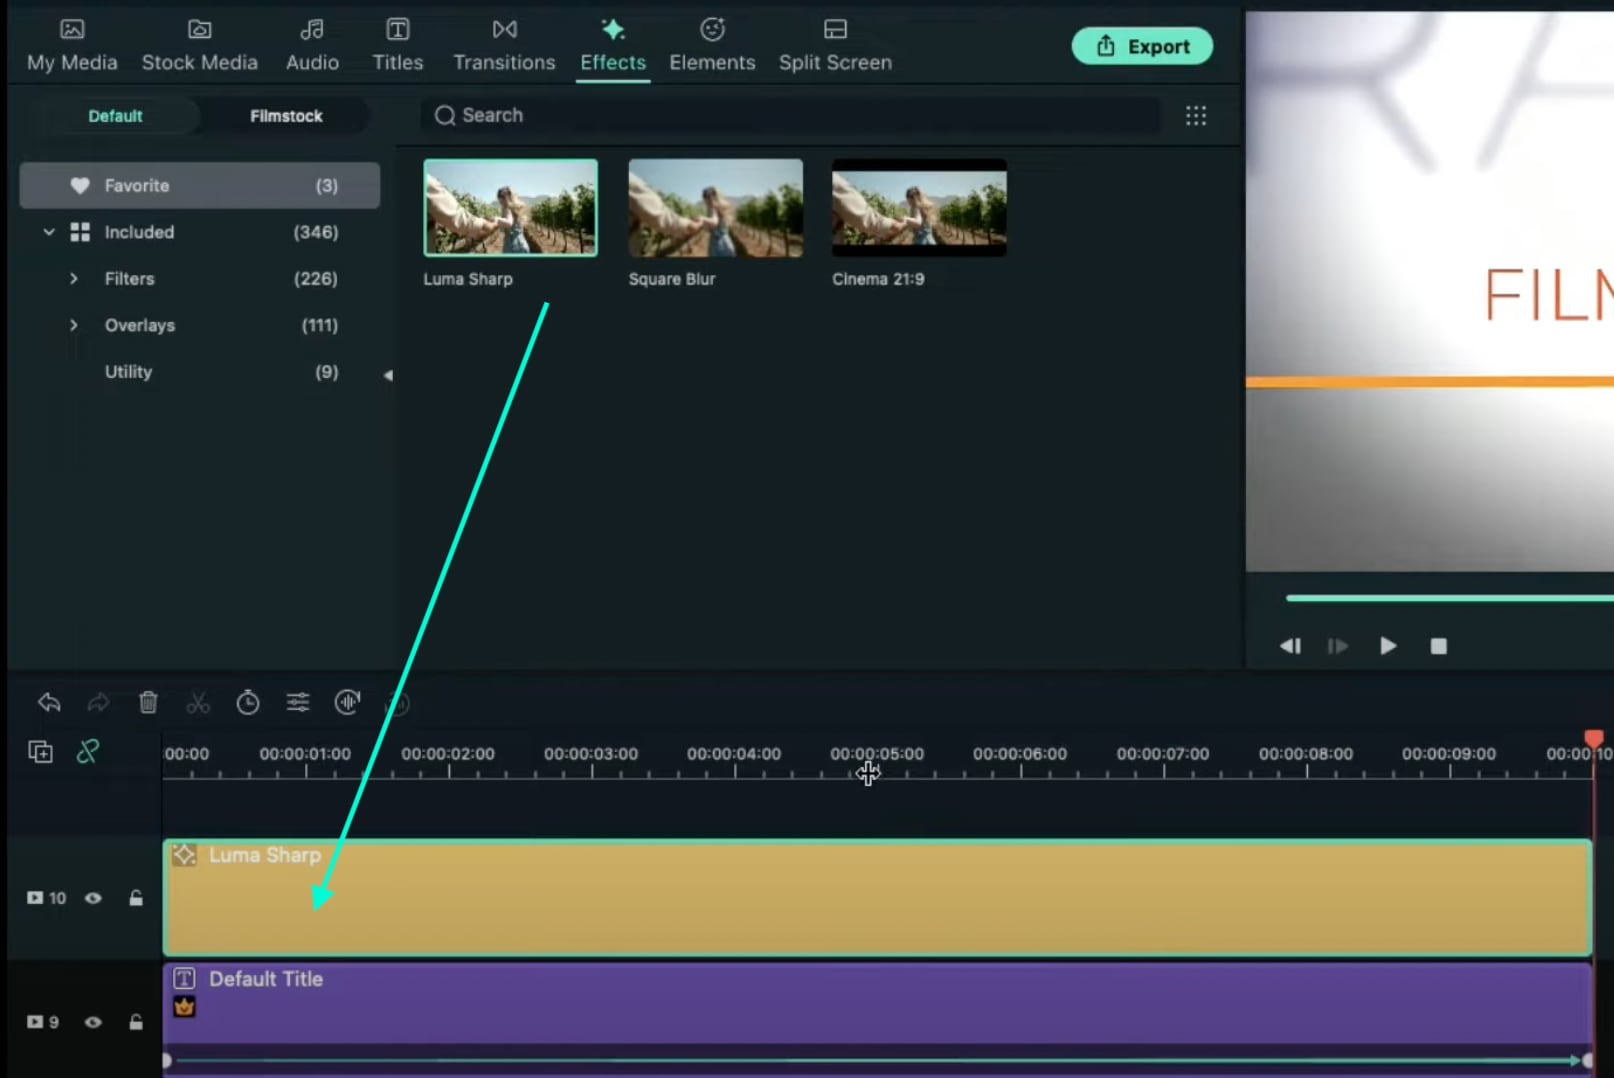
Go to the Effects tab → drag the Luma Sharp effect to Track 10. Click it and change its Intensity to 10.
Step 16
You’re all done. Click on the Render button to render all the clips and finally preview your creation. Congratulations on creating a text animation intro in Filmora.

Summary
What you’ve learned:
- Create a unique text animation intro in Filmora
- Animate text and titles
- How to add and animate different shapes in Filmora
- Edit the advanced settings of elements in the Filmora video editor
What you need to prepare:
- A computer (Windows or macOS)
- Your video materials.
- Filmora video editor
Step 1
Download and Install the Filmora video editor . Then, click on New Project once the program starts.
Step 2
Go to Titles and drag the Default Title to the Timeline. Then, double-click on the Default Title clip to open its settings. Here, type in your text → change the text color to Black → click OK → take a snapshot.

Step 3
Double-click on the Default Title once more and simply change the text color to anything other than black this time. Then, click OK and take another snapshot. After this, delete the Default Title from the Timeline.
Step 4
Next, go to Sample Color and drag the White color to the Timeline. Increase the White Color clip’s duration to 10 seconds by dragging the tail of the clip to the right.

Step 5
For the next step, you need to download a simple Vignette png image . Then, import the Vignette image into Filmora. Go to My Media and click on Import Media. Import it and drag the image to the Timeline. Then, move that clip to Track 3.

Step 6
Drop the Black snapshot you took earlier to Track 2. Double-click on it, go to Animation, and apply these settings. After this, move the Playhead to the end of the clip and change the X-axis value to “-800”.

Step 7
Go to Effects and drag the Square Blur effect to Track 4 on the Timeline. Increase its duration to match the other clips. Then, click on the effect and change its Size bar value to 4. Click OK.

Step 8
Place the Playhead at the beginning of the clip. Go to My Media and drag the Black snapshot to Track 5. Double-click on it → go to Animation and change the settings to look like this. Then, move the Playhead to 9 seconds. Here, change the X-axis to “150” and the Scale to 75%.

Step 9
Now, place the Playhead at the starting point and drag the colored snapshot in Track 6. Double-click on it and change the Scale to 50%. Then, move the Playhead to 9 seconds again and change the Scale to 75%. Click OK.
Step 10
Go to Sample Color and drag “Gradient 4” to Track 7 on the Timeline. Double-click on it → go to the Video tab → change the Blending Mode to Overlay → decrease the Opacity to 25%. Click OK.

Step 11
Drag a Default Title to Track 8 and double-click on it to open its Advanced settings. From here, delete the yellow text clip located under the video. Then, insert a Line shape.

Step 12
Increase the Line’s length to be almost as long as the screen. Then adjust its position until half of the Line is visible on the screen. Like this.

Step 13
Copy this Default Title and paste it into Track 9. Open its Advanced settings and change the Line color to something different than the previous one. Then, move it to the other side of the screen, slightly above the previous line. Click OK.

Step 14
Now, select the Default Title on Track 9, double-click it, and go to the Animation tab. Move the Playhead at the starting point of the Timeline and add a keyframe. Then, move the Playhead to the end of the clip. Drag the X-axis position to the right until the Line shape moves all the way to the right side of the screen.
Do the same for the Default Title on Track 8. But this time, drag the X-axis position toward the other side. When you’re done, press OK.

Step 15
Go to the Effects tab → drag the Luma Sharp effect to Track 10. Click it and change its Intensity to 10.

Step 16
You’re all done. Click on the Render button to render all the clips and finally preview your creation. Congratulations on creating a text animation intro in Filmora.

Summary
What you’ve learned:
- Create a unique text animation intro in Filmora
- Animate text and titles
- How to add and animate different shapes in Filmora
- Edit the advanced settings of elements in the Filmora video editor
What you need to prepare:
- A computer (Windows or macOS)
- Your video materials.
- Filmora video editor
Step 1
Download and Install the Filmora video editor . Then, click on New Project once the program starts.
Step 2
Go to Titles and drag the Default Title to the Timeline. Then, double-click on the Default Title clip to open its settings. Here, type in your text → change the text color to Black → click OK → take a snapshot.

Step 3
Double-click on the Default Title once more and simply change the text color to anything other than black this time. Then, click OK and take another snapshot. After this, delete the Default Title from the Timeline.
Step 4
Next, go to Sample Color and drag the White color to the Timeline. Increase the White Color clip’s duration to 10 seconds by dragging the tail of the clip to the right.

Step 5
For the next step, you need to download a simple Vignette png image . Then, import the Vignette image into Filmora. Go to My Media and click on Import Media. Import it and drag the image to the Timeline. Then, move that clip to Track 3.

Step 6
Drop the Black snapshot you took earlier to Track 2. Double-click on it, go to Animation, and apply these settings. After this, move the Playhead to the end of the clip and change the X-axis value to “-800”.

Step 7
Go to Effects and drag the Square Blur effect to Track 4 on the Timeline. Increase its duration to match the other clips. Then, click on the effect and change its Size bar value to 4. Click OK.

Step 8
Place the Playhead at the beginning of the clip. Go to My Media and drag the Black snapshot to Track 5. Double-click on it → go to Animation and change the settings to look like this. Then, move the Playhead to 9 seconds. Here, change the X-axis to “150” and the Scale to 75%.

Step 9
Now, place the Playhead at the starting point and drag the colored snapshot in Track 6. Double-click on it and change the Scale to 50%. Then, move the Playhead to 9 seconds again and change the Scale to 75%. Click OK.
Step 10
Go to Sample Color and drag “Gradient 4” to Track 7 on the Timeline. Double-click on it → go to the Video tab → change the Blending Mode to Overlay → decrease the Opacity to 25%. Click OK.

Step 11
Drag a Default Title to Track 8 and double-click on it to open its Advanced settings. From here, delete the yellow text clip located under the video. Then, insert a Line shape.

Step 12
Increase the Line’s length to be almost as long as the screen. Then adjust its position until half of the Line is visible on the screen. Like this.

Step 13
Copy this Default Title and paste it into Track 9. Open its Advanced settings and change the Line color to something different than the previous one. Then, move it to the other side of the screen, slightly above the previous line. Click OK.

Step 14
Now, select the Default Title on Track 9, double-click it, and go to the Animation tab. Move the Playhead at the starting point of the Timeline and add a keyframe. Then, move the Playhead to the end of the clip. Drag the X-axis position to the right until the Line shape moves all the way to the right side of the screen.
Do the same for the Default Title on Track 8. But this time, drag the X-axis position toward the other side. When you’re done, press OK.

Step 15
Go to the Effects tab → drag the Luma Sharp effect to Track 10. Click it and change its Intensity to 10.

Step 16
You’re all done. Click on the Render button to render all the clips and finally preview your creation. Congratulations on creating a text animation intro in Filmora.

Summary
What you’ve learned:
- Create a unique text animation intro in Filmora
- Animate text and titles
- How to add and animate different shapes in Filmora
- Edit the advanced settings of elements in the Filmora video editor
What you need to prepare:
- A computer (Windows or macOS)
- Your video materials.
- Filmora video editor
Step 1
Download and Install the Filmora video editor . Then, click on New Project once the program starts.
Step 2
Go to Titles and drag the Default Title to the Timeline. Then, double-click on the Default Title clip to open its settings. Here, type in your text → change the text color to Black → click OK → take a snapshot.

Step 3
Double-click on the Default Title once more and simply change the text color to anything other than black this time. Then, click OK and take another snapshot. After this, delete the Default Title from the Timeline.
Step 4
Next, go to Sample Color and drag the White color to the Timeline. Increase the White Color clip’s duration to 10 seconds by dragging the tail of the clip to the right.

Step 5
For the next step, you need to download a simple Vignette png image . Then, import the Vignette image into Filmora. Go to My Media and click on Import Media. Import it and drag the image to the Timeline. Then, move that clip to Track 3.

Step 6
Drop the Black snapshot you took earlier to Track 2. Double-click on it, go to Animation, and apply these settings. After this, move the Playhead to the end of the clip and change the X-axis value to “-800”.

Step 7
Go to Effects and drag the Square Blur effect to Track 4 on the Timeline. Increase its duration to match the other clips. Then, click on the effect and change its Size bar value to 4. Click OK.

Step 8
Place the Playhead at the beginning of the clip. Go to My Media and drag the Black snapshot to Track 5. Double-click on it → go to Animation and change the settings to look like this. Then, move the Playhead to 9 seconds. Here, change the X-axis to “150” and the Scale to 75%.

Step 9
Now, place the Playhead at the starting point and drag the colored snapshot in Track 6. Double-click on it and change the Scale to 50%. Then, move the Playhead to 9 seconds again and change the Scale to 75%. Click OK.
Step 10
Go to Sample Color and drag “Gradient 4” to Track 7 on the Timeline. Double-click on it → go to the Video tab → change the Blending Mode to Overlay → decrease the Opacity to 25%. Click OK.

Step 11
Drag a Default Title to Track 8 and double-click on it to open its Advanced settings. From here, delete the yellow text clip located under the video. Then, insert a Line shape.

Step 12
Increase the Line’s length to be almost as long as the screen. Then adjust its position until half of the Line is visible on the screen. Like this.

Step 13
Copy this Default Title and paste it into Track 9. Open its Advanced settings and change the Line color to something different than the previous one. Then, move it to the other side of the screen, slightly above the previous line. Click OK.

Step 14
Now, select the Default Title on Track 9, double-click it, and go to the Animation tab. Move the Playhead at the starting point of the Timeline and add a keyframe. Then, move the Playhead to the end of the clip. Drag the X-axis position to the right until the Line shape moves all the way to the right side of the screen.
Do the same for the Default Title on Track 8. But this time, drag the X-axis position toward the other side. When you’re done, press OK.

Step 15
Go to the Effects tab → drag the Luma Sharp effect to Track 10. Click it and change its Intensity to 10.

Step 16
You’re all done. Click on the Render button to render all the clips and finally preview your creation. Congratulations on creating a text animation intro in Filmora.

Summary
What you’ve learned:
- Create a unique text animation intro in Filmora
- Animate text and titles
- How to add and animate different shapes in Filmora
- Edit the advanced settings of elements in the Filmora video editor
Best Audio Waveform Generator
For more than a century, sound waves and broadcasts have played an important role in shaping media as we know it. Here’s how to implement them into your social media strategy. They have become popular in short video animations used to promote audio on social media, commonly referred to as audiograms.
Before learning everything there is to know about audiograms and how to make them, let’s gain a better understanding of the significance of these patterns.
Part 1. What is an audio waveform?
A sound wave is the vibration of air molecules, which is how sound travels. The waveform describes the wave using a graph of how the air molecule is displaced over time.
Amplitude is the strength of a wave’s action; the higher the amplitude, the more the air molecules are displaced. This also translates into loudness for the human ear; increasing the amplitude of the wave will increase how loud it appears to us. Sine, triangle, square, and sawtooth waveforms are the most typical periodic waveforms.
Part 2. What is audio wave animation?
A waveform animation video is a short video clip that can be uploaded to social media that combines an audio file with a static background image and a straightforward waveform animation. Audio animations, an example of audio visualization, make for fantastic video content, which is increasingly valuable on ever-noisy social media platforms.
Part 3. Why do we use audio visualization?
We all know that there is a special way of feeling called synesthesia, which is both a psychological and a linguistic phenomenon. Similar to how you automatically link this rain scene with the sound of heavy rain when you see it. People’s newly awakened senses are more about the synthesis of sensory experience with actual life experience than they are entirely about actual information. Therefore, for clean audio, enhancing it with complementary visual animation effects will improve the user’s visual experience and, to some extent, offer additional information and impact to your audio.

Part 4. Best Audio Waveform Generator
Audio visualization can be presented in a variety of ways. The simplest kind of processing involves taking low-dimensional information like frequency, loudness, and rhythm and converting them into images in the form of colors, forms, strokes, etc. However, modern artificial intelligence technology can now extract high-dimensional visual attributes including style, tone, and emotion. But, for most non-technical players, such processes are obviously out of their league, therefore your best choice is to use a basic audio waveform generator. Following, we’ll suggest 10 desktop or online generators so you may quickly finish the audio visualization project and create your audio-related videos.
Audio Visualizer on Desktop
You may add audio spectrum visualizers to videos using a variety of tools. But one of the best software we recommend is Filmora audio visualizer because you can edit all sound effects on this platform with just one button. Filmora has audio keyframing and a built-in equalizer that can create unique sound effects and make the audio recording more appealing when you hear it.
Price: US$ 49.99/Year
Pros
- Filmora Audio Visualizer provides you with 25 types of audio and concludes circle audio spectrum.
- Easy to use for the beginner and there are more other audio features that you can easily use and start editing your file.
- It’s super affordable as compared to other audio editing software.
Cons
- Pattern shape can’t be defined by yourself, also doesn’t support your custom template
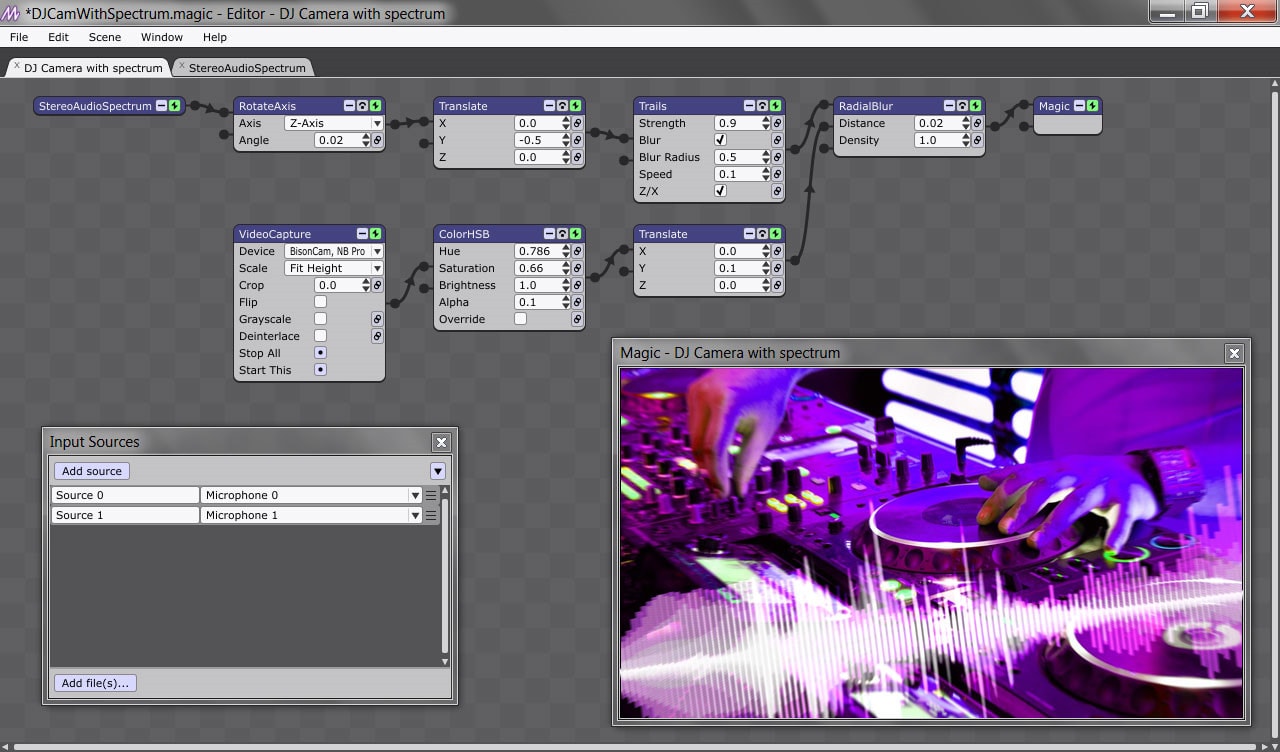
VJs and all other artists who like to combine sound and images during live performances can use the Performer edition of this cross-platform music visualization software. The Studio edition offers all the functions that are necessary to create music visualizations or music videos in real-time. You can use both editions of Magic to generate 2D and 3D graphics that respond to music or mix photos, 3D files, or videos. In addition, you can easily enter full-screen mode and project your videos using LED displays or projectors. Magic Music Visuals also allows its users to combine an unlimited number of audio inputs simultaneously, meaning you can effortlessly mix two or more tracks. This music visualization software allows you to export videos in mp4 and MOV files, but the length of the rendering process depends on the length of the video and the performance of the computer you are using.
Price: Free demo available, $44.95 for a full version license
Pros
- Amazing Visual Effects
- Efficient Text Processing
- Lots of Blending modes
- Custom Color correction
Cons
- No Video Stabilization tool
- Audio waveform and hardware acceleration features are not available
Music visualization is just one of the countless video editing options offered by VDSC Video Editor Free. In addition to creating music-based videos, you can also use this video editing software product to stabilize videos recorded by action cameras, enhance colors in footage captured by a wide range of cameras and drones, create 3D graphics, or export high-quality videos. Resolution to your social media accounts directly from the software. The editor’s Audio Visualizer contains five hundred presets that you can use to create a captivating music video for your latest track. In addition to Spectrum, which displays sounds within a set color range, VDSC Video Editor also offers Audio Abstraction, which generates colorful abstract shapes based on the music you select. While visualizing audio with VDSC Audio Visualizer is a fun and simple process, video creators with no prior video editing experience may need some time to get used to the software’s interface.

Price: Free
Pros
- Every tool for video editing is available
- Amazing Visual Effects
- Efficient Text Processing
- Lots of Blending modes
- Custom Color correction
Cons
- Pro Editing Features are Missing
- No Video Stabilization tool
- Audio waveform and hardware acceleration features are not available
- Standard voiceover and masking tools
Audio Visualizer Online
- Media.io Music Visualizer Online
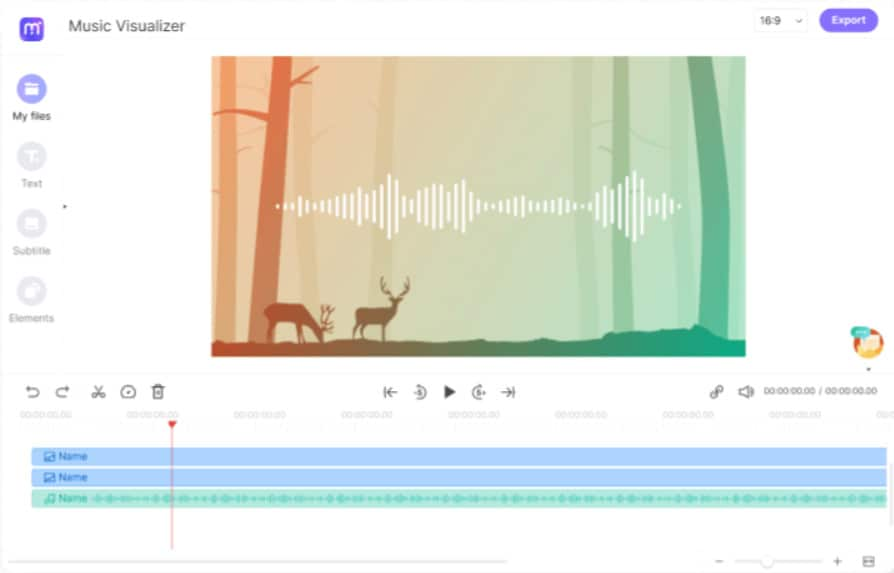
Want to add eye-catching visuals to your audio? Media.io Music Visualizer web app is the perfect app for you. You can add audio waveforms to any audio format, including M4A, M4R, MP3, OGG, AU, and many more. After loading the audio, this program allows you to add a captivating progression and a cover photo of your choice. Additionally, users of Media.io can trim, split, rearrange, and remove audio. You can even add subtitles, subtitles, and texts. If you’re fine with visualizing music, it lets you choose the aspect ratio before exporting to 1080P MP4. Just try it!
Price: Free
Pros
- It has consistently been upgraded and improved since its inception when it was pretty great already.
- The product is great based on how it was marketed, and it is a great tool. This is easily accomplished by use among three brands.
- An excellent experience with a great community of entrepreneurs and marketers supporting the ecosystem.
Cons
- It doesn’t have a direct publication on Instagram but offers 2 ways: via app notification (which can be annoying at times) or integration with Zapier, through a wizard.
Renderforest is a platform that enables users to design whole websites or upload visual assets for online use. However, to start visualizing your music with Renderforest, you must first register and create your account. Then just choose between visualization templates with text or photo holders, add the artist’s name and track title, then add a background photo or video. You can proceed to choose a visualization style that perfectly matches the music, chooses its color, and finally uploads the song you want to use in your video. Once done, you should simply click on the Preview icon and Renderforest will send you an email containing a video of the music visualization. Keep in mind that all videos created using the free version of the platform will be watermarked and cannot exceed the one-minute limit.

Price: Free version accessible; $9.99 is the starting price for subscriptions.
Pros
- It has got loads of beautiful templates to choose from, which could even fit perfectly into the kind of logo animation project you may have in mind.
- The effortless, natural, effective, rational, and impressive way to share your amazing ideas with the world. Just let your imagination go wild and keep going.
- A wide variety of templates and animations, with lots of customization available. And it offers amazing customer service.
Cons
- The only thing that is a downside is that there is a watermark by default, which can only be removed by paying.
- It is fairly expensive for the lack of many features.
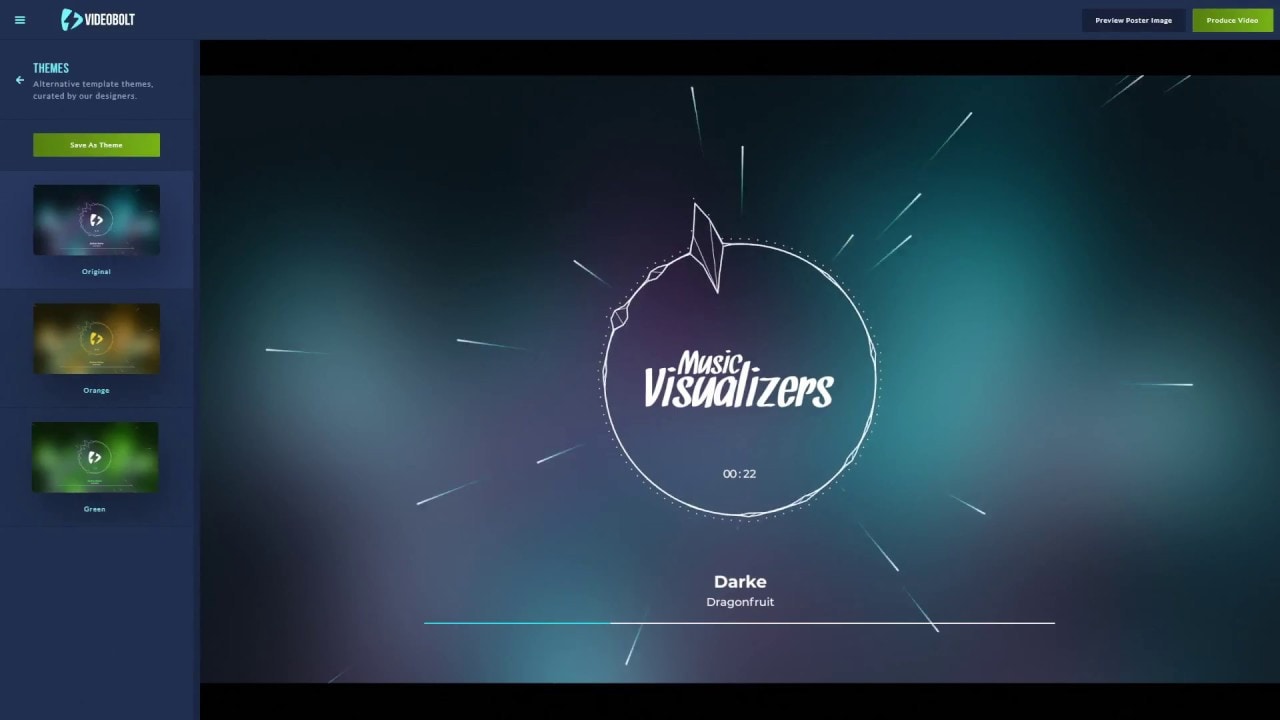
The collection of music visualization templates that this website offers is really impressive as you can choose from a wide variety of templates during the video creation process. However, you must purchase one of the available subscription plans to customize the template you’ve selected and export it without a watermark. After selecting a music visualization template, just click the Edit button below it and start working on your project. You can either upload a song from your computer or use SoundCloud to import the song you want to visualize into your project. You can improve the quality of your video by adding a cover or using a variation of the template you originally selected. The only downside is that you won’t be able to edit the videos produced by Videobolt Music Visualizer during the free trial period.
Price: Free trial available, subscription plans start from $7.99 per month
Pros
- The quality and ease to create awesome-looking intros have been an invaluable tool in my work. Simple to use with excellent assistance available.
- This tool has helped me make an awesome-looking music video and an intro as well.
- Particularly the quality of the final product and the ability to change the templates to compliment the client’s brand guidelines.
Cons
- The overall experience is poor, and their support is terrible.
- As someone with not that much money to spend, it is a bit costly.
- Sometimes it’s hard to find exactly what you need.
Conclusion
Filmora Audio Visualizer is one of the top-rated audio editing software tools due to its incredible features and interface. If you want to create amazing sound effects on your video, we highly recommend you download this software on your computer to enjoy all the amazing editing tools. Social media content creators, musicians, and VJs can produce stunning videos with any of the music visualizers we’ve listed in this article. What’s your favorite music visualizer to use to create videos based on music? Please let us know by leaving a comment below.
Free Download For Win 7 or later(64-bit)
Free Download For macOS 10.14 or later
Price: US$ 49.99/Year
Pros
- Filmora Audio Visualizer provides you with 25 types of audio and concludes circle audio spectrum.
- Easy to use for the beginner and there are more other audio features that you can easily use and start editing your file.
- It’s super affordable as compared to other audio editing software.
Cons
- Pattern shape can’t be defined by yourself, also doesn’t support your custom template
VJs and all other artists who like to combine sound and images during live performances can use the Performer edition of this cross-platform music visualization software. The Studio edition offers all the functions that are necessary to create music visualizations or music videos in real-time. You can use both editions of Magic to generate 2D and 3D graphics that respond to music or mix photos, 3D files, or videos. In addition, you can easily enter full-screen mode and project your videos using LED displays or projectors. Magic Music Visuals also allows its users to combine an unlimited number of audio inputs simultaneously, meaning you can effortlessly mix two or more tracks. This music visualization software allows you to export videos in mp4 and MOV files, but the length of the rendering process depends on the length of the video and the performance of the computer you are using.

Price: Free demo available, $44.95 for a full version license
Pros
- Amazing Visual Effects
- Efficient Text Processing
- Lots of Blending modes
- Custom Color correction
Cons
- No Video Stabilization tool
- Audio waveform and hardware acceleration features are not available
Music visualization is just one of the countless video editing options offered by VDSC Video Editor Free. In addition to creating music-based videos, you can also use this video editing software product to stabilize videos recorded by action cameras, enhance colors in footage captured by a wide range of cameras and drones, create 3D graphics, or export high-quality videos. Resolution to your social media accounts directly from the software. The editor’s Audio Visualizer contains five hundred presets that you can use to create a captivating music video for your latest track. In addition to Spectrum, which displays sounds within a set color range, VDSC Video Editor also offers Audio Abstraction, which generates colorful abstract shapes based on the music you select. While visualizing audio with VDSC Audio Visualizer is a fun and simple process, video creators with no prior video editing experience may need some time to get used to the software’s interface.

Price: Free
Pros
- Every tool for video editing is available
- Amazing Visual Effects
- Efficient Text Processing
- Lots of Blending modes
- Custom Color correction
Cons
- Pro Editing Features are Missing
- No Video Stabilization tool
- Audio waveform and hardware acceleration features are not available
- Standard voiceover and masking tools
Audio Visualizer Online
- Media.io Music Visualizer Online
Want to add eye-catching visuals to your audio? Media.io Music Visualizer web app is the perfect app for you. You can add audio waveforms to any audio format, including M4A, M4R, MP3, OGG, AU, and many more. After loading the audio, this program allows you to add a captivating progression and a cover photo of your choice. Additionally, users of Media.io can trim, split, rearrange, and remove audio. You can even add subtitles, subtitles, and texts. If you’re fine with visualizing music, it lets you choose the aspect ratio before exporting to 1080P MP4. Just try it!

Price: Free
Pros
- It has consistently been upgraded and improved since its inception when it was pretty great already.
- The product is great based on how it was marketed, and it is a great tool. This is easily accomplished by use among three brands.
- An excellent experience with a great community of entrepreneurs and marketers supporting the ecosystem.
Cons
- It doesn’t have a direct publication on Instagram but offers 2 ways: via app notification (which can be annoying at times) or integration with Zapier, through a wizard.
Renderforest is a platform that enables users to design whole websites or upload visual assets for online use. However, to start visualizing your music with Renderforest, you must first register and create your account. Then just choose between visualization templates with text or photo holders, add the artist’s name and track title, then add a background photo or video. You can proceed to choose a visualization style that perfectly matches the music, chooses its color, and finally uploads the song you want to use in your video. Once done, you should simply click on the Preview icon and Renderforest will send you an email containing a video of the music visualization. Keep in mind that all videos created using the free version of the platform will be watermarked and cannot exceed the one-minute limit.

Price: Free version accessible; $9.99 is the starting price for subscriptions.
Pros
- It has got loads of beautiful templates to choose from, which could even fit perfectly into the kind of logo animation project you may have in mind.
- The effortless, natural, effective, rational, and impressive way to share your amazing ideas with the world. Just let your imagination go wild and keep going.
- A wide variety of templates and animations, with lots of customization available. And it offers amazing customer service.
Cons
- The only thing that is a downside is that there is a watermark by default, which can only be removed by paying.
- It is fairly expensive for the lack of many features.
The collection of music visualization templates that this website offers is really impressive as you can choose from a wide variety of templates during the video creation process. However, you must purchase one of the available subscription plans to customize the template you’ve selected and export it without a watermark. After selecting a music visualization template, just click the Edit button below it and start working on your project. You can either upload a song from your computer or use SoundCloud to import the song you want to visualize into your project. You can improve the quality of your video by adding a cover or using a variation of the template you originally selected. The only downside is that you won’t be able to edit the videos produced by Videobolt Music Visualizer during the free trial period.

Price: Free trial available, subscription plans start from $7.99 per month
Pros
- The quality and ease to create awesome-looking intros have been an invaluable tool in my work. Simple to use with excellent assistance available.
- This tool has helped me make an awesome-looking music video and an intro as well.
- Particularly the quality of the final product and the ability to change the templates to compliment the client’s brand guidelines.
Cons
- The overall experience is poor, and their support is terrible.
- As someone with not that much money to spend, it is a bit costly.
- Sometimes it’s hard to find exactly what you need.
Conclusion
Filmora Audio Visualizer is one of the top-rated audio editing software tools due to its incredible features and interface. If you want to create amazing sound effects on your video, we highly recommend you download this software on your computer to enjoy all the amazing editing tools. Social media content creators, musicians, and VJs can produce stunning videos with any of the music visualizers we’ve listed in this article. What’s your favorite music visualizer to use to create videos based on music? Please let us know by leaving a comment below.
Free Download For Win 7 or later(64-bit)
Free Download For macOS 10.14 or later
How to Easily Create a Free Eye-Catching Intro Videos with Invideo
Video is an increasingly popular form of media, and businesses of all sizes are using video to promote their products and services. In today’s fast-paced world, creating an intro for your videos is a great way to quickly engage your viewers and give them a sense of what your content is going to be about.
However, you might think that creating an intro video is a difficult process. Well, it is not! InVideo intro maker makes it possible for even a beginner to create an intro like a professional. It has simplified every useful feature that you need. If you want to learn how to operate InVideo free intro maker, read on carefully.
Part 1. Common Intro Video Types
There are many different types of intro videos that you can create using intro maker InVideo. Each has its own purpose and style. Here, we will give a short overview on some common intro video types, such as Motion intro videos, YouTube intro videos, Movie intro videos, and Ads intro videos.
Motion Intro Videos
A motion intro video for your business or social media help people learn about what you do in a fun way. By using engaging motion visuals, you can quickly communicate key information about your content in a short time.
YouTube Intro Videos
An introduction is one of the first things you’ll need for a YouTube video. It will appear at the beginning of your videos and give viewers a quick overview of who you are and what your channel is all about.
Movie Intro Videos
A movie intro video builds anticipation and excitement to your audience. The intro can be used to set the tone as well as introduce the cast and the house production behind your film.
Ads Intro Videos
Creating a right advertising introduction video is sufficient to promote your products to potential customers. To increase brand awareness, it should include information about your company, your products or services, and your brand.
Part 2. Steps to Make an Intro Video with InVideo
Intro maker InVideo is the answer for creating a simple online video editing platform for any purpose. With a variety of available video templates on InVideo, no need to spend hours in front of a computer! To start making one, simply follow these steps:
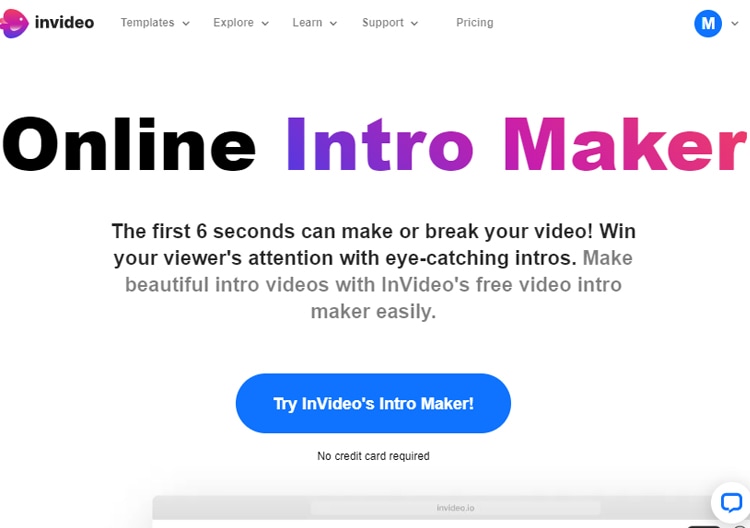
Step1Go to InVideo free intro maker and try InVideo’s intro maker.
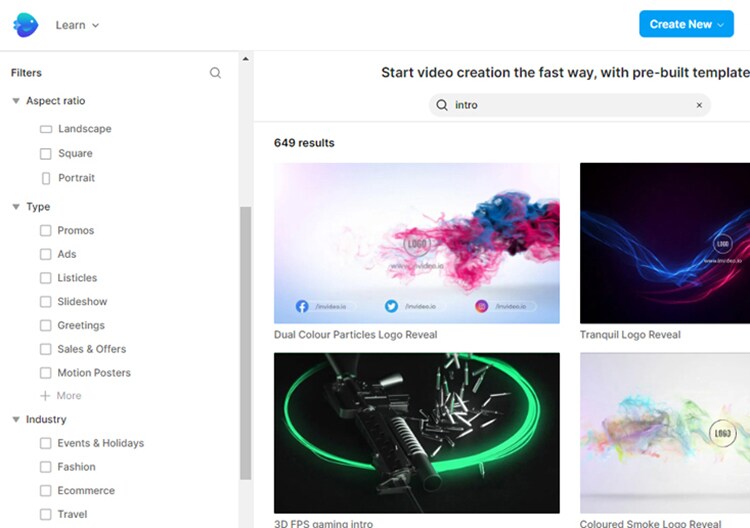
Step2Choose a template that suits your video style. There is also a filter option on the left side to help you narrow down your preferences.
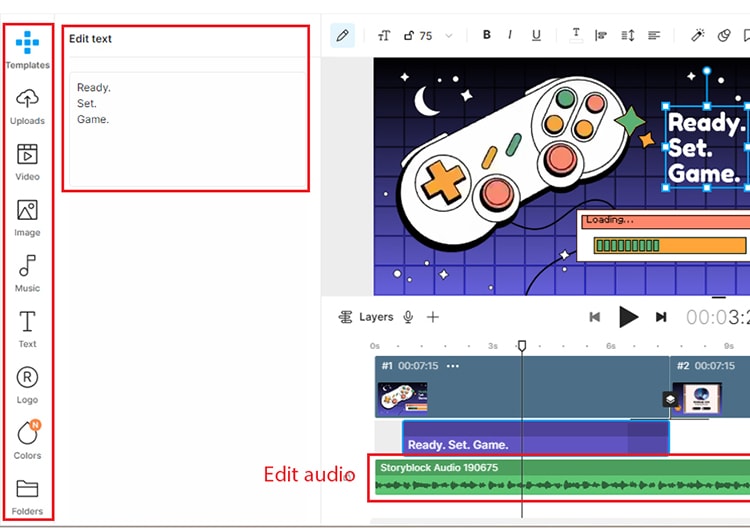
Step3After choosing the template, you can customize it by clicking on the things you want to edit. The tools on the left allow you to add more video, images, or stickers to your project. To edit the audio, click on the audio bar below and the editing tools should appear.
Step4Once you are satisfied with the result, export your video by clicking on the “Export” button on the top-right of your workspace. InVideo will start rendering your video.

Part 3. InVideo Alterative to Make Intro Video on Computer
Aside from InVideo intro maker, Filmora is worth checking out. Filmora is a great alternative software to other more complicated video editors. Whether you are professional or not, it is perfect for those who are looking for a more user-friendly video editing tool that can create professional-looking intro videos.
Filmora offers a wide range of features as a video editing software. It is easy to install and available for both Windows and Mac. Filmora also has a built-in library of some royalty-free music, so copyright issues no longer become your worry. We will show you four easy steps to create intro videos using Filmora templates:
Free Download For Win 7 or later(64-bit)
Free Download For macOS 10.14 or later
Step1After opening the software, choose the aspect ratio that you desire and click New Project.

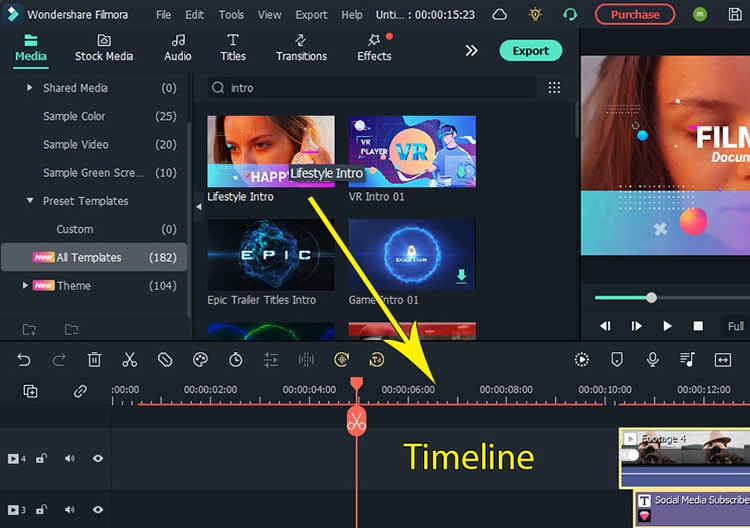
Step2Search for “Intro” from the list of templates on the Media tab. Choose a video clip that you want to use and drag it to your timeline. If you only want to use the free template, avoid the paid assets with a pink diamond icon. Otherwise, you can use free stock video clips included with Filmora.
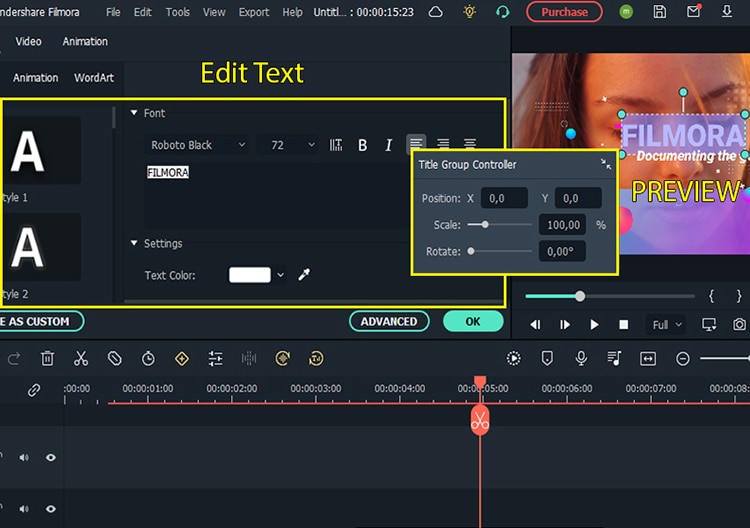
Step3Edit and customize the texts by double-clicking the text on the preview box. You can change the style, font, size, colors, etc.
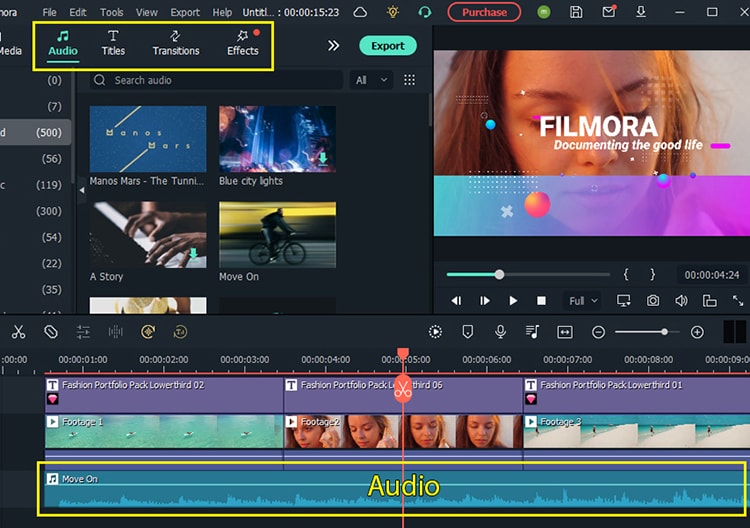
Step4Change, add or customize the audio of your video on the Audio menu. You can also add and customize the text, transition, and effect from other menus. Don’t forget to export your video to the preferred video format and locate it in your desired folder.
Part 4. Related FAQs
- Which software is best for intro making?
The best-used software programs for professional intro-making include Adobe Premiere Pro, Sony Vegas Pro, and Final Cut Pro. However, they are more complex and difficult to operate. Some best intro video makers that are easier to use include Filmora, InVideo, and Animaker.
- How do I make an intro to a video for free?
Many video editing software programs offer free intro templates, such as InVideo intro maker, Canva, Animoto, or Filmora . You can even easily customise their templates based on your content. Another option is to use a video editing program like iMovie or Windows Movie Maker that usually comes with your computers.
- What do YouTubers use to make their intros?
While there is no one-size-fits-all answer to this question, there are some common tools that YouTubers use to make their intro videos. Many YouTubers use software like Adobe Premiere Pro and After Effects, Final Cut Pro, or simpler software like iMovie. Others use online resources like MotionDen or Canva.
Free Download For Win 7 or later(64-bit)
Free Download For macOS 10.14 or later
Free Download For macOS 10.14 or later
Step1After opening the software, choose the aspect ratio that you desire and click New Project.

Step2Search for “Intro” from the list of templates on the Media tab. Choose a video clip that you want to use and drag it to your timeline. If you only want to use the free template, avoid the paid assets with a pink diamond icon. Otherwise, you can use free stock video clips included with Filmora.

Step3Edit and customize the texts by double-clicking the text on the preview box. You can change the style, font, size, colors, etc.

Step4Change, add or customize the audio of your video on the Audio menu. You can also add and customize the text, transition, and effect from other menus. Don’t forget to export your video to the preferred video format and locate it in your desired folder.

Part 4. Related FAQs
- Which software is best for intro making?
The best-used software programs for professional intro-making include Adobe Premiere Pro, Sony Vegas Pro, and Final Cut Pro. However, they are more complex and difficult to operate. Some best intro video makers that are easier to use include Filmora, InVideo, and Animaker.
- How do I make an intro to a video for free?
Many video editing software programs offer free intro templates, such as InVideo intro maker, Canva, Animoto, or Filmora . You can even easily customise their templates based on your content. Another option is to use a video editing program like iMovie or Windows Movie Maker that usually comes with your computers.
- What do YouTubers use to make their intros?
While there is no one-size-fits-all answer to this question, there are some common tools that YouTubers use to make their intro videos. Many YouTubers use software like Adobe Premiere Pro and After Effects, Final Cut Pro, or simpler software like iMovie. Others use online resources like MotionDen or Canva.
Free Download For Win 7 or later(64-bit)
Free Download For macOS 10.14 or later
How to Crop Videos in Windows Media Player
In this generation, we are so much engaged in social media forms. We loved to upload and post some pictures and videos. To show the happiness that we had. But sometimes, we are not satisfied with our videos and photos. That is why we gave time to edit, put some effects , transitions and other forms of editing. It is such a big help, especially if you are running some online business. To get and gain the interest and attention of your viewers and costumers, your videos and pictures must be catchy and have some good edits. By doing some basic editing skills can help you boost your social media platform. And also by taking away some unwanted things in your videos and pictures can improved the focus of your video.
One of the basic way of editing is cropping.
Need to modify the point of interest of your video clipped? you don’t need to re-shoot your footage. The crop device can help!
Cropping is the manner of shifting or adjusting the rims of a photograph or video clip.Often used for image modifying, it’s also useful whilst modifying video. With cropping, you may take away pointless or distracting quantities of a video clip or alternate its dimensions to in shape inside a positive area.Whether you’re running with pictures from a digital digicam or display video, you’ll in all likelihood run into instances whilst you want to crop those clips.
In this article you will learn how to crop a video through windows media player and with Filmora Wondershare. Here are ways to crop your video clip.
How to crop a video in Windows Media Player
Actually, Windows Media Player can not crop a video directly. However plug-ins including the SolveigMM WMP Trimmer may be set up and used to cut or edit videos in Windows Media Player for free. Detailed steps are furnished right here to train you a way to deployation and use this unique plug-in.
As said earlier, the Windows Media Player isn’t always a video editor and can not be used immediately to trim or crop your films until with the assist of plug-ins. However, the stages underneath offer info on how to use Windows Media Player to make the edit. Please follow carefully with the steps below and use the SolveigMM WMP Trimmer to your device/Windows Media Player to make an easy edits in your video file.
Step 1: Download and install the SolveigMM WMP Trimmer plug-in. To download the plugin, click this link: https://www.solveigmm.com/en/products/wmp-trimmer-plugin/
Step 3: On Windows Media Player, click on the principle menu object and navigate to Tools Plug-ins SolveigMM WMP Trimmer Plugin.

Your plug-in will be enabled after selecting it from the menu.
Step 4: While playingthe document you need to edit, flow the blue slider to the segment of the film you need to trim/reduce and click “Start”. Manually type the time of the video you need to begin deciding on into the Start box in case you discover the usage of the slider difficult. Click the “End” button on the factor you need the trimming to end.

Step 5: Find and press the “In” button to trim the chosen component; The “Out” button to reduce the chosen component out of the authentic media document.
Note that SolveigMM WMP Trimmer Plugin supports to edit videos including cutting or trimming, however, it doesn’t offer an option to crop video.
An alternative way to crop video on Windows by Wondershare Filmora
Wondershare Filmora Video Editor is one of the great video enhancing software program with cool functions that compares to different competing video enhancing Softwares program. Many video enhancing applications claimed to provide expert results; Filmora is one in every of some consumer-stage equipment that definitely delivers.
For Win 7 or later (64-bit)
For macOS 10.14 or later
Here in Filmora, it is not just trimming but this tool can help you to adjust the focus of your video clip. Here are steps on how to crop a video using wondershare filmora.
1. Install and launch your Filmora Wondershare app.

2. Find the import media. Click it and choose your preferred video fromyour files that you want to edit. Wait a second until the video is finished importing.
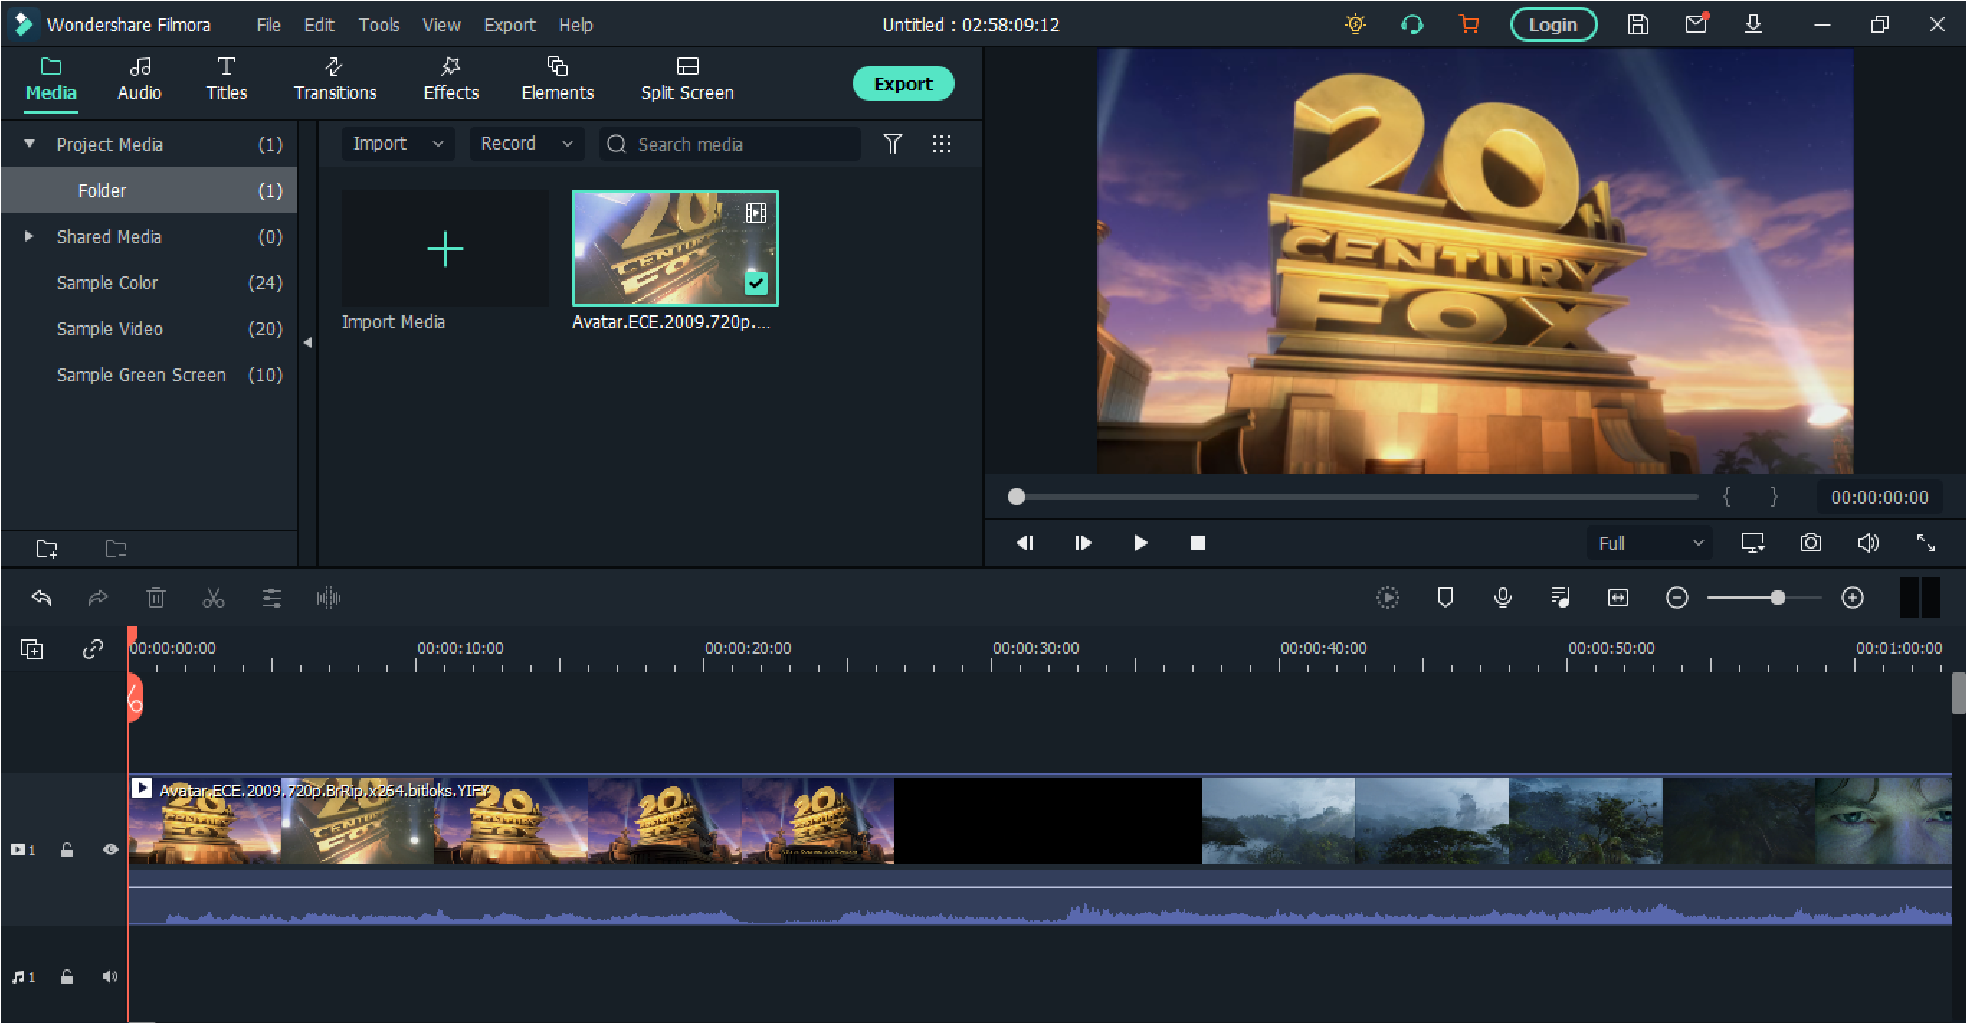
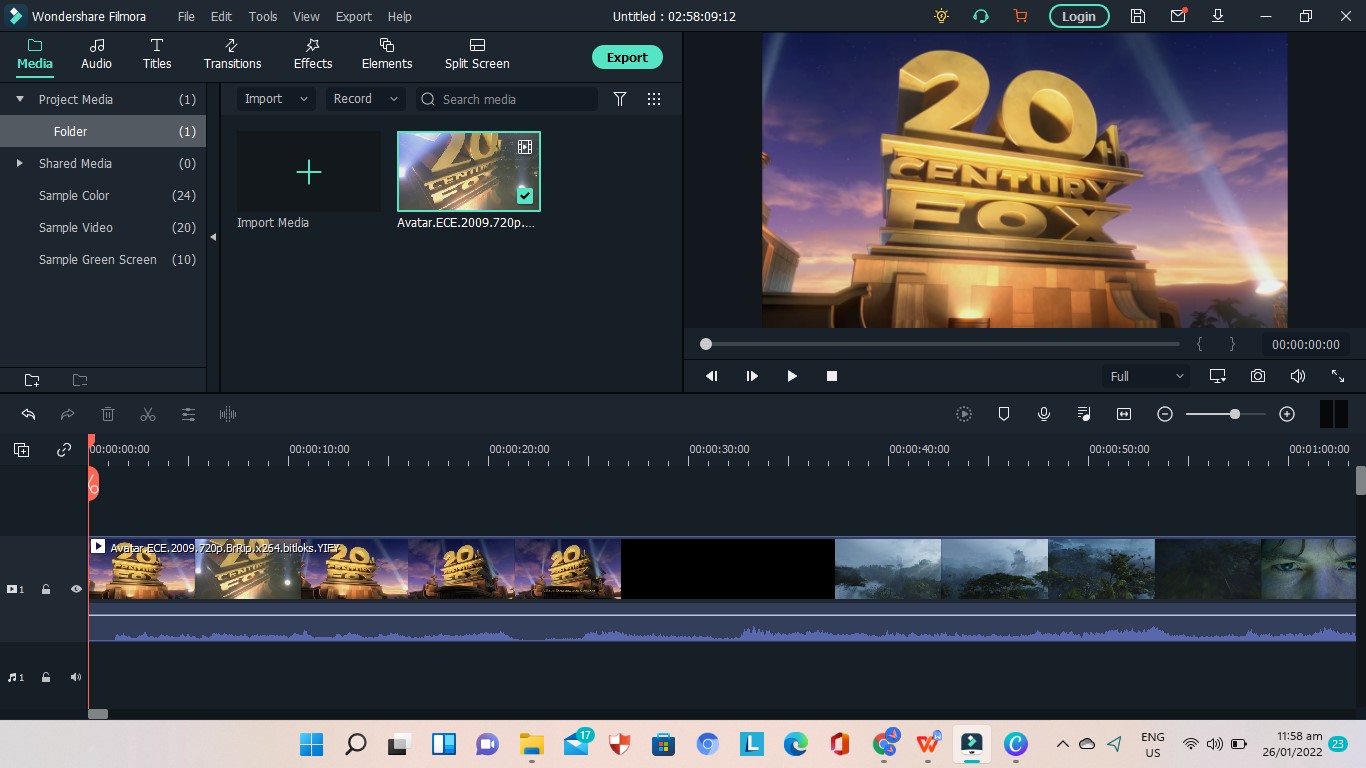
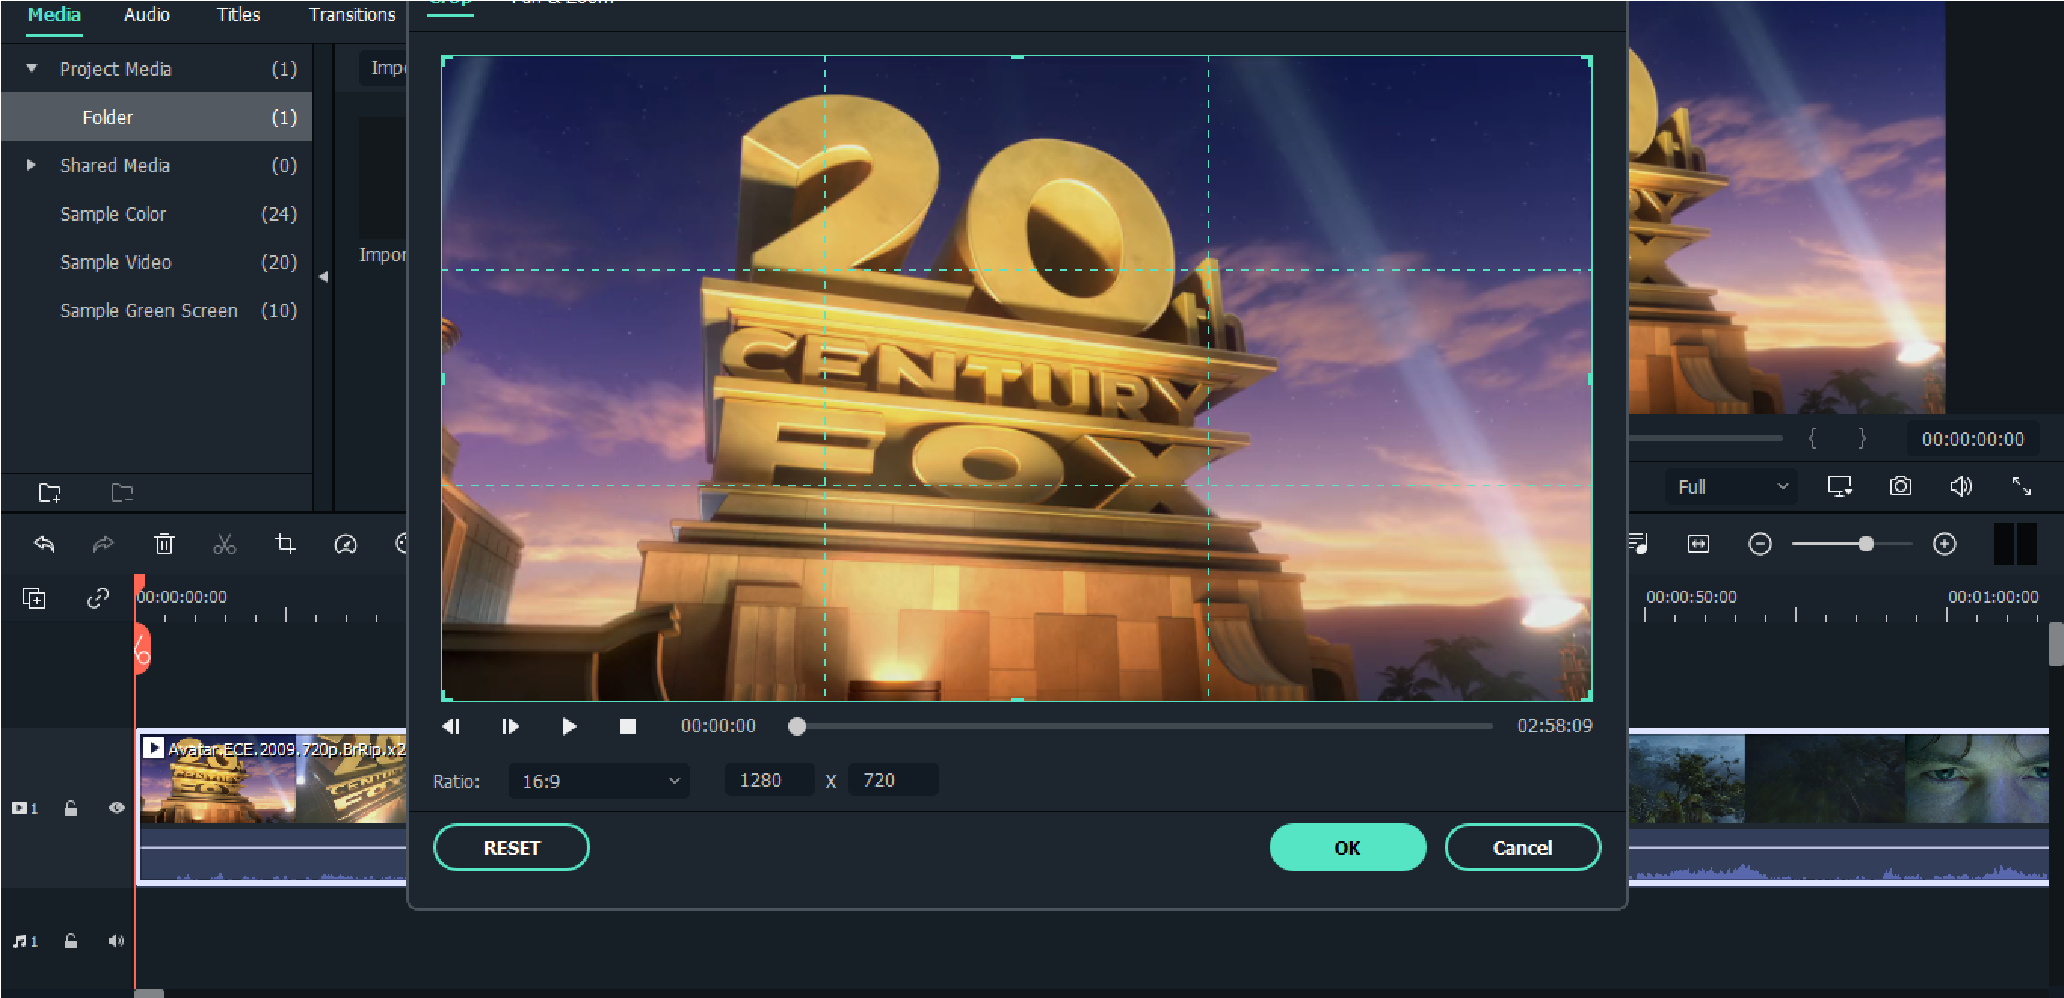
3. Drag the video to the lower left side. After dragging ,right-click yourmouse and choose video and then click “crop and zoom.”
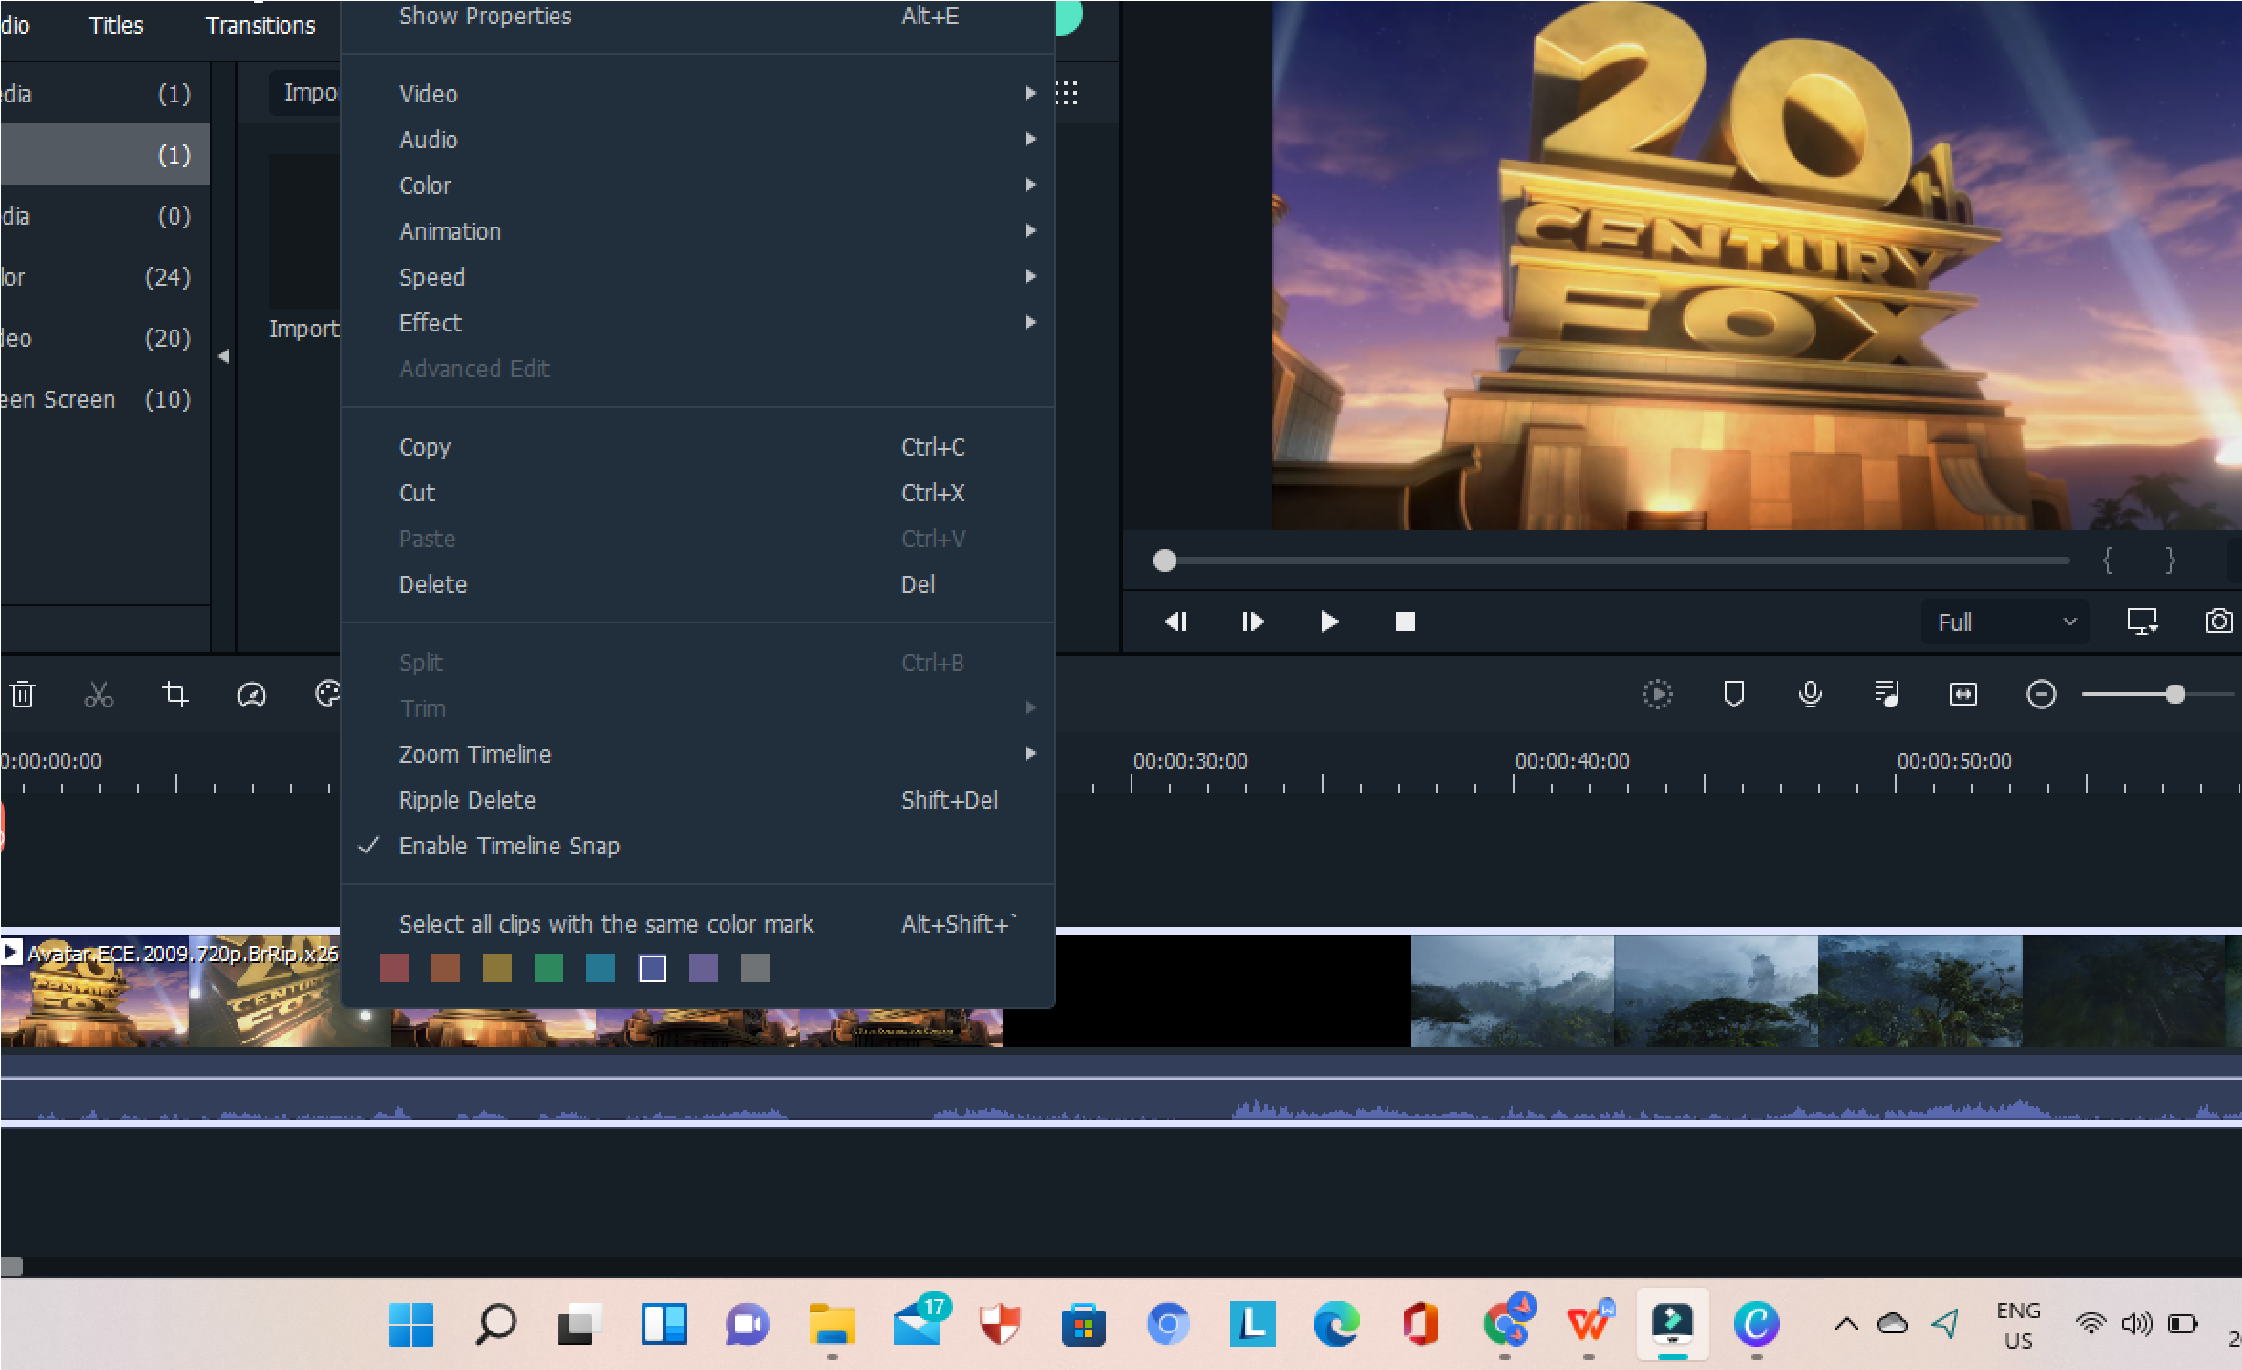
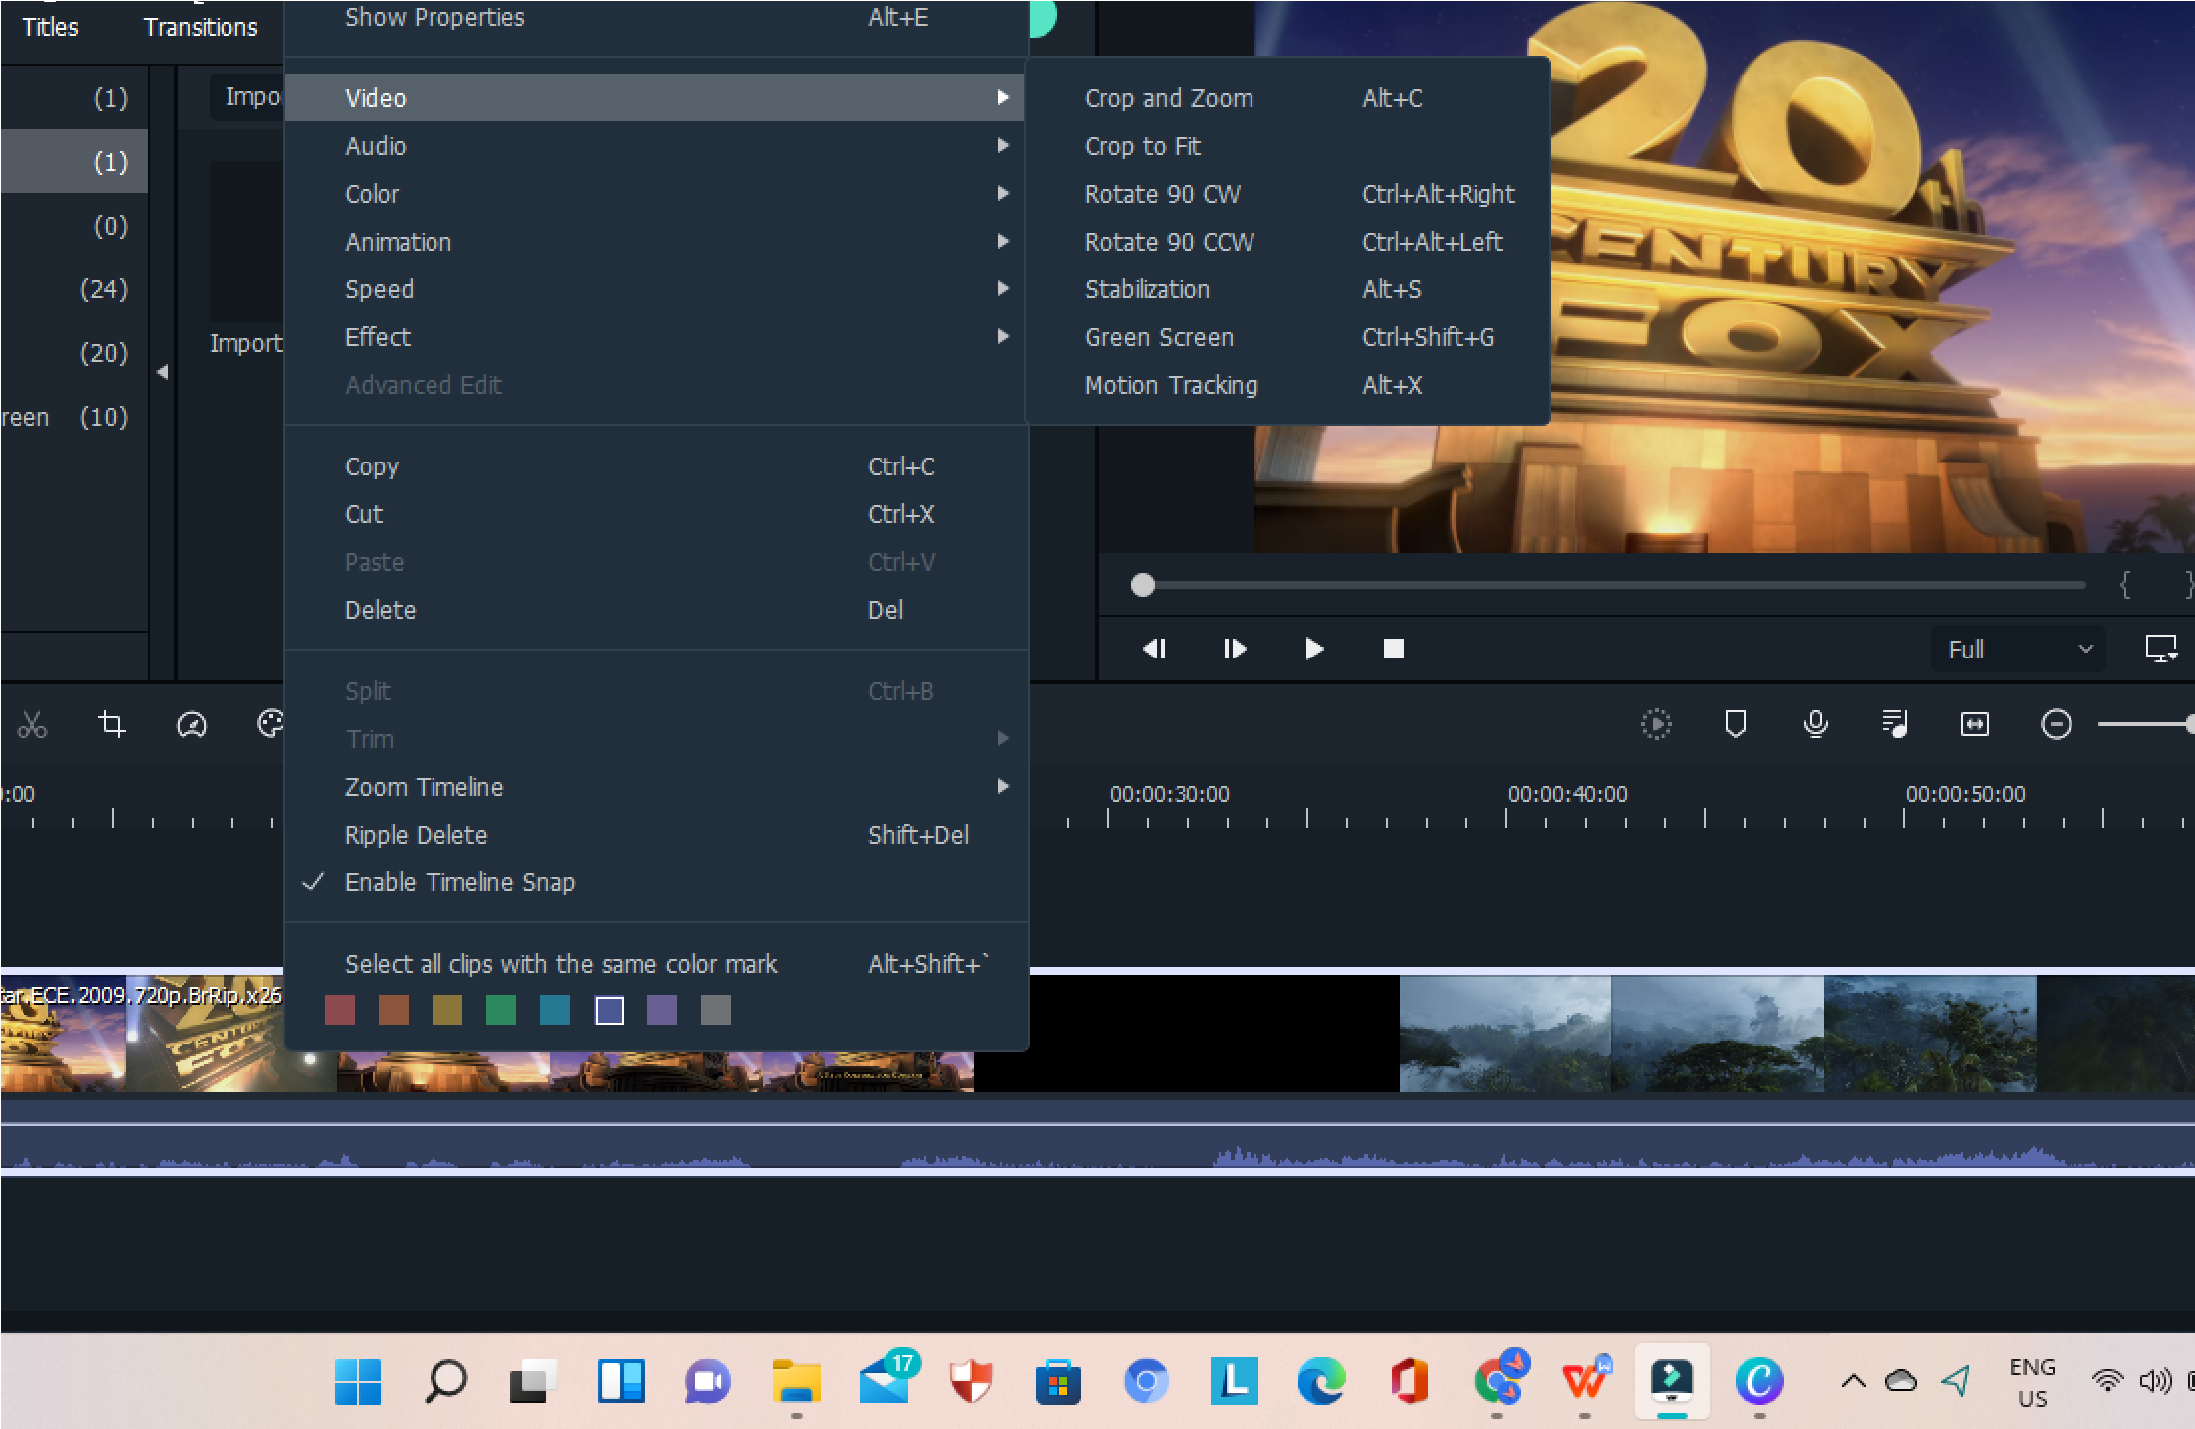
4. Now, you can adjust the focus of your video.
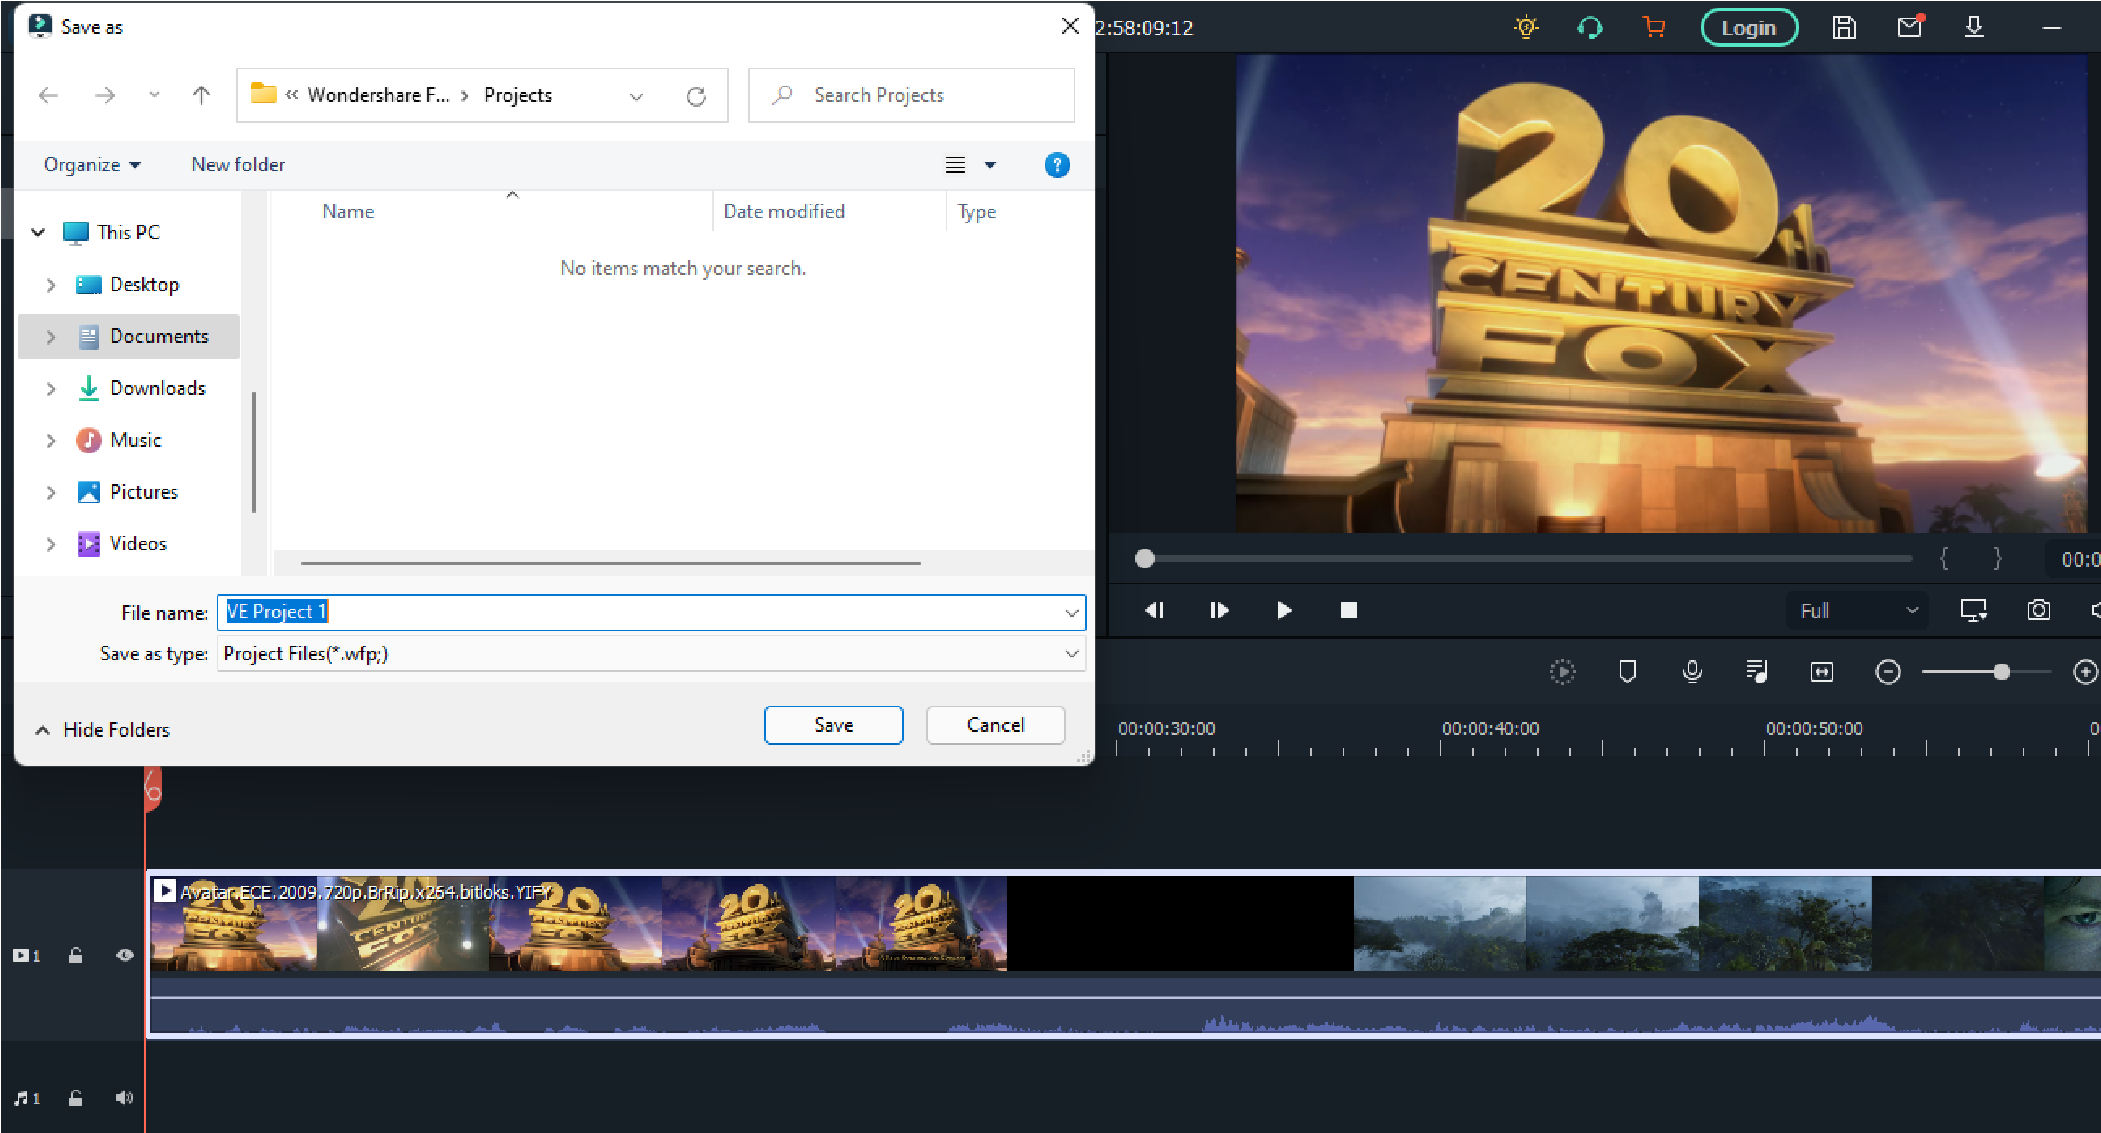
5. After cropping, if you are satisfied with your edit you can now save your project by clicking the save project icon.
Conclusion
In this guide, you have acquired some knowledge about using crop on a video clip. Though this process or step could be very difficult but using Filmora Wondershare you can easily follow the steps provided above.
Therefore, cropping video is necessary. It is one of the basic editing skill that you need to know. It is functional to your online business, work projects, school projects and other related stuffs. Cropping will help you to emphasize more about your subject.
It is easier for you to do the edit if you used some software programs. You can used Filmora Wondershare or any of the best editing software programs. While you are giving the best videos and photos of your costumer and viewers you are also improving and enhancing your editing skills.
However, you also need to be careful in doing some edits. Before you save your project you need to make sure that you are cropping the right portion of your video.
Your plug-in will be enabled after selecting it from the menu.
Step 4: While playingthe document you need to edit, flow the blue slider to the segment of the film you need to trim/reduce and click “Start”. Manually type the time of the video you need to begin deciding on into the Start box in case you discover the usage of the slider difficult. Click the “End” button on the factor you need the trimming to end.

Step 5: Find and press the “In” button to trim the chosen component; The “Out” button to reduce the chosen component out of the authentic media document.
Note that SolveigMM WMP Trimmer Plugin supports to edit videos including cutting or trimming, however, it doesn’t offer an option to crop video.
An alternative way to crop video on Windows by Wondershare Filmora
Wondershare Filmora Video Editor is one of the great video enhancing software program with cool functions that compares to different competing video enhancing Softwares program. Many video enhancing applications claimed to provide expert results; Filmora is one in every of some consumer-stage equipment that definitely delivers.
For Win 7 or later (64-bit)
For macOS 10.14 or later
Here in Filmora, it is not just trimming but this tool can help you to adjust the focus of your video clip. Here are steps on how to crop a video using wondershare filmora.
1. Install and launch your Filmora Wondershare app.

2. Find the import media. Click it and choose your preferred video fromyour files that you want to edit. Wait a second until the video is finished importing.

3. Drag the video to the lower left side. After dragging ,right-click yourmouse and choose video and then click “crop and zoom.”


4. Now, you can adjust the focus of your video.

5. After cropping, if you are satisfied with your edit you can now save your project by clicking the save project icon.

Conclusion
In this guide, you have acquired some knowledge about using crop on a video clip. Though this process or step could be very difficult but using Filmora Wondershare you can easily follow the steps provided above.
Therefore, cropping video is necessary. It is one of the basic editing skill that you need to know. It is functional to your online business, work projects, school projects and other related stuffs. Cropping will help you to emphasize more about your subject.
It is easier for you to do the edit if you used some software programs. You can used Filmora Wondershare or any of the best editing software programs. While you are giving the best videos and photos of your costumer and viewers you are also improving and enhancing your editing skills.
However, you also need to be careful in doing some edits. Before you save your project you need to make sure that you are cropping the right portion of your video.
Your plug-in will be enabled after selecting it from the menu.
Step 4: While playingthe document you need to edit, flow the blue slider to the segment of the film you need to trim/reduce and click “Start”. Manually type the time of the video you need to begin deciding on into the Start box in case you discover the usage of the slider difficult. Click the “End” button on the factor you need the trimming to end.

Step 5: Find and press the “In” button to trim the chosen component; The “Out” button to reduce the chosen component out of the authentic media document.
Note that SolveigMM WMP Trimmer Plugin supports to edit videos including cutting or trimming, however, it doesn’t offer an option to crop video.
An alternative way to crop video on Windows by Wondershare Filmora
Wondershare Filmora Video Editor is one of the great video enhancing software program with cool functions that compares to different competing video enhancing Softwares program. Many video enhancing applications claimed to provide expert results; Filmora is one in every of some consumer-stage equipment that definitely delivers.
For Win 7 or later (64-bit)
For macOS 10.14 or later
Here in Filmora, it is not just trimming but this tool can help you to adjust the focus of your video clip. Here are steps on how to crop a video using wondershare filmora.
1. Install and launch your Filmora Wondershare app.

2. Find the import media. Click it and choose your preferred video fromyour files that you want to edit. Wait a second until the video is finished importing.

3. Drag the video to the lower left side. After dragging ,right-click yourmouse and choose video and then click “crop and zoom.”


4. Now, you can adjust the focus of your video.

5. After cropping, if you are satisfied with your edit you can now save your project by clicking the save project icon.

Conclusion
In this guide, you have acquired some knowledge about using crop on a video clip. Though this process or step could be very difficult but using Filmora Wondershare you can easily follow the steps provided above.
Therefore, cropping video is necessary. It is one of the basic editing skill that you need to know. It is functional to your online business, work projects, school projects and other related stuffs. Cropping will help you to emphasize more about your subject.
It is easier for you to do the edit if you used some software programs. You can used Filmora Wondershare or any of the best editing software programs. While you are giving the best videos and photos of your costumer and viewers you are also improving and enhancing your editing skills.
However, you also need to be careful in doing some edits. Before you save your project you need to make sure that you are cropping the right portion of your video.
Your plug-in will be enabled after selecting it from the menu.
Step 4: While playingthe document you need to edit, flow the blue slider to the segment of the film you need to trim/reduce and click “Start”. Manually type the time of the video you need to begin deciding on into the Start box in case you discover the usage of the slider difficult. Click the “End” button on the factor you need the trimming to end.

Step 5: Find and press the “In” button to trim the chosen component; The “Out” button to reduce the chosen component out of the authentic media document.
Note that SolveigMM WMP Trimmer Plugin supports to edit videos including cutting or trimming, however, it doesn’t offer an option to crop video.
An alternative way to crop video on Windows by Wondershare Filmora
Wondershare Filmora Video Editor is one of the great video enhancing software program with cool functions that compares to different competing video enhancing Softwares program. Many video enhancing applications claimed to provide expert results; Filmora is one in every of some consumer-stage equipment that definitely delivers.
For Win 7 or later (64-bit)
For macOS 10.14 or later
Here in Filmora, it is not just trimming but this tool can help you to adjust the focus of your video clip. Here are steps on how to crop a video using wondershare filmora.
1. Install and launch your Filmora Wondershare app.

2. Find the import media. Click it and choose your preferred video fromyour files that you want to edit. Wait a second until the video is finished importing.

3. Drag the video to the lower left side. After dragging ,right-click yourmouse and choose video and then click “crop and zoom.”


4. Now, you can adjust the focus of your video.

5. After cropping, if you are satisfied with your edit you can now save your project by clicking the save project icon.

Conclusion
In this guide, you have acquired some knowledge about using crop on a video clip. Though this process or step could be very difficult but using Filmora Wondershare you can easily follow the steps provided above.
Therefore, cropping video is necessary. It is one of the basic editing skill that you need to know. It is functional to your online business, work projects, school projects and other related stuffs. Cropping will help you to emphasize more about your subject.
It is easier for you to do the edit if you used some software programs. You can used Filmora Wondershare or any of the best editing software programs. While you are giving the best videos and photos of your costumer and viewers you are also improving and enhancing your editing skills.
However, you also need to be careful in doing some edits. Before you save your project you need to make sure that you are cropping the right portion of your video.
Also read:
- New 4 Ways to Rotate Videos on Windows PC for 2024
- 2024 Approved Best 8 Online GIF to APNG Converters
- New How to Add Font Effect for 2024
- Updated In 2024, How to Combine Videos Into One on Instagram
- New This Article Discusses What Is Adobe Premiere Pro, How to Download, Install and Use It, and Its Key Features. It Further Discusses Its Alternative for Editing Your Videos and More. Check Out Now
- In 2024, What Is the Best Frame Rate for 4K Videos?
- Updated In 2024, Best Cinematic LUTs For Premiere Pro You Can Come Across
- Updated How to Add Green Screen in OBS for 2024
- In 2024, The Best Cinematic LUTs in The Market
- Updated LumaFusion – What Is It and the Best Alternative to Use for 2024
- Updated The Upcoming Generation of AR and VR Is Going to Define Augmented Reality Conferencing as the New Normal for All Business Purposes. With a Global Perspective to Build Better Communication, AR Can Be the Future of Collaborative Workspace
- New S-Log Is a Gamma Curve Optimized for Digital Cameras to Maximize the Image Sensors Performance. Although These Videos May Look Flat and Washed Out, They Contain Lots of Color Information
- Updated Full Guide to Discord Boost for 2024
- Want to Convert MP4 Video To 60 FPS GIF? Read This
- New How to Make Blender Render Transparent Background
- Updated Create Motion Effect with Path Blur In Photoshop
- Updated An Ultimate Guide on the Significance of Music in Videos and How to Choose the Right Music for Your Videos with Wondershare Filmora
- In 2024, How to Cast Vivo V27 Screen to PC Using WiFi | Dr.fone
- In 2024, How to Unlock Itel A60s Phone without Any Data Loss
- App Wont Open on Your Honor X7b? Here Are All Fixes | Dr.fone
- How to Unlock iCloud lock from your Apple iPhone 14 Pro and iPad?
- In 2024, The Best Methods to Unlock the iPhone Locked to Owner for Apple iPhone 7 Plus
- How to Mirror PC Screen to OnePlus 11 5G Phones? | Dr.fone
- Updated How to Reduce GIF Size and Best GIF Resizers
- 4 Easy Ways for Your Infinix Smart 7 HD Hard Reset | Dr.fone
- Put and play MKV movies on Redmi Note 13 5G
- 4 Methods to Turn off Life 360 On Nubia Red Magic 9 Pro+ without Anyone Knowing | Dr.fone
- Title: New Text Animation Intro Tutorial in Filmora
- Author: Chloe
- Created at : 2024-05-20 03:38:18
- Updated at : 2024-05-21 03:38:18
- Link: https://ai-editing-video.techidaily.com/new-text-animation-intro-tutorial-in-filmora/
- License: This work is licensed under CC BY-NC-SA 4.0.

