
:max_bytes(150000):strip_icc():format(webp)/5-things-to-consider-before-buying-a-gaming-laptop-5235493-145a8c941b9f46e99d9a90bdee387893.jpg)
New The After-Effects Match Colour Feature Bestows Numerous Benefits. Thus, in the Following Discussion, We Will Discuss This Feature and an Equally Proficient Efficient Alternative Tool for Colour Matching
The After-Effects Match Colour Feature Bestows Numerous Benefits. Thus, in the Following Discussion, We Will Discuss This Feature and an Equally Proficient Efficient Alternative Tool for Colour Matching
Every Compositor Should Know The Trick of Color Match in After Effects
An easy yet powerful editor
Numerous effects to choose from
Detailed tutorials provided by the official channel
After Effects is one of the most exciting applications put forward by Adobe. You can readily use this application for film-making; that is, you can edit videos with After Effects. The features of this application are highly proficient, effective and intuitive. And one of the most exciting and incredible features of After Effects is the “Colour Match” feature.
The “Color Match” of After Effects has numerous advantages, and there are some steps that you need to follow to use this feature. So, in the following discussion, we have discussed how you can match colours in After Effects its advantages. Lastly, we have introduced a video editing tool that can ideally be an alternative to the “Color Match” of After Effects.
In this article
01 [What Are the Obvious Advantages of the Color Match of After Effects?](#Part 1)
02 [Quick Tip - Matching Colors in After Effects](#Part 2)
03 [Alternative to After Effects Color Match](#Part 3)
Part 1 What Are the Obvious Advantages of the Color Match of After Effects?
As we have mentioned earlier, the colour matcher plugin of After Effects has numerous advantages, we will now be discussing what they are. So, the following list states the different benefits of using the “Color Match” of After Effects.
● You can add shadows and highlights.
Sometimes, our photos are underexposed, while sometimes, they are overexposed. Either way, they do not look quite pleasing. But you efficiently use “Colour Match” of After Effects to correct the exposure. And it will be possible when you adjust the highlights and shadows of the picture or the video through this feature. You can access this advantage in the “Shadows and Highlights” option of After Effects.

● Adjuting Vibrance
Another benefit you get from this feature of After Effects is that you can quickly fix the appropriate saturation of the picture or the video you want to edit. You can adjust the saturation, thus, making the picture or the video more vibrant and natural-looking. The option to adjust the saturation or the vibrance of any image or video is present in the “Vibrance” option. Click on the option and set the saturation of the colours of the images perfectly.

● Access to incredible filters
After Effects’ “Colour Match” feature filters make your photos and videos look all-natural. You can readily adjust the settings of the filters and set them according to the essence you want to have in your picture. The filters make your picture and videos look like they have been shot naturally on high-quality camera lenses. So, your videos and pictures look more natural and of the highest quality.
● Choose and match any colour for your images and videos
You might want to change or alter the colours of a particular video clip or an image with the colour of some other image. The “Colour Match” feature of Adobe After Effect makes it readily possible for you to carry this function.
● Intuitive but proficient feature
The “Colour Match” feature of Adobe After Effect helps you edit your videos and images most profoundly. But at the same time, apart from being a professional feature, it is not difficult to use. You can easily understand how to use the feature and make your videos and images match the colours you want.
Part 2 Quick Tip - Matching Colors in After Effects
Here are the steps by which you can avail of the incredible “Colour Match” feature of after-effects to match the colour between clips.
Step 1The first step requires you to access the “Composition Settings” and make the required changes accordingly. You can find the options in the “Composition Settings” and readily make the needed changes.

Step 2Choose the background color according to your choice.

Step 3Now, import the image you want to edit. First, right-click and then you will find an “Import” option. Click on it to import the image you want.

Step 4As you select the “Import” option, you will see a dialogue box. Select the folder in which the image has been saved and then select the image from the folder.

Step 5After importing the image, you need to select After Effects’ “Effects & Presets” option. And there, you will find the “Colour Correction” option. Click on that option.

Step 6You will see an “Auto-colour” option. Double-click on that option. It will automatically make your image look more realistic ad natural. Adobe After Effects will choose the most suitable colour correction shade for your photo and apply it. As a result, you will see a vibrant change in the image.

Many other features under this tool will help you make your images look as vibrant and incredible as possible. And now, we will be discussing the various features and tips that you can use in “After Effects” to make your images look more fabulous than ever.
● Change the contrast of the image to make it look more vibrant
You can change the settings of the image if you want. Also, you can use the “Blend” feature of After Effects to bring out better changes and edits in your picture. Another feature that can help you edit the colours of your image in After Effects is the “Auto Contrast” feature of After Effects.
In this feature, the tool automatically adjusts the exposure of the image’s colours, lights, and shadows, thereby making it look more realistic and natural. The image quality is also enhanced through this feature. It is because the colour contrast gets automatically adjusted to the perfect settings by the feature.
You will get the “Auto Contrast” feature exactly below the “Auto Colour” option, in the “Colour Contrast” drop-down panel.
● Change the level of your image to make it look more natural
You can readily make your images look more natural and realistic than ever. And that is possible through the “Colour Correction” feature of After Effects. Opt for the “Auto Levels” option present in the “Colour Correction” drop-down box.
Then right below the “Auto Contrast” option, you will find the “Auto-Levels” option. After you click on the option, your image will automatically get its colour adjusted by the tool, correctly adjusting all its required settings to make your image look as realistic and natural as possible.
● Bring a black-and-white effect on your image through the option in After effects
The Black-and-White effect on the images has been one of the most popular trends and styles one chooses to edit. And in order to make your efforts minimal and the quality of with the finest, the After Effects has a “Black & white” option as well.
So, if you want to edit your pictures in the black and white filter, you can readily do so in the highest quality and with the least effort. Open the “Colour Contrast” feature in After Effects and click on its drop-down box. The fourth option is the one that is below the “Auto Levels” option, and you will find the “Black & White” option present.
Click on that option, and you will find your image edited in the black-white hues, in the most impeccable shade, light, shadow and effect.
● Change the tint and the brightness or contrast
Under the “Black & White” option in the “Colour Correction” option of After effects, you can avail of the further edit option that is available under the “Black & White” option. There, the last option will be “Tint”. When you opt for the option of “Tint”. You can select the colour you want to be entirely dominant in your image.
And below the “Black & White” option, you will find the “Brightness & Contrast” option. Click on it to adjust and set the brightness and contrast of the image. It will make the image’s colour and shades look more vibrant because you can change its contrast according to your wish.
Part 3 Alternative to After Effects Color Match
And now, we will be introducing you to another video and image editing tool that will help you match the colours of your videos and images as proficiently as the colour matcher after effects plugin. And the tool is Wondershare Filmora Video Editor . Its incredible feature of “Colour Match” allows you to match the colours of your videos and images, making them more vibrancy, sometimes even monochromatic.
You can choose a particular theme or shade for the entire image or video and the “Colour Match” will help you bring your imagination into reality. If you want to edit or match colours in a particular clip or option of the video, you are all set to do so with Filmora 11.
For Win 7 or later (64-bit)
For macOS 10.12 or later
● Key Takeaways from This Episode →
● The advantages that you receive from “Colour Match” of After effects
● The quick steps of how to use “Colour Match” of “After Effects”
● The “Colour Match” feature of Filmora can readily make your videos alter colors and become more vibrant and incredible.
After Effects is one of the most exciting applications put forward by Adobe. You can readily use this application for film-making; that is, you can edit videos with After Effects. The features of this application are highly proficient, effective and intuitive. And one of the most exciting and incredible features of After Effects is the “Colour Match” feature.
The “Color Match” of After Effects has numerous advantages, and there are some steps that you need to follow to use this feature. So, in the following discussion, we have discussed how you can match colours in After Effects its advantages. Lastly, we have introduced a video editing tool that can ideally be an alternative to the “Color Match” of After Effects.
In this article
01 [What Are the Obvious Advantages of the Color Match of After Effects?](#Part 1)
02 [Quick Tip - Matching Colors in After Effects](#Part 2)
03 [Alternative to After Effects Color Match](#Part 3)
Part 1 What Are the Obvious Advantages of the Color Match of After Effects?
As we have mentioned earlier, the colour matcher plugin of After Effects has numerous advantages, we will now be discussing what they are. So, the following list states the different benefits of using the “Color Match” of After Effects.
● You can add shadows and highlights.
Sometimes, our photos are underexposed, while sometimes, they are overexposed. Either way, they do not look quite pleasing. But you efficiently use “Colour Match” of After Effects to correct the exposure. And it will be possible when you adjust the highlights and shadows of the picture or the video through this feature. You can access this advantage in the “Shadows and Highlights” option of After Effects.
● Adjuting Vibrance
Another benefit you get from this feature of After Effects is that you can quickly fix the appropriate saturation of the picture or the video you want to edit. You can adjust the saturation, thus, making the picture or the video more vibrant and natural-looking. The option to adjust the saturation or the vibrance of any image or video is present in the “Vibrance” option. Click on the option and set the saturation of the colours of the images perfectly.
● Access to incredible filters
After Effects’ “Colour Match” feature filters make your photos and videos look all-natural. You can readily adjust the settings of the filters and set them according to the essence you want to have in your picture. The filters make your picture and videos look like they have been shot naturally on high-quality camera lenses. So, your videos and pictures look more natural and of the highest quality.
● Choose and match any colour for your images and videos
You might want to change or alter the colours of a particular video clip or an image with the colour of some other image. The “Colour Match” feature of Adobe After Effect makes it readily possible for you to carry this function.
● Intuitive but proficient feature
The “Colour Match” feature of Adobe After Effect helps you edit your videos and images most profoundly. But at the same time, apart from being a professional feature, it is not difficult to use. You can easily understand how to use the feature and make your videos and images match the colours you want.
Part 2 Quick Tip - Matching Colors in After Effects
Here are the steps by which you can avail of the incredible “Colour Match” feature of after-effects to match the colour between clips.
Step 1The first step requires you to access the “Composition Settings” and make the required changes accordingly. You can find the options in the “Composition Settings” and readily make the needed changes.
Step 2Choose the background color according to your choice.
Step 3Now, import the image you want to edit. First, right-click and then you will find an “Import” option. Click on it to import the image you want.
Step 4As you select the “Import” option, you will see a dialogue box. Select the folder in which the image has been saved and then select the image from the folder.
Step 5After importing the image, you need to select After Effects’ “Effects & Presets” option. And there, you will find the “Colour Correction” option. Click on that option.
Step 6You will see an “Auto-colour” option. Double-click on that option. It will automatically make your image look more realistic ad natural. Adobe After Effects will choose the most suitable colour correction shade for your photo and apply it. As a result, you will see a vibrant change in the image.
Many other features under this tool will help you make your images look as vibrant and incredible as possible. And now, we will be discussing the various features and tips that you can use in “After Effects” to make your images look more fabulous than ever.
● Change the contrast of the image to make it look more vibrant
You can change the settings of the image if you want. Also, you can use the “Blend” feature of After Effects to bring out better changes and edits in your picture. Another feature that can help you edit the colours of your image in After Effects is the “Auto Contrast” feature of After Effects.
In this feature, the tool automatically adjusts the exposure of the image’s colours, lights, and shadows, thereby making it look more realistic and natural. The image quality is also enhanced through this feature. It is because the colour contrast gets automatically adjusted to the perfect settings by the feature.
You will get the “Auto Contrast” feature exactly below the “Auto Colour” option, in the “Colour Contrast” drop-down panel.
● Change the level of your image to make it look more natural
You can readily make your images look more natural and realistic than ever. And that is possible through the “Colour Correction” feature of After Effects. Opt for the “Auto Levels” option present in the “Colour Correction” drop-down box.
Then right below the “Auto Contrast” option, you will find the “Auto-Levels” option. After you click on the option, your image will automatically get its colour adjusted by the tool, correctly adjusting all its required settings to make your image look as realistic and natural as possible.
● Bring a black-and-white effect on your image through the option in After effects
The Black-and-White effect on the images has been one of the most popular trends and styles one chooses to edit. And in order to make your efforts minimal and the quality of with the finest, the After Effects has a “Black & white” option as well.
So, if you want to edit your pictures in the black and white filter, you can readily do so in the highest quality and with the least effort. Open the “Colour Contrast” feature in After Effects and click on its drop-down box. The fourth option is the one that is below the “Auto Levels” option, and you will find the “Black & White” option present.
Click on that option, and you will find your image edited in the black-white hues, in the most impeccable shade, light, shadow and effect.
● Change the tint and the brightness or contrast
Under the “Black & White” option in the “Colour Correction” option of After effects, you can avail of the further edit option that is available under the “Black & White” option. There, the last option will be “Tint”. When you opt for the option of “Tint”. You can select the colour you want to be entirely dominant in your image.
And below the “Black & White” option, you will find the “Brightness & Contrast” option. Click on it to adjust and set the brightness and contrast of the image. It will make the image’s colour and shades look more vibrant because you can change its contrast according to your wish.
Part 3 Alternative to After Effects Color Match
And now, we will be introducing you to another video and image editing tool that will help you match the colours of your videos and images as proficiently as the colour matcher after effects plugin. And the tool is Wondershare Filmora Video Editor . Its incredible feature of “Colour Match” allows you to match the colours of your videos and images, making them more vibrancy, sometimes even monochromatic.
You can choose a particular theme or shade for the entire image or video and the “Colour Match” will help you bring your imagination into reality. If you want to edit or match colours in a particular clip or option of the video, you are all set to do so with Filmora 11.
For Win 7 or later (64-bit)
For macOS 10.12 or later
● Key Takeaways from This Episode →
● The advantages that you receive from “Colour Match” of After effects
● The quick steps of how to use “Colour Match” of “After Effects”
● The “Colour Match” feature of Filmora can readily make your videos alter colors and become more vibrant and incredible.
How to Add Subtitles in QuickTime Player?
QuickTime is among the most popular multimedia players available for PC users. Developed by Apple Inc. in 1991, it was initially made available for Mac OS. However, from 2005 till 2016, QuickTime was available for Windows operating systems as well. While QuickTime allows you to view images and music, it is a popular choice for playing videos.
Do you use QuickTime player to watch music videos, movies, and TV shows? Well, you may find it interesting that the QuickTime player allows you to add subtitles. As there are multiple methods through which you can add subtitles in QuickTime, we are going to discuss them one by one in this blog. So, let’s start our discussion!
Method 1: Turn on the Subtitles in QuickTime
As you might know, some videos come with embedded subtitles. It’s up to you whether you want to view them while playing the video or not. If you are playing a video with embedded subtitles in the QuickTime player but are somehow unable to view the subtitles, it’s probably because the subtitles feature is turned off. So, you need to enable the subtitles by following certain steps.
Steps to Turn on Subtitles in QuickTime
Step1 Open the QuickTime Player application on your Mac computer.

Step2 Play the video having subtitles embedded in it.
Step3 Within the menu bar, find the “view” tab and open it.

Step4 Now, you need to find the subtitles option.

Step5 Choose a language in which subtitles are available.
Step6 You will be able to view the subtitles at the bottom of the player window.
Step7 You can also click the “subtitles” button in the playback controls to view the subtitles available with a video.
Method 2: Download and Add Subtitles to Videos in QuickTime
If you want to play videos in QuickTime that do not have embedded subtitles, you can add subtitles to them manually. With QuickTime player, it is quite easy to add external subtitles files and watch movies and TV shows with subtitles of your choice. However, you first need to download an appropriate subtitles file for a video from a reliable website and then load it onto the QuickTime player.
While downloading subtitles for the QuickTime player, keep in mind that you need subtitles in .QT file format.
Steps to Add Subtitles to QuickTime Player
Step1 Download the subtitles for the video in the .QT format.
Step2 Navigate to the directory where you have downloaded the subtitles file.
Step3 Right-click the file and select the “Open with QuickTime” option.
Step4 You will be able to see the subtitles. Select all the subtitles, right-click and select “Copy”.
Step5 Now, open the video in the QuickTime player.
Step6 In the menu bar, click “Edit” and then “Add to Movie”.
Step7 Paste the subtitles that you have copied earlier and click the “Save” button.
![]()
Note: While adding the subtitles, make sure the video is set at its very beginning. This will help to ensure that the subtitles are synchronized properly with the video.
Method 3: Watch Subtitles in QuickTime Player with iPad Screen Extension
If you own an iPad, you can use it to view subtitles while playing a video in QuickTime player. In other words, you can use the iPad as an extension to the Mac. The iPad displays the subtitles while the video plays on the Mac.
While using an iPad as an extension to your Mac, there are certain things you need to keep in mind. They are as follows:
- To ensure a proper connection between the Mac and iPad, place both devices within 10 meters of each other.
- To allow synchronization between the two devices, it is important that both of them are signed into one single iCloud account.
- You also need to check the operating systems of both devices to make sure they connect with each other. To be precise, your Mac needs to run macOS Catalina or later versions, while your iPad should run iPadOS 13 or later versions.
If all three conditions specified above are met, you can proceed to connect your iPad with Mac OS and watch subtitles on the iPad.
Steps to Watch Subtitles in QuickTime Player with an iPad Screen Extension
Step1 Open Apple Menu on your Mac by clicking on the Apple icon at the top left of the screen.

Step2 Find and click the “System Preferences” option.

Step3 Search and open “Sidecar”.
Step4 You will see options to connect your Mac with other devices. Connect your Mac with your iPad by follow4ng the instructions provided on the screen.
Step5 You can change the display settings for the iPad from Apple Menu > System Preferences > Displays.

Step6 You can now use your iPad to display the subtitles of a video.
Bonus Tips: How to Edit and Add Subtitles to Videos Easily
As you already know, the subtitles available for a video may have errors and/or inconsistencies. In some cases, you may be unable to find the .QT subtitles file for a video or simply want to add custom subtitles to a video. Whether you want to edit the subtitles file or add subtitles to a video, you should consider using Wondershare Filmora .
Free Download For Win 7 or later(64-bit)
Free Download For macOS 10.14 or later
Filmora is an advanced and feature-rich video editing software developed by Wondershare. It is an exceptionally popular choice among creators for editing and giving a professional touch to raw videos. The software comes loaded with several features to help you style your videos and make them more engaging. With Filmora, you get access to features like green screen, split screen, motion tracking, and HDR support. You can also add subtitles to videos through SRT files or add custom subtitles.
A Step-by-Step Guide for Adding Subtitles to a Video Using Filmora
Following are the key steps to add custom subtitles to videos with Wondershare Filmora:
Step1 Open the Filmora application on your desktop.
Step2 You can either create a new project or choose an existing project.
Step3 Import the video to which you want to add subtitles by clicking the “Import Media” button.
Step4 Once the video gets imported successfully, you can see its thumbnail within the media tab.
Step5 You can load the video into the timeline by either clicking on the “+” button available on the thumbnail or simply dragging and dropping the video onto the timeline.
Step6 Play the video and pause it at the exact section where you need to add custom subtitles. You can leave a mark by either pressing the M key or clicking the marker icon, which is available next to the microphone icon in the timeline tab.
Step7 Now, click the “Titles” option present at the top of the Filmora interface.
Step8 Choose a subtitle template and add it to the video timeline.

Step9 You can add text, modify text style, and add animations.
Step10 Click the “Ok” button to save the subtitles.
Step11 You can repeat the same process for adding subtitles to different sections of the video.
Conclusion
It’s quite easy to add subtitles to QuickTime player and watch videos with subtitles in your preferred language. In this guide, we discussed how to enable embedded subtitles and add external subtitles files to a video in QuickTime. Additionally, we talked about the steps to view subtitles on an iPad and add custom subtitles to videos using the Filmora video editor.
Method 3: Watch Subtitles in QuickTime Player with iPad Screen Extension
If you own an iPad, you can use it to view subtitles while playing a video in QuickTime player. In other words, you can use the iPad as an extension to the Mac. The iPad displays the subtitles while the video plays on the Mac.
While using an iPad as an extension to your Mac, there are certain things you need to keep in mind. They are as follows:
- To ensure a proper connection between the Mac and iPad, place both devices within 10 meters of each other.
- To allow synchronization between the two devices, it is important that both of them are signed into one single iCloud account.
- You also need to check the operating systems of both devices to make sure they connect with each other. To be precise, your Mac needs to run macOS Catalina or later versions, while your iPad should run iPadOS 13 or later versions.
If all three conditions specified above are met, you can proceed to connect your iPad with Mac OS and watch subtitles on the iPad.
Steps to Watch Subtitles in QuickTime Player with an iPad Screen Extension
Step1 Open Apple Menu on your Mac by clicking on the Apple icon at the top left of the screen.
Step2 Find and click the “System Preferences” option.
Step3 Search and open “Sidecar”.
Step4 You will see options to connect your Mac with other devices. Connect your Mac with your iPad by follow4ng the instructions provided on the screen.
Step5 You can change the display settings for the iPad from Apple Menu > System Preferences > Displays.
Step6 You can now use your iPad to display the subtitles of a video.
Bonus Tips: How to Edit and Add Subtitles to Videos Easily
As you already know, the subtitles available for a video may have errors and/or inconsistencies. In some cases, you may be unable to find the .QT subtitles file for a video or simply want to add custom subtitles to a video. Whether you want to edit the subtitles file or add subtitles to a video, you should consider using Wondershare Filmora .
Free Download For Win 7 or later(64-bit)
Free Download For macOS 10.14 or later
Filmora is an advanced and feature-rich video editing software developed by Wondershare. It is an exceptionally popular choice among creators for editing and giving a professional touch to raw videos. The software comes loaded with several features to help you style your videos and make them more engaging. With Filmora, you get access to features like green screen, split screen, motion tracking, and HDR support. You can also add subtitles to videos through SRT files or add custom subtitles.
A Step-by-Step Guide for Adding Subtitles to a Video Using Filmora
Following are the key steps to add custom subtitles to videos with Wondershare Filmora:
Step1 Open the Filmora application on your desktop.
Step2 You can either create a new project or choose an existing project.
Step3 Import the video to which you want to add subtitles by clicking the “Import Media” button.
Step4 Once the video gets imported successfully, you can see its thumbnail within the media tab.
Step5 You can load the video into the timeline by either clicking on the “+” button available on the thumbnail or simply dragging and dropping the video onto the timeline.
Step6 Play the video and pause it at the exact section where you need to add custom subtitles. You can leave a mark by either pressing the M key or clicking the marker icon, which is available next to the microphone icon in the timeline tab.
Step7 Now, click the “Titles” option present at the top of the Filmora interface.
Step8 Choose a subtitle template and add it to the video timeline.
Step9 You can add text, modify text style, and add animations.
Step10 Click the “Ok” button to save the subtitles.
Step11 You can repeat the same process for adding subtitles to different sections of the video.
Conclusion
It’s quite easy to add subtitles to QuickTime player and watch videos with subtitles in your preferred language. In this guide, we discussed how to enable embedded subtitles and add external subtitles files to a video in QuickTime. Additionally, we talked about the steps to view subtitles on an iPad and add custom subtitles to videos using the Filmora video editor.
How to Use LUTs in VN Editor – Complete Guide and Best LUTs Download
Hello and welcome to another article full of information and excitement. The topic of this article is LUT for the VN editor. So it will be exciting for those who want to use LUTs in their video to make them look nice and well. As we will discuss today that what is VN editor and how you can add LUTs to your videos using it on the devices it is compatible for. Moreover, where you can download some fantastic LUTs like moody LUTs, which help your videos to look nice, and which software you should use for this purpose if you are running a device on which the VN editor is not compatible. So let’s begin!
Part 1. What is VN editor?
VN editor is one of the best choices for video editing on mobiles and Mac. Fast editing, transitions, effects, filters, colors, subtitles, music, and many other features make the VN video editing app a great tool for producing and editing videos. It aims to make editing shorter and more feature-rich, empowering everyone to take control of their own lives. You cannot only produce great videos but good films as well. In the following, we will discuss how you can add LUTs to your videos using it.

Part 2. How to use LUTs in VN editor?
First, we must know that it is compatible with which platforms. So, it is now available for Android, iOS, and Mac OS only. However, you can also use it on Windows with some Android or iOS emulators, but it is not a very continent way in our suggestions. Even after doing this, it does not work well on your Windows. Maybe you will face some glitches or malfunctioning problems. So it is better to use it on only those platforms for which it is primarily available. Please read the instructions below since we will go through how to use LUTs in it later on.
On Mac:
First of all, we will learn how you can do it on Mac:
- Download the VN Editor for Mac and open it.
- Add your video and then tap the filters option.
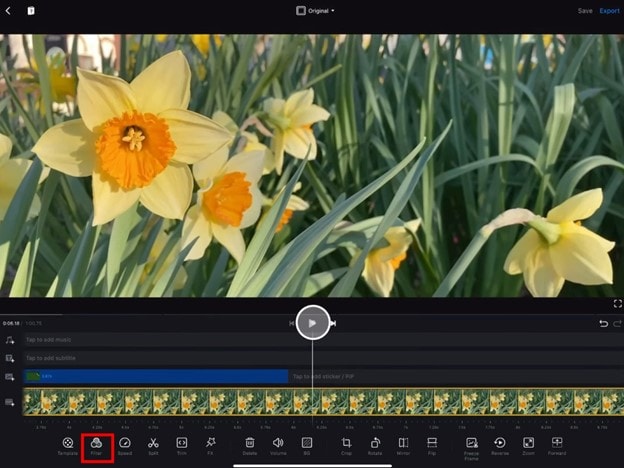
- Now choose custom filters and then select the LUTs pack.

- Select the desired LUT and apply.
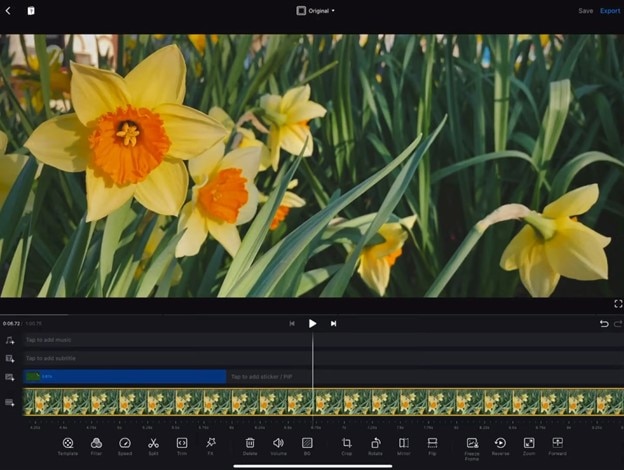
On Mobile:
Secondly, we will discuss how we can do this on our mobiles (Android or iOS). The procedure on both devices (Android or iOS) is almost comparable. Therefore, we will discuss the steps from the perspective of both of these here:
- First, download the VN editor from your mobile app store (Android or iOS) and the LUTs pack you want to use in your video.
- After downloading them on your mobile, open the VN editor application.
- Create a new project and add your video to it.

- Then click on the Filters option and select add external or custom filters option next to the existing filters.
- It will take you to the File manager of your mobile, from which you have to find the folder in which you have stored your LUTs.
- After finding them, you can select those LUTs you want to use in your video and then click on the done or select button.
- Your downloaded LUTs start showing in the VN editor, and you can use them in your videos as you want.
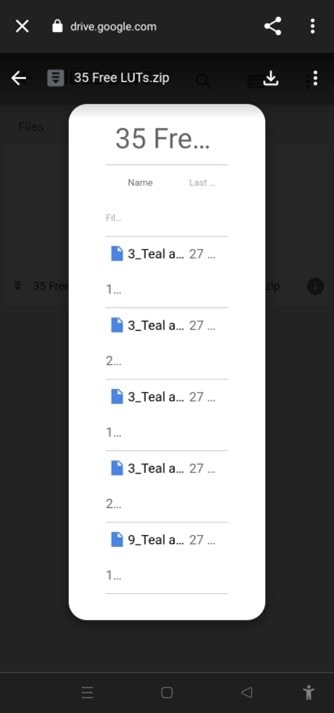
Part 3. Best LUTs resource for VN video editor
1. Presets Store
Presets Store is an online platform that helps you with various Filters, LUTs, and other presets. So you can download LUTs for your videos for the VN editor using it. However, it’s not a free service. You have to pay for the LUTs you want to download from here. You can visit their YouTube channel to follow the latest LUTs, Filters and other presets on this platform.
2. Apna Editz
Apna Editz is another online platform you can use for this purpose. It also provides you with a fantastic variety of Presets like LUTs, Filters, and many other similar effects, which you can use in your video using the VN editor. The main Pros of this recommendation are that it’s a free website. So you can download LUTs for your videos from it for free. Keep an eye on their YouTube channel to be updated about the latest LUTs.
3. Lut Preset
Lut Preset is another alternative to all the above ones. You can get almost all your favorite LUTs for VN editor for free here and then use them in your videos as you want. They also share the latest LUTs on their YouTube Channel.
4. Pencil Hub
Pencil Hub is also a good option in this concern. However, it does not have too much variety of VN LUTs, but you can still use it to download some of the best LUTs for VN editors. To get informed of their every new effect and LUTs, their YouTube channel is the primary source.
5. YRP EDITZ
YRP ETIDZ is another good option if you are still looking for some fantastic VN LUTs. They, too not have a large variety of presets and LUTs. However, if you want some most commonly used LUTs for VN Editor, then they are a good option. You’ll notify of their most website updates by checking their YouTube channel.
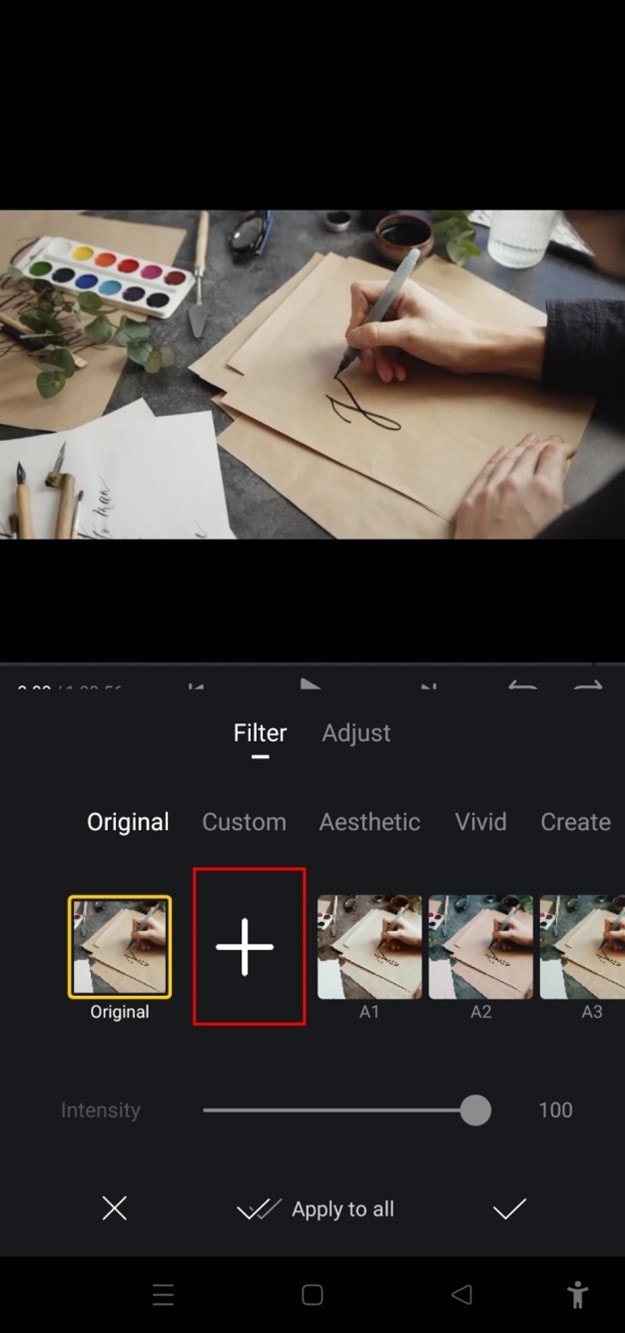
Part 4. How to add LUTs to the best alternative to the VN editor?
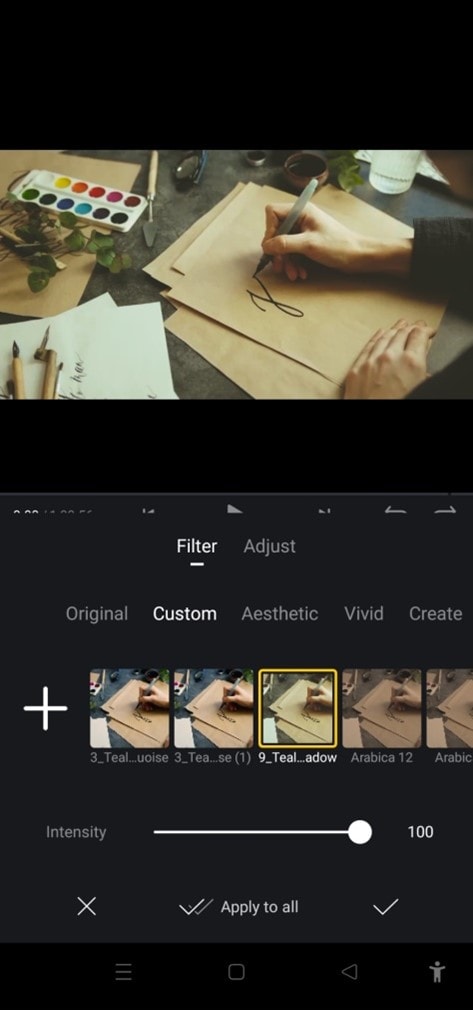
VN Editor is undoubtedly an excellent choice to add LUTs to your videos. However, the VN editor is best suitable for mobile devices. To enhance your LUTs and effects, it would be great if you used some desktop software. Wondershare Filmora offers a great variety of built-in LUTs to choose from. Let’s look at how we can use Filmora to add LUTs:
- Add your video and tap the tools, then click the Color option.
- Now select the Color Correction option and then choose 3D LUT.
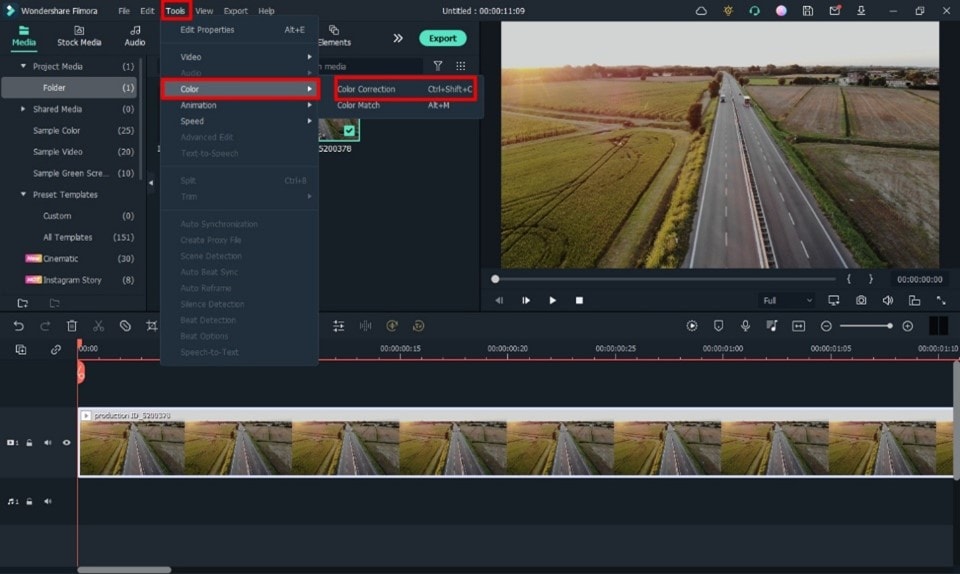
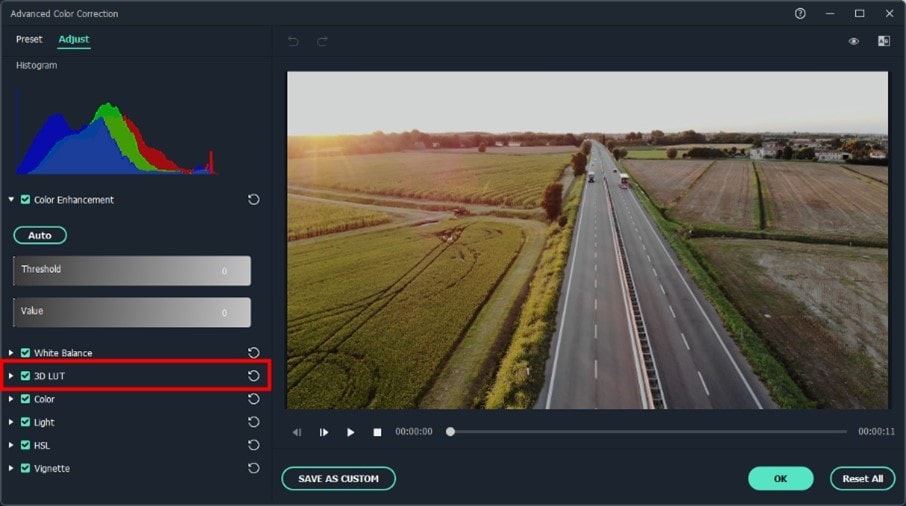
- Click the drop-down menu and select the Load new LUT option. Here you can import other downloaded preset LUTs to use
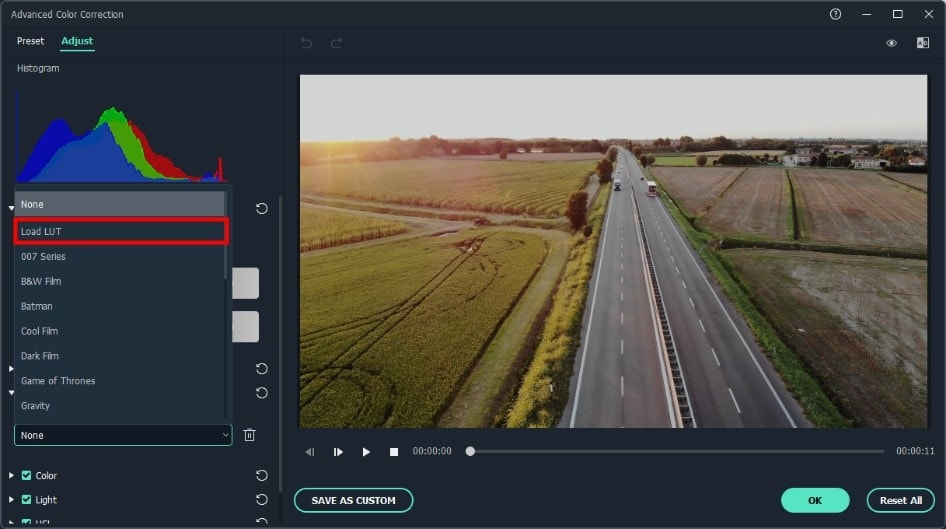
- Choose the LUT and click OK. Your new fantastic video is ready now.

Closing Thoughts
This post recommends several lut resources and demonstrates how to import them if you are a devoted user of VN editor and want to learn how to utilize it for video color grading. The more potent desktop editor Wondershare Filmora, which offers a range of built-in LUT sources and supports color grading settings, is of course recommended if you want to take your videos to the next level. Thanks for reading.
Free Download For Win 7 or later(64-bit)
Free Download For macOS 10.14 or later
2. Apna Editz
Apna Editz is another online platform you can use for this purpose. It also provides you with a fantastic variety of Presets like LUTs, Filters, and many other similar effects, which you can use in your video using the VN editor. The main Pros of this recommendation are that it’s a free website. So you can download LUTs for your videos from it for free. Keep an eye on their YouTube channel to be updated about the latest LUTs.
3. Lut Preset
Lut Preset is another alternative to all the above ones. You can get almost all your favorite LUTs for VN editor for free here and then use them in your videos as you want. They also share the latest LUTs on their YouTube Channel.
4. Pencil Hub
Pencil Hub is also a good option in this concern. However, it does not have too much variety of VN LUTs, but you can still use it to download some of the best LUTs for VN editors. To get informed of their every new effect and LUTs, their YouTube channel is the primary source.
5. YRP EDITZ
YRP ETIDZ is another good option if you are still looking for some fantastic VN LUTs. They, too not have a large variety of presets and LUTs. However, if you want some most commonly used LUTs for VN Editor, then they are a good option. You’ll notify of their most website updates by checking their YouTube channel.
Part 4. How to add LUTs to the best alternative to the VN editor?
VN Editor is undoubtedly an excellent choice to add LUTs to your videos. However, the VN editor is best suitable for mobile devices. To enhance your LUTs and effects, it would be great if you used some desktop software. Wondershare Filmora offers a great variety of built-in LUTs to choose from. Let’s look at how we can use Filmora to add LUTs:
- Add your video and tap the tools, then click the Color option.
- Now select the Color Correction option and then choose 3D LUT.
- Click the drop-down menu and select the Load new LUT option. Here you can import other downloaded preset LUTs to use
- Choose the LUT and click OK. Your new fantastic video is ready now.
Closing Thoughts
This post recommends several lut resources and demonstrates how to import them if you are a devoted user of VN editor and want to learn how to utilize it for video color grading. The more potent desktop editor Wondershare Filmora, which offers a range of built-in LUT sources and supports color grading settings, is of course recommended if you want to take your videos to the next level. Thanks for reading.
Free Download For Win 7 or later(64-bit)
Free Download For macOS 10.14 or later
10 Best Music Video Templates to Make Your Video Popular
Music is essentially the food to the soul. A good song could pull you out of a bad mood or cheer you up when you feel low. You could also use music to motivate you to do tedious tasks, like tackling a mountain of dishes at the sink. In addition to having a catchy beat and rhythm, a good song should accompany a well-executed music video.
If you are a novice and new to the music industry, you might wonder how to make your video look stunning and polished to excite your fans. This article will discuss the ten best templates on Filmstock and how to incorporate them into your music video.

- Retro Music Visualization Background Video Template
- Audio Visualization Intro Template for Your Music Video
- Visualizer Overlays Pack Templates for Music Videos
- Audio Visualization Music Video Template
- Audio Spectrum Template for Music Video
- Music Playlist Video Title Pack Template Free for Download
- Lyrics for Music Video Templates
- Music Event Templates Pack for Your Video
- VJ Looping Backgrounds Templates for Music Videos
- EDM Logo Templates for Music Videos
- How To Edit Your Next Music Video With Templates Using Filmora for Desktop
- How To Use Music Video Templates With Filmora for Mobile
- Tips for Editing Your Music Videos
10 Best Music Video Templates
Without dilly-dallying too much, let’s look at some amazing templates from Filmstock you can use to edit your music videos.
1. Retro Music Visualization Background Video Template
The looping background in our first music video template removes the tedium from editing. Once you ensure your soundtrack is flawless, the template takes it to a whole new level, almost like giving it a facelift. The bright neon and pastel colors are sure to keep your audience glued to their screens, unable to look away from the masterpiece before their eyes.
2. Audio Visualization Intro Template for Your Music Video
This audio visualization intro template is beautifully designed and easy to use for even the least experienced editor. All you need to do is pair it with your favorite soundtrack; the template will match it to the audio animation. This intro template is compatible with Filmora 9.6 and above and comes with 12 titles and 12 effects. Sadly, there are no transitions here.
3. Visualizer Overlays Pack Templates for Music Videos
Perhaps your music videos are a bit bland, or your audience has grown used to a particular editing style. This music template video is a sure way to refresh your videos and introduce your audience to a whole new side of you. Even though it contains plenty of bright colors similar to other templates on our list, we guarantee it shines bright uniquely.
4. Audio Visualization Music Video Template
Podcasts are a new type of content where the viewers can plug in their headphones and listen to you rant while they complete their chores. You could take your podcast videos to the next level using this audio visualization template, which is easy to use and contains deep, rich colors that are easy on the eyes.
5. Audio Spectrum Template for Music Video
There is no shortage of templates with beautiful bold colors on our list. This audio spectrum template is definitely one of them. It also contains geometric shapes and futuristic designs to wow your audience.
6. Music Playlist Video Title Pack Template Free for Download
Some viewers prefer to watch one long video with their favorite artist’s songs bundled up in one place. This template for music video can provide the perfect background for your viewers as they enjoy their beloved songs.
7. Lyrics for Music Video Templates
This fun template takes the boredom out of any music video and allows your audience to enjoy both the auditory and visual experience simultaneously. The lyrics for music video templates are suitable for Filmora 9.6 and above and come with a whopping 16 titles, 17 elements, and four transitions.
8. Music Event Templates Pack for Your Video
The eighth music video template on our list is inspired by concerts and dance clubs, even though it is not as loud or chaotic. This template is compatible with Filmora 9.6 and above and comes with 14 titles, ten elements, four effects, and two transitions. Since you will be adding your own audio track, it’s not such a bummer that it doesn’t come with music.
9. VJ Looping Backgrounds Templates for Music Videos
The modern and futuristic look in the VJ looping background template makes it a great choice for concert-type videos or anything related to sci-fi. The bright colors are hard to miss and will wow your audience.
The VJ looping background template is easy to incorporate into any project, and within a few simple clicks, your video is ready for viewing. You can use this template with Filmora 9.6 and above. However, it only comes with 36 elements. There are no titles, transitions, or effects.
10. EDM Logo Templates for Music Videos
Last but not least, this EDM logo template is compatible with Filmora 9.6 or above and comes with six titles, eight elements, and two effects. Unfortunately, the package doesn’t include any transitions. This electronic video template is perfect for concerts and festival-related music videos that are anything but laid-back.
How To Edit Your Next Music Video With Templates Using Filmora for Desktop
Having seen the beautiful templates for your music video discussed above, you might wonder how you could use them in your next music video to increase traffic to your channel. Wondershare Filmora is an excellent editing tool that can help you achieve exactly that. The desktop version is free to download, not to mention its feature-rich interface and templates you can’t possibly exhaust.
Free Download For Win 7 or later(64-bit)
Free Download For macOS 10.14 or later
Below is a step-by-step guide on how to edit your video with a music video template**.**
Step1 Launch Filmora for desktop on your device and click on the logo to import media from your internal storage. Alternatively, you could drag and drop the files in the designated region as shown.

Step2 Navigate to the “Template” tab and wait for a drop-down menu to appear on the left side of the screen. Select the “Music” tab and wait a few seconds for the platform to download all the available music templates. Click the template that tickles your fancy and drag it to the timeline as shown below.

Step3 Select the “Media” tab at the top of the page. Drag your soundtrack and music video to the timeline and click “Replace” to remove the sample footage that comes with the template.

Step4 Customize your video by adding effects, transitions, and stickers as you see fit. View the changes you have made in the Player window of the platform. Once you are happy with the outcome, click “Export” to save a copy of the final video to your device.

If you want to add more custom designs to your music video, watch the video below to learn more:
How To Use Music Video Templates With Filmora for Mobile
Suppose you want to use your mobile phone to edit a short video clip. Filmora has a mobile app, which is no different from the desktop app, except that it is optimized for smartphones and tablets. The installation is pretty easy, and the interface is very user-friendly.
Stick around to learn how to use Filmora for mobile to edit your video with a free music video template.
Step1 Launch the app on your mobile phone and select the “Template” tab.

Step2 Navigate to the “Lyrics” or “Music Beats” tab to start perusing music video templates on the app.

Step3 Choose a template you like and tap on the “Make Video” button.

Step4 import your music video or photos from your internal storage. Select “Go >” to apply the changes.

Step5 Preview the resulting footage and click “Export” once you are happy with the outcome.

Step6 You can share the video directly on any of your social media platforms. Alternatively, if you want to download the edited video to your device, select “More.”

Tips for Editing Your Music Videos
Now that you have the ideal editing tool to take your videos from drab to fab, here are a few tips to help you along the way.
- Ensure you set the output file to the appropriate resolution to avoid lowering the quality of the video you edit.
- Resist the temptation to insert the artsy shots before you lay a basic framework. It would be wise to focus on the musician’s performance before you insert shots of the beautiful scenery.
- As you edit, it would help to create a storyline that matches the lyrics. You could create a simple story or a complex one.
- Since your computer might struggle to process numerous 4k videos, it would help to create proxy files as early as possible so you can save your progress along the way.
- During filming, create and collect your favorite b-roll shots. These clips provide extra information or context to anyone watching your music video.
- Ensure you match the video to the beat and look out for areas where the performer sings along. We guarantee your fans will notice the slightest delay between the song and the performer in the video.
- Once the music video looks polished and synchronized, you can adjust brightness, contrast, and exposure and change the white balance.
- Lastly, you could begin or end the video with the artists’ credits, such as their names or logo. Since it is a relevant piece of information, ensure this segment of the video grabs the viewers’ attention.
Conclusion
If you want your song to go viral, you ought to put in the work and make the video as good as the soundtrack. Nothing is as bad as a good song with a poorly executed video. Your fans will definitely criticize you for it, making the ratings go down.
Fortunately, the guidelines in this article will set you on the right path and help you make a polished-looking music video in no time.
10 Best Music Video Templates
Without dilly-dallying too much, let’s look at some amazing templates from Filmstock you can use to edit your music videos.
1. Retro Music Visualization Background Video Template
The looping background in our first music video template removes the tedium from editing. Once you ensure your soundtrack is flawless, the template takes it to a whole new level, almost like giving it a facelift. The bright neon and pastel colors are sure to keep your audience glued to their screens, unable to look away from the masterpiece before their eyes.
2. Audio Visualization Intro Template for Your Music Video
This audio visualization intro template is beautifully designed and easy to use for even the least experienced editor. All you need to do is pair it with your favorite soundtrack; the template will match it to the audio animation. This intro template is compatible with Filmora 9.6 and above and comes with 12 titles and 12 effects. Sadly, there are no transitions here.
3. Visualizer Overlays Pack Templates for Music Videos
Perhaps your music videos are a bit bland, or your audience has grown used to a particular editing style. This music template video is a sure way to refresh your videos and introduce your audience to a whole new side of you. Even though it contains plenty of bright colors similar to other templates on our list, we guarantee it shines bright uniquely.
4. Audio Visualization Music Video Template
Podcasts are a new type of content where the viewers can plug in their headphones and listen to you rant while they complete their chores. You could take your podcast videos to the next level using this audio visualization template, which is easy to use and contains deep, rich colors that are easy on the eyes.
5. Audio Spectrum Template for Music Video
There is no shortage of templates with beautiful bold colors on our list. This audio spectrum template is definitely one of them. It also contains geometric shapes and futuristic designs to wow your audience.
6. Music Playlist Video Title Pack Template Free for Download
Some viewers prefer to watch one long video with their favorite artist’s songs bundled up in one place. This template for music video can provide the perfect background for your viewers as they enjoy their beloved songs.
7. Lyrics for Music Video Templates
This fun template takes the boredom out of any music video and allows your audience to enjoy both the auditory and visual experience simultaneously. The lyrics for music video templates are suitable for Filmora 9.6 and above and come with a whopping 16 titles, 17 elements, and four transitions.
8. Music Event Templates Pack for Your Video
The eighth music video template on our list is inspired by concerts and dance clubs, even though it is not as loud or chaotic. This template is compatible with Filmora 9.6 and above and comes with 14 titles, ten elements, four effects, and two transitions. Since you will be adding your own audio track, it’s not such a bummer that it doesn’t come with music.
9. VJ Looping Backgrounds Templates for Music Videos
The modern and futuristic look in the VJ looping background template makes it a great choice for concert-type videos or anything related to sci-fi. The bright colors are hard to miss and will wow your audience.
The VJ looping background template is easy to incorporate into any project, and within a few simple clicks, your video is ready for viewing. You can use this template with Filmora 9.6 and above. However, it only comes with 36 elements. There are no titles, transitions, or effects.
10. EDM Logo Templates for Music Videos
Last but not least, this EDM logo template is compatible with Filmora 9.6 or above and comes with six titles, eight elements, and two effects. Unfortunately, the package doesn’t include any transitions. This electronic video template is perfect for concerts and festival-related music videos that are anything but laid-back.
How To Edit Your Next Music Video With Templates Using Filmora for Desktop
Having seen the beautiful templates for your music video discussed above, you might wonder how you could use them in your next music video to increase traffic to your channel. Wondershare Filmora is an excellent editing tool that can help you achieve exactly that. The desktop version is free to download, not to mention its feature-rich interface and templates you can’t possibly exhaust.
Free Download For Win 7 or later(64-bit)
Free Download For macOS 10.14 or later
Below is a step-by-step guide on how to edit your video with a music video template**.**
Step1 Launch Filmora for desktop on your device and click on the logo to import media from your internal storage. Alternatively, you could drag and drop the files in the designated region as shown.
Step2 Navigate to the “Template” tab and wait for a drop-down menu to appear on the left side of the screen. Select the “Music” tab and wait a few seconds for the platform to download all the available music templates. Click the template that tickles your fancy and drag it to the timeline as shown below.
Step3 Select the “Media” tab at the top of the page. Drag your soundtrack and music video to the timeline and click “Replace” to remove the sample footage that comes with the template.
Step4 Customize your video by adding effects, transitions, and stickers as you see fit. View the changes you have made in the Player window of the platform. Once you are happy with the outcome, click “Export” to save a copy of the final video to your device.
If you want to add more custom designs to your music video, watch the video below to learn more:
How To Use Music Video Templates With Filmora for Mobile
Suppose you want to use your mobile phone to edit a short video clip. Filmora has a mobile app, which is no different from the desktop app, except that it is optimized for smartphones and tablets. The installation is pretty easy, and the interface is very user-friendly.
Stick around to learn how to use Filmora for mobile to edit your video with a free music video template.
Step1 Launch the app on your mobile phone and select the “Template” tab.
Step2 Navigate to the “Lyrics” or “Music Beats” tab to start perusing music video templates on the app.
Step3 Choose a template you like and tap on the “Make Video” button.
Step4 import your music video or photos from your internal storage. Select “Go >” to apply the changes.
Step5 Preview the resulting footage and click “Export” once you are happy with the outcome.
Step6 You can share the video directly on any of your social media platforms. Alternatively, if you want to download the edited video to your device, select “More.”
Tips for Editing Your Music Videos
Now that you have the ideal editing tool to take your videos from drab to fab, here are a few tips to help you along the way.
- Ensure you set the output file to the appropriate resolution to avoid lowering the quality of the video you edit.
- Resist the temptation to insert the artsy shots before you lay a basic framework. It would be wise to focus on the musician’s performance before you insert shots of the beautiful scenery.
- As you edit, it would help to create a storyline that matches the lyrics. You could create a simple story or a complex one.
- Since your computer might struggle to process numerous 4k videos, it would help to create proxy files as early as possible so you can save your progress along the way.
- During filming, create and collect your favorite b-roll shots. These clips provide extra information or context to anyone watching your music video.
- Ensure you match the video to the beat and look out for areas where the performer sings along. We guarantee your fans will notice the slightest delay between the song and the performer in the video.
- Once the music video looks polished and synchronized, you can adjust brightness, contrast, and exposure and change the white balance.
- Lastly, you could begin or end the video with the artists’ credits, such as their names or logo. Since it is a relevant piece of information, ensure this segment of the video grabs the viewers’ attention.
Conclusion
If you want your song to go viral, you ought to put in the work and make the video as good as the soundtrack. Nothing is as bad as a good song with a poorly executed video. Your fans will definitely criticize you for it, making the ratings go down.
Fortunately, the guidelines in this article will set you on the right path and help you make a polished-looking music video in no time.
Also read:
- Updated A Comprehensive Review of LUTs Finding LUTs Made by Danny Gevirtz
- Updated Guide Adding Audio in Wondershare Filmora
- 2024 Approved How to Make a Slow Motion Video Complete Guide
- What Is TS Format and How To Play TS Files for 2024
- New Are You Looking for the Best Premiere Pro Slideshow Template Online for Free? If Yes, You Can Find a Few Exciting Slideshow Templates Here. They Are Worth Using
- Updated 8 Tips to Apply Cinematic Color Grading to Your Video for 2024
- New 2024 Approved All Things About Adding Effects In Kinemaster
- 2024 Approved 6 Instant Ways to Make Windows 10 Slideshow
- Updated Best Guide of 8 Photo Collage Apps for PC for 2024
- In 2024, How to Zoom Desktop Screen
- Updated 2024 Approved VN Editor A Prominent Option for Adding Luts for Video Editing
- New Discover the Ultimate LUTs for Wondershare Filmora Uncover the Answer
- Updated In 2024, Finding the Best Voice Changers for WhatsApp Free and Paid
- New 2024 Approved Take Your Video Editing to the Next Level with Video Scopes
- How To Make a Photo Collage in Microsoft Word — Step by Step Guide for 2024
- New The Power of Music in Videos
- New Final Cut Pro for iPad- Is It Available, In 2024
- How to Correct Lens Distortion With Filmora for 2024
- New Do You Want to Know About the Best Filmic Pro LUTs for Video Editing? This Article Provides Details on the Best Recommendations
- 2024 Approved How to Make Censor Effects with Filmora
- Updated Guide to Create an Intro Video with Filmora for 2024
- New How to Download Windows Movie Maker 2012 Version
- New 2024 Approved Which 10 Best Video Editing Online Makers Is Worth Your Attention?
- New 2024 Approved Effective 10 Ways to Convert YouTube to MOV at Ease PC & Online
- New 15 Best CapCut Templates for Slow Motion Editing
- In 2024, Learn How to Effortlessly Mirror Video Clips in Adobe Premiere Pro with This Step-by-Step Guide. Perfect for Creating a Symmetrical Look in Your Videos
- Updated 2024 Approved Clone Yourself in Videos with Filmora
- New Top 10 Free WhatsApp Video Converter 2023
- New Easy Way to Apply Green Screen to YouTube Videos for 2024
- New How Can You Create Outstanding Educational Teaching Videos?
- Updated How To Add Text In After Effects for 2024
- New 2024 Approved A Wedding Is One of the Exciting Parts that Will Happen in Your Life. Its Not that Easy to Plan a Wedding, Theres a Lot to Be Consider Like Wedding Dress, Food, Venue, Videographer Etc
- How to Create an Adobe Slideshow the Easy Way for 2024
- Updated How Long Does It Take To Edit A Video for 2024
- New 2024 Approved How to Add Text Effects in Adobe Premiere Pro?
- In 2024, Trailer Guide for Creators and Developers
- How to Share Location in Messenger On Oppo Find N3 Flip? | Dr.fone
- In 2024, Unlocking Apple iPhone 12 Passcode without a Computer
- Will the iPogo Get You Banned and How to Solve It On Samsung Galaxy S24 | Dr.fone
- In 2024, Best Ways on How to Unlock/Bypass/Swipe/Remove Xiaomi Redmi A2+ Fingerprint Lock
- In 2024, 3 Effective Ways to Unlock iCloud Account Without Password From Apple iPhone 14 Plus
- In 2024, Ultimate Guide on Vivo V29 FRP Bypass
- Top 15 Augmented Reality Games Like Pokémon GO To Play On Tecno Phantom V Fold | Dr.fone
- How to Unlock Infinix Hot 40i Phone Forgot Password
- My Videos Arent Playing on Oppo Find N3 – What Can I Do? | Dr.fone
- Can Life360 Track Or See Text Messages? What Can You Do with Life360 On Apple iPhone 6? | Dr.fone
- How To Transfer Data From Apple iPhone 15 To Other iPhone 11 devices? | Dr.fone
- Life360 Learn How Everything Works On Apple iPhone 14 Pro Max | Dr.fone
- Tips And Tricks To Tell if Your iPhone 12 Pro Is Unlocked
- Top 10 Password Cracking Tools For Nubia Z50 Ultra
- How do I reset my Tecno Phantom V Fold Phone without technical knowledge? | Dr.fone
- Apply These Techniques to Improve How to Detect Fake GPS Location On Google Pixel Fold | Dr.fone
- Ultimate Guide from Vivo Y27 4G FRP Bypass
- In 2024, Bypass iCloud Activation Lock with IMEI Code From your iPhone 14
- Fix Honor Magic V2 Android System Webview Crash 2024 Issue | Dr.fone
- Google Play Services Wont Update? 12 Fixes are Here on Xiaomi Redmi Note 13 Pro+ 5G | Dr.fone
- How to Transfer Contacts from ZTE Nubia Z60 Ultra to iPhone XS/11 | Dr.fone
- 15 Best Strongest Pokémon To Use in Pokémon GO PvP Leagues For Nokia C300 | Dr.fone
- Title: New The After-Effects Match Colour Feature Bestows Numerous Benefits. Thus, in the Following Discussion, We Will Discuss This Feature and an Equally Proficient Efficient Alternative Tool for Colour Matching
- Author: Chloe
- Created at : 2024-04-24 07:08:22
- Updated at : 2024-04-25 07:08:22
- Link: https://ai-editing-video.techidaily.com/new-the-after-effects-match-colour-feature-bestows-numerous-benefits-thus-in-the-following-discussion-we-will-discuss-this-feature-and-an-equally-proficient/
- License: This work is licensed under CC BY-NC-SA 4.0.
