
New This Article Aim to Teach You How to Make a Night to Day Effect Video with Filmora. Follow the Steps to Figure It Out

This Article Aim to Teach You How to Make a Night to Day Effect Video with Filmora. Follow the Steps to Figure It Out
Do you wish you could control when it’s nighttime to daytime? It would make getting ready in the morning much faster! This tutorial will show you how to use the keyframe and mask feature in Filmora to make a remarkable night-to-day transition.
How-to Guide
1) Preparation
For this effect, you will need to shoot two footage shots with the same frame. The first is for the daytime clip, and the second is for nighttime.
But before that, you need to prepare some things, such as:
- Tripod to ensure your camera stays at the same point, so the frame doesn’t change.
- Mark the place where you want to shoot the scene. You can put a marker on the floor to ensure that you perform at the same spot in different shots.
Once done, let’s start shooting to get the footage.
2) Steps
Shooting footages
First, get the daytime shot. For this tutorial, we will pretend that you are walking and transitioning into nighttime at the spot you have marked.

Now, let’s film the nighttime clip. You will walk through the living room and do the same movement again at the same spot. You can dim the light and change the camera’s white balance settings to bluer to create a night feeling.

After you have both clips that you need, let’s go to Filmora and start editing.
Night-to-day transition
Step1 Launch Filmora and import the footage into the program. If you haven’t installed it, you can download Filmora on their website here: https://filmora.wondershare.com
Step2 Place the nighttime video clip on the first video track of the timeline and place the daytime clip on the top.

Step3 Find the spot where you want to create a transition between the day and nighttime. Then, you can delete the unwanted part.

Step4 Since the transition for this tutorial is where the subject started waving, make sure to place the daytime clip at the same time the subject started waving in the nighttime clip. Hence, the timing in both clips syncs.
Masking transition
For the next step, we will make a masking transition with the Filmora mask feature.
Step1 Double-click the daytime clip on the timeline. In the Filmora setting, find the Mask section > Circle. You can see the mask is applied in the preview screen.

Step2 Scroll down the setting and click add a keyframe at the beginning of the clip.

Step3 Change the scale of the mask to the smallest number and adjust the Width and Height down to 0. You can set the blur strength to 15 to make the transition edge smoother.

Step4 Move the play head to find the spot where you want the mask fully opens up, then add another keyframe. Change the scale of the mask to 2 and the Width and Height to 50. Make sure the mask occupies the whole frame.

Now, if you play back, you can see the nighttime becomes daytime through the mask.

If the movement in the two clips is a bit off, you can fix it by adding more keyframes on the mask.
3) Pro tips
You can add one more effect in Filmora to make it more magical. To do this, open the Effects window on the top left and find “Heartbeat” under the Basic section.

Drag and drop it onto the third video track and start the effect when the mask opens up. Then, trim the effect length to match the movement. Adjust the speed of this effect if needed.

The final result will look like this:

Summary
That is how to do this night-to-day transition night-to-day time shift effect in Filmora. By the end of this tutorial, you should be able to use the masking transition technique. You can apply and adjust it based on your needs.
Free Download For Win 7 or later(64-bit)
Free Download For macOS 10.14 or later
Free Download For macOS 10.14 or later
LumaFusion Offers Various Look Up Table Presets, or LUTs, Such as FiLMiC deLog and FiLMiC DeFlat, and Several Stylistic LUTs for Use with Neutral Use Video. You Can Also Manually Add the LUTs
LumaFusion is one of the most complex iPad and iPhone video editing apps. Many of its customers adore it, and it has some incredible capabilities that you’d find incompetent editing software. They’ve effectively opened up the realm of LUTs to iPhone and iPad users.
LumaFusion LUTs are individual files that act as containers in LumaFusion. This container file includes standard LUT data as well as LumaFusion-specific color preset data. A LumaFusion LUT Preset file is similar to a Super LUT. LumaFusion can only employ one standard LUT at a time; however, LumaFusion LUT presets enable simultaneous Color Grading and Color Corrections.
How will LUTs help with color correction in Lumafusion
Colors in today’s cameras are vibrant, but they may continuously be improved. Color correction corrects the color that’s already there, whether it’s boosting the exposure to brighten a darker photo or increasing the saturation to make the colors pop. Color correction in other NLEs can be difficult, but not in LumaFusion.
The Color Presets tab in the Color & Effects section is where you begin color correcting footage. There are various presets from which to pick. I wouldn’t use these settings on my videos because they’re too stylized, but they’re there. You may alter any of the presets to your taste, so some of the more dramatic ones can be toned down. By picking the original setting, purists can color-fix their raw footage without using LumaFusion. Moving the sliders till the color seems perfect is all that’s required from there.
Exposure, contrast, highlights, shadows, mid-tones, and saturation and hue are all controlled by sliders. The color sliders can be used for a more forceful approach. But proceed with caution. The sliders are delicate, and it’s easy to overdo them. Play around with the sliders until you get the look you want. If you don’t like it, toss it in the trashcan and start over.
Color grading and color correction are not interchangeable terms. Color correction is a technical requirement, but color grading is primarily creative. You’ll have no command over the color grading process if you’re working with film material where primary colors aren’t even visible. Before diving into the creative LUTs, make sure you complete adequate color correcting.
Color grading, unlike color correction, adjusts the shot’s color to modify the atmosphere or feel. The only way to do that in LumaFusion is to play around with the color sliders under the Color Presets tab, but that’s not ideal. As previously stated, the three sliders are sensitive and limited. LumaFusion isn’t designed for color grading, which is OK. Thankfully, LumaFusion allows you to use LUTs.
Always color correct your footage before utilizing any LUTS, which entails changing the White-balance, Highlights, Contrast, and Shadows. Do not apply the LUTS to your footage directly.
How to use LUTs in Lumafusion?
Videographers, colorists, and editors use LUTs because they are efficient. Rather than starting from zero every time you work on a video editing project, you may speed up the color grading process using a LUT with predefined color profiles. It’s elementary to import LUTs. Simply import the preset files into LumaFusion and add the preset to your footage like an Instagram filter.
The Import button in the Color & Effects editor is the easiest way to load LUTs.
- Double click on any video/photo clip on the timeline to access the Clip Editors.
- At the bottom of the Clip Editor UI, select the Color & Effects tab.
- The import button is located directly below the effect preset library.
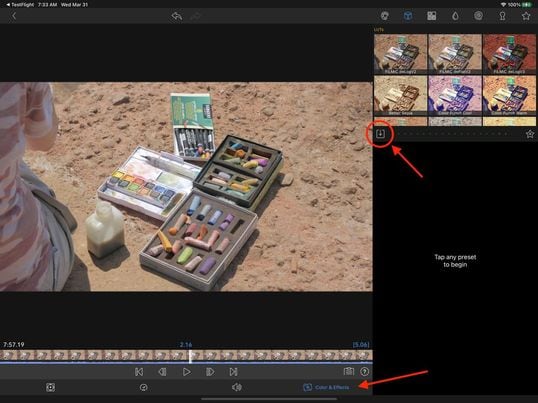
How to use LUTs in Lumafuison
LUTs must be loaded via the LumaFX clip editor at the moment. Follow the steps below to accomplish this:
- To access the LumaFX UI, double-tap any video/photo clip in the timeline.
- At the bottom of the LumaFX UI, select the ‘Color & Effects’ tool.
- In the upper right panel, press the cube icon.
- The import button is located directly below the effect preset library.
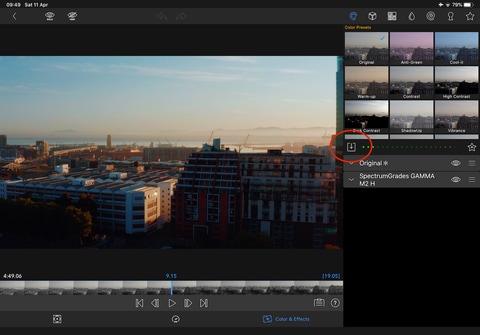
Load LumaFX LUTs
- Once hit, it will display your transfer site options; select your desired transfer site and navigate to the folder where your LUTs are stored.
- Select and import all of the LUTs in the folder.
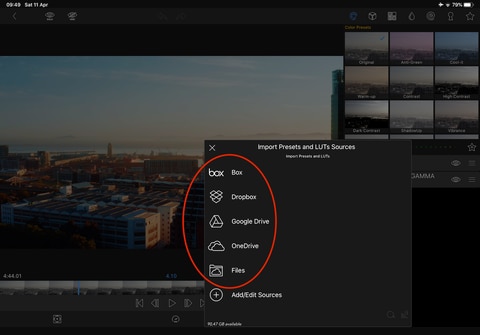
Import LUTs
Free LUTs Resource for Lumafusion
Choosing the appropriate LUT pack will boost your photography and videography immediately. With our quick guide to the top free LUTs available, you can find the appropriate one for you.
1. Jaun Melara free LUTs
LUTs aren’t simply for stylizing video. They’re frequently employed as a color correction tool to ensure that your colors are shown correctly in various formats. Juan Melara has provided a free LUT set to assist you in color correcting your footage for printing on film stock. These free LUTs will provide modest stylization to your footage if you don’t want to send it to print.
Melara developed this video to demonstrate his free LUTs in action. The colors are more subdued than in the other LUTs on this list. This free LUT pack is ideal if you’re looking to produce a modern-style cinematic color grade. Melara also has a great article about using LUTs to create a lovely color grade. DaVinci PowerGrades are available for several of these LUTs. They color correct your film in the same way as LUTs do, but you’ll have more flexibility over individual PowerGrade components.
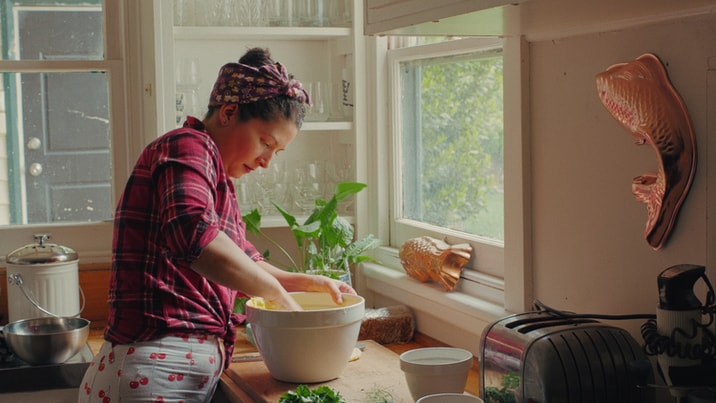
Jaun Melara free LUTs
2. Small Hd free LUTs
SmallHD, a company that makes small, full HD on-camera monitors, is giving away a free set of color grades that reproduce the appearance of seven classic movies. The company is also releasing a series of video lessons that show how to get the most out of these effects throughout production and post-production. Everything is completely free. The color grades are provided as a.zip file and are in the form of 3D LUT files created in DaVinci Resolve. If you’re unfamiliar with SmallHD, the company offers free LUTs for on-set monitoring in real-time. This free set of Movie Look LUTs is inspired by seven recent films, including Apocalypse Now’s warmth and The Matrix’s green overtones. Take use of SmallHD’s free LUT set if you want to give your footage a dramatic and cinematic vibe.

Small Hd free LUTs
3. Color Grading Central free LUTs
Color Grading Central is essential knowledge for any aspiring colorist or video editor who takes color seriously. CGC is a company that specializes in color grading. Their website has a wide range of outstanding color-related products, from grain to LUTs. They also provide their email members with a wealth of free color grading information. Free trials of some LUTs are also available, so you may try them out before you buy. They’re giving away an array of color presets, grains, and burns exclusively to their email list and the seven free color LUTs. We strongly recommend them if you want to give your footage a shot-on-film look.

Color Grading Central free LUTs
4. PremiumBeat Free LUTs
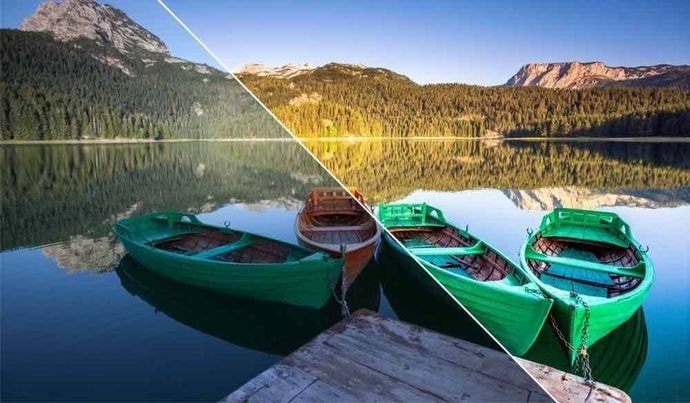
PremiumBeat has freely given countless LUT packs as well as other assets to any video editor or filmmaker over the years. Todd Blankenship has designed a fresh new set of FREE LUTs for Shutterstock, which is their latest addition. Todd chose distinct looks from films and pictures that inspire his daily work to create this bundle with attention and love. There are many options, and these looks will offer you a great place to start when it comes to grading your footage. They recently published an in-depth evaluation of Photon.io, a new color grading tool. Todd Blankenship, who ended up utilizing the tool to create these LUTs, wrote the initial review. The pack has been fine-tuned to replicate some clean, cinematic looks that you may use as a jumping-off point for your video.
PremiumBeat Free LUTs
5. Frank Glencairn free LUT
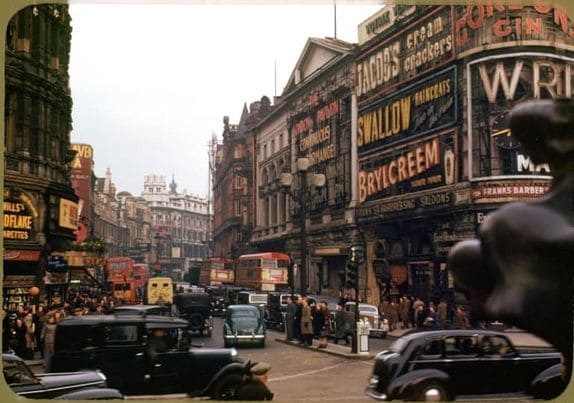
Despite having access to the most advanced filming gear, there’s something about a vintage film aesthetic that looks fantastic. Frank Glencairn has made a nice K-Tone LUT that is meant to look like vintage Kodachrome film. This film grade, which was formerly popular among photographers and filmmakers, has fallen out of favor due to the rise of digital cameras. With this free LUT, you can get the appearance of retro-looking reds, blues, and yellows.
Frank Glencairn free LUT
6. Reverse Tree Media free LUTs
Reverse Tree Media is releasing a new LUTS bundle that is absolutely free. In addition to LUTS, this LUTS collection includes utility LUTS, film grains, and a Black-Bar layer. For the color-grading procedure, this is critical. This bundle contains 56 free LUTS for various scenarios like weddings, television commercials, travel films, landscapes, Rec.709, and so on. It also has several useful LUTS and film grain overlays for 8mm, 16mm, and 35mm video, as well as a cinematic black bar PNG file with a ratio of 2.35:1 to assist you in achieving a more cinematic appearance quickly and save time. Check out the link to learn more about LUTS and to obtain their previous cinematic LUTS bundle, which is also free.

Reverse Tree
Wondershare Filmora11 Express Better
Achieve More
Grow Together
Free Download Free Download Learn More

Closing Thoughts:
LUTs are most typically used to build and store color profiles that can be utilized in other film projects. By using contrast and design, you can bring logs and flat materials to life. Everything you need to know is right here. You can now rush to your desk and fix your video.
Free Download Free Download Learn More

Closing Thoughts:
LUTs are most typically used to build and store color profiles that can be utilized in other film projects. By using contrast and design, you can bring logs and flat materials to life. Everything you need to know is right here. You can now rush to your desk and fix your video.
TikTok Velocity Dance Tutorial| Filmora
Preparation
What you need to prepare:
- A computer (Windows or macOS)
- Your video materials.
- Filmora video editor
Step 1
First, download the Filmora Video Editor . Run it and click on “New Project”.
Step 2
Import the video and audio you want to use for your edit.

Step 3
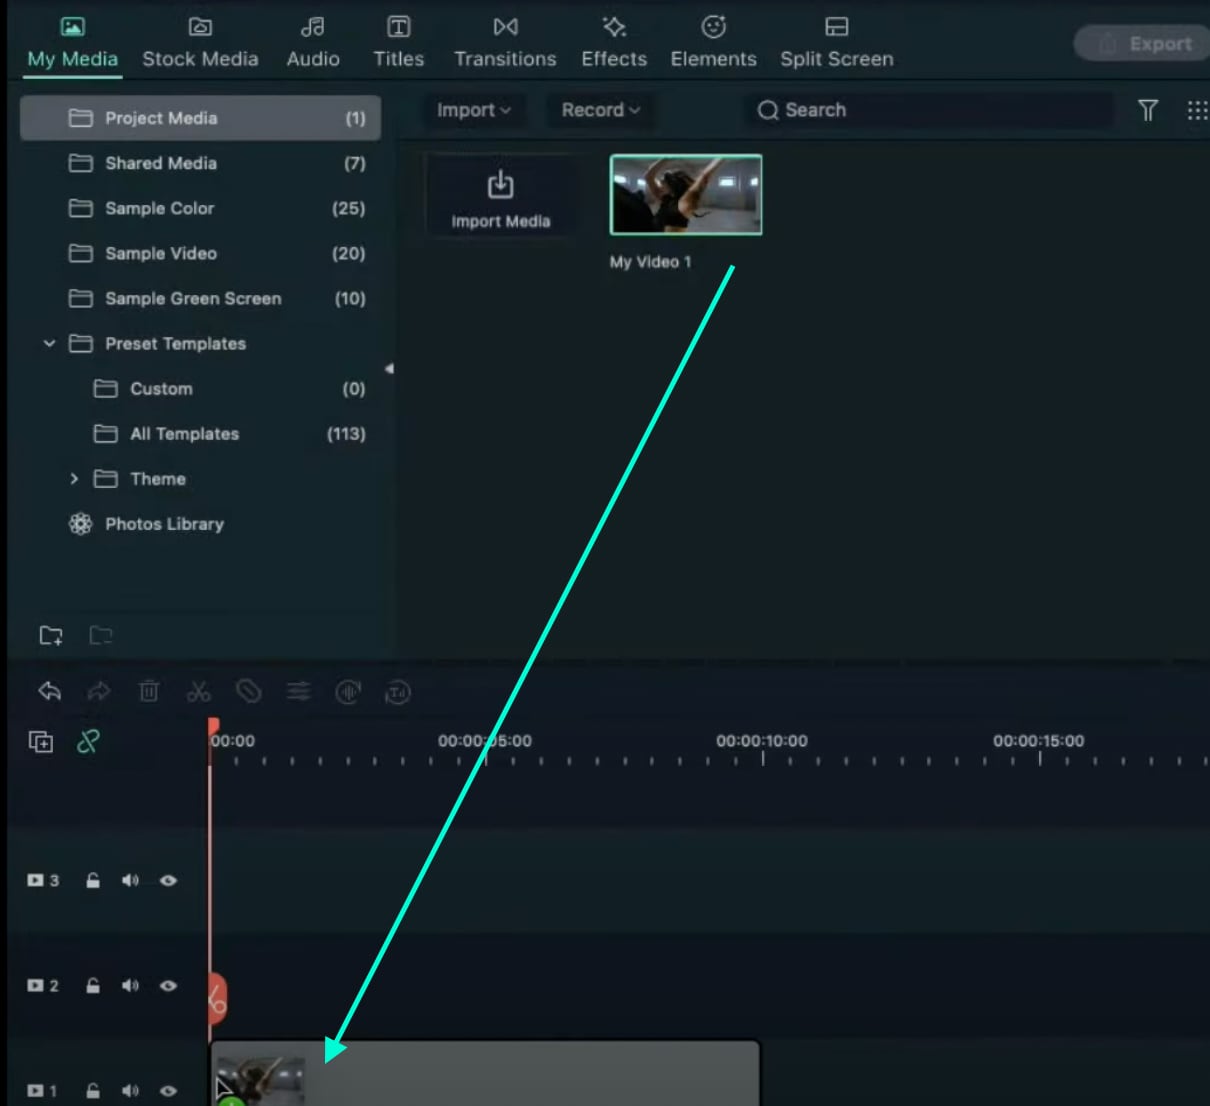
Drag the Audio into the Timeline. Then, Drag your Video clip to Track 1 on the Timeline.
Step 4
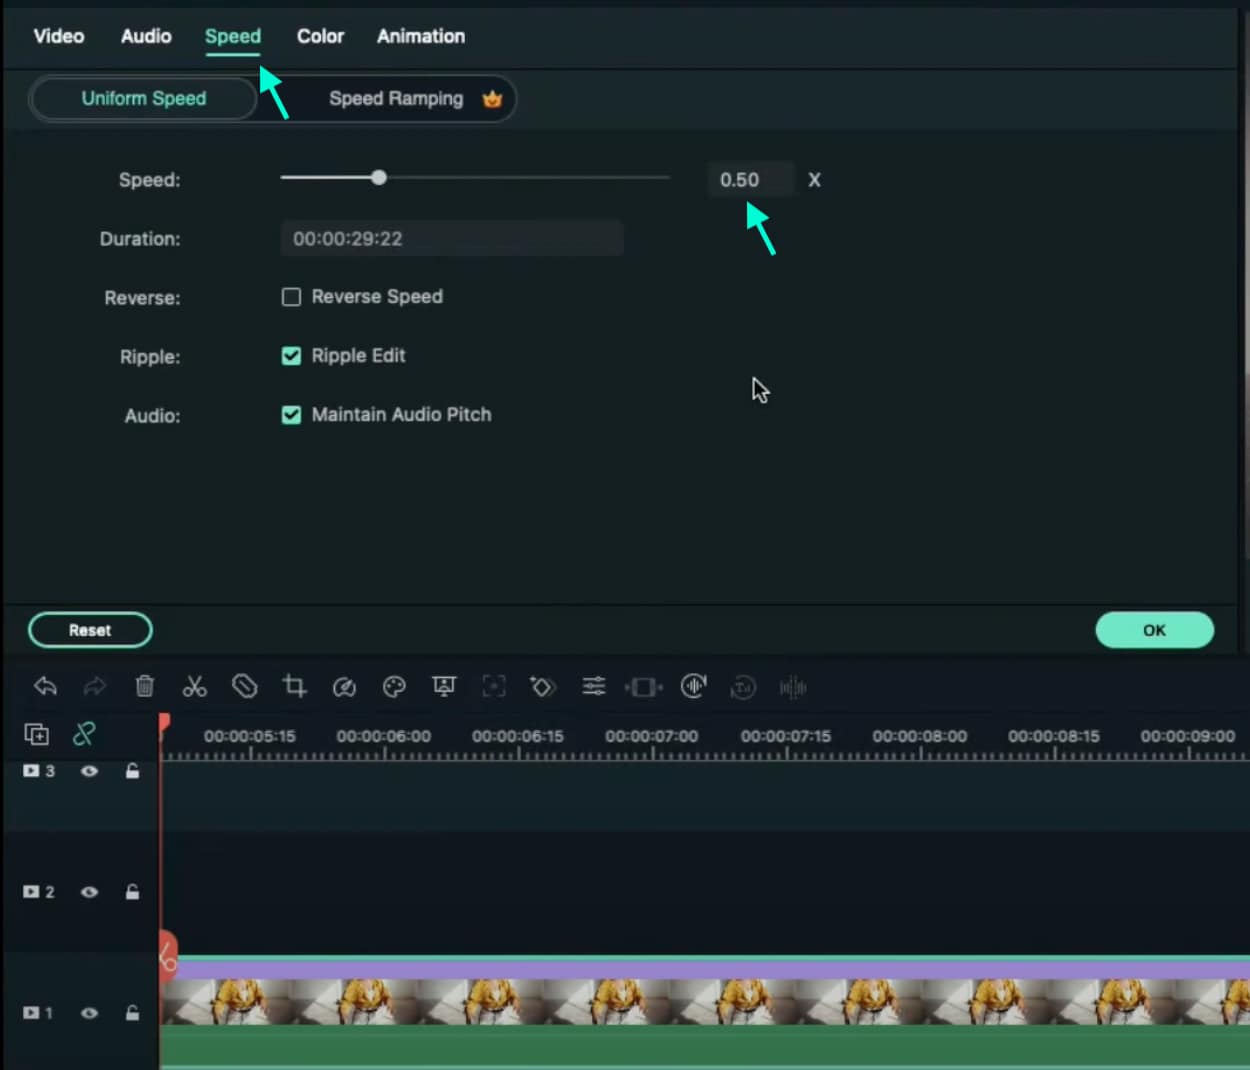
Double-click on the Video clip, go to the Speed tab, and change the Speed value to “0.50”. Click on OK.
Step 5
Next, place the Playhead one frame before the first spike (beat) on the Audio clip. Here, split the Video clip. Click on the Video from the right, go to Speed and change it to “8”.

Step 6
Move the Playhead three frames forward → Split the video → click on the clip from the right → go to Speed → change it back to “0.50”. Do this same process as in Steps 5 and 6 to every Audio spike (beat) you see on the audio clip.
Step 7
That’s it! Render the video and you can watch the final preview. Congratulations on creating a TikTok velocity dance effect in Filmora.

Summary
What you’ve learned:
- How to create a unique velocity dance effect in Filmora
- How to edit video based on unique audio clips
- Edit the speed settings of a video clip in Filmora
What you need to prepare:
- A computer (Windows or macOS)
- Your video materials.
- Filmora video editor
Step 1
First, download the Filmora Video Editor . Run it and click on “New Project”.
Step 2
Import the video and audio you want to use for your edit.

Step 3
Drag the Audio into the Timeline. Then, Drag your Video clip to Track 1 on the Timeline.

Step 4
Double-click on the Video clip, go to the Speed tab, and change the Speed value to “0.50”. Click on OK.

Step 5
Next, place the Playhead one frame before the first spike (beat) on the Audio clip. Here, split the Video clip. Click on the Video from the right, go to Speed and change it to “8”.

Step 6
Move the Playhead three frames forward → Split the video → click on the clip from the right → go to Speed → change it back to “0.50”. Do this same process as in Steps 5 and 6 to every Audio spike (beat) you see on the audio clip.
Step 7
That’s it! Render the video and you can watch the final preview. Congratulations on creating a TikTok velocity dance effect in Filmora.

Summary
What you’ve learned:
- How to create a unique velocity dance effect in Filmora
- How to edit video based on unique audio clips
- Edit the speed settings of a video clip in Filmora
What you need to prepare:
- A computer (Windows or macOS)
- Your video materials.
- Filmora video editor
Step 1
First, download the Filmora Video Editor . Run it and click on “New Project”.
Step 2
Import the video and audio you want to use for your edit.

Step 3
Drag the Audio into the Timeline. Then, Drag your Video clip to Track 1 on the Timeline.

Step 4
Double-click on the Video clip, go to the Speed tab, and change the Speed value to “0.50”. Click on OK.

Step 5
Next, place the Playhead one frame before the first spike (beat) on the Audio clip. Here, split the Video clip. Click on the Video from the right, go to Speed and change it to “8”.

Step 6
Move the Playhead three frames forward → Split the video → click on the clip from the right → go to Speed → change it back to “0.50”. Do this same process as in Steps 5 and 6 to every Audio spike (beat) you see on the audio clip.
Step 7
That’s it! Render the video and you can watch the final preview. Congratulations on creating a TikTok velocity dance effect in Filmora.

Summary
What you’ve learned:
- How to create a unique velocity dance effect in Filmora
- How to edit video based on unique audio clips
- Edit the speed settings of a video clip in Filmora
What you need to prepare:
- A computer (Windows or macOS)
- Your video materials.
- Filmora video editor
Step 1
First, download the Filmora Video Editor . Run it and click on “New Project”.
Step 2
Import the video and audio you want to use for your edit.

Step 3
Drag the Audio into the Timeline. Then, Drag your Video clip to Track 1 on the Timeline.

Step 4
Double-click on the Video clip, go to the Speed tab, and change the Speed value to “0.50”. Click on OK.

Step 5
Next, place the Playhead one frame before the first spike (beat) on the Audio clip. Here, split the Video clip. Click on the Video from the right, go to Speed and change it to “8”.

Step 6
Move the Playhead three frames forward → Split the video → click on the clip from the right → go to Speed → change it back to “0.50”. Do this same process as in Steps 5 and 6 to every Audio spike (beat) you see on the audio clip.
Step 7
That’s it! Render the video and you can watch the final preview. Congratulations on creating a TikTok velocity dance effect in Filmora.

Summary
What you’ve learned:
- How to create a unique velocity dance effect in Filmora
- How to edit video based on unique audio clips
- Edit the speed settings of a video clip in Filmora
How to Add Custom Filters in VN App: 2024 Quick Guide
In the colorful world of video editing, the ability to personalize and enhance your clips with unique looks is what stands your work out. Enter the VN app, the game-changer in mobile video editing, bursting with user-friendly features.
If you’ve been searching for a simple way to dive into the realm of video filters, you’re in luck. Today, we’ll decode how to jazz up your videos using the VN app’s built-in and custom video filter features. Ready to elevate your video content game? Let’s get started!
- Step 2: Save the Filter Preset and Use It Directly Next Time
- Part 3: Best Alternatives
- Part 4: Summary
Part 1: Use VN App Built-in Video Filters (LUTs)
Step 1: Locate the Filters Feature
You must know where the magic happens before you go Spielberg on your videos. Upon launching the VN app, you’ll see a range of editing tools. Look for an icon resembling a magic wand or palette – your gateway to the wonderful world of video filters.
Step 2: Preview and Apply Effects
This step is all about experimenting and having fun. Tap on the filter icon, and voilà! You’re greeted with various preset looks, waiting for your videos to don them. Glide through the options; VN has got it all from vintage vibes to futuristic glow. Found one that catches your eye?
Tap on it and watch your video transform instantly. Not sure about your pick? No worries; simply swipe left or right to preview other effects. Once you’re satisfied, tap ‘apply.’
Step 3: Adjust Details with Color Settings
Okay, young director, you’ve chosen your filter. But what if you want to tweak it just a bit? VN’s got your back.
Once a filter is applied, you’ll notice sliders or dials – these are your video filter editor tools. Play around with them! You can adjust the filter’s intensity, making it as subtle or dramatic as you like. Tweak the brightness, contrast, and saturation until your video looks like you envisioned.
Part 2: Download External Filter Installation Package
Step 1: Locate the My Filters Feature
The VN app is awesome, but can you add even more flair to your videos with custom filters? Yup! These aren’t just your regular video presets – they’re unique styles you can download and add to your VN arsenal.
To begin, tap on the “My Filters” section within the app. If you’re wondering where this is, it’s usually nestled beside the built-in filter options, represented by a ‘+’ or ‘Add’ icon. This personal space is ready to be filled with your downloaded filter goodies.
Step 2: Import the Downloaded VN Filter APK
Here comes the cool part! To get new custom filters:
- Visit the website or store where the VN filters are available for download. (Hint: Search for “vn filter download APK” or “vn iPhone filter download” based on your device.)
- Once downloaded, head back to the VN app and click the ‘Add’ or ‘+’ icon in the “My Filters”
- Navigate to your device’s download folder or wherever the vn filter apk is saved.
- Select the filter file (it should have a .apk or similar extension for Android users and a different format for iPhone users).
- Tap on ‘Import’ and wait for the magic to happen. Your brand-new filter will now be housed in “My Filters”!
Step 2: Save the Filter Preset and Use It Directly Next Time
After importing your snazzy new filter, the next step is super easy. Simply apply it to your video, and if you love how it looks, save it as a preset. This way, the next time you’re editing, you can head straight to “My Filters,” find your favorite custom filter and slap it onto your video without a hitch. Talk about convenience!
Part 3: Best Alternatives
Though VN offers many fantastic filter options, it’s always nice to have alternatives, right? Meet Filmora, another stellar video editing tool known for its expansive video filter collection.
Filmora is more than just an editor; it’s a canvas for videographers. One of its most raved-about features is its extensive range of video filters. With Filmora, you can transport your audience from a sun-kissed beach to a moody, rain-soaked alley in just a tap. Whether you’re going for a documentary feel, a Hollywood movie vibe, or something out of a dream, Filmora’s filters have covered you.
Getting started is a breeze:
- Launch Filmora and import your video.
- Head to the “Effects” tab and immerse yourself in the filter options.
- Preview, select, and apply – it’s that simple!
- Like VN, Filmora allows you to tweak the filter settings for that perfect look.
While Filmora is a great tool, the best fit depends on personal preferences and specific project needs. However, it’s always good to have choices in your editing toolkit. Variety is, after all, the spice of life (and video editing)!
Part 4: Summary
The beauty of video editing lies in the limitless possibilities it offers. With every video filter, editor tweak, and custom preset, you’re not just editing – you’re storytelling. And with tools like VN and Filmora at your fingertips, you have everything you need to tell your story your way.
Remember, whether you’re a seasoned videographer or someone just starting, there’s no ‘right’ or ‘wrong’ regarding creativity. Play around, experiment, and, most importantly, have fun with the process. In the vast universe of video editing, every filter is a star waiting to shine on your masterpiece.
Also read:
- [New] Elevate Your Instagram Feed Vertical Video Edits in FCPX
- [Updated] Audience Allure Identifying the Top 6 Video Types
- [Updated] Navigating the Business of Home-Produced Videos for 2024
- 2024 Approved Elevating Video Post Visibility on FB Groups
- 2024 Approved Top PC Speeds Choosing the Right Extension Software
- Do You Know There Are Websites to Download Free Glitch Transition Effects for Premiere Pro? You Can Easily Download Them and Make Awesome Videos for 2024
- How to Make a Bokeh Effect for 2024
- How To Quickly Create A Screen Print Effect In Photoshop Detailed Guide for 2024
- How to Unlock Motorola Moto G Stylus 5G (2023) PIN Code/Pattern Lock/Password
- In 2024, The Ultimate Guide to Group Photo and Video Uploads in Instagram
- In 2024, The Ultimate Guide to Make a Text Collage
- In 2024, Vintage Film Effect 1980S - How to Create
- New Easy Way to Add Transitions to Videos for 2024
- Professional Grau GmbH Hardware & Software Fixes for Seamless Video Recovery
- The Basics of Ray Tracing in Graphics and Rendering
- Updated Easy Way to Create a DIY Green Screen Video Effect
- Winning the Battle Against Fallout 3'S Sudden Shutdowns on Your Windows 11 PC
- Title: New This Article Aim to Teach You How to Make a Night to Day Effect Video with Filmora. Follow the Steps to Figure It Out
- Author: Chloe
- Created at : 2025-03-02 22:59:12
- Updated at : 2025-03-03 21:37:53
- Link: https://ai-editing-video.techidaily.com/new-this-article-aim-to-teach-you-how-to-make-a-night-to-day-effect-video-with-filmora-follow-the-steps-to-figure-it-out/
- License: This work is licensed under CC BY-NC-SA 4.0.
