
:max_bytes(150000):strip_icc():format(webp)/GettyImages-1342255561-483b636ee00f40a1b3d91d1969b1aaf6.jpg)
New To Find the Best Tool Out of Hundreds of Online and Offline GIF to Video Converters, You Need to Check These Specifications. Read This Review and Get the Best Out of the Best
To Find the Best Tool Out of Hundreds of Online and Offline GIF to Video Converters, You Need to Check These Specifications. Read This Review and Get the Best Out of the Best
Powerful Video Editor - Wondershare Filmora
Provide abundant video effects - A creative video editor
Powerful color correction and grading
Detailed tutorials are provided by the official channel
Since there are so many GIF to video converters available online, the question isn’t which is the best but instead what kind of experience you’re looking for.
Are you looking for a very simple solution where you can plug in your GIF and then immediately share it? Or are you looking for more refined control over your GIF before converting it to videos, such as being able to choose the resolution, frame rate, and aspect ratio? When trying to select from among these various options, think about the ways you will use your converted video clips and pick one that best suits your needs.
Here in this guide, we are going to share with you some amazing online and offline GIFs to video converters. You would love the specifications and possibilities they have created for all types of users to start with them right away!
Best 5 GIF to Video Converter Software
You don’t need to be a professional designer to convert your artwork into a video file. These converters are easy enough to use that anyone can take advantage of them, even you! Now all you have to do is decide which converter is the best for your needs, and get to it.
1. Wondershare Filmora

Wondershare Filmora is the most effective video converter for both PC and Mac users. This powerful and intuitive GIF to Video Converter is the best choice for all your video converting needs.
It offers all of these options, and it also scores high in terms of overall design and ease of use. It’s a clear winner if you’re looking to convert one or multiple GIFs into video. If you decide to download the app, we recommend purchasing the full version, which will give you a lot more customization options.
Pros
Highly adaptive to import and export files
Premium features make it the best tool among all
Faster conversion of files
Easy to use after installation
Cons
Works only on Windows and Mac
Expensive for monthly and yearly subscribers
2. Adobe Premiere Pro

The Adobe Premiere tool is easy to use. Just drag and drop your GIFs into the software, add music if you want, and hit the “Create” button. The software will create a video file that combines your GIF with the attached music in MP4 format so that you can share it across any social platform and enjoy it forever.
It is a subscription-based program that allows you to easily import and manipulate GIF files, and then export them as MP4 videos with the same features and steps that make the GIFs so appealing in the first place.
Pros
Support a plethora of formats for conversion
Quick in functionality
Very smooth experience
High-end customization of videos
Cons
Autosave doesn’t function sometimes
3. Movavi Video Editor Plus

Movavi Video Editor Plus 2020 is an affordable GIF to video converter you can use to shred your unfinished videos into GIFs, even if they’re just simple recordings.
It’s also good for mass-producing low-quality GIFs for your video blogs or YouTube channels. There are better options out there, but this software will suffice if you’re on a budget.
While it’s a bit on the pricey side for some, there aren’t many options that come close. It comes with everything you’d expect in a video editing package, with the added feature of being able to edit and export your videos in various GIF formats.
The program is pretty easy to use, and while it doesn’t have all of the advanced features that more expensive video editors do, it’s probably more than enough for most users.
Pros
Tons of cool transitions, filters, and preset titles
Easy by drag and drop actions
Offers Movavi’s effect store for more templates
Very clean and reflexive
Cons
Don’t have the histogram, vectorscope, or color wheel
Color grading is harder
4. VLC

The VLC media player is way better than most other GIF to video converters because not only can you download it for free but it’s also open-source, meaning that the code is public and developers worldwide can help improve its quality with their suggestions and thoughts. Plus, downloading VLC doesn’t cost a penny and it’s portable too!
In addition to these great features, the VLC player has many other interesting features which make it an essential piece of software for computer users. With its basic interface, it offers something that is very difficult to find in any other media player: the simplicity we talked about before…
Pros
User interface is straightforward
Fast forward pattern of features
Don’t require any codec installation
It is suitable for OS X.
Cons
Has no options for software upgradation
5. Cyberlink PowerDirector

CyberLink PowerDirector for Windows is a very useful tool for converting GIF to video. It is able to edit, process, and blend the video clips from various devices in a very simple and effective way. By adding insert video effects, users can turn their videos into spectacular works of art with ease.
Overall, CyberLink PowerDirector is a good option for users who want to enjoy an all-in-one video editing experience. It can be also used as an alternative to popular video editing software like Adobe Premiere Pro etc.
Pros
Over 100 stellar audio and video editing features
Videos can easily be imported, edited, and exported in 4k
Has advanced 360-degree video editing ability
24/7 fast customer service support
Cons
Create frustration due to ads on the page
Expensive tool
Online GIF to Video Converter
Whether you are looking to make the most out of an event that you have posted on your blog or just want a quick way of sharing a funny GIF on Facebook, like offline converting software, these tools offer a simple solution for quickly converting your GIF into a video.
1. EZGIF.COM

Ezgif.com is a fun and quick way to create memes and convert Gifs into videos quickly and easily. With fast conversion rates and a clear, simple interface, though, it’s possible that you might be disappointed with the amount of customization that this converter offers.
Other than that, however, it has everything you need to take your video from a few minutes to a few seconds.
Overall, while Ezgif’s free web-based service is easy to use, not all of its features are present in the free version. Users who want to customize their videos by adding text or effects may need to upgrade for better results.
Pros
Simple online gif maker
Toolkit for basic animated gif editing
Customize Gifs for better videos
High-end experience
Cons
The layout is not appealing
2. CloudConvert

The main selling point of CloudConvert is its large and varied list of file types, allowing you to convert any file to any other file. GIF to video conversion is just one of the many options offered by the site, and it does a surprisingly impressive job when it comes to this. There’s also an online tool for creating animated GIFs from standard video files, which can definitely come in handy for animators.
There’s no limit to how many files you can convert at once, so if you’re looking to optimize your workflow, CloudConvert will make your life easier.
Pros
High-quality video editing and conversion
Easy to understand interface
Fully-functional basic to intermediate features
Adaptable and free-to-use
Cons
Only 25 conversions/24 hours
3. Online Convert

This Online Convert is made for all your file conversion needs, from online image conversion to online GIF to video converting. With this online converter, if you will find a lot of useful information about all of these most popular online converters, do not hesitate to use them now!
The simple interface of this tool makes the conversion process easy to understand and utilize. If you are an individual looking to create videos of your gifs, then Online Gif Video Converter is the right fit for you.
Pros
Fast and progressive
Effective outcome
Simple step process of conversion
Wide range of formats to convert
Cons
There’s no specific drawback found!
How to Convert GIF to Video Using Wondershare Filmora?
Step 1: Import Media files
For the “Import” button to appear, you need to start by launching the Wondershare Filmora program. When you locate it on your desktop, double-click on it to open and select “Import” to browse and load GIF files from your Mac or PC.

Step 2: Drag to timeline
You can drag your imported media files to the timeline at the bottom of the screen. If you want to add text, you can simply drag and drop it to the timeline.
Step 3: Edit files
You can edit media files (image, audio, video) by using the built-in tools on Filmora. You can add titles, intro text, and watermarks to your video with filters and overlays. You can also add background music, transitions, and slow/fast-motion effects to make your GIF more interesting. If you want to remove the background of an image sequence or a video clip, you can use the green screen effect as well.
Step 4: Add text effects
Once you have imported the GIF file, you can add a text effect to it by double-clicking on the video track. Then go to Text/Credit and choose your desired one from the given options. You can adjust the size of text, font style, color, position, etc. as per your choice. You can also add some transition effects by clicking on Transitions. Once done, click OK to save changes or drag the text into the timeline for further editing.
Step 5: Save and Export
Once you are satisfied with your video, click “File” in the top left corner of the window. From the drop-down menu, select “Export” to get to the export window.

Conclusion
In conclusion, online tools can make your life a lot easier when it comes to converting media files. Sites like the ones reviewed above can also provide you with a host of other functions that make them valuable in your day-to-day work. If you’ve had the chance to try such websites, we hope that they’ve proven to be helpful and convenient.
Since there are so many GIF to video converters available online, the question isn’t which is the best but instead what kind of experience you’re looking for.
Are you looking for a very simple solution where you can plug in your GIF and then immediately share it? Or are you looking for more refined control over your GIF before converting it to videos, such as being able to choose the resolution, frame rate, and aspect ratio? When trying to select from among these various options, think about the ways you will use your converted video clips and pick one that best suits your needs.
Here in this guide, we are going to share with you some amazing online and offline GIFs to video converters. You would love the specifications and possibilities they have created for all types of users to start with them right away!
Best 5 GIF to Video Converter Software
You don’t need to be a professional designer to convert your artwork into a video file. These converters are easy enough to use that anyone can take advantage of them, even you! Now all you have to do is decide which converter is the best for your needs, and get to it.
1. Wondershare Filmora
Wondershare Filmora is the most effective video converter for both PC and Mac users. This powerful and intuitive GIF to Video Converter is the best choice for all your video converting needs.
It offers all of these options, and it also scores high in terms of overall design and ease of use. It’s a clear winner if you’re looking to convert one or multiple GIFs into video. If you decide to download the app, we recommend purchasing the full version, which will give you a lot more customization options.
Pros
Highly adaptive to import and export files
Premium features make it the best tool among all
Faster conversion of files
Easy to use after installation
Cons
Works only on Windows and Mac
Expensive for monthly and yearly subscribers
2. Adobe Premiere Pro
The Adobe Premiere tool is easy to use. Just drag and drop your GIFs into the software, add music if you want, and hit the “Create” button. The software will create a video file that combines your GIF with the attached music in MP4 format so that you can share it across any social platform and enjoy it forever.
It is a subscription-based program that allows you to easily import and manipulate GIF files, and then export them as MP4 videos with the same features and steps that make the GIFs so appealing in the first place.
Pros
Support a plethora of formats for conversion
Quick in functionality
Very smooth experience
High-end customization of videos
Cons
Autosave doesn’t function sometimes
3. Movavi Video Editor Plus
Movavi Video Editor Plus 2020 is an affordable GIF to video converter you can use to shred your unfinished videos into GIFs, even if they’re just simple recordings.
It’s also good for mass-producing low-quality GIFs for your video blogs or YouTube channels. There are better options out there, but this software will suffice if you’re on a budget.
While it’s a bit on the pricey side for some, there aren’t many options that come close. It comes with everything you’d expect in a video editing package, with the added feature of being able to edit and export your videos in various GIF formats.
The program is pretty easy to use, and while it doesn’t have all of the advanced features that more expensive video editors do, it’s probably more than enough for most users.
Pros
Tons of cool transitions, filters, and preset titles
Easy by drag and drop actions
Offers Movavi’s effect store for more templates
Very clean and reflexive
Cons
Don’t have the histogram, vectorscope, or color wheel
Color grading is harder
4. VLC
The VLC media player is way better than most other GIF to video converters because not only can you download it for free but it’s also open-source, meaning that the code is public and developers worldwide can help improve its quality with their suggestions and thoughts. Plus, downloading VLC doesn’t cost a penny and it’s portable too!
In addition to these great features, the VLC player has many other interesting features which make it an essential piece of software for computer users. With its basic interface, it offers something that is very difficult to find in any other media player: the simplicity we talked about before…
Pros
User interface is straightforward
Fast forward pattern of features
Don’t require any codec installation
It is suitable for OS X.
Cons
Has no options for software upgradation
5. Cyberlink PowerDirector
CyberLink PowerDirector for Windows is a very useful tool for converting GIF to video. It is able to edit, process, and blend the video clips from various devices in a very simple and effective way. By adding insert video effects, users can turn their videos into spectacular works of art with ease.
Overall, CyberLink PowerDirector is a good option for users who want to enjoy an all-in-one video editing experience. It can be also used as an alternative to popular video editing software like Adobe Premiere Pro etc.
Pros
Over 100 stellar audio and video editing features
Videos can easily be imported, edited, and exported in 4k
Has advanced 360-degree video editing ability
24/7 fast customer service support
Cons
Create frustration due to ads on the page
Expensive tool
Online GIF to Video Converter
Whether you are looking to make the most out of an event that you have posted on your blog or just want a quick way of sharing a funny GIF on Facebook, like offline converting software, these tools offer a simple solution for quickly converting your GIF into a video.
1. EZGIF.COM
Ezgif.com is a fun and quick way to create memes and convert Gifs into videos quickly and easily. With fast conversion rates and a clear, simple interface, though, it’s possible that you might be disappointed with the amount of customization that this converter offers.
Other than that, however, it has everything you need to take your video from a few minutes to a few seconds.
Overall, while Ezgif’s free web-based service is easy to use, not all of its features are present in the free version. Users who want to customize their videos by adding text or effects may need to upgrade for better results.
Pros
Simple online gif maker
Toolkit for basic animated gif editing
Customize Gifs for better videos
High-end experience
Cons
The layout is not appealing
2. CloudConvert
The main selling point of CloudConvert is its large and varied list of file types, allowing you to convert any file to any other file. GIF to video conversion is just one of the many options offered by the site, and it does a surprisingly impressive job when it comes to this. There’s also an online tool for creating animated GIFs from standard video files, which can definitely come in handy for animators.
There’s no limit to how many files you can convert at once, so if you’re looking to optimize your workflow, CloudConvert will make your life easier.
Pros
High-quality video editing and conversion
Easy to understand interface
Fully-functional basic to intermediate features
Adaptable and free-to-use
Cons
Only 25 conversions/24 hours
3. Online Convert
This Online Convert is made for all your file conversion needs, from online image conversion to online GIF to video converting. With this online converter, if you will find a lot of useful information about all of these most popular online converters, do not hesitate to use them now!
The simple interface of this tool makes the conversion process easy to understand and utilize. If you are an individual looking to create videos of your gifs, then Online Gif Video Converter is the right fit for you.
Pros
Fast and progressive
Effective outcome
Simple step process of conversion
Wide range of formats to convert
Cons
There’s no specific drawback found!
How to Convert GIF to Video Using Wondershare Filmora?
Step 1: Import Media files
For the “Import” button to appear, you need to start by launching the Wondershare Filmora program. When you locate it on your desktop, double-click on it to open and select “Import” to browse and load GIF files from your Mac or PC.
Step 2: Drag to timeline
You can drag your imported media files to the timeline at the bottom of the screen. If you want to add text, you can simply drag and drop it to the timeline.
Step 3: Edit files
You can edit media files (image, audio, video) by using the built-in tools on Filmora. You can add titles, intro text, and watermarks to your video with filters and overlays. You can also add background music, transitions, and slow/fast-motion effects to make your GIF more interesting. If you want to remove the background of an image sequence or a video clip, you can use the green screen effect as well.
Step 4: Add text effects
Once you have imported the GIF file, you can add a text effect to it by double-clicking on the video track. Then go to Text/Credit and choose your desired one from the given options. You can adjust the size of text, font style, color, position, etc. as per your choice. You can also add some transition effects by clicking on Transitions. Once done, click OK to save changes or drag the text into the timeline for further editing.
Step 5: Save and Export
Once you are satisfied with your video, click “File” in the top left corner of the window. From the drop-down menu, select “Export” to get to the export window.
Conclusion
In conclusion, online tools can make your life a lot easier when it comes to converting media files. Sites like the ones reviewed above can also provide you with a host of other functions that make them valuable in your day-to-day work. If you’ve had the chance to try such websites, we hope that they’ve proven to be helpful and convenient.
Create Glitch Text Effect
Glitch text effect is a trending video effect whereby the texts get distorted for a few seconds. The effect is comparable to the glitch you face when your screen starts to malfunction, and the screen appears to be wavy and disoriented. A glitch text effect is better than a regular animated text effect as it helps to get the attention of the viewers immediately and get the message across clearly.
The glitch effect can be applied to the entire video as well as the text as per your preference. There are several video editors available where the glitch text effect comes pre-loaded. All you need to do is to apply it to the text and get it done in a few steps. We will illustrate how to add glitch text effect Premiere Pro. But we recommend Filmora for the best glitter text effect that you can add to your video instantly.
Part 1. Create Glitch Text in Video with Filmora
We have already stated that Wondershare Filmora is the best video editor for the best glitch text effect download and apply to your video in simple steps. Filmora is a premium video editor that is widely used by amateur and professional video editors. You can get all glitch text effect After Effects and add them to your video conveniently in comparison to After Effects.
As a matter of fact, there are literally unlimited video and text effects available, and you can find different types of glitch text effects to apply to your titles and texts. Filmora is available for both Windows and mac users. Here are the steps to create glitch text in video with Filmora.
Free Download For Win 7 or later(64-bit)
Free Download For macOS 10.14 or later
Step1 Download and install Filmora on your computer. Go to File> New Project from the menu bar to start video editing project.

Step2 Go to File> Import Media > Import Media Files to import the video clips where you want to add glitch text effect. Drop the clip into the Timeline to get started.

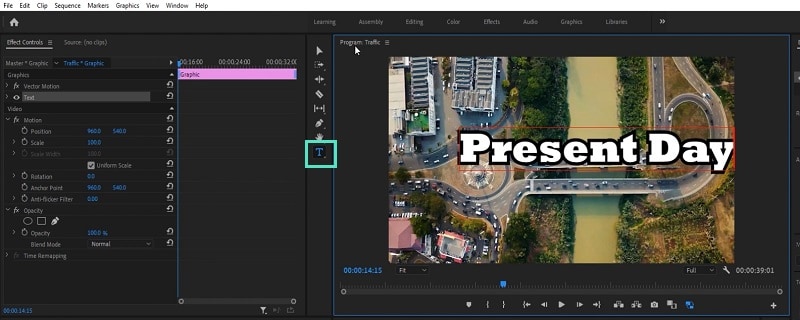
Step3 Go to Titles tab located at the top. From the left panel, click on Titles option. Search “glitch” in the search field and you will see all the glitch text effects that you can apply to the text in your video.
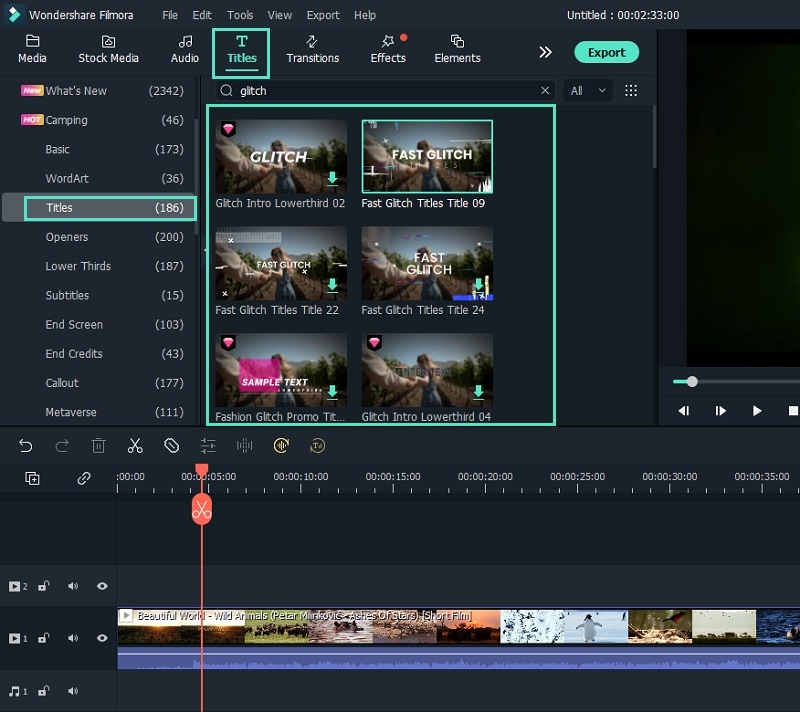
Step4 Select any glitch text effect and drop it into the Timeline above the video clip exactly where you want the text and the effect to appear.
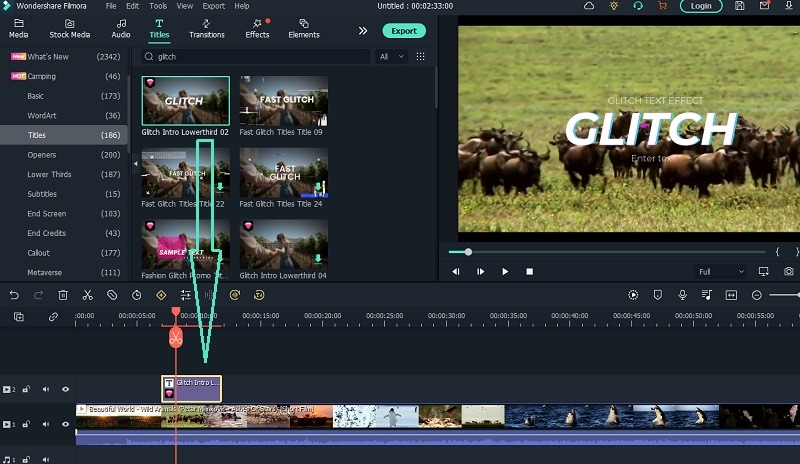
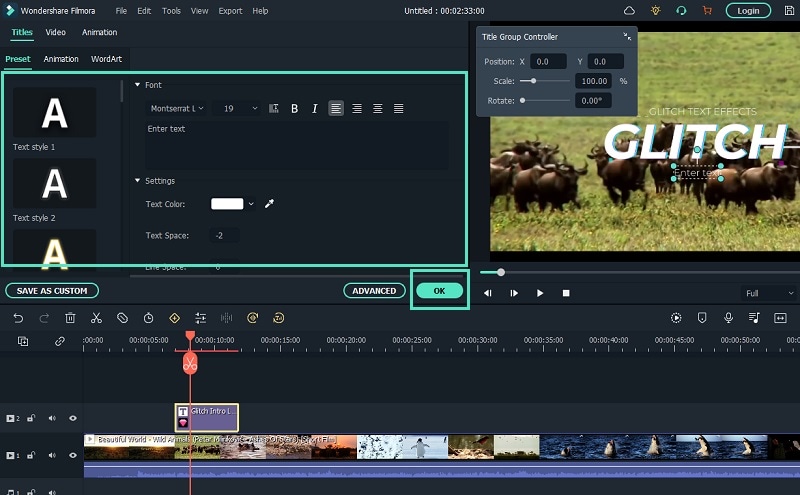
Step5 Double-click on the glitch text effect located on Timeline and edit the text, style, and other parameters as per your preference. Click on Ok and play the video to see your edited video with the glitch text effect.
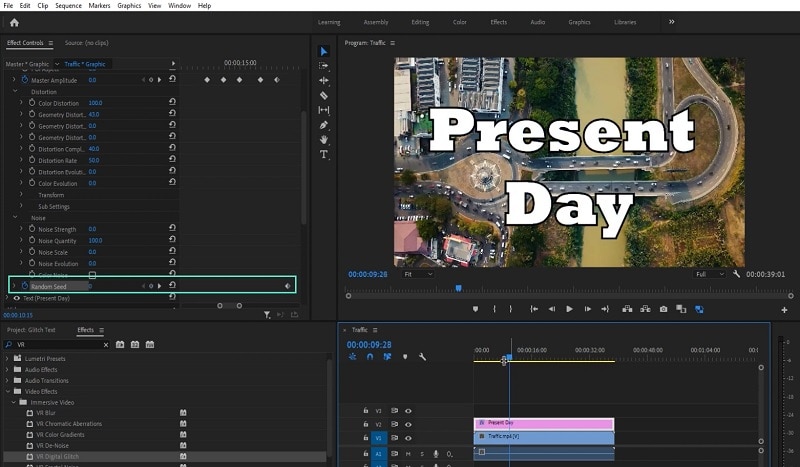
Part 2. How to Make Glitch Text Effect with Premiere Pro
Adobe Premiere Pro is another renowned video editor where you can add glitch text effect to your video. Premiere Pro is strictly for professional video editors as the user interface is not as intuitive as Filmora . The learning curve is steep, and therefore, you need to go through the steps to add glitch text effect Premiere Pro. There are several glitch text effect presets available that you can apply to any text on your video to make them engaging. Here are the steps to make glitch text effect with Premiere Pro.
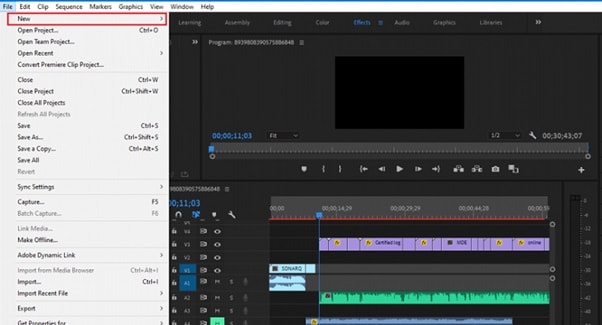
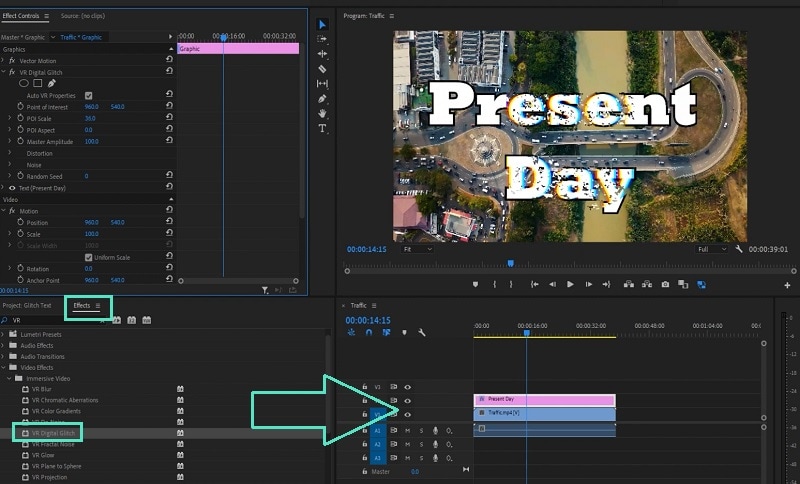
Step1 Launch Adobe Premiere Pro and go to New> Project to get started. Import your video and drop it into Timeline.
Step2 Use the Type tool to write any text on your video to add glitch text effect. You should have a text layer on Timeline.
Step3 Go to Effects> Immersive Video> VR Digital Glitch option. Drag and drop the effect to text layer.
Step4 Under Effect Controls tab, you will find all the different parameters that you can adjust to get the glitch text effect perfectly.
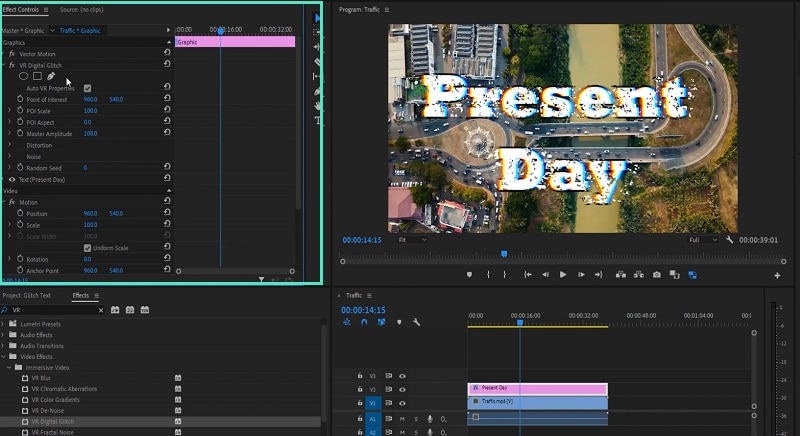
Step5 Turn on Master Amplitude and add multiple keyframes as different points in the Timeline and change the distortion value to make the effect prominent.
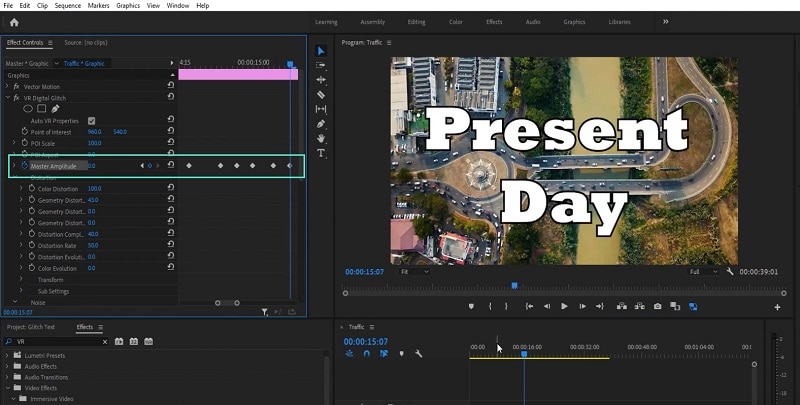
Step6 Go to the first keyframe and turn on Random Seed effect. Go to the last keyframe and turn on Random Seed effect and change the value to 75. Play the video to check the entire video with glitch text effect.
Part 3. Use VSDC Video Editor to Create Glitch Text
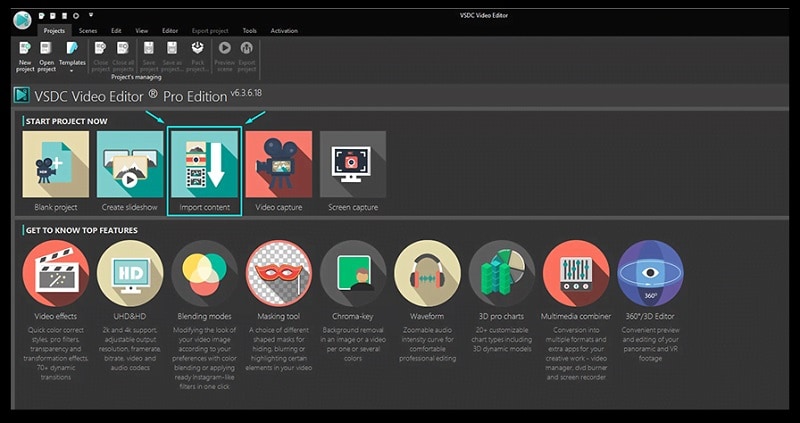
If you do not have any premium video editor on your computer and you do not want to purchase any premium video editor, you can still get glitter text effect free. You need to download and install VSDC free video editor on your computer. But the steps to create glitch text on VSDC video editor are slightly complicated as the user interface is not as intuitive as Filmora . Here are the steps to add free glitch text effect on your video.
Step1 Download and install VSDC video editor. Launch the editor and click on New Project to get started. Import your video to your project where you want to add glitch text effect.
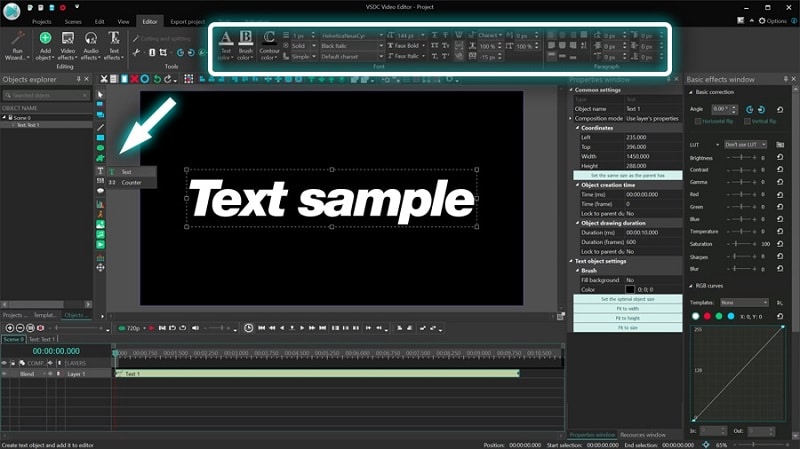
Step2 Use Type tool to write a text on the video. You can press Shift+T shortcut as well. After typing the text, adjust the text style as per your preference.
Step3 Double-click on the text layer on Timeline and go to Video Effects> Special FX and click on Glitch option.
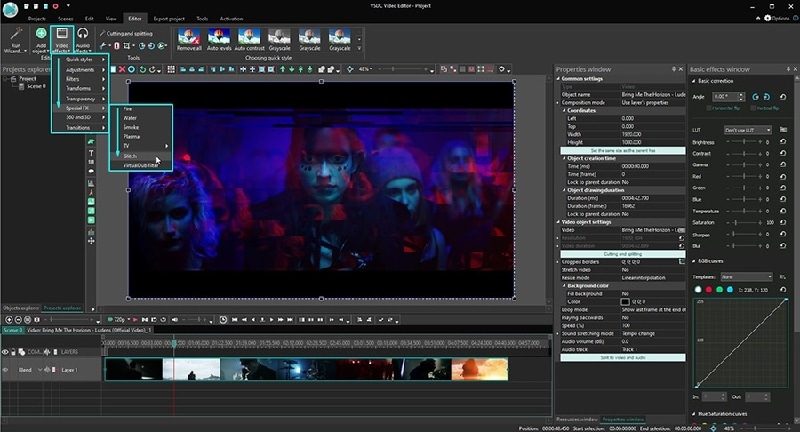
Step4 A window will appear where you can set the starting point, duration, and different parameters. Click on Ok button.
Step5 Go to Properties Windows and click on Presets to select different types of glitch text effects. You can also adjust the intensity of the text effects and other parameters as you feel.
Part 4. Related FAQs about Glitch Text
1. How do you animate glitch text?
If you want to animate glitch text for free, VSDC video editor is ideal as you can customize the effect on any text in simple steps. If you want to use a premium video editor, we recommend Filmora as there are various glitch text effects available to apply to any text on your video instantly.
2. How do you glitch text on video?
First, you have to import your video in your video editor. Type the desired text and set the style. Thereafter, go to glitch text effect presets available on the video editor and apply it to the text instantly. You can customize the glitch text effect as per your preference to make the animation more prominent.
3. How do you glitch text on Android?
You should first install Glitch Video Effect: Glitch FX app from Play Store. Edit your video on the app to add any text, and thereafter, add glitch text effect instantly. In fact, the glitch text effect is available in almost all popular video editor apps on Android due to the effect being trendy and viral.
Free Download For macOS 10.14 or later
Step1 Download and install Filmora on your computer. Go to File> New Project from the menu bar to start video editing project.
Step2 Go to File> Import Media > Import Media Files to import the video clips where you want to add glitch text effect. Drop the clip into the Timeline to get started.
Step3 Go to Titles tab located at the top. From the left panel, click on Titles option. Search “glitch” in the search field and you will see all the glitch text effects that you can apply to the text in your video.
Step4 Select any glitch text effect and drop it into the Timeline above the video clip exactly where you want the text and the effect to appear.
Step5 Double-click on the glitch text effect located on Timeline and edit the text, style, and other parameters as per your preference. Click on Ok and play the video to see your edited video with the glitch text effect.
Part 2. How to Make Glitch Text Effect with Premiere Pro
Adobe Premiere Pro is another renowned video editor where you can add glitch text effect to your video. Premiere Pro is strictly for professional video editors as the user interface is not as intuitive as Filmora . The learning curve is steep, and therefore, you need to go through the steps to add glitch text effect Premiere Pro. There are several glitch text effect presets available that you can apply to any text on your video to make them engaging. Here are the steps to make glitch text effect with Premiere Pro.
Step1 Launch Adobe Premiere Pro and go to New> Project to get started. Import your video and drop it into Timeline.
Step2 Use the Type tool to write any text on your video to add glitch text effect. You should have a text layer on Timeline.
Step3 Go to Effects> Immersive Video> VR Digital Glitch option. Drag and drop the effect to text layer.
Step4 Under Effect Controls tab, you will find all the different parameters that you can adjust to get the glitch text effect perfectly.
Step5 Turn on Master Amplitude and add multiple keyframes as different points in the Timeline and change the distortion value to make the effect prominent.
Step6 Go to the first keyframe and turn on Random Seed effect. Go to the last keyframe and turn on Random Seed effect and change the value to 75. Play the video to check the entire video with glitch text effect.
Part 3. Use VSDC Video Editor to Create Glitch Text
If you do not have any premium video editor on your computer and you do not want to purchase any premium video editor, you can still get glitter text effect free. You need to download and install VSDC free video editor on your computer. But the steps to create glitch text on VSDC video editor are slightly complicated as the user interface is not as intuitive as Filmora . Here are the steps to add free glitch text effect on your video.
Step1 Download and install VSDC video editor. Launch the editor and click on New Project to get started. Import your video to your project where you want to add glitch text effect.
Step2 Use Type tool to write a text on the video. You can press Shift+T shortcut as well. After typing the text, adjust the text style as per your preference.
Step3 Double-click on the text layer on Timeline and go to Video Effects> Special FX and click on Glitch option.
Step4 A window will appear where you can set the starting point, duration, and different parameters. Click on Ok button.
Step5 Go to Properties Windows and click on Presets to select different types of glitch text effects. You can also adjust the intensity of the text effects and other parameters as you feel.
Part 4. Related FAQs about Glitch Text
1. How do you animate glitch text?
If you want to animate glitch text for free, VSDC video editor is ideal as you can customize the effect on any text in simple steps. If you want to use a premium video editor, we recommend Filmora as there are various glitch text effects available to apply to any text on your video instantly.
2. How do you glitch text on video?
First, you have to import your video in your video editor. Type the desired text and set the style. Thereafter, go to glitch text effect presets available on the video editor and apply it to the text instantly. You can customize the glitch text effect as per your preference to make the animation more prominent.
3. How do you glitch text on Android?
You should first install Glitch Video Effect: Glitch FX app from Play Store. Edit your video on the app to add any text, and thereafter, add glitch text effect instantly. In fact, the glitch text effect is available in almost all popular video editor apps on Android due to the effect being trendy and viral.
Convert Your Videos to 60 FPS Using These Excellent Tools
Is the video you have too fast-paced? Does it show an action sequence or an intense basketball game? All the movement could make the video blurry. Changing the video to 60 FPS makes it better and crisper. So how can you do that? You can convert video to 60 FPS using these 5 excellent tools.
Why Convert Video to 60 FPS?
Perhaps you forgot to film your video in 60 FPS or 120 FPS. You can leave it at 30 FPS if you want to. But some videos look choppy when in that setting. By doubling the frames in the video, you make it a lot smoother. The motion will look so much more fluid. Consequently, that will let your viewers have a fantastic, immersive watching experience.
Do you plan to put the video in slow motion? That’s another great reason to convert the video to 60 FPS. Again, this makes the motion more fluid. So when you add the slow-motion effect, it just gets better. Not doing so will lead to terrible video quality, which your viewers would surely not like.
3 Methods To Convert Video to 60 FPS on Windows/Mac?
After reading those reasons, you may have thought of videos that you have that you can improve by converting to 60 FPS. So how can you do that? You can use these 3 effective methods. These are 3 different PC tools that allow for converting videos to 60 FPS.
1. Convert Video to 60 FPS With Wondershare Filmora
Free Download For Win 7 or later(64-bit)
Free Download For macOS 10.14 or later
Wondershare Filmora is one of the most amazing tools for converting videos to 60 FPS. This allows you to do that without complicated steps. It seems like the video just passed through the program with how fast and easy it is!

On top of that, Wondershare Filmora is a great video editor. It is complete with all the basic editing tools, plus some really great advanced features. So you can edit and enhance the video before or after converting it to 60 FPS. Because of that, Wondershare Filmora is a cost-effective tool.
Here are the steps to follow for turning a video to 60 FPS with Wondershare Filmora:
Step1 Open Wondershare Filmora. Click “New Project.”
Step2 Import the video that you want to convert to 60 FPS.
Step3 Drag the video to the timeline. Click “Export.”
Step4 Change the frame rate to 60 FPS. If you can’t find this, check if you are on the “Local” tab.

Step5 Click “Export.”
2. Use SmoothVideo Project to Make Video To 60 FPS
SmoothVideo Project (SVP) uses frame interpolation techniques - the same used by high-end TVs and projectors. This technique increases the frames by adding intermediate frames between existing ones. As a result, it produces smooth, fluid, and clear motion.
SmoothVideo Projects allow you to convert videos to 60 FPS and even to 120 or 144+ FPS. Also, it can convert the videos in real-time, on top of your video player.
Follow this guide to convert videos using this tool:
Step1 Install SVP and ensure to add SVPcode. If you already have the program installed, you can add SVPcode with the Maintain SVP 4 app.
Step2 Select “Browse for a video to transcode..”
Step3 Import the video/s that you want to convert to 60 FPS.
Step4 Pick 60 FPS when selecting a video profile for the video.

Step5 Choose between “Basic” and “Advanced” for the video compression setting.

Step6 Click “Start.”
3. Make Videos 60 FPS With Freemake Video Converter
Freemake is an all-in-one video converter tool. It supports over 500 video file formats and lets you turn photos and audio into video and process multiple videos at once. The best thing is that you don’t even need to download the video. Freemake Video Converter can convert online videos too.
While converting the files, you have the option to change their framerate. Therefore, it’s an excellent tool for turning videos to 60 FPS.
Follow these steps to change a video’s frame rate using this app:
Step1 Launch Freemake Video Converter. Click “+Video” to import the video that you want to convert.
Step2 Double-click the output format to open the window with the settings option.
Step3 Click the gear or “Settings” button.
Step4 On the new window, click the drop-down menu for “Frame Rate.” Select “60 fps.”

Step5 Click “Ok.”
Step6 Select the destination folder for the output file. Click “Convert.”
2 Fantastic 60 FPS Video Converter Online
What if you are not using a PC to edit your videos? For example, you shoot, edit, and upload your videos using your mobile phone. Or what if you use a PC, but you’re away from home? In these cases, you can use online tools. Here are the 2 best ones on the market.
1. VEED.IO 30 FPS to 60 FPS Online
Veed.io is a simple but ever-so-reliable online video tool. It lets you edit videos and change the frame rate for free. Also, it comes with an array of other tools that can help enhance the video. For instance, Veed.io can remove background noise from the video.
Veed.io also lets you change the video’s aspect ratio to optimize it for different video streaming platforms.
Here’s a guide on how to convert to 60 FPS using Veed.io:
Step1 Run your preferred web browser and go to the website of Veed.io.
Step2 Click “Get Started.”
Step3 Click “Upload a File” or drag the video file to the interface to upload it. Select the video that you want to convert to 60 FPS.

Step4 Click “Export” > “Advanced.”
Step5 Drag the slider for “Framerate Limit” to the right until the display text says “60.”

Step6 Click “Export Video.”
Step7 Please wait for Veed.io to finish processing your video. When the screen says, “Your video is ready.” Click the “Download” button.
![]()
Note: Sign in to your account to enable downloading.
2. 30 FPS to 60 FPS Online-Convert Tool
Online-Convert is a popular online file format converter. It supports north of 50 video source formats and allows you to convert files between them. Also, Online-Convert allows you to change the video’s frame rate. You can make it 60 FPS or even 120 FPS!
But please remember that, as the tool name suggests, Online-Convert is only a file converter. You can’t edit your videos using this online service. Thus, you need to either have a reliable video editor on your device or use another online tool with an editor function.
Anyway, here is a tutorial on how to convert videos to 60 FPS with this online tool:
Step1 Launch a web browser and go to the Online-Convert tool page.
Step2 Drag the video file to the green rectangle. Alternatively, click “Choose File”/ Enter URL” / “Dropbox” / “Google Drive” to import your file.

Step3 Scroll down to the “Change frame rate” option. Type “60” in the text box.

Step4 Click “Start.”
Step5 Wait for the conversion to finish. The download will start automatically.
Conclusion
Convert your videos to 60 FPS to make them smoother and give your audience a nicer viewing experience. You can use many tools to do that. We recommend trying Wondershare Filmora. Converting a video’s frame rate using this software is as easy as 1-2-3.
This video solution not only gives you the ability to change a video’s frame rate. Wondershare Filmora also provides you with many amazing video editing tools. Therefore, Filmora can help you turn your videos into art. It is worth it.
Free Download For macOS 10.14 or later
Wondershare Filmora is one of the most amazing tools for converting videos to 60 FPS. This allows you to do that without complicated steps. It seems like the video just passed through the program with how fast and easy it is!
On top of that, Wondershare Filmora is a great video editor. It is complete with all the basic editing tools, plus some really great advanced features. So you can edit and enhance the video before or after converting it to 60 FPS. Because of that, Wondershare Filmora is a cost-effective tool.
Here are the steps to follow for turning a video to 60 FPS with Wondershare Filmora:
Step1 Open Wondershare Filmora. Click “New Project.”
Step2 Import the video that you want to convert to 60 FPS.
Step3 Drag the video to the timeline. Click “Export.”
Step4 Change the frame rate to 60 FPS. If you can’t find this, check if you are on the “Local” tab.
Step5 Click “Export.”
2. Use SmoothVideo Project to Make Video To 60 FPS
SmoothVideo Project (SVP) uses frame interpolation techniques - the same used by high-end TVs and projectors. This technique increases the frames by adding intermediate frames between existing ones. As a result, it produces smooth, fluid, and clear motion.
SmoothVideo Projects allow you to convert videos to 60 FPS and even to 120 or 144+ FPS. Also, it can convert the videos in real-time, on top of your video player.
Follow this guide to convert videos using this tool:
Step1 Install SVP and ensure to add SVPcode. If you already have the program installed, you can add SVPcode with the Maintain SVP 4 app.
Step2 Select “Browse for a video to transcode..”
Step3 Import the video/s that you want to convert to 60 FPS.
Step4 Pick 60 FPS when selecting a video profile for the video.
Step5 Choose between “Basic” and “Advanced” for the video compression setting.
Step6 Click “Start.”
3. Make Videos 60 FPS With Freemake Video Converter
Freemake is an all-in-one video converter tool. It supports over 500 video file formats and lets you turn photos and audio into video and process multiple videos at once. The best thing is that you don’t even need to download the video. Freemake Video Converter can convert online videos too.
While converting the files, you have the option to change their framerate. Therefore, it’s an excellent tool for turning videos to 60 FPS.
Follow these steps to change a video’s frame rate using this app:
Step1 Launch Freemake Video Converter. Click “+Video” to import the video that you want to convert.
Step2 Double-click the output format to open the window with the settings option.
Step3 Click the gear or “Settings” button.
Step4 On the new window, click the drop-down menu for “Frame Rate.” Select “60 fps.”
Step5 Click “Ok.”
Step6 Select the destination folder for the output file. Click “Convert.”
2 Fantastic 60 FPS Video Converter Online
What if you are not using a PC to edit your videos? For example, you shoot, edit, and upload your videos using your mobile phone. Or what if you use a PC, but you’re away from home? In these cases, you can use online tools. Here are the 2 best ones on the market.
1. VEED.IO 30 FPS to 60 FPS Online
Veed.io is a simple but ever-so-reliable online video tool. It lets you edit videos and change the frame rate for free. Also, it comes with an array of other tools that can help enhance the video. For instance, Veed.io can remove background noise from the video.
Veed.io also lets you change the video’s aspect ratio to optimize it for different video streaming platforms.
Here’s a guide on how to convert to 60 FPS using Veed.io:
Step1 Run your preferred web browser and go to the website of Veed.io.
Step2 Click “Get Started.”
Step3 Click “Upload a File” or drag the video file to the interface to upload it. Select the video that you want to convert to 60 FPS.
Step4 Click “Export” > “Advanced.”
Step5 Drag the slider for “Framerate Limit” to the right until the display text says “60.”
Step6 Click “Export Video.”
Step7 Please wait for Veed.io to finish processing your video. When the screen says, “Your video is ready.” Click the “Download” button.
![]()
Note: Sign in to your account to enable downloading.
2. 30 FPS to 60 FPS Online-Convert Tool
Online-Convert is a popular online file format converter. It supports north of 50 video source formats and allows you to convert files between them. Also, Online-Convert allows you to change the video’s frame rate. You can make it 60 FPS or even 120 FPS!
But please remember that, as the tool name suggests, Online-Convert is only a file converter. You can’t edit your videos using this online service. Thus, you need to either have a reliable video editor on your device or use another online tool with an editor function.
Anyway, here is a tutorial on how to convert videos to 60 FPS with this online tool:
Step1 Launch a web browser and go to the Online-Convert tool page.
Step2 Drag the video file to the green rectangle. Alternatively, click “Choose File”/ Enter URL” / “Dropbox” / “Google Drive” to import your file.
Step3 Scroll down to the “Change frame rate” option. Type “60” in the text box.
Step4 Click “Start.”
Step5 Wait for the conversion to finish. The download will start automatically.
Conclusion
Convert your videos to 60 FPS to make them smoother and give your audience a nicer viewing experience. You can use many tools to do that. We recommend trying Wondershare Filmora. Converting a video’s frame rate using this software is as easy as 1-2-3.
This video solution not only gives you the ability to change a video’s frame rate. Wondershare Filmora also provides you with many amazing video editing tools. Therefore, Filmora can help you turn your videos into art. It is worth it.
Efficient Ways to Change Slow Motion Video to Normal on iPhone
Slow-motion videos bring your videos to life by highlighting the emotions and details of a story. However, transforming a slow motion into a normal video has its benefits. For instance, you can make boomerangs or GIFs with normal videos. In addition, you can introduce limitless transitions and animations to them. Thus, are you also finding how to change slow-motion video to a normal iPhone?
This article is the perfect stop for you as it covers all your slow-motion queries from here. It will focus on how to unslow-mo a video on an iPhone and related tools. We will discuss the iPhone’s pre-built feature and some tools to achieve this. There will be a bonus tip on how to change slow-mo video to normal on iPhone.
Slow Motion Video Maker Slow your video’s speed with better control of your keyframes to create unique cinematic effects!
Make A Slow Motion Video Make A Slow Motion Video More Features

Part 1: Direct Method: Changing Slow Motion Video to Normal on iPhone
You might not be aware of this feature if you are a previous user or have just started using an iPhone. This is Apple’s built-in feature, found in iPhones and iPads. In this section, we have tailored a step-by-step guide to doing this. Here is a brief overview of how to convert a slow-motion video to a normal iPhone:
Step 1
Move to its bottom after opening the “Photos” application on your iPhone. From there, select the “Albums” option and scroll down to the “Slo-mo” option in “Media Types.”

Step 2
In the slow-mo section, find a video you want to reverse and select it to open. Navigate towards the top right corner of this video and click the “Edit” option.

Step 3
An editing panel will appear at the bottom of this video. If you’d notice, a vertical lined bar is under the video timeline. This indicates slow-mo duration, which you can change by repositioning sliders. Afterward, click the “Done” button at the right bottom of this screen to finalize.

Part 2: Top Applications That Can Be Used to Change Slow Motion Video to Normal
The iPhone’s built-in feature is equally effective for reversing a slow-mo back to normal. However, sometimes, one requires a tool for detailed editing. In such cases, we recommend you use a third party to help you achieve the desired results. We have assembled some tools on how to take slow-mo off a video on iPhone below:
- SpeedPro Slow Speed Video Edit
- Slow-Fast Motion Video Editor
- Slow Motion Video Fx Editor
- Reverse Cam – Slow Motion Video
- Slow Motion Video Editor
1. SpeedPro Slow Speed Video Edit
This is a versatile application designed explicitly to resolve the slow speed queries on iPhone. Users can effortlessly manipulate the speed of video during editing. The best part about this editor is that you can select a specific video section. It is up to you to reverse a complete slow-mo video or a part of it.

Key Features
- Facilitates both professionals and amateurs with its reachable user interface.
- After editing a video as super slow or super-fast, you can incorporate music.
- The application offers direct sharing options to vast applications like Instagram or YouTube.
2. Slow-Fast Motion Video Editor
If how to convert slow motion video to normal on an iPhone was a bet, this application would be worth your money. Many content creators have used it, and everyone has positively reviewed it. You can transform a slow-mo into a normal video using its speed option. The highest speed option is 2x, and the slowest speed option is 1/4th. There is no limitation on the video’s length or resolution for conversion.

Key Features
- You can apply different time transitions (fast or slow) to distinct video segments.
- The application doesn’t export with a Watermark addition to maintain professionalism.
- Upon converting a video or reversing it, you can adjust the audio pitch to align with it.
3. SloMo Slow Motion Video Editor
With technological advancements, the editing industry has taken up a notch. This application uses modern algorithms to create or reverse a slow with customizations. To reverse a slow-mo, you just need to upload it and increase the video’s speed. It offers three sorts of speed editing, including slow-mo, time-lapse, and stop-motion. The video speed is adjustable up to 240fps and 12x with quick processing.

Key Features
- With its independent frame manipulation, you can edit specific parts of a video.
- You can incorporate music behind your tracks out of 170+ pre-built music tracks.
- This iPhone editor retains the natural resolution of video to maintain its quality.
4. Reverse Cam – Slow Motion Video
Surfing through the internet to find how to unslow-mo a video on an iPhone? This application assists you in controlling or reversing video speed. You just need to import a previously created slow-mo into the application. In addition to reversing a video, you can also reverse audio tracks with it. There are multiple speed options like 0.25, 0.5x, and more.

Key Features
- After modifying the video speed, you can apply multiple effects to it.
- The application is compatible with iOS 9.0 or newer versions.
- It has a built-in library that users can use to save the edited videos and share them directly.
5. Slow Motion’ Video Editor
Solve all your queries related to how to change slo-mo video to normal on iPhone here. Designed to give your videos a perfect slow-motion or high-speed effect. To convert a slow-mo video into a normal one, it offers speed increase options. You can have complete control over your videos with this application.

Key Features
- It has an accessible and intuitive editing interface for user comprehension.
- It allows you to manipulate the speed of your video from 60 to 240 frames.
- It has multiple subscription options, weekly, monthly, or yearly, that you can avail accordingly.
Bonus Part: Speed Up Your iPhone Video on Desktop Using Wondershare Filmora
All these methods of transforming a slow-mo to normal are accurate and efficient. However, when it comes to perfection, one software stands tall than the others.Wondershare Filmora is a premium video editing software for precise editing. There are two methods of manipulating a slow-motion video to normal in it.
The speed ramping involves slow-mo reverse action from specific video frames. On the other hand, uniform speed modifies the complete video speed. You can add specific values for manipulating the frame rate or change the sliders. In addition, you can also add multiple effects to your video afterward. Moreover, you can also export the video in high resolution and desired format.
Free Download For Win 7 or later(64-bit)
Free Download For macOS 10.14 or later
Step-by-Step Guide to Shift Your Slow-Motion Video to Normal with Filmora
This segment involves a step-by-step guide to reverse a slow-mo. Let’s see how to change slo-mo video to normal on iPhone with Filmora below:
Step 1Import Media Files from iPhone
First, connect your iPhone to the source device you are using Filmora on. Once you have connected the devices, navigate towards the “Import” button. Expand this option, and from the dropdown menu, select “Import from a Camera or Phone.” Select the name of your iPhone in the “Import from” section and click “OK.” Once imported, place the clip in the timeline.

Step 2Access Uniform Speed Option
Then, select the clip in the timeline and navigate towards the settings panel. Afterward, go to the “Speed” tab under “Uniform Speed” set values. Drag the Speed slider towards the right to increase the video speed.

Step 3Export the Edited Video
Hit the “Play” button from the preview window to preview your video. Afterward, navigate towards the “Export” button at the top right corner. You can also set the framerate in the Export window according to preference. Further, hit the “Export” button in the Export window to save the file on the device.

Top Features to Note About Wondershare Filmora
There is more to Filmora than how to unslow-mo a video on an iPhone. The tool shows support with multiple devices like Windows, iOS, Linux, and more. Following are some of the top-notch AI features of Filmora:
1. AI Text-to-Video
Use this tool to craft creative and graphic-based videos along with voice integration. With its generative AI, it allows you to tailor videos in different contexts. It uses text-based instructions to analyze demands and follow them.
2. AI Text-Based Editing
Cutting and Trimming videos in a timeline might be difficult for some people. It requires proper skills; however, there is an alternate option. The text-based editing AI uses voice recognition to convert speech to text. Once the video has been converted, you can eliminate the parts you want.
3. AI Music Generator
If you want to generate music based on your video’s mood or context, use this AI. It asks for a few directions like theme, mood, and language to curate music. The song is efficient in what it is designed for and generates results in seconds.
4. AI Vocal Remover
Background noises always decline the quality of an audio track or overall video. With Filmora, you can separate vocals from background noise and delete the track. Both tracks are shown in the timeline and are easy to remove. Afterward, you can apply effects or introduce music before export.
Conclusion
After reaching a conclusion, one should have fully understood the merits of how to change slow-motion video to a normal iPhone. It provided insights into several useful applications for achieving this effect. Wondershare Filmora emerged as a worthy AI-driven desktop application tailored for crafting such videos. It is recommended to help you with your creative endeavors in this domain.
Make A Slow Motion Video Make A Slow Motion Video More Features
Part 1: Direct Method: Changing Slow Motion Video to Normal on iPhone
You might not be aware of this feature if you are a previous user or have just started using an iPhone. This is Apple’s built-in feature, found in iPhones and iPads. In this section, we have tailored a step-by-step guide to doing this. Here is a brief overview of how to convert a slow-motion video to a normal iPhone:
Step 1
Move to its bottom after opening the “Photos” application on your iPhone. From there, select the “Albums” option and scroll down to the “Slo-mo” option in “Media Types.”
Step 2
In the slow-mo section, find a video you want to reverse and select it to open. Navigate towards the top right corner of this video and click the “Edit” option.
Step 3
An editing panel will appear at the bottom of this video. If you’d notice, a vertical lined bar is under the video timeline. This indicates slow-mo duration, which you can change by repositioning sliders. Afterward, click the “Done” button at the right bottom of this screen to finalize.
Part 2: Top Applications That Can Be Used to Change Slow Motion Video to Normal
The iPhone’s built-in feature is equally effective for reversing a slow-mo back to normal. However, sometimes, one requires a tool for detailed editing. In such cases, we recommend you use a third party to help you achieve the desired results. We have assembled some tools on how to take slow-mo off a video on iPhone below:
- SpeedPro Slow Speed Video Edit
- Slow-Fast Motion Video Editor
- Slow Motion Video Fx Editor
- Reverse Cam – Slow Motion Video
- Slow Motion Video Editor
1. SpeedPro Slow Speed Video Edit
This is a versatile application designed explicitly to resolve the slow speed queries on iPhone. Users can effortlessly manipulate the speed of video during editing. The best part about this editor is that you can select a specific video section. It is up to you to reverse a complete slow-mo video or a part of it.
Key Features
- Facilitates both professionals and amateurs with its reachable user interface.
- After editing a video as super slow or super-fast, you can incorporate music.
- The application offers direct sharing options to vast applications like Instagram or YouTube.
2. Slow-Fast Motion Video Editor
If how to convert slow motion video to normal on an iPhone was a bet, this application would be worth your money. Many content creators have used it, and everyone has positively reviewed it. You can transform a slow-mo into a normal video using its speed option. The highest speed option is 2x, and the slowest speed option is 1/4th. There is no limitation on the video’s length or resolution for conversion.
Key Features
- You can apply different time transitions (fast or slow) to distinct video segments.
- The application doesn’t export with a Watermark addition to maintain professionalism.
- Upon converting a video or reversing it, you can adjust the audio pitch to align with it.
3. SloMo Slow Motion Video Editor
With technological advancements, the editing industry has taken up a notch. This application uses modern algorithms to create or reverse a slow with customizations. To reverse a slow-mo, you just need to upload it and increase the video’s speed. It offers three sorts of speed editing, including slow-mo, time-lapse, and stop-motion. The video speed is adjustable up to 240fps and 12x with quick processing.
Key Features
- With its independent frame manipulation, you can edit specific parts of a video.
- You can incorporate music behind your tracks out of 170+ pre-built music tracks.
- This iPhone editor retains the natural resolution of video to maintain its quality.
4. Reverse Cam – Slow Motion Video
Surfing through the internet to find how to unslow-mo a video on an iPhone? This application assists you in controlling or reversing video speed. You just need to import a previously created slow-mo into the application. In addition to reversing a video, you can also reverse audio tracks with it. There are multiple speed options like 0.25, 0.5x, and more.
Key Features
- After modifying the video speed, you can apply multiple effects to it.
- The application is compatible with iOS 9.0 or newer versions.
- It has a built-in library that users can use to save the edited videos and share them directly.
5. Slow Motion’ Video Editor
Solve all your queries related to how to change slo-mo video to normal on iPhone here. Designed to give your videos a perfect slow-motion or high-speed effect. To convert a slow-mo video into a normal one, it offers speed increase options. You can have complete control over your videos with this application.
Key Features
- It has an accessible and intuitive editing interface for user comprehension.
- It allows you to manipulate the speed of your video from 60 to 240 frames.
- It has multiple subscription options, weekly, monthly, or yearly, that you can avail accordingly.
Bonus Part: Speed Up Your iPhone Video on Desktop Using Wondershare Filmora
All these methods of transforming a slow-mo to normal are accurate and efficient. However, when it comes to perfection, one software stands tall than the others.Wondershare Filmora is a premium video editing software for precise editing. There are two methods of manipulating a slow-motion video to normal in it.
The speed ramping involves slow-mo reverse action from specific video frames. On the other hand, uniform speed modifies the complete video speed. You can add specific values for manipulating the frame rate or change the sliders. In addition, you can also add multiple effects to your video afterward. Moreover, you can also export the video in high resolution and desired format.
Free Download For Win 7 or later(64-bit)
Free Download For macOS 10.14 or later
Step-by-Step Guide to Shift Your Slow-Motion Video to Normal with Filmora
This segment involves a step-by-step guide to reverse a slow-mo. Let’s see how to change slo-mo video to normal on iPhone with Filmora below:
Step 1Import Media Files from iPhone
First, connect your iPhone to the source device you are using Filmora on. Once you have connected the devices, navigate towards the “Import” button. Expand this option, and from the dropdown menu, select “Import from a Camera or Phone.” Select the name of your iPhone in the “Import from” section and click “OK.” Once imported, place the clip in the timeline.
Step 2Access Uniform Speed Option
Then, select the clip in the timeline and navigate towards the settings panel. Afterward, go to the “Speed” tab under “Uniform Speed” set values. Drag the Speed slider towards the right to increase the video speed.
Step 3Export the Edited Video
Hit the “Play” button from the preview window to preview your video. Afterward, navigate towards the “Export” button at the top right corner. You can also set the framerate in the Export window according to preference. Further, hit the “Export” button in the Export window to save the file on the device.
Top Features to Note About Wondershare Filmora
There is more to Filmora than how to unslow-mo a video on an iPhone. The tool shows support with multiple devices like Windows, iOS, Linux, and more. Following are some of the top-notch AI features of Filmora:
1. AI Text-to-Video
Use this tool to craft creative and graphic-based videos along with voice integration. With its generative AI, it allows you to tailor videos in different contexts. It uses text-based instructions to analyze demands and follow them.
2. AI Text-Based Editing
Cutting and Trimming videos in a timeline might be difficult for some people. It requires proper skills; however, there is an alternate option. The text-based editing AI uses voice recognition to convert speech to text. Once the video has been converted, you can eliminate the parts you want.
3. AI Music Generator
If you want to generate music based on your video’s mood or context, use this AI. It asks for a few directions like theme, mood, and language to curate music. The song is efficient in what it is designed for and generates results in seconds.
4. AI Vocal Remover
Background noises always decline the quality of an audio track or overall video. With Filmora, you can separate vocals from background noise and delete the track. Both tracks are shown in the timeline and are easy to remove. Afterward, you can apply effects or introduce music before export.
Conclusion
After reaching a conclusion, one should have fully understood the merits of how to change slow-motion video to a normal iPhone. It provided insights into several useful applications for achieving this effect. Wondershare Filmora emerged as a worthy AI-driven desktop application tailored for crafting such videos. It is recommended to help you with your creative endeavors in this domain.
Also read:
- Updated Splice Video Editor Online - Get Your Videos Splice Easily
- In 2024, Why You Should Master Slideshows In Lightroom, Fresh Insight?
- Updated 2024 Approved Change Aspect Ratio of Video
- New A Guide to Adding Audio in Wondershare Filmora
- Updated In 2024, How to Add a Slideshow in PowerPoint
- Updated 2024 Approved Guide To Slowing Down Videos in Snapchat Discussing the Details
- New Easy Ways to Remove Motion Blur In Photoshop
- New How Can You DIY VHS Overlay in After Effects, In 2024
- In 2024, This Article Is Regarding the Guidance About the Split of the Audio From the Video in Premiere Pro. And Also, the Discussion of the Wondershare Fllmora as the Replacement and How to Perform a Similar Task in It
- New Leading Applications to Create Fast Motion in iPhone
- 2024 Approved Tutorial Guides for Video Maker with Song
- In 2024, Magic Effects Video Making How To
- 2024 Approved Ideas That Help You Out in Making Transparent Image
- New Practical Way to Resize Video in Handbrake
- New 2024 Approved How To Add Fade In Windows Video Editor
- New 2024 Approved A Review of Efectum App Making Slow Motion Video
- New How to Create a Light Sweep (Shine) Effect with Filmora for 2024
- Guide to Add Transition Effects in Premiere Pro
- New In 2024, What Is AI Composite Video App and AI Composite Video Tutorial
- Updated Fun & Easy Masking Tricks in Filmora
- New Discover the Various Techniques of Video Framing, Which Involve Capturing the Essence of a Subject While Eliminating Distractions in the Background, Andlearn How to Apply Them Skillfully to Achieve Desired Results
- New In 2024, How To Make Flying Objects in Wondershare Filmora
- In 2024, Ultimate Guidelines to Help You Use VLC Media Player Better
- 2024 Approved How To Combine Videos On TikTok
- New The Power of Music in Videos (+Filmora Editing Tricks) for 2024
- New In 2024, Add Camera Shake to Video in Adobe After Effects
- Updated How to Make a Slow Motion Video in Wondershare Filmora for 2024
- In 2024, How to Comment on YouTube Live Chat
- How to Add Green Screen Effects In Phhotoshop
- 2024 Approved A Countdown Effect Is Widely Used in Gaming and Report Videos. So How to Create Your Own Countdown Video? This Article Will Tell You some Ideas About Contdown Video Editing
- Updated Make Time-Lapse Video on MacBook Complete Guide for 2024
- New In 2024, Add Emoji to Linkedin Post – 5 Tips You Would Like to Know
- Updated How to Make an Aesthetic Slideshow
- Updated Best Cloud Storage Service for Videos
- In 2024, Use Your Social Media App and Make Slow-Motion Videos by Reading This Guide. Besides Learning Slow-Motion Snapchat, Get Useful Apps Serving the Same Purposes
- New Detailed Tutorial to Crop a Video Using Openshot for 2024
- So, without Wasting Time, Let Me Show You How to Mask a Video in Wondershare Filmora. Lets Get Started
- Updated In 2024, Best 12 Best Freeze Frame Video Editing Examples
- In 2024, What Is Motion Blur in the Game? Do You Really Need It?
- New After Reading This Article, You Can Add a B-Roll Feature From Filmora and Captivate More Audience. Explanation Video B-Roll and Story-Telling B-Roll Are Well Illustrated
- New How To Add Scrolling Text Effect for 2024
- Top 10 TEXT TO SPEECH VIDEO MAKERS for 2024
- 4 Methods How To Make a Recap Video for 2024
- Updated 2024 Approved Best Ideas on Using Filmora Green Screen
- Updated How To Make Split Screen Videos in Filmora for 2024
- Top-Search The Best Game Screen Recording Tools for PC
- Updated How to Color Grade Your Picture in LightRoom for 2024
- Updated In 2024, What Is the Best FPS for YouTube Videos?
- 2024 Approved How to Merge FLV Files Windows, Mac,Android, iPhone & Online
- Filter Not Working Error in Excel 2003 Fix 2024 | Stellar
- What Pokémon Evolve with A Dawn Stone For Oppo A18? | Dr.fone
- In 2024, Universal Unlock Pattern for Realme 11 Pro
- What is Geo-Blocking and How to Bypass it On Infinix Note 30 Pro? | Dr.fone
- Top Apps and Online Tools To Track Samsung Galaxy S23 Phone With/Without IMEI Number
- Ultimate Guide to Free PPTP VPN For Beginners On Motorola Edge 40 Pro | Dr.fone
- In 2024, How to Spy on Text Messages from Computer & Oppo A78 | Dr.fone
- How To Leave a Life360 Group On Oppo Reno 10 Pro+ 5G Without Anyone Knowing? | Dr.fone
- How to Soft Reset Honor Play 40C phone? | Dr.fone
- In 2024, Top 5 Tracking Apps to Track Xiaomi 13T Pro without Them Knowing | Dr.fone
- How to Create Free Photo Collage Frame in Minutes for 2024
- Title: New To Find the Best Tool Out of Hundreds of Online and Offline GIF to Video Converters, You Need to Check These Specifications. Read This Review and Get the Best Out of the Best
- Author: Chloe
- Created at : 2024-04-24 07:08:23
- Updated at : 2024-04-25 07:08:23
- Link: https://ai-editing-video.techidaily.com/new-to-find-the-best-tool-out-of-hundreds-of-online-and-offline-gif-to-video-converters-you-need-to-check-these-specifications-read-this-review-and-get-the-/
- License: This work is licensed under CC BY-NC-SA 4.0.
