

New Vintage Film Effect 1920S - How to Make for 2024
Vintage Film Effect 1920S - How to Make
Do you want to roll back the hands of time and shoot a film like you were in WWI or Charlie Chaplin’s era? That’s what a vintage film effect is all about. In other words, this video effect will give your videos an old-film look and feel. So, without wasting time, let’s learn how to convert a normal video into a film shot in the 1920s with Wondershare Filmora.
Preparation

In this tutorial, you don’t need a lot of creativity to create a vintage film, as Wondershare Filmora will be doing the heavy lifting. Just shoot an action video like chasing each other around, chatting with friends, running away from something, or doing anything else. Let’s learn how to do that below For Win 7 or later(64-bit)
Free Download For macOS 10.14 or later
Step1 Add a video you want to edit

Upload your video on Filmora, then move it to the editing timeline by dragging it. This should take a second or two.
Step2 Add a crop effect

After successfully adding your video to the timeline, tap the Effect tab on top of the screen and click Utility. Then, choose the Crop effect and add a few tracks above the video clip.

Next, double-tap the Crop effect on the editing timeline to open the effect editing tools. Now change the crop amount to 15 to add a vintage feel to your video. Just enter 15 on the Left and Right boxes.
Step3 Add the Dirty Film and Silent Film effects

Tap the Effect tab, then open the Overlay drop-down menu. Then, choose the Old Film category before adding a Dirty Film effect above the clip. To apply a more vintage feel to your video, add a Silent Film effect to the track above the Dirty Film effect.
Step4 Add a black & white effect to your video

Up to this point, your film should now start having a more vintage feel. But to make it look even older, double-click the video clip and tap the Color tab. After that, open the 3D LUT arrow and choose the B&W Film option. Now play the video and enjoy.
Summary
See, you don’t need to break a sweat to add a vintage feel to your funny video. With Filmora, you’ll access multiple tools and effects to create an old-looking film with just a single click. And don’t forget to play around with other Filmora overlays and effects to bring out the inner video editor in you. Thanks for reading For macOS 10.14 or later
Step1 Add a video you want to edit
Upload your video on Filmora, then move it to the editing timeline by dragging it. This should take a second or two.
Step2 Add a crop effect
After successfully adding your video to the timeline, tap the Effect tab on top of the screen and click Utility. Then, choose the Crop effect and add a few tracks above the video clip.
Next, double-tap the Crop effect on the editing timeline to open the effect editing tools. Now change the crop amount to 15 to add a vintage feel to your video. Just enter 15 on the Left and Right boxes.
Step3 Add the Dirty Film and Silent Film effects
Tap the Effect tab, then open the Overlay drop-down menu. Then, choose the Old Film category before adding a Dirty Film effect above the clip. To apply a more vintage feel to your video, add a Silent Film effect to the track above the Dirty Film effect.
Step4 Add a black & white effect to your video
Up to this point, your film should now start having a more vintage feel. But to make it look even older, double-click the video clip and tap the Color tab. After that, open the 3D LUT arrow and choose the B&W Film option. Now play the video and enjoy.
Summary
See, you don’t need to break a sweat to add a vintage feel to your funny video. With Filmora, you’ll access multiple tools and effects to create an old-looking film with just a single click. And don’t forget to play around with other Filmora overlays and effects to bring out the inner video editor in you. Thanks for reading!
How to Add Motion Titles
Do you want to make your videos eye-catching instantly? Looking for some cool title animations to make your texts stand out? You should definitely opt for motion title templates that are widely available in popular video editors. Motion title templates come preloaded with animated texts, engaging graphic elements, and even background effects.
You can add them directly to your video and customize them as per you requirements so that your video looks exactly the way you desire. Different video editors have different motion titles, and therefore, you should check them out one by one to find out the templates you are looking for. We will illustrate title motion graphics in all the leading video editors.
Part 1. Add Motion Title with Filmora
The easiest way to add motion title to your video on your computer is through Wondershare Filmora . Filmora is a professional video editor that is available for Windows and Mac users. Filmora has the best collection of motion title templates, and the user interface is super intuitive and anyone can use without any prior experience. Here are the steps to add motion title with Filmora.
Step1Install and launch Wondershare Filmora on your computer. Click on New Project option on the welcome screen or go to File menu and click on New Project option.

Step2Go to File menu and Import Media option to import your video file. Otherwise, you can simply drop the video file into Project Media folder.
Step3Drag the video file from Project Media folder and drop it into the Timeline.

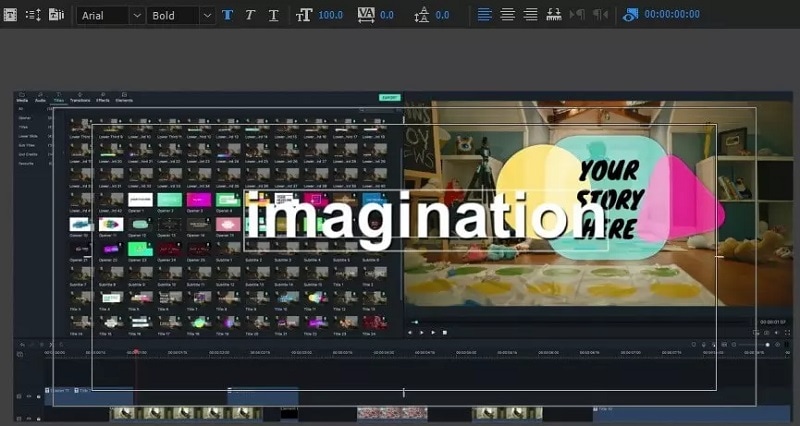
Step4Go to Titles at the top and go to the left panel. You can different categories of motion title templates. Select any desired text effect and drop into the Timeline above the video layer wherever you want.
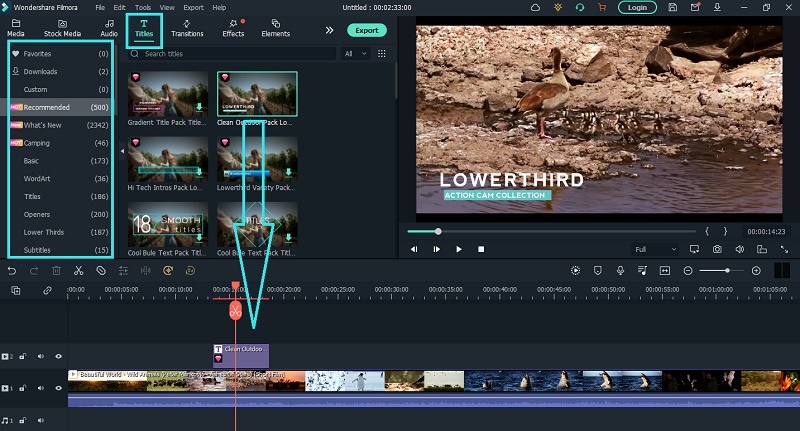
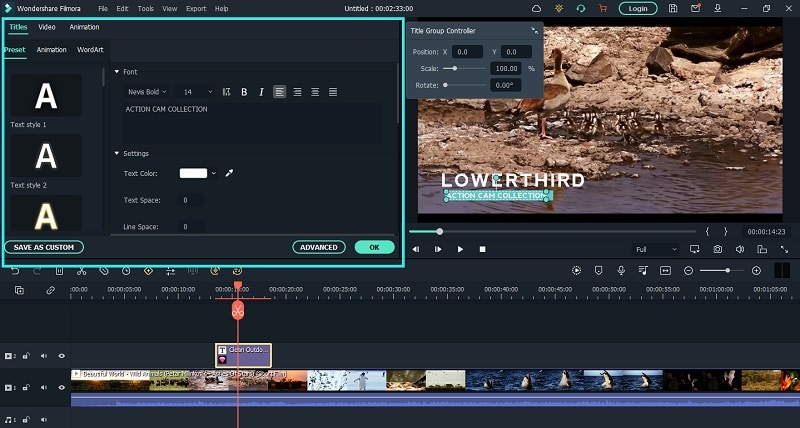
Step5Double clicking on the text layer on Timeline to edit the text and change the styles. Under Preset tab, you can change font, size, and color. Finally, click on OK button to save the edits done.
Part 2. Add Motion Title with Premiere Pro
Adobe Premiere Pro is a renowned video editor that is mostly used by professionals to edit videos and add effects and animations. Even though Premiere Pro has a steep learning curve, you can create motion title in simple steps. You can write any text on the video and select from different effects and animations to create motion title graphics. Here are the steps to add title motion graphics Premiere Pro free.
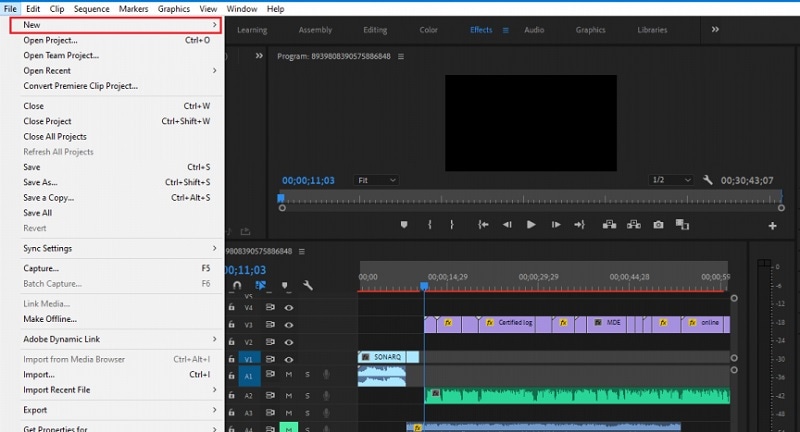
Step1Launch Premiere Pro and go to New> Project option. Import the video file and drop it into Timeline.
Step2Go to Title> New Title> Default Still option and follow the on-screen instructions.

Step3You will see different types of title styles and designs to choose from as you feel.

Step4Click on Type Tool option and click on the area on the video where you want the text to appear. You can customize them from the right panel from Title Styles, Title Properties, Tools and Title Actions.
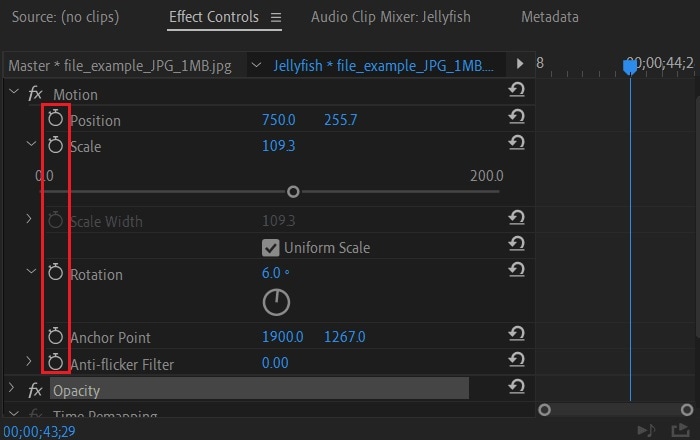
Step5To add motion to the title, click on Effects Control window. Click on any desired animation and turn to Stopwatch icon to apply the effect to the text. There is a dedicated Motion option available.
Part 3. Make motion title with Studio
Studio is a popular video editing software where you can not only apply motion title presets but also create motion title presets from scratch. The reason why video editors choose Studio is because it allows users to customize everything and create different templates and animations for personalization. Here are the steps to create title motion graphics in Studio as per your requirements.
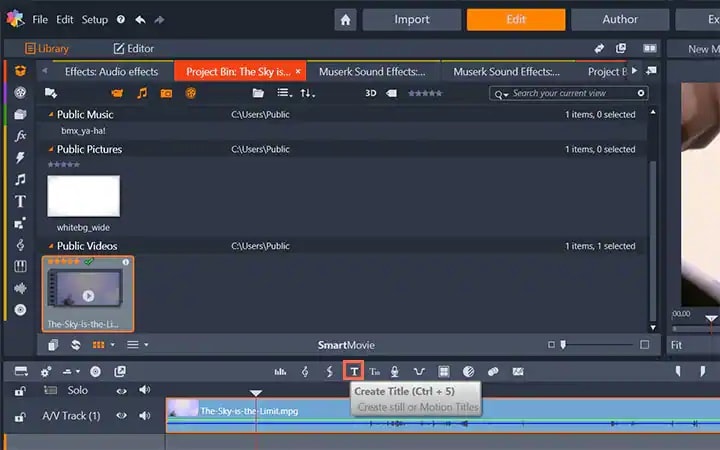
Step1Launch Studio. Import your video file, and you can import single frames such as images from a live video for stop motion titles. Once you have imported, go to the header bar above the Timeline. Click on Create Title option to open Title Editor to create title motion.
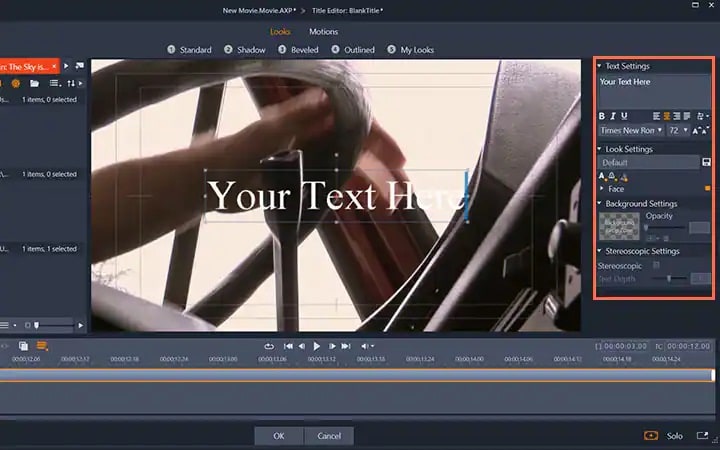
Step2Add your preferred text under Title Editor and adjust font, size, and style as you feel. Go to the right side to make changes to Look, Background, and Stereoscopic Settings to get the perfect text style from the wide range of choices available.
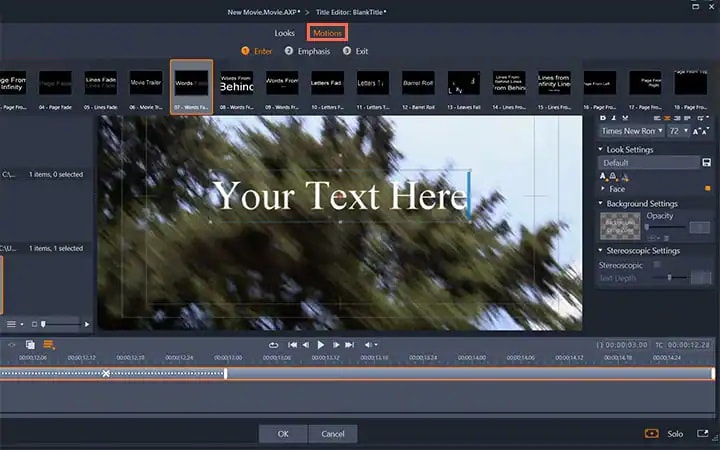
Step3Click on Motion option at the top to add motion to the text. Choose from the different motion title templates as per your preference.
Step4You can adjust the duration of the motion effect from the right panel and click on Ok button.

Part 4. Add Motion Title with WeVideo
WeVideo is a popular online video editor that you can use to add title motion graphics Premiere Pro free. You can find many motion titles on WeVideo for free like you get in Premiere Pro and there are many exclusive motion text templates available. You need to create a free account with WeVideo to get started. You can create your video from scratch by selecting from the available video templates. You can even import your recorded video and add motion texts and animations as per your preference. Here are the steps to add motion title with WeVideo.
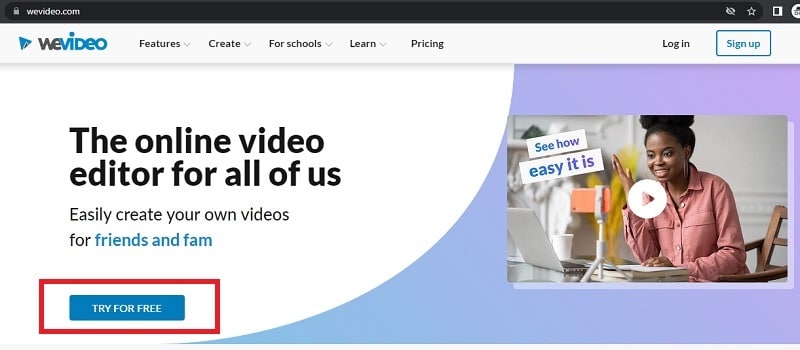
Step1Open your web browser and visit “wevideo.com”. Click on Try For Free button. Sign up for free and go to WeVideo video editor.
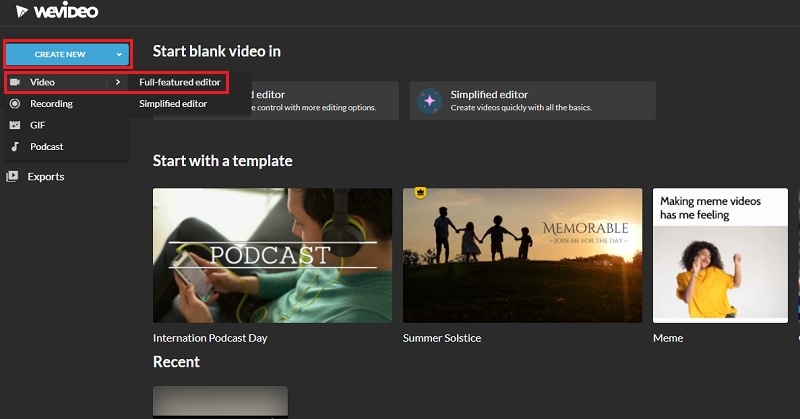
Step2Click on Create New button and select Video option. Click on Full-featured editor option.
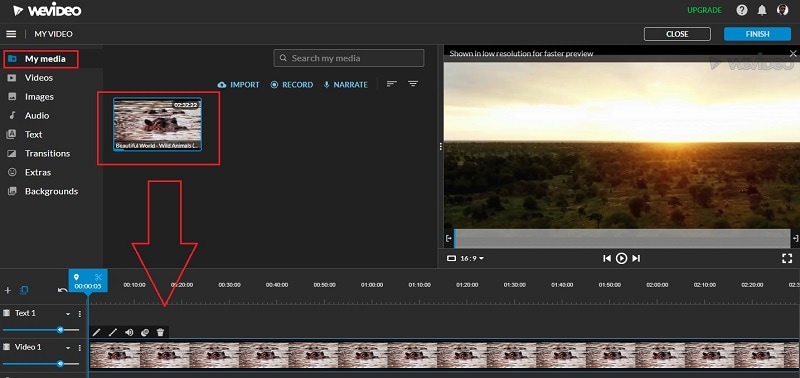
Step3Drag and drop your video file into My Media folder and bring it to Timeline.
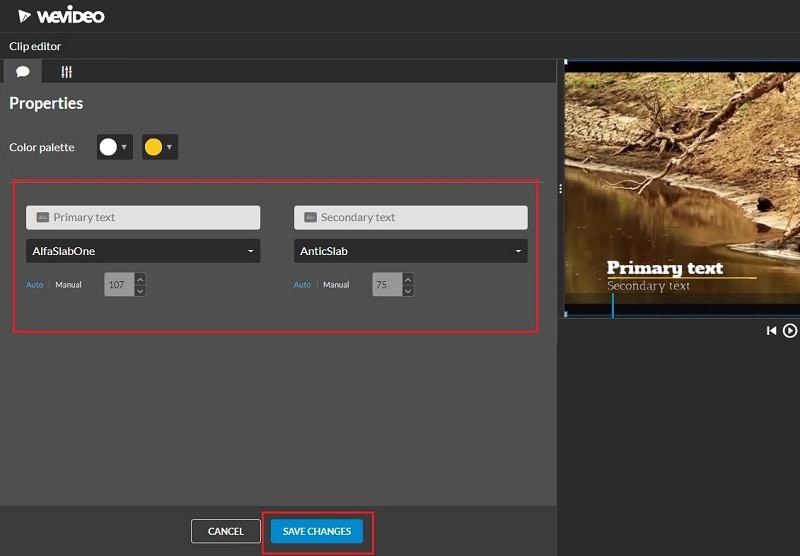
Step4Go to Text tab and you will see all the motion animated titles under Titles section. Click on them to check out their previews in Viewer. If you have selected anyone, drag and drop it into Timeline.
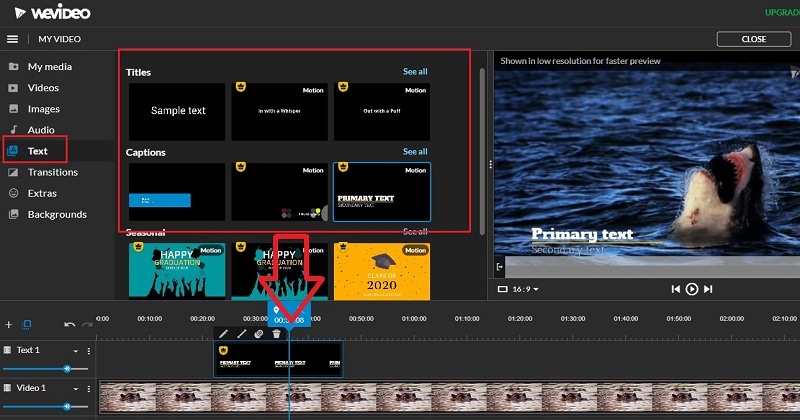
Step5Adjust the position where you want the title to appear on the video and stretch the duration as required. Double-click on the title to edit and customize it as per your preference. Finally, click on Save Changes button.
The Bottom Line
Motion titles are extremely important for any video because they bring in a variety to your video. They make the video eye-catching and help in getting the message across by grabbing the attention of the viewers. We have illustrated how to add motion titles Premiere Pro and Studio. You can also use WeVideo online video editor. We recommend Wondershare Filmora for its extensive collection of motion title templates to choose from and apply to your text.
Free Download For Win 7 or later(64-bit)
Free Download For macOS 10.14 or later
Get 15 Absolutely-Free LUTs From This Article as Well as Get an Insight on How Cinematic LUTs Affect Your Film
Create High-Quality Video - Wondershare Filmora
An easy and powerful YouTube video editor
Numerous video and audio effects to choose from
Detailed tutorials are provided by the official channel
A significant way of creating cinematic looks for your project is by using LUTs. And with a single click, you will transform your footage into an absolute masterpiece. By using free LUTs, not only will you save on cost but also on the hassle and bustle of having to color grade your film.
LUTs function to create a uniform color throughout a film while enhancing or preserving skin tones. You don’t have to use all the LUTs in this world to create splendid films. Besides, most professional video editors and colorists prefer to work with a handful of LUTs and create stunning films. By going through this article, you will come to learn about 15 free cinematic LUTs for your film.

In this article
01 How Cinematic LUTs Affect Your Film
02 15 Free Cinematic LUTs for Your Film
03 Edit Your Film with Filmora and its Cinematic LUTs
How Cinematic LUTs Affect Your Film
When it comes to marketing, videos often tend to play a huge role. And to market your brand effectively, you need to have top-notch videos. It doesn’t mean that you should go and study to become a colorist or a video editor. Besides, there are professional colorists and video editors who gave in their time and effort to design powerful LUTs and offer them for free.
You can use those free LUTs to create mesmerizing videos and photos for your projects. And depending on the nature of your project, you will find here a free LUT that will work best for you.
There are two types of LUTs;
- 1. Conversion LUTs
Conversion LUTs function by correcting the Log color space back to the standard color space. Professional colorists often use this LUT to obtain a high dynamic range by maintaining more details in the highlights and shadows. - 2. Creative LUTs
Creative LUTs are essentially used in bringing out the creative colors of footage. Color styles in creative LUT are of a wide range, such as moody, cinematic, vintage, and summer, among others.
Creative LUTs is the one that is often used in many cases.

Filmora 3D LUT
Empower your videos with a new mood using different LUTs
Filmora now offers 800+ top-quality LUTs cover a broad range of scenarios. Transform your videos with Filmora’s powerful 3D LUTs.
Apply LUT on Videos Apply LUT on Videos Learn More >


15 Free Cinematic LUTs for Your Film
A good LUT is one that can be applied to several setups and different lighting situations. Besides, it doesn’t mean that a single LUT should be applied to every project; instead, it should be able to produce several perfect matches to your project.
Here are some of the top-tier free cinematic LUTs that you can apply to your film.
1. 40 Free Instagram LUTs
Create amazing Instagram footage using these 40 free LUTs. Besides, you can use these free LUTs in a couple of applications, including Adobe Premiere Pro, Wondershare Filmora, Photoshop, and Da Vinci Resolve.
After applying these LUTs, you can carry out bits of basic corrections such as brightness and contrast to your footage.
2. 3 Eyes and Teeth Whitening LUTs
Eye and teeth whitening LUTs are often used in movies and quality photos. Whiten the color of your teeth and eyes using these three free LUTs.
These LUTs are very simple to use, and when you effectively incorporate them, you are assured of creating magnificent photos.

3. 70 Free Hollywood Film LUTs
Do you have a project file and want it to appear like the ones in Hollywood films? You need not to worry since here are 70 eye-catching LUTs that you can add to your project and get that ‘Hollywood” look you’ve always wanted.
4. Free Summer LUTs
Summer clips perfectly match the orange, teal look. Here, you will get summer LUTs that will work perfectly with your project.
You can use these LUTs in Adobe Premiere, Wondershare Filmora, Da Vinci Resolve, and Lightroom.
5. Free Moody Green LUTs
Footages taken in the jungle work ideally with the moody green LUTs. Here are some of the amazing LUTs you can incorporate into your project.
6. Moody Blue LUTs
When it comes to appreciating nature, moody blue LUTs tend to be the perfect resort. Create cinematic scenes for your videos using these LUTs for free.
The LUTs here are protected with a password, what you do is to watch that video to completion, and you will come across the password.
7. 3 Free Urban Dark Cinematic LUTs
Often in many movies, you will come across urban scenes that are moody, dark, and portrayed as something out-of-this-world. You can also create such scenes with these three free urban dark cinematic LUTs.
You can use these three free cinema LUTs to your Wondershare Filmora or Adobe Premiere.
8. 10 Free Winter LUTs
Footages shot in winter outdoors don’t just work with any LUTs. Besides, there are LUTs designed explicitly for winter footage, and here are the ten best winters LUTs.
Download the LUTs and apply one that you find the perfect match for your project.
9. 20 Free Travel LUTs
When traveling, you may capture several photos and videos that are not very appealing – This may hinder you from sharing them with your friends or family. Besides, you don’t have to discard those footage since you can give them a new mind-blowing look using these 20 free travel LUTs.
To access all the 20 LUTs, you only need to subscribe to their YouTube channel, and you are good to go.
10. Free Korean Tone LUT
Korean movies are enticing because of their unique, bewildering LUT mood. You can also employ this LUT to your footage and leave your followers jaw-dropping.
Here, this free LUT pack is protected, and the only catch is to watch the YouTube video and get the password.
11. 5 Free Wedding LUTs
Wedding footages often require that romantic mood. Get the best five free wedding LUTs here.
The LUT file pack here is protected by a password. So to access the password, watch the YouTube video to completion and access it. Often, it is displayed in the top-right corner of the clip.
12. Free Sunset LUTs
Sunsets footages go simultaneously with the golden light or dark violet colors. Here, you will access the free sunset LUTs that you can incorporate into your project.
After downloading the file, you will realize it is protected. What you do is only watch this YouTube video and access the password.
13. Vintage LUTs
One of the commonly used LUTs in movies is the vintage LUTs. Access over 28 free vintage LUTs here and give your footage that brilliant vintage appearance.
14. Free Warm LUT
Warm LUTs do create a sensational atmosphere in the footage. Incorporate this LUT into your footage and get jaw-dropping results.
After downloading this free LUT pack, input the password displayed in the top-right corner of this YouTube video.
15. Free Music LUTs
In music, fans are always allured by the quality of the video. Besides, you may also gain or lose fans through your video quality. Improve the quality of your music video using this free LUT pack.
To download it for free, input 0$ under the payout bar and click “Buy Now.” Complete the other forms and download your music LUT for free.

Edit Your Film with Filmora and its Cinematic LUTs
Wondershare Filmora is an award-winning video editing software that allows its users to create stunning videos through its wide array of powerful video editing tools. The platform is well aware of all your video editing needs and provides easy-to-use functionalities that include LUTs.
For Win 7 or later (64-bit)
For macOS 10.14 or later
Use LUTs in Wondershare Filmora to express your intended video ideas.
Here are the simple steps on how to edit your film with Filmora:
Step 1. Download Wondershare Filmora
First, download Wondershare Fimora to your computer and allow it to run.
Step 2. Add your Footage to the Timeline
Load your video to Filmora. Drag and drop them to your timeline.

Step 3. Access your LUT Library
To access your LUT library, open “Color Correction.” Then click on “3D LUT.”

Step 4. Add your preferred LUT to your Project video
After clicking on “3D LUT,” a drop-down list showing all the available LUTs will be displayed. Scroll and select your preferred LUT.

When you want to apply your LUTs in Filmora, click on “Load new LUT,” which is still under “3D LUTs.” You will be directed to your computer storage space to select the folder containing your LUTs.
After selecting your preferred LUT folder, hit the “OK” button to apply.
Conclusion
● Worry no more when you have a small budget and a tight deadline for your project. Depending on your project’s type, nature, and requirements, create bewildering footage using the above 15 LUTs. After applying your favorite LUT, carry out small basic adjustments such as the white balance, brightness, and contrast to your footage when necessary. By doing so, you are going to leave your clients and viewers ground rooted.
● A few of these free LUTs have a catch: watching the YouTube video and getting a password for unlocking their free LUT pack. The password is often displayed on the top-right corners of the YouTube videos.
A significant way of creating cinematic looks for your project is by using LUTs. And with a single click, you will transform your footage into an absolute masterpiece. By using free LUTs, not only will you save on cost but also on the hassle and bustle of having to color grade your film.
LUTs function to create a uniform color throughout a film while enhancing or preserving skin tones. You don’t have to use all the LUTs in this world to create splendid films. Besides, most professional video editors and colorists prefer to work with a handful of LUTs and create stunning films. By going through this article, you will come to learn about 15 free cinematic LUTs for your film.
In this article
01 How Cinematic LUTs Affect Your Film
02 15 Free Cinematic LUTs for Your Film
03 Edit Your Film with Filmora and its Cinematic LUTs
How Cinematic LUTs Affect Your Film
When it comes to marketing, videos often tend to play a huge role. And to market your brand effectively, you need to have top-notch videos. It doesn’t mean that you should go and study to become a colorist or a video editor. Besides, there are professional colorists and video editors who gave in their time and effort to design powerful LUTs and offer them for free.
You can use those free LUTs to create mesmerizing videos and photos for your projects. And depending on the nature of your project, you will find here a free LUT that will work best for you.
There are two types of LUTs;
- 1. Conversion LUTs
Conversion LUTs function by correcting the Log color space back to the standard color space. Professional colorists often use this LUT to obtain a high dynamic range by maintaining more details in the highlights and shadows. - 2. Creative LUTs
Creative LUTs are essentially used in bringing out the creative colors of footage. Color styles in creative LUT are of a wide range, such as moody, cinematic, vintage, and summer, among others.
Creative LUTs is the one that is often used in many cases.
Filmora 3D LUT
Empower your videos with a new mood using different LUTs
Filmora now offers 800+ top-quality LUTs cover a broad range of scenarios. Transform your videos with Filmora’s powerful 3D LUTs.
Apply LUT on Videos Apply LUT on Videos Learn More >
15 Free Cinematic LUTs for Your Film
A good LUT is one that can be applied to several setups and different lighting situations. Besides, it doesn’t mean that a single LUT should be applied to every project; instead, it should be able to produce several perfect matches to your project.
Here are some of the top-tier free cinematic LUTs that you can apply to your film.
1. 40 Free Instagram LUTs
Create amazing Instagram footage using these 40 free LUTs. Besides, you can use these free LUTs in a couple of applications, including Adobe Premiere Pro, Wondershare Filmora, Photoshop, and Da Vinci Resolve.
After applying these LUTs, you can carry out bits of basic corrections such as brightness and contrast to your footage.
2. 3 Eyes and Teeth Whitening LUTs
Eye and teeth whitening LUTs are often used in movies and quality photos. Whiten the color of your teeth and eyes using these three free LUTs.
These LUTs are very simple to use, and when you effectively incorporate them, you are assured of creating magnificent photos.
3. 70 Free Hollywood Film LUTs
Do you have a project file and want it to appear like the ones in Hollywood films? You need not to worry since here are 70 eye-catching LUTs that you can add to your project and get that ‘Hollywood” look you’ve always wanted.
4. Free Summer LUTs
Summer clips perfectly match the orange, teal look. Here, you will get summer LUTs that will work perfectly with your project.
You can use these LUTs in Adobe Premiere, Wondershare Filmora, Da Vinci Resolve, and Lightroom.
5. Free Moody Green LUTs
Footages taken in the jungle work ideally with the moody green LUTs. Here are some of the amazing LUTs you can incorporate into your project.
6. Moody Blue LUTs
When it comes to appreciating nature, moody blue LUTs tend to be the perfect resort. Create cinematic scenes for your videos using these LUTs for free.
The LUTs here are protected with a password, what you do is to watch that video to completion, and you will come across the password.
7. 3 Free Urban Dark Cinematic LUTs
Often in many movies, you will come across urban scenes that are moody, dark, and portrayed as something out-of-this-world. You can also create such scenes with these three free urban dark cinematic LUTs.
You can use these three free cinema LUTs to your Wondershare Filmora or Adobe Premiere.
8. 10 Free Winter LUTs
Footages shot in winter outdoors don’t just work with any LUTs. Besides, there are LUTs designed explicitly for winter footage, and here are the ten best winters LUTs.
Download the LUTs and apply one that you find the perfect match for your project.
9. 20 Free Travel LUTs
When traveling, you may capture several photos and videos that are not very appealing – This may hinder you from sharing them with your friends or family. Besides, you don’t have to discard those footage since you can give them a new mind-blowing look using these 20 free travel LUTs.
To access all the 20 LUTs, you only need to subscribe to their YouTube channel, and you are good to go.
10. Free Korean Tone LUT
Korean movies are enticing because of their unique, bewildering LUT mood. You can also employ this LUT to your footage and leave your followers jaw-dropping.
Here, this free LUT pack is protected, and the only catch is to watch the YouTube video and get the password.
11. 5 Free Wedding LUTs
Wedding footages often require that romantic mood. Get the best five free wedding LUTs here.
The LUT file pack here is protected by a password. So to access the password, watch the YouTube video to completion and access it. Often, it is displayed in the top-right corner of the clip.
12. Free Sunset LUTs
Sunsets footages go simultaneously with the golden light or dark violet colors. Here, you will access the free sunset LUTs that you can incorporate into your project.
After downloading the file, you will realize it is protected. What you do is only watch this YouTube video and access the password.
13. Vintage LUTs
One of the commonly used LUTs in movies is the vintage LUTs. Access over 28 free vintage LUTs here and give your footage that brilliant vintage appearance.
14. Free Warm LUT
Warm LUTs do create a sensational atmosphere in the footage. Incorporate this LUT into your footage and get jaw-dropping results.
After downloading this free LUT pack, input the password displayed in the top-right corner of this YouTube video.
15. Free Music LUTs
In music, fans are always allured by the quality of the video. Besides, you may also gain or lose fans through your video quality. Improve the quality of your music video using this free LUT pack.
To download it for free, input 0$ under the payout bar and click “Buy Now.” Complete the other forms and download your music LUT for free.
Edit Your Film with Filmora and its Cinematic LUTs
Wondershare Filmora is an award-winning video editing software that allows its users to create stunning videos through its wide array of powerful video editing tools. The platform is well aware of all your video editing needs and provides easy-to-use functionalities that include LUTs.
For Win 7 or later (64-bit)
For macOS 10.14 or later
Use LUTs in Wondershare Filmora to express your intended video ideas.
Here are the simple steps on how to edit your film with Filmora:
Step 1. Download Wondershare Filmora
First, download Wondershare Fimora to your computer and allow it to run.
Step 2. Add your Footage to the Timeline
Load your video to Filmora. Drag and drop them to your timeline.
Step 3. Access your LUT Library
To access your LUT library, open “Color Correction.” Then click on “3D LUT.”
Step 4. Add your preferred LUT to your Project video
After clicking on “3D LUT,” a drop-down list showing all the available LUTs will be displayed. Scroll and select your preferred LUT.
When you want to apply your LUTs in Filmora, click on “Load new LUT,” which is still under “3D LUTs.” You will be directed to your computer storage space to select the folder containing your LUTs.
After selecting your preferred LUT folder, hit the “OK” button to apply.
Conclusion
● Worry no more when you have a small budget and a tight deadline for your project. Depending on your project’s type, nature, and requirements, create bewildering footage using the above 15 LUTs. After applying your favorite LUT, carry out small basic adjustments such as the white balance, brightness, and contrast to your footage when necessary. By doing so, you are going to leave your clients and viewers ground rooted.
● A few of these free LUTs have a catch: watching the YouTube video and getting a password for unlocking their free LUT pack. The password is often displayed on the top-right corners of the YouTube videos.
Go Through This Guide on All Steps in Freezing Frame Sequences in Videos Using Filmora. Details Include Splitting the Clip, Reversing Speed, and More
One can add different effects to videos to create a more appealing movie style. One of the most well-liked and widely used effects is the freeze frame effect, which creates a short frozen frame effect on clips.
You can use different video editing software to create this effect in videos. But not all of them come close to the easy-to-use functionality of Wondershare Filmora . On a video, you can utilize this feature to freeze a specific reaction of the character on screen or add a dramatic effect for a pivotal moment, like scoring a touchdown.
Upon enabling this effect, the video clip automatically splits at the frozen moments. Users insert another image file for that duration and activate the background audio and effects. If you are wondering how to carry out this feature on Filmora, read all the steps involved here.
Launching the Software
The first step is downloading the software on your computer, whether it is macOS-powered or Windows. Go to the software’s official website and click on the blue Download button at the top of the home page.
You do not have to do a lot of steps to complete this process since an installer of the app will automatically download into your device at this step. Make sure you are downloading the Wondershare Filmora 11 version since it is the latest version of the software with advanced upgrades, like the Freeze Frame support.
Free Download For Win 7 or later(64-bit)
Free Download For macOS 10.14 or later
To install the software, you have to double-click on the app installer that got downloaded and agree to the permissions that it prompts. Then, the installation process will continue. The software will launch automatically after the process ends and you press Start Now.

Adding the footage
Next, your main step is to add the video you will edit into the Filmora software. First, you must click the Create New Project tab on the homepage. When the editor opens, tap on the “Click here to import media” button and insert the video you will edit from your device. Next, drag it down to the editing timeline for making further changes. Choose the Keep project settings option when the prompt comes up to ensure the same quality of the video.

Still, it would help if you tapped the play button on the screen to see a Preview of the video clip to check its stability and quality. Also, ensure that your main subject is darker than the backdrop in the video clip.
Adjust the playhead location
On the video clip, you added to the editing timeline, click on the playhead. Then, drag it to move it to the specific point in the video where you will freeze the frame. Click on the Snapshot icon at the right end of the preview window to capture the frame. Press the Lock Track icon after that.

Move the image in place
After the previously mentioned step, you should drag the snapshot you just captured to the second layer on the timeline above the clip. Make sure to place the image where the playhead is, marking the point of the freeze frame. Then, drag the slider at the end of the image clip you added to the timeline to match its length with the video clip.
Afterward, you should click on the playhead and move it a little ahead by a few frames. Again, tap the “Lock Track” icon beside the image file to keep it in place. Following that, take another snapshot of the image via the Snapshot icon.

Unlock the layers
Repeat this step for a few more layers, like dragging the snapshot image to the timeline > moving the playhead by some frames > Snapshot > Lock Track. Then, after you are done with the number of stages possible with your video clip, unlock all of the locked track layers sequentially from top to bottom.
Editing the layers
After this, click on the second clip in the layers. Right-click on the top of the clip in the timeline and choose “Edit Properties” from the drop-down menu. Next, click on the Compositing option and tap the tickmark beside it. Then, select the drop-down menu for the Blending Mode option and change Normal to Darken. Press the OK button after you are done.

Following that, repeat the same for all of the layers of the snapshots to choose the blending mode parameter for them to Darken. After you are done, click on the Preview play button to see how the process worked for creating the freeze frame effect in your video clip.
Exporting the effect the first time
After completing all the editing steps, you should select the Export button at the top of the screen. Then, choose the Local tab and click on the MP4 as the video file format. Make settings-based changes if needed and press the Export button.

After that, however, import the edited file to Filmora from your device again.
Edit the freeze frame video clip
Choose all of the video clip sections you edited on Filmora from the timeline after adding the recently edited video clip to the editor. Then, drag this clip to the primary editing timeline layer on the timeline and drop it.
Then, drag the playhead on the clip to the frame at which the third freeze frame occurs. For this, you can play the Preview of the clip to verify. After placing the playhead at that exact moment, click on the Split icon from the toolbar above the editor timeline or the Scissor icon. Then, remove the second half of the clip.

Create the freeze frame to reverse the speed effect
After this, right-click on the top of the remaining video clip on your timeline. From the drop-down menu that appears, tap on the Copy option. Then, paste the second half beside the first half on the same layer.
After that, right-click on the second copied clip and choose the Speed option > Click on Reverse. After that, play the Preview to see how the effect appears in your video. Finally, export the video from Filmora.

Conclusion
The process of creating a freeze-frame effect can typically get complex. But it is relatively simple to achieve on Filmora if you follow the steps diligently. Furthermore, on this software, whether you are using a Windows or Mac device, there are various video editing features, including the freeze-frame effect. They all assure quick and advanced optimization of video projects, so you should try the platform.
Free Download For macOS 10.14 or later
To install the software, you have to double-click on the app installer that got downloaded and agree to the permissions that it prompts. Then, the installation process will continue. The software will launch automatically after the process ends and you press Start Now.
Adding the footage
Next, your main step is to add the video you will edit into the Filmora software. First, you must click the Create New Project tab on the homepage. When the editor opens, tap on the “Click here to import media” button and insert the video you will edit from your device. Next, drag it down to the editing timeline for making further changes. Choose the Keep project settings option when the prompt comes up to ensure the same quality of the video.
Still, it would help if you tapped the play button on the screen to see a Preview of the video clip to check its stability and quality. Also, ensure that your main subject is darker than the backdrop in the video clip.
Adjust the playhead location
On the video clip, you added to the editing timeline, click on the playhead. Then, drag it to move it to the specific point in the video where you will freeze the frame. Click on the Snapshot icon at the right end of the preview window to capture the frame. Press the Lock Track icon after that.
Move the image in place
After the previously mentioned step, you should drag the snapshot you just captured to the second layer on the timeline above the clip. Make sure to place the image where the playhead is, marking the point of the freeze frame. Then, drag the slider at the end of the image clip you added to the timeline to match its length with the video clip.
Afterward, you should click on the playhead and move it a little ahead by a few frames. Again, tap the “Lock Track” icon beside the image file to keep it in place. Following that, take another snapshot of the image via the Snapshot icon.
Unlock the layers
Repeat this step for a few more layers, like dragging the snapshot image to the timeline > moving the playhead by some frames > Snapshot > Lock Track. Then, after you are done with the number of stages possible with your video clip, unlock all of the locked track layers sequentially from top to bottom.
Editing the layers
After this, click on the second clip in the layers. Right-click on the top of the clip in the timeline and choose “Edit Properties” from the drop-down menu. Next, click on the Compositing option and tap the tickmark beside it. Then, select the drop-down menu for the Blending Mode option and change Normal to Darken. Press the OK button after you are done.
Following that, repeat the same for all of the layers of the snapshots to choose the blending mode parameter for them to Darken. After you are done, click on the Preview play button to see how the process worked for creating the freeze frame effect in your video clip.
Exporting the effect the first time
After completing all the editing steps, you should select the Export button at the top of the screen. Then, choose the Local tab and click on the MP4 as the video file format. Make settings-based changes if needed and press the Export button.
After that, however, import the edited file to Filmora from your device again.
Edit the freeze frame video clip
Choose all of the video clip sections you edited on Filmora from the timeline after adding the recently edited video clip to the editor. Then, drag this clip to the primary editing timeline layer on the timeline and drop it.
Then, drag the playhead on the clip to the frame at which the third freeze frame occurs. For this, you can play the Preview of the clip to verify. After placing the playhead at that exact moment, click on the Split icon from the toolbar above the editor timeline or the Scissor icon. Then, remove the second half of the clip.
Create the freeze frame to reverse the speed effect
After this, right-click on the top of the remaining video clip on your timeline. From the drop-down menu that appears, tap on the Copy option. Then, paste the second half beside the first half on the same layer.
After that, right-click on the second copied clip and choose the Speed option > Click on Reverse. After that, play the Preview to see how the effect appears in your video. Finally, export the video from Filmora.
Conclusion
The process of creating a freeze-frame effect can typically get complex. But it is relatively simple to achieve on Filmora if you follow the steps diligently. Furthermore, on this software, whether you are using a Windows or Mac device, there are various video editing features, including the freeze-frame effect. They all assure quick and advanced optimization of video projects, so you should try the platform.
Also read:
- In 2024, ReVisionFX ReelSmart Motion Blur Plugin For Premiere Pro
- New In 2024, How to Create a Bokeh Effect
- New 2024 Approved Techniques You Never Heard of for Learning AI Marketing YouTube
- New Best 12 Sony Vegas Slideshow Templates for Free Download
- 2024 Approved Mastering the Art of Video Framing
- Updated In 2024, 10 Top Vloggers on YouTube
- Top 18 Video Editors for PC and Mac for 2024
- In 2024, 4 Methods for Rotating Your GoPro Videos Professionally
- How to to Mimic Professional Filming Gears for 2024
- Updated In 2024, How to Do Masking in After Effects Alternative Provided
- New How to Create Cinematic Style Videos? Easy Guide for Beginners
- New Green Screen YouTube Videos for 2024
- Updated Easy Steps to Loop YouTube Videos on iPhone
- Do You Want to Apply LUTs Using Open Broadcaster Software? You Can Download Free LUTs for OBS and Apply Them to Your Files. There Are Many LUTs Available
- Updated Extracting Audio From Videos Is a Key to Better Storytelling. Learn How Filmoras Audio Removal Feature Can Enhance Your Video Stories
- 2024 Approved How to Find a High-Quality Video Marketing Agency?
- New Applying the Effect of Camera Shake in Video Creation
- In 2024, What Is Animated GIF
- Updated Detailed Steps to Resize Video in Davinci Resolve
- How to Create A Freeze Frame Sequence in Video
- Updated Split Audio From Video in Adobe Premiere Pro Step by Step
- Updated 5 Tips for Faster Editing in Filmora for 2024
- New Gimp Green Screen for 2024
- Updated In 2024, Secret Tips & Tricks to Use in Filmora
- How To Change Sky Background With Adobe Photoshop Best Ways
- Detailed Tutorial to Crop Video in KineMaster
- Updated Free Green Screen Mobile Frame Downloads for 2024
- Top 10 Secret Tips & Tricks to Use in Wondershare Filmora
- New 2024 Approved Create Your Face Zoom TikTok Now
- How to Add Slideshow in PowerPoint for 2024
- 2024 Approved How to Share YouTube Video on Zoom?
- If You Are a Marketer Who Want to Create Facebook Ads to Boost Your Business, You Are Coming to the Right Place. Well Share You some Useful Tips to Start Your First FB Ads Campaign
- 2024 Approved Ideas That Will Help You Out in Making Transparent Image
- Top Animated Title Makers
- Do You Want to Use LUTs in Final Cut Pro? There Are Many Free LUTs for FCPX Available that You Can Use. Using LUTs, You Can Create Professional-Looking Content
- 2024 Approved Do You Know About some Efficient Slow-Motion Video Editors? Read This Article to Find Out the Best Slow-Motion Video Editing Tools that You Can Try
- In 2024, The Top 5 Android Apps That Use Fingerprint Sensor to Lock Your Apps On Realme GT 5 Pro
- A Perfect Guide To Remove or Disable Google Smart Lock On Realme GT 5 Pro
- In 2024, How to Share/Fake Location on WhatsApp for Apple iPhone 8 | Dr.fone
- The Ultimate Guide to Bypassing iCloud Activation Lock on Apple iPhone SE
- In 2024, 3 Facts You Need to Know about Screen Mirroring Oppo Find X7 Ultra | Dr.fone
- How to Change/Fake Your OnePlus Nord 3 5G Location on Viber | Dr.fone
- Why Is My Samsung Galaxy S24 Offline? Troubleshooting Guide | Dr.fone
- 3 Easy Solutions to Hard Reset Realme V30T | Dr.fone
- How to Use Phone Clone to Migrate Your Infinix Smart 8 Data? | Dr.fone
- What is Geo-Blocking and How to Bypass it On Poco M6 Pro 5G? | Dr.fone
- Does Samsung Galaxy F54 5G has native HEVC support?
- Where Is the Best Place to Catch Dratini On Apple iPhone 11 Pro | Dr.fone
- How to fix error 1015 while restoring iPhone 11 Pro Max | Stellar
- How to Share Location in Messenger On Oppo A38? | Dr.fone
- How to Hide/Fake Snapchat Location on Your Poco C50 | Dr.fone
- How to Fix Android.Process.Media Has Stopped on Infinix Hot 40 | Dr.fone
- How to Use Pokémon Emerald Master Ball Cheat On Samsung Galaxy S23 Ultra | Dr.fone
- In 2024, How To Fix OEM Unlock Missing on Vivo Y17s?
- Fix Unfortunately Settings Has Stopped on Oppo Reno 8T Quickly | Dr.fone
- Where Is the Best Place to Catch Dratini On Samsung Galaxy F04 | Dr.fone
- In 2024, 10 Fake GPS Location Apps on Android Of your Honor Magic 5 Pro | Dr.fone
- All Things You Need to Know about Wipe Data/Factory Reset For ZTE Nubia Z60 Ultra | Dr.fone
- Android Screen Stuck General Samsung Galaxy S23 FE Partly Screen Unresponsive | Dr.fone
- 4 Ways to Transfer Music from Nokia C12 Plus to iPhone | Dr.fone
- How Can I Use a Fake GPS Without Mock Location On Samsung Galaxy F34 5G? | Dr.fone
- Everything You Need To Know About Unlocked iPhone 15
- Top 12 Prominent Nubia Red Magic 8S Pro Fingerprint Not Working Solutions
- In 2024, Ways to trade pokemon go from far away On Apple iPhone 13 Pro? | Dr.fone
- In 2024, How to get the dragon scale and evolution-enabled pokemon On Vivo T2 Pro 5G? | Dr.fone
- How to Bypass Apple iPhone 6 Plus Passcode Easily Video Inside
- In 2024, How To Remove iCloud On Apple iPhone 6s Smoothly
- A Step-by-Step Guide on Using ADB and Fastboot to Remove FRP Lock on your Samsung Galaxy M34
- The Complete Guide to Motorola Moto E13 FRP Bypass Everything You Need to Know
- Solved Warning Camera Failed on Vivo Y100i | Dr.fone
- Xiaomi Redmi 12 5G Camera Not Working Unexpected Error? Fix It Now | Dr.fone
- Title: New Vintage Film Effect 1920S - How to Make for 2024
- Author: Chloe
- Created at : 2024-06-18 14:30:55
- Updated at : 2024-06-19 14:30:55
- Link: https://ai-editing-video.techidaily.com/new-vintage-film-effect-1920s-how-to-make-for-2024/
- License: This work is licensed under CC BY-NC-SA 4.0.
