
:max_bytes(150000):strip_icc():format(webp)/012_how-to-make-video-call-on-android-bd93ab594aa648c7977f4c1ecf42c85b.jpg)
New Vintage Film Effect 1990S - How to Make for 2024
Vintage Film Effect 1990S - How to Make
In the 90s, movie production technology improved a lot. This decade saw horror movies become much more fun and immersive than in the 80s and 50s because they were more psychological. In fact, we can say that the horror movies of the 90s laid the foundation for current horror movies. So, without wasting time, let’s create a 1990s horror movie similar to The Blair Witch Project.
Preparation

The preparation for this horror film production is relatively self-explanatory if you’ve watched The Blair Witch Project. Simply shoot footage inside a dark room and apply some light to your face. It’s even better if you can shoot the video inside the woods. Just add some drama and a few screaming scenes to evoke emotions.
How to create a 1990s horror film with Filmora :
Free Download For Win 7 or later(64-bit)
Free Download For macOS 10.14 or later
Step1 Add the horror video to the timeline

Open Wondershare Filmora on your computer, then load the video you want to edit. After adding the video, drag it to the editing timeline, then move it a few keyframes to the right. The idea is to apply some black screen to add drama and fear before the film starts playing.
Step2 Apply color grading

Next, double-click the horror clip and go to the Color menu. Then, click the Tone arrow before lowering the Saturation to -50%. This will give us a less saturated look popularly used in horror films.

Now click the 3D LUT option and choose a LUT that works for your film. For this horror film project, we’ll select the Dark Film option.
Step3 Add creepiness to the video

Obviously, you’ll want your horror film to look as creepy as possible. To achieve that, click the Elements tab, then search for the Smokescreen 1 effect. Move the effect to the timeline above the video track before trimming the effect clip to fit with the original horror video.

We’ll now change the size and positioning of the smokescreen effect to match the feature video. To do that, double-click the effect track. You can also reduce the opacity to around 30% to make the smoke more visible.
Step4 Add a retro filming effect

Now we’ll make the film more believable by adding a retro overlay. Click the Effects tab, then search for Retro Film Overlay 15 before dragging and dropping the effect above all the tracks in the editing timeline.

Summary
That’s it! With these tips and tricks, you can effortlessly create a retro-style 1990s horror film. Follow this tutorial and play around with the movie effects to find what works best for you. Remember, Filmstock is the ultimate resource for video and movie effects. Give it a try!
Free Download For macOS 10.14 or later
Step1 Add the horror video to the timeline
Open Wondershare Filmora on your computer, then load the video you want to edit. After adding the video, drag it to the editing timeline, then move it a few keyframes to the right. The idea is to apply some black screen to add drama and fear before the film starts playing.
Step2 Apply color grading
Next, double-click the horror clip and go to the Color menu. Then, click the Tone arrow before lowering the Saturation to -50%. This will give us a less saturated look popularly used in horror films.
Now click the 3D LUT option and choose a LUT that works for your film. For this horror film project, we’ll select the Dark Film option.
Step3 Add creepiness to the video
Obviously, you’ll want your horror film to look as creepy as possible. To achieve that, click the Elements tab, then search for the Smokescreen 1 effect. Move the effect to the timeline above the video track before trimming the effect clip to fit with the original horror video.
We’ll now change the size and positioning of the smokescreen effect to match the feature video. To do that, double-click the effect track. You can also reduce the opacity to around 30% to make the smoke more visible.
Step4 Add a retro filming effect
Now we’ll make the film more believable by adding a retro overlay. Click the Effects tab, then search for Retro Film Overlay 15 before dragging and dropping the effect above all the tracks in the editing timeline.
Summary
That’s it! With these tips and tricks, you can effortlessly create a retro-style 1990s horror film. Follow this tutorial and play around with the movie effects to find what works best for you. Remember, Filmstock is the ultimate resource for video and movie effects. Give it a try!
Easy Way to Apply Green Screen to YouTube Videos
This is a large green backdrop that is placed in the background of a shot to allow for digital effects later on. A majority of popular YouTube vloggers use green to enhance interesting background views to their videos. Screen replaces the background and adds depth and visually interesting patterns that ends up keeping the viewer captivated.
Why use Green Screen
1. Creativity
There are several effects that can be applied to green screen video editing in the editing process, it gives one a chance to explore their imagination. A good editor can really customize the video to make the production really stand out from those of the competitors.
2. Flexibility
There are portable green screens that can be taken to any location of choice for video shooting. Location allows one endless possibilities without having to spend time and resources doing assembling of different sets and backgrounds. The desired feel to the video can be simply achieved by an image.
3. Budget
Filming YouTube using green screen is a cost effective way of producing professional video content on a small budget. This is a great idea for upcoming YouTube vloggers as expenses catering for travel and location are eliminated.
4. Consistency
At some point in YouTube green screen use, you may be affected by the weather and worse pf all, natural lighting may end up being problematic while you are on location doing your video shots. However, with YouTube Video green screen technology, ambient lighting is blocked out and the screen can be lit the same way every time. This brings consistency over a number of videos the user applies green screen on.
5. Clarity
Youtube video green screen allows for an additional visual ellements and diagrams such as graphics, this can be added on to the video to illustrate what the speaker is saying. This green screen effect helps the viewer to gain a better understanding of any concepts or complex illustrations mentioned by the presenter.
6. Branding
YouTube green screen logo and branding colors can be easily added into the video, this can easily make the viewers to identify the video with your business. Apart from standing out from other competitors, you will also have a professional, high quality and reliable video to use anytime you please.
Best Places to find Green Screen Effects
Filmstock
Filmstock features a massive library full of royalty-free stock video, video effects, sound effects, video templates, and so much more. There are resources on the platform for all kinds of creators, including video editors, content creators, social media influencers, and marketers. You get unlimited access to all these resources for a single price when you subscribe to Filmstock. While there are other marketplaces that offer similar options, Filmstock does things differently.
Green Screen Effects
1. Balance Beam
Ever wanted to walk across a small beam way high up in the air? Me neither, but you can make a cool effect that looks like you did. Throwing a green screen on the ground and then building a balance beam over top of it you can start recording the main shot. Strap a GoPro to your head and look down while walking across the beam.
2. Shrink Effect
Okay this one is really easy. Take some footage of a person walking in front of a green screen, ideally looking at something to be featured in the main shot to sell the effect. Then take a close up of a small object. Key out the green behind the person, take the footage and drop it over your close up, and then scale it to match. Duplicate it, mirror it horizontally to act as a reflection and then drop the opacity and add some blur to make it look more realistic. It’s a fun little trick.
3. Floating Object
This is a simple one, making an object appear to be floating. This is another two clip shot. First, take a shot with the object hanging in front of a blue screen. Then on the same location, take another shot but while pretending to levitate the hammer. Masking around the hammer will get rid of the string for hanging, key out the blue, and then dropping it on top of the other clip is all you need.
Best Green Screen Video Editor for YouTube
Filmora
If you’re just starting out with video editing, or just want a simple program that works, Wondershare Filmora might be what you’re looking for. It has the essential tools, and anyone can learn to use it easily.
Wondershare Filmora is the one of best video editing software with cool features that compares to other competing video editing Softwares. Many video editing programs claim to offer professional results; Filmora is one of a few consumer-level tools that actually delivers.
For Win 7 or later (64-bit)
For macOS 10.12 or later
Installation Steps
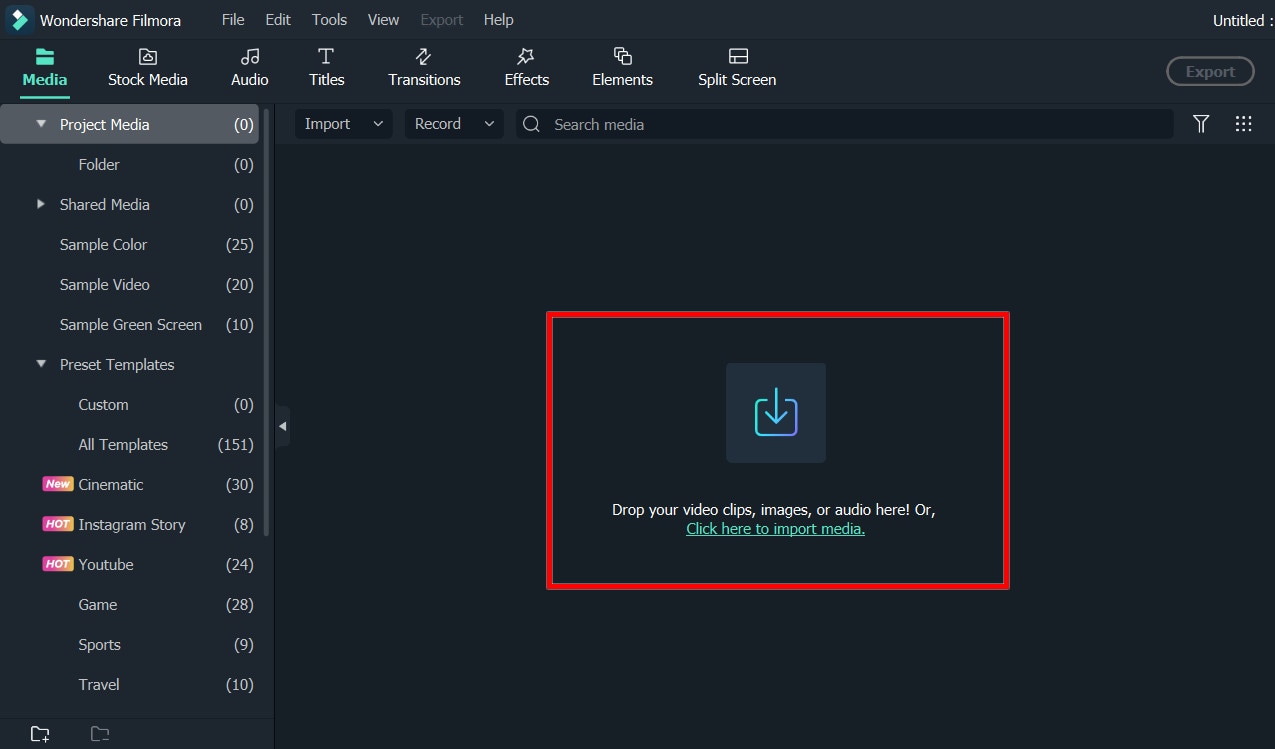
- Click the icon in the center of the Media Library to add files directly.
- Go File > Import Media > Import Media Files.
- Drag and drop to the Media Library directly.
While importing a media file, Wondershar Filmora may ask you if you wish to create a proxy file to accelerate the editing process. Select “Yes” to have a fast video editing experience.
You can also import video clips using your Touch Bar controls if your computer has Touch Bar.
Record a media file
Apart from the videos shot by your digital devices, you can also directly import media files by recording video from your webcam, capturing the computer screen, or recording a voice-over.
Find green screen effects: Now you can select the different types of green screen effects.

Apply green screen: drag the effects to the timeline to apply it to your videos.

Save and Export: Then you can save or export the video.
A green screen is a green surface used as a background when filming so that any image can replace the screen behind the actor or presenter. Shooting with a green screen involves filming a person or adding visual effects in front of a solid color. Then, by digitally removing or “keying out” that color, you can drop that scene onto the background of your choice in post-production. Removing the colored background is also referred to as “chroma keying.”
Steps with Images
The first step is to record footage in front of a green screen so that you can import it into WeVideo as a media file. To capture footage that is optimal for the Green Screen effect, please ensure the following:
- There is ample lighting distributed evenly around you with no shadows.
- You are in front of a solid background with no creases. Green or blue is the recommended color for your background.
- The quality of your camera is high enough so that the footage is not pixelated or grainy. 720p HD footage or above is recommended.
Step 2) Add media to the Timeline
Once you’ve captured the footage you want to use for the Green Screen effect, import that media file and add it to the Timeline. Remember to place the green screen footage in the Video 2 track and the clip you would like to use as the background in the Video 1 track.
If you are using more than two video tracks, place the green screen footage in the track above whichever track holds the background footage to ensure proper layering techniques are used.
Step 3) Open the clip editor
Double click on the green screen clip in the Timeline to open the clip editor. In the clip editor, navigate to the Color Keying tab.
Step 4) Use the color picker tool
Select the color picker tool and then click anywhere on the green screen footage to apply the effect.
Step 5) _(optional) Adjust the color settings
The Green Screen effect should automatically apply without the need to adjust the color settings. However, if you would like to make these additional modifications, you can use the scroll bars to make the following adjustments:
- **Show- You can select Mask to reveal a black and white representation of the mask you are applying using the color keying tool. Notice that the black area represents transparent sections of your video, while the white area represents opaque sections.
- **Color Balance- This adjusts how selective the effect is. The further right you scroll, the wider the range of tints and shades are removed.
- **Color Sensitivity- This smooths out any pixelation and rough edges of color that remain.
- **Defringe- This helps reduce color bleeding at the edges of your mask. The left and right sliders control the level of white and black respectively to help match the edges of the mask with your new background color.
For macOS 10.12 or later
Installation Steps
- Click the icon in the center of the Media Library to add files directly.
- Go File > Import Media > Import Media Files.
- Drag and drop to the Media Library directly.
While importing a media file, Wondershar Filmora may ask you if you wish to create a proxy file to accelerate the editing process. Select “Yes” to have a fast video editing experience.
You can also import video clips using your Touch Bar controls if your computer has Touch Bar.
Record a media file
Apart from the videos shot by your digital devices, you can also directly import media files by recording video from your webcam, capturing the computer screen, or recording a voice-over.
Find green screen effects: Now you can select the different types of green screen effects.
Apply green screen: drag the effects to the timeline to apply it to your videos.
Save and Export: Then you can save or export the video.
A green screen is a green surface used as a background when filming so that any image can replace the screen behind the actor or presenter. Shooting with a green screen involves filming a person or adding visual effects in front of a solid color. Then, by digitally removing or “keying out” that color, you can drop that scene onto the background of your choice in post-production. Removing the colored background is also referred to as “chroma keying.”
Steps with Images
The first step is to record footage in front of a green screen so that you can import it into WeVideo as a media file. To capture footage that is optimal for the Green Screen effect, please ensure the following:
- There is ample lighting distributed evenly around you with no shadows.
- You are in front of a solid background with no creases. Green or blue is the recommended color for your background.
- The quality of your camera is high enough so that the footage is not pixelated or grainy. 720p HD footage or above is recommended.
Step 2) Add media to the Timeline
Once you’ve captured the footage you want to use for the Green Screen effect, import that media file and add it to the Timeline. Remember to place the green screen footage in the Video 2 track and the clip you would like to use as the background in the Video 1 track.
If you are using more than two video tracks, place the green screen footage in the track above whichever track holds the background footage to ensure proper layering techniques are used.
Step 3) Open the clip editor
Double click on the green screen clip in the Timeline to open the clip editor. In the clip editor, navigate to the Color Keying tab.
Step 4) Use the color picker tool
Select the color picker tool and then click anywhere on the green screen footage to apply the effect.
Step 5) _(optional) Adjust the color settings
The Green Screen effect should automatically apply without the need to adjust the color settings. However, if you would like to make these additional modifications, you can use the scroll bars to make the following adjustments:
- **Show- You can select Mask to reveal a black and white representation of the mask you are applying using the color keying tool. Notice that the black area represents transparent sections of your video, while the white area represents opaque sections.
- **Color Balance- This adjusts how selective the effect is. The further right you scroll, the wider the range of tints and shades are removed.
- **Color Sensitivity- This smooths out any pixelation and rough edges of color that remain.
- **Defringe- This helps reduce color bleeding at the edges of your mask. The left and right sliders control the level of white and black respectively to help match the edges of the mask with your new background color.
Video marketing is the process of promoting a product, service, or brand using videos intended to attract audiences’ attention and prompt them to action. With marketers and communicators working increasingly with AI, automation, chatbots, and all sorts of generative technology in 2023 and beyond, video is one of the most common digital mediums for connecting with people.
What exactly does effective video marketing look like today? This guide will take a closer look.
- Part 2. 3 Typical Types of Marketing Videos
- Part 3. 6 Tips for Making Your Video Effective
- Part 4: Useful Video Editing Tool
- Conclusion
Part 1: How to Create a Video Marketing Campaign

Launching a video marketing campaign requires considerable planning and preparation. Follow these best practices for video campaign success:
1.Set Goals and Identify Your Audience
The aim of video marketing for small businesses or large businesses should be tied to business objectives, such as raising brand awareness, educating consumers, or driving conversions. First and foremost, define these goals.
Who are you trying to reach with video content? You need a clear picture of this. Collect insights about audiences with regard to demographics, interests, values, media habits, and existing brand impressions. With these insights, you can create unique content that appeals to your target viewers.
2.Conduct Market Research
Research what kinds of videos connect with your audiences by accounting for competitors and non-competitors successfully using video. Identify videos with the most hits, shares, subscribers generated, and other metrics through channels like YouTube Analytics, Tubular Labs or SEMrush.
From the data, conclude common themes around video length, preferred formats for content, production methodologies, and so on, which should then serve to guide your own content.
3.Craft a Compelling Story
Every great marketing video is a story. Draw a story plot with rising tension and emotion leading to resolution. The story’s exposition, rising action, climax, and denouement can be outlined by famous storytelling frameworks.
Narratives that keep viewers engaged from beginning to end result in better videos. Early validation for your script ideas can be gathered through focus groups, social listening, surveys, and interviews with members of your target audience.
4.Produce Video/Audio with Quality
Bring your story to life by investing in experienced video producers. Budgets may be wildly divergent, so always aim to achieve the best production quality.
Feature crisp, bright camerawork, professional editing, and transitions. Be sure to use intense music to underscore emotional peaks and simple but eye-catching visual effects where they make sense.
For audio, manage volumes between scenes at the same level; minimize background noise; have clear dialogue and smooth mixing. Good video and audio keep viewers glued to your content.
5. Select Suitable Video Platforms
Research where video marketing is most effective in your niche, and figure out which social platforms and media sites your target audiences use.
Being present on several different platforms is every strategy’s dream. However, the real key is finding out where your audiences are most engaged and directing them there with video content tailored for the individual user experience by the platform.
6.Implement a Strong Call-to-Action
The ending of every video narrative should take the viewer toward an action. Clicks to websites? Subscriptions to YouTube channels? Form fills? App downloads?
Your final message in your video clears CTA. Add supporting calls-to-action in the form of superimposed graphics, cards, or endscreens outside of the video to direct traffic beyond that medium and give more expression to the story.
7.Track and Optimize Performance
After videos are posted, collect data on performance. Such indicators include view counts, average % viewed, changes in viewership over time, referral traffic, subscribers gained (added), conversion rates, and so on.
Feed analytics insights into an optimization road map. To inform new video projects targeting the same KPIs, look at higher versus lower-converting videos. Test repetition of the same content on different media platforms at various time intervals, with varying images of thumbnails and so forth, to improve metrics.
Part 2: 3 Typical Types of Marketing Videos

There are some video formats that particularly suit certain marketing objectives. Let’s explore some of the most versatile, effective genres with real-world examples:
1. Explainer Videos
Knowing how to simplify and explain complex products, services, or concepts is precisely what Seasoned Explainers do. They use motion graphics, cartoons, live action–it’s all good. They express it interestingly and help audiences understand value offerings they may be unfamiliar with.
2. Tutorial Videos
A good video tutorial leads audiences through a process one can use to employ the product, carry out the method, or develop the skill. Hands-on learning material meets user information needs, indirectly promoting brand owners of the know-how.
3. Behind-the-Scenes Content
These videos give audiences an insider’s perspective on making popular products. Getting a peek behind the curtain helps pique viewer curiosity while humanizing brands through interviews, b-roll footage, and more.
Part 3: 6 Tips for making your video effective

Creating personalized video marketing strategies that effectively engage your target audience and achieve your marketing goals requires careful planning and execution. You need to grab viewer attention fast, communicate your key messages clearly, and provide strong calls to action.
The key is to keep it concise, optimize for sound-off viewing, build in interactivity, showcase user-generated content, partner with influencers, and more. Apply these best practices for getting your marketing videos noticed and acted upon:
1.Keep It Concise
With a sea of content competing for viewer attention getting longer daily, shorter is better. Videos under 1 minute perform far better for driving clicks, conversions, completes, and shares. Test even 6-second bumper ads on YouTube and Facebook.
2. Capture Attention Early
You have seconds to hook audiences scrolling feeds non-stop. Dynamically edited intros with eye-catching colors, quick cuts, and dramatic questions/facts immediately grab interest versus slow fades or titles.
3.Make Sound Optional
85% of videos are now watched without sound on mobile devices. While strong audio is still important for reeled-in viewers, ensure critical info is communicated visually as well.
4.Incorporate Interactive Elements
Leverage platform tools like YouTube cards, info cards, links, hashtags, Q&As and more to keep audiences actively engaged with video content instead of passively viewing.
5. Spotlight User-Generated Content
User videos reviewing products or demonstrating branded tutorials often outperform corporate studio content now. Repurpose this UGC via reaction videos, contest highlights, and “best of” community compilations.
6.Build Influencer Partnerships
Collaborations with influencers popular with your target demos lend video credibility. Support creators with gear, access, co-promotion, etc., in exchange for branded integration and affiliate sales.
Part 4: Useful Video Editing Tool

Video Editing Now For Win 7 or later(64-bit)
Video Editing Now For macOS 10.14 or later
In creating marketing videos, the right editing software should help cut together raw material gatherings and integrate graphic elements. It must also permit an easy handling of musical components and the application of effects, among other things. The final step, polishing the product into various forms for export to a multitude of servers, should all be done with minimal effort through intelligent operating interfaces (UI). Among the options used by amateurs and professionals alike, Wondershare’s Filmora is one of the most popular.
Advertisement Video Editing in Filmora
Free Download For Win 7 or later(64-bit)
Free Download For macOS 10.14 or later
More advanced video editing for veteran editors yet an easy-to-use, intuitive software for beginners. Key features of Filmora include:
- Simple Drag-and-Drop Timeline Interface
- Library Of Visual Effects and Transitions
- Built-In Title Templates
- Color Grading and Color Matching Tools
- Support For Keyframe Animation
- Background Audio Mixer
- The Free-Use Audio, Image, Video Library
- Instant Previews of Edits
- Export For All Types of Platforms
From planning and carrying out shooting to editing, rendering and output, Filmora speeds up all the steps of bringing video projects to life. For marketing teams constantly producing clips, an intriguing aspect of the software is that its wide appeal to video skill levels combines well with pro-grade tools.
Conclusion
In the future, video marketing will only grow more critical. With virtual reality moving from gaming to experiential e-commerce, it is up to marketers to drive adoption. With these strategies, your brand can get ahead of the curve and use groundbreaking video programs to win over audiences at this time and in the years that follow.
Part 1: How to Create a Video Marketing Campaign
Launching a video marketing campaign requires considerable planning and preparation. Follow these best practices for video campaign success:
1.Set Goals and Identify Your Audience
The aim of video marketing for small businesses or large businesses should be tied to business objectives, such as raising brand awareness, educating consumers, or driving conversions. First and foremost, define these goals.
Who are you trying to reach with video content? You need a clear picture of this. Collect insights about audiences with regard to demographics, interests, values, media habits, and existing brand impressions. With these insights, you can create unique content that appeals to your target viewers.
2.Conduct Market Research
Research what kinds of videos connect with your audiences by accounting for competitors and non-competitors successfully using video. Identify videos with the most hits, shares, subscribers generated, and other metrics through channels like YouTube Analytics, Tubular Labs or SEMrush.
From the data, conclude common themes around video length, preferred formats for content, production methodologies, and so on, which should then serve to guide your own content.
3.Craft a Compelling Story
Every great marketing video is a story. Draw a story plot with rising tension and emotion leading to resolution. The story’s exposition, rising action, climax, and denouement can be outlined by famous storytelling frameworks.
Narratives that keep viewers engaged from beginning to end result in better videos. Early validation for your script ideas can be gathered through focus groups, social listening, surveys, and interviews with members of your target audience.
4.Produce Video/Audio with Quality
Bring your story to life by investing in experienced video producers. Budgets may be wildly divergent, so always aim to achieve the best production quality.
Feature crisp, bright camerawork, professional editing, and transitions. Be sure to use intense music to underscore emotional peaks and simple but eye-catching visual effects where they make sense.
For audio, manage volumes between scenes at the same level; minimize background noise; have clear dialogue and smooth mixing. Good video and audio keep viewers glued to your content.
5. Select Suitable Video Platforms
Research where video marketing is most effective in your niche, and figure out which social platforms and media sites your target audiences use.
Being present on several different platforms is every strategy’s dream. However, the real key is finding out where your audiences are most engaged and directing them there with video content tailored for the individual user experience by the platform.
6.Implement a Strong Call-to-Action
The ending of every video narrative should take the viewer toward an action. Clicks to websites? Subscriptions to YouTube channels? Form fills? App downloads?
Your final message in your video clears CTA. Add supporting calls-to-action in the form of superimposed graphics, cards, or endscreens outside of the video to direct traffic beyond that medium and give more expression to the story.
7.Track and Optimize Performance
After videos are posted, collect data on performance. Such indicators include view counts, average % viewed, changes in viewership over time, referral traffic, subscribers gained (added), conversion rates, and so on.
Feed analytics insights into an optimization road map. To inform new video projects targeting the same KPIs, look at higher versus lower-converting videos. Test repetition of the same content on different media platforms at various time intervals, with varying images of thumbnails and so forth, to improve metrics.
Part 2: 3 Typical Types of Marketing Videos
There are some video formats that particularly suit certain marketing objectives. Let’s explore some of the most versatile, effective genres with real-world examples:
1. Explainer Videos
Knowing how to simplify and explain complex products, services, or concepts is precisely what Seasoned Explainers do. They use motion graphics, cartoons, live action–it’s all good. They express it interestingly and help audiences understand value offerings they may be unfamiliar with.
2. Tutorial Videos
A good video tutorial leads audiences through a process one can use to employ the product, carry out the method, or develop the skill. Hands-on learning material meets user information needs, indirectly promoting brand owners of the know-how.
3. Behind-the-Scenes Content
These videos give audiences an insider’s perspective on making popular products. Getting a peek behind the curtain helps pique viewer curiosity while humanizing brands through interviews, b-roll footage, and more.
Part 3: 6 Tips for making your video effective
Creating personalized video marketing strategies that effectively engage your target audience and achieve your marketing goals requires careful planning and execution. You need to grab viewer attention fast, communicate your key messages clearly, and provide strong calls to action.
The key is to keep it concise, optimize for sound-off viewing, build in interactivity, showcase user-generated content, partner with influencers, and more. Apply these best practices for getting your marketing videos noticed and acted upon:
1.Keep It Concise
With a sea of content competing for viewer attention getting longer daily, shorter is better. Videos under 1 minute perform far better for driving clicks, conversions, completes, and shares. Test even 6-second bumper ads on YouTube and Facebook.
2. Capture Attention Early
You have seconds to hook audiences scrolling feeds non-stop. Dynamically edited intros with eye-catching colors, quick cuts, and dramatic questions/facts immediately grab interest versus slow fades or titles.
3.Make Sound Optional
85% of videos are now watched without sound on mobile devices. While strong audio is still important for reeled-in viewers, ensure critical info is communicated visually as well.
4.Incorporate Interactive Elements
Leverage platform tools like YouTube cards, info cards, links, hashtags, Q&As and more to keep audiences actively engaged with video content instead of passively viewing.
5. Spotlight User-Generated Content
User videos reviewing products or demonstrating branded tutorials often outperform corporate studio content now. Repurpose this UGC via reaction videos, contest highlights, and “best of” community compilations.
6.Build Influencer Partnerships
Collaborations with influencers popular with your target demos lend video credibility. Support creators with gear, access, co-promotion, etc., in exchange for branded integration and affiliate sales.
Part 4: Useful Video Editing Tool
Video Editing Now For Win 7 or later(64-bit)
Video Editing Now For macOS 10.14 or later
In creating marketing videos, the right editing software should help cut together raw material gatherings and integrate graphic elements. It must also permit an easy handling of musical components and the application of effects, among other things. The final step, polishing the product into various forms for export to a multitude of servers, should all be done with minimal effort through intelligent operating interfaces (UI). Among the options used by amateurs and professionals alike, Wondershare’s Filmora is one of the most popular.
Advertisement Video Editing in Filmora
Free Download For Win 7 or later(64-bit)
Free Download For macOS 10.14 or later
More advanced video editing for veteran editors yet an easy-to-use, intuitive software for beginners. Key features of Filmora include:
- Simple Drag-and-Drop Timeline Interface
- Library Of Visual Effects and Transitions
- Built-In Title Templates
- Color Grading and Color Matching Tools
- Support For Keyframe Animation
- Background Audio Mixer
- The Free-Use Audio, Image, Video Library
- Instant Previews of Edits
- Export For All Types of Platforms
From planning and carrying out shooting to editing, rendering and output, Filmora speeds up all the steps of bringing video projects to life. For marketing teams constantly producing clips, an intriguing aspect of the software is that its wide appeal to video skill levels combines well with pro-grade tools.
Conclusion
In the future, video marketing will only grow more critical. With virtual reality moving from gaming to experiential e-commerce, it is up to marketers to drive adoption. With these strategies, your brand can get ahead of the curve and use groundbreaking video programs to win over audiences at this time and in the years that follow.
Tips to Make Cinematic Color Grading
New modern color grading software allows you to do point-and-click color grading right in your browser. Color changes are as easy and intuitive as painting or sketching.
You can choose from many different look presets and movie emulations based on Hollywood movies plus real-time previews of your favorite LUTs with this software.
Part 1. What is Cinematic Color Grading?
The cinematic look is all the rage these days and aims to mimic images captured on real film rather than digitally created. To achieve this effect, film directors use various means from lighting to cinematic color gradation. The latter is a powerful tool for bringing a cool or warm tone to a video and providing smooth color transitions to fall on an image that doesn’t look too real but feels emotional.
This kind of post-production processing, which produces beautiful results when used by color magicians, requires a deep understanding of colors and their effect on our psyche and even physiology. It’s not enough to watch a color grading video and use a LUT to get where you want. You should at the very least have an understanding of:
- Color wheel
- Color quality
- Color harmony and discord
- Warm and cool colors
- Color context
Part 2. Tips to make cinematic color grading
Here are three helpful tips to create cinematic-looking images in DaVinci Resolve.
In my 10-year career as a colorist, I’ve worked on every type of content imaginable: short, long, commercial, educational, episodic—you name it. And while each of these formats requires its approach, the one constant that spans them all is the client’s desire for a cinematic look.
Virtually all of us aspire to more cinematic color, but we often come up short—in part because the term itself has become too broad to effectively target. To focus on the goal, I like to think of “cinematic” as “an image whose key visual properties are consistent with those of printed film.”
The print film was the primary medium through which we consumed cinematic images for the first century of filmmaking and is therefore at the very heart of cinematic aesthetics. In this video, I’ll show you my top three secrets to achieving this aesthetic quickly and consistently in Davinci Resolve.
Tips1: Create Color Density
The first secret to film color is to create color density. Another key aesthetic property of film images is that colors can be either highly saturated or highly luminescent but cannot be both.
We can mimic this visual characteristic by identifying strongly saturated colors in our image and using the Hue vs. Lum to reduce their brightness. This simple technique is especially effective on pure primary colors (red, green, and blue).
Tips2: Separation Beats Saturation
The second secret to film color is prioritizing separation over saturation. When you feel like an image lacks overall color or pop, it’s all too easy to reach for the saturation knob, but that’s not a very cinematic solution.
Instead, try using split toning—pushing cool colors into shadows and warm colors into highlights—to increase tonal separation and add depth to an image. This characteristic is present in virtually every film print and is deeply evocative when applied correctly.
Tips3: Strong Contrast is Your Friend
The third secret of film colors is a strong contrast. This is not always easy, as a higher contrast look inherently requires more precision with exposure placement. Too often we pump up some contrast, end up with an image that looks blown out or too crisp, and then immediately back away from editing.
However, if you stick with high contrast long enough to improve your exposure, you’ll get a very different result and be well on your way to a more cinematic image.
Part 3. How to add color cinematic grading by using Filmora?
New modern color grading software allows you to do point-and-click color grading right in your browser. Color changes are as easy and intuitive as painting or sketching.
You can choose from many different look presets and movie emulations based on Hollywood movies plus real-time previews of your favorite LUTs with this software.
Wondershare Filmora is an option if you want to easily change the colors of your projects. You may just double-click the media after dragging it onto the editing timeline to change the contrast, saturation, brightness, and hue.
Despite its speed, it also allows you to merge, edit audio, divide, rotate, and apply as many cool video effects as you like.
Step1Add the media
After installing Wondershare Filmora, click the New Project and Import button to easily find and load your videos.
Step2Correct the color [Basic and Advanced]
In the timeline, double-click the video editing window. Select the “Color” panel and make adjustments.
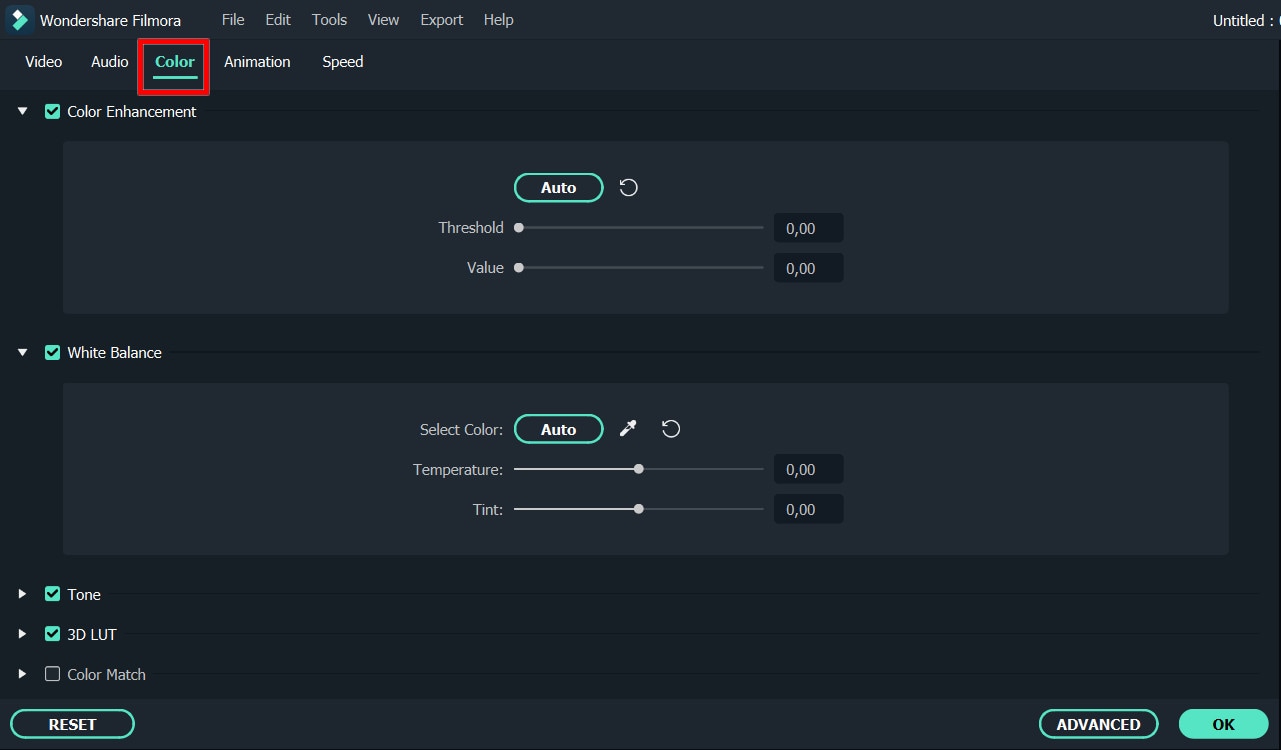
- Contrast: By adjusting this setting, you can control the brightness and color in different parts of the image.
- Saturation: This setting highlights the gray part of the video to a shade. You can adjust it to make the colors of the entire video image appear more saturated or more subdued.
- Brightness: You can change this setting to adjust the overall darkness and lightness of your project.
- Hue: Hue is generally the lightness of a color. Let’s say that when red is saturated with white, it creates a shade of pink.
- 3D LUT: 3D lookup tables provide your media with Hollywood movie color sets like the 007 series, Batman, Harry Porter, etc.
Hover over the indicator to adjust the color correction settings. Then left click on it and move the slider. The corresponding value stabilizes after releasing the mouse button.
With Filmora, you also have access to advanced color correction. Click the Advanced Color Tuning icon to enter the appropriate window where you can fine-tune the color or use preset templates.
The Preferences tab has a variety of templates, including Movie, Normal, 3D LUT, and Vignette. In the Edit tab, you can adjust color temperature, white balance, hue, 3D LUT, color, HSL, light, vignette, etc.
Step3Preview and save the new video
When you are satisfied with your creation, click “Export”. Then click the Settings button and save the new videos in different formats in the Format tab. You can also export the video directly to Vimeo or YouTube or burn it to DVD for better preservation.
Filmora’s color correction tools will make your videos look natural, more attractive, more vibrant, consistent, and professional.
Color Correction Presets
Color correction presets help your video achieve an enhanced cinematic look. Adjust gives you control over fine-tuning the colors in your shots. You can make various adjustments such as color temperature and exposure.
In the “Effects > LUT” tab, you’ll see an extensive selection of preset color settings. These include Vignettes, Movie Looks Like Old Movies, and Cinematic 3D LUT effects such as Harry Potter, Game of Thrones, House of Cards, and Mission Impossible.
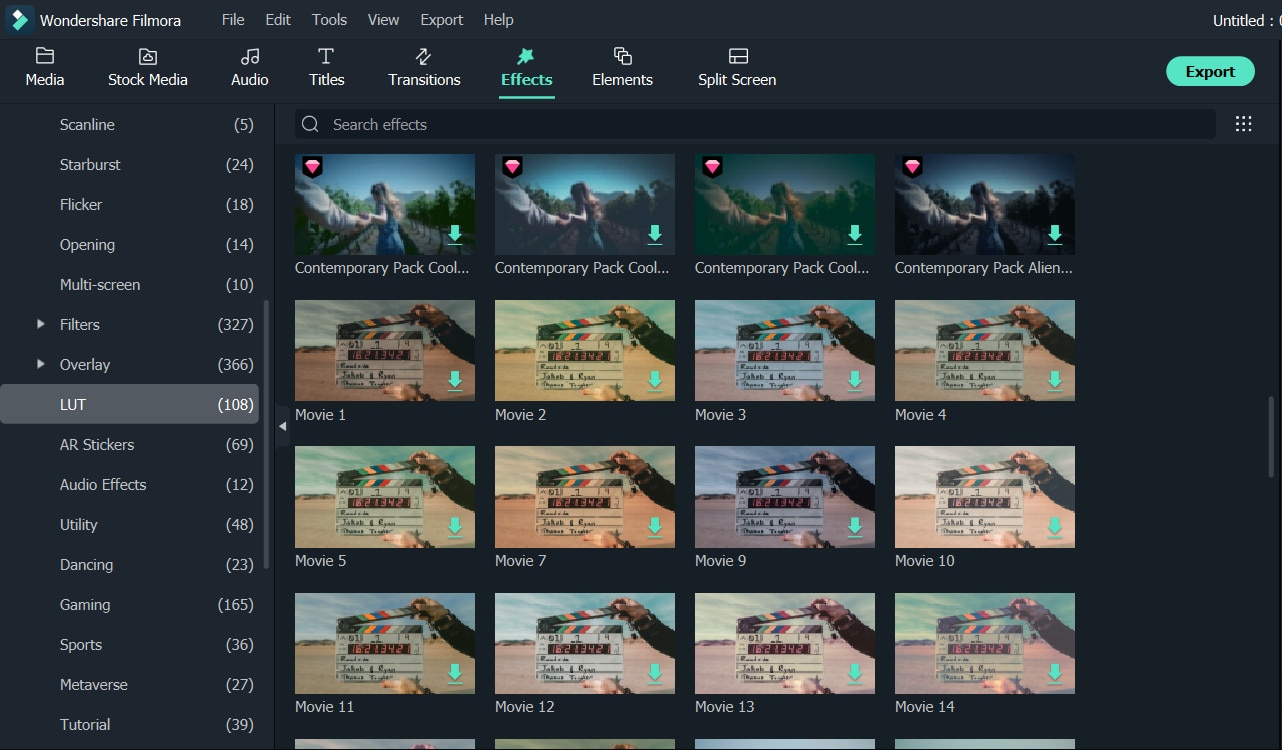
Filmora’s Color Correction Advanced Tool also categorizes your presets. Click on All Presents to see six categories: Favorites, Custom, 3D Lut, Common, Film, and Vignette.
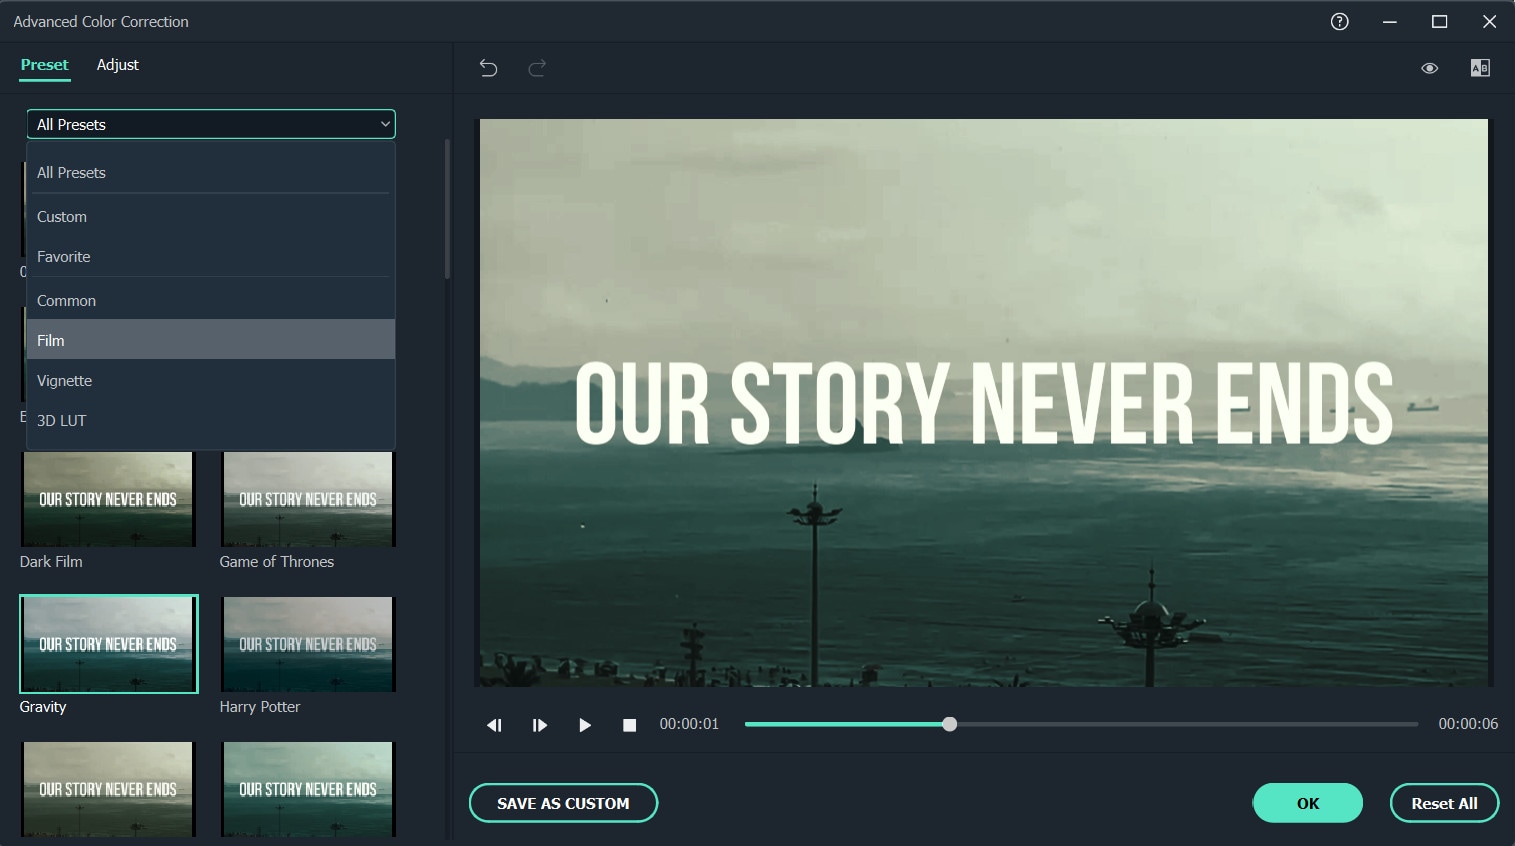
Double-click a preset to apply it to your video. You can see how it looks in the Advanced Color Correction preview window. If you are satisfied with the results, click OK.
Conclusion
Above are the steps to give your video a cinematic look using Wondershare Filmora, hope this helps if you are wondering how to do it. As we can see above, using Filmora video editor will make you more creative in making videos with a suitable emotional tone.
Free Download For Win 7 or later(64-bit)
Free Download For macOS 10.14 or later
Also read:
- 2024 Approved Splitting a Video in VSDC Step by Step
- In 2024, Learn How to Merge Audio and Video Like a Pro with This Step-by-Step Guide to Using FFmpeg. Create Seamless Videos and Improve Your Video Production Skills
- New Looking for a Free and Open Source Video Editor with Cross-Platform Support? Kdenlive Video Editor Is Great but Is It the Best? Find Out From Our Complete Kdenlive Review
- AVI Video Format How to Open, Play, Edit AVI File for 2024
- How to Create The Best Video Collages ?
- Updated 2024 Approved How to Fade in Text in Adobe Premiere Pro
- Updated How to Make a Super Easy Rotating Video Effect
- New Best 16 Motion Blur Apps for Videos & Photos
- 2024 Approved Looking for a Free and Open Source Video Editor with Cross-Platform Support? Kdenlive Video Editor Is Great but Is It the Best? Find Out From Our Complete Kdenlive Review
- New In 2024, How-To Tutorials of Kapwing Collage Maker
- In 2024, Powerpoint Slideshow Icon, Slide Sorter View Icon, Slideshow Icon Powerpoint, Slide Show View Icon
- Updated Online Video Makers for 2024
- New Experience Time Differently with The Top Slow-Motion Applications for 2024
- New Top 10 Free Text to Speech Software Windows, Mac,Android, iPhone & O
- Do You Wish to Convert GIF to Animated PNG? Then, You Need to Know About Using a GIF to APNG Converter to Help You Carry This Process Out in No Time. Read On for 2024
- Updated How to Create an URL for Your Video?
- Everything That You Need to Know About Video Montages- Ideas, Techniqu
- Updated Guide to Making Cinematography for Music Video for 2024
- Updated How to Make Your CSGO Montage Impressive for 2024
- 2024 Approved All Things About Adding Effects In Kinemaster
- New 2024 Approved Ultimate Guide on How to Film Better in Public
- New 8 Ways To Live Stream Pre-Recorded Video for 2024
- New 2024 Approved Top 20 Slideshow Makers for Win/Mac/Online Review
- In 2024, 15 Best Travel Vloggers That You Should Follow
- 2024 Approved 10+ Top Unlimited FCPX Slideshow Templates
- Difference Between Time Lapse and Hyperlapse for 2024
- New In 2024, 10 Best Suggestions for AI Video Interviews
- Free 3D Intro Makers
- New Add Stylish Text to Videos
- In 2024, How to Trim Video in Quicktime Player on Mac
- New A Vlog Has Many Elements to Answer. While Setting up Ideas for It, There Are Several Things Into Which You Should Look. This Article Presents a Picture of How a Vlog Video Is Made Perfectly for 2024
- New How to Make Subtitle Videos
- Guide to Mirror Your Realme GT 5 (240W) to Other Android devices | Dr.fone
- Can I Bypass a Forgotten Phone Password Of Infinix Hot 40?
- In 2024, How and Where to Find a Shiny Stone Pokémon For Motorola Defy 2? | Dr.fone
- 9 Best Free Android Monitoring Apps to Monitor Phone Remotely For your Realme Narzo N55 | Dr.fone
- How To Pause Life360 Location Sharing For Apple iPhone SE (2020) | Dr.fone
- How to Use Pokémon Emerald Master Ball Cheat On Samsung Galaxy S24 Ultra | Dr.fone
- How To Recover Data from Apple iPhone SE? | Dr.fone
- How To Unlock Poco X5 Pro Phone Without Password?
- Reasons for Realme GT Neo 5 Stuck on Startup Screen and Ways To Fix Them | Dr.fone
- New Types of Cartoon Styles You May Use for Your Next Marketing Project
- In 2024, 5 Ways to Transfer Music from Poco F5 Pro 5G to Other Android Devices Easily | Dr.fone
- Updated In 2024, How to Make a Slideshow with Music
- Title: New Vintage Film Effect 1990S - How to Make for 2024
- Author: Chloe
- Created at : 2024-04-24 07:08:39
- Updated at : 2024-04-25 07:08:39
- Link: https://ai-editing-video.techidaily.com/new-vintage-film-effect-1990s-how-to-make-for-2024/
- License: This work is licensed under CC BY-NC-SA 4.0.
