
New VSDC Free Video Editor Review for 2024

VSDC Free Video Editor Review 2023
If you are a Window user and you are looking for a free video editor without a watermark, VSDC free video editor is definitely a great application. There are only a handful of free video editors available where the output video will not have a watermark, and there is no limitation on the video length. VSDC video editor belongs to the non-liner video editor group where you can combine video clips, photos, objects, and blend and overlap them as per your requirements.
For a beginner, VSDC free video editor is undoubtedly one of the best video editors. It supports different types of video and audio formats as well as codes. The system requirements are very basic, and hence, it is perfect for low-end computers? But can you rely on VSDC editor when you need slightly advanced video editing? Check out our VSDC editor review and find a better alternative.
Part 1. How to Download and Install VSDC?
VSDC editor download is only available for Windows users. It is tailor-made for those who have a low-end computer with older Windows version OS. The software is compatible with Windows 2000 to Windows 11. The minimum RAM requirement is 128MB and free disk space of 200 MB. Here are the steps to download and install VSDC editor.
Step 1: Open your web browser and visit ‘www.videosoftdev.com/free-video-editor/download” .
Step 2: Click on Download Video Editor button based on 32-bit or 64-bit version of your computer. If you have Windows XP, you have to download VDSC video editor version 6.4 instead of the latest version for compatibility.
Step 3: Give some time for the installer file to get downloaded. It is merely 100 MB and it should not take long. After downloading the installer, launch it and follow the on-screen instruction to complete the installation.
Step 4: After proper installation, launch VSDC video editor. You will get the options to create a new project and capture screen, start editing an existing video and export the finished project in a proper video format.
Part 2. Key Features of VSDC
There are two versions of VSDC video editor available – Free video editor and Pro video editor. The free version has limited features while Pro version has advanced features. Here are going to discuss the key features of VSDC Free Video Editor.
Low System Requirements – One of the reasons for the wide popularity of VSDC video editor is that it does not demand high system configurations like most other video editors. If you have a low-end computer with an outdated Windows operating system, you can use VSDC video editor without any issue.
Basic Editing – Among the basic editing tools, you can cut, trim, split and join video clips. There are options for rotating and resizing videos. You can also go for color correction and put overlays on videos as applicable. Besides, you can edit 36-degree videos with zoom and chart tools.
Effects – VSDC has a wide collection of video, audio and text effects. You can also add objects to your video and apply different ready-made filters. There are also transitions to apply in between video clips and slides. You can also use green screen effect to change your background. The special split-screen effect and picture-in-picture effects are quite eye-catching.
Capture Video – VSDC video editor is equally competent in capturing videos from your webcam as well as recording your screen video. In fact, there is a dedicated option available for creating slideshow videos from photos. You can even record your voiceover if you want to.
File Formats - VSDC supports all the popular file formats for importing and exporting video and audio files. There are different export profiles available so that you can save your edited video for different devices conveniently.
Apart from these, if you opt for the Pro version, you get motion tracking, video masking, video stabilization, and much more such advanced video editing tools.
Part 3. How to Edit Videos with VSDC
If you have the recorded video and you want to edit it with VSDC video editor, the steps are quite simple. You can even record your webcam and screen video with audio if you want to start from scratch. Coming to the editing part, you can split large video files, merge video clips, add transitions in between, add objects in the video as well as crop and rotate videos. There are different effects you can apply to uplift video content. Here are the steps to edit videos with VSDC editor.
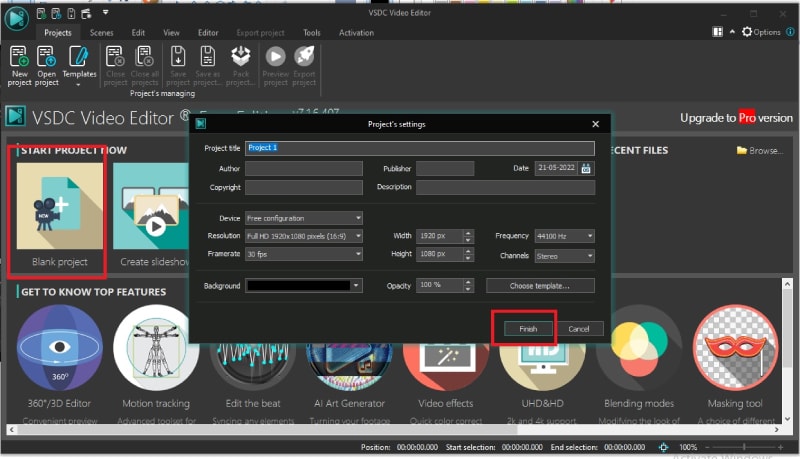
Step 1: Open VSDC Video Editor and click on Blank Project option. Name the project and change parameters, and click on Finish.
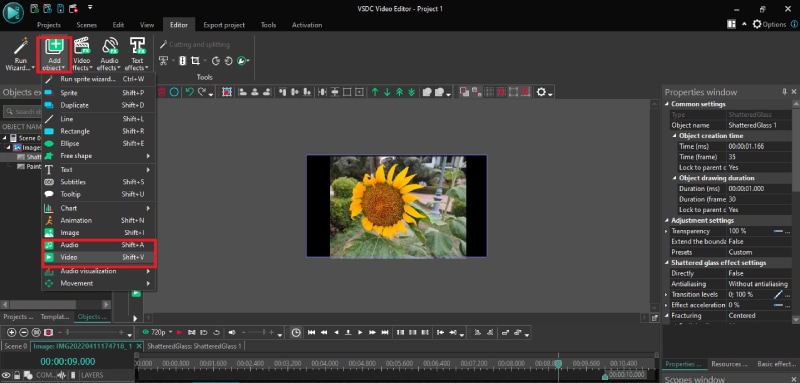
Step 2: Click on Add Object option at the top and select Video. Import the video clips saved on your hard drive. Similarly, you can go to Add Objects> Audio to import audio files.
Step 3: All the imported media files will appear on the timeline. If you have multiple video clips, you can shift the position of clips on the timeline so that one video clip ends and the other begins.
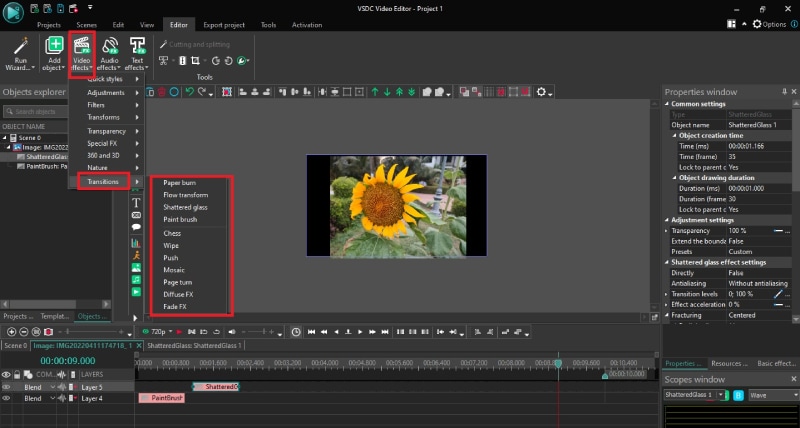
Step 4: If you want to add transitions in between the video clips, go to Video Effects> Transitions> select the effect you want to apply. Check the on-screen parameters such as duration and click on Ok button.
Step 5: If you want to add objects, go to Add Object and select shapes, texts, animations, charts, and much more. You can also add Audio Effects as well as Text Effects from the top bar.
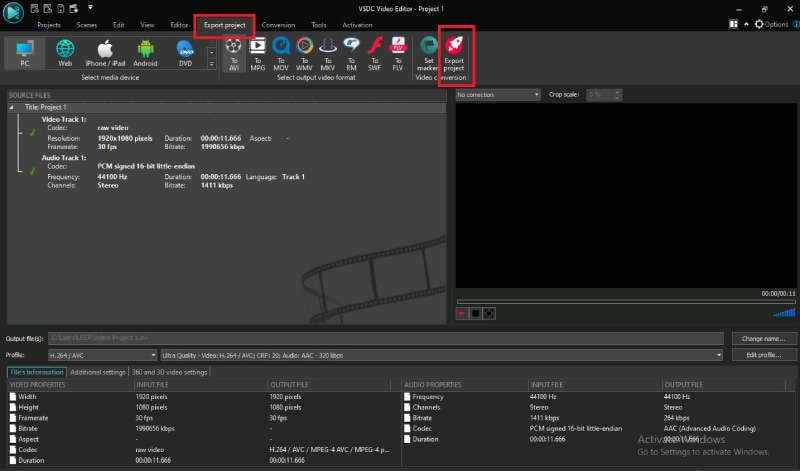
Step 6: Once you are happy with the preview of the edited video, go to Export Project and check all the parameters. Click on Export Project option.
Part 4. Best VSDC Alternative Video Editor
Since VSDC video editor is available completely free, there is no hard in downloading the application and trying it out. But soon, you will understand that the video editor is limited as far as tools and features are concerned. If you want to get more than just basic tools, you will have to upgrade to its Pro version. However, there are better premium video editors available. We recommend Wondershare Filmora as a better alternative to VSDC video editor.
Filmora is extremely popular in the professional video editing world as it has an intuitive interface and does not demand high-end computers. There are tons of transitions, effects, filters, and objects available to add to your edit. You can perform all standard and advanced video editing to take your video to the next level. Here are all the steps to edit videos on Filmora.
For Win 7 or later (64-bit)
For macOS 10.12 or later
Step 1: Download and install Filmora and it is available for Windows and Mac. Launch Filmora and click on New Project. Import all your media files into Project Media folder by drag and drop action.

Step 2: Arrange the video clips and audio clips on the timeline by drag and drop action. You should be placing the video and audio files on different tracks. This is where you can do all the basic editing such as trimming, cutting, splitting, and merging.

Step 3: To add transitions in between the video clips, go to Transitions from the top bar and drag and drop any transition in between the clips. Check out Titles, Effects, and Elements from the top bar and insert them on the timeline as you think appropriate.

Step 4: Play the video to see if everything is perfect and click on Export button to save your video to your hard drive.

Part 5. FAQs about VSDC
1. Is VSDC video editor really free?
Yes, VSDC video editor is completely free to use. However, there is a pro version available where more features are present. But the free version does not put watermark on the output video and has all the standard tools for video editing without any limitation.
2. Is VSDC better than Adobe Premiere Pro?
No, VSDC is not better than Adobe Premiere Pro. VSDC is a free video tor while Adobe Premiere Pro is a premium one. Naturally, Adobe Premiere Pro has more features and functionalities. However, VSDC is better for beginners and those who have low-end computers if you compare it with Adobe Premiere Pro.
3. Is VSDC safe?
Yes VSDC video editor is safe and stable to use. However, there was an incident in 2019 where VSDC video editor’s official website was hacked, but the software itself is safe to use on Windows computers.
For macOS 10.12 or later
Step 1: Download and install Filmora and it is available for Windows and Mac. Launch Filmora and click on New Project. Import all your media files into Project Media folder by drag and drop action.

Step 2: Arrange the video clips and audio clips on the timeline by drag and drop action. You should be placing the video and audio files on different tracks. This is where you can do all the basic editing such as trimming, cutting, splitting, and merging.

Step 3: To add transitions in between the video clips, go to Transitions from the top bar and drag and drop any transition in between the clips. Check out Titles, Effects, and Elements from the top bar and insert them on the timeline as you think appropriate.

Step 4: Play the video to see if everything is perfect and click on Export button to save your video to your hard drive.

Part 5. FAQs about VSDC
1. Is VSDC video editor really free?
Yes, VSDC video editor is completely free to use. However, there is a pro version available where more features are present. But the free version does not put watermark on the output video and has all the standard tools for video editing without any limitation.
2. Is VSDC better than Adobe Premiere Pro?
No, VSDC is not better than Adobe Premiere Pro. VSDC is a free video tor while Adobe Premiere Pro is a premium one. Naturally, Adobe Premiere Pro has more features and functionalities. However, VSDC is better for beginners and those who have low-end computers if you compare it with Adobe Premiere Pro.
3. Is VSDC safe?
Yes VSDC video editor is safe and stable to use. However, there was an incident in 2019 where VSDC video editor’s official website was hacked, but the software itself is safe to use on Windows computers.
For macOS 10.12 or later
Step 1: Download and install Filmora and it is available for Windows and Mac. Launch Filmora and click on New Project. Import all your media files into Project Media folder by drag and drop action.

Step 2: Arrange the video clips and audio clips on the timeline by drag and drop action. You should be placing the video and audio files on different tracks. This is where you can do all the basic editing such as trimming, cutting, splitting, and merging.

Step 3: To add transitions in between the video clips, go to Transitions from the top bar and drag and drop any transition in between the clips. Check out Titles, Effects, and Elements from the top bar and insert them on the timeline as you think appropriate.

Step 4: Play the video to see if everything is perfect and click on Export button to save your video to your hard drive.

Part 5. FAQs about VSDC
1. Is VSDC video editor really free?
Yes, VSDC video editor is completely free to use. However, there is a pro version available where more features are present. But the free version does not put watermark on the output video and has all the standard tools for video editing without any limitation.
2. Is VSDC better than Adobe Premiere Pro?
No, VSDC is not better than Adobe Premiere Pro. VSDC is a free video tor while Adobe Premiere Pro is a premium one. Naturally, Adobe Premiere Pro has more features and functionalities. However, VSDC is better for beginners and those who have low-end computers if you compare it with Adobe Premiere Pro.
3. Is VSDC safe?
Yes VSDC video editor is safe and stable to use. However, there was an incident in 2019 where VSDC video editor’s official website was hacked, but the software itself is safe to use on Windows computers.
For macOS 10.12 or later
Step 1: Download and install Filmora and it is available for Windows and Mac. Launch Filmora and click on New Project. Import all your media files into Project Media folder by drag and drop action.

Step 2: Arrange the video clips and audio clips on the timeline by drag and drop action. You should be placing the video and audio files on different tracks. This is where you can do all the basic editing such as trimming, cutting, splitting, and merging.

Step 3: To add transitions in between the video clips, go to Transitions from the top bar and drag and drop any transition in between the clips. Check out Titles, Effects, and Elements from the top bar and insert them on the timeline as you think appropriate.

Step 4: Play the video to see if everything is perfect and click on Export button to save your video to your hard drive.

Part 5. FAQs about VSDC
1. Is VSDC video editor really free?
Yes, VSDC video editor is completely free to use. However, there is a pro version available where more features are present. But the free version does not put watermark on the output video and has all the standard tools for video editing without any limitation.
2. Is VSDC better than Adobe Premiere Pro?
No, VSDC is not better than Adobe Premiere Pro. VSDC is a free video tor while Adobe Premiere Pro is a premium one. Naturally, Adobe Premiere Pro has more features and functionalities. However, VSDC is better for beginners and those who have low-end computers if you compare it with Adobe Premiere Pro.
3. Is VSDC safe?
Yes VSDC video editor is safe and stable to use. However, there was an incident in 2019 where VSDC video editor’s official website was hacked, but the software itself is safe to use on Windows computers.
This Article Will Show You How to Clone Yourslef in Videos with Filmora
With the help of video editing programs like Filmora , you can create clones of yourself. Whether you’re looking to create a funny skit or a serious video, cloning yourself can add much production value to your project.
In this article, we’ll walk you through the process of how to clone yourself in videos using Filmora.
Part 1: How to Film Clips for Cloning Effects?
To make cloning effects, you will need to take two different shots and use a tripod to place the camera, so the frame doesn’t change.
Shooting the first clip
For the first shot, stay on one side of the frame and do the first action. For example, you can pretend to yank and take off your jacket. Then, drop the jacket to the other side of the frame.

To make it more realistic, make an interaction by reacting to the “clone” while facing the other direction.

Shooting the second clip
Then, shoot for the second clip without changing the frame. You will have to go to the place where you dropped the jacket from the first shot.

Act as if you have just appeared there and give a reaction to the other side as well.
Part 2: How to Do the Clone Effect with Filmora?
After you have shot the necessary film clips, bring the clips into Filmora 11. If you haven’t installed Filmora yet, you can go to their website and download it here:
Free Download For Win 7 or later(64-bit)
Free Download For macOS 10.14 or later
Once you have opened Filmora 11, follow the steps below:
Step1 Bring the first clip to the timeline and cut the clip where you pretend to yank and take off the jacket. Select and delete the unnecessary clip.
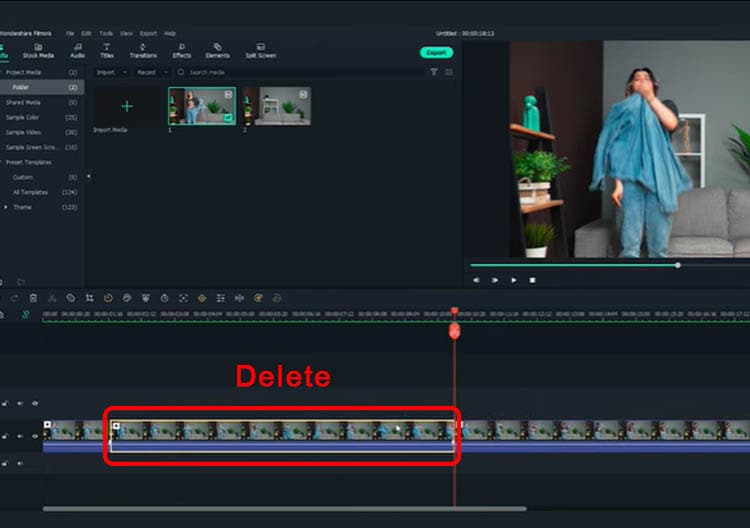
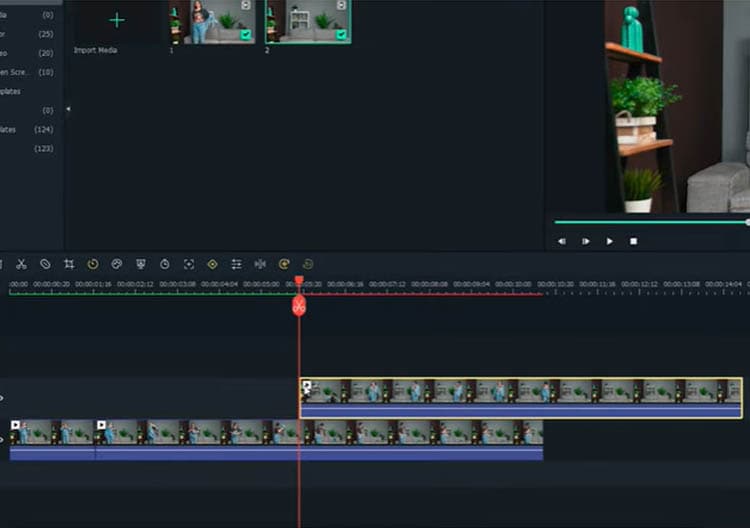
Step2 After you have the first part of the effect ready, let’s start working on the clone part using masking.
First, place the second clip on a different window track, and the starting point is where you react to the “clone.”
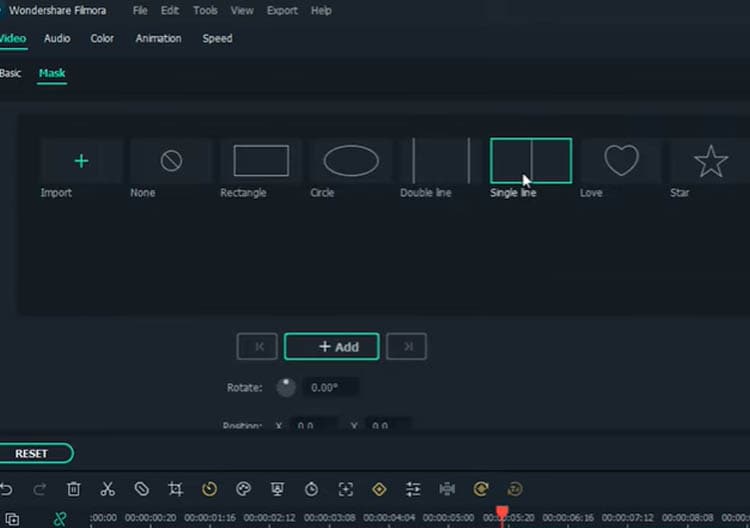
Then, double-click the second clip and go to the Filmora setting window. Tap on the Mask section > Single line.
On the preview screen, adjust the position of the mask to only show “the clone.”
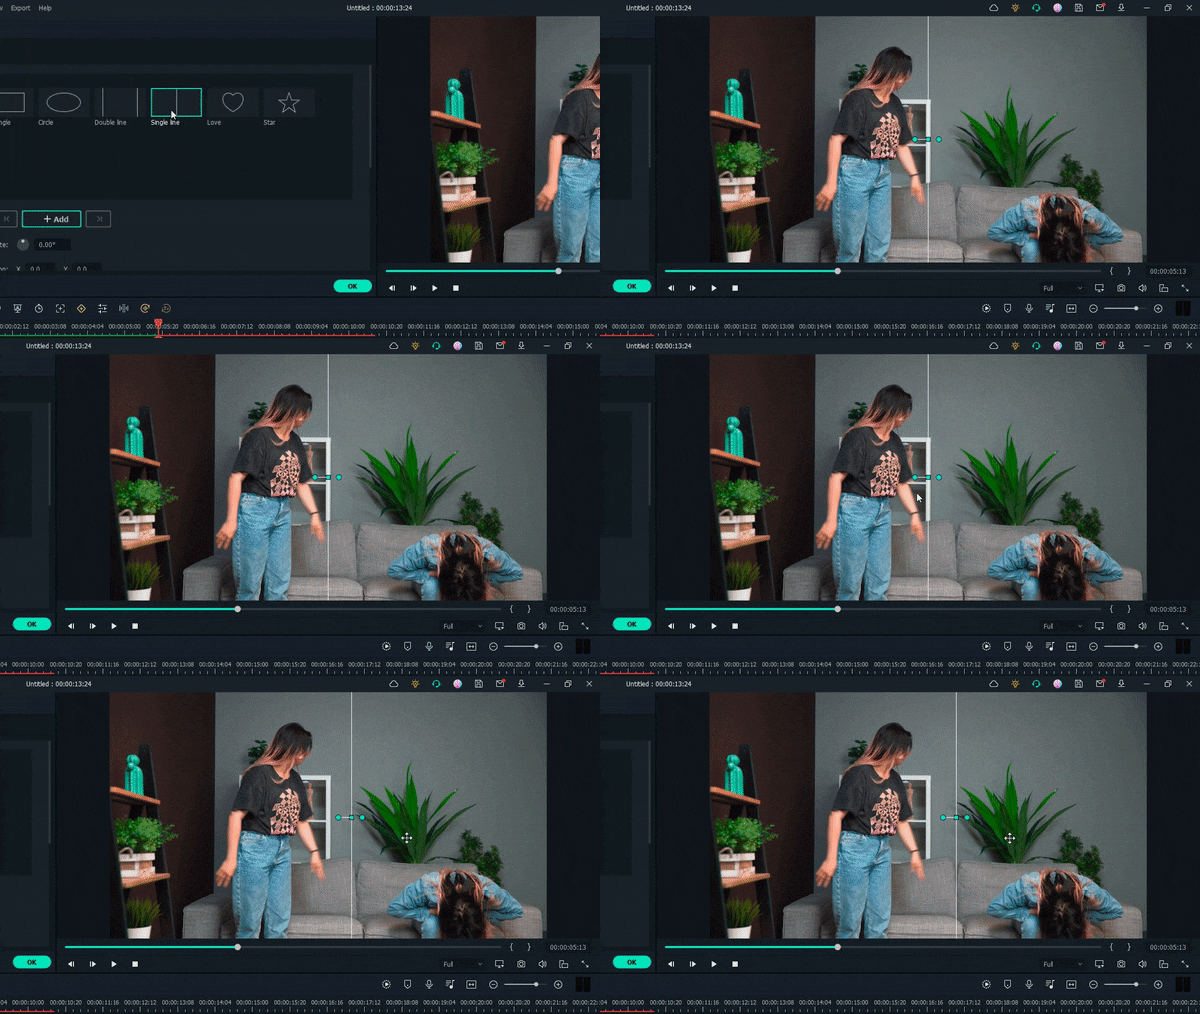
Set the blur strength on the setting to make a smoother edge transition.
Step3 If the timing of the two clips doesn’t match, you can fix it using the speed ramping feature on Filmora 11. To use it, double-click the second clip and select Speed > Speed Ramping > Customize.
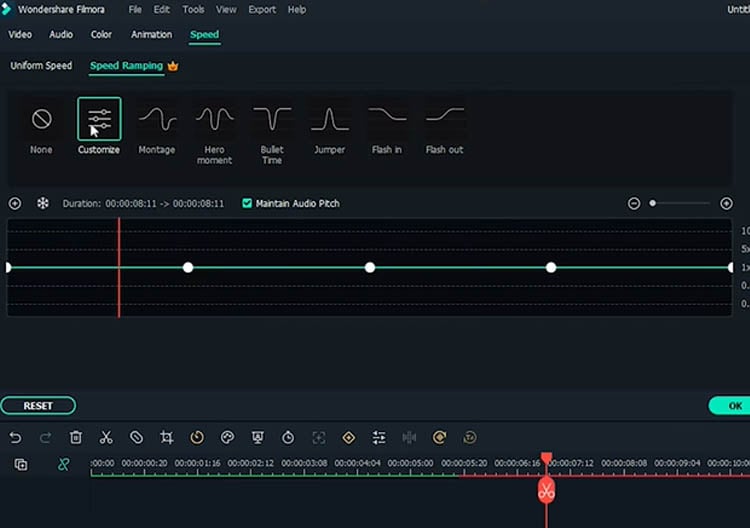
Move the keyframe up to increase the speed. You can adjust it according to your needs.
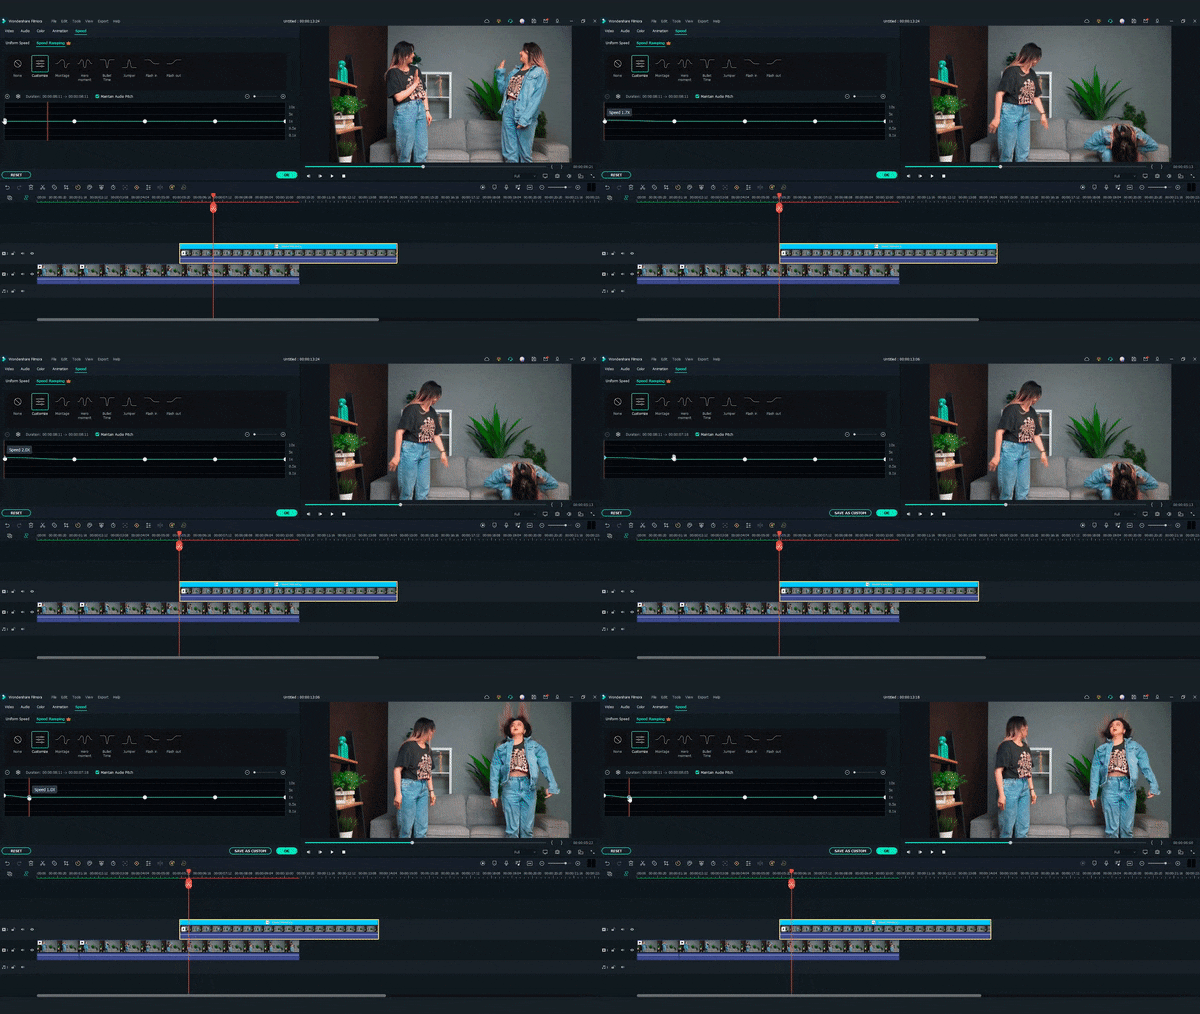
Step4 Once you are satisfied, adjust the clip length on the timeline and make sure that both clips finish at the same time.
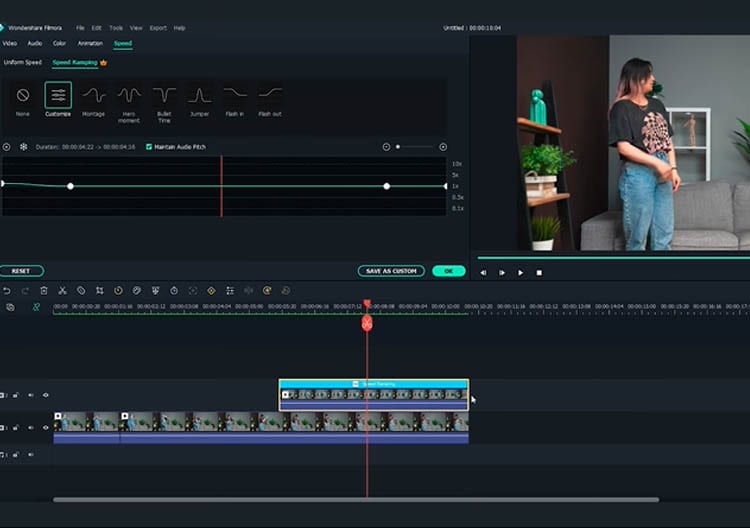
Extra tip: Add one more effect to make it more magical.
Step1 Open the Effects window and search for “up down 1.”
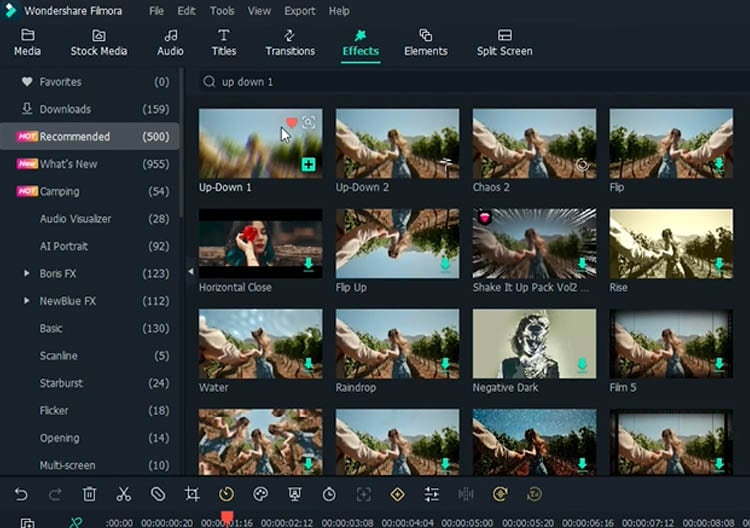
Step2 Drag and drop the effect onto the timeline where the first cut is set. Adjust the effect length to match the action.
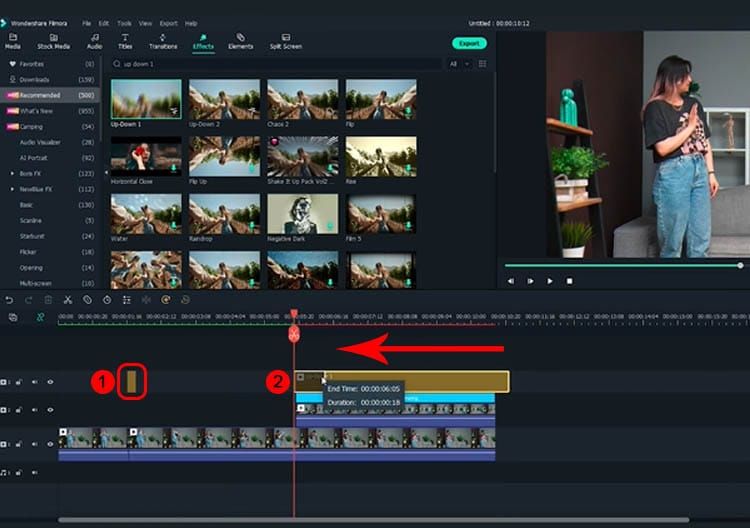
Then, drag and drop the effect again in the transition between the first and the second clip. Adjust it to the appropriate length, then it will give a more dramatic effect.
Step3 You can playback and see how it looks on the preview screen.
Summary
Making a clone effect on video is easy using Filmora. You can use the same trick to create a fashion lookbook video or other creative content to make them more engaging. Let us know if you want to see more tutorials.
Free Download For Win 7 or later(64-bit)
Free Download For macOS 10.14 or later
Free Download For macOS 10.14 or later
Once you have opened Filmora 11, follow the steps below:
Step1 Bring the first clip to the timeline and cut the clip where you pretend to yank and take off the jacket. Select and delete the unnecessary clip.

Step2 After you have the first part of the effect ready, let’s start working on the clone part using masking.
First, place the second clip on a different window track, and the starting point is where you react to the “clone.”

Then, double-click the second clip and go to the Filmora setting window. Tap on the Mask section > Single line.

On the preview screen, adjust the position of the mask to only show “the clone.”

Set the blur strength on the setting to make a smoother edge transition.
Step3 If the timing of the two clips doesn’t match, you can fix it using the speed ramping feature on Filmora 11. To use it, double-click the second clip and select Speed > Speed Ramping > Customize.

Move the keyframe up to increase the speed. You can adjust it according to your needs.

Step4 Once you are satisfied, adjust the clip length on the timeline and make sure that both clips finish at the same time.

Extra tip: Add one more effect to make it more magical.
Step1 Open the Effects window and search for “up down 1.”

Step2 Drag and drop the effect onto the timeline where the first cut is set. Adjust the effect length to match the action.

Then, drag and drop the effect again in the transition between the first and the second clip. Adjust it to the appropriate length, then it will give a more dramatic effect.
Step3 You can playback and see how it looks on the preview screen.
Summary
Making a clone effect on video is easy using Filmora. You can use the same trick to create a fashion lookbook video or other creative content to make them more engaging. Let us know if you want to see more tutorials.
Free Download For Win 7 or later(64-bit)
Free Download For macOS 10.14 or later
Add Motion Blur in After Effects
Everyone has seen those transition or animation video cuts when something doesn’t quite seem right; the movement appears forced or the playback is choppy. Typically, this occurs because a motion blur effect was not used while editing. Learning the ins, outs, rights, and wrongs of Motion Blur in After Effects is one of the most thrilling early steps in the motion graphics adventure. Learning how and when to utilize it successfully is a true “level up” moment for most designers.
Making everything you add to a motion graphic or animation project appear like it belongs there organically and hasn’t been “artificially” inserted is a crucial component. Adding motion blur After Effects Is a fantastic tool for making items mix more naturally in your compositions. Let’s quickly examine Motion Blur with all of this in mind. To help you better grasp motion blur and how to add motion blur to flawlessly merge objects in your video projects or even create styled effects, we’ve put up a detailed guide here.
Part 1. What is Motion Blur Effects
Let’s start with a little introduction before learning how to apply motion blur. The visual result of an item moving while being photographed in conjunction with the shutter speed of the camera is called motion blur. When we swiftly move our heads from side to side, this effect also naturally occurs with our eyes, but we aren’t aware of it since our brains “edit” it for us. It may be startling and awkward to watch when items are moving on the screen, particularly rapid motion, without any kind of blurring effect.
Motion blur was introduced into animation to aid in the blending of frames and replicate the blurring that was seen in earlier cameras as a result of fast-moving objects. When a moving item keeps moving while light is still reaching our eyes, motion blur results. The goal of Motion Blur in After Effects is to replicate this phenomenon. After Effects will duplicate your layer several times when it changes in size or location. Then, it will offset it in various ways. This is closely related to the direction and pace of your layer’s animation.
These days, we have cameras with fast shutter speeds, which allows us to almost completely remove motion blur. Without motion blurring, each frame of your animation is like a flawless still image, making the action seem a little disorienting. Each picture captures the exact moment in time, despite the fluid motion. However, the absence of motion blur is what viewers do notice. Because of this, visual effects creators often use artificial motion blur in their effects to replicate what the viewer would experience if the element were really there in the picture.
Part 2. How to Add Motion Blur in After Effects
In videos, slow-motion may be used in a variety of ways, such as to convey the emotional context of a story or make beautiful slideshow backdrops. It doesn’t matter why you want to make a slow-motion sequence; After Effects’ slow-motion effect will work well. Click the Motion Blur layer switch to turn Motion Blur on or off. Make sure you can render out Motion Blur by turning on the Enable Motion Blur composition option at the top of the Timeline panel.
Using the motion blur option in your layer settings is the first and easiest approach to apply motion blur in After Effects. You’ll see many choices on the left and right sides of the screen after choosing a certain video. There are several techniques to motion blur a video, which we wish to accomplish. But because this guide is for novices, we will choose the simpler option. Follow the steps below to learn how to add motion blur to a video in AE:
Steps to Add Motion Blur to After Effects:
So, it goes without saying that After Effects makes it simple to access Motion Blur’s magic. You should shoot the movie at a frame rate that is faster than the average if you want the greatest slow-motion effects. How many photos are being captured each second is indicated by the frame rate.
Step1 Download and install Adobe After Effects if it isn’t already on your PC. Since Adobe After Effects is a commercial program, it is not available for free. Open the program after installation. After installation, launch it and choose “New Project” to begin editing a brand-new file. Look through the video you wish to alter.

Step2 You have a variety of settings in Adobe After Effects on the right side. Then, choose “Effects & Presets.” A search bar will appear as a result. Enter “CC Force Motion Blur” in the search field if you wish to add motion blur to the video. You may apply this effect to whatever layer you choose since your movie is made up of layers.

Step3 Next, drag the “CC Force Motion Blur” to the layers that represent your imported video at the bottom left of the screen. On the left side of the screen, under “CC Force Motion Blur,” you will find settings for motion blur. Here, you may change the motion blur to suit your needs. You may type in the values and watch the video as appropriate. There are several choices available for you to modify.

![]()
Note: Before applying any speed effects, first trim your film to the proper length. Once the speed effects have been included, you need also make sure that your composition is lengthy enough for your clip. Once you’re satisfied with the footage you want to slow down, choose one of the ways—Time warp or Time Stretch.
Step4 Customize “Shutter Angle” and “Motion Blur Samples.” Always be careful to preview the video after any modifications. Adjust to your needs and specifications. Additionally, if you wish, you may add any additional effect to the video. When finished, save the video by selecting “File” in the upper left corner.

Step5 Finally, hit the OK button and afterwards, export the project with the Motion Blur embedded inside the main video. Adobe AE also gives you flexibility to export to the desired format with the preset project settings.
Part 3. Other Video Editor to Add Effects to Videos
Due to its cost and adaptability, Adobe After Effects is quite expensive; especially for the beginners. So, we’ve a handy option, Filmora by Wondershare, that is a fantastic option since most high-end video editors are, to put it mildly, expensive. It may seem natural to just add motion blur to everything before rendering while working on a conventional 2D project in After Effects, but there are occasions when having no motion blur at all is preferable. When used properly, After Effects’ slow-motion features are extensive and reliable.
Wondershare: A video-making and editing program has its flagship product called Filmora . You may use the tools to create a wide variety of styles and appearances. Less complicated and user-friendly for beginners, the program. With the help of this program, you may edit your video at home like an expert. With this user-friendly tool and stylish effects, making excellent films doesn’t have to be difficult. When you open the app and choose Editor mode as it will walk you through each stage of the procedure.
Free Download For Win 7 or later(64-bit)
Free Download For macOS 10.14 or later
Import Files
Media files may be easily added to the timeline in Filmora from the device’s library. .mpg,.mpeg, and many more file types are supported for this video file format’s input.

Utilize Filmstock
On Wondershare Filmora , there is a full-service shop called Filmstock that offers a ton of exciting media and after-effects for download. You may get free sound effects and short video clips to add to your videos on this website.
Edit Effect
Download films from the effect store or import them from your device and add them to your timeline in Filmora to modify your videos. Utilize the software’s drag-and-drop feature to modify the video.

Apply filters
Overlays and video filters are effects used to enhance the appeal of the video. Open the effects tab and select your desired filter to apply overlays and filters. To apply it, drag and drop it into the timeline’s video. Additionally, filters may be adjusted to change the time scale and transparency.
Export
Exporting a video to a variety of platforms comes after editing it. Filmora allows users to export video in a number of different file types, including mp4, Wmv, Mkv, ts, 3gp, f4v, Mkv, MOV, mpg, 3gp, GIF 4K, and mp3.
Conclusion
Motion blur is crucial when animating characters to move. Your videos require some blur to seem realistic when there is motion, particularly when there is quick movement. You have learnt how to include motion blur into your animation project from this guide. To add motion blur effects to your movie or animation, After Effects offers a wide variety of options. To inform you about this wonderful gesture, we utilized Filmora and Adobe After Effects and recommend Filmora for easiness and handy outputs.
Let’s start with a little introduction before learning how to apply motion blur. The visual result of an item moving while being photographed in conjunction with the shutter speed of the camera is called motion blur. When we swiftly move our heads from side to side, this effect also naturally occurs with our eyes, but we aren’t aware of it since our brains “edit” it for us. It may be startling and awkward to watch when items are moving on the screen, particularly rapid motion, without any kind of blurring effect.Motion blur was introduced into animation to aid in the blending of frames and replicate the blurring that was seen in earlier cameras as a result of fast-moving objects. When a moving item keeps moving while light is still reaching our eyes, motion blur results. The goal of Motion Blur in After Effects is to replicate this phenomenon. After Effects will duplicate your layer several times when it changes in size or location. Then, it will offset it in various ways. This is closely related to the direction and pace of your layer’s animation.
These days, we have cameras with fast shutter speeds, which allows us to almost completely remove motion blur. Without motion blurring, each frame of your animation is like a flawless still image, making the action seem a little disorienting. Each picture captures the exact moment in time, despite the fluid motion. However, the absence of motion blur is what viewers do notice. Because of this, visual effects creators often use artificial motion blur in their effects to replicate what the viewer would experience if the element were really there in the picture.
Part 2. How to Add Motion Blur in After Effects
In videos, slow-motion may be used in a variety of ways, such as to convey the emotional context of a story or make beautiful slideshow backdrops. It doesn’t matter why you want to make a slow-motion sequence; After Effects’ slow-motion effect will work well. Click the Motion Blur layer switch to turn Motion Blur on or off. Make sure you can render out Motion Blur by turning on the Enable Motion Blur composition option at the top of the Timeline panel.
Using the motion blur option in your layer settings is the first and easiest approach to apply motion blur in After Effects. You’ll see many choices on the left and right sides of the screen after choosing a certain video. There are several techniques to motion blur a video, which we wish to accomplish. But because this guide is for novices, we will choose the simpler option. Follow the steps below to learn how to add motion blur to a video in AE:
Steps to Add Motion Blur to After Effects:
So, it goes without saying that After Effects makes it simple to access Motion Blur’s magic. You should shoot the movie at a frame rate that is faster than the average if you want the greatest slow-motion effects. How many photos are being captured each second is indicated by the frame rate.
Step1 Download and install Adobe After Effects if it isn’t already on your PC. Since Adobe After Effects is a commercial program, it is not available for free. Open the program after installation. After installation, launch it and choose “New Project” to begin editing a brand-new file. Look through the video you wish to alter.

Step2 You have a variety of settings in Adobe After Effects on the right side. Then, choose “Effects & Presets.” A search bar will appear as a result. Enter “CC Force Motion Blur” in the search field if you wish to add motion blur to the video. You may apply this effect to whatever layer you choose since your movie is made up of layers.

Step3 Next, drag the “CC Force Motion Blur” to the layers that represent your imported video at the bottom left of the screen. On the left side of the screen, under “CC Force Motion Blur,” you will find settings for motion blur. Here, you may change the motion blur to suit your needs. You may type in the values and watch the video as appropriate. There are several choices available for you to modify.

![]()
Note: Before applying any speed effects, first trim your film to the proper length. Once the speed effects have been included, you need also make sure that your composition is lengthy enough for your clip. Once you’re satisfied with the footage you want to slow down, choose one of the ways—Time warp or Time Stretch.
Step4 Customize “Shutter Angle” and “Motion Blur Samples.” Always be careful to preview the video after any modifications. Adjust to your needs and specifications. Additionally, if you wish, you may add any additional effect to the video. When finished, save the video by selecting “File” in the upper left corner.

Step5 Finally, hit the OK button and afterwards, export the project with the Motion Blur embedded inside the main video. Adobe AE also gives you flexibility to export to the desired format with the preset project settings.
Part 3. Other Video Editor to Add Effects to Videos
Due to its cost and adaptability, Adobe After Effects is quite expensive; especially for the beginners. So, we’ve a handy option, Filmora by Wondershare, that is a fantastic option since most high-end video editors are, to put it mildly, expensive. It may seem natural to just add motion blur to everything before rendering while working on a conventional 2D project in After Effects, but there are occasions when having no motion blur at all is preferable. When used properly, After Effects’ slow-motion features are extensive and reliable.
Wondershare: A video-making and editing program has its flagship product called Filmora . You may use the tools to create a wide variety of styles and appearances. Less complicated and user-friendly for beginners, the program. With the help of this program, you may edit your video at home like an expert. With this user-friendly tool and stylish effects, making excellent films doesn’t have to be difficult. When you open the app and choose Editor mode as it will walk you through each stage of the procedure.
Free Download For Win 7 or later(64-bit)
Free Download For macOS 10.14 or later
Import Files
Media files may be easily added to the timeline in Filmora from the device’s library. .mpg,.mpeg, and many more file types are supported for this video file format’s input.

Utilize Filmstock
On Wondershare Filmora , there is a full-service shop called Filmstock that offers a ton of exciting media and after-effects for download. You may get free sound effects and short video clips to add to your videos on this website.
Edit Effect
Download films from the effect store or import them from your device and add them to your timeline in Filmora to modify your videos. Utilize the software’s drag-and-drop feature to modify the video.

Apply filters
Overlays and video filters are effects used to enhance the appeal of the video. Open the effects tab and select your desired filter to apply overlays and filters. To apply it, drag and drop it into the timeline’s video. Additionally, filters may be adjusted to change the time scale and transparency.
Export
Exporting a video to a variety of platforms comes after editing it. Filmora allows users to export video in a number of different file types, including mp4, Wmv, Mkv, ts, 3gp, f4v, Mkv, MOV, mpg, 3gp, GIF 4K, and mp3.
Conclusion
Motion blur is crucial when animating characters to move. Your videos require some blur to seem realistic when there is motion, particularly when there is quick movement. You have learnt how to include motion blur into your animation project from this guide. To add motion blur effects to your movie or animation, After Effects offers a wide variety of options. To inform you about this wonderful gesture, we utilized Filmora and Adobe After Effects and recommend Filmora for easiness and handy outputs.
How to Split Videos in Final Cut Pro
If you are looking for a video splitting ad merging software and you want someone to recommend you, it is more likely that they will consider referring Final Cut Pro. People, especially video editors prefer using Final Cut Pro for multiple reasons. Final Cut Pro features the most advanced organizing tools out of all the professional video editing software. Create Smart Collections that automatically compile content based on a set of specified criteria and tag entire clips or clip ranges with metadata for searching.
Considering its importance, this guide is to introduce different ways to split and merge video and answer the question that has been raised in your mind about whether there is any other software program that can be used as a Final Cut Pro alternative.
Part 1. How to split a clip in Final Cut Pro?
A great video editor, Final Cut Pro (or Final Cut Pro X), offers a variety of capabilities to enhance videos and supports a wide range of video formats. You may create post-production video editing from a variety of angles thanks to it.
One of the most fundamental video editing skills you’ll need to master is how to split clips in Final Cut Pro. After being divided in two, you can modify or reorganize one half of your clip without affecting the other.
Way 1: Split a Clip in the Timeline (shortcut: Command+B)
You can follow these steps to split a clip in the timeline:
Step1The blade can be selected in Final Cut Pro by clicking the Tools pop-up menu in the timeline’s upper left corner (or press B).
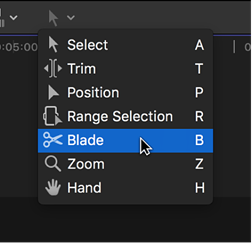
Step2Then click and move the skimmer to the frame in the video you wish to cut from.

Step3You can split the video by following these two methods:
- Choose Trim > Join Clips after selecting one or both sides of the edit point (or press Delete).
- Choose Trim > Join Clips after selecting the clips on either side of the edit.

Way 2. Split several clips at the same time
You can follow these steps to split several clips at the same time:
Step1Move the skimmer to the desired cutting frame in the Final Cut Pro timeline.

Step2Deciding on Trim > Blade All (or press Shift+Command+B). At the skimmer position, all clips are removed.
Way 3. Split all clips at once
The Blade command allows you to simultaneously cut selected core storyline segments and related clips.
You can follow these steps to split all clips at once:
Step1Choose the videos you wish to cut from the timeline in Final Cut Pro.
Step2The skimmer should be moved to the desired cutting frame.
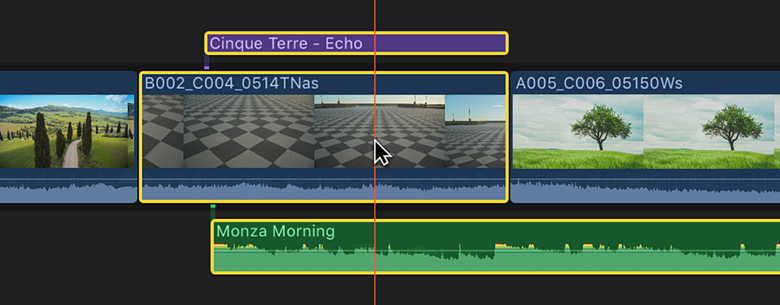
Step3Click Trim > Blade (or press Command+B). The skimmer position is used to cut the chosen clips.
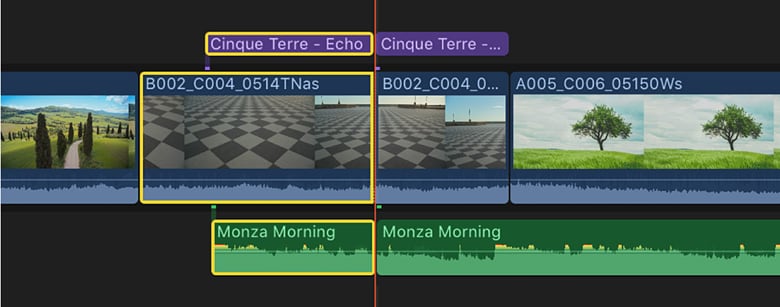
Tips: How to heal the sliced clips?
How should I recover if there is an error in the edited video? Here are 3 methods for you.
Way 1: Delete the cut point (by pressing Delete)
You can follow these steps to merge 2 clips by clicking delete:
Step1Move the mouse over the time point you want to remove, then select Delete directly to restore the original full video.

Way 2: Undo the action (by pressing Command + Z)
You can either click “Command + Z” to reverse the process if you want to link the clips back together to repair a clip in the timeline.
Way 3: merge 2 clips (by clicking " Join Clips")
Choose two neighboring portions, then select “Join Clips” from the drop-down option under “Trim” to join the individual clips together into one.
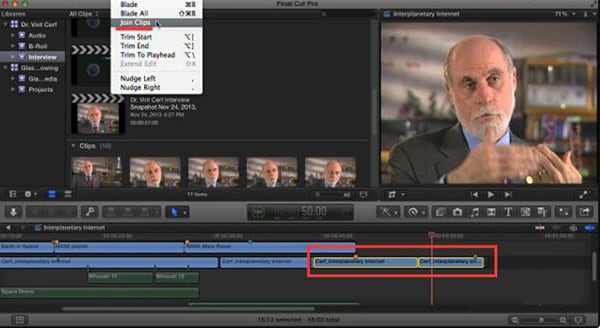
Tips: These 3 ways only work if the two clips come from the same clip.
Part 2. How to split a clip in alternative to Final Cut Pro?
Final Cut Pro is a more complex user to understand; It can sometimes corrupt your file if it isn’t saved properly, leading to all your work becoming lost. To save your work, you should do this every 5 minutes to ensure that your work doesn’t corrupt. There are limited export settings; you are limited in the formats and sizes you can export from FCPX; whereas before, you could export many codecs and formats out of FCP, you must complete more specific encoding in a compressor.
Therefore, the alternative to Final Cut Pro is Filmora because it allows you to edit, split or merge clips in one go.
Split a clip in the best alternative to FCP - Wondershare Filmora
Wondershare Filmora is a video editing program with a delightfully user-friendly interface that enables anyone to become an excellent video editor. With the help of a variety of strong editing tools and Wondershare Filmora, users may quickly and easily make outstanding videos.
To split audio and video without any problem, just follow these steps:
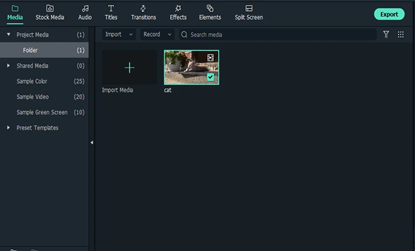
Step1To add video files to the Timeline for trimming, first click “Import“ on the main windows and choose the video files you want from your computer. You can also just drag and drop movies into the Media Library.
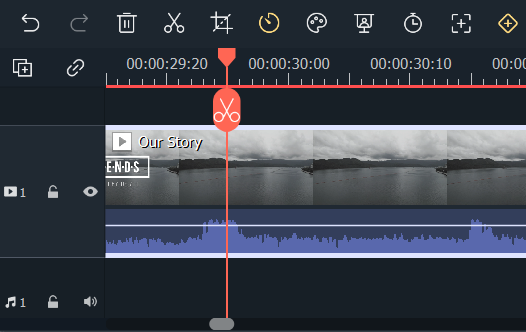
Step2Move the playhead over the unwanted section, then click the trash can symbol.
Step3Click “Export“ after you’re done trimming, then choose where you want to save the edited video.
Conclusion
We hope this article can help you learn how to split videos with Final Cut Pro, however, we still recommend more users choose Filmora . It is one of the widely preferred and commonly used video editing software programs as it introduces you to a world of editing tools allowing you in creating high-quality content. Although some of the features require in-app purchases, still Filmora provides access to a wide range of tools in the free version.
Free Download For Win 7 or later(64-bit)
Free Download For macOS 10.14 or later
Free Download For macOS 10.14 or later
Also read:
- [New] Optimizing Your VLC Livestream over the Net
- [Updated] 2024 Approved The Ultimate Smartphone List for Optimal Gear VR Functionality (2 Written By John Doe, MBA | Expert in Strategic Business Planning and Marketing
- [Updated] 2024 Approved Ultimate 8 Choice of Cameras for Excellent Video Feeds
- [Updated] Comparative Review Samsung's Imaging Suite, 2023 Edition
- 2024 Approved Are You Looking to Store Your Videos Securely and Efficiently? Look No Further than Our Top Pick for the Best Cloud Storage Service for Videos
- 2024 Approved How to Use 3D Camera Tracking Effects in After Effects
- A Step-by-Step Manual for Capturing VR Playthroughs
- How To Remove or Bypass Knox Enrollment Service On OnePlus
- In 2024, Best Ideas on Using Filmora Green Screen
- In 2024, How to Comment on YouTube Live Chat
- In 2024, How to Unlock Vivo Y78t Phone without Any Data Loss
- New Steps To Fade Audio In Premier Pro
- Reenergize Your AirPods in Just 9 Steps – Beat the Charge Drain
- Updated Difference Between Time Lapse and Hyperlapse for 2024
- Updated Full Guide to Funcall Voice Changer and Its Alternatives for 2024
- Which Platforms Support the Use of Windows Defender by Microsoft - Insights From YL Computing
- Title: New VSDC Free Video Editor Review for 2024
- Author: Chloe
- Created at : 2025-02-25 19:20:09
- Updated at : 2025-03-03 22:27:59
- Link: https://ai-editing-video.techidaily.com/new-vsdc-free-video-editor-review-for-2024/
- License: This work is licensed under CC BY-NC-SA 4.0.