
:max_bytes(150000):strip_icc():format(webp)/SetaLiveWallpaperinWindows11-b8ca3913592d4a5790808131bf8f34e1.jpg)
New Want to Have Slow Zoom Effect in Your Video? We Will Illustrate How to Apply Slow Zoom Effect to Your Video on Your Smartphone, Computer, and TikTok
Want to Have Slow Zoom Effect in Your Video? We Will Illustrate How to Apply Slow Zoom Effect to Your Video on Your Smartphone, Computer, and TikTok
A raw video without any effect will fall flat on its face when it comes to engagement and watch time. Nobody likes watching videos without effects as there is no entertainment value, and the video is not soothing and pleasing to the eyes. That is why effects in videos are extremely important especially when it is a video you are posting on social media to get everyone’s attention. You should definitely consider adding slow zoom effect in your video to make it stand out.
The slow zoom effect is one of the most common but widely loved video effects that work for any video. Human eyes love when there is slow motion effect of panning and zooming into the central or specific portion of a video. The slow zoom in effect is extremely popular among TikTok videos. We will illustrate how to apply slow zoom effect to your video on your smartphone as well as on your computer.
Part 1. How to create slow zoom-in effect in Filmora
If you want to add slow zoom to any recorded video on your computer, you will need a dedicated video editor. There are many popular video editors available where slow zoom effect is not available. We recommend Wondershare Filmora which is a professional video editor that is available for Windows and Mac users. You will need to combine slow motion and keyframe to achieve the desired slow zoom effect. Here are the steps on how to create slow zoom in effect for your videos.
Free Download For Win 7 or later(64-bit)
Free Download For macOS 10.14 or later
Step1 Download and install Wondershare Filmora . Launch the application and click on New Project option from the welcome screen.

Step2 Drag and drop your video in Project Media folder. Thereafter, drag and drop the video into the Timeline.

Step3 Put the red header on the beginning part of the clip that you want to cut off and click on Cut(Scissor) icon. Then put the red header on the end part of the clip and click on Cut icon again. You should now have the separated clip for applying slow zoom effect.

Step4 Select the separated clip and click on Speed icon. Go to Slow option and select the speed according to the slowness of zooming you want.

Step5 Now you have to add multiple keyframes so that the slow zoom effect is smooth and soothing. Right-click on the clip, go to Animation and click on Add Animation. Go to Animation tab and then to Customization section.

Move the red header to the point where you want a keyframe and click on Add option. Similarly, move the red header slightly farther and add another keyframe. Keep adding like that till you reach the end point.

Step6 Double-click on the clip and go to Video> Basic> Transform. Select keyframes and slowly increase the scale slider for each keyframe to apply the zoom effect. Therefore, for every keyframe, zooming will increase gradually and you have already applied slow speed for complete slow zoom effect.

Part 2. How to do the slow zoom in effect on TikTok?
TikTok is one of the most popular short-video sharing platforms among teenagers and young adults. The slow zoom effect has been popularized by TikTokers as they use the effect quite regularly. Naturally, adding slow zoom in effect on your video on TikTok is the easiest. Here are the steps to follow one by one.
Step1 Launch TikTok app and you can shoot your video directly from TikTok. If you have already recorded the video, tap on “+” icon located at the bottom of the app screen and select the video.
Step2 After adding the video, go to Effects> Time. Under Time section, tap on “Slo-Mo” option to add slow-motion effect on your video.

Step3 Go to Visuals and you will find Zoom option. Place the header on the part of the video where you want to place the slow zoom effect. Thereafter, tap and hold Zoom effect so that the effect applies on the video clip. Release the effect where the desired section is covered.

Step4 Tap on Save option and play the video to see slow zoom effect. Tap on Next button and you can share the video on social media platforms as well.

There is another way you can apply slow zoom effect on TikTok. Here are the steps to find and apply slow zoom effect.
Step1 Launch TikTok app and tap on Discover option located at the bottom.

Step2 On the next screen, type “Slow Zoom” on the search bar and tap on Search option.

Step3 Now you will see the videos where different TikTok users have already applied slow zoom effect. Tap on Effects Slow Motion to apply the same effect to your video.

Step4 On the next screen, tap on Try This Effect button. You can select the duration of the zooming of the video you are about to shoot as well the zooming magnification.

Step5 Finally, tap on Record button to capture your video and apply slow zoom effect on the video automatically.

Conclusion
The slow zoom effect is one of the most viral and trending video effects on social media platforms. If you want to add slow zoom effect to your video for a certain portion, you can do the same from your smartphone as well as computer. For Windows and Mac users, we recommend you use Wondershare Filmora .
Free Download For macOS 10.14 or later
Step1 Download and install Wondershare Filmora . Launch the application and click on New Project option from the welcome screen.
Step2 Drag and drop your video in Project Media folder. Thereafter, drag and drop the video into the Timeline.
Step3 Put the red header on the beginning part of the clip that you want to cut off and click on Cut(Scissor) icon. Then put the red header on the end part of the clip and click on Cut icon again. You should now have the separated clip for applying slow zoom effect.
Step4 Select the separated clip and click on Speed icon. Go to Slow option and select the speed according to the slowness of zooming you want.
Step5 Now you have to add multiple keyframes so that the slow zoom effect is smooth and soothing. Right-click on the clip, go to Animation and click on Add Animation. Go to Animation tab and then to Customization section.
Move the red header to the point where you want a keyframe and click on Add option. Similarly, move the red header slightly farther and add another keyframe. Keep adding like that till you reach the end point.
Step6 Double-click on the clip and go to Video> Basic> Transform. Select keyframes and slowly increase the scale slider for each keyframe to apply the zoom effect. Therefore, for every keyframe, zooming will increase gradually and you have already applied slow speed for complete slow zoom effect.
Part 2. How to do the slow zoom in effect on TikTok?
TikTok is one of the most popular short-video sharing platforms among teenagers and young adults. The slow zoom effect has been popularized by TikTokers as they use the effect quite regularly. Naturally, adding slow zoom in effect on your video on TikTok is the easiest. Here are the steps to follow one by one.
Step1 Launch TikTok app and you can shoot your video directly from TikTok. If you have already recorded the video, tap on “+” icon located at the bottom of the app screen and select the video.
Step2 After adding the video, go to Effects> Time. Under Time section, tap on “Slo-Mo” option to add slow-motion effect on your video.
Step3 Go to Visuals and you will find Zoom option. Place the header on the part of the video where you want to place the slow zoom effect. Thereafter, tap and hold Zoom effect so that the effect applies on the video clip. Release the effect where the desired section is covered.
Step4 Tap on Save option and play the video to see slow zoom effect. Tap on Next button and you can share the video on social media platforms as well.
There is another way you can apply slow zoom effect on TikTok. Here are the steps to find and apply slow zoom effect.
Step1 Launch TikTok app and tap on Discover option located at the bottom.
Step2 On the next screen, type “Slow Zoom” on the search bar and tap on Search option.
Step3 Now you will see the videos where different TikTok users have already applied slow zoom effect. Tap on Effects Slow Motion to apply the same effect to your video.
Step4 On the next screen, tap on Try This Effect button. You can select the duration of the zooming of the video you are about to shoot as well the zooming magnification.
Step5 Finally, tap on Record button to capture your video and apply slow zoom effect on the video automatically.
Conclusion
The slow zoom effect is one of the most viral and trending video effects on social media platforms. If you want to add slow zoom effect to your video for a certain portion, you can do the same from your smartphone as well as computer. For Windows and Mac users, we recommend you use Wondershare Filmora .
20 Best Video Background Templates
Content creation has evolved from a part-time hobby to a full-time job. Platforms like YouTube give creative minds an outlet for their ideas and an opportunity to make money from their videos. However, if your videos are sub-par, your target audience will not support your channel and watch your content. Changing the background in your videos is one way to make them more visually appealing.
Today, numerous editing tools like Filmstock can help you effortlessly change the background of your video. Stay tuned to discover some exciting video background templates and how to use Wondershare Filmora to edit your videos.
Free Download For Win 7 or later(64-bit)
Free Download For macOS 10.14 or later

- Simple Video Background Template Pack Free for Download
- Weather Background Template for Your Video
- Download Dance Loop Background Template Video Pack for Free
- Retro Greenscreen Background Templates for Any Video Themes (Download Free)
- Background Template Pack for Horror Videos
- Free Sci-Fi Stage Background Video Templates
- Creative Background Intro Template
- Video Backgrounds for Instagram Videos
- Dynamic Background Templates for Cinematic Videos
- Starry Sky Background Video Templates
- Ink Background Templates for All Kinds of Videos
- Epic Film Backgrounds Video Templates Pack
- Landscape Background Templates Pack
- Background Template Pack for Stock Videos
- Free Abstract Background Templates to Make Your Video Colorful
- Background Templates for Makeup Videos (Free for Download)
- Retro Music Visualization Background Templates
- Golden Luxury Background Templates to Make Your Video Elegant
- Rainbow Background Template Videos
- Moonrise Background Video Template Pack (Downloadable for Free)
- How To Change Background in Your Video With Filmora for Desktop
- How To Change Video Background With Filmora for Mobile
20 Fantastic Video Background Templates for Download
We have now come to the fun part of this article, where we present twenty awesome video background templates from Filmstock . We hope you will find something you like by the time we get to the last one.
1. Simple Video Background Template Pack Free for Download
You can never go wrong with a simple background, free from visual distractions. After all, the main focus should be on the video and no other distracting elements.
2. Weather Background Template for Your Video
If your video has a theme surrounding the sky, thunderstorms, or meteors, then this weather background is the perfect choice. We could never tire of looking at the sky and the serene feelings it elicits.
3. Download Dance Loop Background Template Video Pack for Free
The dance loop background is a powerful, electric display suitable for retro and psychedelic scenes. You could also use this background if your video has lots of stage lighting, smoke, or a disco ball.
4. Retro Greenscreen Background Templates for Any Video Themes (Download Free)
Similar to the previous background, this video template background is a fireball and is sure to make the background of your video light up with excitement. The vibrant colors also make it hard to miss.
5. Background Template Pack for Horror Videos
Horror enthusiasts will love this template because we guarantee it could give your viewers a heart attack. However, if your fanbase is into spooky stuff and the supernatural, go for it!
6. Free Sci-Fi Stage Background Video Templates
Sci-Fi backgrounds are becoming a hit nowadays, especially for dance videos. The neon colors pack a mean punch, and your audience won’t resist clicking on your videos.
7. Creative Background Intro Template
When creating content, creativity is the name of the game. This unique background template has colorful and astonishing geometric shapes to take your video to the next level.
8. Video Backgrounds for Instagram Videos
The tell-tale gradient of colors in the new Instagram logo could make a fitting background for your story or feed, making your rivals go green with envy. However, this background template is also suitable for any video.
9. Dynamic Background Templates for Cinematic Videos
If you have ever been to the cinemas, you understand how grand and immersive the display can be. This video background template gives your videos a similar vibe, engulfing anyone who watches.
10. Starry Sky Background Video Templates
Japanese comics are a fan favorite with their whimsical characters and exciting animations. You could use this starry sky background if you create animated videos and would like to set the mood even further.
11. Ink Background Templates for All Kinds of Videos
Perhaps you want to create a video to commemorate your child’s birthday or a loved one’s wedding day. This ink background template has some beautiful pastel colors and is pretty laid back, making it the perfect choice for family-related videos or the holidays.
12. Epic Film Backgrounds Video Templates Pack
If you post documentaries and factual content, your audience needs to take you a bit seriously. This epic film background is perfect for you as it contains stunning light effects, old paper, maps, and desert and winter scenes to add some oomph to your message and cement it in the viewer’s mind.
13. Landscape Background Templates Pack
Most of the templates we have seen are 2-dimensional. If you want to stand out from the rest, you could edit your videos using this landscape background template with a 3D environment to make your viewers feel like they can touch the waves in the ocean or the mountain’s terrain.
14. Background Template Pack for Stock Videos
Suppose you post educational content teaching your audience about the stock market and other financial matters. This background template video about the stock market is the perfect choice because a starry sky background would simply look out of place. The dominant blue color also sends a subliminal message to your viewers’ subconscious that they can trust you and that your information is reliable.
15. Free Abstract Background Templates to Make Your Video Colorful
If you are making a music video or a fun life hacks video, this abstract background will make your content stand out. The vibrant colors also help your audience enjoy watching your videos and crave more content.
16. Background Templates for Makeup Videos (Free for Download)
A significant percentage of makeup artists honed their skills by watching tutorials online. If you want to start creating makeup vlogs on your channel, it will help to consider this video background template. The delicate colors give your video a feminine touch and resonate with the people watching your videos.
17. Retro Music Visualization Background Templates
Lyric videos have become increasingly popular, especially among people who don’t speak the native language in the song. You could make your music or lyric video come alive with this free video background template that captures the attention of anyone who watches it.
18. Golden Luxury Background Templates to Make Your Video Elegant
The metallic and golden silk textures in this background scream luxury and can make your viewers feel like they can feel the soft material beneath their touch. You could use this background to create house tour videos or travel vlogs of picturesque destinations.
19. Rainbow Background Template Videos
We haven’t forgotten about the kids, who enjoy watching content online as much as adults. You could get this video background template free of charge and create educational content for the young and capture their attention with bright pastel colors.
20. Moonrise Background Video Template Pack (Downloadable for Free)
The last video background template on our list is the moonrise background, which features beautiful shades of the moon partially shielded from view by delicate clouds. This background is suitable for music videos or spooky content.
How To Change Background in Your Video With Filmora for Desktop
Having seen the great video templates in this article, you might wonder how to use them to edit your videos. Filmora is an example of an efficient editing tool that will take your content from drab to fab. The platform has a desktop version that you can install effortlessly on your device and work on the go.
Below is a simple guide on how to use Filmora to change the background in your videos.
Step1 Launch Filmora on your device and click on the logo to import media from your internal storage. Alternatively, as shown, you could drag and drop the video to the designated region.

Step2 Drag the footage to the timeline as shown below.

Step3 Use the AI portrait tool to eliminate the old background.

Step4 Click on the “Media” tab and type “Background” in the search bar. Peruse through the available options and choose the option that tickles your fancy. Drag and drop the background to the timeline under your footage.

Step5 Adjust the color of the footage to suit your liking and ensure it blends with the background you have chosen. Once you are happy with the outcome, click “Export” to save a copy of the video to your device.

How To Change Video Background With Filmora for Mobile
Filmora also has a mobile app that works best when you want to edit the background of your video using your smartphone or tablet. The app is not all that different from the desktop version, only that it is optimized for mobile users to enhance your experience.
Here is a step-by-step guide on how to change the background of your video using Filmora for mobile.
Step1 Launch the app on your phone and select “New Project.”

Step2 Select the video you want to edit and click “Import.”

Step3 Tap on the “Trim” button to get access to other trimming options.

Step4 Select the “Smart Cutout” button.

Step5 Click on “Remove Background” to remove the existing background in the video you uploaded.

Step6 Navigate to the main toolbar and select “Background.”

Step7 You can choose the stock backgrounds in the app and change the colors as you see fit. Alternatively, you can import a media file from your internal storage to use as a background. If you are satisfied with the new background, tap on “EXPORT” to share the new media on social platforms or save it to your mobile devices.

Conclusion
Your videos can only go viral if you make a valiant effort to post top-tier content. A pro tip when changing the background to your video is to ensure it blends well with the footage to avoid harsh lines that look unprofessional. A little practice goes a long way, and within no time, you will be editing your videos like a pro! Your fans will also notice a significant change in the quality of your videos over time.
Free Download For macOS 10.14 or later
- Simple Video Background Template Pack Free for Download
- Weather Background Template for Your Video
- Download Dance Loop Background Template Video Pack for Free
- Retro Greenscreen Background Templates for Any Video Themes (Download Free)
- Background Template Pack for Horror Videos
- Free Sci-Fi Stage Background Video Templates
- Creative Background Intro Template
- Video Backgrounds for Instagram Videos
- Dynamic Background Templates for Cinematic Videos
- Starry Sky Background Video Templates
- Ink Background Templates for All Kinds of Videos
- Epic Film Backgrounds Video Templates Pack
- Landscape Background Templates Pack
- Background Template Pack for Stock Videos
- Free Abstract Background Templates to Make Your Video Colorful
- Background Templates for Makeup Videos (Free for Download)
- Retro Music Visualization Background Templates
- Golden Luxury Background Templates to Make Your Video Elegant
- Rainbow Background Template Videos
- Moonrise Background Video Template Pack (Downloadable for Free)
- How To Change Background in Your Video With Filmora for Desktop
- How To Change Video Background With Filmora for Mobile
20 Fantastic Video Background Templates for Download
We have now come to the fun part of this article, where we present twenty awesome video background templates from Filmstock . We hope you will find something you like by the time we get to the last one.
1. Simple Video Background Template Pack Free for Download
You can never go wrong with a simple background, free from visual distractions. After all, the main focus should be on the video and no other distracting elements.
2. Weather Background Template for Your Video
If your video has a theme surrounding the sky, thunderstorms, or meteors, then this weather background is the perfect choice. We could never tire of looking at the sky and the serene feelings it elicits.
3. Download Dance Loop Background Template Video Pack for Free
The dance loop background is a powerful, electric display suitable for retro and psychedelic scenes. You could also use this background if your video has lots of stage lighting, smoke, or a disco ball.
4. Retro Greenscreen Background Templates for Any Video Themes (Download Free)
Similar to the previous background, this video template background is a fireball and is sure to make the background of your video light up with excitement. The vibrant colors also make it hard to miss.
5. Background Template Pack for Horror Videos
Horror enthusiasts will love this template because we guarantee it could give your viewers a heart attack. However, if your fanbase is into spooky stuff and the supernatural, go for it!
6. Free Sci-Fi Stage Background Video Templates
Sci-Fi backgrounds are becoming a hit nowadays, especially for dance videos. The neon colors pack a mean punch, and your audience won’t resist clicking on your videos.
7. Creative Background Intro Template
When creating content, creativity is the name of the game. This unique background template has colorful and astonishing geometric shapes to take your video to the next level.
8. Video Backgrounds for Instagram Videos
The tell-tale gradient of colors in the new Instagram logo could make a fitting background for your story or feed, making your rivals go green with envy. However, this background template is also suitable for any video.
9. Dynamic Background Templates for Cinematic Videos
If you have ever been to the cinemas, you understand how grand and immersive the display can be. This video background template gives your videos a similar vibe, engulfing anyone who watches.
10. Starry Sky Background Video Templates
Japanese comics are a fan favorite with their whimsical characters and exciting animations. You could use this starry sky background if you create animated videos and would like to set the mood even further.
11. Ink Background Templates for All Kinds of Videos
Perhaps you want to create a video to commemorate your child’s birthday or a loved one’s wedding day. This ink background template has some beautiful pastel colors and is pretty laid back, making it the perfect choice for family-related videos or the holidays.
12. Epic Film Backgrounds Video Templates Pack
If you post documentaries and factual content, your audience needs to take you a bit seriously. This epic film background is perfect for you as it contains stunning light effects, old paper, maps, and desert and winter scenes to add some oomph to your message and cement it in the viewer’s mind.
13. Landscape Background Templates Pack
Most of the templates we have seen are 2-dimensional. If you want to stand out from the rest, you could edit your videos using this landscape background template with a 3D environment to make your viewers feel like they can touch the waves in the ocean or the mountain’s terrain.
14. Background Template Pack for Stock Videos
Suppose you post educational content teaching your audience about the stock market and other financial matters. This background template video about the stock market is the perfect choice because a starry sky background would simply look out of place. The dominant blue color also sends a subliminal message to your viewers’ subconscious that they can trust you and that your information is reliable.
15. Free Abstract Background Templates to Make Your Video Colorful
If you are making a music video or a fun life hacks video, this abstract background will make your content stand out. The vibrant colors also help your audience enjoy watching your videos and crave more content.
16. Background Templates for Makeup Videos (Free for Download)
A significant percentage of makeup artists honed their skills by watching tutorials online. If you want to start creating makeup vlogs on your channel, it will help to consider this video background template. The delicate colors give your video a feminine touch and resonate with the people watching your videos.
17. Retro Music Visualization Background Templates
Lyric videos have become increasingly popular, especially among people who don’t speak the native language in the song. You could make your music or lyric video come alive with this free video background template that captures the attention of anyone who watches it.
18. Golden Luxury Background Templates to Make Your Video Elegant
The metallic and golden silk textures in this background scream luxury and can make your viewers feel like they can feel the soft material beneath their touch. You could use this background to create house tour videos or travel vlogs of picturesque destinations.
19. Rainbow Background Template Videos
We haven’t forgotten about the kids, who enjoy watching content online as much as adults. You could get this video background template free of charge and create educational content for the young and capture their attention with bright pastel colors.
20. Moonrise Background Video Template Pack (Downloadable for Free)
The last video background template on our list is the moonrise background, which features beautiful shades of the moon partially shielded from view by delicate clouds. This background is suitable for music videos or spooky content.
How To Change Background in Your Video With Filmora for Desktop
Having seen the great video templates in this article, you might wonder how to use them to edit your videos. Filmora is an example of an efficient editing tool that will take your content from drab to fab. The platform has a desktop version that you can install effortlessly on your device and work on the go.
Below is a simple guide on how to use Filmora to change the background in your videos.
Step1 Launch Filmora on your device and click on the logo to import media from your internal storage. Alternatively, as shown, you could drag and drop the video to the designated region.
Step2 Drag the footage to the timeline as shown below.
Step3 Use the AI portrait tool to eliminate the old background.
Step4 Click on the “Media” tab and type “Background” in the search bar. Peruse through the available options and choose the option that tickles your fancy. Drag and drop the background to the timeline under your footage.
Step5 Adjust the color of the footage to suit your liking and ensure it blends with the background you have chosen. Once you are happy with the outcome, click “Export” to save a copy of the video to your device.
How To Change Video Background With Filmora for Mobile
Filmora also has a mobile app that works best when you want to edit the background of your video using your smartphone or tablet. The app is not all that different from the desktop version, only that it is optimized for mobile users to enhance your experience.
Here is a step-by-step guide on how to change the background of your video using Filmora for mobile.
Step1 Launch the app on your phone and select “New Project.”
Step2 Select the video you want to edit and click “Import.”
Step3 Tap on the “Trim” button to get access to other trimming options.
Step4 Select the “Smart Cutout” button.
Step5 Click on “Remove Background” to remove the existing background in the video you uploaded.
Step6 Navigate to the main toolbar and select “Background.”
Step7 You can choose the stock backgrounds in the app and change the colors as you see fit. Alternatively, you can import a media file from your internal storage to use as a background. If you are satisfied with the new background, tap on “EXPORT” to share the new media on social platforms or save it to your mobile devices.
Conclusion
Your videos can only go viral if you make a valiant effort to post top-tier content. A pro tip when changing the background to your video is to ensure it blends well with the footage to avoid harsh lines that look unprofessional. A little practice goes a long way, and within no time, you will be editing your videos like a pro! Your fans will also notice a significant change in the quality of your videos over time.
Featuring The Use of Camera Shake in Creating the Best Videos
Camera shake effects in videos showcase the instability effect. Capturing real-time camera shake videos is not an easy thing. Even professional photographers need to give more input to get beneficial output. However, you can easily find ready-made camera shake effects in this content to drive the world.
Don’t panic if you don’t know the tools to accomplish this task because Wondershare Filmora got you covered in this scenario. By the end of this article, you will learn how to add camera shake effects in videos with Filmora and another impressive editor named Premiere Pro.
Part 1: Why Should You Involve Effects in Your Videos During Video Creation?
Do you know that you can create more engaging and appealing video content by adding effects to it? Here are some benefits of using effects in your video content which you should know:
1. Quality Visuals
Your content’s visual quality can be increased using different appealing effects. These effects can make your content more eye-catching and engaging. You can use many effects in your visual content. This includes transitions and remarkable filters that can grab the viewer’s attention.
2. Innovative Presentation
If you want to express creativity in your content, using effects is a good option. This is because effects allow you to add uniqueness to your content. You can reflect your style and creativity with the help of these effects. Experimenting with different effects can help you to create unique content.
3. Emotional Resonance
With the help of different effects, you can grab the attention of your viewers. This way, you can easily convey your story or message to them effectively. Effects help you to create an atmosphere that helps to convey emotions beautifully.
4. Showcase of Professionalism
Effects give your videos a very professional look that can engage your audience. Using effects in the right way can help you showcase your production value. This can leave a very positive impact on your audience’s mind. So you can establish a good connection with them as a content creator.
5. Audience Retention
Well-placed effects can help you keep your audience interested in your visual content. They can make your video look more enjoyable and maintain good engagement with your viewers. Eventually, this will also improve your audience retention.
Part 2: Wondershare Filmora: An Epitome of Perfection in Video Editing
Do you wish to make professional-level edits in videos and want to add the smoothest camera shake effects? Nothing to be worried about because you can accomplish this goal with Wondershare Filmora . This video editor helps you make captivating edits and reinforce executive effects.
Camera Shake Effect Editor Add camera shake effects in videos with Wondershare Filmora and Premiere Pro to make cool and unique videos.
Free Download Free Download Learn More

Camera shake videos are not easy to make, and you must invest maximum time and effort to finish the work. Yet, this can be easy if you intend to utilize the feature-rich tool named Wondershare Filmora. This video editor offers timeline-based editing along with a non-destructive procedure.
You also get the fullest control over the video metrics, such as format, dimension, and length. Other than this, you can also select multiple stock media assets. As it has integrations with Giphy, Unsplash, Pexels, and other third-party media libraries, you will not face any issues.
Key Features of Wondershare Filmora
01of 04
Filmora supports integrations with ChatGPT which enhance the usage of the AI Copywriting feature . Through this, you can get inspiring AI-generated content to express better in a limited time.
02of 04
Unrequired silenced intervals in videos impact the video quality in a bad way. To cater to this, Filmora offers you to use its Silence Detection feature to get rid of silenced intervals from videos.
03of 04
You can break the monotony and correct all the colors in the color-disruptive videos. Over 40+ color presets are present in Filmora, which can make videos more outclass.
04of 04
There are more than 70 AI portraits and sticker effects added in Filmora. By this, you can remove the background from videos without affecting humans in videos.
Part 3: Create a Camera Shake Effect Using Premiere Pro
Premiere Pro stands in the top video editing platform in today’s digital market. The video editing intuition helps users develop professional videos that are of the highest quality. It integrates some of the finest functions, making it easy for users to create camera shake effect videos. To know how it is created through Premiere Pro, follow the camera shake effect Premiere Pro steps:
Step 1
In the “Effects” section on the bottom-left of the screen, look for the “Transform” effect and drag it onto the imported video.

Step 2
Continue to the effects settings that open on the top-left section of the Premiere Pro screen. Change the “Scale” and set the “Position” keyframes on the left and right side of the video frames. Do this for the frames throughout the video in Premiere Pro.

Step 3
For adding motion blur in your camera shake effect video, uncheck the “Use Composition’s Shutter Angle” and set it to “360” degrees. This completes the camera shake, which can be easily exported to the computer.

Part 4: A Step-by-Step Understanding of How To Create a Camera Shake Effect with Filmora
Now that you know the outclass capabilities of Filmora, you must be wondering about the procedure of adding a camera shake effect in videos . The instructions to make the camera shake video with Filmora are discussed here for you:
Filmora Tutorial - How to Add CAMERA SHAKE Effects to Your Videos
Free Download For Win 7 or later(64-bit)
Free Download For macOS 10.14 or later
Step 1Add Video File in Filmora
To make the camera shake video with Filmora, install and open Wondershare Filmora on your device and hit the “New Project” option. Next, tap the “Click here to import media” button and then locate the video in which you want to add the camera shake effect. After importing the video, drag it to the “Timeline” to enable editing.

Step 2Add Camera Shake Effect
To add a camera shake effect, go to the “Effects” tab and click “Search Bar.” Next, search for an appropriate camera shake effect and hit the “Download” icon on the effect of your choice. Once the effect is downloaded, drag it on the video in the timeline and customize it as needed.

Step 3Export Camera Shake Video
Finally, go to “Export” and manage “Format,” “Preset,” “Frame Rate,” and other parameters of the video. Next, hit the “Export” button to save the video on your computer.

Conclusion
As discussed in this article, you can add a camera shake effect in videos to make them cinematic standards. Several reasons tell us why adding effects in videos is essential, and you can find some of the most relatable reasons above.
Moreover, Filmora can add exquisite level camera shake effects in videos, and you can also find the procedure for accomplishing this task from the above discussion. You have also worked on a method showing how to make a camera shake effect in Premiere Pro.
Free Download Free Download Learn More
Camera shake videos are not easy to make, and you must invest maximum time and effort to finish the work. Yet, this can be easy if you intend to utilize the feature-rich tool named Wondershare Filmora. This video editor offers timeline-based editing along with a non-destructive procedure.
You also get the fullest control over the video metrics, such as format, dimension, and length. Other than this, you can also select multiple stock media assets. As it has integrations with Giphy, Unsplash, Pexels, and other third-party media libraries, you will not face any issues.
Key Features of Wondershare Filmora
01of 04
Filmora supports integrations with ChatGPT which enhance the usage of the AI Copywriting feature . Through this, you can get inspiring AI-generated content to express better in a limited time.
02of 04
Unrequired silenced intervals in videos impact the video quality in a bad way. To cater to this, Filmora offers you to use its Silence Detection feature to get rid of silenced intervals from videos.
03of 04
You can break the monotony and correct all the colors in the color-disruptive videos. Over 40+ color presets are present in Filmora, which can make videos more outclass.
04of 04
There are more than 70 AI portraits and sticker effects added in Filmora. By this, you can remove the background from videos without affecting humans in videos.
Part 3: Create a Camera Shake Effect Using Premiere Pro
Premiere Pro stands in the top video editing platform in today’s digital market. The video editing intuition helps users develop professional videos that are of the highest quality. It integrates some of the finest functions, making it easy for users to create camera shake effect videos. To know how it is created through Premiere Pro, follow the camera shake effect Premiere Pro steps:
Step 1
In the “Effects” section on the bottom-left of the screen, look for the “Transform” effect and drag it onto the imported video.
Step 2
Continue to the effects settings that open on the top-left section of the Premiere Pro screen. Change the “Scale” and set the “Position” keyframes on the left and right side of the video frames. Do this for the frames throughout the video in Premiere Pro.
Step 3
For adding motion blur in your camera shake effect video, uncheck the “Use Composition’s Shutter Angle” and set it to “360” degrees. This completes the camera shake, which can be easily exported to the computer.
Part 4: A Step-by-Step Understanding of How To Create a Camera Shake Effect with Filmora
Now that you know the outclass capabilities of Filmora, you must be wondering about the procedure of adding a camera shake effect in videos . The instructions to make the camera shake video with Filmora are discussed here for you:
Filmora Tutorial - How to Add CAMERA SHAKE Effects to Your Videos
Free Download For Win 7 or later(64-bit)
Free Download For macOS 10.14 or later
Step 1Add Video File in Filmora
To make the camera shake video with Filmora, install and open Wondershare Filmora on your device and hit the “New Project” option. Next, tap the “Click here to import media” button and then locate the video in which you want to add the camera shake effect. After importing the video, drag it to the “Timeline” to enable editing.
Step 2Add Camera Shake Effect
To add a camera shake effect, go to the “Effects” tab and click “Search Bar.” Next, search for an appropriate camera shake effect and hit the “Download” icon on the effect of your choice. Once the effect is downloaded, drag it on the video in the timeline and customize it as needed.
Step 3Export Camera Shake Video
Finally, go to “Export” and manage “Format,” “Preset,” “Frame Rate,” and other parameters of the video. Next, hit the “Export” button to save the video on your computer.
Conclusion
As discussed in this article, you can add a camera shake effect in videos to make them cinematic standards. Several reasons tell us why adding effects in videos is essential, and you can find some of the most relatable reasons above.
Moreover, Filmora can add exquisite level camera shake effects in videos, and you can also find the procedure for accomplishing this task from the above discussion. You have also worked on a method showing how to make a camera shake effect in Premiere Pro.
Windows Movie Maker Review
Are you considering creating impressive movies from your video clips? Then you need to install this famous Windows movie maker tool to fulfill your job. This is expert video editing Microsoft software that you may use for free. This video editing tool by Windows has received massive recognition due to its simplicity. Also, it makes every task easy and quick, like combining video clips to form digital movies, including various effects, background music, transitions, and titles.
So, Windows Movie Maker is undoubtedly the ideal software for this job. Moreover, video editors using this app experience several attributes in their organization to finally emerge with the perfect videos, like audio options, animations, transitions overlays, and timeline narration. It has user-friendly features, which you’ll enjoy experimenting with. This software also has XML code allowing its end users to modify live effects and transitions or even prepare very new ones.
This brilliant tool can even do primary track editing, including fade-out and fade-in effects in your final audio tracks. Windows movie maker even allows you to post your final project effortlessly on various video sites and social media platforms. Here’s a complete guide:
1. Download and Install Windows Movie Maker
Windows movie maker was previously recognized in Windows 7 as Windows Live Movie Maker. So to experience the features of this software, first, you need to download and install this app which is available free of charge. The steps are as follows.
- Firstly, download the setup file of Windows Live Essentials.
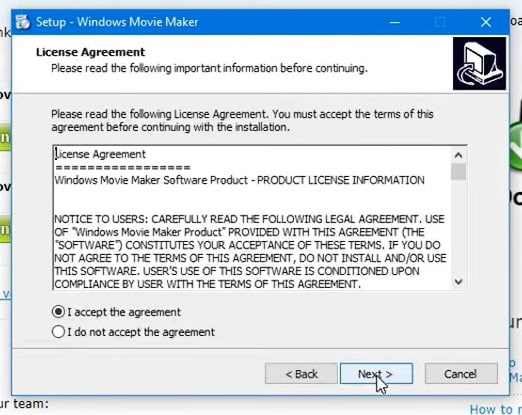
- You’ve to double-click on this setup file called windows-movie-maker.exe. Then tap on ‘Yes’ to permit the setup package to function.
- You’ll now be redirected to the installation window of Windows Essential. Next, you’ll see two options towards the web page’s top, and you’ll have to select the option ‘Install all of Windows Essentials (recommended)’ to continue with the installation process.
Windows Essentials comprise Microsoft OneDrive, Outlook Connector Pack, Movie Maker, Writer, Mail, Photo Gallery, and Messenger.
- Locate ‘View Details’ towards the left end of the page and tap on it. A progress and percentage bar will pop out along with the details regarding the program you’re installing.
- You need to wait a while to install Windows Movie Maker Software. Pause until the program completes its installation. After you find that the program title changes to another program such as Mail, you may proceed again.
- Now click on the Windows icon and then the ‘Start’ menu on the bottom left of your computer screen.
- Type and Search for ‘Windows Movie Maker, and you’ll find the newly downloaded app on the screen.
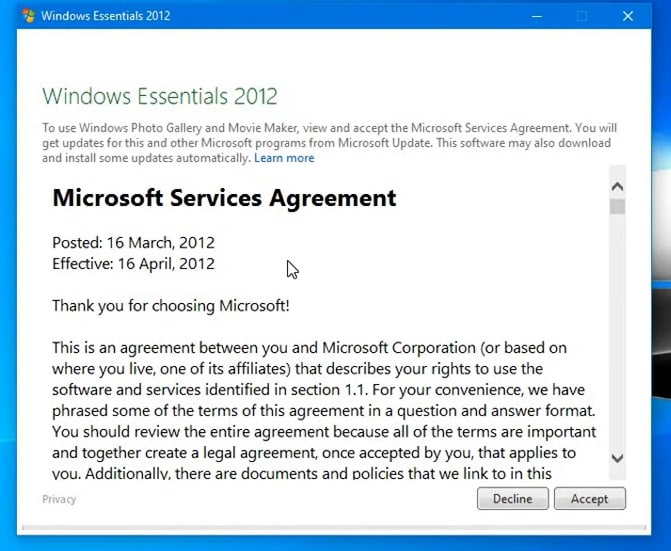
- Click on the icon with film reel, which is the Movie Maker app, and you’ll locate it above the Start menu. Next, you’ll be redirected to the terms of use of Windows Essentials for this Window to begin.
- Find the ‘Accept ‘ button towards the screen’s right-end corner and tap on it. Windows Movie Maker will now open.
- Next, tap on ‘Close’ when prompted with an error message from the installation windows.
You may now Enjoy Windows Movie Maker Live and begin making movies and videos using this software.
2. Interface
The user interface of Winona Movie Maker has three essential areas: the timeline and the storyboard, the panes and the toolbar, and the menu bar. This area covers…
- Timeline and storyboard: It offers a timeline and storyboard usage details for working with the current project clips.
- Panes: It offers details regarding Collections pane usage for viewing all your collections. Furthermore, it offers information regarding the Movie Task pane for all general tasks during movie making or project editing.
- Toolbar and Menubar: Here, you’ll get details regarding toolbar and menu commands usage for different tasks in this software.
3. Basic Editing
Adding clips to your timeline is the most straightforward method for creating digital movies using Movie Maker. Thereby, picking any one AutoMovie Themes out of those seven choices from default, sepia, black and white, pan and zoom, fade, cinematic, and contemporary.
You can enjoy the following choices for editing all your video clips:
- Creating clips: You may create new clips from different video clips after you’re done with capturing and importing in the Windows Movie Maker. You may create clips in the software anytime, according to your convenience.
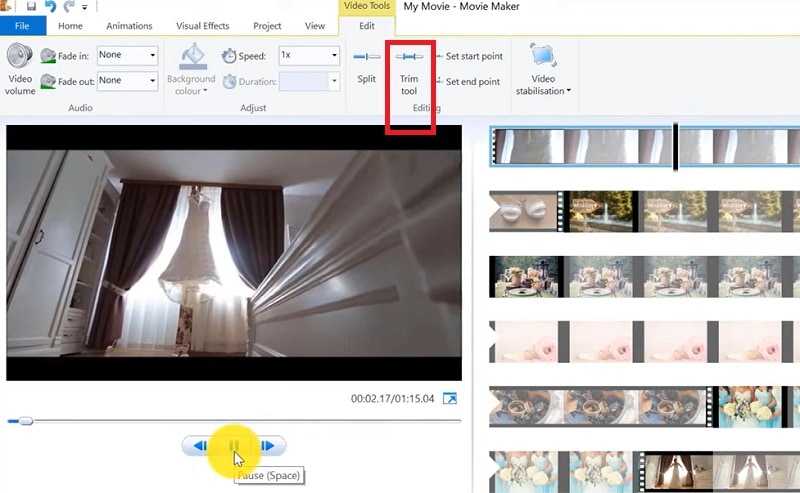
- Trimming any clip: You may hide any clip part you don’t wish to keep in the project. For instance, you may trim the clip’s end or beginning. Also, trimming doesn’t erase the details provided in their source material.
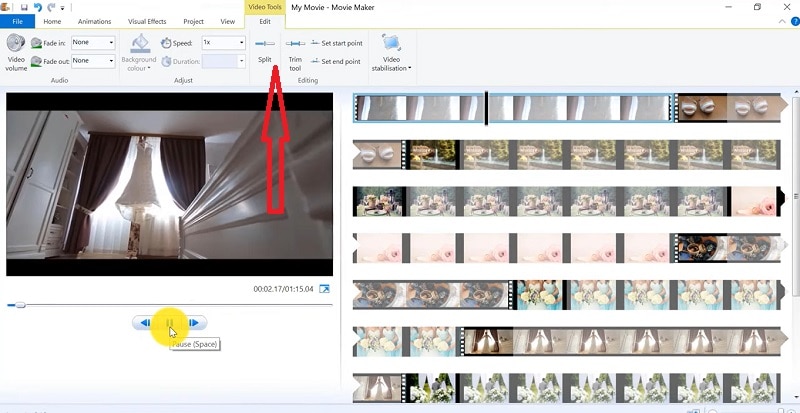
- Splitting Clips: Movie Maker allows you to split any video into two parts which can be helpful when you wish to add a video transition picture between the clips.
- Combining clips: Movie Maker allows you to merge two or multiple contiguous clips. Contiguous indicates that you need to record these clips together so that the beginning and end times are the same as the following video clip.
4. Add Video Effects
Video effects’ ascertain how any title, picture, or video clip displays in the final movie or project. Video effects permit you to include various effects in the movie and are added for the total time that the title, picture, or video clip displays.
Furthermore, you may add various other effects, which you’ll find in the folder of video effects in their Collections pane. You may maintain video effects when moving, copying, cutting, or splitting a picture or video clip.
5. Audio Editing
Windows Movie Maker permits you to operate various audios in several ways. A few specific audio-related jobs you may execute in Windows Movie Live Maker comprise the following:
- Audio levels adjustment: You can adjust your audio level so that you can easily control the audio playback and balance after you have the audio that comes up on Music/ Audio and Audio tracks in your timeline.
- Timeline narration: You may include a voice narration for the picture or video clips, which will appear on the timeline’s video track. There’ll be an automated synchronization of the audio narration with your video, where the narration shall elaborate on the movie event or action when you play it.
- Audio Clips Volume adjustment: You may adjust the audio volume for the video clip’s audio portion or the clips containing only audio. This permits you to control the audio clip’s volume such that you can hear it based on the sound level you’ve set for your audio clip.
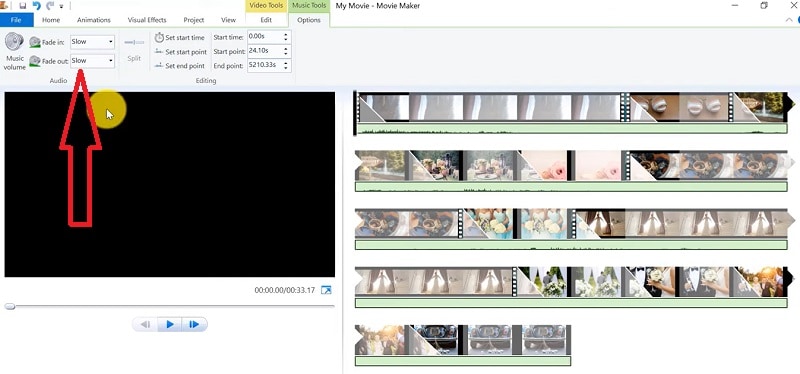
- Adding audio effects: You may add various audio effects like mute, fade out and fade in.
6. Share Files
Are you done with video project editing, and now you wish to share it? Windows Movie Maker offers you various choices for sharing straight away from their app, comprising:
- YouTube
- Vimeo
So with this power, you may guarantee to share the video’s correct aspect ratio and size version to any planned platform. Nevertheless, you don’t require signing in to your Microsoft account for sharing to the preferred platform, which may act as a hurdle for all its users who do not have Microsoft Office accounts.
7. Pros and Cons
The software’s advantages are its automated preview, simple controls, and user-friendliness. Additionally, the following are some clear advantages and disadvantages of using Windows Movie Maker:
Pros
- This app is perfect for all novices and is an ideal introduction as it utilizes several pro editing systems’ general workflow components like assembling timelines and importing. Its interface has easy navigation and is exceptionally intuitive for most new beginners as well.
- Windows Live MovieMaker is a video editing Microsoft application that arrives standard with all Windows computers. It is amongst the most favorite editing apps obtainable and exact, as other programs are user-friendly and fun. This software comes free with Vista, XP, and Windows Me and has effortless usage. Moreover, you may download additional video plugins, plus it won’t give you any chance to complain regarding its free software.
- This app is straightforward to learn, and you won’t require any experience in film editing for using Windows Media Player. You’ll explore more than 130 effects with accessible Fantastic credits, titles, and transitions. Next to this, you may drag and then drop the clip at any place in the timeline.
- Windows Movie Maker is an ideal app for image slide shows and was developed to create photo and home movie slide shows. It presents excellent fun transitions and themes; you may add music easily. This app provides excellent variety, being a free editing application. Furthermore, it offers transitions and striking effects to function with.
- Windows Live Movie Maker is free of cost for all Microsoft Windows users and is basically for clients having zero to minimum experience editing audio and videos. Moreover, it has many special effects you may use while creating videos. Also, you may frag and then place any picture or video anywhere you wish to see it.
- You can choose from several themes, enhancing your film with tools like contemporary themes, fade effects, and sepia toning choices. You have to click once, and then the users can choose and apply from the multiple effects collection.
Cons
- Windows Movie Maker contains unlimited audio and video tracks, yet it provides just one accessible one at a time. Hence, if you wish to include some other audio or music track, you may prepare the video, thereby sending it to the ultimate file.
- It isn’t uninstallable using any remove or add control panel. Also, it is impossible to do video overlaying.
- This app requires much patience because it is prone to crashes. Moreover, you’ll require enough time and effort to do video reversing. It often becomes frustrating for all advanced editors to cut clips into small parts and then add them back. Hence, Windows Movie maker isn’t good for professional video editors.
- Windows Live MovieMaker can crash and freeze and is known to suffer frequent crashes. Hence, ensure saving often and avoid creating complex videos. Also, you cannot perform complex editing and can now prepare single audio and video track.
8. Windows Movie Maker Alternative Software
Wondershare Filmora Video Editor is the best alternative for Windows Movie Live Maker and is a highly favored and most effective software program. You can download it for free, and it is adaptable with Windows 7 OS or above. This app is user-friendly but powerful and allows you to split, merge, crop, and trip various video clips with essential built-in video editing attributes.
Free Download For Win 7 or later(64-bit)
Free Download For macOS 10.14 or later
Additionally, you may get a few advanced properties like video stabilization, color correction, and green screen in Filmora effortlessly. You may even explore several fashionable and modern video effects such as music, text, and intros for topics like games, Education, Travel, Vlogger, Beauty, etc. Here is the comparison between the two software:
Filmora and Windows Movie Maker comparison
| Basis | Windows Movie Maker | Wondershare Filmora |
|---|---|---|
| Pricing | Free/ inexpensive | Quote basedAnnual SubscriptionOne-time paymentMonthly Payment |
| Interface | Pleasing interface | Auto movie options |
| Effects | Several overlays and effects | Special effects choices and transition overlays |
| Integration | YouTubeFacebookVimeoEmail | TwitterInstagramFacebookVimeoYouTube |
Conclusion
You may use Windows Movie Maker Live for capturing videos and audio to the computer using various video sources, including Web Cameras and Video Cameras, thereby using the recorded data in your new movies. You may import still pictures, video, and audio into this application to use in the movies you’re making. Moreover, after you’ve finished with video and audio content editing in this app, which may involve adding effects, video transitions, and titles, you may finally save the ultimate movie and then share and watch it with your family and friends.
Also read:
- New 2024 Approved How To Quick Guide for Making Google Slideshows
- Hitfilm Express - A Guide to Download, Install, Key Features for 2024
- Updated 2024 Approved Get The Perfect Drone Footage With Free Drone LUTs
- In 2024, This Article Is a Guide on How to Download and Install Final Cut Pro, Its Key Features, and More. It Also Discusses an Alternative Option to It so the Creators or Editors Can Opt for Editing Videos Accordingly
- New How to Resize FLV Video EfficientlyWindows, Mac, Android, iPhone &
- Doable Ways to Create Transparent Background in Procreate
- New 10 Best Cartoon Video Makers (Online and Desktop Solution) for 2024
- 2024 Approved How To Blur The Video Background in After Effects
- New Discover the Top 10 Video Editing Apps with Templates for Professional-Grade Results. Edit Like a Pro with These Tools
- 2024 Approved Want to Buy a Drone for Better Videography Creating? This Article Will Review 6 of the Best Drones on the Market for You to Consider
- Updated 2024 Approved How to Get VHS Filter and Glitch Filter to Your Images or Videos?
- Updated In 2024, Add Text Animation to A Video Online
- Updated Are You Ready to Learn About Something Free yet Amazing? We Are Talking About All Format Video Players for PC that You Should Know , Lets Begin
- 2 Ways to Fade in Text in Premiere Pro for 2024
- Use Mobile Phones to Shoot a Video Is Very Convenient Compare with Professional Cameras. In This Article, Well List You some Tips to Help Capture a High-Quality Video on Your Phone
- How to Create a Light Sweep (Shine) Effect for 2024
- New How to Make a Smooth Speed Ramping in Premiere Pro, In 2024
- New In 2024, 10 Catchy Pixel Art Wallpapers and How to Custom Your Own
- What Is TS Format and How To Play TS Files? Basic Tips
- 2024 Approved How to Merge Audio and Video Using FFmpeg
- In 2024, Learn to Use Montage with These Movies
- 2024 Approved Introduction to LUTs Their Overview and Benefits
- How to Make Subtitle Videos
- 2024 Approved This Article Aims to Provide a Step-by-Step Guide to Changing a Videos Speed by Using the Speed Adjustment Panel and Duration Panel on Wondershare Filmora
- New Read and Learn How to Convert a Slow-Motion Video to Normal in This Guide. Besides, Find the Best Desktop Solution to Adjust Video Speed Quickly and Easily
- In 2024, Repeated Text Animation Tutorial in Filmora
- New Top 4 Free 3D Intro Maker to Use
- Updated 3 Ways to Make Time-Lapse Video on MacBook
- Top Fixes to Resolve Issues with Premiere Pro Slow Playback
- A Guide to Understanding Efectum App and Some Top Alternatives
- New Discover the Best Video Filter Software . Elevate Your Video Editing with Top Contenders Like Filmora, DaVinci Resolve, HitFilm Express, and More
- New Replacing Sky Background Using Adobe Photoshop A Comprehensive Guide
- 2024 Approved How to Use Twixtor Effect to Add Slow-Motion Effect to Video?
- 8 Tips to Apply Cinematic Color Grading to Your Videos
- Updated In 2024, How to Zoom Video in VLC Media Player
- 2024 Approved Detailed Tutorial to Crop a Video in KineMaster
- New Detailed Tutorial to Merge Videos in VLC Media Player
- A Comprehensive Review of LUTs Finding LUTs Made by Danny Gevirtz for 2024
- REVIEW Whats Best 10 Software to Make AI Upscaling Video for 2024
- New How Long Does It Take To Edit A Video
- New 2024 Approved Everything About Adding Effects In Kinemaster
- In 2024, How to Unlock Apple iPhone 8 with a Mask On
- For People Wanting to Mock GPS on Infinix Smart 8 Plus Devices | Dr.fone
- In 2024, How to Transfer Contacts from Vivo T2 5G to Outlook | Dr.fone
- In 2024, Is pgsharp legal when you are playing pokemon On Motorola Moto G Stylus (2023)? | Dr.fone
- The way to get back lost videos from ROG Phone 8 Pro
- Tips and Tricks for Apple ID Locked Issue From Apple iPhone 12
- Fixing Foneazy MockGo Not Working On Samsung Galaxy M34 | Dr.fone
- How To Use Allshare Cast To Turn On Screen Mirroring On Realme C33 2023 | Dr.fone
- Hassle-Free Ways to Remove FRP Lock on Vivo Y77t Phones with/without a PC
- Can Life360 Track Or See Text Messages? What Can You Do with Life360 On ZTE Nubia Z60 Ultra? | Dr.fone
- Strategies for Apps That Wont Download From Play Store On Motorola Edge 40 Neo | Dr.fone
- In 2024, How to Track OnePlus 11 5G by Phone Number | Dr.fone
- 7 Solutions to Fix Chrome Crashes or Wont Open on OnePlus 11R | Dr.fone
- How To Exit Recovery Mode on Apple iPhone 6s? | Dr.fone
- In 2024, How To Bypass iCloud Activation Lock on Mac For Apple iPhone 8 Plus?
- Best 10 Mock Location Apps Worth Trying On Meizu 21 | Dr.fone
- In 2024, Top 10 Fingerprint Lock Apps to Lock Your Vivo X Flip Phone
- Title: New Want to Have Slow Zoom Effect in Your Video? We Will Illustrate How to Apply Slow Zoom Effect to Your Video on Your Smartphone, Computer, and TikTok
- Author: Chloe
- Created at : 2024-04-24 07:08:24
- Updated at : 2024-04-25 07:08:24
- Link: https://ai-editing-video.techidaily.com/new-want-to-have-slow-zoom-effect-in-your-video-we-will-illustrate-how-to-apply-slow-zoom-effect-to-your-video-on-your-smartphone-computer-and-tiktok/
- License: This work is licensed under CC BY-NC-SA 4.0.
