
:max_bytes(150000):strip_icc():format(webp)/mixed-race-woman-buying-christmas-presents-online-with-credit-card-84527986-582352235f9b58d5b1ea09cc.jpg)
New Want to Skip the Typing Hustle with a Convenient and Instant Conversion of Your Words Into Text? Stay Here to Learn About some Irresistible Software Solutions to Address the Concern
Want to Skip the Typing Hustle with a Convenient and Instant Conversion of Your Words Into Text? Stay Here to Learn About some Irresistible Software Solutions to Address the Concern
How Can You Deny These Best 10 Free Speech to Text Software
An easy yet powerful editor
Numerous effects to choose from
Detailed tutorials provided by the official channel
In this article
01 [What is the Speech to Text App?](#Part 1)
02 [Why is Speech to Text App Getting Popular?](#Part 2)
03 [10 Best Speech to Text Apps That Will Help Translate from Speech](#Part 3)
04 [How Can We Get Text-to-Speech Then?](#Part 4)
05 [Speech to Text Q&A](#Part 5)
Best Speech to Text Software Save plenty of time on transcribing subtitles and boost your editing efficiency by applying Filmora Speech-To-Text.
Try STT Now Try STT Now Explore STT

Part 1 What is the Speech to Text App?
In today’s busy schedules of personal and professional routines, most of us have a common habit of running away from entering lengthy text inputs to adhere specific concerns on smartphones and desktops. It is an obvious fact that given a choice to voice out or type, the former would bag in a considerably higher number of votes.
Having a technology backup, it is now practically possible to convert your voice commands into text with utmost ease, thanks to the advent of reliable speech to text applications. The utility works to transform the words you speak, into an exact text representation, thus saving both, your time and energy. Such applications work on the principle of responding to speech recognition requests and processing the same to render an equitable text output.
The required audio information is sent across a synchronous request to process the different sound pieces, one at a time. When all such pieces are processed and recognized, the text response is generated to the credit of the user. Talking of the device and platform compatibility of such applications, you can comfortably work on them in either of your system based, or mobile devices with an equal efficiency.
Browsing through the IT market, you may however land across exclusive as well as implicit choices to work on your preferred deices. While there are some smartphone specific speech-to-text applications, others may have a good compatibility with desktops and PCs. Moving ahead, there comes a third category of software ranges that is all set to work with smartphones as well as desktop systems.
Part 2 Why is Speech to Text Apps Getting Popular?
Talking in the light of personal credibility and usage, the speech to text apps may often be recognized as having limited application diversity, but the instincts are not same on the professional front. Entering deeper into the domain, there are fields like digital marketing and content planning that are reported of having a considerable dependency on such applications and utilities. Some of the pivotal reasons in support of the credibility are described as follows:
● Improving Work Efficiency
Talking specifically in line with the professional organizations that are greatly centered on text based working modules, or follow an extraneous typing and writing work pattern, the speech to text conversion facility is no less than a fantastic rescue to the tiresome sessions of spending time on fidgeting with PC and laptop keyboards.
Not only do such applications work towards lightening up the system exposure burden, but also facilitate a quick workability that further caters to increase the efficiency and work performance of the organization’s workforce. This in turn results in a fast and efficient addressing of the various types of text based operational concerns.
● Improvise Content Marketing Strategies
When the discussion is centered on devising high end and advanced level content marketing proposals and strategies, the speech to text facility can go a long way. You can work with such platforms to take quick and smart professional suggestions from the web within the blink of an eye, instead of typing the entire array of words and text to explain your point.
Such applications further work to modernize your content and data search habits, which may in most cases, can indirectly cause a refinement of your searches, thus facilitating you with a more exact and strategic content that affordably fits in the line of your market requirements. The bottom line is, such applications are on the way to increasing their professional credibility in cohesion with the modern day trends of the professional world.
● Academic and Media Centered Utilities
Speech to text application offers an extended credibility with respect to academic and educational requirements. Students can take advantage of the facility to quickly convert memos and lecture dictations into quick text files. Under the circumstances of working with audio and sound files, you can conveniently transform the audio transcriptions into viable text files with an almost instant effect.
When working on media centered projects, you can pick these applications to supplement your sound based contents with automatic titles and captions. The apps also come handy in converting lengthy dialogue audios into readable text so that you can understand and learn the same at your own convenient pace.
In the specific situations of creating text documents to supplement your project work in the absence of your PC or desktop, you can rely on these utilities to effectively create extensive text files with quick voice inputs.
Part 3 Best Speech to Text Apps That Will Help Translate from Speech
By far, you have become quite familiar with the functionality and significance of working with speech to text applications to a notable extent. While having an understanding of such utilities is one aspect, the real essence lies in having hands on experience with using the same in practical situations. When aiming to work towards the concern of using such facilities to expand your professional capabilities, it is of great important to make the right selection.
Moving along the line, here is a discussion of some top rated speech to text applications that you can choose to work with for a smart display of your professional expertise and efficiency in what follows next:
01Dragon Anywhere
Free Trial Period: days
Accuracy Rate: 99%
Starting with the list, there is the Dragon Anywhere application which you can reliably pick to effectively sort out your concern of converting text to readable text. The app is essentially a smartphone compatible utility, which was launched by the Nuances software development company as an allied facility of its desktop compatible speech to text conversion program to work on mobile devices.
The app comes to you as a complete package of dictation facilities that work well with your Android and iOS devices. Examining the app’s credibility in the line of its desktop counterpart, you may notice a minimal amount of lag between the input speech and output text. The underlying reason behind this delay is however, the obvious processing time frame of the cloud facility. Neglecting the same, the app works effectively to respond to the aforesaid conversion requirements.
The app further extends its utilities by allowing you to add text within a document file through its boilerplate functionality that creates chunks of the specific text that requires an insertion. All you need to do is enter a quick command and that’s really it. An additional appeal of working with the application is the extensive set of customized vocabularies that are rendered complementary with the app, along with having a convenient synchronization with their desktop compatible software.
Pros
● Recognizes your speech in an affordable quality
● Syncs perfectly with its desktop counterpart
● Loaded with a diverse range of functionalities
Cons
● Offers a limited dictation facility
● The speech recognition process has a logging factor
● Free version is available for a limited period.

02Otter
Free Trial Period: hours
Accuracy Rate: 99%
If you are on the search of an affordable smartphone centered solution to address your day to day business documentation and dictation requirements, this aforesaid is your go to application. Designed explicitly to cater the professional needs of experienced and mainstream corporate users, the tool is a cloud oriented mobile utility to work through real-time transcription, while catering the additional needs of editing, organizing and searching documents or playing audio files.
The major functionality of the application lies with sorting out the documentation requirements of interviews, lectures and meetings to pull off the concern of taking quick notes. You can further work with the app to run coordinated meetings and conferences with a collaborated group of members within a particular profile. This is brought about by assigning unique speaker credentials for a quick and convenient understanding of audio and text transcriptions.
You can work with the application by opting one of the 3 access options, 2 of which are paid subscriptions, while the remaining one is free for a limited period. The app comes with a comprehensive wordcloud and updated keyword summaries for an easy search through of specific subjects. The application grants you the liberty to share and organize text documents, import audio-visual elements for transcription purposes and much more.
Pros
● This speech to text app allows you to add live captions to your audio transcripted texts
● You are facilitated with a host of platform choices to export the documents directly
● The tool is readily compatible with team collaborations
Cons
● The application lacks a live chat facility
● The working interface is quite dated
● Free trial period is very short

03Verbit
Free Trial Period: hours
Accuracy Rate: 99%
Designed specifically for educational and enterprise centered applications, Verbit is a high end and intelligent speech to text converter utility that works to facilitate automatic captioning and transcriptions through artificial intelligence. Delivering a high speed transcription output, the efficiency of this upgraded application is way beyond the exclusively manual transcription facilities.
Talking of the operational methodology, the utility works to cater an excellent audio transcription by creating a mixture of speech modules through artificial intelligence algorithms and neural networks. These sophisticated models work to adapt the specific characteristics of the audio files, followed by the creation of a new series of linguistic, contextual and acoustic event modules.
Additional merits of using the application for transcribing speech centered audio are the elimination of background noise, recognition of speakers with different accents, integration of context based events, such as company information, news, etc., into recorded audio tracks. While the application hosts a free live version to caption and transcript the speech audio with an affordable accuracy rate, the paid versions promise of 100% accuracy to transcribe audio files into text.
Tracking the transcription process becomes highly convenient with the application’s real-time status update facility available through the Verbit Cloud Portal. The utility further supports a series of third party platforms that facilitate a convenient and quick distribution of the transcripted outputs.
Pros
● The application extends a high speed and accurate transcription service
● The utility houses an elaborated range of tools to caption videos
● The smart AI feature facilitates an expanded range of services to complement the transcription process
Cons
● The application’s multi-linguistic feature can be improved
● The utility’s free version is a limited period facility
● The pricing plans of the application are available on an individual basis

04Speechmatics
Free Trial Period: days for 10 hours
Accuracy Rate: 83%
Moving ahead with the list, Speechmatics is another effective speech-to-text conversion utility that works with the aid of machine learning to address the concern of transcribing audio files. Using an automated speech recognition advantage, this application is greatly preferred for creating text based transcriptions of audio-visual files on a free as well as paid subscription.
The application works in good cohesion with all popular British accents, beyond the constraints of nationality. You can prefer the utility to create audio transcriptions in British and American English, in addition to the Jamaican and South Asian accents. Offering a relatively higher count of speech to text conversion facilities and services, the Speechmatics application stays ahead of its counterparts in catering to the aforesaid concern.
A few of the major conversion services extended by the application include the transformation of phone recordings in a call center and transcribing them into Word files and text based information that can be searched across the web. You can further integrate the application to work with different types of audio-visual media to add captions and use keyword triggers for managing a series of allied operations.
Pros
● The application boasts of landing among the most power packed transcription engines
● The utility possesses the smartest integration of artificial intelligence through a responsive machine learning ability
● The application comes with a free version to examine the latter’s credibility before a purchase
Cons
● The application does render any out of the box means to carry out the audio transcription process
● The unpaid version of the tool has a limited period validity
● The paid subscription of the app is quite high on price

05Braina Pro
Free Trial Period: days
Accuracy Rate: 99%
Establishing itself as a world class speech to text converter application, Briana Pro is a web based utility that works with the Google Chrome browser. Functioning as a one stop solution for adhering to the most widespread concerns of digital assistance and dictation, ahead of the speech recognition facility, this one is quite a reliable voice recognition tool. Working with the application, you can dictate information in 90 different languages, other than English, to a varied range of third party programs.
The voice recognition capability of the app is nowhere to be questioned with a remarkable accuracy of 99%. The application additionally caters to sort out the functionalities of setting alarms, hosting a file search within your device or across the web, playing MP3 files, reading eBooks clearly, etc., along with adhering to a series of customized commands.
What’s most appealing about the program is the latter’s dual compatibility with Windows systems and Android smartphones. About the credibility of the Android application, you can work with the latter for remotely controlling your system. The utility can also be implemented to deliver function centered commands to the same through a localized Wi-Fi network.
The application grants you the liberty to test the credibility of its speech recognition tool by offering one week free trial facility. Though the free version comes with restricted functionalities, the paid subscription compensates it all.
Pros
● The application works as the most reliable digital assistant
● The utility works towards the efficient transcription of already recorded plugins
● The Android compatible module of the program aids in controlling your PC from a distance
Cons
● The application interface looks quite dated
● You cannot work with the utility on a Mac compatible device
● The recent purchase reports show a considerable increase in the application’s pricing constraints

06Amazon Transcribe
Free Trial Period: hours
Accuracy Rate: 99%
Moving further in the list, the Amazon Transcribe is a cloud centered, automated voice recognition facility, which has been created essentially to address the speech to text conversion requirements for a diversity of third party applications. Talking of the functional credibility, the audio recognition and text based outputs delivered by the platform are way ahead in terms of quality and accuracy in comparison to the most popular allies.
The platform works most efficiently to cater a precise text based output from noisy and low sound audio recording, like that within a call center. The facility works through an advanced deep learning algorithm to automatically include the necessary formatting and punctuation marks within the text output. You are further, allowed to undertake a secured live streaming for the conversion process, along with going for a batch processing of speech to text transcriptions.
Expanding the merit count of the facility, the latter provides time stamps for a quick and convenient search of specific words within the generated text output. The platform additionally caters to recognize and process a diversity of voice accents and sound channels, along with complementing the same with suitable annotations. You can also work with customizing the text transcriptions, with features like vocabulary filtering.
The platform grants you the liberty to work with word replacements for maintaining the consistency of product names, which further aids in a convenient analysis of the transcription files. All-in-all, this one is quite a credible platform to address voice to text conversion needs, though the true potential of the utility is better accessed by enterprise and business oriented users.
Pros
● The platform allows you to edit vocabularies of your preferred languages
● The audio transcription facility extends to a wide range of applications
● The utility caters to the recognition of sound channels and speakers
Cons
● The facility is not a smart choice for customer oriented usage
● The response time of the facility for a speech to text conversion is more than what can be regarded as feasible
● The platform does not recognize numeric digits

07Google Gboard
Free Trial Period: Complementary service
Accuracy Rate: 92%
This one is more of a complementary service that comes to you for free when you download the Google Keyboard application for your Android device from the Google Play Store. Functioning essentially as an instant utility to transcribe speech into text, the facility is works as a physical input keyboard. Adding further to the ease of access, the utility allows you to directly enter a speech input.
Thanks to the availability of Google’s hardware backup, you don’t have to worry about the responsiveness of the tool. The app additionally houses a heap of appealing features, like voice commands that help you to include images within the text output, and the flexibility to work with the Google Translate facility that is configured for extending a conversion support to more than 60 different languages.
Though the utility does not work as an exclusive tool for transcribing speech to text, it is still good at supporting the fundamental transcription features. Being a keyboard class application, the utility is compatible to almost any Android app you choose to work with on your device. Working with this specific facility, you can choose to save, edit and export the generated text outputs.
Pros
● The utility is packed with a lot of extra features, apart from text to speech conversion
● The application usage is not interrupted with annoying and frequent ads
● The facility extends its credibility with a diversity of Android applications
Cons
● The facility does not permit you to work with shortcut commands
● There is no ‘Undo’ button to erase wrong typing and you can only use the swipe tool to delete even the longest word strings
● The utility lags a bit to read symbolic representations

08Just Press Record
Free Trial Period: No cost utility
Accuracy Rate: 95%
This one is a Windows and iOS compatible application program that works on your PC to address the speech to text conversion requirements. Developed to essentially function as a reliable dictation utility, the app comes with a variety of additional facilities. A few of the major attractions of the tool are iCloud syncing, transcriptions and single tap recording.
What’s best is, the app can be easily understood and worked upon by all users, regardless of them being experienced or newbies to the domain. As far as the requirement of recording speech notes is concerned, the latter is confined to a single tap with a limitless record duration. You can additionally create transcribed text outputs from the audio input that is fed to the application.
The facility works to quickly and seamlessly recognize and convert voice inputs into text output that can be easily searched across the web. You are also permitted to edit the transcribed text file. For those who need to work with an overseas clientele, the app offers a commendable aid through its recognition capability across more than 30 different languages.
The application further ensures a complete absence of typographical errors from the output text files through its ability to recognize punctuation commands. The facility accommodates a cloud technology to allow an easy access of the transcribed files and notes through any device that has running internet connectivity. You can further, view the recorded text and audio files, as the app works to organize them at a single place, and share the same across a host of iOS applications.
Pros
● The app supports a multi-lingual speech recognition and audio transcription facility
● The utility works in a cloud compatible configuration to keep your transcriptions safe and secure
● The app’s working interface is easy to understand and work upon
Cons
● The facility does not support an allied application for Android smartphones
● The app often tends to skip or misidentify even the most clearly spoken words
● The utility is incompatible with background processing and hence the transcription process comes to a halt in absence of foreground running

09Speechnotes
Free Trial Period: No cost utility
Accuracy Rate: 86%
This one is another addition to the series of dictation applications, but with a highly relaxed and quick transcription process. Escaping the hustle of creating online accounts or signing up, you can simply start the speech to text conversion process by launching the app and clicking on the microphone symbol. With a dependable backup of Google’s voice recognition technology, you are granted the liberty to use voice commands or the default punctuation keyboard for dictating punctuation marks within the text output.
The app’s default keyboard comes with a set of custom keys that work to include greetings, signatures, names and other types of regularly used word strings within the output. The app also facilitates an automatic capitalization, while saving all the changes you make within a particular note on a cloud space. The output text files can be further customized with an extensive variety of text sizes and fonts.
While the app’s free version is available on the Google Play Store, the latter is known to have a restricted set of features. You can however, avail a paid subscription to the utility through the in-app purchases to work with the complete set of features.
Pros
● The application works to automatically recognize punctuation marks from the voice input
● The utility greets you with a welcoming and convenient to use workspace
● The app is available for Android as well as Chrome operating systems
Cons
● The transcribed recordings demand a paid subscription to get processed
● The app does not allow you to choose the format of the output text files, while offering a limited security to your creations
● You cannot work with the application on iOS devices.

10Windows 10 Speech Recognition
Free Trial Period: Single time free usage
Accuracy Rate: 95%
The Windows 10 operating system is packed with a good number of built in features and utilities, while the voice recognition facility being one among them. Working with the Windows Speech Recognition functionality, you can move ahead with document dictations, while simultaneously executing voice controlled commands.
You can further, work to increase the speech recognition accuracy of the application through a high tone reading of the text and granting the app permissions to access your documents for a better understanding of your vocabulary. These practices are helpful in training the application for an upgrade in the latter’s performance accuracy. It becomes additionally important to train the app in case you wish to work with the speech recognition facility of the tool in a better way.
It’s not that you cannot work with the facility while using the older versions of the Windows operating system, but the developer reports claim the recent version’s applicability to be more fruitful. The obvious reason backing up the app’s credibility is the deep neural network technology that promises of delivering increased benefits in times ahead.
You can start working with the facility by navigating to and clicking on the ‘Control Panel’ in the ‘Start Menu’. Select ‘Ease of Access’ from the list of options that follows next. The ‘Start Speech Recognition’ option appears, along with the facility for setting up a microphone, in case you have not enabled the same. Just click on the aforesaid options and that’s it! You can proceed with the conversion process right away.
Pros
● The facility has a complete integration with the Windows operating system
● The speech to text transcription process is quick and easy
● The app greets you with a responsive interface to work upon
Cons
● The utility has a wide scope of improvement in terms of performance accuracy
● The app does not have an iOS or Android compatibility
● The tool needs a recursive training to keep delivering the desired outputs with a significant accuracy

Part 4 How Can We Get Text-to-Speech Then?
Working with the text to speech facility has become quite an easy task with today’s modern day technologies that fit into a variety of apps and software programs. While such voice recognition utilities are compatible with a series of operating systems and platforms, you can work with them either through in-built features or third party applications.
As you begin with your search for affordable and accurate text to speech conversion software, these are a host of choices at your disposal. Discussing along the line, let us talk about the voice recognition and text to speech conversion credibility of some popular text to audio transcription programs in the following section:
01Converting Text to Speech in Panopreter
If you are working on a Windows desktop or PC, this one is reliable software alternative for addressing the concern of converting text based inputs into speech outputs. Before you start using the facility, it is important to note that the aforesaid program supports 2 different working modes to provide additional convenience to its users. You can pick anyone of the ‘Input and Speak’ or ‘Read Batch Files’ modes to initiate the speech to text conversion process.
Working with the Panopreter program requires you to have a running internet facility for downloading the program to your system, followed by going through an app installation procedure. Post that, all you need to do is, activate the service and adhere to the following user guide to start converting texts into audio with the program:
02User’s Guide for Converting Text to Speech in Panopreter
Step 1: Download the Converter Program
Navigate to the official Panopreter website and download the software to your system. Once then download gets completed, proceed to install the same and wait for the program’s welcome screen to appear.
Step 2: Mode Selection and Setting
As the launch screen pops up, you will be asked to choose the preferred working mode from the ‘Input and Speak’ and ‘Read Batch Files’ alternatives. You should know that the former is the default operation mode of the software and you can activate the same in a few steps.
Start with navigating to the ‘Menu Options’ tab and clicking on the ‘Settings’ option in the latter’s drop down list. The ‘Settings’ dialog box pops up, where you need to hit the ‘Speak Node’ option in the panel at the left. In the ‘Speak Window’ that appears next, click within the checkbox of your desired option and that’s it! The default ‘Input and Speak’ mode will be activated when you re-launch the software.
If, on the other hand, you desire to work in the ‘Read Batch Files’ mode, navigate to the ‘Menu Bar’ at the top of the software interface and hit the ‘File’ tab. From the list of items that drops down, select the ‘Read Batch Files’ option.
Step 3: Mode Specific Software Operation
If you are working in the ‘Input and Speak’ mode, you can proceed with typing or pasting a desired text within the ‘Text Window’ Another option is to open a desired text document or file directly from your system. As for working in the ‘Read Batch Files’ mode, you are allowed to manage your system’s text files through the ‘Open’, ‘Clear’ and ‘Delete’ buttons. You should however take caution to add all the files in a common language.
Step 4: Language Selection
Navigate to the ‘Language List’ window and pick a preferred language to convert the text files into audio transcripts. Remember to choose the same conversion language as added of the ‘Text Window’ files in Step 2, lest you would end up getting an undesirable speech output.
Step 5: Voice Selection
As you complete Step 4, a series of preset text to speech voice alternatives present within your system for the preferred language will show up in the ‘Voice Window’. Proceed to select the voice type you like.
Step 6: Read Aloud!
After you have selected the voice, tap the ‘Speak’ button and start reading your text aloud. Amid the process, you will see the ‘Stop’, ‘Resume’ and ‘Pause’ buttons getting enabled.
Step 7: Save Your Transcription
When you have finished reading the text, click on the ‘Stop’ button to end the transcription process. The ‘Save as Audio’ option gets enabled, allowing you to convert your text into speech in the MP3, OGG, WAV and FLAC file formats.
Step 8: Customize Your Audio
The Panopreter program lets you add suitable customizations to the transcribed audio to ensure affordable file size and sound quality. You can adjust the bit rate and sample rate to address the aforesaid concern. All you need to do is, head to the ‘Menu Options’ at the top of the app screen and select ‘Settings’.
Click on the ‘Audio Format’ option within the ‘Settings’ window pops up, followed by selecting a suitable format for the audio file. On most cases, the WAV format works best to address the output quality requirements in an affordable manner.

03Converting Text to Speech in Wondershare Filmora
Recognized more popularly as a top rated video editing software program, Filmora by Wondershare is a storehouse of applicational utilities that work to address a diversity of additional concerns. Speaking in the light of text to speech conversion, the software extends exceptional capabilities for working towards the requirement.
You can avail the facility to add an extra bit of convenient accessibility to your graphic and video centered projects and artworks by transcribing text based subtitles into speech with a single click. The feature is a welcome rescue for those who encounter discomfort in dubbing or voice exposure applications, like news presentations and video dubbings.
Though the software is a paid utility with a limited period of free usage, the welcoming news is that you need not to pay an extra amount to work with the feature. It is available to you as you subscribe for the video editing utilities of software. Having talked enough about the work credibility, let us now proceed with understanding the text to speech conversion process of Filmora through a stepwise guide in what follows next:
04User’s Guide for Converting Text to Speech in Wondershare Filmora Video Editor
For Win 7 or later (64-bit)
For macOS 10.12 or later
Step 1: Download and Install the Program
Navigate to the official Wondershare website and initiate a free download of the Filmora Editor program to a preferred Windows or Mac supported device. Once the download finishes, move ahead with installing the program in your system, and wait to be greeted by the software’s welcome interface.
Step 2: Select the Text to Speech Functionality
You can select the text to speech option in Wondershare Filmora through any one of the following 3 methods:
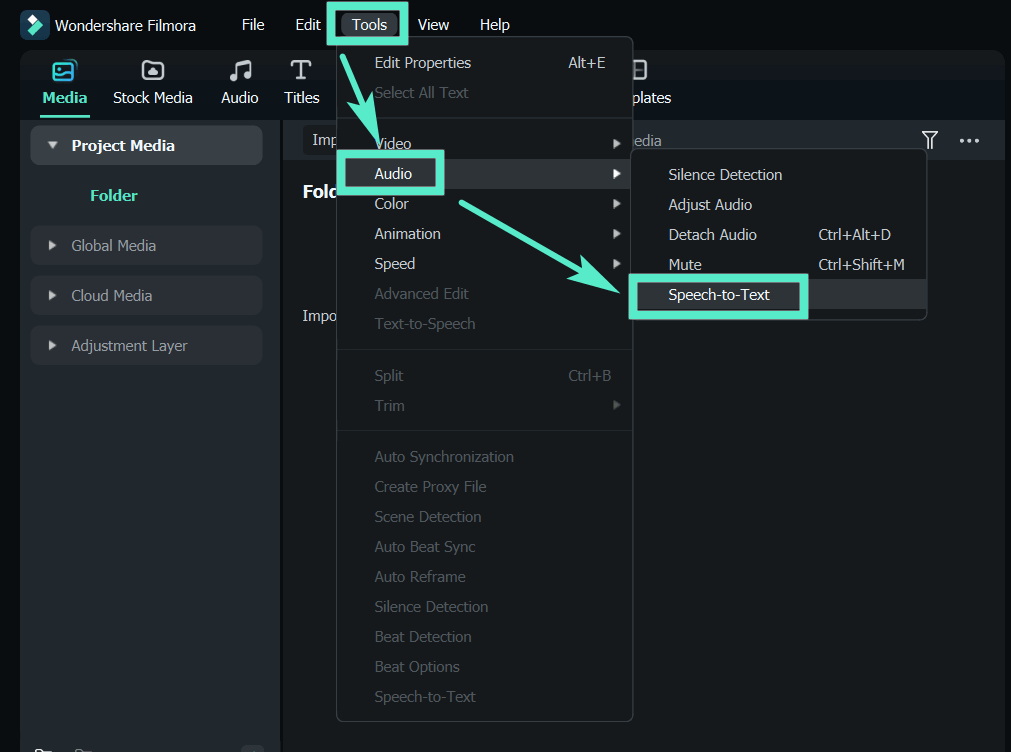
● Method 1 - Select the audio asset in the timeline, click Tools on the top menu bar, and click Audio > Speech to Text.
Speech to Text
● Method 2 - Select the audio asset in the timeline, and click the Speech to Text icon in the toolbar; if there is no supported file type on the timeline, it will not be displayed.

Toolbar Speech-to-Text
● Method 3 - Select the audio asset on the timeline, right-click and select Speech to Text.

Timeline Speech to Text
Parameter Settings
● In the STT parameter setting bar, select the language of the audio to be transcribed and files to be converted and check automatically match to the timeline. Now, the feature supports direct transcription of bilingual subtitles.

Part 5 Speech to Text Q&A
● How does the speech to text conversion utility work?
A conventional audio to text functionality works through listening to and recognizing a sound based input, followed by rendering a precise text centered transcript on a preferred system or device. The program’s voice recognition capability is the pivot behind this utility.
● What is the credibility of punctuation in a text transcription?
The transcription outputs rendered by a speech to text converter program use the comma to separate different elements and sections within the text, in the same way as you would normally do while writing a document with conventional methods.
● What is the significance of a clean verbatim?
A clean verbatim caters to a convenient readability of your audio-visual files through a slight customization process. This one is an accurately rendered transcription that keeps all the essential information within the recording, while eliminating the undesired, noisy background audio.
● What is the usage credibility of speech to text programs for students?
The speech to text converter programs are greatly beneficial for students in the sense that the latter works to remove a series of hindrances, like handwriting and speed matching difficulties, or transcription of thoughts during brainstorming sessions.
● Does working with a speech to text conversion facility require an internet connection?
The requirement of internet connectivity is rather selective with respect to the specific converter program or application you are working with. While some of them may require you to remain online throughout the transcription process, other may work well in the offline mode of operation.
● Ending Thoughts →
● Working with speech to text conversion software and application programs becomes quite handy in addressing a variety of personal and professional documentation needs.
● Browsing through the software market, you can select from a diversity of free and paid smartphone apps and system software utilities to transcribe text from audio files
● When looking for a dependable speech to text software program, you can pick the Wondershare Filmora editor application without having a second thought.
In this article
01 [What is the Speech to Text App?](#Part 1)
02 [Why is Speech to Text App Getting Popular?](#Part 2)
03 [10 Best Speech to Text Apps That Will Help Translate from Speech](#Part 3)
04 [How Can We Get Text-to-Speech Then?](#Part 4)
05 [Speech to Text Q&A](#Part 5)
Best Speech to Text Software Save plenty of time on transcribing subtitles and boost your editing efficiency by applying Filmora Speech-To-Text.
Try STT Now Try STT Now Explore STT
Part 1 What is the Speech to Text App?
In today’s busy schedules of personal and professional routines, most of us have a common habit of running away from entering lengthy text inputs to adhere specific concerns on smartphones and desktops. It is an obvious fact that given a choice to voice out or type, the former would bag in a considerably higher number of votes.
Having a technology backup, it is now practically possible to convert your voice commands into text with utmost ease, thanks to the advent of reliable speech to text applications. The utility works to transform the words you speak, into an exact text representation, thus saving both, your time and energy. Such applications work on the principle of responding to speech recognition requests and processing the same to render an equitable text output.
The required audio information is sent across a synchronous request to process the different sound pieces, one at a time. When all such pieces are processed and recognized, the text response is generated to the credit of the user. Talking of the device and platform compatibility of such applications, you can comfortably work on them in either of your system based, or mobile devices with an equal efficiency.
Browsing through the IT market, you may however land across exclusive as well as implicit choices to work on your preferred deices. While there are some smartphone specific speech-to-text applications, others may have a good compatibility with desktops and PCs. Moving ahead, there comes a third category of software ranges that is all set to work with smartphones as well as desktop systems.
Part 2 Why is Speech to Text Apps Getting Popular?
Talking in the light of personal credibility and usage, the speech to text apps may often be recognized as having limited application diversity, but the instincts are not same on the professional front. Entering deeper into the domain, there are fields like digital marketing and content planning that are reported of having a considerable dependency on such applications and utilities. Some of the pivotal reasons in support of the credibility are described as follows:
● Improving Work Efficiency
Talking specifically in line with the professional organizations that are greatly centered on text based working modules, or follow an extraneous typing and writing work pattern, the speech to text conversion facility is no less than a fantastic rescue to the tiresome sessions of spending time on fidgeting with PC and laptop keyboards.
Not only do such applications work towards lightening up the system exposure burden, but also facilitate a quick workability that further caters to increase the efficiency and work performance of the organization’s workforce. This in turn results in a fast and efficient addressing of the various types of text based operational concerns.
● Improvise Content Marketing Strategies
When the discussion is centered on devising high end and advanced level content marketing proposals and strategies, the speech to text facility can go a long way. You can work with such platforms to take quick and smart professional suggestions from the web within the blink of an eye, instead of typing the entire array of words and text to explain your point.
Such applications further work to modernize your content and data search habits, which may in most cases, can indirectly cause a refinement of your searches, thus facilitating you with a more exact and strategic content that affordably fits in the line of your market requirements. The bottom line is, such applications are on the way to increasing their professional credibility in cohesion with the modern day trends of the professional world.
● Academic and Media Centered Utilities
Speech to text application offers an extended credibility with respect to academic and educational requirements. Students can take advantage of the facility to quickly convert memos and lecture dictations into quick text files. Under the circumstances of working with audio and sound files, you can conveniently transform the audio transcriptions into viable text files with an almost instant effect.
When working on media centered projects, you can pick these applications to supplement your sound based contents with automatic titles and captions. The apps also come handy in converting lengthy dialogue audios into readable text so that you can understand and learn the same at your own convenient pace.
In the specific situations of creating text documents to supplement your project work in the absence of your PC or desktop, you can rely on these utilities to effectively create extensive text files with quick voice inputs.
Part 3 Best Speech to Text Apps That Will Help Translate from Speech
By far, you have become quite familiar with the functionality and significance of working with speech to text applications to a notable extent. While having an understanding of such utilities is one aspect, the real essence lies in having hands on experience with using the same in practical situations. When aiming to work towards the concern of using such facilities to expand your professional capabilities, it is of great important to make the right selection.
Moving along the line, here is a discussion of some top rated speech to text applications that you can choose to work with for a smart display of your professional expertise and efficiency in what follows next:
01Dragon Anywhere
Free Trial Period: days
Accuracy Rate: 99%
Starting with the list, there is the Dragon Anywhere application which you can reliably pick to effectively sort out your concern of converting text to readable text. The app is essentially a smartphone compatible utility, which was launched by the Nuances software development company as an allied facility of its desktop compatible speech to text conversion program to work on mobile devices.
The app comes to you as a complete package of dictation facilities that work well with your Android and iOS devices. Examining the app’s credibility in the line of its desktop counterpart, you may notice a minimal amount of lag between the input speech and output text. The underlying reason behind this delay is however, the obvious processing time frame of the cloud facility. Neglecting the same, the app works effectively to respond to the aforesaid conversion requirements.
The app further extends its utilities by allowing you to add text within a document file through its boilerplate functionality that creates chunks of the specific text that requires an insertion. All you need to do is enter a quick command and that’s really it. An additional appeal of working with the application is the extensive set of customized vocabularies that are rendered complementary with the app, along with having a convenient synchronization with their desktop compatible software.
Pros
● Recognizes your speech in an affordable quality
● Syncs perfectly with its desktop counterpart
● Loaded with a diverse range of functionalities
Cons
● Offers a limited dictation facility
● The speech recognition process has a logging factor
● Free version is available for a limited period.
02Otter
Free Trial Period: hours
Accuracy Rate: 99%
If you are on the search of an affordable smartphone centered solution to address your day to day business documentation and dictation requirements, this aforesaid is your go to application. Designed explicitly to cater the professional needs of experienced and mainstream corporate users, the tool is a cloud oriented mobile utility to work through real-time transcription, while catering the additional needs of editing, organizing and searching documents or playing audio files.
The major functionality of the application lies with sorting out the documentation requirements of interviews, lectures and meetings to pull off the concern of taking quick notes. You can further work with the app to run coordinated meetings and conferences with a collaborated group of members within a particular profile. This is brought about by assigning unique speaker credentials for a quick and convenient understanding of audio and text transcriptions.
You can work with the application by opting one of the 3 access options, 2 of which are paid subscriptions, while the remaining one is free for a limited period. The app comes with a comprehensive wordcloud and updated keyword summaries for an easy search through of specific subjects. The application grants you the liberty to share and organize text documents, import audio-visual elements for transcription purposes and much more.
Pros
● This speech to text app allows you to add live captions to your audio transcripted texts
● You are facilitated with a host of platform choices to export the documents directly
● The tool is readily compatible with team collaborations
Cons
● The application lacks a live chat facility
● The working interface is quite dated
● Free trial period is very short
03Verbit
Free Trial Period: hours
Accuracy Rate: 99%
Designed specifically for educational and enterprise centered applications, Verbit is a high end and intelligent speech to text converter utility that works to facilitate automatic captioning and transcriptions through artificial intelligence. Delivering a high speed transcription output, the efficiency of this upgraded application is way beyond the exclusively manual transcription facilities.
Talking of the operational methodology, the utility works to cater an excellent audio transcription by creating a mixture of speech modules through artificial intelligence algorithms and neural networks. These sophisticated models work to adapt the specific characteristics of the audio files, followed by the creation of a new series of linguistic, contextual and acoustic event modules.
Additional merits of using the application for transcribing speech centered audio are the elimination of background noise, recognition of speakers with different accents, integration of context based events, such as company information, news, etc., into recorded audio tracks. While the application hosts a free live version to caption and transcript the speech audio with an affordable accuracy rate, the paid versions promise of 100% accuracy to transcribe audio files into text.
Tracking the transcription process becomes highly convenient with the application’s real-time status update facility available through the Verbit Cloud Portal. The utility further supports a series of third party platforms that facilitate a convenient and quick distribution of the transcripted outputs.
Pros
● The application extends a high speed and accurate transcription service
● The utility houses an elaborated range of tools to caption videos
● The smart AI feature facilitates an expanded range of services to complement the transcription process
Cons
● The application’s multi-linguistic feature can be improved
● The utility’s free version is a limited period facility
● The pricing plans of the application are available on an individual basis
04Speechmatics
Free Trial Period: days for 10 hours
Accuracy Rate: 83%
Moving ahead with the list, Speechmatics is another effective speech-to-text conversion utility that works with the aid of machine learning to address the concern of transcribing audio files. Using an automated speech recognition advantage, this application is greatly preferred for creating text based transcriptions of audio-visual files on a free as well as paid subscription.
The application works in good cohesion with all popular British accents, beyond the constraints of nationality. You can prefer the utility to create audio transcriptions in British and American English, in addition to the Jamaican and South Asian accents. Offering a relatively higher count of speech to text conversion facilities and services, the Speechmatics application stays ahead of its counterparts in catering to the aforesaid concern.
A few of the major conversion services extended by the application include the transformation of phone recordings in a call center and transcribing them into Word files and text based information that can be searched across the web. You can further integrate the application to work with different types of audio-visual media to add captions and use keyword triggers for managing a series of allied operations.
Pros
● The application boasts of landing among the most power packed transcription engines
● The utility possesses the smartest integration of artificial intelligence through a responsive machine learning ability
● The application comes with a free version to examine the latter’s credibility before a purchase
Cons
● The application does render any out of the box means to carry out the audio transcription process
● The unpaid version of the tool has a limited period validity
● The paid subscription of the app is quite high on price
05Braina Pro
Free Trial Period: days
Accuracy Rate: 99%
Establishing itself as a world class speech to text converter application, Briana Pro is a web based utility that works with the Google Chrome browser. Functioning as a one stop solution for adhering to the most widespread concerns of digital assistance and dictation, ahead of the speech recognition facility, this one is quite a reliable voice recognition tool. Working with the application, you can dictate information in 90 different languages, other than English, to a varied range of third party programs.
The voice recognition capability of the app is nowhere to be questioned with a remarkable accuracy of 99%. The application additionally caters to sort out the functionalities of setting alarms, hosting a file search within your device or across the web, playing MP3 files, reading eBooks clearly, etc., along with adhering to a series of customized commands.
What’s most appealing about the program is the latter’s dual compatibility with Windows systems and Android smartphones. About the credibility of the Android application, you can work with the latter for remotely controlling your system. The utility can also be implemented to deliver function centered commands to the same through a localized Wi-Fi network.
The application grants you the liberty to test the credibility of its speech recognition tool by offering one week free trial facility. Though the free version comes with restricted functionalities, the paid subscription compensates it all.
Pros
● The application works as the most reliable digital assistant
● The utility works towards the efficient transcription of already recorded plugins
● The Android compatible module of the program aids in controlling your PC from a distance
Cons
● The application interface looks quite dated
● You cannot work with the utility on a Mac compatible device
● The recent purchase reports show a considerable increase in the application’s pricing constraints
06Amazon Transcribe
Free Trial Period: hours
Accuracy Rate: 99%
Moving further in the list, the Amazon Transcribe is a cloud centered, automated voice recognition facility, which has been created essentially to address the speech to text conversion requirements for a diversity of third party applications. Talking of the functional credibility, the audio recognition and text based outputs delivered by the platform are way ahead in terms of quality and accuracy in comparison to the most popular allies.
The platform works most efficiently to cater a precise text based output from noisy and low sound audio recording, like that within a call center. The facility works through an advanced deep learning algorithm to automatically include the necessary formatting and punctuation marks within the text output. You are further, allowed to undertake a secured live streaming for the conversion process, along with going for a batch processing of speech to text transcriptions.
Expanding the merit count of the facility, the latter provides time stamps for a quick and convenient search of specific words within the generated text output. The platform additionally caters to recognize and process a diversity of voice accents and sound channels, along with complementing the same with suitable annotations. You can also work with customizing the text transcriptions, with features like vocabulary filtering.
The platform grants you the liberty to work with word replacements for maintaining the consistency of product names, which further aids in a convenient analysis of the transcription files. All-in-all, this one is quite a credible platform to address voice to text conversion needs, though the true potential of the utility is better accessed by enterprise and business oriented users.
Pros
● The platform allows you to edit vocabularies of your preferred languages
● The audio transcription facility extends to a wide range of applications
● The utility caters to the recognition of sound channels and speakers
Cons
● The facility is not a smart choice for customer oriented usage
● The response time of the facility for a speech to text conversion is more than what can be regarded as feasible
● The platform does not recognize numeric digits
07Google Gboard
Free Trial Period: Complementary service
Accuracy Rate: 92%
This one is more of a complementary service that comes to you for free when you download the Google Keyboard application for your Android device from the Google Play Store. Functioning essentially as an instant utility to transcribe speech into text, the facility is works as a physical input keyboard. Adding further to the ease of access, the utility allows you to directly enter a speech input.
Thanks to the availability of Google’s hardware backup, you don’t have to worry about the responsiveness of the tool. The app additionally houses a heap of appealing features, like voice commands that help you to include images within the text output, and the flexibility to work with the Google Translate facility that is configured for extending a conversion support to more than 60 different languages.
Though the utility does not work as an exclusive tool for transcribing speech to text, it is still good at supporting the fundamental transcription features. Being a keyboard class application, the utility is compatible to almost any Android app you choose to work with on your device. Working with this specific facility, you can choose to save, edit and export the generated text outputs.
Pros
● The utility is packed with a lot of extra features, apart from text to speech conversion
● The application usage is not interrupted with annoying and frequent ads
● The facility extends its credibility with a diversity of Android applications
Cons
● The facility does not permit you to work with shortcut commands
● There is no ‘Undo’ button to erase wrong typing and you can only use the swipe tool to delete even the longest word strings
● The utility lags a bit to read symbolic representations
08Just Press Record
Free Trial Period: No cost utility
Accuracy Rate: 95%
This one is a Windows and iOS compatible application program that works on your PC to address the speech to text conversion requirements. Developed to essentially function as a reliable dictation utility, the app comes with a variety of additional facilities. A few of the major attractions of the tool are iCloud syncing, transcriptions and single tap recording.
What’s best is, the app can be easily understood and worked upon by all users, regardless of them being experienced or newbies to the domain. As far as the requirement of recording speech notes is concerned, the latter is confined to a single tap with a limitless record duration. You can additionally create transcribed text outputs from the audio input that is fed to the application.
The facility works to quickly and seamlessly recognize and convert voice inputs into text output that can be easily searched across the web. You are also permitted to edit the transcribed text file. For those who need to work with an overseas clientele, the app offers a commendable aid through its recognition capability across more than 30 different languages.
The application further ensures a complete absence of typographical errors from the output text files through its ability to recognize punctuation commands. The facility accommodates a cloud technology to allow an easy access of the transcribed files and notes through any device that has running internet connectivity. You can further, view the recorded text and audio files, as the app works to organize them at a single place, and share the same across a host of iOS applications.
Pros
● The app supports a multi-lingual speech recognition and audio transcription facility
● The utility works in a cloud compatible configuration to keep your transcriptions safe and secure
● The app’s working interface is easy to understand and work upon
Cons
● The facility does not support an allied application for Android smartphones
● The app often tends to skip or misidentify even the most clearly spoken words
● The utility is incompatible with background processing and hence the transcription process comes to a halt in absence of foreground running
09Speechnotes
Free Trial Period: No cost utility
Accuracy Rate: 86%
This one is another addition to the series of dictation applications, but with a highly relaxed and quick transcription process. Escaping the hustle of creating online accounts or signing up, you can simply start the speech to text conversion process by launching the app and clicking on the microphone symbol. With a dependable backup of Google’s voice recognition technology, you are granted the liberty to use voice commands or the default punctuation keyboard for dictating punctuation marks within the text output.
The app’s default keyboard comes with a set of custom keys that work to include greetings, signatures, names and other types of regularly used word strings within the output. The app also facilitates an automatic capitalization, while saving all the changes you make within a particular note on a cloud space. The output text files can be further customized with an extensive variety of text sizes and fonts.
While the app’s free version is available on the Google Play Store, the latter is known to have a restricted set of features. You can however, avail a paid subscription to the utility through the in-app purchases to work with the complete set of features.
Pros
● The application works to automatically recognize punctuation marks from the voice input
● The utility greets you with a welcoming and convenient to use workspace
● The app is available for Android as well as Chrome operating systems
Cons
● The transcribed recordings demand a paid subscription to get processed
● The app does not allow you to choose the format of the output text files, while offering a limited security to your creations
● You cannot work with the application on iOS devices.
10Windows 10 Speech Recognition
Free Trial Period: Single time free usage
Accuracy Rate: 95%
The Windows 10 operating system is packed with a good number of built in features and utilities, while the voice recognition facility being one among them. Working with the Windows Speech Recognition functionality, you can move ahead with document dictations, while simultaneously executing voice controlled commands.
You can further, work to increase the speech recognition accuracy of the application through a high tone reading of the text and granting the app permissions to access your documents for a better understanding of your vocabulary. These practices are helpful in training the application for an upgrade in the latter’s performance accuracy. It becomes additionally important to train the app in case you wish to work with the speech recognition facility of the tool in a better way.
It’s not that you cannot work with the facility while using the older versions of the Windows operating system, but the developer reports claim the recent version’s applicability to be more fruitful. The obvious reason backing up the app’s credibility is the deep neural network technology that promises of delivering increased benefits in times ahead.
You can start working with the facility by navigating to and clicking on the ‘Control Panel’ in the ‘Start Menu’. Select ‘Ease of Access’ from the list of options that follows next. The ‘Start Speech Recognition’ option appears, along with the facility for setting up a microphone, in case you have not enabled the same. Just click on the aforesaid options and that’s it! You can proceed with the conversion process right away.
Pros
● The facility has a complete integration with the Windows operating system
● The speech to text transcription process is quick and easy
● The app greets you with a responsive interface to work upon
Cons
● The utility has a wide scope of improvement in terms of performance accuracy
● The app does not have an iOS or Android compatibility
● The tool needs a recursive training to keep delivering the desired outputs with a significant accuracy
Part 4 How Can We Get Text-to-Speech Then?
Working with the text to speech facility has become quite an easy task with today’s modern day technologies that fit into a variety of apps and software programs. While such voice recognition utilities are compatible with a series of operating systems and platforms, you can work with them either through in-built features or third party applications.
As you begin with your search for affordable and accurate text to speech conversion software, these are a host of choices at your disposal. Discussing along the line, let us talk about the voice recognition and text to speech conversion credibility of some popular text to audio transcription programs in the following section:
01Converting Text to Speech in Panopreter
If you are working on a Windows desktop or PC, this one is reliable software alternative for addressing the concern of converting text based inputs into speech outputs. Before you start using the facility, it is important to note that the aforesaid program supports 2 different working modes to provide additional convenience to its users. You can pick anyone of the ‘Input and Speak’ or ‘Read Batch Files’ modes to initiate the speech to text conversion process.
Working with the Panopreter program requires you to have a running internet facility for downloading the program to your system, followed by going through an app installation procedure. Post that, all you need to do is, activate the service and adhere to the following user guide to start converting texts into audio with the program:
02User’s Guide for Converting Text to Speech in Panopreter
Step 1: Download the Converter Program
Navigate to the official Panopreter website and download the software to your system. Once then download gets completed, proceed to install the same and wait for the program’s welcome screen to appear.
Step 2: Mode Selection and Setting
As the launch screen pops up, you will be asked to choose the preferred working mode from the ‘Input and Speak’ and ‘Read Batch Files’ alternatives. You should know that the former is the default operation mode of the software and you can activate the same in a few steps.
Start with navigating to the ‘Menu Options’ tab and clicking on the ‘Settings’ option in the latter’s drop down list. The ‘Settings’ dialog box pops up, where you need to hit the ‘Speak Node’ option in the panel at the left. In the ‘Speak Window’ that appears next, click within the checkbox of your desired option and that’s it! The default ‘Input and Speak’ mode will be activated when you re-launch the software.
If, on the other hand, you desire to work in the ‘Read Batch Files’ mode, navigate to the ‘Menu Bar’ at the top of the software interface and hit the ‘File’ tab. From the list of items that drops down, select the ‘Read Batch Files’ option.
Step 3: Mode Specific Software Operation
If you are working in the ‘Input and Speak’ mode, you can proceed with typing or pasting a desired text within the ‘Text Window’ Another option is to open a desired text document or file directly from your system. As for working in the ‘Read Batch Files’ mode, you are allowed to manage your system’s text files through the ‘Open’, ‘Clear’ and ‘Delete’ buttons. You should however take caution to add all the files in a common language.
Step 4: Language Selection
Navigate to the ‘Language List’ window and pick a preferred language to convert the text files into audio transcripts. Remember to choose the same conversion language as added of the ‘Text Window’ files in Step 2, lest you would end up getting an undesirable speech output.
Step 5: Voice Selection
As you complete Step 4, a series of preset text to speech voice alternatives present within your system for the preferred language will show up in the ‘Voice Window’. Proceed to select the voice type you like.
Step 6: Read Aloud!
After you have selected the voice, tap the ‘Speak’ button and start reading your text aloud. Amid the process, you will see the ‘Stop’, ‘Resume’ and ‘Pause’ buttons getting enabled.
Step 7: Save Your Transcription
When you have finished reading the text, click on the ‘Stop’ button to end the transcription process. The ‘Save as Audio’ option gets enabled, allowing you to convert your text into speech in the MP3, OGG, WAV and FLAC file formats.
Step 8: Customize Your Audio
The Panopreter program lets you add suitable customizations to the transcribed audio to ensure affordable file size and sound quality. You can adjust the bit rate and sample rate to address the aforesaid concern. All you need to do is, head to the ‘Menu Options’ at the top of the app screen and select ‘Settings’.
Click on the ‘Audio Format’ option within the ‘Settings’ window pops up, followed by selecting a suitable format for the audio file. On most cases, the WAV format works best to address the output quality requirements in an affordable manner.
03Converting Text to Speech in Wondershare Filmora
Recognized more popularly as a top rated video editing software program, Filmora by Wondershare is a storehouse of applicational utilities that work to address a diversity of additional concerns. Speaking in the light of text to speech conversion, the software extends exceptional capabilities for working towards the requirement.
You can avail the facility to add an extra bit of convenient accessibility to your graphic and video centered projects and artworks by transcribing text based subtitles into speech with a single click. The feature is a welcome rescue for those who encounter discomfort in dubbing or voice exposure applications, like news presentations and video dubbings.
Though the software is a paid utility with a limited period of free usage, the welcoming news is that you need not to pay an extra amount to work with the feature. It is available to you as you subscribe for the video editing utilities of software. Having talked enough about the work credibility, let us now proceed with understanding the text to speech conversion process of Filmora through a stepwise guide in what follows next:
04User’s Guide for Converting Text to Speech in Wondershare Filmora Video Editor
For Win 7 or later (64-bit)
For macOS 10.12 or later
Step 1: Download and Install the Program
Navigate to the official Wondershare website and initiate a free download of the Filmora Editor program to a preferred Windows or Mac supported device. Once the download finishes, move ahead with installing the program in your system, and wait to be greeted by the software’s welcome interface.
Step 2: Select the Text to Speech Functionality
You can select the text to speech option in Wondershare Filmora through any one of the following 3 methods:
● Method 1 - Select the audio asset in the timeline, click Tools on the top menu bar, and click Audio > Speech to Text.
Speech to Text
● Method 2 - Select the audio asset in the timeline, and click the Speech to Text icon in the toolbar; if there is no supported file type on the timeline, it will not be displayed.
Toolbar Speech-to-Text
● Method 3 - Select the audio asset on the timeline, right-click and select Speech to Text.
Timeline Speech to Text
Parameter Settings
● In the STT parameter setting bar, select the language of the audio to be transcribed and files to be converted and check automatically match to the timeline. Now, the feature supports direct transcription of bilingual subtitles.
Part 5 Speech to Text Q&A
● How does the speech to text conversion utility work?
A conventional audio to text functionality works through listening to and recognizing a sound based input, followed by rendering a precise text centered transcript on a preferred system or device. The program’s voice recognition capability is the pivot behind this utility.
● What is the credibility of punctuation in a text transcription?
The transcription outputs rendered by a speech to text converter program use the comma to separate different elements and sections within the text, in the same way as you would normally do while writing a document with conventional methods.
● What is the significance of a clean verbatim?
A clean verbatim caters to a convenient readability of your audio-visual files through a slight customization process. This one is an accurately rendered transcription that keeps all the essential information within the recording, while eliminating the undesired, noisy background audio.
● What is the usage credibility of speech to text programs for students?
The speech to text converter programs are greatly beneficial for students in the sense that the latter works to remove a series of hindrances, like handwriting and speed matching difficulties, or transcription of thoughts during brainstorming sessions.
● Does working with a speech to text conversion facility require an internet connection?
The requirement of internet connectivity is rather selective with respect to the specific converter program or application you are working with. While some of them may require you to remain online throughout the transcription process, other may work well in the offline mode of operation.
● Ending Thoughts →
● Working with speech to text conversion software and application programs becomes quite handy in addressing a variety of personal and professional documentation needs.
● Browsing through the software market, you can select from a diversity of free and paid smartphone apps and system software utilities to transcribe text from audio files
● When looking for a dependable speech to text software program, you can pick the Wondershare Filmora editor application without having a second thought.
GIF to JPG Is as Simple as a Blink of an Eye
GIF to JPG is as Simple as a Blink of an Eye
An easy yet powerful editor
Numerous effects to choose from
Detailed tutorials provided by the official channel
We are a generation of people who are aware of all the tools that are catering to our needs. For all the procedures from basic to advance, now the tools are available helping us to deal with all such things.
Well, this read is for those who are in the editing field and always ready to try hands-on new animations. Every time it is not necessary that the file you have received is in the same format as required. In that case, the right tools are important to make the conversion.
By keeping the same in mind, we have presented this read for you. Here we discuss GIF to JPG converting tools or vice-versa. These tools will help you to get the task done as required, and you will not face any sort of problem at all. To know all the details keep reading till the last!
In this article
01 [How to Create GIF Animation from a Stack of JPGs](#Part 1)
02 [5 Ways to Convert GIF to Jpg [Online & Desktop]](#Part 2)
03 [5 Ways to Convert Jpg to GIF [Online & Desktop]](#Part 3)
Part 1 How to Create GIF Animation from a Stack of JPGs
Sometimes it happens that we have some pictures from our favorite even or so, and we are looking forward to combining all of them in one file. Undoubtedly, this conversion is easy but only when you are aware of the right steps. Until and unless you have no clue about the steps, the JPG to GIF conversion seems to be impossible. Let’s have a look at the steps you need to follow for it:
Step 1: Firstly, “choose the photos”. Until and unless you do not have the selected photos, you cannot initiate the conversion process.
Step 2: Choose the right tool. A tool is important to choose because, without it, you cannot be a part of the process. In this case, we are discussing ADOBE Photoshop.
Step 3: Upload all the photos that you have selected and move them to the timeline panel by clicking on the Windows option. Here you need to select “Create Video Timeline.”


Step 4: Do the editing as needed. You can simply add layers to the frame or change the basics of the particular image by clicking on it.

Step 5: Set up the loop timing and then click on “Save as GIF”


Part 2 Ways to Convert GIF to Jpg [Online & Desktop]
Well, in this section, we are discussing the best tools that cater to your needs of converting GIF to JPG easily. These tools are available in the form of extensions and also on desktops. It is on the user which format they want to consider. The tools to know are as follows:-
01Convertio
Convertio is a free online tool that converts GIF to JPG. It is easy to use, just upload the GIF and then download the converted JPG file. This tool is useful for those who want to share their animated GIFs on social media sites such as Facebook or Twitter that don’t accept animated GIFs. Furthermore, it is a perfect tool for marketers who want to use GIFs in their content, but they need the images to be in JPG format. However, it works like any other online converter, you upload your GIF, and it will generate an image of the same size as the original one.

02CloudConvert
CloudConvert is a cloud-based online conversion tool that converts files from one format to another. The service can convert GIFs to JPGs, PNGs, and other formats. Users are happy because CloudConvert is a reliable and easy-to-use tool that can help you convert files from one format to another. It has a simple interface with drag-and-drop features. It also offers an efficient way to convert large batches of files at once, without the need for uploading them on your device or using any additional software.

03FileZigZag
FileZigZag is an easy to use web app that converts GIFs to JPGs with just a few clicks. In the toolbar, you can upload the GIF of your choice and then convert it into one of three different resolutions: HD, Medium, or Low. The higher resolution will produce better quality but will take up more space on your hard drive. It is a free, open-source tool that can be used on both Windows and Mac computers.

04Aconvert
Aconvert is a tool that converts GIFs to JPGs. It’s a very simple and straightforward tool for converting GIFs to JPGs. It has two main features: Convert gif files to jpg files and Convert jpg files to gif files.
The first feature is self-explanatory: it will convert any gif file, even animated, into a jpg file. The second feature is also easy to use: you just have to drag and drop the desired jpg file onto the converter, and it will create a corresponding animated gif file of the same size as the original one.

05Ezgif
Ezgif is a free online tool that converts GIF to JPG. This tool was created by the team of developers at Ezgif in order to make converting GIFs as easy as possible. It’s a very simple and straightforward process, which makes it perfect for anyone who wants to convert GIFs but doesn’t want to spend time learning how it works. All you need to do is upload your GIF, choose the desired output format (JPG), and click convert.
It’s a free and easy to use tool that converts your animated GIFs into high-quality JPGs, PNGs, and WebP formats.

Part 3 5 Ways to Convert Jpg to GIF [Online & Desktop]
This section will help you to know about the best tools available to convert the JPG file into GIF. We all know it is not necessary that every time you have a GIF available suiting to the needs. In that case, these tools will help you. Well, the tools you can consider include-
01Filmora
Wondershare Filmora Video Editor is video editing software that helps users to create and share videos of their own. It provides an easy way to make videos from photos, videos, and music. Users can edit the video by adding text, filters, and other effects. This tool is a JPG to GIF converter as well that has been around for many years. It has evolved into a more sophisticated tool with time. This software has been used by professionals in many different fields such as marketing, design, photography, etc. Furthermore, it has a simple and intuitive interface which makes it easy to use.

Wondershare Filmora - Best Video Editor for Mac/Windows
5,481,435 people have downloaded it.
Build unique custom animations without breaking a sweat.
Focus on creating epic stories and leave the details to Filmora’s auto features.
Start a creative adventure with drag & drop effects and endless possibilities.
Filmora simplifies advanced features to save you time and effort.
Filmora cuts out repetition so you can move on to your next creative breakthrough.
02OnlineConverterFree
OnlineConverterFree is an online conversion tool that converts JPG images to GIF format. It is a free, easy-to-use, and powerful converter. Additionally, It can convert any of the following formats: JPEG, PNG, BMP, TIFF, and GIF.
It also has a preview function for checking the quality of the converted images before you download them. You just need to check that out so that you can analyze whether the same quality will suit your needs or not. Also, the conversion process is so fast that it can be used on large files without taking up too much time or space.

03MyGeodata Converter
MyGeodata Converter is a web-based tool that converts files from one format to another. It has the capability to convert between different formats like JPG, GIF, PNG, SVG, and more. The converter provides an easy way to convert JPG into the desired format. It also supports batch conversion of multiple files at the same time.
The interface of the tool is very simple, which means that even a layman will be able to use this tool.

04ConvertImage
ConvertImage is an online tool that converts images from one format to another. This tool is a JPG to GIF converter that can be used on the web. It has a drag and drop interface, which makes it easy to use for anyone who knows how to use a computer. Users can upload their photos from their computer or from any URL and then choose the desired output format.

05Pixillion image converter
Pixillion is a free online image converter that converts images between different formats.
It is one of the most popular converters available on the internet. It converts images between different formats and has a user-friendly interface. The Pixillion converter supports converting images from JPG to GIF, PNG, BMP, TIFF, and other formats. It also provides support for batch conversion of multiple files at once.

● Key Takeaways from This Episode →
● Converting GIF to JPG is a simple process.
● Filmora is an occupied tool for all conversions.
● Conversions are easy to do with the right set of tools.
We are a generation of people who are aware of all the tools that are catering to our needs. For all the procedures from basic to advance, now the tools are available helping us to deal with all such things.
Well, this read is for those who are in the editing field and always ready to try hands-on new animations. Every time it is not necessary that the file you have received is in the same format as required. In that case, the right tools are important to make the conversion.
By keeping the same in mind, we have presented this read for you. Here we discuss GIF to JPG converting tools or vice-versa. These tools will help you to get the task done as required, and you will not face any sort of problem at all. To know all the details keep reading till the last!
In this article
01 [How to Create GIF Animation from a Stack of JPGs](#Part 1)
02 [5 Ways to Convert GIF to Jpg [Online & Desktop]](#Part 2)
03 [5 Ways to Convert Jpg to GIF [Online & Desktop]](#Part 3)
Part 1 How to Create GIF Animation from a Stack of JPGs
Sometimes it happens that we have some pictures from our favorite even or so, and we are looking forward to combining all of them in one file. Undoubtedly, this conversion is easy but only when you are aware of the right steps. Until and unless you have no clue about the steps, the JPG to GIF conversion seems to be impossible. Let’s have a look at the steps you need to follow for it:
Step 1: Firstly, “choose the photos”. Until and unless you do not have the selected photos, you cannot initiate the conversion process.
Step 2: Choose the right tool. A tool is important to choose because, without it, you cannot be a part of the process. In this case, we are discussing ADOBE Photoshop.
Step 3: Upload all the photos that you have selected and move them to the timeline panel by clicking on the Windows option. Here you need to select “Create Video Timeline.”
Step 4: Do the editing as needed. You can simply add layers to the frame or change the basics of the particular image by clicking on it.
Step 5: Set up the loop timing and then click on “Save as GIF”
Part 2 Ways to Convert GIF to Jpg [Online & Desktop]
Well, in this section, we are discussing the best tools that cater to your needs of converting GIF to JPG easily. These tools are available in the form of extensions and also on desktops. It is on the user which format they want to consider. The tools to know are as follows:-
01Convertio
Convertio is a free online tool that converts GIF to JPG. It is easy to use, just upload the GIF and then download the converted JPG file. This tool is useful for those who want to share their animated GIFs on social media sites such as Facebook or Twitter that don’t accept animated GIFs. Furthermore, it is a perfect tool for marketers who want to use GIFs in their content, but they need the images to be in JPG format. However, it works like any other online converter, you upload your GIF, and it will generate an image of the same size as the original one.
02CloudConvert
CloudConvert is a cloud-based online conversion tool that converts files from one format to another. The service can convert GIFs to JPGs, PNGs, and other formats. Users are happy because CloudConvert is a reliable and easy-to-use tool that can help you convert files from one format to another. It has a simple interface with drag-and-drop features. It also offers an efficient way to convert large batches of files at once, without the need for uploading them on your device or using any additional software.
03FileZigZag
FileZigZag is an easy to use web app that converts GIFs to JPGs with just a few clicks. In the toolbar, you can upload the GIF of your choice and then convert it into one of three different resolutions: HD, Medium, or Low. The higher resolution will produce better quality but will take up more space on your hard drive. It is a free, open-source tool that can be used on both Windows and Mac computers.
04Aconvert
Aconvert is a tool that converts GIFs to JPGs. It’s a very simple and straightforward tool for converting GIFs to JPGs. It has two main features: Convert gif files to jpg files and Convert jpg files to gif files.
The first feature is self-explanatory: it will convert any gif file, even animated, into a jpg file. The second feature is also easy to use: you just have to drag and drop the desired jpg file onto the converter, and it will create a corresponding animated gif file of the same size as the original one.
05Ezgif
Ezgif is a free online tool that converts GIF to JPG. This tool was created by the team of developers at Ezgif in order to make converting GIFs as easy as possible. It’s a very simple and straightforward process, which makes it perfect for anyone who wants to convert GIFs but doesn’t want to spend time learning how it works. All you need to do is upload your GIF, choose the desired output format (JPG), and click convert.
It’s a free and easy to use tool that converts your animated GIFs into high-quality JPGs, PNGs, and WebP formats.
Part 3 5 Ways to Convert Jpg to GIF [Online & Desktop]
This section will help you to know about the best tools available to convert the JPG file into GIF. We all know it is not necessary that every time you have a GIF available suiting to the needs. In that case, these tools will help you. Well, the tools you can consider include-
01Filmora
Wondershare Filmora Video Editor is video editing software that helps users to create and share videos of their own. It provides an easy way to make videos from photos, videos, and music. Users can edit the video by adding text, filters, and other effects. This tool is a JPG to GIF converter as well that has been around for many years. It has evolved into a more sophisticated tool with time. This software has been used by professionals in many different fields such as marketing, design, photography, etc. Furthermore, it has a simple and intuitive interface which makes it easy to use.
Wondershare Filmora - Best Video Editor for Mac/Windows
5,481,435 people have downloaded it.
Build unique custom animations without breaking a sweat.
Focus on creating epic stories and leave the details to Filmora’s auto features.
Start a creative adventure with drag & drop effects and endless possibilities.
Filmora simplifies advanced features to save you time and effort.
Filmora cuts out repetition so you can move on to your next creative breakthrough.
02OnlineConverterFree
OnlineConverterFree is an online conversion tool that converts JPG images to GIF format. It is a free, easy-to-use, and powerful converter. Additionally, It can convert any of the following formats: JPEG, PNG, BMP, TIFF, and GIF.
It also has a preview function for checking the quality of the converted images before you download them. You just need to check that out so that you can analyze whether the same quality will suit your needs or not. Also, the conversion process is so fast that it can be used on large files without taking up too much time or space.
03MyGeodata Converter
MyGeodata Converter is a web-based tool that converts files from one format to another. It has the capability to convert between different formats like JPG, GIF, PNG, SVG, and more. The converter provides an easy way to convert JPG into the desired format. It also supports batch conversion of multiple files at the same time.
The interface of the tool is very simple, which means that even a layman will be able to use this tool.
04ConvertImage
ConvertImage is an online tool that converts images from one format to another. This tool is a JPG to GIF converter that can be used on the web. It has a drag and drop interface, which makes it easy to use for anyone who knows how to use a computer. Users can upload their photos from their computer or from any URL and then choose the desired output format.
05Pixillion image converter
Pixillion is a free online image converter that converts images between different formats.
It is one of the most popular converters available on the internet. It converts images between different formats and has a user-friendly interface. The Pixillion converter supports converting images from JPG to GIF, PNG, BMP, TIFF, and other formats. It also provides support for batch conversion of multiple files at once.
● Key Takeaways from This Episode →
● Converting GIF to JPG is a simple process.
● Filmora is an occupied tool for all conversions.
● Conversions are easy to do with the right set of tools.
A Guide to Speed up a Video on Splice
Create High-Quality Video - Wondershare Filmora
An easy and powerful YouTube video editor
Numerous video and audio effects to choose from
Detailed tutorials are provided by the official channel
The availability of video editing apps enables you to turn your device into a compelling tool to make video tweaks. Several editing abilities are available, ranging from adding overlays, text, music, and changing speed. The latter carries more weight, especially when dealing with a wide range of scenes. You can either slow down or speed up your video with a click of a button. In this article, we focus on how to speed up video on Splice and its alternative.

In this article
01 Can I speed up a video using Splice?
02 Alternative: Try out Filmora V11’s Speed Ramping
03Additional Video Splice Apps for Android
Can I speed up a video using Splice?
Yes, Splice is a state-of-the-art tool that comprises several editing features, including speed up and down controls. It works with iOS devices like iPhones and iPads and is a sure bet to edit your videos on the go. The Splice app is generally useful for social media influencers who want to market their products and hold online tutorials, among other functions.t
Splice’s video speed control features
Among the features of Splice, is the ability to speed up or slow down your video. A splice speed ramp is the rate of acceleration or deceleration of a clip. This technique smoothly adjusts the video speed to the desired pace.
Some other features of the Splice
- You can also add music to your videos. Music attracts attention, thereby keeping them glued during the video playback.
- The trim and crop features let you cut out unnecessary footage from your video for a polished finish. Likewise, you can use the app to remove some segments that you don’t want to feature in your video.
- It brings you exclusive effects that widely enhance your videos. Adding certain elements, like overlay text, and changing speed, among other aspects, is a great way to enrich your video.
- Utilizing the social media platform is Splice’s most influential feature. It facilitates the online sharing of videos once you have edited and completed the creation process. You can easily upload your video to Instagram, Facebook, and YouTube, among other platforms.
Alternative: Try out Filmora V11’s Speed Ramping
An alternative to Splice video in Filmora V11’s Speed Ramping. Filmora brings you ramping features to make breathtaking videos.
- Filmora brings you six preset speed effects to create professional speed changes such as flash in, bullet time, montage, etc.
- This tool helps you to maintain the original audio pitch when changing the video’s speed.
- Filmora also supports customized speed ramping templates for a unique speed ramping effect.
For Win 7 or later (64-bit)
For macOS 10.12 or later
How to use Filmora to speed up video
Filmora is a sophisticated tool that quickly solves any editing functions for you. It has an intuitive interface, accommodating both professionals and beginners. It is a quick solution to speed up your video for a fast-track action. Follow these steps to speed up the video with Filmora to produce high-end quality videos.
Step 1. Launch Filmora and open the video
First, open the Filmora app on your device, then search for the target video to speed up. Alternatively, you can drag and drop the videos onto the interface.
Step 2: The speed
Working Vary with the video from your timeline Right-click on the video, and a menu will pop up immediately. Then tap on “Speed and Duration” and select the number of times you want to speed up your speed. These range from X2, X3, X4, X5, or any other speed rate of your choice.

Step 3: Modify the Duration
Specify the duration of your video; it will take Remember that the duration should be less than the original one if you aim to speed up the video. Then click on the “OK” button to preview the video.
Step 4. Save and export your video
Finally, it’s time to save and share your video. Click on the “File” tab and go to the “Save Project” option. Give your project a name then, tap on the “Save” option. Then use the “Export” feature to export your video to other media sites.
Using Splice to Speed Up a Video
Before you speed up a video on Splice, it is better to know how to use the Splice app and make impressive videos.
1) Starting a video project
Ensure the Splice app is installed on your device. Then choose what needs to be the first part of your video. This could be a title screen, or you could add a video first. To create a title screen, click on the “Title” button. Then type in the text to use as a title. Likewise, you can select how long the title screen should show in your video by adjusting the “duration” slider. Next, continue to add content after your title or the video you used.
2) Add videos
Check for the video to add to your project and click on the “+” button. You should notice the “Albums” screen show up and your videos will be visible in the “Camera roll” section. Choose the video you want to edit and click on the “Done” tab. Next, your videos will upload into the project, and be brought back to the main screen where you can view the project.
3) Edit your videos
The Splice app is rich in various editing tools to change your video into any enticing piece of work.
To trim and cut video: To trim your video, just tap on your video and drag the edge clip to the portion you want to trim.
Meanwhile, to cut your video, tap on the video and locate where you want to cut the clip. Check on the “yellow” line as it is the guideline for your clip. Then tap on your clip once more and hit the “Split” tab to separate the video into two.
To add video overlays, first, insert your video into the timeline. Then press and hold on to the media that you want to add as an overlay. Next, drag the clip to the “Drop here to turn into an overlay” tab to add it.
To add text: Adding text to your video allows you to expand on it more easily. To do this, tap on the “Title” icon at the bottom of the timeline. Then double-tap on the media screen and type in the text you want to add.
To add music: For music, tap on the “Music” icon found at the bottom of the timeline. You can extract music from the “Splice” gallery or import your music from your device.
Add filters and other effects: You can also add filters to your clip. Just click on the “Filter” icon found at the bottom of the timeline. Then choose the filter of choice you wish to add and, finally, adjust the filter level.
4) Save and export your video
After a successful edit, it is time to save your project onto your device. Splice lets you choose an output format to save your file into. Once saved on your computer, you can now share it on social media sites.
• Remember, you can do more with Splice, such as speeding up your video. This section walks you through simple ways to speed up video for a professional look.
Here are the steps to speed up your video on Splice
Step 1: Choose a video
You first need to select the video that you need to speed up. Go to the timeline and select the video to add to the timeline. You can select the video from the Splice gallery by importing it or dragging and dropping the video onto the timeline.

Step 2: Select your speed
It is the speed rate that determines how fast or slow is your video. For this, you should select a fast speed. To do so, first, choose the “Speed” tab from the bottom toolbar. Then tap the “Speed Effects” option and specify your speed as X2, X4, etc.
Step 3: Begin the effect
Identify where you want to start the speeding effect and position the yellow line at that point.

Step 4. Add a speed point
Just tap the white “+” button to add a speed point to your video.
Step 5: Determine an endpoint
Now position the yellow line once more at the point where you intend to end the effect. Next, click on the white “+” button again and you will have specified the endpoint.
Step 6. Set the desired speed
Finally, choose the segment whose speed you wish to adjust. Use the “Slider” at the bottom to set the speed you want for your video. Then save and share your video.

Conclusion
● Video editing entails many aspects. Speed control is one of the major specifications of a successful video. Speeding up your video will fast forward to the selected portion and, thereby, eliminate repetitions or non-important sections of your video. This article covers how to splice and speed up video and also perform other video edits.
The availability of video editing apps enables you to turn your device into a compelling tool to make video tweaks. Several editing abilities are available, ranging from adding overlays, text, music, and changing speed. The latter carries more weight, especially when dealing with a wide range of scenes. You can either slow down or speed up your video with a click of a button. In this article, we focus on how to speed up video on Splice and its alternative.
In this article
01 Can I speed up a video using Splice?
02 Alternative: Try out Filmora V11’s Speed Ramping
03Additional Video Splice Apps for Android
Can I speed up a video using Splice?
Yes, Splice is a state-of-the-art tool that comprises several editing features, including speed up and down controls. It works with iOS devices like iPhones and iPads and is a sure bet to edit your videos on the go. The Splice app is generally useful for social media influencers who want to market their products and hold online tutorials, among other functions.t
Splice’s video speed control features
Among the features of Splice, is the ability to speed up or slow down your video. A splice speed ramp is the rate of acceleration or deceleration of a clip. This technique smoothly adjusts the video speed to the desired pace.
Some other features of the Splice
- You can also add music to your videos. Music attracts attention, thereby keeping them glued during the video playback.
- The trim and crop features let you cut out unnecessary footage from your video for a polished finish. Likewise, you can use the app to remove some segments that you don’t want to feature in your video.
- It brings you exclusive effects that widely enhance your videos. Adding certain elements, like overlay text, and changing speed, among other aspects, is a great way to enrich your video.
- Utilizing the social media platform is Splice’s most influential feature. It facilitates the online sharing of videos once you have edited and completed the creation process. You can easily upload your video to Instagram, Facebook, and YouTube, among other platforms.
Alternative: Try out Filmora V11’s Speed Ramping
An alternative to Splice video in Filmora V11’s Speed Ramping. Filmora brings you ramping features to make breathtaking videos.
- Filmora brings you six preset speed effects to create professional speed changes such as flash in, bullet time, montage, etc.
- This tool helps you to maintain the original audio pitch when changing the video’s speed.
- Filmora also supports customized speed ramping templates for a unique speed ramping effect.
For Win 7 or later (64-bit)
For macOS 10.12 or later
How to use Filmora to speed up video
Filmora is a sophisticated tool that quickly solves any editing functions for you. It has an intuitive interface, accommodating both professionals and beginners. It is a quick solution to speed up your video for a fast-track action. Follow these steps to speed up the video with Filmora to produce high-end quality videos.
Step 1. Launch Filmora and open the video
First, open the Filmora app on your device, then search for the target video to speed up. Alternatively, you can drag and drop the videos onto the interface.
Step 2: The speed
Working Vary with the video from your timeline Right-click on the video, and a menu will pop up immediately. Then tap on “Speed and Duration” and select the number of times you want to speed up your speed. These range from X2, X3, X4, X5, or any other speed rate of your choice.
Step 3: Modify the Duration
Specify the duration of your video; it will take Remember that the duration should be less than the original one if you aim to speed up the video. Then click on the “OK” button to preview the video.
Step 4. Save and export your video
Finally, it’s time to save and share your video. Click on the “File” tab and go to the “Save Project” option. Give your project a name then, tap on the “Save” option. Then use the “Export” feature to export your video to other media sites.
Using Splice to Speed Up a Video
Before you speed up a video on Splice, it is better to know how to use the Splice app and make impressive videos.
1) Starting a video project
Ensure the Splice app is installed on your device. Then choose what needs to be the first part of your video. This could be a title screen, or you could add a video first. To create a title screen, click on the “Title” button. Then type in the text to use as a title. Likewise, you can select how long the title screen should show in your video by adjusting the “duration” slider. Next, continue to add content after your title or the video you used.
2) Add videos
Check for the video to add to your project and click on the “+” button. You should notice the “Albums” screen show up and your videos will be visible in the “Camera roll” section. Choose the video you want to edit and click on the “Done” tab. Next, your videos will upload into the project, and be brought back to the main screen where you can view the project.
3) Edit your videos
The Splice app is rich in various editing tools to change your video into any enticing piece of work.
To trim and cut video: To trim your video, just tap on your video and drag the edge clip to the portion you want to trim.
Meanwhile, to cut your video, tap on the video and locate where you want to cut the clip. Check on the “yellow” line as it is the guideline for your clip. Then tap on your clip once more and hit the “Split” tab to separate the video into two.
To add video overlays, first, insert your video into the timeline. Then press and hold on to the media that you want to add as an overlay. Next, drag the clip to the “Drop here to turn into an overlay” tab to add it.
To add text: Adding text to your video allows you to expand on it more easily. To do this, tap on the “Title” icon at the bottom of the timeline. Then double-tap on the media screen and type in the text you want to add.
To add music: For music, tap on the “Music” icon found at the bottom of the timeline. You can extract music from the “Splice” gallery or import your music from your device.
Add filters and other effects: You can also add filters to your clip. Just click on the “Filter” icon found at the bottom of the timeline. Then choose the filter of choice you wish to add and, finally, adjust the filter level.
4) Save and export your video
After a successful edit, it is time to save your project onto your device. Splice lets you choose an output format to save your file into. Once saved on your computer, you can now share it on social media sites.
• Remember, you can do more with Splice, such as speeding up your video. This section walks you through simple ways to speed up video for a professional look.
Here are the steps to speed up your video on Splice
Step 1: Choose a video
You first need to select the video that you need to speed up. Go to the timeline and select the video to add to the timeline. You can select the video from the Splice gallery by importing it or dragging and dropping the video onto the timeline.
Step 2: Select your speed
It is the speed rate that determines how fast or slow is your video. For this, you should select a fast speed. To do so, first, choose the “Speed” tab from the bottom toolbar. Then tap the “Speed Effects” option and specify your speed as X2, X4, etc.
Step 3: Begin the effect
Identify where you want to start the speeding effect and position the yellow line at that point.
Step 4. Add a speed point
Just tap the white “+” button to add a speed point to your video.
Step 5: Determine an endpoint
Now position the yellow line once more at the point where you intend to end the effect. Next, click on the white “+” button again and you will have specified the endpoint.
Step 6. Set the desired speed
Finally, choose the segment whose speed you wish to adjust. Use the “Slider” at the bottom to set the speed you want for your video. Then save and share your video.
Conclusion
● Video editing entails many aspects. Speed control is one of the major specifications of a successful video. Speeding up your video will fast forward to the selected portion and, thereby, eliminate repetitions or non-important sections of your video. This article covers how to splice and speed up video and also perform other video edits.
Easy Steps to Create Intro Video with After Effects

It’s difficult to make an intro in After Effects. To start, you must have a natural beginning that will catch the
viewer’s attention in the film you’ve made right away. Then, you can improve the caliber of your intros by using built-in filters, transition effects, overlays, animation, and more! Therefore, we’re confident that this article will be helpful to you if you’ve been trying to learn how to create After Effects intros of the highest level. Continue reading to learn more.
Let’s start off!
1. Create a new composition for your intro
You must build up your video’s composition based on the output. You can upload the previously recorded video after choosing the composition and the runtime. Right-click again and select “Pre-compose” from the menu that appears. To make it simpler to find later, you can also rename your movie here.
The composition can then include a solid layer. Follow *Layer > New > Solid* to get to this option. Additionally,
you can choose a hue based on the type of video you want to make. Additionally, you may use the Text option to build text layers, which will allow you to split the words at different points in the document. You can edit each word separately when you break it into layers. Finally, you can move the text around and change the color of the reader to make it more appropriate for your films.
After Effects makes it incredibly simple to edit the text composition and import it into the timeline of the film.
A panel appears on the right after importing a text composition. Here, you can alter the text’s color, position,
and size.
2. Add the first transition layer
By include the transition layer, you may use After Effects’ effects templates to apply a variety of effects to your
videos. You can experiment with a variety of transition layers in After Effects before selecting the ideal one (CC Light Wipe is a popular choice).
You can modify the transition after applying it to the layer. For instance, you may decide to apply the second
key transition at a later period in the timeline and configure the first key transition to occur immediately at the start of the timeline. Setting the completion value is crucial since it will influence how long the word will remain displayed in the video.
3. Add the second transition layer
The transition effect you introduced in the first stage can either be maintained here, or you can select an
entirely different one. According to how long you want the text to be displayed, add the layer and adjust
completion. The reader is invisible when the completion value is set to 100%, or the word is said when it is set
to 0%.
A memory sketch
If you want to make a black-and-white video that is more interesting, the memory sketch is a great template to use. You can make a visually beautiful video with its outstanding text captions, fluid transitions, and excellent animations.
Toolkit for Instagram
These days, Instagram is a very popular social media site. Instagram is a platform where reels and videos
flourish, therefore you must make every effort to differentiate your video from the millions of others available.
The Instagram Toolkit template meets the standards of the social media network by being brief, clear, and
appealing.
Lighting sweep
A final transition effect, which can be found in the *Effects > Generate *section, must be added to the video in order to complete the effect. The final flourish can be added in the same way as the other keyframes. In this step, you can use the edge intensity, sweep intensity, and direction. This allows you to seamlessly combine the transition of words with lighting effects.
These are some quick and easy techniques to adding some intros to your videos that look professional. Let’s
also take a look at some well-known templates you may utilize to make perfect video intros. Because the initial few seconds of any video are so important, After Effects has put together some incredible templates that have a variety of video clips, images, text, sound effects, and music tracks. To produce the video you want, you must obtain the ideal template.
The Bottom Line
Utilizing templates will hasten your workflow even though it takes some time to become familiar with After
Effects’ various tools. To gain a feel for how After Effects functions, we advise playing around by adding some
clips and titles. When you do that, you will be well on your way to creating a fantastic intro for your upcoming
video project.
Free Download For Win 7 or later(64-bit)
Free Download For macOS 10.14 or later
Free Download For macOS 10.14 or later
Also read:
- Updated 3 Ways to Combine 2 or 3 Videos Into 1
- Hitfilm Express - A Guide to Download, Install, Key Features
- 2024 Approved Slow Down the GIF to Emphasize Details Better. To Do so, Read This Guide and Learn to Use the Best Platforms for Slow-Motion GIFs
- In 2024, How to Resize FLV Video EfficientlyWindows, Mac, Android, iPhone &
- New Free LUTs for OBS How to Use Them for 2024
- How to Use a Stabilization Tool in Filmora
- New 100+ Best TikTok Captions Enhance Your Content
- Updated You Can Splice Video on the iPhone Using Various Applications. This Article Will Guide You Through the Steps Necessary to Splice Your Videos
- New In 2024, How to Rotate AVI in Vertical/Portrait Orientation Windows, Mac,Android, iPhone & Online
- In 2024, Kinetic Typography Text Effect 【EASY&FAST】
- New Gif to Svg, Svg to Gif, Convert Gif to Svg, Animated Svg to Gif, Convert Svg to Gif, Svg to Gif Converter, Svg to Gif Animation, Svg Animation to Gif, Gif to Svg Converter
- New 2024 Approved How to Create Datamoshing Effect to Your Footage in After Effects?
- New In 2024, Control Playback Speed in Premiere Pro
- New 2024 Approved Kdenlive Review – Is It The Best Video Editor?
- New In 2024, Step by Step to Rotate Videos Using OBS
- Updated How to Make a Neon Dance Effect With Filmora for 2024
- New Learn About Open Broadcaster Software and How to Perform Obs Color Correction. Also, Explore the Various Aspects of Color Correction Like Contrast, Brightness, Saturation, Among Others
- New Thousands Already Know Ezgif and So Can You for 2024
- In 2024, Want to Make Your Slideshows More Fun and Exciting? Follow the Given Discussion to Know How to Make a Slideshow Gif, Thereby Making Your Slideshow More Enjoyable than Ever
- How To Split Videos in Premier Pro for 2024
- In 2024, Funny Content Ideas for YouTube Videos
- Benefits of Live Streaming on YouTube
- Updated In 2024, Learn Topaz Video Enhance AI Review and Achieve Powerful Video Conversion
- Updated In 2024, How to Add Subtitles in VLC Media Play
- New 2024 Approved 4 Ways to Merge MP4 and MP3
- New 2024 Approved How to Stabilize Videos for Free with Google Photos App
- What Is TS Format and How To Play TS Files? Basic Tips for 2024
- In 2024, How to Change/Fake Your Realme Narzo 60 5G Location on Viber | Dr.fone
- How to Stop My Spouse from Spying on My Vivo Y27 4G | Dr.fone
- In 2024, Full Guide to Unlock Apple iPhone 13 Pro Max with iTunes | Dr.fone
- 9 Mind-Blowing Tricks to Hatch Eggs in Pokemon Go Without Walking On Vivo V29 | Dr.fone
- Lava Yuva 2 Pro ADB Format Tool for PC vs. Other Unlocking Tools Which One is the Best?
- Is pgsharp legal when you are playing pokemon On Oppo A78 5G? | Dr.fone
- Will iSpoofer update On Oppo F23 5G | Dr.fone
- Easy steps to recover deleted data from Infinix Hot 40i
- How to Make Animated Explainer Videos for 2024
- How Can Xiaomi 13TMirror Share to PC? | Dr.fone
- In 2024, Hassle-Free Ways to Remove FRP Lock on Itelwith/without a PC
- In 2024, How to Detect and Stop mSpy from Spying on Your Asus ROG Phone 8 Pro | Dr.fone
- Create AI Avatar Video with Templates
- Title: New Want to Skip the Typing Hustle with a Convenient and Instant Conversion of Your Words Into Text? Stay Here to Learn About some Irresistible Software Solutions to Address the Concern
- Author: Chloe
- Created at : 2024-04-24 07:08:24
- Updated at : 2024-04-25 07:08:24
- Link: https://ai-editing-video.techidaily.com/new-want-to-skip-the-typing-hustle-with-a-convenient-and-instant-conversion-of-your-words-into-text-stay-here-to-learn-about-some-irresistible-software-solu/
- License: This work is licensed under CC BY-NC-SA 4.0.
