
:max_bytes(150000):strip_icc():format(webp)/GettyImages-990620130-ec2a7076e3f043bfa4f540b72d2034c6.jpg)
New With Looping Videos, People Stay on Your Site Longer, Boosting Engagement. With Video Being Watched on Mobile over 3X More than Any Other Content, Its an Essential Part of Mobile Advertising
With Looping Videos, People Stay on Your Site Longer, Boosting Engagement. With Video Being Watched on Mobile over 3X More than Any Other Content, It’s an Essential Part of Mobile Advertising
Looping video is a great way to keep your audience engaged, and it can help you stand out from the crowd. The best part about looping video is that it doesn’t require any special equipment or software, so you don’t have to spend money or time learning how to do it! You can use looped clips as part of a larger advertisement campaign by repeating the same content.
Looping a video on Android is a great way to watch your favorite shows or movies without having to go through the hassle of downloading each episode or movie. You can also use it to share videos with others, which can be perfect for when you want to show off your new movie collection but don’t want to bother downloading it on your phone.
Looping a video on Android can be helpful for several reasons. First, it’s just plain fun to watch a video over and over again! Your phone doesn’t have to work as hard to keep the video playing. This means that your battery life will last longer and you’ll be able to use your phone more often without worrying about it running out of battery life quickly.
Part 1: Steps to Loop a Video on Android
Looping videos can also come in handy when trying to find something specific in a series of videos. For example, if you want to see how long it takes before someone gets hit by a car while crossing the street, then looping through the first few seconds of each clip might help find exactly what you’re looking for!
Loop a video on android is quite simple and easy. You not only can loop a video but also customize it according to your choice. Let’s take an example if you install a reverse or loop app on your mobile phone. Firstly, we install an app whose name is Boomerate reverse or loop app.
Step1 Open the app and record or select the video from the gallery
You can install it from the play-store after installation opens the app. You can record a live video by clicking on the white circle or selecting any media from your gallery. These apps allow you to create short video loops that play over and over again. They’re perfect for setting up as a screensaver or for use as a fun way to show off your favorite photos.

Step2 Crop or select the duration of the video
After selecting the video, you can trim your video or select the duration of your video. Suppose you have a video of 30 seconds so you can also make that video of 1 minute.

Step3 Select the loop option
Several options appear below where you can edit effects to your video or loop your video without any interruption. You can loop your video 3 to 4 times or so on.

Step4 Save the video to the gallery
After editing the video click on the save button in the top left corner. To save the video to your phone, you can use the Save button on the video player or the Save button on the phone’s media player. You can easily access and watch your videos anytime you want.

One of the great things about Android is that you can use it to record looping videos. This can be helpful if you want to create a video that you can share with others or use as a background on your device. If you have a lot of videos that you want to keep on your phone, then you can use loop video to help you save space.
Part 2: How to Edit Time-Lapse Video on a Computer
There are a few things to keep in mind when creating a time-lapse video on a computer. First, make sure the video resolution is high enough to create a good image. Second, make sure the video is smooth and free from any choppy or jittery movements. Finally, make sure the video is timed correctly so that the scenes move in smooth, chronological order.
Here’s how you can make a time-lapse video on your computer:
Step1 Install a program like Final Cut Pro or Filmora. These programs allow you to set up scenes and transitions in advance so that when you start filming, everything is ready to go.
Step2 Get started by choosing a period and location this will help you decide what kind of scenery will make sense for your scene. The longer the period, the more important it is to pick one that has a lot of natural light. If there are no natural light sources available, consider shooting on an overcast day or at night instead.
Step3 Next, choose what type of camera angle works best for showing off your subject matter; this could be static shots or moving ones that mimic motion through time or space. Also, consider how far away from your subject matter you want viewers to see them from before deciding on which angle works best for showing both sides equally well without making either side too large.
Benefits of editing time-lapse on computer
Time-lapse videos are a great way to capture incredible footage of your life with minimal effort. You can set the speed of your camera, and then sit back and watch as it moves through time in real-time.
You can play with the speed of the camera to get just the right look. You might find that you want it to go faster or slower, or even stop altogether so that you can get a good shot of something specific in your life (like the chirping of birds or water droplets).
Editing time-lapses on your computer allows you to zoom in and out at will you don’t have to worry about adjusting the zoom on your camera when you’re filming something out of frame, which means less work for you!
Time-lapses are great for making movies that go from beginning to end you can make one movie that shows how you spend each day from sunrise until sunset or one where every hour is its scene. This way, people who watch your videos will see exactly what they need without having to listen over and over again about all things related to everyday life (which would be boring!).
Filmora editing software:
Filmora is the best editing software for video. We can help you edit your videos in a way that will make them look professional and polished. We provide an easy-to-use interface that makes it simple for any level of user to edit their videos. The interface is clean and intuitive, making it easy for even beginner users to learn how to use the software.
Filmora is designed around simplicity, so you don’t have to worry about being overwhelmed by all the features available on other editing software. You can quickly find what you’re looking for by searching through our library of over 50 000 videos or by browsing through our library of categories such as music videos, TV commercials, wedding videos, movie trailers, and much more!
Steps for editing video on Filmora:
You can use Filmora on your desktop or laptop, which makes it easy for people who want to edit their videos in the comfort of their home but don’t want to spend an arm and a leg on an expensive computer system. If you’re looking for a great way to start editing videos, look no further than Filmora!
Free Download For Win 7 or later(64-bit)
Free Download For macOS 10.14 or later
Step1 Download the Filmora software
Install Filmora from its official website and open it. Click on create a new project and then start doing your editing.

Step2 Select a video from its location
Click on the plus symbol and select the specific video you want to edit. Or you just simply drag and drop the video into the software.

Step3 Put the video on the timeline
After selecting the video place it on a timeline or drop it on the timeline. If you have multiple clips then place them in a sequence.

Step4 Customize the video
You can add different effects to your video. You can select a title page according to your choice or select any transition.

Step5 Set duration and export it
Set the duration of your video, you can also trim your video or set the time of each clip. Lastly, export the video to your desktop.
Conclusion
The use of looping video on android is a trend that works for pretty much every type of app, from gaming to streaming video to social apps and beyond. It offers another level of engagement for users, as well as something more cinematic and exciting. Furthermore, it offers an easy way to improve your app’s functionality.
After making a loop video, you must require some editing tools. But not need to worry about it, Filmora is the best editing software for your needs. First, it’s easy to use. It has a lot of features that make it so simple to get started and make you look like an expert. You can simply install it and use it, with no need for any registration.
Free Download For macOS 10.14 or later
Step1 Download the Filmora software
Install Filmora from its official website and open it. Click on create a new project and then start doing your editing.
Step2 Select a video from its location
Click on the plus symbol and select the specific video you want to edit. Or you just simply drag and drop the video into the software.
Step3 Put the video on the timeline
After selecting the video place it on a timeline or drop it on the timeline. If you have multiple clips then place them in a sequence.
Step4 Customize the video
You can add different effects to your video. You can select a title page according to your choice or select any transition.
Step5 Set duration and export it
Set the duration of your video, you can also trim your video or set the time of each clip. Lastly, export the video to your desktop.
Conclusion
The use of looping video on android is a trend that works for pretty much every type of app, from gaming to streaming video to social apps and beyond. It offers another level of engagement for users, as well as something more cinematic and exciting. Furthermore, it offers an easy way to improve your app’s functionality.
After making a loop video, you must require some editing tools. But not need to worry about it, Filmora is the best editing software for your needs. First, it’s easy to use. It has a lot of features that make it so simple to get started and make you look like an expert. You can simply install it and use it, with no need for any registration.
Speed Up/Down Videos in VLC
You can add fun by modifying the video speed when you play a video. To perform the detailed effects on the content, you need sophisticated programs that are reliable and user-friendly. Do you know about the VLC playback speed? Are there any options in the VLC app to edit the playback speed as per your needs?
Here, you will be learning about the precise video edits you can perform effortlessly on your captured content using VLC and its alternative application. Stay connected and scroll down for enlightening facts on it.

In this article
01 What is VLC?
02 How to speed up/down videos in VLC
03 Alternative for changing speed for videos
Part 1: What is VLC?
VLC is an open-source program, and it supports media files to play on its interface efficiently. This app supports different file formats and is available in many versions. You can use VLC players on Windows, Mac, and Linux platforms. There are options to play a part of a file using this program when trying to download any video file into your system.

Here, you can find video edit features like you can add subtitles and modifying the playback speed precisely. It is a flexible player with a simple user interface. You do not require any prior knowledge to play the desired content on this interface. All the essential controls are explicit and you can reach for them quickly.
Part 2: How to speed up/down videos in VLC
It is high time to learn about the VLC playback speed that you can implement on your video effortlessly. You must carefully follow up the below instructions and perform the right clicks to edit the video speed.
The stepwise guidelines to modify the video speed using the VLC application.
Step 1
Install VLC from its official webpage according to your system OS type and then upload the desired video into its working space.

Step 2
Now, tap the Playback option from the menu and choose the required speed duration of the content from the expanded items. Select faster, slower, normal speed in pace with your needs and modify the video speed accordingly.

Save the changes you had performed on the video and play the track to view the changes done on this media space.
The Filmora video editor is the reliable and performable tool that edits the video beyond limitations. The above instructions will guide you to edit the video speed using the VLC player. If you search for an alternative tool to perform further edits on your captures, then quickly scroll down for more enlightening facts.
Part 3: Alternative for changing speed for videos
The Filmora video editor provides you with in-built templates, filter effects, transitions to make the content attractive. If you take closer looks at the filters, you will find mesmerizing special effects available as ready to use the element to edit your uploaded content on the timeline. Few clicks are enough to bring the best in your video in no time. It is easy to use and you can embed efficient elements to the video precisely. There are options to insert desired elements from integrated libraries like Filmstock, Giphy to add flavors to your video content.
The Key Features of Filmora Video Editor program.
- This app supports all file types effortlessly, and you can import any media file quickly despite its size.
- Simple clicks are sufficient to include desired effects on the video content.
- Filters, transitions, and special elements to insert into the uploaded file.
- Use audio customization features like Audio ducking, audio equalizers, and detach audio to personalize the content.
- Tap the preview option to view the edited file before finalizing the export option.
Connect with the integrated libraries and download the desired elements to customize the uploaded content. During the export action, you can change its file type, resolution, and size to add compatibility for end streaming devices. Drag and drop the elements into the working timeline to insert the changes to the captured media.
The detailed guide on how to change the video speed using the Filmora video editor tool.
Step 1: Install the program
Download the application from its official website and install it by following the instruction wizard. Then, launch the app and import the media file into the working space. To make further edits, drag and drop the file into the timeline.

Step 2: Customize the video speed
Next, make a right-click on the imported media file and select the Speed and Duration option from the expanded list. Adjust the speed slider from the pop-up window to change the video duration while playing. Finally, save the changes by tapping the OK button.

Now, play the edited content to witness the changes in the video speed. The video plays according to the customized value, and you can have a preview before exporting it to the necessary storage space.
Conclusion
Wondershare Filmora
Get started easily with Filmora’s powerful performance, intuitive interface, and countless effects!
Try It Free Try It Free Try It Free Learn More about Filmora>

Thus, in detail, you had an enlightening discussion on the VLC playback speed. You would have understood the tips and tricks associated with these video edits. Use the Filmora video editor application to create stunning videos for your needs. It is a reliable program, and you can go for it without any hesitation. You can customize the content by modifying every detail of the content precisely. Choose Filmora and enjoy the video edits beyond boundaries. Create content as per your requirements without sacrificing any parameters. Stay tuned for many more facts on video edits using the Filmora video editor application.
02 How to speed up/down videos in VLC
03 Alternative for changing speed for videos
Part 1: What is VLC?
VLC is an open-source program, and it supports media files to play on its interface efficiently. This app supports different file formats and is available in many versions. You can use VLC players on Windows, Mac, and Linux platforms. There are options to play a part of a file using this program when trying to download any video file into your system.
Here, you can find video edit features like you can add subtitles and modifying the playback speed precisely. It is a flexible player with a simple user interface. You do not require any prior knowledge to play the desired content on this interface. All the essential controls are explicit and you can reach for them quickly.
Part 2: How to speed up/down videos in VLC
It is high time to learn about the VLC playback speed that you can implement on your video effortlessly. You must carefully follow up the below instructions and perform the right clicks to edit the video speed.
The stepwise guidelines to modify the video speed using the VLC application.
Step 1
Install VLC from its official webpage according to your system OS type and then upload the desired video into its working space.
Step 2
Now, tap the Playback option from the menu and choose the required speed duration of the content from the expanded items. Select faster, slower, normal speed in pace with your needs and modify the video speed accordingly.
Save the changes you had performed on the video and play the track to view the changes done on this media space.
The Filmora video editor is the reliable and performable tool that edits the video beyond limitations. The above instructions will guide you to edit the video speed using the VLC player. If you search for an alternative tool to perform further edits on your captures, then quickly scroll down for more enlightening facts.
Part 3: Alternative for changing speed for videos
The Filmora video editor provides you with in-built templates, filter effects, transitions to make the content attractive. If you take closer looks at the filters, you will find mesmerizing special effects available as ready to use the element to edit your uploaded content on the timeline. Few clicks are enough to bring the best in your video in no time. It is easy to use and you can embed efficient elements to the video precisely. There are options to insert desired elements from integrated libraries like Filmstock, Giphy to add flavors to your video content.
The Key Features of Filmora Video Editor program.
- This app supports all file types effortlessly, and you can import any media file quickly despite its size.
- Simple clicks are sufficient to include desired effects on the video content.
- Filters, transitions, and special elements to insert into the uploaded file.
- Use audio customization features like Audio ducking, audio equalizers, and detach audio to personalize the content.
- Tap the preview option to view the edited file before finalizing the export option.
Connect with the integrated libraries and download the desired elements to customize the uploaded content. During the export action, you can change its file type, resolution, and size to add compatibility for end streaming devices. Drag and drop the elements into the working timeline to insert the changes to the captured media.
The detailed guide on how to change the video speed using the Filmora video editor tool.
Step 1: Install the program
Download the application from its official website and install it by following the instruction wizard. Then, launch the app and import the media file into the working space. To make further edits, drag and drop the file into the timeline.
Step 2: Customize the video speed
Next, make a right-click on the imported media file and select the Speed and Duration option from the expanded list. Adjust the speed slider from the pop-up window to change the video duration while playing. Finally, save the changes by tapping the OK button.
Now, play the edited content to witness the changes in the video speed. The video plays according to the customized value, and you can have a preview before exporting it to the necessary storage space.
Conclusion
Wondershare Filmora
Get started easily with Filmora’s powerful performance, intuitive interface, and countless effects!
Try It Free Try It Free Try It Free Learn More about Filmora>
Thus, in detail, you had an enlightening discussion on the VLC playback speed. You would have understood the tips and tricks associated with these video edits. Use the Filmora video editor application to create stunning videos for your needs. It is a reliable program, and you can go for it without any hesitation. You can customize the content by modifying every detail of the content precisely. Choose Filmora and enjoy the video edits beyond boundaries. Create content as per your requirements without sacrificing any parameters. Stay tuned for many more facts on video edits using the Filmora video editor application.
Best Method to Split Video Into Parts Online
Apart from offline editing software, online video splitters are also available with the evolution of technology nowadays. VEED is one of them. It helps you in splitting the video into different parts. The splitter tool is available for deleting a specific part of the video. Even you can save these parts separately. The whole video editor is extremely user-friendly.
Along with the split and trimming of the videos, VEED also offers several tools for editing and adding effects to the images. It is suitable for training video makers and social media managers to demonstrate the products, business presentations, and HR videos. There are camera filters present, including sepia, night vision, fish eye, and many others. This article is actually the guide regarding editing the videos through VEED. As a substitute, Wondershare Filmora is also under discussion that is also available for the same purpose.
How can you split the video clips online from VEED?
VEED also supports different formats such as WMV, AVI, MPEG and others. While editing the videos in VEED, it converts into MP4, which is compatible with most media players. This is the most suitable format for sharing videos on social networking sites. This splitter tool also helps create a GIF file with animation. Even there is also a possibility of creating GIFs from various software. No matter the duration is of the video, VEED can split the video. It is freely available, and you can use it easily from your browser. You don’t need purchasing of premium software for splitting the videos.
Step 1: Select the video and upload it on the VEED. Simply drag and drop your video file in the editor when you click on “Choose video”. After the selection, split or trim on the timeline and drag towards the left side corner to make the clips shorter.

Step 2: Click on where you are looking to split the video or keep moving the slider on the timeline. Now, you need to press the “S” key on the keyboard or click on the button “Split”. It is easy to delete the clips you don’t need anymore.
Step 3: Click on the option of “Export”, and this is the time for saving the new file as the MP4 video file. Simply export them as a single video file. It is the simplest option to use, and you can do all the steps in a few clicks.

An easier way to split the video into parts
An online tool is available for instant tasks and increases efficiency. But unfortunately, it becomes time-consuming whenever the size of your file is a large or unstable internet connection. Here emerges the usage of Filmora Video Editor . It is an incredible tool for creating and editing your images and videos. This also helps maintain the quality of the videos without any concern about their size. All the options of splitting, rotating, resizing, and trimming the videos are also available offline.
For Win 7 or later (64-bit)
For macOS 10.14 or later
Features:
- Cloning of the effects
- Magical effects
- Motion graphics and addition of animation as well
- Splitting of the screen and video clips
- Matching of the colour
- Controls available for adjusting the audios and videos
There is a number of options available for a variety of users. There is Wondershare Filmora Pro for the experts and solutions for the business owners. The whole business plan of Wondershare Filmora is for showcasing your brand. Support centres are available for helping you whenever you face any hurdle. All the new features are updated in the latest version of it. User guides are also available on its official site. For splitting the videos and extracting your favourite scenes, below steps are how to split the videos in Wondershare Filmora:
Step 1. To split the videos in Wondershare Filmora, the feature of scene detection is very helpful for this purpose. It automatically makes the parts of the videos depending on the changes of the scene. To enable this feature, right-click on your video clip in your library folder and choose the “scene detection” option for its window.

Step 2. Click on “Detect”, and Wondershare Filmora starts dividing the videos into the number of clips depending on changing of the scenes. Click on every small clip for it is easy for you to preview the outcome for its addition on the timeline.

Step 3. For deleting the specific part of the video, its selection is essential and click on the trash icon. Click on “Add on the timeline” for separating the clips and edit them later. The clips you have split can be imported on the timeline, just like in the picture below.

Step 4. After splitting the video files, there are many options to apply to them like rotation, merger, cropping and recording the voice-over. Join the number of segments and add the background music to make the new video.
Wondershare Filmora is on the top ranking in the list of video editing software. Without facing any issues, you can simply create videos as well as edit them as well. You can get quickly a video editor of a professional level in just a smaller number of days of using it. All the tools are just on your timeline, and the simple interface makes it more enjoyable to use.
It is possible for the user to apply every feature in many ways, so Wondershare Filmora is very simple in handling all the functionalities. The whole software is full of fun. It guarantees to deliver highly professional results. Whether online or offline, Wondershare Filmora is also available to bring your imagination into reality. Even you can join the certification program of Wondershare Filmora. Start using it now as you will feel the difference in using it apart from other video editing software.
Step 2: Click on where you are looking to split the video or keep moving the slider on the timeline. Now, you need to press the “S” key on the keyboard or click on the button “Split”. It is easy to delete the clips you don’t need anymore.
Step 3: Click on the option of “Export”, and this is the time for saving the new file as the MP4 video file. Simply export them as a single video file. It is the simplest option to use, and you can do all the steps in a few clicks.
An easier way to split the video into parts
An online tool is available for instant tasks and increases efficiency. But unfortunately, it becomes time-consuming whenever the size of your file is a large or unstable internet connection. Here emerges the usage of Filmora Video Editor . It is an incredible tool for creating and editing your images and videos. This also helps maintain the quality of the videos without any concern about their size. All the options of splitting, rotating, resizing, and trimming the videos are also available offline.
For Win 7 or later (64-bit)
For macOS 10.14 or later
Features:
- Cloning of the effects
- Magical effects
- Motion graphics and addition of animation as well
- Splitting of the screen and video clips
- Matching of the colour
- Controls available for adjusting the audios and videos
There is a number of options available for a variety of users. There is Wondershare Filmora Pro for the experts and solutions for the business owners. The whole business plan of Wondershare Filmora is for showcasing your brand. Support centres are available for helping you whenever you face any hurdle. All the new features are updated in the latest version of it. User guides are also available on its official site. For splitting the videos and extracting your favourite scenes, below steps are how to split the videos in Wondershare Filmora:
Step 1. To split the videos in Wondershare Filmora, the feature of scene detection is very helpful for this purpose. It automatically makes the parts of the videos depending on the changes of the scene. To enable this feature, right-click on your video clip in your library folder and choose the “scene detection” option for its window.
Step 2. Click on “Detect”, and Wondershare Filmora starts dividing the videos into the number of clips depending on changing of the scenes. Click on every small clip for it is easy for you to preview the outcome for its addition on the timeline.
Step 3. For deleting the specific part of the video, its selection is essential and click on the trash icon. Click on “Add on the timeline” for separating the clips and edit them later. The clips you have split can be imported on the timeline, just like in the picture below.
Step 4. After splitting the video files, there are many options to apply to them like rotation, merger, cropping and recording the voice-over. Join the number of segments and add the background music to make the new video.
Wondershare Filmora is on the top ranking in the list of video editing software. Without facing any issues, you can simply create videos as well as edit them as well. You can get quickly a video editor of a professional level in just a smaller number of days of using it. All the tools are just on your timeline, and the simple interface makes it more enjoyable to use.
It is possible for the user to apply every feature in many ways, so Wondershare Filmora is very simple in handling all the functionalities. The whole software is full of fun. It guarantees to deliver highly professional results. Whether online or offline, Wondershare Filmora is also available to bring your imagination into reality. Even you can join the certification program of Wondershare Filmora. Start using it now as you will feel the difference in using it apart from other video editing software.
Create Glitch Text Effect
Glitch text effect is a trending video effect whereby the texts get distorted for a few seconds. The effect is comparable to the glitch you face when your screen starts to malfunction, and the screen appears to be wavy and disoriented. A glitch text effect is better than a regular animated text effect as it helps to get the attention of the viewers immediately and get the message across clearly.
The glitch effect can be applied to the entire video as well as the text as per your preference. There are several video editors available where the glitch text effect comes pre-loaded. All you need to do is to apply it to the text and get it done in a few steps. We will illustrate how to add glitch text effect Premiere Pro. But we recommend Filmora for the best glitter text effect that you can add to your video instantly.
Part 1. Create Glitch Text in Video with Filmora
We have already stated that Wondershare Filmora is the best video editor for the best glitch text effect download and apply to your video in simple steps. Filmora is a premium video editor that is widely used by amateur and professional video editors. You can get all glitch text effect After Effects and add them to your video conveniently in comparison to After Effects.
As a matter of fact, there are literally unlimited video and text effects available, and you can find different types of glitch text effects to apply to your titles and texts. Filmora is available for both Windows and mac users. Here are the steps to create glitch text in video with Filmora.
Free Download For Win 7 or later(64-bit)
Free Download For macOS 10.14 or later
Step1 Download and install Filmora on your computer. Go to File> New Project from the menu bar to start video editing project.
Step2 Go to File> Import Media > Import Media Files to import the video clips where you want to add glitch text effect. Drop the clip into the Timeline to get started.

Step3 Go to Titles tab located at the top. From the left panel, click on Titles option. Search “glitch” in the search field and you will see all the glitch text effects that you can apply to the text in your video.
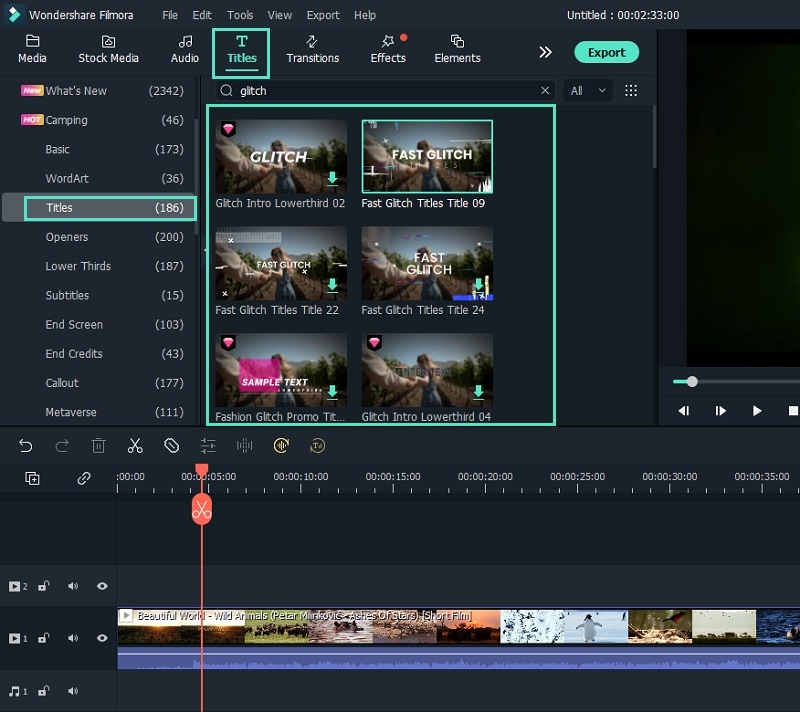
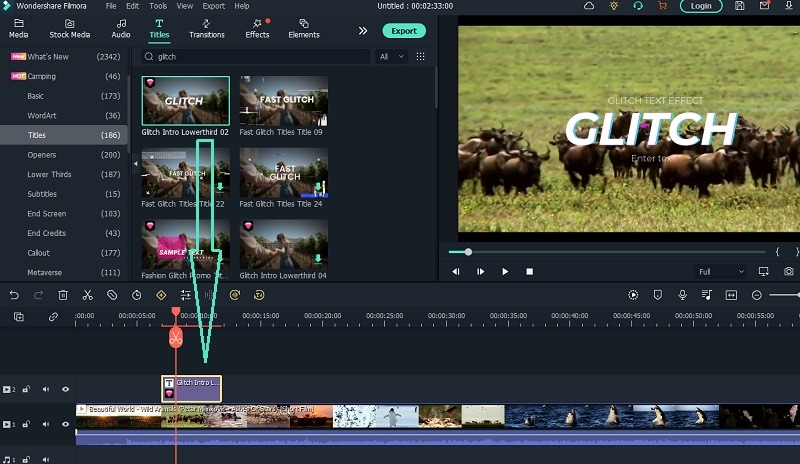
Step4 Select any glitch text effect and drop it into the Timeline above the video clip exactly where you want the text and the effect to appear.
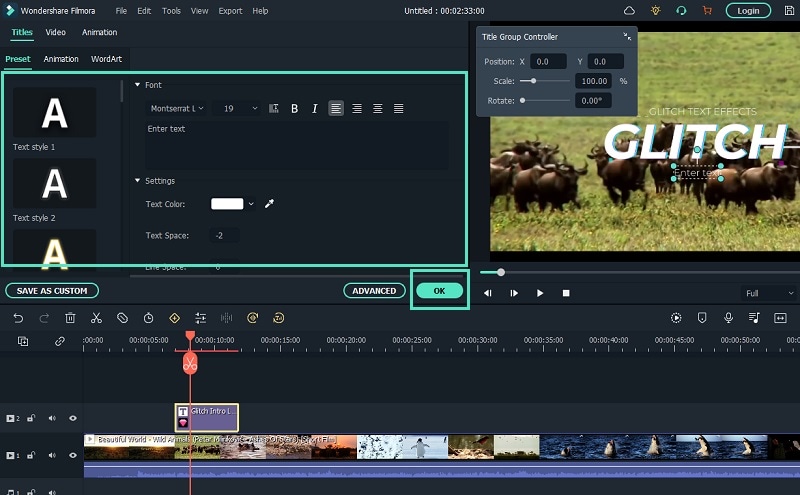
Step5 Double-click on the glitch text effect located on Timeline and edit the text, style, and other parameters as per your preference. Click on Ok and play the video to see your edited video with the glitch text effect.
Part 2. How to Make Glitch Text Effect with Premiere Pro
Adobe Premiere Pro is another renowned video editor where you can add glitch text effect to your video. Premiere Pro is strictly for professional video editors as the user interface is not as intuitive as Filmora . The learning curve is steep, and therefore, you need to go through the steps to add glitch text effect Premiere Pro. There are several glitch text effect presets available that you can apply to any text on your video to make them engaging. Here are the steps to make glitch text effect with Premiere Pro.
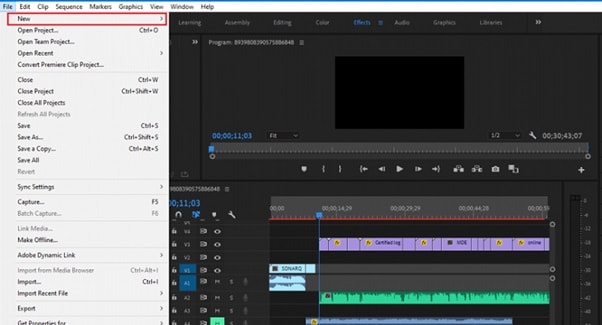
Step1 Launch Adobe Premiere Pro and go to New> Project to get started. Import your video and drop it into Timeline.
Step2 Use the Type tool to write any text on your video to add glitch text effect. You should have a text layer on Timeline.
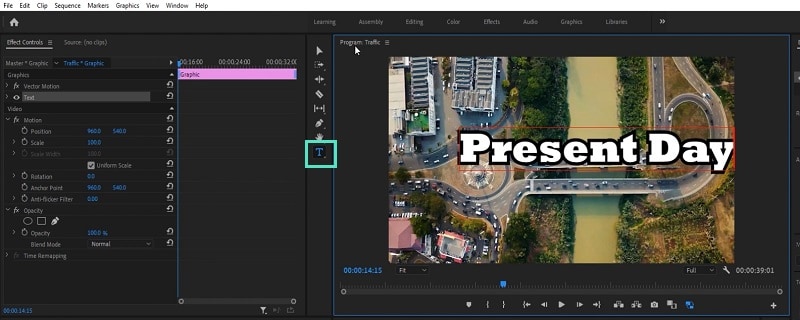
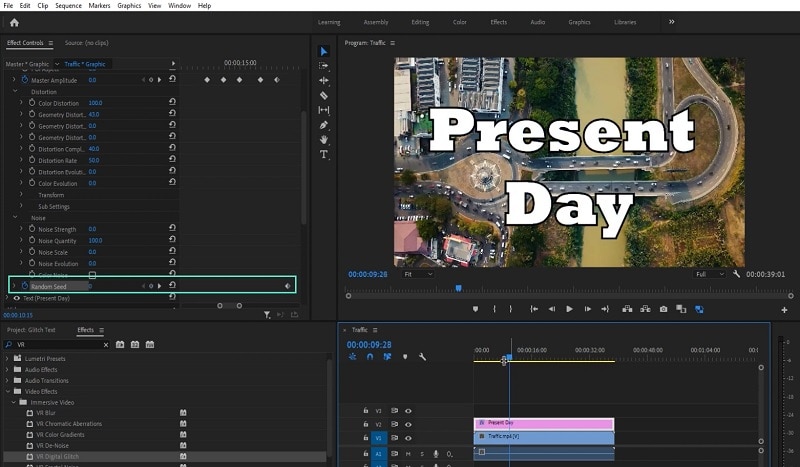
Step3 Go to Effects> Immersive Video> VR Digital Glitch option. Drag and drop the effect to text layer.
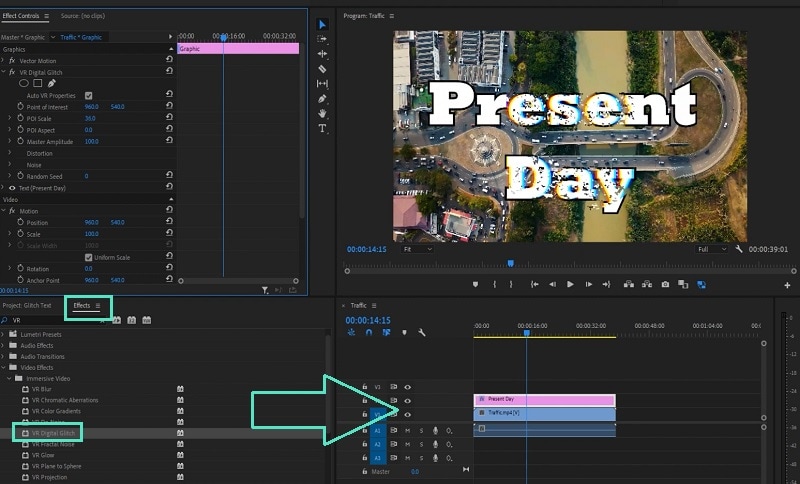
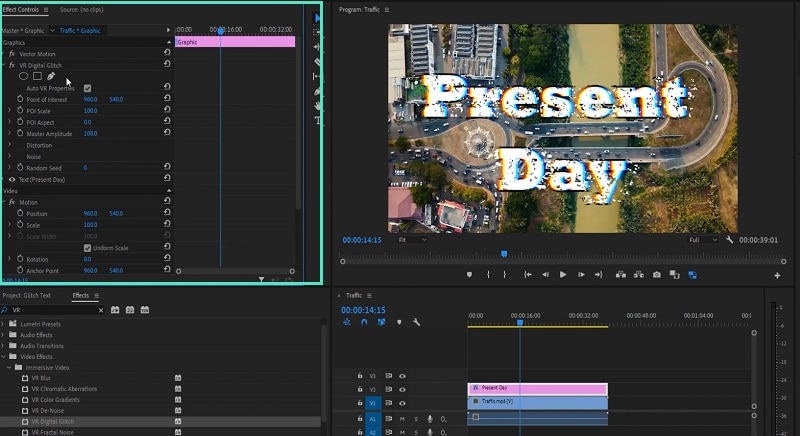
Step4 Under Effect Controls tab, you will find all the different parameters that you can adjust to get the glitch text effect perfectly.
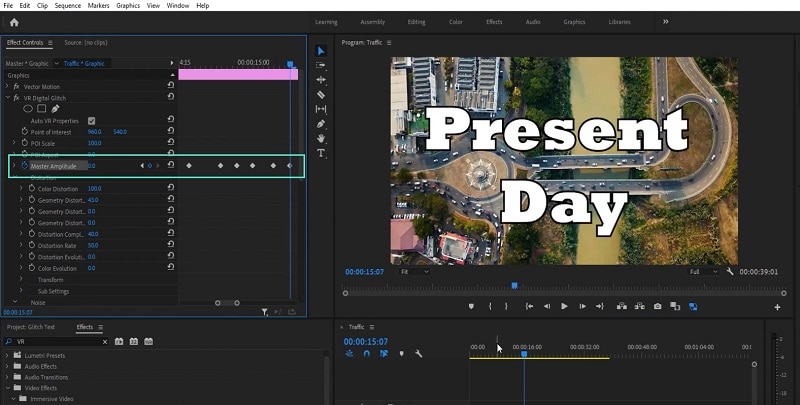
Step5 Turn on Master Amplitude and add multiple keyframes as different points in the Timeline and change the distortion value to make the effect prominent.
Step6 Go to the first keyframe and turn on Random Seed effect. Go to the last keyframe and turn on Random Seed effect and change the value to 75. Play the video to check the entire video with glitch text effect.
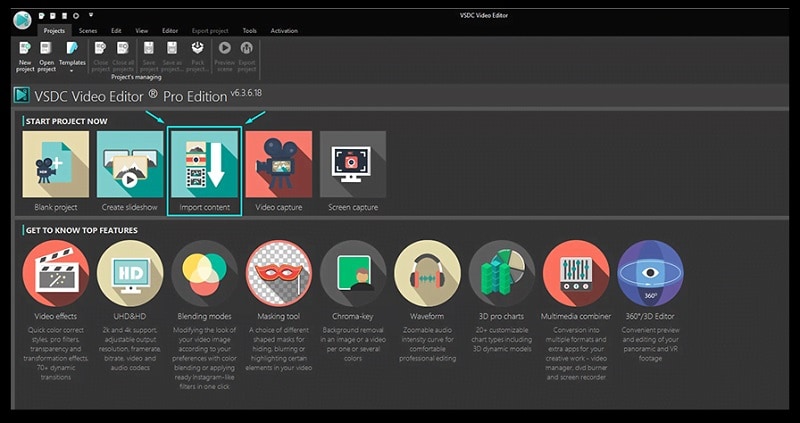
Part 3. Use VSDC Video Editor to Create Glitch Text
If you do not have any premium video editor on your computer and you do not want to purchase any premium video editor, you can still get glitter text effect free. You need to download and install VSDC free video editor on your computer. But the steps to create glitch text on VSDC video editor are slightly complicated as the user interface is not as intuitive as Filmora . Here are the steps to add free glitch text effect on your video.
Step1 Download and install VSDC video editor. Launch the editor and click on New Project to get started. Import your video to your project where you want to add glitch text effect.
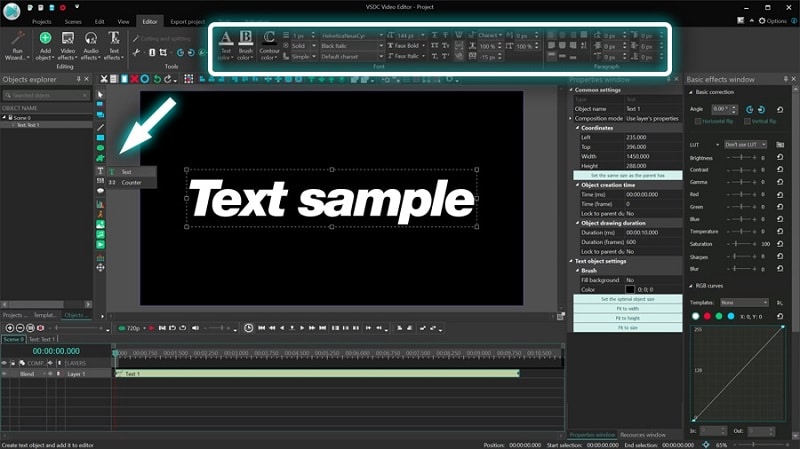
Step2 Use Type tool to write a text on the video. You can press Shift+T shortcut as well. After typing the text, adjust the text style as per your preference.
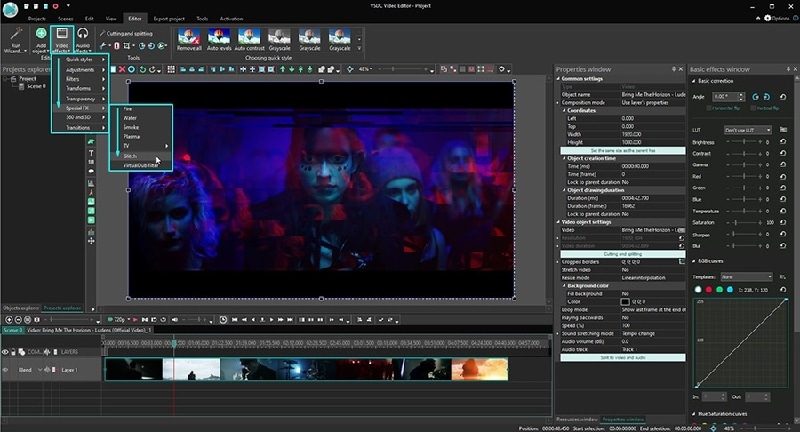
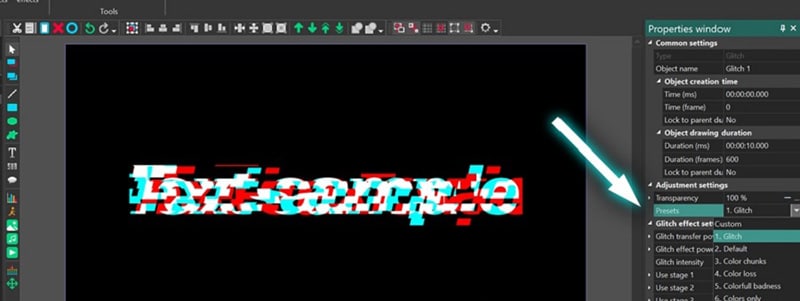
Step3 Double-click on the text layer on Timeline and go to Video Effects> Special FX and click on Glitch option.
Step4 A window will appear where you can set the starting point, duration, and different parameters. Click on Ok button.
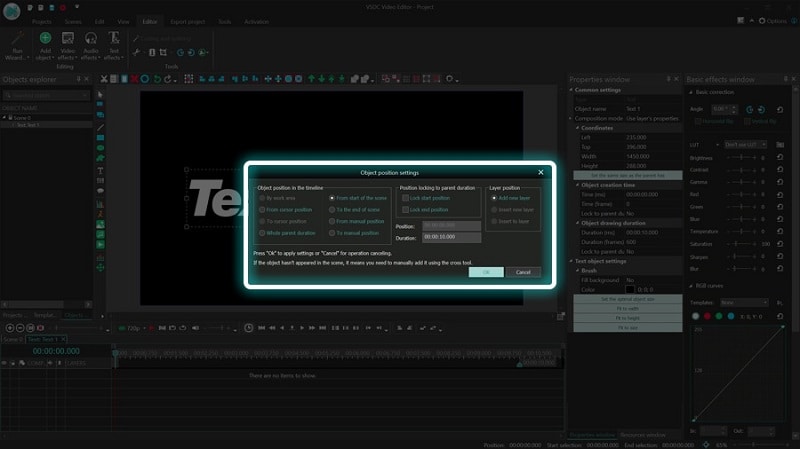
Step5 Go to Properties Windows and click on Presets to select different types of glitch text effects. You can also adjust the intensity of the text effects and other parameters as you feel.
Part 4. Related FAQs about Glitch Text
1. How do you animate glitch text?
If you want to animate glitch text for free, VSDC video editor is ideal as you can customize the effect on any text in simple steps. If you want to use a premium video editor, we recommend Filmora as there are various glitch text effects available to apply to any text on your video instantly.
2. How do you glitch text on video?
First, you have to import your video in your video editor. Type the desired text and set the style. Thereafter, go to glitch text effect presets available on the video editor and apply it to the text instantly. You can customize the glitch text effect as per your preference to make the animation more prominent.
3. How do you glitch text on Android?
You should first install Glitch Video Effect: Glitch FX app from Play Store. Edit your video on the app to add any text, and thereafter, add glitch text effect instantly. In fact, the glitch text effect is available in almost all popular video editor apps on Android due to the effect being trendy and viral.
Free Download For macOS 10.14 or later
Step1 Download and install Filmora on your computer. Go to File> New Project from the menu bar to start video editing project.
Step2 Go to File> Import Media > Import Media Files to import the video clips where you want to add glitch text effect. Drop the clip into the Timeline to get started.
Step3 Go to Titles tab located at the top. From the left panel, click on Titles option. Search “glitch” in the search field and you will see all the glitch text effects that you can apply to the text in your video.
Step4 Select any glitch text effect and drop it into the Timeline above the video clip exactly where you want the text and the effect to appear.
Step5 Double-click on the glitch text effect located on Timeline and edit the text, style, and other parameters as per your preference. Click on Ok and play the video to see your edited video with the glitch text effect.
Part 2. How to Make Glitch Text Effect with Premiere Pro
Adobe Premiere Pro is another renowned video editor where you can add glitch text effect to your video. Premiere Pro is strictly for professional video editors as the user interface is not as intuitive as Filmora . The learning curve is steep, and therefore, you need to go through the steps to add glitch text effect Premiere Pro. There are several glitch text effect presets available that you can apply to any text on your video to make them engaging. Here are the steps to make glitch text effect with Premiere Pro.
Step1 Launch Adobe Premiere Pro and go to New> Project to get started. Import your video and drop it into Timeline.
Step2 Use the Type tool to write any text on your video to add glitch text effect. You should have a text layer on Timeline.
Step3 Go to Effects> Immersive Video> VR Digital Glitch option. Drag and drop the effect to text layer.
Step4 Under Effect Controls tab, you will find all the different parameters that you can adjust to get the glitch text effect perfectly.
Step5 Turn on Master Amplitude and add multiple keyframes as different points in the Timeline and change the distortion value to make the effect prominent.
Step6 Go to the first keyframe and turn on Random Seed effect. Go to the last keyframe and turn on Random Seed effect and change the value to 75. Play the video to check the entire video with glitch text effect.
Part 3. Use VSDC Video Editor to Create Glitch Text
If you do not have any premium video editor on your computer and you do not want to purchase any premium video editor, you can still get glitter text effect free. You need to download and install VSDC free video editor on your computer. But the steps to create glitch text on VSDC video editor are slightly complicated as the user interface is not as intuitive as Filmora . Here are the steps to add free glitch text effect on your video.
Step1 Download and install VSDC video editor. Launch the editor and click on New Project to get started. Import your video to your project where you want to add glitch text effect.
Step2 Use Type tool to write a text on the video. You can press Shift+T shortcut as well. After typing the text, adjust the text style as per your preference.
Step3 Double-click on the text layer on Timeline and go to Video Effects> Special FX and click on Glitch option.
Step4 A window will appear where you can set the starting point, duration, and different parameters. Click on Ok button.
Step5 Go to Properties Windows and click on Presets to select different types of glitch text effects. You can also adjust the intensity of the text effects and other parameters as you feel.
Part 4. Related FAQs about Glitch Text
1. How do you animate glitch text?
If you want to animate glitch text for free, VSDC video editor is ideal as you can customize the effect on any text in simple steps. If you want to use a premium video editor, we recommend Filmora as there are various glitch text effects available to apply to any text on your video instantly.
2. How do you glitch text on video?
First, you have to import your video in your video editor. Type the desired text and set the style. Thereafter, go to glitch text effect presets available on the video editor and apply it to the text instantly. You can customize the glitch text effect as per your preference to make the animation more prominent.
3. How do you glitch text on Android?
You should first install Glitch Video Effect: Glitch FX app from Play Store. Edit your video on the app to add any text, and thereafter, add glitch text effect instantly. In fact, the glitch text effect is available in almost all popular video editor apps on Android due to the effect being trendy and viral.
Also read:
- New Free Ways to Download Mobile Phone Green Screen Videos and Pictures No Copyright
- New 2024 Approved Best 7 Color Match Paint Apps
- Updated In 2024, List of Supported Whatsapp Video Format You May Want to Know
- New Looking for the Simple Steps to Add a Filter to Your Video in Premiere Pro? Here Are the Complete Steps Along with the List of Free Premiere Filter Presets to Use
- In 2024, How To Change Speed of Video in Final Cut Pro?
- Updated Learn Everything About Leeming LUT Pro
- Best Phantom Slow-Mo Camera For Recording Slow Motion Videos for 2024
- New How to Trim Video in Quicktime Player on Mac for 2024
- New 2024 Approved How to Do Datamoshing Effect in After Effects?
- In 2024, How to Add Selective Color Effect to Your Videos
- Ever Wondered About the Similarity You Bear with an Anime Character? If You Have Not yet Looked Into This Exciting Aspect of Motion Graphic Design, You Can Very Well Break the Ice Here
- Updated Color Correction Basics (S-LOG Footage) for 2024
- Updated How to Make a Vacation Slideshow in 5 Minutes for 2024
- New Are You Also a Fan of the Slow Mo Guys? Well! Who Isnt? Learn How You Can Create Compelling Slow-Mo Videos Like the Slow Mo Guys Here
- Leading Applications to Create Fast Motion in iPhone
- How to Convert SRT to DOCX for 2024
- Updated In This Article, We Will Discuss How to Rotate Videos in the Lightworks Application. Below Is a Way to Rotate Videos in Lightworks Manually, Here, We Will Use the Z-Axis Rotation
- Updated In 2024, HOW to Add Fade to Black on Premiere Pro
- Updated Looking for the Best Alternatives of iPad Compatible Slideshow Applications to Design High End Graphic Presentations? Rest Assured, You Have Landed at the Correct Spot
- Updated In 2024, Adobe Photoshop Is the Best Photo Editor to Add Green Screen Effect to Your Photo While Wondershare Filmora Is the Best Video Editor to Add Green Screen Effect to Your Video
- New TikTok Velocity Dance Tutorial| Filmora
- In 2024, Steps to Add Subtitles in Canva
- New Have You Ever Watched a Movie Where You Felt the Filmmakers Left You Hanging? Yea, Thats What Freeze Frame Does. Here We Will Enlighten You on What It Is, Freeze Frame Examples Where It Has Been Helpful to Drive Our Point Home
- New Good Ways to Make Sure Your Video Editing Course Is Worthing to Watch for 2024
- In 2024, Are You Trying to Create a Stunning Intro for Your Video for Free? This Article Will Show You How to Make an Intro Video Using InVideo in a Few Simple Steps
- Updated The Best 10 AI Video Analytics Companies at a Glance for 2024
- Updated How to Slow Down Time-Lapse Videos on iPhone for 2024
- Updated Best GIF to AVI Converters
- Updated Learn to Merge Clips in DaVinci Resolve with Simple Steps
- In 2024, Simple Tricks Make 3D GIF Production of Inspiration Pop Up
- Updated Level Up Videos By Applying Keyframe with Filmora
- New 2024 Approved The Right Ways to Slow Down a Video on iPhone
- Updated 2024 Approved Best Free LUTs To Use in Shotcut
- New 2024 Approved How To Make Flying Objects in Wondershare Filmora
- New How To Change Font In Premiere Pro
- Updated Easily Sync Audio With Video With Filmora
- In 2024, Do You Want to Stream and Record at the Same Time but Cant Find an Easy Solution? This Guide Will Help You Get This Done Using Three Easy-to-Follow Methods
- Guide to Add Transition Effects in Premiere Pro
- New Top 5 Online Video Converter for Instagram 2024
- How to Rotate AVI in Vertical/Portrait Orientation Windows, Mac,Android, iPhone & Online
- New How To Combine Videos On TikTok
- New Splice Video Editor Online - Get Your Videos Splice
- Updated In 2024, What You Should Know About Speech-to-Text Technology
- Guiding Principles of Track Matte and Tracking in Adobe After Effects
- New Mastering Video Speed Control Slow Down, Speed Up, and Edit with Ease
- How to Turn Off Find My Apple iPhone 12 when Phone is Broken? | Dr.fone
- Top 4 Android System Repair Software for Asus ROG Phone 8 Pro Bricked Devices | Dr.fone
- How To Get Out of Recovery on Apple iPhone 8? | Dr.fone
- How To Fix Part of the Touch Screen Not Working on Samsung Galaxy A14 5G | Dr.fone
- The Easy Way to Remove an Apple ID from Your MacBook For your iPhone 12 mini
- 8 Solutions to Solve YouTube App Crashing on Realme GT 5 | Dr.fone
- In 2024, Is GSM Flasher ADB Legit? Full Review To Bypass Your Vivo Y27 4GFRP Lock
- 4 Most-Known Ways to Find Someone on Tinder For Infinix Zero 30 5G by Name | Dr.fone
- Complete Tutorial to Use VPNa to Fake GPS Location On Apple iPhone 7 Plus | Dr.fone
- In 2024, Best Ways on How to Unlock/Bypass/Swipe/Remove Xiaomi Redmi K70 Pro Fingerprint Lock
- In 2024, How to Fake Snapchat Location without Jailbreak On Honor Magic 6 | Dr.fone
- Solutions to open Excel 2016 Read Only Documents
- In 2024, How to Transfer from Apple iPhone 15 Plus to Samsung Galaxy S20? | Dr.fone
- In 2024, How to Turn Off Google Location to Stop Tracking You on Meizu 21 Pro | Dr.fone
- In 2024, 5 Ways To Teach You To Transfer Files from OnePlus Ace 2 to Other Android Devices Easily | Dr.fone
- Updated How To Easily Use Korean to English Video Translators
- Does Sony support MKV video files?
- How to Unlock Itel P55+ Phone Password Without Factory Reset?
- My Videos Arent Playing on Motorola Moto G73 5G – What Can I Do? | Dr.fone
- In 2024, How Can Poco F5 5GMirror Share to PC? | Dr.fone
- 9 Quick Fixes to Unfortunately TouchWiz has stopped Of Samsung Galaxy F54 5G | Dr.fone
- How To Enable USB Debugging on a Locked Realme Narzo 60 5G Phone
- How to Transfer Data from Vivo V30 Pro to BlackBerry | Dr.fone
- In 2024, Step-by-Step Tutorial How To Bypass Oppo A59 5G FRP
- Reset iTunes Backup Password Of iPhone 15 Pro Max Prevention & Solution
- In 2024, How to Reset a Locked Itel P55T Phone
- Best 10 Mock Location Apps Worth Trying On Oppo F23 5G | Dr.fone
- How Can I Use a Fake GPS Without Mock Location On Google Pixel Fold? | Dr.fone
- How to Turn Off Find My iPhone 14 Pro Max when Phone is Broken? | Dr.fone
- 2024 Approved Adobe Auto Rigger Is AWESOME
- Home Button Not Working on Realme GT Neo 5 SE? Here Are Real Fixes | Dr.fone
- Unlocking iPhone 8 Passcode without a Computer
- Title: New With Looping Videos, People Stay on Your Site Longer, Boosting Engagement. With Video Being Watched on Mobile over 3X More than Any Other Content, Its an Essential Part of Mobile Advertising
- Author: Chloe
- Created at : 2024-04-24 07:08:24
- Updated at : 2024-04-25 07:08:24
- Link: https://ai-editing-video.techidaily.com/new-with-looping-videos-people-stay-on-your-site-longer-boosting-engagement-with-video-being-watched-on-mobile-over-3x-more-than-any-other-content-its-an-es/
- License: This work is licensed under CC BY-NC-SA 4.0.
