
:max_bytes(150000):strip_icc():format(webp)/GettyImages-1065028028-8e770c58918e4cf8b0852e81cff60ed6.jpg)
New Wondering About Vimeo Slideshow Maker? Know Everything About the Platform Which Is Gaining Much Popularity. Also, Browse some Tips to Create Appealing Video Slideshows
Wondering About Vimeo Slideshow Maker? Know Everything About the Platform Which Is Gaining Much Popularity. Also, Browse some Tips to Create Appealing Video Slideshows
Why Vimeo Slideshow Maker Become Popular
An easy yet powerful editor
Numerous effects to choose from
Detailed tutorials provided by the official channel
Have you recently heard about Vimeo from any of your friends or colleagues? Or have you come through it and want to know more about it? Then here you can get all information needed about the platform. Vimeo slideshow creator is a wonderful tool launched by a group of filmmakers in 2004.

It has gained a lot of popularity over the past decade and appears as the competitor of largest video sharing giant YouTube. The platform has approximately 80 million users and 1 million subscribers. In some ways, Vimeo is even better than YouTube.
In this article
01 [What Is Vimeo for & Why It Become Popular](#Part 1)
02 [Tips for a Great Slideshow Video](#Part 2)
Part 1: What Is Vimeo for & Why It Become Popular
Vimeo is an online video streaming and editing tool which is designed for video creators and artists. The platform provides various tools to its users including monetization, marketing, collaboration, post-production, management, storage, etc. It provides a great user experience because it is ad-free. The mode of revenue for the owners of Vimeo is a software as a service (SaaS). They provide paid subscription plans for creating and editing videos, broadcasting tools, connecting with clients, etc.

It works in a “freemium” model. That means the users have limited access to the platform if they are using it for free. For example, a basic free membership allows the user to have access to a total of 5GB of storage and can upload 500MB on a weekly basis. As a free or paid member of Vimeo Slideshow maker, you can like, comment on videos, and at the same time save, watch, and upload them. Also, you can create playlists. What features you will be able to access totally depends on your membership level and plan.
Vimeo is becoming popular due to the following reasons:
01Vimeo offers better encoding and video quality
Vimeo is more focused on the quality of the video that gets uploaded on it. Its processing load is lighter and it follows strict guidelines to accept videos. The platform uses better encoding techniques to maximize the quality of the video.
02Vimeo offers greater prestige
Being on Vimeo is a matter of prestige. Vimeo videos are considered more professional as compared to Youtube. There is a limit on what kind of channels one can run on Vimeo.
03Vimeo has a more sophisticated audience
Because of the high quality of videos and its prestigious nature, Vimeo has a more sophisticated fan base. The content offered by the platform is more knowledgeable and determined. The audience here is more sophisticated. Also, the creators are more insightful, mature, and constructive.
04Vimeo offers greater artistic freedom
Vimeo always welcomes the creators with their videos to show their art. It offers artistic freedom to its users. The platform checks the artistic value of the video and talent of the creator and allows them to upload, unlike Youtube.
05Vimeo boasts unique features and customizations
There are certain unique features of YouTube which make it a great platform for its users.
● Plus, Pro, Business, Premium Plans
Vimeo is funded by its community and you have to purchase the plan to use it apart from the free features. Different Vimeo plans are:
Vimeo - $7/month
Pro - $20/month
Business - $50/month
Top-tier Vimeo Premium - $75/month.
● Make money with pay per view
Just like Google’s PPC program, Vimeo also features a pay per program view where viewers need to pay in order to watch certain videos. With this, you can sell your art anywhere in the country or worldwide and make money with it.
● Advanced analytics
The subscribers of Vimeo are offered different levels of analytics. You will get the analytics according to your subscription level. The analytics levels on Vimeo consist of Google Analytics integration, engagement graphs, custom reports, and a traffic dashboard.
● Web player branding
Vimeo allows the users to use their own branding and logo in their videos. It makes all the embedded videos share the same look and ends with an unsightly suggestions page.
● Domain-restricted embeds
Vimeo offers the users a feature of domain-restricted embeds. It means the users can set the domains to embed any particular or a set of videos. This feature lets you hide the video on Vimeo and make it visible on the allowed domain.
● Password protection
It is an extraordinary feature that Vimeo offers. The user can set a password for the particular video to restrict the video’s visibility. Only those people who will have access to the password will be able to watch that particular video.
● Replace video but keep URL
This one is also an amazing and unique feature of Vimeo. With this feature, you can replace any existing video with the new one by keeping the same URL. Also, it will keep the stats, comments, likes, etc as it is.
Part 2 Tips for a Great Slideshow Video
Videos are gaining much popularity these days. It is an easy way to connect with people and show emotions to them. In the same way, slideshow videos also are important in their place. Slides are the collection of traditional photos or negatives which are out of trend now. And slideshow videos are the perfect way to use those slides and relieve those faded memories with loved ones. Creating the slideshow video is also easy and can be done easily with the help of some tools. You don’t need to be professional, but the only need is to follow certain tips carefully. Here, we are sharing the essential tips to prepare a great slideshow video. Also, you will get to know about the best tool for video creation.
● Tell a story
Prepare the slideshow video in the form of storytelling. Whatever is the theme of your slideshow, prepare the script of the video right from the start. Make a meaningful and impressive story. Select and collect the raw materials according to the requirement.
● Keep it cohesive
The cohesion of photos or images is very important in a video slideshow. It is advised not to mix and match still photos and videos in 1 slideshow. Also, choose the photos belonging to the same color family. Mixing different varieties of photos divert the attention of the viewer. Also, one warm photo, then one cool and so on are not the efficient choices for a slideshow. All the images should appear as part of one color family and are similar to one another. Always maintain the quality of photos throughout the slideshow. Gradual jumps between grainy portrait mode photos and some screenshots, meanwhile photos of other modes lead to distracting the viewer and blurring their experience.
● Make it personal
Video slideshows are a powerful tool to show your personality and your personal message. The videos should contain your feelings. So, customize them and make them as personal as you can. Give your uniqueness to your slideshows. For this, you can customize the color palette, text, etc and make them unique and personal. So that the people with whom you share the videos may also feel your touch.
● Keep slideshow videos short
There might be different aims for creating a slideshow video. You might want to share it with loved ones or any of your friends’ circle. Or you might be wanting it to post as an ad on social media platforms such as Instagram, or Facebook. Whatever the purpose of your making the video, keep them concise and short. Short video clips are best for grabbing the attention of the viewers. Everyone does not find it interesting to watch long-form videos. If you are aiming to make a longer-form video slideshow which contains both images and video clips, then keep each photo for 3 to 5 seconds and each video clip a maximum of 20 seconds. It is recommended to maintain the user’s interest throughout.
● Create a storyboard to plan your slideshow video
As we have already discussed in the above point, the video should depict your story. Also, it should be in sync to make it more compelling. Creating a storyboard or outline is the perfect way to predict the right flow as well as choose the right elements for the video.
The storyboard helps to prepare a plan and develop the logical sequence of the photos. Also, if you want to add photos, video clips, texts, etc in a single slideshow, the storyboard can help to outline the sequence. With this, you will be able to create a video that will be logically correct.
● Add text to videos and images to convey your message clearly
Text or captions are very crucial to be added to the slideshow especially if you are preparing them for social media. People these days do watch the videos by keeping the sound off on social media. So, they will not be able to get your message without captions. Keep all your key messages highlighted in the video. The first few seconds of the video play an important role. It is the deciding factor whether the viewer will watch the whole video or will just bounce back. So, give a captivating hook to the slideshow to capture the viewer’s attention and make them hit the unmute button.
Wondershare Filmora Video Editor is an effective tool which can help you to create wonderful video slideshows. It provides all the functionalities which you need to make the slideshow convincing. You can make appealing videos to show your impressions to the viewers. It enables you to create slideshows with photos, videos, and captions. The color correction and gradient option in the Filmora allow you to change the look of the photos or old slides according to your choices. You can edit the slides with this tool, to make them cohesively right and create a slideshow out of them. In short, Filmora is the perfect way to make a slideshow video that can be interesting and engaging for the viewers.
For Win 7 or later (64-bit)
For macOS 10.12 or later

● Ending Thoughts →
● So, here we can conclude that Vimeo slideshow maker is an impressive platform. Despite having a smaller user base, it is gaining much popularity because of its unique features.
● Moreover, you can generate great videos by following the tips we have shared. By uploading those videos on Vimeo, you will be able to gain a decent audience base. If you are aiming to have a genuine and sophisticated fanbase for your videos, then Vimeo would be a great choice.
● Using Filmora will make your process of creating slideshows easy. The variety of features available by the tool will let you create wonderful storytelling out of your old memories.
Have you recently heard about Vimeo from any of your friends or colleagues? Or have you come through it and want to know more about it? Then here you can get all information needed about the platform. Vimeo slideshow creator is a wonderful tool launched by a group of filmmakers in 2004.
It has gained a lot of popularity over the past decade and appears as the competitor of largest video sharing giant YouTube. The platform has approximately 80 million users and 1 million subscribers. In some ways, Vimeo is even better than YouTube.
In this article
01 [What Is Vimeo for & Why It Become Popular](#Part 1)
02 [Tips for a Great Slideshow Video](#Part 2)
Part 1: What Is Vimeo for & Why It Become Popular
Vimeo is an online video streaming and editing tool which is designed for video creators and artists. The platform provides various tools to its users including monetization, marketing, collaboration, post-production, management, storage, etc. It provides a great user experience because it is ad-free. The mode of revenue for the owners of Vimeo is a software as a service (SaaS). They provide paid subscription plans for creating and editing videos, broadcasting tools, connecting with clients, etc.
It works in a “freemium” model. That means the users have limited access to the platform if they are using it for free. For example, a basic free membership allows the user to have access to a total of 5GB of storage and can upload 500MB on a weekly basis. As a free or paid member of Vimeo Slideshow maker, you can like, comment on videos, and at the same time save, watch, and upload them. Also, you can create playlists. What features you will be able to access totally depends on your membership level and plan.
Vimeo is becoming popular due to the following reasons:
01Vimeo offers better encoding and video quality
Vimeo is more focused on the quality of the video that gets uploaded on it. Its processing load is lighter and it follows strict guidelines to accept videos. The platform uses better encoding techniques to maximize the quality of the video.
02Vimeo offers greater prestige
Being on Vimeo is a matter of prestige. Vimeo videos are considered more professional as compared to Youtube. There is a limit on what kind of channels one can run on Vimeo.
03Vimeo has a more sophisticated audience
Because of the high quality of videos and its prestigious nature, Vimeo has a more sophisticated fan base. The content offered by the platform is more knowledgeable and determined. The audience here is more sophisticated. Also, the creators are more insightful, mature, and constructive.
04Vimeo offers greater artistic freedom
Vimeo always welcomes the creators with their videos to show their art. It offers artistic freedom to its users. The platform checks the artistic value of the video and talent of the creator and allows them to upload, unlike Youtube.
05Vimeo boasts unique features and customizations
There are certain unique features of YouTube which make it a great platform for its users.
● Plus, Pro, Business, Premium Plans
Vimeo is funded by its community and you have to purchase the plan to use it apart from the free features. Different Vimeo plans are:
Vimeo - $7/month
Pro - $20/month
Business - $50/month
Top-tier Vimeo Premium - $75/month.
● Make money with pay per view
Just like Google’s PPC program, Vimeo also features a pay per program view where viewers need to pay in order to watch certain videos. With this, you can sell your art anywhere in the country or worldwide and make money with it.
● Advanced analytics
The subscribers of Vimeo are offered different levels of analytics. You will get the analytics according to your subscription level. The analytics levels on Vimeo consist of Google Analytics integration, engagement graphs, custom reports, and a traffic dashboard.
● Web player branding
Vimeo allows the users to use their own branding and logo in their videos. It makes all the embedded videos share the same look and ends with an unsightly suggestions page.
● Domain-restricted embeds
Vimeo offers the users a feature of domain-restricted embeds. It means the users can set the domains to embed any particular or a set of videos. This feature lets you hide the video on Vimeo and make it visible on the allowed domain.
● Password protection
It is an extraordinary feature that Vimeo offers. The user can set a password for the particular video to restrict the video’s visibility. Only those people who will have access to the password will be able to watch that particular video.
● Replace video but keep URL
This one is also an amazing and unique feature of Vimeo. With this feature, you can replace any existing video with the new one by keeping the same URL. Also, it will keep the stats, comments, likes, etc as it is.
Part 2 Tips for a Great Slideshow Video
Videos are gaining much popularity these days. It is an easy way to connect with people and show emotions to them. In the same way, slideshow videos also are important in their place. Slides are the collection of traditional photos or negatives which are out of trend now. And slideshow videos are the perfect way to use those slides and relieve those faded memories with loved ones. Creating the slideshow video is also easy and can be done easily with the help of some tools. You don’t need to be professional, but the only need is to follow certain tips carefully. Here, we are sharing the essential tips to prepare a great slideshow video. Also, you will get to know about the best tool for video creation.
● Tell a story
Prepare the slideshow video in the form of storytelling. Whatever is the theme of your slideshow, prepare the script of the video right from the start. Make a meaningful and impressive story. Select and collect the raw materials according to the requirement.
● Keep it cohesive
The cohesion of photos or images is very important in a video slideshow. It is advised not to mix and match still photos and videos in 1 slideshow. Also, choose the photos belonging to the same color family. Mixing different varieties of photos divert the attention of the viewer. Also, one warm photo, then one cool and so on are not the efficient choices for a slideshow. All the images should appear as part of one color family and are similar to one another. Always maintain the quality of photos throughout the slideshow. Gradual jumps between grainy portrait mode photos and some screenshots, meanwhile photos of other modes lead to distracting the viewer and blurring their experience.
● Make it personal
Video slideshows are a powerful tool to show your personality and your personal message. The videos should contain your feelings. So, customize them and make them as personal as you can. Give your uniqueness to your slideshows. For this, you can customize the color palette, text, etc and make them unique and personal. So that the people with whom you share the videos may also feel your touch.
● Keep slideshow videos short
There might be different aims for creating a slideshow video. You might want to share it with loved ones or any of your friends’ circle. Or you might be wanting it to post as an ad on social media platforms such as Instagram, or Facebook. Whatever the purpose of your making the video, keep them concise and short. Short video clips are best for grabbing the attention of the viewers. Everyone does not find it interesting to watch long-form videos. If you are aiming to make a longer-form video slideshow which contains both images and video clips, then keep each photo for 3 to 5 seconds and each video clip a maximum of 20 seconds. It is recommended to maintain the user’s interest throughout.
● Create a storyboard to plan your slideshow video
As we have already discussed in the above point, the video should depict your story. Also, it should be in sync to make it more compelling. Creating a storyboard or outline is the perfect way to predict the right flow as well as choose the right elements for the video.
The storyboard helps to prepare a plan and develop the logical sequence of the photos. Also, if you want to add photos, video clips, texts, etc in a single slideshow, the storyboard can help to outline the sequence. With this, you will be able to create a video that will be logically correct.
● Add text to videos and images to convey your message clearly
Text or captions are very crucial to be added to the slideshow especially if you are preparing them for social media. People these days do watch the videos by keeping the sound off on social media. So, they will not be able to get your message without captions. Keep all your key messages highlighted in the video. The first few seconds of the video play an important role. It is the deciding factor whether the viewer will watch the whole video or will just bounce back. So, give a captivating hook to the slideshow to capture the viewer’s attention and make them hit the unmute button.
Wondershare Filmora Video Editor is an effective tool which can help you to create wonderful video slideshows. It provides all the functionalities which you need to make the slideshow convincing. You can make appealing videos to show your impressions to the viewers. It enables you to create slideshows with photos, videos, and captions. The color correction and gradient option in the Filmora allow you to change the look of the photos or old slides according to your choices. You can edit the slides with this tool, to make them cohesively right and create a slideshow out of them. In short, Filmora is the perfect way to make a slideshow video that can be interesting and engaging for the viewers.
For Win 7 or later (64-bit)
For macOS 10.12 or later
● Ending Thoughts →
● So, here we can conclude that Vimeo slideshow maker is an impressive platform. Despite having a smaller user base, it is gaining much popularity because of its unique features.
● Moreover, you can generate great videos by following the tips we have shared. By uploading those videos on Vimeo, you will be able to gain a decent audience base. If you are aiming to have a genuine and sophisticated fanbase for your videos, then Vimeo would be a great choice.
● Using Filmora will make your process of creating slideshows easy. The variety of features available by the tool will let you create wonderful storytelling out of your old memories.
Why Did Filmora AI Portrait Attract People?
Quick Answer: Why Did Filmora AI Portrait Attract People?
An easy yet powerful editor
Numerous effects to choose from
Detailed tutorials provided by the official channel
In the recent few years, video editing has become one of the most-sought after professions, all thanks to the popularity of various video sharing platforms like YouTube. Today, creators don’t need big budgets to share their stories with the world. They can simply grab the camera, shoot the video, and use editing software to compile their brainchild into a dedicated movie. And, once the movie is ready, these creators can simply upload it to YouTube and gain the desired viewership. However, it’s worth noting that YouTube isn’t the only element that has helped content creators excel in their careers and follow their passion.
Editing software like Wondershare Filmora also play an equal role in the success of a creator in today’s digital world. These editing tools are equipped with a plethora of features that allow creators to unleash their creativity and compile high-quality videos for their viewers. What’s more interesting is that these tools keep receiving new updates that further streamlines the entire video editing process to help creators edit videos more conveniently.
Today, we are here to talk about one such feature - known as Filmora AI portrait - that recently got introduced to Wondershare Filmora and became an all-time favorite of many creators. We’ll be going in detail about Filmora AI portrait and how you can use it in your videos to uplift the production quality of your videos. We’ll also share some of the alternatives of this cool feature so that you can bring variety to your videos and keep the viewers engaged throughout the video.
In this article
01 [Why Did AI Portrait Become More and More Popular](#Part 1)
02 [What Scenes Apply to AI Portrait?](#Part 2)
03 [What Scenes Do Not Apply to AI Portrait?](#Part 3)
04 [Why Filmora AI Portrait Deserves to Try?](#Part 4)
05 [A Comparison to Other AI Portrait Software](#Part 5)
Part 1 Why Did AI Portrait Become More and More Popular
Let’s start with the basics first! What is Filmora AI portrait and why it has gained an immense popularity in the editing community. It’s basically an add-on effect in Wondershare Filmora X that was introduced with the latest Filmora X version 10.5.
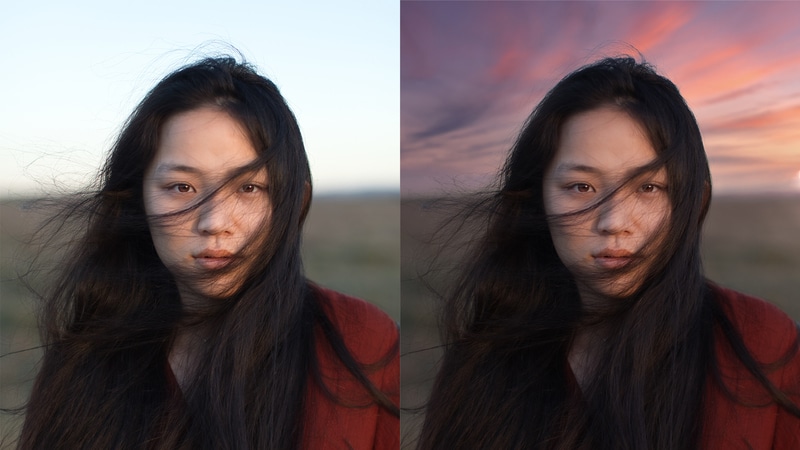
By integrating this add-on into their video, editors can remove/change the background without losing any details of the main subject. So, let’s say if you don’t have green screen footage and still want to remove the background without affecting the foreground (a single subject), Filmora AI portrait will help you get the job done without any hassle.
Being an AI-powered feature, Filmora AI portrait automatically detects the shape and structure of the main subject and separates it from the background. This way even if you don’t have used a green screen or don’t know how to apply the Chroma key in your videos, you’ll be able to remove the background from the RAW footage and replace it with a custom background. This will allow you to make your videos more appealing and add a funny element for better engagement. For example, you can add a moving background to uplift the entire storyline to your videos.
Filmora AI portrait is a great feature for different types of creators such as gaming streamers, YouTube content creators, and daily vloggers. Regardless of your editing style, by integrating the Filmora AI portrait add-on, you’ll have the liberty to remove unwanted backgrounds from various shots and keep the production quality high.
In addition to removing the background, Filmora AI portrait is also a great tool to design thumbnails for your videos. Also, you can use this feature to apply borders, glitch effects, pixelated, noise, or segmentation video effects to your videos. All these elements will allow you to eliminate dull and low quality things from your videos and make the main characters pop-out in every frame.
Here are a few situations where one can implement the Filmora AI portrait and make the most out of its functions.
● If you livestream videos on YouTube, but don’t have a green screen yet, you can use the AI portrait feature in Filmora to remove the background and make your streaming setup look more elegant and professional.
● With the Filmora AI portrait feature, you can also design high-quality and captivating thumbnails for your videos and draw the maximum attention within YouTube’s rabbithole. Any new viewer is more likely to click on your videos when the thumbnail is engaging.
● You can also use Filmora AI portrait effect to remove background from interviews. Usually, when someone shoots an interview, they usually place a green screen behind the person. But, in case you don’t have green screen footage, you can easily make your interviews look more professional with the Filmora AI portrait effect.
● Finally, you can also use the Filmora AI portrait feature in regular YouTube vlogs. This would be applicable when there are unnecessary elements in the background of a clip that are ruining the entire frame. In this case by simply erasing the background and replacing it with a custom one, you’ll be able to keep the production quality high and keep the viewers engaged throughout the vlog.
Part 2 What Scenes Apply to AI Portrait?
While the AI portrait effect can work for all frames, there are a few situations when it delivers the best results. The designers at Wondershare Filmora claim that AI Portrait works like a charm when the frame has a single subject talking directly to the camera.
When there’s a single individual or subject in front of the camera, it’s relatively easier for the AI-algorithm to detect the edges and separate the background with high precision. Moreover, when the main subject is static, you are most likely to witness the best output in terms of background removal. Why? The reason being when there’s a single static subject, an AI-powered algorithm can precisely mark its edges and achieve relatively better results.
Let’s understand this with the help of a few examples.
One-Person Interview
Going back to the interview example - let’s say you are interviewing a person who’s sitting in a chair and talking directly to the camera in front of him. Now, since there isn’t too much movement on his side, the AI-algorithm will be able to detect his edges and remove the background accordingly. In fact, in such ideal cases, the tool will even be able to detect the hair of the subject with high precision.
Shot of a Monologue
Monologues are no longer limited to high-budget Hollywood movies only. They have become a regular part of conventional videos such as daily YouTube vlogs. Monologues boast better authenticity as the entire clip is shot in one go.
Since there are no random cuts, the presenter can easily convey his views to the viewers. But, for a monologue to work, it’s extremely crucial that it has a high-quality background otherwise it’ll fail to grab the viewer’s attention. In case you are also stuck with a monologue that has a bad background, you can use Filmora AI portrait to remove it and make the primary character of the video pop-up more effectively.
YouTube Vlogs
Again, YouTube vlogs are another great example where editors could really benefit from Filmora’s AI portrait effect. For daily vloggers, getting the perfect shot is always a challenge. And, more often than you think, they end up taking shots that have bad backgrounds. But, thanks to Filmora’s AI portrait effect, one could easily remove background from such shots and use them to convey the storyline more effectively. This won’t waste your efforts and you’ll be able to use the shot that would have otherwise gone to Trash.
So, these are a few situations where the AI portrait effect in Filmora can do wonders for your video editing process.
Part 3 What Scenes Do Not Apply to AI Portrait?

Now, as we mentioned in the previous part, the Filmora AI portrait effect works better in scenarios where there’s only a single subject in the frame. This means the effect isn’t applicable in all the situations.
If there is a lot of movement in the frame, the AI-algorithm may fail to detect the edges of the subject(s) and not deliver the expected results. For example if you are working on a vlog where you are moving the camera really fast, the AI effect will struggle to separate the background from the foreground and fail to achieve the desired precision while removing background.
Some of the other situations where you won’t be able to make the most out of the AI portrait effect include:
Shots With Multiple Moving Subjects
If you have a shot of a crowded place where too many people are moving in the frame, it’ll be challenging to detect the background properly. The movement of multiple subjects will interfere with the overall functionality of the algorithm, restricting users from achieving a background-free shot. In such a situation, you’ll either have to use the shot without removing the background or dump into the Trash folder.
Videos With Special Effects and Filters
Here’s the deal; special effects and filters have become an inevitable part of today’s social media-influenced world. People apply filters and visual effects to make their videos more appealing and grab more likes and comments on Instagram, Facebook, and Snapchat.
But, these filters are often a nightmare for video editors as it’s pretty challenging to process them in any video editing software. If you have a clip with filters or video effects, you’ll struggle to implement the Filmora AI portrait effect properly. In fact, the effect will not work as expected and you’ll be stuck with a shot that would be pretty useless for the entire storyline. So, do not apply unnecessary filters to your videos if you are planning to apply the AI portrait effect in the long run.
Videos With Backlights
The lighting setup of any video has a huge influence on how it will look at the end. Just like a human being, even the AI algorithm struggles to detect the background in a video that has poor lighting conditions or bad backlight. In such videos, it’s challenging for the algorithm to detect the main subject and then identify its edges.
To avoid such scenarios, it would be better to plan your shots in advance and shoot them when there are proper lighting conditions. In case you are going to shoot indoors, you can use a dedicated lighting setup. If anything, this will make it much easier to apply the Filmora AI portrait effect and achieve the best results in terms of background removal.
Paintings
Paintings aren’t like traditional videos. The color scheme is entirely different and it’s much challenging to identify the background and the foreground. So, if there are any images of paintings that you want to use as a thumbnail, it might get a bit challenging to remove the background. In such a scenario, it would be much better to either choose a different image for the thumbnail and use the painting without removing its background.
So, these are a few scenarios where using the Filmora AI portrait won’t be an effective solution for you. We would recommend to plan your shots in advance so that you don’t end up with random shots where it’s challenging to apply the AI portrait effect.
Part 4 Why Filmora AI Portrait Deserves to Try?
If you’ve come this far, you are most likely to be serious about video editing. So, now that we have clarified all the situations where using ****Wondershare Filmora Video Editor AI portrait** will be effective, let’s understand how you can use it in your videos.
01Are the Subscription Periods for Wondershare Filmora and the AI Portrait Add-on the Same?
So, first things first, will you get direct access to the AI portrait add-on along with your Filmora license? The answer is No! THe AI portrait add-on is available as a separate item and you’ll have to pay additional charges to use it on your videos. The default Filmora license will not give you access to the AI portrait mode whatsoever. In terms of pricing, the Filmora AI portrait is available at a pocket-friendly price.
For Win 7 or later (64-bit)
For macOS 10.12 or later
You can get this add-on by paying a minimal fee of $5.99 per month. One of the best things about choosing this add-on is that you can discontinue it whenever you want. So, let’s say you no longer need to remove backgrounds from your videos - in this situation, you can directly discontinue your subscription without affecting your regular Filmora subscription.
02How to Add AI Portrait Effects?
Now, coming to the real reason why you’ve come this far - the process to use the AI portrait effect in Filmora. To be honest, it’s a relatively easier process to add the AI portrait effect in Filmora. Even if you are not a Filmora user, you’ll be able to get the job done without any hassle. Let me quickly walk you through the step-by-step procedure of adding the AI portrait effect in Wondershare Filmora.
Step 1 - If you are not an existing user of Filmora, start by purchasing its license and install the software on your system to get started. On the other hand, if you’ve been using Filmora for a while, directly move to the next step to proceed further.
Step 2 - Now, launch the software and create a new project. You’ll be prompted to Filmora’s editing panel. At this point, you’ll have to drag the video clip (that you want to edit) to the timeline.
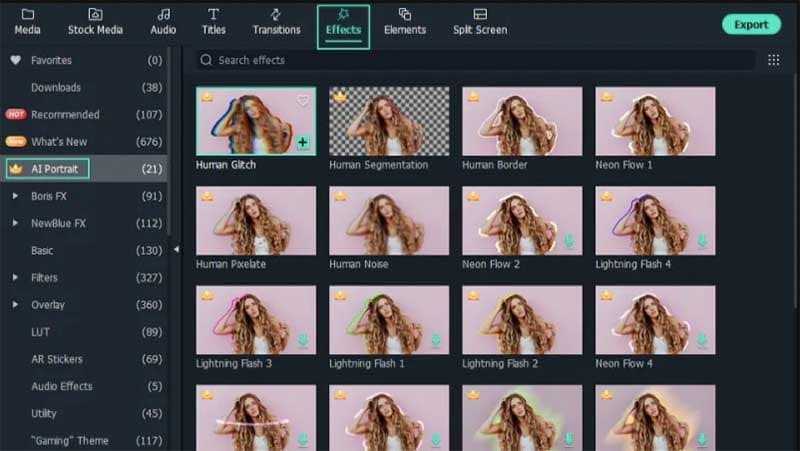
Step 3 - Once the video is successfully imported, switch to the “Effects” tab and search for “AI Portrait”. You’ll see a “premium” icon next to its name. Double-click on the effect and follow the on-screen instructions to complete the payment procedure.
Step 4 - After you have bought the effect, just drag it to the timeline and place it above your video.

Step 5 - Based on how long you want to keep this effect, you can elongate or shorten its duration by simply stretching its duration.
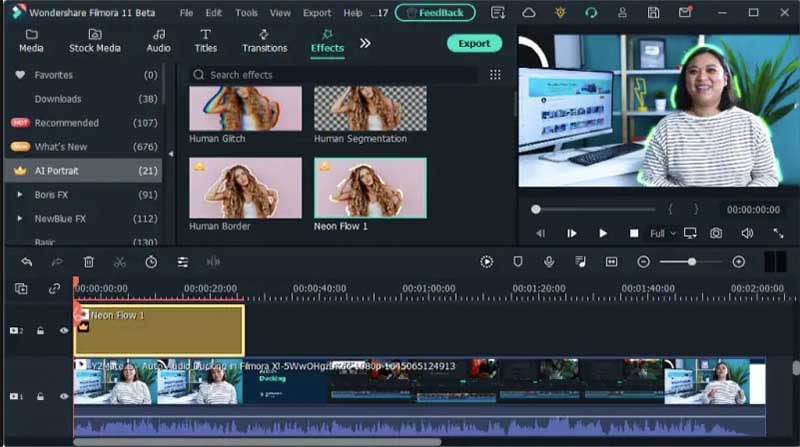
That’s it; the AI portrait effect will automatically detect and remove the background without requiring you to even lift a finger. After the background is removed, you can tap the “Export” button and choose the desired output format to save the file on your system.
03How to Adjust AI Portrait Effects?
Apart from its core ability to remove the background from a video/image, the another advantage of choosing Filmora AI portrait add-on is its fully customization support. Based on your requirements, you can adjust different parameters such as percentage, edge thickness, edge feather, etc. to achieve the desired results in the output.
Let’s have a closer look at all these parameters to understand their overall functionality more precisely.
● Percentage: By adjusting the percentage, you can decide how effective you want the AI portrait effect to appear in your videos. If you drag the slider all the way to the end, the background will be removed completely and you might not even recognize the main subject properly. On the other hand, if you keep it at a lower percentage, there will be a little bit of transparency in the background.
● Alpha: The alpha slider will decide the transparency of the portrait effect itself. You can drag this slider left or right until you have the perfect frame in front of you.
● Edge Thickness: As the name implies, edge thickness decides how thick the edges of the subject would appear in the video. A smaller percentage would mean thinner edges whereas a higher percentage would mean larger edges.
● Edge Feather: With Edge feather, you can define the blurriness of the edges themselves. The higher the value of the edge feather, the blurier the edges would appear in your videos.
Now, to access all these features, all you have to do is double-tap on the AI portrait effect within FIlmora’s timeline. This will automatically prompt you to the editing panel for this particular effect where you’ll be able to manipulate all these parameters and achieve the desired portrait results accordingly.
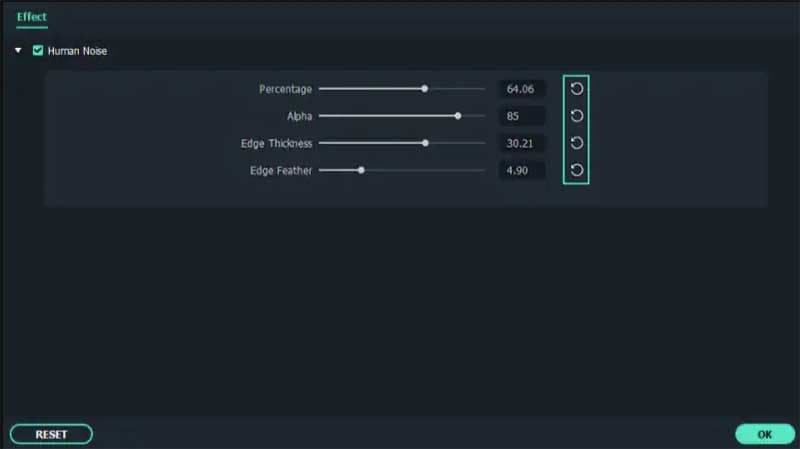
In case you are not happy with your customization, you can also tap the “Restore” button next to each parameter to restore the default value. Once you are happy with the results, just tap the “Ok” button to implement your changes.
04Why Did Filmora AI Portrait Attract People?
Apart from attracting editors, what makes Filmora AI portrait one of the best video effects that you can apply to your videos to engage viewers. Well, the answer is pretty simple; AI portrait effect makes the background of a video transparent.
It means the editors have the liberty to replace the dull boring background with a custom one and keep the engagement level high. This becomes really useful when you are trying to compile a long documentary and have a few shots with bad backgrounds. Since using such shots directly might affect the production quality of your videos, it would be better to first replace the background using the AI portrait effect.
So, regardless of your editing setup, production goals, or the type of video you want to compile at the end, you can use the AI portrait effect in Wondershare Filmora in different situations and protect the end results from becoming a failure. This will help you maximize the reach of your videos and attract more viewers more effectively. So, install Filmora today and sign up for its AI portrait effect to uplift the overall video quality of your projects.
Part 5 A Comparison to Other AI Portrait Software
Now, before saying goodbye, we also believe that it would be unfair if we only talk about a single tool and a single effect in this guide. Of course, Filmora’s AI portrait effect works like a charm in different situations, there are other tools in the market that you can try to achieve similar results. As a video editor, it’s always great to keep trying new things as it will add variation to your portfolio and make it much easier to attract new clients.
So, here’s a list of top 5 video editing software that you can use to get similar functionality like the AI portrait effect in Wondershare Filmora.
01Adobe Premiere Pro
Adobe Premiere Pro is undoubtedly one of the most popular video editing software with a strong fan base. Many industry leaders including Sam Kolder and Rory Kramer use Premier Pro to compile high-quality Hollywood-style videos for musicians as well as other clients.
Premiere Pro is more of an advanced video editing tool, which means even though it can help you remove background from portraits, you’ll have to do all the work manually. There’s no predefined add-on or effect that you can apply to the video to erase the background. Instead, you’ll have to manually mark the edges of the subject, erase the background and then, replace it with a different one to achieve the desired results.
In general, Premiere Pro is a great option for skilled editors who want to take things in their own hands to achieve the best results. If you are a beginner, you would be better off with a more user-friendly tool such as Wondershare Filmora.
Key Features:
● Extreme precision while erasing the background
● Achieve the desired results without compromising the quality of the main subject in the portrait
● An industry-preferred software
Pros:
● Existing Premiere Pro users will find it much easier to replicate the AI portrait effect
● Complete flexibility over your project
Cons:
● It can take several hours to precisely remove the background
● The entire process will be manual
02Final Cut Pro
Like Premiere Pro, Final Cut Pro is another famous video editing software that can help you replicate the results of the Filmora AI portrait effect and remove the background from different videos, images, and motion graphics. Keep in mind that Final Cut Pro is only available for macOS, which means if you own a Windows system, you won’t be able to use the software whatsoever.
Again, the only downside of using Final Cut Pro is the amount of manual effort you’ll have to put in to achieve the expected results. Being a full-scale video editing tool, there aren’t too many add-ons or predefined video effects.
Instead, you’ll have to rely on conventional methods such as keyframing to remove the background frame by frame and make your videos look professional. On the major side, Final Cut Pro will work in all situations. Even if you have a clip with too many moving objects, you’ll be able to mark the edges frame-by-frame and remove the background without losing any details from the foreground.
Key Features:
● Timeline-based interface for rapid video editing
● Exclusive macOS compatibility ensures high performance
● Ideal for experienced editors and designers
Pros:
● Final Cut Pro has an easy-to-use interface
● It’s easier to process each frame individually
Cons:
● Unlike Wondershare Filmora, there aren’t any ready-to-use add-ons
● While working on complex shots, it can take several hours to remove the background
03Unscreen Online
Unscreen is an online video background remover that’s specifically designed to remove background from videos with a single click. Being an online application, Unscreen is an ideal choice for short videos (up to 20 seconds) because longer-duration videos will likely take forever to upload. If you want to edit a video for Instagram Reels or YouTube shorts, Unscreen Online would be worth the consideration.
It’ll allow you to remove the background with one click and you won’t even need high-performance software to get the job done. The only drawback of Unscreen online is its lack of video format compatibility. Since it’s an online application, not all video formats are compatible with Unscreen Online.
Moreover, you can only use the tool to process shorter videos. In general, this is an ideal choice for an average Joe who doesn’t want to go through the hassle of installing and using a dedicated video editing software. So, if you are a professional, it would be far beneficial to stick to other premium tools like Filmora, Premiere Pro, and Final Cut Pro.
Key Features:
● You can access Unscreen Online on any device you want
● The edge detection is quite precise for videos with a single subject
● As compared to other premium options, Unscreen Online is relatively cheaper
Pros:
● Cross-platform compatibility
● Perfect for Instagram content creators
● Affordable pricing
Cons:
● Doesn’t achieve the expected results for more complex videos having too many subjects
● Can’t process videos having longer durations
04MOVAVI Video Editor
MOVAVI is another desktop-based video editing software that offers all the basic functionality one looks for in a video editing tool. The software is compatible with Windows and is an ideal choice for beginners who are just getting started on their video editing journey. You’ll find all the basic features along with a few advanced functions such as background removal. Like Filmora, MOVAVI also has a built-in add-on to remove the background from your clips. However, you might not be able to achieve the same precision, especially when we are talking about more complex frames.
Key Features:
● An ideal choice for beginners
● Compatible with Windows
● Can remove background from videos with a single subject
Pros:
● The user interface is pretty straightforward
● It’s easier to edit the videos, thanks to a timeline-based interface
Cons:
● For a beginner editing tool, the price is on the higher side
● You won’t be able to remove background from complex shots with multiple subjects in the foreground
05Kinemaster
Kinemaster is a video editing tool that’s only available on mobile devices, Android to be more specific. It boasts a plethora of features that make it one of the most sought-after editing tools among mobile users. Apart from the basic editing features, Kinemaster also has Chroma key and green screen functionality that allow users to remove background from the videos. Though it’s not as same as a professional-level video editing tool like Filmora Pro, you can still use Kinemaster to erase the background from your green screen footage to achieve the desired portrait look.
Features:
● Kinemaster is beginner-friendly
● Compatible with all Android devices
Pros:
● Green screen compatibility
● Offers advanced features such as chroma key
● Idea choice for novice video editors
Cons:
● It’s quite challenging to edit longer videos on a phone, making Kinemaster less reliable for large documentary-type videos
● Ending Thoughts →
● Wondershare Filmora has introduced a new AI Portrait feature that allows users to remove background from different video clips to shift the entire focus on the main subject.
● Filmora AI Portrait is applicable in different situations and can help editors maximize the production quality of their videos
● Apart from Filmora AI Portrait, there are several video editing tools that editors can give a try to replicate the AI portrait effect. Though, the results of such tools may differ as well.
In the recent few years, video editing has become one of the most-sought after professions, all thanks to the popularity of various video sharing platforms like YouTube. Today, creators don’t need big budgets to share their stories with the world. They can simply grab the camera, shoot the video, and use editing software to compile their brainchild into a dedicated movie. And, once the movie is ready, these creators can simply upload it to YouTube and gain the desired viewership. However, it’s worth noting that YouTube isn’t the only element that has helped content creators excel in their careers and follow their passion.
Editing software like Wondershare Filmora also play an equal role in the success of a creator in today’s digital world. These editing tools are equipped with a plethora of features that allow creators to unleash their creativity and compile high-quality videos for their viewers. What’s more interesting is that these tools keep receiving new updates that further streamlines the entire video editing process to help creators edit videos more conveniently.
Today, we are here to talk about one such feature - known as Filmora AI portrait - that recently got introduced to Wondershare Filmora and became an all-time favorite of many creators. We’ll be going in detail about Filmora AI portrait and how you can use it in your videos to uplift the production quality of your videos. We’ll also share some of the alternatives of this cool feature so that you can bring variety to your videos and keep the viewers engaged throughout the video.
In this article
01 [Why Did AI Portrait Become More and More Popular](#Part 1)
02 [What Scenes Apply to AI Portrait?](#Part 2)
03 [What Scenes Do Not Apply to AI Portrait?](#Part 3)
04 [Why Filmora AI Portrait Deserves to Try?](#Part 4)
05 [A Comparison to Other AI Portrait Software](#Part 5)
Part 1 Why Did AI Portrait Become More and More Popular
Let’s start with the basics first! What is Filmora AI portrait and why it has gained an immense popularity in the editing community. It’s basically an add-on effect in Wondershare Filmora X that was introduced with the latest Filmora X version 10.5.
By integrating this add-on into their video, editors can remove/change the background without losing any details of the main subject. So, let’s say if you don’t have green screen footage and still want to remove the background without affecting the foreground (a single subject), Filmora AI portrait will help you get the job done without any hassle.
Being an AI-powered feature, Filmora AI portrait automatically detects the shape and structure of the main subject and separates it from the background. This way even if you don’t have used a green screen or don’t know how to apply the Chroma key in your videos, you’ll be able to remove the background from the RAW footage and replace it with a custom background. This will allow you to make your videos more appealing and add a funny element for better engagement. For example, you can add a moving background to uplift the entire storyline to your videos.
Filmora AI portrait is a great feature for different types of creators such as gaming streamers, YouTube content creators, and daily vloggers. Regardless of your editing style, by integrating the Filmora AI portrait add-on, you’ll have the liberty to remove unwanted backgrounds from various shots and keep the production quality high.
In addition to removing the background, Filmora AI portrait is also a great tool to design thumbnails for your videos. Also, you can use this feature to apply borders, glitch effects, pixelated, noise, or segmentation video effects to your videos. All these elements will allow you to eliminate dull and low quality things from your videos and make the main characters pop-out in every frame.
Here are a few situations where one can implement the Filmora AI portrait and make the most out of its functions.
● If you livestream videos on YouTube, but don’t have a green screen yet, you can use the AI portrait feature in Filmora to remove the background and make your streaming setup look more elegant and professional.
● With the Filmora AI portrait feature, you can also design high-quality and captivating thumbnails for your videos and draw the maximum attention within YouTube’s rabbithole. Any new viewer is more likely to click on your videos when the thumbnail is engaging.
● You can also use Filmora AI portrait effect to remove background from interviews. Usually, when someone shoots an interview, they usually place a green screen behind the person. But, in case you don’t have green screen footage, you can easily make your interviews look more professional with the Filmora AI portrait effect.
● Finally, you can also use the Filmora AI portrait feature in regular YouTube vlogs. This would be applicable when there are unnecessary elements in the background of a clip that are ruining the entire frame. In this case by simply erasing the background and replacing it with a custom one, you’ll be able to keep the production quality high and keep the viewers engaged throughout the vlog.
Part 2 What Scenes Apply to AI Portrait?
While the AI portrait effect can work for all frames, there are a few situations when it delivers the best results. The designers at Wondershare Filmora claim that AI Portrait works like a charm when the frame has a single subject talking directly to the camera.
When there’s a single individual or subject in front of the camera, it’s relatively easier for the AI-algorithm to detect the edges and separate the background with high precision. Moreover, when the main subject is static, you are most likely to witness the best output in terms of background removal. Why? The reason being when there’s a single static subject, an AI-powered algorithm can precisely mark its edges and achieve relatively better results.
Let’s understand this with the help of a few examples.
One-Person Interview
Going back to the interview example - let’s say you are interviewing a person who’s sitting in a chair and talking directly to the camera in front of him. Now, since there isn’t too much movement on his side, the AI-algorithm will be able to detect his edges and remove the background accordingly. In fact, in such ideal cases, the tool will even be able to detect the hair of the subject with high precision.
Shot of a Monologue
Monologues are no longer limited to high-budget Hollywood movies only. They have become a regular part of conventional videos such as daily YouTube vlogs. Monologues boast better authenticity as the entire clip is shot in one go.
Since there are no random cuts, the presenter can easily convey his views to the viewers. But, for a monologue to work, it’s extremely crucial that it has a high-quality background otherwise it’ll fail to grab the viewer’s attention. In case you are also stuck with a monologue that has a bad background, you can use Filmora AI portrait to remove it and make the primary character of the video pop-up more effectively.
YouTube Vlogs
Again, YouTube vlogs are another great example where editors could really benefit from Filmora’s AI portrait effect. For daily vloggers, getting the perfect shot is always a challenge. And, more often than you think, they end up taking shots that have bad backgrounds. But, thanks to Filmora’s AI portrait effect, one could easily remove background from such shots and use them to convey the storyline more effectively. This won’t waste your efforts and you’ll be able to use the shot that would have otherwise gone to Trash.
So, these are a few situations where the AI portrait effect in Filmora can do wonders for your video editing process.
Part 3 What Scenes Do Not Apply to AI Portrait?
Now, as we mentioned in the previous part, the Filmora AI portrait effect works better in scenarios where there’s only a single subject in the frame. This means the effect isn’t applicable in all the situations.
If there is a lot of movement in the frame, the AI-algorithm may fail to detect the edges of the subject(s) and not deliver the expected results. For example if you are working on a vlog where you are moving the camera really fast, the AI effect will struggle to separate the background from the foreground and fail to achieve the desired precision while removing background.
Some of the other situations where you won’t be able to make the most out of the AI portrait effect include:
Shots With Multiple Moving Subjects
If you have a shot of a crowded place where too many people are moving in the frame, it’ll be challenging to detect the background properly. The movement of multiple subjects will interfere with the overall functionality of the algorithm, restricting users from achieving a background-free shot. In such a situation, you’ll either have to use the shot without removing the background or dump into the Trash folder.
Videos With Special Effects and Filters
Here’s the deal; special effects and filters have become an inevitable part of today’s social media-influenced world. People apply filters and visual effects to make their videos more appealing and grab more likes and comments on Instagram, Facebook, and Snapchat.
But, these filters are often a nightmare for video editors as it’s pretty challenging to process them in any video editing software. If you have a clip with filters or video effects, you’ll struggle to implement the Filmora AI portrait effect properly. In fact, the effect will not work as expected and you’ll be stuck with a shot that would be pretty useless for the entire storyline. So, do not apply unnecessary filters to your videos if you are planning to apply the AI portrait effect in the long run.
Videos With Backlights
The lighting setup of any video has a huge influence on how it will look at the end. Just like a human being, even the AI algorithm struggles to detect the background in a video that has poor lighting conditions or bad backlight. In such videos, it’s challenging for the algorithm to detect the main subject and then identify its edges.
To avoid such scenarios, it would be better to plan your shots in advance and shoot them when there are proper lighting conditions. In case you are going to shoot indoors, you can use a dedicated lighting setup. If anything, this will make it much easier to apply the Filmora AI portrait effect and achieve the best results in terms of background removal.
Paintings
Paintings aren’t like traditional videos. The color scheme is entirely different and it’s much challenging to identify the background and the foreground. So, if there are any images of paintings that you want to use as a thumbnail, it might get a bit challenging to remove the background. In such a scenario, it would be much better to either choose a different image for the thumbnail and use the painting without removing its background.
So, these are a few scenarios where using the Filmora AI portrait won’t be an effective solution for you. We would recommend to plan your shots in advance so that you don’t end up with random shots where it’s challenging to apply the AI portrait effect.
Part 4 Why Filmora AI Portrait Deserves to Try?
If you’ve come this far, you are most likely to be serious about video editing. So, now that we have clarified all the situations where using ****Wondershare Filmora Video Editor AI portrait** will be effective, let’s understand how you can use it in your videos.
01Are the Subscription Periods for Wondershare Filmora and the AI Portrait Add-on the Same?
So, first things first, will you get direct access to the AI portrait add-on along with your Filmora license? The answer is No! THe AI portrait add-on is available as a separate item and you’ll have to pay additional charges to use it on your videos. The default Filmora license will not give you access to the AI portrait mode whatsoever. In terms of pricing, the Filmora AI portrait is available at a pocket-friendly price.
For Win 7 or later (64-bit)
For macOS 10.12 or later
You can get this add-on by paying a minimal fee of $5.99 per month. One of the best things about choosing this add-on is that you can discontinue it whenever you want. So, let’s say you no longer need to remove backgrounds from your videos - in this situation, you can directly discontinue your subscription without affecting your regular Filmora subscription.
02How to Add AI Portrait Effects?
Now, coming to the real reason why you’ve come this far - the process to use the AI portrait effect in Filmora. To be honest, it’s a relatively easier process to add the AI portrait effect in Filmora. Even if you are not a Filmora user, you’ll be able to get the job done without any hassle. Let me quickly walk you through the step-by-step procedure of adding the AI portrait effect in Wondershare Filmora.
Step 1 - If you are not an existing user of Filmora, start by purchasing its license and install the software on your system to get started. On the other hand, if you’ve been using Filmora for a while, directly move to the next step to proceed further.
Step 2 - Now, launch the software and create a new project. You’ll be prompted to Filmora’s editing panel. At this point, you’ll have to drag the video clip (that you want to edit) to the timeline.
Step 3 - Once the video is successfully imported, switch to the “Effects” tab and search for “AI Portrait”. You’ll see a “premium” icon next to its name. Double-click on the effect and follow the on-screen instructions to complete the payment procedure.
Step 4 - After you have bought the effect, just drag it to the timeline and place it above your video.
Step 5 - Based on how long you want to keep this effect, you can elongate or shorten its duration by simply stretching its duration.
That’s it; the AI portrait effect will automatically detect and remove the background without requiring you to even lift a finger. After the background is removed, you can tap the “Export” button and choose the desired output format to save the file on your system.
03How to Adjust AI Portrait Effects?
Apart from its core ability to remove the background from a video/image, the another advantage of choosing Filmora AI portrait add-on is its fully customization support. Based on your requirements, you can adjust different parameters such as percentage, edge thickness, edge feather, etc. to achieve the desired results in the output.
Let’s have a closer look at all these parameters to understand their overall functionality more precisely.
● Percentage: By adjusting the percentage, you can decide how effective you want the AI portrait effect to appear in your videos. If you drag the slider all the way to the end, the background will be removed completely and you might not even recognize the main subject properly. On the other hand, if you keep it at a lower percentage, there will be a little bit of transparency in the background.
● Alpha: The alpha slider will decide the transparency of the portrait effect itself. You can drag this slider left or right until you have the perfect frame in front of you.
● Edge Thickness: As the name implies, edge thickness decides how thick the edges of the subject would appear in the video. A smaller percentage would mean thinner edges whereas a higher percentage would mean larger edges.
● Edge Feather: With Edge feather, you can define the blurriness of the edges themselves. The higher the value of the edge feather, the blurier the edges would appear in your videos.
Now, to access all these features, all you have to do is double-tap on the AI portrait effect within FIlmora’s timeline. This will automatically prompt you to the editing panel for this particular effect where you’ll be able to manipulate all these parameters and achieve the desired portrait results accordingly.
In case you are not happy with your customization, you can also tap the “Restore” button next to each parameter to restore the default value. Once you are happy with the results, just tap the “Ok” button to implement your changes.
04Why Did Filmora AI Portrait Attract People?
Apart from attracting editors, what makes Filmora AI portrait one of the best video effects that you can apply to your videos to engage viewers. Well, the answer is pretty simple; AI portrait effect makes the background of a video transparent.
It means the editors have the liberty to replace the dull boring background with a custom one and keep the engagement level high. This becomes really useful when you are trying to compile a long documentary and have a few shots with bad backgrounds. Since using such shots directly might affect the production quality of your videos, it would be better to first replace the background using the AI portrait effect.
So, regardless of your editing setup, production goals, or the type of video you want to compile at the end, you can use the AI portrait effect in Wondershare Filmora in different situations and protect the end results from becoming a failure. This will help you maximize the reach of your videos and attract more viewers more effectively. So, install Filmora today and sign up for its AI portrait effect to uplift the overall video quality of your projects.
Part 5 A Comparison to Other AI Portrait Software
Now, before saying goodbye, we also believe that it would be unfair if we only talk about a single tool and a single effect in this guide. Of course, Filmora’s AI portrait effect works like a charm in different situations, there are other tools in the market that you can try to achieve similar results. As a video editor, it’s always great to keep trying new things as it will add variation to your portfolio and make it much easier to attract new clients.
So, here’s a list of top 5 video editing software that you can use to get similar functionality like the AI portrait effect in Wondershare Filmora.
01Adobe Premiere Pro
Adobe Premiere Pro is undoubtedly one of the most popular video editing software with a strong fan base. Many industry leaders including Sam Kolder and Rory Kramer use Premier Pro to compile high-quality Hollywood-style videos for musicians as well as other clients.
Premiere Pro is more of an advanced video editing tool, which means even though it can help you remove background from portraits, you’ll have to do all the work manually. There’s no predefined add-on or effect that you can apply to the video to erase the background. Instead, you’ll have to manually mark the edges of the subject, erase the background and then, replace it with a different one to achieve the desired results.
In general, Premiere Pro is a great option for skilled editors who want to take things in their own hands to achieve the best results. If you are a beginner, you would be better off with a more user-friendly tool such as Wondershare Filmora.
Key Features:
● Extreme precision while erasing the background
● Achieve the desired results without compromising the quality of the main subject in the portrait
● An industry-preferred software
Pros:
● Existing Premiere Pro users will find it much easier to replicate the AI portrait effect
● Complete flexibility over your project
Cons:
● It can take several hours to precisely remove the background
● The entire process will be manual
02Final Cut Pro
Like Premiere Pro, Final Cut Pro is another famous video editing software that can help you replicate the results of the Filmora AI portrait effect and remove the background from different videos, images, and motion graphics. Keep in mind that Final Cut Pro is only available for macOS, which means if you own a Windows system, you won’t be able to use the software whatsoever.
Again, the only downside of using Final Cut Pro is the amount of manual effort you’ll have to put in to achieve the expected results. Being a full-scale video editing tool, there aren’t too many add-ons or predefined video effects.
Instead, you’ll have to rely on conventional methods such as keyframing to remove the background frame by frame and make your videos look professional. On the major side, Final Cut Pro will work in all situations. Even if you have a clip with too many moving objects, you’ll be able to mark the edges frame-by-frame and remove the background without losing any details from the foreground.
Key Features:
● Timeline-based interface for rapid video editing
● Exclusive macOS compatibility ensures high performance
● Ideal for experienced editors and designers
Pros:
● Final Cut Pro has an easy-to-use interface
● It’s easier to process each frame individually
Cons:
● Unlike Wondershare Filmora, there aren’t any ready-to-use add-ons
● While working on complex shots, it can take several hours to remove the background
03Unscreen Online
Unscreen is an online video background remover that’s specifically designed to remove background from videos with a single click. Being an online application, Unscreen is an ideal choice for short videos (up to 20 seconds) because longer-duration videos will likely take forever to upload. If you want to edit a video for Instagram Reels or YouTube shorts, Unscreen Online would be worth the consideration.
It’ll allow you to remove the background with one click and you won’t even need high-performance software to get the job done. The only drawback of Unscreen online is its lack of video format compatibility. Since it’s an online application, not all video formats are compatible with Unscreen Online.
Moreover, you can only use the tool to process shorter videos. In general, this is an ideal choice for an average Joe who doesn’t want to go through the hassle of installing and using a dedicated video editing software. So, if you are a professional, it would be far beneficial to stick to other premium tools like Filmora, Premiere Pro, and Final Cut Pro.
Key Features:
● You can access Unscreen Online on any device you want
● The edge detection is quite precise for videos with a single subject
● As compared to other premium options, Unscreen Online is relatively cheaper
Pros:
● Cross-platform compatibility
● Perfect for Instagram content creators
● Affordable pricing
Cons:
● Doesn’t achieve the expected results for more complex videos having too many subjects
● Can’t process videos having longer durations
04MOVAVI Video Editor
MOVAVI is another desktop-based video editing software that offers all the basic functionality one looks for in a video editing tool. The software is compatible with Windows and is an ideal choice for beginners who are just getting started on their video editing journey. You’ll find all the basic features along with a few advanced functions such as background removal. Like Filmora, MOVAVI also has a built-in add-on to remove the background from your clips. However, you might not be able to achieve the same precision, especially when we are talking about more complex frames.
Key Features:
● An ideal choice for beginners
● Compatible with Windows
● Can remove background from videos with a single subject
Pros:
● The user interface is pretty straightforward
● It’s easier to edit the videos, thanks to a timeline-based interface
Cons:
● For a beginner editing tool, the price is on the higher side
● You won’t be able to remove background from complex shots with multiple subjects in the foreground
05Kinemaster
Kinemaster is a video editing tool that’s only available on mobile devices, Android to be more specific. It boasts a plethora of features that make it one of the most sought-after editing tools among mobile users. Apart from the basic editing features, Kinemaster also has Chroma key and green screen functionality that allow users to remove background from the videos. Though it’s not as same as a professional-level video editing tool like Filmora Pro, you can still use Kinemaster to erase the background from your green screen footage to achieve the desired portrait look.
Features:
● Kinemaster is beginner-friendly
● Compatible with all Android devices
Pros:
● Green screen compatibility
● Offers advanced features such as chroma key
● Idea choice for novice video editors
Cons:
● It’s quite challenging to edit longer videos on a phone, making Kinemaster less reliable for large documentary-type videos
● Ending Thoughts →
● Wondershare Filmora has introduced a new AI Portrait feature that allows users to remove background from different video clips to shift the entire focus on the main subject.
● Filmora AI Portrait is applicable in different situations and can help editors maximize the production quality of their videos
● Apart from Filmora AI Portrait, there are several video editing tools that editors can give a try to replicate the AI portrait effect. Though, the results of such tools may differ as well.
10 Matching Color Combination That Works Together
10 Matching Color Combination That Works Together
An easy yet powerful editor
Numerous effects to choose from
Detailed tutorials provided by the official channel
Color is abundant in our life. Our moods, sensations, and perceptions, as well as our decision-making processes, are all influenced by color. Emotion evokes by color. It affects our perception, eliciting subconscious or conscious responses in the human brain. Color is perhaps the most robust tool at your disposal as a designer because of its influential and communicative nature.

Although not everyone is born with a keen sense of color or a natural aptitude for graphic design, there are methods and principles you can employ to select the best color that matches together to make a strong impression and achieve your desired effect. Fortunately, we’ve got you backed up. The ten best colors that match everything are listed below to help you create your next design.
In this article
01 [What is a color combination?](#Part 1)
02 [Types of color combinations](#Part 2)
03 [Two-color combination vs. Three-color logo combinations](#Part 3)
04 [How to apply color combinations to your designs?](#Part 4)
Part 1 What is Color Combination?
Color Theory is an art when it comes to playing with colors. It explains how people perceive color and the visual effects of colors mixing, pairing, and contrasting with one another. Designers use a color wheel and considerable collected knowledge about human psychology, society, and more to pick the perfect colors that match everything. Color is a crucial, if not the most important, feature of design since it may affect the meaning of the text, how people move across a layout, and how they feel. You may be more intentional in generating graphics that affect you if you understand color theory.
Part 2 Types of Color Combinations
Learning how different colors match together is essential for successful color combinations. Studying the color wheel and color harmonies (what works, what doesn’t, and how color communicates) will help you blend colors, establish a stronger brand, and share more effectively with your designers and printers.
The color wheel contains:?
● Three primary colors (red, yellow, and blue),?
● Three secondary colors (purple, green, and orange), and?
● Six tertiary colors (colors generated when you mix primary colors), plus (colors created from primary and secondary colors, such as blue-green or red-violet).

Draw a line over the core of the wheel to separate the warm colors (reds, oranges, and yellows) from the cool colors (blues, greens, and purples) (blues, greens, purples).
Warm colors are connected with activity, brightness, and vigor, whereas cold colors are associated with tranquility, peace, and serenity. So when you hold that color has a temperature, you can see how its use might influence your message.
On the color wheel, complementary hues are opposites. They may make artwork jump because of the great contrast between the two hues, but overusing them can get tiring.
Analogous hues are next to each other. Therefore, one color will dominate, one will support, and another will accent when developing a similar color scheme.
Triadic hues are energetic and vibrant, evenly dispersed throughout the color wheel. They provide visual contrast and harmony, allowing everything to shine as the overall image comes to life.
You can build a variety of grand color schemes by using the color wheel. Finding the perfect color combination for the right occasion is vital.
● 10 Matching Color Combination That Works Together
01Yellow and Blue

Yellow is the ultimate attention-getter, and it provides a young backdrop for the commanding navy. The equally electrifying Blue color that matches with Yellow dazzles the senses. It’s one of those color schemes mainly used for parties and casual gatherings. It helps instill a sense of purpose and energy in a design by contributing to enthusiasm.
02Black and Orange

The vibrant orange contrasts wonderfully with the dark black, providing a sense of mystery and suspense. Black is one of my favorite colors that match with orange.
03Lime Green and Purple

This high-octane color combination exudes a powerful presence, with purple being a beautiful choice to compliment light green. That?**color matches the lime green?**and presents a strong sense of design.?
04Dark Brown and Yellow

This fantastic color combination is ideal for creating a design that shouts spontaneity and dependability. The perfect tag-team, marigold yellow, catches the eye while dark brown keeps it. Yellow is yet another favorite pick of color that matches dark brown.
05Lavender and Indigo

Indigo, a dramatic color associated with the arts, is intuitive and forceful. It creates an exciting backdrop for the softer purple shade.
06Turquoise Blue and Purple

The imaginative purple and waterleaf turquoise combination create an overall sensation of limitless possibilities. These colors are ideal for communication-related businesses, such as teachers, trainers, and media communication. Purple is the choice of many designers, and this color matches turquoise blue perfectly.
07Light Pink, Hot Pink & Maroon

The pink color family is your best pick if you’re looking for a design that shouts “approachable.” These colors are distinct enough to provide visual interest to the design while remaining similar sufficient to maintain an innocent appearance. When you add maroon to the mix, you reduce the chance of appearing foolish while also exuding just the appropriate amount of professionalism. Hot Pink and Maroon are my top picks for a color that matches light pink.
08Light Gray and Desert Sand Beige

Although desert sand beige is one of the least-used design colors, it will make you stand out if you use it. For fashion or interior design brands, the tones of desert sand and emperor gray work nicely together.
09Dark Sea Green and Deep Forest Green

Forest green is a color that conjures up images of nature just by its name. This adaptable color connects with growth, and it looks cool and fresh when coupled with lighter seafoam green.
10Dark Blue, Turquoise, Beige

These colors go well together and reinforce the brand’s reliability. When you combine them with the beige backdrop, you feel secure exploring and pursuing. This color combination functions well for vacation, life consulting, and healthcare businesses.
Part 3 Two Color Combination vs. Three Color Combination
The choice is yours to decide. Colors have a significant role in your brand’s identification. After you’ve decided on the style of logo you want to employ, think about what each color will say about your business. Check for the feelings you want to evoke and how you want your customers to react to your brand. You can assist your brand leave a lasting impression and forming a stronger connection with your audience by selecting the proper color combination.
Part 4 How to Apply Color Combinations to Your Designs?
Specific color combinations have the power to catch our attention, generate emotion, and ultimately make a lasting statement.
In this section, we’ll look at some great colors that match together and can help your brand make a significant impact, along with a step guide on how you can easily color match during video editing.
0110 Beautiful Color Combinations for Your Next Design
● You can produce all kinds of grand color schemes with the color wheel. Find the right color pairing for the right occasion.
● Yellow, magenta, cyan, and black

Hex code: #e2d810, #d9138a, #12a4d9 and #322e2f
Almost each print project is dependent upon these four ink colors. They can create any color imaginable after they combine. Individually, they make a color scheme that’s bright, contemporary, and full of life.
● Shades of pink and brown

Hex code: #e75874, #be1558, #fbcbc9 and #322514
Pink is youthful, modern, and luxurious, and using different shades adds even more motion and depth to the design. Combining pink with dark brown adds a basic level of contrast and seriousness.
● Gold, charcoal, and grey

Hex code: #ef9d10f, #3b4d61 and #6b7b8c
It is a perfect merge of seriousness and sunshine. The gold represents nature and cheerfulness, which combines perfectly with two different shades of black and grey that add a layer of maturity.
● Tan, deep turquoise, and black

Hex code: #ecc19c, #1e847f, #000000
Over a natural, masculine tan base, this merge presents turquoise to the forefront to display its utility as a color that displays nature and rebirth.
● Raspberry and shades of blue

Hex code: #8a307f, #79a7d3, #6883bc
Like the palette above, trusted blue forms the foundation of this combination, while the pinkish-purple addition of raspberry adds luxurious femininity.
● Sea-foam, salmon, and navy

Hex code: #aed6dc, #ff9a8d, #4a536b
The ideal beachy palette. This unique pastel combination of salmon, sea-foam, and navy represents everyone’s favorite coastal colors and shows the warmth and peacefulness that comes from a day at the ocean.
● Yellow-green, olive, and forest green

Hex code: #e1dd72, #a8c66c, #1b6535
These three color combinations of green are the perfect palette for this lime and mint beverage. They both combine into a brilliant blend of excitement and youthfulness.
● Beige, slate, and khaki

Hex code: #f6ead4, #a2a595, #b4a284
Two complementary shades of lean brown masculine. An accent of khaki-grey represents a touch of elegance and maturity.
● Scarlet, light olive, and light teal

Hex code: #b85042, #e7e8d1, #a7beae
An extremely subdued take on the primary colors, this combination adds a lot of greys to keep the palette’s personality feeling severe and mysterious.
● Turquoise, mustard, and black

Hex code: #7fc3c0, #cfb845, #141414
This classic pairing of a calm and warm tone evokes calmness and cheerfulness. The black adds a bold, contemporary accent.
02How to Apply Color Combinations to Your Designs
The very famous video editor, Wondershare Filmora 11, is now launched. It is exclusively made with an intuitive interface now offering advanced editing features to even novice editors. The latest updates include audio ducking, motion graphics, keyframing, and color matches.
The color match feature in Wondershare Filmora Video Editor allows you to match one scene’s color in the video with all other different colors. The same video can have different results due to lighting concerns. For example, a car speeding up the road might display varied colors to the hype of the audience. The color match can correct the color combinations of all the clips with one click and introduce a beautiful consistency.
Color Match assists you to color correct clips as a batch instead of having to edit each individually. Here’s how.
For Win 7 or later (64-bit)
For macOS 10.12 or later
● Step 1: Import the media
Place the images and video clips you want to use into the timeline. If you wish to do any custom color correction, choose one clip or photo and proceed with making your changes.

● Step 2: Select Color Match
Then, place the playhead to a frame you wish to match your other clips. Choose the rest of the clips and photos and then either right-click and select ‘Color Match’ or hit the color icon on the toolbar and choose ‘Color Match.’

● Step 3: Start Color Matching
Then, choose a frame as a reference page and ‘Match.’

This is what you will watch after tapping the ‘Match’ option.

● Step 4: Preview your Color Match
Lastly, you need to modify the degree to which the color settings of the other clips are synced using the slider and preview the results in the Preview’s ‘comparison view.’

● Key Takeaways from This Episode →
● The connection of matching color combinations with emotion is unforgettable. Color brings that extra oomph to create stunning masterpieces. The lists of colors that match together are here to ensure we look through the perfect color to improve brand visibility or attract an audience.
● With these clues, you can get your hands on any and every color imaginable. You can use the matching color combinations by looking them through either the RGB or HEX color picker, whatever goes with your project at hand.
● Even Filmora is here to assist you in making beautiful videos by using the latest feature of color match. Now that you know how significant color is go on and find the perfect shade from our devised list of?colors that goes together.
Color is abundant in our life. Our moods, sensations, and perceptions, as well as our decision-making processes, are all influenced by color. Emotion evokes by color. It affects our perception, eliciting subconscious or conscious responses in the human brain. Color is perhaps the most robust tool at your disposal as a designer because of its influential and communicative nature.
Although not everyone is born with a keen sense of color or a natural aptitude for graphic design, there are methods and principles you can employ to select the best color that matches together to make a strong impression and achieve your desired effect. Fortunately, we’ve got you backed up. The ten best colors that match everything are listed below to help you create your next design.
In this article
01 [What is a color combination?](#Part 1)
02 [Types of color combinations](#Part 2)
03 [Two-color combination vs. Three-color logo combinations](#Part 3)
04 [How to apply color combinations to your designs?](#Part 4)
Part 1 What is Color Combination?
Color Theory is an art when it comes to playing with colors. It explains how people perceive color and the visual effects of colors mixing, pairing, and contrasting with one another. Designers use a color wheel and considerable collected knowledge about human psychology, society, and more to pick the perfect colors that match everything. Color is a crucial, if not the most important, feature of design since it may affect the meaning of the text, how people move across a layout, and how they feel. You may be more intentional in generating graphics that affect you if you understand color theory.
Part 2 Types of Color Combinations
Learning how different colors match together is essential for successful color combinations. Studying the color wheel and color harmonies (what works, what doesn’t, and how color communicates) will help you blend colors, establish a stronger brand, and share more effectively with your designers and printers.
The color wheel contains:?
● Three primary colors (red, yellow, and blue),?
● Three secondary colors (purple, green, and orange), and?
● Six tertiary colors (colors generated when you mix primary colors), plus (colors created from primary and secondary colors, such as blue-green or red-violet).
Draw a line over the core of the wheel to separate the warm colors (reds, oranges, and yellows) from the cool colors (blues, greens, and purples) (blues, greens, purples).
Warm colors are connected with activity, brightness, and vigor, whereas cold colors are associated with tranquility, peace, and serenity. So when you hold that color has a temperature, you can see how its use might influence your message.
On the color wheel, complementary hues are opposites. They may make artwork jump because of the great contrast between the two hues, but overusing them can get tiring.
Analogous hues are next to each other. Therefore, one color will dominate, one will support, and another will accent when developing a similar color scheme.
Triadic hues are energetic and vibrant, evenly dispersed throughout the color wheel. They provide visual contrast and harmony, allowing everything to shine as the overall image comes to life.
You can build a variety of grand color schemes by using the color wheel. Finding the perfect color combination for the right occasion is vital.
● 10 Matching Color Combination That Works Together
01Yellow and Blue
Yellow is the ultimate attention-getter, and it provides a young backdrop for the commanding navy. The equally electrifying Blue color that matches with Yellow dazzles the senses. It’s one of those color schemes mainly used for parties and casual gatherings. It helps instill a sense of purpose and energy in a design by contributing to enthusiasm.
02Black and Orange
The vibrant orange contrasts wonderfully with the dark black, providing a sense of mystery and suspense. Black is one of my favorite colors that match with orange.
03Lime Green and Purple
This high-octane color combination exudes a powerful presence, with purple being a beautiful choice to compliment light green. That?**color matches the lime green?**and presents a strong sense of design.?
04Dark Brown and Yellow
This fantastic color combination is ideal for creating a design that shouts spontaneity and dependability. The perfect tag-team, marigold yellow, catches the eye while dark brown keeps it. Yellow is yet another favorite pick of color that matches dark brown.
05Lavender and Indigo
Indigo, a dramatic color associated with the arts, is intuitive and forceful. It creates an exciting backdrop for the softer purple shade.
06Turquoise Blue and Purple
The imaginative purple and waterleaf turquoise combination create an overall sensation of limitless possibilities. These colors are ideal for communication-related businesses, such as teachers, trainers, and media communication. Purple is the choice of many designers, and this color matches turquoise blue perfectly.
07Light Pink, Hot Pink & Maroon
The pink color family is your best pick if you’re looking for a design that shouts “approachable.” These colors are distinct enough to provide visual interest to the design while remaining similar sufficient to maintain an innocent appearance. When you add maroon to the mix, you reduce the chance of appearing foolish while also exuding just the appropriate amount of professionalism. Hot Pink and Maroon are my top picks for a color that matches light pink.
08Light Gray and Desert Sand Beige
Although desert sand beige is one of the least-used design colors, it will make you stand out if you use it. For fashion or interior design brands, the tones of desert sand and emperor gray work nicely together.
09Dark Sea Green and Deep Forest Green
Forest green is a color that conjures up images of nature just by its name. This adaptable color connects with growth, and it looks cool and fresh when coupled with lighter seafoam green.
10Dark Blue, Turquoise, Beige
These colors go well together and reinforce the brand’s reliability. When you combine them with the beige backdrop, you feel secure exploring and pursuing. This color combination functions well for vacation, life consulting, and healthcare businesses.
Part 3 Two Color Combination vs. Three Color Combination
The choice is yours to decide. Colors have a significant role in your brand’s identification. After you’ve decided on the style of logo you want to employ, think about what each color will say about your business. Check for the feelings you want to evoke and how you want your customers to react to your brand. You can assist your brand leave a lasting impression and forming a stronger connection with your audience by selecting the proper color combination.
Part 4 How to Apply Color Combinations to Your Designs?
Specific color combinations have the power to catch our attention, generate emotion, and ultimately make a lasting statement.
In this section, we’ll look at some great colors that match together and can help your brand make a significant impact, along with a step guide on how you can easily color match during video editing.
0110 Beautiful Color Combinations for Your Next Design
● You can produce all kinds of grand color schemes with the color wheel. Find the right color pairing for the right occasion.
● Yellow, magenta, cyan, and black
Hex code: #e2d810, #d9138a, #12a4d9 and #322e2f
Almost each print project is dependent upon these four ink colors. They can create any color imaginable after they combine. Individually, they make a color scheme that’s bright, contemporary, and full of life.
● Shades of pink and brown
Hex code: #e75874, #be1558, #fbcbc9 and #322514
Pink is youthful, modern, and luxurious, and using different shades adds even more motion and depth to the design. Combining pink with dark brown adds a basic level of contrast and seriousness.
● Gold, charcoal, and grey
Hex code: #ef9d10f, #3b4d61 and #6b7b8c
It is a perfect merge of seriousness and sunshine. The gold represents nature and cheerfulness, which combines perfectly with two different shades of black and grey that add a layer of maturity.
● Tan, deep turquoise, and black
Hex code: #ecc19c, #1e847f, #000000
Over a natural, masculine tan base, this merge presents turquoise to the forefront to display its utility as a color that displays nature and rebirth.
● Raspberry and shades of blue
Hex code: #8a307f, #79a7d3, #6883bc
Like the palette above, trusted blue forms the foundation of this combination, while the pinkish-purple addition of raspberry adds luxurious femininity.
● Sea-foam, salmon, and navy
Hex code: #aed6dc, #ff9a8d, #4a536b
The ideal beachy palette. This unique pastel combination of salmon, sea-foam, and navy represents everyone’s favorite coastal colors and shows the warmth and peacefulness that comes from a day at the ocean.
● Yellow-green, olive, and forest green
Hex code: #e1dd72, #a8c66c, #1b6535
These three color combinations of green are the perfect palette for this lime and mint beverage. They both combine into a brilliant blend of excitement and youthfulness.
● Beige, slate, and khaki
Hex code: #f6ead4, #a2a595, #b4a284
Two complementary shades of lean brown masculine. An accent of khaki-grey represents a touch of elegance and maturity.
● Scarlet, light olive, and light teal
Hex code: #b85042, #e7e8d1, #a7beae
An extremely subdued take on the primary colors, this combination adds a lot of greys to keep the palette’s personality feeling severe and mysterious.
● Turquoise, mustard, and black
Hex code: #7fc3c0, #cfb845, #141414
This classic pairing of a calm and warm tone evokes calmness and cheerfulness. The black adds a bold, contemporary accent.
02How to Apply Color Combinations to Your Designs
The very famous video editor, Wondershare Filmora 11, is now launched. It is exclusively made with an intuitive interface now offering advanced editing features to even novice editors. The latest updates include audio ducking, motion graphics, keyframing, and color matches.
The color match feature in Wondershare Filmora Video Editor allows you to match one scene’s color in the video with all other different colors. The same video can have different results due to lighting concerns. For example, a car speeding up the road might display varied colors to the hype of the audience. The color match can correct the color combinations of all the clips with one click and introduce a beautiful consistency.
Color Match assists you to color correct clips as a batch instead of having to edit each individually. Here’s how.
For Win 7 or later (64-bit)
For macOS 10.12 or later
● Step 1: Import the media
Place the images and video clips you want to use into the timeline. If you wish to do any custom color correction, choose one clip or photo and proceed with making your changes.
● Step 2: Select Color Match
Then, place the playhead to a frame you wish to match your other clips. Choose the rest of the clips and photos and then either right-click and select ‘Color Match’ or hit the color icon on the toolbar and choose ‘Color Match.’
● Step 3: Start Color Matching
Then, choose a frame as a reference page and ‘Match.’
This is what you will watch after tapping the ‘Match’ option.
● Step 4: Preview your Color Match
Lastly, you need to modify the degree to which the color settings of the other clips are synced using the slider and preview the results in the Preview’s ‘comparison view.’
● Key Takeaways from This Episode →
● The connection of matching color combinations with emotion is unforgettable. Color brings that extra oomph to create stunning masterpieces. The lists of colors that match together are here to ensure we look through the perfect color to improve brand visibility or attract an audience.
● With these clues, you can get your hands on any and every color imaginable. You can use the matching color combinations by looking them through either the RGB or HEX color picker, whatever goes with your project at hand.
● Even Filmora is here to assist you in making beautiful videos by using the latest feature of color match. Now that you know how significant color is go on and find the perfect shade from our devised list of?colors that goes together.
Looking for the Simple Steps to Add Transition Effects in Your Video? We Will Illustrate How to Add Transition in Filmora and Mention Tips and Tricks for Video Transition Effects
Editing a video is equally important as recording a video. A raw video footage is never appealing to the eyes because of sudden cuts, unnecessary parts, and lack of eye-catching effects. That is why video editing is crucial for turning an unappealing raw video into an attention-grabbing video. As a matter of fact, the way you edit your video makes your video stand out when you are posting on social media platforms.
One of the most important aspects of video editing is adding transitions to video clips. When you jump from one scene to another and make sudden cuts, you need to apply some video transitions so that the move from one scene to another becomes soothing to the eyes. Different video editors have different transition effects and Wondershare Filmora has the best collection of transitions. We will illustrate how to add transition in Filmora and how to improve your video with video transitions.
Part 1. What is a Video transition effect?
A video transition effect is the most commonly used graphical effect in video editing. A video transition effect is essential whereby you connect one shot to another, especially when you are making sudden cuts in the video. Therefore, a video transition effect sits in between two shots and connects them together smoothly so that it does not look odd to the eyes. Video editing with transitions is a common practice for short videos on social media, presentation videos, and even movies.
A video transition effect is effective when you are jumping from two moods and emotions in the video. It is equally useful while jumping between storylines, points of view, and timelines. Besides, you can spice up your narrative and make your video eye-catching as well as eye-soothing. There are different types of video transition effects such as fade in and out, zoom in and out, dissolve, wipe and pan.
Part 2. How to add transitions in video?
To add transitions to your video, you will need a video editor. You should choose a video editor that has a wide collection of transition effects so that you can apply them to your video as per your preference. If you are someone who regularly makes videos and edits them, a variety of transitions will make the videos look different. There are Movie Maker transitions for Windows users and iMovie transitions for Mac users. But we recommend Wondershare Filmora as the best video editor for adding transitions.
<pFilmora is a professional video editor with so many different categories of transitions including the trending ones. Their team continuously adds new transitions to their collection, and you can download them and use on your videos. Starting from basic, slideshow, and social media to 3D, light and smoke, there is no dearth of transitions to fulfill your requirements. Here are the steps how to add transition in Filmora. Free Download For Win 7 or later(64-bit)
Free Download For macOS 10.14 or later
Step1 Download and install Filmora on your computer. Filmora is available for Windows and Mac users. Launch Filmora and click on New Project.

Step2 Drag and drop your video clips under Project Media folder. Thereafter, drag and drop them on Timeline.
If you have one raw video file, you can split it up into multiple video clips to add transitions in between them.
Step3 Go to Transitions tab located at the top bar. You will see all the categories of transitions on the left panel.

Step4 Once you select your desired transition effect, drag and drop it in between the video clips. You can add multiple transition effects for different video clips.

Play the video after you are done editing and adding transitions. Thereafter, click on Export button to save the video on your hard drive. You should follow the same steps on how to add transition effects in reels, status videos, and YouTube videos.
Part 3. Video transitions tips and tricks
If you want to make your video stand out by simply using video transition effects, you have to follow the following tips and tricks.
Consistency – Amateur video editors tend to use several extravagant transitions in one video that distract and even annoy the audience. You are using video transition effects not to distract but to smoothen the video content. Therefore, you need to be consistent with the video transition effect you use. You should use one or maximum of two transition effects throughout the video so that the audience does not get distracted.
Experiment – While it is true that you should not be using too many video transitions in one video, but you should definitely apply different video transition effects in different videos initially. This will help you to understand which transition is getting better traction, and thereafter, you can stick to it for the rest of your videos. This is particularly useful when you are making similar type of content for social media and video streaming sites.
Out of the Box – The reason you recommended Wondershare Filmora is that there is a huge collection of different types of transition effects. If you use the regular transitions such as fade, zoom, wipe, and dissolve, you cannot create an impression among your viewers. You have to use out of the box transitions so that your video can look and feel different even when you content is not. There are 3D effects, social media effects, and different genres of effects that can go well with your video content.
Judicious – There is a difference between transition effects and video effects. Transition effects should last only for a fraction of a second so that there is no aftereffect in mind. On the contrary, a video effect can last as long as required in the video. Therefore, do not stretch the duration of a transition effect and keep it as short as possible. Similarly, you should not use transition effects here and there unnecessarily. It should be used only when there is a proper scope such as scene cuts, mood changes, and subject changes.
Meaningful – Even transition effect has a meaning behind it and you should understand it and use wherever appropriate. For example, fade out effect signifies the fading of a scene or changing of mood. Similarly, a dissolve effect is appropriate when the subject is dissolved in certain thoughts or a scene is getting dissolved. That way the effect will look natural and more meaningful as well as impactful.
The Bottom Line
Video transition effects are essential in almost all types of videos. They enhance the video content and make the transition between scenes smoother. You should choose your video editor wisely so that you can avail different types of video transition effects. We recommend Wondershare Filmora for its better collection of video transition effects for all types of videos.
Step1 Download and install Filmora on your computer. Filmora is available for Windows and Mac users. Launch Filmora and click on New Project.
Step2 Drag and drop your video clips under Project Media folder. Thereafter, drag and drop them on Timeline.
If you have one raw video file, you can split it up into multiple video clips to add transitions in between them.
Step3 Go to Transitions tab located at the top bar. You will see all the categories of transitions on the left panel.
Step4 Once you select your desired transition effect, drag and drop it in between the video clips. You can add multiple transition effects for different video clips.
Play the video after you are done editing and adding transitions. Thereafter, click on Export button to save the video on your hard drive. You should follow the same steps on how to add transition effects in reels, status videos, and YouTube videos.
Part 3. Video transitions tips and tricks
If you want to make your video stand out by simply using video transition effects, you have to follow the following tips and tricks.
Consistency – Amateur video editors tend to use several extravagant transitions in one video that distract and even annoy the audience. You are using video transition effects not to distract but to smoothen the video content. Therefore, you need to be consistent with the video transition effect you use. You should use one or maximum of two transition effects throughout the video so that the audience does not get distracted.
Experiment – While it is true that you should not be using too many video transitions in one video, but you should definitely apply different video transition effects in different videos initially. This will help you to understand which transition is getting better traction, and thereafter, you can stick to it for the rest of your videos. This is particularly useful when you are making similar type of content for social media and video streaming sites.
Out of the Box – The reason you recommended Wondershare Filmora is that there is a huge collection of different types of transition effects. If you use the regular transitions such as fade, zoom, wipe, and dissolve, you cannot create an impression among your viewers. You have to use out of the box transitions so that your video can look and feel different even when you content is not. There are 3D effects, social media effects, and different genres of effects that can go well with your video content.
Judicious – There is a difference between transition effects and video effects. Transition effects should last only for a fraction of a second so that there is no aftereffect in mind. On the contrary, a video effect can last as long as required in the video. Therefore, do not stretch the duration of a transition effect and keep it as short as possible. Similarly, you should not use transition effects here and there unnecessarily. It should be used only when there is a proper scope such as scene cuts, mood changes, and subject changes.
Meaningful – Even transition effect has a meaning behind it and you should understand it and use wherever appropriate. For example, fade out effect signifies the fading of a scene or changing of mood. Similarly, a dissolve effect is appropriate when the subject is dissolved in certain thoughts or a scene is getting dissolved. That way the effect will look natural and more meaningful as well as impactful.
The Bottom Line
Video transition effects are essential in almost all types of videos. They enhance the video content and make the transition between scenes smoother. You should choose your video editor wisely so that you can avail different types of video transition effects. We recommend Wondershare Filmora for its better collection of video transition effects for all types of videos.
Also read:
- New 18 Video Editors Weve Tested Heres What We Learned for 2024
- How To Quickly Create A Screen Print Effect In Photoshop Detailed Guide
- New How to Edit FLV Video Files with FLV Editor Windows, Mac,Android, iPhone & Online
- In 2024, Guide Adding Audio in Wondershare Filmora
- New Best Video Editing Courses Online with Certificate for 2024
- New In 2024, OBS Green Screen Guide
- Best Video Grabbers for Chrome for 2024
- New Do You Want to Rotate Your TikTok Video to Stylize It More? This Article Will Provide Simple Methods of Rotating TikTok Videos to Improve the Audience Viewing Experience
- In 2024, Are You Looking to Freeze-Frame in FCP? If Yes, Read One, as Here Is a Guide About How to Freeze-Frame in Final Cut Pro (FCP) with Ease
- Do You Want to Crop a TikTok Video? In This Article, We Will Provide You with Detailed Steps Through Which You Can Discover How to Crop TikTok Videos Easily for 2024
- Updated Are You Looking to Finish Your YouTube Video in Style? The Following Are the Best End Screen Makers to Choose From
- 2024 Approved Finding the Best Game Recorder for PC
- Updated Wondering About How to Easily Create a Slideshow on Your iPhone? Well, Take Note of some of the Finest Apps to Turn Your Vision Into Reality
- Updated In 2024, How to Add Slideshow in PowerPoint
- Want to Make Your Slideshows More Fun and Exciting? Follow the Given Discussion to Know How to Make a Slideshow Gif, Thereby Making Your Slideshow More Enjoyable than Ever
- 2024 Approved Ultimate Guide on How to Plan and Storyboard a Music Video
- How to Add Miniature Effect in Video with Filmora
- Updated In 2024, Best PDF to GIF Converters
- Discover the Process of Slowing Down Time-Lapse Videos on Your iPhone
- In 2024, How to Fake Snapchat Location without Jailbreak On Huawei Nova Y71 | Dr.fone
- How to Fix Samsung Galaxy S24 Ultra Find My Friends No Location Found? | Dr.fone
- Updated In 2024, Translate Videos and Subtitles with Veed.io
- Step-by-Step Tutorial How To Bypass Samsung Galaxy A15 4G FRP
- In 2024, Two Ways to Track My Boyfriends OnePlus 12R without Him Knowing | Dr.fone
- In 2024, How to Send and Fake Live Location on Facebook Messenger Of your Google Pixel Fold | Dr.fone
- In 2024, Does Airplane Mode Turn off GPS Location On Oppo Reno 9A? | Dr.fone
- How to Transfer Videos from Oppo A38 to iPad | Dr.fone
- How to Factory Reset Infinix Hot 40i without Losing Data | Dr.fone
- In 2024, A Working Guide For Pachirisu Pokemon Go Map On Lava Blaze Curve 5G | Dr.fone
- Title: New Wondering About Vimeo Slideshow Maker? Know Everything About the Platform Which Is Gaining Much Popularity. Also, Browse some Tips to Create Appealing Video Slideshows
- Author: Chloe
- Created at : 2024-04-24 07:08:25
- Updated at : 2024-04-25 07:08:25
- Link: https://ai-editing-video.techidaily.com/new-wondering-about-vimeo-slideshow-maker-know-everything-about-the-platform-which-is-gaining-much-popularity-also-browse-some-tips-to-create-appealing-vide/
- License: This work is licensed under CC BY-NC-SA 4.0.
