
:max_bytes(150000):strip_icc():format(webp)/Race-982fb219114a48fb96b9c5a2c6f93847.jpg)
New Zoom In and Out on Snapchat
Zoom In and Out on Snapchat
Abundant Video Effects - Wondershare Filmora
Provide abundant video effects - A creative video editor
Powerful color correction and grading
Detailed tutorials are provided by the official channel
People make Snapchat videos for various purposes, such as capturing beautiful natural scenery or a funny video of a friend. To capture the details or to focus on a specific part, the zoom in and out feature is commonly used. By doing so, you can manually focus on a particular area clearly with your fingers.
The following article will focus on how to zoom in on Snapchat by offering detailed and easy steps. Moreover, we will suggest a powerful tool that can help you in zooming in and out on Snapchat flawlessly, along with additional distinct features.
In this article
Part 1: How to Zoom In and Out a Video on Snapchat While Recording?
Part 2: How to Zoom In and Out a Pre-Recorded Video on Snapchat?
Part 3: How to Zoom In and Zoom Out Videos using Wondershare Filmora?
Part 1: How to Zoom In and Out a Video on Snapchat While Recording?
In this section, we will provide you with two methods of how to zoom in and out on Snapchat videos instantly:
Method 1: Without Locking Snapchat Recorder
Step 1: Start by opening your Snapchat from on your mobile device to access the camera screen for recording a video. Now, start capturing the video by holding the center red button from the middle of your screen.

Step 2: While holding the center recording button, use your finger and slide it in the upward direction to zoom in.

Step 3: To zoom out, use the same finger by sliding it to the bottom direction. Once done, leave the recording button by removing your finger to finish the recording. Now you can save the recorded video on Snapchat.

Method 2: By Using the Snapchat Lock Feature
Step 1: Begin with opening your Snapchat account and stay on your camera screen to record the video. Now start the recording by holding the center red button from your displayed screen.

Step 2: To “Lock” the recording, move your finger towards the left side, after which you can see the padlock icon on your screen.

Step 3: After recording the video is locked, use your two fingers simultaneously and move them apart to zoom in on the specific part. Conversely, for zooming out, use your two fingers and move them in an inward direction.

Step 4: To finalize the recording, simply tap on the recording icon, and the recording will stop. You can now edit your snap and send it to your friends or post it on your Snapchat.

Part 2: How to Zoom In and Out a Pre-Recorded Video on Snapchat?
In this section, we will offer detailed steps on how to zoom in and out on Snapchat with pre-recorded videos:
Step 1: Open your Snapchat from your smartphone and then tap on the icon showing on the left side depicting “Two Mobiles Overlapping Each Other.” From this icon, navigate to your “Camera Roll.”

Step 2: From your camera roll, choose the video you want to edit. Then click on the “Pencil” icon by going to the bottom left corner to zoom in and out on your video.

Step 3: On the next screen, you will see various editing options on the right side. Select the second last option, which is for cropping and can be used to zoom in on the videos.

Step 4: By using this selected option, you can zoom in and out on the video according to your preference. Just use your two fingers and place them on the screen. To zoom in, stretch the fingers and move them apart and control the zoom value manually.

Step 5: For zooming out, move the fingers in an inward direction. Once done with all the changes, tap on the “Tick” button. Afterward, click on the “Done” option and save the changes by tapping on “Save Changes.”

Part 3: How to Zoom In and Zoom Out Videos using Wondershare Filmora?
If you are finding it difficult how to zoom in on Snapchat effortlessly, we will recommend Wondershare Filmora as a complete toolbox for editing videos. Through this tool, you can not only flawlessly zoom in on the multiple Snapchat videos but can also perform various editing functions. The user interface is specially designed in a way to assist beginners in executing the editing process.
You can take advantage of tons of advanced features in Filmora like auto reframing, video effects, transitions, and instant mode. The user interface is so simple that within seconds you can zoom in and out on any video perfectly.
Collectively, this tool functions as a complete professional toolbox for video editing and does not require technical experience or additional tools. Steps to Zoom In and Out through Wondershare Filmora:
Step 1: Select New Project
Begin with launching Wondershare Filmora on your computer and click to open its user interface. Afterward, tap on the option “New Project” to continue with the process.

Step 2: Import your Snapchat Video
On the new window, click on the icon of the “Arrowhead” to import the video on this tool. Once done with uploading the video, drag the video to the timeline of this tool.

Step 3: Go to Transitions Tab
From the tabs displayed on the left side, navigate to the “Transitions” tab by clicking on them. On its search box, type “Zoom In Out,” and the tool will automatically fetch transitions related to it.

Step 4: Choose Transitions
From the displayed transitions, select any transition of your choice. Apply the transition to your video by dragging it to the video available on the timeline.

Step 5: Preview the video
If you find the results satisfactory in the preview window, tap on the “Export” button displayed on top and save the video on your computer.

Conclusion
Snapchat videos are highly popular due to their high-quality results and features. However, if you are struggling to focus on certain parts while recording a video through Snapchat, this article has offered a well-structured guide on how to zoom in and out on Snapchat quickly. If you are finding manual methods confusing, you can rely on the top-notch tool called Wondershare Filmora for Snapchat zoomed in.
People make Snapchat videos for various purposes, such as capturing beautiful natural scenery or a funny video of a friend. To capture the details or to focus on a specific part, the zoom in and out feature is commonly used. By doing so, you can manually focus on a particular area clearly with your fingers.
The following article will focus on how to zoom in on Snapchat by offering detailed and easy steps. Moreover, we will suggest a powerful tool that can help you in zooming in and out on Snapchat flawlessly, along with additional distinct features.
In this article
Part 1: How to Zoom In and Out a Video on Snapchat While Recording?
Part 2: How to Zoom In and Out a Pre-Recorded Video on Snapchat?
Part 3: How to Zoom In and Zoom Out Videos using Wondershare Filmora?
Part 1: How to Zoom In and Out a Video on Snapchat While Recording?
In this section, we will provide you with two methods of how to zoom in and out on Snapchat videos instantly:
Method 1: Without Locking Snapchat Recorder
Step 1: Start by opening your Snapchat from on your mobile device to access the camera screen for recording a video. Now, start capturing the video by holding the center red button from the middle of your screen.
Step 2: While holding the center recording button, use your finger and slide it in the upward direction to zoom in.
Step 3: To zoom out, use the same finger by sliding it to the bottom direction. Once done, leave the recording button by removing your finger to finish the recording. Now you can save the recorded video on Snapchat.
Method 2: By Using the Snapchat Lock Feature
Step 1: Begin with opening your Snapchat account and stay on your camera screen to record the video. Now start the recording by holding the center red button from your displayed screen.
Step 2: To “Lock” the recording, move your finger towards the left side, after which you can see the padlock icon on your screen.
Step 3: After recording the video is locked, use your two fingers simultaneously and move them apart to zoom in on the specific part. Conversely, for zooming out, use your two fingers and move them in an inward direction.
Step 4: To finalize the recording, simply tap on the recording icon, and the recording will stop. You can now edit your snap and send it to your friends or post it on your Snapchat.
Part 2: How to Zoom In and Out a Pre-Recorded Video on Snapchat?
In this section, we will offer detailed steps on how to zoom in and out on Snapchat with pre-recorded videos:
Step 1: Open your Snapchat from your smartphone and then tap on the icon showing on the left side depicting “Two Mobiles Overlapping Each Other.” From this icon, navigate to your “Camera Roll.”
Step 2: From your camera roll, choose the video you want to edit. Then click on the “Pencil” icon by going to the bottom left corner to zoom in and out on your video.
Step 3: On the next screen, you will see various editing options on the right side. Select the second last option, which is for cropping and can be used to zoom in on the videos.
Step 4: By using this selected option, you can zoom in and out on the video according to your preference. Just use your two fingers and place them on the screen. To zoom in, stretch the fingers and move them apart and control the zoom value manually.
Step 5: For zooming out, move the fingers in an inward direction. Once done with all the changes, tap on the “Tick” button. Afterward, click on the “Done” option and save the changes by tapping on “Save Changes.”
Part 3: How to Zoom In and Zoom Out Videos using Wondershare Filmora?
If you are finding it difficult how to zoom in on Snapchat effortlessly, we will recommend Wondershare Filmora as a complete toolbox for editing videos. Through this tool, you can not only flawlessly zoom in on the multiple Snapchat videos but can also perform various editing functions. The user interface is specially designed in a way to assist beginners in executing the editing process.
You can take advantage of tons of advanced features in Filmora like auto reframing, video effects, transitions, and instant mode. The user interface is so simple that within seconds you can zoom in and out on any video perfectly.
Collectively, this tool functions as a complete professional toolbox for video editing and does not require technical experience or additional tools. Steps to Zoom In and Out through Wondershare Filmora:
Step 1: Select New Project
Begin with launching Wondershare Filmora on your computer and click to open its user interface. Afterward, tap on the option “New Project” to continue with the process.
Step 2: Import your Snapchat Video
On the new window, click on the icon of the “Arrowhead” to import the video on this tool. Once done with uploading the video, drag the video to the timeline of this tool.
Step 3: Go to Transitions Tab
From the tabs displayed on the left side, navigate to the “Transitions” tab by clicking on them. On its search box, type “Zoom In Out,” and the tool will automatically fetch transitions related to it.
Step 4: Choose Transitions
From the displayed transitions, select any transition of your choice. Apply the transition to your video by dragging it to the video available on the timeline.
Step 5: Preview the video
If you find the results satisfactory in the preview window, tap on the “Export” button displayed on top and save the video on your computer.
Conclusion
Snapchat videos are highly popular due to their high-quality results and features. However, if you are struggling to focus on certain parts while recording a video through Snapchat, this article has offered a well-structured guide on how to zoom in and out on Snapchat quickly. If you are finding manual methods confusing, you can rely on the top-notch tool called Wondershare Filmora for Snapchat zoomed in.
How to Apply Video Filters
In the digital age, video editing has become an increasingly popular way for people to express themselves. Technological advances make it easy to apply video filters and effects. In this article, we will find how you can use iPhone video filters, AI video filter, and cartoon video filter in 2024 through filmora quickly and easily. We will discuss the latest version of Filmora – one of the most influential and user-friendly video editors today.
Part 1 Apply Video Filters on Mobile Devices
Applying video filters on mobile devices is a simple process that can significantly enhance the overall look of your videos.
Step1: Download Filmora in the app store
First, you must download a video editing app with different filters. One popular option is Filmora, which can be found in the app store.
Step2: Import your videos
Once you have downloaded the app, you can begin importing your videos. It can typically do this by selecting the “Import” option within the app and choosing the desired videos from your library. You may also record videos directly within the app if desired.
Step3: Add video filter effects
After importing your videos, you can start adding video filter effects. Filmora and similar apps typically offer various filters, such as vintage, black and white, or cinematic effects. To apply a filter, select the desired effect and adjust any accompanying settings to achieve the desired look.
With a few easy and quick taps on your mobile device, you can transform your video filters for iPhone to create visually stunning content.
Part 2 Apply Video Filters on Desktop
To apply video filters on your desktop, you can follow these steps using the software Filmora
Create AI Filter For Win 7 or later(64-bit)
Create AI Filter For macOS 10.14 or later
Step 1: Download Filmora
Start by downloading and installing the Filmora software onto your desktop. This software provides a range of video editing tools, including video filters.
Step 2: Import your videos
Open Filmora and import the videos you want to apply filters to. You can do this by clicking the “Import” button and selecting the video files from your computer.
Step 3: Add video filter effects in 2 ways
Filmora offers two main ways to add video filters to your footage.
1. Add filters in the Effects panel
First, you can add filters in the Effects panel. To do this, select the video clip you want to apply a filter to and click on the “Effects” tab in the upper-left corner.
Please browse through the available filters and click on one to apply it to your video. You can preview the effects in real-time and adjust the intensity or other settings.
2. Add luts and presets in the Color panel
Second, add LUTs (Look-Up Tables) and presets in the Color panel. LUTs are predefined color grading settings that can give your videos a specific look or style. Select the video reel and click the “Color” tab to add a LUT or preset.
Then, click the “LUT” or “Presets” button and choose the desired effect from the available options. Like the Effects panel, you can adjust the settings to customize the product further.
Following these steps, you can easily apply video filters to your footage using Filmora on your desktop. Explore the various options and experiment with different effects to amplify the visual appeal of your videos.
Summary
In the modern digital era, Filmora will be the best video filter editor, thanks to its intuitive interface and comprehensive feature set designed specifically for beginners and professionals! Whether looking to add a subtle touch of personalization to stand out amongst the crowd or simply wanting to enhance the overall quality of production being worked no matter the, rest assured that you are capable of doing the same without breaking the sweat and effort expended hereinabove described stepwise fashion!
3 Ways To Stream And Record At The Same Time
The popularity of live streaming has exploded recently. A live stream is simply a video broadcast in real-time over the internet. It’s a great way to connect with people directly, whether for a gaming session, a cooking show, or a Q&A.
Many reasons are there for which why you might want to live stream and record at the same time. For instance, keep a record of your gameplay or stream highlights for future editing or use your live stream to generate content for your YouTube channel.
Whatever your reasons, this article will show you how to do live streaming and recording at the same time using three different methods.
Way 1. Use OBS To Stream And Record Video At The Same Time
OBS, or Open Broadcaster Software, is a free and open-source tool that allows you to stream and record video at the same time, which can be useful if you want to live-stream your gameplay on Twitch or record a tutorial for YouTube.
Key Features of OBS
- Compatible with Mac OS X, Linux, and Windows operating systems.
- Requires at least 4 GB of storage space and an Intel i5 2000-series processor or higher DirectX 10 capable graphics card.
- High-performance video capturing and mixing in real-time.
- With Custom Transitions, you can set up an unlimited number of scenes you can switch between seamlessly.
- Intuitive audio mixer.
- Easy-to-use and simple configuration options.
Steps
Here’s an easy and quick guide on how to use OBS Studio to stream and record videos simultaneously:
Step1 Download OBS Studio from the official website and install it on your computer or laptop.
Step2 Launch OBS Studio and go to the Settings menu. Find the Recording section under the Output tab.
Step3 Click “Start Recording” to manually start the recording or head to the General Tab and checkmark the box before “Automatically Record When Streaming.”
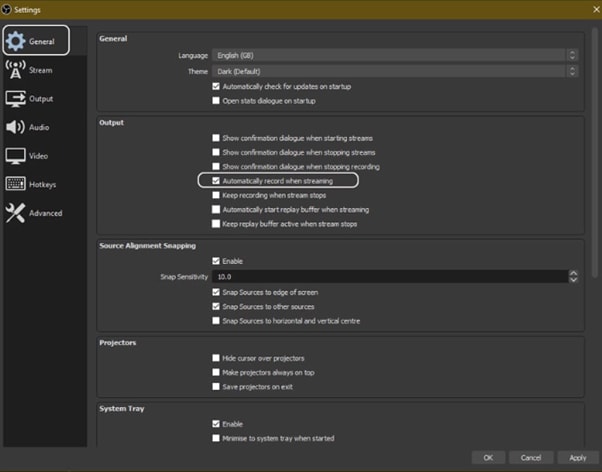
Step4 Finally, click “Apply” to save your settings. Now when you start your stream, the recording will also begin simultaneously.
Way 2. Use Twitch To Save Your Streams
Twitch is the most popular and best live streaming platform that allows gamers to broadcast their gameplay to a live audience and also gives them the ability to save their past broadcasts, or “streams.”
This feature can be useful to save your live stream for later viewing or share your stream with someone who missed it.
Features
Twitch offers a variety of features that make it a unique and powerful game streaming platform. Some of the most notable ones are:
- Live streaming: Twitch allows gamers to share their gameplay in real-time with other gamers around the world. This live aspect of the platform makes it unique and engaging.
- Social interaction: Twitch offers a variety of features that allow gamers to connect with each other, including chat rooms, forums, and user-generated content.
You can save your stream on Twitch in two ways:
- Use the “Highlights” feature, which allows you to save specific moments from your live stream.
- Download your stream’s entire VOD (video on demand) after it has ended.
Steps
Here are the quick steps to saving a stream on your PC from Twitch. But first, you need to enable Twitch VODs before starting your broadcast in the following way:
Step1 Visit Twitch and sign in to your account. Now, click the “Profile” icons and go to “Creator Dashboard.”
Step2 Head to Setting from the left-sidebar and click the “Stream” option. Scroll down and find the VOD Settings. Toggle the buttons next to “Store Past Broadcasts.”
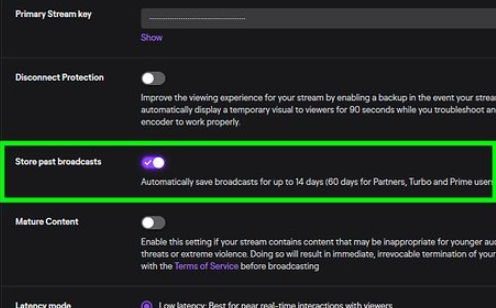
Step3 To publish your VODs instantly after broadcasting, toggle the button next to “Always Publish VODs.”
Now, to download the recordings of your broadcasts to your PC, do the following steps in sequence:
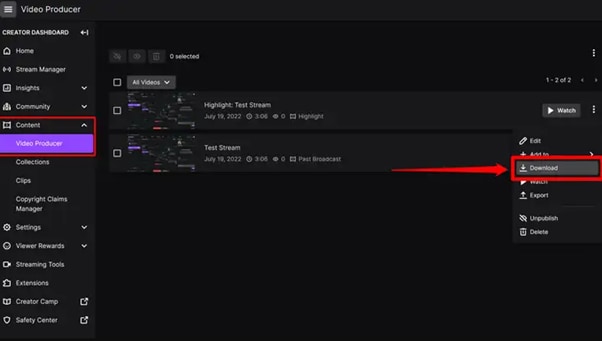
Step1 Head to the Creator Dashboard, find the “Content” section in the left sidebar, and click “Video Producer.”
Step2 Find the stream (VOD or Highlights) you want to download and on the right side, click the three dots.
Step3 Finally, click the “Download” option and let Twitch prepare your video. You will then get the stream’s recording in MP4 format.
Way 3. Use Screen Recorder To Record Your Streams
Using a screen recorder is a great way to record your live stream because it lets you capture the full screen of your PC. Although there are many different screen recorders to choose from, we recommend using Filmora.
Wondershare Filmora is a powerful editor with easy-to-use screen recording capabilities, giving you everything you need to record and stream your video at the same time. The software is free to use and has an intuitive interface.
Features of Filmora
- Support for both Mac OS X and Windows operating systems.
- Ability to record your PC screen, audio, and webcam all at once
- A variety of video editing features
- An easy-to-use interface
Steps
Here’s how to use Filmora for recording while streaming:
Step1 Head to the official Filmora website, download the software and install it on your PC.
Step2 Launch Filmora 11 and click “New project” in the main interface. Click “File” from the top toolbar and scroll down to “Record media.” From the drop-down menu, select “Record PC Screen.”
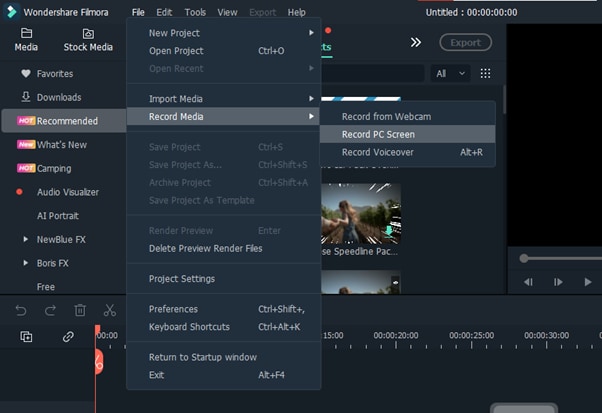
Step3 A new “Wondershare Screen Recorder” window will pop up. You can set up a full screen, custom or target screen recording, speaker, and microphone settings. If you want more Settings, click the drop-down icon.
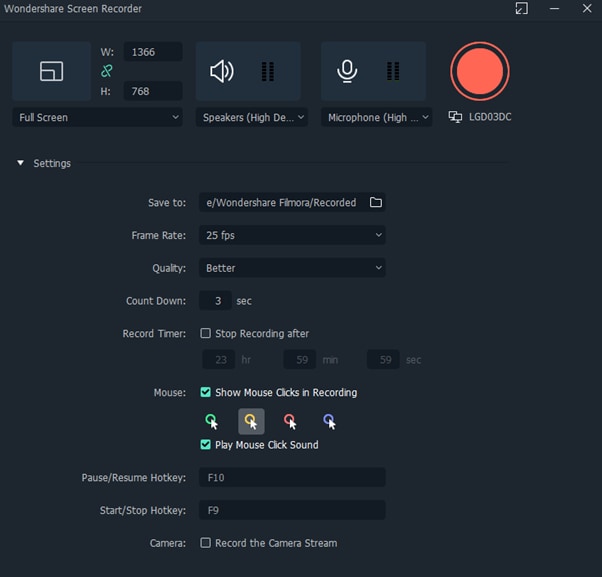
Step4 Click the Start icon to begin your recording. Afterward, click the Stop icon to stop the recording, and your stream will be saved in the selected destination.
Conclusion
In this article, we’ve discussed three step-by-step methods to help you do live streaming and recording at the same time. With these solutions at your disposal, you’ll be able to save your VODs with ease.
It is best to choose only one software to start with to avoid the time-consuming trial-and-error process. If you want to add another tool, do so later; otherwise, you will waste your precious time and resources.
Give these methods a shot, and eventually, you will find your groove—and become accustomed to just how easy it is to record and stream a video simultaneously.
Free Download For Win 7 or later(64-bit)
Free Download For macOS 10.14 or later
Free Download For macOS 10.14 or later
REVIEW: What’s Best 10 Software to Make AI Upscaling Video
REVIEW: What’s Best 10 Software to Make AI Upscaling Video
An easy yet powerful editor
Numerous effects to choose from
Detailed tutorials provided by the official channel
AI Upscaling is often used to improve the video quality. Here are some of the methods to do AI video upscaling. Follow these methods to successfully enhance your video quality.
In this article
01 [What Is AI Upscaling? And Why AI Upscaling Is Significant?](#Part 1)
02 [How to Easily AI Upscale Video to 1080p or 4K?](#Part 2)
03 [Best 10 Software to Make AI Upscaling Video](#Part 3)
Part 1 What Is AI Upscaling? And Why AI Upscaling Is Significant?
The process of generating or creating additional pixels of an image or frame in a video is AI Upscaling. This has many good results on the final video output.
This is mainly done to raise the bit rate of the video and, therefore, slightly improve the visual quality of the video. This is also used to improve the picture quality of DVDs and other low-quality videos. It is done to support lower quality videos or pictures on higher resolution screens like TV. This kind of upscaling is mostly done in TVs automatically.
Part 2 How to Easily AI Upscale Video to 1080p or 4K?
The interesting part is that this upscaling is done by the higher resolution device itself. If you display a lower resolution video on a high-resolution TV, the TV will upscale the video quality of the lower resolution video. This process mainly happens by the displaying device itself. But you can try to upscale videos by yourself using this software, which will help you achieve the best results.
Part 3 Best 10 Software to Make AI Upscaling Video
There are numerous AI upscale video software on the internet. The software listed below is the best among the numerous software because of its extraordinary features and interface. The 10 best AI video upscaling software are:
01DVDFab Enlarger AI
DVDFab Enlarger AI is an AI upscale video software published by Fengtao Software Limited. You can upscale any video you want to 4k. There are a few highlights of this software, and they are:
● This software is available onWindows.
● The price of the software ranges from $44.99 to $139.99
● You can use this software to rip videos from both DVDs and Blu-ray.
● You can save the output from the software in MP4 or MKV form.
● This software allows you to boost your fps up to 60.
Pros
Upscale your video to 4K resolution.
Boost your video to 60 fps.
Appropriate for beginners.
Cons
Available only on Windows.
Very Expensive.
No slow-motion is available.

02Video2X
Video2X is popular ai video upscaling software that is developed by Open-source. It is quite popular among the professionals for various reasons like:
● Video2X is available exclusive to Windows.
● You can avail this software without paying any money.
● You can upscale old low-resolution videos.
● Upscale your videos to 4K.
● You can save the output from the software in MP4 or MKV form.
Pros
You can availthis software for free.
You can upscale GIFs.
You can decide your output format.
Cons
It is not beginner-friendly.
No slow-motion editing is available.
There is no fps boosting.

03Pixop
Pixop ai video upscaling online software is published or developed by Pixop ApS. The main features of this software are:
● It is available online.
● Available both for Windows and Mac.
● Allows to upscale videos up to 8K.
● Supports MP4, MXF, M2TS, and MOV formats of output.
● Allows custom fps boost in videos.
Pros
Available online for both Windows and Mac.
Allows video upscaling up to 8K.
Allows custom fps boost.
Cons
Expensive for longer videos.
Does not support slow-motion editing.
Only supports MP4, MXF, M2TS, and MOV formats of output.

04Topaz Video Enhance AI
Topaz Video Enhance AI is an ai upscaling video enhancing app developed by the Topaz labs. The built-in AI system in topaz ai upscale software has been experimented on numerous videos, and it has been successful each time to edit every pixel in every frame of the video. The main features of this software are:
● The software is available for both os that is Mac and Windows.
● You can use this software to edit your video into slow motion, two thousand percent.
● This software can enhance any video up to 8K resolution.
● You can save the output from the software in any form, like MP4, PNG, TIFF, JPG, or MOV.
● This software allows fps boosting up to 120.
Pros
You can have a free trial.
You can upscale any video up to 8K resolution.
You can edit the video into slow motion to 2000%.
Cons
The app is expensive.
A watermark remains on the videos edited through these apps.
This software is not beginner-friendly software.

05AVCLabs Video Enhancer AI
AVCLabs Video Enhancer AI is ai video upscaling software developed by Anvsoft Inc. The most interesting features of this software are:
● Available for Windows only.
● It can be accessed through payment of $39.95/Month.
● Enhance video quality up to 4K.
● ‘Multi-frame feature’ helps to edit every frame of the video minutely.
● Manual settings for upscaling video or converting to low-quality video up to 480p.
Pros
Excellent video enhancing quality.
Allows enhancing video up to 4K.
This software can remove noise, overlay, and blurriness from the videos.
Cons
Expensive
Available only on Windows
Only for professional or expert users.

06GDFLab
GDFLab is an AI video enhancer online software. You can edit both images and videos with this software. This app is used in many fields, and it has been successful in all those fields due to its outstanding features like:
● This ai video upscaling online software gives a full free trial for its users.
● It is available online.
● It can be used both in Windows and Mac.
● You can upscale your videos up to 4K.
● The price of the software depends on the size of the video or photo you are enhancing.
Pros
This software is available both in Windows and Mac.
You can upscale your videos up to 4K.
You can use this app to restore your images to 4x.
Cons
Interruption in editing for internet problems.
You cannot use this app until you register.
This software is too complex for beginners to handle.

07iSize
iSize is an ai upscaler video online enhancer published by iSize technologies. It is said that this app excels in its field. This may happen for its extraordinary features like:
● This software is available both for Mac and Windows.
● A must-use software for professionals.
● High-end video codec capacity.
● You can use this app to upscale videos and also images.
Pros
You can use this software to upscale both videos and photos.
The video conversion process is fast.
This software supports batch conversion of videos.
Cons
Hardware is not upgraded regularly.
Expensive to avail.
Not for beginners.
● You can upscale your videos up to 8K.

08Cupscale
Cupscale is another such ai upscaling video software. The main features of this software are:
● This software uses the very popular ESRGAN algorithm.
● This software is available both for PC and Mac.
● This software is available for free.
● This software can be used to upscale videos up to 8K.
● This software does not change the actual video format while editing the video.
Pros
Available for both Windows and Mac.
Available free.
Allows you to upscale videos up to 8K.
Cons
Supports only MP4, PNG, and JPG output formats.
Complex interface.
The AI used by this software is not stable.

09MiniTool Video Converter
MiniTool Video Converter is another AI-driven video upscaling software. This app can also be used to upscale videos. It has some exciting features which can make your editing experience outstanding. The features are:
● This software is available for free.
● It is available only for Windows.
● This software supports more than 1000 output formats.
● You can use this video to enhance videos as well as audio.
● You can record your computer screen without a watermark.
Pros
Available free.
Supports more than 1000 different output formats.
Allows to the record computer screen without watermark.
Cons
Available only on Windows.
To run this software, high-end PC specifications are required.
This software is not for beginner use.

10Tipard Video Converter Ultimate
Tipard Video Converter Ultimate has some mind-boggling features, making this software one of the bestai upscale video software**.** This software is an all-in-one solution for the editors. The main features of this app are:
● Available in both Windows and Mac.
● Supports almost all different video formats.
● Upscale videos from DVDs to UHD videos.
● You can upscale your videos up to 8K.
● This app allows you to edit or retouch your videos on the timeline.
Pros
Available both for Windows and Mac.
You can rip videos from DVDs.
Allows you to upscale your videos up to 8K resolution.
Cons
It has a time-consuming editing process.
Does not support any usual PC.
Not beginner-friendly software.

Tip:Comparison between different AI Video Upscaling software
| Software | Windows/Mac/Both | 8K/4K Upscaling | Expensive | Beginner Friendly |
|---|---|---|---|---|
| DVDFab Enlarger AI | Windows | 4k | Yes | Yes |
| Video2x | Windows | 4k | No | No |
| Pixop | Both | 8k | Yes | No |
| Topaz Video Enhance AI | Both | 8k | Yes | No |
| AVCLabs Video Enhancer AI | Both | 8k | Yes | No |
| Windows | Both | 4k | Yes | No |
| GDFLab | Both | 4k | No | No |
| iSize | Both | 8k | Yes | No |
| Cupscale | Both | 8k | No | No |
| MiniTool Video Converter | Windows | 8k | No | No |
| Tipard Video Converter | Both | 8k | No | No |
There is another video editing app, which is Wondershare Filmora Video Editor . It is not an AI-driven video upscaling app. You can use this app to upscale videos of any format and create outputs of any format. This app allows you to upscale videos to 4K. You can use this app also for other video editing purposes to add new meaning and engagement to your video.
For Win 7 or later (64-bit)
For macOS 10.12 or later
● Ending Thoughts →
● I hope by now you know different software to upscale your low-quality video.
● Though this is an automatic process, you can use any software mentioned above to make your work smooth and hustle-free.
● You can access most software from any device and get output in any format with high-quality editing. This software will help you achieve the best results in your editing experience.
AI Upscaling is often used to improve the video quality. Here are some of the methods to do AI video upscaling. Follow these methods to successfully enhance your video quality.
In this article
01 [What Is AI Upscaling? And Why AI Upscaling Is Significant?](#Part 1)
02 [How to Easily AI Upscale Video to 1080p or 4K?](#Part 2)
03 [Best 10 Software to Make AI Upscaling Video](#Part 3)
Part 1 What Is AI Upscaling? And Why AI Upscaling Is Significant?
The process of generating or creating additional pixels of an image or frame in a video is AI Upscaling. This has many good results on the final video output.
This is mainly done to raise the bit rate of the video and, therefore, slightly improve the visual quality of the video. This is also used to improve the picture quality of DVDs and other low-quality videos. It is done to support lower quality videos or pictures on higher resolution screens like TV. This kind of upscaling is mostly done in TVs automatically.
Part 2 How to Easily AI Upscale Video to 1080p or 4K?
The interesting part is that this upscaling is done by the higher resolution device itself. If you display a lower resolution video on a high-resolution TV, the TV will upscale the video quality of the lower resolution video. This process mainly happens by the displaying device itself. But you can try to upscale videos by yourself using this software, which will help you achieve the best results.
Part 3 Best 10 Software to Make AI Upscaling Video
There are numerous AI upscale video software on the internet. The software listed below is the best among the numerous software because of its extraordinary features and interface. The 10 best AI video upscaling software are:
01DVDFab Enlarger AI
DVDFab Enlarger AI is an AI upscale video software published by Fengtao Software Limited. You can upscale any video you want to 4k. There are a few highlights of this software, and they are:
● This software is available onWindows.
● The price of the software ranges from $44.99 to $139.99
● You can use this software to rip videos from both DVDs and Blu-ray.
● You can save the output from the software in MP4 or MKV form.
● This software allows you to boost your fps up to 60.
Pros
Upscale your video to 4K resolution.
Boost your video to 60 fps.
Appropriate for beginners.
Cons
Available only on Windows.
Very Expensive.
No slow-motion is available.
02Video2X
Video2X is popular ai video upscaling software that is developed by Open-source. It is quite popular among the professionals for various reasons like:
● Video2X is available exclusive to Windows.
● You can avail this software without paying any money.
● You can upscale old low-resolution videos.
● Upscale your videos to 4K.
● You can save the output from the software in MP4 or MKV form.
Pros
You can availthis software for free.
You can upscale GIFs.
You can decide your output format.
Cons
It is not beginner-friendly.
No slow-motion editing is available.
There is no fps boosting.
03Pixop
Pixop ai video upscaling online software is published or developed by Pixop ApS. The main features of this software are:
● It is available online.
● Available both for Windows and Mac.
● Allows to upscale videos up to 8K.
● Supports MP4, MXF, M2TS, and MOV formats of output.
● Allows custom fps boost in videos.
Pros
Available online for both Windows and Mac.
Allows video upscaling up to 8K.
Allows custom fps boost.
Cons
Expensive for longer videos.
Does not support slow-motion editing.
Only supports MP4, MXF, M2TS, and MOV formats of output.
04Topaz Video Enhance AI
Topaz Video Enhance AI is an ai upscaling video enhancing app developed by the Topaz labs. The built-in AI system in topaz ai upscale software has been experimented on numerous videos, and it has been successful each time to edit every pixel in every frame of the video. The main features of this software are:
● The software is available for both os that is Mac and Windows.
● You can use this software to edit your video into slow motion, two thousand percent.
● This software can enhance any video up to 8K resolution.
● You can save the output from the software in any form, like MP4, PNG, TIFF, JPG, or MOV.
● This software allows fps boosting up to 120.
Pros
You can have a free trial.
You can upscale any video up to 8K resolution.
You can edit the video into slow motion to 2000%.
Cons
The app is expensive.
A watermark remains on the videos edited through these apps.
This software is not beginner-friendly software.
05AVCLabs Video Enhancer AI
AVCLabs Video Enhancer AI is ai video upscaling software developed by Anvsoft Inc. The most interesting features of this software are:
● Available for Windows only.
● It can be accessed through payment of $39.95/Month.
● Enhance video quality up to 4K.
● ‘Multi-frame feature’ helps to edit every frame of the video minutely.
● Manual settings for upscaling video or converting to low-quality video up to 480p.
Pros
Excellent video enhancing quality.
Allows enhancing video up to 4K.
This software can remove noise, overlay, and blurriness from the videos.
Cons
Expensive
Available only on Windows
Only for professional or expert users.
06GDFLab
GDFLab is an AI video enhancer online software. You can edit both images and videos with this software. This app is used in many fields, and it has been successful in all those fields due to its outstanding features like:
● This ai video upscaling online software gives a full free trial for its users.
● It is available online.
● It can be used both in Windows and Mac.
● You can upscale your videos up to 4K.
● The price of the software depends on the size of the video or photo you are enhancing.
Pros
This software is available both in Windows and Mac.
You can upscale your videos up to 4K.
You can use this app to restore your images to 4x.
Cons
Interruption in editing for internet problems.
You cannot use this app until you register.
This software is too complex for beginners to handle.
07iSize
iSize is an ai upscaler video online enhancer published by iSize technologies. It is said that this app excels in its field. This may happen for its extraordinary features like:
● This software is available both for Mac and Windows.
● A must-use software for professionals.
● High-end video codec capacity.
● You can use this app to upscale videos and also images.
Pros
You can use this software to upscale both videos and photos.
The video conversion process is fast.
This software supports batch conversion of videos.
Cons
Hardware is not upgraded regularly.
Expensive to avail.
Not for beginners.
● You can upscale your videos up to 8K.
08Cupscale
Cupscale is another such ai upscaling video software. The main features of this software are:
● This software uses the very popular ESRGAN algorithm.
● This software is available both for PC and Mac.
● This software is available for free.
● This software can be used to upscale videos up to 8K.
● This software does not change the actual video format while editing the video.
Pros
Available for both Windows and Mac.
Available free.
Allows you to upscale videos up to 8K.
Cons
Supports only MP4, PNG, and JPG output formats.
Complex interface.
The AI used by this software is not stable.
09MiniTool Video Converter
MiniTool Video Converter is another AI-driven video upscaling software. This app can also be used to upscale videos. It has some exciting features which can make your editing experience outstanding. The features are:
● This software is available for free.
● It is available only for Windows.
● This software supports more than 1000 output formats.
● You can use this video to enhance videos as well as audio.
● You can record your computer screen without a watermark.
Pros
Available free.
Supports more than 1000 different output formats.
Allows to the record computer screen without watermark.
Cons
Available only on Windows.
To run this software, high-end PC specifications are required.
This software is not for beginner use.
10Tipard Video Converter Ultimate
Tipard Video Converter Ultimate has some mind-boggling features, making this software one of the bestai upscale video software**.** This software is an all-in-one solution for the editors. The main features of this app are:
● Available in both Windows and Mac.
● Supports almost all different video formats.
● Upscale videos from DVDs to UHD videos.
● You can upscale your videos up to 8K.
● This app allows you to edit or retouch your videos on the timeline.
Pros
Available both for Windows and Mac.
You can rip videos from DVDs.
Allows you to upscale your videos up to 8K resolution.
Cons
It has a time-consuming editing process.
Does not support any usual PC.
Not beginner-friendly software.
Tip:Comparison between different AI Video Upscaling software
| Software | Windows/Mac/Both | 8K/4K Upscaling | Expensive | Beginner Friendly |
|---|---|---|---|---|
| DVDFab Enlarger AI | Windows | 4k | Yes | Yes |
| Video2x | Windows | 4k | No | No |
| Pixop | Both | 8k | Yes | No |
| Topaz Video Enhance AI | Both | 8k | Yes | No |
| AVCLabs Video Enhancer AI | Both | 8k | Yes | No |
| Windows | Both | 4k | Yes | No |
| GDFLab | Both | 4k | No | No |
| iSize | Both | 8k | Yes | No |
| Cupscale | Both | 8k | No | No |
| MiniTool Video Converter | Windows | 8k | No | No |
| Tipard Video Converter | Both | 8k | No | No |
There is another video editing app, which is Wondershare Filmora Video Editor . It is not an AI-driven video upscaling app. You can use this app to upscale videos of any format and create outputs of any format. This app allows you to upscale videos to 4K. You can use this app also for other video editing purposes to add new meaning and engagement to your video.
For Win 7 or later (64-bit)
For macOS 10.12 or later
● Ending Thoughts →
● I hope by now you know different software to upscale your low-quality video.
● Though this is an automatic process, you can use any software mentioned above to make your work smooth and hustle-free.
● You can access most software from any device and get output in any format with high-quality editing. This software will help you achieve the best results in your editing experience.
Also read:
- New In 2024, 2 Practical Ways to Combine Videos on TikTok
- How To Make a Video Podcast
- Updated In 2024, How to Make a Vacation Slideshow in 5 Minutes
- Updated How to Easily Convert SRT to VTT
- In 2024, Looking for the Best Websites for 3D Text PNG? Weve Covered You with Our Top 8 Picks for Your Upcoming Work
- Updated How to Loop a Video on Vimeo?
- 2024 Approved The Article Shall Offer an Overview to Create a Promising Sports Intro and Edit a YouTube Outro for a Sports Channel. There Will Also Be Three Recommended Apps to Download Background Music for Exercise
- Updated Want to Make Your Canva Slideshow More Attractive? Follow the Given Discussion to Know Everything About Making the Best Slideshows with Canva
- Updated In 2024, Everything That You Need to Know About Video Montages- Ideas, Techniques, and Software
- 2024 Approved Are You Curious About the Functionality of LUTs in LumaFusion? This Article Will Satisfy Your Queries with Ease
- New Ll About GIF Keyboard That You Want to Know
- 2024 Approved Making Slow Motion Videos in Premiere Pro A Review on The Best Methods
- In 2024, Top 31 Video Trimmers That Will Save You Time in Ediitng
- Creating Video Testimonials for 2024
- New 2024 Approved How To Edit Youtube Videos In Simple Steps
- New In 2024, Convert Slow Motion Videos to Regular Videos in Your iOS Device |A How
- Updated 2024 Approved Step by Step to Cut Video in Adobe Premiere Pro
- Updated Working Out All Important Details of Slowing Down Video in After Effects
- Updated How to Create Simple Slideshow Word for 2024
- Updated 6 Best Methods to Make a Video Longer
- New Everything That You Need to Know About Video Montages- Ideas, Techniques, and Software
- Top Shortcut Towards Timeline Template
- How to Change Quicktime Player Speed on Mac?
- In 2024, This Article Has a Detailed Description of How You Can Split the Videos in Lightworks Including the the Discussion of Splitting the Wondershare Filmora as an Alternative. It Is Also a Suitable Choice
- New Easy Ways to Edit Recorded Video for 2024
- New 7 Solutions to Cut Video on Mac without Using FFmpeg for 2024
- New 2024 Approved Best 15 Subtitle Apps 2023 Windows, Mac, iPhone, Android & Online
- New Looking for the Different Ar Video Effects to Include in Your Film? Check Out This Article for the Best 10 Augmented Reality Effects and the Fun Ar Effects in Filmora
- How to Create a Light Sweep (Shine) Effect with Filmora
- New In 2024, Add Text Animation to A Video Online
- Updated In 2024, Quick Answer What Is a GIF File?
- Updated In 2024, Best 10 Anime Movies for All Time
- Best Video Grabbers for Chrome for 2024
- Updated In 2024, Best 16 Motion Blur Apps for Videos & Photos
- New Best iOS Slow Motion Apps To Work With for 2024
- New In 2024, Create a Kickass COD Warzone Thumbnail for Free
- Updated Do You Seek to Blur Out Your Video and Photo to Display some Motion Blur? This Article Provides a List of the Best Motion Blur Apps for Videos and Photos
- Updated Split Audio From Video in Adobe Premiere Pro Step by Step
- In 2024, If You Are Looking for Reliable Solutions to Export Your Musical Slideshow Through a DVD Burning Process, Take a Breath, You Have Landed at the Right Place
- Updated 10 Best Cartoon Video Makers (Online and Desktop Solution) for 2024
- Updated 2024 Approved Top 10 iPad Slideshow Apps to Create a Slideshow
- Do You Need to Create a Video for Your Business Online but Feel You Do Not Have the Skill and Time to Do That? Try Out These AI Video Generators that Will Work for You to Carry Out Tasks Effectively
- New In 2024, How to Create Your Own Subscribe Channel Graphics
- Updated Having Issues Trying to View SRT Files when You Add Subtitle Files for VLC? Learn the Right Ways to Do so and the Best Alternative Solution
- In 2024, How to Make Eye Zoom Transition Effect with Filmora
- New Control Playback Speed in Premiere Pro for 2024
- New 4 Methods to Resize a WebM File for 2024
- New In 2024, 30+ Amazing Templates for VN Video Editor
- Updated Camtasia Vs Captivate - Which to Choose for 2024
- Updated In 2024, Adding Text to Your Collage Not only Makes It Look Sophisticated but Also Versatile. So, if You Too Are Looking for Ways to Create a Collage Text, Check Out Our Article
- All About Factory Reset, What Is It and What It Does to Your Samsung Galaxy F15 5G? | Dr.fone
- How To Unlink Apple ID From Apple iPhone 11 Pro
- How to Intercept Text Messages on Xiaomi Redmi Note 12T Pro | Dr.fone
- In 2024, Best Anti Tracker Software For OnePlus 12 | Dr.fone
- Top 5 Car Locator Apps for Samsung Galaxy S24+ | Dr.fone
- In 2024, 3 Things You Must Know about Fake Snapchat Location On Oppo A1x 5G | Dr.fone
- Complete guide for recovering messages files on Xiaomi Redmi Note 12 4G
- Data Retrieval tool – restore lost data from Find N3
- In 2024, How to Unlock Apple ID From your iPhone 12 Pro without Security Questions?
- In 2024, How To Fix OEM Unlock Missing on Realme Narzo 60x 5G?
- In 2024, Everything You Need to Know about Lock Screen Settings on your Motorola Moto G34 5G
- Infinix Data Retrieval tool – restore lost data from Infinix Hot 30i
- In 2024, How to use Pokemon Go Joystick on Samsung Galaxy M34 5G? | Dr.fone
- How to Factory Reset iPhone 11 Pro Max and iPad Without Apple ID | Stellar
- In 2024, How to Spy on Text Messages from Computer & Samsung Galaxy A05s | Dr.fone
- In 2024, How Do I Stop Someone From Tracking My Vivo Y78t? | Dr.fone
- In 2024, Top 4 SIM Location Trackers To Easily Find Your Lost Realme Narzo N55 Device
- In 2024, Turning Off Two Factor Authentication On Apple iPhone 15 Pro? 5 Tips You Must Know
- How To Change Your iPhone XS Apple ID on MacBook
- In 2024, Effective Ways To Fix Checkra1n Error 31 From iPhone 13 Pro
- Proven Ways to Fix There Was A Problem Parsing the Package on Infinix Zero 30 5G | Dr.fone
- In 2024, Hassle-Free Ways to Remove FRP Lock on Infinix Smart 7 Phones with/without a PC
- iPhone SE (2022) Data Recovery – An Infographic to Conquer iPhone Data Loss | Stellar
- In 2024, Fake the Location to Get Around the MLB Blackouts on Xiaomi Redmi K70 | Dr.fone
- How to Transfer from Apple iPhone 7 Plus to Samsung Galaxy S20? | Dr.fone
- Title: New Zoom In and Out on Snapchat
- Author: Chloe
- Created at : 2024-05-20 03:37:56
- Updated at : 2024-05-21 03:37:56
- Link: https://ai-editing-video.techidaily.com/new-zoom-in-and-out-on-snapchat/
- License: This work is licensed under CC BY-NC-SA 4.0.
