:max_bytes(150000):strip_icc():format(webp)/camera-56e0976d3df78c5ba0566b37.jpg)
Online Calculate and Change Video Aspect Ratio

Online Calculate and Change Video Aspect Ratio
Versatile Video Editor - Wondershare Filmora
An easy yet powerful editor
Numerous effects to choose from
Detailed tutorials provided by the official channel
While watching movies, you might have noticed specific clips have black lines at the sides of the screen. It is because the original video’s aspect ratio is different from that of the screen on which you see it.
Nowadays, people are using multiple devices with different aspect ratios. Videos are an effective marketing tool that most marketers are using to expand their business. Therefore, the video aspect ratio has become vital.
Some people feel technical aspects such as video aspect ratio or using aspect ratio editor are a bit intimidating. But they are easy and simple to understand. So, let us know more about them.
In this article
01 [How to Calculate Video Aspect Ratio Online?](#Part 1)
02 [Websites to Change Video Aspect Ratio Online](#Part 2)
Part 1 How to Calculate Video Aspect Ratio Online?
Do you want to make changes to the video? If yes, then it is important to understand the basic concepts of video aspect ratios. Moreover, you can determine the specifications using an aspect ratio editor online.
Every photo, canvas, responsive design, digital video, or frame is rectangular with precise proportions. Outline the aspect ratios to create shapes according to different mediums like computers, TV, movies, or camera screens.
With the help of aspect ratio calculators, you can calculate the image’s value and new size. You can also use it to convert the image size and keep the objects in shape to make them look natural.
The formula to find an aspect ratio is: Width / Height
Aspect Ratio Calculation Process
Calculating the aspect resolution is pretty straightforward. The steps mentioned below will help you to get the correct height for the edited image:
- Take the original height-for example, 2400 units.
- Take the actual width- for example, 3200 units.
- Then, divide the height by width- for example, 2400/3200=0.75.
- Multiply the result (quotient) by new expected width- for instance, 0.75*600=450.
- The resulting figure is a new height.
Part 2 Websites to Change Video Aspect Ratio Online
If you want to change the video aspect ratio, you can easily crop the size of the video online with the help of different websites. These websites offer other aspect ratio options. So, let us learn more about them:
Free Convert

FreeConvert.com is a free editing website that allows you to edit video aspect ratio online. Usually, it is a cloud-based editor that converts a variety of files. So, you can use it to change the video aspect ratio of your clip.
You can see various options such as aspect ratio, codec, screen resolution, or more during video file conversion. For example, you can opt for an aspect ratio as per your requirements there.
Then, this converter will fix the clip automatically in the resolution selected by you. This website can process multiple files up to 1GB at once.
Pros:
- No Pop-ups occur while converting
- It did not affect the download speed
- Easy to convert the files
Cons:
- You have a limit of 25 minutes to convert files. After that, you need to upgrade to pro by making monthly payments.
CloudConvert

Cloud Convert is a file conversion service supporting around 200 file formats online for free. You can adjust the aspect ratio of videos on this website easily.
You have to upload a video clip and select its output format as per your original file. Then go to output video configuration to change the aspect ratio there. Choose the aspect ratio from the options given.
Pros:
- Several conversion options for high-quality files
- Supports cloud services
- Platform independent
- User-friendly
- Supports batch conversion
- It offers a powerful API
Cons:
- Get 25 minutes a day to convert the files
Kapwing

It is a free online aspect ratio editor to create content online. This tool has several features and a collection of online material. For example, through this aspect ratio editor, you can crop the size of video online.
You can select or resize video aspect ratio according to different social media platforms. But you can export only 720 p quality through this website for free after that; you have to create an account.
Pros:
- Merge multiple videos or images collectively in any order and add audio.
- Reduce the video size of any format with a single click.
- Add video subtitles
- Resize or crop videos for all social media posts.
- Cut out multiple sections of a video.
Cons:
- 250MB file upload limit
- Export only in 720p quality
- Export video clips for 7 minutes
- Edit or store content till two days
IMOVIE

Try the iMovie iPhone aspect ratio editor if you want to drag or drop the interface for editing videos simply. It has primitive tools to edit videos or images, and you can also import content from local drives or cloud storage with it.
It offers various visual effects like picture-in-picture, split-screen, or green screen effects. You can also enable viewers to zoom in or pass the scenes. Imovie set aspect ratio gives videos a cinematic feel using its 13 different video filters.
Pros:
- It has a simple interface.
- Its 4K resolution support allows you to give a cinematic feel to videos.
- iMovie has great speed controls that enable you for optimal pace-setting of scenes.
Cons:
- It does not have many output controls options.
- It only works on Mac systems.
Wondershare Filmora
If you permanently want to change the aspect ratio online, you must opt for a video converter or editor. Wondershare Filmora is the most remarkable aspect ratio editor that allows you to easily create videos of 4:3, 9:16, 16:9, and 1:1 aspect ratios.
Moreover, it is a convenient tool to edit videos on YouTube, Apple TV, Vimeo, or mobile devices. So, many YouTubers or bloggers are using it.
It is a reliable and cost-effective tool that offers drop and drag effects, audio, templates, soundtracks, filters, and other options. In addition, you can access features like split-screen, green screen, motion tracking, etc.
Its keyframing feature allows you to include custom animations, while motion tracking helps you track objects. Then, the color matching feature enables you to copy the color settings of one video and apply them to another clip.
You can even assign hotkeys shortcuts for various tools to save your time. Moreover, you can use different transitions, motion elements, filters, clips, titles, audios, and many other things with a simple drag and drop option.
Wondershare Filmora
Get started easily with Filmora’s powerful performance, intuitive interface, and countless effects!
Try It Free Try It Free Try It Free Learn More >

With its green screen feature, you can remove or change the video background. Then, you have an audio ducking feature to lower down the background volume or fade the audio track to another.
Here are various methods to change the aspect ratio in Wondershare Filmora:
Method 1: Change Aspect Ratio at the Starting Interface
Wondershare Filmora allows you to resize video aspect ratio when you launch the editor program. First, go to the drop-down menu button. Then, click on it to see various aspect ratios such as 16:9, 1:1, 4:3, 9:16, or 21:9.
Choose the aspect ratio that you want by simply clicking on it.

Method 2: Change Aspect Ratio under Project Settings
You can change the aspect ratio by clicking on the “Project Settings.” You can decide the target aspect ratio based on the aspect ratio of the media source.
For instance, if the aspect ratio of media source files is 4:3, select the standard aspect ratio of 4:3. Then, media files with other aspect ratios will show black bars.
In case of any discordance or if you want to change the aspect ratio, choose the proper ratio from project settings.

Method 3: Change Aspect Ratio during Editing
Even after importing the videos or images into Filmora’s timeline, you can easily change the ratio from the Crop and Zoom tool.
- Go to timeline and right-click on the video clip. Then, select “Crop and Zoom.” You will see the pop-up window.
- Click on 16:9, 4:3, 1:1, or 9:16 manually at the bottom if you like to change the video aspect ratio.
- You can also manually enter the video aspect ratio. Next, click on the “Ok” button.

After changing the aspect ratio, add background blur effects if you notice a black bar. It will enhance the video. You can also intensify your video by using filters, visual effects, overlays, or titles.

Method 4: Change the Aspect Ratio with Auto-Reframe
If you use Filmora’s latest versions, you will notice Auto Reframe helps to change the aspect ratio. Other than cropping, it will find the object in clips and crop it automatically if needed.
The following are steps to change the aspect ratio using the Auto-Reframe option:
Step1 Once you upload the video clips to the media library, right-click on it and choose the Auto-Reframe option

Step2 You will see the Auto Reframe window appear on the screen. Replace the existing video with a new clip. Then, change the video aspect ratio and video motion speed. Make sure to change the aspect ratio that fits most with different social media platforms

Step3 Once you choose the aspect ratio, click on the “Analyze” button. Filmora will Auto-Reframe the video itself. Once the process completes, you can see results in the preview window
Drag box to adjust the frame or to keep the object in it. It will automatically remove the content outside the box.

Step4 After completing adjustment or reframing, click on the “Export” button to save your video
Change the name of the video and select the location where you want to save the video. Now, click on the “Export” again to save.

Method 5: Change Aspect Ratio at Exporting
You can save the clip to your system or smartphones, depending on your requirements. Then, upload them directly to Youtube or burn them into DVD by clicking on the “Export button.” In this way, you can watch on widescreen or standard TV whenever you want.

● Change Aspect Ratio for the Local Computer
First, you will see the “Local” tab. There you can save the clip in a particular aspect ratio to your system.
You can see all resolutions with various aspect ratios after selecting the format. The output video depends on the media click resolution.
● Change Aspect Ratio for a Device
Change the “Device” tab to save the video in formats compatible with popular devices, including iPod, iPhone, PSP, iPad, etc. Once you choose the device, you will see all resolutions. Choose your favorite or the best resolution.
The video quality will continue improving with higher resolutions. But it will also increase the size of the file.
● Change Aspect Ratio for YouTube
Go to the “YouTube” tab and fill in the information. Then, click the “Export” button. Selecting the aspect ratio again is not necessary. It will directly upload your videos to YouTube.
● Change Aspect Ratio for DVD TV
When you go to the “DVD” tab, you will notice various aspect ratio options. Switching the aspect ratio for TV from 4:3 to 16:9 is pretty straightforward. To do so, select what you think is right.
Conclusion
From the article above, you have learned about different online converters. Now you know how to change the video aspect ratio online and use the video aspect ratio editor. Also, understand how to calculate aspect ratios.
So, you can decide for yourself that Wondershare Filmora video editor is one of the best tools. Using its different methods you can change the aspect ratio easily.
Furthermore, you can use it to make changes on both social media platforms and your devices because it is an effective and reliable tool.
For Win 7 or later (64-bit)
For macOS 10.12 or later
While watching movies, you might have noticed specific clips have black lines at the sides of the screen. It is because the original video’s aspect ratio is different from that of the screen on which you see it.
Nowadays, people are using multiple devices with different aspect ratios. Videos are an effective marketing tool that most marketers are using to expand their business. Therefore, the video aspect ratio has become vital.
Some people feel technical aspects such as video aspect ratio or using aspect ratio editor are a bit intimidating. But they are easy and simple to understand. So, let us know more about them.
In this article
01 [How to Calculate Video Aspect Ratio Online?](#Part 1)
02 [Websites to Change Video Aspect Ratio Online](#Part 2)
Part 1 How to Calculate Video Aspect Ratio Online?
Do you want to make changes to the video? If yes, then it is important to understand the basic concepts of video aspect ratios. Moreover, you can determine the specifications using an aspect ratio editor online.
Every photo, canvas, responsive design, digital video, or frame is rectangular with precise proportions. Outline the aspect ratios to create shapes according to different mediums like computers, TV, movies, or camera screens.
With the help of aspect ratio calculators, you can calculate the image’s value and new size. You can also use it to convert the image size and keep the objects in shape to make them look natural.
The formula to find an aspect ratio is: Width / Height
Aspect Ratio Calculation Process
Calculating the aspect resolution is pretty straightforward. The steps mentioned below will help you to get the correct height for the edited image:
- Take the original height-for example, 2400 units.
- Take the actual width- for example, 3200 units.
- Then, divide the height by width- for example, 2400/3200=0.75.
- Multiply the result (quotient) by new expected width- for instance, 0.75*600=450.
- The resulting figure is a new height.
Part 2 Websites to Change Video Aspect Ratio Online
If you want to change the video aspect ratio, you can easily crop the size of the video online with the help of different websites. These websites offer other aspect ratio options. So, let us learn more about them:
Free Convert

FreeConvert.com is a free editing website that allows you to edit video aspect ratio online. Usually, it is a cloud-based editor that converts a variety of files. So, you can use it to change the video aspect ratio of your clip.
You can see various options such as aspect ratio, codec, screen resolution, or more during video file conversion. For example, you can opt for an aspect ratio as per your requirements there.
Then, this converter will fix the clip automatically in the resolution selected by you. This website can process multiple files up to 1GB at once.
Pros:
- No Pop-ups occur while converting
- It did not affect the download speed
- Easy to convert the files
Cons:
- You have a limit of 25 minutes to convert files. After that, you need to upgrade to pro by making monthly payments.
CloudConvert

Cloud Convert is a file conversion service supporting around 200 file formats online for free. You can adjust the aspect ratio of videos on this website easily.
You have to upload a video clip and select its output format as per your original file. Then go to output video configuration to change the aspect ratio there. Choose the aspect ratio from the options given.
Pros:
- Several conversion options for high-quality files
- Supports cloud services
- Platform independent
- User-friendly
- Supports batch conversion
- It offers a powerful API
Cons:
- Get 25 minutes a day to convert the files
Kapwing

It is a free online aspect ratio editor to create content online. This tool has several features and a collection of online material. For example, through this aspect ratio editor, you can crop the size of video online.
You can select or resize video aspect ratio according to different social media platforms. But you can export only 720 p quality through this website for free after that; you have to create an account.
Pros:
- Merge multiple videos or images collectively in any order and add audio.
- Reduce the video size of any format with a single click.
- Add video subtitles
- Resize or crop videos for all social media posts.
- Cut out multiple sections of a video.
Cons:
- 250MB file upload limit
- Export only in 720p quality
- Export video clips for 7 minutes
- Edit or store content till two days
IMOVIE

Try the iMovie iPhone aspect ratio editor if you want to drag or drop the interface for editing videos simply. It has primitive tools to edit videos or images, and you can also import content from local drives or cloud storage with it.
It offers various visual effects like picture-in-picture, split-screen, or green screen effects. You can also enable viewers to zoom in or pass the scenes. Imovie set aspect ratio gives videos a cinematic feel using its 13 different video filters.
Pros:
- It has a simple interface.
- Its 4K resolution support allows you to give a cinematic feel to videos.
- iMovie has great speed controls that enable you for optimal pace-setting of scenes.
Cons:
- It does not have many output controls options.
- It only works on Mac systems.
Wondershare Filmora
If you permanently want to change the aspect ratio online, you must opt for a video converter or editor. Wondershare Filmora is the most remarkable aspect ratio editor that allows you to easily create videos of 4:3, 9:16, 16:9, and 1:1 aspect ratios.
Moreover, it is a convenient tool to edit videos on YouTube, Apple TV, Vimeo, or mobile devices. So, many YouTubers or bloggers are using it.
It is a reliable and cost-effective tool that offers drop and drag effects, audio, templates, soundtracks, filters, and other options. In addition, you can access features like split-screen, green screen, motion tracking, etc.
Its keyframing feature allows you to include custom animations, while motion tracking helps you track objects. Then, the color matching feature enables you to copy the color settings of one video and apply them to another clip.
You can even assign hotkeys shortcuts for various tools to save your time. Moreover, you can use different transitions, motion elements, filters, clips, titles, audios, and many other things with a simple drag and drop option.
Wondershare Filmora
Get started easily with Filmora’s powerful performance, intuitive interface, and countless effects!
Try It Free Try It Free Try It Free Learn More >

With its green screen feature, you can remove or change the video background. Then, you have an audio ducking feature to lower down the background volume or fade the audio track to another.
Here are various methods to change the aspect ratio in Wondershare Filmora:
Method 1: Change Aspect Ratio at the Starting Interface
Wondershare Filmora allows you to resize video aspect ratio when you launch the editor program. First, go to the drop-down menu button. Then, click on it to see various aspect ratios such as 16:9, 1:1, 4:3, 9:16, or 21:9.
Choose the aspect ratio that you want by simply clicking on it.

Method 2: Change Aspect Ratio under Project Settings
You can change the aspect ratio by clicking on the “Project Settings.” You can decide the target aspect ratio based on the aspect ratio of the media source.
For instance, if the aspect ratio of media source files is 4:3, select the standard aspect ratio of 4:3. Then, media files with other aspect ratios will show black bars.
In case of any discordance or if you want to change the aspect ratio, choose the proper ratio from project settings.

Method 3: Change Aspect Ratio during Editing
Even after importing the videos or images into Filmora’s timeline, you can easily change the ratio from the Crop and Zoom tool.
- Go to timeline and right-click on the video clip. Then, select “Crop and Zoom.” You will see the pop-up window.
- Click on 16:9, 4:3, 1:1, or 9:16 manually at the bottom if you like to change the video aspect ratio.
- You can also manually enter the video aspect ratio. Next, click on the “Ok” button.

After changing the aspect ratio, add background blur effects if you notice a black bar. It will enhance the video. You can also intensify your video by using filters, visual effects, overlays, or titles.

Method 4: Change the Aspect Ratio with Auto-Reframe
If you use Filmora’s latest versions, you will notice Auto Reframe helps to change the aspect ratio. Other than cropping, it will find the object in clips and crop it automatically if needed.
The following are steps to change the aspect ratio using the Auto-Reframe option:
Step1 Once you upload the video clips to the media library, right-click on it and choose the Auto-Reframe option

Step2 You will see the Auto Reframe window appear on the screen. Replace the existing video with a new clip. Then, change the video aspect ratio and video motion speed. Make sure to change the aspect ratio that fits most with different social media platforms

Step3 Once you choose the aspect ratio, click on the “Analyze” button. Filmora will Auto-Reframe the video itself. Once the process completes, you can see results in the preview window
Drag box to adjust the frame or to keep the object in it. It will automatically remove the content outside the box.

Step4 After completing adjustment or reframing, click on the “Export” button to save your video
Change the name of the video and select the location where you want to save the video. Now, click on the “Export” again to save.

Method 5: Change Aspect Ratio at Exporting
You can save the clip to your system or smartphones, depending on your requirements. Then, upload them directly to Youtube or burn them into DVD by clicking on the “Export button.” In this way, you can watch on widescreen or standard TV whenever you want.

● Change Aspect Ratio for the Local Computer
First, you will see the “Local” tab. There you can save the clip in a particular aspect ratio to your system.
You can see all resolutions with various aspect ratios after selecting the format. The output video depends on the media click resolution.
● Change Aspect Ratio for a Device
Change the “Device” tab to save the video in formats compatible with popular devices, including iPod, iPhone, PSP, iPad, etc. Once you choose the device, you will see all resolutions. Choose your favorite or the best resolution.
The video quality will continue improving with higher resolutions. But it will also increase the size of the file.
● Change Aspect Ratio for YouTube
Go to the “YouTube” tab and fill in the information. Then, click the “Export” button. Selecting the aspect ratio again is not necessary. It will directly upload your videos to YouTube.
● Change Aspect Ratio for DVD TV
When you go to the “DVD” tab, you will notice various aspect ratio options. Switching the aspect ratio for TV from 4:3 to 16:9 is pretty straightforward. To do so, select what you think is right.
Conclusion
From the article above, you have learned about different online converters. Now you know how to change the video aspect ratio online and use the video aspect ratio editor. Also, understand how to calculate aspect ratios.
So, you can decide for yourself that Wondershare Filmora video editor is one of the best tools. Using its different methods you can change the aspect ratio easily.
Furthermore, you can use it to make changes on both social media platforms and your devices because it is an effective and reliable tool.
For Win 7 or later (64-bit)
For macOS 10.12 or later
While watching movies, you might have noticed specific clips have black lines at the sides of the screen. It is because the original video’s aspect ratio is different from that of the screen on which you see it.
Nowadays, people are using multiple devices with different aspect ratios. Videos are an effective marketing tool that most marketers are using to expand their business. Therefore, the video aspect ratio has become vital.
Some people feel technical aspects such as video aspect ratio or using aspect ratio editor are a bit intimidating. But they are easy and simple to understand. So, let us know more about them.
In this article
01 [How to Calculate Video Aspect Ratio Online?](#Part 1)
02 [Websites to Change Video Aspect Ratio Online](#Part 2)
Part 1 How to Calculate Video Aspect Ratio Online?
Do you want to make changes to the video? If yes, then it is important to understand the basic concepts of video aspect ratios. Moreover, you can determine the specifications using an aspect ratio editor online.
Every photo, canvas, responsive design, digital video, or frame is rectangular with precise proportions. Outline the aspect ratios to create shapes according to different mediums like computers, TV, movies, or camera screens.
With the help of aspect ratio calculators, you can calculate the image’s value and new size. You can also use it to convert the image size and keep the objects in shape to make them look natural.
The formula to find an aspect ratio is: Width / Height
Aspect Ratio Calculation Process
Calculating the aspect resolution is pretty straightforward. The steps mentioned below will help you to get the correct height for the edited image:
- Take the original height-for example, 2400 units.
- Take the actual width- for example, 3200 units.
- Then, divide the height by width- for example, 2400/3200=0.75.
- Multiply the result (quotient) by new expected width- for instance, 0.75*600=450.
- The resulting figure is a new height.
Part 2 Websites to Change Video Aspect Ratio Online
If you want to change the video aspect ratio, you can easily crop the size of the video online with the help of different websites. These websites offer other aspect ratio options. So, let us learn more about them:
Free Convert

FreeConvert.com is a free editing website that allows you to edit video aspect ratio online. Usually, it is a cloud-based editor that converts a variety of files. So, you can use it to change the video aspect ratio of your clip.
You can see various options such as aspect ratio, codec, screen resolution, or more during video file conversion. For example, you can opt for an aspect ratio as per your requirements there.
Then, this converter will fix the clip automatically in the resolution selected by you. This website can process multiple files up to 1GB at once.
Pros:
- No Pop-ups occur while converting
- It did not affect the download speed
- Easy to convert the files
Cons:
- You have a limit of 25 minutes to convert files. After that, you need to upgrade to pro by making monthly payments.
CloudConvert

Cloud Convert is a file conversion service supporting around 200 file formats online for free. You can adjust the aspect ratio of videos on this website easily.
You have to upload a video clip and select its output format as per your original file. Then go to output video configuration to change the aspect ratio there. Choose the aspect ratio from the options given.
Pros:
- Several conversion options for high-quality files
- Supports cloud services
- Platform independent
- User-friendly
- Supports batch conversion
- It offers a powerful API
Cons:
- Get 25 minutes a day to convert the files
Kapwing

It is a free online aspect ratio editor to create content online. This tool has several features and a collection of online material. For example, through this aspect ratio editor, you can crop the size of video online.
You can select or resize video aspect ratio according to different social media platforms. But you can export only 720 p quality through this website for free after that; you have to create an account.
Pros:
- Merge multiple videos or images collectively in any order and add audio.
- Reduce the video size of any format with a single click.
- Add video subtitles
- Resize or crop videos for all social media posts.
- Cut out multiple sections of a video.
Cons:
- 250MB file upload limit
- Export only in 720p quality
- Export video clips for 7 minutes
- Edit or store content till two days
IMOVIE

Try the iMovie iPhone aspect ratio editor if you want to drag or drop the interface for editing videos simply. It has primitive tools to edit videos or images, and you can also import content from local drives or cloud storage with it.
It offers various visual effects like picture-in-picture, split-screen, or green screen effects. You can also enable viewers to zoom in or pass the scenes. Imovie set aspect ratio gives videos a cinematic feel using its 13 different video filters.
Pros:
- It has a simple interface.
- Its 4K resolution support allows you to give a cinematic feel to videos.
- iMovie has great speed controls that enable you for optimal pace-setting of scenes.
Cons:
- It does not have many output controls options.
- It only works on Mac systems.
Wondershare Filmora
If you permanently want to change the aspect ratio online, you must opt for a video converter or editor. Wondershare Filmora is the most remarkable aspect ratio editor that allows you to easily create videos of 4:3, 9:16, 16:9, and 1:1 aspect ratios.
Moreover, it is a convenient tool to edit videos on YouTube, Apple TV, Vimeo, or mobile devices. So, many YouTubers or bloggers are using it.
It is a reliable and cost-effective tool that offers drop and drag effects, audio, templates, soundtracks, filters, and other options. In addition, you can access features like split-screen, green screen, motion tracking, etc.
Its keyframing feature allows you to include custom animations, while motion tracking helps you track objects. Then, the color matching feature enables you to copy the color settings of one video and apply them to another clip.
You can even assign hotkeys shortcuts for various tools to save your time. Moreover, you can use different transitions, motion elements, filters, clips, titles, audios, and many other things with a simple drag and drop option.
Wondershare Filmora
Get started easily with Filmora’s powerful performance, intuitive interface, and countless effects!
Try It Free Try It Free Try It Free Learn More >

With its green screen feature, you can remove or change the video background. Then, you have an audio ducking feature to lower down the background volume or fade the audio track to another.
Here are various methods to change the aspect ratio in Wondershare Filmora:
Method 1: Change Aspect Ratio at the Starting Interface
Wondershare Filmora allows you to resize video aspect ratio when you launch the editor program. First, go to the drop-down menu button. Then, click on it to see various aspect ratios such as 16:9, 1:1, 4:3, 9:16, or 21:9.
Choose the aspect ratio that you want by simply clicking on it.

Method 2: Change Aspect Ratio under Project Settings
You can change the aspect ratio by clicking on the “Project Settings.” You can decide the target aspect ratio based on the aspect ratio of the media source.
For instance, if the aspect ratio of media source files is 4:3, select the standard aspect ratio of 4:3. Then, media files with other aspect ratios will show black bars.
In case of any discordance or if you want to change the aspect ratio, choose the proper ratio from project settings.

Method 3: Change Aspect Ratio during Editing
Even after importing the videos or images into Filmora’s timeline, you can easily change the ratio from the Crop and Zoom tool.
- Go to timeline and right-click on the video clip. Then, select “Crop and Zoom.” You will see the pop-up window.
- Click on 16:9, 4:3, 1:1, or 9:16 manually at the bottom if you like to change the video aspect ratio.
- You can also manually enter the video aspect ratio. Next, click on the “Ok” button.

After changing the aspect ratio, add background blur effects if you notice a black bar. It will enhance the video. You can also intensify your video by using filters, visual effects, overlays, or titles.

Method 4: Change the Aspect Ratio with Auto-Reframe
If you use Filmora’s latest versions, you will notice Auto Reframe helps to change the aspect ratio. Other than cropping, it will find the object in clips and crop it automatically if needed.
The following are steps to change the aspect ratio using the Auto-Reframe option:
Step1 Once you upload the video clips to the media library, right-click on it and choose the Auto-Reframe option

Step2 You will see the Auto Reframe window appear on the screen. Replace the existing video with a new clip. Then, change the video aspect ratio and video motion speed. Make sure to change the aspect ratio that fits most with different social media platforms

Step3 Once you choose the aspect ratio, click on the “Analyze” button. Filmora will Auto-Reframe the video itself. Once the process completes, you can see results in the preview window
Drag box to adjust the frame or to keep the object in it. It will automatically remove the content outside the box.

Step4 After completing adjustment or reframing, click on the “Export” button to save your video
Change the name of the video and select the location where you want to save the video. Now, click on the “Export” again to save.

Method 5: Change Aspect Ratio at Exporting
You can save the clip to your system or smartphones, depending on your requirements. Then, upload them directly to Youtube or burn them into DVD by clicking on the “Export button.” In this way, you can watch on widescreen or standard TV whenever you want.

● Change Aspect Ratio for the Local Computer
First, you will see the “Local” tab. There you can save the clip in a particular aspect ratio to your system.
You can see all resolutions with various aspect ratios after selecting the format. The output video depends on the media click resolution.
● Change Aspect Ratio for a Device
Change the “Device” tab to save the video in formats compatible with popular devices, including iPod, iPhone, PSP, iPad, etc. Once you choose the device, you will see all resolutions. Choose your favorite or the best resolution.
The video quality will continue improving with higher resolutions. But it will also increase the size of the file.
● Change Aspect Ratio for YouTube
Go to the “YouTube” tab and fill in the information. Then, click the “Export” button. Selecting the aspect ratio again is not necessary. It will directly upload your videos to YouTube.
● Change Aspect Ratio for DVD TV
When you go to the “DVD” tab, you will notice various aspect ratio options. Switching the aspect ratio for TV from 4:3 to 16:9 is pretty straightforward. To do so, select what you think is right.
Conclusion
From the article above, you have learned about different online converters. Now you know how to change the video aspect ratio online and use the video aspect ratio editor. Also, understand how to calculate aspect ratios.
So, you can decide for yourself that Wondershare Filmora video editor is one of the best tools. Using its different methods you can change the aspect ratio easily.
Furthermore, you can use it to make changes on both social media platforms and your devices because it is an effective and reliable tool.
For Win 7 or later (64-bit)
For macOS 10.12 or later
While watching movies, you might have noticed specific clips have black lines at the sides of the screen. It is because the original video’s aspect ratio is different from that of the screen on which you see it.
Nowadays, people are using multiple devices with different aspect ratios. Videos are an effective marketing tool that most marketers are using to expand their business. Therefore, the video aspect ratio has become vital.
Some people feel technical aspects such as video aspect ratio or using aspect ratio editor are a bit intimidating. But they are easy and simple to understand. So, let us know more about them.
In this article
01 [How to Calculate Video Aspect Ratio Online?](#Part 1)
02 [Websites to Change Video Aspect Ratio Online](#Part 2)
Part 1 How to Calculate Video Aspect Ratio Online?
Do you want to make changes to the video? If yes, then it is important to understand the basic concepts of video aspect ratios. Moreover, you can determine the specifications using an aspect ratio editor online.
Every photo, canvas, responsive design, digital video, or frame is rectangular with precise proportions. Outline the aspect ratios to create shapes according to different mediums like computers, TV, movies, or camera screens.
With the help of aspect ratio calculators, you can calculate the image’s value and new size. You can also use it to convert the image size and keep the objects in shape to make them look natural.
The formula to find an aspect ratio is: Width / Height
Aspect Ratio Calculation Process
Calculating the aspect resolution is pretty straightforward. The steps mentioned below will help you to get the correct height for the edited image:
- Take the original height-for example, 2400 units.
- Take the actual width- for example, 3200 units.
- Then, divide the height by width- for example, 2400/3200=0.75.
- Multiply the result (quotient) by new expected width- for instance, 0.75*600=450.
- The resulting figure is a new height.
Part 2 Websites to Change Video Aspect Ratio Online
If you want to change the video aspect ratio, you can easily crop the size of the video online with the help of different websites. These websites offer other aspect ratio options. So, let us learn more about them:
Free Convert

FreeConvert.com is a free editing website that allows you to edit video aspect ratio online. Usually, it is a cloud-based editor that converts a variety of files. So, you can use it to change the video aspect ratio of your clip.
You can see various options such as aspect ratio, codec, screen resolution, or more during video file conversion. For example, you can opt for an aspect ratio as per your requirements there.
Then, this converter will fix the clip automatically in the resolution selected by you. This website can process multiple files up to 1GB at once.
Pros:
- No Pop-ups occur while converting
- It did not affect the download speed
- Easy to convert the files
Cons:
- You have a limit of 25 minutes to convert files. After that, you need to upgrade to pro by making monthly payments.
CloudConvert

Cloud Convert is a file conversion service supporting around 200 file formats online for free. You can adjust the aspect ratio of videos on this website easily.
You have to upload a video clip and select its output format as per your original file. Then go to output video configuration to change the aspect ratio there. Choose the aspect ratio from the options given.
Pros:
- Several conversion options for high-quality files
- Supports cloud services
- Platform independent
- User-friendly
- Supports batch conversion
- It offers a powerful API
Cons:
- Get 25 minutes a day to convert the files
Kapwing

It is a free online aspect ratio editor to create content online. This tool has several features and a collection of online material. For example, through this aspect ratio editor, you can crop the size of video online.
You can select or resize video aspect ratio according to different social media platforms. But you can export only 720 p quality through this website for free after that; you have to create an account.
Pros:
- Merge multiple videos or images collectively in any order and add audio.
- Reduce the video size of any format with a single click.
- Add video subtitles
- Resize or crop videos for all social media posts.
- Cut out multiple sections of a video.
Cons:
- 250MB file upload limit
- Export only in 720p quality
- Export video clips for 7 minutes
- Edit or store content till two days
IMOVIE

Try the iMovie iPhone aspect ratio editor if you want to drag or drop the interface for editing videos simply. It has primitive tools to edit videos or images, and you can also import content from local drives or cloud storage with it.
It offers various visual effects like picture-in-picture, split-screen, or green screen effects. You can also enable viewers to zoom in or pass the scenes. Imovie set aspect ratio gives videos a cinematic feel using its 13 different video filters.
Pros:
- It has a simple interface.
- Its 4K resolution support allows you to give a cinematic feel to videos.
- iMovie has great speed controls that enable you for optimal pace-setting of scenes.
Cons:
- It does not have many output controls options.
- It only works on Mac systems.
Wondershare Filmora
If you permanently want to change the aspect ratio online, you must opt for a video converter or editor. Wondershare Filmora is the most remarkable aspect ratio editor that allows you to easily create videos of 4:3, 9:16, 16:9, and 1:1 aspect ratios.
Moreover, it is a convenient tool to edit videos on YouTube, Apple TV, Vimeo, or mobile devices. So, many YouTubers or bloggers are using it.
It is a reliable and cost-effective tool that offers drop and drag effects, audio, templates, soundtracks, filters, and other options. In addition, you can access features like split-screen, green screen, motion tracking, etc.
Its keyframing feature allows you to include custom animations, while motion tracking helps you track objects. Then, the color matching feature enables you to copy the color settings of one video and apply them to another clip.
You can even assign hotkeys shortcuts for various tools to save your time. Moreover, you can use different transitions, motion elements, filters, clips, titles, audios, and many other things with a simple drag and drop option.
Wondershare Filmora
Get started easily with Filmora’s powerful performance, intuitive interface, and countless effects!
Try It Free Try It Free Try It Free Learn More >

With its green screen feature, you can remove or change the video background. Then, you have an audio ducking feature to lower down the background volume or fade the audio track to another.
Here are various methods to change the aspect ratio in Wondershare Filmora:
Method 1: Change Aspect Ratio at the Starting Interface
Wondershare Filmora allows you to resize video aspect ratio when you launch the editor program. First, go to the drop-down menu button. Then, click on it to see various aspect ratios such as 16:9, 1:1, 4:3, 9:16, or 21:9.
Choose the aspect ratio that you want by simply clicking on it.

Method 2: Change Aspect Ratio under Project Settings
You can change the aspect ratio by clicking on the “Project Settings.” You can decide the target aspect ratio based on the aspect ratio of the media source.
For instance, if the aspect ratio of media source files is 4:3, select the standard aspect ratio of 4:3. Then, media files with other aspect ratios will show black bars.
In case of any discordance or if you want to change the aspect ratio, choose the proper ratio from project settings.

Method 3: Change Aspect Ratio during Editing
Even after importing the videos or images into Filmora’s timeline, you can easily change the ratio from the Crop and Zoom tool.
- Go to timeline and right-click on the video clip. Then, select “Crop and Zoom.” You will see the pop-up window.
- Click on 16:9, 4:3, 1:1, or 9:16 manually at the bottom if you like to change the video aspect ratio.
- You can also manually enter the video aspect ratio. Next, click on the “Ok” button.

After changing the aspect ratio, add background blur effects if you notice a black bar. It will enhance the video. You can also intensify your video by using filters, visual effects, overlays, or titles.

Method 4: Change the Aspect Ratio with Auto-Reframe
If you use Filmora’s latest versions, you will notice Auto Reframe helps to change the aspect ratio. Other than cropping, it will find the object in clips and crop it automatically if needed.
The following are steps to change the aspect ratio using the Auto-Reframe option:
Step1 Once you upload the video clips to the media library, right-click on it and choose the Auto-Reframe option

Step2 You will see the Auto Reframe window appear on the screen. Replace the existing video with a new clip. Then, change the video aspect ratio and video motion speed. Make sure to change the aspect ratio that fits most with different social media platforms

Step3 Once you choose the aspect ratio, click on the “Analyze” button. Filmora will Auto-Reframe the video itself. Once the process completes, you can see results in the preview window
Drag box to adjust the frame or to keep the object in it. It will automatically remove the content outside the box.

Step4 After completing adjustment or reframing, click on the “Export” button to save your video
Change the name of the video and select the location where you want to save the video. Now, click on the “Export” again to save.

Method 5: Change Aspect Ratio at Exporting
You can save the clip to your system or smartphones, depending on your requirements. Then, upload them directly to Youtube or burn them into DVD by clicking on the “Export button.” In this way, you can watch on widescreen or standard TV whenever you want.

● Change Aspect Ratio for the Local Computer
First, you will see the “Local” tab. There you can save the clip in a particular aspect ratio to your system.
You can see all resolutions with various aspect ratios after selecting the format. The output video depends on the media click resolution.
● Change Aspect Ratio for a Device
Change the “Device” tab to save the video in formats compatible with popular devices, including iPod, iPhone, PSP, iPad, etc. Once you choose the device, you will see all resolutions. Choose your favorite or the best resolution.
The video quality will continue improving with higher resolutions. But it will also increase the size of the file.
● Change Aspect Ratio for YouTube
Go to the “YouTube” tab and fill in the information. Then, click the “Export” button. Selecting the aspect ratio again is not necessary. It will directly upload your videos to YouTube.
● Change Aspect Ratio for DVD TV
When you go to the “DVD” tab, you will notice various aspect ratio options. Switching the aspect ratio for TV from 4:3 to 16:9 is pretty straightforward. To do so, select what you think is right.
Conclusion
From the article above, you have learned about different online converters. Now you know how to change the video aspect ratio online and use the video aspect ratio editor. Also, understand how to calculate aspect ratios.
So, you can decide for yourself that Wondershare Filmora video editor is one of the best tools. Using its different methods you can change the aspect ratio easily.
Furthermore, you can use it to make changes on both social media platforms and your devices because it is an effective and reliable tool.
For Win 7 or later (64-bit)
For macOS 10.12 or later
Detailed Steps to Rotate Videos in Windows Media Player
Video Editing and the emotion the final product evokes is dependent on many aspects, be it the source clips, the cuts introduced or the way of presentation. But to get to the end, there are several steps involved in the production process, and not every instance of it is perfect. But we all know, editing does often help iron out any kinks, with its ability to solve basic problems, like footage that is askew, or upside down. Thus with the steps listed in this article we will help you understand how you can rotate videos to ensure your edited project looks as intended.
This particular article considers the pre-installed Windows Media Player and WonderShare Filmora.
Note: We documented the steps in this guide with Windows Media Player (on a device running Windows 10 ) and WonderShare Filmora.
How to Rotate Videos with Windows Media Player?
Imagine you’re in a situation where you have gone ahead and finished the filming portion of a project on your smartphone but realise that the capture footage is upside down. Fortunately, this sort of a scenario is a common occurrence and it has quite a simple fix. If you look around the gallery app on your phone, you should be able to rotate the footage there itself, but if you’ve already moved it over to your laptop, hopping into a video editor can get this done in a jiffy.
Unfortunately, if you were planning to do this with the pre-installed Windows Media Player, you will not be able to rotate the clip. The software is only capable of being used as a Media Player that can help keep track of stored videos in a neat and easy to view format. It also has the ability to burn inserted discs, although we doubt any modern laptop comes with a disc drive.
Hence, to rotate video and still ensure its compatible with Windows Media Player, you can use free tools like VLC Media Player or Wondershare Filmora. The steps on how to use Wondershare Filmora to rotate video clips have been elaborated ahead in this article.
TIPS FOR WINDOWS MEDIA PLAYER
In case you want to use Windows Media Player as your default software to manage stored content, read this section to understand how you can control displayed video libraries.
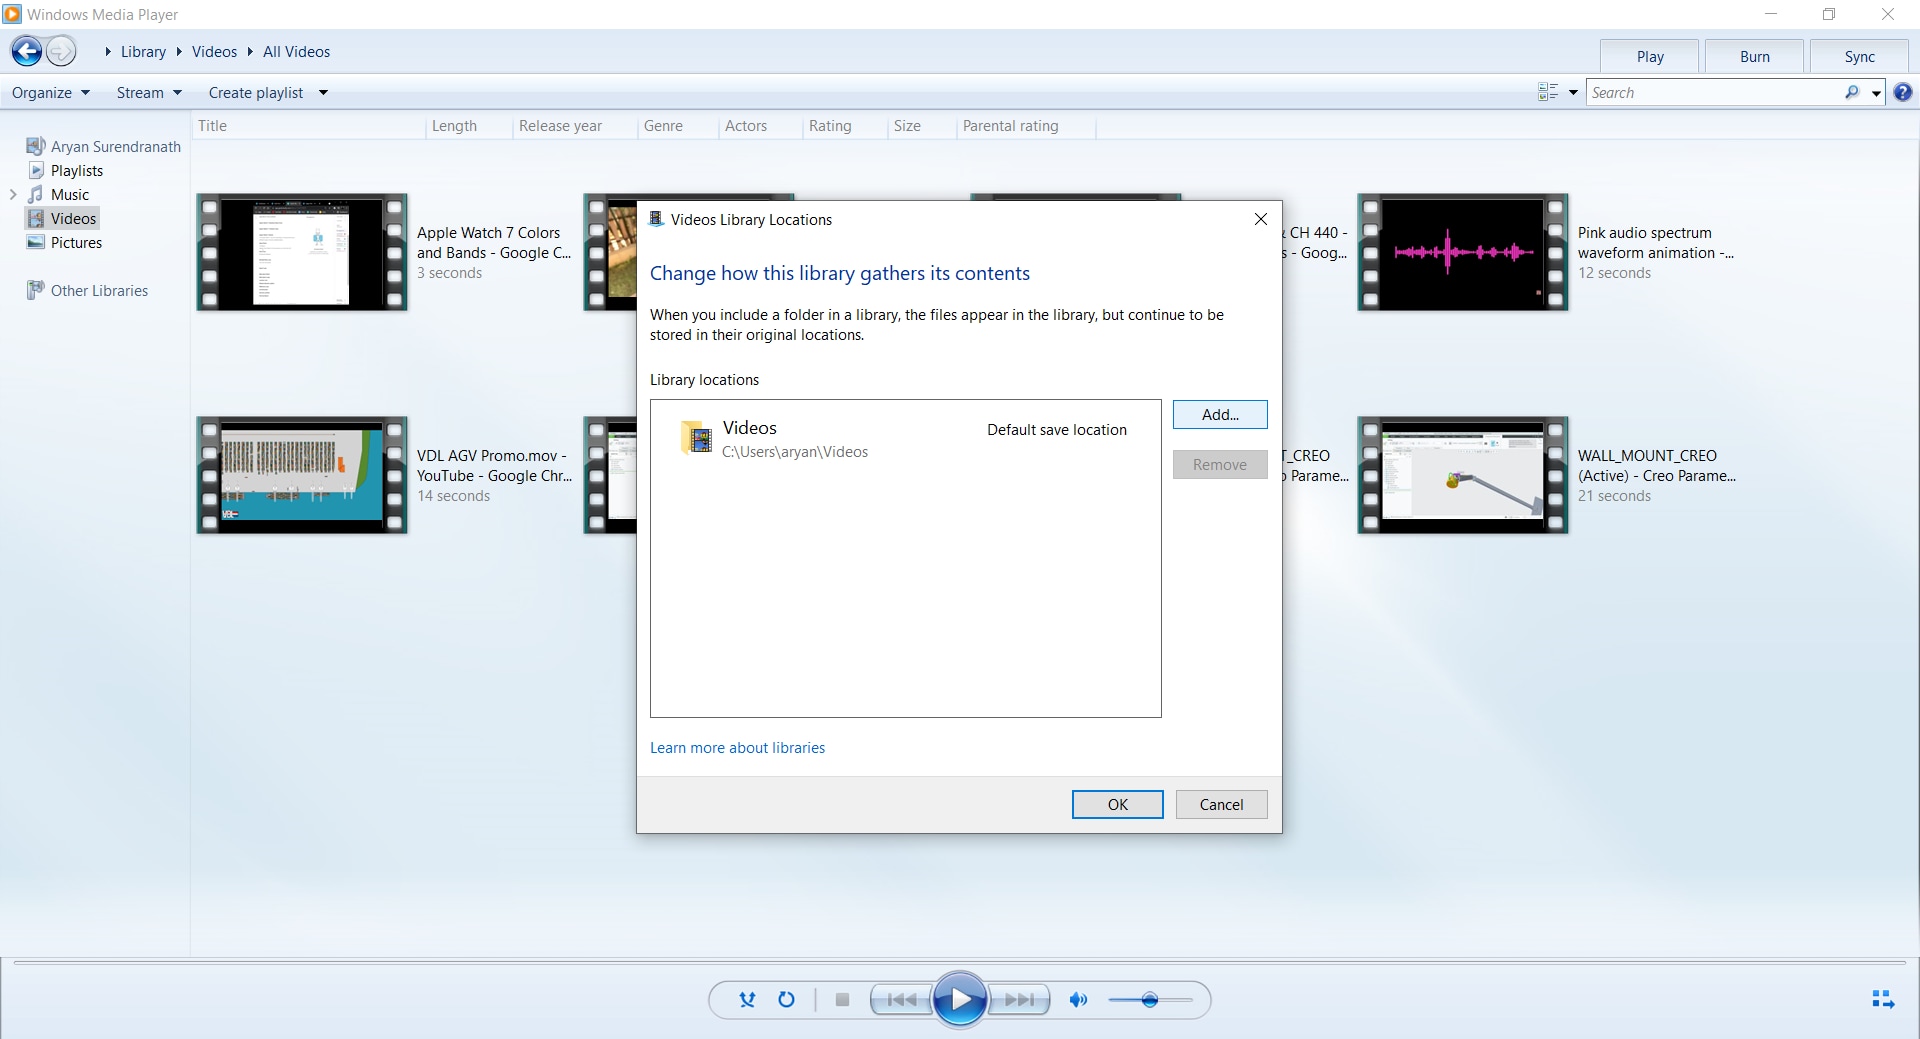
While Windows Media Player will pull all compatible files present in the Default Video Library, you can customise the information made available by using the Organises Function.
To configure the Videos Section to display specific content follow the steps listed below.
- Click on Organize.
- Then move onto Manage Libraries
- Now click on Videos.

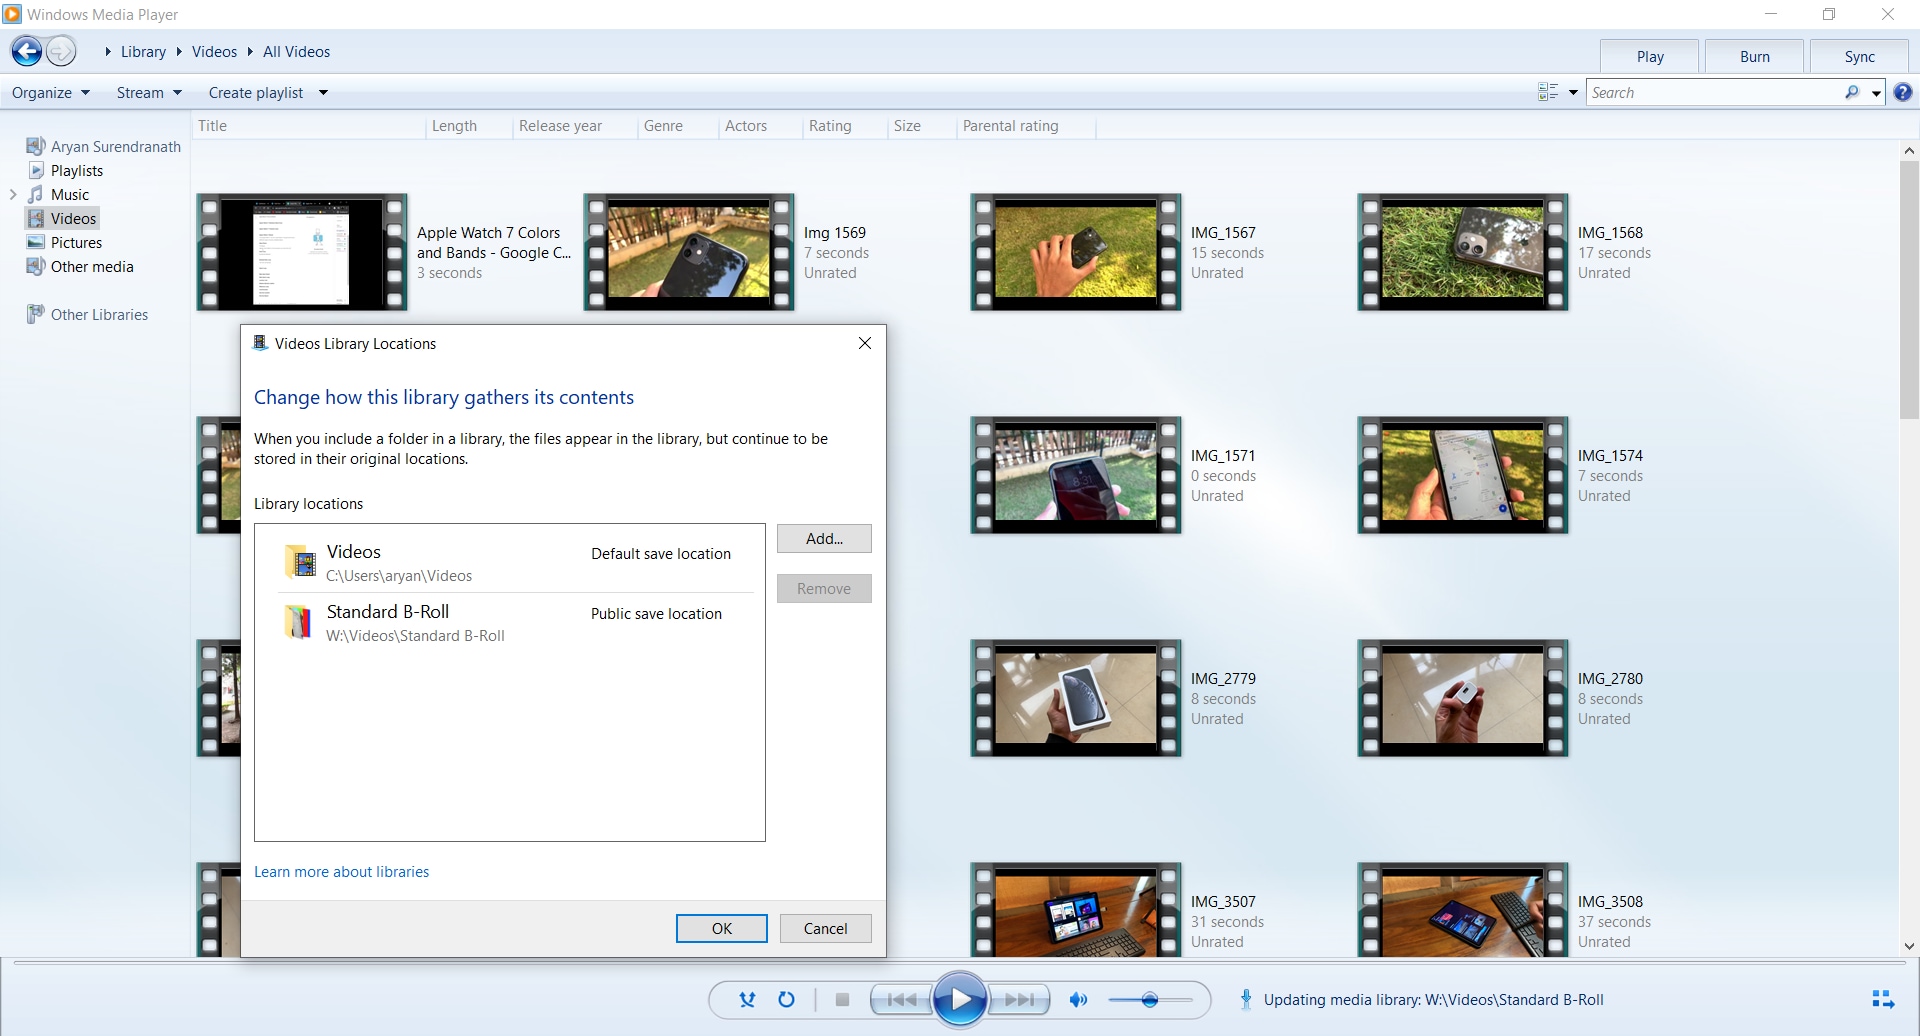
Click on Add to enter File Explorer and choose a new folder to add to this section.
Once you add the new folder, the screen will update itself with all the video files present in the folder.
An alternate way to Rotate Video with Wondershare Filmora
With Windows Media Player only being a playback tool, we feel free software like Filmora Video Editor are a great option to have installed on your device.
In Wondershare Filmora, footage rotation can only be done via the Edit Option — in my experience this straightforward approach felt quite simple and intuitive. And in case you wish to incorporate Keyframes into the rotation step, the feature is available near the Timeline.
The emphasis on accessibility for every function in Filmora, provides a significant advantage. The use of modern iconography also betters the familiarity users may have with the software. These factors make Wondershare Filmora a great option to consider. If you do not already have Wondershare Filmora, you can download the software by visiting the official website.
Now, the steps we have listed below will help you learn how to use the rotate function in Wondershare Filmora and get the desired output.
For Win 7 or later (64-bit)
For macOS 10.14 or later
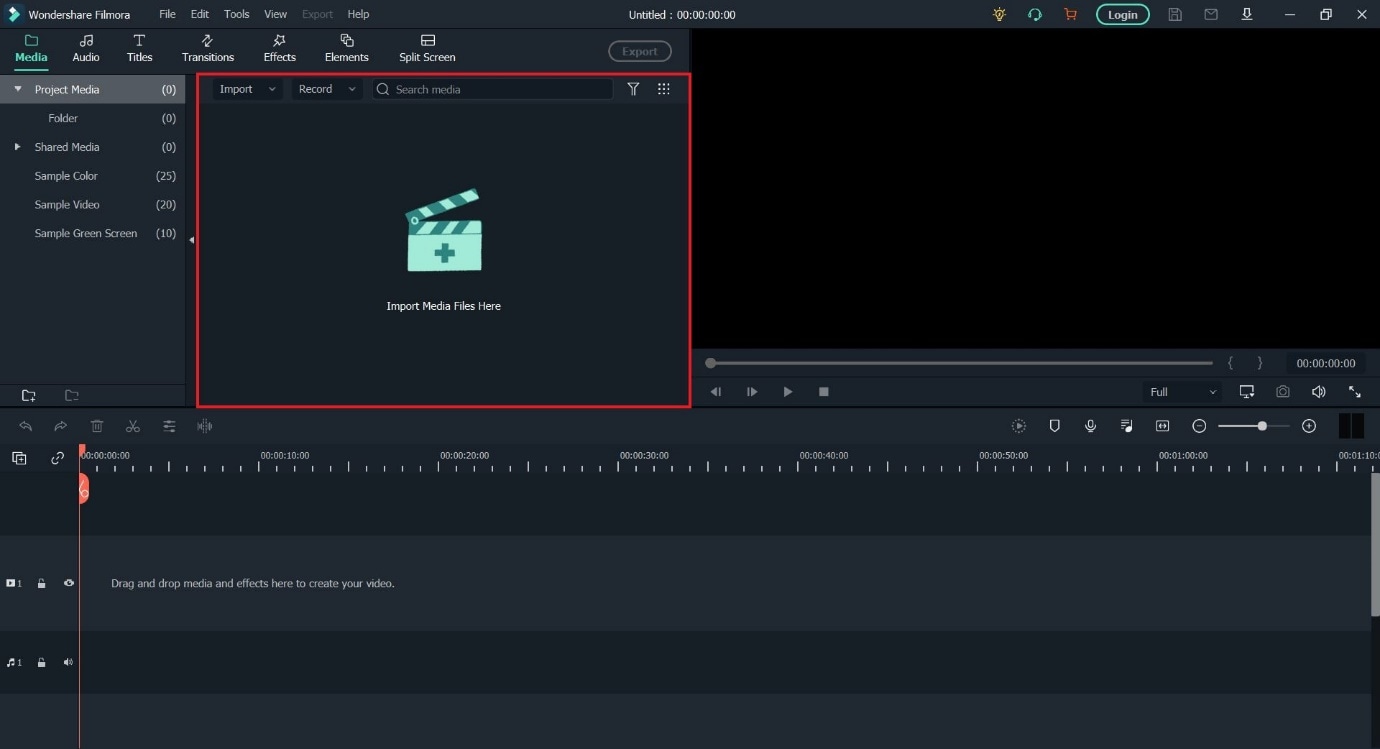
Open a new video project in Filmora and follow the steps listed below.
Step 1: Import a Media File for editing into the newly created Video Project.
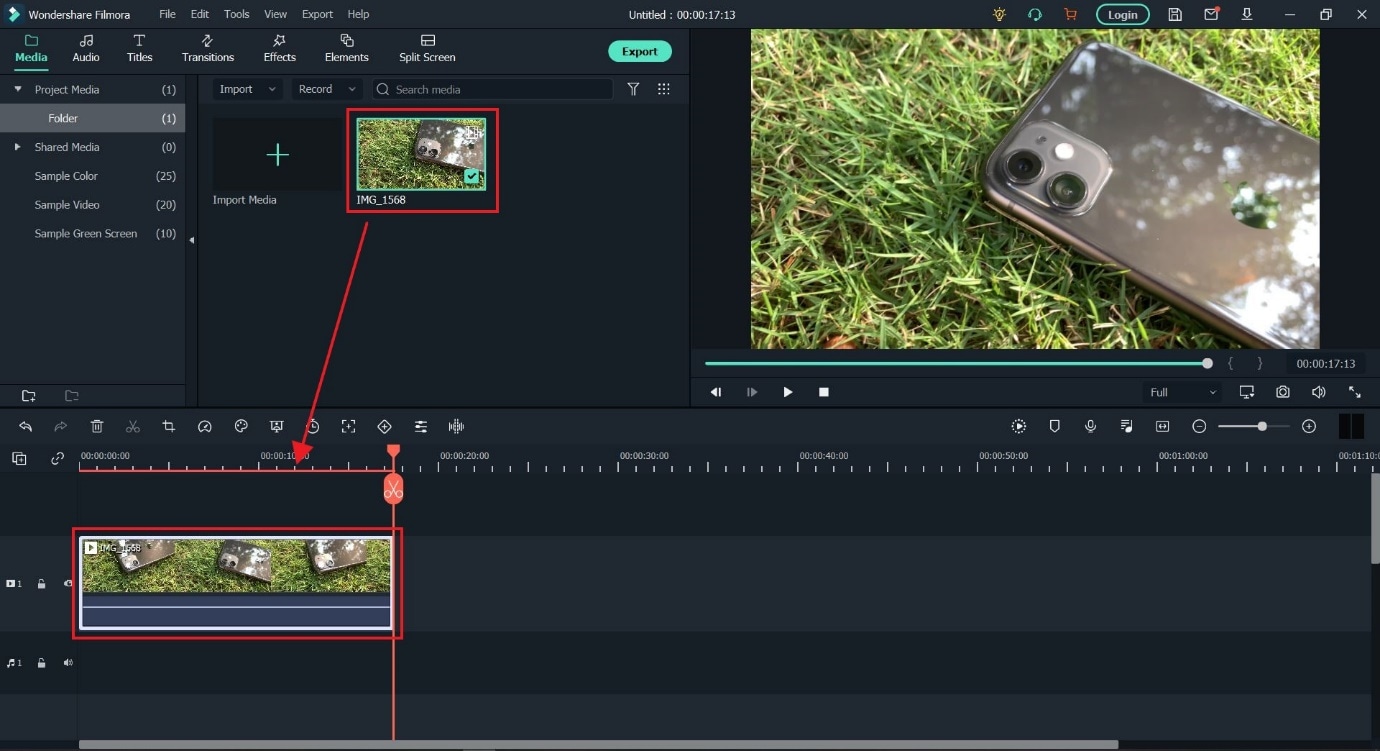
Step 2: Drag and drop the selected video clip on your Timeline and select it with your mouse to activate it for the next set of interactions.
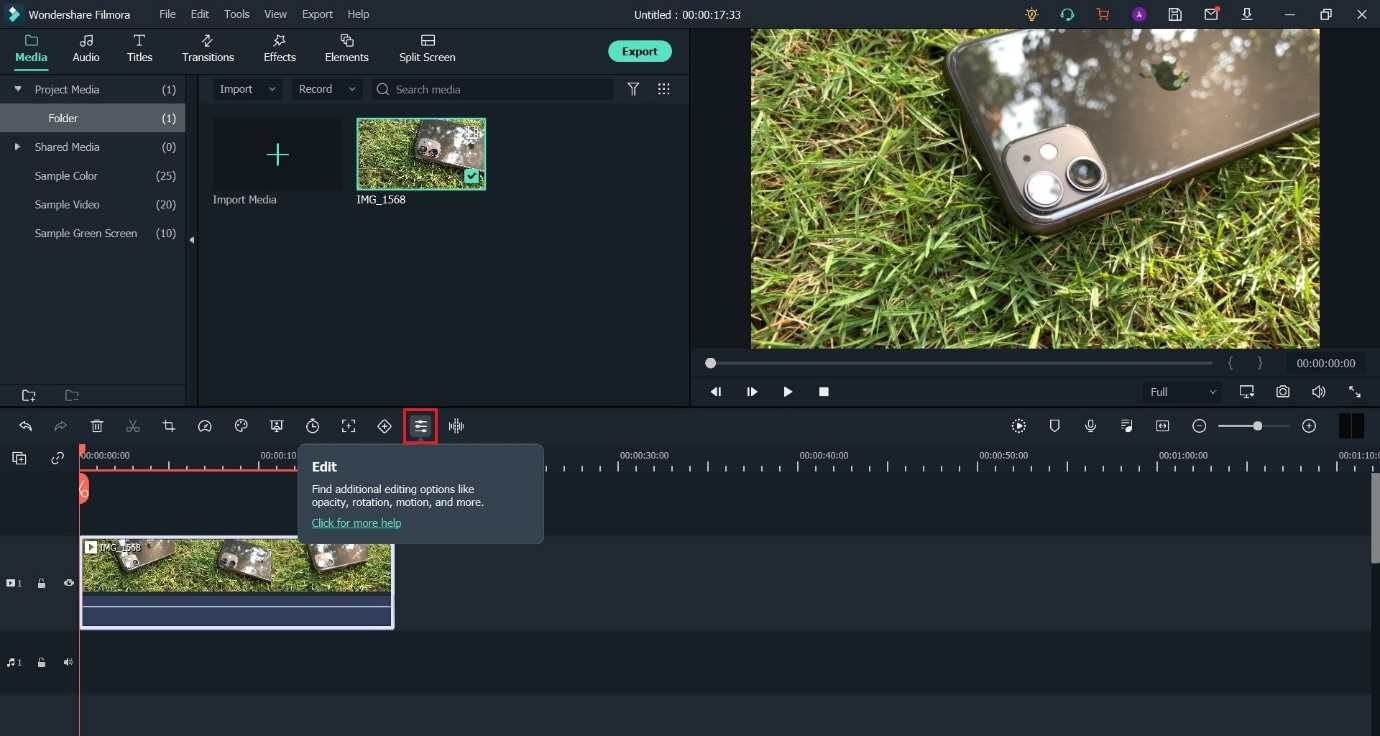
Step 3: Choose the Edit Option, which we have marked in Red. Doing this will bring up the Edit Window on your screen.
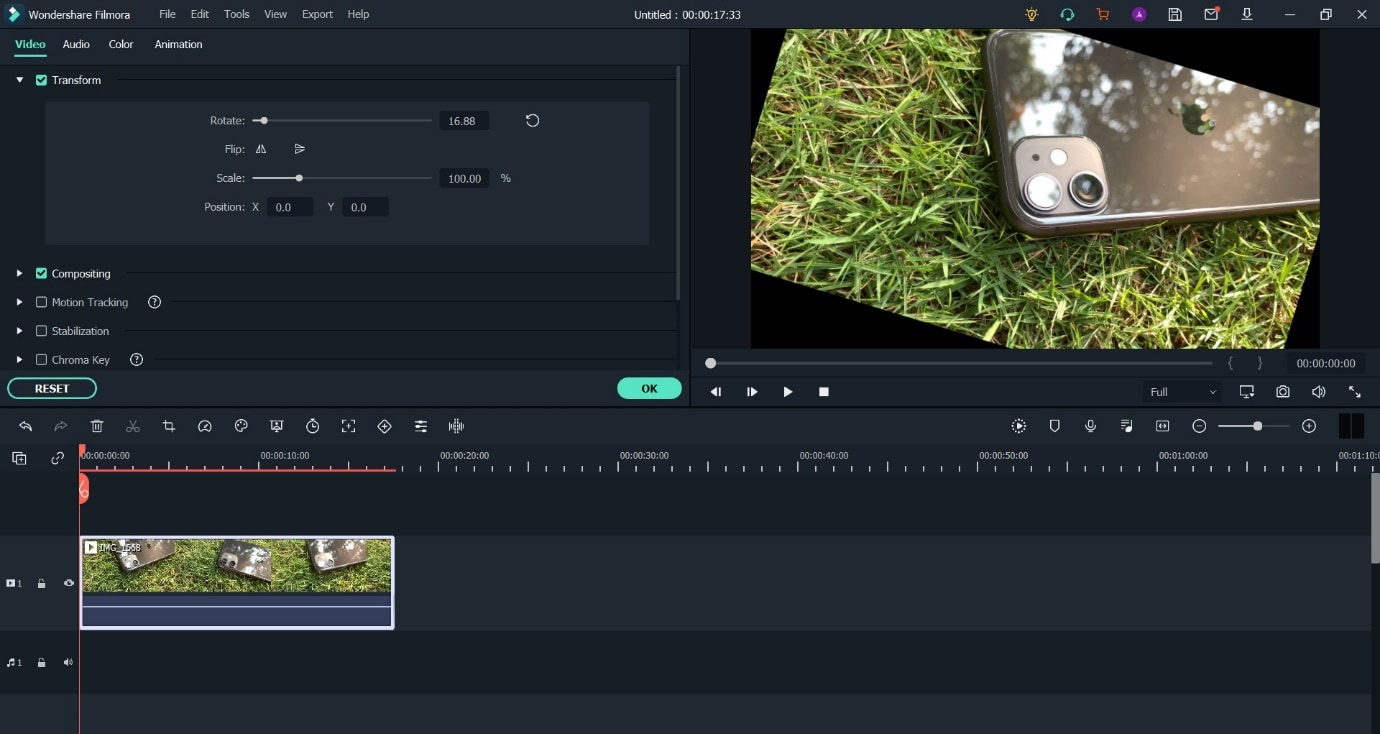
Step 4: Click on the checkbox next to Transform and then use the Rotation Slider to modify the orientation.
Now that you’ve read this portion of the guide, you may have realised the simple nature of Wondershare Filmora.
BONUS – KEYFRAMING IN WONDERSHARE FILMORA
While the steps we listed above showed how to perform rotation with just a few clicks. You can make the end product more dynamic with the use of Keyframes.
Definition: Keyframes in Video Editing is a software-based tool that will let you configure start and end points on the timeline, within which you can configure different clip properites. The set of changes that you create will occur gradually as the playhead continues through the playback. Some properties that can be modified with this method are zoom, rotation, colors, positions, etc.
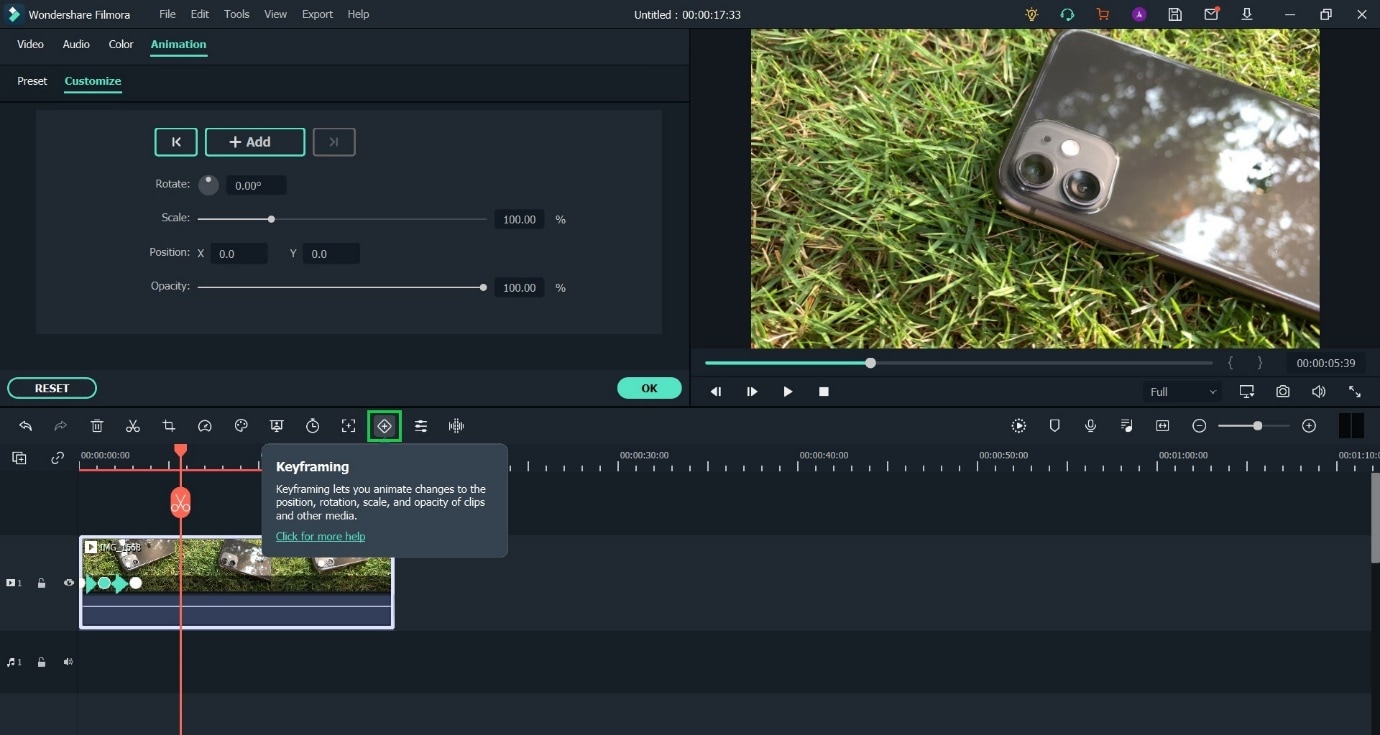
Click on the Keyframe Button (marked in Green) to access the Keyframe Menu in Wondershare Filmora.
The Bottom Line
Rotating video is unfortunately impossible in Windows Media Player, thus the access and ability to free software like Wondershare Filmora is a huge positive for the creative community. Speaking of how rotation is done in Filmora, the intuitive number-based system is a huge positive, as there are some software which prefer using swivels. The integration of Keyframes into a free tool is also welcome.
This marks the end of our guide on how to rotate video in Windows Media Player and Wondershare Filmora. Once again, if you wish to not use a proper video editing tool, you can consider alternate players like VLC, which can rotate footage.

Click on Add to enter File Explorer and choose a new folder to add to this section.

Once you add the new folder, the screen will update itself with all the video files present in the folder.

An alternate way to Rotate Video with Wondershare Filmora
With Windows Media Player only being a playback tool, we feel free software like Filmora Video Editor are a great option to have installed on your device.
In Wondershare Filmora, footage rotation can only be done via the Edit Option — in my experience this straightforward approach felt quite simple and intuitive. And in case you wish to incorporate Keyframes into the rotation step, the feature is available near the Timeline.
The emphasis on accessibility for every function in Filmora, provides a significant advantage. The use of modern iconography also betters the familiarity users may have with the software. These factors make Wondershare Filmora a great option to consider. If you do not already have Wondershare Filmora, you can download the software by visiting the official website.
Now, the steps we have listed below will help you learn how to use the rotate function in Wondershare Filmora and get the desired output.
For Win 7 or later (64-bit)
For macOS 10.14 or later
Open a new video project in Filmora and follow the steps listed below.
Step 1: Import a Media File for editing into the newly created Video Project.

Step 2: Drag and drop the selected video clip on your Timeline and select it with your mouse to activate it for the next set of interactions.

Step 3: Choose the Edit Option, which we have marked in Red. Doing this will bring up the Edit Window on your screen.

Step 4: Click on the checkbox next to Transform and then use the Rotation Slider to modify the orientation.

Now that you’ve read this portion of the guide, you may have realised the simple nature of Wondershare Filmora.
BONUS – KEYFRAMING IN WONDERSHARE FILMORA
While the steps we listed above showed how to perform rotation with just a few clicks. You can make the end product more dynamic with the use of Keyframes.
Definition: Keyframes in Video Editing is a software-based tool that will let you configure start and end points on the timeline, within which you can configure different clip properites. The set of changes that you create will occur gradually as the playhead continues through the playback. Some properties that can be modified with this method are zoom, rotation, colors, positions, etc.
Click on the Keyframe Button (marked in Green) to access the Keyframe Menu in Wondershare Filmora.

The Bottom Line
Rotating video is unfortunately impossible in Windows Media Player, thus the access and ability to free software like Wondershare Filmora is a huge positive for the creative community. Speaking of how rotation is done in Filmora, the intuitive number-based system is a huge positive, as there are some software which prefer using swivels. The integration of Keyframes into a free tool is also welcome.
This marks the end of our guide on how to rotate video in Windows Media Player and Wondershare Filmora. Once again, if you wish to not use a proper video editing tool, you can consider alternate players like VLC, which can rotate footage.

Click on Add to enter File Explorer and choose a new folder to add to this section.

Once you add the new folder, the screen will update itself with all the video files present in the folder.

An alternate way to Rotate Video with Wondershare Filmora
With Windows Media Player only being a playback tool, we feel free software like Filmora Video Editor are a great option to have installed on your device.
In Wondershare Filmora, footage rotation can only be done via the Edit Option — in my experience this straightforward approach felt quite simple and intuitive. And in case you wish to incorporate Keyframes into the rotation step, the feature is available near the Timeline.
The emphasis on accessibility for every function in Filmora, provides a significant advantage. The use of modern iconography also betters the familiarity users may have with the software. These factors make Wondershare Filmora a great option to consider. If you do not already have Wondershare Filmora, you can download the software by visiting the official website.
Now, the steps we have listed below will help you learn how to use the rotate function in Wondershare Filmora and get the desired output.
For Win 7 or later (64-bit)
For macOS 10.14 or later
Open a new video project in Filmora and follow the steps listed below.
Step 1: Import a Media File for editing into the newly created Video Project.

Step 2: Drag and drop the selected video clip on your Timeline and select it with your mouse to activate it for the next set of interactions.

Step 3: Choose the Edit Option, which we have marked in Red. Doing this will bring up the Edit Window on your screen.

Step 4: Click on the checkbox next to Transform and then use the Rotation Slider to modify the orientation.

Now that you’ve read this portion of the guide, you may have realised the simple nature of Wondershare Filmora.
BONUS – KEYFRAMING IN WONDERSHARE FILMORA
While the steps we listed above showed how to perform rotation with just a few clicks. You can make the end product more dynamic with the use of Keyframes.
Definition: Keyframes in Video Editing is a software-based tool that will let you configure start and end points on the timeline, within which you can configure different clip properites. The set of changes that you create will occur gradually as the playhead continues through the playback. Some properties that can be modified with this method are zoom, rotation, colors, positions, etc.
Click on the Keyframe Button (marked in Green) to access the Keyframe Menu in Wondershare Filmora.

The Bottom Line
Rotating video is unfortunately impossible in Windows Media Player, thus the access and ability to free software like Wondershare Filmora is a huge positive for the creative community. Speaking of how rotation is done in Filmora, the intuitive number-based system is a huge positive, as there are some software which prefer using swivels. The integration of Keyframes into a free tool is also welcome.
This marks the end of our guide on how to rotate video in Windows Media Player and Wondershare Filmora. Once again, if you wish to not use a proper video editing tool, you can consider alternate players like VLC, which can rotate footage.

Click on Add to enter File Explorer and choose a new folder to add to this section.

Once you add the new folder, the screen will update itself with all the video files present in the folder.

An alternate way to Rotate Video with Wondershare Filmora
With Windows Media Player only being a playback tool, we feel free software like Filmora Video Editor are a great option to have installed on your device.
In Wondershare Filmora, footage rotation can only be done via the Edit Option — in my experience this straightforward approach felt quite simple and intuitive. And in case you wish to incorporate Keyframes into the rotation step, the feature is available near the Timeline.
The emphasis on accessibility for every function in Filmora, provides a significant advantage. The use of modern iconography also betters the familiarity users may have with the software. These factors make Wondershare Filmora a great option to consider. If you do not already have Wondershare Filmora, you can download the software by visiting the official website.
Now, the steps we have listed below will help you learn how to use the rotate function in Wondershare Filmora and get the desired output.
For Win 7 or later (64-bit)
For macOS 10.14 or later
Open a new video project in Filmora and follow the steps listed below.
Step 1: Import a Media File for editing into the newly created Video Project.

Step 2: Drag and drop the selected video clip on your Timeline and select it with your mouse to activate it for the next set of interactions.

Step 3: Choose the Edit Option, which we have marked in Red. Doing this will bring up the Edit Window on your screen.

Step 4: Click on the checkbox next to Transform and then use the Rotation Slider to modify the orientation.

Now that you’ve read this portion of the guide, you may have realised the simple nature of Wondershare Filmora.
BONUS – KEYFRAMING IN WONDERSHARE FILMORA
While the steps we listed above showed how to perform rotation with just a few clicks. You can make the end product more dynamic with the use of Keyframes.
Definition: Keyframes in Video Editing is a software-based tool that will let you configure start and end points on the timeline, within which you can configure different clip properites. The set of changes that you create will occur gradually as the playhead continues through the playback. Some properties that can be modified with this method are zoom, rotation, colors, positions, etc.
Click on the Keyframe Button (marked in Green) to access the Keyframe Menu in Wondershare Filmora.

The Bottom Line
Rotating video is unfortunately impossible in Windows Media Player, thus the access and ability to free software like Wondershare Filmora is a huge positive for the creative community. Speaking of how rotation is done in Filmora, the intuitive number-based system is a huge positive, as there are some software which prefer using swivels. The integration of Keyframes into a free tool is also welcome.
This marks the end of our guide on how to rotate video in Windows Media Player and Wondershare Filmora. Once again, if you wish to not use a proper video editing tool, you can consider alternate players like VLC, which can rotate footage.
Step by Step to Rotate Videos Using Handbrake
Handbrake is a video editing tool that allows you to rotate videos. It is a free and open source software that is available on Windows, Mac, and Linux. It is used to convert video files from one format to another. You can use it to compress videos, add subtitles, or create chapters. It also allows you to rotate videos in different directions. You can use it to fix videos that are not aligned properly or that have been filmed upside down. A handbrake is a popular tool because it is easy to use and it has a variety of features.
Step-by-step on how to rotate videos using Handbrake
When you import a video into the Handbrake software, it will by default be in a “landscape” orientation, with the long edge of the video oriented horizontally. If you want to rotate the video 90 degrees counterclockwise so that it appears “vertical,” or if you want to rotate it 180 degrees so that it is upside down, you can do so by following these two steps:
Step 1: Open the Handbrake software and import your video.
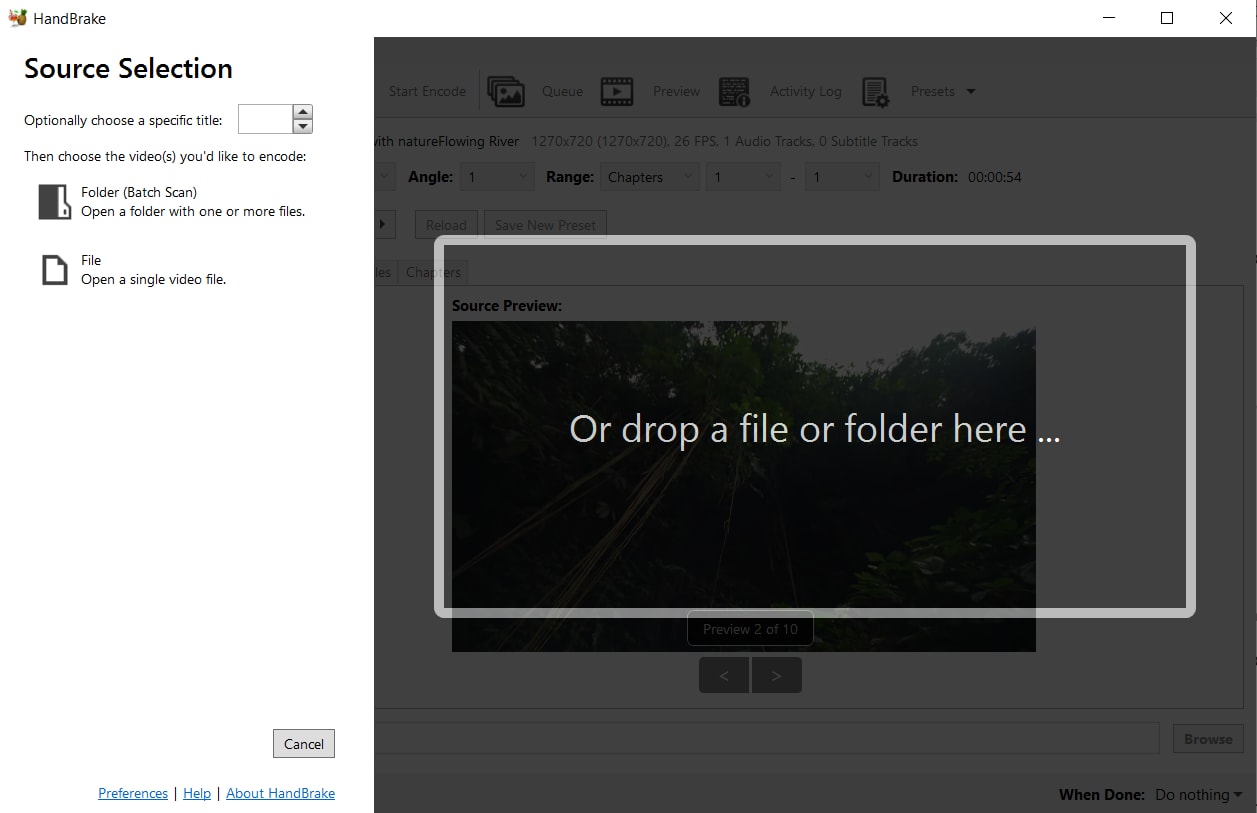
Step 2: Click on the “Dimensions” tab at the top of the Handbrake window.

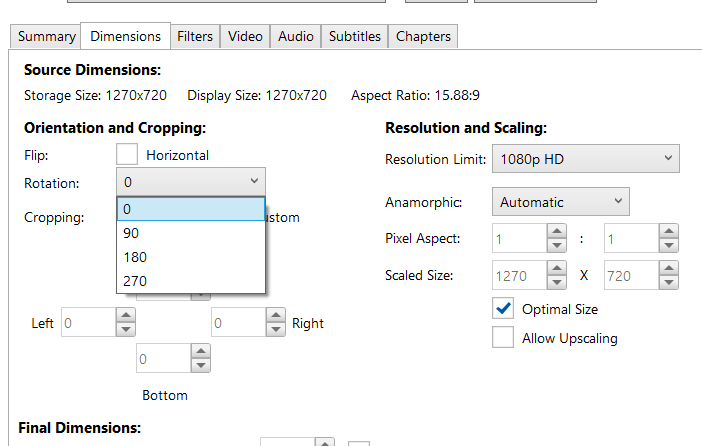
Step 3: Under the “Orientation and Cropping” section, click on one of the options in the “Rotate” menu.
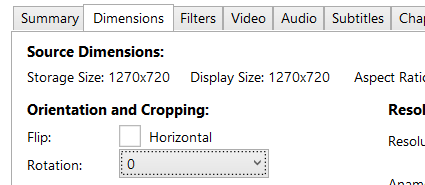
Step 4: If you want to rotate a video 90 degrees counterclockwise, select “90 Degrees CW (Counter-Clockwise).” If you want to rotate the video 180 degrees so that it is upside down, select “180 Degrees.”
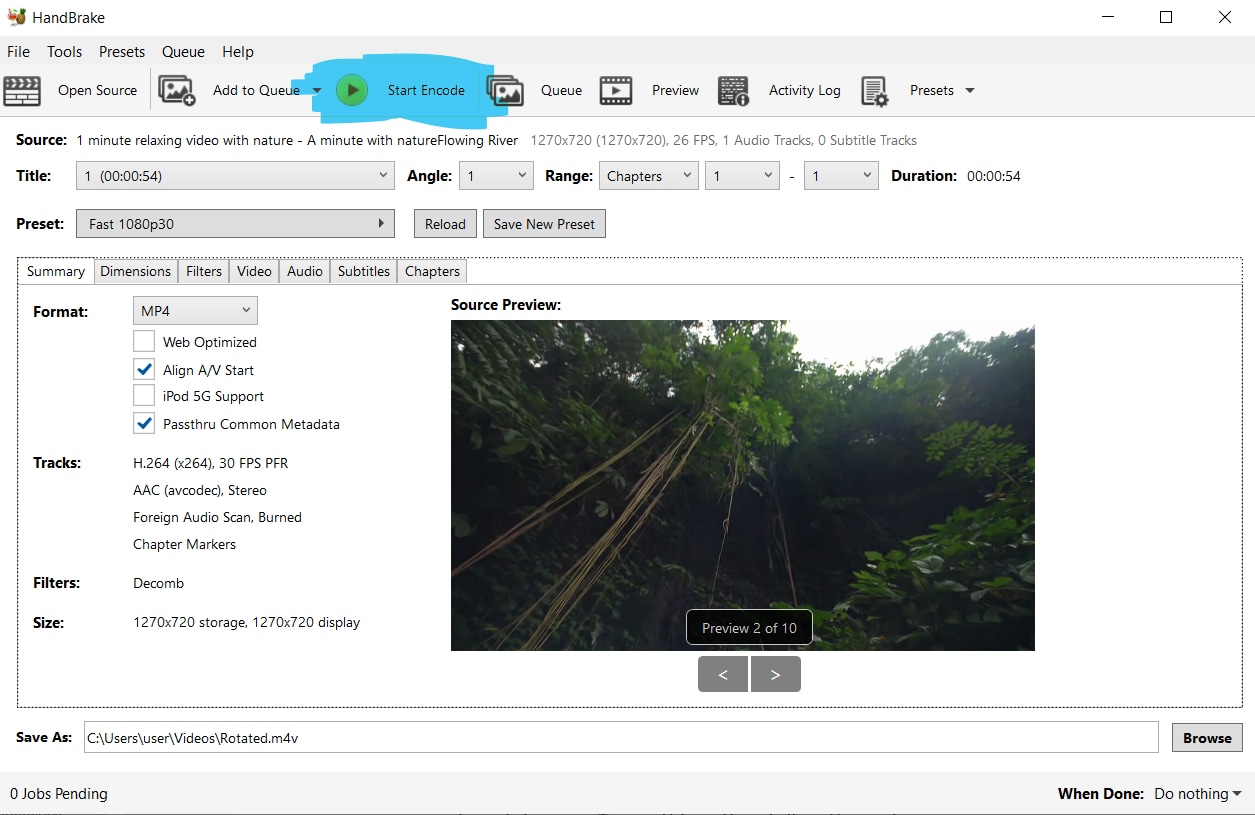
Step 5: Click on the “Preview” button at the bottom of the Handbrake window to see a preview of how your rotated video will look. When you are satisfied with the rotation, click on the “Start Encode” button to begin the encoding process.
The Handbrake software also offers a “Flip” option which you can do after rotating it, which allows you to slip the video after rotating it. To use this option, follow these steps:
Under the “Orientation and Cropping” section, Go to Rotation and choose the degrees that best is best for your rotation requirements.
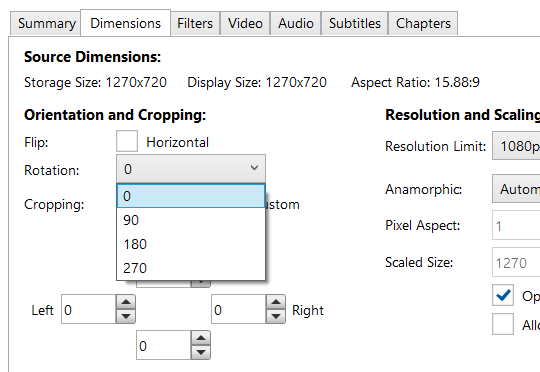
Click on “Flip” to flip your video horizontally.
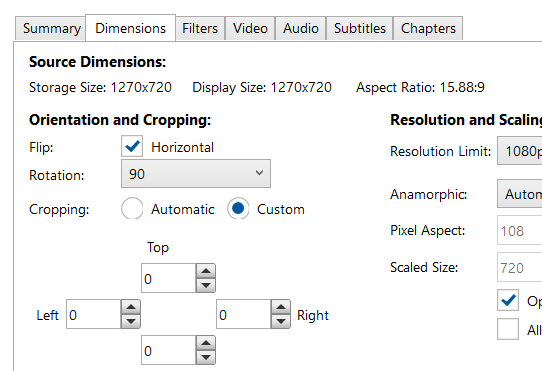
Click on the “Preview” button at the bottom of the Handbrake window to see a preview of how your rotated video will look. When you are satisfied with the rotation, click on the “Start Encode” button to begin the encoding process.
Both of these methods for rotating videos are easy to use and produce good results. Experiment with them to see which method works best for you.
An Easy Way to Rotate Videos Using Filmora
Moreover, instead of using Handbrake, you can use Filmora Video Editor instead. Filmora is a video editor that is very easy to use. It has a variety of features, including the ability to rotate videos. You can download Filmora from the Filmora website. The website has links to the download page for each of the supported platforms.
For Win 7 or later (64-bit)
For macOS 10.14 or later
Step-by-Step on how to rotate videos in Filmora
In order for you to rotate videos in Filmora, follow these simple steps:
Step 1: Import the video that you want to rotate into Filmora.
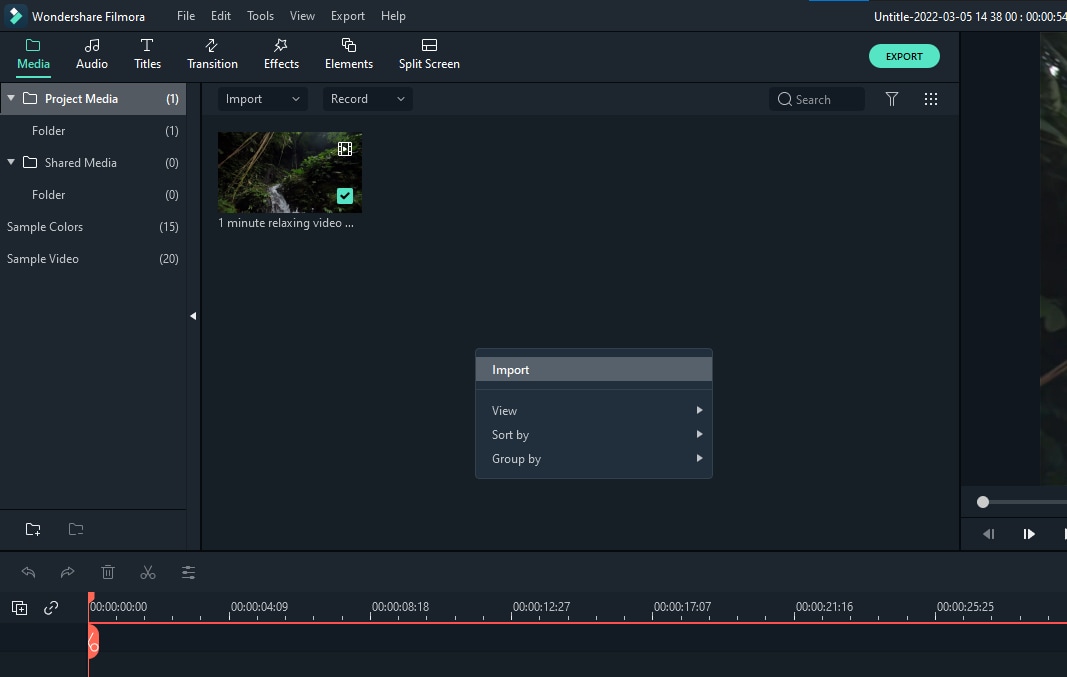
Step 2: Click on the “Edit” tab at the top of the video timeline.
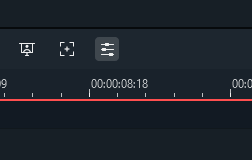
Step 3: Click on the “Rotate” button in the “Transform” section of the toolbar.
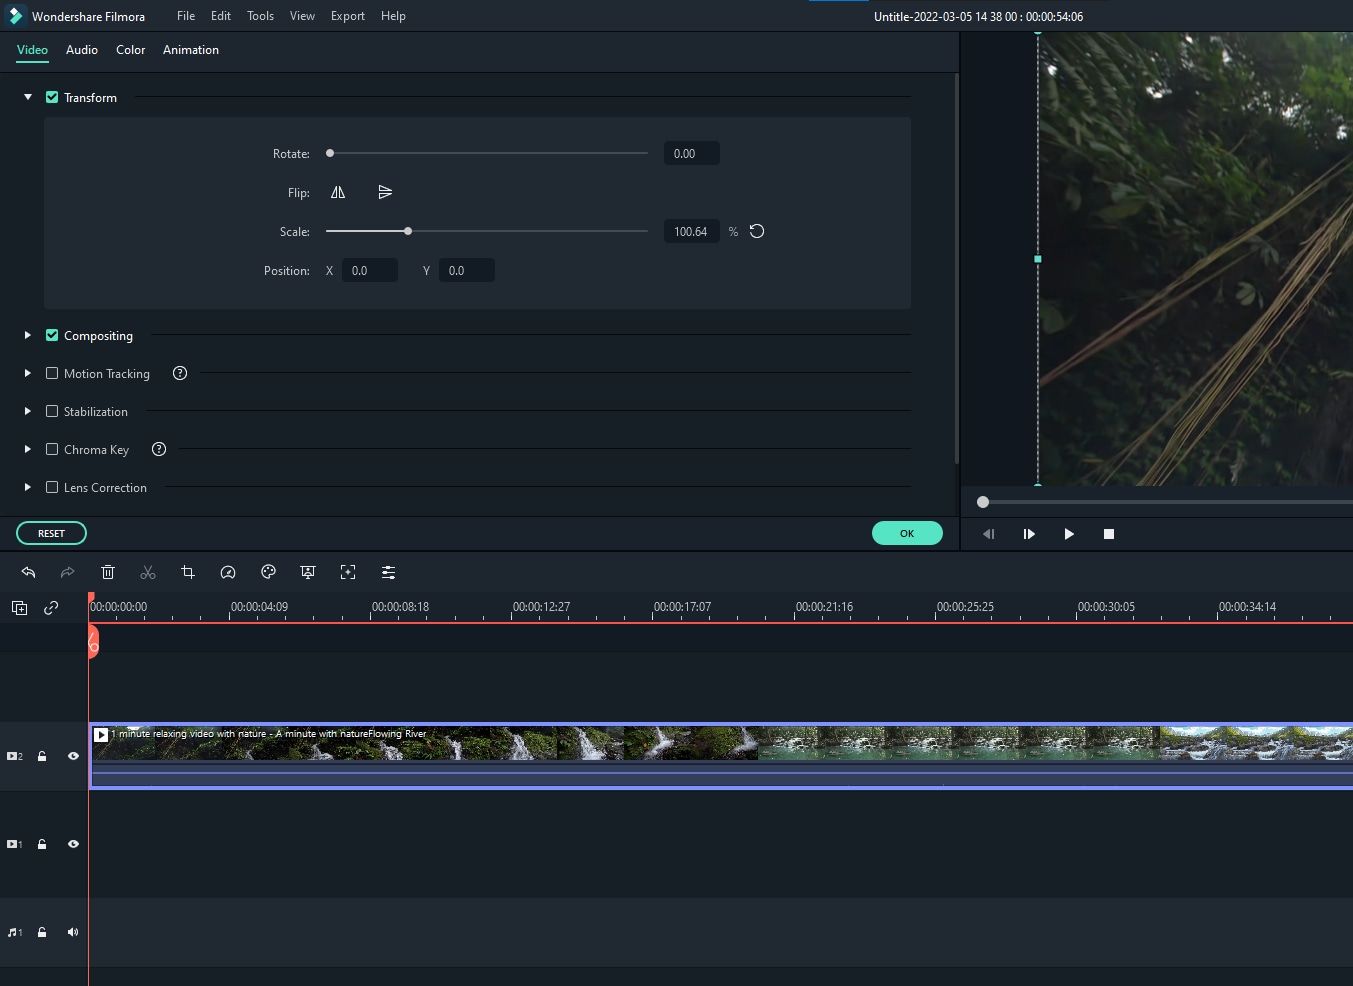
Step 4: Select the rotation angle that you want to rotate the video in the “Rotate” menu.

Step 5: Click on the “Preview” button at the bottom of the Filmora window to see a preview of how your rotated video will look. When you are satisfied with the rotation, click on the “OK” button to apply the rotation.
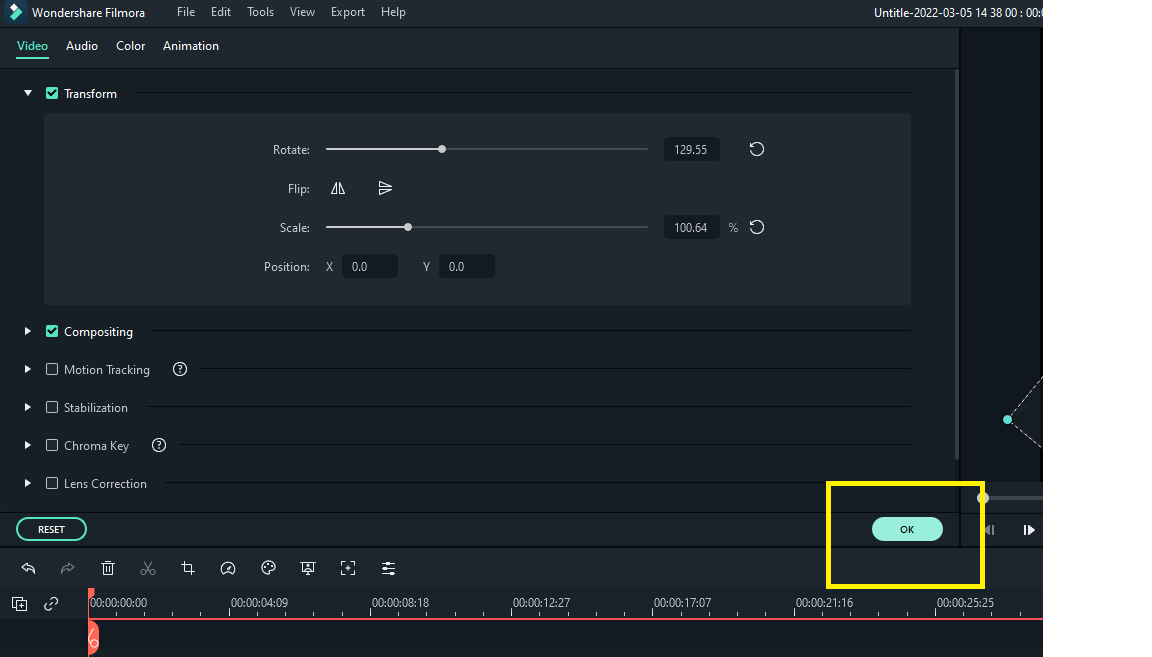
As you can see, rotating videos is a very easy process in both Handbrake and Filmora. Both Handbrake and Filmora offer simple methods for rotating videos. In Handbrake, you can rotate the video 90 degrees counterclockwise or 180 degrees.
In Filmora, you can rotate the video by any number of degrees in either direction. Experiment with these methods to see which one works best for you. Additionally, Filmora offers a number of other features, such as the ability to add text and transitions, that you may find useful.
Step 2: Click on the “Dimensions” tab at the top of the Handbrake window.

Step 3: Under the “Orientation and Cropping” section, click on one of the options in the “Rotate” menu.

Step 4: If you want to rotate a video 90 degrees counterclockwise, select “90 Degrees CW (Counter-Clockwise).” If you want to rotate the video 180 degrees so that it is upside down, select “180 Degrees.”

Step 5: Click on the “Preview” button at the bottom of the Handbrake window to see a preview of how your rotated video will look. When you are satisfied with the rotation, click on the “Start Encode” button to begin the encoding process.

The Handbrake software also offers a “Flip” option which you can do after rotating it, which allows you to slip the video after rotating it. To use this option, follow these steps:
Under the “Orientation and Cropping” section, Go to Rotation and choose the degrees that best is best for your rotation requirements.

Click on “Flip” to flip your video horizontally.

Click on the “Preview” button at the bottom of the Handbrake window to see a preview of how your rotated video will look. When you are satisfied with the rotation, click on the “Start Encode” button to begin the encoding process.
Both of these methods for rotating videos are easy to use and produce good results. Experiment with them to see which method works best for you.
An Easy Way to Rotate Videos Using Filmora
Moreover, instead of using Handbrake, you can use Filmora Video Editor instead. Filmora is a video editor that is very easy to use. It has a variety of features, including the ability to rotate videos. You can download Filmora from the Filmora website. The website has links to the download page for each of the supported platforms.
For Win 7 or later (64-bit)
For macOS 10.14 or later
Step-by-Step on how to rotate videos in Filmora
In order for you to rotate videos in Filmora, follow these simple steps:
Step 1: Import the video that you want to rotate into Filmora.

Step 2: Click on the “Edit” tab at the top of the video timeline.

Step 3: Click on the “Rotate” button in the “Transform” section of the toolbar.

Step 4: Select the rotation angle that you want to rotate the video in the “Rotate” menu.

Step 5: Click on the “Preview” button at the bottom of the Filmora window to see a preview of how your rotated video will look. When you are satisfied with the rotation, click on the “OK” button to apply the rotation.

As you can see, rotating videos is a very easy process in both Handbrake and Filmora. Both Handbrake and Filmora offer simple methods for rotating videos. In Handbrake, you can rotate the video 90 degrees counterclockwise or 180 degrees.
In Filmora, you can rotate the video by any number of degrees in either direction. Experiment with these methods to see which one works best for you. Additionally, Filmora offers a number of other features, such as the ability to add text and transitions, that you may find useful.
Step 2: Click on the “Dimensions” tab at the top of the Handbrake window.

Step 3: Under the “Orientation and Cropping” section, click on one of the options in the “Rotate” menu.

Step 4: If you want to rotate a video 90 degrees counterclockwise, select “90 Degrees CW (Counter-Clockwise).” If you want to rotate the video 180 degrees so that it is upside down, select “180 Degrees.”

Step 5: Click on the “Preview” button at the bottom of the Handbrake window to see a preview of how your rotated video will look. When you are satisfied with the rotation, click on the “Start Encode” button to begin the encoding process.

The Handbrake software also offers a “Flip” option which you can do after rotating it, which allows you to slip the video after rotating it. To use this option, follow these steps:
Under the “Orientation and Cropping” section, Go to Rotation and choose the degrees that best is best for your rotation requirements.

Click on “Flip” to flip your video horizontally.

Click on the “Preview” button at the bottom of the Handbrake window to see a preview of how your rotated video will look. When you are satisfied with the rotation, click on the “Start Encode” button to begin the encoding process.
Both of these methods for rotating videos are easy to use and produce good results. Experiment with them to see which method works best for you.
An Easy Way to Rotate Videos Using Filmora
Moreover, instead of using Handbrake, you can use Filmora Video Editor instead. Filmora is a video editor that is very easy to use. It has a variety of features, including the ability to rotate videos. You can download Filmora from the Filmora website. The website has links to the download page for each of the supported platforms.
For Win 7 or later (64-bit)
For macOS 10.14 or later
Step-by-Step on how to rotate videos in Filmora
In order for you to rotate videos in Filmora, follow these simple steps:
Step 1: Import the video that you want to rotate into Filmora.

Step 2: Click on the “Edit” tab at the top of the video timeline.

Step 3: Click on the “Rotate” button in the “Transform” section of the toolbar.

Step 4: Select the rotation angle that you want to rotate the video in the “Rotate” menu.

Step 5: Click on the “Preview” button at the bottom of the Filmora window to see a preview of how your rotated video will look. When you are satisfied with the rotation, click on the “OK” button to apply the rotation.

As you can see, rotating videos is a very easy process in both Handbrake and Filmora. Both Handbrake and Filmora offer simple methods for rotating videos. In Handbrake, you can rotate the video 90 degrees counterclockwise or 180 degrees.
In Filmora, you can rotate the video by any number of degrees in either direction. Experiment with these methods to see which one works best for you. Additionally, Filmora offers a number of other features, such as the ability to add text and transitions, that you may find useful.
Step 2: Click on the “Dimensions” tab at the top of the Handbrake window.

Step 3: Under the “Orientation and Cropping” section, click on one of the options in the “Rotate” menu.

Step 4: If you want to rotate a video 90 degrees counterclockwise, select “90 Degrees CW (Counter-Clockwise).” If you want to rotate the video 180 degrees so that it is upside down, select “180 Degrees.”

Step 5: Click on the “Preview” button at the bottom of the Handbrake window to see a preview of how your rotated video will look. When you are satisfied with the rotation, click on the “Start Encode” button to begin the encoding process.

The Handbrake software also offers a “Flip” option which you can do after rotating it, which allows you to slip the video after rotating it. To use this option, follow these steps:
Under the “Orientation and Cropping” section, Go to Rotation and choose the degrees that best is best for your rotation requirements.

Click on “Flip” to flip your video horizontally.

Click on the “Preview” button at the bottom of the Handbrake window to see a preview of how your rotated video will look. When you are satisfied with the rotation, click on the “Start Encode” button to begin the encoding process.
Both of these methods for rotating videos are easy to use and produce good results. Experiment with them to see which method works best for you.
An Easy Way to Rotate Videos Using Filmora
Moreover, instead of using Handbrake, you can use Filmora Video Editor instead. Filmora is a video editor that is very easy to use. It has a variety of features, including the ability to rotate videos. You can download Filmora from the Filmora website. The website has links to the download page for each of the supported platforms.
For Win 7 or later (64-bit)
For macOS 10.14 or later
Step-by-Step on how to rotate videos in Filmora
In order for you to rotate videos in Filmora, follow these simple steps:
Step 1: Import the video that you want to rotate into Filmora.

Step 2: Click on the “Edit” tab at the top of the video timeline.

Step 3: Click on the “Rotate” button in the “Transform” section of the toolbar.

Step 4: Select the rotation angle that you want to rotate the video in the “Rotate” menu.

Step 5: Click on the “Preview” button at the bottom of the Filmora window to see a preview of how your rotated video will look. When you are satisfied with the rotation, click on the “OK” button to apply the rotation.

As you can see, rotating videos is a very easy process in both Handbrake and Filmora. Both Handbrake and Filmora offer simple methods for rotating videos. In Handbrake, you can rotate the video 90 degrees counterclockwise or 180 degrees.
In Filmora, you can rotate the video by any number of degrees in either direction. Experiment with these methods to see which one works best for you. Additionally, Filmora offers a number of other features, such as the ability to add text and transitions, that you may find useful.
How to Correct Lens Distortion in Videos
The distortion in your video may irritate you when you’re working on the video’s edit. When you take images or record sound, you frequently end up with distorted results due to lens distortion. In this article, we will discuss what lens distortion is, how it may be fixed, and the factors you need to pay attention to avoid lens distortion when taking or recording videos.
Part 1: Basic introduction to lens distortion
1. What is lens distortion
Distortion means that the straight rectilinear projection is not straight. In the pinhole camera model, lens distortion is measured by how far from the image’s ideal projection is. From a geometric optics point of view, the scene’s straight lines don’t look straight in the image.
When you take a picture, the camera lens can somehow change the shape of the image. It is called camera lens distortion. In simple terms, we can tell you that this is the case because distortion in-camera is when the lens makes curved lines in an image and doesn’t show the straight lines from the scene.
2. What cause it
Lens distortion happens with all lenses. It is because of several things, such as how the lens is curved, how far away the subject is, and the angle at which the photo was taken. Furthermore, it changes the image in many ways, but you can see it most when straight lines at the frame’s edges are no longer parallel.
Most geometric lens distortions happen when the focal distance is short (barrel distortion), long (pincushion distortion), or when a fish-eye lens is used to take a picture from a low angle (keystone distortion).
Part 2: How to correct a distorted lens?
A lot of times, with lower-end wide-angle lenses, especially action cams like GoPro, you get pretty gnarly distortion when you’re filming. As we know, the Earth is round, but it shouldn’t look like this when you take a picture. Indeed, it’s very distorted, it has the horizon line bending all over the place, and basically, all of the lines in the video have some level of curvature.
Hence, follow all the steps below to know how to fix it:
Step1 Import your video to Filmora .

Free Download For Win 7 or later(64-bit)
Free Download For macOS 10.14 or later
Step2 Click on the clip and head over to the lens correction. Choose the “Camera model” based on what you used, but in this tutorial, the video was taken with a GoPro Hero 7. However, you can choose some other camera model options there.

Step3 To adjust the distortion, you can slide the bar to the left or the right. If you slide the bar to the right (maximum level), there will be no adjustment. However, if you slide the bar to the left, you can see it pulling those lines as high up as possible.
You can see a bit of curvature, but it looks much more natural, and all of the lines in the video look so much better.

Step4 Lastly, if you play the video back, you will see the video look much better than before.

Part 3: How to avoid distorted lens while shooting?
1. Avoid very wide-angle lenses
The more distortion there is in a lens, like a 15mm prime, the wider it is. Sometimes you need a very wide-angle lens, and distortion is unavoidable. If you have room to move back, you could try using a lens with a different focal length.
2. Avoid getting too close
Doing so will enhance optical distortion in many lenses and the likelihood of perspective distortion in all lenses.
3. Be mindful of your composition
There are numerous instances where distortion is acceptable or even intended. Others must be carefully examined, such as utilizing a wide-angle lens to photograph a row of people. When you get too close to a group, the distortion makes the people at each end appear considerably wider! Therefore, consider your composition. Stand back and add space around your group; if necessary, you can trim the image afterward.
4. Use a 50mm lens
50mm lenses are often called “all-purpose” lenses. There is a good reason
for this. A 50mm lens is great for portraits, street photography, and many other kinds of photography, including architecture. If your subject is big, you just need space to stand back. You will see that a 50mm lens rarely distorts the image.
Free Download For macOS 10.14 or later
Step2 Click on the clip and head over to the lens correction. Choose the “Camera model” based on what you used, but in this tutorial, the video was taken with a GoPro Hero 7. However, you can choose some other camera model options there.

Step3 To adjust the distortion, you can slide the bar to the left or the right. If you slide the bar to the right (maximum level), there will be no adjustment. However, if you slide the bar to the left, you can see it pulling those lines as high up as possible.
You can see a bit of curvature, but it looks much more natural, and all of the lines in the video look so much better.

Step4 Lastly, if you play the video back, you will see the video look much better than before.

Part 3: How to avoid distorted lens while shooting?
1. Avoid very wide-angle lenses
The more distortion there is in a lens, like a 15mm prime, the wider it is. Sometimes you need a very wide-angle lens, and distortion is unavoidable. If you have room to move back, you could try using a lens with a different focal length.
2. Avoid getting too close
Doing so will enhance optical distortion in many lenses and the likelihood of perspective distortion in all lenses.
3. Be mindful of your composition
There are numerous instances where distortion is acceptable or even intended. Others must be carefully examined, such as utilizing a wide-angle lens to photograph a row of people. When you get too close to a group, the distortion makes the people at each end appear considerably wider! Therefore, consider your composition. Stand back and add space around your group; if necessary, you can trim the image afterward.
4. Use a 50mm lens
50mm lenses are often called “all-purpose” lenses. There is a good reason
for this. A 50mm lens is great for portraits, street photography, and many other kinds of photography, including architecture. If your subject is big, you just need space to stand back. You will see that a 50mm lens rarely distorts the image.
Also read:
- New Best 15 Subtitle Apps
- Updated 3GP Video Format What Is 3GP Format And How To Play It for 2024
- New In 2024, How to Add Video Transitions in Videos
- With This Article, We Will Be Looking at Steps to Rotate a Video in Cyberlink PowerDirector to Help You when Required. We Have Also Mentioned the Steps You Will Need to Follow in Wondershare Filmora for 2024
- New In 2024, Take Your Video Editing to the Next Level with Video Scopes
- 2024 Approved How to Edit GoPro Videos on Mac
- New 2024 Approved How to Speed Up Pictures on TikTok Slideshow
- New Know How to Create OBS Slideshow. Creating OBS Slideshow in Simple Steps; Application for Creating OBS Slideshow. Make OBS Slideshow Online
- Updated The Way to Make Dynamic Video Collages for 2024
- The Ultimate Guide to Slideshow Maker with Music
- Updated 2024 Approved How to Speed Up and Slow Down a Video
- Updated Do You Want to Remove the Unnecessary Scene From Your TikTok Video? This Article Will Help You to Adjust the Length of TikTok Clip by Providing Easy Methods
- Updated Add Emoji to Linkedin Post – 5 Tips You Would Like to Know
- 2024 Approved Are You Looking to Find Out How to Loop YouTube Videos on iPhone? Learn How to Loop Your Favorite YouTube Video on Your iPhone, so You Can Play that Part over and Over
- Updated This Article Talks in Detail About How to Convert Time-Lapse to Normal Video Using Certain Methods on iPhone, Online Tools, and so On. It Further Discusses Converting Time-Lapse Video to Normal on the Computer. Check Out
- Updated Green Screen Is a Widely Used Effect in After Effects. Many Professional Photographers Use It to Make Creative Video Effects. This Guide Will Show You How to Use Green Screen to Videos in After Effects
- New Perfect Guide for Beginners to Make a TikTok with Multiple Clips
- New In 2024, Step by Step to Cut Video in Adobe Premiere Pro
- Updated In 2024, 5 Methods to Denoise a Video
- Updated How to Create Vintage Film Effect 1990S for 2024
- New REVIEW Whats Top 10 Software to Make AI Upscaling Video
- New 8 Frame Rate Video Converters for a Professional Finish for 2024
- How to Do Velocity Edits on PC
- New In 2024, Some Facts That Few People Know on How to Make Transparent Background in Canva
- How to Color Grading in Final Cut Pro for 2024
- New Step by Step to Resize Video in Davinci Resolve
- New 2024 Approved How to Add a Lower Third to Your Video
- In 2024, Best Photo Video Maker Apps with Song PC, Mobile, Online
- Updated 2024 Approved Simple Tricks Make 3D GIF Production of Inspiration Pop up Constantly
- In 2024, 3 Effective Methods to Fake GPS location on Android For your Oppo Reno 8T 5G | Dr.fone
- How to Change Netflix Location to Get More Country Version On Samsung Galaxy M14 5G | Dr.fone
- The Best iSpoofer Alternative to Try On Samsung Galaxy F34 5G | Dr.fone
- Unlocking Made Easy The Best 10 Apps for Unlocking Your Xiaomi Mix Fold 3 Device
- Bypass/Reset Vivo S17 Pro Phone Screen Passcode/Pattern/Pin
- New 2024 Approved The Essential Guide to Emoji, Memoji, Animoji, and Bitmoji
- The Most Effective Ways to Bypass iPhone 6 Plus Activation Lock
- The way to recover deleted contacts on Motorola Edge 40 Neo without backup.
- In 2024, Does find my friends work on Motorola Moto G73 5G | Dr.fone
- New How to Create A GIF with Sound?
- Unlock Apple iPhone 13 Pro With Forgotten Passcode Different Methods You Can Try
- In 2024, How Can Honor V PurseMirror Share to PC? | Dr.fone
- In 2024, 3 Facts You Need to Know about Screen Mirroring Motorola Edge 40 Neo | Dr.fone
- How to Delete iCloud Account From Apple iPhone 15 Pro Max without Password?
- In 2024, 5 Quick Methods to Bypass Vivo V30 FRP
- In 2024, How to Mirror Apple iPhone 6 Plus to Other iPhone? | Dr.fone
- In 2024, How to Screen Mirroring Vivo S17 Pro? | Dr.fone
- How to Change Location on TikTok to See More Content On your Motorola Edge 40 | Dr.fone
- How to Cast Poco X5 to Computer for iPhone and Android? | Dr.fone
- Title: Online Calculate and Change Video Aspect Ratio
- Author: Chloe
- Created at : 2024-05-20 03:37:30
- Updated at : 2024-05-21 03:37:30
- Link: https://ai-editing-video.techidaily.com/online-calculate-and-change-video-aspect-ratio/
- License: This work is licensed under CC BY-NC-SA 4.0.

