
:max_bytes(150000):strip_icc():format(webp)/social-media-text-588a94263df78caebc620f05.jpg)
Powerpoint Supported Video Format and Advanced User Tips
Powerpoint Supported Video Format and Advanced User Tips
It doesn’t matter if you are a student or a working person; you must have made a PowerPoint presentation in your life. It can be a business presentation, educational presentation, or any work-related presentation if you are an employee. The types of presentation may vary, but the way to make a presentation is almost the same.
We are here to share a few tips and tricks to make your presentations unique like, you can add videos, voice-overs, and much more things. Remember one thing; there are certain video formats that PowerPoint supports. The video formats for PowerPoint presentations are discussed below, read ahead, and you’ll know more about them.
In this article
01 Overview of PowerPoint Supported Video Format
02 How to Insert or Embed Video in PowerPoint?
03 How to Turn Your Presentation into A Video with PowerPoint?
04 How to Match Color and Remove Image Background in PowerPoint?
Part 1. Overview of PowerPoint Supported Video Format
The supported video formats for PowerPoint are different for both Windows and macOS. All the supported formats for both types of the operating system are discussed below individually:

Windows
ASF: Advanced System Format (ASF) is a proprietary video and audio container format. It is an extensible file format design.
AVI: AVI is an Audio Video Interleave file. It is a multimedia container format made by Microsoft. It allows synchronous audio with video playback.
MP4, M4V, MOV: MPEG-4 file format is also known as MP4 or M4V. It is a common video file format. In comparison, MOV is developed by Apple Inc. It is the same as MP4 but is made for Apple devices.
MPEG, MPG: It is a famous file format for movies that are distributed over the internet. They use specific compression that makes downloading and steaming easy and fast.
WMV: WMV was introduced by Microsoft, and it stands for Windows Media Video. It is a compressed file container. The format is based on ASF.
macOS
AVI, VFW: AVI stands for Audio Video Interleave, and VFW stands for Video for Windows. Both are multimedia container files. AVI is encoded into VFW.
MP4, MPEG-4: MP4 is a digital video file format. MPEG-4 uses compression, but it is less common than the MP4 extension. MPEG encodes audio tracks.
M4V: It is a video container format developed by Apple Inc. It is similar to MP4. MV4 is used to encode video files in iTunes.
MPG, MPEG, MPE, M75, M15: MPG, MPEG, MPE, M75, and M15 are all the different types of formats developed by the Moving Pictures Expert Group.
M2V: It contains only video data and no other files. It is encoded by using MPEG-2 compression. It is mostly used by DVD authorized applications.
TS: It is a Video Transport Stream file and is used to store MPEG-2 compressed video data. It is used by digital broadcasting systems.
MOV, QT: QT and MOV both were developed by Apple Inc. Both the formats can hold multiple types of multimedia formats (audio, video, and subtitles).
DIF: DIF stands for Data Interchange Format. It is a text-based file format and is used for tabular and spreadsheet data. It is also used to transfer data between spreadsheets.
Part 2. How to Insert or Embed Video in PowerPoint?
PowerPoint is the simplest way to make a presentation. You might impress your boss with a good presentation. Do you ever consider adding videos from your computer across your slides? Have you ever embedded a video in PowerPoint? Allow us to help you out with this. The process to insert or embed a video in PowerPoint is not difficult; you can do this in a few simple steps.
How to Insert a Video in PowerPoint
The video format for PowerPoint differs for different versions. The steps to insert a video in PowerPoint do not deviate much. You can follow the following instructions and insert the video:
Step 1: First, you need to select the slide in which the video is supposed to be inserted. Select the video from the device you are using by heading to the ‘Insert’ tab. There, look for the ‘Video’ option and click on it to select the ‘This Device’ option.

Step 2: After you have located and selected the video, click on ‘Insert.’ Adjust the video settings from the ‘Format’ and ‘Playback’ toolbar according to your needs. You can resize the video, add effects, play full screen, etc.

Step 3: After all the settings are done, you need to preview the slideshow to check if the video is playing according to your desire or not.

How to Embed a Video in PowerPoint
If you are looking to add an online video across PowerPoint, the platform allows you to either embed its code or use its URL for adding it within your slides. To follow this, look into the steps featured below.
Step 1: Access the online video across your browser that you wish to embed in your PowerPoint slides. You can either copy its embed code or simply copy its URL. However, this video can only be from YouTube, SlideShare, Vimeo, Stream, or Flipgrid, as allowed by PowerPoint.

Step 2: Once copied, open your slides, and navigate to the “Insert” panel. Select “Video” from the available options and proceed to click on “Online Videos.”

Step 3: A new window opens up. Paste the copied code or URL across the provided space and tap “Insert” to add the online video across your slides. You can enhance the video across the “Video Format” and “Playback” sections.

Part 3. How to Turn Your Presentation into A Video with PowerPoint?
Inserting videos in PowerPoint presentations is normal; now, it’s time to discover something new. Have you ever thought of making a PowerPoint presentation a video itself? It is interesting! Your superior authority might get impressed and give you a promotion; who knows.
How to save your presentation as a video in PowerPoint? It can be done in a few simple steps. These steps are concisely discussed in the section below; follow to help yourself.
Step 1: You need to save the presentation that you made at first. After saving the original file, you need to click on ‘Export’ from the main menu.

Step 2: From the ‘Export’ menu, click on the ‘Create Video’ option. Select the video quality as per your needs. You can use pre-recorded narrations with the timings. In case no recorded narrations exist, you can record your own.

Step 3: The recorded narration will play over your video. If you don’t want narrations, you can simply skip these settings and move on.

Step 4: Next step is to select how much time a single slide will be shown. Keep in mind the longest slide; select an appropriate time so that all the material in the slides can be read easily.

Step 5: Now, moving towards the final step, click on ‘Create Video.’ This will generate and save the new PowerPoint video on your respective device.

Part 4. How to Match Color and Remove Image Background in PowerPoint?
There are two different things that you can do to make your presentation better. These are distinctive concerning video format for PowerPoint. Removal of background in PowerPoint is discussed, followed by Color Matching.
Remove Image Background
A simple way to remove background in PowerPoint is discussed in the following steps, read them for further assistance:
Step 1: Start by opening the PowerPoint software. Afterward, move to the ‘Insert’ tab and hit the ‘Pictures’ option to insert the image you plan to work with. As you click the photo, the ‘Picture Format’ tab will appear on the taskbar. Select the ‘Remove Background’ option on the left-most side below the taskbar.

Step 2: When you click ‘Remove Background,’ it will give options. Select the ‘Mark Areas to Keep’ option and draw the section that you want to save. You can also select the option ‘Mark Areas to Remove.’ It depends on the type of photo on which the task is being performed.

Step 3: Once all the necessary editing is done, click on the option ‘Keep Changes.’ You can save the image separately by clicking on ‘Save as Picture.’

Match Color in PowerPoint
Eyedropper helps you to match colors in your presentation. This takes a few clicks, and you have done color matching.
Step 1: For this, you need to open PowerPoint and select the image that you want to match the color of its background with the rest of the slide. Navigate to the “Design” panel and select the “Format Background” option.

Step 2: Click on ‘Drawing tool’ from the ribbon. Select the option of ‘Solid Fill’ from the menu bar at the top of the screen. Now, from ‘Solid Fill,’ move the mouse towards the ‘Eyedropper’ option. Tap on the background color that you wish to match within the background.

Step 3: Select the area that you want to change the background to its desired color. Access the option of “Solid Fill” after selecting the appropriate section of the document and select the color from the preview window present in the recent colors.

Closing Words
After reading the above article, you will be able to make incredible PowerPoint presentations. As videos add great information to your presentation so hence, we discussed in detail various video formats for PowerPoint. Now let’s share something new.
Do you know anything about Wondershare Filmora ? The software is a video editor with tons of great features and functionalities. You can create stunning videos with Filmora and its wide list of features. The video editor lets you trim, join, cut, split, and do much more than this. You get so many different effects, transitions, and elements with Filmora.
For Win 7 or later (64-bit)
For macOS 10.12 or later
02 How to Insert or Embed Video in PowerPoint?
03 How to Turn Your Presentation into A Video with PowerPoint?
04 How to Match Color and Remove Image Background in PowerPoint?
Part 1. Overview of PowerPoint Supported Video Format
The supported video formats for PowerPoint are different for both Windows and macOS. All the supported formats for both types of the operating system are discussed below individually:
Windows
ASF: Advanced System Format (ASF) is a proprietary video and audio container format. It is an extensible file format design.
AVI: AVI is an Audio Video Interleave file. It is a multimedia container format made by Microsoft. It allows synchronous audio with video playback.
MP4, M4V, MOV: MPEG-4 file format is also known as MP4 or M4V. It is a common video file format. In comparison, MOV is developed by Apple Inc. It is the same as MP4 but is made for Apple devices.
MPEG, MPG: It is a famous file format for movies that are distributed over the internet. They use specific compression that makes downloading and steaming easy and fast.
WMV: WMV was introduced by Microsoft, and it stands for Windows Media Video. It is a compressed file container. The format is based on ASF.
macOS
AVI, VFW: AVI stands for Audio Video Interleave, and VFW stands for Video for Windows. Both are multimedia container files. AVI is encoded into VFW.
MP4, MPEG-4: MP4 is a digital video file format. MPEG-4 uses compression, but it is less common than the MP4 extension. MPEG encodes audio tracks.
M4V: It is a video container format developed by Apple Inc. It is similar to MP4. MV4 is used to encode video files in iTunes.
MPG, MPEG, MPE, M75, M15: MPG, MPEG, MPE, M75, and M15 are all the different types of formats developed by the Moving Pictures Expert Group.
M2V: It contains only video data and no other files. It is encoded by using MPEG-2 compression. It is mostly used by DVD authorized applications.
TS: It is a Video Transport Stream file and is used to store MPEG-2 compressed video data. It is used by digital broadcasting systems.
MOV, QT: QT and MOV both were developed by Apple Inc. Both the formats can hold multiple types of multimedia formats (audio, video, and subtitles).
DIF: DIF stands for Data Interchange Format. It is a text-based file format and is used for tabular and spreadsheet data. It is also used to transfer data between spreadsheets.
Part 2. How to Insert or Embed Video in PowerPoint?
PowerPoint is the simplest way to make a presentation. You might impress your boss with a good presentation. Do you ever consider adding videos from your computer across your slides? Have you ever embedded a video in PowerPoint? Allow us to help you out with this. The process to insert or embed a video in PowerPoint is not difficult; you can do this in a few simple steps.
How to Insert a Video in PowerPoint
The video format for PowerPoint differs for different versions. The steps to insert a video in PowerPoint do not deviate much. You can follow the following instructions and insert the video:
Step 1: First, you need to select the slide in which the video is supposed to be inserted. Select the video from the device you are using by heading to the ‘Insert’ tab. There, look for the ‘Video’ option and click on it to select the ‘This Device’ option.
Step 2: After you have located and selected the video, click on ‘Insert.’ Adjust the video settings from the ‘Format’ and ‘Playback’ toolbar according to your needs. You can resize the video, add effects, play full screen, etc.
Step 3: After all the settings are done, you need to preview the slideshow to check if the video is playing according to your desire or not.
How to Embed a Video in PowerPoint
If you are looking to add an online video across PowerPoint, the platform allows you to either embed its code or use its URL for adding it within your slides. To follow this, look into the steps featured below.
Step 1: Access the online video across your browser that you wish to embed in your PowerPoint slides. You can either copy its embed code or simply copy its URL. However, this video can only be from YouTube, SlideShare, Vimeo, Stream, or Flipgrid, as allowed by PowerPoint.
Step 2: Once copied, open your slides, and navigate to the “Insert” panel. Select “Video” from the available options and proceed to click on “Online Videos.”
Step 3: A new window opens up. Paste the copied code or URL across the provided space and tap “Insert” to add the online video across your slides. You can enhance the video across the “Video Format” and “Playback” sections.
Part 3. How to Turn Your Presentation into A Video with PowerPoint?
Inserting videos in PowerPoint presentations is normal; now, it’s time to discover something new. Have you ever thought of making a PowerPoint presentation a video itself? It is interesting! Your superior authority might get impressed and give you a promotion; who knows.
How to save your presentation as a video in PowerPoint? It can be done in a few simple steps. These steps are concisely discussed in the section below; follow to help yourself.
Step 1: You need to save the presentation that you made at first. After saving the original file, you need to click on ‘Export’ from the main menu.
Step 2: From the ‘Export’ menu, click on the ‘Create Video’ option. Select the video quality as per your needs. You can use pre-recorded narrations with the timings. In case no recorded narrations exist, you can record your own.
Step 3: The recorded narration will play over your video. If you don’t want narrations, you can simply skip these settings and move on.
Step 4: Next step is to select how much time a single slide will be shown. Keep in mind the longest slide; select an appropriate time so that all the material in the slides can be read easily.
Step 5: Now, moving towards the final step, click on ‘Create Video.’ This will generate and save the new PowerPoint video on your respective device.
Part 4. How to Match Color and Remove Image Background in PowerPoint?
There are two different things that you can do to make your presentation better. These are distinctive concerning video format for PowerPoint. Removal of background in PowerPoint is discussed, followed by Color Matching.
Remove Image Background
A simple way to remove background in PowerPoint is discussed in the following steps, read them for further assistance:
Step 1: Start by opening the PowerPoint software. Afterward, move to the ‘Insert’ tab and hit the ‘Pictures’ option to insert the image you plan to work with. As you click the photo, the ‘Picture Format’ tab will appear on the taskbar. Select the ‘Remove Background’ option on the left-most side below the taskbar.
Step 2: When you click ‘Remove Background,’ it will give options. Select the ‘Mark Areas to Keep’ option and draw the section that you want to save. You can also select the option ‘Mark Areas to Remove.’ It depends on the type of photo on which the task is being performed.
Step 3: Once all the necessary editing is done, click on the option ‘Keep Changes.’ You can save the image separately by clicking on ‘Save as Picture.’
Match Color in PowerPoint
Eyedropper helps you to match colors in your presentation. This takes a few clicks, and you have done color matching.
Step 1: For this, you need to open PowerPoint and select the image that you want to match the color of its background with the rest of the slide. Navigate to the “Design” panel and select the “Format Background” option.
Step 2: Click on ‘Drawing tool’ from the ribbon. Select the option of ‘Solid Fill’ from the menu bar at the top of the screen. Now, from ‘Solid Fill,’ move the mouse towards the ‘Eyedropper’ option. Tap on the background color that you wish to match within the background.
Step 3: Select the area that you want to change the background to its desired color. Access the option of “Solid Fill” after selecting the appropriate section of the document and select the color from the preview window present in the recent colors.
Closing Words
After reading the above article, you will be able to make incredible PowerPoint presentations. As videos add great information to your presentation so hence, we discussed in detail various video formats for PowerPoint. Now let’s share something new.
Do you know anything about Wondershare Filmora ? The software is a video editor with tons of great features and functionalities. You can create stunning videos with Filmora and its wide list of features. The video editor lets you trim, join, cut, split, and do much more than this. You get so many different effects, transitions, and elements with Filmora.
For Win 7 or later (64-bit)
For macOS 10.12 or later
IMovie Review – Is It The Best Video Editor for Mac Users?
If you are a Mac user and you are getting started in video editing, it is better if you start with a free video editing software. There is no need to download any external free video editor when you are a Mac user. This is because Mac comes with a pre-installed free video editor called iMovie editor. iMovie is a video editing app from Apple where you will get all the standard and some advanced features.
iMovie is extremely popular among Mac users for video editing because it is completely free and easy to use. In fact, iMovie is also available for iPhone and iPad users. You can start your video editing on your iPhone and transfer the same work to Mac to continue editing on your Mac. But the most important question is if iMovie editor is the best video editor for Mac users. Read our iMovie review and find out a better alternative.
Part 1. Key Features of iMovie
Even iMovie is completely free to use, it competes with several premium video editors in terms of features. There are only a handful of free video editors available that lets you edit 4K videos, and iMovie is one of them. Similarly, there are only a few premium video editors available that support editing the same video project on different devices like iMovie. Here are all the key features of iMovie that you should know.
Templates and Themes – iMovie comes with different templates and themes for creating different types of videos including cinematic videos. There are classy and trending themes available to create trailers and short films. These themes and templates have limited customization options so that you can adjust as per your requirements.
Basic Editing – iMovie lets you combine video clips, split a large video file, trim video parts, crop and rotate video. Besides, you get to zoom videos as well as resize them as you need. You can add texts and titles as well as apply different transitions wherever you want to.
Advanced Editing – You can change speed and turn your video clips into slow-motion videos. You can correct the color as well as stabilize them. Besides, you can apply green screen effect and split screen effect. Moreover, you can reverse video as well as put overlays on videos. iMovie is also capable of recording video and audio if you want to record your screen or webcam video.
Audio Editing – iMovie lets you edit audio as well which is an essential requirement in video editing. You can increase and decrease volume, change speed and add beat markers to a video if required. Coming to audio effects, you can apply fade-in and fade-out effects. You can mute the audio in your recorded video and add a background music instead. Moreover, you can add voiceover and choose royalty-free audio clips.
Transitions and Effects – Even though there are limited visual effects, there are unique and eye-catchy. iMovie keeps on adding new and trending effects with every update so that the users have enough options to make their videos stand out. iMovie also provides different backgrounds that you can use on your video to enhance its quality. Apart from visual effects, there are several standard audio effects available.
User Interface – iMovie comes with a simple and intuitive user interface that lets everyone edit videos instantly without prior experience. This is exactly why some users never go for premium video editors. The user interface is clean, and all options are readily available. You can upload media files on Media Library, and they are automatically categorized from where you can access them instantly.
Part 2. How to Edit Videos with iMovie?
iMovie comes pre-installed on Mac, and hence, there is no need to download and install the application. Coming to how to use iMovie, there are three types of projects you can choose on iMovie. They are Media, Projects, and Theater. Media is where your footages reside, Projects represent the main workspace, and Theater is where your finished projects reside. Here are the steps regarding iMovie edit video.
Step 1: Open iMovie and click on Projects. You will see two options Movie and Trailer. Click on Movie to edit your videos.

Step 2: Click on My Movie under Project Media and go to My Media. Import your video clips and audio files under My Media.

Step 3: Drag and drop the video clips and audio clips on the timeline in proper order. You can go for iMovie edit audio and video such as trimming as required.
Step 4: Go to Transitions located at the top bar beside My Media and place the desired transitions in between the video clips.

Step 5: Similarly, go to Titles located at the top bar beside Transitions and place them on the timeline wherever appropriate.
Step 6: Finally, check your edited video on the canvas and then go to the top-right corner and click on Export. You will have to option to save it in Theater and share on social media as well as through email and iTunes.

Part 3. Alternative to Edit Videos - Filmora
In spite of iMovie being a good video editor, Mac users search for a better alternative. This is because there are limited transitions and effects available. You can have two video tracks only on the timeline and there is lack of customization. Besides, the advanced features of video editing such as motion tracking are not available. Moreover, there are limited file formats supported for importing and exporting.
Wondershare Filmora is the best alternative to iMovie for Mac users. Filmora is a premium video editor where all the shortcomings of iMovie are taken care of. Filmora supports almost all file formats for media files. There is a wide range of transitions, effects, elements as well as animations available. Besides, there are different styles of texts and titles available along with stock media library. Here are the steps to edit videos with iMovie.
For Win 7 or later (64-bit)
For macOS 10.12 or later
Step 1: Download and install Filmora on your Mac. Launch Filmora and click on New Project.
Step 2: Drag and drop your video clips and audio files Project Media folder. Drag and place the video clips on the timeline and arrange per perfectly. Place audio files on the timeline on a different track.

Step 3: If you want to apply transitions, go to Transitions at the top bar and drag any transition in between video clips on the timeline. You can also insert texts from Titles and objects from Elements from the top bar.

Step 4: Play the video to see the changes you have made, and click on Export button to save the video when you are satisfied.

Part 4. FAQs about iMovie
Is iMovie good for video editing?
Yes, iMovie is good for basic video editing. You can edit 4K videos, and iMovie is available on macOS and iOS. If you are a beginner, iMovie is perfect for you. If you want advanced editing features, we recommend Wondershare Filmora.
What’s better Premiere Pro or iMovie?
In terms of features and functionalities, Premiere Pro is far better than iMovie. However, Premiere Pro is more for advanced video editing while iMovie is more for beginners. iMovie is simpler to use than Premiere Pro, and hence, beginners will love it.
Can I make YouTube videos with iMovie?
Yes, you can make YouTube videos with iMovie as it has all the required tools and options. Import your video clips and audio files on the timeline, go for iMovie edit clip like trim and crop as required, add transitions, texts, and effects as applicable and publish your finished video on YouTube.
For macOS 10.12 or later
Step 1: Download and install Filmora on your Mac. Launch Filmora and click on New Project.
Step 2: Drag and drop your video clips and audio files Project Media folder. Drag and place the video clips on the timeline and arrange per perfectly. Place audio files on the timeline on a different track.
Step 3: If you want to apply transitions, go to Transitions at the top bar and drag any transition in between video clips on the timeline. You can also insert texts from Titles and objects from Elements from the top bar.
Step 4: Play the video to see the changes you have made, and click on Export button to save the video when you are satisfied.
Part 4. FAQs about iMovie
Is iMovie good for video editing?
Yes, iMovie is good for basic video editing. You can edit 4K videos, and iMovie is available on macOS and iOS. If you are a beginner, iMovie is perfect for you. If you want advanced editing features, we recommend Wondershare Filmora.
What’s better Premiere Pro or iMovie?
In terms of features and functionalities, Premiere Pro is far better than iMovie. However, Premiere Pro is more for advanced video editing while iMovie is more for beginners. iMovie is simpler to use than Premiere Pro, and hence, beginners will love it.
Can I make YouTube videos with iMovie?
Yes, you can make YouTube videos with iMovie as it has all the required tools and options. Import your video clips and audio files on the timeline, go for iMovie edit clip like trim and crop as required, add transitions, texts, and effects as applicable and publish your finished video on YouTube.
Add Green Screen Effects in Final Cut Pro
No matter the type of video you are shooting, the background of the video plays a major play. The background determines how eye-pleasing the frame of the entire video looks. A beautiful background enhances the video content while a distracting background can deteriorate the video outlook. You do not need to be in exotic locations or have eye-catching backgrounds in reality while shooting a video thanks to the use of the green screen effect.
Once you shoot a video with green screen background, you can replace the green screen with anything you want. You will need a video editor to replace the green screen, and Final Cut Pro is the most widely used video editor among Mac Users. We will illustrate how to add green screen in Final Cut Pro and get any background for your recorded video. We will also recommend an alternative watt to add green screen effect to your video.
Part 1. How to add green screen on Final Cut Pro
Final Cut Pro is the most popular professional video editor among Mac users. The learning curve is slightly steep, but once you get used to Final Cut Pro, you can take your recorded video to the next level with profound editing. The most important part of adding green screen effect to a video is shooting the video with a proper green screen in the background. Once you have successfully recorded your video, here are the steps on how to add background to green screen Final Cut Pro.
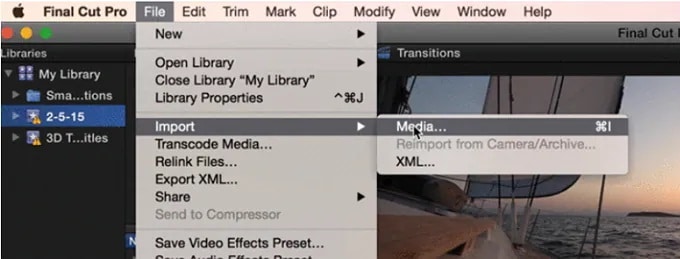
Step1 Launch Final Cut Pro and go to File> Import> Media. Select the video file with green screen background from your storage to import the file into FCP. Similarly, you should import the video or photo with which you want to replace the green screen.
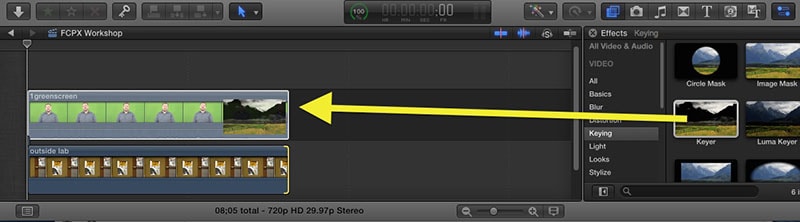
Step2 Drag the video clip with green screen background (called foreground clip) to Timeline and place it to Primary Storyline. Drag the replacement video (called background clip) below the foreground clip in Timeline.
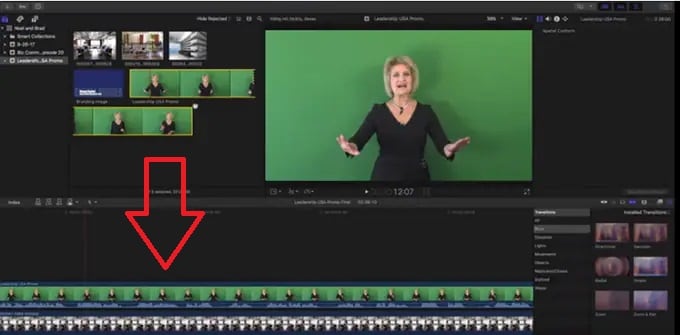
Step3 Select the foreground clip and click on Effects button present at the extreme top-right corner of the Timeline.
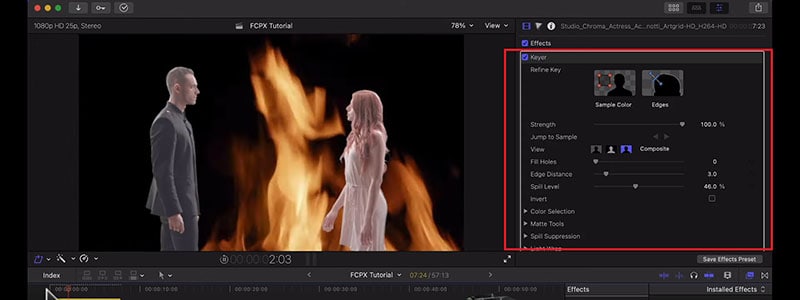
Step4 From the Effects options, select Keyer effect. If you cannot spot it immediately, you can search for it from the search field.
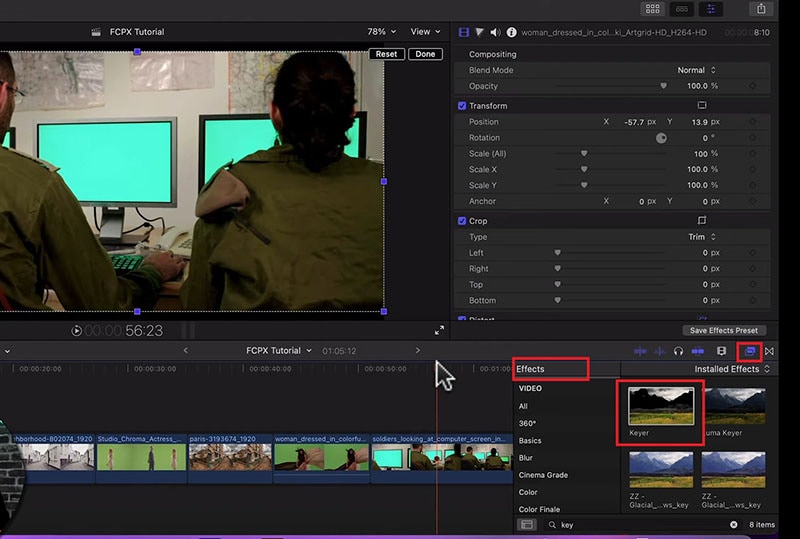
Step5 Drag and drop Keyer effect to the foreground clip. The effect detects the green screen and replaces it with the available background clip.
Step6 You might have to adjust the Keyer effect settings to get the green screen effect perfectly. Go to Inspector Window and click on Sample color and fine-tune the available settings to get it correct.
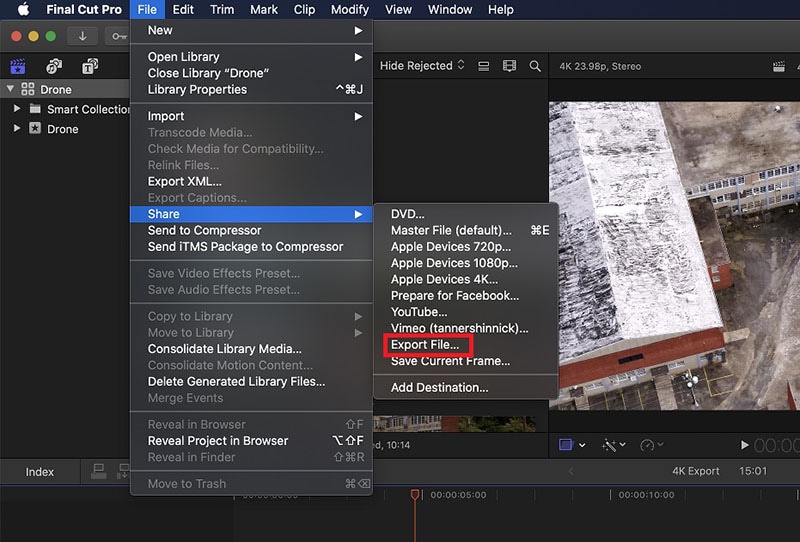
Step7 Once you are satisfied with the effect, go to File> Share> Export File and save the modified video.
Part 2. Alternative Way to Add Green Screen to Videos
Final Cut Pro is a professional but highly expensive video editor. The learning curve is not very suitable for amateur video editors. That is why if you are looking for a better alternative way to add green screen to videos, we recommend Wondershare Filmora . Filmora is a popular video editor that is available for Mac and Windows users. The user interface is extremely intuitive, and adding green screen effect is super easy. Here are the steps on how to add background to green screen effect.
Free Download For Win 7 or later(64-bit)
Free Download For macOS 10.14 or later
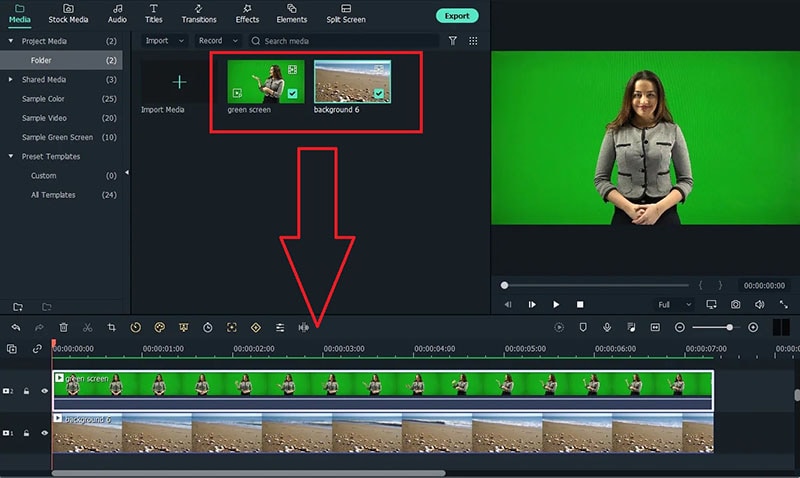
Step1 Download and install Filmora on your computer. Launch Filmora and click on New Projects.
Step2 Under Project Media folder, Drag and drop the video clip with green screen background as well as the photo or video with which you want to replace the green screen.
Step3 Drag and drop the video clips on the Timeline. The video with green screen should be at the top while the replacement video or photo should be below it.
Step4 Double-click on the green screen video clip on Timeline. Go to Video>Basic and turn on Chroma key option.
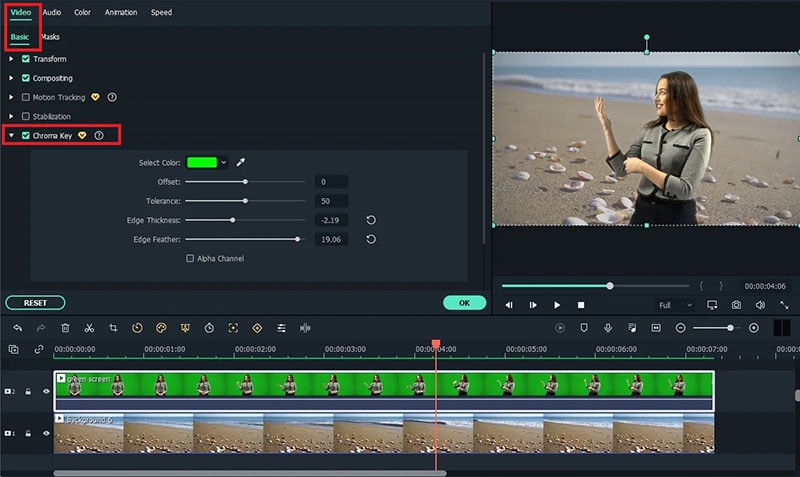
Step5 Adjust the different parameters such as offset to get the effect perfect and click on Ok button.
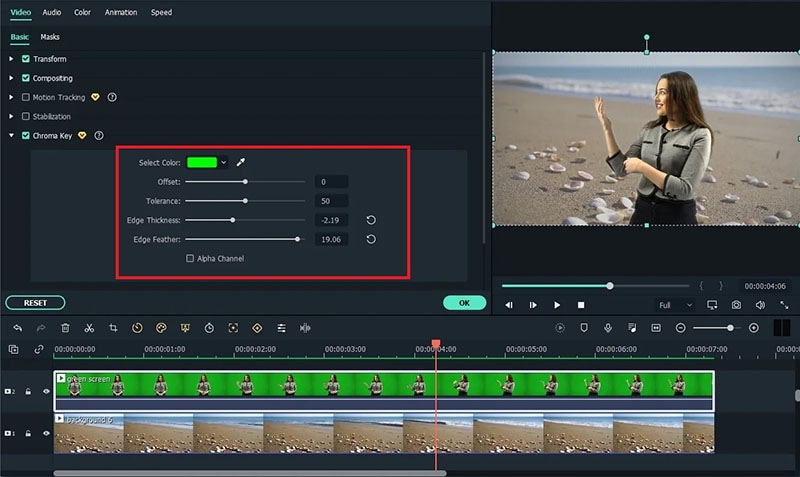
Step6 Play the video and if you are satisfied with the result, click on Export button to save the modified video file.
Part 3. Green Screen Video Tips to Use
We have already stated that replacing green screen in your video with an eye-catching background is the easiest part. On the contrary, shooting the green screen video is the most important part. If you shoot the video perfectly, replacing the background accurately in the video editor becomes super easy. Here are some important tips to use while shooting green screen video.
Distance – There should be enough distance between the subject and the green screen background so that the subject does not cast a shadow on the green screen. This distance is also important to place lights in between so that the green screen is perfectly lit for a great video shooting session.
Quality – You should opt for a high-quality green screen cloth for the background. This means the green screen should have a solid color instead of light and dark patches here and there. Besides, you should ensure that there are no wrinkles on the green screen.
Otherwise, when you will apply green screen effect through the video editor, the transformation will be uneven. You have to spend a lot of time adjusting the parameters to cover up uneven patches in the background.
Lighting – The way you set up your lights plays a major role in shooting green screen video perfectly. The light falling on the green screen will light up the screen evenly so that there are no light and dark patches. Transforming the green screen in the video editor will become that much easier.
You should focus on soft and even lighting for the entire green screen, and you should check through your camera to ensure the lighting is perfect. Sometimes, you can place lights behind the subject if the subject is staying stationary throughout the video. Otherwise, you can place the light above the subject for even distribution.
Aperture – The settings of your camera are equally important to smoothen out the green screen in the background and focus on the subject sharply. That is where aperture comes into the scene, and you need to use low aperture while shooting green screen videos. Low aperture opens up the camera lens, and the green screen turns softer in the background. The subject stands out while the background turns uniformly green.
Shutter Speed – While shooting a green screen video, you should keep a high shutter speed to prevent motion blur and uneven background. If the subject stays fixed throughout, the shutter speed should be double the frame rate. If the subject is moving throughout, the shutter speed should be around 4 times the frame rate such as 1/100.
ISO – The last thing you want in a green screen video is grainy footage. Your life will turn upside down editing the video and getting the green screen effect perfectly in any video editor. ISO determines the sensitivity and thereby, the grainy effect in your video. When the ISO is too high, the chance of getting grains in the video is high. It is better to use a native ISO for green screen effect, but you need to check with a sample recording and adjust if required.
Conclusion
We have answered how to add background to green screen Final Cut Pro. You can replace any green screen in your video with any video or photo for the background of the video. If you do not have Final Cut Pro or you find the steps slightly complicated, we recommend you to use Wondershare Filmora for instant green screen effect and quick adjustments for the best outcome.
Free Download For macOS 10.14 or later
Step1 Download and install Filmora on your computer. Launch Filmora and click on New Projects.
Step2 Under Project Media folder, Drag and drop the video clip with green screen background as well as the photo or video with which you want to replace the green screen.
Step3 Drag and drop the video clips on the Timeline. The video with green screen should be at the top while the replacement video or photo should be below it.
Step4 Double-click on the green screen video clip on Timeline. Go to Video>Basic and turn on Chroma key option.
Step5 Adjust the different parameters such as offset to get the effect perfect and click on Ok button.
Step6 Play the video and if you are satisfied with the result, click on Export button to save the modified video file.
Part 3. Green Screen Video Tips to Use
We have already stated that replacing green screen in your video with an eye-catching background is the easiest part. On the contrary, shooting the green screen video is the most important part. If you shoot the video perfectly, replacing the background accurately in the video editor becomes super easy. Here are some important tips to use while shooting green screen video.
Distance – There should be enough distance between the subject and the green screen background so that the subject does not cast a shadow on the green screen. This distance is also important to place lights in between so that the green screen is perfectly lit for a great video shooting session.
Quality – You should opt for a high-quality green screen cloth for the background. This means the green screen should have a solid color instead of light and dark patches here and there. Besides, you should ensure that there are no wrinkles on the green screen.
Otherwise, when you will apply green screen effect through the video editor, the transformation will be uneven. You have to spend a lot of time adjusting the parameters to cover up uneven patches in the background.
Lighting – The way you set up your lights plays a major role in shooting green screen video perfectly. The light falling on the green screen will light up the screen evenly so that there are no light and dark patches. Transforming the green screen in the video editor will become that much easier.
You should focus on soft and even lighting for the entire green screen, and you should check through your camera to ensure the lighting is perfect. Sometimes, you can place lights behind the subject if the subject is staying stationary throughout the video. Otherwise, you can place the light above the subject for even distribution.
Aperture – The settings of your camera are equally important to smoothen out the green screen in the background and focus on the subject sharply. That is where aperture comes into the scene, and you need to use low aperture while shooting green screen videos. Low aperture opens up the camera lens, and the green screen turns softer in the background. The subject stands out while the background turns uniformly green.
Shutter Speed – While shooting a green screen video, you should keep a high shutter speed to prevent motion blur and uneven background. If the subject stays fixed throughout, the shutter speed should be double the frame rate. If the subject is moving throughout, the shutter speed should be around 4 times the frame rate such as 1/100.
ISO – The last thing you want in a green screen video is grainy footage. Your life will turn upside down editing the video and getting the green screen effect perfectly in any video editor. ISO determines the sensitivity and thereby, the grainy effect in your video. When the ISO is too high, the chance of getting grains in the video is high. It is better to use a native ISO for green screen effect, but you need to check with a sample recording and adjust if required.
Conclusion
We have answered how to add background to green screen Final Cut Pro. You can replace any green screen in your video with any video or photo for the background of the video. If you do not have Final Cut Pro or you find the steps slightly complicated, we recommend you to use Wondershare Filmora for instant green screen effect and quick adjustments for the best outcome.
Start Making Procreate GIFs and Take Your Editing Creativity to the Next Level
Easy Ways to Make Procreate GIFs
An easy yet powerful editor
Numerous effects to choose from
Detailed tutorials provided by the official channel
Stay tuned for a complete know-how into making Procreate GIFs.
In this article
01 [How Animation Works in Procreate](#Part 1)
02 [How to Make Animated Gifs in Procreate](#Part 2)
Part 1 How Animation Works in Procreate
GIFs are known to be the top ranked and most intuitive trendsetters in the world of infotainment and media service tools. Be it for fun or a targeted market influence, you can depend on GIFs for a variety of information solutions. Moving to the creative aspect, the experimentation belt with creating GIFs is huge. From making simple static and animated GIFs to creating professionally sound market promotion tools; you can play with your editing skills to extract just anything from these quick snippets.
Having said that, let’s take a dive into creating animated Procreate GIFs. Being a relatively new dimension of GIF editing, a merge of the two produces matchless and classic results. Read through the further article to get a complete guide for working on GIF creation and editing with Procreate.
● Underlying Concept
Before you begin creating a Procreate GIF, let’s get a bit familiar with the concept behind this GIF creation utility. This one is an excellent and advanced means of exploring your skills in digital drawing and animations. It is one of the easiest GIF maker software that helps you to become a pro in animation creativity even if you are beginner and for the ones already into the skill, Procreate is simply heaven.
Procreate allows you to work with animation in its ‘Animation Assist’ tool, where you get a generous workspace with the perfect editing canvas to experiment with a plethora of tools, effects and filters to create exciting GIFs with basic and complex animation craft.
The software allows frame-by-frame animation that refers to working with different frames of a particular illustration, while making minimal changes in each frame. Once you finish, your final creation gets played in a motion loop.
Part 1 How to Make Animated Gifs in Procreate
As is already stated, Procreate is among the most affordable GIF creator and editing software. Creating GIFs here is a few minute stuff within a span of counted steps. Let’s have a broader see through of the creation process. Take the following quick steps and get started to make your exclusive Procreate GIF:
● Step 1: Select an Artwork
Launch the software in your device to reach the Procreate welcome screen, where you need to select an existing static GIF to work on from your device. You can also create a fresh one if you like. Having done that, make a right swipe on the ‘Canvas’ icon and select ‘Duplicate’. This creates a copy of your artwork, preserving all of its layers, so that you are free to make changes or stick to the original one according to your preference.
If you want to use a specific section of your image to animate, you can use the crop tool to remove unwanted portions. Next, you need to put together the specific layers you wish to animate and also remove any unwanted layers you don’t want to use.

● Step 2: Enable Animation Assist Tool
From the Procreate tool gallery at the top, click on the ‘Wrench’ icon and select ‘Canvas’ from the ’Actions’ menu that drops down. In the interface that appears, enable the ‘Animation Assist’ tool with a right toggle. This will cause the ‘Animation Toolbar’ to appear at the bottom of the interface.

● Step 3: Add Frames and Make Image Adjustments
At this instant, you need to make additional adjustments in your selected image and create a copy of the image frames. To get this done, navigate to the ‘Animation Assist Toolbar’ and long press the ‘Add Frame’ button. A duplicate frame will now appear on the screen. Within this frame, you need to move the image elements that you wish to animate. To do this, select an element and drag it to a convenient spot of your choice.
While you go through with object movement, the software simultaneously shows you a semi-transparent preview of your creation through its unique ‘Onion-skin’ feature. You can enjoy playing your animation at this very stage, or continue to create something more exciting.
● Step 4: Enjoying? Let’s Continue.
Repeat Step 3 to create long and smooth GIFs with additional frames. Take caution to create a copy of your latest frame (not the original one), in case you need to make any adjustments later on. Consider playing your GIF to see if you need to add extra frames or implement further changes.
Step 5: Almost There.
You may notice a jerky movement of your final image frames. This is on account of the ‘Default Play’ feature of the Procreate software that initiates a run of your creation from the beginning to end and loops on the same fashion.
To set this right, navigate to the ‘Settings’ tool of the ‘Animation Assist Toolbar’ and tap ‘Ping-Pong’ on the opening interface. Your animated Gif will now play in a forward to backward loop, resulting in a smooth frame movement.
● Step 6: Time to Share.
Once you are happy with your artwork, you can share it across different media platforms. To export your creation, navigate to the Procreate tool gallery and tap the ‘Wrench’ icon and select ‘Share’. In the ‘Sharing Options’ menu, you will be asked to make a format selection. You can share your creation in either of the GIF, PNG or MP4 formats.
You may even require a size modification in the created file with respect to specific sharing platforms. You can either select a web compatible resolution to shrink your file, or create a copy of the file to resize the same.
Once you get familiar with Procreate and its GIF creation basics, you have the liberty to explore the huge effects library offered by the software to give your animated GIFs the classy, professional touch. So why wait? Just get the software and start a never ending spree of Procreating GIFs.
Procreate is undoubtedly an excellent tool for creating animated GIFs, but if you are looking for alternatives, another software to rely on is Wondershare Filmora Video Editor GIF creator.

Wondershare Filmora - Best Video Editor for Mac/Windows
5,481,435 people have downloaded it.
Build unique custom animations without breaking a sweat.
Focus on creating epic stories and leave the details to Filmora’s auto features.
Start a creative adventure with drag & drop effects and endless possibilities.
Filmora simplifies advanced features to save you time and effort.
Filmora cuts out repetition so you can move on to your next creative breakthrough.
● Filmora GIF Maker
Launched by Wondershare, this one is something you can blindly count upon for creating stunning animated GIFs from image and video files. Packed with tons of amazing features, Filmora is an inventory of audio-visual effects and filters that never runs out of fresh and appealing choices. Available to you as free and clean GIF generator software, this is easily compatible to almost any smart device. Working with Filmora will certainly make you admit that creating GIFs was never easier.

To start creating GIFs with this awesome tool, here’s what you need to do:
● Step 1: Import Necessary Media Files
Either a funny video or a group of stunning still images, you can choose any suitable media to make GIFs in Filmora. All you need to do is import the desired files from your PC or smartphone to the software’s timeline.
● Step 2: Timeline Dragging
Once you are done with importing the required files, you need to drag and drop the same to the ‘Editor Timeline’ of the GIF maker tool, where can improvise them to your heart’s content.

● Step 3: Time to Edit.
The Filmora effects library is simply heaven for the ones with creative instincts. Getting a liberty to browse and apply a glut of effects and filters, you are at the perfect place to create professionally sound and next level animated GIFs. Try hands on creating classy backgrounds with overlays, crop and trim clips to the perfect shot, make frame and time adjustments, add text to intensify your message, or pick up just anything you like, to create magic with your creativity.

● Step 4: Show it to the World.
When finally satisfied, save your artwork file to your device using the .gif extension and receive compliments from friends and peers by sharing it on your Instagram or other social media handles.

● Key Takeaways from This Episode →
● Animated GIFs are among the latest social media frenzy. These short, moving clips are nothing less than a complete entertainment roll-on. When it comes to creating animated GIFs, you can certainly take the Procreate software as a worthy choice.
● This one is a super easy and exciting means of working on animation GIFs that are by default, captivating for every onlooker. Talking of competing alternatives, you can trust on Wondershare Filmora, a handy, quick and clean solution to animated GIF creation.
Stay tuned for a complete know-how into making Procreate GIFs.
In this article
01 [How Animation Works in Procreate](#Part 1)
02 [How to Make Animated Gifs in Procreate](#Part 2)
Part 1 How Animation Works in Procreate
GIFs are known to be the top ranked and most intuitive trendsetters in the world of infotainment and media service tools. Be it for fun or a targeted market influence, you can depend on GIFs for a variety of information solutions. Moving to the creative aspect, the experimentation belt with creating GIFs is huge. From making simple static and animated GIFs to creating professionally sound market promotion tools; you can play with your editing skills to extract just anything from these quick snippets.
Having said that, let’s take a dive into creating animated Procreate GIFs. Being a relatively new dimension of GIF editing, a merge of the two produces matchless and classic results. Read through the further article to get a complete guide for working on GIF creation and editing with Procreate.
● Underlying Concept
Before you begin creating a Procreate GIF, let’s get a bit familiar with the concept behind this GIF creation utility. This one is an excellent and advanced means of exploring your skills in digital drawing and animations. It is one of the easiest GIF maker software that helps you to become a pro in animation creativity even if you are beginner and for the ones already into the skill, Procreate is simply heaven.
Procreate allows you to work with animation in its ‘Animation Assist’ tool, where you get a generous workspace with the perfect editing canvas to experiment with a plethora of tools, effects and filters to create exciting GIFs with basic and complex animation craft.
The software allows frame-by-frame animation that refers to working with different frames of a particular illustration, while making minimal changes in each frame. Once you finish, your final creation gets played in a motion loop.
Part 1 How to Make Animated Gifs in Procreate
As is already stated, Procreate is among the most affordable GIF creator and editing software. Creating GIFs here is a few minute stuff within a span of counted steps. Let’s have a broader see through of the creation process. Take the following quick steps and get started to make your exclusive Procreate GIF:
● Step 1: Select an Artwork
Launch the software in your device to reach the Procreate welcome screen, where you need to select an existing static GIF to work on from your device. You can also create a fresh one if you like. Having done that, make a right swipe on the ‘Canvas’ icon and select ‘Duplicate’. This creates a copy of your artwork, preserving all of its layers, so that you are free to make changes or stick to the original one according to your preference.
If you want to use a specific section of your image to animate, you can use the crop tool to remove unwanted portions. Next, you need to put together the specific layers you wish to animate and also remove any unwanted layers you don’t want to use.
● Step 2: Enable Animation Assist Tool
From the Procreate tool gallery at the top, click on the ‘Wrench’ icon and select ‘Canvas’ from the ’Actions’ menu that drops down. In the interface that appears, enable the ‘Animation Assist’ tool with a right toggle. This will cause the ‘Animation Toolbar’ to appear at the bottom of the interface.
● Step 3: Add Frames and Make Image Adjustments
At this instant, you need to make additional adjustments in your selected image and create a copy of the image frames. To get this done, navigate to the ‘Animation Assist Toolbar’ and long press the ‘Add Frame’ button. A duplicate frame will now appear on the screen. Within this frame, you need to move the image elements that you wish to animate. To do this, select an element and drag it to a convenient spot of your choice.
While you go through with object movement, the software simultaneously shows you a semi-transparent preview of your creation through its unique ‘Onion-skin’ feature. You can enjoy playing your animation at this very stage, or continue to create something more exciting.
● Step 4: Enjoying? Let’s Continue.
Repeat Step 3 to create long and smooth GIFs with additional frames. Take caution to create a copy of your latest frame (not the original one), in case you need to make any adjustments later on. Consider playing your GIF to see if you need to add extra frames or implement further changes.
Step 5: Almost There.
You may notice a jerky movement of your final image frames. This is on account of the ‘Default Play’ feature of the Procreate software that initiates a run of your creation from the beginning to end and loops on the same fashion.
To set this right, navigate to the ‘Settings’ tool of the ‘Animation Assist Toolbar’ and tap ‘Ping-Pong’ on the opening interface. Your animated Gif will now play in a forward to backward loop, resulting in a smooth frame movement.
● Step 6: Time to Share.
Once you are happy with your artwork, you can share it across different media platforms. To export your creation, navigate to the Procreate tool gallery and tap the ‘Wrench’ icon and select ‘Share’. In the ‘Sharing Options’ menu, you will be asked to make a format selection. You can share your creation in either of the GIF, PNG or MP4 formats.
You may even require a size modification in the created file with respect to specific sharing platforms. You can either select a web compatible resolution to shrink your file, or create a copy of the file to resize the same.
Once you get familiar with Procreate and its GIF creation basics, you have the liberty to explore the huge effects library offered by the software to give your animated GIFs the classy, professional touch. So why wait? Just get the software and start a never ending spree of Procreating GIFs.
Procreate is undoubtedly an excellent tool for creating animated GIFs, but if you are looking for alternatives, another software to rely on is Wondershare Filmora Video Editor GIF creator.
Wondershare Filmora - Best Video Editor for Mac/Windows
5,481,435 people have downloaded it.
Build unique custom animations without breaking a sweat.
Focus on creating epic stories and leave the details to Filmora’s auto features.
Start a creative adventure with drag & drop effects and endless possibilities.
Filmora simplifies advanced features to save you time and effort.
Filmora cuts out repetition so you can move on to your next creative breakthrough.
● Filmora GIF Maker
Launched by Wondershare, this one is something you can blindly count upon for creating stunning animated GIFs from image and video files. Packed with tons of amazing features, Filmora is an inventory of audio-visual effects and filters that never runs out of fresh and appealing choices. Available to you as free and clean GIF generator software, this is easily compatible to almost any smart device. Working with Filmora will certainly make you admit that creating GIFs was never easier.
To start creating GIFs with this awesome tool, here’s what you need to do:
● Step 1: Import Necessary Media Files
Either a funny video or a group of stunning still images, you can choose any suitable media to make GIFs in Filmora. All you need to do is import the desired files from your PC or smartphone to the software’s timeline.
● Step 2: Timeline Dragging
Once you are done with importing the required files, you need to drag and drop the same to the ‘Editor Timeline’ of the GIF maker tool, where can improvise them to your heart’s content.
● Step 3: Time to Edit.
The Filmora effects library is simply heaven for the ones with creative instincts. Getting a liberty to browse and apply a glut of effects and filters, you are at the perfect place to create professionally sound and next level animated GIFs. Try hands on creating classy backgrounds with overlays, crop and trim clips to the perfect shot, make frame and time adjustments, add text to intensify your message, or pick up just anything you like, to create magic with your creativity.
● Step 4: Show it to the World.
When finally satisfied, save your artwork file to your device using the .gif extension and receive compliments from friends and peers by sharing it on your Instagram or other social media handles.
● Key Takeaways from This Episode →
● Animated GIFs are among the latest social media frenzy. These short, moving clips are nothing less than a complete entertainment roll-on. When it comes to creating animated GIFs, you can certainly take the Procreate software as a worthy choice.
● This one is a super easy and exciting means of working on animation GIFs that are by default, captivating for every onlooker. Talking of competing alternatives, you can trust on Wondershare Filmora, a handy, quick and clean solution to animated GIF creation.
Also read:
- New Tactics to Make Transparent Image in Minimal Steps for 2024
- Updated 2024 Approved Ideas for Time-Lapse Video
- Updated Top 10 TEXT TO SPEECH VIDEO MAKERS
- New 2024 Approved Create Your Own Subscribe Channel Graphics
- New How To Create A Green Screen Video In After Effects for 2024
- Top 10 Audio Visualizers Windows, Mac, Android, iPhone & Online for 2024
- Updated How to Make Your CSGO Montage Impressive
- Convert Your Videos to 60 FPS Using These Excellent Tools
- DVD Slideshow Builder Review and Tutorial for 2024
- 2024 Approved How to Make a Smooth Speed Ramping in Premiere Pro?
- Updated In 2024, How to Perfectly Use Canva Color Match?
- 2024 Approved Looking for a Video Editor Where You Can Edit Your Tutorial and Training Videos? Camtasia Is a Great Choice. But Is It the Best Video Editor Available? Find Out From Our Camtasia Review
- In 2024, HOW to Add Fade to Black on Premiere Pro
- Updated How to Make Discord Logo GIF for 2024
- New Guide Adding Audio in Wondershare Filmora for 2024
- Updated Any Video May Be Enhanced Using Adobe Premiere Transitions. If You Are Looking to Learn How to Add Fade to Black in Premiere Pro? Then, Check Out This Fade to Black Transition Premiere Pro Guide to Learn the Trick
- Updated How to Make A Jaw-Dropping Time Lapse Video, In 2024
- Updated Do You Wish to Know How FFmpeg Can Remove Audio From a Video? If Yes, Keep Scrolling This Guide to Remove Audio From Video with FFmpeg and Other Alternative Software
- 2024 Approved Do You Want to Remove the Video Background in Premier Pro Using the Ultra Key but Dont Know About the Whole Process? Please Read Our Complete Step-by-Step Tutorial and Learn From Scratch as a Beginner
- Updated The Ultimate Guide for the 10 Leading Slow-Motion Cameras
- New Blender Is a 3D Animation Software that Can Be Used to Create Stunning 3D Models and Videos
- Detailed Guide to Resize Your Video in VLC
- Looking Forward to Complement Your Weekend Evenings with a Fantasy Tour to the Anime World? Stay Here to Pick the Most Appealing Alternative From the Best and Timeless Anime Creations for 2024
- Here We Will Discuss About Both the Methods Which You Can Choose One to Get Rid of Unwanted Portions From Your Videos or Photos
- Updated In 2024, How to Make GIFs From Videos on Mac
- Ultimate Guide on How to Film Better in Public
- 2024 Approved This Article Presents the Guide to Using Magic Effects for Creating Competent Films with Step-by-Step Instructions and Filmoras Grow and Win Program Contest
- Updated Top 10 Free Spanish Text To Speech Converter Websites
- Updated 2024 Approved Finding The Best Ways To Replace Sky in Lightroom
- New 2024 Approved Best Video Format Converter for PC and Online
- New 2024 Approved As a Designer, Color Is the Most Powerful and the Most Diverse Tool at Your Disposal. Here Are Ten Matching Color Combinations to Get You Started on Your Next Project
- New In 2024, Wondershare Filmora Tutorial | Using The AI Auto Reframe Feature
- New In 2024, How to Loop QuickTime Video
- In 2024, Best 4 Love Video Maker with Music
- New Understanding More About CapCut Lenta Template and Slow-Motion Videos for 2024
- In 2024, Techniques You Never Heard of for Learning AI Marketing YouTube
- Updated Discover Vintage LUTs Premiere Pro Free and Paid Options Available for 2024
- New This Article Is Regarding the Guidance About the Split of the Audio From the Video in Premiere Pro. And Also, the Discussion of the Wondershare Fllmora as the Replacement and How to Perform a Similar Task in It
- New How to Add Subtitles in Canva for 2024
- New 2024 Approved Free Ways to Download Mobile Phone Green Screen Videos and Pictures No Copyright
- Top 9 Xiaomi 13 Ultra Monitoring Apps for Parental Controls | Dr.fone
- Authentication Error Occurred on Motorola G54 5G? Here Are 10 Proven Fixes | Dr.fone
- Samsung Galaxy XCover 6 Pro Tactical Edition Messages Recovery - Recover Deleted Messages from Samsung Galaxy XCover 6 Pro Tactical Edition
- Easy Guide to Samsung Galaxy A15 4G FRP Bypass With Best Methods
- In 2024, How to Change your Samsung Galaxy Z Fold 5 Location on Twitter | Dr.fone
- In 2024, Top 5 Honor Magic5 Ultimate Bypass FRP Tools for PC That Actually Work
- In 2024, How To Track IMEI Number Of Oppo Reno 11 Pro 5G Through Google Earth?
- Edit and Send Fake Location on Telegram For your Realme GT 3 in 3 Ways | Dr.fone
- In 2024, Everything You Need to Know about Lock Screen Settings on your Poco
- Quickly Remove Google FRP Lock on Tecno Pop 7 Pro
- In 2024, Ultimate Guide from Itel A05s FRP Bypass
- In 2024, Locked Out of Apple iPhone 12 Pro Max? 5 Ways to get into a Locked Apple iPhone 12 Pro Max | Dr.fone
- In 2024, Top 15 Augmented Reality Games Like Pokémon GO To Play On Samsung Galaxy A25 5G | Dr.fone
- Title: Powerpoint Supported Video Format and Advanced User Tips
- Author: Chloe
- Created at : 2024-05-20 03:37:30
- Updated at : 2024-05-21 03:37:30
- Link: https://ai-editing-video.techidaily.com/powerpoint-supported-video-format-and-advanced-user-tips/
- License: This work is licensed under CC BY-NC-SA 4.0.
