:max_bytes(150000):strip_icc():format(webp)/GettyImages-962954554-5c338fc146e0fb0001346aec.jpg)
Powerpoint Supported Video Format and User Tips

Powerpoint Supported Video Format and User Tips
It doesn’t matter if you are a student or a working person; you must have made a PowerPoint presentation in your life. It can be a business presentation, educational presentation, or any work-related presentation if you are an employee. The types of presentation may vary, but the way to make a presentation is almost the same.
We are here to share a few tips and tricks to make your presentations unique like, you can add videos, voice-overs, and much more things. Remember one thing; there are certain video formats that PowerPoint supports. The video formats for PowerPoint presentations are discussed below, read ahead, and you’ll know more about them.
In this article
01 Overview of PowerPoint Supported Video Format
02 How to Insert or Embed Video in PowerPoint?
03 How to Turn Your Presentation into A Video with PowerPoint?
04 How to Match Color and Remove Image Background in PowerPoint?
Part 1. Overview of PowerPoint Supported Video Format
The supported video formats for PowerPoint are different for both Windows and macOS. All the supported formats for both types of the operating system are discussed below individually:

Windows
ASF: Advanced System Format (ASF) is a proprietary video and audio container format. It is an extensible file format design.
AVI: AVI is an Audio Video Interleave file. It is a multimedia container format made by Microsoft. It allows synchronous audio with video playback.
MP4, M4V, MOV: MPEG-4 file format is also known as MP4 or M4V. It is a common video file format. In comparison, MOV is developed by Apple Inc. It is the same as MP4 but is made for Apple devices.
MPEG, MPG: It is a famous file format for movies that are distributed over the internet. They use specific compression that makes downloading and steaming easy and fast.
WMV: WMV was introduced by Microsoft, and it stands for Windows Media Video. It is a compressed file container. The format is based on ASF.
macOS
AVI, VFW: AVI stands for Audio Video Interleave, and VFW stands for Video for Windows. Both are multimedia container files. AVI is encoded into VFW.
MP4, MPEG-4: MP4 is a digital video file format. MPEG-4 uses compression, but it is less common than the MP4 extension. MPEG encodes audio tracks.
M4V: It is a video container format developed by Apple Inc. It is similar to MP4. MV4 is used to encode video files in iTunes.
MPG, MPEG, MPE, M75, M15: MPG, MPEG, MPE, M75, and M15 are all the different types of formats developed by the Moving Pictures Expert Group.
M2V: It contains only video data and no other files. It is encoded by using MPEG-2 compression. It is mostly used by DVD authorized applications.
TS: It is a Video Transport Stream file and is used to store MPEG-2 compressed video data. It is used by digital broadcasting systems.
MOV, QT: QT and MOV both were developed by Apple Inc. Both the formats can hold multiple types of multimedia formats (audio, video, and subtitles).
DIF: DIF stands for Data Interchange Format. It is a text-based file format and is used for tabular and spreadsheet data. It is also used to transfer data between spreadsheets.
Part 2. How to Insert or Embed Video in PowerPoint?
PowerPoint is the simplest way to make a presentation. You might impress your boss with a good presentation. Do you ever consider adding videos from your computer across your slides? Have you ever embedded a video in PowerPoint? Allow us to help you out with this. The process to insert or embed a video in PowerPoint is not difficult; you can do this in a few simple steps.
How to Insert a Video in PowerPoint
The video format for PowerPoint differs for different versions. The steps to insert a video in PowerPoint do not deviate much. You can follow the following instructions and insert the video:
Step 1: First, you need to select the slide in which the video is supposed to be inserted. Select the video from the device you are using by heading to the ‘Insert’ tab. There, look for the ‘Video’ option and click on it to select the ‘This Device’ option.

Step 2: After you have located and selected the video, click on ‘Insert.’ Adjust the video settings from the ‘Format’ and ‘Playback’ toolbar according to your needs. You can resize the video, add effects, play full screen, etc.

Step 3: After all the settings are done, you need to preview the slideshow to check if the video is playing according to your desire or not.

How to Embed a Video in PowerPoint
If you are looking to add an online video across PowerPoint, the platform allows you to either embed its code or use its URL for adding it within your slides. To follow this, look into the steps featured below.
Step 1: Access the online video across your browser that you wish to embed in your PowerPoint slides. You can either copy its embed code or simply copy its URL. However, this video can only be from YouTube, SlideShare, Vimeo, Stream, or Flipgrid, as allowed by PowerPoint.

Step 2: Once copied, open your slides, and navigate to the “Insert” panel. Select “Video” from the available options and proceed to click on “Online Videos.”

Step 3: A new window opens up. Paste the copied code or URL across the provided space and tap “Insert” to add the online video across your slides. You can enhance the video across the “Video Format” and “Playback” sections.

Part 3. How to Turn Your Presentation into A Video with PowerPoint?
Inserting videos in PowerPoint presentations is normal; now, it’s time to discover something new. Have you ever thought of making a PowerPoint presentation a video itself? It is interesting! Your superior authority might get impressed and give you a promotion; who knows.
How to save your presentation as a video in PowerPoint? It can be done in a few simple steps. These steps are concisely discussed in the section below; follow to help yourself.
Step 1: You need to save the presentation that you made at first. After saving the original file, you need to click on ‘Export’ from the main menu.

Step 2: From the ‘Export’ menu, click on the ‘Create Video’ option. Select the video quality as per your needs. You can use pre-recorded narrations with the timings. In case no recorded narrations exist, you can record your own.

Step 3: The recorded narration will play over your video. If you don’t want narrations, you can simply skip these settings and move on.

Step 4: Next step is to select how much time a single slide will be shown. Keep in mind the longest slide; select an appropriate time so that all the material in the slides can be read easily.

Step 5: Now, moving towards the final step, click on ‘Create Video.’ This will generate and save the new PowerPoint video on your respective device.

Part 4. How to Match Color and Remove Image Background in PowerPoint?
There are two different things that you can do to make your presentation better. These are distinctive concerning video format for PowerPoint. Removal of background in PowerPoint is discussed, followed by Color Matching.
Remove Image Background
A simple way to remove background in PowerPoint is discussed in the following steps, read them for further assistance:
Step 1: Start by opening the PowerPoint software. Afterward, move to the ‘Insert’ tab and hit the ‘Pictures’ option to insert the image you plan to work with. As you click the photo, the ‘Picture Format’ tab will appear on the taskbar. Select the ‘Remove Background’ option on the left-most side below the taskbar.

Step 2: When you click ‘Remove Background,’ it will give options. Select the ‘Mark Areas to Keep’ option and draw the section that you want to save. You can also select the option ‘Mark Areas to Remove.’ It depends on the type of photo on which the task is being performed.

Step 3: Once all the necessary editing is done, click on the option ‘Keep Changes.’ You can save the image separately by clicking on ‘Save as Picture.’

Match Color in PowerPoint
Eyedropper helps you to match colors in your presentation. This takes a few clicks, and you have done color matching.
Step 1: For this, you need to open PowerPoint and select the image that you want to match the color of its background with the rest of the slide. Navigate to the “Design” panel and select the “Format Background” option.

Step 2: Click on ‘Drawing tool’ from the ribbon. Select the option of ‘Solid Fill’ from the menu bar at the top of the screen. Now, from ‘Solid Fill,’ move the mouse towards the ‘Eyedropper’ option. Tap on the background color that you wish to match within the background.

Step 3: Select the area that you want to change the background to its desired color. Access the option of “Solid Fill” after selecting the appropriate section of the document and select the color from the preview window present in the recent colors.

Closing Words
After reading the above article, you will be able to make incredible PowerPoint presentations. As videos add great information to your presentation so hence, we discussed in detail various video formats for PowerPoint. Now let’s share something new.
Do you know anything about Wondershare Filmora ? The software is a video editor with tons of great features and functionalities. You can create stunning videos with Filmora and its wide list of features. The video editor lets you trim, join, cut, split, and do much more than this. You get so many different effects, transitions, and elements with Filmora.
For Win 7 or later (64-bit)
For macOS 10.12 or later
02 How to Insert or Embed Video in PowerPoint?
03 How to Turn Your Presentation into A Video with PowerPoint?
04 How to Match Color and Remove Image Background in PowerPoint?
Part 1. Overview of PowerPoint Supported Video Format
The supported video formats for PowerPoint are different for both Windows and macOS. All the supported formats for both types of the operating system are discussed below individually:

Windows
ASF: Advanced System Format (ASF) is a proprietary video and audio container format. It is an extensible file format design.
AVI: AVI is an Audio Video Interleave file. It is a multimedia container format made by Microsoft. It allows synchronous audio with video playback.
MP4, M4V, MOV: MPEG-4 file format is also known as MP4 or M4V. It is a common video file format. In comparison, MOV is developed by Apple Inc. It is the same as MP4 but is made for Apple devices.
MPEG, MPG: It is a famous file format for movies that are distributed over the internet. They use specific compression that makes downloading and steaming easy and fast.
WMV: WMV was introduced by Microsoft, and it stands for Windows Media Video. It is a compressed file container. The format is based on ASF.
macOS
AVI, VFW: AVI stands for Audio Video Interleave, and VFW stands for Video for Windows. Both are multimedia container files. AVI is encoded into VFW.
MP4, MPEG-4: MP4 is a digital video file format. MPEG-4 uses compression, but it is less common than the MP4 extension. MPEG encodes audio tracks.
M4V: It is a video container format developed by Apple Inc. It is similar to MP4. MV4 is used to encode video files in iTunes.
MPG, MPEG, MPE, M75, M15: MPG, MPEG, MPE, M75, and M15 are all the different types of formats developed by the Moving Pictures Expert Group.
M2V: It contains only video data and no other files. It is encoded by using MPEG-2 compression. It is mostly used by DVD authorized applications.
TS: It is a Video Transport Stream file and is used to store MPEG-2 compressed video data. It is used by digital broadcasting systems.
MOV, QT: QT and MOV both were developed by Apple Inc. Both the formats can hold multiple types of multimedia formats (audio, video, and subtitles).
DIF: DIF stands for Data Interchange Format. It is a text-based file format and is used for tabular and spreadsheet data. It is also used to transfer data between spreadsheets.
Part 2. How to Insert or Embed Video in PowerPoint?
PowerPoint is the simplest way to make a presentation. You might impress your boss with a good presentation. Do you ever consider adding videos from your computer across your slides? Have you ever embedded a video in PowerPoint? Allow us to help you out with this. The process to insert or embed a video in PowerPoint is not difficult; you can do this in a few simple steps.
How to Insert a Video in PowerPoint
The video format for PowerPoint differs for different versions. The steps to insert a video in PowerPoint do not deviate much. You can follow the following instructions and insert the video:
Step 1: First, you need to select the slide in which the video is supposed to be inserted. Select the video from the device you are using by heading to the ‘Insert’ tab. There, look for the ‘Video’ option and click on it to select the ‘This Device’ option.

Step 2: After you have located and selected the video, click on ‘Insert.’ Adjust the video settings from the ‘Format’ and ‘Playback’ toolbar according to your needs. You can resize the video, add effects, play full screen, etc.

Step 3: After all the settings are done, you need to preview the slideshow to check if the video is playing according to your desire or not.

How to Embed a Video in PowerPoint
If you are looking to add an online video across PowerPoint, the platform allows you to either embed its code or use its URL for adding it within your slides. To follow this, look into the steps featured below.
Step 1: Access the online video across your browser that you wish to embed in your PowerPoint slides. You can either copy its embed code or simply copy its URL. However, this video can only be from YouTube, SlideShare, Vimeo, Stream, or Flipgrid, as allowed by PowerPoint.

Step 2: Once copied, open your slides, and navigate to the “Insert” panel. Select “Video” from the available options and proceed to click on “Online Videos.”

Step 3: A new window opens up. Paste the copied code or URL across the provided space and tap “Insert” to add the online video across your slides. You can enhance the video across the “Video Format” and “Playback” sections.

Part 3. How to Turn Your Presentation into A Video with PowerPoint?
Inserting videos in PowerPoint presentations is normal; now, it’s time to discover something new. Have you ever thought of making a PowerPoint presentation a video itself? It is interesting! Your superior authority might get impressed and give you a promotion; who knows.
How to save your presentation as a video in PowerPoint? It can be done in a few simple steps. These steps are concisely discussed in the section below; follow to help yourself.
Step 1: You need to save the presentation that you made at first. After saving the original file, you need to click on ‘Export’ from the main menu.

Step 2: From the ‘Export’ menu, click on the ‘Create Video’ option. Select the video quality as per your needs. You can use pre-recorded narrations with the timings. In case no recorded narrations exist, you can record your own.

Step 3: The recorded narration will play over your video. If you don’t want narrations, you can simply skip these settings and move on.

Step 4: Next step is to select how much time a single slide will be shown. Keep in mind the longest slide; select an appropriate time so that all the material in the slides can be read easily.

Step 5: Now, moving towards the final step, click on ‘Create Video.’ This will generate and save the new PowerPoint video on your respective device.

Part 4. How to Match Color and Remove Image Background in PowerPoint?
There are two different things that you can do to make your presentation better. These are distinctive concerning video format for PowerPoint. Removal of background in PowerPoint is discussed, followed by Color Matching.
Remove Image Background
A simple way to remove background in PowerPoint is discussed in the following steps, read them for further assistance:
Step 1: Start by opening the PowerPoint software. Afterward, move to the ‘Insert’ tab and hit the ‘Pictures’ option to insert the image you plan to work with. As you click the photo, the ‘Picture Format’ tab will appear on the taskbar. Select the ‘Remove Background’ option on the left-most side below the taskbar.

Step 2: When you click ‘Remove Background,’ it will give options. Select the ‘Mark Areas to Keep’ option and draw the section that you want to save. You can also select the option ‘Mark Areas to Remove.’ It depends on the type of photo on which the task is being performed.

Step 3: Once all the necessary editing is done, click on the option ‘Keep Changes.’ You can save the image separately by clicking on ‘Save as Picture.’

Match Color in PowerPoint
Eyedropper helps you to match colors in your presentation. This takes a few clicks, and you have done color matching.
Step 1: For this, you need to open PowerPoint and select the image that you want to match the color of its background with the rest of the slide. Navigate to the “Design” panel and select the “Format Background” option.

Step 2: Click on ‘Drawing tool’ from the ribbon. Select the option of ‘Solid Fill’ from the menu bar at the top of the screen. Now, from ‘Solid Fill,’ move the mouse towards the ‘Eyedropper’ option. Tap on the background color that you wish to match within the background.

Step 3: Select the area that you want to change the background to its desired color. Access the option of “Solid Fill” after selecting the appropriate section of the document and select the color from the preview window present in the recent colors.

Closing Words
After reading the above article, you will be able to make incredible PowerPoint presentations. As videos add great information to your presentation so hence, we discussed in detail various video formats for PowerPoint. Now let’s share something new.
Do you know anything about Wondershare Filmora ? The software is a video editor with tons of great features and functionalities. You can create stunning videos with Filmora and its wide list of features. The video editor lets you trim, join, cut, split, and do much more than this. You get so many different effects, transitions, and elements with Filmora.
For Win 7 or later (64-bit)
For macOS 10.12 or later
02 How to Insert or Embed Video in PowerPoint?
03 How to Turn Your Presentation into A Video with PowerPoint?
04 How to Match Color and Remove Image Background in PowerPoint?
Part 1. Overview of PowerPoint Supported Video Format
The supported video formats for PowerPoint are different for both Windows and macOS. All the supported formats for both types of the operating system are discussed below individually:

Windows
ASF: Advanced System Format (ASF) is a proprietary video and audio container format. It is an extensible file format design.
AVI: AVI is an Audio Video Interleave file. It is a multimedia container format made by Microsoft. It allows synchronous audio with video playback.
MP4, M4V, MOV: MPEG-4 file format is also known as MP4 or M4V. It is a common video file format. In comparison, MOV is developed by Apple Inc. It is the same as MP4 but is made for Apple devices.
MPEG, MPG: It is a famous file format for movies that are distributed over the internet. They use specific compression that makes downloading and steaming easy and fast.
WMV: WMV was introduced by Microsoft, and it stands for Windows Media Video. It is a compressed file container. The format is based on ASF.
macOS
AVI, VFW: AVI stands for Audio Video Interleave, and VFW stands for Video for Windows. Both are multimedia container files. AVI is encoded into VFW.
MP4, MPEG-4: MP4 is a digital video file format. MPEG-4 uses compression, but it is less common than the MP4 extension. MPEG encodes audio tracks.
M4V: It is a video container format developed by Apple Inc. It is similar to MP4. MV4 is used to encode video files in iTunes.
MPG, MPEG, MPE, M75, M15: MPG, MPEG, MPE, M75, and M15 are all the different types of formats developed by the Moving Pictures Expert Group.
M2V: It contains only video data and no other files. It is encoded by using MPEG-2 compression. It is mostly used by DVD authorized applications.
TS: It is a Video Transport Stream file and is used to store MPEG-2 compressed video data. It is used by digital broadcasting systems.
MOV, QT: QT and MOV both were developed by Apple Inc. Both the formats can hold multiple types of multimedia formats (audio, video, and subtitles).
DIF: DIF stands for Data Interchange Format. It is a text-based file format and is used for tabular and spreadsheet data. It is also used to transfer data between spreadsheets.
Part 2. How to Insert or Embed Video in PowerPoint?
PowerPoint is the simplest way to make a presentation. You might impress your boss with a good presentation. Do you ever consider adding videos from your computer across your slides? Have you ever embedded a video in PowerPoint? Allow us to help you out with this. The process to insert or embed a video in PowerPoint is not difficult; you can do this in a few simple steps.
How to Insert a Video in PowerPoint
The video format for PowerPoint differs for different versions. The steps to insert a video in PowerPoint do not deviate much. You can follow the following instructions and insert the video:
Step 1: First, you need to select the slide in which the video is supposed to be inserted. Select the video from the device you are using by heading to the ‘Insert’ tab. There, look for the ‘Video’ option and click on it to select the ‘This Device’ option.

Step 2: After you have located and selected the video, click on ‘Insert.’ Adjust the video settings from the ‘Format’ and ‘Playback’ toolbar according to your needs. You can resize the video, add effects, play full screen, etc.

Step 3: After all the settings are done, you need to preview the slideshow to check if the video is playing according to your desire or not.

How to Embed a Video in PowerPoint
If you are looking to add an online video across PowerPoint, the platform allows you to either embed its code or use its URL for adding it within your slides. To follow this, look into the steps featured below.
Step 1: Access the online video across your browser that you wish to embed in your PowerPoint slides. You can either copy its embed code or simply copy its URL. However, this video can only be from YouTube, SlideShare, Vimeo, Stream, or Flipgrid, as allowed by PowerPoint.

Step 2: Once copied, open your slides, and navigate to the “Insert” panel. Select “Video” from the available options and proceed to click on “Online Videos.”

Step 3: A new window opens up. Paste the copied code or URL across the provided space and tap “Insert” to add the online video across your slides. You can enhance the video across the “Video Format” and “Playback” sections.

Part 3. How to Turn Your Presentation into A Video with PowerPoint?
Inserting videos in PowerPoint presentations is normal; now, it’s time to discover something new. Have you ever thought of making a PowerPoint presentation a video itself? It is interesting! Your superior authority might get impressed and give you a promotion; who knows.
How to save your presentation as a video in PowerPoint? It can be done in a few simple steps. These steps are concisely discussed in the section below; follow to help yourself.
Step 1: You need to save the presentation that you made at first. After saving the original file, you need to click on ‘Export’ from the main menu.

Step 2: From the ‘Export’ menu, click on the ‘Create Video’ option. Select the video quality as per your needs. You can use pre-recorded narrations with the timings. In case no recorded narrations exist, you can record your own.

Step 3: The recorded narration will play over your video. If you don’t want narrations, you can simply skip these settings and move on.

Step 4: Next step is to select how much time a single slide will be shown. Keep in mind the longest slide; select an appropriate time so that all the material in the slides can be read easily.

Step 5: Now, moving towards the final step, click on ‘Create Video.’ This will generate and save the new PowerPoint video on your respective device.

Part 4. How to Match Color and Remove Image Background in PowerPoint?
There are two different things that you can do to make your presentation better. These are distinctive concerning video format for PowerPoint. Removal of background in PowerPoint is discussed, followed by Color Matching.
Remove Image Background
A simple way to remove background in PowerPoint is discussed in the following steps, read them for further assistance:
Step 1: Start by opening the PowerPoint software. Afterward, move to the ‘Insert’ tab and hit the ‘Pictures’ option to insert the image you plan to work with. As you click the photo, the ‘Picture Format’ tab will appear on the taskbar. Select the ‘Remove Background’ option on the left-most side below the taskbar.

Step 2: When you click ‘Remove Background,’ it will give options. Select the ‘Mark Areas to Keep’ option and draw the section that you want to save. You can also select the option ‘Mark Areas to Remove.’ It depends on the type of photo on which the task is being performed.

Step 3: Once all the necessary editing is done, click on the option ‘Keep Changes.’ You can save the image separately by clicking on ‘Save as Picture.’

Match Color in PowerPoint
Eyedropper helps you to match colors in your presentation. This takes a few clicks, and you have done color matching.
Step 1: For this, you need to open PowerPoint and select the image that you want to match the color of its background with the rest of the slide. Navigate to the “Design” panel and select the “Format Background” option.

Step 2: Click on ‘Drawing tool’ from the ribbon. Select the option of ‘Solid Fill’ from the menu bar at the top of the screen. Now, from ‘Solid Fill,’ move the mouse towards the ‘Eyedropper’ option. Tap on the background color that you wish to match within the background.

Step 3: Select the area that you want to change the background to its desired color. Access the option of “Solid Fill” after selecting the appropriate section of the document and select the color from the preview window present in the recent colors.

Closing Words
After reading the above article, you will be able to make incredible PowerPoint presentations. As videos add great information to your presentation so hence, we discussed in detail various video formats for PowerPoint. Now let’s share something new.
Do you know anything about Wondershare Filmora ? The software is a video editor with tons of great features and functionalities. You can create stunning videos with Filmora and its wide list of features. The video editor lets you trim, join, cut, split, and do much more than this. You get so many different effects, transitions, and elements with Filmora.
For Win 7 or later (64-bit)
For macOS 10.12 or later
02 How to Insert or Embed Video in PowerPoint?
03 How to Turn Your Presentation into A Video with PowerPoint?
04 How to Match Color and Remove Image Background in PowerPoint?
Part 1. Overview of PowerPoint Supported Video Format
The supported video formats for PowerPoint are different for both Windows and macOS. All the supported formats for both types of the operating system are discussed below individually:

Windows
ASF: Advanced System Format (ASF) is a proprietary video and audio container format. It is an extensible file format design.
AVI: AVI is an Audio Video Interleave file. It is a multimedia container format made by Microsoft. It allows synchronous audio with video playback.
MP4, M4V, MOV: MPEG-4 file format is also known as MP4 or M4V. It is a common video file format. In comparison, MOV is developed by Apple Inc. It is the same as MP4 but is made for Apple devices.
MPEG, MPG: It is a famous file format for movies that are distributed over the internet. They use specific compression that makes downloading and steaming easy and fast.
WMV: WMV was introduced by Microsoft, and it stands for Windows Media Video. It is a compressed file container. The format is based on ASF.
macOS
AVI, VFW: AVI stands for Audio Video Interleave, and VFW stands for Video for Windows. Both are multimedia container files. AVI is encoded into VFW.
MP4, MPEG-4: MP4 is a digital video file format. MPEG-4 uses compression, but it is less common than the MP4 extension. MPEG encodes audio tracks.
M4V: It is a video container format developed by Apple Inc. It is similar to MP4. MV4 is used to encode video files in iTunes.
MPG, MPEG, MPE, M75, M15: MPG, MPEG, MPE, M75, and M15 are all the different types of formats developed by the Moving Pictures Expert Group.
M2V: It contains only video data and no other files. It is encoded by using MPEG-2 compression. It is mostly used by DVD authorized applications.
TS: It is a Video Transport Stream file and is used to store MPEG-2 compressed video data. It is used by digital broadcasting systems.
MOV, QT: QT and MOV both were developed by Apple Inc. Both the formats can hold multiple types of multimedia formats (audio, video, and subtitles).
DIF: DIF stands for Data Interchange Format. It is a text-based file format and is used for tabular and spreadsheet data. It is also used to transfer data between spreadsheets.
Part 2. How to Insert or Embed Video in PowerPoint?
PowerPoint is the simplest way to make a presentation. You might impress your boss with a good presentation. Do you ever consider adding videos from your computer across your slides? Have you ever embedded a video in PowerPoint? Allow us to help you out with this. The process to insert or embed a video in PowerPoint is not difficult; you can do this in a few simple steps.
How to Insert a Video in PowerPoint
The video format for PowerPoint differs for different versions. The steps to insert a video in PowerPoint do not deviate much. You can follow the following instructions and insert the video:
Step 1: First, you need to select the slide in which the video is supposed to be inserted. Select the video from the device you are using by heading to the ‘Insert’ tab. There, look for the ‘Video’ option and click on it to select the ‘This Device’ option.

Step 2: After you have located and selected the video, click on ‘Insert.’ Adjust the video settings from the ‘Format’ and ‘Playback’ toolbar according to your needs. You can resize the video, add effects, play full screen, etc.

Step 3: After all the settings are done, you need to preview the slideshow to check if the video is playing according to your desire or not.

How to Embed a Video in PowerPoint
If you are looking to add an online video across PowerPoint, the platform allows you to either embed its code or use its URL for adding it within your slides. To follow this, look into the steps featured below.
Step 1: Access the online video across your browser that you wish to embed in your PowerPoint slides. You can either copy its embed code or simply copy its URL. However, this video can only be from YouTube, SlideShare, Vimeo, Stream, or Flipgrid, as allowed by PowerPoint.

Step 2: Once copied, open your slides, and navigate to the “Insert” panel. Select “Video” from the available options and proceed to click on “Online Videos.”

Step 3: A new window opens up. Paste the copied code or URL across the provided space and tap “Insert” to add the online video across your slides. You can enhance the video across the “Video Format” and “Playback” sections.

Part 3. How to Turn Your Presentation into A Video with PowerPoint?
Inserting videos in PowerPoint presentations is normal; now, it’s time to discover something new. Have you ever thought of making a PowerPoint presentation a video itself? It is interesting! Your superior authority might get impressed and give you a promotion; who knows.
How to save your presentation as a video in PowerPoint? It can be done in a few simple steps. These steps are concisely discussed in the section below; follow to help yourself.
Step 1: You need to save the presentation that you made at first. After saving the original file, you need to click on ‘Export’ from the main menu.

Step 2: From the ‘Export’ menu, click on the ‘Create Video’ option. Select the video quality as per your needs. You can use pre-recorded narrations with the timings. In case no recorded narrations exist, you can record your own.

Step 3: The recorded narration will play over your video. If you don’t want narrations, you can simply skip these settings and move on.

Step 4: Next step is to select how much time a single slide will be shown. Keep in mind the longest slide; select an appropriate time so that all the material in the slides can be read easily.

Step 5: Now, moving towards the final step, click on ‘Create Video.’ This will generate and save the new PowerPoint video on your respective device.

Part 4. How to Match Color and Remove Image Background in PowerPoint?
There are two different things that you can do to make your presentation better. These are distinctive concerning video format for PowerPoint. Removal of background in PowerPoint is discussed, followed by Color Matching.
Remove Image Background
A simple way to remove background in PowerPoint is discussed in the following steps, read them for further assistance:
Step 1: Start by opening the PowerPoint software. Afterward, move to the ‘Insert’ tab and hit the ‘Pictures’ option to insert the image you plan to work with. As you click the photo, the ‘Picture Format’ tab will appear on the taskbar. Select the ‘Remove Background’ option on the left-most side below the taskbar.

Step 2: When you click ‘Remove Background,’ it will give options. Select the ‘Mark Areas to Keep’ option and draw the section that you want to save. You can also select the option ‘Mark Areas to Remove.’ It depends on the type of photo on which the task is being performed.

Step 3: Once all the necessary editing is done, click on the option ‘Keep Changes.’ You can save the image separately by clicking on ‘Save as Picture.’

Match Color in PowerPoint
Eyedropper helps you to match colors in your presentation. This takes a few clicks, and you have done color matching.
Step 1: For this, you need to open PowerPoint and select the image that you want to match the color of its background with the rest of the slide. Navigate to the “Design” panel and select the “Format Background” option.

Step 2: Click on ‘Drawing tool’ from the ribbon. Select the option of ‘Solid Fill’ from the menu bar at the top of the screen. Now, from ‘Solid Fill,’ move the mouse towards the ‘Eyedropper’ option. Tap on the background color that you wish to match within the background.

Step 3: Select the area that you want to change the background to its desired color. Access the option of “Solid Fill” after selecting the appropriate section of the document and select the color from the preview window present in the recent colors.

Closing Words
After reading the above article, you will be able to make incredible PowerPoint presentations. As videos add great information to your presentation so hence, we discussed in detail various video formats for PowerPoint. Now let’s share something new.
Do you know anything about Wondershare Filmora ? The software is a video editor with tons of great features and functionalities. You can create stunning videos with Filmora and its wide list of features. The video editor lets you trim, join, cut, split, and do much more than this. You get so many different effects, transitions, and elements with Filmora.
For Win 7 or later (64-bit)
For macOS 10.12 or later
Best Ways to Convert Video Frame Rate to 60FPS [Software and Online Choices]
One of the primary things that differentiate a good video from a low-quality one is its frame rate or burst rate. This refers to the frequency of a series of images or frames consecutively appearing during display. A low frame rate per second or FPS causes issues in most display screens, so you will need a 60 FPS video converter to update it.
You need to convert or make video 60FPS online through tools and software to improve the sharpness of frame speed and make it suitable for streaming sites like YouTube that play 60FPS only or create UHD/4K videos. Plus, most high-definition screens for gaming, computers, tablets, and smartphones require high FPS.
This article will teach you the best solutions to make the conversion possible. Choose your option after a full evaluation.
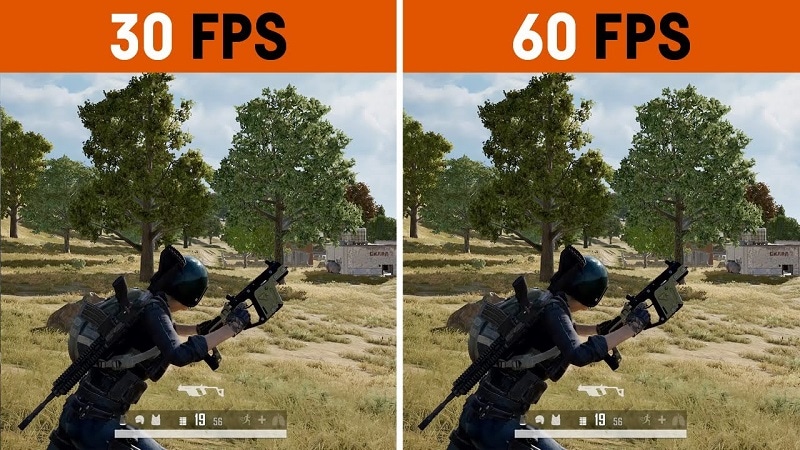
Part I. What does 60 FPS mean?
Before discussing the best tools available for frame rate conversion, you should know what frame rate is. Also known as update rate, this signifies the frequency of the display of consecutive series of frames or images. The speed of how they appear determines the fluid play of the video with no interruption or lag.
In the context of video and film cameras, motion capture systems, and computer graphics, you should try to convert video to 60FPS. There are multiple types available, like the low 24FPS or 30FPS or the higher 60FPS or 120FPS. 60FPS is the most accepted option for diverse operating systems, screens, and graphics.
Differences between 24FPS, 30FPS, and 60FPS
Here are the differences you will note between the three common frame rates per second in videos. For a simple overview, these differences are expressed in tabular form.
| 24FPS | 30FPS | 60FPS | |
|---|---|---|---|
| Description | This universally acceptable frame rate choice is used for transferring video signals to film. | 30FPS is a slightly higher frame rate choice for animations and show videos that are suitable for television viewing and online platforms. | Videos at 60FPS have better fluency and smoother definition, with sharp videos that work during gaming, high-definition streaming, and UHD/4K video editing. |
| Types of videos | Older videos and films. | Online videos, TV shows, and news. | HD-quality movies, online videos, and games. |
| Users | Movie suppliers | Entertainment and Media professionals. | Movie producers, video editors, gaming software developers, etc. |
Why Should You Convert Videos into 60FPS?
In the context of video FPS, the three variations- 30FPS, 60FPS, and 24FPS are the most common. However, there are specific reasons why 60FPS is the best option you should use, and take the time to convert your files with this frame rate.
- Playing 24FPS or 30FPS videos on LCD screens have more prominent motion blur, the sharpness of transition is low and rough, etc.
- Well-known streaming sites like YouTube set their standard for videos at 60FPS. If you use a file with a higher FPS, it will compress to 60FPS automatically. Anything lower than that is unacceptable since it creates a laggy video transition.
- Creating high-quality movies in UHD or 4K resolution requires a high FPS like 60FPS. Movies shot with 24FPS do not assure the best display in the native frame rate and need pulldown conversion. This causes judder, which affects video quality. Converting the video to 60fps ai online is a better choice.
- Modern devices like computers, smartphones, and tablets have a high refresh rate. So, these, including some gaming monitors and television varieties, accept videos with 60FPS best.
- In animation, most creators run 3-4 images per drawing, which means 6 or 8 drawings per second. For the best transition between shorts and images, converting the animation videos to 60FPS is useful.
If you want to know more about these FPS options and which one to select for long-term usage, read through the comprehensive review .
Part II. How to convert A Video to 60fps?
If you plan to use a 60fps video converter, luckily, multiple capable choices are available in the market. Here, we present the top options you can use with an accurate conversion that occurs quickly and with limited errors.
1. Best Software Converters
The following are the best software-based platforms that you can try out.
One notable ai 60fps converter that users find extremely useful all around for optimized video editing is Wondershare UniConverter. The tool comes with varying AI-powered tools you can try to change.
With this software, you can easily make changes to the file during the conversion, like upgrading the FPS and bitrate of various video codecs, adjusting the contrast, contrast, etc., for output. Plus, it is possible to change the speed of the videos you are editing through the Editing timeline, between 0.25X - 3X speed options.

- User Base: Professional video editors, social media vloggers, businesses, students, beginner-level users, etc.
Watch this video to get a visual representation of how the tool works for FPS conversion and other editing functions.
How to use Wondershare UniConverter for converting FPS?
Step1 Download and launch the Wondershare UniConverter software on your device after completing all installation steps.
Step2 Click or drag and drop the video file of which you will change the frame rate.
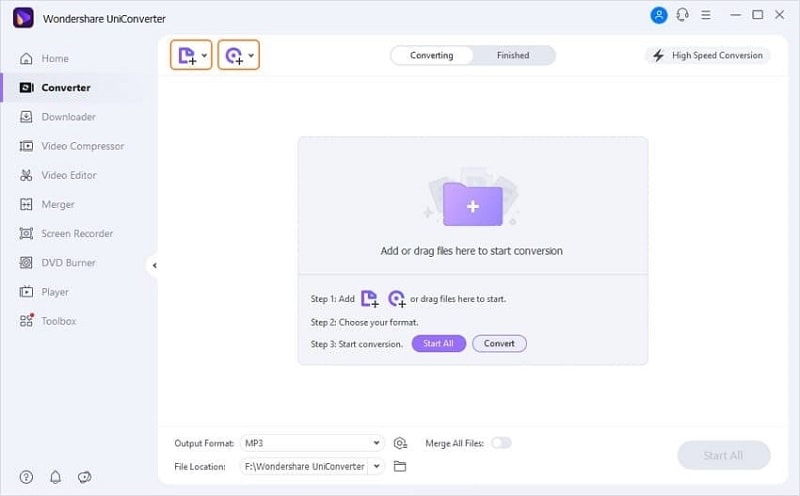
Step3 To make changes to the video, click the Edit button and do them- like speed change, cutting sections, etc.
Step4 Then press the Settings button. Choose the Video option and then select the format like MP4.
Step5 Tap the setting icon beside the format choice and set the frame rate option as 60FPS. Then, press the Create button.
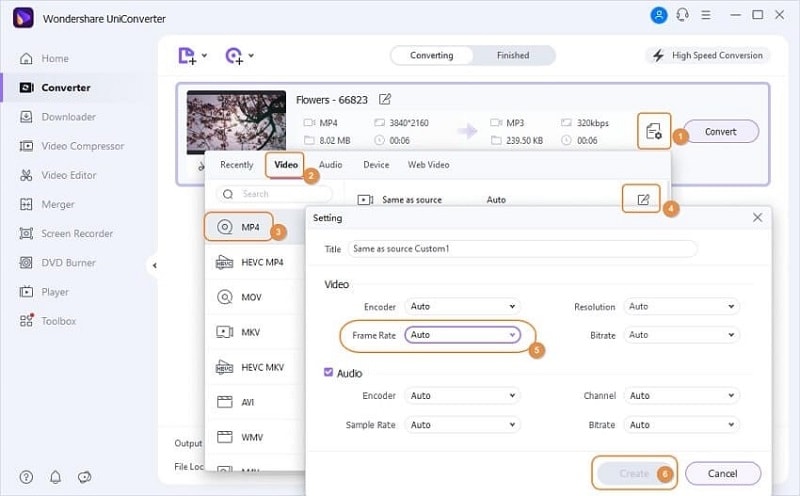
Step6 To convert the file further, click the Convert button and choose the destination file format. Press Convert.
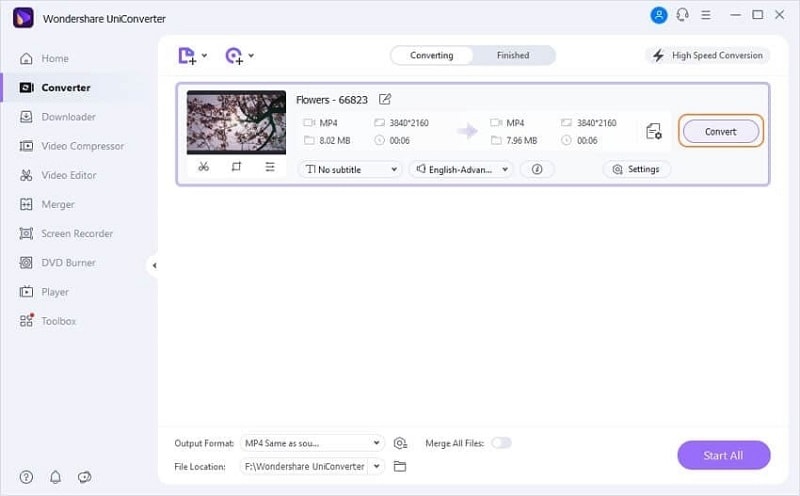
Features:
- Convert between different file formats.
- Edit or split the files.
- Change the speed of the video between various speed modes.
- Download files at high resolution as per customization.
Pros
- Easy to use for non-technical users.
- The free software includes most of the conversion functions.
- Zero quality loss or lagging FPS playthrough in the converted file.
Cons
- GPU acceleration and High-Speed Conversion are available for Pro users only.
- You can resize the file for social media platforms like YouTube once using the Free Trial version.
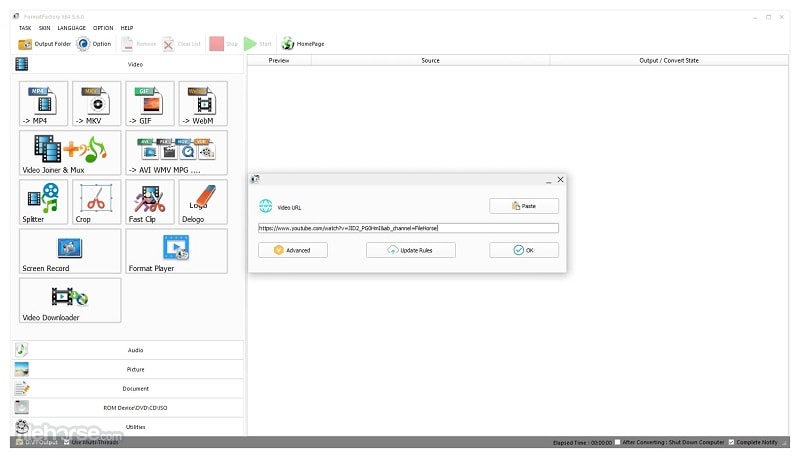
Another FPS video maker and converter tool that you must try is Format Factory. This professional-quality video and audio converter tool are useful for various levels of video editing, including specifications like the frame rate per second.
You can clip and join your video section and do audio mixing steps. Easily adjust your video frame speed to ensure top-grade video playback with limited to no resolution loss. You can easily set the frame rate to 60FPS after downloading YouTube videos and making adjustments.
Pros
- Compress file size with settings changes for frame rate.
- Supports different video formats.
- Compatible with HEIC and WEBP formats for conversion.
Cons
- Only suitable for Windows users.
- Slightly complex to try for beginner-level users.
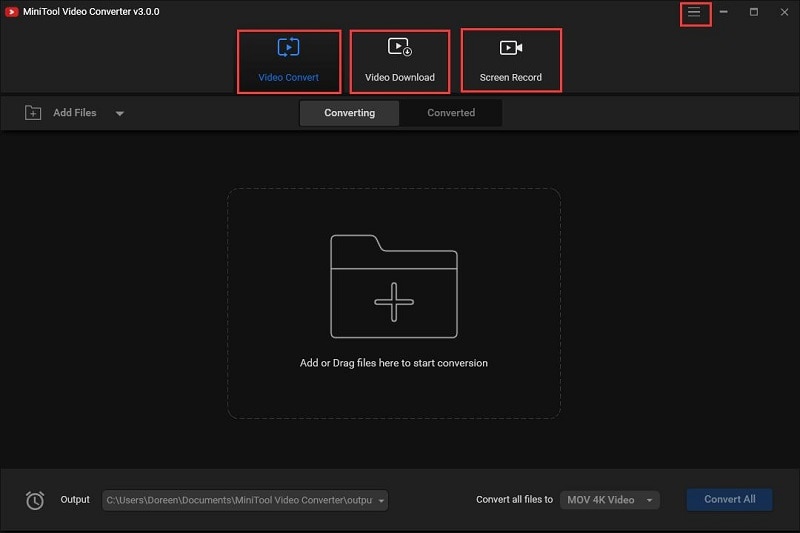
One of the best 60fps video editor options available in the market is MiniTool Video Converter. This Windows-based native software can make multiple advanced changes to your video file during conversion. Not to mention, it supports quick batch processing, with zero drop in quality after the process.
You can easily change the frame rate speed to 60FPS or other speed options during the exporting process. Adding effects will maintain a strong frame rate frequency that you can also preview.
Pros
- Supports a variety of video formats for conversion.
- Batch conversion is supported here.
- No loss of quality when you change the frame rate or bitrate.
Cons
- The process will lag if there is not at least 1 GB of free storage space in your device.
- Only works on Windows devices.
2. Best Online Converters
If you want to use a 60fps video converter online, there are tools available for that as well. These converters come with limited advanced mechanisms or features. However, in terms of changing the FPS of videos, web-based tools are easier to operate and do straightforward tasks.
Plus, you will not need to register or download third-party software here- the tools are accessible through any browser or device.
1) AI Video Frame Rate Converter
One of the best tools for online video frame rate conversion is the AI Video Frame Rate Converter. With this online tool, you can easily insert your file into the tool you access on any browser of your choice.
Then, choose the conversion FPS like 60FPS for your video and get high-resolution video quality in the final file. The software does not keep the file on the server, which assures good privacy protection for users with their files and data.

Pros
- No need to install the software.
- Easily choose the FPS option to convert the file.
- The quick conversion process.
Cons
- The free version only allows 5 credits for users to try.
- No tools to enhance video quality with the free tool.
2) Video2Edit
Another top 60fps converter online that users should give a chance is Video2Edit. This tool is accessible through any web browser and allows one to change various aspects of the video they are converting, including the frame rate.
You can choose 60FPS as the target frame rate choice for the video that you add to your device’s tool. It also supports 120FPS and other options lower than 60FPS- the final converter file is still a high definition.

Pros
- Choose the frame rate per second for your video.
- Make settings changes for your video audio additionally.
- The tool is easily accessible and free to use.
Cons
- You have to take more steps for customization instead of directly getting the FPS changing option.
- Cannot convert multiple files simultaneously.
3) Aconvert
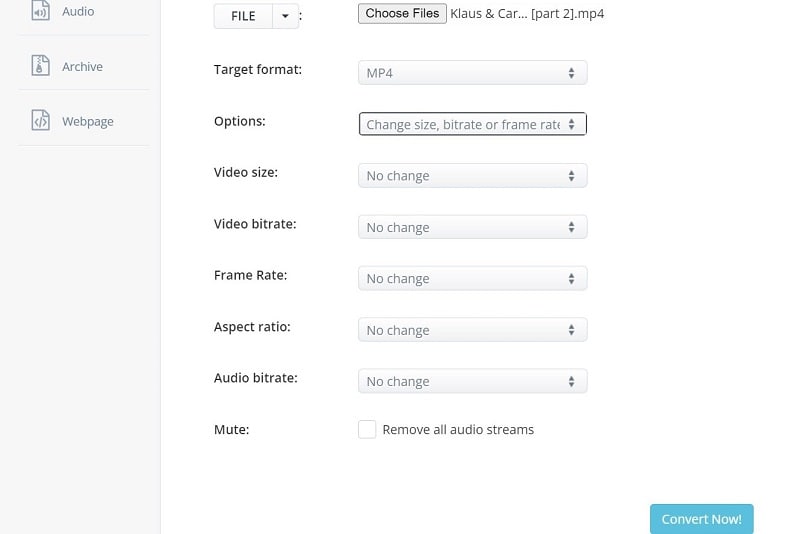
Users can try out this online video to 60fps converter to change elements of videos quickly during conversion. You can insert your file from a cloud account, device, or URL and choose the video format to convert.
Plus, it is much easier to directly set the frame rate you want to change in the video. This tool supports up to 60FPS for the change, and you can choose a custom FPS if necessary.
Pros
- Can convert video codec settings like bitrate, etc., for different file formats.
- Easily add a file from the device, URL, or cloud.
- Quick processing speed for the conversion.
Cons
- No batch conversion for multiple files.
- Big files can get slow to convert.
Bonus Tip. Use Wondershare Filmora to Create High-Quality Videos with 60FPS Support
If you plan to make further edits to your video clips and directly create a project with 60FPS support, using a capable 60fps maker software is necessary. Wondershare Filmora is suitable software for video editing professionals and regular users to try to make videos easily.
Free Download For Win 7 or later(64-bit)
Free Download For macOS 10.14 or later
You can use the different features available for quick and customized video projects. Here, you can try the Instant Mode feature for instantaneous video edits or directly try out the editor timeline with diverse features like Edit icon or Speed Ramping to make changes. As for adjusting the frame rate, you can make those changes during export.
Watch this video to know how to use Filmora for further video editing.
How to Change Frame Rate to 60FPS in Filmora?
Step1 After you have completed all of the edits, click on the Export button in the editor timeline of Filmora.
Step2 Choose the output format you will download the video file, e.g., MP4, from the Local tab.
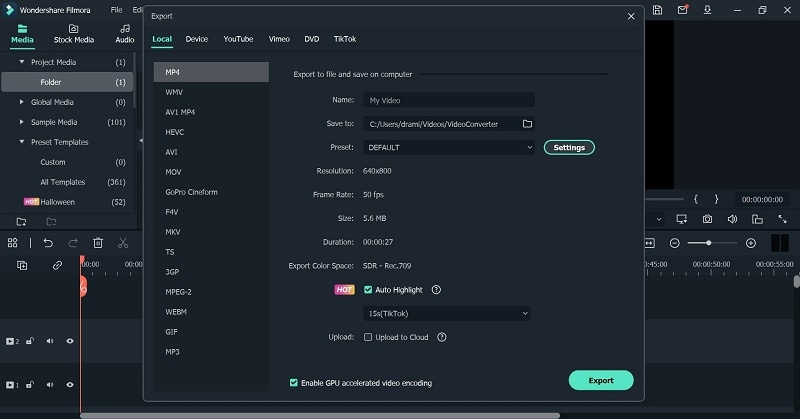
Step3 Click on the Settings button. Adjust the specification of the video, like frame rate, and change to 60FPS. Make other changes if needed, and press OK.
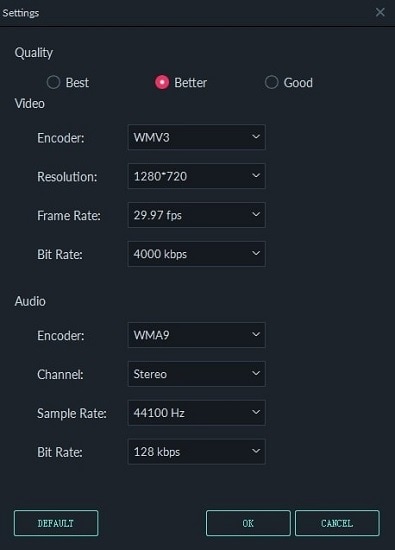
Step4 Click on Export to download the file or directly upload it via Vimeo or YouTube through those tabs.
Conclusion
Indeed, adjusting the frame rate of your video will help you create high-quality videos with a fluid and lag-less transition. You should convert your file to 60FPS if it is a lower version at the time to improve sharpness and make it compatible with most screen types, 4K movie playing, and streaming.
Use the available online and native software options to make these changes quickly and efficiently. Additionally, if you want to create a file directly at 60FPS, you can do so using Filmora.
Give these tools a try first to get a better experience with the features and process.
Why Should You Convert Videos into 60FPS?
In the context of video FPS, the three variations- 30FPS, 60FPS, and 24FPS are the most common. However, there are specific reasons why 60FPS is the best option you should use, and take the time to convert your files with this frame rate.
- Playing 24FPS or 30FPS videos on LCD screens have more prominent motion blur, the sharpness of transition is low and rough, etc.
- Well-known streaming sites like YouTube set their standard for videos at 60FPS. If you use a file with a higher FPS, it will compress to 60FPS automatically. Anything lower than that is unacceptable since it creates a laggy video transition.
- Creating high-quality movies in UHD or 4K resolution requires a high FPS like 60FPS. Movies shot with 24FPS do not assure the best display in the native frame rate and need pulldown conversion. This causes judder, which affects video quality. Converting the video to 60fps ai online is a better choice.
- Modern devices like computers, smartphones, and tablets have a high refresh rate. So, these, including some gaming monitors and television varieties, accept videos with 60FPS best.
- In animation, most creators run 3-4 images per drawing, which means 6 or 8 drawings per second. For the best transition between shorts and images, converting the animation videos to 60FPS is useful.
If you want to know more about these FPS options and which one to select for long-term usage, read through the comprehensive review .
Part II. How to convert A Video to 60fps?
If you plan to use a 60fps video converter, luckily, multiple capable choices are available in the market. Here, we present the top options you can use with an accurate conversion that occurs quickly and with limited errors.
1. Best Software Converters
The following are the best software-based platforms that you can try out.
One notable ai 60fps converter that users find extremely useful all around for optimized video editing is Wondershare UniConverter. The tool comes with varying AI-powered tools you can try to change.
With this software, you can easily make changes to the file during the conversion, like upgrading the FPS and bitrate of various video codecs, adjusting the contrast, contrast, etc., for output. Plus, it is possible to change the speed of the videos you are editing through the Editing timeline, between 0.25X - 3X speed options.

- User Base: Professional video editors, social media vloggers, businesses, students, beginner-level users, etc.
Watch this video to get a visual representation of how the tool works for FPS conversion and other editing functions.
How to use Wondershare UniConverter for converting FPS?
Step1 Download and launch the Wondershare UniConverter software on your device after completing all installation steps.
Step2 Click or drag and drop the video file of which you will change the frame rate.

Step3 To make changes to the video, click the Edit button and do them- like speed change, cutting sections, etc.
Step4 Then press the Settings button. Choose the Video option and then select the format like MP4.
Step5 Tap the setting icon beside the format choice and set the frame rate option as 60FPS. Then, press the Create button.

Step6 To convert the file further, click the Convert button and choose the destination file format. Press Convert.

Features:
- Convert between different file formats.
- Edit or split the files.
- Change the speed of the video between various speed modes.
- Download files at high resolution as per customization.
Pros
- Easy to use for non-technical users.
- The free software includes most of the conversion functions.
- Zero quality loss or lagging FPS playthrough in the converted file.
Cons
- GPU acceleration and High-Speed Conversion are available for Pro users only.
- You can resize the file for social media platforms like YouTube once using the Free Trial version.
Another FPS video maker and converter tool that you must try is Format Factory. This professional-quality video and audio converter tool are useful for various levels of video editing, including specifications like the frame rate per second.
You can clip and join your video section and do audio mixing steps. Easily adjust your video frame speed to ensure top-grade video playback with limited to no resolution loss. You can easily set the frame rate to 60FPS after downloading YouTube videos and making adjustments.

Pros
- Compress file size with settings changes for frame rate.
- Supports different video formats.
- Compatible with HEIC and WEBP formats for conversion.
Cons
- Only suitable for Windows users.
- Slightly complex to try for beginner-level users.
One of the best 60fps video editor options available in the market is MiniTool Video Converter. This Windows-based native software can make multiple advanced changes to your video file during conversion. Not to mention, it supports quick batch processing, with zero drop in quality after the process.
You can easily change the frame rate speed to 60FPS or other speed options during the exporting process. Adding effects will maintain a strong frame rate frequency that you can also preview.

Pros
- Supports a variety of video formats for conversion.
- Batch conversion is supported here.
- No loss of quality when you change the frame rate or bitrate.
Cons
- The process will lag if there is not at least 1 GB of free storage space in your device.
- Only works on Windows devices.
2. Best Online Converters
If you want to use a 60fps video converter online, there are tools available for that as well. These converters come with limited advanced mechanisms or features. However, in terms of changing the FPS of videos, web-based tools are easier to operate and do straightforward tasks.
Plus, you will not need to register or download third-party software here- the tools are accessible through any browser or device.
1) AI Video Frame Rate Converter
One of the best tools for online video frame rate conversion is the AI Video Frame Rate Converter. With this online tool, you can easily insert your file into the tool you access on any browser of your choice.
Then, choose the conversion FPS like 60FPS for your video and get high-resolution video quality in the final file. The software does not keep the file on the server, which assures good privacy protection for users with their files and data.

Pros
- No need to install the software.
- Easily choose the FPS option to convert the file.
- The quick conversion process.
Cons
- The free version only allows 5 credits for users to try.
- No tools to enhance video quality with the free tool.
2) Video2Edit
Another top 60fps converter online that users should give a chance is Video2Edit. This tool is accessible through any web browser and allows one to change various aspects of the video they are converting, including the frame rate.
You can choose 60FPS as the target frame rate choice for the video that you add to your device’s tool. It also supports 120FPS and other options lower than 60FPS- the final converter file is still a high definition.

Pros
- Choose the frame rate per second for your video.
- Make settings changes for your video audio additionally.
- The tool is easily accessible and free to use.
Cons
- You have to take more steps for customization instead of directly getting the FPS changing option.
- Cannot convert multiple files simultaneously.
3) Aconvert
Users can try out this online video to 60fps converter to change elements of videos quickly during conversion. You can insert your file from a cloud account, device, or URL and choose the video format to convert.
Plus, it is much easier to directly set the frame rate you want to change in the video. This tool supports up to 60FPS for the change, and you can choose a custom FPS if necessary.

Pros
- Can convert video codec settings like bitrate, etc., for different file formats.
- Easily add a file from the device, URL, or cloud.
- Quick processing speed for the conversion.
Cons
- No batch conversion for multiple files.
- Big files can get slow to convert.
Bonus Tip. Use Wondershare Filmora to Create High-Quality Videos with 60FPS Support
If you plan to make further edits to your video clips and directly create a project with 60FPS support, using a capable 60fps maker software is necessary. Wondershare Filmora is suitable software for video editing professionals and regular users to try to make videos easily.
Free Download For Win 7 or later(64-bit)
Free Download For macOS 10.14 or later
You can use the different features available for quick and customized video projects. Here, you can try the Instant Mode feature for instantaneous video edits or directly try out the editor timeline with diverse features like Edit icon or Speed Ramping to make changes. As for adjusting the frame rate, you can make those changes during export.
Watch this video to know how to use Filmora for further video editing.
How to Change Frame Rate to 60FPS in Filmora?
Step1 After you have completed all of the edits, click on the Export button in the editor timeline of Filmora.
Step2 Choose the output format you will download the video file, e.g., MP4, from the Local tab.

Step3 Click on the Settings button. Adjust the specification of the video, like frame rate, and change to 60FPS. Make other changes if needed, and press OK.

Step4 Click on Export to download the file or directly upload it via Vimeo or YouTube through those tabs.
Conclusion
Indeed, adjusting the frame rate of your video will help you create high-quality videos with a fluid and lag-less transition. You should convert your file to 60FPS if it is a lower version at the time to improve sharpness and make it compatible with most screen types, 4K movie playing, and streaming.
Use the available online and native software options to make these changes quickly and efficiently. Additionally, if you want to create a file directly at 60FPS, you can do so using Filmora.
Give these tools a try first to get a better experience with the features and process.
Zoom In and Zoom Out on YouTube
Abundant Video Effects - Wondershare Filmora
Provide abundant video effects - A creative video editor
Powerful color correction and grading
Detailed tutorials provided by the official channel
YouTube has undoubtedly become the most popular platform for streaming millions of videos to people worldwide. People, influencers, celebrities, and various brands can freely post their videos on YouTube, and with a single click, they can fetch millions of views. Due to the simplicity and exceptional features of YouTube, people across the globe have shifted to this platform to extract various kinds of information comfortably.
Many times, people find it difficult to catch small yet important details from the videos on YouTube. If you want to observe little details in the YouTube videos closely, this article will address easy methods on how to zoom in on YouTube videos quickly.
In this article
Part 1: Why Should You Look Forward to Zoom Your YouTube Video?
Part 2: Effective Methods on How to Zoom in and Out YouTube Videos Easily
Part 1: Why Should You Look Forward to Zoom Your YouTube Video?
There can be various causes to zoom in on YouTube videos as users can clearly see hidden information and details from the video through it. For instance, if you are reviewing a trailer of a particular movie on your YouTube channel, you would be required to zoom in YouTube video many times. For breaking down the trailer, you would need to focus on the backgrounds, props, and other hidden details that are only possible through zooming in and out of the videos.
Moreover, if you are watching a demonstration of the chemistry practical on YouTube videos, readings on the apparatus may not be apparent in it. So here, you can also read and notice precise complicated readings on the videos by just zooming in. Also, in other scenarios, you can read the product’s description in makeup tutorials by using the option of zooming in and out.
To sum up, every regular user of YouTube must know how to zoom in on YouTube videos so that he can quickly focus on the details with a single click. By knowing the methods of zooming in and out, you can comprehensively extract the information through YouTube videos that can make your daily tasks easier.
Part 2: Effective Methods on How to Zoom in and Out YouTube Videos Easily
In this section, we will provide three effective methods to zoom in YouTube videos effortlessly. By applying any of the following methods, you can easily focus on the small details.
Method 1: Zoom In and Out on the YouTube Video Player
Are you looking for easier ways to zoom in and out of the YouTube video? YouTube gives the option on its player for viewing the videos in two modes: Theatre mode and full mode. Through theater mode, you can watch your video in a comparatively zoomed manner, whereas, in full screen, you can watch the video on a full screen of the monitor.
In this particular method, we will provide simple and easy steps for zooming in on the YouTube video player:
Step 1: Navigate to the YouTube app on your device browser, such as Google Chrome. On its search box, enter the video you want to watch.

Step 2: Press Enter, and you will see various options related to your desired video. Click on any particular video to watch.
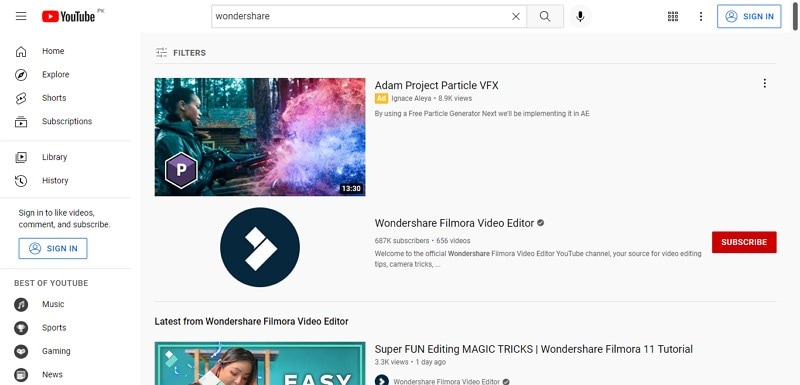
Step 3: On the YouTube video player, you would be able to see two screen mode options on the right side. The first option is “Full Screen” mode, through which you can enjoy watching your videos on a full monitor screen. The second option is “Theatre Mode,” which will display the video in a cinematic look by zooming in to some extent. Explore these options to observe the small details in your YouTube video closely.

Method 2: Zoom In and Out with Browser Zoom Features
To zoom in on YouTube videos, your browser also offers effective ways for the users. By using the browser zoom features, you can quickly zoom in and out of the video without the need for additional help. Moreover, these zoom features are also beneficial for reading eBooks or online documents.
Here are the three ways through which you can instantly zoom in on your favorite YouTube videos easily:
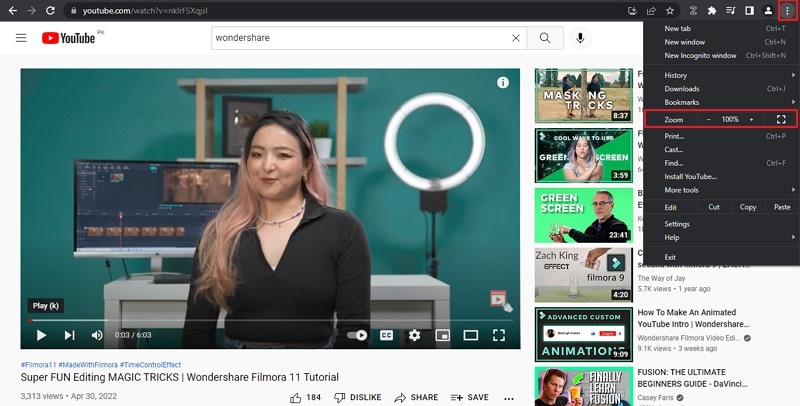
Way 1: The first way to zoom in on video is through browser options. To do so, tap on the “Three-Dot” icon of your browser displayed in the top right corner. From the menu, tap on “Zoom” and control the actions through its small menu.
Way 2: Another way to zoom in and out of the YouTube video is through your mouse pad. Point your cursor to the place where you want to zoom and try to expand the screen from your mouse pad and vice versa for zoom out.

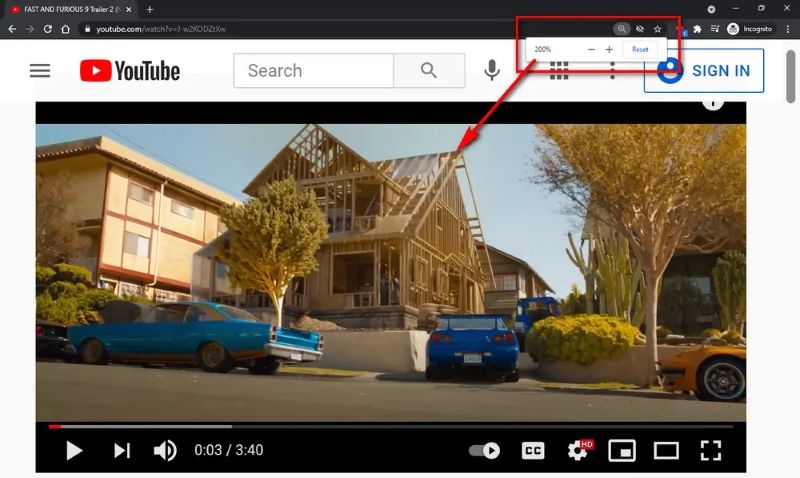
Way 3: On the URL search bar of YouTube, you can see different icons displayed next to it. Simply tap on the “Zoom” icon to control the zoom in and out accordingly.
Method 3: Zoom In on YouTube Video with Browser Extension
In this section, we will use a browser extension that will assist you in zooming in and out on YouTube videos comfortably. We will recommend the Zoom browser extension due to its distinct properties and features. Through its slider, you can zoom in on the YouTube video up to 400 factors with a single swipe.
Moreover, through this special browser extension, you can save the zoomed version of the website and can resume watching the videos from the set zoom value. To save your time, this browser also gives the option to zoom in and out the web pages together with a single click. To use this browser extension to zoom in on Youtube, here are simple steps.
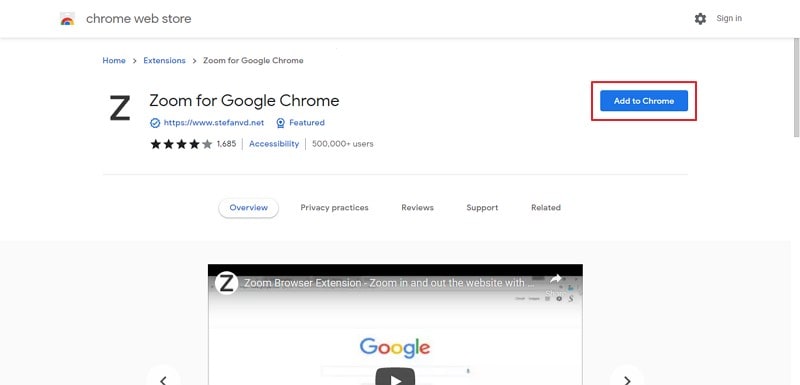
Step 1: Install the Zoom browser extension on your device from the Chrome Store by tapping on the “Add to Chrome” button to download and install the extension.
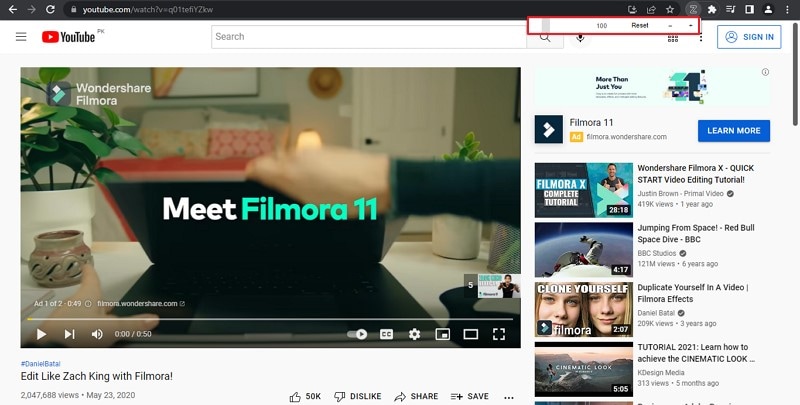
Step 2: Now, open YouTube and play your desired video. Afterward, tap on the icon of extensions from the top and select this particular extension. Through this extension, you can either click on the “+” button or the slider to zoom the video accordingly.
Conclusion
YouTube has become a mainstream channel for watching and creating videos in this era. Many times we miss small yet important details while watching YouTube videos on our devices. To quickly catch up on these essential details, we have offered different and easy methods regarding zoom in on YouTube videos with a single click.
YouTube has undoubtedly become the most popular platform for streaming millions of videos to people worldwide. People, influencers, celebrities, and various brands can freely post their videos on YouTube, and with a single click, they can fetch millions of views. Due to the simplicity and exceptional features of YouTube, people across the globe have shifted to this platform to extract various kinds of information comfortably.
Many times, people find it difficult to catch small yet important details from the videos on YouTube. If you want to observe little details in the YouTube videos closely, this article will address easy methods on how to zoom in on YouTube videos quickly.
In this article
Part 1: Why Should You Look Forward to Zoom Your YouTube Video?
Part 2: Effective Methods on How to Zoom in and Out YouTube Videos Easily
Part 1: Why Should You Look Forward to Zoom Your YouTube Video?
There can be various causes to zoom in on YouTube videos as users can clearly see hidden information and details from the video through it. For instance, if you are reviewing a trailer of a particular movie on your YouTube channel, you would be required to zoom in YouTube video many times. For breaking down the trailer, you would need to focus on the backgrounds, props, and other hidden details that are only possible through zooming in and out of the videos.
Moreover, if you are watching a demonstration of the chemistry practical on YouTube videos, readings on the apparatus may not be apparent in it. So here, you can also read and notice precise complicated readings on the videos by just zooming in. Also, in other scenarios, you can read the product’s description in makeup tutorials by using the option of zooming in and out.
To sum up, every regular user of YouTube must know how to zoom in on YouTube videos so that he can quickly focus on the details with a single click. By knowing the methods of zooming in and out, you can comprehensively extract the information through YouTube videos that can make your daily tasks easier.
Part 2: Effective Methods on How to Zoom in and Out YouTube Videos Easily
In this section, we will provide three effective methods to zoom in YouTube videos effortlessly. By applying any of the following methods, you can easily focus on the small details.
Method 1: Zoom In and Out on the YouTube Video Player
Are you looking for easier ways to zoom in and out of the YouTube video? YouTube gives the option on its player for viewing the videos in two modes: Theatre mode and full mode. Through theater mode, you can watch your video in a comparatively zoomed manner, whereas, in full screen, you can watch the video on a full screen of the monitor.
In this particular method, we will provide simple and easy steps for zooming in on the YouTube video player:
Step 1: Navigate to the YouTube app on your device browser, such as Google Chrome. On its search box, enter the video you want to watch.

Step 2: Press Enter, and you will see various options related to your desired video. Click on any particular video to watch.

Step 3: On the YouTube video player, you would be able to see two screen mode options on the right side. The first option is “Full Screen” mode, through which you can enjoy watching your videos on a full monitor screen. The second option is “Theatre Mode,” which will display the video in a cinematic look by zooming in to some extent. Explore these options to observe the small details in your YouTube video closely.

Method 2: Zoom In and Out with Browser Zoom Features
To zoom in on YouTube videos, your browser also offers effective ways for the users. By using the browser zoom features, you can quickly zoom in and out of the video without the need for additional help. Moreover, these zoom features are also beneficial for reading eBooks or online documents.
Here are the three ways through which you can instantly zoom in on your favorite YouTube videos easily:
Way 1: The first way to zoom in on video is through browser options. To do so, tap on the “Three-Dot” icon of your browser displayed in the top right corner. From the menu, tap on “Zoom” and control the actions through its small menu.

Way 2: Another way to zoom in and out of the YouTube video is through your mouse pad. Point your cursor to the place where you want to zoom and try to expand the screen from your mouse pad and vice versa for zoom out.

Way 3: On the URL search bar of YouTube, you can see different icons displayed next to it. Simply tap on the “Zoom” icon to control the zoom in and out accordingly.

Method 3: Zoom In on YouTube Video with Browser Extension
In this section, we will use a browser extension that will assist you in zooming in and out on YouTube videos comfortably. We will recommend the Zoom browser extension due to its distinct properties and features. Through its slider, you can zoom in on the YouTube video up to 400 factors with a single swipe.
Moreover, through this special browser extension, you can save the zoomed version of the website and can resume watching the videos from the set zoom value. To save your time, this browser also gives the option to zoom in and out the web pages together with a single click. To use this browser extension to zoom in on Youtube, here are simple steps.
Step 1: Install the Zoom browser extension on your device from the Chrome Store by tapping on the “Add to Chrome” button to download and install the extension.

Step 2: Now, open YouTube and play your desired video. Afterward, tap on the icon of extensions from the top and select this particular extension. Through this extension, you can either click on the “+” button or the slider to zoom the video accordingly.

Conclusion
YouTube has become a mainstream channel for watching and creating videos in this era. Many times we miss small yet important details while watching YouTube videos on our devices. To quickly catch up on these essential details, we have offered different and easy methods regarding zoom in on YouTube videos with a single click.
YouTube has undoubtedly become the most popular platform for streaming millions of videos to people worldwide. People, influencers, celebrities, and various brands can freely post their videos on YouTube, and with a single click, they can fetch millions of views. Due to the simplicity and exceptional features of YouTube, people across the globe have shifted to this platform to extract various kinds of information comfortably.
Many times, people find it difficult to catch small yet important details from the videos on YouTube. If you want to observe little details in the YouTube videos closely, this article will address easy methods on how to zoom in on YouTube videos quickly.
In this article
Part 1: Why Should You Look Forward to Zoom Your YouTube Video?
Part 2: Effective Methods on How to Zoom in and Out YouTube Videos Easily
Part 1: Why Should You Look Forward to Zoom Your YouTube Video?
There can be various causes to zoom in on YouTube videos as users can clearly see hidden information and details from the video through it. For instance, if you are reviewing a trailer of a particular movie on your YouTube channel, you would be required to zoom in YouTube video many times. For breaking down the trailer, you would need to focus on the backgrounds, props, and other hidden details that are only possible through zooming in and out of the videos.
Moreover, if you are watching a demonstration of the chemistry practical on YouTube videos, readings on the apparatus may not be apparent in it. So here, you can also read and notice precise complicated readings on the videos by just zooming in. Also, in other scenarios, you can read the product’s description in makeup tutorials by using the option of zooming in and out.
To sum up, every regular user of YouTube must know how to zoom in on YouTube videos so that he can quickly focus on the details with a single click. By knowing the methods of zooming in and out, you can comprehensively extract the information through YouTube videos that can make your daily tasks easier.
Part 2: Effective Methods on How to Zoom in and Out YouTube Videos Easily
In this section, we will provide three effective methods to zoom in YouTube videos effortlessly. By applying any of the following methods, you can easily focus on the small details.
Method 1: Zoom In and Out on the YouTube Video Player
Are you looking for easier ways to zoom in and out of the YouTube video? YouTube gives the option on its player for viewing the videos in two modes: Theatre mode and full mode. Through theater mode, you can watch your video in a comparatively zoomed manner, whereas, in full screen, you can watch the video on a full screen of the monitor.
In this particular method, we will provide simple and easy steps for zooming in on the YouTube video player:
Step 1: Navigate to the YouTube app on your device browser, such as Google Chrome. On its search box, enter the video you want to watch.

Step 2: Press Enter, and you will see various options related to your desired video. Click on any particular video to watch.

Step 3: On the YouTube video player, you would be able to see two screen mode options on the right side. The first option is “Full Screen” mode, through which you can enjoy watching your videos on a full monitor screen. The second option is “Theatre Mode,” which will display the video in a cinematic look by zooming in to some extent. Explore these options to observe the small details in your YouTube video closely.

Method 2: Zoom In and Out with Browser Zoom Features
To zoom in on YouTube videos, your browser also offers effective ways for the users. By using the browser zoom features, you can quickly zoom in and out of the video without the need for additional help. Moreover, these zoom features are also beneficial for reading eBooks or online documents.
Here are the three ways through which you can instantly zoom in on your favorite YouTube videos easily:
Way 1: The first way to zoom in on video is through browser options. To do so, tap on the “Three-Dot” icon of your browser displayed in the top right corner. From the menu, tap on “Zoom” and control the actions through its small menu.

Way 2: Another way to zoom in and out of the YouTube video is through your mouse pad. Point your cursor to the place where you want to zoom and try to expand the screen from your mouse pad and vice versa for zoom out.

Way 3: On the URL search bar of YouTube, you can see different icons displayed next to it. Simply tap on the “Zoom” icon to control the zoom in and out accordingly.

Method 3: Zoom In on YouTube Video with Browser Extension
In this section, we will use a browser extension that will assist you in zooming in and out on YouTube videos comfortably. We will recommend the Zoom browser extension due to its distinct properties and features. Through its slider, you can zoom in on the YouTube video up to 400 factors with a single swipe.
Moreover, through this special browser extension, you can save the zoomed version of the website and can resume watching the videos from the set zoom value. To save your time, this browser also gives the option to zoom in and out the web pages together with a single click. To use this browser extension to zoom in on Youtube, here are simple steps.
Step 1: Install the Zoom browser extension on your device from the Chrome Store by tapping on the “Add to Chrome” button to download and install the extension.

Step 2: Now, open YouTube and play your desired video. Afterward, tap on the icon of extensions from the top and select this particular extension. Through this extension, you can either click on the “+” button or the slider to zoom the video accordingly.

Conclusion
YouTube has become a mainstream channel for watching and creating videos in this era. Many times we miss small yet important details while watching YouTube videos on our devices. To quickly catch up on these essential details, we have offered different and easy methods regarding zoom in on YouTube videos with a single click.
YouTube has undoubtedly become the most popular platform for streaming millions of videos to people worldwide. People, influencers, celebrities, and various brands can freely post their videos on YouTube, and with a single click, they can fetch millions of views. Due to the simplicity and exceptional features of YouTube, people across the globe have shifted to this platform to extract various kinds of information comfortably.
Many times, people find it difficult to catch small yet important details from the videos on YouTube. If you want to observe little details in the YouTube videos closely, this article will address easy methods on how to zoom in on YouTube videos quickly.
In this article
Part 1: Why Should You Look Forward to Zoom Your YouTube Video?
Part 2: Effective Methods on How to Zoom in and Out YouTube Videos Easily
Part 1: Why Should You Look Forward to Zoom Your YouTube Video?
There can be various causes to zoom in on YouTube videos as users can clearly see hidden information and details from the video through it. For instance, if you are reviewing a trailer of a particular movie on your YouTube channel, you would be required to zoom in YouTube video many times. For breaking down the trailer, you would need to focus on the backgrounds, props, and other hidden details that are only possible through zooming in and out of the videos.
Moreover, if you are watching a demonstration of the chemistry practical on YouTube videos, readings on the apparatus may not be apparent in it. So here, you can also read and notice precise complicated readings on the videos by just zooming in. Also, in other scenarios, you can read the product’s description in makeup tutorials by using the option of zooming in and out.
To sum up, every regular user of YouTube must know how to zoom in on YouTube videos so that he can quickly focus on the details with a single click. By knowing the methods of zooming in and out, you can comprehensively extract the information through YouTube videos that can make your daily tasks easier.
Part 2: Effective Methods on How to Zoom in and Out YouTube Videos Easily
In this section, we will provide three effective methods to zoom in YouTube videos effortlessly. By applying any of the following methods, you can easily focus on the small details.
Method 1: Zoom In and Out on the YouTube Video Player
Are you looking for easier ways to zoom in and out of the YouTube video? YouTube gives the option on its player for viewing the videos in two modes: Theatre mode and full mode. Through theater mode, you can watch your video in a comparatively zoomed manner, whereas, in full screen, you can watch the video on a full screen of the monitor.
In this particular method, we will provide simple and easy steps for zooming in on the YouTube video player:
Step 1: Navigate to the YouTube app on your device browser, such as Google Chrome. On its search box, enter the video you want to watch.

Step 2: Press Enter, and you will see various options related to your desired video. Click on any particular video to watch.

Step 3: On the YouTube video player, you would be able to see two screen mode options on the right side. The first option is “Full Screen” mode, through which you can enjoy watching your videos on a full monitor screen. The second option is “Theatre Mode,” which will display the video in a cinematic look by zooming in to some extent. Explore these options to observe the small details in your YouTube video closely.

Method 2: Zoom In and Out with Browser Zoom Features
To zoom in on YouTube videos, your browser also offers effective ways for the users. By using the browser zoom features, you can quickly zoom in and out of the video without the need for additional help. Moreover, these zoom features are also beneficial for reading eBooks or online documents.
Here are the three ways through which you can instantly zoom in on your favorite YouTube videos easily:
Way 1: The first way to zoom in on video is through browser options. To do so, tap on the “Three-Dot” icon of your browser displayed in the top right corner. From the menu, tap on “Zoom” and control the actions through its small menu.

Way 2: Another way to zoom in and out of the YouTube video is through your mouse pad. Point your cursor to the place where you want to zoom and try to expand the screen from your mouse pad and vice versa for zoom out.

Way 3: On the URL search bar of YouTube, you can see different icons displayed next to it. Simply tap on the “Zoom” icon to control the zoom in and out accordingly.

Method 3: Zoom In on YouTube Video with Browser Extension
In this section, we will use a browser extension that will assist you in zooming in and out on YouTube videos comfortably. We will recommend the Zoom browser extension due to its distinct properties and features. Through its slider, you can zoom in on the YouTube video up to 400 factors with a single swipe.
Moreover, through this special browser extension, you can save the zoomed version of the website and can resume watching the videos from the set zoom value. To save your time, this browser also gives the option to zoom in and out the web pages together with a single click. To use this browser extension to zoom in on Youtube, here are simple steps.
Step 1: Install the Zoom browser extension on your device from the Chrome Store by tapping on the “Add to Chrome” button to download and install the extension.

Step 2: Now, open YouTube and play your desired video. Afterward, tap on the icon of extensions from the top and select this particular extension. Through this extension, you can either click on the “+” button or the slider to zoom the video accordingly.

Conclusion
YouTube has become a mainstream channel for watching and creating videos in this era. Many times we miss small yet important details while watching YouTube videos on our devices. To quickly catch up on these essential details, we have offered different and easy methods regarding zoom in on YouTube videos with a single click.
11 Ways To Radial Blur To Images (iPhone/Android/Mac/Windows)
Radial blur is an effect you can use to create a sense of movement, emphasize parts of an image, add visual interest to a scene, or make a subject stand out. There are multiple apps and software programs available to achieve this effect.
But if you don’t know where to start, we’ll show you 11 ways to create radial blur images on your iPhone, Android device, Mac, or Windows PC. With these tools, you can quickly recreate your pictures to make them unique by adding visual interest.
How To Make A Radial Blur Effect On iPhone And Android?
Below we’ve provided a list of 5 apps that can help you make a radial blur photo effect on your iPhone or Android devices.
1. Design Blur: Radial Blur
Design Blur: Radial Blur is a free app available on the Play Store for Android devices that lets you add a sense of motion and depth to your picture by applying the radial effect with just a few taps.

Download:Android
Key features:
- Mainly devoted to creating radial blur and motion blur effects.
- Includes a camera to help you instantly take pictures and apply radial effects.
- Option to revert to your original picture if you don’t like the effects.
- Easier to remove the radial blur effect from parts of your image.
- Supports changing the intensity of the effect.
Pros
- Includes a redo and undo option
- Free to use
- User-friendly UI
- Applies the effect instantly
Cons
- Includes ads
2. DSLR Camera Blur Effects
With the DSLR Camera Blur Effects app, you can instantly apply a more natural-looking radial motion blur effect to your images to give them a more professional appearance. The app offers multiple image-blurring tools and adds a DSLR-like finish to your photos.
Download: Android
Key Features
- Import photos from your phone’s gallery or take a new one using the app’s camera option.
- Options to crop your image before uploading.
- Multiple types of blur effects to choose from, such as motion blur, gaussian blur, line blur, box blur, and pixel blur.
- Can change the focus from auto to circular, linear, freestyle, point focus, or point blur.
Pros
- Simple and fast to use
- Available for free
- Draws around the subject
- A quick social sharing option is available
Cons
- Shows multiple ads
- Adds a watermark to your final image
3. Image Radial Blur
The Image Radial Blur is another user-friendly app designed to create radial blur effects for Android users and has a range of blur strengths, types, and focus options, so you can create the exact look you want.

Download:Android
Key Features
- Two Focus Move options and two blur types to choose from.
- Adjusts the strength of the radial blur on your image.
- Instantly applies the radial blur effect.
Pros
- Free and easy to use
- Applies the effect with one tap
- Comes with a quick social sharing option
- Excellent UI
Cons
- Displays ads
4. Picsart
Picsart is a powerful photo editing app that lets you create beautiful images by removing backgrounds, adding text and radial blur or other effects, and even creating collages.

Key Features
- All-in-one photo and video editor.
- Supports creating slideshows, and collages, adding subtitles to your video, and more.
- Labeled as “Editor’s Choice” on Google Play Store.
- Blur parts of an image, its background, the subject’s face, or a complete photo.
Pros
- Available for free
- AI select auto-detect blur feature
- Perfect for quick and easy edits
- Gives a professional touch to images
Cons
- The app lags sometimes
5. Affinity Photo
Affinity Photo is an award-winning photo editor available for iPads offering desktop-grade basic and advanced editing tools, including the Radial Blur effect.

Download: iOS
Key Features
- Available for a one-time purchase of $2476.20.
- Creates the radial effect in concentric circle lines, giving your images a sense of rotation.
- Brings the focus point in your pictures to life.
Pros
- Creates unique motion blur effects
- Offers other editing options
- Desktop-grade editing
Cons
- No image organization feature is available
6 Ways To Radial Blur Your Images On Windows And Mac
Here are our top 5 recommended tools to radial blur your images on Windows and Mac:
1. Wondershare Filmora
Free Download For Win 7 or later(64-bit)
Free Download For macOS 10.14 or later
Price: Starts at $7.99 per month
Support System: Windows 11 and below & macOS 10.14 - macOS 12
Wondershare Filmora is an editing software recommended by many content creators and is available for Windows and macOS. The software comes with various features such as speed ramping, screen recording, a library of royalty-free music, radial blur, keyframing, numerous filters, effects, & preset templates, motion tracking, title editing, and more.
To create a radial blur effect on your photos using the Wondershare Filmora software, do the following steps:
Step1 Visit the Filmora website and download the file, depending on your system. Install the software and launch it. Click the “Create New Project” option and drag & drop your file.

Step2 Head to the “Effects” tab, choose the Tilt-shift Circle for the radial blur effect and drop it in the timeline.

Step3 Double-click the effect in the timeline and configure the size, X-axis, Y-axis, and intensity. That’s about it. You can now export your file by clicking the “Export” option.
2. Final Cut Pro
Price: $299.99/perpetual license
Support System: macOS 11.5.1 or later
Final Cut Pro is an editing software designed for Mac systems and has everything you need to create high-finished videos. This software program offers a wide range of features, including a timeline, proxy editing, Multicam editing, and support for 4K and HDR footage.
With Final Cut Pro, you can instantly apply the radial blur effect to your images and adjust it using various parameters in the Filters Inspector section, such as Center, Angle, Crop, and Mix.
3. Adobe Photoshop
Price: US$20.99/month
Support System: macOS and Windows
As one of the most popular and advanced photo editing software in the digital market, Adobe Photoshop is packed with high-end features and is used by many professionals as well as graphic designers to create stunning radial blur effects in their projects.
To add the radial blur effect on your images using Adobe Photoshop, start with converting your background image into a Smart Object and go to the “Filters” tab. Next, select “Blur” and click “Radial Blur.” Finally, you can set the parameter in the radial blur window to adjust the effect.
4. Paint.NET
Price: Free
Support System: Microsoft .NET 6, Windows XP, Vista, 7, & 8, and needs a 64-bit Windows processor

Paint.NET is an easy-to-use software developed on the .NET framework and is only compatible with Windows PCs. The software is free and has an innovative interface for novice users to create stunning image editing projects in no time.
Paint.NET also lets you quickly create the radial blur image effect using its blur effects. You can even configure the angle, center, and quality of the effect.
5. BCC FX Editor
Price: $175 per month
Support System: macOS Mojave 10.14

Yet another powerful software is the BCC FX Editor, designed with an intuitive interface where you can quickly apply the BCC+ Radial Blur effect around a specific point in your pictures.
The software also offers various parameters to help you adjust the effect on your image. These include GPU rendering, blur type, center, radial amount, rotation amount, falloff, smooth mode, edge mode, apply mode, and more.
6. VideoPad Video Editor
Price: Free, and the premium version starts at $23.16 quarterly
Support System: Windows 10, XP, Vista, 7, 8, and 8.1
Designed for Windows systems, the VideoPad Editor is an intuitive and fast software program that can help you quickly add the radial blur effect to your file. Moreover, the software comes with numerous visual effects and transitions.
You can add custom logos, texts, & overlays and create & export your file in over 60 different video formats.
Last Words
In this article, we’ve provided a list of 5 iOS and Android apps and 6 Mac and Windows software for creating the radial blur image effect. From the above list, whichever tool you choose can help you create some stunning radial blur effects that will add depth and movement to your photos.
We’ve also provided step-by-step instructions on how you can use the Filmora 11 software to add impactful effects.
Hopefully, you’ve enjoyed reading this article and can now quickly add the radial blur effect to your images without any issues.
2. DSLR Camera Blur Effects
With the DSLR Camera Blur Effects app, you can instantly apply a more natural-looking radial motion blur effect to your images to give them a more professional appearance. The app offers multiple image-blurring tools and adds a DSLR-like finish to your photos.

Download: Android
Key Features
- Import photos from your phone’s gallery or take a new one using the app’s camera option.
- Options to crop your image before uploading.
- Multiple types of blur effects to choose from, such as motion blur, gaussian blur, line blur, box blur, and pixel blur.
- Can change the focus from auto to circular, linear, freestyle, point focus, or point blur.
Pros
- Simple and fast to use
- Available for free
- Draws around the subject
- A quick social sharing option is available
Cons
- Shows multiple ads
- Adds a watermark to your final image
3. Image Radial Blur
The Image Radial Blur is another user-friendly app designed to create radial blur effects for Android users and has a range of blur strengths, types, and focus options, so you can create the exact look you want.

Download:Android
Key Features
- Two Focus Move options and two blur types to choose from.
- Adjusts the strength of the radial blur on your image.
- Instantly applies the radial blur effect.
Pros
- Free and easy to use
- Applies the effect with one tap
- Comes with a quick social sharing option
- Excellent UI
Cons
- Displays ads
4. Picsart
Picsart is a powerful photo editing app that lets you create beautiful images by removing backgrounds, adding text and radial blur or other effects, and even creating collages.

Key Features
- All-in-one photo and video editor.
- Supports creating slideshows, and collages, adding subtitles to your video, and more.
- Labeled as “Editor’s Choice” on Google Play Store.
- Blur parts of an image, its background, the subject’s face, or a complete photo.
Pros
- Available for free
- AI select auto-detect blur feature
- Perfect for quick and easy edits
- Gives a professional touch to images
Cons
- The app lags sometimes
5. Affinity Photo
Affinity Photo is an award-winning photo editor available for iPads offering desktop-grade basic and advanced editing tools, including the Radial Blur effect.

Download: iOS
Key Features
- Available for a one-time purchase of $2476.20.
- Creates the radial effect in concentric circle lines, giving your images a sense of rotation.
- Brings the focus point in your pictures to life.
Pros
- Creates unique motion blur effects
- Offers other editing options
- Desktop-grade editing
Cons
- No image organization feature is available
6 Ways To Radial Blur Your Images On Windows And Mac
Here are our top 5 recommended tools to radial blur your images on Windows and Mac:
1. Wondershare Filmora
Free Download For Win 7 or later(64-bit)
Free Download For macOS 10.14 or later
Price: Starts at $7.99 per month
Support System: Windows 11 and below & macOS 10.14 - macOS 12
Wondershare Filmora is an editing software recommended by many content creators and is available for Windows and macOS. The software comes with various features such as speed ramping, screen recording, a library of royalty-free music, radial blur, keyframing, numerous filters, effects, & preset templates, motion tracking, title editing, and more.
To create a radial blur effect on your photos using the Wondershare Filmora software, do the following steps:
Step1 Visit the Filmora website and download the file, depending on your system. Install the software and launch it. Click the “Create New Project” option and drag & drop your file.

Step2 Head to the “Effects” tab, choose the Tilt-shift Circle for the radial blur effect and drop it in the timeline.

Step3 Double-click the effect in the timeline and configure the size, X-axis, Y-axis, and intensity. That’s about it. You can now export your file by clicking the “Export” option.
2. Final Cut Pro
Price: $299.99/perpetual license
Support System: macOS 11.5.1 or later

Final Cut Pro is an editing software designed for Mac systems and has everything you need to create high-finished videos. This software program offers a wide range of features, including a timeline, proxy editing, Multicam editing, and support for 4K and HDR footage.
With Final Cut Pro, you can instantly apply the radial blur effect to your images and adjust it using various parameters in the Filters Inspector section, such as Center, Angle, Crop, and Mix.
3. Adobe Photoshop
Price: US$20.99/month
Support System: macOS and Windows

As one of the most popular and advanced photo editing software in the digital market, Adobe Photoshop is packed with high-end features and is used by many professionals as well as graphic designers to create stunning radial blur effects in their projects.
To add the radial blur effect on your images using Adobe Photoshop, start with converting your background image into a Smart Object and go to the “Filters” tab. Next, select “Blur” and click “Radial Blur.” Finally, you can set the parameter in the radial blur window to adjust the effect.
4. Paint.NET
Price: Free
Support System: Microsoft .NET 6, Windows XP, Vista, 7, & 8, and needs a 64-bit Windows processor

Paint.NET is an easy-to-use software developed on the .NET framework and is only compatible with Windows PCs. The software is free and has an innovative interface for novice users to create stunning image editing projects in no time.
Paint.NET also lets you quickly create the radial blur image effect using its blur effects. You can even configure the angle, center, and quality of the effect.
5. BCC FX Editor
Price: $175 per month
Support System: macOS Mojave 10.14

Yet another powerful software is the BCC FX Editor, designed with an intuitive interface where you can quickly apply the BCC+ Radial Blur effect around a specific point in your pictures.
The software also offers various parameters to help you adjust the effect on your image. These include GPU rendering, blur type, center, radial amount, rotation amount, falloff, smooth mode, edge mode, apply mode, and more.
6. VideoPad Video Editor
Price: Free, and the premium version starts at $23.16 quarterly
Support System: Windows 10, XP, Vista, 7, 8, and 8.1

Designed for Windows systems, the VideoPad Editor is an intuitive and fast software program that can help you quickly add the radial blur effect to your file. Moreover, the software comes with numerous visual effects and transitions.
You can add custom logos, texts, & overlays and create & export your file in over 60 different video formats.
Last Words
In this article, we’ve provided a list of 5 iOS and Android apps and 6 Mac and Windows software for creating the radial blur image effect. From the above list, whichever tool you choose can help you create some stunning radial blur effects that will add depth and movement to your photos.
We’ve also provided step-by-step instructions on how you can use the Filmora 11 software to add impactful effects.
Hopefully, you’ve enjoyed reading this article and can now quickly add the radial blur effect to your images without any issues.
Also read:
- 2024 Approved How to Add Transitions in Adobe Premiere Pro
- Updated In 2024, How to Change Aspect Ratio of Video?
- Updated Top-Search The Best Game Screen Recording Tools for PC
- Updated Best GIF to Video Converters for 2024
- New How to Add Green Screen Effects In Phhotoshop
- Updated How Can You Create Outstanding Educational Teaching Videos, In 2024
- Updated 2024 Approved What Are the 10 Best GIF Creator?
- Updated Best Free LUTs to Use for 2024
- New 2024 Approved Simple Tricks Make 3D GIF Production of Inspiration Pop Up
- If You Want an App to Make Videos with Pictures and Music for Social Media Posts, We Are with the Best Apps to Make Videos with Music and Pictures
- New How to Create a Dynamic Text Animation in Filmora — Step-By-Step for 2024
- Updated Are You Looking to Find Out How to Loop YouTube Videos on iPhone? Learn How to Loop Your Favorite YouTube Video on Your iPhone, so You Can Play that Part over and Over
- This Article Introduces How Sheila Become a Youtuber and How She Started Video Editing for 2024
- New Create Chroma Key Written Text Effects in Filmora
- New How to Create an Aesthetic Slideshow Presentation
- Updated 2024 Approved List of Supported Whatsapp Video Format You May Want to Know
- How to Fake GPS on Android without Mock Location For your Sony Xperia 10 V | Dr.fone
- Updated How to Create Slideshow in LinkedIn for 2024
- How to Cast Vivo V30 Lite 5G to Computer for iPhone and Android? | Dr.fone
- In 2024, How to Reset Gmail Password on Xiaomi Redmi Note 12 Pro 4G Devices
- How to Reset Infinix Zero 5G 2023 Turbo without Losing Data | Dr.fone
- Easy steps to recover deleted data from Oppo Find N3 Flip
- A Perfect Guide To Remove or Disable Google Smart Lock On Realme 10T 5G
- In 2024, How to Transfer Apps from Motorola Edge 40 to Another | Dr.fone
- How to Transfer Everything from Apple iPhone 14 to iPhone | Dr.fone
- Hard Reset Honor 90 in 3 Efficient Ways | Dr.fone
- How to Fake Snapchat Location on Vivo Y02T | Dr.fone
- In 2024, Top Apps and Online Tools To Track Samsung Galaxy F14 5G Phone With/Without IMEI Number
- Title: Powerpoint Supported Video Format and User Tips
- Author: Chloe
- Created at : 2024-05-20 03:37:23
- Updated at : 2024-05-21 03:37:23
- Link: https://ai-editing-video.techidaily.com/powerpoint-supported-video-format-and-user-tips/
- License: This work is licensed under CC BY-NC-SA 4.0.

