:max_bytes(150000):strip_icc():format(webp)/GettyImages-962954554-5c338fc146e0fb0001346aec.jpg)
Premiere Pro Slow Playback Issues Finding The Best Solutions for 2024

Premiere Pro Slow Playback Issues: Finding The Best Solutions
Video editors are massively relying on Adobe Premiere Pro for their professional projects. This tool ensures workflow in video production and relieves several complex editing tasks. Unfortunately, it does have some errors, like Premiere Pro playback slow, which users refer to as patience-testing. Apart from being the most stable video editor, Premiere Pro consumes many resources.
Due to this, users encounter Premiere playback issues during video editing. If your choppy playback and unexpected freeze have annoyed you, keep reading this article. Here, you will find the best 8 solutions to instantly fix Premiere Pro’s slow playback. Plus, there will be an alternative that you can consider for error-free video editing.
Slow Motion Video Maker Slow your video’s speed with better control of your keyframes to create unique cinematic effects!
Make A Slow Motion Video Make A Slow Motion Video More Features

Part 1: What Does a Video with a Slow Playback Mean?
Premiere Pro Playback Slow is a common issue faced by editors these days. It refers to playback slowness and choppiness of a fresh or edited video. Many users report a complete blackout in video footage during the playback. Lagging in playback might result from insufficient RAM or inadequate storage space. Maybe an outdated GPU, heavy video effects, or active background programs cause it.
Such playback lagging can prove incredibly frustrating or test your patience beyond limits. It can desync the audio and video components of files during the playback. You can consider it a sign that your computer does not have the right specs for Adobe Premiere Pro . Also, it could mean that this tool is dropping frames in the Playback of videos.
Part 2: Fixing the Premiere Pro Slow Playback Issue [100% Effective Solutions]
If your Premiere Pro is not smoothly playing the videos, this section is for you. Firstly, you should confirm that your playback is lagging or slowing down. To do so, analyze whether your playhead is making small jumps or playing smoothly. There are plenty of things that you can do to reduce or minimize the Premiere playback slow.
- Solution 1: Disable High-Quality Playback
- Solution 2: Delete Media Cache Files
- Solution 3: Optimize Rendering for Performance
- Solution 4: Close Unnecessary Applications
- Solution 5: Turn on GPU Acceleration
- Solution 6: Change Playback Resolution
- Solution 7: Use Proxy Videos in Adobe
- Solution 8: Mute FX Effects
Solution 1: Disable High-Quality Playback
Adobe Premiere Pro enables a High-Quality playback option by default. It helps in watching videos clearly but causes trouble. Thus, turning it off can fix the playback lagging. Tap on the “Settings” icon, which is next to the playback resolution menu. From there, disable the “High-Quality Playback” option by selecting it.

Solution 2: Delete Media Cache Files
In Premiere Pro, the Media cache is a temporary storage space that keeps copies of files. It allows you to access the files faster and cause a good playback. If these media caches use hefty hard disk space, then to enhance playback performance.
To do so, open the Premiere Pro and go to the “Preferences” menu. From the list, select “Media Cache.” Now browse to select the media and tap on the “Delete Unused” next to the “Delete Unused Media Cache Files. After choosing the option to delete cache files, click on “OK and the files will be removed.

Solution 3: Optimize Rendering for Performance
If Premiere Pro slow playback still exists, then use this method to fix it. Set the optimized rendering to fix the performance of playback. Press the “Edit” option from the top toolbar and choose the “Preferences.” Then, navigate toward “Memory” and find a pop-up window. From that screen, click on “Memory” dropdown and pick “Performance.” Finally, tap on “OK” and get a better playback.

Solution 4: Close Unnecessary Applications
Sometimes, lagging in playback occurs when you work on multiple applications. The system gets burdened and might slow down every process at that time. For a quick and effective solution, you should close the other tabs immediately. Only Adobe Premiere Pro and your file manager can remain open for continuous playback.

Solution 5: Turn on GPU Acceleration
There is another fix you can try to overcome Premiere Pro playback slow. Without any delay, ensure that the Render is set to GPU Acceleration. Simply go to the “File” option at the top toolbar and click on the “Project Settings.” Then, pick “General” and set it to “Mercury Playback Engine GPU Acceleration.” This option is under the Playback Section and Video Render.

Solution 6: Change Playback Resolution
Due to the higher resolution of videos, playback lagging occurs. It has a quick solution: changing the playback resolution to a lower rate. For this purpose, go to “Settings” at the top right and choose the “Dynamic Quality” option. Select a lower resolution, like 1:2 or lower. You should look for options that can reduce resolution from the original resolution of the clip.

Solution 7: Use Proxy Videos in Adobe
Proxy videos are proxy files that are compressed versions of original projects. They help users edit heavy and lengthy videos with any Premiere Playback slow. In your project panel, select your video and right-click on it. From the list, choose “Proxy” and explore “Create Proxies.”
Now, pick the “Codec” option from another window and tap “QuickTime.” Specify a location for proxies and try to keep them in a new folder with the original media. Lastly, click “OK,” and Adobe Media Encoder will instantly produce video proxies.

Solution 8: Mute FX Effects
The working size of video files gets increased with visual and audio effects. If your videos are still lagging in playbacks, then head to mute those effects to fix this issue. From the playback toolbar, choose the “fx” button. Alternatively, click on the “+” icon at the top right side of Program Monitor. Drag it to the button panel and press the “fx” button to toggle it “Off.”

Part 3: Make the Slow-Motion Video Making Easy with Wondershare Filmora
Apart from Premiere Pro’s slow playback, it’s a difficult tool to work with. Even professional video editors face several challenges and look for fix guides. As an effective solution, Wondershare Filmora is a good option for all users. It is a great video editor with AI-integrated features. Non-tech persons can even maintain smooth editing with Filmora’s AI assistant.
This software equips you with a complete video editing suit. Using any feature, you will not face laggings during the editing process. Many editors want to add slow motion or speed ramping in their videos to embrace creativity. They can freely use Filmora without fearing system crashes or playback slowing down.
Step-by-Step Guide to Perform Slow Motion Effect with Optical Flow
Without any playback, slow down and enjoy slow-motion effects in your videos. To add such an effect with optical flow, you can follow the steps below.
Free Download For Win 7 or later(64-bit)
Free Download For macOS 10.14 or later
Step 1Import Project in the Timeline Section
Successfully install Filmora and head to its main interface. Start working on your project by tapping “New Project” and importing the file into the timeline. You can press the “Ctrl + I” keys, browse the project to import, and drag it into the timeline.

Step 2Slow Down Video with the Optical Flow Option
Right-click on your clip and pick “Speed Ramping” from the list. Now, choose the “Customize” option and move below to edit it. Hold the dots and adjust their location to change the video speed. You can select Montage and Jumper effects to change the speed of clips.
Now, scroll down and find “AI Frame Interpolation.” Click on the downward icon and tap “Optical Flow” for slow but high-quality video.

Step 3Export After Finalizing
After making edits, look for the “Export” option at the top right side. Make changes in resolution, project name, and other aspects. Press “Export” to get the file to your assigned location.

Effective Key Features of Filmora
Besides smooth playback, Filmora offers powerful AI features to edit videos. Let’s explore some of its dynamic and innovative options.
AI Copilot: This tool provides you with an AI assistant in case you are unfamiliar with editing basics. It can not only guide you but also navigate towards the respective features. Users can ask anything and find solutions with natural language prompts.
AI Music Generator: Are you tired of internet surfing but haven’t found perfect music? Filmora offers AI-generated music that perfectly aligns with your content needs. It allows you to choose the number of music tracks, moods, and duration of the videos.
AI Image: With Filmora, getting a copyright-free image is not a big deal. Users have to describe an image and pick one style to grab their dream image. Also, they can select an aspect ratio to start creating an image.
AI Smart Masking: Often, the best-captured media seems useless because of its messy background. AI masking comes to rescue your projects. You can use the Chroma key or AI portrait to remove or change the backgrounds of the media.
Conclusion
To wrap up, Adobe Premiere Pro’s slow playback can occur for several reasons. Many solutions are discussed above to tackle such errors and avoid frustration. Meanwhile, you can use Wondershare Filmora, which is much easier. Also, it does not cause any errors while working and ensures a smooth workflow. With AI features, users can effectively perform every kind of video editing task.
Make A Slow Motion Video Make A Slow Motion Video More Features

Part 1: What Does a Video with a Slow Playback Mean?
Premiere Pro Playback Slow is a common issue faced by editors these days. It refers to playback slowness and choppiness of a fresh or edited video. Many users report a complete blackout in video footage during the playback. Lagging in playback might result from insufficient RAM or inadequate storage space. Maybe an outdated GPU, heavy video effects, or active background programs cause it.
Such playback lagging can prove incredibly frustrating or test your patience beyond limits. It can desync the audio and video components of files during the playback. You can consider it a sign that your computer does not have the right specs for Adobe Premiere Pro . Also, it could mean that this tool is dropping frames in the Playback of videos.
Part 2: Fixing the Premiere Pro Slow Playback Issue [100% Effective Solutions]
If your Premiere Pro is not smoothly playing the videos, this section is for you. Firstly, you should confirm that your playback is lagging or slowing down. To do so, analyze whether your playhead is making small jumps or playing smoothly. There are plenty of things that you can do to reduce or minimize the Premiere playback slow.
- Solution 1: Disable High-Quality Playback
- Solution 2: Delete Media Cache Files
- Solution 3: Optimize Rendering for Performance
- Solution 4: Close Unnecessary Applications
- Solution 5: Turn on GPU Acceleration
- Solution 6: Change Playback Resolution
- Solution 7: Use Proxy Videos in Adobe
- Solution 8: Mute FX Effects
Solution 1: Disable High-Quality Playback
Adobe Premiere Pro enables a High-Quality playback option by default. It helps in watching videos clearly but causes trouble. Thus, turning it off can fix the playback lagging. Tap on the “Settings” icon, which is next to the playback resolution menu. From there, disable the “High-Quality Playback” option by selecting it.

Solution 2: Delete Media Cache Files
In Premiere Pro, the Media cache is a temporary storage space that keeps copies of files. It allows you to access the files faster and cause a good playback. If these media caches use hefty hard disk space, then to enhance playback performance.
To do so, open the Premiere Pro and go to the “Preferences” menu. From the list, select “Media Cache.” Now browse to select the media and tap on the “Delete Unused” next to the “Delete Unused Media Cache Files. After choosing the option to delete cache files, click on “OK and the files will be removed.

Solution 3: Optimize Rendering for Performance
If Premiere Pro slow playback still exists, then use this method to fix it. Set the optimized rendering to fix the performance of playback. Press the “Edit” option from the top toolbar and choose the “Preferences.” Then, navigate toward “Memory” and find a pop-up window. From that screen, click on “Memory” dropdown and pick “Performance.” Finally, tap on “OK” and get a better playback.

Solution 4: Close Unnecessary Applications
Sometimes, lagging in playback occurs when you work on multiple applications. The system gets burdened and might slow down every process at that time. For a quick and effective solution, you should close the other tabs immediately. Only Adobe Premiere Pro and your file manager can remain open for continuous playback.

Solution 5: Turn on GPU Acceleration
There is another fix you can try to overcome Premiere Pro playback slow. Without any delay, ensure that the Render is set to GPU Acceleration. Simply go to the “File” option at the top toolbar and click on the “Project Settings.” Then, pick “General” and set it to “Mercury Playback Engine GPU Acceleration.” This option is under the Playback Section and Video Render.

Solution 6: Change Playback Resolution
Due to the higher resolution of videos, playback lagging occurs. It has a quick solution: changing the playback resolution to a lower rate. For this purpose, go to “Settings” at the top right and choose the “Dynamic Quality” option. Select a lower resolution, like 1:2 or lower. You should look for options that can reduce resolution from the original resolution of the clip.

Solution 7: Use Proxy Videos in Adobe
Proxy videos are proxy files that are compressed versions of original projects. They help users edit heavy and lengthy videos with any Premiere Playback slow. In your project panel, select your video and right-click on it. From the list, choose “Proxy” and explore “Create Proxies.”
Now, pick the “Codec” option from another window and tap “QuickTime.” Specify a location for proxies and try to keep them in a new folder with the original media. Lastly, click “OK,” and Adobe Media Encoder will instantly produce video proxies.

Solution 8: Mute FX Effects
The working size of video files gets increased with visual and audio effects. If your videos are still lagging in playbacks, then head to mute those effects to fix this issue. From the playback toolbar, choose the “fx” button. Alternatively, click on the “+” icon at the top right side of Program Monitor. Drag it to the button panel and press the “fx” button to toggle it “Off.”

Part 3: Make the Slow-Motion Video Making Easy with Wondershare Filmora
Apart from Premiere Pro’s slow playback, it’s a difficult tool to work with. Even professional video editors face several challenges and look for fix guides. As an effective solution, Wondershare Filmora is a good option for all users. It is a great video editor with AI-integrated features. Non-tech persons can even maintain smooth editing with Filmora’s AI assistant.
This software equips you with a complete video editing suit. Using any feature, you will not face laggings during the editing process. Many editors want to add slow motion or speed ramping in their videos to embrace creativity. They can freely use Filmora without fearing system crashes or playback slowing down.
Step-by-Step Guide to Perform Slow Motion Effect with Optical Flow
Without any playback, slow down and enjoy slow-motion effects in your videos. To add such an effect with optical flow, you can follow the steps below.
Free Download For Win 7 or later(64-bit)
Free Download For macOS 10.14 or later
Step 1Import Project in the Timeline Section
Successfully install Filmora and head to its main interface. Start working on your project by tapping “New Project” and importing the file into the timeline. You can press the “Ctrl + I” keys, browse the project to import, and drag it into the timeline.

Step 2Slow Down Video with the Optical Flow Option
Right-click on your clip and pick “Speed Ramping” from the list. Now, choose the “Customize” option and move below to edit it. Hold the dots and adjust their location to change the video speed. You can select Montage and Jumper effects to change the speed of clips.
Now, scroll down and find “AI Frame Interpolation.” Click on the downward icon and tap “Optical Flow” for slow but high-quality video.

Step 3Export After Finalizing
After making edits, look for the “Export” option at the top right side. Make changes in resolution, project name, and other aspects. Press “Export” to get the file to your assigned location.

Effective Key Features of Filmora
Besides smooth playback, Filmora offers powerful AI features to edit videos. Let’s explore some of its dynamic and innovative options.
AI Copilot: This tool provides you with an AI assistant in case you are unfamiliar with editing basics. It can not only guide you but also navigate towards the respective features. Users can ask anything and find solutions with natural language prompts.
AI Music Generator: Are you tired of internet surfing but haven’t found perfect music? Filmora offers AI-generated music that perfectly aligns with your content needs. It allows you to choose the number of music tracks, moods, and duration of the videos.
AI Image: With Filmora, getting a copyright-free image is not a big deal. Users have to describe an image and pick one style to grab their dream image. Also, they can select an aspect ratio to start creating an image.
AI Smart Masking: Often, the best-captured media seems useless because of its messy background. AI masking comes to rescue your projects. You can use the Chroma key or AI portrait to remove or change the backgrounds of the media.
Conclusion
To wrap up, Adobe Premiere Pro’s slow playback can occur for several reasons. Many solutions are discussed above to tackle such errors and avoid frustration. Meanwhile, you can use Wondershare Filmora, which is much easier. Also, it does not cause any errors while working and ensures a smooth workflow. With AI features, users can effectively perform every kind of video editing task.
Focusing On The Best Ways To Convert Slow-Motion Video to Normal
Maintain consistency in your projects by adding all video clips simultaneously. Sometimes, you have to include a slow-motion video due to its content. In such cases, convert them into a normal video for an even flow in the media. Turning slow-motion videos into the normal is essential in several cases. Unfortunately, many people don’t know how to make a slow-mo video at normal speed.
To address this concern, we have enlisted perfect ways to make slow-mo to usual video. Read this guide and learn how to convert a slow-motion video to normal step-wise. Besides, you will also find some online and desktop solutions to make the best choice.
Slow Motion Video Maker Slow your video’s speed with better control of your keyframes to create unique cinematic effects!
Make A Slow Motion Video Make A Slow Motion Video More Features

Part 1: Android User’s Solution: Converting Slow Motion Video to Normal
Android cameras can record slow-motion videos and turn them into normal as well. For this purpose, you have to upload your clips on Google Photos. Let’s discover how to convert slow-motion video to normal in Google Photos for Android. Remember that these steps might vary across different Android models.
Step 1
Enter your Google Photos app and pick one of your intended Slow-motion videos. While previewing it, look for the “Slow Motion” option at the top and touch it.

Step 2
Read the instructions from the displayed pop-up and hit the “OK.” Drag the two sliders and enclose them from both ends. Your slow-motion video is converted into the normal one.

Part 2: iOS User’s Solution: Converting Slow Motion Video to Normal
iPhone also offers a built-in option to change the speed of videos. Almost all iPhone series follow the same steps to change the video speed. Thus, you can quickly learn how to make slow-motion videos at regular speed, regardless of the version. Without further delay, make a slow-motion video and read the given steps:
Step 1
Unlock your iPhone and open the “Photos” app from the main screen. There, reach the “Albums” icon from the bottom and scroll until you get the “Slo-mo” option. Click on it and get a preview of your slow-motion video.

Step 2
Now, hit “Edit” from the top right side and find an editing screen. From the bottom, enclose the sliders from both sides and tap the “Done” button. This way, you will get a standard video instantly saved on your iPhone.

Part 3: Online Solution: Converting Slow Motion Video to Normal
Use this online tool if you cannot perform slow-motion to normal video conversion. Clideo is an online platform that allows you to change the video speed without causing playback issues. It offers a high level of security where only you can access your files. Some of its additional editing options allow you to pick an output format. Besides, users can keep their media sound or mute while making the conversion.
This tool supports MP4, MPG, VOB, MOV, and WMV media file formats. The following is a step-by-step guide to using this online solution:
Step 1
Access the official site of Clideo Stop Motion Maker and click the “Choose File” button. Browse your slow-motion video and press the “Open” button. Now, wait for a while until it gets uploaded on the site.

Step 2
Afterward, set the “Speed” from three given options. Choose to set the video to “Medium” speed. Moreover, you can also set the “Clip Rate” of the video as per requirements.

Step 3
When you get the desired outcome, click the “Export” button from the bottom-right corner. You will get a preview of the video on the next screen. Tap on the downward “ Download “ symbol and pick the file export destination. You can simply hit “Download” to get the file in your system.

Part 4: Desktop Recommendation: Converting Slow Motion Video to Normal Using Wondershare Filmora
In the above sections, you have learned how to turn slow-mo into normal. Now, it is time to look for an effective offline solution. That’s where you can count on Wondershare Filmora , which is the simplest but powerful video editor. Fortunately, it can speed up and slow down videos within the highest quality. Filmora provides more advanced editing options than the above solutions.
Free Download For Win 7 or later(64-bit)
Free Download For macOS 10.14 or later
Steps to Perform Slow Motion and Speed Up Videos to Normal with Filmora
Unlike other tools, Filmora can quickly convert your video speed to your desired extent. Head below and transform your video easily with this step-by-step guide.
Step 1Install Filmora and Export Your Media to Start a Project
Successfully launch Filmora in your system and access its home screen. Click on the “New Project” option to initiate media editing. Bring your video to the timeline after importing it into the media panel. To import the file, press the “Ctrl + I” keys using your keyboard.

Step 2Slow Down or Speed Up the Video with Optical Flow
Right-click on your slow-motion video in the timeline to get an extended list. From that list, tap the “Uniform Speed” option and find an editing panel on the right. Now, drag the “Speed” slider right to speed up the video. You can move it to the left side to slow down the video. To ensure a smooth quality, extend the “AI Frame Interpolation” menu and pick the “Optical Flow.”

Step 3Save the File Through the Export Button
Press the Space bar from your keyboard and preview the video. Navigate toward the “Export” button at the top right corner. You can adjust the export parameters and tap “Export” to save the file on your device.

Other Exceptional Features of Filmora
Filmora is more than a simple video editing app. AI integration can generate music, images, and scripts to embrace creativity in your content. Read the following points to learn more about Filmora’s incredible features.
- AI Vocal Remover: If you want to dub a video, use this feature to remove existing vocals. It can separate music and vocal soundtracks while keeping their quality high. Once AI removes vocals, you can quickly edit or remove unwanted elements from the tracks.
- AI Text to Video: Content creators can get instant engagement in their content with this feature. Users just have to write their ideas and let AI transform them into a visual story. They can later customize fonts, styles, and other elements to achieve desired results.
- AI Smart Masking: Professionals can improve their multi-dimensional scenes using this option. It enables multi-layer overlay editing that isolates subjects. Users can freeze frames and perform auto-correction for visual enhancements of the projects.
Conclusion
In short, slow-motion to normal video conversion is possible and serves fruitful purposes. In this regard, iPhone and Android offer built-in options that are explained earlier. Besides, you get familiar with how to convert a slow-motion video to normal using an online tool. For an effective desktop solution, try using Filmora, which is a top-notch video editor so far.
Make A Slow Motion Video Make A Slow Motion Video More Features

Part 1: Android User’s Solution: Converting Slow Motion Video to Normal
Android cameras can record slow-motion videos and turn them into normal as well. For this purpose, you have to upload your clips on Google Photos. Let’s discover how to convert slow-motion video to normal in Google Photos for Android. Remember that these steps might vary across different Android models.
Step 1
Enter your Google Photos app and pick one of your intended Slow-motion videos. While previewing it, look for the “Slow Motion” option at the top and touch it.

Step 2
Read the instructions from the displayed pop-up and hit the “OK.” Drag the two sliders and enclose them from both ends. Your slow-motion video is converted into the normal one.

Part 2: iOS User’s Solution: Converting Slow Motion Video to Normal
iPhone also offers a built-in option to change the speed of videos. Almost all iPhone series follow the same steps to change the video speed. Thus, you can quickly learn how to make slow-motion videos at regular speed, regardless of the version. Without further delay, make a slow-motion video and read the given steps:
Step 1
Unlock your iPhone and open the “Photos” app from the main screen. There, reach the “Albums” icon from the bottom and scroll until you get the “Slo-mo” option. Click on it and get a preview of your slow-motion video.

Step 2
Now, hit “Edit” from the top right side and find an editing screen. From the bottom, enclose the sliders from both sides and tap the “Done” button. This way, you will get a standard video instantly saved on your iPhone.

Part 3: Online Solution: Converting Slow Motion Video to Normal
Use this online tool if you cannot perform slow-motion to normal video conversion. Clideo is an online platform that allows you to change the video speed without causing playback issues. It offers a high level of security where only you can access your files. Some of its additional editing options allow you to pick an output format. Besides, users can keep their media sound or mute while making the conversion.
This tool supports MP4, MPG, VOB, MOV, and WMV media file formats. The following is a step-by-step guide to using this online solution:
Step 1
Access the official site of Clideo Stop Motion Maker and click the “Choose File” button. Browse your slow-motion video and press the “Open” button. Now, wait for a while until it gets uploaded on the site.

Step 2
Afterward, set the “Speed” from three given options. Choose to set the video to “Medium” speed. Moreover, you can also set the “Clip Rate” of the video as per requirements.

Step 3
When you get the desired outcome, click the “Export” button from the bottom-right corner. You will get a preview of the video on the next screen. Tap on the downward “ Download “ symbol and pick the file export destination. You can simply hit “Download” to get the file in your system.

Part 4: Desktop Recommendation: Converting Slow Motion Video to Normal Using Wondershare Filmora
In the above sections, you have learned how to turn slow-mo into normal. Now, it is time to look for an effective offline solution. That’s where you can count on Wondershare Filmora , which is the simplest but powerful video editor. Fortunately, it can speed up and slow down videos within the highest quality. Filmora provides more advanced editing options than the above solutions.
Free Download For Win 7 or later(64-bit)
Free Download For macOS 10.14 or later
Steps to Perform Slow Motion and Speed Up Videos to Normal with Filmora
Unlike other tools, Filmora can quickly convert your video speed to your desired extent. Head below and transform your video easily with this step-by-step guide.
Step 1Install Filmora and Export Your Media to Start a Project
Successfully launch Filmora in your system and access its home screen. Click on the “New Project” option to initiate media editing. Bring your video to the timeline after importing it into the media panel. To import the file, press the “Ctrl + I” keys using your keyboard.

Step 2Slow Down or Speed Up the Video with Optical Flow
Right-click on your slow-motion video in the timeline to get an extended list. From that list, tap the “Uniform Speed” option and find an editing panel on the right. Now, drag the “Speed” slider right to speed up the video. You can move it to the left side to slow down the video. To ensure a smooth quality, extend the “AI Frame Interpolation” menu and pick the “Optical Flow.”

Step 3Save the File Through the Export Button
Press the Space bar from your keyboard and preview the video. Navigate toward the “Export” button at the top right corner. You can adjust the export parameters and tap “Export” to save the file on your device.

Other Exceptional Features of Filmora
Filmora is more than a simple video editing app. AI integration can generate music, images, and scripts to embrace creativity in your content. Read the following points to learn more about Filmora’s incredible features.
- AI Vocal Remover: If you want to dub a video, use this feature to remove existing vocals. It can separate music and vocal soundtracks while keeping their quality high. Once AI removes vocals, you can quickly edit or remove unwanted elements from the tracks.
- AI Text to Video: Content creators can get instant engagement in their content with this feature. Users just have to write their ideas and let AI transform them into a visual story. They can later customize fonts, styles, and other elements to achieve desired results.
- AI Smart Masking: Professionals can improve their multi-dimensional scenes using this option. It enables multi-layer overlay editing that isolates subjects. Users can freeze frames and perform auto-correction for visual enhancements of the projects.
Conclusion
In short, slow-motion to normal video conversion is possible and serves fruitful purposes. In this regard, iPhone and Android offer built-in options that are explained earlier. Besides, you get familiar with how to convert a slow-motion video to normal using an online tool. For an effective desktop solution, try using Filmora, which is a top-notch video editor so far.
Time Lapse Video Is Very Interesting and Creative, Which Usually Attracts More Attention. This Article Will Show You How to Make a Time Lapse Video with Adobe After Effects
Time-Lapse movies are great for a variety of projects; you can use them as establishing shots in sitcoms, corporate marketing videos, and they can make lovely backgrounds for animated slideshows. A time-lapse video is essentially a series of photographs taken at regular intervals to depict how the environment changes gradually over a shorter period of time. In this article, we’ll demonstrate how you may quickly and easily build an After Effects time-lapse effect.
With that said, let’s start!
Step 1. Create a new composition
Calculating your composition length to accommodate the frame rate and number of images is the first step in generating a time-lapse video.
- Verify the number of images you have for your Sequence.
- New Composition Creation. Selecting a frame rate: A time lapse film produced at 30 frames per second will flow smoothly, but you can select any frame rate you like.
- To determine the duration of your composition, divide the number of photographs you have by the frame rate you’ve chosen. For instance, if you use 600 photos at 30 frames per second, your composition will last 20 seconds.
Step 2. Import your images
You are prepared to make a time-lapse sequence if all of your photographs are saved to the same folder and are in the same order. If you are working directly from your Camera, you will likely have Camera Raw files, although this procedure works with PNG and JPEG sequences.
- Press Command/Control I on your keyboard or select File > Import. Find the folder holding your image sequence.
- To begin, select the first picture in the sequence. If all of your images have accurate names, After Effects will be able to identify a sequence of images.
- Make sure the Force Alphabetical Order and Camera Raw Sequence checkboxes are selected. Your Time-Lapse Sequence will display in the Project Browser Panel after you click Import.
- Once you’ve watched how it plays, you can adjust the Frame Rate by right-clicking the Sequence in the Project Browser and selecting Interpret Footage > Main.
- To update your time-lapse, modify the Frame Rate setting and click OK.

Step 3. Create movements
- After Effects’ Time-Lapse Sequence can be used just like any other standalone clip. This implies that you may give your time-lapse clip movement by adding Keyframes and Effects.
- Place your Playhead at the beginning of the clip after choosing the Image Sequence. Make a keyframe for the scale or position.
- To generate a second Keyframe for the value of your choice, move to the end of the clip. Make any necessary Clip modifications.
- Right-click on the timeline, choose New > Adjustment Layer, then add your effects to the Adjustment Layer to add effects like noise and grain.
Step 4. Create slow motion from a video
You can import your video after you’ve shot it to prepare it for editing. The same steps, including naming your photos in order, must be taken for the Time Lapse sequence. It may be advantageous to entirely rename both your Image Sequence and Performer clip.
- Drag the finished Time Lapse sequence to your Timeline after completing it as previously explained.
- Over the Time Lapse, add the Performer Clip to the Timeline.
- Choose Time>Time Stretch by performing a right-click on the performer clip.
- You can alter the Stretch Factor or Duration in the dialogue box. When you alter one parameter, the other will reflect the new Stretch Factor or Duration for you.
Step 5. Make an overlay
You can alter the Stretch Factor or Duration in the dialogue box. When you alter one parameter, the other will reflect the new Stretch Factor or Duration for you.
- Find Luma Key in the Effect Control Panel and drag it to your clip.
- Change the Key Type setting in the Effect Control Panel to Key Out Brighter.
- The Threshold, Tolerance, and Edge settings should be adjusted until only the silhouette is visible.
- Use the Pen or Mask Tool to create a circle around the parts you want to delete if you discover any corners of your clip that are still visible.
- Add any Effects, such as Light Leaks, to your Adjustment Layer by choosing “Right-click > New > Adjustment layer.”
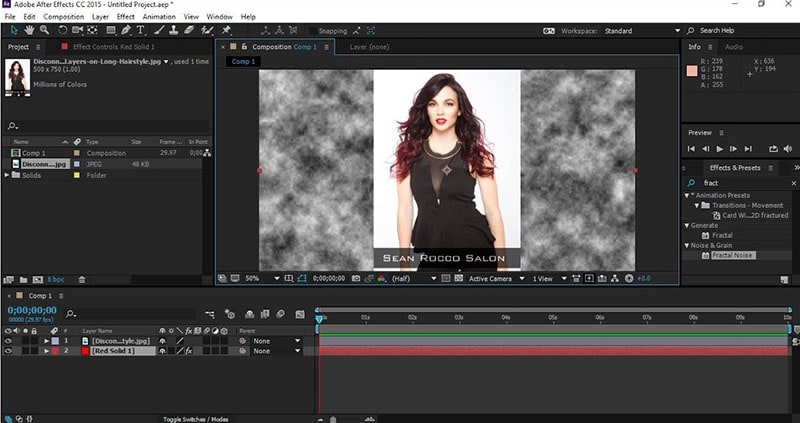
After Effects CC must be opened, a new project must be created, the Import File menu option must be selected, and the appropriate folder containing the altered still images must be located and selected before the time-lapse photos can be turned into a film. You need to make sure that the JPEG Series box is checked, as well as the Force Alphabetical Order box.
Once you have clicked on the first image in the sequence. The time-lapse video that you uploaded appears in the project library. After performing a right-click on the filename, select “New Comp from Selection” from the context menu.
Step 6. Exporting your video
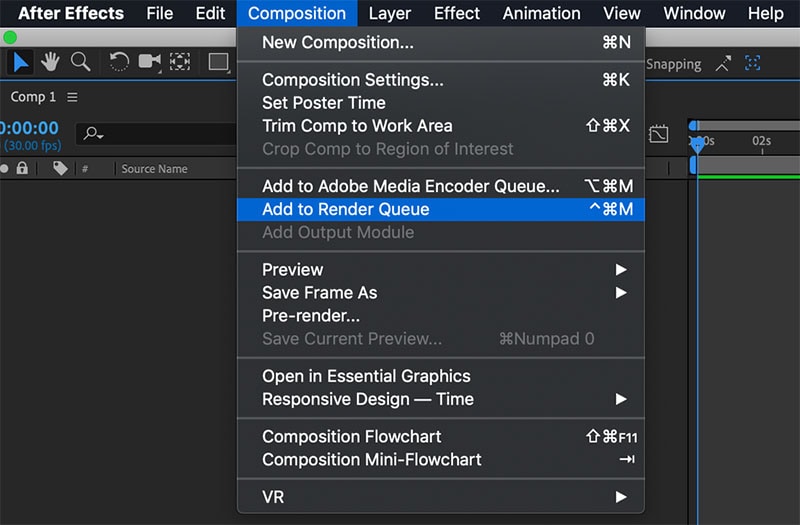
After getting our sequence to perform some kind of slow, understated animation so that it appears as though the camera is moving dramatically, we will need to export a video file. Go to File > Export > Add to Render Queue, then open the Render Queue dialog box by going to Window > Render Queue. From there, you can choose the Output Module and change the settings in the options dialog box. Finally, choose the Output To option and select the location on your computer where you would like to save the video clip that we are currently rendering and exporting.
Conclusion
No matter how you make your time lapse videos, After Effects has a ton of features you can use to modify and enhance the way they look. Now that you are familiar with the fundamentals, you can play with the Frame Rates and Composition options. Check out this helpful manual for more information on Time Stretching and Remapping in After Effects.
Free Download For Win 7 or later(64-bit)
Free Download For macOS 10.14 or later
Free Download For macOS 10.14 or later
Right Tools for Converting 60FPS Frame Rate in Videos
One of the primary things that differentiate a good video from a low-quality one is its frame rate or burst rate. This refers to the frequency of a series of images or frames consecutively appearing during display. A low frame rate per second or FPS causes issues in most display screens, so you will need a 60 FPS video converter to update it.
You need to convert or make video 60FPS online through tools and software to improve the sharpness of frame speed and make it suitable for streaming sites like YouTube that play 60FPS only or create UHD/4K videos. Plus, most high-definition screens for gaming, computers, tablets, and smartphones require high FPS.
This article will teach you the best solutions to make the conversion possible. Choose your option after a full evaluation.
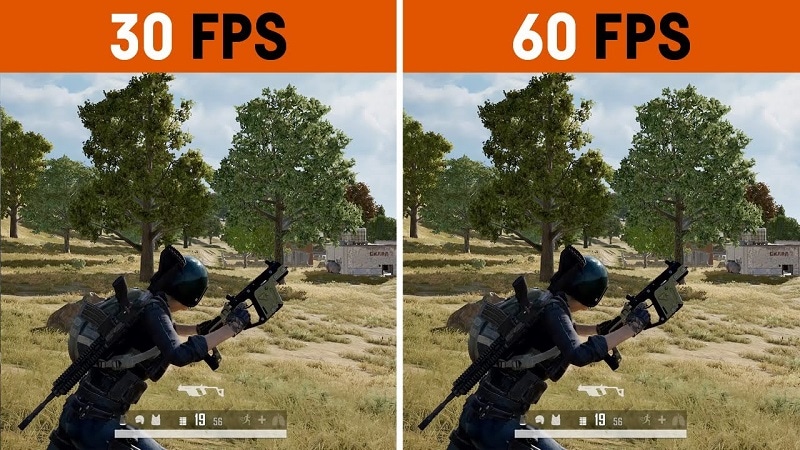
Part I. What does 60 FPS mean?
Before discussing the best tools available for frame rate conversion, you should know what frame rate is. Also known as update rate, this signifies the frequency of the display of consecutive series of frames or images. The speed of how they appear determines the fluid play of the video with no interruption or lag.
In the context of video and film cameras, motion capture systems, and computer graphics, you should try to convert video to 60FPS. There are multiple types available, like the low 24FPS or 30FPS or the higher 60FPS or 120FPS. 60FPS is the most accepted option for diverse operating systems, screens, and graphics.
Differences between 24FPS, 30FPS, and 60FPS
Here are the differences you will note between the three common frame rates per second in videos. For a simple overview, these differences are expressed in tabular form.
| 24FPS | 30FPS | 60FPS | |
|---|---|---|---|
| Description | This universally acceptable frame rate choice is used for transferring video signals to film. | 30FPS is a slightly higher frame rate choice for animations and show videos that are suitable for television viewing and online platforms. | Videos at 60FPS have better fluency and smoother definition, with sharp videos that work during gaming, high-definition streaming, and UHD/4K video editing. |
| Types of videos | Older videos and films. | Online videos, TV shows, and news. | HD-quality movies, online videos, and games. |
| Users | Movie suppliers | Entertainment and Media professionals. | Movie producers, video editors, gaming software developers, etc. |
Why Should You Convert Videos into 60FPS?
In the context of video FPS, the three variations- 30FPS, 60FPS, and 24FPS are the most common. However, there are specific reasons why 60FPS is the best option you should use, and take the time to convert your files with this frame rate.
- Playing 24FPS or 30FPS videos on LCD screens have more prominent motion blur, the sharpness of transition is low and rough, etc.
- Well-known streaming sites like YouTube set their standard for videos at 60FPS. If you use a file with a higher FPS, it will compress to 60FPS automatically. Anything lower than that is unacceptable since it creates a laggy video transition.
- Creating high-quality movies in UHD or 4K resolution requires a high FPS like 60FPS. Movies shot with 24FPS do not assure the best display in the native frame rate and need pulldown conversion. This causes judder, which affects video quality. Converting the video to 60fps ai online is a better choice.
- Modern devices like computers, smartphones, and tablets have a high refresh rate. So, these, including some gaming monitors and television varieties, accept videos with 60FPS best.
- In animation, most creators run 3-4 images per drawing, which means 6 or 8 drawings per second. For the best transition between shorts and images, converting the animation videos to 60FPS is useful.
If you want to know more about these FPS options and which one to select for long-term usage, read through the comprehensive review .
Part II. How to convert A Video to 60fps?
If you plan to use a 60fps video converter, luckily, multiple capable choices are available in the market. Here, we present the top options you can use with an accurate conversion that occurs quickly and with limited errors.
1. Best Software Converters
The following are the best software-based platforms that you can try out.
One notable ai 60fps converter that users find extremely useful all around for optimized video editing is Wondershare UniConverter. The tool comes with varying AI-powered tools you can try to change.
With this software, you can easily make changes to the file during the conversion, like upgrading the FPS and bitrate of various video codecs, adjusting the contrast, contrast, etc., for output. Plus, it is possible to change the speed of the videos you are editing through the Editing timeline, between 0.25X - 3X speed options.

- User Base: Professional video editors, social media vloggers, businesses, students, beginner-level users, etc.
Watch this video to get a visual representation of how the tool works for FPS conversion and other editing functions.
How to use Wondershare UniConverter for converting FPS?
Step1 Download and launch the Wondershare UniConverter software on your device after completing all installation steps.
Step2 Click or drag and drop the video file of which you will change the frame rate.
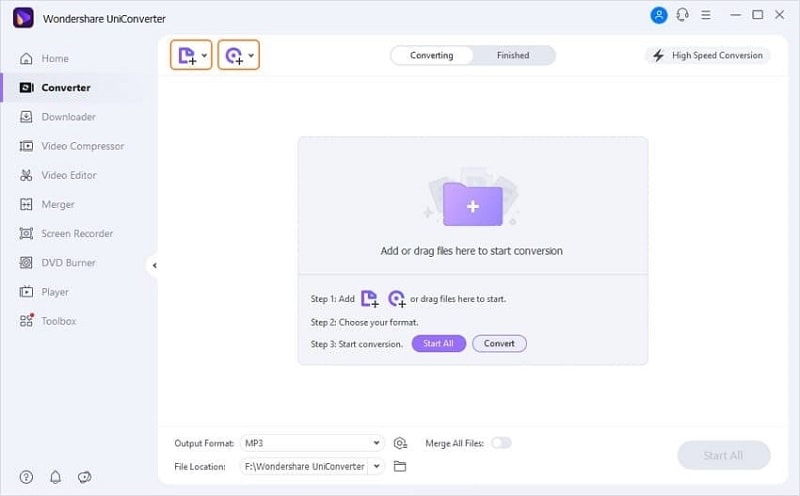
Step3 To make changes to the video, click the Edit button and do them- like speed change, cutting sections, etc.
Step4 Then press the Settings button. Choose the Video option and then select the format like MP4.
Step5 Tap the setting icon beside the format choice and set the frame rate option as 60FPS. Then, press the Create button.
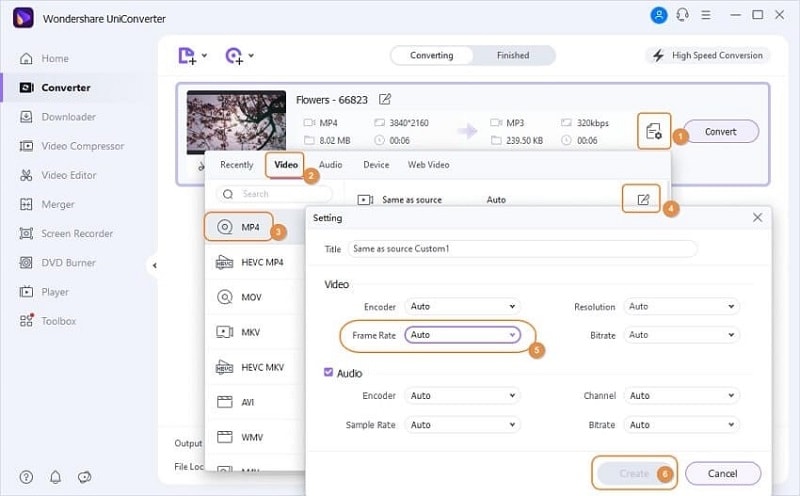
Step6 To convert the file further, click the Convert button and choose the destination file format. Press Convert.
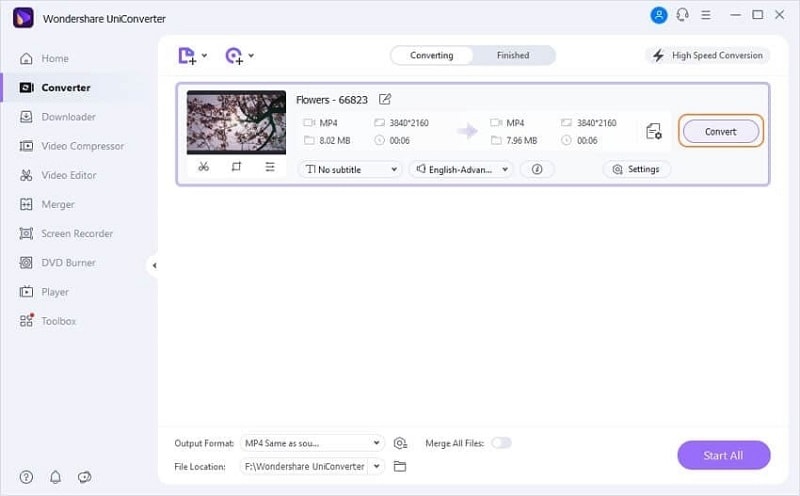
Features:
- Convert between different file formats.
- Edit or split the files.
- Change the speed of the video between various speed modes.
- Download files at high resolution as per customization.
Pros
- Easy to use for non-technical users.
- The free software includes most of the conversion functions.
- Zero quality loss or lagging FPS playthrough in the converted file.
Cons
- GPU acceleration and High-Speed Conversion are available for Pro users only.
- You can resize the file for social media platforms like YouTube once using the Free Trial version.
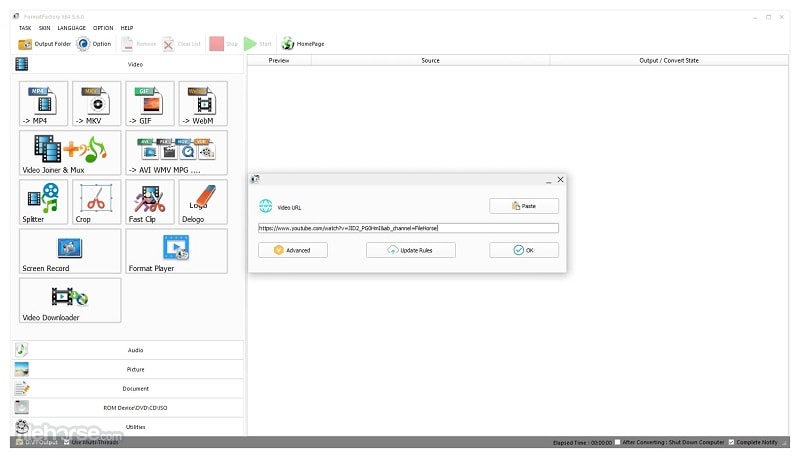
Another FPS video maker and converter tool that you must try is Format Factory. This professional-quality video and audio converter tool are useful for various levels of video editing, including specifications like the frame rate per second.
You can clip and join your video section and do audio mixing steps. Easily adjust your video frame speed to ensure top-grade video playback with limited to no resolution loss. You can easily set the frame rate to 60FPS after downloading YouTube videos and making adjustments.
Pros
- Compress file size with settings changes for frame rate.
- Supports different video formats.
- Compatible with HEIC and WEBP formats for conversion.
Cons
- Only suitable for Windows users.
- Slightly complex to try for beginner-level users.
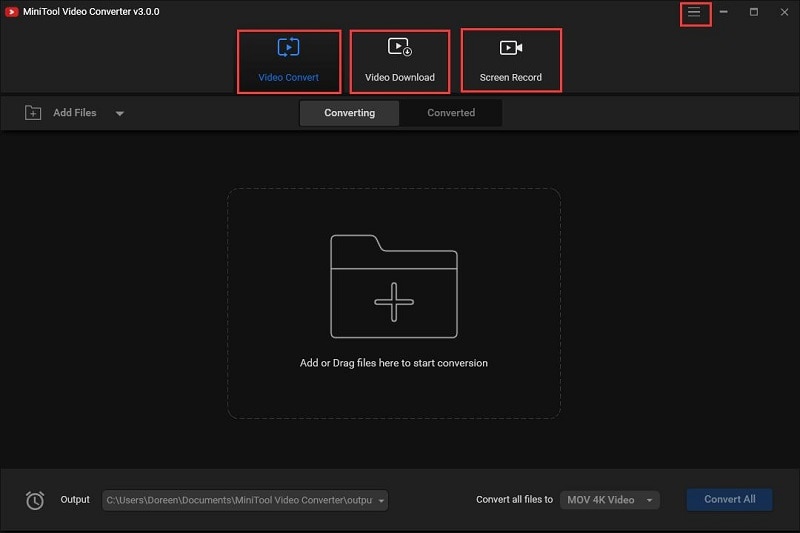
One of the best 60fps video editor options available in the market is MiniTool Video Converter. This Windows-based native software can make multiple advanced changes to your video file during conversion. Not to mention, it supports quick batch processing, with zero drop in quality after the process.
You can easily change the frame rate speed to 60FPS or other speed options during the exporting process. Adding effects will maintain a strong frame rate frequency that you can also preview.
Pros
- Supports a variety of video formats for conversion.
- Batch conversion is supported here.
- No loss of quality when you change the frame rate or bitrate.
Cons
- The process will lag if there is not at least 1 GB of free storage space in your device.
- Only works on Windows devices.
2. Best Online Converters
If you want to use a 60fps video converter online, there are tools available for that as well. These converters come with limited advanced mechanisms or features. However, in terms of changing the FPS of videos, web-based tools are easier to operate and do straightforward tasks.
Plus, you will not need to register or download third-party software here- the tools are accessible through any browser or device.
1) AI Video Frame Rate Converter
One of the best tools for online video frame rate conversion is the AI Video Frame Rate Converter. With this online tool, you can easily insert your file into the tool you access on any browser of your choice.
Then, choose the conversion FPS like 60FPS for your video and get high-resolution video quality in the final file. The software does not keep the file on the server, which assures good privacy protection for users with their files and data.

Pros
- No need to install the software.
- Easily choose the FPS option to convert the file.
- The quick conversion process.
Cons
- The free version only allows 5 credits for users to try.
- No tools to enhance video quality with the free tool.
2) Video2Edit
Another top 60fps converter online that users should give a chance is Video2Edit. This tool is accessible through any web browser and allows one to change various aspects of the video they are converting, including the frame rate.
You can choose 60FPS as the target frame rate choice for the video that you add to your device’s tool. It also supports 120FPS and other options lower than 60FPS- the final converter file is still a high definition.

Pros
- Choose the frame rate per second for your video.
- Make settings changes for your video audio additionally.
- The tool is easily accessible and free to use.
Cons
- You have to take more steps for customization instead of directly getting the FPS changing option.
- Cannot convert multiple files simultaneously.
3) Aconvert
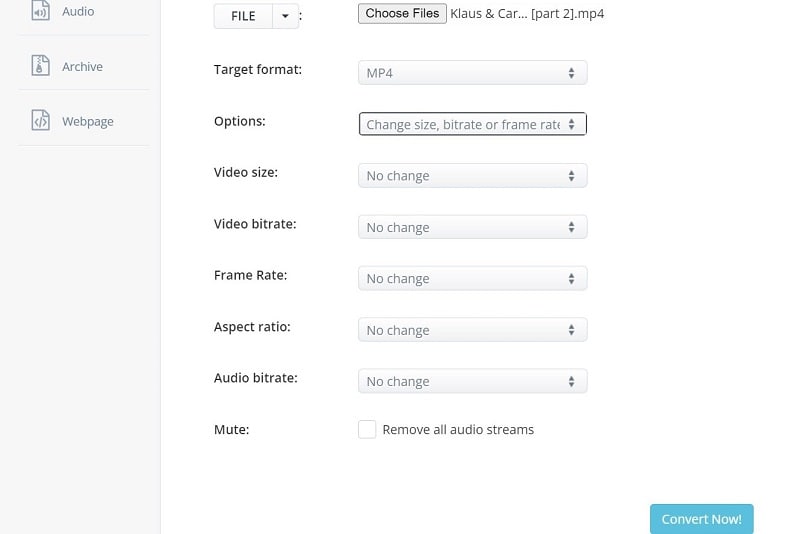
Users can try out this online video to 60fps converter to change elements of videos quickly during conversion. You can insert your file from a cloud account, device, or URL and choose the video format to convert.
Plus, it is much easier to directly set the frame rate you want to change in the video. This tool supports up to 60FPS for the change, and you can choose a custom FPS if necessary.
Pros
- Can convert video codec settings like bitrate, etc., for different file formats.
- Easily add a file from the device, URL, or cloud.
- Quick processing speed for the conversion.
Cons
- No batch conversion for multiple files.
- Big files can get slow to convert.
Bonus Tip. Use Wondershare Filmora to Create High-Quality Videos with 60FPS Support
If you plan to make further edits to your video clips and directly create a project with 60FPS support, using a capable 60fps maker software is necessary. Wondershare Filmora is suitable software for video editing professionals and regular users to try to make videos easily.
Free Download For Win 7 or later(64-bit)
Free Download For macOS 10.14 or later
You can use the different features available for quick and customized video projects. Here, you can try the Instant Mode feature for instantaneous video edits or directly try out the editor timeline with diverse features like Edit icon or Speed Ramping to make changes. As for adjusting the frame rate, you can make those changes during export.
Watch this video to know how to use Filmora for further video editing.
How to Change Frame Rate to 60FPS in Filmora?
Step1 After you have completed all of the edits, click on the Export button in the editor timeline of Filmora.
Step2 Choose the output format you will download the video file, e.g., MP4, from the Local tab.
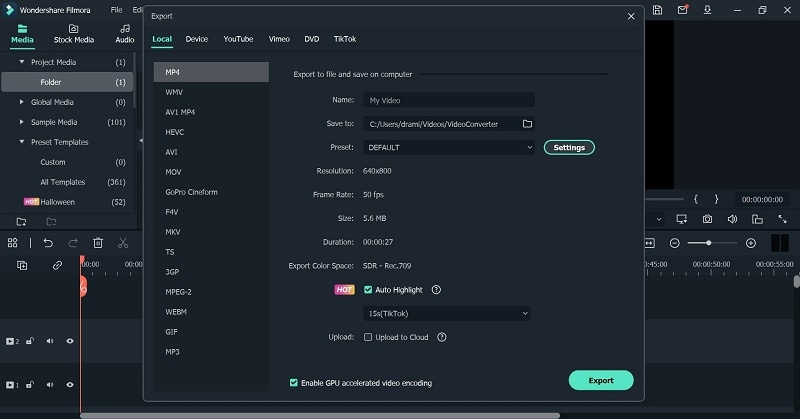
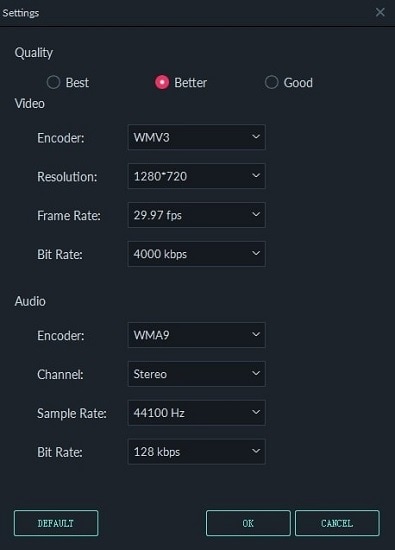
Step3 Click on the Settings button. Adjust the specification of the video, like frame rate, and change to 60FPS. Make other changes if needed, and press OK.
Step4 Click on Export to download the file or directly upload it via Vimeo or YouTube through those tabs.
Conclusion
Indeed, adjusting the frame rate of your video will help you create high-quality videos with a fluid and lag-less transition. You should convert your file to 60FPS if it is a lower version at the time to improve sharpness and make it compatible with most screen types, 4K movie playing, and streaming.
Use the available online and native software options to make these changes quickly and efficiently. Additionally, if you want to create a file directly at 60FPS, you can do so using Filmora.
Give these tools a try first to get a better experience with the features and process.
Why Should You Convert Videos into 60FPS?
In the context of video FPS, the three variations- 30FPS, 60FPS, and 24FPS are the most common. However, there are specific reasons why 60FPS is the best option you should use, and take the time to convert your files with this frame rate.
- Playing 24FPS or 30FPS videos on LCD screens have more prominent motion blur, the sharpness of transition is low and rough, etc.
- Well-known streaming sites like YouTube set their standard for videos at 60FPS. If you use a file with a higher FPS, it will compress to 60FPS automatically. Anything lower than that is unacceptable since it creates a laggy video transition.
- Creating high-quality movies in UHD or 4K resolution requires a high FPS like 60FPS. Movies shot with 24FPS do not assure the best display in the native frame rate and need pulldown conversion. This causes judder, which affects video quality. Converting the video to 60fps ai online is a better choice.
- Modern devices like computers, smartphones, and tablets have a high refresh rate. So, these, including some gaming monitors and television varieties, accept videos with 60FPS best.
- In animation, most creators run 3-4 images per drawing, which means 6 or 8 drawings per second. For the best transition between shorts and images, converting the animation videos to 60FPS is useful.
If you want to know more about these FPS options and which one to select for long-term usage, read through the comprehensive review .
Part II. How to convert A Video to 60fps?
If you plan to use a 60fps video converter, luckily, multiple capable choices are available in the market. Here, we present the top options you can use with an accurate conversion that occurs quickly and with limited errors.
1. Best Software Converters
The following are the best software-based platforms that you can try out.
One notable ai 60fps converter that users find extremely useful all around for optimized video editing is Wondershare UniConverter. The tool comes with varying AI-powered tools you can try to change.
With this software, you can easily make changes to the file during the conversion, like upgrading the FPS and bitrate of various video codecs, adjusting the contrast, contrast, etc., for output. Plus, it is possible to change the speed of the videos you are editing through the Editing timeline, between 0.25X - 3X speed options.

- User Base: Professional video editors, social media vloggers, businesses, students, beginner-level users, etc.
Watch this video to get a visual representation of how the tool works for FPS conversion and other editing functions.
How to use Wondershare UniConverter for converting FPS?
Step1 Download and launch the Wondershare UniConverter software on your device after completing all installation steps.
Step2 Click or drag and drop the video file of which you will change the frame rate.

Step3 To make changes to the video, click the Edit button and do them- like speed change, cutting sections, etc.
Step4 Then press the Settings button. Choose the Video option and then select the format like MP4.
Step5 Tap the setting icon beside the format choice and set the frame rate option as 60FPS. Then, press the Create button.

Step6 To convert the file further, click the Convert button and choose the destination file format. Press Convert.

Features:
- Convert between different file formats.
- Edit or split the files.
- Change the speed of the video between various speed modes.
- Download files at high resolution as per customization.
Pros
- Easy to use for non-technical users.
- The free software includes most of the conversion functions.
- Zero quality loss or lagging FPS playthrough in the converted file.
Cons
- GPU acceleration and High-Speed Conversion are available for Pro users only.
- You can resize the file for social media platforms like YouTube once using the Free Trial version.
Another FPS video maker and converter tool that you must try is Format Factory. This professional-quality video and audio converter tool are useful for various levels of video editing, including specifications like the frame rate per second.
You can clip and join your video section and do audio mixing steps. Easily adjust your video frame speed to ensure top-grade video playback with limited to no resolution loss. You can easily set the frame rate to 60FPS after downloading YouTube videos and making adjustments.

Pros
- Compress file size with settings changes for frame rate.
- Supports different video formats.
- Compatible with HEIC and WEBP formats for conversion.
Cons
- Only suitable for Windows users.
- Slightly complex to try for beginner-level users.
One of the best 60fps video editor options available in the market is MiniTool Video Converter. This Windows-based native software can make multiple advanced changes to your video file during conversion. Not to mention, it supports quick batch processing, with zero drop in quality after the process.
You can easily change the frame rate speed to 60FPS or other speed options during the exporting process. Adding effects will maintain a strong frame rate frequency that you can also preview.

Pros
- Supports a variety of video formats for conversion.
- Batch conversion is supported here.
- No loss of quality when you change the frame rate or bitrate.
Cons
- The process will lag if there is not at least 1 GB of free storage space in your device.
- Only works on Windows devices.
2. Best Online Converters
If you want to use a 60fps video converter online, there are tools available for that as well. These converters come with limited advanced mechanisms or features. However, in terms of changing the FPS of videos, web-based tools are easier to operate and do straightforward tasks.
Plus, you will not need to register or download third-party software here- the tools are accessible through any browser or device.
1) AI Video Frame Rate Converter
One of the best tools for online video frame rate conversion is the AI Video Frame Rate Converter. With this online tool, you can easily insert your file into the tool you access on any browser of your choice.
Then, choose the conversion FPS like 60FPS for your video and get high-resolution video quality in the final file. The software does not keep the file on the server, which assures good privacy protection for users with their files and data.

Pros
- No need to install the software.
- Easily choose the FPS option to convert the file.
- The quick conversion process.
Cons
- The free version only allows 5 credits for users to try.
- No tools to enhance video quality with the free tool.
2) Video2Edit
Another top 60fps converter online that users should give a chance is Video2Edit. This tool is accessible through any web browser and allows one to change various aspects of the video they are converting, including the frame rate.
You can choose 60FPS as the target frame rate choice for the video that you add to your device’s tool. It also supports 120FPS and other options lower than 60FPS- the final converter file is still a high definition.

Pros
- Choose the frame rate per second for your video.
- Make settings changes for your video audio additionally.
- The tool is easily accessible and free to use.
Cons
- You have to take more steps for customization instead of directly getting the FPS changing option.
- Cannot convert multiple files simultaneously.
3) Aconvert
Users can try out this online video to 60fps converter to change elements of videos quickly during conversion. You can insert your file from a cloud account, device, or URL and choose the video format to convert.
Plus, it is much easier to directly set the frame rate you want to change in the video. This tool supports up to 60FPS for the change, and you can choose a custom FPS if necessary.

Pros
- Can convert video codec settings like bitrate, etc., for different file formats.
- Easily add a file from the device, URL, or cloud.
- Quick processing speed for the conversion.
Cons
- No batch conversion for multiple files.
- Big files can get slow to convert.
Bonus Tip. Use Wondershare Filmora to Create High-Quality Videos with 60FPS Support
If you plan to make further edits to your video clips and directly create a project with 60FPS support, using a capable 60fps maker software is necessary. Wondershare Filmora is suitable software for video editing professionals and regular users to try to make videos easily.
Free Download For Win 7 or later(64-bit)
Free Download For macOS 10.14 or later
You can use the different features available for quick and customized video projects. Here, you can try the Instant Mode feature for instantaneous video edits or directly try out the editor timeline with diverse features like Edit icon or Speed Ramping to make changes. As for adjusting the frame rate, you can make those changes during export.
Watch this video to know how to use Filmora for further video editing.
How to Change Frame Rate to 60FPS in Filmora?
Step1 After you have completed all of the edits, click on the Export button in the editor timeline of Filmora.
Step2 Choose the output format you will download the video file, e.g., MP4, from the Local tab.

Step3 Click on the Settings button. Adjust the specification of the video, like frame rate, and change to 60FPS. Make other changes if needed, and press OK.

Step4 Click on Export to download the file or directly upload it via Vimeo or YouTube through those tabs.
Conclusion
Indeed, adjusting the frame rate of your video will help you create high-quality videos with a fluid and lag-less transition. You should convert your file to 60FPS if it is a lower version at the time to improve sharpness and make it compatible with most screen types, 4K movie playing, and streaming.
Use the available online and native software options to make these changes quickly and efficiently. Additionally, if you want to create a file directly at 60FPS, you can do so using Filmora.
Give these tools a try first to get a better experience with the features and process.
Also read:
- New Best Method to Split the Video Into Parts Online
- Updated Can You Make an Fcpx Slideshow? Undoubtedly Yes, with the Unlimited Best Fcpx Slideshow Templates Available. To Know How to, Follow the Discussion Below
- New In 2024, Advancements in Game Recording Software A Comprehensive Overview
- New 2024 Approved Step by Step to Rotate Videos Using OBS
- New 2024 Approved How to Combine Multiple Videos Into One on Instagram
- 2024 Approved Quickly Turn Any Video Into a Paper Rip Effect
- Updated Add Neon Effects to Your Dance Videos with the Help of Wondershare Filmora After Reading This Article. It Will Give a More Thrilling and Exciting Appearance
- New In 2024, End Screen Makers
- 2024 Approved How to Make Boring Videos Look Cool By B Rolls
- 2024 Approved How to Make Falling Text Effect in Filmora?
- Updated 2024 Approved Top 20 Slideshow Makers for Win/Mac/Online Review
- Learn the Step-by-Step Process of Slowing Down Time-Lapse Videos on Your iPhone
- Top 5 Apps To Add Song To Video for 2024
- Updated Ultimate Guide to Making Cinematography for Music Video for 2024
- In 2024, Looking Into How Slow Mo Guys Have Changed the Dynamics of Slow-Motion
- New In 2024, Top 5 Apps To Add Song To Video
- In 2024, Easiest Fix Included! Top 5 Ways to Convert HDR to SDR Videos
- Updated 2024 Approved How to Clone Yourself in Videos with Filmora?
- Failed to play HEVC files on Galaxy S23 Ultra
- How to Perform Hard Reset on Motorola G24 Power? | Dr.fone
- Complete Guide to Hard Reset Your Oppo A1 5G | Dr.fone
- In 2024, What Is a SIM Network Unlock PIN? Get Your Samsung Galaxy F15 5G Phone Network-Ready
- In 2024, A Working Guide For Pachirisu Pokemon Go Map On Honor 80 Pro Straight Screen Edition | Dr.fone
- In 2024, Forgot Pattern Lock? Heres How You Can Unlock Xiaomi Redmi A2 Pattern Lock Screen
- How to Intercept Text Messages on OnePlus Nord N30 SE | Dr.fone
- Poco C51 support - Forgotten screen lock.
- Issues playing MOV videos on Samsung
- In 2024, A How-To Guide on Bypassing the Apple iPhone 11 Pro Max iCloud Lock
- Which is the Best Fake GPS Joystick App On OnePlus Nord 3 5G? | Dr.fone
- How to fix iCloud lock on your Apple iPhone XS Max and iPad
- Top 15 Augmented Reality Games Like Pokémon GO To Play On Nubia Red Magic 9 Pro+ | Dr.fone
- Title: Premiere Pro Slow Playback Issues Finding The Best Solutions for 2024
- Author: Chloe
- Created at : 2024-04-24 07:08:14
- Updated at : 2024-04-25 07:08:14
- Link: https://ai-editing-video.techidaily.com/premiere-pro-slow-playback-issues-finding-the-best-solutions-for-2024/
- License: This work is licensed under CC BY-NC-SA 4.0.

