:max_bytes(150000):strip_icc():format(webp)/before-you-buy-a-video-projector-1847845-v3-ED-8a08e03f2cfc4835a13872618bd4ad00.png)
Premiere Pro Text Effects Beginner Guide for 2024

Premiere Pro Text Effects Beginner Guide
If you want to edit your raw video footage and turn ordinary clips into eye-catching videos, you will need a professional video editor. Adobe Premiere Pro is the most commonly used premium video editor that most professionals prefer. When it comes to editing videos, text effects play a major role along with video effects and animations.
If you are new to Adobe Premiere Pro, you will experience a steep learning curve. This is because the user interface is specially designed for professional video editors. Therefore, you might not get Premiere Pro text effects readily available. In this article, we will illustrate how you can add Adobe Premiere Pro text effects to your video project. We will also state the best alternative to Premiere Pro to add stunning text effects easily.
Part 1. Steps to Add Text Effects to Adobe Premiere
Text effects are an essential part of videos to enhance the video content immensely. You can add opening titles and end credits with text effects and animations. You can display the dialogues on the screen as subtitles. Showing location information and shooting date through text effects is quite regular these days. Besides, the use of lower thirds for social media promotion in videos is common. Without further ado, let us look at the steps to add Premiere text effects.
Step1 Add Your Text
First of all, you need to import your video and add text to it and apply different text effects. Here we are starting from scratch for better illustration. Go to Window> Essential Graphics> Text Tool(T). Type your text as per your requirements. You will notice a new text layer appearing under Edit tab.
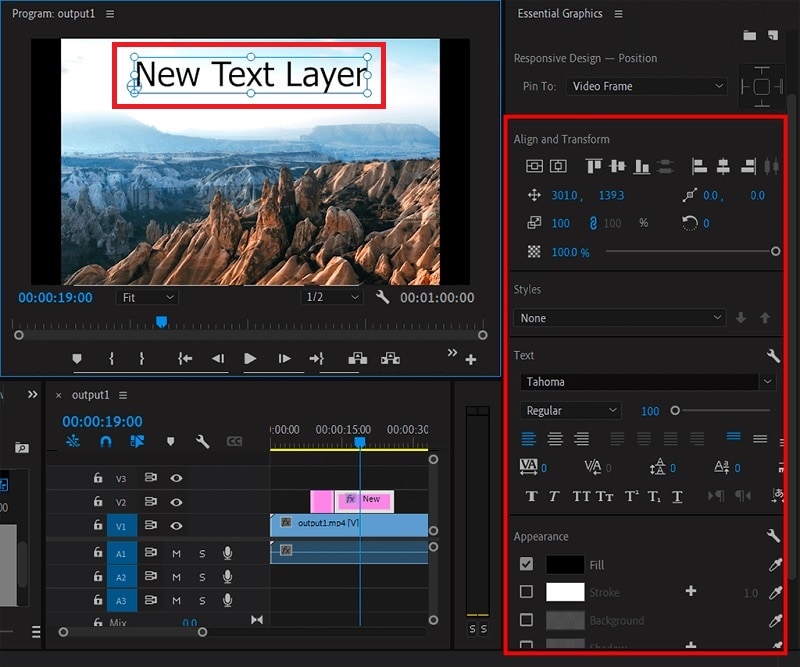
Select the text layer and you will see all the properties that you can tweak. For example, go to Align and Transform section to reposition and resize your text properly. Go to Text section to change the style of the text. Similarly, there is an Appearance section to adjust color, shadow, and much more.
Step2 Apply Pre-Animated Template
Go to Graphics> Essential Graphics and browser through the title templates available to match your requirements. Once you have selected one title template, drag and drop it into your timeline above your video clip.
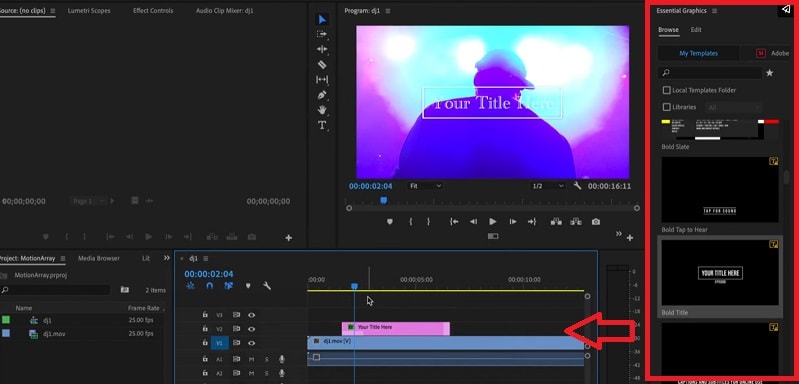
Double-click on the text to edit the content and type your title. Go to Essential Graphics panel and customize the text effect as per your preference. You can also choose the available elements included in the template to enhance the text effects as you think fit.
Step3 Edit the Text Effect and Animation
Select the text layer on your timeline to check out the keyframes applied in the template. Go to Effects Control panel and open Keyframe box by dragging it to the right. Adjust the keyframe to speed up or slow down the animation.

Bring the keyframes closer or spread them apart respectively. You can also adjust Velocity Controls present under different text properties as per the speed requirements.
Part 2. Alternative Way to Make Text Effects
If you are new to Adobe Premiere Pro, you will find title effects Premiere Pro difficult to add and edit as per your requirements. It is very common for amateur video editors to look for an easy alternative to Premiere Pro. We recommend Wondershare Filmora as the best alternative to Adobe Premiere text effects.
Filmora has a super intuitive user interface that is suitable for everyone including those who do not have prior video editing experience. There are more text effects and animations available that you can customize to get the desired effect. Here are the steps to add text effects to your video on Filmora.
Free Download For Win 7 or later(64-bit)
Free Download For macOS 10.14 or later
Step1 Download and install Wondershare Filmora and it is available for both Windows and macOS. Launch the application and click on New Project on the welcome screen.

Step2 Drag and drop your video clips under Project Media folder and then onto the timeline. Go to Titles and you will see different categories of text effects and templates.

Step3 Select a template whichever you think is perfect for your project and drop it on the timeline. Adjust its position on the timeline as per where you want it to appear. Double-click on it to edit the title and type in your text. Similarly, you can reposition the text from Viewer as per your need.
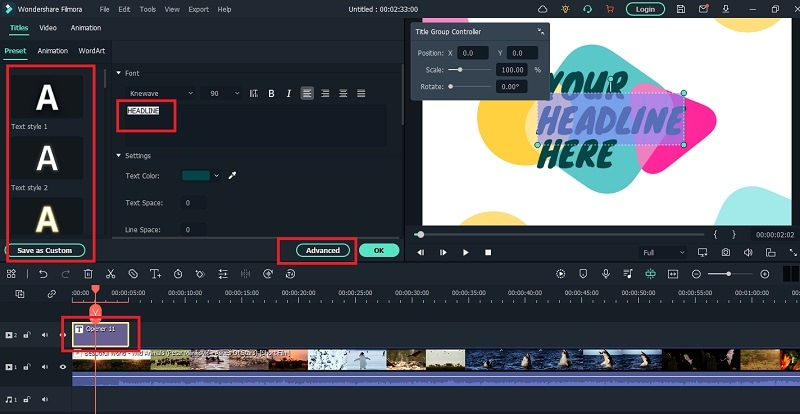
Select the text style as well as adjust fonts and settings to get different styles for your texts. There is also an Advanced section available for detailed editing and getting the desired text effect.
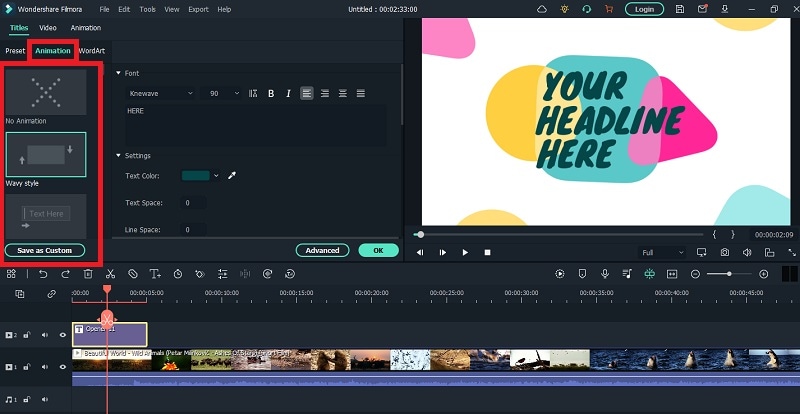
Step4 You can animate the texts in your video from Animation section. Choose from the animation presets to animate individual text in the video. Besides, you can also add keyframes and animate the text as per your preference.
Part 3. Related FAQs on Adobe Premiere Pro
1. How do you make text look good in Premiere Pro?
There are several steps you need to take to make text look good in Premiere Pro. First of all, the color of the text should be in contrast to the background. You can add a rectangle highlighter in the background. Experiment with font and text of the text. Apply a text effect from the different templates available. Customize the effect to get the desired result.
2. How do you add typing effects in Premiere?
Add your text to your video so that a text layer appears on the timeline. Animate the text Effects> Video Effects> Liner Wipe and double-click to get the typing effect. Tweak the parameters like transition completion, wipe angle, and others to smoothen out the animation. Draw a cursor icon using rectangle tool and animation it to move with the text using keyframes.
3. How do I open text effects controls in Premiere Pro?
Select the text layer from the timeline of the project. From the main menu, go to Windows> Effects Control option to open effect controls for text. Otherwise, you can directly go to Effects Control tab located below the menu bar after selecting your text layer.
The Bottom Line
Adding text effects in Premiere Pro can be slightly overwhelming for an amateur video editor who does not have enough experience with Premiere Pro. We have stated the simple steps to apply Premiere Pro text effects to your video project. However, we recommend Wondershare Filmora as the best and the easiest alternative to Premiere Pro where you get more text effects and add them instantly and effortlessly.
Free Download For macOS 10.14 or later
Step1 Download and install Wondershare Filmora and it is available for both Windows and macOS. Launch the application and click on New Project on the welcome screen.

Step2 Drag and drop your video clips under Project Media folder and then onto the timeline. Go to Titles and you will see different categories of text effects and templates.

Step3 Select a template whichever you think is perfect for your project and drop it on the timeline. Adjust its position on the timeline as per where you want it to appear. Double-click on it to edit the title and type in your text. Similarly, you can reposition the text from Viewer as per your need.

Select the text style as well as adjust fonts and settings to get different styles for your texts. There is also an Advanced section available for detailed editing and getting the desired text effect.
Step4 You can animate the texts in your video from Animation section. Choose from the animation presets to animate individual text in the video. Besides, you can also add keyframes and animate the text as per your preference.

Part 3. Related FAQs on Adobe Premiere Pro
1. How do you make text look good in Premiere Pro?
There are several steps you need to take to make text look good in Premiere Pro. First of all, the color of the text should be in contrast to the background. You can add a rectangle highlighter in the background. Experiment with font and text of the text. Apply a text effect from the different templates available. Customize the effect to get the desired result.
2. How do you add typing effects in Premiere?
Add your text to your video so that a text layer appears on the timeline. Animate the text Effects> Video Effects> Liner Wipe and double-click to get the typing effect. Tweak the parameters like transition completion, wipe angle, and others to smoothen out the animation. Draw a cursor icon using rectangle tool and animation it to move with the text using keyframes.
3. How do I open text effects controls in Premiere Pro?
Select the text layer from the timeline of the project. From the main menu, go to Windows> Effects Control option to open effect controls for text. Otherwise, you can directly go to Effects Control tab located below the menu bar after selecting your text layer.
The Bottom Line
Adding text effects in Premiere Pro can be slightly overwhelming for an amateur video editor who does not have enough experience with Premiere Pro. We have stated the simple steps to apply Premiere Pro text effects to your video project. However, we recommend Wondershare Filmora as the best and the easiest alternative to Premiere Pro where you get more text effects and add them instantly and effortlessly.
How to Add Effects in Premiere Pro
In order to provide video editors a simple method to combine unprocessed material into a finished product, Adobe Premiere Pro was created. Add effects in premiere pro shines at this job if you’re trying to take the raw video of a video that was taken and remove all of the less fascinating bits while retaining all of the better pieces. You may utilize how to add video effects in premiere pro by importing your material into the application, adding it all to a sequence, and then starting to rearrange the individual clips and add effects.
In Adobe Premiere Pro, you can significantly speed up the editing process, including a large number of common effects that can be applied to your video and configurable parameters that can change the clip size, opacity, rotation, and position. Knowing how to add after effects to premiere pro can be learned with the upcoming steps as it also offers a variety of editing tools that lets you clip, split a structured sequence of tracks and is designed for playback. Additionally, Premiere Pro templates may be used to jumpstart your procedure.
Part 1. Types of Video Effects on Adobe Premiere Pro
A video editing program called Adobe Premiere Pro can be used to create everything from TV programs and movies to advertisements and family videos. These effects include Transitions, VFX, Audio, Videos as well as Advanced level effects like Green Screen. In addition, to know how to add shake effect in premiere pro, we’ve explained in the upcoming steps.
For editors who don’t want to utilize the other motion graphic packages, Premiere provides a ton of built-in effects. Here are a few effects that you may not be aware are available to you. Any filmmaker or content producer must understand how to apply effects since they are necessary for a top-notch video. We’ve compiled easy steps on applying effects in Premiere Pro to be of assistance.
Part 2. How to Add Effects in Premier Pro
Add Transition Effects
There are several transition effects in Adobe Premiere Pro, and there are countless ways to customize them to fit your film. It is quite easy to locate transitions and add them. The Effects panel, which is accessible from the very top options bar, contains all the transition options. A panel will show up on the right when you choose this. To include a transition, adhere to these procedures.
- Navigate to the Video Transitions area of the Effects panel.
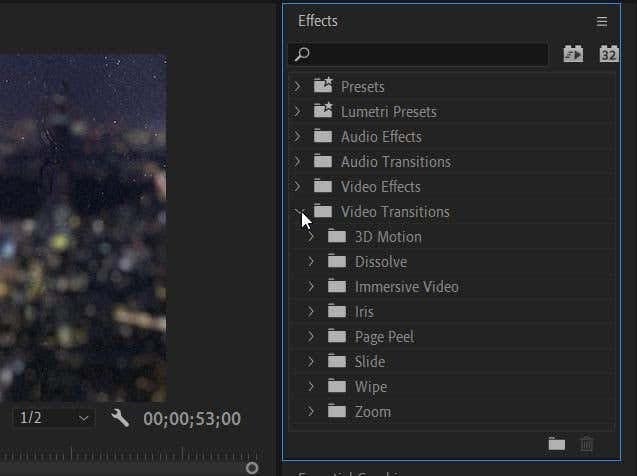
- Select the desired transition type from any of the available ones When you wish to employ a transition, press and hold it before dragging it to the start or finish of the clip. Alternately, insert it in between two clips to serve as a transition between the start and finish of each.

- In Premiere, there are several possible transitions, and some can be more suitable for your project than others.
Add Visual Effects
The Essential Graphics panel was added by Adobe to Premiere Pro. Users now have a much different workflow than they had with the few prior title panels. Now that everything is in one panel, you can easily create, animate, and use VFX. Some of the VFX shots were just building miniature towns and adding pieces, while others involved the standard green screen removal and backdrop replacement.
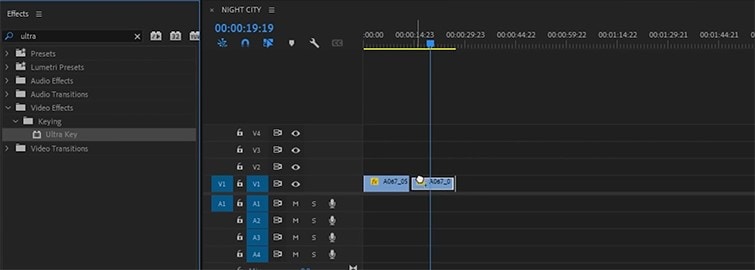
- Simply importing and uploading your video and audio files into Premiere Pro is the first step. The procedure of clicking through is fairly simple. Choose “New Project.” Press the Media Browser panel button and find the Ultra Key tool by opening the Effects panel.
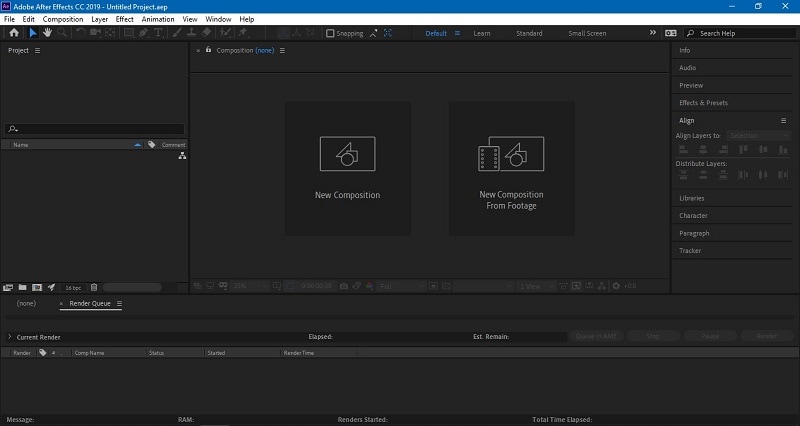
- The film clip with the green screen should have the Ultra Key added. Utilizing the matte creation and matte cleaning tools, remove the green screen using the ultra key effect. When softening, be cautious to eliminate any sharp edges. All of this can be adjusted under the Effects Control panel.
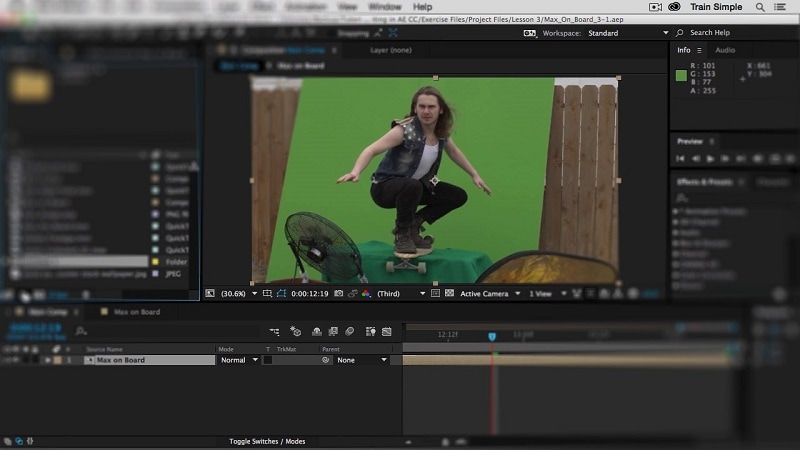
- Put your backdrop material behind your green screen clip after you have a clear key. You should now be able to view your backdrop behind the keyed layer.
Add Text Effects
There are many justifications for include text in your video. It has the ability to reach a bigger audience and is a fantastic example of cross-media integration. We must be able to write text since it is such a crucial component of video production. Learning how to add text in Adobe Premiere is quite simple; here’s an example:
- Select the type tool from the tool window. To add text, click the backdrop and then type. The segment includes a music titled visuals.
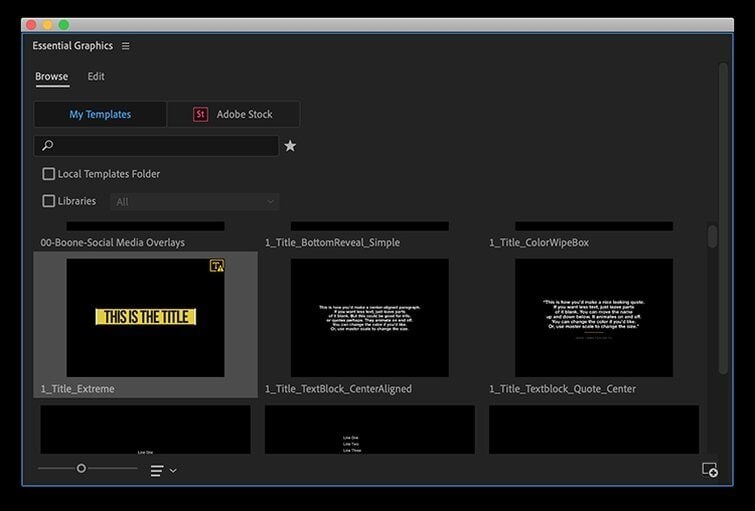
- choosing the Type Tool (T) Drag a text box onto your movie using the Graphic Type Tool, then type in it. You may need to go to Windows > Tools and click and hold on Type Tool if it isn’t already selected.
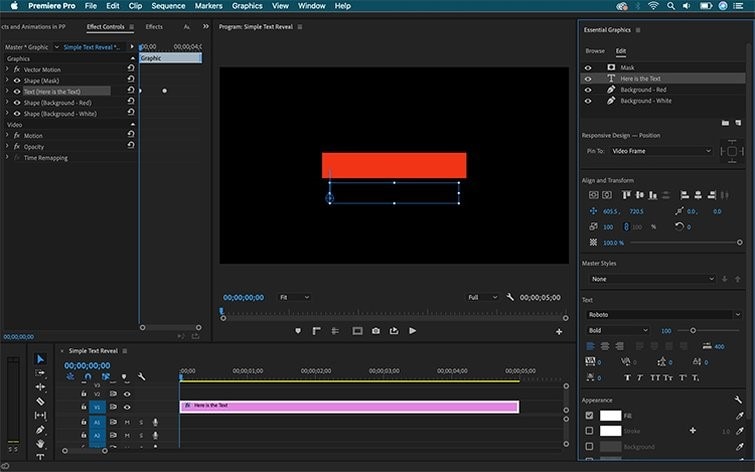
- Head over to the Effect controls panel. under the Text Tab. The text’s font and color can be changed. Decide on a place. Use the Effect Controls panel if you want to add some simple motion to your text. Motion may be added here. You can make rolling credits at the conclusion of your movie or add a rotating effect to your titles using the Properties window as shown below.

- To Fine-Tune the Text Effects, go to Window > Effect Controls You can see all of the effects I changed in the Essential Graphics panel using this panel. A graphic layer will instantly reflect and be highlighted in the Effect Controls panel when clicked on in the Essential Graphics panel, and vice versa.
Add Audio Effects
It’s simple to work with audio with Premiere Pro. By selecting Clip > Audio Options > Audio Gain (or by hitting “G” on your keyboard), you may fast change audio levels. By adding keyframes to the audio clips in your sequence, you can also get greater audio control.
- First, equalize the audio. You have thus eliminated your stutters and the buzz from the audio track of your speaker. You may use the Parametric Equalizer effect under Effects > Audio Effects to give your voices a last boost of clarity and flow.
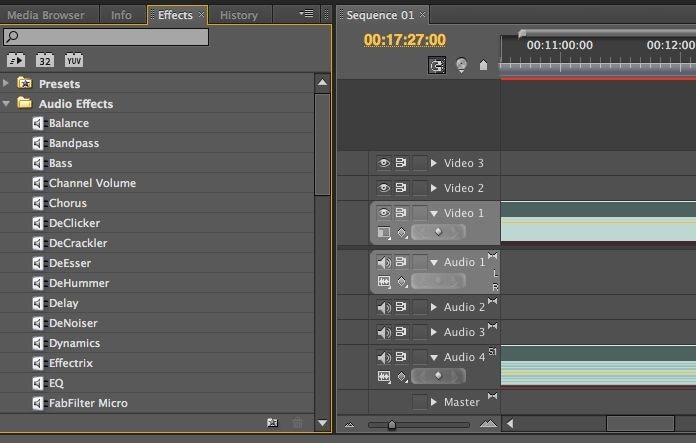
- Click on your clip and choose Effect Controls > Custom Setup > Edit to make more customizations.
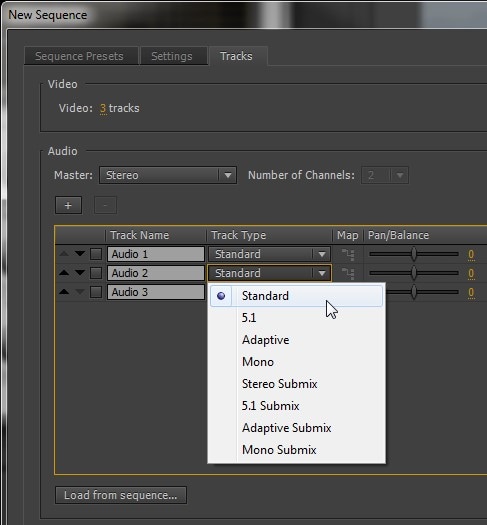
- Make use of the vocal enhancer. In the dropdown menu of your parametric equalizer, choose vocal enhancement. Next, adjust your frequencies upward and downward until everything sounds good.
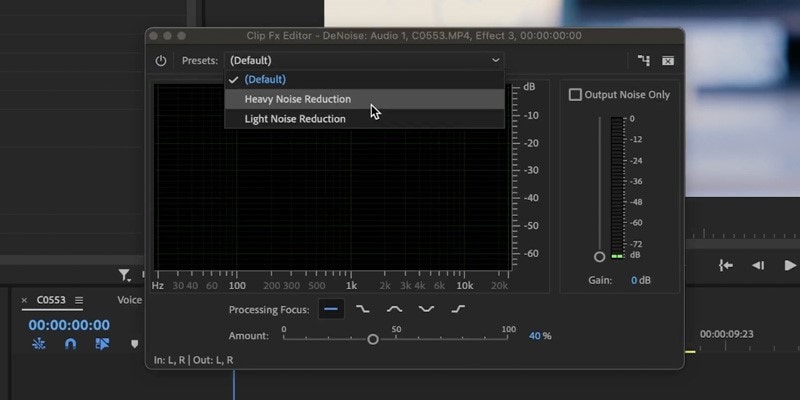
- In Adobe Premiere Pro, a crossfade is used as the audio transition by default. Use them to join audio files together, provide a smooth transition from opening to closing credits, or add and remove sounds as required. Select Audio Transitions > Crossfade from the Effects menu.
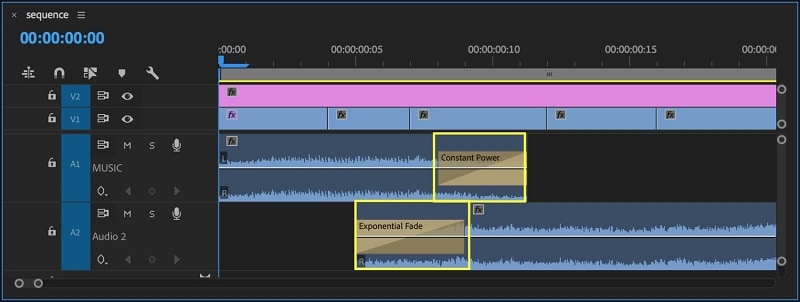
- For fine-tuning your audio, go to Preferences > Timeline > Audio Transition Default to finish. To polish your audio, use duration.
Presets Effects
Presets for Adobe Premiere Pro CC can be a useful tool while editing videos. They eliminate the need for constant manual adjustment by enabling the user to rapidly and simply apply effects, transitions, and other intricate settings. You may utilize effect presets to give your video clips effects. This is a fantastic way to give your project some flare and originality!
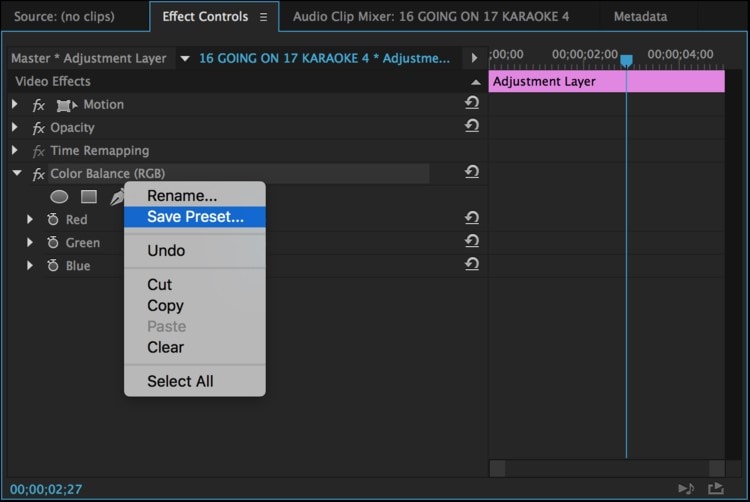
- After adjusting the effect to your liking, right-click the name and choose Save Preset. Your own effects are kept by default by Premiere Pro CC in the Presets folder of your Effects Window.
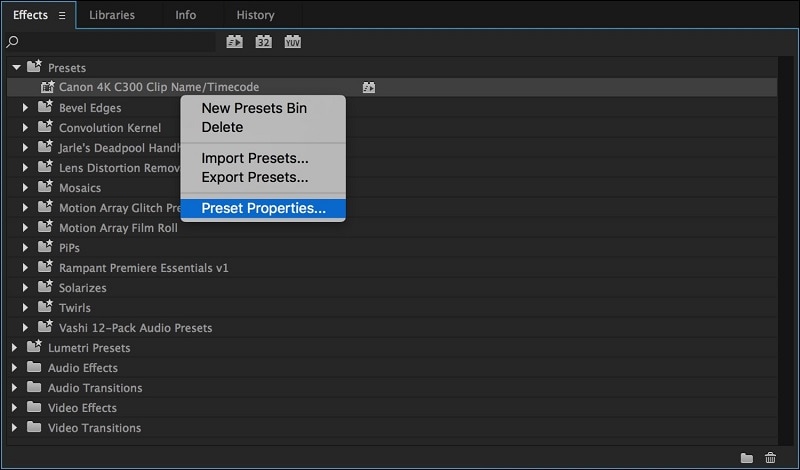
- Right-click the effect preset and choose “Preset Properties…” to alter the Name, Type, or Description of the preset. This option can also be found in the pop-up menu for the Effects panel.
- Editors using Premiere Pro may export and share effect presets. This includes changes to the speed, opacity, and motion! Select “Export Presets” from the Effects panel pop-up menu after selecting the effect preset or presets you want to export. The names of the specific preset included in this file remain unchanged.
Part 3. Alternative Way to Add Effects to Videos [Use Filmora]
Making films can be a wonderful way to save your priceless memories, and several internet influencers have made it their full-time profession and artistic endeavor. Due to how easy it is to locate and utilize its many functions, Filmora is simpler to use than a tool like Adobe Premiere. Simply locate the effect you want to use and drag it onto your timeline. You can quickly find and use any feature you choose.
The most recent edition of a video editing tool regarded for being the most user-friendly and intuitive in its industry is called Wondershare Filmora . The magnetic timeline in Wondershare Filmora enables effects to locate and quickly snap to the boundaries of clips and other effects when they are dropped into different tracks. You may disable this function. Advanced color tuning is available, allowing you to modify the white balance, light, color, and HSL settings as well as add 3D LUTs and custom vignetting. Follow the steps below to Add effects to videos using Filmora:
Free Download For Win 7 or later(64-bit)
Free Download For macOS 10.14 or later
Steps to Use Filmora to Add Effects to Videos:
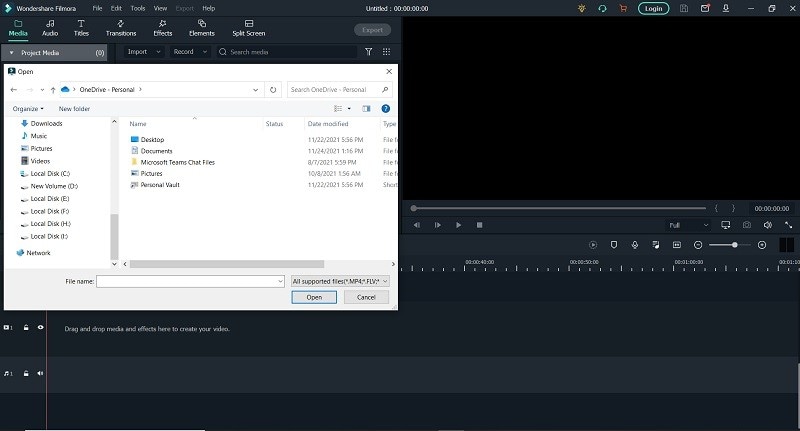
Step1Import Files
The first step is to import files. You may accomplish this by downloading videos, music, and photographs from social networking websites as well as from your computer. You can quickly arrange the Filmora Media Library to make it simple to locate your clips. To add an element to the timeline, drag it there or click the “Import Files” button.
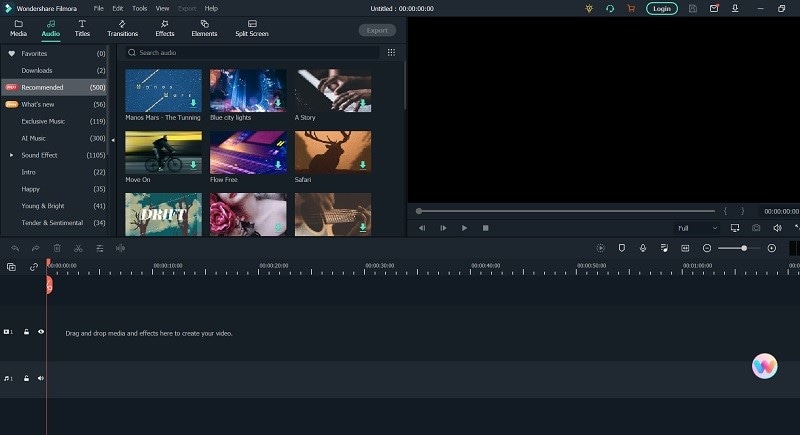
Step2Use Sound Effects
To enter the sound editing window, double-click on the soundtrack in the timeline. Drag your movie to the timeline, pick the “Music” tab, click on the sound effect, and then drag it to the timeline’s soundtrack. You may also change the sound’s tempo, fade-in and fade-out effects, loudness, and other settings. Additionally, background noise can be eliminated.
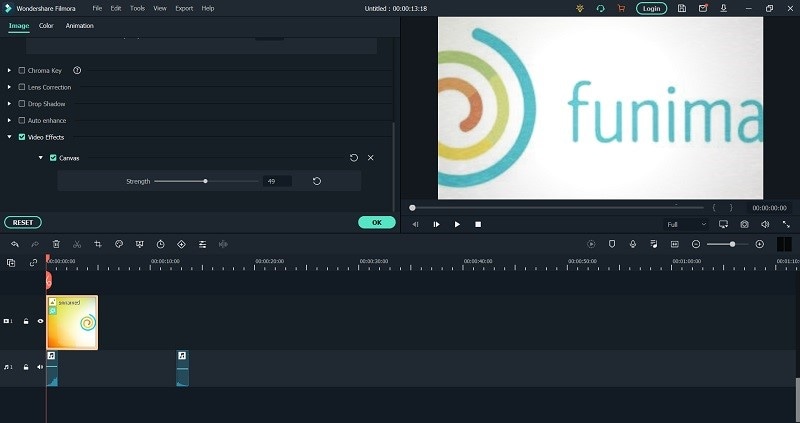
Step3Apply Effects
Simply locate the effect you want to use and drag it onto your timeline. You may employ sophisticated tools like green screen, picture-in-picture (PIP), split-screen, stabilization, and speed adjustments to elevate your films to a new level.
Step4Export the Masterpiece
Wondershare There are many export possibilities available with Filmora9. You can instantly publish your films to Facebook, Vimeo, YouTube, and other social networking platforms. You may pick from a variety of video file types when exporting your movie, including WMV, MP4, AVI, MOV, FLV, MKV, TS, 3GP, MPEG-2, WEBM, MP3, and GIF. A DVD might also be created.

Conclusion
Adobe Premiere Pro enables video editors to import their material and add it to sequences that can be put together anyway the editor sees fit. This involves cutting out extraneous material, combining brief portions that make a narrative, and adding sound effects, music, or effects. You now know how to add after effects to premiere pro. However, Filmora , a reliable video editor with an amazing feature set, particularly for its affordable price, is what we suggest for the best performance. The editing process is simplified, allowing users to concentrate on being creative.
A video editing program called Adobe Premiere Pro can be used to create everything from TV programs and movies to advertisements and family videos. These effects include Transitions, VFX, Audio, Videos as well as Advanced level effects like Green Screen. In addition, to know how to add shake effect in premiere pro, we’ve explained in the upcoming steps.For editors who don’t want to utilize the other motion graphic packages, Premiere provides a ton of built-in effects. Here are a few effects that you may not be aware are available to you. Any filmmaker or content producer must understand how to apply effects since they are necessary for a top-notch video. We’ve compiled easy steps on applying effects in Premiere Pro to be of assistance.
Part 2. How to Add Effects in Premier Pro
Add Transition Effects
There are several transition effects in Adobe Premiere Pro, and there are countless ways to customize them to fit your film. It is quite easy to locate transitions and add them. The Effects panel, which is accessible from the very top options bar, contains all the transition options. A panel will show up on the right when you choose this. To include a transition, adhere to these procedures.
- Navigate to the Video Transitions area of the Effects panel.

- Select the desired transition type from any of the available ones When you wish to employ a transition, press and hold it before dragging it to the start or finish of the clip. Alternately, insert it in between two clips to serve as a transition between the start and finish of each.

- In Premiere, there are several possible transitions, and some can be more suitable for your project than others.
Add Visual Effects
The Essential Graphics panel was added by Adobe to Premiere Pro. Users now have a much different workflow than they had with the few prior title panels. Now that everything is in one panel, you can easily create, animate, and use VFX. Some of the VFX shots were just building miniature towns and adding pieces, while others involved the standard green screen removal and backdrop replacement.
- Simply importing and uploading your video and audio files into Premiere Pro is the first step. The procedure of clicking through is fairly simple. Choose “New Project.” Press the Media Browser panel button and find the Ultra Key tool by opening the Effects panel.

- The film clip with the green screen should have the Ultra Key added. Utilizing the matte creation and matte cleaning tools, remove the green screen using the ultra key effect. When softening, be cautious to eliminate any sharp edges. All of this can be adjusted under the Effects Control panel.

- Put your backdrop material behind your green screen clip after you have a clear key. You should now be able to view your backdrop behind the keyed layer.

Add Text Effects
There are many justifications for include text in your video. It has the ability to reach a bigger audience and is a fantastic example of cross-media integration. We must be able to write text since it is such a crucial component of video production. Learning how to add text in Adobe Premiere is quite simple; here’s an example:
- Select the type tool from the tool window. To add text, click the backdrop and then type. The segment includes a music titled visuals.

- choosing the Type Tool (T) Drag a text box onto your movie using the Graphic Type Tool, then type in it. You may need to go to Windows > Tools and click and hold on Type Tool if it isn’t already selected.

- Head over to the Effect controls panel. under the Text Tab. The text’s font and color can be changed. Decide on a place. Use the Effect Controls panel if you want to add some simple motion to your text. Motion may be added here. You can make rolling credits at the conclusion of your movie or add a rotating effect to your titles using the Properties window as shown below.

- To Fine-Tune the Text Effects, go to Window > Effect Controls You can see all of the effects I changed in the Essential Graphics panel using this panel. A graphic layer will instantly reflect and be highlighted in the Effect Controls panel when clicked on in the Essential Graphics panel, and vice versa.
Add Audio Effects
It’s simple to work with audio with Premiere Pro. By selecting Clip > Audio Options > Audio Gain (or by hitting “G” on your keyboard), you may fast change audio levels. By adding keyframes to the audio clips in your sequence, you can also get greater audio control.
- First, equalize the audio. You have thus eliminated your stutters and the buzz from the audio track of your speaker. You may use the Parametric Equalizer effect under Effects > Audio Effects to give your voices a last boost of clarity and flow.

- Click on your clip and choose Effect Controls > Custom Setup > Edit to make more customizations.

- Make use of the vocal enhancer. In the dropdown menu of your parametric equalizer, choose vocal enhancement. Next, adjust your frequencies upward and downward until everything sounds good.

- In Adobe Premiere Pro, a crossfade is used as the audio transition by default. Use them to join audio files together, provide a smooth transition from opening to closing credits, or add and remove sounds as required. Select Audio Transitions > Crossfade from the Effects menu.

- For fine-tuning your audio, go to Preferences > Timeline > Audio Transition Default to finish. To polish your audio, use duration.
Presets Effects
Presets for Adobe Premiere Pro CC can be a useful tool while editing videos. They eliminate the need for constant manual adjustment by enabling the user to rapidly and simply apply effects, transitions, and other intricate settings. You may utilize effect presets to give your video clips effects. This is a fantastic way to give your project some flare and originality!
- After adjusting the effect to your liking, right-click the name and choose Save Preset. Your own effects are kept by default by Premiere Pro CC in the Presets folder of your Effects Window.

- Right-click the effect preset and choose “Preset Properties…” to alter the Name, Type, or Description of the preset. This option can also be found in the pop-up menu for the Effects panel.

- Editors using Premiere Pro may export and share effect presets. This includes changes to the speed, opacity, and motion! Select “Export Presets” from the Effects panel pop-up menu after selecting the effect preset or presets you want to export. The names of the specific preset included in this file remain unchanged.
Part 3. Alternative Way to Add Effects to Videos [Use Filmora]
Making films can be a wonderful way to save your priceless memories, and several internet influencers have made it their full-time profession and artistic endeavor. Due to how easy it is to locate and utilize its many functions, Filmora is simpler to use than a tool like Adobe Premiere. Simply locate the effect you want to use and drag it onto your timeline. You can quickly find and use any feature you choose.
The most recent edition of a video editing tool regarded for being the most user-friendly and intuitive in its industry is called Wondershare Filmora . The magnetic timeline in Wondershare Filmora enables effects to locate and quickly snap to the boundaries of clips and other effects when they are dropped into different tracks. You may disable this function. Advanced color tuning is available, allowing you to modify the white balance, light, color, and HSL settings as well as add 3D LUTs and custom vignetting. Follow the steps below to Add effects to videos using Filmora:
Free Download For Win 7 or later(64-bit)
Free Download For macOS 10.14 or later
Steps to Use Filmora to Add Effects to Videos:
Step1Import Files
The first step is to import files. You may accomplish this by downloading videos, music, and photographs from social networking websites as well as from your computer. You can quickly arrange the Filmora Media Library to make it simple to locate your clips. To add an element to the timeline, drag it there or click the “Import Files” button.

Step2Use Sound Effects
To enter the sound editing window, double-click on the soundtrack in the timeline. Drag your movie to the timeline, pick the “Music” tab, click on the sound effect, and then drag it to the timeline’s soundtrack. You may also change the sound’s tempo, fade-in and fade-out effects, loudness, and other settings. Additionally, background noise can be eliminated.

Step3Apply Effects
Simply locate the effect you want to use and drag it onto your timeline. You may employ sophisticated tools like green screen, picture-in-picture (PIP), split-screen, stabilization, and speed adjustments to elevate your films to a new level.

Step4Export the Masterpiece
Wondershare There are many export possibilities available with Filmora9. You can instantly publish your films to Facebook, Vimeo, YouTube, and other social networking platforms. You may pick from a variety of video file types when exporting your movie, including WMV, MP4, AVI, MOV, FLV, MKV, TS, 3GP, MPEG-2, WEBM, MP3, and GIF. A DVD might also be created.

Conclusion
Adobe Premiere Pro enables video editors to import their material and add it to sequences that can be put together anyway the editor sees fit. This involves cutting out extraneous material, combining brief portions that make a narrative, and adding sound effects, music, or effects. You now know how to add after effects to premiere pro. However, Filmora , a reliable video editor with an amazing feature set, particularly for its affordable price, is what we suggest for the best performance. The editing process is simplified, allowing users to concentrate on being creative.
Easy Ways to Create Procreate GIFs
Easy Ways to Make Procreate GIFs
An easy yet powerful editor
Numerous effects to choose from
Detailed tutorials provided by the official channel
Stay tuned for a complete know-how into making Procreate GIFs.
In this article
01 [How Animation Works in Procreate](#Part 1)
02 [How to Make Animated Gifs in Procreate](#Part 2)
Part 1 How Animation Works in Procreate
GIFs are known to be the top ranked and most intuitive trendsetters in the world of infotainment and media service tools. Be it for fun or a targeted market influence, you can depend on GIFs for a variety of information solutions. Moving to the creative aspect, the experimentation belt with creating GIFs is huge. From making simple static and animated GIFs to creating professionally sound market promotion tools; you can play with your editing skills to extract just anything from these quick snippets.
Having said that, let’s take a dive into creating animated Procreate GIFs. Being a relatively new dimension of GIF editing, a merge of the two produces matchless and classic results. Read through the further article to get a complete guide for working on GIF creation and editing with Procreate.
● Underlying Concept
Before you begin creating a Procreate GIF, let’s get a bit familiar with the concept behind this GIF creation utility. This one is an excellent and advanced means of exploring your skills in digital drawing and animations. It is one of the easiest GIF maker software that helps you to become a pro in animation creativity even if you are beginner and for the ones already into the skill, Procreate is simply heaven.
Procreate allows you to work with animation in its ‘Animation Assist’ tool, where you get a generous workspace with the perfect editing canvas to experiment with a plethora of tools, effects and filters to create exciting GIFs with basic and complex animation craft.
The software allows frame-by-frame animation that refers to working with different frames of a particular illustration, while making minimal changes in each frame. Once you finish, your final creation gets played in a motion loop.
Part 1 How to Make Animated Gifs in Procreate
As is already stated, Procreate is among the most affordable GIF creator and editing software. Creating GIFs here is a few minute stuff within a span of counted steps. Let’s have a broader see through of the creation process. Take the following quick steps and get started to make your exclusive Procreate GIF:
● Step 1: Select an Artwork
Launch the software in your device to reach the Procreate welcome screen, where you need to select an existing static GIF to work on from your device. You can also create a fresh one if you like. Having done that, make a right swipe on the ‘Canvas’ icon and select ‘Duplicate’. This creates a copy of your artwork, preserving all of its layers, so that you are free to make changes or stick to the original one according to your preference.
If you want to use a specific section of your image to animate, you can use the crop tool to remove unwanted portions. Next, you need to put together the specific layers you wish to animate and also remove any unwanted layers you don’t want to use.
● Step 2: Enable Animation Assist Tool
From the Procreate tool gallery at the top, click on the ‘Wrench’ icon and select ‘Canvas’ from the ’Actions’ menu that drops down. In the interface that appears, enable the ‘Animation Assist’ tool with a right toggle. This will cause the ‘Animation Toolbar’ to appear at the bottom of the interface.
● Step 3: Add Frames and Make Image Adjustments
At this instant, you need to make additional adjustments in your selected image and create a copy of the image frames. To get this done, navigate to the ‘Animation Assist Toolbar’ and long press the ‘Add Frame’ button. A duplicate frame will now appear on the screen. Within this frame, you need to move the image elements that you wish to animate. To do this, select an element and drag it to a convenient spot of your choice.
While you go through with object movement, the software simultaneously shows you a semi-transparent preview of your creation through its unique ‘Onion-skin’ feature. You can enjoy playing your animation at this very stage, or continue to create something more exciting.
● Step 4: Enjoying? Let’s Continue.
Repeat Step 3 to create long and smooth GIFs with additional frames. Take caution to create a copy of your latest frame (not the original one), in case you need to make any adjustments later on. Consider playing your GIF to see if you need to add extra frames or implement further changes.
Step 5: Almost There.
You may notice a jerky movement of your final image frames. This is on account of the ‘Default Play’ feature of the Procreate software that initiates a run of your creation from the beginning to end and loops on the same fashion.
To set this right, navigate to the ‘Settings’ tool of the ‘Animation Assist Toolbar’ and tap ‘Ping-Pong’ on the opening interface. Your animated Gif will now play in a forward to backward loop, resulting in a smooth frame movement.
● Step 6: Time to Share.
Once you are happy with your artwork, you can share it across different media platforms. To export your creation, navigate to the Procreate tool gallery and tap the ‘Wrench’ icon and select ‘Share’. In the ‘Sharing Options’ menu, you will be asked to make a format selection. You can share your creation in either of the GIF, PNG or MP4 formats.
You may even require a size modification in the created file with respect to specific sharing platforms. You can either select a web compatible resolution to shrink your file, or create a copy of the file to resize the same.
Once you get familiar with Procreate and its GIF creation basics, you have the liberty to explore the huge effects library offered by the software to give your animated GIFs the classy, professional touch. So why wait? Just get the software and start a never ending spree of Procreating GIFs.
Procreate is undoubtedly an excellent tool for creating animated GIFs, but if you are looking for alternatives, another software to rely on is Wondershare Filmora Video Editor GIF creator.

Wondershare Filmora - Best Video Editor for Mac/Windows
5,481,435 people have downloaded it.
Build unique custom animations without breaking a sweat.
Focus on creating epic stories and leave the details to Filmora’s auto features.
Start a creative adventure with drag & drop effects and endless possibilities.
Filmora simplifies advanced features to save you time and effort.
Filmora cuts out repetition so you can move on to your next creative breakthrough.
● Filmora GIF Maker
Launched by Wondershare, this one is something you can blindly count upon for creating stunning animated GIFs from image and video files. Packed with tons of amazing features, Filmora is an inventory of audio-visual effects and filters that never runs out of fresh and appealing choices. Available to you as free and clean GIF generator software, this is easily compatible to almost any smart device. Working with Filmora will certainly make you admit that creating GIFs was never easier.
To start creating GIFs with this awesome tool, here’s what you need to do:
● Step 1: Import Necessary Media Files
Either a funny video or a group of stunning still images, you can choose any suitable media to make GIFs in Filmora. All you need to do is import the desired files from your PC or smartphone to the software’s timeline.
● Step 2: Timeline Dragging
Once you are done with importing the required files, you need to drag and drop the same to the ‘Editor Timeline’ of the GIF maker tool, where can improvise them to your heart’s content.
● Step 3: Time to Edit.
The Filmora effects library is simply heaven for the ones with creative instincts. Getting a liberty to browse and apply a glut of effects and filters, you are at the perfect place to create professionally sound and next level animated GIFs. Try hands on creating classy backgrounds with overlays, crop and trim clips to the perfect shot, make frame and time adjustments, add text to intensify your message, or pick up just anything you like, to create magic with your creativity.
● Step 4: Show it to the World.
When finally satisfied, save your artwork file to your device using the .gif extension and receive compliments from friends and peers by sharing it on your Instagram or other social media handles.
● Key Takeaways from This Episode →
● Animated GIFs are among the latest social media frenzy. These short, moving clips are nothing less than a complete entertainment roll-on. When it comes to creating animated GIFs, you can certainly take the Procreate software as a worthy choice.
● This one is a super easy and exciting means of working on animation GIFs that are by default, captivating for every onlooker. Talking of competing alternatives, you can trust on Wondershare Filmora, a handy, quick and clean solution to animated GIF creation.
Stay tuned for a complete know-how into making Procreate GIFs.
In this article
01 [How Animation Works in Procreate](#Part 1)
02 [How to Make Animated Gifs in Procreate](#Part 2)
Part 1 How Animation Works in Procreate
GIFs are known to be the top ranked and most intuitive trendsetters in the world of infotainment and media service tools. Be it for fun or a targeted market influence, you can depend on GIFs for a variety of information solutions. Moving to the creative aspect, the experimentation belt with creating GIFs is huge. From making simple static and animated GIFs to creating professionally sound market promotion tools; you can play with your editing skills to extract just anything from these quick snippets.
Having said that, let’s take a dive into creating animated Procreate GIFs. Being a relatively new dimension of GIF editing, a merge of the two produces matchless and classic results. Read through the further article to get a complete guide for working on GIF creation and editing with Procreate.
● Underlying Concept
Before you begin creating a Procreate GIF, let’s get a bit familiar with the concept behind this GIF creation utility. This one is an excellent and advanced means of exploring your skills in digital drawing and animations. It is one of the easiest GIF maker software that helps you to become a pro in animation creativity even if you are beginner and for the ones already into the skill, Procreate is simply heaven.
Procreate allows you to work with animation in its ‘Animation Assist’ tool, where you get a generous workspace with the perfect editing canvas to experiment with a plethora of tools, effects and filters to create exciting GIFs with basic and complex animation craft.
The software allows frame-by-frame animation that refers to working with different frames of a particular illustration, while making minimal changes in each frame. Once you finish, your final creation gets played in a motion loop.
Part 1 How to Make Animated Gifs in Procreate
As is already stated, Procreate is among the most affordable GIF creator and editing software. Creating GIFs here is a few minute stuff within a span of counted steps. Let’s have a broader see through of the creation process. Take the following quick steps and get started to make your exclusive Procreate GIF:
● Step 1: Select an Artwork
Launch the software in your device to reach the Procreate welcome screen, where you need to select an existing static GIF to work on from your device. You can also create a fresh one if you like. Having done that, make a right swipe on the ‘Canvas’ icon and select ‘Duplicate’. This creates a copy of your artwork, preserving all of its layers, so that you are free to make changes or stick to the original one according to your preference.
If you want to use a specific section of your image to animate, you can use the crop tool to remove unwanted portions. Next, you need to put together the specific layers you wish to animate and also remove any unwanted layers you don’t want to use.
● Step 2: Enable Animation Assist Tool
From the Procreate tool gallery at the top, click on the ‘Wrench’ icon and select ‘Canvas’ from the ’Actions’ menu that drops down. In the interface that appears, enable the ‘Animation Assist’ tool with a right toggle. This will cause the ‘Animation Toolbar’ to appear at the bottom of the interface.
● Step 3: Add Frames and Make Image Adjustments
At this instant, you need to make additional adjustments in your selected image and create a copy of the image frames. To get this done, navigate to the ‘Animation Assist Toolbar’ and long press the ‘Add Frame’ button. A duplicate frame will now appear on the screen. Within this frame, you need to move the image elements that you wish to animate. To do this, select an element and drag it to a convenient spot of your choice.
While you go through with object movement, the software simultaneously shows you a semi-transparent preview of your creation through its unique ‘Onion-skin’ feature. You can enjoy playing your animation at this very stage, or continue to create something more exciting.
● Step 4: Enjoying? Let’s Continue.
Repeat Step 3 to create long and smooth GIFs with additional frames. Take caution to create a copy of your latest frame (not the original one), in case you need to make any adjustments later on. Consider playing your GIF to see if you need to add extra frames or implement further changes.
Step 5: Almost There.
You may notice a jerky movement of your final image frames. This is on account of the ‘Default Play’ feature of the Procreate software that initiates a run of your creation from the beginning to end and loops on the same fashion.
To set this right, navigate to the ‘Settings’ tool of the ‘Animation Assist Toolbar’ and tap ‘Ping-Pong’ on the opening interface. Your animated Gif will now play in a forward to backward loop, resulting in a smooth frame movement.
● Step 6: Time to Share.
Once you are happy with your artwork, you can share it across different media platforms. To export your creation, navigate to the Procreate tool gallery and tap the ‘Wrench’ icon and select ‘Share’. In the ‘Sharing Options’ menu, you will be asked to make a format selection. You can share your creation in either of the GIF, PNG or MP4 formats.
You may even require a size modification in the created file with respect to specific sharing platforms. You can either select a web compatible resolution to shrink your file, or create a copy of the file to resize the same.
Once you get familiar with Procreate and its GIF creation basics, you have the liberty to explore the huge effects library offered by the software to give your animated GIFs the classy, professional touch. So why wait? Just get the software and start a never ending spree of Procreating GIFs.
Procreate is undoubtedly an excellent tool for creating animated GIFs, but if you are looking for alternatives, another software to rely on is Wondershare Filmora Video Editor GIF creator.

Wondershare Filmora - Best Video Editor for Mac/Windows
5,481,435 people have downloaded it.
Build unique custom animations without breaking a sweat.
Focus on creating epic stories and leave the details to Filmora’s auto features.
Start a creative adventure with drag & drop effects and endless possibilities.
Filmora simplifies advanced features to save you time and effort.
Filmora cuts out repetition so you can move on to your next creative breakthrough.
● Filmora GIF Maker
Launched by Wondershare, this one is something you can blindly count upon for creating stunning animated GIFs from image and video files. Packed with tons of amazing features, Filmora is an inventory of audio-visual effects and filters that never runs out of fresh and appealing choices. Available to you as free and clean GIF generator software, this is easily compatible to almost any smart device. Working with Filmora will certainly make you admit that creating GIFs was never easier.
To start creating GIFs with this awesome tool, here’s what you need to do:
● Step 1: Import Necessary Media Files
Either a funny video or a group of stunning still images, you can choose any suitable media to make GIFs in Filmora. All you need to do is import the desired files from your PC or smartphone to the software’s timeline.
● Step 2: Timeline Dragging
Once you are done with importing the required files, you need to drag and drop the same to the ‘Editor Timeline’ of the GIF maker tool, where can improvise them to your heart’s content.
● Step 3: Time to Edit.
The Filmora effects library is simply heaven for the ones with creative instincts. Getting a liberty to browse and apply a glut of effects and filters, you are at the perfect place to create professionally sound and next level animated GIFs. Try hands on creating classy backgrounds with overlays, crop and trim clips to the perfect shot, make frame and time adjustments, add text to intensify your message, or pick up just anything you like, to create magic with your creativity.
● Step 4: Show it to the World.
When finally satisfied, save your artwork file to your device using the .gif extension and receive compliments from friends and peers by sharing it on your Instagram or other social media handles.
● Key Takeaways from This Episode →
● Animated GIFs are among the latest social media frenzy. These short, moving clips are nothing less than a complete entertainment roll-on. When it comes to creating animated GIFs, you can certainly take the Procreate software as a worthy choice.
● This one is a super easy and exciting means of working on animation GIFs that are by default, captivating for every onlooker. Talking of competing alternatives, you can trust on Wondershare Filmora, a handy, quick and clean solution to animated GIF creation.
Stay tuned for a complete know-how into making Procreate GIFs.
In this article
01 [How Animation Works in Procreate](#Part 1)
02 [How to Make Animated Gifs in Procreate](#Part 2)
Part 1 How Animation Works in Procreate
GIFs are known to be the top ranked and most intuitive trendsetters in the world of infotainment and media service tools. Be it for fun or a targeted market influence, you can depend on GIFs for a variety of information solutions. Moving to the creative aspect, the experimentation belt with creating GIFs is huge. From making simple static and animated GIFs to creating professionally sound market promotion tools; you can play with your editing skills to extract just anything from these quick snippets.
Having said that, let’s take a dive into creating animated Procreate GIFs. Being a relatively new dimension of GIF editing, a merge of the two produces matchless and classic results. Read through the further article to get a complete guide for working on GIF creation and editing with Procreate.
● Underlying Concept
Before you begin creating a Procreate GIF, let’s get a bit familiar with the concept behind this GIF creation utility. This one is an excellent and advanced means of exploring your skills in digital drawing and animations. It is one of the easiest GIF maker software that helps you to become a pro in animation creativity even if you are beginner and for the ones already into the skill, Procreate is simply heaven.
Procreate allows you to work with animation in its ‘Animation Assist’ tool, where you get a generous workspace with the perfect editing canvas to experiment with a plethora of tools, effects and filters to create exciting GIFs with basic and complex animation craft.
The software allows frame-by-frame animation that refers to working with different frames of a particular illustration, while making minimal changes in each frame. Once you finish, your final creation gets played in a motion loop.
Part 1 How to Make Animated Gifs in Procreate
As is already stated, Procreate is among the most affordable GIF creator and editing software. Creating GIFs here is a few minute stuff within a span of counted steps. Let’s have a broader see through of the creation process. Take the following quick steps and get started to make your exclusive Procreate GIF:
● Step 1: Select an Artwork
Launch the software in your device to reach the Procreate welcome screen, where you need to select an existing static GIF to work on from your device. You can also create a fresh one if you like. Having done that, make a right swipe on the ‘Canvas’ icon and select ‘Duplicate’. This creates a copy of your artwork, preserving all of its layers, so that you are free to make changes or stick to the original one according to your preference.
If you want to use a specific section of your image to animate, you can use the crop tool to remove unwanted portions. Next, you need to put together the specific layers you wish to animate and also remove any unwanted layers you don’t want to use.
● Step 2: Enable Animation Assist Tool
From the Procreate tool gallery at the top, click on the ‘Wrench’ icon and select ‘Canvas’ from the ’Actions’ menu that drops down. In the interface that appears, enable the ‘Animation Assist’ tool with a right toggle. This will cause the ‘Animation Toolbar’ to appear at the bottom of the interface.
● Step 3: Add Frames and Make Image Adjustments
At this instant, you need to make additional adjustments in your selected image and create a copy of the image frames. To get this done, navigate to the ‘Animation Assist Toolbar’ and long press the ‘Add Frame’ button. A duplicate frame will now appear on the screen. Within this frame, you need to move the image elements that you wish to animate. To do this, select an element and drag it to a convenient spot of your choice.
While you go through with object movement, the software simultaneously shows you a semi-transparent preview of your creation through its unique ‘Onion-skin’ feature. You can enjoy playing your animation at this very stage, or continue to create something more exciting.
● Step 4: Enjoying? Let’s Continue.
Repeat Step 3 to create long and smooth GIFs with additional frames. Take caution to create a copy of your latest frame (not the original one), in case you need to make any adjustments later on. Consider playing your GIF to see if you need to add extra frames or implement further changes.
Step 5: Almost There.
You may notice a jerky movement of your final image frames. This is on account of the ‘Default Play’ feature of the Procreate software that initiates a run of your creation from the beginning to end and loops on the same fashion.
To set this right, navigate to the ‘Settings’ tool of the ‘Animation Assist Toolbar’ and tap ‘Ping-Pong’ on the opening interface. Your animated Gif will now play in a forward to backward loop, resulting in a smooth frame movement.
● Step 6: Time to Share.
Once you are happy with your artwork, you can share it across different media platforms. To export your creation, navigate to the Procreate tool gallery and tap the ‘Wrench’ icon and select ‘Share’. In the ‘Sharing Options’ menu, you will be asked to make a format selection. You can share your creation in either of the GIF, PNG or MP4 formats.
You may even require a size modification in the created file with respect to specific sharing platforms. You can either select a web compatible resolution to shrink your file, or create a copy of the file to resize the same.
Once you get familiar with Procreate and its GIF creation basics, you have the liberty to explore the huge effects library offered by the software to give your animated GIFs the classy, professional touch. So why wait? Just get the software and start a never ending spree of Procreating GIFs.
Procreate is undoubtedly an excellent tool for creating animated GIFs, but if you are looking for alternatives, another software to rely on is Wondershare Filmora Video Editor GIF creator.

Wondershare Filmora - Best Video Editor for Mac/Windows
5,481,435 people have downloaded it.
Build unique custom animations without breaking a sweat.
Focus on creating epic stories and leave the details to Filmora’s auto features.
Start a creative adventure with drag & drop effects and endless possibilities.
Filmora simplifies advanced features to save you time and effort.
Filmora cuts out repetition so you can move on to your next creative breakthrough.
● Filmora GIF Maker
Launched by Wondershare, this one is something you can blindly count upon for creating stunning animated GIFs from image and video files. Packed with tons of amazing features, Filmora is an inventory of audio-visual effects and filters that never runs out of fresh and appealing choices. Available to you as free and clean GIF generator software, this is easily compatible to almost any smart device. Working with Filmora will certainly make you admit that creating GIFs was never easier.
To start creating GIFs with this awesome tool, here’s what you need to do:
● Step 1: Import Necessary Media Files
Either a funny video or a group of stunning still images, you can choose any suitable media to make GIFs in Filmora. All you need to do is import the desired files from your PC or smartphone to the software’s timeline.
● Step 2: Timeline Dragging
Once you are done with importing the required files, you need to drag and drop the same to the ‘Editor Timeline’ of the GIF maker tool, where can improvise them to your heart’s content.
● Step 3: Time to Edit.
The Filmora effects library is simply heaven for the ones with creative instincts. Getting a liberty to browse and apply a glut of effects and filters, you are at the perfect place to create professionally sound and next level animated GIFs. Try hands on creating classy backgrounds with overlays, crop and trim clips to the perfect shot, make frame and time adjustments, add text to intensify your message, or pick up just anything you like, to create magic with your creativity.
● Step 4: Show it to the World.
When finally satisfied, save your artwork file to your device using the .gif extension and receive compliments from friends and peers by sharing it on your Instagram or other social media handles.
● Key Takeaways from This Episode →
● Animated GIFs are among the latest social media frenzy. These short, moving clips are nothing less than a complete entertainment roll-on. When it comes to creating animated GIFs, you can certainly take the Procreate software as a worthy choice.
● This one is a super easy and exciting means of working on animation GIFs that are by default, captivating for every onlooker. Talking of competing alternatives, you can trust on Wondershare Filmora, a handy, quick and clean solution to animated GIF creation.
Stay tuned for a complete know-how into making Procreate GIFs.
In this article
01 [How Animation Works in Procreate](#Part 1)
02 [How to Make Animated Gifs in Procreate](#Part 2)
Part 1 How Animation Works in Procreate
GIFs are known to be the top ranked and most intuitive trendsetters in the world of infotainment and media service tools. Be it for fun or a targeted market influence, you can depend on GIFs for a variety of information solutions. Moving to the creative aspect, the experimentation belt with creating GIFs is huge. From making simple static and animated GIFs to creating professionally sound market promotion tools; you can play with your editing skills to extract just anything from these quick snippets.
Having said that, let’s take a dive into creating animated Procreate GIFs. Being a relatively new dimension of GIF editing, a merge of the two produces matchless and classic results. Read through the further article to get a complete guide for working on GIF creation and editing with Procreate.
● Underlying Concept
Before you begin creating a Procreate GIF, let’s get a bit familiar with the concept behind this GIF creation utility. This one is an excellent and advanced means of exploring your skills in digital drawing and animations. It is one of the easiest GIF maker software that helps you to become a pro in animation creativity even if you are beginner and for the ones already into the skill, Procreate is simply heaven.
Procreate allows you to work with animation in its ‘Animation Assist’ tool, where you get a generous workspace with the perfect editing canvas to experiment with a plethora of tools, effects and filters to create exciting GIFs with basic and complex animation craft.
The software allows frame-by-frame animation that refers to working with different frames of a particular illustration, while making minimal changes in each frame. Once you finish, your final creation gets played in a motion loop.
Part 1 How to Make Animated Gifs in Procreate
As is already stated, Procreate is among the most affordable GIF creator and editing software. Creating GIFs here is a few minute stuff within a span of counted steps. Let’s have a broader see through of the creation process. Take the following quick steps and get started to make your exclusive Procreate GIF:
● Step 1: Select an Artwork
Launch the software in your device to reach the Procreate welcome screen, where you need to select an existing static GIF to work on from your device. You can also create a fresh one if you like. Having done that, make a right swipe on the ‘Canvas’ icon and select ‘Duplicate’. This creates a copy of your artwork, preserving all of its layers, so that you are free to make changes or stick to the original one according to your preference.
If you want to use a specific section of your image to animate, you can use the crop tool to remove unwanted portions. Next, you need to put together the specific layers you wish to animate and also remove any unwanted layers you don’t want to use.
● Step 2: Enable Animation Assist Tool
From the Procreate tool gallery at the top, click on the ‘Wrench’ icon and select ‘Canvas’ from the ’Actions’ menu that drops down. In the interface that appears, enable the ‘Animation Assist’ tool with a right toggle. This will cause the ‘Animation Toolbar’ to appear at the bottom of the interface.
● Step 3: Add Frames and Make Image Adjustments
At this instant, you need to make additional adjustments in your selected image and create a copy of the image frames. To get this done, navigate to the ‘Animation Assist Toolbar’ and long press the ‘Add Frame’ button. A duplicate frame will now appear on the screen. Within this frame, you need to move the image elements that you wish to animate. To do this, select an element and drag it to a convenient spot of your choice.
While you go through with object movement, the software simultaneously shows you a semi-transparent preview of your creation through its unique ‘Onion-skin’ feature. You can enjoy playing your animation at this very stage, or continue to create something more exciting.
● Step 4: Enjoying? Let’s Continue.
Repeat Step 3 to create long and smooth GIFs with additional frames. Take caution to create a copy of your latest frame (not the original one), in case you need to make any adjustments later on. Consider playing your GIF to see if you need to add extra frames or implement further changes.
Step 5: Almost There.
You may notice a jerky movement of your final image frames. This is on account of the ‘Default Play’ feature of the Procreate software that initiates a run of your creation from the beginning to end and loops on the same fashion.
To set this right, navigate to the ‘Settings’ tool of the ‘Animation Assist Toolbar’ and tap ‘Ping-Pong’ on the opening interface. Your animated Gif will now play in a forward to backward loop, resulting in a smooth frame movement.
● Step 6: Time to Share.
Once you are happy with your artwork, you can share it across different media platforms. To export your creation, navigate to the Procreate tool gallery and tap the ‘Wrench’ icon and select ‘Share’. In the ‘Sharing Options’ menu, you will be asked to make a format selection. You can share your creation in either of the GIF, PNG or MP4 formats.
You may even require a size modification in the created file with respect to specific sharing platforms. You can either select a web compatible resolution to shrink your file, or create a copy of the file to resize the same.
Once you get familiar with Procreate and its GIF creation basics, you have the liberty to explore the huge effects library offered by the software to give your animated GIFs the classy, professional touch. So why wait? Just get the software and start a never ending spree of Procreating GIFs.
Procreate is undoubtedly an excellent tool for creating animated GIFs, but if you are looking for alternatives, another software to rely on is Wondershare Filmora Video Editor GIF creator.

Wondershare Filmora - Best Video Editor for Mac/Windows
5,481,435 people have downloaded it.
Build unique custom animations without breaking a sweat.
Focus on creating epic stories and leave the details to Filmora’s auto features.
Start a creative adventure with drag & drop effects and endless possibilities.
Filmora simplifies advanced features to save you time and effort.
Filmora cuts out repetition so you can move on to your next creative breakthrough.
● Filmora GIF Maker
Launched by Wondershare, this one is something you can blindly count upon for creating stunning animated GIFs from image and video files. Packed with tons of amazing features, Filmora is an inventory of audio-visual effects and filters that never runs out of fresh and appealing choices. Available to you as free and clean GIF generator software, this is easily compatible to almost any smart device. Working with Filmora will certainly make you admit that creating GIFs was never easier.
To start creating GIFs with this awesome tool, here’s what you need to do:
● Step 1: Import Necessary Media Files
Either a funny video or a group of stunning still images, you can choose any suitable media to make GIFs in Filmora. All you need to do is import the desired files from your PC or smartphone to the software’s timeline.
● Step 2: Timeline Dragging
Once you are done with importing the required files, you need to drag and drop the same to the ‘Editor Timeline’ of the GIF maker tool, where can improvise them to your heart’s content.
● Step 3: Time to Edit.
The Filmora effects library is simply heaven for the ones with creative instincts. Getting a liberty to browse and apply a glut of effects and filters, you are at the perfect place to create professionally sound and next level animated GIFs. Try hands on creating classy backgrounds with overlays, crop and trim clips to the perfect shot, make frame and time adjustments, add text to intensify your message, or pick up just anything you like, to create magic with your creativity.
● Step 4: Show it to the World.
When finally satisfied, save your artwork file to your device using the .gif extension and receive compliments from friends and peers by sharing it on your Instagram or other social media handles.
● Key Takeaways from This Episode →
● Animated GIFs are among the latest social media frenzy. These short, moving clips are nothing less than a complete entertainment roll-on. When it comes to creating animated GIFs, you can certainly take the Procreate software as a worthy choice.
● This one is a super easy and exciting means of working on animation GIFs that are by default, captivating for every onlooker. Talking of competing alternatives, you can trust on Wondershare Filmora, a handy, quick and clean solution to animated GIF creation.
Discovering The Best Wedding LUTs for Premiere Pro | An Overview
A wedding is an important event that legally combines two souls. Hence, this occasion is momentous and special for both partners. Thus, wedding pictures and videos are captured to record these memorable moments. But your visual content may need better quality due to camera problems or amateur photography.
In this situation, using wedding LUTs Premiere Pro is an ideal solution. This article provides the best free wedding LUTs, including implementation steps.
Empower your videos with a new mood using different LUTs. Filmora now offers 100+ top-quality 3D LUTs cover a broad range of scenarios. Transform your videos with Filmora’s powerful 3D LUTs.
Apply LUT on Videos Apply LUT on Videos Learn More

Part 1: What Are The Best Wedding LUTs Available for Premiere Pro?
LUTs and look-up tables are unique editing tools that enhance color gradients. For videos and photos, LUTs are a great source of color-enhancing tools. Meanwhile, for enhancing video content, there are specialized wedding LUTs free. To choose the best wedding LUT for yourself, proceed here:
1. Colorify Wedding LUTs
Upscale your important wedding videography and photography with Colorify Wedding LUTs. This LUT wedding pack has special color presets that provide stunning visual looks. The color presets are packed within filters that enhance color brightness and sharpness. Thus, your important wedding videos and photos will be enhanced with enchanting colors. After all, this is amongst the best wedding LUTs available.

2. Blackmagic Film Wedding and Standard LUTs
Wedding visual content is always special. With Blackmagic wedding LUTs for Premiere Pro, you can enhance color schemas. Hence, your videos can be transformed with engaging black gradients. There are 25 LUTs to upscale the colors of your visual content. Every LUT offers unique color grades for upgrading color resolutions and overall quality.
3. Slog3 Film Wedding and Standard LUTs
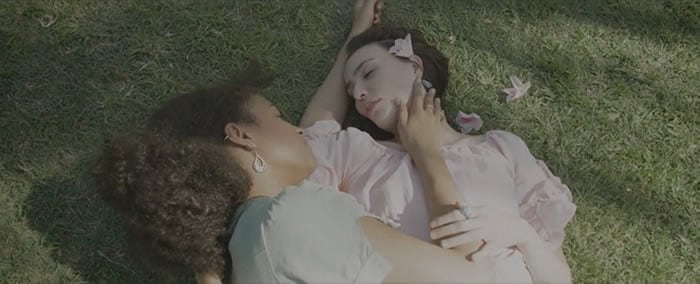
Weddings are incomplete without the videos of this critical event. Thus, upscaling video colors is essential to promote video quality and engagement. In this matter, using this wedding LUTs free download is a great solution. After all, the pack contains 25 Sony Slog3 wedding LUTs. So, you can apply LUTs on your all-important wedding videos. The colors will be enhanced with stylish and unique gradients.

4. Film Wedding LUTs Pack
Add cinematic looks to your wedding photos and videos with this LUTs pack. There are 20 LUT film grades that can improve and enhance your wedding content. Meanwhile, you can also adjust intensity, contrast, and saturation. All the LUT colors preset are available in unique color composure and styles. This LUTs Premiere Pro free pack is compatible with Mac and Windows.

5. Rustic Wedding LUTs
Make your wedding photography and videography more enchanting. This wedding LUTs for Premiere Pro pack comprises 11 LUT presets in cube format. So, you can apply these LUTs to your wedding visual content. Meanwhile, you will see instant color corrections and color enhancements. This way, your wedding content will appear livelier and more engaging.

Part 2: How Can You Add Wedding LUTs in Premiere Pro?
Wedding LUTs are useful tools for upgrading colors within wedding visual content. Premiere Pro is the most frequently used tool for video editing with several features. As a user, you may not understand the operations of Premiere Pro software. Thus, to add LUTs through Premiere Pro, follow these easy steps:
Step 1: Open Adobe Premiere Pro on your device. Make sure to add a video clip that needs editing in the timeline. After this, move into the “Color” workspace from the top of your screen.

Step 2: On the bottom left, there is a project window. From there, you need to click the “New Item” tab and choose “Adjustment Layer.” Now adjust the settings of the video from the available panel. This includes “Width,” “Height,” “Timebase,” and “Pixel Aspect Ratio.” Click “OK.” after you are done with settings.

Step 3: Drag the adjustment layer into the timeline from the project window. Set the length of the adjustment layer similar to the video’s length. Select the adjustment layer, and click “Lumetri Color” from the right-hand panel. From the “Basic Correction” category, set “Input LUT” and click the “Browse” option from the drop-down menu. Choose your LUT pack from the folder and press “Open” to apply the LUTs to the video.

Part 3: Finding The Best Wedding LUTs in Wondershare Filmora
Video editing can consume a lot of time and resources. While using LUTs, you can enhance the color gradients of your photos and videos without editing. Meanwhile, finding good yet reliable wedding LUTs can be difficult. In Wondershare Filmora , you can find more than 200 LUTs to support your needs. The interesting thing is every LUT will be unique with more distinctive colors.
Add LUTs on Video For Win 7 or later(64-bit)
Add LUTs on Video For macOS 10.14 or later
Meanwhile, Filmora also upscales video content through effects, stickers, and text. You can even use AI audio stretch, AI audio denoise, and silence detection.

Key Features of Wondershare Filmora
Making video editing simpler and smarter, Wondershare Filmora is a trusted solution. After all, this software comes with extensive functionalities. Let’s find some of its other extended features:
AI Smart Cutout and Reframe
Using AI smart cutout feature, users can paint backgrounds and even people. This way, the imperfections in videos are rectified for a flawless experience. Meanwhile, with auto-reframe, you can even resize a row of videos. No need for any editing skills in all cases.
Unlimited Editing Tools
The availability of pan and zoom, crop, keyframing, masking, and other tools make Filmora special. This means users don’t need to look for other editing tools. Every type of video adjustment is present within a single solution. After video editing, you can proceed with video export to the device.
Extended Audio Technology
With Filmora, you can enhance your video engagement by adding audio tracks. The video and audio synchronization is clear and appropriate. Meanwhile, you can use an audio visualizer to make your music come alive. With audio ducking, fade your music to stand out in the dialogue.
Part 4: What are The Benefits and Drawbacks of Using LUTs?
LUTs are video editing mechanisms that optimally improve video quality. There are many benefits to using LUTs. Also, there are drawbacks of LUTs that cannot be neglected. Let’s discuss both benefits and disadvantages:
Benefits
- LUTs are fast and efficient in their color grading schemas. So they can enhance upscale color resolutions in a calculated way.
- With maximum consistency, LUTs apply color grading across the frames in the video. Hence, this provides a consistent look to the video in unique colors.
- Using LUTs, you can carry experiments on your video through filter presets. The presets are available in different colors and styles, and you can adjust them.
Drawbacks
- There is a lack of personalization in most LUT filter presets. Hence, you cannot customize the color and styles for desired looks.
- Due to limited precision, LUTs can involve color inaccuracies in their process. This happens because LUTs follow discrete values rather than using continuous gradients.
Conclusion
Like other events, weddings are also important occasions. This is why videography and photography are standard in this type of event. To improve the quality of video content, you need wedding LUTs Premiere Pro free. Meanwhile, in this article, you discovered the 5 best wedding LUTs to use. Finally, Wondershare Filmora has the availability of more than 200 LUT presets. You can even find wedding LUTs free in Filmora.
Add LUTs on Video For Win 7 or later(64-bit)
Add LUTs on Video For macOS 10.14 or later
Apply LUT on Videos Apply LUT on Videos Learn More

Part 1: What Are The Best Wedding LUTs Available for Premiere Pro?
LUTs and look-up tables are unique editing tools that enhance color gradients. For videos and photos, LUTs are a great source of color-enhancing tools. Meanwhile, for enhancing video content, there are specialized wedding LUTs free. To choose the best wedding LUT for yourself, proceed here:
1. Colorify Wedding LUTs
Upscale your important wedding videography and photography with Colorify Wedding LUTs. This LUT wedding pack has special color presets that provide stunning visual looks. The color presets are packed within filters that enhance color brightness and sharpness. Thus, your important wedding videos and photos will be enhanced with enchanting colors. After all, this is amongst the best wedding LUTs available.

2. Blackmagic Film Wedding and Standard LUTs
Wedding visual content is always special. With Blackmagic wedding LUTs for Premiere Pro, you can enhance color schemas. Hence, your videos can be transformed with engaging black gradients. There are 25 LUTs to upscale the colors of your visual content. Every LUT offers unique color grades for upgrading color resolutions and overall quality.

3. Slog3 Film Wedding and Standard LUTs
Weddings are incomplete without the videos of this critical event. Thus, upscaling video colors is essential to promote video quality and engagement. In this matter, using this wedding LUTs free download is a great solution. After all, the pack contains 25 Sony Slog3 wedding LUTs. So, you can apply LUTs on your all-important wedding videos. The colors will be enhanced with stylish and unique gradients.

4. Film Wedding LUTs Pack
Add cinematic looks to your wedding photos and videos with this LUTs pack. There are 20 LUT film grades that can improve and enhance your wedding content. Meanwhile, you can also adjust intensity, contrast, and saturation. All the LUT colors preset are available in unique color composure and styles. This LUTs Premiere Pro free pack is compatible with Mac and Windows.

5. Rustic Wedding LUTs
Make your wedding photography and videography more enchanting. This wedding LUTs for Premiere Pro pack comprises 11 LUT presets in cube format. So, you can apply these LUTs to your wedding visual content. Meanwhile, you will see instant color corrections and color enhancements. This way, your wedding content will appear livelier and more engaging.

Part 2: How Can You Add Wedding LUTs in Premiere Pro?
Wedding LUTs are useful tools for upgrading colors within wedding visual content. Premiere Pro is the most frequently used tool for video editing with several features. As a user, you may not understand the operations of Premiere Pro software. Thus, to add LUTs through Premiere Pro, follow these easy steps:
Step 1: Open Adobe Premiere Pro on your device. Make sure to add a video clip that needs editing in the timeline. After this, move into the “Color” workspace from the top of your screen.

Step 2: On the bottom left, there is a project window. From there, you need to click the “New Item” tab and choose “Adjustment Layer.” Now adjust the settings of the video from the available panel. This includes “Width,” “Height,” “Timebase,” and “Pixel Aspect Ratio.” Click “OK.” after you are done with settings.

Step 3: Drag the adjustment layer into the timeline from the project window. Set the length of the adjustment layer similar to the video’s length. Select the adjustment layer, and click “Lumetri Color” from the right-hand panel. From the “Basic Correction” category, set “Input LUT” and click the “Browse” option from the drop-down menu. Choose your LUT pack from the folder and press “Open” to apply the LUTs to the video.

Part 3: Finding The Best Wedding LUTs in Wondershare Filmora
Video editing can consume a lot of time and resources. While using LUTs, you can enhance the color gradients of your photos and videos without editing. Meanwhile, finding good yet reliable wedding LUTs can be difficult. In Wondershare Filmora , you can find more than 200 LUTs to support your needs. The interesting thing is every LUT will be unique with more distinctive colors.
Add LUTs on Video For Win 7 or later(64-bit)
Add LUTs on Video For macOS 10.14 or later
Meanwhile, Filmora also upscales video content through effects, stickers, and text. You can even use AI audio stretch, AI audio denoise, and silence detection.

Key Features of Wondershare Filmora
Making video editing simpler and smarter, Wondershare Filmora is a trusted solution. After all, this software comes with extensive functionalities. Let’s find some of its other extended features:
AI Smart Cutout and Reframe
Using AI smart cutout feature, users can paint backgrounds and even people. This way, the imperfections in videos are rectified for a flawless experience. Meanwhile, with auto-reframe, you can even resize a row of videos. No need for any editing skills in all cases.
Unlimited Editing Tools
The availability of pan and zoom, crop, keyframing, masking, and other tools make Filmora special. This means users don’t need to look for other editing tools. Every type of video adjustment is present within a single solution. After video editing, you can proceed with video export to the device.
Extended Audio Technology
With Filmora, you can enhance your video engagement by adding audio tracks. The video and audio synchronization is clear and appropriate. Meanwhile, you can use an audio visualizer to make your music come alive. With audio ducking, fade your music to stand out in the dialogue.
Part 4: What are The Benefits and Drawbacks of Using LUTs?
LUTs are video editing mechanisms that optimally improve video quality. There are many benefits to using LUTs. Also, there are drawbacks of LUTs that cannot be neglected. Let’s discuss both benefits and disadvantages:
Benefits
- LUTs are fast and efficient in their color grading schemas. So they can enhance upscale color resolutions in a calculated way.
- With maximum consistency, LUTs apply color grading across the frames in the video. Hence, this provides a consistent look to the video in unique colors.
- Using LUTs, you can carry experiments on your video through filter presets. The presets are available in different colors and styles, and you can adjust them.
Drawbacks
- There is a lack of personalization in most LUT filter presets. Hence, you cannot customize the color and styles for desired looks.
- Due to limited precision, LUTs can involve color inaccuracies in their process. This happens because LUTs follow discrete values rather than using continuous gradients.
Conclusion
Like other events, weddings are also important occasions. This is why videography and photography are standard in this type of event. To improve the quality of video content, you need wedding LUTs Premiere Pro free. Meanwhile, in this article, you discovered the 5 best wedding LUTs to use. Finally, Wondershare Filmora has the availability of more than 200 LUT presets. You can even find wedding LUTs free in Filmora.
Add LUTs on Video For Win 7 or later(64-bit)
Add LUTs on Video For macOS 10.14 or later
Also read:
- New 2024 Approved Add Zoom Blur Effect In Photoshop Step by Step
- Updated Why You Should Master Slideshows In Lightroom, Fresh Insight for 2024
- 5 Tips for Aquasoft Slideshow
- Updated DVD Slideshow Builder 2024 Review and Tutorial
- New How to Choose A Nice GoPro for Vlogging?
- Step by Step to Cut a Video in Lightworks
- 2024 Approved This Article Introduces How Sheila Become a Youtuber and How She Started Video Editing
- Updated What Can Be Better than Converting Apple Video Format Into Other Formats so that You Can Use the Files Easily. We Have a Few Options that You Can Use for This Purpose
- Updated How to Apply Gaussian Blur Effect to Videos In Premiere Pro, In 2024
- The Ultimate Guide to Make a Text Collage
- New In 2024, 20 Best Video Background Templates
- New 2024 Approved How to Change Video Thumbnail on Google Drive
- Updated Top 10 Anime Movies of All Time
- How to Make Transparent Background in Canva for 2024
- New Using Track Matte and Tracking in Adobe After Effects Reviewing All Possibilities for 2024
- In 2024, Denoise Video in Adobe Premiere Pro – Audio and Video Noise Removal
- In 2024, If Youre Considering Starting a Podcast Video Recording, You Need to Read This Article and Learn All You Need to Know About Making a Successful Podcast
- What Anime Character Are You Look Like for 2024
- Reliable User Guide to Fix Vivo Y100A Running Slow and Freezing | Dr.fone
- Bypass iCloud Activation Lock with IMEI Code On iPhone 15 Pro
- In 2024, 5 Ways to Track Vivo Y77t without App | Dr.fone
- 8 Solutions to Fix Find My Friends Location Not Available On Vivo X Fold 2 | Dr.fone
- Updated SRT Subtitle Translation Tools and Techniques
- 5 Easy Ways to Change Location on YouTube TV On Samsung Galaxy A15 4G | Dr.fone
- New How to Create Your Own Avatar Free
- In 2024, Getting the Pokemon Go GPS Signal Not Found 11 Error in Tecno Spark 20 Pro | Dr.fone
- In 2024, How Can I Unlock My Apple iPhone 15 Plus After Forgetting my PIN Code?
- App Wont Open on Your Poco C51? Here Are All Fixes | Dr.fone
- In 2024, A List of The Top SpongeBob Voice Generators
- How to recover deleted pictures from Tecno Pova 5 Pro.
- How To Remove iCloud On iPhone 14 Pro Smoothly
- Create AI Avatar Video with AI Avatar | Wondershare Virbo Online
- Title: Premiere Pro Text Effects Beginner Guide for 2024
- Author: Chloe
- Created at : 2024-05-20 03:38:16
- Updated at : 2024-05-21 03:38:16
- Link: https://ai-editing-video.techidaily.com/premiere-pro-text-effects-beginner-guide-for-2024/
- License: This work is licensed under CC BY-NC-SA 4.0.


