
:max_bytes(150000):strip_icc():format(webp)/d-link-default-password-list-2619152-d6281a924f45426f879c8707220ce92d.png)
Read and Learn How to Convert a Slow-Motion Video to Normal in This Guide. Besides, Find the Best Desktop Solution to Adjust Video Speed Quickly and Easily for 2024
Read and Learn How to Convert a Slow-Motion Video to Normal in This Guide. Besides, Find the Best Desktop Solution to Adjust Video Speed Quickly and Easily
Maintain consistency in your projects by adding all video clips simultaneously. Sometimes, you have to include a slow-motion video due to its content. In such cases, convert them into a normal video for an even flow in the media. Turning slow-motion videos into the normal is essential in several cases. Unfortunately, many people don’t know how to make a slow-mo video at normal speed.
To address this concern, we have enlisted perfect ways to make slow-mo to usual video. Read this guide and learn how to convert a slow-motion video to normal step-wise. Besides, you will also find some online and desktop solutions to make the best choice.
Slow Motion Video Maker Slow your video’s speed with better control of your keyframes to create unique cinematic effects!
Make A Slow Motion Video Make A Slow Motion Video More Features

Part 1: Android User’s Solution: Converting Slow Motion Video to Normal
Android cameras can record slow-motion videos and turn them into normal as well. For this purpose, you have to upload your clips on Google Photos. Let’s discover how to convert slow-motion video to normal in Google Photos for Android. Remember that these steps might vary across different Android models.
Step 1
Enter your Google Photos app and pick one of your intended Slow-motion videos. While previewing it, look for the “Slow Motion” option at the top and touch it.

Step 2
Read the instructions from the displayed pop-up and hit the “OK.” Drag the two sliders and enclose them from both ends. Your slow-motion video is converted into the normal one.

Part 2: iOS User’s Solution: Converting Slow Motion Video to Normal
iPhone also offers a built-in option to change the speed of videos. Almost all iPhone series follow the same steps to change the video speed. Thus, you can quickly learn how to make slow-motion videos at regular speed, regardless of the version. Without further delay, make a slow-motion video and read the given steps:
Step 1
Unlock your iPhone and open the “Photos” app from the main screen. There, reach the “Albums” icon from the bottom and scroll until you get the “Slo-mo” option. Click on it and get a preview of your slow-motion video.

Step 2
Now, hit “Edit” from the top right side and find an editing screen. From the bottom, enclose the sliders from both sides and tap the “Done” button. This way, you will get a standard video instantly saved on your iPhone.

Part 3: Online Solution: Converting Slow Motion Video to Normal
Use this online tool if you cannot perform slow-motion to normal video conversion. Clideo is an online platform that allows you to change the video speed without causing playback issues. It offers a high level of security where only you can access your files. Some of its additional editing options allow you to pick an output format. Besides, users can keep their media sound or mute while making the conversion.
This tool supports MP4, MPG, VOB, MOV, and WMV media file formats. The following is a step-by-step guide to using this online solution:
Step 1
Access the official site of Clideo Stop Motion Maker and click the “Choose File” button. Browse your slow-motion video and press the “Open” button. Now, wait for a while until it gets uploaded on the site.

Step 2
Afterward, set the “Speed” from three given options. Choose to set the video to “Medium” speed. Moreover, you can also set the “Clip Rate” of the video as per requirements.

Step 3
When you get the desired outcome, click the “Export” button from the bottom-right corner. You will get a preview of the video on the next screen. Tap on the downward “ Download “ symbol and pick the file export destination. You can simply hit “Download” to get the file in your system.

Part 4: Desktop Recommendation: Converting Slow Motion Video to Normal Using Wondershare Filmora
In the above sections, you have learned how to turn slow-mo into normal. Now, it is time to look for an effective offline solution. That’s where you can count on Wondershare Filmora , which is the simplest but powerful video editor. Fortunately, it can speed up and slow down videos within the highest quality. Filmora provides more advanced editing options than the above solutions.
Free Download For Win 7 or later(64-bit)
Free Download For macOS 10.14 or later
Steps to Perform Slow Motion and Speed Up Videos to Normal with Filmora
Unlike other tools, Filmora can quickly convert your video speed to your desired extent. Head below and transform your video easily with this step-by-step guide.
Step 1Install Filmora and Export Your Media to Start a Project
Successfully launch Filmora in your system and access its home screen. Click on the “New Project” option to initiate media editing. Bring your video to the timeline after importing it into the media panel. To import the file, press the “Ctrl + I” keys using your keyboard.

Step 2Slow Down or Speed Up the Video with Optical Flow
Right-click on your slow-motion video in the timeline to get an extended list. From that list, tap the “Uniform Speed” option and find an editing panel on the right. Now, drag the “Speed” slider right to speed up the video. You can move it to the left side to slow down the video. To ensure a smooth quality, extend the “AI Frame Interpolation” menu and pick the “Optical Flow.”

Step 3Save the File Through the Export Button
Press the Space bar from your keyboard and preview the video. Navigate toward the “Export” button at the top right corner. You can adjust the export parameters and tap “Export” to save the file on your device.

Other Exceptional Features of Filmora
Filmora is more than a simple video editing app. AI integration can generate music, images, and scripts to embrace creativity in your content. Read the following points to learn more about Filmora’s incredible features.
- AI Vocal Remover: If you want to dub a video, use this feature to remove existing vocals. It can separate music and vocal soundtracks while keeping their quality high. Once AI removes vocals, you can quickly edit or remove unwanted elements from the tracks.
- AI Text to Video: Content creators can get instant engagement in their content with this feature. Users just have to write their ideas and let AI transform them into a visual story. They can later customize fonts, styles, and other elements to achieve desired results.
- AI Smart Masking: Professionals can improve their multi-dimensional scenes using this option. It enables multi-layer overlay editing that isolates subjects. Users can freeze frames and perform auto-correction for visual enhancements of the projects.
Conclusion
In short, slow-motion to normal video conversion is possible and serves fruitful purposes. In this regard, iPhone and Android offer built-in options that are explained earlier. Besides, you get familiar with how to convert a slow-motion video to normal using an online tool. For an effective desktop solution, try using Filmora, which is a top-notch video editor so far.
Make A Slow Motion Video Make A Slow Motion Video More Features
Part 1: Android User’s Solution: Converting Slow Motion Video to Normal
Android cameras can record slow-motion videos and turn them into normal as well. For this purpose, you have to upload your clips on Google Photos. Let’s discover how to convert slow-motion video to normal in Google Photos for Android. Remember that these steps might vary across different Android models.
Step 1
Enter your Google Photos app and pick one of your intended Slow-motion videos. While previewing it, look for the “Slow Motion” option at the top and touch it.
Step 2
Read the instructions from the displayed pop-up and hit the “OK.” Drag the two sliders and enclose them from both ends. Your slow-motion video is converted into the normal one.
Part 2: iOS User’s Solution: Converting Slow Motion Video to Normal
iPhone also offers a built-in option to change the speed of videos. Almost all iPhone series follow the same steps to change the video speed. Thus, you can quickly learn how to make slow-motion videos at regular speed, regardless of the version. Without further delay, make a slow-motion video and read the given steps:
Step 1
Unlock your iPhone and open the “Photos” app from the main screen. There, reach the “Albums” icon from the bottom and scroll until you get the “Slo-mo” option. Click on it and get a preview of your slow-motion video.
Step 2
Now, hit “Edit” from the top right side and find an editing screen. From the bottom, enclose the sliders from both sides and tap the “Done” button. This way, you will get a standard video instantly saved on your iPhone.
Part 3: Online Solution: Converting Slow Motion Video to Normal
Use this online tool if you cannot perform slow-motion to normal video conversion. Clideo is an online platform that allows you to change the video speed without causing playback issues. It offers a high level of security where only you can access your files. Some of its additional editing options allow you to pick an output format. Besides, users can keep their media sound or mute while making the conversion.
This tool supports MP4, MPG, VOB, MOV, and WMV media file formats. The following is a step-by-step guide to using this online solution:
Step 1
Access the official site of Clideo Stop Motion Maker and click the “Choose File” button. Browse your slow-motion video and press the “Open” button. Now, wait for a while until it gets uploaded on the site.
Step 2
Afterward, set the “Speed” from three given options. Choose to set the video to “Medium” speed. Moreover, you can also set the “Clip Rate” of the video as per requirements.
Step 3
When you get the desired outcome, click the “Export” button from the bottom-right corner. You will get a preview of the video on the next screen. Tap on the downward “ Download “ symbol and pick the file export destination. You can simply hit “Download” to get the file in your system.
Part 4: Desktop Recommendation: Converting Slow Motion Video to Normal Using Wondershare Filmora
In the above sections, you have learned how to turn slow-mo into normal. Now, it is time to look for an effective offline solution. That’s where you can count on Wondershare Filmora , which is the simplest but powerful video editor. Fortunately, it can speed up and slow down videos within the highest quality. Filmora provides more advanced editing options than the above solutions.
Free Download For Win 7 or later(64-bit)
Free Download For macOS 10.14 or later
Steps to Perform Slow Motion and Speed Up Videos to Normal with Filmora
Unlike other tools, Filmora can quickly convert your video speed to your desired extent. Head below and transform your video easily with this step-by-step guide.
Step 1Install Filmora and Export Your Media to Start a Project
Successfully launch Filmora in your system and access its home screen. Click on the “New Project” option to initiate media editing. Bring your video to the timeline after importing it into the media panel. To import the file, press the “Ctrl + I” keys using your keyboard.
Step 2Slow Down or Speed Up the Video with Optical Flow
Right-click on your slow-motion video in the timeline to get an extended list. From that list, tap the “Uniform Speed” option and find an editing panel on the right. Now, drag the “Speed” slider right to speed up the video. You can move it to the left side to slow down the video. To ensure a smooth quality, extend the “AI Frame Interpolation” menu and pick the “Optical Flow.”
Step 3Save the File Through the Export Button
Press the Space bar from your keyboard and preview the video. Navigate toward the “Export” button at the top right corner. You can adjust the export parameters and tap “Export” to save the file on your device.
Other Exceptional Features of Filmora
Filmora is more than a simple video editing app. AI integration can generate music, images, and scripts to embrace creativity in your content. Read the following points to learn more about Filmora’s incredible features.
- AI Vocal Remover: If you want to dub a video, use this feature to remove existing vocals. It can separate music and vocal soundtracks while keeping their quality high. Once AI removes vocals, you can quickly edit or remove unwanted elements from the tracks.
- AI Text to Video: Content creators can get instant engagement in their content with this feature. Users just have to write their ideas and let AI transform them into a visual story. They can later customize fonts, styles, and other elements to achieve desired results.
- AI Smart Masking: Professionals can improve their multi-dimensional scenes using this option. It enables multi-layer overlay editing that isolates subjects. Users can freeze frames and perform auto-correction for visual enhancements of the projects.
Conclusion
In short, slow-motion to normal video conversion is possible and serves fruitful purposes. In this regard, iPhone and Android offer built-in options that are explained earlier. Besides, you get familiar with how to convert a slow-motion video to normal using an online tool. For an effective desktop solution, try using Filmora, which is a top-notch video editor so far.
Ultimate Guidelines to Help You Use VLC Media Player Better
Video players have made it quite easy for users to watch movies and their favorite seasons whenever they wish to. While working on improving video quality, several video players have taken dominance across the current market. VLC Media Player stands among the top contenders of video players that have provided users with exceptional services. This article stands on discussing the pointers that would help you use VLC Media Player in a better way.
In this article
01 Key Features of VLC Media Player
02 List of VLC Media Player Supported Format
03 How to Play or Download Streaming Videos with VLC
04 How to Record Screen and Take Screenshots by Using VLC?
05 How to Convert Video File to Different Formats with VLC?
06 Extra Tips: Top Recommended Video Editor in 2022 – Filmora Video Editor
Part 1: Key Features of VLC Media Player
VLC Media Player is an open-source, free video player accessible for all users across major platforms. Being one of the best, it is essential to realize the features that make VLC Media Player special.

Convert Video Files
One of the most anticipated features of VLC is its conversion ability. While converting videos, users can also proceed towards audios. However, as our focus is across the video file formats, VLC offers an extensive set of formats to convert the video without compromising the quality.
Loop Parts of Video
Where most video players provide the option of looping complete files, VLC has changed the narrative of looping specific parts of a video by setting up markers across it. This helps users loop specific parts across their videos.
Stream Podcasts
VLC Media Player exempts the need to download dedicated platforms that stream podcasts for you. The video player allows you to stream podcasts across its platform without the need for any additional settings easily.
Enhance Your Videos
With VLC player, you can always consider revamping your video by adding different filters and effects across it. The user can change the brightness, contrast, colors, geometry, overlays, and several other video features across the platform.
Adding Subtitles
While watching movies and videos, you can download and add external subtitle files across the VLC player to improve your video experience.
Part 2: List of VLC Media Player Supported Format
The following VLC formats are supported across the platform. Users can consider using any of the following as per their convenience:
- AVI
- WMA
- MP4
- MOV
- 3GP
- OGG
- FLAC
- MKV
- MPEG-1/2
- DivX® (1/2/3/4/5/6)
- MPEG-4 ASP
- XviD
- 3ivX D4
- 261
- 263 / H.263i
- 264 / MPEG-4 AVC
- Cinepak
- Theora
- Dirac / VC-2
- MJPEG (A/B)
- WMV 1/2
- WMV 3 / WMV-9
- VC-1
- Sorenson 1/3
- DV
- On2 VP3/VP5/VP6
- Indeo Video v3 (IV32)
- Real Video (1/2/3/4)
Part 3: How to Play or Download Streaming Videos with VLC
As you use a video player, it is always preferable to have one that provides extensive and impressive functions. VLC Media Player for PC allows you to download and play videos across the platform. To understand the procedure, go through the steps provided below:
Step 1: Install VLC Media Player across your device. Run the video player once installed and proceed to select “Media.” Select “Open Network Stream” from the drop-down menu.

Step 2: You need to open the video’s web page that is to be downloaded through VLC. Copy and paste the video URL across the “Please enter a network URL:” box across the window that opens on the screen. Select the “ Stream “ option across the drop-down menu that appears across the “Play” option.

Step 3: On the next window, select “Add” and browse the output destination of the file along with its name.

Step 4: Following this, select the output format of the video file that you need to save your download video in. Ensure that the option of “Activate Transcoding” is enabled. Tap on “Next” to proceed.

Step 5: With all settings specified, click “Stream” to download the video across the specified destination.

Step 6: Once the video is downloaded, select “Media” and tap on “Open Files.” You can access the specific file folder and play the video from there across VLC Media Player with ease.

Part 4: How to Record Screen and Take Screenshots by Using VLC?
Being a content creator, you particularly wish to work on a low budget at the start. Recording videos and streaming them has been made easy with VLC Media Player. Follow the steps of recording screen and taking screenshots of your device with the help of VLC.
Recording Screen with VLC
Step 1: Open VLC Media Player on your device. You also need to open the platform to be recorded with VLC.

Step 2: Tap on “Media” followed by “Open Network Stream” across the drop-down menu to open a new window.

Step 3: Across the “Capture Mode” option, select “Desktop” to record the desktop screen across the player. Set up the desired frame rate for your screen recording. Tap on “Play” once you have configured all essential settings.

Taking Screenshots on VLC
Step 1: Access the “Media” section and select “Open File” to import a video across the player.

Step 2: After opening a video across VLC, you can capture your screen by proceeding to the “Video” tab and selecting the option of “Take Snapshot” to take a screenshot across VLC.

Step 3: You can also set up and use the hotkeys of “CTRL + ALT + S” and “Shift + S” for capturing the screen across the VLC player.
Part 5: How to Convert Video File to Different Formats with VLC?
If you are looking to convert your video file into different VLC formats, you can consider adopting the services of a VLC player. To cover this, look into the steps featured below:
Step 1: Open VLC Media Player on your device and navigate the “Media” tab. Select the “Convert/Save” option across the drop-down menu.

Step 2: With a new screen on the front, select “Add” to import the video file to be converted. Tap on “Convert/Save” once added.

Step 3: Once you add the video, a new screen opens containing the conversion options. Select the file format you wish to change to across the “Profile” option. Set up the output folder of the converted video across the “Destination file” option. As you have set the options, tap on “Start” to conclude the process and convert the video successfully.

Extra Tips: Top Recommended Video Editor in 2022 – Filmora Video Editor
Video editors are as important as video players within this current digital world. Content creators who have their setup across developing videos require platforms that can help them enhance their videos to perfection before playing them across video players such as VLC Media Player. Wondershare Filmora is a clear example of such video editors that provide proficient services in the video editing platform to their users.

For Win 7 or later (64-bit)
For macOS 10.12 or later
As far as the platform goes, it provides a simple and effective user interface to its users. It has tried to embed all necessary features across a simple structure to make things easier for beginners. This is how video editing is quite easy across Filmora Video Editor. With various editing options to work on, users can trim their videos, adjust their audios, add effects and transitions, and utilize visual effects to perfection.
Designing videos with Filmora is a treat for the creators. While recommending the platform for users, they can discover explicit tools for motion tracking, color matching, keyframing, and multiple other options. This is what makes Filmora an exceptional option in video editing platforms. At a price that numerous users can afford, the platform offers unique and diverse options compared to other video editors in the market.
Conclusion
This article has provided an in-depth understanding of the VLC Media Player and the feature it provides. It has also focused on discussing the details about the multiple procedures that can be tried across the player, including conversion, recording, and taking screenshots across VLC. Users new to this platform should look into these details before using it for their specific purpose.
Wondershare Filmora
Get started easily with Filmora’s powerful performance, intuitive interface, and countless effects!
Try It Free Try It Free Try It Free Learn More >

02 List of VLC Media Player Supported Format
03 How to Play or Download Streaming Videos with VLC
04 How to Record Screen and Take Screenshots by Using VLC?
05 How to Convert Video File to Different Formats with VLC?
06 Extra Tips: Top Recommended Video Editor in 2022 – Filmora Video Editor
Part 1: Key Features of VLC Media Player
VLC Media Player is an open-source, free video player accessible for all users across major platforms. Being one of the best, it is essential to realize the features that make VLC Media Player special.
Convert Video Files
One of the most anticipated features of VLC is its conversion ability. While converting videos, users can also proceed towards audios. However, as our focus is across the video file formats, VLC offers an extensive set of formats to convert the video without compromising the quality.
Loop Parts of Video
Where most video players provide the option of looping complete files, VLC has changed the narrative of looping specific parts of a video by setting up markers across it. This helps users loop specific parts across their videos.
Stream Podcasts
VLC Media Player exempts the need to download dedicated platforms that stream podcasts for you. The video player allows you to stream podcasts across its platform without the need for any additional settings easily.
Enhance Your Videos
With VLC player, you can always consider revamping your video by adding different filters and effects across it. The user can change the brightness, contrast, colors, geometry, overlays, and several other video features across the platform.
Adding Subtitles
While watching movies and videos, you can download and add external subtitle files across the VLC player to improve your video experience.
Part 2: List of VLC Media Player Supported Format
The following VLC formats are supported across the platform. Users can consider using any of the following as per their convenience:
- AVI
- WMA
- MP4
- MOV
- 3GP
- OGG
- FLAC
- MKV
- MPEG-1/2
- DivX® (1/2/3/4/5/6)
- MPEG-4 ASP
- XviD
- 3ivX D4
- 261
- 263 / H.263i
- 264 / MPEG-4 AVC
- Cinepak
- Theora
- Dirac / VC-2
- MJPEG (A/B)
- WMV 1/2
- WMV 3 / WMV-9
- VC-1
- Sorenson 1/3
- DV
- On2 VP3/VP5/VP6
- Indeo Video v3 (IV32)
- Real Video (1/2/3/4)
Part 3: How to Play or Download Streaming Videos with VLC
As you use a video player, it is always preferable to have one that provides extensive and impressive functions. VLC Media Player for PC allows you to download and play videos across the platform. To understand the procedure, go through the steps provided below:
Step 1: Install VLC Media Player across your device. Run the video player once installed and proceed to select “Media.” Select “Open Network Stream” from the drop-down menu.
Step 2: You need to open the video’s web page that is to be downloaded through VLC. Copy and paste the video URL across the “Please enter a network URL:” box across the window that opens on the screen. Select the “ Stream “ option across the drop-down menu that appears across the “Play” option.
Step 3: On the next window, select “Add” and browse the output destination of the file along with its name.
Step 4: Following this, select the output format of the video file that you need to save your download video in. Ensure that the option of “Activate Transcoding” is enabled. Tap on “Next” to proceed.
Step 5: With all settings specified, click “Stream” to download the video across the specified destination.
Step 6: Once the video is downloaded, select “Media” and tap on “Open Files.” You can access the specific file folder and play the video from there across VLC Media Player with ease.
Part 4: How to Record Screen and Take Screenshots by Using VLC?
Being a content creator, you particularly wish to work on a low budget at the start. Recording videos and streaming them has been made easy with VLC Media Player. Follow the steps of recording screen and taking screenshots of your device with the help of VLC.
Recording Screen with VLC
Step 1: Open VLC Media Player on your device. You also need to open the platform to be recorded with VLC.
Step 2: Tap on “Media” followed by “Open Network Stream” across the drop-down menu to open a new window.
Step 3: Across the “Capture Mode” option, select “Desktop” to record the desktop screen across the player. Set up the desired frame rate for your screen recording. Tap on “Play” once you have configured all essential settings.
Taking Screenshots on VLC
Step 1: Access the “Media” section and select “Open File” to import a video across the player.
Step 2: After opening a video across VLC, you can capture your screen by proceeding to the “Video” tab and selecting the option of “Take Snapshot” to take a screenshot across VLC.
Step 3: You can also set up and use the hotkeys of “CTRL + ALT + S” and “Shift + S” for capturing the screen across the VLC player.
Part 5: How to Convert Video File to Different Formats with VLC?
If you are looking to convert your video file into different VLC formats, you can consider adopting the services of a VLC player. To cover this, look into the steps featured below:
Step 1: Open VLC Media Player on your device and navigate the “Media” tab. Select the “Convert/Save” option across the drop-down menu.
Step 2: With a new screen on the front, select “Add” to import the video file to be converted. Tap on “Convert/Save” once added.
Step 3: Once you add the video, a new screen opens containing the conversion options. Select the file format you wish to change to across the “Profile” option. Set up the output folder of the converted video across the “Destination file” option. As you have set the options, tap on “Start” to conclude the process and convert the video successfully.
Extra Tips: Top Recommended Video Editor in 2022 – Filmora Video Editor
Video editors are as important as video players within this current digital world. Content creators who have their setup across developing videos require platforms that can help them enhance their videos to perfection before playing them across video players such as VLC Media Player. Wondershare Filmora is a clear example of such video editors that provide proficient services in the video editing platform to their users.
For Win 7 or later (64-bit)
For macOS 10.12 or later
As far as the platform goes, it provides a simple and effective user interface to its users. It has tried to embed all necessary features across a simple structure to make things easier for beginners. This is how video editing is quite easy across Filmora Video Editor. With various editing options to work on, users can trim their videos, adjust their audios, add effects and transitions, and utilize visual effects to perfection.
Designing videos with Filmora is a treat for the creators. While recommending the platform for users, they can discover explicit tools for motion tracking, color matching, keyframing, and multiple other options. This is what makes Filmora an exceptional option in video editing platforms. At a price that numerous users can afford, the platform offers unique and diverse options compared to other video editors in the market.
Conclusion
This article has provided an in-depth understanding of the VLC Media Player and the feature it provides. It has also focused on discussing the details about the multiple procedures that can be tried across the player, including conversion, recording, and taking screenshots across VLC. Users new to this platform should look into these details before using it for their specific purpose.
Wondershare Filmora
Get started easily with Filmora’s powerful performance, intuitive interface, and countless effects!
Try It Free Try It Free Try It Free Learn More >
Adobe After Effects Review
Make cinematic films, movies, intros, and transitions. Delete people from clips. Start fires or create a foggy weather. With Adobe After Effects, the industry-standard motion graphics and visual effects software, you are able to take any idea and make it come to life. Animate titles, credits, and lower thirds. Begin editing from scratch or with presets available. Combine photos and video footage to create anything you can think of.
Choose amazing effects from hundreds of options, remove unwanted parts from the frame, people or objects, and make VR videos to push your audience into the action. This software lets professionals configure keyframes, allow them to create compositing operations. Features of Adobe After Effects include a content library, digital asset management, video rendering, data import/export, and much more. In this article we will give you a brief overview of what After Effects is, what it’s used for and by who and the overall experience!
With that said, let’s get started!
1. Speed and Stability
When talking about speed and stability, After Effects has the latest release packed with improvements. All the developers have focused themselves on speed and also performance. The team at Adobe have worked very hard to make this application more responsive and when we go along in this article, that can be seen in many ways
The main improvement which is immediately clear to all users, is the renewed preview playback optimization. What we noticed is that After Effects is creating the ram preview for your projects a lot faster. However, while working with the software for this article, we did find the user interface to be more responsive, the playback is way smoother, so is it a lot more stable overall.
While using shape layers, there was a significant improvement. A few expressions are a lot faster. This alone is worth upgrading to the latest version of After Effects.

2. User Interface
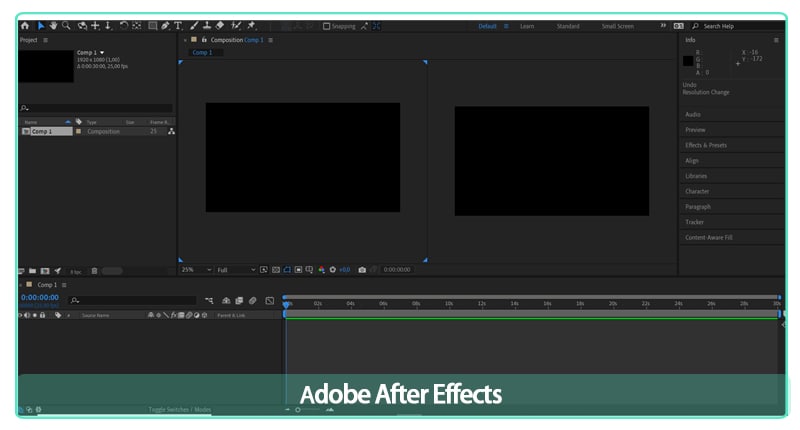
The After Effects interface is constructed up of four main parts. The Timeline panel, the Project panel, the Composition panel and the Effects panel.
The Timeline Panel
In the Timeline panel, you edit all the footage and clips to create your rough cut. You can find the Timeline panel on the bottom of the workspace.
The Project Panel
It’s pretty straightforward that in the Project panel you import your footage and create your project. This is located on the top left of the standard After Effects workspace.
The Composition Panel
The Composition panel is where you will see the final product. This is located in the middle of your workspace.
The Effects Panel
In order to make creative changes to your video, use the preview, audio, effects, and Preset Panels. These panels are located on the upper right area of your workspace, each one also has its dropdown.
3. Learning Curve
The learning curve for After Effects depends on your background, the best way to find out if you like it is starting a free trial. Go through some tutorials online or paid courses. You’ll also want to spend time with the User Guide. The Search Help field in the top right corner provides you an easier search for answers to most questions that you have. Speaking of YouTube and online learning, most of the video tutorials you will find have been created by people that are experienced in After Effects and know their way around it.
4. VFX
There’s a time-period when video editors require strengthening their skills, calling it imperative software for improving editing skills is nowhere near an exaggeration. it really helps prospective professionals improve their learning experience through visual effects, camera tracking, text animation, motion tracking, color grading, etc. All of these methodologies do help in improving the VFX learning process in the long run.
Video editing happens to be a crucial part of film production. Making videos in a fantastic process can indulge in building professional videos via motion graphics animation. This is where Adobe After Effects become an excellent learning tool.
5. Motion Graphics
Motion graphics can sound quite scary. It’s a new term for a specific genre of animation. Motion graphics is the intersection between animation and graphic design. These are purpose-driven visual aspects with the goal of showing information to the viewer through the use of animated graphics or text. Sometimes they include voice-overs narrating what the text or graphics are showing. Where it gets a little complex is that the more popular the term motion graphics becomes, the more people are misaligning animations to it. They need to represent information and illustrate the idea to the viewer clearly, so they do that using animation and motion graphics.
6. Titles and Outros
Adobe released a new combination of features for you. For Adobe Stock: Graphics templates. Those pre-made templates give you a super smooth way to discover new motion graphics within Premiere Pro, without needing to spend time creating titles, overlays, or animations from scratch. The world has digitalized, and videos often need visual aspects such as titles, lower thirds, to present information. The templates not only assist video editors increase the quality of the content by showing certain information, but they also give a strong visual touch to keep the viewer engaged throughout the video. The audience nowadays is a lot more sophisticated, meaning that motion graphics are a necessity in a driven media world.
Motion Graphics templates are valuable for video editors of all levels. For the beginning content creators, the templates offer great quality, ready-made footage to help their creative goal. They can explore and work on their skills. Motion graphics that are pre-made are an excellent way to express the vision and express inspiration to new opportunities.
So now that you are aware of what After Effects templates are, we can move on to the actual workflow, why it is important, and how to use it as efficient as possible.
7. Workflow
Whether you are using Adobe After Effects to create motion graphics, or composite realistic visuals, you usually follow the same workflow, you may repeat the process of adjusting layer properties, editing, and compositing until everything looks good. You can change any property of any element, such as position, opacity and size. Make use of motion tracking to stabilize footage so that it follows the motion from another clip, and so much more!
8. Rendering Speed
When it comes to exporting your project in After Effects, you don’t need to buy an expensive workstation. You can speed up your rendering process from your own laptop without investing too much and by using the following tips we have for you below!
Tip #1: Enable Multiprocessing
What exactly is multiprocessing? That is when After Effects uses multiple cores from your CPU to export multiple frames at once. If your processor has one or more cores, you can enable this feature to reduce your rendering time. We want to mention that you need to check whether or not this option is turned on. Once enabled, you’ll see a great decrease in export time.
To enable Multiprocessing, navigate to Preferences > Memory & Multiprocessing. Then you click the check box next to ‘Render Multiple Frames Simultaneously’ and remember also to adjust the settings that you need.
Tip #2: Optimize Your RAM Usage
The RAM memory inside your workstation can be used to write and read data at a lot higher speeds than regular hard drives and portable drives. Configuring your RAM in a system is one of the easiest upgrades for better performance. Giving you affordable solutions for both desktop and laptop systems, the RAM memory upgrade does not require a lot of knowledge. The more RAM you allow applications to use, the higher the performance you will get out of it.
It also shows a noticeable increase in rendering speed. When the export time in your work is longer than needed, look at your RAM memory and see if you can make the necessary changes or upgrades.
Tip #3: Use the Media Encoder
Let’s talk about the Media Encoder. It’s the software that comes up with Adobe Creative Cloud products such as After Effects and Premiere Pro to simplify the export process. You can easily render your project from After Effects to Adobe Media Encoder and begin the project render process from that point on. The Media Encoder will increase your rendering performance and will significantly decrease rendering time.
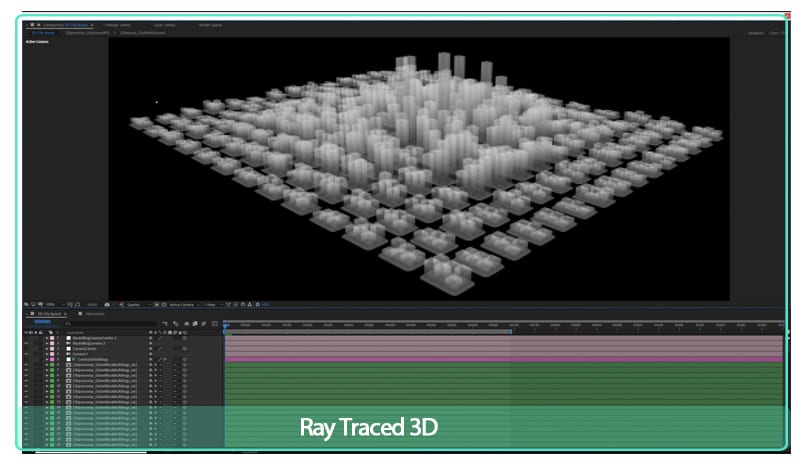
Tip #4: Disable Ray-Traced 3D
The included After Effects Ray-Traced 3D feature enables you to produce 3D models within After Effects without any struggle. Calculating all the motions and visual graphics is such a heavy process for your workstation. When you disable raytracing, you will get a faster export time. By looking that ‘Classic 3D’ is checked instead of ‘Ray-Traced 3D’ from your composition preferences, you can speed your rendering speed up to 50%. Isn’t that incredible?
Tip #5: Activate GPU Exporting with Cuda Acceleration
Exporting your videos with GPU rather than CPU will increase the efficiency of your render process. The export length will decrease a whole lot when you activate Mercury GPU Acceleration, also known as ‘CUDA’ from the ‘Project Settings’.
After Effects doesn’t really require CUDA features from a special kind of Nvidia GPU. Only the GPU accelerated 3D renderer, that is based on the raytracing algorithm, requires that. The other GPU features are running on any GPU that meets the basic minimums, including Intel and AMD GPUs.
9. System Requirements for Windows
These are the minimum specifications needed to use After Effects on PC:
OS: Windows 10 (64-bit) versions 1909 and later, or Windows 11
CPU: Intel or AMD Quad-Core Processor (Intel i5 and i7 will do the job)
RAM: 16 GB
Monitor resolution: 1280 x 1080
An internet connection
Free storage: 15 GB
GPU: Minimum 2 GB of VRAM
10. System Requirements for macOS
OS: macOS 10.13 or later
RAM: 16 GB
CPU: Intel and Apple Silicon (Rosetta2 Supported) Quad-Core Processor
GPU: 2GB of VRAM
Monitor resolution: 1440×900
Free storage: 15 GB
An internet connection
11. Keyboard Shortcuts
You can work visually when you configure your keyboard shortcuts with the visual keyboard shortcut editor within After Effects. You can use the keyboard user interface to show the keys that have been assigned to shortcuts, the available keys for assignment, and edit assigned shortcuts to make your workflow even easier.
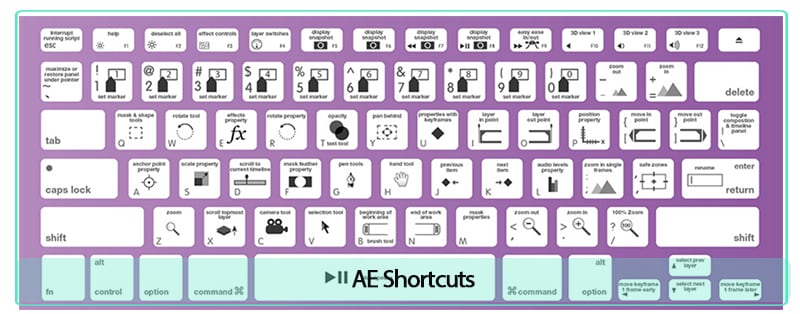
The keyboard layout:
This is a representation of your physical keyboard where you can see which keys have been assigned a shortcut, and which are available.
Command list:
The list displays all the commands that can be assigned shortcuts.
Key modifier list:
This list shows you all the modifier combinations and assigned shortcuts associated with the key you select on your physical keyboard.
After Effects does not allow you to reassign the following keys:
- A
- AA
- E
- EE
- F
- FF
- L
- LL
- M
- MM
- P
- PP
- R
- RR
- S
- SS
- T
- TT
- U
- UU
12. Should You Buy It?
Well first, you cannot buy After Effects, Premiere Pro or other software from Adobe. You have to rent them by paying monthly. After Effects is primarily a compositing and graphics software. Premiere is primarily a video editing program. In the case of After Effects and Premiere Pro, it’s not really an either/or. They’re both software with different purposes. After Effects is a lot more powerful and essentially showcases most of Premiere’s functionality, but according to our experience, the Premiere Pro interface and workflow is way more superior for video editing.
Premiere Pro is essentially built around its timeline, the region where you cut your video clips and drag and place them into your appropriate sequence. Hollywood filmmakers and professional YouTube content creators are using Premiere Pro to edit high-performing content and award-winning films. The software is very intuitive and easy for beginners to start with.
Are going to work with After Effects to create an income? Or are just going to use it for a hobby? It’s crucial to mention that question because Adobe After Effects is not something that is cheaply available. You will be investing much money on the program, and if you are working to use the software, paying a good amount, and earning nothing in return, then you might want to shift to another alternative which would cost you less. For instance, let’s assume you are using the application to earn an income, and have a few low-paying clients. In such a situation, you will have to rethink your options of software and analyze whether what you are paying in comparison to what you are getting is enough for you or not. We all are different individuals and have different preferences. Once we can see what is more important to us, or what is our need at this moment, then we will be able to judge the worth of purchasing Adobe After Effects better.
Are you going to use After Effects to earn an income? Or are just using it as a hobby? It is very important to address this question because Adobe After Effects is not something cheaply accessible. You will be investing a lot of money into this software, if you are using the software while paying a good amount and earning nothing in return yet, then you could shift to a different alternative which will cost you a lot less. Let’s say you are using After Effects to earn an income and have some low-paying work. In that case, you will have to reconsider your options of video editing software and look at whether what you are paying in comparison to what you are getting is possible for you. When we can see what is more important to us, we will be able to see the worth of buying After Effects.
Did you previously use After Effects or are you new to the program? The return that you will get using Adobe After Effects, depends on how good you know how to work with the options, functions and features in the software.
The Bottom Line
So summing it all together, Adobe After Effects takes care of all your assets and creates a final product, considering that After Effects is usually an asset-generation tool. Most video editors complete their projects in After Effects non-stop. It’s excellent for making visual videos come to life.
AE version 22.3 is very impressive. Giving you a wealth of new features created to make VFX editing a lot faster and easier. Offering new features on a regular basis, improving their subscription model making it more attractive. Especially if you’re a professional editor and designer.
Once you get comfortable with Adobe After Effects, you learn how to dynamically combine After Effects compositions to your Premiere projects. You are able to access both assets at the same time if needed!
Free Download For Win 7 or later(64-bit)
Free Download For macOS 10.14 or later
Color Lut in Video -How to Color Grade Your Video
Create High-Quality Video - Wondershare Filmora
An easy and powerful YouTube video editor
Numerous video and audio effects to choose from
Detailed tutorials provided by the official channel
Do you want to improve the quality of your videos? With so many people providing online video content. Other than the subject of your video, its quality is also important. One way to make your content pop is to create a lut video. Below is information on how to color grade your video using lut resources. Keep reading to discover why lut video editing is important and where to get the best resources.

In this article
01 What is LUT?
02 Why do we need to use LUTs?
03 How to add luts to your video using Filmora
So, what is LUT?
LUT refers to Look Up Tables, which a custom color templates you use when creating videos. These help you create content for different devices, including television and mobile devices. For example, you can create custom LUTs for easy conversion from standard definition to more modern cinematic formats such as 4K and UHD.
What are the different types of LUTs?
Here are the colour lut categories for filmmakers:
- Transform
- Calibration
- Viewing
- 1D: 1D lut offers customization on one value of your colors. These are available as .lut file types.
- 3D: These award you more control over your luts video editing since they offer saturation, hues, and brightness levels on different axis. You will find these as .cube file types.

These allow you to make your content vibrant and mimic the color schemes of famous filmmakers such as David Fincher. He is famous for using greens and blues in his films to arrest your attention. He does this by employing a darker than usual color scheme, which leaves you staring at the screen for the entire film. You can see this color lut in the movie Fight Club or The Social Network.
Keep reading to discover the effects of each in luts video editing.
Why do we need to use LUTs?
You use LUTs for different reasons, as you can see from David Fincher’s example. However, here are a few more:
• To add emphasis to a particular scene
Sometimes, it can be challenging to communicate the importance of your message using standard color schemes. As such, filmmakers use dramatic color schemes in their content. For example, the colour scheme in the above photo emphasizes the tranquillity of the sea between contrasting landscapes.

• To ensure uniformity across different devices
You will use a calibration color lut to ensure a similar video quality across different TV monitors whether it is HD, UHD, or 4K. Similarly, you can use a transformation colour lut to add a cinematic effect to your film to make it appear as if your audience is viewing it in a theatre.
Camera manufacturers use different color luts to diversify their products according to their target markets. For example, you get a different lut color grading from a Sony camera as you would in a Canon.

How to add luts to your video using Filmora
Filmora is a great video editing tool for all filmmaker experience levels. It includes tons of features and a user-friendly interface to ensure professional results each time. It is available for both macOS and Windows devices. Filmora allows you to install custom Luts and apply it to your videos.
Guide to use Filmora
1. Launch the video editor
Once you complete the download, launch it to start making magical videos for your audience.
2. Import Your Film
The lut editing video software allows you to import your videos directly from your device.
3. Select Advanced Color Tuning
You will find this on the Tools drop-down menu. It is located on the top menu options of Filmora. Then, drag and drop your video to the timeline. The tool also offers an A/B comparison, allowing you to check the result of your lut video editing before you apply the effect.
You can use the preset luts Filmora offers or upload your custom luts from any of the sites in the next section.
4. Save & Export
Click OK to finalize the correction and export the video to your preferred device. You will see the available options from the software’s export menu.
A few things to consider before using Filmora’s Advanced Color correction tool include:
- Your film white balance needs to be correct to get better results.
- Your camera’s exposure during filming also needs to be optimal to get ideal results when using Filmora for lut video editing. However, the Advanced Color Correction tool will tell you if everything is optimal.
- Finally, the original video needs to be of ideal quality for optimal color lut results. Different shooting conditions may not work with certain color luts. Therefore, opt for luts that match your filmmaking style to get the best results.
For Win 7 or later (64-bit)
For macOS 10.12 or later
Bonus! Free Lut Resources
Do you want more diversity in your lut video editing? Here are some free lut resources to check out.
1. Vision color luts
Vision color luts is another lut video editing software that you can use to hone your skills. They also offer free luts you can upload on their favorite software. Additionally, they have luts for even the latest display resolutions such as 2K and 3D. Check out the full list here.
2. Sam Kolder
Sam Kolder is a Vlogger who is famous for his stunning creations that feature his travels. His work also inspires many creators thanks to his editing and use of color luts. He also shares free lut packs and his creative process across his official channels, including YouTube and Instagram.
He mainly works on Adobe Premiere pro. However, his luts still work with other video editing software.
3. Shutterstock.com
Shutterstock also offers tons of free stuff relating to lut video editing. You will also find free luts that are compatible with Filmora on the website. Here are a few of them you can sample. Please check before you download other packs, as some of the stuff may not match your current versions.
4. Giggster.com
Giggster.com is an LA-based company that caters to aspiring filmmakers. They too offer the occasional lut files you can use to make your videos more stunning. However, they mostly feature those that work with Photoshop CC. So, you may wanna check your software’s compatibility beforehand. Here is one of the freebies you can download.
5. Premiumbeat.com
You may also want to check out some of Premiumbeat’s free offerings if you are an AfterEffects user. They offer stylistic luts and other free tools you can use to edit your films. Additionally, they do this regularly. Therefore, they are worth a look to see what is new.
Conclusion
● Color luts are incredible tools to add flair to your videos. Additionally, you can use them with incredible ease on software like Filmora. Here are some of the creations you can sample from some of the free ones that come with the tool.
Do you want to improve the quality of your videos? With so many people providing online video content. Other than the subject of your video, its quality is also important. One way to make your content pop is to create a lut video. Below is information on how to color grade your video using lut resources. Keep reading to discover why lut video editing is important and where to get the best resources.
In this article
01 What is LUT?
02 Why do we need to use LUTs?
03 How to add luts to your video using Filmora
So, what is LUT?
LUT refers to Look Up Tables, which a custom color templates you use when creating videos. These help you create content for different devices, including television and mobile devices. For example, you can create custom LUTs for easy conversion from standard definition to more modern cinematic formats such as 4K and UHD.
What are the different types of LUTs?
Here are the colour lut categories for filmmakers:
- Transform
- Calibration
- Viewing
- 1D: 1D lut offers customization on one value of your colors. These are available as .lut file types.
- 3D: These award you more control over your luts video editing since they offer saturation, hues, and brightness levels on different axis. You will find these as .cube file types.
These allow you to make your content vibrant and mimic the color schemes of famous filmmakers such as David Fincher. He is famous for using greens and blues in his films to arrest your attention. He does this by employing a darker than usual color scheme, which leaves you staring at the screen for the entire film. You can see this color lut in the movie Fight Club or The Social Network.
Keep reading to discover the effects of each in luts video editing.
Why do we need to use LUTs?
You use LUTs for different reasons, as you can see from David Fincher’s example. However, here are a few more:
• To add emphasis to a particular scene
Sometimes, it can be challenging to communicate the importance of your message using standard color schemes. As such, filmmakers use dramatic color schemes in their content. For example, the colour scheme in the above photo emphasizes the tranquillity of the sea between contrasting landscapes.
• To ensure uniformity across different devices
You will use a calibration color lut to ensure a similar video quality across different TV monitors whether it is HD, UHD, or 4K. Similarly, you can use a transformation colour lut to add a cinematic effect to your film to make it appear as if your audience is viewing it in a theatre.
Camera manufacturers use different color luts to diversify their products according to their target markets. For example, you get a different lut color grading from a Sony camera as you would in a Canon.
How to add luts to your video using Filmora
Filmora is a great video editing tool for all filmmaker experience levels. It includes tons of features and a user-friendly interface to ensure professional results each time. It is available for both macOS and Windows devices. Filmora allows you to install custom Luts and apply it to your videos.
Guide to use Filmora
1. Launch the video editor
Once you complete the download, launch it to start making magical videos for your audience.
2. Import Your Film
The lut editing video software allows you to import your videos directly from your device.
3. Select Advanced Color Tuning
You will find this on the Tools drop-down menu. It is located on the top menu options of Filmora. Then, drag and drop your video to the timeline. The tool also offers an A/B comparison, allowing you to check the result of your lut video editing before you apply the effect.
You can use the preset luts Filmora offers or upload your custom luts from any of the sites in the next section.
4. Save & Export
Click OK to finalize the correction and export the video to your preferred device. You will see the available options from the software’s export menu.
A few things to consider before using Filmora’s Advanced Color correction tool include:
- Your film white balance needs to be correct to get better results.
- Your camera’s exposure during filming also needs to be optimal to get ideal results when using Filmora for lut video editing. However, the Advanced Color Correction tool will tell you if everything is optimal.
- Finally, the original video needs to be of ideal quality for optimal color lut results. Different shooting conditions may not work with certain color luts. Therefore, opt for luts that match your filmmaking style to get the best results.
For Win 7 or later (64-bit)
For macOS 10.12 or later
Bonus! Free Lut Resources
Do you want more diversity in your lut video editing? Here are some free lut resources to check out.
1. Vision color luts
Vision color luts is another lut video editing software that you can use to hone your skills. They also offer free luts you can upload on their favorite software. Additionally, they have luts for even the latest display resolutions such as 2K and 3D. Check out the full list here.
2. Sam Kolder
Sam Kolder is a Vlogger who is famous for his stunning creations that feature his travels. His work also inspires many creators thanks to his editing and use of color luts. He also shares free lut packs and his creative process across his official channels, including YouTube and Instagram.
He mainly works on Adobe Premiere pro. However, his luts still work with other video editing software.
3. Shutterstock.com
Shutterstock also offers tons of free stuff relating to lut video editing. You will also find free luts that are compatible with Filmora on the website. Here are a few of them you can sample. Please check before you download other packs, as some of the stuff may not match your current versions.
4. Giggster.com
Giggster.com is an LA-based company that caters to aspiring filmmakers. They too offer the occasional lut files you can use to make your videos more stunning. However, they mostly feature those that work with Photoshop CC. So, you may wanna check your software’s compatibility beforehand. Here is one of the freebies you can download.
5. Premiumbeat.com
You may also want to check out some of Premiumbeat’s free offerings if you are an AfterEffects user. They offer stylistic luts and other free tools you can use to edit your films. Additionally, they do this regularly. Therefore, they are worth a look to see what is new.
Conclusion
● Color luts are incredible tools to add flair to your videos. Additionally, you can use them with incredible ease on software like Filmora. Here are some of the creations you can sample from some of the free ones that come with the tool.
Also read:
- Adding a Spooky Shadow Effect with Filmora
- What Is AI Composite Video App and AI Composite Video Guide
- 2024 Approved Top 5 Apps To Add Song To Video
- Updated 2024 Approved Deleting White Background in Photoshop Is Hard?
- New Are You Looking for the Best Premiere Pro Slideshow Template Online for Free? If Yes, You Can Find a Few Exciting Slideshow Templates Here. They Are Worth Using
- New Top 9 Best Solutions To Go For When Creating an AI Thumbnail for 2024
- Learning Unique Ways to Slow Down Time Lapse on iPhone for 2024
- Updated In 2024, How to Create a Dynamic Text Animation in Filmora — Step-By-Step
- Ways to Make Sure Your Recording Slideshow in Powerpoint Is Not Wrong
- How to Make A Fantastic Café Vlog for 2024
- In 2024, Learn How to Convert MP4 Videos to 60 FPS GIFs with This Easy-to-Follow Tutorial. Get Smooth and Crisp Motion in Your GIFs in Just a Few Simple Steps
- 2024 Approved Use The Best LUTs for Lightroom
- Leveraging the Vectorscope for Better Color Correction in Premiere Pro for 2024
- New In 2024, 3 Best Effects to Appear on Camera Made with Filmora
- Updated How Can You DIY VHS Overlay in After Effects for 2024
- New The Top 10 Effective SRT Editors Online
- New How to Use Color Grading in Final Cut Pro
- How to Make GIF With Transparent Background for 2024
- New How to Create Your Own LOL Montage Video for 2024
- Updated Are You Looking to Make a Thumbnail for Your Fortnite Video? This Article Features a Guide Explaining Creating a Fortnite Motion Blur Thumbnail
- Brighten a Video in Windows 10 Easily When Video Clips You Recorded on Your Windows 10 Computer or Those Downloaded From YouTube Are Too Dark or Too Bright, You Can Easily Adjust the Color Levels in a Few Clicks
- Updated Best AR Video App - Top 10 Picks
- Updated In 2024, Detailed Tutorial to Rotate a Video in Cyberlink PowerDirector
- In 2024, Something About Skin Care Vlog Ideas
- In 2024, Linkedin Posts Can Be Made Engaging by Using the Emojis. This Article Will Tell You Its Importance and Different Ways to Add Them
- How to Make a Transparent Background in Paint. How 3D Paint Transparent Background Can Be Made. How to Save an Image with Transparent Background, In 2024
- Want to Give a Bold and Colorful Look to Your Ad or Abstract Art Project? This Quick and Easy Tutorial Teaches How to Create a Risograph Effect in Photoshop for 2024
- Split Audio From a Video in Adobe Premiere Pro Step by Step for 2024
- You Can Make Stylish Chroma Key Text Effects After Reading This Article. Wondershare Filmora Will Fill the Crazy Colors in Your Handwritten Note or Words
- In 2024, Make A Tattoo Disappear Like A Magic
- How to Remove Audio From Videos with FFmpeg, In 2024
- 2024 Approved How To Create A YouTube Intro
- New Do You Wish to Convert GIF to Animated PNG? Then, You Need to Know About Using a GIF to APNG Converter to Help You Carry This Process Out in No Time. Read On
- New This Article Will Show You How to Clone Yourslef in Videos with Filmora
- In 2024, Have You Ever Used the Path Blur Effect in Your Photos? This Article Will Address How to Use Path Blur in Photoshop to Generate Appealing Results Accurately
- In 2024, Making Slow Motion Videos in Premiere Pro A Review on The Best Method
- In 2024, Tips And Tricks To Tell if Your iPhone 13 Pro Is Unlocked
- How to Transfer Photos from Xiaomi Redmi Note 12 Pro 4G to Laptop Without USB | Dr.fone
- In 2024, How To Bypass Vivo Y55s 5G (2023) FRP In 3 Different Ways
- Pokemon Go No GPS Signal? Heres Every Possible Solution On Oppo Reno 10 5G | Dr.fone
- 5 Ways to Restart ZTE Blade A73 5G Without Power Button | Dr.fone
- Recover lost data from HTC
- How to play HEVC H.265 video on 14?
- In 2024, 9 Mind-Blowing Tricks to Hatch Eggs in Pokemon Go Without Walking On Apple iPhone 15 Plus | Dr.fone
- Dose Life360 Notify Me When Someone Checks My Location On Oppo A56s 5G? | Dr.fone
- How to Screen Mirroring Oppo K11x to PC? | Dr.fone
- Recommended Best Applications for Mirroring Your Honor Play 40C Screen | Dr.fone
- Title: Read and Learn How to Convert a Slow-Motion Video to Normal in This Guide. Besides, Find the Best Desktop Solution to Adjust Video Speed Quickly and Easily for 2024
- Author: Chloe
- Created at : 2024-04-24 07:08:22
- Updated at : 2024-04-25 07:08:22
- Link: https://ai-editing-video.techidaily.com/read-and-learn-how-to-convert-a-slow-motion-video-to-normal-in-this-guide-besides-find-the-best-desktop-solution-to-adjust-video-speed-quickly-and-easily-fo/
- License: This work is licensed under CC BY-NC-SA 4.0.
