
ReVisionFX ReelSmart Motion Blur Plugin For Premiere Pro for 2024

ReVisionFX ReelSmart Motion Blur Plugin For Premiere Pro
Premiere Pro is an exceptional tool for editing videos flawlessly by using various advanced features. For instance, you can use Adobe Premiere Pro to add extraordinary effects to your videos, such as motion blur. However, if you want a more smooth and flawless effect, you can use a plugin known as ReelSmart Motion Blur. By reading this article, you can learn about the ReelSmart Motion Blur Plugin Premiere Pro and its related instructions for usage.
Part 1: What is ReVisionFX ReelSmart Motion Blur?
You must be wondering why it’s essential to use the motion blur plugin for Premiere Pro. The reason is that using a plugin like ReelSmart Motion Blur can offer more advanced capabilities and options to create professional results. The ReelSmart Motion Blur plugin uses advanced algorithms to track each pixel automatically. As a result, it provides a more compelling and natural outlook to the video. Hence, you can easily apply the motion blur effect to your videos using RSMB without hard work.
Key Features
- Offers Automatic Tracking: To provide accurate and precise results, RSMB uses automatic tracking. This function allows the plugin to track every pixel automatically from one frame to another efficiently.
- Ability to Adjust Blur: You can add refinements by adjusting the amount of blur according to your preference. By doing so, you can generate the desired final output easily.
- Removing Motion Blur: Apart from adding and adjusting the motion blur effect, you can also remove the blur effect using RSMB effortlessly.
- Add Motion Blur to 360 Videos: RSMB is also capable of adding a motion blur to 360 videos properly. It can recognize the edges of sides along with the top and bottom to create a motion blur effect appropriately.
Part 2: Is It Worth Trying ReelSmart Motion Blur Pro?
As we have discussed the regular version of ReelSmart Motion Blur, now we will also shed light on its Pro version. To help you in choosing the best version, we will draw a comparison between the regular and pro versions of RSMB in this section.
Pricing Price
| Regular Version | Pro Version |
|---|---|
| $104.95 | $164.95 |
Supported Hosts
| ReelSmart Motion Blur | Regular Version | Pro Version |
|---|---|---|
| Adobe: After Effects, Premiere Pro | Adobe: After Effects, Premiere Pro | |
| Apple: Final Cut Pro, Motion | Apple: Final Cut Pro, Motion | |
| / | Avid: Media Composer | |
| OFX: Catalyst Edit, DaVinci Resolve, Final Cut Pro, HitFilm, Movie Studio, Natron, and Vegas Pro | Supports all Regular version Hosts Plus the Following:OFX: Baselight, Flame, Fusion Studio, Smoke, Nucoda, Scratch, Nuke, and Silhouette |
New Features
- Separates the Object: RSMB Pro has the additional capability to isolate the background and foreground effectively. It utilizes a specified matte that can help in object separation to create motion blur with great precision. (Not available with Movie Studio, Vegas Pro, Catalyst Edit, Smoke, Media Composer, Flame, or Nucoda)
- Blur with Motion Vectors: If you have imported a 3D animation video, the pro version can blur the motion vectors provided by you. Thus, it can work on a 3D animation system perfectly. (Not available with Vegas Pro, DaVinci Resolve, Movie Studio, Media Composer, Catalyst Edit, or Nucoda)
- RGB+A Tracking: This option is used to recognize and track dark images with mattes by using the alpha channel. You can use this option for masked or CG stuff. (Not available with Media Composer)
- Use of Tracking Points: To help the RSMB’s calculation of motion vectors, you can provide tracking points. By defining the tracking points, you can tell RSMB about the movement of one pixel from one frame to another efficiently. (Not available with Vegas Pro, Media Composer, Catalyst Edit, DaVinci Resolve, Smoke, Flame, Movie Studio, or Nucoda)
- Spline Guidance: If RSMB encounters problems related to tracking, you can draw and animate shapes to tell about the object’s movement. Thus, it can help the RSMB find the object movement easily. (Not available with Premiere Pro, Nucoda, Vegas Pro, HitFilm, Movie Studio, Smoke, Sihouette, Flame, Scratch, Nuke, Motion, Media Composer, DaVinci Resolve, Catalyst Edit, FCPX)
Rating
- 7 out of 5
Our Verdict
The new features in the pro version of RSMB are really compelling and beneficial. However, there are various restrictions when it comes to the supported hosts of the pro version. So, if you are using any common software for video editing that is not recognized by the pro version, we will recommend you use the regular version of RSMB. The regular version of RSMB is cost-effective and works proficiently.
Part 3: How to Use ReelSmart Motion Blur Plugin in Premiere Pro?
Are you eager to know how to use the Premiere Pro motion blur plugin? Read and follow the steps provided below to craft flawless results.
Step1 Import Video Clip
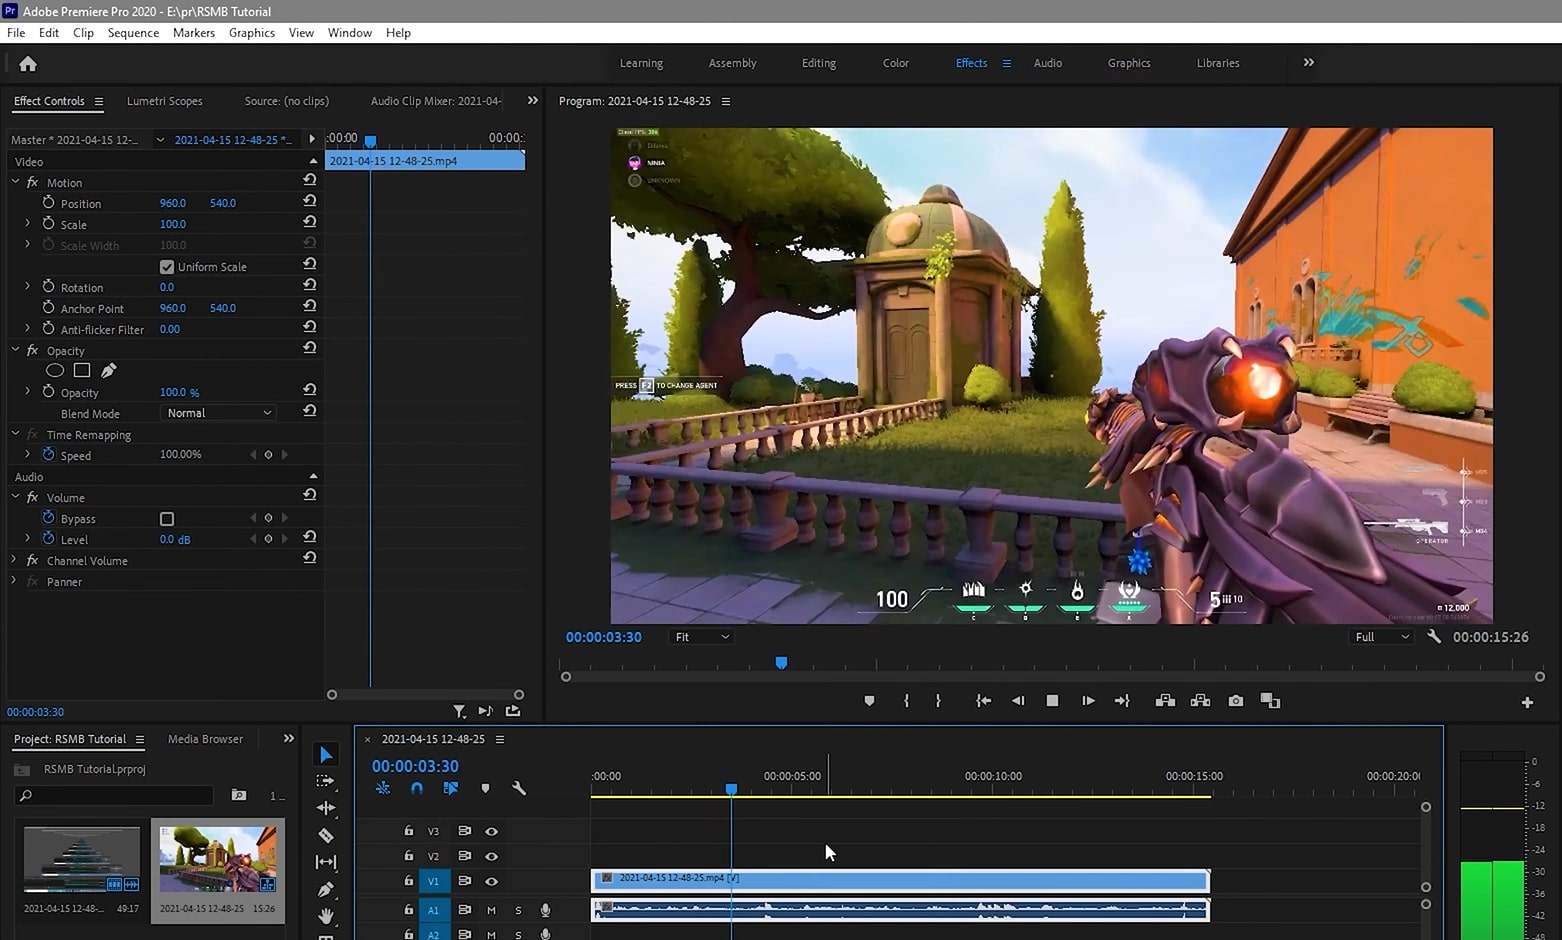
Open Adobe Premiere Pro in your system and start with a new project. On the newly displayed window, import the video clip by browsing through your computer. After importing the desired video file, make sure to drag and drop it into the timeline to begin editing.
Step2 Search for RSMB Effect
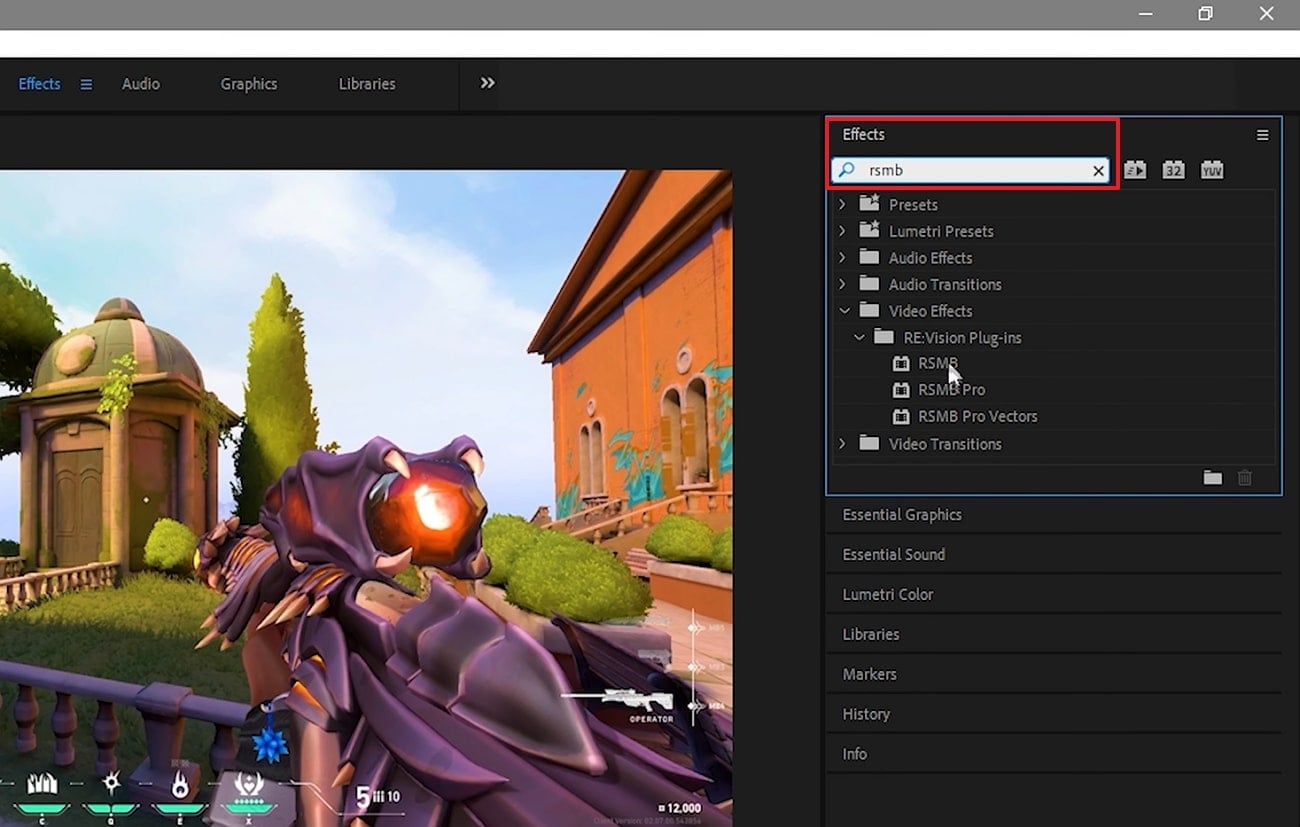
Once you have dropped the video into the timeline, navigate to the “Effects” tab given on the right side. On the search box, type “RSMB.” From the fetched results, select RSMB and apply it to the above layer of your video clip in the timeline.
Step3 Adjust the Plugin Settings
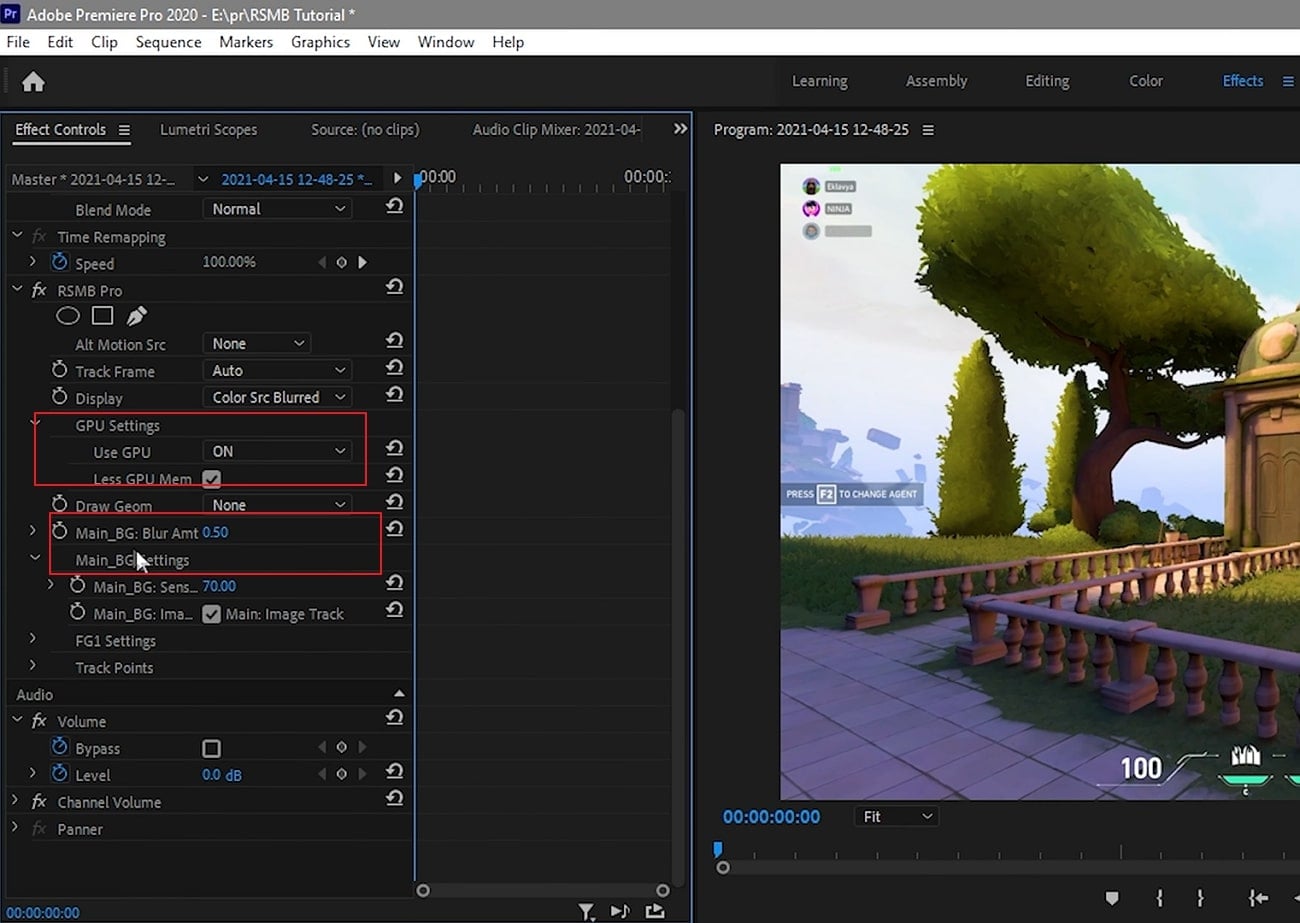
Now head to the settings on the left side and enable the GPU settings. Moreover, you can increase the blur amount to 1 or 1.5. By doing so, you can create a smoother look in your video. Once done with the settings, make sure to render your video to produce a smooth finish. Once done with rendering, you can preview and save the video easily.
Conclusion
Motion blur effect can drastically transform your video clip. If you are using Premiere Pro to add motion blur, we will recommend you use the plugin called ReVisionFX ReelSmart Motion Blur. If you are unaware of the motion blur plugin Premiere Pro, this article has fetched all the related details. This article has provided all the significance and instructions to use the RSMB plugin.
Supported Hosts
| ReelSmart Motion Blur | Regular Version | Pro Version |
|---|---|---|
| Adobe: After Effects, Premiere Pro | Adobe: After Effects, Premiere Pro | |
| Apple: Final Cut Pro, Motion | Apple: Final Cut Pro, Motion | |
| / | Avid: Media Composer | |
| OFX: Catalyst Edit, DaVinci Resolve, Final Cut Pro, HitFilm, Movie Studio, Natron, and Vegas Pro | Supports all Regular version Hosts Plus the Following:OFX: Baselight, Flame, Fusion Studio, Smoke, Nucoda, Scratch, Nuke, and Silhouette |
New Features
- Separates the Object: RSMB Pro has the additional capability to isolate the background and foreground effectively. It utilizes a specified matte that can help in object separation to create motion blur with great precision. (Not available with Movie Studio, Vegas Pro, Catalyst Edit, Smoke, Media Composer, Flame, or Nucoda)
- Blur with Motion Vectors: If you have imported a 3D animation video, the pro version can blur the motion vectors provided by you. Thus, it can work on a 3D animation system perfectly. (Not available with Vegas Pro, DaVinci Resolve, Movie Studio, Media Composer, Catalyst Edit, or Nucoda)
- RGB+A Tracking: This option is used to recognize and track dark images with mattes by using the alpha channel. You can use this option for masked or CG stuff. (Not available with Media Composer)
- Use of Tracking Points: To help the RSMB’s calculation of motion vectors, you can provide tracking points. By defining the tracking points, you can tell RSMB about the movement of one pixel from one frame to another efficiently. (Not available with Vegas Pro, Media Composer, Catalyst Edit, DaVinci Resolve, Smoke, Flame, Movie Studio, or Nucoda)
- Spline Guidance: If RSMB encounters problems related to tracking, you can draw and animate shapes to tell about the object’s movement. Thus, it can help the RSMB find the object movement easily. (Not available with Premiere Pro, Nucoda, Vegas Pro, HitFilm, Movie Studio, Smoke, Sihouette, Flame, Scratch, Nuke, Motion, Media Composer, DaVinci Resolve, Catalyst Edit, FCPX)
Rating
- 7 out of 5
Our Verdict
The new features in the pro version of RSMB are really compelling and beneficial. However, there are various restrictions when it comes to the supported hosts of the pro version. So, if you are using any common software for video editing that is not recognized by the pro version, we will recommend you use the regular version of RSMB. The regular version of RSMB is cost-effective and works proficiently.
Part 3: How to Use ReelSmart Motion Blur Plugin in Premiere Pro?
Are you eager to know how to use the Premiere Pro motion blur plugin? Read and follow the steps provided below to craft flawless results.
Step1 Import Video Clip
Open Adobe Premiere Pro in your system and start with a new project. On the newly displayed window, import the video clip by browsing through your computer. After importing the desired video file, make sure to drag and drop it into the timeline to begin editing.

Step2 Search for RSMB Effect
Once you have dropped the video into the timeline, navigate to the “Effects” tab given on the right side. On the search box, type “RSMB.” From the fetched results, select RSMB and apply it to the above layer of your video clip in the timeline.

Step3 Adjust the Plugin Settings
Now head to the settings on the left side and enable the GPU settings. Moreover, you can increase the blur amount to 1 or 1.5. By doing so, you can create a smoother look in your video. Once done with the settings, make sure to render your video to produce a smooth finish. Once done with rendering, you can preview and save the video easily.

Conclusion
Motion blur effect can drastically transform your video clip. If you are using Premiere Pro to add motion blur, we will recommend you use the plugin called ReVisionFX ReelSmart Motion Blur. If you are unaware of the motion blur plugin Premiere Pro, this article has fetched all the related details. This article has provided all the significance and instructions to use the RSMB plugin.
A Guide to Effective Video Marketing
Video marketing is the process of promoting a product, service, or brand using videos intended to attract audiences’ attention and prompt them to action. With marketers and communicators working increasingly with AI, automation, chatbots, and all sorts of generative technology in 2023 and beyond, video is one of the most common digital mediums for connecting with people.
What exactly does effective video marketing look like today? This guide will take a closer look.
- Part 2. 3 Typical Types of Marketing Videos
- Part 3. 6 Tips for Making Your Video Effective
- Part 4: Useful Video Editing Tool
- Conclusion
Part 1: How to Create a Video Marketing Campaign

Launching a video marketing campaign requires considerable planning and preparation. Follow these best practices for video campaign success:
1.Set Goals and Identify Your Audience
The aim of video marketing for small businesses or large businesses should be tied to business objectives, such as raising brand awareness, educating consumers, or driving conversions. First and foremost, define these goals.
Who are you trying to reach with video content? You need a clear picture of this. Collect insights about audiences with regard to demographics, interests, values, media habits, and existing brand impressions. With these insights, you can create unique content that appeals to your target viewers.
2.Conduct Market Research
Research what kinds of videos connect with your audiences by accounting for competitors and non-competitors successfully using video. Identify videos with the most hits, shares, subscribers generated, and other metrics through channels like YouTube Analytics, Tubular Labs or SEMrush.
From the data, conclude common themes around video length, preferred formats for content, production methodologies, and so on, which should then serve to guide your own content.
3.Craft a Compelling Story
Every great marketing video is a story. Draw a story plot with rising tension and emotion leading to resolution. The story’s exposition, rising action, climax, and denouement can be outlined by famous storytelling frameworks.
Narratives that keep viewers engaged from beginning to end result in better videos. Early validation for your script ideas can be gathered through focus groups, social listening, surveys, and interviews with members of your target audience.
4.Produce Video/Audio with Quality
Bring your story to life by investing in experienced video producers. Budgets may be wildly divergent, so always aim to achieve the best production quality.
Feature crisp, bright camerawork, professional editing, and transitions. Be sure to use intense music to underscore emotional peaks and simple but eye-catching visual effects where they make sense.
For audio, manage volumes between scenes at the same level; minimize background noise; have clear dialogue and smooth mixing. Good video and audio keep viewers glued to your content.
5. Select Suitable Video Platforms
Research where video marketing is most effective in your niche, and figure out which social platforms and media sites your target audiences use.
Being present on several different platforms is every strategy’s dream. However, the real key is finding out where your audiences are most engaged and directing them there with video content tailored for the individual user experience by the platform.
6.Implement a Strong Call-to-Action
The ending of every video narrative should take the viewer toward an action. Clicks to websites? Subscriptions to YouTube channels? Form fills? App downloads?
Your final message in your video clears CTA. Add supporting calls-to-action in the form of superimposed graphics, cards, or endscreens outside of the video to direct traffic beyond that medium and give more expression to the story.
7.Track and Optimize Performance
After videos are posted, collect data on performance. Such indicators include view counts, average % viewed, changes in viewership over time, referral traffic, subscribers gained (added), conversion rates, and so on.
Feed analytics insights into an optimization road map. To inform new video projects targeting the same KPIs, look at higher versus lower-converting videos. Test repetition of the same content on different media platforms at various time intervals, with varying images of thumbnails and so forth, to improve metrics.
Part 2: 3 Typical Types of Marketing Videos

There are some video formats that particularly suit certain marketing objectives. Let’s explore some of the most versatile, effective genres with real-world examples:
1. Explainer Videos
Knowing how to simplify and explain complex products, services, or concepts is precisely what Seasoned Explainers do. They use motion graphics, cartoons, live action–it’s all good. They express it interestingly and help audiences understand value offerings they may be unfamiliar with.
2. Tutorial Videos
A good video tutorial leads audiences through a process one can use to employ the product, carry out the method, or develop the skill. Hands-on learning material meets user information needs, indirectly promoting brand owners of the know-how.
3. Behind-the-Scenes Content
These videos give audiences an insider’s perspective on making popular products. Getting a peek behind the curtain helps pique viewer curiosity while humanizing brands through interviews, b-roll footage, and more.
Part 3: 6 Tips for making your video effective

Creating personalized video marketing strategies that effectively engage your target audience and achieve your marketing goals requires careful planning and execution. You need to grab viewer attention fast, communicate your key messages clearly, and provide strong calls to action.
The key is to keep it concise, optimize for sound-off viewing, build in interactivity, showcase user-generated content, partner with influencers, and more. Apply these best practices for getting your marketing videos noticed and acted upon:
1.Keep It Concise
With a sea of content competing for viewer attention getting longer daily, shorter is better. Videos under 1 minute perform far better for driving clicks, conversions, completes, and shares. Test even 6-second bumper ads on YouTube and Facebook.
2. Capture Attention Early
You have seconds to hook audiences scrolling feeds non-stop. Dynamically edited intros with eye-catching colors, quick cuts, and dramatic questions/facts immediately grab interest versus slow fades or titles.
3.Make Sound Optional
85% of videos are now watched without sound on mobile devices. While strong audio is still important for reeled-in viewers, ensure critical info is communicated visually as well.
4.Incorporate Interactive Elements
Leverage platform tools like YouTube cards, info cards, links, hashtags, Q&As and more to keep audiences actively engaged with video content instead of passively viewing.
5. Spotlight User-Generated Content
User videos reviewing products or demonstrating branded tutorials often outperform corporate studio content now. Repurpose this UGC via reaction videos, contest highlights, and “best of” community compilations.
6.Build Influencer Partnerships
Collaborations with influencers popular with your target demos lend video credibility. Support creators with gear, access, co-promotion, etc., in exchange for branded integration and affiliate sales.
Part 4: Useful Video Editing Tool

Video Editing Now For Win 7 or later(64-bit)
Video Editing Now For macOS 10.14 or later
In creating marketing videos, the right editing software should help cut together raw material gatherings and integrate graphic elements. It must also permit an easy handling of musical components and the application of effects, among other things. The final step, polishing the product into various forms for export to a multitude of servers, should all be done with minimal effort through intelligent operating interfaces (UI). Among the options used by amateurs and professionals alike, Wondershare’s Filmora is one of the most popular.
Advertisement Video Editing in Filmora
Free Download For Win 7 or later(64-bit)
Free Download For macOS 10.14 or later
More advanced video editing for veteran editors yet an easy-to-use, intuitive software for beginners. Key features of Filmora include:
- Simple Drag-and-Drop Timeline Interface
- Library Of Visual Effects and Transitions
- Built-In Title Templates
- Color Grading and Color Matching Tools
- Support For Keyframe Animation
- Background Audio Mixer
- The Free-Use Audio, Image, Video Library
- Instant Previews of Edits
- Export For All Types of Platforms
From planning and carrying out shooting to editing, rendering and output, Filmora speeds up all the steps of bringing video projects to life. For marketing teams constantly producing clips, an intriguing aspect of the software is that its wide appeal to video skill levels combines well with pro-grade tools.
Conclusion
In the future, video marketing will only grow more critical. With virtual reality moving from gaming to experiential e-commerce, it is up to marketers to drive adoption. With these strategies, your brand can get ahead of the curve and use groundbreaking video programs to win over audiences at this time and in the years that follow.
Part 1: How to Create a Video Marketing Campaign

Launching a video marketing campaign requires considerable planning and preparation. Follow these best practices for video campaign success:
1.Set Goals and Identify Your Audience
The aim of video marketing for small businesses or large businesses should be tied to business objectives, such as raising brand awareness, educating consumers, or driving conversions. First and foremost, define these goals.
Who are you trying to reach with video content? You need a clear picture of this. Collect insights about audiences with regard to demographics, interests, values, media habits, and existing brand impressions. With these insights, you can create unique content that appeals to your target viewers.
2.Conduct Market Research
Research what kinds of videos connect with your audiences by accounting for competitors and non-competitors successfully using video. Identify videos with the most hits, shares, subscribers generated, and other metrics through channels like YouTube Analytics, Tubular Labs or SEMrush.
From the data, conclude common themes around video length, preferred formats for content, production methodologies, and so on, which should then serve to guide your own content.
3.Craft a Compelling Story
Every great marketing video is a story. Draw a story plot with rising tension and emotion leading to resolution. The story’s exposition, rising action, climax, and denouement can be outlined by famous storytelling frameworks.
Narratives that keep viewers engaged from beginning to end result in better videos. Early validation for your script ideas can be gathered through focus groups, social listening, surveys, and interviews with members of your target audience.
4.Produce Video/Audio with Quality
Bring your story to life by investing in experienced video producers. Budgets may be wildly divergent, so always aim to achieve the best production quality.
Feature crisp, bright camerawork, professional editing, and transitions. Be sure to use intense music to underscore emotional peaks and simple but eye-catching visual effects where they make sense.
For audio, manage volumes between scenes at the same level; minimize background noise; have clear dialogue and smooth mixing. Good video and audio keep viewers glued to your content.
5. Select Suitable Video Platforms
Research where video marketing is most effective in your niche, and figure out which social platforms and media sites your target audiences use.
Being present on several different platforms is every strategy’s dream. However, the real key is finding out where your audiences are most engaged and directing them there with video content tailored for the individual user experience by the platform.
6.Implement a Strong Call-to-Action
The ending of every video narrative should take the viewer toward an action. Clicks to websites? Subscriptions to YouTube channels? Form fills? App downloads?
Your final message in your video clears CTA. Add supporting calls-to-action in the form of superimposed graphics, cards, or endscreens outside of the video to direct traffic beyond that medium and give more expression to the story.
7.Track and Optimize Performance
After videos are posted, collect data on performance. Such indicators include view counts, average % viewed, changes in viewership over time, referral traffic, subscribers gained (added), conversion rates, and so on.
Feed analytics insights into an optimization road map. To inform new video projects targeting the same KPIs, look at higher versus lower-converting videos. Test repetition of the same content on different media platforms at various time intervals, with varying images of thumbnails and so forth, to improve metrics.
Part 2: 3 Typical Types of Marketing Videos

There are some video formats that particularly suit certain marketing objectives. Let’s explore some of the most versatile, effective genres with real-world examples:
1. Explainer Videos
Knowing how to simplify and explain complex products, services, or concepts is precisely what Seasoned Explainers do. They use motion graphics, cartoons, live action–it’s all good. They express it interestingly and help audiences understand value offerings they may be unfamiliar with.
2. Tutorial Videos
A good video tutorial leads audiences through a process one can use to employ the product, carry out the method, or develop the skill. Hands-on learning material meets user information needs, indirectly promoting brand owners of the know-how.
3. Behind-the-Scenes Content
These videos give audiences an insider’s perspective on making popular products. Getting a peek behind the curtain helps pique viewer curiosity while humanizing brands through interviews, b-roll footage, and more.
Part 3: 6 Tips for making your video effective

Creating personalized video marketing strategies that effectively engage your target audience and achieve your marketing goals requires careful planning and execution. You need to grab viewer attention fast, communicate your key messages clearly, and provide strong calls to action.
The key is to keep it concise, optimize for sound-off viewing, build in interactivity, showcase user-generated content, partner with influencers, and more. Apply these best practices for getting your marketing videos noticed and acted upon:
1.Keep It Concise
With a sea of content competing for viewer attention getting longer daily, shorter is better. Videos under 1 minute perform far better for driving clicks, conversions, completes, and shares. Test even 6-second bumper ads on YouTube and Facebook.
2. Capture Attention Early
You have seconds to hook audiences scrolling feeds non-stop. Dynamically edited intros with eye-catching colors, quick cuts, and dramatic questions/facts immediately grab interest versus slow fades or titles.
3.Make Sound Optional
85% of videos are now watched without sound on mobile devices. While strong audio is still important for reeled-in viewers, ensure critical info is communicated visually as well.
4.Incorporate Interactive Elements
Leverage platform tools like YouTube cards, info cards, links, hashtags, Q&As and more to keep audiences actively engaged with video content instead of passively viewing.
5. Spotlight User-Generated Content
User videos reviewing products or demonstrating branded tutorials often outperform corporate studio content now. Repurpose this UGC via reaction videos, contest highlights, and “best of” community compilations.
6.Build Influencer Partnerships
Collaborations with influencers popular with your target demos lend video credibility. Support creators with gear, access, co-promotion, etc., in exchange for branded integration and affiliate sales.
Part 4: Useful Video Editing Tool

Video Editing Now For Win 7 or later(64-bit)
Video Editing Now For macOS 10.14 or later
In creating marketing videos, the right editing software should help cut together raw material gatherings and integrate graphic elements. It must also permit an easy handling of musical components and the application of effects, among other things. The final step, polishing the product into various forms for export to a multitude of servers, should all be done with minimal effort through intelligent operating interfaces (UI). Among the options used by amateurs and professionals alike, Wondershare’s Filmora is one of the most popular.
Advertisement Video Editing in Filmora
Free Download For Win 7 or later(64-bit)
Free Download For macOS 10.14 or later
More advanced video editing for veteran editors yet an easy-to-use, intuitive software for beginners. Key features of Filmora include:
- Simple Drag-and-Drop Timeline Interface
- Library Of Visual Effects and Transitions
- Built-In Title Templates
- Color Grading and Color Matching Tools
- Support For Keyframe Animation
- Background Audio Mixer
- The Free-Use Audio, Image, Video Library
- Instant Previews of Edits
- Export For All Types of Platforms
From planning and carrying out shooting to editing, rendering and output, Filmora speeds up all the steps of bringing video projects to life. For marketing teams constantly producing clips, an intriguing aspect of the software is that its wide appeal to video skill levels combines well with pro-grade tools.
Conclusion
In the future, video marketing will only grow more critical. With virtual reality moving from gaming to experiential e-commerce, it is up to marketers to drive adoption. With these strategies, your brand can get ahead of the curve and use groundbreaking video programs to win over audiences at this time and in the years that follow.
Color Correction Basics (S-LOG Footage)
S-Log is a gamma curve optimized for digital cameras to maximize the image sensor’s performance. Although these videos may look flat and washed out, they contain lots of color information. Even better, video creators can use color correction to edit the S-Log videos and make them look as natural as possible. That’s what this article is all about.
How to Color-Correct an S-Log Footage
This tutorial assumes that you already have an S-Log footage. If not, you can record S-Log footage using most Canon, Sony, and Panasonic cameras.

Let’s get to the steps!
Step1 Adjust the color settings
Start by adding your video to the timeline on Wondershare Filmora and then double-click the video track. Then, click on the Color tab before tapping Advanced.
Free Download For Win 7 or later(64-bit)
Free Download For macOS 10.14 or later

Step2 Read and study the histogram
Now you’ll see the Advanced Color Correction pop-up window. Here, you’ll see a histogram with the brightest point on the right and the darkest point on the left. From our example, you can see that the video has more dark pixels than bright ones. Horizontally, the histogram shows you how many pixels are in a certain range of brightness.

Step3 Adjust the image colors
Once you’ve understood the histogram, look for pure black and white parts on the video clip. For example, in this video, you can see that the roofs are pure black and the boat at the bottom-right corner is pure white.

After finding the white and black parts in the video, go to the Light section, then adjust the Highlights to see if you can get a pure white on the boat. If the boat or any other image of your choice doesn’t look pure white, increase the Whites slide to make it whiter.

Now adjust the Shadows settings to reduce the effect and make the roofs look closer to pure black. If you want the roofs to look darker, drag the Blacks slider to the left.
Pro tip: Ensure that the darkest and brightest points don’t cross the broken lines on the edge, or the video will start losing details.
Step4 Adjust the color saturation
Does your video still look a little flat? Probably yes! In that case, click the Color section and adjust the Saturation slider to the right to make the video less flat. Saturation simply means how colorful a video clip is to the viewer. Apart from the color saturation, you can also adjust the Vibrance to make your video objects look more colorful.

Step5 Preview and compare the video
Now it’s time to check and compare the results. To make it easier, click the Eye icon at the top-right corner to switch between the original S-Log video and the color-corrected clip. You can also tap the AB icon and choose Split View-Left/Right to view the clips in the side-by-side mode.

Summary
I guess that was easy, right? Up to this juncture, you should be able to perform basic color correction on your video using Wondershare Filmora. Remember, this video editor packs many other editing tools to bring out your creativity. Give it a try!
Free Download For macOS 10.14 or later

Step2 Read and study the histogram
Now you’ll see the Advanced Color Correction pop-up window. Here, you’ll see a histogram with the brightest point on the right and the darkest point on the left. From our example, you can see that the video has more dark pixels than bright ones. Horizontally, the histogram shows you how many pixels are in a certain range of brightness.

Step3 Adjust the image colors
Once you’ve understood the histogram, look for pure black and white parts on the video clip. For example, in this video, you can see that the roofs are pure black and the boat at the bottom-right corner is pure white.

After finding the white and black parts in the video, go to the Light section, then adjust the Highlights to see if you can get a pure white on the boat. If the boat or any other image of your choice doesn’t look pure white, increase the Whites slide to make it whiter.

Now adjust the Shadows settings to reduce the effect and make the roofs look closer to pure black. If you want the roofs to look darker, drag the Blacks slider to the left.
Pro tip: Ensure that the darkest and brightest points don’t cross the broken lines on the edge, or the video will start losing details.
Step4 Adjust the color saturation
Does your video still look a little flat? Probably yes! In that case, click the Color section and adjust the Saturation slider to the right to make the video less flat. Saturation simply means how colorful a video clip is to the viewer. Apart from the color saturation, you can also adjust the Vibrance to make your video objects look more colorful.

Step5 Preview and compare the video
Now it’s time to check and compare the results. To make it easier, click the Eye icon at the top-right corner to switch between the original S-Log video and the color-corrected clip. You can also tap the AB icon and choose Split View-Left/Right to view the clips in the side-by-side mode.

Summary
I guess that was easy, right? Up to this juncture, you should be able to perform basic color correction on your video using Wondershare Filmora. Remember, this video editor packs many other editing tools to bring out your creativity. Give it a try!
Free Download For macOS 10.14 or later

Step2 Read and study the histogram
Now you’ll see the Advanced Color Correction pop-up window. Here, you’ll see a histogram with the brightest point on the right and the darkest point on the left. From our example, you can see that the video has more dark pixels than bright ones. Horizontally, the histogram shows you how many pixels are in a certain range of brightness.

Step3 Adjust the image colors
Once you’ve understood the histogram, look for pure black and white parts on the video clip. For example, in this video, you can see that the roofs are pure black and the boat at the bottom-right corner is pure white.

After finding the white and black parts in the video, go to the Light section, then adjust the Highlights to see if you can get a pure white on the boat. If the boat or any other image of your choice doesn’t look pure white, increase the Whites slide to make it whiter.

Now adjust the Shadows settings to reduce the effect and make the roofs look closer to pure black. If you want the roofs to look darker, drag the Blacks slider to the left.
Pro tip: Ensure that the darkest and brightest points don’t cross the broken lines on the edge, or the video will start losing details.
Step4 Adjust the color saturation
Does your video still look a little flat? Probably yes! In that case, click the Color section and adjust the Saturation slider to the right to make the video less flat. Saturation simply means how colorful a video clip is to the viewer. Apart from the color saturation, you can also adjust the Vibrance to make your video objects look more colorful.

Step5 Preview and compare the video
Now it’s time to check and compare the results. To make it easier, click the Eye icon at the top-right corner to switch between the original S-Log video and the color-corrected clip. You can also tap the AB icon and choose Split View-Left/Right to view the clips in the side-by-side mode.

Summary
I guess that was easy, right? Up to this juncture, you should be able to perform basic color correction on your video using Wondershare Filmora. Remember, this video editor packs many other editing tools to bring out your creativity. Give it a try!
Free Download For macOS 10.14 or later

Step2 Read and study the histogram
Now you’ll see the Advanced Color Correction pop-up window. Here, you’ll see a histogram with the brightest point on the right and the darkest point on the left. From our example, you can see that the video has more dark pixels than bright ones. Horizontally, the histogram shows you how many pixels are in a certain range of brightness.

Step3 Adjust the image colors
Once you’ve understood the histogram, look for pure black and white parts on the video clip. For example, in this video, you can see that the roofs are pure black and the boat at the bottom-right corner is pure white.

After finding the white and black parts in the video, go to the Light section, then adjust the Highlights to see if you can get a pure white on the boat. If the boat or any other image of your choice doesn’t look pure white, increase the Whites slide to make it whiter.

Now adjust the Shadows settings to reduce the effect and make the roofs look closer to pure black. If you want the roofs to look darker, drag the Blacks slider to the left.
Pro tip: Ensure that the darkest and brightest points don’t cross the broken lines on the edge, or the video will start losing details.
Step4 Adjust the color saturation
Does your video still look a little flat? Probably yes! In that case, click the Color section and adjust the Saturation slider to the right to make the video less flat. Saturation simply means how colorful a video clip is to the viewer. Apart from the color saturation, you can also adjust the Vibrance to make your video objects look more colorful.

Step5 Preview and compare the video
Now it’s time to check and compare the results. To make it easier, click the Eye icon at the top-right corner to switch between the original S-Log video and the color-corrected clip. You can also tap the AB icon and choose Split View-Left/Right to view the clips in the side-by-side mode.

Summary
I guess that was easy, right? Up to this juncture, you should be able to perform basic color correction on your video using Wondershare Filmora. Remember, this video editor packs many other editing tools to bring out your creativity. Give it a try!
How to Edit Recorded Video
The most critical component of post-production for a video marketer is editing. Your video will seem unfinished and repel your viewers if you cannot effortlessly weave your images together or get your cut to reach the proper frame. Learning to edit a video may soon become a never-ending task. While each project you work on will have somewhat different editing needs, the principles of video editing remain basically the same. You don’t need to spend a lot on costly equipment to have a professional appearance; if you pay attention to a few important things, you can produce excellent movies with whatever you have right now.
Content producers, entrepreneurs, and influencers can have much too much material to include into a single YouTube video. You may not be able to buy video editing software if you’re on a tight budget. So, what does a video marketer do if they don’t have editing software? To assist you with the process of video editing, we’ve put up this thorough tutorial that covers everything you’ll need to know to make stunning films, even if you’ve never done it before. We’ll also demonstrate how to utilize the super-intuitive and user-friendly editor to create a video.
Part 1. Edit Recorded Video in OBS
OBS is a video streaming and recording application. It’s open source, free, and works on Macs, Windows, and Linux. It is a strong and adaptable screencast video creation tool when paired with competent audio and video editing tools. Unfortunately, OBS doesn’t support editing feature and hence, we’re enlisting the recording steps so you can edit them by using a third-party toolkit mentioned in the guide.
Step 1. Download and Install OBS
Install OBS according to the instructions for your operating system by downloading it from the link below.
Step 2. Setup Screen Recording
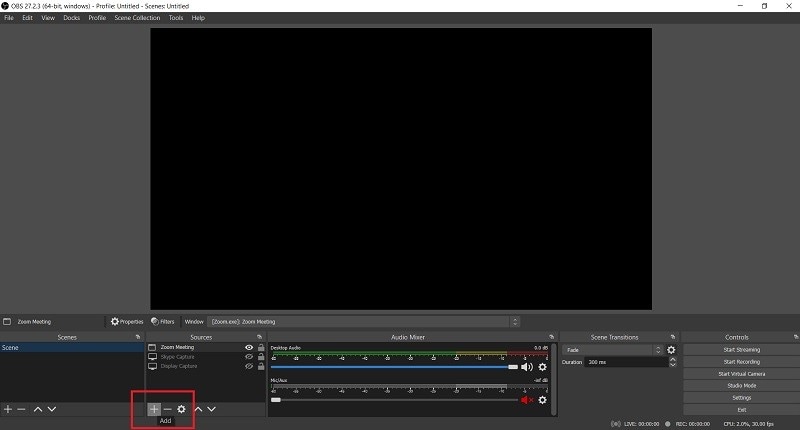
The window is divided into separate parts called “docks” when you initially launch the app. Every dock has a distinct function. Scenes, Sources, Mixer, and Controls are the areas to pay attention to. OBS employs a Scenes and Sources system, which will be discussed in more depth in a later lesson. These two tools operate in tandem to help you keep track of your video, audio, and other production materials. When you first start OBS, you’ll see that a scene is already loaded, which you can locate in the bottom left corner of the interface.
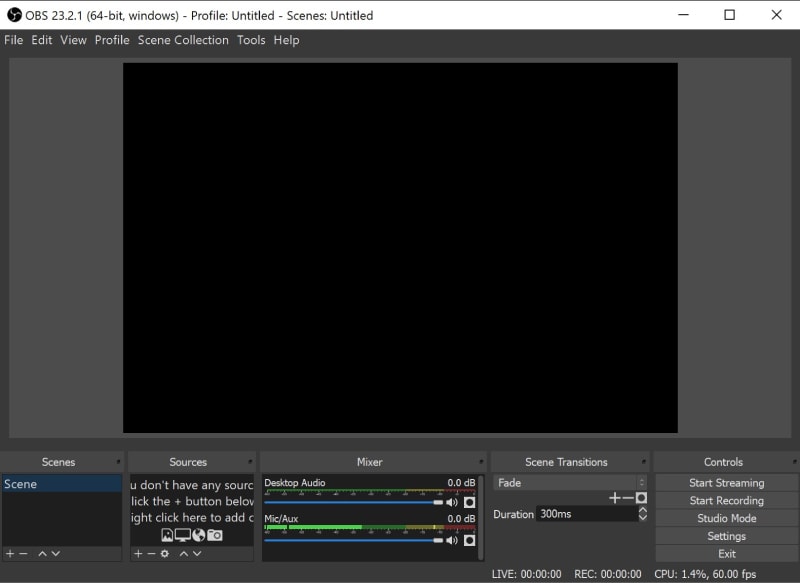
You’ll also need to add a source to this scene before you can begin recording. Click the Add button at the bottom of the Sources panel, then pick Screen Capture on Linux or Display Capture on Mac and Windows with the default Scene chosen (it will be highlighted).
Step 3. Customize the Recording Source
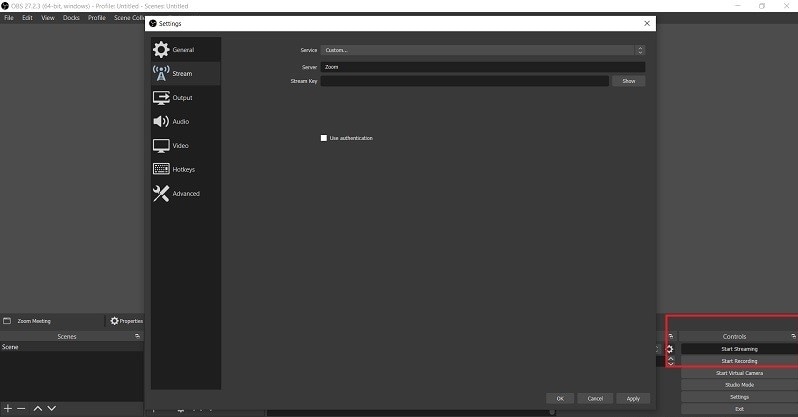
You’ll need to create a new source before you can begin recording your desktop screen. Select “Display Capture” by clicking the “+” icon on the Sources dock. You will be prompted to name the Display source in a popup window. Click “OK”. At the bottom right of the screen, click the Settings icon. Take note of the Recording Path field under the Output tab. This is where your recorded video will be kept on your computer.
Step 4. Start/Stop Recording
You’ll be able to choose the computer screen display you wish to capture in the following window. If you just have one monitor, make that the default. OBS Studios should show you the screen in the window after a valid display has been chosen. We need to change your graphics settings if OBS is unable to successfully load the screen video. Click the Start Recording button in the bottom right corner when you’re ready to begin recording. When you’re finished, click Stop Recording, and a movie will be saved to the folder you chose in the preferences.
Part 2. Edit Recorded Video in Filmora
Wondershare Filmora is a powerful screen recording application that includes a video editing suite, screen sketching tools, AI face recognition, built-in video effect packs, customizable branding watermark, and more. It may not only make recording movies simpler, but it may also provide you more possibilities for making your films more professional, creative, and attractive. Filmora is a great tool for beginners who want to make high-quality explainer films, training videos, demo videos, and more quickly. Because of the excellent video templates, screen recording is more appealing. To highlight important information, people might utilize annotation tools like as callouts, arrows, and drawing motions.
Steps to Record and Edit with Filmora
Step 1: Install Filmora on your laptop
To begin, you must first download this software program to your system from the following links:
For Win 7 or later (64-bit)
For macOS 10.12 or later
After you’ve finished downloading it, you’ll need to install it on your computer so that you can start using it with your laptop.
Step 2: Launch the Program and Begin Customizing It
The next step is to launch the software application and start recording your screen. Simply click the New Recording button in the start-up box to start recording. You may totally alter your screen recordings using the tools included in Filmora. You may also incorporate your laptop’s Webcam or a microphone as an audio source in your recordings.

Step 3: Start/Stop Screen Recording
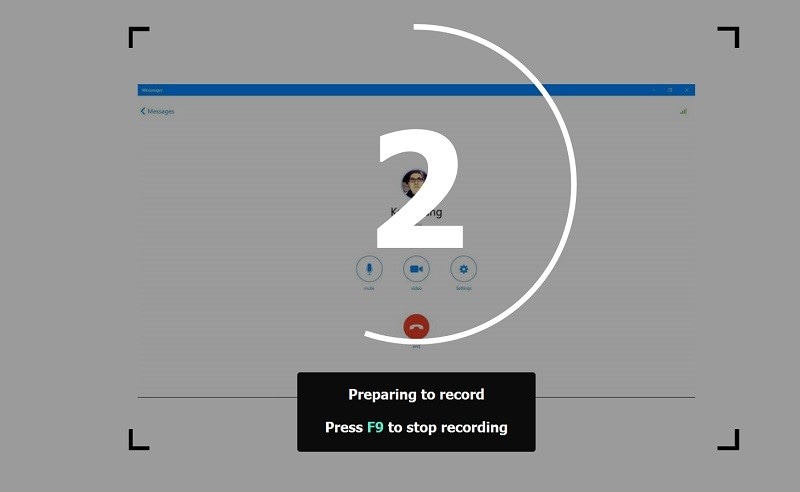
Now is the time to begin recording your audio, which you can accomplish by hitting the red circular recording button. Press the Square-shaped button on your laptop’s screen to end the recording.
Step 4: Edit the Recordings and Save Them
Finally, you may adjust your audio recordings with entirely configurable editing tools. To do so, use Filmora’s editor and utilize easy to complicated editing ways to edit your recorded audio files. Filmora’s Editor lets you add Animated Titles, amazing effects, Audio Enhancements, and more to your recorded video to make it more polished.

Step 5: Add Special Effects to Your Video
Wondershare Filmora was designed specifically to provide a professional touch to your videos. It includes a number of eye-catching and adaptable effects that you can use to make your video projects stand out from the crowd. We’ve gone through some of the greatest effects for giving life to your drab and amateurish videos in this section.

Step 6: Save or Share the Videos
Finally, after you’ve finished editing the recorded video, you may utilize the Filmora editor in its entirety, as described before. Click the Export option and select the platform where you wish to share your video clip to post your work of art immediately to YouTube or another well-known website. You may even alter the movie before sharing it if you desire.

Part 3. Edit Recorded Video with Zoom
Trimming and editing Zoom recordings is a necessary for digging out value-packed nuggets from captured footage. But although you already know this, you’re probably putting off doing so as you’re anticipating you’ll need to learn a ton of new tools to edit Zoom recordings.
Steps to Record Videos with Zoom
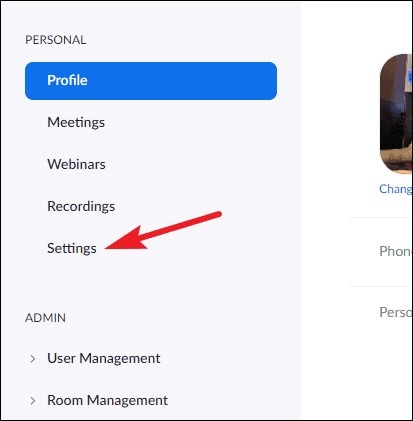
Step 1For the cloud recordings, go to zoom.us and log in to your account. Then, navigate to ‘Settings’ from the navigation menu on the left.
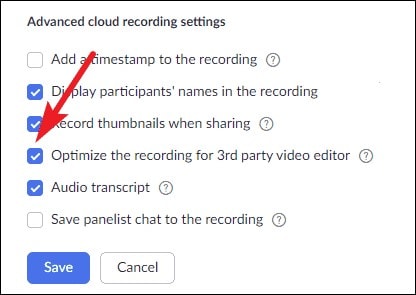
Step 2 Under Advanced cloud recording options, tick the option for ‘Optimize the recording for 3rd party video editor’ and click ‘Save’.
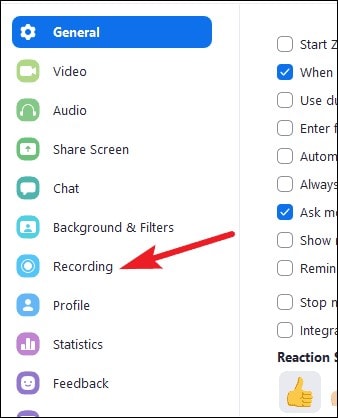
Step 3Then, navigate to ‘Recording’ from the navigation menu on the left. Check the option for ‘Optimize for 3rd party video editor.
Step 4To really edit a Zoom recording, whether it’s stored on your PC or Zoom cloud, you need to utilize third-party video editing software. But no worries, you don’t need any sophisticated equipment or software here.
Part 4. Edit Recorded Video in Teams
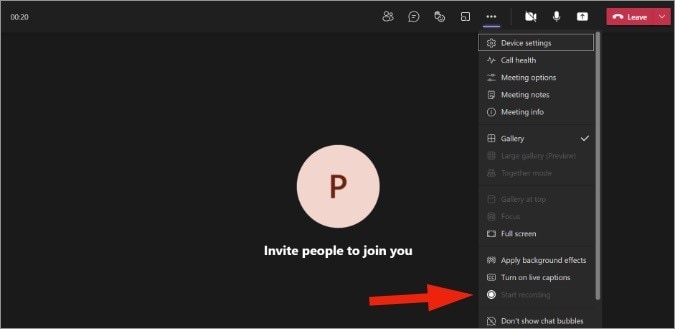
Teams gives the opportunity to record your online meetings. This may be especially beneficial for sharing meeting recordings with individuals unable to attend live, to preserve instructional material for future use, or to enable participants to revisit prior meeting topics. At the top of the meeting window, a message will appear stating that the recording has begun, which alerts participants that their interactions in the meeting may be recorded by the recording. You will also notice a recording sign and the duration of the recording in the top-left corner of the meeting window.
Steps to Record Videos with Teams
Step 1 Open Microsoft Teams on Windows and Mac.
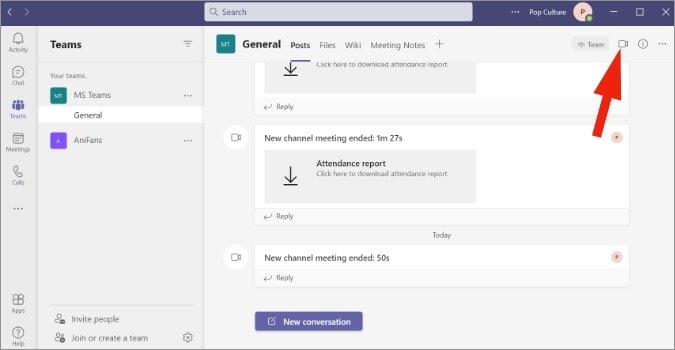
Step 2 Go to appropriate Teams or Channel and click on the Video button at the top to create a video call.
Step 3Invite people and organize a meeting. Whenever you feel you need to record any significant point, click on the three-dot menu at the top.
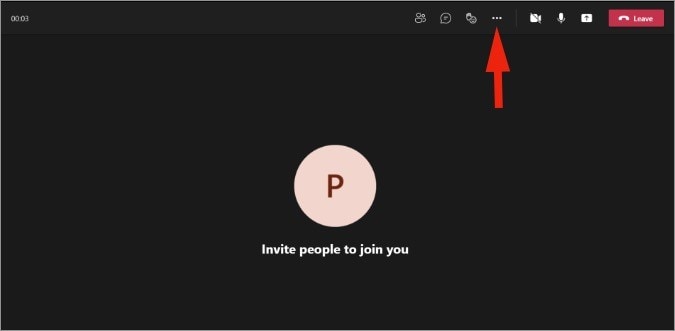
Step 4 Click on Start recording and Microsoft Teams will start recording the video/voice call. As soon as you start recording, every participant will be told about it.
At any moment, you may stop recording from the same. Once the meeting as concluded, your recording will display in the Chat panel in the main Teams window. Please note that depending on the length of the recording it might take some time for the recording to complete and display in the meeting chat. To find the recording, pick the Chat panel, open the correct meeting from the chat list and the recording will display in the chat window once processed.
Part 5. Edit Recorded Video in Google Meet
With more individuals working from home these days, services like Google Meet are rising in popularity. You may have an online video conference, see everyone’s face, communicate, and take care of business. As with in-office meetings, notes with action items and summaries for online meetings are just as crucial. Unfortunately, it doesn’t always happen. To have formal documentation for your meeting or share it with people who couldn’t attend, try recording your Google Meet.
Steps to Record and Edit Videos by Meet
Step 1. Launch Meet
Visit Google Meet and sign in to join or start your meeting.
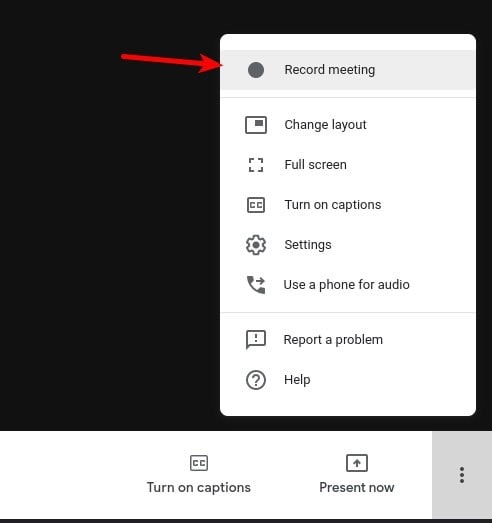
Step 2. Start Recording
Select the Activities symbol on the bottom right and pick Recording when you’re ready to start recording.
Step 3. Stop/Save Recording
Visit Google Drive and login in if required. Navigate to My Drive on the left and search for the Meet Recordings folder on the right. It may take several minutes for the recording to show. If you do not already have a Meet Recordings folder, Google Drive will create one. You’ll notice the recording named with the meeting identifier along with the date and hour. If Chat took occurred during the meeting, you’d view this as a distinct text file.
To get a preview of your recording or chat transcript, just double-click the file in the Meet Recordings folder on Google Drive. You may download, distribute, or acquire a link to the recording (or chat) file from the Meet Recordings folder or the File Preview. In the folder, right-click the file and pick an action from the menu. Notice you may execute further options such as Rename, Make a copy, and Open with.

Step 4. Use WeVideo to Edit Videos
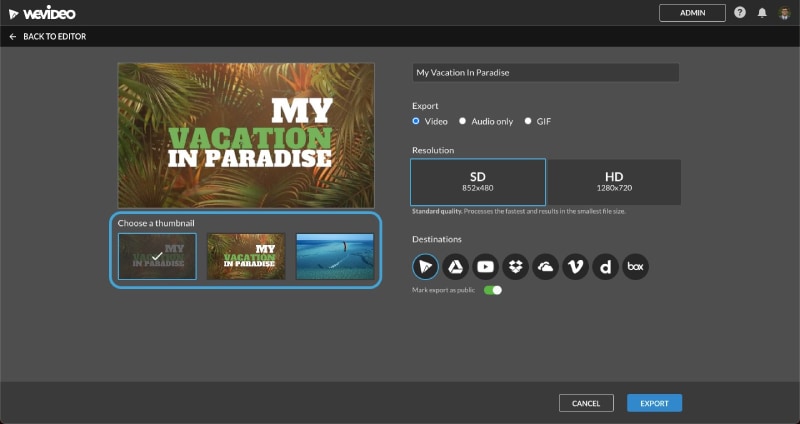
WeVideo is the cloud-based video production tool that supports student creativity, narrative, engagement and multimodal learning. Video projects develop deep knowledge about a subject through creating abilities like teamwork, communication and critical thinking. Log in and click Create New. Choose what you want to make (video, recording, etc.) and a format. Upload your media or search the Stock media repository. Make any extra modifications and preview your movie one final time. All done? Click Finish to export, download and share your video!
Part 6: Related FAQs
1. How do I edit video recordings?
Most individuals have the tools they need to film and edit small videos. With a smartphone or tablet and access to a computer, you can get the job done without even checking out equipment, much less employing a key grip. A laptop isn’t the finest equipment to film a movie–that would be extremely uncomfortable. Smartphone or tablet is easy to use. This topic is for those with access to an iPhone and a PC. Android, iPad, and Mac users will have a distinct process. Smartphones and tablets often default to recording video at a very high-Quality level, which takes up a lot of memory and results in big file sizes. Most likely you will want to lessen the resolution that you photograph.
Can you edit an already uploaded video?
If you have found yourself in this circumstance, your initial instinct could be to worry and assume you must repair the issue, delete the uploaded video, and re-upload the new one. However, this procedure will make your prior video URL dead, and any embeds of your video will display the following graphic to visitors. Nevertheless, these aforementioned sites recognizes that artists occasionally make small honest errors, or someone included in the uploaded video may demand that they be removed from it. So, to permit that, makers may chop away sections from their film without resetting a video’s metrics.
How to edit recorded video on iPhone?
If you have iOS 13 or later, you can edit films in the built-in Photos app… much as you edit your images. You may cut, crop, and straighten your films. And you may make your film more attractive by altering brightness, color, or even making it black and white. Filming films on iPhone has gotten more popular as iPhone camera lenses have progressed over the years. Many iPhone filmmakers desire the capacity to edit their video directly from their phone for simple social sharing. Using a video editing software for iPhone is a terrific method to effortlessly produce and upload videos. just open the video you want to modify, then press Edit at the upper right to get it done.
Conclusion:
If you routinely use Google Meet or Zoom, it can be a good idea to record your conferences so you can still return to them at a later period. Recording these conversations and meetings may be a big assistance when it’s time for later evaluations, updates, and enabling absent team members catch up on the meeting topic. For instance, do you wish to share meeting minutes or information with people missing in this meeting? Essentially the call recording is for other co-workers to view afterwards. Instead, you may use the recommended screen recorders to capture every moment and then use a specialist video editor like Filmora to make the required edits before sharing it with others.
For macOS 10.12 or later
After you’ve finished downloading it, you’ll need to install it on your computer so that you can start using it with your laptop.
Step 2: Launch the Program and Begin Customizing It
The next step is to launch the software application and start recording your screen. Simply click the New Recording button in the start-up box to start recording. You may totally alter your screen recordings using the tools included in Filmora. You may also incorporate your laptop’s Webcam or a microphone as an audio source in your recordings.

Step 3: Start/Stop Screen Recording
Now is the time to begin recording your audio, which you can accomplish by hitting the red circular recording button. Press the Square-shaped button on your laptop’s screen to end the recording.

Step 4: Edit the Recordings and Save Them
Finally, you may adjust your audio recordings with entirely configurable editing tools. To do so, use Filmora’s editor and utilize easy to complicated editing ways to edit your recorded audio files. Filmora’s Editor lets you add Animated Titles, amazing effects, Audio Enhancements, and more to your recorded video to make it more polished.

Step 5: Add Special Effects to Your Video
Wondershare Filmora was designed specifically to provide a professional touch to your videos. It includes a number of eye-catching and adaptable effects that you can use to make your video projects stand out from the crowd. We’ve gone through some of the greatest effects for giving life to your drab and amateurish videos in this section.

Step 6: Save or Share the Videos
Finally, after you’ve finished editing the recorded video, you may utilize the Filmora editor in its entirety, as described before. Click the Export option and select the platform where you wish to share your video clip to post your work of art immediately to YouTube or another well-known website. You may even alter the movie before sharing it if you desire.

Part 3. Edit Recorded Video with Zoom
Trimming and editing Zoom recordings is a necessary for digging out value-packed nuggets from captured footage. But although you already know this, you’re probably putting off doing so as you’re anticipating you’ll need to learn a ton of new tools to edit Zoom recordings.
Steps to Record Videos with Zoom
Step 1For the cloud recordings, go to zoom.us and log in to your account. Then, navigate to ‘Settings’ from the navigation menu on the left.

Step 2 Under Advanced cloud recording options, tick the option for ‘Optimize the recording for 3rd party video editor’ and click ‘Save’.

Step 3Then, navigate to ‘Recording’ from the navigation menu on the left. Check the option for ‘Optimize for 3rd party video editor.

Step 4To really edit a Zoom recording, whether it’s stored on your PC or Zoom cloud, you need to utilize third-party video editing software. But no worries, you don’t need any sophisticated equipment or software here.
Part 4. Edit Recorded Video in Teams
Teams gives the opportunity to record your online meetings. This may be especially beneficial for sharing meeting recordings with individuals unable to attend live, to preserve instructional material for future use, or to enable participants to revisit prior meeting topics. At the top of the meeting window, a message will appear stating that the recording has begun, which alerts participants that their interactions in the meeting may be recorded by the recording. You will also notice a recording sign and the duration of the recording in the top-left corner of the meeting window.
Steps to Record Videos with Teams
Step 1 Open Microsoft Teams on Windows and Mac.
Step 2 Go to appropriate Teams or Channel and click on the Video button at the top to create a video call.

Step 3Invite people and organize a meeting. Whenever you feel you need to record any significant point, click on the three-dot menu at the top.

Step 4 Click on Start recording and Microsoft Teams will start recording the video/voice call. As soon as you start recording, every participant will be told about it.
At any moment, you may stop recording from the same. Once the meeting as concluded, your recording will display in the Chat panel in the main Teams window. Please note that depending on the length of the recording it might take some time for the recording to complete and display in the meeting chat. To find the recording, pick the Chat panel, open the correct meeting from the chat list and the recording will display in the chat window once processed.

Part 5. Edit Recorded Video in Google Meet
With more individuals working from home these days, services like Google Meet are rising in popularity. You may have an online video conference, see everyone’s face, communicate, and take care of business. As with in-office meetings, notes with action items and summaries for online meetings are just as crucial. Unfortunately, it doesn’t always happen. To have formal documentation for your meeting or share it with people who couldn’t attend, try recording your Google Meet.
Steps to Record and Edit Videos by Meet
Step 1. Launch Meet
Visit Google Meet and sign in to join or start your meeting.
Step 2. Start Recording
Select the Activities symbol on the bottom right and pick Recording when you’re ready to start recording.

Step 3. Stop/Save Recording
Visit Google Drive and login in if required. Navigate to My Drive on the left and search for the Meet Recordings folder on the right. It may take several minutes for the recording to show. If you do not already have a Meet Recordings folder, Google Drive will create one. You’ll notice the recording named with the meeting identifier along with the date and hour. If Chat took occurred during the meeting, you’d view this as a distinct text file.
To get a preview of your recording or chat transcript, just double-click the file in the Meet Recordings folder on Google Drive. You may download, distribute, or acquire a link to the recording (or chat) file from the Meet Recordings folder or the File Preview. In the folder, right-click the file and pick an action from the menu. Notice you may execute further options such as Rename, Make a copy, and Open with.

Step 4. Use WeVideo to Edit Videos
WeVideo is the cloud-based video production tool that supports student creativity, narrative, engagement and multimodal learning. Video projects develop deep knowledge about a subject through creating abilities like teamwork, communication and critical thinking. Log in and click Create New. Choose what you want to make (video, recording, etc.) and a format. Upload your media or search the Stock media repository. Make any extra modifications and preview your movie one final time. All done? Click Finish to export, download and share your video!

Part 6: Related FAQs
1. How do I edit video recordings?
Most individuals have the tools they need to film and edit small videos. With a smartphone or tablet and access to a computer, you can get the job done without even checking out equipment, much less employing a key grip. A laptop isn’t the finest equipment to film a movie–that would be extremely uncomfortable. Smartphone or tablet is easy to use. This topic is for those with access to an iPhone and a PC. Android, iPad, and Mac users will have a distinct process. Smartphones and tablets often default to recording video at a very high-Quality level, which takes up a lot of memory and results in big file sizes. Most likely you will want to lessen the resolution that you photograph.
Can you edit an already uploaded video?
If you have found yourself in this circumstance, your initial instinct could be to worry and assume you must repair the issue, delete the uploaded video, and re-upload the new one. However, this procedure will make your prior video URL dead, and any embeds of your video will display the following graphic to visitors. Nevertheless, these aforementioned sites recognizes that artists occasionally make small honest errors, or someone included in the uploaded video may demand that they be removed from it. So, to permit that, makers may chop away sections from their film without resetting a video’s metrics.
How to edit recorded video on iPhone?
If you have iOS 13 or later, you can edit films in the built-in Photos app… much as you edit your images. You may cut, crop, and straighten your films. And you may make your film more attractive by altering brightness, color, or even making it black and white. Filming films on iPhone has gotten more popular as iPhone camera lenses have progressed over the years. Many iPhone filmmakers desire the capacity to edit their video directly from their phone for simple social sharing. Using a video editing software for iPhone is a terrific method to effortlessly produce and upload videos. just open the video you want to modify, then press Edit at the upper right to get it done.
Conclusion:
If you routinely use Google Meet or Zoom, it can be a good idea to record your conferences so you can still return to them at a later period. Recording these conversations and meetings may be a big assistance when it’s time for later evaluations, updates, and enabling absent team members catch up on the meeting topic. For instance, do you wish to share meeting minutes or information with people missing in this meeting? Essentially the call recording is for other co-workers to view afterwards. Instead, you may use the recommended screen recorders to capture every moment and then use a specialist video editor like Filmora to make the required edits before sharing it with others.
For macOS 10.12 or later
After you’ve finished downloading it, you’ll need to install it on your computer so that you can start using it with your laptop.
Step 2: Launch the Program and Begin Customizing It
The next step is to launch the software application and start recording your screen. Simply click the New Recording button in the start-up box to start recording. You may totally alter your screen recordings using the tools included in Filmora. You may also incorporate your laptop’s Webcam or a microphone as an audio source in your recordings.

Step 3: Start/Stop Screen Recording
Now is the time to begin recording your audio, which you can accomplish by hitting the red circular recording button. Press the Square-shaped button on your laptop’s screen to end the recording.

Step 4: Edit the Recordings and Save Them
Finally, you may adjust your audio recordings with entirely configurable editing tools. To do so, use Filmora’s editor and utilize easy to complicated editing ways to edit your recorded audio files. Filmora’s Editor lets you add Animated Titles, amazing effects, Audio Enhancements, and more to your recorded video to make it more polished.

Step 5: Add Special Effects to Your Video
Wondershare Filmora was designed specifically to provide a professional touch to your videos. It includes a number of eye-catching and adaptable effects that you can use to make your video projects stand out from the crowd. We’ve gone through some of the greatest effects for giving life to your drab and amateurish videos in this section.

Step 6: Save or Share the Videos
Finally, after you’ve finished editing the recorded video, you may utilize the Filmora editor in its entirety, as described before. Click the Export option and select the platform where you wish to share your video clip to post your work of art immediately to YouTube or another well-known website. You may even alter the movie before sharing it if you desire.

Part 3. Edit Recorded Video with Zoom
Trimming and editing Zoom recordings is a necessary for digging out value-packed nuggets from captured footage. But although you already know this, you’re probably putting off doing so as you’re anticipating you’ll need to learn a ton of new tools to edit Zoom recordings.
Steps to Record Videos with Zoom
Step 1For the cloud recordings, go to zoom.us and log in to your account. Then, navigate to ‘Settings’ from the navigation menu on the left.

Step 2 Under Advanced cloud recording options, tick the option for ‘Optimize the recording for 3rd party video editor’ and click ‘Save’.

Step 3Then, navigate to ‘Recording’ from the navigation menu on the left. Check the option for ‘Optimize for 3rd party video editor.

Step 4To really edit a Zoom recording, whether it’s stored on your PC or Zoom cloud, you need to utilize third-party video editing software. But no worries, you don’t need any sophisticated equipment or software here.
Part 4. Edit Recorded Video in Teams
Teams gives the opportunity to record your online meetings. This may be especially beneficial for sharing meeting recordings with individuals unable to attend live, to preserve instructional material for future use, or to enable participants to revisit prior meeting topics. At the top of the meeting window, a message will appear stating that the recording has begun, which alerts participants that their interactions in the meeting may be recorded by the recording. You will also notice a recording sign and the duration of the recording in the top-left corner of the meeting window.
Steps to Record Videos with Teams
Step 1 Open Microsoft Teams on Windows and Mac.
Step 2 Go to appropriate Teams or Channel and click on the Video button at the top to create a video call.

Step 3Invite people and organize a meeting. Whenever you feel you need to record any significant point, click on the three-dot menu at the top.

Step 4 Click on Start recording and Microsoft Teams will start recording the video/voice call. As soon as you start recording, every participant will be told about it.
At any moment, you may stop recording from the same. Once the meeting as concluded, your recording will display in the Chat panel in the main Teams window. Please note that depending on the length of the recording it might take some time for the recording to complete and display in the meeting chat. To find the recording, pick the Chat panel, open the correct meeting from the chat list and the recording will display in the chat window once processed.

Part 5. Edit Recorded Video in Google Meet
With more individuals working from home these days, services like Google Meet are rising in popularity. You may have an online video conference, see everyone’s face, communicate, and take care of business. As with in-office meetings, notes with action items and summaries for online meetings are just as crucial. Unfortunately, it doesn’t always happen. To have formal documentation for your meeting or share it with people who couldn’t attend, try recording your Google Meet.
Steps to Record and Edit Videos by Meet
Step 1. Launch Meet
Visit Google Meet and sign in to join or start your meeting.
Step 2. Start Recording
Select the Activities symbol on the bottom right and pick Recording when you’re ready to start recording.

Step 3. Stop/Save Recording
Visit Google Drive and login in if required. Navigate to My Drive on the left and search for the Meet Recordings folder on the right. It may take several minutes for the recording to show. If you do not already have a Meet Recordings folder, Google Drive will create one. You’ll notice the recording named with the meeting identifier along with the date and hour. If Chat took occurred during the meeting, you’d view this as a distinct text file.
To get a preview of your recording or chat transcript, just double-click the file in the Meet Recordings folder on Google Drive. You may download, distribute, or acquire a link to the recording (or chat) file from the Meet Recordings folder or the File Preview. In the folder, right-click the file and pick an action from the menu. Notice you may execute further options such as Rename, Make a copy, and Open with.

Step 4. Use WeVideo to Edit Videos
WeVideo is the cloud-based video production tool that supports student creativity, narrative, engagement and multimodal learning. Video projects develop deep knowledge about a subject through creating abilities like teamwork, communication and critical thinking. Log in and click Create New. Choose what you want to make (video, recording, etc.) and a format. Upload your media or search the Stock media repository. Make any extra modifications and preview your movie one final time. All done? Click Finish to export, download and share your video!

Part 6: Related FAQs
1. How do I edit video recordings?
Most individuals have the tools they need to film and edit small videos. With a smartphone or tablet and access to a computer, you can get the job done without even checking out equipment, much less employing a key grip. A laptop isn’t the finest equipment to film a movie–that would be extremely uncomfortable. Smartphone or tablet is easy to use. This topic is for those with access to an iPhone and a PC. Android, iPad, and Mac users will have a distinct process. Smartphones and tablets often default to recording video at a very high-Quality level, which takes up a lot of memory and results in big file sizes. Most likely you will want to lessen the resolution that you photograph.
Can you edit an already uploaded video?
If you have found yourself in this circumstance, your initial instinct could be to worry and assume you must repair the issue, delete the uploaded video, and re-upload the new one. However, this procedure will make your prior video URL dead, and any embeds of your video will display the following graphic to visitors. Nevertheless, these aforementioned sites recognizes that artists occasionally make small honest errors, or someone included in the uploaded video may demand that they be removed from it. So, to permit that, makers may chop away sections from their film without resetting a video’s metrics.
How to edit recorded video on iPhone?
If you have iOS 13 or later, you can edit films in the built-in Photos app… much as you edit your images. You may cut, crop, and straighten your films. And you may make your film more attractive by altering brightness, color, or even making it black and white. Filming films on iPhone has gotten more popular as iPhone camera lenses have progressed over the years. Many iPhone filmmakers desire the capacity to edit their video directly from their phone for simple social sharing. Using a video editing software for iPhone is a terrific method to effortlessly produce and upload videos. just open the video you want to modify, then press Edit at the upper right to get it done.
Conclusion:
If you routinely use Google Meet or Zoom, it can be a good idea to record your conferences so you can still return to them at a later period. Recording these conversations and meetings may be a big assistance when it’s time for later evaluations, updates, and enabling absent team members catch up on the meeting topic. For instance, do you wish to share meeting minutes or information with people missing in this meeting? Essentially the call recording is for other co-workers to view afterwards. Instead, you may use the recommended screen recorders to capture every moment and then use a specialist video editor like Filmora to make the required edits before sharing it with others.
For macOS 10.12 or later
After you’ve finished downloading it, you’ll need to install it on your computer so that you can start using it with your laptop.
Step 2: Launch the Program and Begin Customizing It
The next step is to launch the software application and start recording your screen. Simply click the New Recording button in the start-up box to start recording. You may totally alter your screen recordings using the tools included in Filmora. You may also incorporate your laptop’s Webcam or a microphone as an audio source in your recordings.

Step 3: Start/Stop Screen Recording
Now is the time to begin recording your audio, which you can accomplish by hitting the red circular recording button. Press the Square-shaped button on your laptop’s screen to end the recording.

Step 4: Edit the Recordings and Save Them
Finally, you may adjust your audio recordings with entirely configurable editing tools. To do so, use Filmora’s editor and utilize easy to complicated editing ways to edit your recorded audio files. Filmora’s Editor lets you add Animated Titles, amazing effects, Audio Enhancements, and more to your recorded video to make it more polished.

Step 5: Add Special Effects to Your Video
Wondershare Filmora was designed specifically to provide a professional touch to your videos. It includes a number of eye-catching and adaptable effects that you can use to make your video projects stand out from the crowd. We’ve gone through some of the greatest effects for giving life to your drab and amateurish videos in this section.

Step 6: Save or Share the Videos
Finally, after you’ve finished editing the recorded video, you may utilize the Filmora editor in its entirety, as described before. Click the Export option and select the platform where you wish to share your video clip to post your work of art immediately to YouTube or another well-known website. You may even alter the movie before sharing it if you desire.

Part 3. Edit Recorded Video with Zoom
Trimming and editing Zoom recordings is a necessary for digging out value-packed nuggets from captured footage. But although you already know this, you’re probably putting off doing so as you’re anticipating you’ll need to learn a ton of new tools to edit Zoom recordings.
Steps to Record Videos with Zoom
Step 1For the cloud recordings, go to zoom.us and log in to your account. Then, navigate to ‘Settings’ from the navigation menu on the left.

Step 2 Under Advanced cloud recording options, tick the option for ‘Optimize the recording for 3rd party video editor’ and click ‘Save’.

Step 3Then, navigate to ‘Recording’ from the navigation menu on the left. Check the option for ‘Optimize for 3rd party video editor.

Step 4To really edit a Zoom recording, whether it’s stored on your PC or Zoom cloud, you need to utilize third-party video editing software. But no worries, you don’t need any sophisticated equipment or software here.
Part 4. Edit Recorded Video in Teams
Teams gives the opportunity to record your online meetings. This may be especially beneficial for sharing meeting recordings with individuals unable to attend live, to preserve instructional material for future use, or to enable participants to revisit prior meeting topics. At the top of the meeting window, a message will appear stating that the recording has begun, which alerts participants that their interactions in the meeting may be recorded by the recording. You will also notice a recording sign and the duration of the recording in the top-left corner of the meeting window.
Steps to Record Videos with Teams
Step 1 Open Microsoft Teams on Windows and Mac.
Step 2 Go to appropriate Teams or Channel and click on the Video button at the top to create a video call.

Step 3Invite people and organize a meeting. Whenever you feel you need to record any significant point, click on the three-dot menu at the top.

Step 4 Click on Start recording and Microsoft Teams will start recording the video/voice call. As soon as you start recording, every participant will be told about it.
At any moment, you may stop recording from the same. Once the meeting as concluded, your recording will display in the Chat panel in the main Teams window. Please note that depending on the length of the recording it might take some time for the recording to complete and display in the meeting chat. To find the recording, pick the Chat panel, open the correct meeting from the chat list and the recording will display in the chat window once processed.

Part 5. Edit Recorded Video in Google Meet
With more individuals working from home these days, services like Google Meet are rising in popularity. You may have an online video conference, see everyone’s face, communicate, and take care of business. As with in-office meetings, notes with action items and summaries for online meetings are just as crucial. Unfortunately, it doesn’t always happen. To have formal documentation for your meeting or share it with people who couldn’t attend, try recording your Google Meet.
Steps to Record and Edit Videos by Meet
Step 1. Launch Meet
Visit Google Meet and sign in to join or start your meeting.
Step 2. Start Recording
Select the Activities symbol on the bottom right and pick Recording when you’re ready to start recording.

Step 3. Stop/Save Recording
Visit Google Drive and login in if required. Navigate to My Drive on the left and search for the Meet Recordings folder on the right. It may take several minutes for the recording to show. If you do not already have a Meet Recordings folder, Google Drive will create one. You’ll notice the recording named with the meeting identifier along with the date and hour. If Chat took occurred during the meeting, you’d view this as a distinct text file.
To get a preview of your recording or chat transcript, just double-click the file in the Meet Recordings folder on Google Drive. You may download, distribute, or acquire a link to the recording (or chat) file from the Meet Recordings folder or the File Preview. In the folder, right-click the file and pick an action from the menu. Notice you may execute further options such as Rename, Make a copy, and Open with.

Step 4. Use WeVideo to Edit Videos
WeVideo is the cloud-based video production tool that supports student creativity, narrative, engagement and multimodal learning. Video projects develop deep knowledge about a subject through creating abilities like teamwork, communication and critical thinking. Log in and click Create New. Choose what you want to make (video, recording, etc.) and a format. Upload your media or search the Stock media repository. Make any extra modifications and preview your movie one final time. All done? Click Finish to export, download and share your video!

Part 6: Related FAQs
1. How do I edit video recordings?
Most individuals have the tools they need to film and edit small videos. With a smartphone or tablet and access to a computer, you can get the job done without even checking out equipment, much less employing a key grip. A laptop isn’t the finest equipment to film a movie–that would be extremely uncomfortable. Smartphone or tablet is easy to use. This topic is for those with access to an iPhone and a PC. Android, iPad, and Mac users will have a distinct process. Smartphones and tablets often default to recording video at a very high-Quality level, which takes up a lot of memory and results in big file sizes. Most likely you will want to lessen the resolution that you photograph.
Can you edit an already uploaded video?
If you have found yourself in this circumstance, your initial instinct could be to worry and assume you must repair the issue, delete the uploaded video, and re-upload the new one. However, this procedure will make your prior video URL dead, and any embeds of your video will display the following graphic to visitors. Nevertheless, these aforementioned sites recognizes that artists occasionally make small honest errors, or someone included in the uploaded video may demand that they be removed from it. So, to permit that, makers may chop away sections from their film without resetting a video’s metrics.
How to edit recorded video on iPhone?
If you have iOS 13 or later, you can edit films in the built-in Photos app… much as you edit your images. You may cut, crop, and straighten your films. And you may make your film more attractive by altering brightness, color, or even making it black and white. Filming films on iPhone has gotten more popular as iPhone camera lenses have progressed over the years. Many iPhone filmmakers desire the capacity to edit their video directly from their phone for simple social sharing. Using a video editing software for iPhone is a terrific method to effortlessly produce and upload videos. just open the video you want to modify, then press Edit at the upper right to get it done.
Conclusion:
If you routinely use Google Meet or Zoom, it can be a good idea to record your conferences so you can still return to them at a later period. Recording these conversations and meetings may be a big assistance when it’s time for later evaluations, updates, and enabling absent team members catch up on the meeting topic. For instance, do you wish to share meeting minutes or information with people missing in this meeting? Essentially the call recording is for other co-workers to view afterwards. Instead, you may use the recommended screen recorders to capture every moment and then use a specialist video editor like Filmora to make the required edits before sharing it with others.
Also read:
- In 2024, Do You Want to Be Aware of VHSs Meaning? There Is Nothing to Be Worried About because We Will Guide You in This Article
- New In 2024, Best Tools To Create Blend Image Collage
- Updated Finding The Best Filmic Pro LUTs For Video Editing
- 2024 Approved As an Online Marketer, It Is Important to Know the Algorithm of YouTube Platform. Ill Share You the History of Algorithm of YouTube and the New Changes in This Year
- Updated Quick Answer What Is a Transparent Logo and Why Do You Need It
- How to Make a Bokeh Effect for 2024
- New Easiest Fix Included! Top 5 Ways to Convert HDR to SDR Videos for 2024
- Updated Looking for Ways to Compress Your Videos for Instagram? Keep Reading to Know About some of the Best Video Compressors for Instagram
- Updated Top iOS Solutions Finding Premium Slow Motion Apps For Video Creation for 2024
- New How to Slow Down a Video on iPhone and Android The Easy Way
- Are You Working on Editing a Video and Youd Like to Add Text to It? Learn the Various Ways that You Can Add Text to a Video
- New 2024 Approved How to Add Photos to Tik Tok Video
- Updated 2024 Approved How to Do Velocity Edits on PC
- New Convert Slow Motion Videos to Regular Videos in Your iOS Device |A How
- New How to Perfectly Use Canva Color Match?
- Updated Converting Files Is Easy with the Right Tools, and Likewise, GIF to JPG Conversion Is. Choose the Best Tool and Get the Expected Results Within the Blink of an Eye
- Updated In 2024, Guide Adopting Lumetri Color Presets in Effective Color Grading
- Do You Want to Enable the Motion Blur Effect While Playing Dying Light 2? Read This Article to Find Out How to Use Dying Light 2 Motion Blur for a Great Gaming Experience
- New Quickly Turn Any Video Into a Paper Rip Effect for 2024
- New Guide Adding Audio in Wondershare Filmora for 2024
- New Best 8 Top Premiere Pro Slideshow Templates
- New In 2024, How to Get VHS Filter and Glitch Filter to Your Images or Videos?
- 2024 Approved Demystifying the Vectorscope A Comprehensive Guide for Premiere Pro Color Correction
- Updated How To Synchronize Your Audio And Videos Properly?
- 2024 Approved Want to Make a Single Video From Different Clips? Follow These Ways to Learn About How to Merge Clips in DaVinci Resolve
- New Which 10 Best Video Editing Online Makers Is Worth Your Attention?
- New How to Create Sports Intro and YouTube Endscreen for 2024
- New 8 Tips to Apply Cinematic Color Grading to Your Video
- New In 2024, 3 Different Methods to Correct Color Distortion in Videos
- Updated Learn How to Easily Concatenate Videos Using FFmpeg in This Step-by-Step Guide. From Installation to Execution, We Cover It All to Streamline Your Video Editing Process
- Updated Do You Need to Convert TXT to SRT to Add Subtitles to Your Videos? Here Are Three Effective Ways You Can Do It Effortlessly
- In 2024, Thousands Already Know Ezgif and So Can You
- Do You Want to Add Voiceovers to Your Video Project? Wondershare Filmora Is an Amazing Tool that Lets You Add Audio Files, Including Voiceovers
- Updated Create Photoshop GIFs with Zero Hustle
- New How to Make A Jaw-Dropping Time Lapse Video, In 2024
- Updated Want to Give a Bold and Colorful Look to Your Ad or Abstract Art Project? This Quick and Easy Tutorial Teaches How to Create a Risograph Effect in Photoshop
- Updated Blender Is a 3D Animation Software that Can Be Used to Create Stunning 3D Models and Videos
- In 2024, How to Make Text Reveal Effect for Your Video
- How to Rescue Lost Videos from OnePlus Nord CE 3 Lite 5G
- Recover lost data from Oppo Reno 11 5G
- Updated How to Send and Add Snapchat GIFs 100 The Easy Way for 2024
- Reasons for Samsung Galaxy S23 Stuck on Boot Screen and Ways To Fix Them | Dr.fone
- Gmail Not Working on Infinix Smart 7 7 Common Problems & Fixes | Dr.fone
- Overview of the Best Realme GT 3 Screen Mirroring App | Dr.fone
- In 2024, Best Pokemons for PVP Matches in Pokemon Go For Tecno Spark 20 | Dr.fone
- In 2024, Sim Unlock Nokia 130 Music Phones without Code 2 Ways to Remove Android Sim Lock
- Life360 Circle Everything You Need to Know On Infinix Smart 8 HD | Dr.fone
- How to Track Motorola Edge 40 Location by Number | Dr.fone
- In 2024, How To Remove Passcode From iPhone XS Max? Complete Guide | Dr.fone
- How To Repair System Issues of Apple iPhone 6 Plus? | Dr.fone
- Unlock android phone if you don't have Honor X7b fingerprint
- Title: ReVisionFX ReelSmart Motion Blur Plugin For Premiere Pro for 2024
- Author: Chloe
- Created at : 2024-06-09 16:15:05
- Updated at : 2024-06-10 16:15:05
- Link: https://ai-editing-video.techidaily.com/revisionfx-reelsmart-motion-blur-plugin-for-premiere-pro-for-2024/
- License: This work is licensed under CC BY-NC-SA 4.0.

