:max_bytes(150000):strip_icc():format(webp)/GettyImages-1342255561-483b636ee00f40a1b3d91d1969b1aaf6.jpg)
Rotate Video in iMovie

Rotate Video in iMovie
Are you wondering how to change the orientation of videos in iMovie? You’re not alone. With iMovie as a professional video editing suite, it is no surprise to see iOS, iPad OS, and Mac OS users wanting to learn how to create cinematic and breathtaking videos using iMovie. iMovie allows its users to import clips, add effects, customize music, employ filters and motion elements, and lots more.
There are many ways of being creative during movie production. iMovie editors are exploring fast forward and slow-motion effects to changing backgrounds and flipping clips over. Depending on what you would like to achieve, you may flip your video clips to make them appear better or give them another outlook. You can decide to change orientation in iMovie. To change video orientation in iMovie requires that you know how to use the software. You can vertically or horizontally flip a clip and rotate it left or right in iMovie.
In this article
01 What is Rotating Video and Why
02 Detailed Steps to Rotate Video in iMovie
03 Rotate Video - iMovie Alternative
Part 1: What is Rotating Video and Why
Rotating a video means changing its orientation. A video clip can turn in a clockwise or counterclockwise direction, in 90° increments. Different video-making and editing software or applications have other steps to carry out this process. However, the result is the same for all, a change in the orientation of the video.
People rotate video clips for a variety of reasons. Here are some reasons as to why you may want to change video orientation in iMovie:
- Video stylization: While a rotated video may look disoriented, editors sometimes use the technique to convey a particular mood or emotion.
- Continuity: Video clip rotation can help you correct production errors or last-minute effect changes.
- Correct disorientation: Sometimes, as a result of errors while shooting, especially when using a mobile device, some video clips may appear in a lateral direction; video rotation can help fix this.
- Create horizontal videos: With a change in video orientation, you can make some footage like backgrounds appear vertically or horizontally.
Now that you know what video rotation is and some of the reasons people choose to change a video’s orientation, let’s now dive right into rotating videos in iMovie. And move ahead to lead from other video editors with this change orientation of video in iMovie technique going to discuss below.
Part 2: Detailed Steps to Rotate Video in iMovie
Appropriate video orientation is the requirement of every video creation project. If video orientation is not as needed, either the one created in iMovie or already existing video. Then, the need arises to look around ways to assist in performing the iMovie change orientation task effectively. This part of the article will specifically explain how to change the orientation of video in iMovie with all the necessary steps.
Before adding a clip or photo to your movie, you can decide to change its orientation. The following steps would show how to change video orientation in iMovie:
Step 1: Launch iMovie
On your Mac, launch iMovie > From the browser or timeline, select the photo or video clip to be rotated.
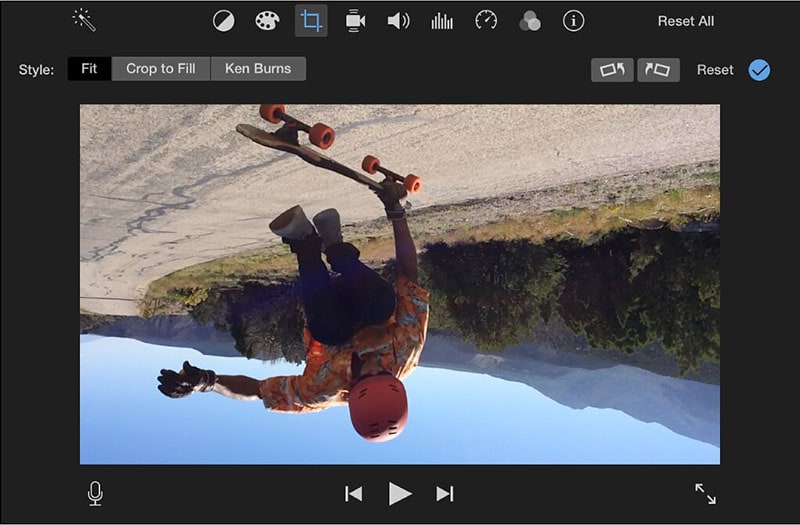
Step 2: Click on the Crop icon
Click the cropping icon to reveal the cropping options/controls.
![]()
Step 3:Rotate Video
On the right portion of the cropping controls, click Rotate Clockwise to rotate the clip or photo in a clockwise direction. Otherwise, click Rotates Counterclockwise to rotate the clip or image counterclockwise.
Step 4:Apply Changes
In the cropping controls, click Apply to effect the changes.
If you wish to remove the rotation, click the reset button at the top right-hand corner of your screen.
Now, as you know the steps to change video orientation in iMovie, simply move ahead of your video creation and editing process with iMovie and enjoy the wonderful experience of creating something new, engaging, and innovative in the world of video making. Not only this step guide will be going to assist you, but there are some more alternative ways also that you can give a try to enhance your overall experience in the area of the video content editing process. For that, you don’t need to go anywhere. Right here, you will have that vast area of information.
Part 3: Rotate Video - iMovie Alternative
Are you looking for some other software to rotate your Video with? Wondershare Filmora is your sure plug! This easy-to-use yet professional video editing software turns videos and add titles, add text, perform color grading, add multiple overlays, do motion tracking, use stickers and animations, and, what is more, purchase the software at an affordable price. With this software, you can comment and play your video clips to not have to worry about doing this now and then.
To rotate MPEG and MPG videos using Wondershare Filmora, follow these simple steps:
Step 1: Import the MP4 files to be rotated
Drag and drop the clip to be rotated on the primary window or click Import to browse your files.

Step 2: Rotate the MP4 clips
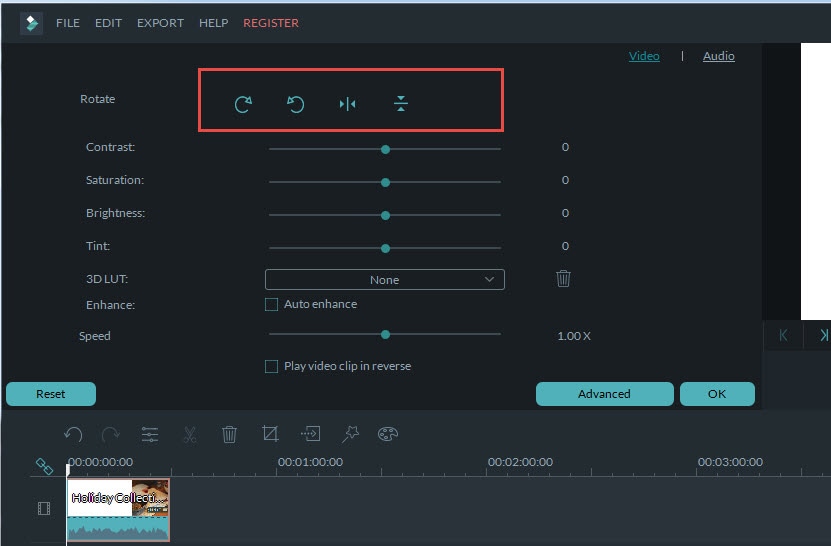
Now, from the User’s Album, drag the MP4 file to be rotated to the video track on the timeline. Double click the MP4 video thumbnail to reveal the Rotate options, allowing you to rotate your video in one click. There are four rotation related options in Wondershare Filmora:
- Rotate the clip 90° in a clockwise direction and continuously. This way, you can rotate the clip 90°, 180°, and 270°.
- Rotate the clip 90° in an anticlockwise direction and constantly.
- Flip the Video horizontally in an upside-down fashion.
- Flip the Video vertically left to right.
Step 3: Export the rotated video clip
To permanently save the changes made, click the Create button to reveal four options: YouTube, DVD, Format, and Device. Select the right format/device and click Create to output your rotated video clip.

You have sufficient equipment to start your voyage to creation and innovation by now. No doubt, Filmora comes here as a rescue and an alternative solution to let you change video orientation and a provider of many editing options. So without any concern, you can explore the tool at any time as per your availability and requirement.
Conclusion
Wondershare Filmora
Get started easily with Filmora’s powerful performance, intuitive interface, and countless effects!
Try It Free Try It Free Try It Free Learn More about Filmora>

Through this article, you learnt how to change orientation in iMovie, and thus nothing is holding your creativity back! With iMovie change orientation, you can now flip video clips in different directions to suit your preference. You now also know that with Wondershare Filmora, you can achieve just about the same result as you would if you were using iMovie for video rotation. So, now you have two robust tools to perform your task. Just keep going and let rock the world with your fantastic creativity and efforts.
02 Detailed Steps to Rotate Video in iMovie
03 Rotate Video - iMovie Alternative
Part 1: What is Rotating Video and Why
Rotating a video means changing its orientation. A video clip can turn in a clockwise or counterclockwise direction, in 90° increments. Different video-making and editing software or applications have other steps to carry out this process. However, the result is the same for all, a change in the orientation of the video.
People rotate video clips for a variety of reasons. Here are some reasons as to why you may want to change video orientation in iMovie:
- Video stylization: While a rotated video may look disoriented, editors sometimes use the technique to convey a particular mood or emotion.
- Continuity: Video clip rotation can help you correct production errors or last-minute effect changes.
- Correct disorientation: Sometimes, as a result of errors while shooting, especially when using a mobile device, some video clips may appear in a lateral direction; video rotation can help fix this.
- Create horizontal videos: With a change in video orientation, you can make some footage like backgrounds appear vertically or horizontally.
Now that you know what video rotation is and some of the reasons people choose to change a video’s orientation, let’s now dive right into rotating videos in iMovie. And move ahead to lead from other video editors with this change orientation of video in iMovie technique going to discuss below.
Part 2: Detailed Steps to Rotate Video in iMovie
Appropriate video orientation is the requirement of every video creation project. If video orientation is not as needed, either the one created in iMovie or already existing video. Then, the need arises to look around ways to assist in performing the iMovie change orientation task effectively. This part of the article will specifically explain how to change the orientation of video in iMovie with all the necessary steps.
Before adding a clip or photo to your movie, you can decide to change its orientation. The following steps would show how to change video orientation in iMovie:
Step 1: Launch iMovie
On your Mac, launch iMovie > From the browser or timeline, select the photo or video clip to be rotated.
Step 2: Click on the Crop icon
Click the cropping icon to reveal the cropping options/controls.
![]()
Step 3:Rotate Video
On the right portion of the cropping controls, click Rotate Clockwise to rotate the clip or photo in a clockwise direction. Otherwise, click Rotates Counterclockwise to rotate the clip or image counterclockwise.

Step 4:Apply Changes
In the cropping controls, click Apply to effect the changes.
If you wish to remove the rotation, click the reset button at the top right-hand corner of your screen.
Now, as you know the steps to change video orientation in iMovie, simply move ahead of your video creation and editing process with iMovie and enjoy the wonderful experience of creating something new, engaging, and innovative in the world of video making. Not only this step guide will be going to assist you, but there are some more alternative ways also that you can give a try to enhance your overall experience in the area of the video content editing process. For that, you don’t need to go anywhere. Right here, you will have that vast area of information.
Part 3: Rotate Video - iMovie Alternative
Are you looking for some other software to rotate your Video with? Wondershare Filmora is your sure plug! This easy-to-use yet professional video editing software turns videos and add titles, add text, perform color grading, add multiple overlays, do motion tracking, use stickers and animations, and, what is more, purchase the software at an affordable price. With this software, you can comment and play your video clips to not have to worry about doing this now and then.
To rotate MPEG and MPG videos using Wondershare Filmora, follow these simple steps:
Step 1: Import the MP4 files to be rotated
Drag and drop the clip to be rotated on the primary window or click Import to browse your files.

Step 2: Rotate the MP4 clips
Now, from the User’s Album, drag the MP4 file to be rotated to the video track on the timeline. Double click the MP4 video thumbnail to reveal the Rotate options, allowing you to rotate your video in one click. There are four rotation related options in Wondershare Filmora:
- Rotate the clip 90° in a clockwise direction and continuously. This way, you can rotate the clip 90°, 180°, and 270°.
- Rotate the clip 90° in an anticlockwise direction and constantly.
- Flip the Video horizontally in an upside-down fashion.
- Flip the Video vertically left to right.

Step 3: Export the rotated video clip
To permanently save the changes made, click the Create button to reveal four options: YouTube, DVD, Format, and Device. Select the right format/device and click Create to output your rotated video clip.

You have sufficient equipment to start your voyage to creation and innovation by now. No doubt, Filmora comes here as a rescue and an alternative solution to let you change video orientation and a provider of many editing options. So without any concern, you can explore the tool at any time as per your availability and requirement.
Conclusion
Wondershare Filmora
Get started easily with Filmora’s powerful performance, intuitive interface, and countless effects!
Try It Free Try It Free Try It Free Learn More about Filmora>

Through this article, you learnt how to change orientation in iMovie, and thus nothing is holding your creativity back! With iMovie change orientation, you can now flip video clips in different directions to suit your preference. You now also know that with Wondershare Filmora, you can achieve just about the same result as you would if you were using iMovie for video rotation. So, now you have two robust tools to perform your task. Just keep going and let rock the world with your fantastic creativity and efforts.
02 Detailed Steps to Rotate Video in iMovie
03 Rotate Video - iMovie Alternative
Part 1: What is Rotating Video and Why
Rotating a video means changing its orientation. A video clip can turn in a clockwise or counterclockwise direction, in 90° increments. Different video-making and editing software or applications have other steps to carry out this process. However, the result is the same for all, a change in the orientation of the video.
People rotate video clips for a variety of reasons. Here are some reasons as to why you may want to change video orientation in iMovie:
- Video stylization: While a rotated video may look disoriented, editors sometimes use the technique to convey a particular mood or emotion.
- Continuity: Video clip rotation can help you correct production errors or last-minute effect changes.
- Correct disorientation: Sometimes, as a result of errors while shooting, especially when using a mobile device, some video clips may appear in a lateral direction; video rotation can help fix this.
- Create horizontal videos: With a change in video orientation, you can make some footage like backgrounds appear vertically or horizontally.
Now that you know what video rotation is and some of the reasons people choose to change a video’s orientation, let’s now dive right into rotating videos in iMovie. And move ahead to lead from other video editors with this change orientation of video in iMovie technique going to discuss below.
Part 2: Detailed Steps to Rotate Video in iMovie
Appropriate video orientation is the requirement of every video creation project. If video orientation is not as needed, either the one created in iMovie or already existing video. Then, the need arises to look around ways to assist in performing the iMovie change orientation task effectively. This part of the article will specifically explain how to change the orientation of video in iMovie with all the necessary steps.
Before adding a clip or photo to your movie, you can decide to change its orientation. The following steps would show how to change video orientation in iMovie:
Step 1: Launch iMovie
On your Mac, launch iMovie > From the browser or timeline, select the photo or video clip to be rotated.
Step 2: Click on the Crop icon
Click the cropping icon to reveal the cropping options/controls.
![]()
Step 3:Rotate Video
On the right portion of the cropping controls, click Rotate Clockwise to rotate the clip or photo in a clockwise direction. Otherwise, click Rotates Counterclockwise to rotate the clip or image counterclockwise.

Step 4:Apply Changes
In the cropping controls, click Apply to effect the changes.
If you wish to remove the rotation, click the reset button at the top right-hand corner of your screen.
Now, as you know the steps to change video orientation in iMovie, simply move ahead of your video creation and editing process with iMovie and enjoy the wonderful experience of creating something new, engaging, and innovative in the world of video making. Not only this step guide will be going to assist you, but there are some more alternative ways also that you can give a try to enhance your overall experience in the area of the video content editing process. For that, you don’t need to go anywhere. Right here, you will have that vast area of information.
Part 3: Rotate Video - iMovie Alternative
Are you looking for some other software to rotate your Video with? Wondershare Filmora is your sure plug! This easy-to-use yet professional video editing software turns videos and add titles, add text, perform color grading, add multiple overlays, do motion tracking, use stickers and animations, and, what is more, purchase the software at an affordable price. With this software, you can comment and play your video clips to not have to worry about doing this now and then.
To rotate MPEG and MPG videos using Wondershare Filmora, follow these simple steps:
Step 1: Import the MP4 files to be rotated
Drag and drop the clip to be rotated on the primary window or click Import to browse your files.

Step 2: Rotate the MP4 clips
Now, from the User’s Album, drag the MP4 file to be rotated to the video track on the timeline. Double click the MP4 video thumbnail to reveal the Rotate options, allowing you to rotate your video in one click. There are four rotation related options in Wondershare Filmora:
- Rotate the clip 90° in a clockwise direction and continuously. This way, you can rotate the clip 90°, 180°, and 270°.
- Rotate the clip 90° in an anticlockwise direction and constantly.
- Flip the Video horizontally in an upside-down fashion.
- Flip the Video vertically left to right.

Step 3: Export the rotated video clip
To permanently save the changes made, click the Create button to reveal four options: YouTube, DVD, Format, and Device. Select the right format/device and click Create to output your rotated video clip.

You have sufficient equipment to start your voyage to creation and innovation by now. No doubt, Filmora comes here as a rescue and an alternative solution to let you change video orientation and a provider of many editing options. So without any concern, you can explore the tool at any time as per your availability and requirement.
Conclusion
Wondershare Filmora
Get started easily with Filmora’s powerful performance, intuitive interface, and countless effects!
Try It Free Try It Free Try It Free Learn More about Filmora>

Through this article, you learnt how to change orientation in iMovie, and thus nothing is holding your creativity back! With iMovie change orientation, you can now flip video clips in different directions to suit your preference. You now also know that with Wondershare Filmora, you can achieve just about the same result as you would if you were using iMovie for video rotation. So, now you have two robust tools to perform your task. Just keep going and let rock the world with your fantastic creativity and efforts.
02 Detailed Steps to Rotate Video in iMovie
03 Rotate Video - iMovie Alternative
Part 1: What is Rotating Video and Why
Rotating a video means changing its orientation. A video clip can turn in a clockwise or counterclockwise direction, in 90° increments. Different video-making and editing software or applications have other steps to carry out this process. However, the result is the same for all, a change in the orientation of the video.
People rotate video clips for a variety of reasons. Here are some reasons as to why you may want to change video orientation in iMovie:
- Video stylization: While a rotated video may look disoriented, editors sometimes use the technique to convey a particular mood or emotion.
- Continuity: Video clip rotation can help you correct production errors or last-minute effect changes.
- Correct disorientation: Sometimes, as a result of errors while shooting, especially when using a mobile device, some video clips may appear in a lateral direction; video rotation can help fix this.
- Create horizontal videos: With a change in video orientation, you can make some footage like backgrounds appear vertically or horizontally.
Now that you know what video rotation is and some of the reasons people choose to change a video’s orientation, let’s now dive right into rotating videos in iMovie. And move ahead to lead from other video editors with this change orientation of video in iMovie technique going to discuss below.
Part 2: Detailed Steps to Rotate Video in iMovie
Appropriate video orientation is the requirement of every video creation project. If video orientation is not as needed, either the one created in iMovie or already existing video. Then, the need arises to look around ways to assist in performing the iMovie change orientation task effectively. This part of the article will specifically explain how to change the orientation of video in iMovie with all the necessary steps.
Before adding a clip or photo to your movie, you can decide to change its orientation. The following steps would show how to change video orientation in iMovie:
Step 1: Launch iMovie
On your Mac, launch iMovie > From the browser or timeline, select the photo or video clip to be rotated.
Step 2: Click on the Crop icon
Click the cropping icon to reveal the cropping options/controls.
![]()
Step 3:Rotate Video
On the right portion of the cropping controls, click Rotate Clockwise to rotate the clip or photo in a clockwise direction. Otherwise, click Rotates Counterclockwise to rotate the clip or image counterclockwise.

Step 4:Apply Changes
In the cropping controls, click Apply to effect the changes.
If you wish to remove the rotation, click the reset button at the top right-hand corner of your screen.
Now, as you know the steps to change video orientation in iMovie, simply move ahead of your video creation and editing process with iMovie and enjoy the wonderful experience of creating something new, engaging, and innovative in the world of video making. Not only this step guide will be going to assist you, but there are some more alternative ways also that you can give a try to enhance your overall experience in the area of the video content editing process. For that, you don’t need to go anywhere. Right here, you will have that vast area of information.
Part 3: Rotate Video - iMovie Alternative
Are you looking for some other software to rotate your Video with? Wondershare Filmora is your sure plug! This easy-to-use yet professional video editing software turns videos and add titles, add text, perform color grading, add multiple overlays, do motion tracking, use stickers and animations, and, what is more, purchase the software at an affordable price. With this software, you can comment and play your video clips to not have to worry about doing this now and then.
To rotate MPEG and MPG videos using Wondershare Filmora, follow these simple steps:
Step 1: Import the MP4 files to be rotated
Drag and drop the clip to be rotated on the primary window or click Import to browse your files.

Step 2: Rotate the MP4 clips
Now, from the User’s Album, drag the MP4 file to be rotated to the video track on the timeline. Double click the MP4 video thumbnail to reveal the Rotate options, allowing you to rotate your video in one click. There are four rotation related options in Wondershare Filmora:
- Rotate the clip 90° in a clockwise direction and continuously. This way, you can rotate the clip 90°, 180°, and 270°.
- Rotate the clip 90° in an anticlockwise direction and constantly.
- Flip the Video horizontally in an upside-down fashion.
- Flip the Video vertically left to right.

Step 3: Export the rotated video clip
To permanently save the changes made, click the Create button to reveal four options: YouTube, DVD, Format, and Device. Select the right format/device and click Create to output your rotated video clip.

You have sufficient equipment to start your voyage to creation and innovation by now. No doubt, Filmora comes here as a rescue and an alternative solution to let you change video orientation and a provider of many editing options. So without any concern, you can explore the tool at any time as per your availability and requirement.
Conclusion
Wondershare Filmora
Get started easily with Filmora’s powerful performance, intuitive interface, and countless effects!
Try It Free Try It Free Try It Free Learn More about Filmora>

Through this article, you learnt how to change orientation in iMovie, and thus nothing is holding your creativity back! With iMovie change orientation, you can now flip video clips in different directions to suit your preference. You now also know that with Wondershare Filmora, you can achieve just about the same result as you would if you were using iMovie for video rotation. So, now you have two robust tools to perform your task. Just keep going and let rock the world with your fantastic creativity and efforts.
Unlocking the Power of DaVinci Resolve Scopes: Enhance Your Color Grad
How do you set up DaVinci scopes? The internal color scopes in Resolve are flexible and customizable but can be confusing. The built-in DaVinci Resolve scope used to be limited only a few possibilities. However, the new 9-scope view offers a wider range of choice, making them a powerful tool for video editing. In this article, we will explore how to set up DaVinci scopes to achieve better color results.
Color Correction Editor An easy-to-use video editor helps you make color correction and color grading experience for videos!
Free Download Use Vectorscope in Filmora Try Color Correction

Part 1. Unlocking Color Precision: Exploring the Improved Scopes in DaVinci Resolve
The Blackmagic Design continues to improve the Resolve to make it better with every iteration. The new features improve colorist workflow in less powerful ways. The major improvements include a major facelift to the scope, allowing professions to do more with DaVinci resolve. Let’s have a look at some of these changes:
1. CIE 1931 Color Space
The inclusion of the CIE chromaticity diagram is perhaps the biggest change to DaVinci scopes. It displays the gamut of the project as set in the Color Management preferences. This makes it a useful alternate way of looking at the trace of an image to judge when the values are out of legal range. It also functions as an educational tool for learning about the range of color spaces.
2. Low Pass Filter
The wavefront and parade scopes now have a low pass filter, which reduces noise in the trace. This visually sharpens the display of the scopes, allowing easier detection of elements in the frame.
The image above shows the major improvements. The second set of waveforms has more defined lines. These have the low-pass filter activated, which makes the scopes easier to read.
3. High, Mid, and Low Views in Vectorscope
The vectorscope has been added to the ability to toggle the mid-tones, shadows, and highlights of the image independently. You can set the ranges with greater visualization control.
As seen in the picture above, the vectorscope controls allow you to select the low, mid, or high range of the image. You can also set the low and high ranges as desired.
4. Histograms Over Curves
Another great DaVinci scope is the histogram, which now appears outside of the scope panel. The new improvements have embedded the histogram inside the Curves tab on the bottom Palette. Click on the three dots in the Custom Curves tab. The pulldown menu that appears includes the Input or Output of the histogram. With these settings, you can find the element in the frame that helps you make adjustments quickly.
5. Scope Quality
The GPU-accelerated scopes engine allows the scopes to respond quickly. Users have the option to set the quality to high, medium, or low and the scopes will respond to a range of hardware systems. Depending on whether you are working on a stationary short or looking to see how the scopes react in real-time, you will be able to toggle the modes quickly and easily.

6. YRGB View in Histogram and Parade
The histogram and parade now come with the ability to view luminance together with the red, green, and blue channels. Users also have the option for YCbCr mode in the Parade.

7. Extents
These are weak elements in the signore, which are of lesser importance compared to the stronger elements. However, Danvici now allows them to be revealed for a full illustration of the information that lies in the image. Consequently, extents can be used to determine whether the data is being clipped beyond legal limits.

Part 2. Mastering Scopes in DaVinci Resolve: A Brief Guide
DaVinci scopes help you to analyze images as a basis for color correction. When used properly, scopes help in fixing white balance issues and checking saturation. They also allow you to get the correct exposure and check details like skin tone. To use scopes in DaVinci Resolve, go to the color page in the bottom right corner. You can also click on the small graph icon to view the scope. Here is how to use them:
1. Waveform
The Waveform represents the brightness or luminance of your image. In this video scope, the brightest parts are at the top while the darkest are at the bottom. The pixels are represented from left to right.
The Waveform scope on DaVinci Resolve is helpful when you are checking for clipping. This simply means finding out whether the image is too bright or too dark. The waveform also ensures that the image is properly exposed. The colorize feature of the waveform shows the colors of the image while the extent shows the darkest or lightest parts of the image.
2. Parade (RGB)
The RGB Parade comprises 3 waveforms that represent the luminance of red, green, and blue channels. The approach for reading the parade video scope is similar to that of the waveform. However, you now look at the balance between the colors correct the white balance, and check for a color cast.
The Parade works almost in a similar manner as the waveform. It displays the red, green, and blue channels of the image as separate waveforms. This way, you can easily identify and correct color casts while ensuring the colors in the image are balanced. The video scope provides useful information to decide which parts of the image need to be corrected or tweaked further.
3. Vectorscope
Vectorscope in DaVinci Resolve shows hue and saturation on a circular graph. Hues (the colors) are indicated outside of the color wheel for easier color correction. Saturation is indicated by how far the graph extends from the center.
By displaying the hue and saturation of the image as a vector, this video scope helps check skin tones. The scope specifically checks whether skin tones are shifted toward colors such as yellow, magenta, or green. It allows you to make sure that the colors in your subject skin tones are not too saturated or desaturated.
4. Histogram
Histogram is a video scope in DaVinci Resolve that displays the brightness or luminance of an image from left to right for the RGB channel. The video scope is based on the number of pixels that the colors red, blue, and green have in an image.
Using the histogram video scope on DaVinci Resolve allows you to check for overexposure or underexposure in your image. You can also ensure that the image has a good overall brightness range. The scope provides a graphical representation of tonal distribution in each channel. This way, you can evaluate the tone in detail for more accurate brightness and contrast adjustments.
Part 3: Edit Like a Pro: Mastering Video Scopes in Filmora
When working on video projects, Wondershare Filmora is a great editing software. It comes with unique features to color-correct your videos on the go as you edit it. From AI-powered features to royalty-free music, there is so much more you can do with Filmora.
Free Download For Win 7 or later(64-bit)
Free Download For macOS 10.14 or later
How to Use Video Scopes on Filmora
Using video scopes on Filmora is easy. The software offers four video scope options, allowing you to color-correct and grade your visual images properly. They include parade RGB, waveform, vectorscope, and histogram. When editing videos on Filmora, the video scopes can be accessed by clicking on the video scopes icon. The icon is found on the top right corner of the media player.
Filmora has made it easy for users to manage video scopes, and color-correct videos quickly. Users can change the layout options of the video scopes to match the editing needs of their project. You can also expand the button to show the name of the scope. As you manage the scopes, you can start with the Parade to make the necessary adjustments. Then move on to waveform, vectorscope, and histogram.
The uses of the video scope on Filmora are as follows:
- Parade – Cahnge the color channel from RBG to YRGB or YCbCr
- Vectorscope – Identify skin tone
- Waveform – Adjust color channels in a different way
- Histogram – Display the multiple color adjustments in a graphical way
Conclusion
Scopes are indeed valuable to video editors and colorists. While viewing images on a monitor can be subjective, scopes allow you to analyze and define them objectively. This gives you the power to color grade and correct to ensure that viewers look at the image with a clear representation. When working on or editing your videos, we recommend Wondershare Filmora. The video editing software comes with a wide range of features and video scopes that allow you to do everything on the same platform.
Free Download Use Vectorscope in Filmora Try Color Correction

Part 1. Unlocking Color Precision: Exploring the Improved Scopes in DaVinci Resolve
The Blackmagic Design continues to improve the Resolve to make it better with every iteration. The new features improve colorist workflow in less powerful ways. The major improvements include a major facelift to the scope, allowing professions to do more with DaVinci resolve. Let’s have a look at some of these changes:
1. CIE 1931 Color Space
The inclusion of the CIE chromaticity diagram is perhaps the biggest change to DaVinci scopes. It displays the gamut of the project as set in the Color Management preferences. This makes it a useful alternate way of looking at the trace of an image to judge when the values are out of legal range. It also functions as an educational tool for learning about the range of color spaces.
2. Low Pass Filter
The wavefront and parade scopes now have a low pass filter, which reduces noise in the trace. This visually sharpens the display of the scopes, allowing easier detection of elements in the frame.
The image above shows the major improvements. The second set of waveforms has more defined lines. These have the low-pass filter activated, which makes the scopes easier to read.
3. High, Mid, and Low Views in Vectorscope
The vectorscope has been added to the ability to toggle the mid-tones, shadows, and highlights of the image independently. You can set the ranges with greater visualization control.
As seen in the picture above, the vectorscope controls allow you to select the low, mid, or high range of the image. You can also set the low and high ranges as desired.
4. Histograms Over Curves
Another great DaVinci scope is the histogram, which now appears outside of the scope panel. The new improvements have embedded the histogram inside the Curves tab on the bottom Palette. Click on the three dots in the Custom Curves tab. The pulldown menu that appears includes the Input or Output of the histogram. With these settings, you can find the element in the frame that helps you make adjustments quickly.
5. Scope Quality
The GPU-accelerated scopes engine allows the scopes to respond quickly. Users have the option to set the quality to high, medium, or low and the scopes will respond to a range of hardware systems. Depending on whether you are working on a stationary short or looking to see how the scopes react in real-time, you will be able to toggle the modes quickly and easily.

6. YRGB View in Histogram and Parade
The histogram and parade now come with the ability to view luminance together with the red, green, and blue channels. Users also have the option for YCbCr mode in the Parade.

7. Extents
These are weak elements in the signore, which are of lesser importance compared to the stronger elements. However, Danvici now allows them to be revealed for a full illustration of the information that lies in the image. Consequently, extents can be used to determine whether the data is being clipped beyond legal limits.

Part 2. Mastering Scopes in DaVinci Resolve: A Brief Guide
DaVinci scopes help you to analyze images as a basis for color correction. When used properly, scopes help in fixing white balance issues and checking saturation. They also allow you to get the correct exposure and check details like skin tone. To use scopes in DaVinci Resolve, go to the color page in the bottom right corner. You can also click on the small graph icon to view the scope. Here is how to use them:
1. Waveform
The Waveform represents the brightness or luminance of your image. In this video scope, the brightest parts are at the top while the darkest are at the bottom. The pixels are represented from left to right.
The Waveform scope on DaVinci Resolve is helpful when you are checking for clipping. This simply means finding out whether the image is too bright or too dark. The waveform also ensures that the image is properly exposed. The colorize feature of the waveform shows the colors of the image while the extent shows the darkest or lightest parts of the image.
2. Parade (RGB)
The RGB Parade comprises 3 waveforms that represent the luminance of red, green, and blue channels. The approach for reading the parade video scope is similar to that of the waveform. However, you now look at the balance between the colors correct the white balance, and check for a color cast.
The Parade works almost in a similar manner as the waveform. It displays the red, green, and blue channels of the image as separate waveforms. This way, you can easily identify and correct color casts while ensuring the colors in the image are balanced. The video scope provides useful information to decide which parts of the image need to be corrected or tweaked further.
3. Vectorscope
Vectorscope in DaVinci Resolve shows hue and saturation on a circular graph. Hues (the colors) are indicated outside of the color wheel for easier color correction. Saturation is indicated by how far the graph extends from the center.
By displaying the hue and saturation of the image as a vector, this video scope helps check skin tones. The scope specifically checks whether skin tones are shifted toward colors such as yellow, magenta, or green. It allows you to make sure that the colors in your subject skin tones are not too saturated or desaturated.
4. Histogram
Histogram is a video scope in DaVinci Resolve that displays the brightness or luminance of an image from left to right for the RGB channel. The video scope is based on the number of pixels that the colors red, blue, and green have in an image.
Using the histogram video scope on DaVinci Resolve allows you to check for overexposure or underexposure in your image. You can also ensure that the image has a good overall brightness range. The scope provides a graphical representation of tonal distribution in each channel. This way, you can evaluate the tone in detail for more accurate brightness and contrast adjustments.
Part 3: Edit Like a Pro: Mastering Video Scopes in Filmora
When working on video projects, Wondershare Filmora is a great editing software. It comes with unique features to color-correct your videos on the go as you edit it. From AI-powered features to royalty-free music, there is so much more you can do with Filmora.
Free Download For Win 7 or later(64-bit)
Free Download For macOS 10.14 or later
How to Use Video Scopes on Filmora
Using video scopes on Filmora is easy. The software offers four video scope options, allowing you to color-correct and grade your visual images properly. They include parade RGB, waveform, vectorscope, and histogram. When editing videos on Filmora, the video scopes can be accessed by clicking on the video scopes icon. The icon is found on the top right corner of the media player.
Filmora has made it easy for users to manage video scopes, and color-correct videos quickly. Users can change the layout options of the video scopes to match the editing needs of their project. You can also expand the button to show the name of the scope. As you manage the scopes, you can start with the Parade to make the necessary adjustments. Then move on to waveform, vectorscope, and histogram.
The uses of the video scope on Filmora are as follows:
- Parade – Cahnge the color channel from RBG to YRGB or YCbCr
- Vectorscope – Identify skin tone
- Waveform – Adjust color channels in a different way
- Histogram – Display the multiple color adjustments in a graphical way
Conclusion
Scopes are indeed valuable to video editors and colorists. While viewing images on a monitor can be subjective, scopes allow you to analyze and define them objectively. This gives you the power to color grade and correct to ensure that viewers look at the image with a clear representation. When working on or editing your videos, we recommend Wondershare Filmora. The video editing software comes with a wide range of features and video scopes that allow you to do everything on the same platform.
How to Add Camera Shake to Video in Adobe After Effects
Create High-Quality Video - Wondershare Filmora
An easy and powerful YouTube video editor
Numerous video and audio effects to choose from
Detailed tutorials are provided by the official channel
So you’ve shot your video with good camera technique and shot it on a good camera; how can you make it look like you shot it on an old PXL 2000? Well, the answer is to add a little camera shake to the footage. If you’ve ever been to a theme park, then you’ve likely seen the effect of camera shake. Video camera shake can be a powerful tool for telling a story and creating an impactful scene. It helps to build suspense and make the video more realistic. This article will show you how to add camera shake to your videos using Adobe After Effects.
In this article
01 Why Do We Need To Add A Camera Shake Effect To The Video?
02 How to add camera shake to video in After Effects
03 Bonus! Camera Shake Presets for After Effects
Why Do We Need To Add A Camera Shake Effect To The Video?
Have you ever tried to add a simple camera shake effect to your videos? You know, those cool shake effects that you may have seen on an amateur or professional video on the web? Well, if you have, then you probably thought it was impossible. The camera shake effect is a technique applied to the clips where shaky camera movements cause the image to appear more cinematic and real. Applying a camera shake effect is to hide your flaws when shooting a video.
Camera shake is often mistaken for poor cinematography. It can enhance your video. For instance, if you’re filming something like a car chase or any other scene where there’s lots of movement and action, the inclusion of a camera shake can help make it more realistic.
A camera shake effect can be an excellent way of adding a sense of realism to your videos. Whether you’re making a video that’s meant to be taken as a real scene, such as one depicting a robbery, or one that’s supposed to be shot in a documentary style, such as making a movie, you can use this as an effective tool. You can consider adding camera shakes to your videos due to the following reasons:
- This camera shake effect makes your video more creative. If you want to make, your video different from those other businesses produce, adding this effect will be a good idea.
- Your audience will be able to relate better to your video if they’ve seen similar videos before.
- Adding a camera shake to your video will make it more interesting and engaging for your viewers.
- It’s a great way to mask any mistakes you might have made during the video production. After all, we aren’t perfect humans, so we can’t make perfect videos every time!”
- You can use camera shakes to simulate the feeling of being in an environment that is free from control (such as being on a boat).
- You can use them to create a sense of urgency for the viewer/audience by adding motion blur to the sequence.
How to add camera shake to video in After Effects
When it comes to video editing, knowing how to make a layer shake in After Effects is a very useful skill. Using it correctly can add subtle motion to a static frame, emphasize an important object, and even make a character quiver in fear! In this tutorial, you will learn how to effectively use the wiggle expression to affect a layer throughout the Composition.
Step 1. Select the layer you want to shake from your After Effects file
Suppose you have an image or video of an object and want to apply it to shake effect, then it is quite easy. Just follow the steps described below.

Step 2. Press the alt/option key, then click the stopwatch next to “position.”
You are adding an “expression” to the timeline when the position text turns red, and you begin typing. Using a coding language adapted from javascript, you can apply complex motion to layers.
By pressing the alt/option again on the stopwatch, you can edit your expression anytime-or by clicking the arrow beside “position” and then double-clicking the text in the timeline.

Step 3. Enter “Wiggle (3,8)” and adjust the settings accordingly
In this expression, the first number indicates the frequency of Wiggle – basically, how quickly it appears to tremble. Its amplitude is the second number, which indicates how far it moves. The numbers are adjustable as you wish. Layers will shake dramatically but slowly when they use Wiggle (2,40). The “Wiggle (10,3)” command makes a layer move quickly without too much movement in one direction.
Step 4. Adjust the frame rate of your Composition
In order to make the overall effect more “choppy,” you can reduce the frame rate of the video by going to Composition> Composition settings. After Effects uses a frame rate of 24.5, you can go as low as “8” if you want a choppy feel.

Your entire Composition will become choppier if you reduce the frame rate, so it might not be worth it if you have other moving elements in your Composition. Only adjust the frame rate of the layer containing the wiggling object if you want it to affect that layer.
Bonus! Camera Shake Presets for After Effects
Working with After Effects, you will have to shoot a movie that uses a camera shake. It is important to read the manual completely to take control of the camera. After Effects provides us with ready-made presets that we can quickly and easily. Here is a set of 5 camera shake presets that will help you create motion effects.
Normal Light 1
This preset gives you a light camera shake like a normal lens.
Resolution: 2K (2048x1080) and 4K (4096x2160)
Frame Rate: 29.97fps
Earthquake 1
This preset gives you a feel of camera shake, just like from an earthquake.
Resolution: 2K (2048x1080) and 4K (4096x2160)
Frame Rate: 29.97fps
Normal Heavy 1
This preset provides you with a feel of a heavy camera shake from a normal lens.
Resolution: 2K (2048x1080) and 4K (4096x2160)
Frame Rate: 29.97fps
Telephoto Light 1
This preset gives you an effect of light camera shake from a telephoto lens.
Resolution: 2K (2048x1080) and 4K (4096x2160)
Frame Rate: 29.97fp
Wide Heavy 1
You get a heavy camera shake from a wide lens with this preset.
Resolution: 2K (2048x1080) and 4K (4096x2160)
Frame Rate: 29.97fp
Conclusion
● We hope that this tutorial gave you some new ideas for making your videos more interesting for your audience. It’s easy to add camera shake to your videos in Adobe After Effects. It’s a matter of getting all the right details right—that means it’s a matter of knowing all the right settings and controls, which we detail above. With this information and a little practice, you’ll be able to add that cinematic flair to your video footage in no time.
So you’ve shot your video with good camera technique and shot it on a good camera; how can you make it look like you shot it on an old PXL 2000? Well, the answer is to add a little camera shake to the footage. If you’ve ever been to a theme park, then you’ve likely seen the effect of camera shake. Video camera shake can be a powerful tool for telling a story and creating an impactful scene. It helps to build suspense and make the video more realistic. This article will show you how to add camera shake to your videos using Adobe After Effects.
In this article
01 Why Do We Need To Add A Camera Shake Effect To The Video?
02 How to add camera shake to video in After Effects
03 Bonus! Camera Shake Presets for After Effects
Why Do We Need To Add A Camera Shake Effect To The Video?
Have you ever tried to add a simple camera shake effect to your videos? You know, those cool shake effects that you may have seen on an amateur or professional video on the web? Well, if you have, then you probably thought it was impossible. The camera shake effect is a technique applied to the clips where shaky camera movements cause the image to appear more cinematic and real. Applying a camera shake effect is to hide your flaws when shooting a video.
Camera shake is often mistaken for poor cinematography. It can enhance your video. For instance, if you’re filming something like a car chase or any other scene where there’s lots of movement and action, the inclusion of a camera shake can help make it more realistic.
A camera shake effect can be an excellent way of adding a sense of realism to your videos. Whether you’re making a video that’s meant to be taken as a real scene, such as one depicting a robbery, or one that’s supposed to be shot in a documentary style, such as making a movie, you can use this as an effective tool. You can consider adding camera shakes to your videos due to the following reasons:
- This camera shake effect makes your video more creative. If you want to make, your video different from those other businesses produce, adding this effect will be a good idea.
- Your audience will be able to relate better to your video if they’ve seen similar videos before.
- Adding a camera shake to your video will make it more interesting and engaging for your viewers.
- It’s a great way to mask any mistakes you might have made during the video production. After all, we aren’t perfect humans, so we can’t make perfect videos every time!”
- You can use camera shakes to simulate the feeling of being in an environment that is free from control (such as being on a boat).
- You can use them to create a sense of urgency for the viewer/audience by adding motion blur to the sequence.
How to add camera shake to video in After Effects
When it comes to video editing, knowing how to make a layer shake in After Effects is a very useful skill. Using it correctly can add subtle motion to a static frame, emphasize an important object, and even make a character quiver in fear! In this tutorial, you will learn how to effectively use the wiggle expression to affect a layer throughout the Composition.
Step 1. Select the layer you want to shake from your After Effects file
Suppose you have an image or video of an object and want to apply it to shake effect, then it is quite easy. Just follow the steps described below.

Step 2. Press the alt/option key, then click the stopwatch next to “position.”
You are adding an “expression” to the timeline when the position text turns red, and you begin typing. Using a coding language adapted from javascript, you can apply complex motion to layers.
By pressing the alt/option again on the stopwatch, you can edit your expression anytime-or by clicking the arrow beside “position” and then double-clicking the text in the timeline.

Step 3. Enter “Wiggle (3,8)” and adjust the settings accordingly
In this expression, the first number indicates the frequency of Wiggle – basically, how quickly it appears to tremble. Its amplitude is the second number, which indicates how far it moves. The numbers are adjustable as you wish. Layers will shake dramatically but slowly when they use Wiggle (2,40). The “Wiggle (10,3)” command makes a layer move quickly without too much movement in one direction.
Step 4. Adjust the frame rate of your Composition
In order to make the overall effect more “choppy,” you can reduce the frame rate of the video by going to Composition> Composition settings. After Effects uses a frame rate of 24.5, you can go as low as “8” if you want a choppy feel.

Your entire Composition will become choppier if you reduce the frame rate, so it might not be worth it if you have other moving elements in your Composition. Only adjust the frame rate of the layer containing the wiggling object if you want it to affect that layer.
Bonus! Camera Shake Presets for After Effects
Working with After Effects, you will have to shoot a movie that uses a camera shake. It is important to read the manual completely to take control of the camera. After Effects provides us with ready-made presets that we can quickly and easily. Here is a set of 5 camera shake presets that will help you create motion effects.
Normal Light 1
This preset gives you a light camera shake like a normal lens.
Resolution: 2K (2048x1080) and 4K (4096x2160)
Frame Rate: 29.97fps
Earthquake 1
This preset gives you a feel of camera shake, just like from an earthquake.
Resolution: 2K (2048x1080) and 4K (4096x2160)
Frame Rate: 29.97fps
Normal Heavy 1
This preset provides you with a feel of a heavy camera shake from a normal lens.
Resolution: 2K (2048x1080) and 4K (4096x2160)
Frame Rate: 29.97fps
Telephoto Light 1
This preset gives you an effect of light camera shake from a telephoto lens.
Resolution: 2K (2048x1080) and 4K (4096x2160)
Frame Rate: 29.97fp
Wide Heavy 1
You get a heavy camera shake from a wide lens with this preset.
Resolution: 2K (2048x1080) and 4K (4096x2160)
Frame Rate: 29.97fp
Conclusion
● We hope that this tutorial gave you some new ideas for making your videos more interesting for your audience. It’s easy to add camera shake to your videos in Adobe After Effects. It’s a matter of getting all the right details right—that means it’s a matter of knowing all the right settings and controls, which we detail above. With this information and a little practice, you’ll be able to add that cinematic flair to your video footage in no time.
So you’ve shot your video with good camera technique and shot it on a good camera; how can you make it look like you shot it on an old PXL 2000? Well, the answer is to add a little camera shake to the footage. If you’ve ever been to a theme park, then you’ve likely seen the effect of camera shake. Video camera shake can be a powerful tool for telling a story and creating an impactful scene. It helps to build suspense and make the video more realistic. This article will show you how to add camera shake to your videos using Adobe After Effects.
In this article
01 Why Do We Need To Add A Camera Shake Effect To The Video?
02 How to add camera shake to video in After Effects
03 Bonus! Camera Shake Presets for After Effects
Why Do We Need To Add A Camera Shake Effect To The Video?
Have you ever tried to add a simple camera shake effect to your videos? You know, those cool shake effects that you may have seen on an amateur or professional video on the web? Well, if you have, then you probably thought it was impossible. The camera shake effect is a technique applied to the clips where shaky camera movements cause the image to appear more cinematic and real. Applying a camera shake effect is to hide your flaws when shooting a video.
Camera shake is often mistaken for poor cinematography. It can enhance your video. For instance, if you’re filming something like a car chase or any other scene where there’s lots of movement and action, the inclusion of a camera shake can help make it more realistic.
A camera shake effect can be an excellent way of adding a sense of realism to your videos. Whether you’re making a video that’s meant to be taken as a real scene, such as one depicting a robbery, or one that’s supposed to be shot in a documentary style, such as making a movie, you can use this as an effective tool. You can consider adding camera shakes to your videos due to the following reasons:
- This camera shake effect makes your video more creative. If you want to make, your video different from those other businesses produce, adding this effect will be a good idea.
- Your audience will be able to relate better to your video if they’ve seen similar videos before.
- Adding a camera shake to your video will make it more interesting and engaging for your viewers.
- It’s a great way to mask any mistakes you might have made during the video production. After all, we aren’t perfect humans, so we can’t make perfect videos every time!”
- You can use camera shakes to simulate the feeling of being in an environment that is free from control (such as being on a boat).
- You can use them to create a sense of urgency for the viewer/audience by adding motion blur to the sequence.
How to add camera shake to video in After Effects
When it comes to video editing, knowing how to make a layer shake in After Effects is a very useful skill. Using it correctly can add subtle motion to a static frame, emphasize an important object, and even make a character quiver in fear! In this tutorial, you will learn how to effectively use the wiggle expression to affect a layer throughout the Composition.
Step 1. Select the layer you want to shake from your After Effects file
Suppose you have an image or video of an object and want to apply it to shake effect, then it is quite easy. Just follow the steps described below.

Step 2. Press the alt/option key, then click the stopwatch next to “position.”
You are adding an “expression” to the timeline when the position text turns red, and you begin typing. Using a coding language adapted from javascript, you can apply complex motion to layers.
By pressing the alt/option again on the stopwatch, you can edit your expression anytime-or by clicking the arrow beside “position” and then double-clicking the text in the timeline.

Step 3. Enter “Wiggle (3,8)” and adjust the settings accordingly
In this expression, the first number indicates the frequency of Wiggle – basically, how quickly it appears to tremble. Its amplitude is the second number, which indicates how far it moves. The numbers are adjustable as you wish. Layers will shake dramatically but slowly when they use Wiggle (2,40). The “Wiggle (10,3)” command makes a layer move quickly without too much movement in one direction.
Step 4. Adjust the frame rate of your Composition
In order to make the overall effect more “choppy,” you can reduce the frame rate of the video by going to Composition> Composition settings. After Effects uses a frame rate of 24.5, you can go as low as “8” if you want a choppy feel.

Your entire Composition will become choppier if you reduce the frame rate, so it might not be worth it if you have other moving elements in your Composition. Only adjust the frame rate of the layer containing the wiggling object if you want it to affect that layer.
Bonus! Camera Shake Presets for After Effects
Working with After Effects, you will have to shoot a movie that uses a camera shake. It is important to read the manual completely to take control of the camera. After Effects provides us with ready-made presets that we can quickly and easily. Here is a set of 5 camera shake presets that will help you create motion effects.
Normal Light 1
This preset gives you a light camera shake like a normal lens.
Resolution: 2K (2048x1080) and 4K (4096x2160)
Frame Rate: 29.97fps
Earthquake 1
This preset gives you a feel of camera shake, just like from an earthquake.
Resolution: 2K (2048x1080) and 4K (4096x2160)
Frame Rate: 29.97fps
Normal Heavy 1
This preset provides you with a feel of a heavy camera shake from a normal lens.
Resolution: 2K (2048x1080) and 4K (4096x2160)
Frame Rate: 29.97fps
Telephoto Light 1
This preset gives you an effect of light camera shake from a telephoto lens.
Resolution: 2K (2048x1080) and 4K (4096x2160)
Frame Rate: 29.97fp
Wide Heavy 1
You get a heavy camera shake from a wide lens with this preset.
Resolution: 2K (2048x1080) and 4K (4096x2160)
Frame Rate: 29.97fp
Conclusion
● We hope that this tutorial gave you some new ideas for making your videos more interesting for your audience. It’s easy to add camera shake to your videos in Adobe After Effects. It’s a matter of getting all the right details right—that means it’s a matter of knowing all the right settings and controls, which we detail above. With this information and a little practice, you’ll be able to add that cinematic flair to your video footage in no time.
So you’ve shot your video with good camera technique and shot it on a good camera; how can you make it look like you shot it on an old PXL 2000? Well, the answer is to add a little camera shake to the footage. If you’ve ever been to a theme park, then you’ve likely seen the effect of camera shake. Video camera shake can be a powerful tool for telling a story and creating an impactful scene. It helps to build suspense and make the video more realistic. This article will show you how to add camera shake to your videos using Adobe After Effects.
In this article
01 Why Do We Need To Add A Camera Shake Effect To The Video?
02 How to add camera shake to video in After Effects
03 Bonus! Camera Shake Presets for After Effects
Why Do We Need To Add A Camera Shake Effect To The Video?
Have you ever tried to add a simple camera shake effect to your videos? You know, those cool shake effects that you may have seen on an amateur or professional video on the web? Well, if you have, then you probably thought it was impossible. The camera shake effect is a technique applied to the clips where shaky camera movements cause the image to appear more cinematic and real. Applying a camera shake effect is to hide your flaws when shooting a video.
Camera shake is often mistaken for poor cinematography. It can enhance your video. For instance, if you’re filming something like a car chase or any other scene where there’s lots of movement and action, the inclusion of a camera shake can help make it more realistic.
A camera shake effect can be an excellent way of adding a sense of realism to your videos. Whether you’re making a video that’s meant to be taken as a real scene, such as one depicting a robbery, or one that’s supposed to be shot in a documentary style, such as making a movie, you can use this as an effective tool. You can consider adding camera shakes to your videos due to the following reasons:
- This camera shake effect makes your video more creative. If you want to make, your video different from those other businesses produce, adding this effect will be a good idea.
- Your audience will be able to relate better to your video if they’ve seen similar videos before.
- Adding a camera shake to your video will make it more interesting and engaging for your viewers.
- It’s a great way to mask any mistakes you might have made during the video production. After all, we aren’t perfect humans, so we can’t make perfect videos every time!”
- You can use camera shakes to simulate the feeling of being in an environment that is free from control (such as being on a boat).
- You can use them to create a sense of urgency for the viewer/audience by adding motion blur to the sequence.
How to add camera shake to video in After Effects
When it comes to video editing, knowing how to make a layer shake in After Effects is a very useful skill. Using it correctly can add subtle motion to a static frame, emphasize an important object, and even make a character quiver in fear! In this tutorial, you will learn how to effectively use the wiggle expression to affect a layer throughout the Composition.
Step 1. Select the layer you want to shake from your After Effects file
Suppose you have an image or video of an object and want to apply it to shake effect, then it is quite easy. Just follow the steps described below.

Step 2. Press the alt/option key, then click the stopwatch next to “position.”
You are adding an “expression” to the timeline when the position text turns red, and you begin typing. Using a coding language adapted from javascript, you can apply complex motion to layers.
By pressing the alt/option again on the stopwatch, you can edit your expression anytime-or by clicking the arrow beside “position” and then double-clicking the text in the timeline.

Step 3. Enter “Wiggle (3,8)” and adjust the settings accordingly
In this expression, the first number indicates the frequency of Wiggle – basically, how quickly it appears to tremble. Its amplitude is the second number, which indicates how far it moves. The numbers are adjustable as you wish. Layers will shake dramatically but slowly when they use Wiggle (2,40). The “Wiggle (10,3)” command makes a layer move quickly without too much movement in one direction.
Step 4. Adjust the frame rate of your Composition
In order to make the overall effect more “choppy,” you can reduce the frame rate of the video by going to Composition> Composition settings. After Effects uses a frame rate of 24.5, you can go as low as “8” if you want a choppy feel.

Your entire Composition will become choppier if you reduce the frame rate, so it might not be worth it if you have other moving elements in your Composition. Only adjust the frame rate of the layer containing the wiggling object if you want it to affect that layer.
Bonus! Camera Shake Presets for After Effects
Working with After Effects, you will have to shoot a movie that uses a camera shake. It is important to read the manual completely to take control of the camera. After Effects provides us with ready-made presets that we can quickly and easily. Here is a set of 5 camera shake presets that will help you create motion effects.
Normal Light 1
This preset gives you a light camera shake like a normal lens.
Resolution: 2K (2048x1080) and 4K (4096x2160)
Frame Rate: 29.97fps
Earthquake 1
This preset gives you a feel of camera shake, just like from an earthquake.
Resolution: 2K (2048x1080) and 4K (4096x2160)
Frame Rate: 29.97fps
Normal Heavy 1
This preset provides you with a feel of a heavy camera shake from a normal lens.
Resolution: 2K (2048x1080) and 4K (4096x2160)
Frame Rate: 29.97fps
Telephoto Light 1
This preset gives you an effect of light camera shake from a telephoto lens.
Resolution: 2K (2048x1080) and 4K (4096x2160)
Frame Rate: 29.97fp
Wide Heavy 1
You get a heavy camera shake from a wide lens with this preset.
Resolution: 2K (2048x1080) and 4K (4096x2160)
Frame Rate: 29.97fp
Conclusion
● We hope that this tutorial gave you some new ideas for making your videos more interesting for your audience. It’s easy to add camera shake to your videos in Adobe After Effects. It’s a matter of getting all the right details right—that means it’s a matter of knowing all the right settings and controls, which we detail above. With this information and a little practice, you’ll be able to add that cinematic flair to your video footage in no time.
Cropping Videos in VLC [Step by Step]
Want to crop your videos but don’t know how to start?
A video editor needs to know how he can crop his videos. There is a way to do this using the VLC that is installed in your computer. This guide will teach you a simple way to get what you want. This might appear as complicated at first sight but it will be shown to you in a digestible way. An alternative way would be to use Wondershare Filmora. You will also be guided on how to use this software to crop your videos. Don’t worry and just take it one step at a time.
How to Crop a Video using VLC
Have you ever heard of the VLC media player? If not, you can browse through it online and install it on your computer. Aside from watching content, you can also crop videos with it. Cropping is a way to remove spaces that you would not want to be included on your video.
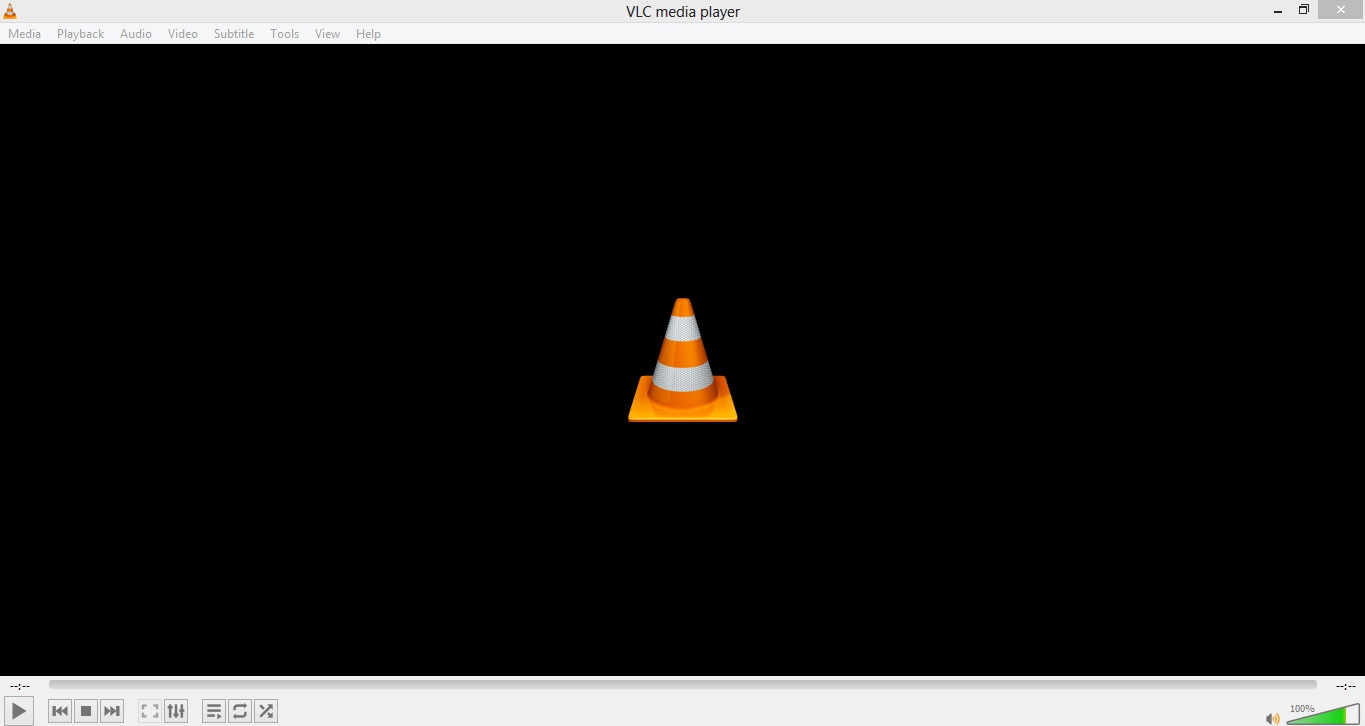
Find the software on your computer and don’t be overwhelmed by the interface.
Then click the Media and select Open File to choose the video that you want to crop. You should prepare the videos that you want to be cropped and rename them to avoid confusion.

Click the Tools on the menu and select the Effects and Filters.

After that, click on the Video Effects and under that select Crop. Doing this, will open the cropping editor.

You need to enter specific pixels on the left, right, top and bottom. This will depend on your preferences. If it is your first time and you don’t know the exact pixels then just input what you think would be enough.
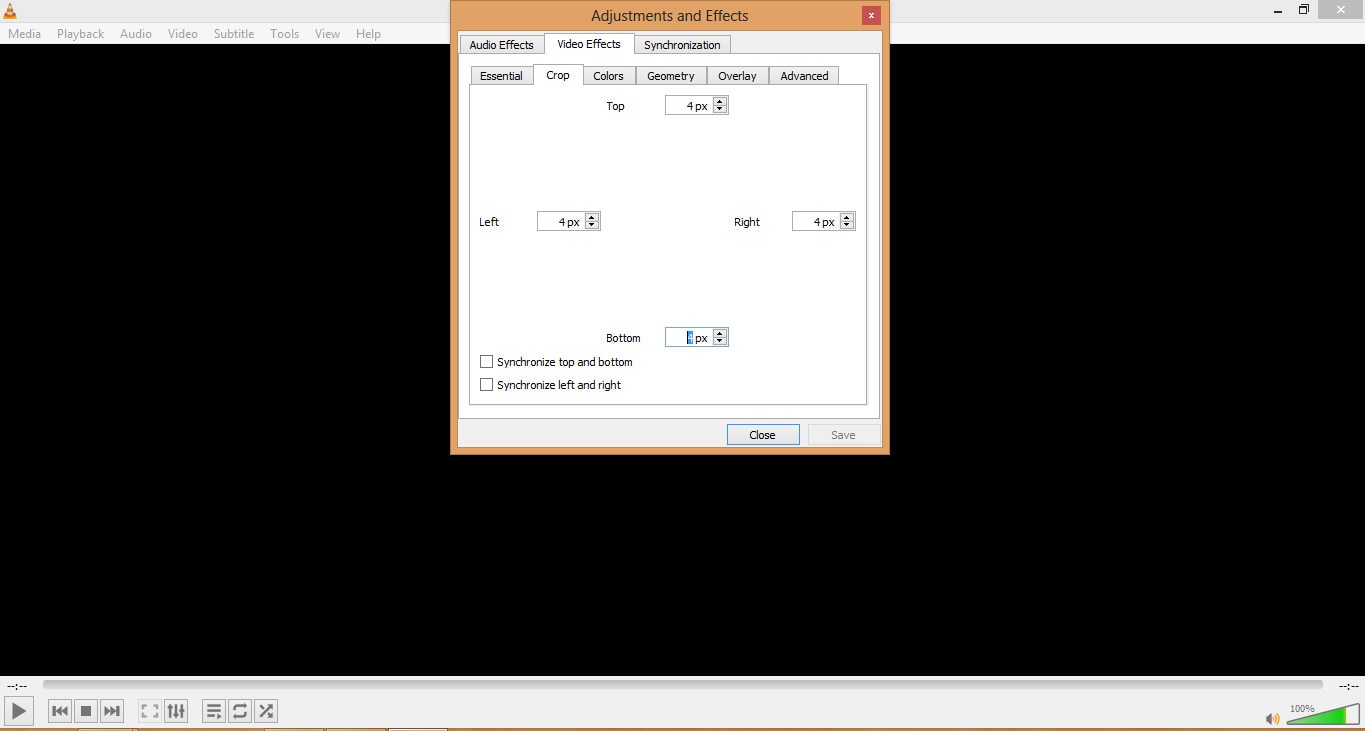
After entering your preferred pixels, you can preview it. If you would like to adjust then just simply repeat entering the specific pixels.

You decided to save the cropped video. Find the Tools menu and select Preferences.
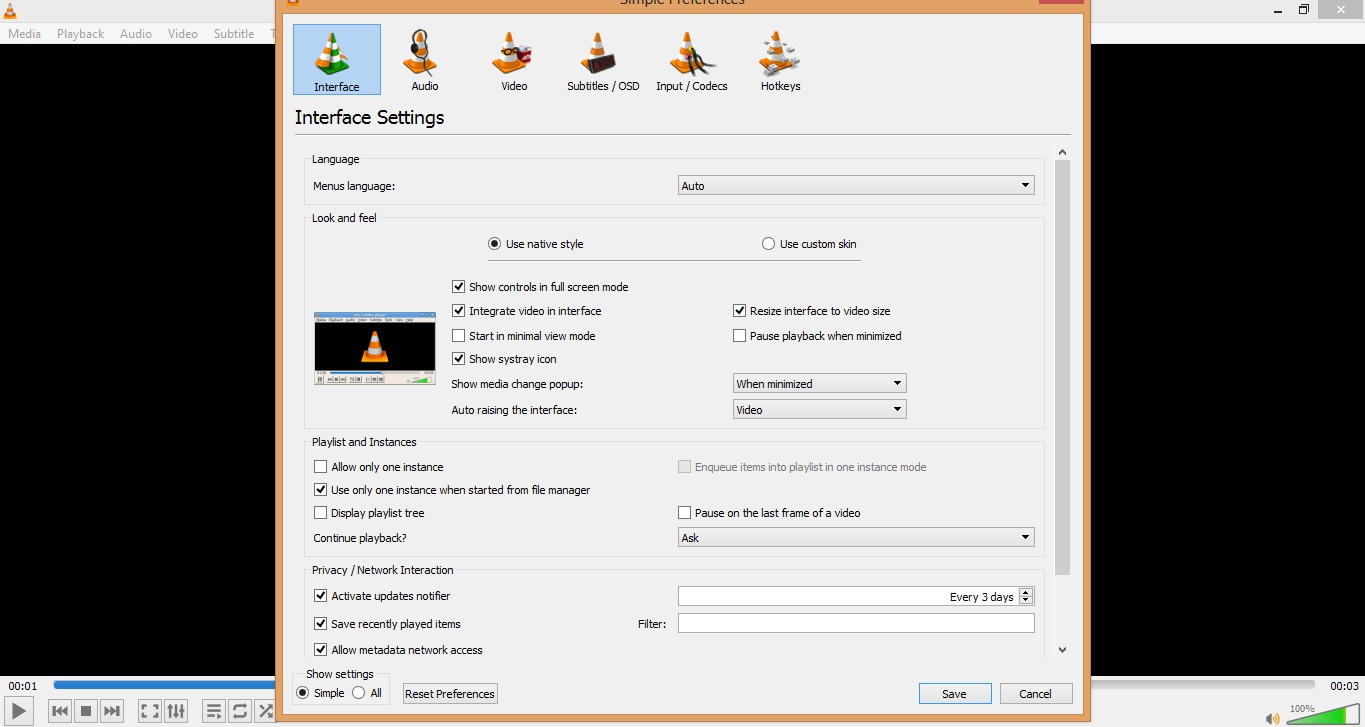
Find the Show settings and click All. In the search bar type Croppadd then save your previous preferred pixel settings. Lastly, click Save.

In the Media menu select the Convert/Save. You can drag and drop the cropped video to the File box.

You can select your file format and codecs by clicking Convert/Save.

Find the Edit Selected Profile and click the Video Codec. Then under the Filters tab, select the Video cropping filter. Finally, click Save.
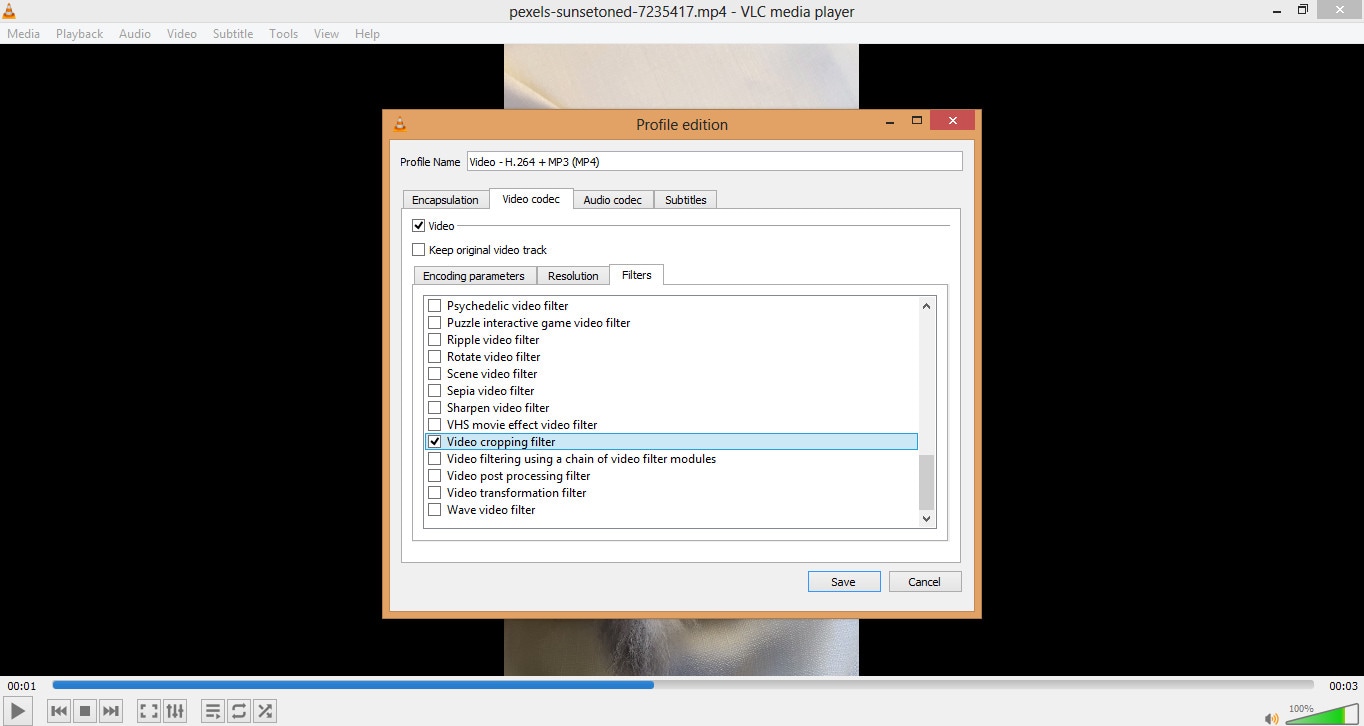
In the Destination file select where you want it to be saved.

Then click Start.

Congratulations on getting here! You finally cropped your video using the VLC media player.
Although there are disadvantages to using this as your cropping tool. Like for example you want the real-time preview of what you’ve changed in your video. This would be a turn off for some that want their outputs to be shown to them immediately. Aside from this, there is a chance that you will forget one step to make and thus, the whole process would need to start over from scratch. Lastly, is the freedom to batch crop multiple videos. This is especially important for those that need to have many clips in one video. A user might lose the continuity of the story within his video.
While one of its strong suits is the affordability of the software. It is completely free and has no additional charges that may surprise you in the future. Finally, your output won’t have watermarks that could destroy the aesthetics of your video.
What are your experiences with using it as a cropping tool? What would you recommend to improve it? It is up to you the user if you want to continue using this as your partner in removing the excess in your videos.
An Easier Way to Crop a Video using Wondershare Filmora
Have you heard of an editing tool called Wondershare Filmora Video Editor ? What are your first impressions of this software? You can download this for free by going to the official site.
Wondershare Filmora is a useful editor that can help you produce the content that you want. It is packed with beneficial tools that you can learn to apply. If it is already installed on your computer then proceed to opening it.
For Win 7 or later (64-bit)
For macOS 10.14 or later

Prepare your videos that you need to crop. You can drag and drop your video or click the Import.
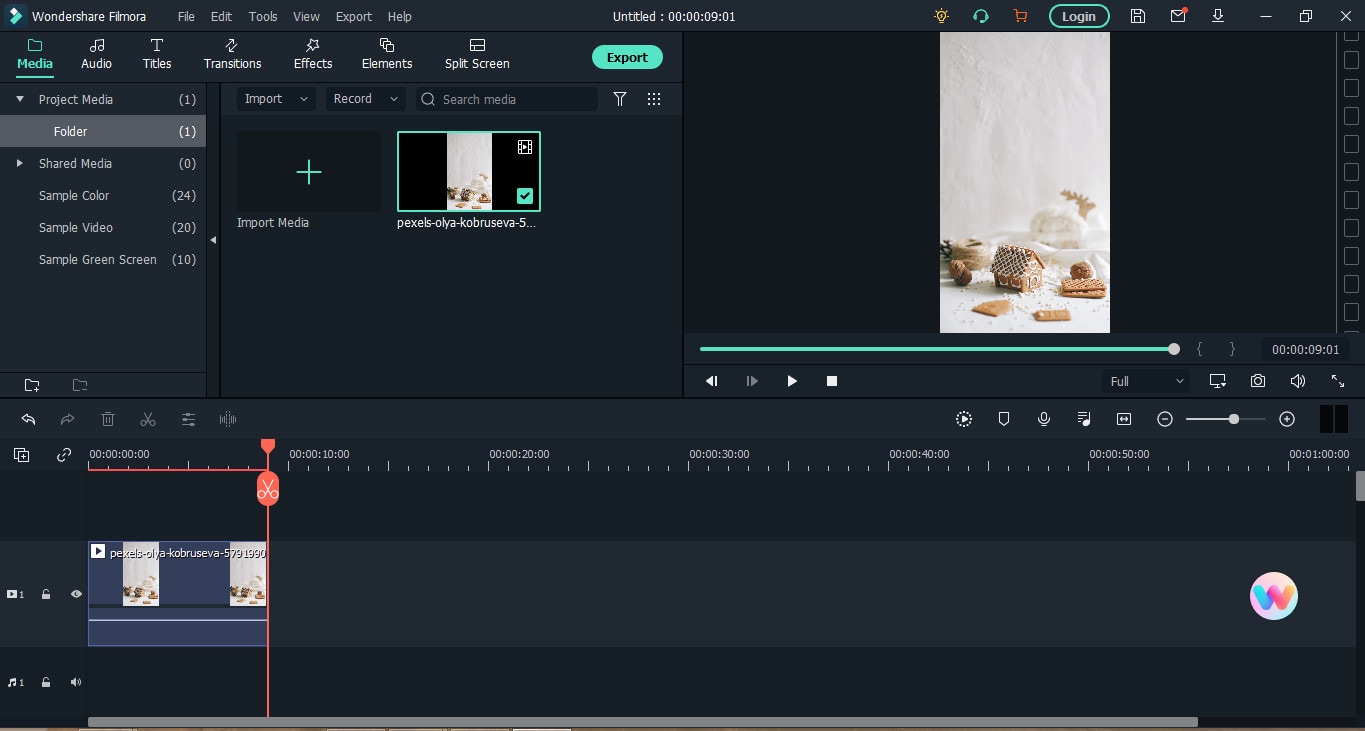
Select the video clip that you want to crop. Then, click the Crop tool and choose if you want the Crop or Pan & Zoom.

You can also right click the video clip .Under the Video tab you can select the Crop and Zoom or Crop to Fit then adjust to your preferred ratio.
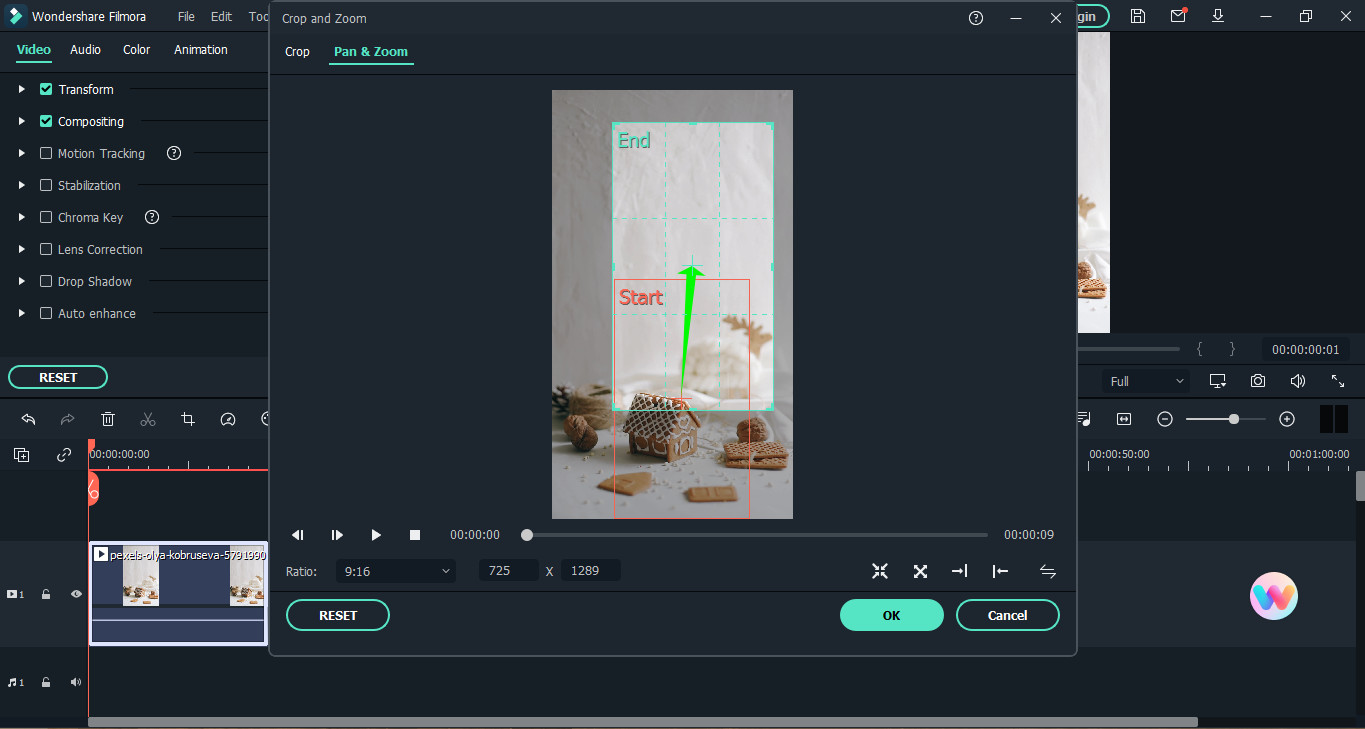
One of the advantages of Filmora is you can preview what you have cropped immediately. This will greatly help you if you’re not sure what kind of crop that you want. If you’ve thought that you made a mistake then a simple Undo button could fix it. In short, you’re not going through the gruesome process of starting all over again. You can also do the batch cropping of multiple videos helping you ensure the smoothness of flow in the final output.
Although the Filmora is not free, there is a trial that you can use to test it to check if this video editor would meet your needs. It has tools that a beginner to expert video editor could use to produce high quality videos that would make the audience think that it was life from the movies.
The Bottom Line
The journey of exploring different options would help you make the decision. Both VLC media player and Wondershare Filmora have their great features which would aid the user to crop his videos in an efficient way. What are your thoughts on each of them? As an individual you have varied needs that a video tool should meet.
After reading this, you’ve had a clearer view of what these video softwares offers. Did this guide help you decide which would fit your needs as a video editor? What are your suggestions for improvement?
You could share with us the tips and tricks you know on cropping videos using these applications.
A video editor needs to know how he can crop his videos. There is a way to do this using the VLC that is installed in your computer. This guide will teach you a simple way to get what you want. This might appear as complicated at first sight but it will be shown to you in a digestible way. An alternative way would be to use Wondershare Filmora. You will also be guided on how to use this software to crop your videos. Don’t worry and just take it one step at a time.
How to Crop a Video using VLC
Have you ever heard of the VLC media player? If not, you can browse through it online and install it on your computer. Aside from watching content, you can also crop videos with it. Cropping is a way to remove spaces that you would not want to be included on your video.
Find the software on your computer and don’t be overwhelmed by the interface.

Then click the Media and select Open File to choose the video that you want to crop. You should prepare the videos that you want to be cropped and rename them to avoid confusion.

Click the Tools on the menu and select the Effects and Filters.

After that, click on the Video Effects and under that select Crop. Doing this, will open the cropping editor.

You need to enter specific pixels on the left, right, top and bottom. This will depend on your preferences. If it is your first time and you don’t know the exact pixels then just input what you think would be enough.

After entering your preferred pixels, you can preview it. If you would like to adjust then just simply repeat entering the specific pixels.

You decided to save the cropped video. Find the Tools menu and select Preferences.

Find the Show settings and click All. In the search bar type Croppadd then save your previous preferred pixel settings. Lastly, click Save.

In the Media menu select the Convert/Save. You can drag and drop the cropped video to the File box.

You can select your file format and codecs by clicking Convert/Save.

Find the Edit Selected Profile and click the Video Codec. Then under the Filters tab, select the Video cropping filter. Finally, click Save.

In the Destination file select where you want it to be saved.

Then click Start.

Congratulations on getting here! You finally cropped your video using the VLC media player.
Although there are disadvantages to using this as your cropping tool. Like for example you want the real-time preview of what you’ve changed in your video. This would be a turn off for some that want their outputs to be shown to them immediately. Aside from this, there is a chance that you will forget one step to make and thus, the whole process would need to start over from scratch. Lastly, is the freedom to batch crop multiple videos. This is especially important for those that need to have many clips in one video. A user might lose the continuity of the story within his video.
While one of its strong suits is the affordability of the software. It is completely free and has no additional charges that may surprise you in the future. Finally, your output won’t have watermarks that could destroy the aesthetics of your video.
What are your experiences with using it as a cropping tool? What would you recommend to improve it? It is up to you the user if you want to continue using this as your partner in removing the excess in your videos.
An Easier Way to Crop a Video using Wondershare Filmora
Have you heard of an editing tool called Wondershare Filmora Video Editor ? What are your first impressions of this software? You can download this for free by going to the official site.
Wondershare Filmora is a useful editor that can help you produce the content that you want. It is packed with beneficial tools that you can learn to apply. If it is already installed on your computer then proceed to opening it.
For Win 7 or later (64-bit)
For macOS 10.14 or later

Prepare your videos that you need to crop. You can drag and drop your video or click the Import.

Select the video clip that you want to crop. Then, click the Crop tool and choose if you want the Crop or Pan & Zoom.

You can also right click the video clip .Under the Video tab you can select the Crop and Zoom or Crop to Fit then adjust to your preferred ratio.

One of the advantages of Filmora is you can preview what you have cropped immediately. This will greatly help you if you’re not sure what kind of crop that you want. If you’ve thought that you made a mistake then a simple Undo button could fix it. In short, you’re not going through the gruesome process of starting all over again. You can also do the batch cropping of multiple videos helping you ensure the smoothness of flow in the final output.
Although the Filmora is not free, there is a trial that you can use to test it to check if this video editor would meet your needs. It has tools that a beginner to expert video editor could use to produce high quality videos that would make the audience think that it was life from the movies.
The Bottom Line
The journey of exploring different options would help you make the decision. Both VLC media player and Wondershare Filmora have their great features which would aid the user to crop his videos in an efficient way. What are your thoughts on each of them? As an individual you have varied needs that a video tool should meet.
After reading this, you’ve had a clearer view of what these video softwares offers. Did this guide help you decide which would fit your needs as a video editor? What are your suggestions for improvement?
You could share with us the tips and tricks you know on cropping videos using these applications.
A video editor needs to know how he can crop his videos. There is a way to do this using the VLC that is installed in your computer. This guide will teach you a simple way to get what you want. This might appear as complicated at first sight but it will be shown to you in a digestible way. An alternative way would be to use Wondershare Filmora. You will also be guided on how to use this software to crop your videos. Don’t worry and just take it one step at a time.
How to Crop a Video using VLC
Have you ever heard of the VLC media player? If not, you can browse through it online and install it on your computer. Aside from watching content, you can also crop videos with it. Cropping is a way to remove spaces that you would not want to be included on your video.
Find the software on your computer and don’t be overwhelmed by the interface.

Then click the Media and select Open File to choose the video that you want to crop. You should prepare the videos that you want to be cropped and rename them to avoid confusion.

Click the Tools on the menu and select the Effects and Filters.

After that, click on the Video Effects and under that select Crop. Doing this, will open the cropping editor.

You need to enter specific pixels on the left, right, top and bottom. This will depend on your preferences. If it is your first time and you don’t know the exact pixels then just input what you think would be enough.

After entering your preferred pixels, you can preview it. If you would like to adjust then just simply repeat entering the specific pixels.

You decided to save the cropped video. Find the Tools menu and select Preferences.

Find the Show settings and click All. In the search bar type Croppadd then save your previous preferred pixel settings. Lastly, click Save.

In the Media menu select the Convert/Save. You can drag and drop the cropped video to the File box.

You can select your file format and codecs by clicking Convert/Save.

Find the Edit Selected Profile and click the Video Codec. Then under the Filters tab, select the Video cropping filter. Finally, click Save.

In the Destination file select where you want it to be saved.

Then click Start.

Congratulations on getting here! You finally cropped your video using the VLC media player.
Although there are disadvantages to using this as your cropping tool. Like for example you want the real-time preview of what you’ve changed in your video. This would be a turn off for some that want their outputs to be shown to them immediately. Aside from this, there is a chance that you will forget one step to make and thus, the whole process would need to start over from scratch. Lastly, is the freedom to batch crop multiple videos. This is especially important for those that need to have many clips in one video. A user might lose the continuity of the story within his video.
While one of its strong suits is the affordability of the software. It is completely free and has no additional charges that may surprise you in the future. Finally, your output won’t have watermarks that could destroy the aesthetics of your video.
What are your experiences with using it as a cropping tool? What would you recommend to improve it? It is up to you the user if you want to continue using this as your partner in removing the excess in your videos.
An Easier Way to Crop a Video using Wondershare Filmora
Have you heard of an editing tool called Wondershare Filmora Video Editor ? What are your first impressions of this software? You can download this for free by going to the official site.
Wondershare Filmora is a useful editor that can help you produce the content that you want. It is packed with beneficial tools that you can learn to apply. If it is already installed on your computer then proceed to opening it.
For Win 7 or later (64-bit)
For macOS 10.14 or later

Prepare your videos that you need to crop. You can drag and drop your video or click the Import.

Select the video clip that you want to crop. Then, click the Crop tool and choose if you want the Crop or Pan & Zoom.

You can also right click the video clip .Under the Video tab you can select the Crop and Zoom or Crop to Fit then adjust to your preferred ratio.

One of the advantages of Filmora is you can preview what you have cropped immediately. This will greatly help you if you’re not sure what kind of crop that you want. If you’ve thought that you made a mistake then a simple Undo button could fix it. In short, you’re not going through the gruesome process of starting all over again. You can also do the batch cropping of multiple videos helping you ensure the smoothness of flow in the final output.
Although the Filmora is not free, there is a trial that you can use to test it to check if this video editor would meet your needs. It has tools that a beginner to expert video editor could use to produce high quality videos that would make the audience think that it was life from the movies.
The Bottom Line
The journey of exploring different options would help you make the decision. Both VLC media player and Wondershare Filmora have their great features which would aid the user to crop his videos in an efficient way. What are your thoughts on each of them? As an individual you have varied needs that a video tool should meet.
After reading this, you’ve had a clearer view of what these video softwares offers. Did this guide help you decide which would fit your needs as a video editor? What are your suggestions for improvement?
You could share with us the tips and tricks you know on cropping videos using these applications.
A video editor needs to know how he can crop his videos. There is a way to do this using the VLC that is installed in your computer. This guide will teach you a simple way to get what you want. This might appear as complicated at first sight but it will be shown to you in a digestible way. An alternative way would be to use Wondershare Filmora. You will also be guided on how to use this software to crop your videos. Don’t worry and just take it one step at a time.
How to Crop a Video using VLC
Have you ever heard of the VLC media player? If not, you can browse through it online and install it on your computer. Aside from watching content, you can also crop videos with it. Cropping is a way to remove spaces that you would not want to be included on your video.
Find the software on your computer and don’t be overwhelmed by the interface.

Then click the Media and select Open File to choose the video that you want to crop. You should prepare the videos that you want to be cropped and rename them to avoid confusion.

Click the Tools on the menu and select the Effects and Filters.

After that, click on the Video Effects and under that select Crop. Doing this, will open the cropping editor.

You need to enter specific pixels on the left, right, top and bottom. This will depend on your preferences. If it is your first time and you don’t know the exact pixels then just input what you think would be enough.

After entering your preferred pixels, you can preview it. If you would like to adjust then just simply repeat entering the specific pixels.

You decided to save the cropped video. Find the Tools menu and select Preferences.

Find the Show settings and click All. In the search bar type Croppadd then save your previous preferred pixel settings. Lastly, click Save.

In the Media menu select the Convert/Save. You can drag and drop the cropped video to the File box.

You can select your file format and codecs by clicking Convert/Save.

Find the Edit Selected Profile and click the Video Codec. Then under the Filters tab, select the Video cropping filter. Finally, click Save.

In the Destination file select where you want it to be saved.

Then click Start.

Congratulations on getting here! You finally cropped your video using the VLC media player.
Although there are disadvantages to using this as your cropping tool. Like for example you want the real-time preview of what you’ve changed in your video. This would be a turn off for some that want their outputs to be shown to them immediately. Aside from this, there is a chance that you will forget one step to make and thus, the whole process would need to start over from scratch. Lastly, is the freedom to batch crop multiple videos. This is especially important for those that need to have many clips in one video. A user might lose the continuity of the story within his video.
While one of its strong suits is the affordability of the software. It is completely free and has no additional charges that may surprise you in the future. Finally, your output won’t have watermarks that could destroy the aesthetics of your video.
What are your experiences with using it as a cropping tool? What would you recommend to improve it? It is up to you the user if you want to continue using this as your partner in removing the excess in your videos.
An Easier Way to Crop a Video using Wondershare Filmora
Have you heard of an editing tool called Wondershare Filmora Video Editor ? What are your first impressions of this software? You can download this for free by going to the official site.
Wondershare Filmora is a useful editor that can help you produce the content that you want. It is packed with beneficial tools that you can learn to apply. If it is already installed on your computer then proceed to opening it.
For Win 7 or later (64-bit)
For macOS 10.14 or later

Prepare your videos that you need to crop. You can drag and drop your video or click the Import.

Select the video clip that you want to crop. Then, click the Crop tool and choose if you want the Crop or Pan & Zoom.

You can also right click the video clip .Under the Video tab you can select the Crop and Zoom or Crop to Fit then adjust to your preferred ratio.

One of the advantages of Filmora is you can preview what you have cropped immediately. This will greatly help you if you’re not sure what kind of crop that you want. If you’ve thought that you made a mistake then a simple Undo button could fix it. In short, you’re not going through the gruesome process of starting all over again. You can also do the batch cropping of multiple videos helping you ensure the smoothness of flow in the final output.
Although the Filmora is not free, there is a trial that you can use to test it to check if this video editor would meet your needs. It has tools that a beginner to expert video editor could use to produce high quality videos that would make the audience think that it was life from the movies.
The Bottom Line
The journey of exploring different options would help you make the decision. Both VLC media player and Wondershare Filmora have their great features which would aid the user to crop his videos in an efficient way. What are your thoughts on each of them? As an individual you have varied needs that a video tool should meet.
After reading this, you’ve had a clearer view of what these video softwares offers. Did this guide help you decide which would fit your needs as a video editor? What are your suggestions for improvement?
You could share with us the tips and tricks you know on cropping videos using these applications.
Also read:
- How to Livestream Zoom on Facebook?
- Best Android Apps For Creating Slow Motion Videos
- Updated In 2024, 12 Impressive AI Video Ideas for Creating Engaging Video Content
- 2024 Approved How to Become a Youtuber?
- In 2024, Using One of the Best Converter Tools to Turn GIFs Into PNG or JPG. Here, Learn About the Ten Best Ones for Different Operating Systems, with Details on Features, Prices, and More
- How to Make Video Fade to Black in Movie Maker
- In 2024, Best 4 Love Video Maker with Music
- In 2024, Are You Looking to Make Transparent Background in Canva Then You Can Learn About It in This Article
- New In 2024, How to Add Motion Blur in After Effects
- Voice Changer for Discord | Use Voicemod on Discord for 2024
- In 2024, Detailed Guide to Rotate Videos in Blender
- Updated Attaining Slow Motion Video Trend Finding The Best CapCut Templates for 2024
- 2024 Approved 5 Methods to Denoise a Video
- New How to Create Realistic Fire Effects for 2024
- 2024 Approved What Is the Top Filmora Slideshow Templates? Experts Choice
- Updated How to Create The Best Video Collages ?
- New Best Audio Waveform Generator
- 2024 Approved Do You Want to Add an Adjustment Layer to Your Video for Easier Editing? Read This Article to Find Out How to Efficiently Add an Adjustment Layer in After Effects
- How To Install the Latest iOS/iPadOS Beta Version on iPhone SE (2022)? | Dr.fone
- How to Stop Google Chrome from Tracking Your Location On Vivo T2x 5G? | Dr.fone
- Will Pokémon Go Ban the Account if You Use PGSharp On Nubia Z50 Ultra | Dr.fone
- How to Draw Cartoons Step by Step with This Guide for 2024
- Does find my friends work on Apple iPhone 11 Pro Max | Dr.fone
- Best Pokemons for PVP Matches in Pokemon Go For Oppo K11x | Dr.fone
- How to use iSpoofer on OnePlus Nord 3 5G? | Dr.fone
- Huawei Nova Y71 Bootloop Problem, How to Fix it Without Data Loss | Dr.fone
- How To Transfer WhatsApp From iPhone SE (2020) to other iPhone 13 devices? | Dr.fone
- How To Transfer WhatsApp From Apple iPhone 6s to other iPhone 13 Pro devices? | Dr.fone
- Three Solutions to Hard Reset Vivo S18e? | Dr.fone
- Updated 8 Best Meme Maker App to Create Memes with Your Own Picture
- In 2024, Why does the pokemon go battle league not available On Samsung Galaxy M34 5G | Dr.fone
- In 2024, Unova Stone Pokémon Go Evolution List and How Catch Them For Realme 11 Pro | Dr.fone
- Title: Rotate Video in iMovie
- Author: Chloe
- Created at : 2024-05-20 03:37:30
- Updated at : 2024-05-21 03:37:30
- Link: https://ai-editing-video.techidaily.com/rotate-video-in-imovie/
- License: This work is licensed under CC BY-NC-SA 4.0.


