
:max_bytes(150000):strip_icc():format(webp)/GettyImages-527847020-5b9edc17c9e77c0050ff9045.jpg)
Searching for the Best Video Editor to Make Your Video More Attractive? This Article Introduce You Everything About Choosing a Video Editing Software
Searching for the Best Video Editor to Make Your Video More Attractive? This Article Introduce You Everything About Choosing a Video Editing Software
More and more people love to share their knowledge, experience and daily life via videos. Platforms such as TikTok, YouTube, Vimeo are continuing to attract more and more people. But most people don’t know much about video editing. Which video editor they can use? How to apply the effects to improve the video visually? This post will give you all the tips and answers on editing a video.
Contents
01 [Video Editing Basics ](#Part 1)
02 [Editor’s Top 3 Picks ](#Part 2)
03 [Open-Source Video Editors](#Part 3)
04 [Freemium and Freeware Video Editors](#Part 4)
05 [Proprietary Video Editing Software](#Part 5)
06 [How to Choose the Suitable Video Editor](#Part 6)
07 [Video Editing Tips for Newbies](#Part 7)
08 [Frequently Asked Questions of Video Editor](#Part 8)
Part 1: Video Editing Basics
Before going to the best video editors, you should be aware of the basics of video editing. Here are the basic concepts of video editing that you must know as they are common across all video editors.
1. The Timeline: The timeline is an area of a video editor where you place your video clips sequentially. When you play the video after editing, the video will play from the start of the timeline and finish at the end of the timeline where your video content ends. The timeline is where you can place your audio clips, video effects, and graphical elements as per your requirements.
2. The Canvas: The canvas is an area of a video editor where you view your video clips frame by frame. The canvas allows you to edit the video starting from cropping to adding graphical elements. You can view all the changes you make to the video before applying them permanently.
3. Basic editing: The basic editing of a video includes splitting and trimming out important parts of a large video file and, thereafter, joining the different video clips to make an engaging video. The basic editing also includes adding audio clips, adjusting video parameters such as color, brightness, contrast as well as adding texts to the video.
4. Aspect Ratio: The aspect ratio of a video represents the ratio of width to height of the video in terms of pixels. For example, a video with aspect ratio of 16:9 means the video is 1920p x 1080p. You can edit the aspect ratio depending on where you want to publish the video. For example, social media videos use 1:1 and 9: 16 aspect ratio, tablets use 4:3 aspect ratio, and 16:9 is the standard aspect ratio.
5. B-roll: B-roll is a secondary video footage that you can add to your primary video(A-roll) to enhance the video creativity and aesthetic value. B-roll could be a cinematic shot, a slow-motion footage, a close-up shot from different angles, as well as a shot mixed with wide-angle, pans, and tilts.
6. Frame Rate: Frame rate refers to the number of images or frames displayed per second in a video. In short, frame rate refers to frames per second in a video. For example, a video of 30fps means the video is showing 30 different images per second. The 24fps is used for movies and the 30fps is used for online and TV videos. Even 60fps videos are becoming common as they produce a smoother video experience.
Part 2: Editor’s Top 3 Picks - Choose The Best Video Editor
Best Video Editor for All Creators - Filmora
Wondershare Filmora is the ideal video editor with an intuitive user interface. You get all the standard and advanced video editing features packed into its platform. You can record videos of external webcam and computer screen as well. There are unlimited video effects and graphical elements to turn your raw videos into eye-catching videos instantly.
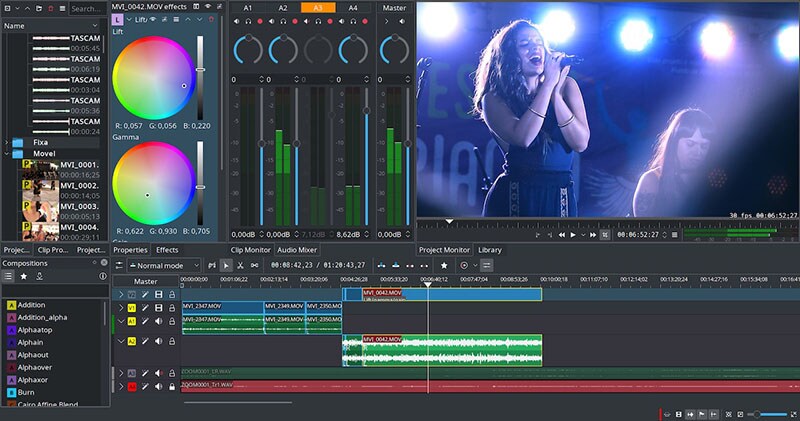
Best for Professional Editing - Premiere Pro
Adobe Premium Pro is the best professional video editor where all the advanced features of video editing are available. The software supports editing multiple projects simultaneously. You can edit VR, Multicam, and 3D videos as well. It is a perfect platform for a professional video editing team to work in sync.
Best for Online Video Editing - WeVideo
WeVideo is by far the best online video editor with 30 million users. Starting from standard video editing options and uploading directly to social media platforms, WeVideo is a full-fledged video editor. You can also record videos and create your own video templates. Moreover, you can collaborate with other video creators and make the best use of the unlimited stock media library.
Part 3: Open-Source Video Editors
Open-source video editors have compatibility with all the desktop operating systems. Moreover, due to their codes readily available online, these video editing software applications are available completely free of cost. Here are the best open-source video editors for beginners and experienced users.
# For Beginner Users
1. Blender
Compatibility: Windows, Mac, Linux
Best for: best open-source video editor with balanced features
G2 rating: 4.5 out of 5

Blender is an open-source video editing suite that is popular for its 3D models. Since it is a suite, you can use the platform not only for video editing but also for creating animated videos and games.
Starting from basic video editing such as trim and split to advance video editing such as masking and color adjustment, all options are readily available. Besides, there are options for audio mixing and live preview of editing works.
Reason to Choose:-
- Video cropping, trimming, splitting, joining, and adjusting speed.
- Different slots to add videos, images, scenes, audio clips, effects and masks.
- Different transitions, filters, effects, waveforms, and keyframes available.
- Create 3D models and animated videos with proper audio mixing.
Reason to Avoid:-
- Takes time to get used to the platform.
- Reports of bugs have become a regular occurrence.
2. Avidemux
Compatibility: Windows, Mac, Linux
Best for: best open-source video editor for basic editing
G2 rating: 4.4 out of 5

Avidemux from Soundforge is a lightweight and basic video editor. Starting from trimming and cutting videos to applying filters and encoding videos, all the options are readily available. The software supports a wide range of video file formats for editing.
The platform also supports scripting through which you can automate tasks to perform on videos. Besides, there are options for color adjustments, video conversion, and advanced interlacing. The simple user interface is perfect for beginners to edit videos intuitively.
Reason to Choose:-
- Quick video editing for trimming, cutting, rotating, and cropping.
- Change speed and use different filters for color adjustments and subtitles.
- Supports different video file formats in import and export.
- The user interface is simple and suitable for beginners.
Reason to Avoid:-
- Does not have a traditional timeline for video editing.
- Limited effects, filters, and advanced features.
3. Kdenlive
Compatibility: Windows, Mac, Linux
Best for: best open-source video editor for all
G2 rating: 4.3 out of 5
Kdenlive video editor is a versatile video editor with standard and advanced video editing features balanced properly. The open-source software allows multi-track timeline and supports dual monitor setup for video editing. The user interface is simple, and you can configure it as per your preference.
Kdenlive supports a wide range of video and audio files, and you can use configurable keyboard shortcuts for easy operation. The automatic backup feature is highly useful in the professional video editing world. Similarly, the presence of keyframe-based effects and advanced effects can make a video stand out.
Reason to Choose:-
- Multi-track timeline for working with multiple video and audio clips.
- Keyframeable effects, transitions, color correction and unlimited online resources.
- Vast set of options for creating stunning texts and titles.
- Smooth preview, configurable interface, and automatic backup.
Reason to Avoid:-
- Lacks GPU acceleration and hence, slow response at times.
- Speed adjustment effect is not efficient.
# For Advanced Users
4. OpenShot
Compatibility: Windows, Mac, Linux, Chrome OS
Best for: Best open source editor for all desktop users
G2 rating: 4.4 out of 5

OpenShot is a cross-platform, open-source video editor where you can work on one project on different operating systems. It works on keyframe animation framework, and you can choose from different interpolations. The platform offers you to work with unlimited video and audio clips as well as layers.
You can perform all the basic video editing operations as well as go for advanced editing. The features and tools are well-balanced for regular as well as professional video editing. Starting from video effects and audio mixing to chroma key and time-mapping, everything is available under one roof.
Reason to Choose:-
- Basic video editing with panning, zooming, and scrolling features.
- Wide range of transitions, effects, time and speed control.
- Time-mapping, audio mixing, overlays, and composting.
- Supports 3D animations and objects, templates for titles and sub-titles.
Reason to Avoid:-
- Hardware acceleration is not very powerful.
- Not suitable for 4K video editing as it gets extremely slow.
5. Shotcut
Compatibility: Windows, Mac, Linux
Best for: Best for video editors who love filters and effects
G2 rating: 4.2 out of 5

Shotcut is another open-source and cross-platform video editor with a professional user interface. The software supports importing different file formats of video and audio files. It is suitable for editing 4K videos, and it is a full-fledged audio editor as well.
Its vast video filters and effects are comparable to premium video editors. You can work with multi-track timeline and keyframes with markers and rangers. Besides, you can keep notes on your project easily. Overall, it is a balanced video editor in terms of features and functionalities.
Reason to Choose:-
- Wide categories of video effects, transitions, and filters.
- Multi-track and multi-format timeline and detailed audio editor.
- Standard and advanced editing options with hardware acceleration.
- Export video in high-resolution and in different formats.
Reason to Avoid:-
- The user interface can take some time to get used to.
- The stock media library is rather limited.
6. NATRON
Compatibility: Windows, Mac, Linux
Best for: Best open-source video editor with visual effects
G2 rating: 3.5 out of 5
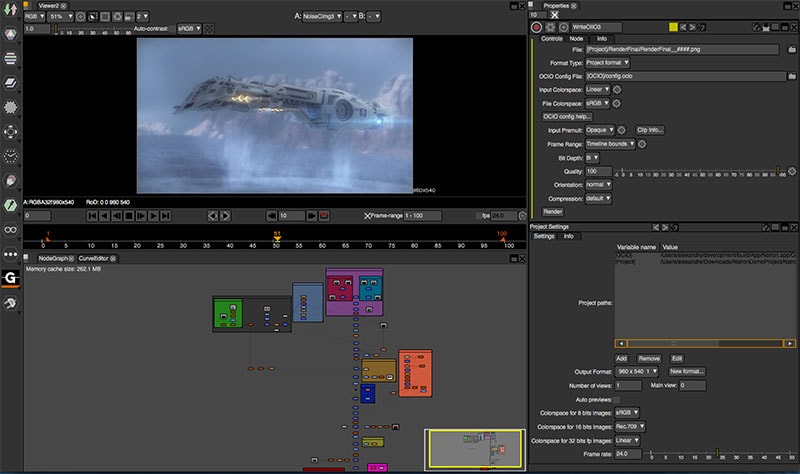
NATRON is a robust video editor with powerful tracking tool for 2D and planar tracking. You can work with multiple layers and clips and avail various keying options on your video editing project. In fact, it is a full-fledged video compositing software for better video production with multi-layer structure.
The hardware acceleration of the software produces faster rendering. You get to work with presets, tracker nodes, rotoscoping, multi-plane and motion editing. The option of multi-view workflow along with real-time playback is extremely useful while editing multicam videos.
Reason to Choose:-
- Superior visual effects and motion editing.
- Multi-tasking with multi-view workflow.
- Option of rotoscoping and python scripting.
- Supports different open-source plugins.
Reason to Avoid:-
- The user interface is quite advanced and needs some learning time.
- It gets unstable and slow while previewing high-resolution videos.
Part 4: Freemium and Freeware Video Editors
Freeware video editors are available completely free of cost and they are mostly exclusive to a certain operating system. On the other hand, freemium video editors have certain features completely free while it charges users a small fee for certain advanced features. Here is the list of the best freemium and freeware video editors.
# For Beginner Users
7. ActivePresenter
Compatibility: Windows and Mac
Best for: best video editing software for learning videos.
G2 rating: 4.5 out of 5

ActivePresenter from AtomiSystems is a video editor with screen recording options. The software is particularly useful in making and editing learning videos. There are different templates available for editing videos quickly. Besides, you can use the platform for standard editing options for any video.
Starting from working with multiple timelines to making videos interactive and responsive, there are various out-of-box features. Moreover, you can edit your audio and export your edited video in different file formats.
Reason to Choose:-
- Multiple timelines for editing various video and audio clips.
- Basic video and audio editing options and greenscreen effects.
- Webcam and screen recording with audio from different sources.
- Export videos with different file formats, HTML, xAPI, SCORM and much more.
Reason to Avoid:-
- The learning curve is slightly steep.
- Not suitable for editing all types of videos.
8. Microsoft Photos
Compatibility: Windows
Best for: best built-in video editor for Windows users
G2 rating: 4.6 out of 5

Microsoft Photos is the inbuilt video editor for Windows users. The app comes pre-installed in Windows and it is mostly used for viewing photos. But there is an inbuilt video editor where you can do the basic video editing works.
You can trim a video, add texts, and apply 3D effects as well as different filters available. There are also options for rotating videos, applying background music and customizing audio. The user interface is very simple for all users.
Reason to Choose:-
- Instant basic video editing options available.
- Apply effects, filters, as well as music.
- Simple and intuitive user interface for everyone.
- Comes pre-installed and completely free of cost.
Reason to Avoid:-
- Very limited video editing options.
- Very limited video file formats supported.
9. iMovie
Compatibility: Mac
Best for: Best built-in video editor for Mac users
G2 rating: 4.3 out of 5

iMovie is the inbuilt video editor for Mac users as it comes pre-installed on macOS. The application is free to use and it is compatible with iPhone and iPad as well. You can perform all the basic video editing works starting from trimming to rotating videos.
Besides, there is a wide range of effects and filters available to apply on your videos. The best part is that it supports editing 4K videos. There are also various graphical elements available and you can share your video easily on different platforms.
Reason to Choose:-
- Trim, rotate, split and crop videos easily.
- Work across Mac, iPhone and iPad seamlessly.
- Wide range of effects, filters, and objects available.
- Supports editing 4K videos without any lag.
Reason to Avoid:-
- Lacks advanced editing options though it is a dedicated video editor.
- Supports very limited video file formats.
# For Advanced Users
10. Lightworks
Compatibility: Windows, Mac, Linux
Best for: best for social media video creators
G2 rating: 3.5 out of 5

Lightworks is a freemium video editor where most features are reserved for premium users. If you are a social media creator or learning video creator, Lightworks Create is best for you. If you are a professional video creator, you should opt for Lightworks Pro.
The software supports almost all file formats, and you can export videos on social media instantly. The timeline is advanced with proxy editing, autosave and background processing features. You can share projects with your teammates and work collaboratively.
Reason to Choose:-
- Powerful and advanced timeline for quick editing.
- Motion graphics and tilting along with advanced metadata.
- Flexible user interface with proxy workflow and storyboard bin.
- Suitable for collaborating works and cloud storage.
Reason to Avoid:-
- Can crash while working with 4K videos.
- Limited options for advanced video editing.
11. VideoPad
Compatibility: Windows
Best for: best video editor for short video creators.
G2 rating: 4.1 out of 5

VideoPad by NCH Software is an intuitive video editor that supports over 60 different video file formats. There are tools available for basic editing such as trimming and cropping. Besides, there are various effects and transitions available to apply on your video.
The video editor also lets you edit audio files and you can edit 360-degree videos as well. There are video stabilization and chroma key effect available. The video editor is available free for non-commercial use with certain limitations that you can overcome with its premium plan.
Reason to Choose:-
- Edit in Storybook or Timeline mode and perfect all basic editing works.
- Audio editing options with different audio effects.
- Add 3D video effects, special filters, and change video speed.
- Supports a wide range of video file formats.
Reason to Avoid:-
- Can crash while editing 4K videos.
- Lacks advanced editing options.
12. VSDC Free Video Editor
Compatibility: Windows only.
Best for: Free feature-rich video editing suite
G2 rating: 4.0 out of 5

VSDC Free Video Editor is a free suite that includes both video and audio editor. You can use the software for recording screen as well as voiceovers. The software is suitable for low-end computers as it is a lightweight application.
Apart from basic editing, you can edit 360 videos. Starting from color correction and zooming to split-screen effect and chroma key, it is full-fledged feature-rich software. For more advanced features, you can opt for VSDC Video Editor Pro version.
Reason to Choose:-
- Zooming, panning, and color correction options.
- Wide range of effects and filters present.
- Chrome key option as well as 360 degree video editing.
- Work with multiple layers and sync objects perfectly.
Reason to Avoid:-
- Lacks advanced video editing options.
- No masking or video stabilization option available.
Part 5: Proprietary Video Editing Software
If you are a regular video creator and you want to invest in video editing to improve the quality of your video content, you have to opt for a proprietary video editing software. All professional video creators prefer proprietary video editing software over freeware and freemium video editors. Here are the best premium video videos with the most advanced video editing options.
# For Beginner Users
13. Filmora
Compatibility: Windows and Mac.
Best for: Best video editors for YouTubers and vloggers
G2 rating: 4.4 out of 5

Wondershare Filmora is a feature-rich video editor but an intuitive user interface. Therefore, it is perfectly suitable for beginners who want all the features and tools for advanced video editing without a steep learning curve. Filmora is also useful if you want to record screen or webcam video.
Starting from tons of video effects and transitions to a large stock library and graphical elements, Filmora is tailor-made for editing all types of videos. It also supports a wide range of file formats and you can edit 4K videos as well as audio files comfortably.
For Win 7 or later (64-bit)
For macOS 10.12 or later
Reason to Choose:-
- Trim, split, join, crop and work with multiple video and audio clips.
- Large collection of video and audio effects, transitions, and graphical elements.
- Large stock library of free media files and animations.
- Work with multiple layers and clips effortlessly on its smooth timeline.
Reason to Avoid:-
- The processing time for videos could be on the higher side.
14. Camtasia
Compatibility: Windows and Mac.
Best for: Teachers and students to edit tutorial videos
G2 rating: 4.6 out of 5

Camtasia by Techsmith is a premium video editor and it is equally popular as a video recorder. It is particularly useful for recording and editing tutorial videos as there are different templates available. Coming to video editing part, you can perform all the basic video editing works instantly.
There are various trendy effects, transitions, and presets available. You can remove green screen and apply different frames for video compatibility on different devices. Besides, you can upload the editing video different on different platforms instantly.
Reason to Choose:-
- Quick trimming, splitting, cropping options.
- Large collection of templates and presets.
- Wide range of effects, annotations, and transitions.
- Import, export, and share different file formats.
Reason to Avoid:-
- No motion tracking option.
- Reports of frequent crashes.
15. Final Cut Pro
Compatibility: Mac only.
Best for: best professional video editors for Mac users
G2 rating: 4.4 out of 5

Final Cut Pro from Apple is an extremely popular premium video editor among professional video creators who are Mac users. It is a powerful and advanced video editor that can handle high resolution videos smoothly. It is a perfect mix of standard and advanced video editing features.
Starting from editing multicam and VR videos to 3D and 360 degree videos, Final Cut Pro is suitable for all. There are unlimited presets and effects present and you can edit 4K videos as well as large video files smoothly.
Reason to Choose:-
- Basic and advanced video and audio editing features.
- Supports editing all the different video types such as 3D, 4K, VR videos.
- Supports plug-ins, external tools and cinematic effects.
- Renders high resolution, large video files in short time.
Reason to Avoid:-
- Learning curve is quite steep.
- Pricing is on the higher side.
# For Beginner Users
16. Adobe Premiere Pro
Compatibility: Windows only.
Best for: best professional video editing software for most people
G2 rating: 4.5 out of 5

Adobe Premiere Pro is the ultimate video editor in the professional video editing world. You get all the different advanced features of video editing packed in the application. Even though the learning curve is steep, Adobe Premiere Pro is one of the most used video editors in professional video creation.
Adobe Premiere Pro supports all the different video file formats and you can edit various videos simultaneously. It is a perfect tool for editing a large video project collaboratively. It supports editing VR videos, 3D videos, as well as multicam videos.
Reason to Choose:-
- Standard and advanced editing options with quick rendering.
- Suitable for multi-tasking and collaborative work in video editing.
- Supports almost all types of videos and audio file formats.
- Flexible and configurable user interface and advanced timeline.
Reason to Avoid:-
- Learning curve is very steep.
- Not suitable for low-end computers.
17. Vegas Pro
Compatibility: Windows only.
Best for: Video & audio editing for professionals
G2 rating: 4.2 out of 5

Vegas Pro from Sony is a professional video and audio editor. You can work with multiple video and audio files and you can choose from timeline or storyboard layout. In fact, there are options for nested timeline and multicam editing. The customized workflow and layouts make the application suitable for everyone.
You can enhance your video with its large collection of filters, effects, and titles. There are options for keyframing, scene detection, color correction, and light adjustments. The artificial intelligence makes editing faster with automation control.
Reason to Choose:-
- Powerful timeline and storyboard mode with keyframing.
- Advanced HDR color correction and grading.
- Artificial intelligence for quick and repeated editing.
- Multicam editing, motion tracking, and support for 3D videos.
Reason to Avoid:-
- Stability of the application is questionable.
- Pricing is steep and lacks tutorial guide.
18. Hitfilm Express
Compatibility: Windows and Mac
Best for: Best for video effects lovers
G2 rating: 4.4 out of 5

Hitfilm Express is particularly popular for its unlimited video effects that make the video stand out easily. The user interface is quite simple to use, and you can apply effects to turn your raw video into professional video instantly. In fact, it has the largest VFX toolkit with industry-grade effects.
You can edit 4K videos, and there are options for motion tracking and video animations. You can also opt for color correction and grading. You can also edit vertical videos and upload them on social media platforms. You can also edit audio clips and use composting and layering features to enhance your video.
Reason to Choose:-
- Advanced timeline for better workflow.
- Standard and advanced video editing options.
- Largest collection of video effects of different categories.
- Color grading, correction, and free training and support.
Reason to Avoid:-
- Lacks green screen editing option.
- Rendering is not always swift.
Part 6: How to Choose the Suitable Video Editor?
The most important part of video editing is to choose the most suitable video editor for your videos. Here are some important factors to consider while choosing a video editor.
1. Budget and Price: If you are getting started, you can opt for a free video editor. But eventually, you have to go for a premium video editor if you are serious about video editing. You should opt for that video editor that fits your budget and offers more features for the price charged in comparison to its competitors.
2. Learning Curve: You should always opt for a video editor that has a low learning curve. If the video editor is complicated to operate, you will get frustrated, and you won’t be able to unlock the full potential of the video editor. Besides, you will have to lose a lot of time in learning and perfecting the usage of the application.
3. Stock Library: The video editor you are choosing must have a sizeable stock media library. A stock library is where you can find video clips and audio clips that are free to use for everyone. You can incorporate them into your video to enhance the content quality and bring variety to your audiences.
4. Audio control: Video editing is incomplete without proper audio editing. Your video editor should have a separate timeline for audio clips so that you can place them perfect to go in sync with the video clips. Some video editors have dedicated options for audio mixing and editing as per requirements.
5. upport video formats: Your video editor must support a wide range of video file formats that you have to include from time to time. If it supports only the popular file formats, you will not be able to include the interesting videos you may get from different sources which the video editor does not support.
6. Software stability: If you need to edit high-resolution videos, you have to ensure that the video editor you are choosing can stay stable throughout. There are many popular video editors available that become unstable while editing and rendering high-resolution videos. You have to read reviews to come to a conclusion about software stability.
7. Customer Support: Last but most importantly, your video editor must have a good customer support team. In your video editing journey, you will need the help of technical customer support to clarify issues related to the software so that you can excel in your video editing sessions.
Part 7: Video Editing Tips for Beginners
Here are some basic video editing tips that you should keep in mind while editing any video.
1. Try Tight Cuts: Your video should not be too long so that it gets boring for the viewers. Therefore, you have to make tight cuts which means you have to cut out pauses, gaps between dialogs, and anything that is unnecessary for viewers. If you think that tight cuts will take more time than usual, you can consider reshooting the part to save time.
2. Put The Story Before The Footage: When you are shooting a planned video, you must be shooting the video with multiple cameras from different angles. While editing and choosing the perfect angle for a certain video segment, you have to select the one that enhances the story you are telling through your video. For example, in an interview video, you should know when to emphasize and show close angles to capture the emotion of the speaker.
3. Chop Out Mistakes: The most basic work in video editing is to cut out the mistakes. This is because you are sure to make mistakes while shooting, and you will reshoot a lot of mistakes to correct them. Therefore, take your time to chop out mistakes but make sure that the video feels continuous, and if required, you can reshoot. To avoid mistakes in action, you can use different camera angles, blur portions, and bleep out certain words.
4. Learn to use color: Color correction and adjustment is a majorly neglected part of video editing that can make your video different from others. When you are shooting in outdoor conditions, the color of the video could get disturbed depending on the color of your dress as well as your surrounding. While editing, you need to correct them so that the video looks visually pleasing to the eyes.
5. Cut to music: Audio plays a very important role in any video, and hence, you should not neglect it. Always opt for a video editor that has a good collection of stock music so that you can apply them to your video in appropriate places. Music helps to break the monotony and grab the attention of the audience instantly.
6. Back up your work: It takes hours to shoot a video but only a second to lose it. Instead of blindingly relying on your storage device, you should take back up of your work on multiple devices. Taking backup in the cloud storage area is the best option as you can access your work from anywhere.
Part 8: Frequently Asked Questions of Video Editor
What is the best video editor?
Wondershare Filmora is the best video editor as it has the perfect mix of standard and advanced video editing options. The user interface is intuitive and easy to operate for every video creator.
What editor do YouTubers use on PC?
The most commonly used video editors by YouTubers are Final Cut Pro, Adobe Premiere Pro and Filmora. Unless you are a pro in video editing, we recommend Filmora and Shotcut for your YouTube videos.
How can I edit videos for free?
If you are a Windows user, you can use Microsoft Photos and Openshot for editing your videos for free. For Mac users, iMovie is the best free video editor with balanced features.
Does Windows 10 have a free video editor?
Yes, Windows 10 does come with a free video editor and it is called Microsoft Photos. You can edit your photos and videos with the application.
Is Filmora Free?
No, Filmora is a premium video editor. However, you can download its free trial version to understand its features and functionalities. Thereafter, you can purchase its premium plan as per your suitability.
02 [Editor’s Top 3 Picks ](#Part 2)
03 [Open-Source Video Editors](#Part 3)
04 [Freemium and Freeware Video Editors](#Part 4)
05 [Proprietary Video Editing Software](#Part 5)
06 [How to Choose the Suitable Video Editor](#Part 6)
07 [Video Editing Tips for Newbies](#Part 7)
08 [Frequently Asked Questions of Video Editor](#Part 8)
Part 1: Video Editing Basics
Before going to the best video editors, you should be aware of the basics of video editing. Here are the basic concepts of video editing that you must know as they are common across all video editors.
1. The Timeline: The timeline is an area of a video editor where you place your video clips sequentially. When you play the video after editing, the video will play from the start of the timeline and finish at the end of the timeline where your video content ends. The timeline is where you can place your audio clips, video effects, and graphical elements as per your requirements.
2. The Canvas: The canvas is an area of a video editor where you view your video clips frame by frame. The canvas allows you to edit the video starting from cropping to adding graphical elements. You can view all the changes you make to the video before applying them permanently.
3. Basic editing: The basic editing of a video includes splitting and trimming out important parts of a large video file and, thereafter, joining the different video clips to make an engaging video. The basic editing also includes adding audio clips, adjusting video parameters such as color, brightness, contrast as well as adding texts to the video.
4. Aspect Ratio: The aspect ratio of a video represents the ratio of width to height of the video in terms of pixels. For example, a video with aspect ratio of 16:9 means the video is 1920p x 1080p. You can edit the aspect ratio depending on where you want to publish the video. For example, social media videos use 1:1 and 9: 16 aspect ratio, tablets use 4:3 aspect ratio, and 16:9 is the standard aspect ratio.
5. B-roll: B-roll is a secondary video footage that you can add to your primary video(A-roll) to enhance the video creativity and aesthetic value. B-roll could be a cinematic shot, a slow-motion footage, a close-up shot from different angles, as well as a shot mixed with wide-angle, pans, and tilts.
6. Frame Rate: Frame rate refers to the number of images or frames displayed per second in a video. In short, frame rate refers to frames per second in a video. For example, a video of 30fps means the video is showing 30 different images per second. The 24fps is used for movies and the 30fps is used for online and TV videos. Even 60fps videos are becoming common as they produce a smoother video experience.
Part 2: Editor’s Top 3 Picks - Choose The Best Video Editor
Best Video Editor for All Creators - Filmora
Wondershare Filmora is the ideal video editor with an intuitive user interface. You get all the standard and advanced video editing features packed into its platform. You can record videos of external webcam and computer screen as well. There are unlimited video effects and graphical elements to turn your raw videos into eye-catching videos instantly.
Best for Professional Editing - Premiere Pro
Adobe Premium Pro is the best professional video editor where all the advanced features of video editing are available. The software supports editing multiple projects simultaneously. You can edit VR, Multicam, and 3D videos as well. It is a perfect platform for a professional video editing team to work in sync.
Best for Online Video Editing - WeVideo
WeVideo is by far the best online video editor with 30 million users. Starting from standard video editing options and uploading directly to social media platforms, WeVideo is a full-fledged video editor. You can also record videos and create your own video templates. Moreover, you can collaborate with other video creators and make the best use of the unlimited stock media library.
Part 3: Open-Source Video Editors
Open-source video editors have compatibility with all the desktop operating systems. Moreover, due to their codes readily available online, these video editing software applications are available completely free of cost. Here are the best open-source video editors for beginners and experienced users.
# For Beginner Users
1. Blender
Compatibility: Windows, Mac, Linux
Best for: best open-source video editor with balanced features
G2 rating: 4.5 out of 5
Blender is an open-source video editing suite that is popular for its 3D models. Since it is a suite, you can use the platform not only for video editing but also for creating animated videos and games.
Starting from basic video editing such as trim and split to advance video editing such as masking and color adjustment, all options are readily available. Besides, there are options for audio mixing and live preview of editing works.
Reason to Choose:-
- Video cropping, trimming, splitting, joining, and adjusting speed.
- Different slots to add videos, images, scenes, audio clips, effects and masks.
- Different transitions, filters, effects, waveforms, and keyframes available.
- Create 3D models and animated videos with proper audio mixing.
Reason to Avoid:-
- Takes time to get used to the platform.
- Reports of bugs have become a regular occurrence.
2. Avidemux
Compatibility: Windows, Mac, Linux
Best for: best open-source video editor for basic editing
G2 rating: 4.4 out of 5
Avidemux from Soundforge is a lightweight and basic video editor. Starting from trimming and cutting videos to applying filters and encoding videos, all the options are readily available. The software supports a wide range of video file formats for editing.
The platform also supports scripting through which you can automate tasks to perform on videos. Besides, there are options for color adjustments, video conversion, and advanced interlacing. The simple user interface is perfect for beginners to edit videos intuitively.
Reason to Choose:-
- Quick video editing for trimming, cutting, rotating, and cropping.
- Change speed and use different filters for color adjustments and subtitles.
- Supports different video file formats in import and export.
- The user interface is simple and suitable for beginners.
Reason to Avoid:-
- Does not have a traditional timeline for video editing.
- Limited effects, filters, and advanced features.
3. Kdenlive
Compatibility: Windows, Mac, Linux
Best for: best open-source video editor for all
G2 rating: 4.3 out of 5
Kdenlive video editor is a versatile video editor with standard and advanced video editing features balanced properly. The open-source software allows multi-track timeline and supports dual monitor setup for video editing. The user interface is simple, and you can configure it as per your preference.
Kdenlive supports a wide range of video and audio files, and you can use configurable keyboard shortcuts for easy operation. The automatic backup feature is highly useful in the professional video editing world. Similarly, the presence of keyframe-based effects and advanced effects can make a video stand out.
Reason to Choose:-
- Multi-track timeline for working with multiple video and audio clips.
- Keyframeable effects, transitions, color correction and unlimited online resources.
- Vast set of options for creating stunning texts and titles.
- Smooth preview, configurable interface, and automatic backup.
Reason to Avoid:-
- Lacks GPU acceleration and hence, slow response at times.
- Speed adjustment effect is not efficient.
# For Advanced Users
4. OpenShot
Compatibility: Windows, Mac, Linux, Chrome OS
Best for: Best open source editor for all desktop users
G2 rating: 4.4 out of 5
OpenShot is a cross-platform, open-source video editor where you can work on one project on different operating systems. It works on keyframe animation framework, and you can choose from different interpolations. The platform offers you to work with unlimited video and audio clips as well as layers.
You can perform all the basic video editing operations as well as go for advanced editing. The features and tools are well-balanced for regular as well as professional video editing. Starting from video effects and audio mixing to chroma key and time-mapping, everything is available under one roof.
Reason to Choose:-
- Basic video editing with panning, zooming, and scrolling features.
- Wide range of transitions, effects, time and speed control.
- Time-mapping, audio mixing, overlays, and composting.
- Supports 3D animations and objects, templates for titles and sub-titles.
Reason to Avoid:-
- Hardware acceleration is not very powerful.
- Not suitable for 4K video editing as it gets extremely slow.
5. Shotcut
Compatibility: Windows, Mac, Linux
Best for: Best for video editors who love filters and effects
G2 rating: 4.2 out of 5
Shotcut is another open-source and cross-platform video editor with a professional user interface. The software supports importing different file formats of video and audio files. It is suitable for editing 4K videos, and it is a full-fledged audio editor as well.
Its vast video filters and effects are comparable to premium video editors. You can work with multi-track timeline and keyframes with markers and rangers. Besides, you can keep notes on your project easily. Overall, it is a balanced video editor in terms of features and functionalities.
Reason to Choose:-
- Wide categories of video effects, transitions, and filters.
- Multi-track and multi-format timeline and detailed audio editor.
- Standard and advanced editing options with hardware acceleration.
- Export video in high-resolution and in different formats.
Reason to Avoid:-
- The user interface can take some time to get used to.
- The stock media library is rather limited.
6. NATRON
Compatibility: Windows, Mac, Linux
Best for: Best open-source video editor with visual effects
G2 rating: 3.5 out of 5
NATRON is a robust video editor with powerful tracking tool for 2D and planar tracking. You can work with multiple layers and clips and avail various keying options on your video editing project. In fact, it is a full-fledged video compositing software for better video production with multi-layer structure.
The hardware acceleration of the software produces faster rendering. You get to work with presets, tracker nodes, rotoscoping, multi-plane and motion editing. The option of multi-view workflow along with real-time playback is extremely useful while editing multicam videos.
Reason to Choose:-
- Superior visual effects and motion editing.
- Multi-tasking with multi-view workflow.
- Option of rotoscoping and python scripting.
- Supports different open-source plugins.
Reason to Avoid:-
- The user interface is quite advanced and needs some learning time.
- It gets unstable and slow while previewing high-resolution videos.
Part 4: Freemium and Freeware Video Editors
Freeware video editors are available completely free of cost and they are mostly exclusive to a certain operating system. On the other hand, freemium video editors have certain features completely free while it charges users a small fee for certain advanced features. Here is the list of the best freemium and freeware video editors.
# For Beginner Users
7. ActivePresenter
Compatibility: Windows and Mac
Best for: best video editing software for learning videos.
G2 rating: 4.5 out of 5
ActivePresenter from AtomiSystems is a video editor with screen recording options. The software is particularly useful in making and editing learning videos. There are different templates available for editing videos quickly. Besides, you can use the platform for standard editing options for any video.
Starting from working with multiple timelines to making videos interactive and responsive, there are various out-of-box features. Moreover, you can edit your audio and export your edited video in different file formats.
Reason to Choose:-
- Multiple timelines for editing various video and audio clips.
- Basic video and audio editing options and greenscreen effects.
- Webcam and screen recording with audio from different sources.
- Export videos with different file formats, HTML, xAPI, SCORM and much more.
Reason to Avoid:-
- The learning curve is slightly steep.
- Not suitable for editing all types of videos.
8. Microsoft Photos
Compatibility: Windows
Best for: best built-in video editor for Windows users
G2 rating: 4.6 out of 5
Microsoft Photos is the inbuilt video editor for Windows users. The app comes pre-installed in Windows and it is mostly used for viewing photos. But there is an inbuilt video editor where you can do the basic video editing works.
You can trim a video, add texts, and apply 3D effects as well as different filters available. There are also options for rotating videos, applying background music and customizing audio. The user interface is very simple for all users.
Reason to Choose:-
- Instant basic video editing options available.
- Apply effects, filters, as well as music.
- Simple and intuitive user interface for everyone.
- Comes pre-installed and completely free of cost.
Reason to Avoid:-
- Very limited video editing options.
- Very limited video file formats supported.
9. iMovie
Compatibility: Mac
Best for: Best built-in video editor for Mac users
G2 rating: 4.3 out of 5
iMovie is the inbuilt video editor for Mac users as it comes pre-installed on macOS. The application is free to use and it is compatible with iPhone and iPad as well. You can perform all the basic video editing works starting from trimming to rotating videos.
Besides, there is a wide range of effects and filters available to apply on your videos. The best part is that it supports editing 4K videos. There are also various graphical elements available and you can share your video easily on different platforms.
Reason to Choose:-
- Trim, rotate, split and crop videos easily.
- Work across Mac, iPhone and iPad seamlessly.
- Wide range of effects, filters, and objects available.
- Supports editing 4K videos without any lag.
Reason to Avoid:-
- Lacks advanced editing options though it is a dedicated video editor.
- Supports very limited video file formats.
# For Advanced Users
10. Lightworks
Compatibility: Windows, Mac, Linux
Best for: best for social media video creators
G2 rating: 3.5 out of 5
Lightworks is a freemium video editor where most features are reserved for premium users. If you are a social media creator or learning video creator, Lightworks Create is best for you. If you are a professional video creator, you should opt for Lightworks Pro.
The software supports almost all file formats, and you can export videos on social media instantly. The timeline is advanced with proxy editing, autosave and background processing features. You can share projects with your teammates and work collaboratively.
Reason to Choose:-
- Powerful and advanced timeline for quick editing.
- Motion graphics and tilting along with advanced metadata.
- Flexible user interface with proxy workflow and storyboard bin.
- Suitable for collaborating works and cloud storage.
Reason to Avoid:-
- Can crash while working with 4K videos.
- Limited options for advanced video editing.
11. VideoPad
Compatibility: Windows
Best for: best video editor for short video creators.
G2 rating: 4.1 out of 5
VideoPad by NCH Software is an intuitive video editor that supports over 60 different video file formats. There are tools available for basic editing such as trimming and cropping. Besides, there are various effects and transitions available to apply on your video.
The video editor also lets you edit audio files and you can edit 360-degree videos as well. There are video stabilization and chroma key effect available. The video editor is available free for non-commercial use with certain limitations that you can overcome with its premium plan.
Reason to Choose:-
- Edit in Storybook or Timeline mode and perfect all basic editing works.
- Audio editing options with different audio effects.
- Add 3D video effects, special filters, and change video speed.
- Supports a wide range of video file formats.
Reason to Avoid:-
- Can crash while editing 4K videos.
- Lacks advanced editing options.
12. VSDC Free Video Editor
Compatibility: Windows only.
Best for: Free feature-rich video editing suite
G2 rating: 4.0 out of 5
VSDC Free Video Editor is a free suite that includes both video and audio editor. You can use the software for recording screen as well as voiceovers. The software is suitable for low-end computers as it is a lightweight application.
Apart from basic editing, you can edit 360 videos. Starting from color correction and zooming to split-screen effect and chroma key, it is full-fledged feature-rich software. For more advanced features, you can opt for VSDC Video Editor Pro version.
Reason to Choose:-
- Zooming, panning, and color correction options.
- Wide range of effects and filters present.
- Chrome key option as well as 360 degree video editing.
- Work with multiple layers and sync objects perfectly.
Reason to Avoid:-
- Lacks advanced video editing options.
- No masking or video stabilization option available.
Part 5: Proprietary Video Editing Software
If you are a regular video creator and you want to invest in video editing to improve the quality of your video content, you have to opt for a proprietary video editing software. All professional video creators prefer proprietary video editing software over freeware and freemium video editors. Here are the best premium video videos with the most advanced video editing options.
# For Beginner Users
13. Filmora
Compatibility: Windows and Mac.
Best for: Best video editors for YouTubers and vloggers
G2 rating: 4.4 out of 5
Wondershare Filmora is a feature-rich video editor but an intuitive user interface. Therefore, it is perfectly suitable for beginners who want all the features and tools for advanced video editing without a steep learning curve. Filmora is also useful if you want to record screen or webcam video.
Starting from tons of video effects and transitions to a large stock library and graphical elements, Filmora is tailor-made for editing all types of videos. It also supports a wide range of file formats and you can edit 4K videos as well as audio files comfortably.
For Win 7 or later (64-bit)
For macOS 10.12 or later
Reason to Choose:-
- Trim, split, join, crop and work with multiple video and audio clips.
- Large collection of video and audio effects, transitions, and graphical elements.
- Large stock library of free media files and animations.
- Work with multiple layers and clips effortlessly on its smooth timeline.
Reason to Avoid:-
- The processing time for videos could be on the higher side.
14. Camtasia
Compatibility: Windows and Mac.
Best for: Teachers and students to edit tutorial videos
G2 rating: 4.6 out of 5
Camtasia by Techsmith is a premium video editor and it is equally popular as a video recorder. It is particularly useful for recording and editing tutorial videos as there are different templates available. Coming to video editing part, you can perform all the basic video editing works instantly.
There are various trendy effects, transitions, and presets available. You can remove green screen and apply different frames for video compatibility on different devices. Besides, you can upload the editing video different on different platforms instantly.
Reason to Choose:-
- Quick trimming, splitting, cropping options.
- Large collection of templates and presets.
- Wide range of effects, annotations, and transitions.
- Import, export, and share different file formats.
Reason to Avoid:-
- No motion tracking option.
- Reports of frequent crashes.
15. Final Cut Pro
Compatibility: Mac only.
Best for: best professional video editors for Mac users
G2 rating: 4.4 out of 5
Final Cut Pro from Apple is an extremely popular premium video editor among professional video creators who are Mac users. It is a powerful and advanced video editor that can handle high resolution videos smoothly. It is a perfect mix of standard and advanced video editing features.
Starting from editing multicam and VR videos to 3D and 360 degree videos, Final Cut Pro is suitable for all. There are unlimited presets and effects present and you can edit 4K videos as well as large video files smoothly.
Reason to Choose:-
- Basic and advanced video and audio editing features.
- Supports editing all the different video types such as 3D, 4K, VR videos.
- Supports plug-ins, external tools and cinematic effects.
- Renders high resolution, large video files in short time.
Reason to Avoid:-
- Learning curve is quite steep.
- Pricing is on the higher side.
# For Beginner Users
16. Adobe Premiere Pro
Compatibility: Windows only.
Best for: best professional video editing software for most people
G2 rating: 4.5 out of 5
Adobe Premiere Pro is the ultimate video editor in the professional video editing world. You get all the different advanced features of video editing packed in the application. Even though the learning curve is steep, Adobe Premiere Pro is one of the most used video editors in professional video creation.
Adobe Premiere Pro supports all the different video file formats and you can edit various videos simultaneously. It is a perfect tool for editing a large video project collaboratively. It supports editing VR videos, 3D videos, as well as multicam videos.
Reason to Choose:-
- Standard and advanced editing options with quick rendering.
- Suitable for multi-tasking and collaborative work in video editing.
- Supports almost all types of videos and audio file formats.
- Flexible and configurable user interface and advanced timeline.
Reason to Avoid:-
- Learning curve is very steep.
- Not suitable for low-end computers.
17. Vegas Pro
Compatibility: Windows only.
Best for: Video & audio editing for professionals
G2 rating: 4.2 out of 5
Vegas Pro from Sony is a professional video and audio editor. You can work with multiple video and audio files and you can choose from timeline or storyboard layout. In fact, there are options for nested timeline and multicam editing. The customized workflow and layouts make the application suitable for everyone.
You can enhance your video with its large collection of filters, effects, and titles. There are options for keyframing, scene detection, color correction, and light adjustments. The artificial intelligence makes editing faster with automation control.
Reason to Choose:-
- Powerful timeline and storyboard mode with keyframing.
- Advanced HDR color correction and grading.
- Artificial intelligence for quick and repeated editing.
- Multicam editing, motion tracking, and support for 3D videos.
Reason to Avoid:-
- Stability of the application is questionable.
- Pricing is steep and lacks tutorial guide.
18. Hitfilm Express
Compatibility: Windows and Mac
Best for: Best for video effects lovers
G2 rating: 4.4 out of 5
Hitfilm Express is particularly popular for its unlimited video effects that make the video stand out easily. The user interface is quite simple to use, and you can apply effects to turn your raw video into professional video instantly. In fact, it has the largest VFX toolkit with industry-grade effects.
You can edit 4K videos, and there are options for motion tracking and video animations. You can also opt for color correction and grading. You can also edit vertical videos and upload them on social media platforms. You can also edit audio clips and use composting and layering features to enhance your video.
Reason to Choose:-
- Advanced timeline for better workflow.
- Standard and advanced video editing options.
- Largest collection of video effects of different categories.
- Color grading, correction, and free training and support.
Reason to Avoid:-
- Lacks green screen editing option.
- Rendering is not always swift.
Part 6: How to Choose the Suitable Video Editor?
The most important part of video editing is to choose the most suitable video editor for your videos. Here are some important factors to consider while choosing a video editor.
1. Budget and Price: If you are getting started, you can opt for a free video editor. But eventually, you have to go for a premium video editor if you are serious about video editing. You should opt for that video editor that fits your budget and offers more features for the price charged in comparison to its competitors.
2. Learning Curve: You should always opt for a video editor that has a low learning curve. If the video editor is complicated to operate, you will get frustrated, and you won’t be able to unlock the full potential of the video editor. Besides, you will have to lose a lot of time in learning and perfecting the usage of the application.
3. Stock Library: The video editor you are choosing must have a sizeable stock media library. A stock library is where you can find video clips and audio clips that are free to use for everyone. You can incorporate them into your video to enhance the content quality and bring variety to your audiences.
4. Audio control: Video editing is incomplete without proper audio editing. Your video editor should have a separate timeline for audio clips so that you can place them perfect to go in sync with the video clips. Some video editors have dedicated options for audio mixing and editing as per requirements.
5. upport video formats: Your video editor must support a wide range of video file formats that you have to include from time to time. If it supports only the popular file formats, you will not be able to include the interesting videos you may get from different sources which the video editor does not support.
6. Software stability: If you need to edit high-resolution videos, you have to ensure that the video editor you are choosing can stay stable throughout. There are many popular video editors available that become unstable while editing and rendering high-resolution videos. You have to read reviews to come to a conclusion about software stability.
7. Customer Support: Last but most importantly, your video editor must have a good customer support team. In your video editing journey, you will need the help of technical customer support to clarify issues related to the software so that you can excel in your video editing sessions.
Part 7: Video Editing Tips for Beginners
Here are some basic video editing tips that you should keep in mind while editing any video.
1. Try Tight Cuts: Your video should not be too long so that it gets boring for the viewers. Therefore, you have to make tight cuts which means you have to cut out pauses, gaps between dialogs, and anything that is unnecessary for viewers. If you think that tight cuts will take more time than usual, you can consider reshooting the part to save time.
2. Put The Story Before The Footage: When you are shooting a planned video, you must be shooting the video with multiple cameras from different angles. While editing and choosing the perfect angle for a certain video segment, you have to select the one that enhances the story you are telling through your video. For example, in an interview video, you should know when to emphasize and show close angles to capture the emotion of the speaker.
3. Chop Out Mistakes: The most basic work in video editing is to cut out the mistakes. This is because you are sure to make mistakes while shooting, and you will reshoot a lot of mistakes to correct them. Therefore, take your time to chop out mistakes but make sure that the video feels continuous, and if required, you can reshoot. To avoid mistakes in action, you can use different camera angles, blur portions, and bleep out certain words.
4. Learn to use color: Color correction and adjustment is a majorly neglected part of video editing that can make your video different from others. When you are shooting in outdoor conditions, the color of the video could get disturbed depending on the color of your dress as well as your surrounding. While editing, you need to correct them so that the video looks visually pleasing to the eyes.
5. Cut to music: Audio plays a very important role in any video, and hence, you should not neglect it. Always opt for a video editor that has a good collection of stock music so that you can apply them to your video in appropriate places. Music helps to break the monotony and grab the attention of the audience instantly.
6. Back up your work: It takes hours to shoot a video but only a second to lose it. Instead of blindingly relying on your storage device, you should take back up of your work on multiple devices. Taking backup in the cloud storage area is the best option as you can access your work from anywhere.
Part 8: Frequently Asked Questions of Video Editor
What is the best video editor?
Wondershare Filmora is the best video editor as it has the perfect mix of standard and advanced video editing options. The user interface is intuitive and easy to operate for every video creator.
What editor do YouTubers use on PC?
The most commonly used video editors by YouTubers are Final Cut Pro, Adobe Premiere Pro and Filmora. Unless you are a pro in video editing, we recommend Filmora and Shotcut for your YouTube videos.
How can I edit videos for free?
If you are a Windows user, you can use Microsoft Photos and Openshot for editing your videos for free. For Mac users, iMovie is the best free video editor with balanced features.
Does Windows 10 have a free video editor?
Yes, Windows 10 does come with a free video editor and it is called Microsoft Photos. You can edit your photos and videos with the application.
Is Filmora Free?
No, Filmora is a premium video editor. However, you can download its free trial version to understand its features and functionalities. Thereafter, you can purchase its premium plan as per your suitability.
Zoom In and Zoom Out on YouTube
Abundant Video Effects - Wondershare Filmora
Provide abundant video effects - A creative video editor
Powerful color correction and grading
Detailed tutorials provided by the official channel
YouTube has undoubtedly become the most popular platform for streaming millions of videos to people worldwide. People, influencers, celebrities, and various brands can freely post their videos on YouTube, and with a single click, they can fetch millions of views. Due to the simplicity and exceptional features of YouTube, people across the globe have shifted to this platform to extract various kinds of information comfortably.
Many times, people find it difficult to catch small yet important details from the videos on YouTube. If you want to observe little details in the YouTube videos closely, this article will address easy methods on how to zoom in on YouTube videos quickly.
In this article
Part 1: Why Should You Look Forward to Zoom Your YouTube Video?
Part 2: Effective Methods on How to Zoom in and Out YouTube Videos Easily
Part 1: Why Should You Look Forward to Zoom Your YouTube Video?
There can be various causes to zoom in on YouTube videos as users can clearly see hidden information and details from the video through it. For instance, if you are reviewing a trailer of a particular movie on your YouTube channel, you would be required to zoom in YouTube video many times. For breaking down the trailer, you would need to focus on the backgrounds, props, and other hidden details that are only possible through zooming in and out of the videos.
Moreover, if you are watching a demonstration of the chemistry practical on YouTube videos, readings on the apparatus may not be apparent in it. So here, you can also read and notice precise complicated readings on the videos by just zooming in. Also, in other scenarios, you can read the product’s description in makeup tutorials by using the option of zooming in and out.
To sum up, every regular user of YouTube must know how to zoom in on YouTube videos so that he can quickly focus on the details with a single click. By knowing the methods of zooming in and out, you can comprehensively extract the information through YouTube videos that can make your daily tasks easier.
Part 2: Effective Methods on How to Zoom in and Out YouTube Videos Easily
In this section, we will provide three effective methods to zoom in YouTube videos effortlessly. By applying any of the following methods, you can easily focus on the small details.
Method 1: Zoom In and Out on the YouTube Video Player
Are you looking for easier ways to zoom in and out of the YouTube video? YouTube gives the option on its player for viewing the videos in two modes: Theatre mode and full mode. Through theater mode, you can watch your video in a comparatively zoomed manner, whereas, in full screen, you can watch the video on a full screen of the monitor.
In this particular method, we will provide simple and easy steps for zooming in on the YouTube video player:
Step 1: Navigate to the YouTube app on your device browser, such as Google Chrome. On its search box, enter the video you want to watch.

Step 2: Press Enter, and you will see various options related to your desired video. Click on any particular video to watch.

Step 3: On the YouTube video player, you would be able to see two screen mode options on the right side. The first option is “Full Screen” mode, through which you can enjoy watching your videos on a full monitor screen. The second option is “Theatre Mode,” which will display the video in a cinematic look by zooming in to some extent. Explore these options to observe the small details in your YouTube video closely.

Method 2: Zoom In and Out with Browser Zoom Features
To zoom in on YouTube videos, your browser also offers effective ways for the users. By using the browser zoom features, you can quickly zoom in and out of the video without the need for additional help. Moreover, these zoom features are also beneficial for reading eBooks or online documents.
Here are the three ways through which you can instantly zoom in on your favorite YouTube videos easily:
Way 1: The first way to zoom in on video is through browser options. To do so, tap on the “Three-Dot” icon of your browser displayed in the top right corner. From the menu, tap on “Zoom” and control the actions through its small menu.

Way 2: Another way to zoom in and out of the YouTube video is through your mouse pad. Point your cursor to the place where you want to zoom and try to expand the screen from your mouse pad and vice versa for zoom out.

Way 3: On the URL search bar of YouTube, you can see different icons displayed next to it. Simply tap on the “Zoom” icon to control the zoom in and out accordingly.

Method 3: Zoom In on YouTube Video with Browser Extension
In this section, we will use a browser extension that will assist you in zooming in and out on YouTube videos comfortably. We will recommend the Zoom browser extension due to its distinct properties and features. Through its slider, you can zoom in on the YouTube video up to 400 factors with a single swipe.
Moreover, through this special browser extension, you can save the zoomed version of the website and can resume watching the videos from the set zoom value. To save your time, this browser also gives the option to zoom in and out the web pages together with a single click. To use this browser extension to zoom in on Youtube, here are simple steps.
Step 1: Install the Zoom browser extension on your device from the Chrome Store by tapping on the “Add to Chrome” button to download and install the extension.

Step 2: Now, open YouTube and play your desired video. Afterward, tap on the icon of extensions from the top and select this particular extension. Through this extension, you can either click on the “+” button or the slider to zoom the video accordingly.

Conclusion
YouTube has become a mainstream channel for watching and creating videos in this era. Many times we miss small yet important details while watching YouTube videos on our devices. To quickly catch up on these essential details, we have offered different and easy methods regarding zoom in on YouTube videos with a single click.
YouTube has undoubtedly become the most popular platform for streaming millions of videos to people worldwide. People, influencers, celebrities, and various brands can freely post their videos on YouTube, and with a single click, they can fetch millions of views. Due to the simplicity and exceptional features of YouTube, people across the globe have shifted to this platform to extract various kinds of information comfortably.
Many times, people find it difficult to catch small yet important details from the videos on YouTube. If you want to observe little details in the YouTube videos closely, this article will address easy methods on how to zoom in on YouTube videos quickly.
In this article
Part 1: Why Should You Look Forward to Zoom Your YouTube Video?
Part 2: Effective Methods on How to Zoom in and Out YouTube Videos Easily
Part 1: Why Should You Look Forward to Zoom Your YouTube Video?
There can be various causes to zoom in on YouTube videos as users can clearly see hidden information and details from the video through it. For instance, if you are reviewing a trailer of a particular movie on your YouTube channel, you would be required to zoom in YouTube video many times. For breaking down the trailer, you would need to focus on the backgrounds, props, and other hidden details that are only possible through zooming in and out of the videos.
Moreover, if you are watching a demonstration of the chemistry practical on YouTube videos, readings on the apparatus may not be apparent in it. So here, you can also read and notice precise complicated readings on the videos by just zooming in. Also, in other scenarios, you can read the product’s description in makeup tutorials by using the option of zooming in and out.
To sum up, every regular user of YouTube must know how to zoom in on YouTube videos so that he can quickly focus on the details with a single click. By knowing the methods of zooming in and out, you can comprehensively extract the information through YouTube videos that can make your daily tasks easier.
Part 2: Effective Methods on How to Zoom in and Out YouTube Videos Easily
In this section, we will provide three effective methods to zoom in YouTube videos effortlessly. By applying any of the following methods, you can easily focus on the small details.
Method 1: Zoom In and Out on the YouTube Video Player
Are you looking for easier ways to zoom in and out of the YouTube video? YouTube gives the option on its player for viewing the videos in two modes: Theatre mode and full mode. Through theater mode, you can watch your video in a comparatively zoomed manner, whereas, in full screen, you can watch the video on a full screen of the monitor.
In this particular method, we will provide simple and easy steps for zooming in on the YouTube video player:
Step 1: Navigate to the YouTube app on your device browser, such as Google Chrome. On its search box, enter the video you want to watch.
Step 2: Press Enter, and you will see various options related to your desired video. Click on any particular video to watch.
Step 3: On the YouTube video player, you would be able to see two screen mode options on the right side. The first option is “Full Screen” mode, through which you can enjoy watching your videos on a full monitor screen. The second option is “Theatre Mode,” which will display the video in a cinematic look by zooming in to some extent. Explore these options to observe the small details in your YouTube video closely.
Method 2: Zoom In and Out with Browser Zoom Features
To zoom in on YouTube videos, your browser also offers effective ways for the users. By using the browser zoom features, you can quickly zoom in and out of the video without the need for additional help. Moreover, these zoom features are also beneficial for reading eBooks or online documents.
Here are the three ways through which you can instantly zoom in on your favorite YouTube videos easily:
Way 1: The first way to zoom in on video is through browser options. To do so, tap on the “Three-Dot” icon of your browser displayed in the top right corner. From the menu, tap on “Zoom” and control the actions through its small menu.
Way 2: Another way to zoom in and out of the YouTube video is through your mouse pad. Point your cursor to the place where you want to zoom and try to expand the screen from your mouse pad and vice versa for zoom out.
Way 3: On the URL search bar of YouTube, you can see different icons displayed next to it. Simply tap on the “Zoom” icon to control the zoom in and out accordingly.
Method 3: Zoom In on YouTube Video with Browser Extension
In this section, we will use a browser extension that will assist you in zooming in and out on YouTube videos comfortably. We will recommend the Zoom browser extension due to its distinct properties and features. Through its slider, you can zoom in on the YouTube video up to 400 factors with a single swipe.
Moreover, through this special browser extension, you can save the zoomed version of the website and can resume watching the videos from the set zoom value. To save your time, this browser also gives the option to zoom in and out the web pages together with a single click. To use this browser extension to zoom in on Youtube, here are simple steps.
Step 1: Install the Zoom browser extension on your device from the Chrome Store by tapping on the “Add to Chrome” button to download and install the extension.
Step 2: Now, open YouTube and play your desired video. Afterward, tap on the icon of extensions from the top and select this particular extension. Through this extension, you can either click on the “+” button or the slider to zoom the video accordingly.
Conclusion
YouTube has become a mainstream channel for watching and creating videos in this era. Many times we miss small yet important details while watching YouTube videos on our devices. To quickly catch up on these essential details, we have offered different and easy methods regarding zoom in on YouTube videos with a single click.
A Guide to Find a High-Quality Video Marketing Agency
We live in a digital world where videos are the most consumed digital commodity globally. Videos have become the most impactful medium for businesses to engage targeted audiences with their products or services and drive sales to the next level.
However, only high-quality videos produced skilfully and marketed effectively can reach the targeted audience and create the expected impact. Honestly, creating a high-quality video is not everyone’s cup of tea, and that is where a video marketing agency comes into the picture.
What Does a Video Marketing Agency Do?
A video marketing agency creates high-quality videos to promote brands, products, or services and strategically markets the videos to capture the targeted audiences’ attention.
Starting from generating creative ideas and creating engaging video content to developing compelling marketing strategies and promoting through various platforms effectively, a digital video marketing agency is crucial for the success of a business.
Are you wondering how do I choose a video marketing agency near me? That is exactly why you should read the rest of the article and find the answer yourself.
Best Demo Video Makers to Create Marketing Videos
Free Download For Win 7 or later(64-bit)
Free Download For macOS 10.14 or later
How Do You Find a High-Quality Video Marketing Company?
It is difficult to spot a high-quality agency because most promise a lot but deliver very little. With so many video marketing companies ready to scam you, the question boils down to how to find a high-quality agency that can provide the expected results. Here are some crucial steps to judge if a marketing video agency is worth your time and money.
Step 1 Be Clear About Your Objective
Before you start finding video content marketing companies, you should be clear about the goals you want to achieve through video marketing. For some brands, the goal could be increasing brand awareness and visibility by driving website traffic. For others, it could be generating leads and boosting sales. Once you are clear about your goals and expectations, you can start finding agencies that specialize in fulfilling your objectives.

Step 2 Assess Overall Quality
On your journey of finding video marketing companies, you will come across many agencies that will look very promising, apparently. But you cannot take their promises for granted. Instead, evaluate their capabilities by reviewing their portfolio consisting of their past projects. You can assess their quality by judging their creativity, work style, production value, and marketing techniques from their past works. Once you are convinced of their skills and capabilities, you can shortlist them.

Step 3 Give Priority to Experience
Selecting a marketing video agency without past experience with companies in your industry will be a blunder. This is because their past experience will help them understand your objectives and targeted audiences better. They are likely to be aware of the things that work and do not work with the audiences in your industry. Besides, they will be capable of finding opportunities and identifying challenges faster during the marketing process. Therefore, agencies with experience in your industry should get priority on your list.

Step 4 Check Customer Testimonials
Checking out the reviews of past clients and customers is an essential part of selection. Customer testimonials can reveal insights for you to judge the strengths and weaknesses of the agency. You can form an opinion on their professionalism, communication style, operational techniques, and customer satisfaction. You should check the reviews and feedback on their websites and ask for references from their past customers.

Step 5 Watch out for Creativity
Creativity differentiates between excellence and average in the video marketing world. Every company invests in video marketing, but only a few are successful in their efforts. The key to their success lies in their creative thinking and innovative approach. Creativity makes video content attention-grabbing, long-lasting, and highly sharable.
Similarly, innovative marketing techniques will give you a significant edge over your competitors. You can judge a video marketing agency’s creativity if they pitch unique ideas, creative storytelling, and innovative marketing approaches. Watch out for the reviews to determine if the company has a proven record of creativity in their field.

Step 6 Take Optimization Seriously
Creative video content is useless if it cannot reach the most targeted audiences. The reach in the digital world depends on optimization. That is why when you choose a marketing video agency near you, ensure they understand optimization principles. Proper search engine optimization helps a video rank higher in search results and get more organic audiences.
Optimization techniques vary for search engines, video streaming websites, and social media platforms. A video marketing agency should have expertise in optimization for organic reach and generating leads.

Step 7 Dive Into the Process
You should choose a video agency that is more open about its operation and process of execution. They must explain the entire process, from concept development to final delivery. Similarly, they should be open to suggestions, flexible in approaches, and adaptable during challenges.
Understanding the execution process will help you determine instinctively if the agency is worth your investment. There should be clarity in the thought process and executive plan with deadline and budget for your peace of mind and satisfaction.

Step 8 Focus on Communication
Communication is a highly underrated skill in the professional world, especially when outsourcing your work to an agency. Without proper communication, there cannot be a proper collaboration with the video marketing company. If you cannot share your feedback or get involved in the required process, your goals and objectives will stay unachieved.
Therefore, while discussing the execution plan, you should emphasize communication. For example, you can check how often you will get updates and how responsive and proactive the agency will be with suggestions and feedback. Communication enhances transparency in execution and boosts customer satisfaction.

Step 9 Request a Proposal
You must have shortlisted a few high-quality video marketing companies following the steps mentioned so far. It is time to request a proposal or quotation from the interested agencies. You should reiterate your goals, objectives, expectations, and requirements so the agencies can provide tailored proposals accordingly.
You can also clarify any doubts and assess their professionalism and communication well. The proposals can reveal the level of service you will get. The more detailed the proposal, the deeper you can evaluate the service and make the final selection accordingly.

Step 10 Evaluate Return on Investment
Last but not least, you should compare the prices to evaluate which proposals offer more value for your money. You should also calculate your return on investment so that your investment brings in the expected results without damaging you monetarily. You will also get to know the hidden charges and deliveries, and you should consider an agency that mentions them upfront for transparency. Finally, trust your assessment and instinct and select the best promotional video production company to take your business to the next level.

Conclusion
Video marketing is a crucial step in the path to success of a company in today’s world. That is why you should not compromise quality when choosing a video marketing company for your brand. We have explained in a step-by-step process how you can land the best-quality video marketing agency. Trust the process, execute the steps minutely, and get the agency onboard that will take your business to heights never imagined.
Free Download For Win 7 or later(64-bit)
Free Download For macOS 10.14 or later
How Do You Find a High-Quality Video Marketing Company?
It is difficult to spot a high-quality agency because most promise a lot but deliver very little. With so many video marketing companies ready to scam you, the question boils down to how to find a high-quality agency that can provide the expected results. Here are some crucial steps to judge if a marketing video agency is worth your time and money.
Step 1 Be Clear About Your Objective
Before you start finding video content marketing companies, you should be clear about the goals you want to achieve through video marketing. For some brands, the goal could be increasing brand awareness and visibility by driving website traffic. For others, it could be generating leads and boosting sales. Once you are clear about your goals and expectations, you can start finding agencies that specialize in fulfilling your objectives.
Step 2 Assess Overall Quality
On your journey of finding video marketing companies, you will come across many agencies that will look very promising, apparently. But you cannot take their promises for granted. Instead, evaluate their capabilities by reviewing their portfolio consisting of their past projects. You can assess their quality by judging their creativity, work style, production value, and marketing techniques from their past works. Once you are convinced of their skills and capabilities, you can shortlist them.
Step 3 Give Priority to Experience
Selecting a marketing video agency without past experience with companies in your industry will be a blunder. This is because their past experience will help them understand your objectives and targeted audiences better. They are likely to be aware of the things that work and do not work with the audiences in your industry. Besides, they will be capable of finding opportunities and identifying challenges faster during the marketing process. Therefore, agencies with experience in your industry should get priority on your list.
Step 4 Check Customer Testimonials
Checking out the reviews of past clients and customers is an essential part of selection. Customer testimonials can reveal insights for you to judge the strengths and weaknesses of the agency. You can form an opinion on their professionalism, communication style, operational techniques, and customer satisfaction. You should check the reviews and feedback on their websites and ask for references from their past customers.
Step 5 Watch out for Creativity
Creativity differentiates between excellence and average in the video marketing world. Every company invests in video marketing, but only a few are successful in their efforts. The key to their success lies in their creative thinking and innovative approach. Creativity makes video content attention-grabbing, long-lasting, and highly sharable.
Similarly, innovative marketing techniques will give you a significant edge over your competitors. You can judge a video marketing agency’s creativity if they pitch unique ideas, creative storytelling, and innovative marketing approaches. Watch out for the reviews to determine if the company has a proven record of creativity in their field.
Step 6 Take Optimization Seriously
Creative video content is useless if it cannot reach the most targeted audiences. The reach in the digital world depends on optimization. That is why when you choose a marketing video agency near you, ensure they understand optimization principles. Proper search engine optimization helps a video rank higher in search results and get more organic audiences.
Optimization techniques vary for search engines, video streaming websites, and social media platforms. A video marketing agency should have expertise in optimization for organic reach and generating leads.
Step 7 Dive Into the Process
You should choose a video agency that is more open about its operation and process of execution. They must explain the entire process, from concept development to final delivery. Similarly, they should be open to suggestions, flexible in approaches, and adaptable during challenges.
Understanding the execution process will help you determine instinctively if the agency is worth your investment. There should be clarity in the thought process and executive plan with deadline and budget for your peace of mind and satisfaction.
Step 8 Focus on Communication
Communication is a highly underrated skill in the professional world, especially when outsourcing your work to an agency. Without proper communication, there cannot be a proper collaboration with the video marketing company. If you cannot share your feedback or get involved in the required process, your goals and objectives will stay unachieved.
Therefore, while discussing the execution plan, you should emphasize communication. For example, you can check how often you will get updates and how responsive and proactive the agency will be with suggestions and feedback. Communication enhances transparency in execution and boosts customer satisfaction.
Step 9 Request a Proposal
You must have shortlisted a few high-quality video marketing companies following the steps mentioned so far. It is time to request a proposal or quotation from the interested agencies. You should reiterate your goals, objectives, expectations, and requirements so the agencies can provide tailored proposals accordingly.
You can also clarify any doubts and assess their professionalism and communication well. The proposals can reveal the level of service you will get. The more detailed the proposal, the deeper you can evaluate the service and make the final selection accordingly.
Step 10 Evaluate Return on Investment
Last but not least, you should compare the prices to evaluate which proposals offer more value for your money. You should also calculate your return on investment so that your investment brings in the expected results without damaging you monetarily. You will also get to know the hidden charges and deliveries, and you should consider an agency that mentions them upfront for transparency. Finally, trust your assessment and instinct and select the best promotional video production company to take your business to the next level.
Conclusion
Video marketing is a crucial step in the path to success of a company in today’s world. That is why you should not compromise quality when choosing a video marketing company for your brand. We have explained in a step-by-step process how you can land the best-quality video marketing agency. Trust the process, execute the steps minutely, and get the agency onboard that will take your business to heights never imagined.
Easy Way to Create an Alternate Reality Effect
Ditch boring one-dimensional videos and create a mesmerizing video with this alternative reality effect you can easily create using Wondershare Filmora.
This cool effect enables you to show a dream-like scene where two mirrored footages appear within the same frame using the Masking feature. But why stop there?
Keep reading to find out how you can use this style of effect to spice up your daily vlog bumper intro or even for your upcoming sci-fi content.

Preparing the footage
There are not many restrictions on preparing the footage for this effect. However, depending on the results you’re aiming for, you might need to consider a few things.
First, a wider view and some camera panning, or tilting will deliver a better result as it provides angle variations. This will later enhance the dynamic of the scene, making it feels even more uncanny.
Then, while you’re at it, you need to also figure out the purpose of the video itself. If you want to upload it to certain platforms where vertical videos are more popular, you will want to work on that as well. When you’re shooting your footage, make sure that you’re taking it at the correct angle that would fit the ratio you’re aiming for.
Last but not least, consider the length of the footage. If you’re planning to make a bumper video, you might want a quick yet comprehensive shot of the objects you want to highlight. You can always trim and adjust the timing later, but it is better to also plan it early.
Editing the video
If you have your footage or stock video ready, then you can start editing. Follow this simple step-by-step guide to create your own alternate reality using Filmora .
Free Download For Win 7 or later(64-bit)
Free Download For macOS 10.14 or later
Step 1: Drag and drop the video footage into the timeline - this will be the bottom part of the scene. Go to Effect > Utility > Image Mask. Drag and drop it onto the video footage.

Step 2: Adjust the mask by double-clicking the video footage. Go to Setting > Mask Setting and choose any shape you like. Set the feather number to 100.

Step 3: Scroll up the Setting > Transform. Adjust the position of the video footage on the x and y-axis to ensure that the mask shows the bottom of the landscape view. Click Ok.

Step 4: Drag and drop the same video footage onto the timeline next to the first video footage. Place an Image Mask as well on this footage. This will be the upper part of the scene.

Step 5: Double-click the second footage to open the Setting menu on the top left. Choose Transform > Vertical Flip.

Step 6: Scroll down the Setting menu to find the mask settings. Choose an opposing mask shape for this second footage then set the feather number to 100 as well.

Step 7: Adjust the video footage position by dragging the second footage to the second video track and aligning it with the first video footage.

Step 8: Double-click to open the Setting > Transform, then, adjust the x and y-axis numbers to ensure that the mask reveals only the top half of the landscape. Click Ok.

You can recheck the preview at this stage and just save it as it is if you’re already satisfied with the result. However, if you want a more dynamic alternate reality scene, continue reading to see advanced tips you can follow to make your video looks even more otherworldly.
Enhancing the effect with rotation keyframes
If you’re using stock videos or encountering limitations when making your footage, chances are your alternate reality is not looking as dynamic as you want it to be. Go all out by adding the rotation keyframes to the video footage so that the alternate reality looks more unreal.
Step 1: Double-click the video footage on the first video track to open the Animation Settings > Customize.

Step 2: Move the playhead to the beginning of the first video footage and add a keyframe by clicking on the Add button. Set the rotation of this keyframe at 0 and the scale at 100.

Step 3: Now move the playhead to the end of the video footage and add another keyframe. This time, set the rotation to 20 and adjust the scale number to 115.

Step 4: Do Steps 1 to 3 to the second video footage. Don’t forget to preview the result to see if both footages are rotated properly.

Your alternate reality is now more dynamic with more movement. You can also add more filters or effects to further enhance the sci-fi ambiance. Once you’re satisfied, you can export the file to a format that is compatible with your destination platform.
Conclusion
Wondershare Filmora aims to empower your inner video creator with its robust yet easy-to-use editing suite. You can easily mimic the scenes from the latest blockbuster superhero movies with some simple clicks.
Not only it offers a strapping video editing menu with simple visual effects plug-ins and beginner-friendly smart templates, but you can also access its rich royalty-free stock media library. You can operate the program on both Windows and Mac. Install the program and let it do wonders to your content.
Free Download For macOS 10.14 or later
Step 1: Drag and drop the video footage into the timeline - this will be the bottom part of the scene. Go to Effect > Utility > Image Mask. Drag and drop it onto the video footage.
Step 2: Adjust the mask by double-clicking the video footage. Go to Setting > Mask Setting and choose any shape you like. Set the feather number to 100.
Step 3: Scroll up the Setting > Transform. Adjust the position of the video footage on the x and y-axis to ensure that the mask shows the bottom of the landscape view. Click Ok.
Step 4: Drag and drop the same video footage onto the timeline next to the first video footage. Place an Image Mask as well on this footage. This will be the upper part of the scene.
Step 5: Double-click the second footage to open the Setting menu on the top left. Choose Transform > Vertical Flip.
Step 6: Scroll down the Setting menu to find the mask settings. Choose an opposing mask shape for this second footage then set the feather number to 100 as well.
Step 7: Adjust the video footage position by dragging the second footage to the second video track and aligning it with the first video footage.
Step 8: Double-click to open the Setting > Transform, then, adjust the x and y-axis numbers to ensure that the mask reveals only the top half of the landscape. Click Ok.
You can recheck the preview at this stage and just save it as it is if you’re already satisfied with the result. However, if you want a more dynamic alternate reality scene, continue reading to see advanced tips you can follow to make your video looks even more otherworldly.
Enhancing the effect with rotation keyframes
If you’re using stock videos or encountering limitations when making your footage, chances are your alternate reality is not looking as dynamic as you want it to be. Go all out by adding the rotation keyframes to the video footage so that the alternate reality looks more unreal.
Step 1: Double-click the video footage on the first video track to open the Animation Settings > Customize.
Step 2: Move the playhead to the beginning of the first video footage and add a keyframe by clicking on the Add button. Set the rotation of this keyframe at 0 and the scale at 100.
Step 3: Now move the playhead to the end of the video footage and add another keyframe. This time, set the rotation to 20 and adjust the scale number to 115.
Step 4: Do Steps 1 to 3 to the second video footage. Don’t forget to preview the result to see if both footages are rotated properly.
Your alternate reality is now more dynamic with more movement. You can also add more filters or effects to further enhance the sci-fi ambiance. Once you’re satisfied, you can export the file to a format that is compatible with your destination platform.
Conclusion
Wondershare Filmora aims to empower your inner video creator with its robust yet easy-to-use editing suite. You can easily mimic the scenes from the latest blockbuster superhero movies with some simple clicks.
Not only it offers a strapping video editing menu with simple visual effects plug-ins and beginner-friendly smart templates, but you can also access its rich royalty-free stock media library. You can operate the program on both Windows and Mac. Install the program and let it do wonders to your content.
Also read:
- How to Set Up Twitch Green Screen for 2024
- New Add Effects to Video Online for 2024
- Updated Unravel the Creative Potential of Adobe After Effects for Precise Motion Synchronization. Learn How to Use Track Matte and Tracking with a Simple Alternative
- Updated How to Make Custom Lower Thirds with Filmora
- New Every Compositor Should Know The Trick of Color Match in After Effects
- Want to Make Your Canva Slideshow More Attractive? Follow the Given Discussion to Know Everything About Making the Best Slideshows with Canva for 2024
- New Best 16 Motion Blur Apps for Videos & Photos
- Updated 5 Tips for Aquasoft Slideshow for 2024
- Brightening a Video Doesnt Need to Be Complicated. This Article Will Discuss How to Brighten up Your Videos Easily Using Premiere Pro
- In 2024, Here We Are Going to Show You the Best Effects to Appear on Camera Made with Filmora
- Updated In 2024, VSCO Slow Motion
- New 2024 Approved How To Change Speed of Video in Final Cut Pro?
- Want to Learn How to Make Gaming Montage Videos? You Have Come to the Right Place. This Guide Will Teach You All You Need to Know to Create Montages of Video Games and Share Them with Other Players for 2024
- New 2024 Approved Everything About Adding Effects In Kinemaster
- Updated In 2024, Best Frame Rate for 4K Video
- New Splitting a Video in VSDC Step by Step
- In 2024, 8 Free Title Makers to Use
- Online Calculate and Change Video Aspect Ratio for 2024
- Updated In 2024, 4 Ways to Add White Border to Video on Mobile and Desktop
- Updated In 2024, Finding the Best Voice Changers for WhatsApp Free and Paid
- Updated How to Add Background to Video With/Without a Green Screen
- Updated YouTube Being One of the Most Used Video Platforms Uses Artificial Intelligence to Recommend Videos. Click Here to Know About YouTube AI in Detail
- New In 2024, Find The Best LUTs for Lightroom
- Modern Silence Detection Tools Are Changing the Face of Video Editing. Use Them to Improve the Quality of Your Video Clips. Learn How These Tools Let You Detect Silence with Pinpoint Accuracy for 2024
- New 2024 Approved | Best 8 Online GIF to APNG Converters
- Free Ways To Split Video For Whatsapp Status On All Platforms
- In 2024, Camtasia Vs Captivate Which Is Better
- 2024 Approved Add Motion Blur in After Effects
- 2024 Approved Keyframes Interval Everything You Need To Know | Filmora
- Free 3D Intro Makers for 2024
- 2024 Approved Steps to Make a Neon Dance Effect With Filmora
- What Are AR Emoji Stickers & How to Add Them to Your Video
- New How to Change Video Thumbnail on Google Drive for 2024
- In 2024, Best Way to Freeze-Frame in Final Cut Pro
- New In This Guidepost, Youll Learn What an HDRI Photo Is and How to Use the Best Free HDRI Program to Edit Photos. Youll Also Know the Difference Between HDR and HDRI
- 2024 Approved How To Make A Do-It-Yourself Video
- Updated Best Ways to Add Photos to Tik Tok Video
- Updated 2024 Approved 20 Best LUTs for Music Videos
- New Create A Freeze Frame Sequence In Your Videos
- Updated 2024 Approved 12 Impressive AI Video Ideas for Creating Engaging Video Content
- New Can You Make an Fcpx Slideshow? Undoubtedly Yes, with the Unlimited Best Fcpx Slideshow Templates Available. To Know How to, Follow the Discussion Below
- In 2024, How to Stabilize Videos with Google Photos App for Free
- Updated 2024 Approved End This Problem! Make Transparent Background Video Today
- New In 2024, A Vlog Has Many Elements to Answer. While Setting up Ideas for It, There Are Several Things Into Which You Should Look. This Article Presents a Picture of How a Vlog Video Is Made Perfectly
- Despite the Aforementioned Restrictions, Cartoon Video Makers Still Offer a Sea of Possibilities to Their Users, so Lets Dive Into the Magical World of Animated Videos
- New An Ultimate Guide to Edit a Music Video Aspect Ratio and First Cut for 2024
- How to Recover iPhone 14 Pro Data From iOS iTunes Backup? | Dr.fone
- New Easy Steps To Create Talking Memoji on iPhone Free for 2024
- In 2024, Ways To Find Unlocking Codes For Nokia G22 Phones
- How to Cast Infinix Hot 40 Pro to Computer for iPhone and Android? | Dr.fone
- How to install and update device drivers manually on Windows 11/10/7
- In 2024, Detailed Review of doctorSIM Unlock Service For Apple iPhone 12 Pro Max | Dr.fone
- In 2024, How to Unlock iPhone 6s Plus Passcode Screen? | Dr.fone
- The Best Android Unlock Software For Vivo V30 Device Top 5 Picks to Remove Android Locks
- In 2024, Full Guide to Fix iToolab AnyGO Not Working On Samsung Galaxy M14 5G | Dr.fone
- 9 Best Phone Monitoring Apps for Itel P40 | Dr.fone
- How to Fix My Oppo A78 Location Is Wrong | Dr.fone
- Everything You Need to Know about Lock Screen Settings on your Samsung Galaxy Z Flip 5
- Updated 2024 Approved What Is an AI Editor?
- How to Get and Use Pokemon Go Promo Codes On HTC U23 Pro | Dr.fone
- Updated 2024 Approved Best 9 French Video Translators Online and Download Options
- Reliable User Guide to Fix Oppo Reno 11 5G Running Slow and Freezing | Dr.fone
- What are Location Permissions Life360 On Oppo Reno 9A? | Dr.fone
- How to Put iPhone 7 or iPad on Recovery mode? (Step by Step Tutorial) | Stellar
- The Easiest Methods to Hard Reset Xiaomi 13 Ultra | Dr.fone
- New Top 9 Choices for Video Auto Translate for 2024
- Title: Searching for the Best Video Editor to Make Your Video More Attractive? This Article Introduce You Everything About Choosing a Video Editing Software
- Author: Chloe
- Created at : 2024-05-20 03:37:36
- Updated at : 2024-05-21 03:37:36
- Link: https://ai-editing-video.techidaily.com/searching-for-the-best-video-editor-to-make-your-video-more-attractive-this-article-introduce-you-everything-about-choosing-a-video-editing-software/
- License: This work is licensed under CC BY-NC-SA 4.0.
