:max_bytes(150000):strip_icc():format(webp)/HotelTransylvaniaTransformania-71f0792728254936864ad509c847c73c.jpg)
Step by Step to Crop a Video with CyberLink PowerDirector

Step by Step to Crop a Video with CyberLink PowerDirector
Video Editing is an art form dependent on various elements and factors that are part of your video; this means people, items, or objects in the background can often make or break the viewing experience.
Can you imagine having shot a scene with impeccable attention to detail, but a small uncontrollable action leaves a portion of an unwanted cable or equipment in the frame? Bummer, right? But luckily, due to the power of video editing software, it is not hard to deal with such problems.
A way to work with such clips is to use the crop function while editing, as it can help emphasize or detract attention from a particular part of any video project.
Author’s Note: While filming, try to capture footage in the highest resolution allowed by the available camera hardware; this will give you more room to play with while using the crop function.
To preface, CyberLink PowerDirector is a free video editing tool capable of accomplishing this and providing a professional touch to your video projects. And like other competing software, the program not only allows you to crop into clips but also uses keyframes to modify aspects like panning and zoom. So to help you perform this action, in this article, we list the steps you will need for cropping into video clips with PowerDirector. As an added bonus, we have also included the method to perform the same actions in WonderShare Filmora.
Note: We documented the steps in this guide with PowerDirector 365 and WonderShare Filmora X.
How to Crop Videos with CyberLink PowerDirector?
The idea of cropping into clips has always been an easy action to perform; once you have PowerDirector 365 open, follow the steps listed below.
If you do not already have CyberLink PowerDirector 365, download the software by visiting Cyberlink’s official website.
Step 1: Create a new video project in Cyberlink PowerDirector 365 by choosing Full Mode.

Note: Full Mode in Cyberlink PowerDirector 365 provides access to a full-featured video editing tool, similar to Wondershare Filmora. The other available options cater to distinct video types.
Step 2: Import media onto the Timeline from the Media Library; in this guide, we have gone ahead and used the pre-existing stock footage.

Step 3: Now, click on the video file on the Timeline; this will activate the video toolbar giving you access to the various controls built into PowerDirector 365. Hover over the tools open, following which you need to click on the Crop, Zoom, and Pan option.

Step 4: Pick either corner of the frame visible around the video and set the area you want the clip to focus upon; following this, click Save.
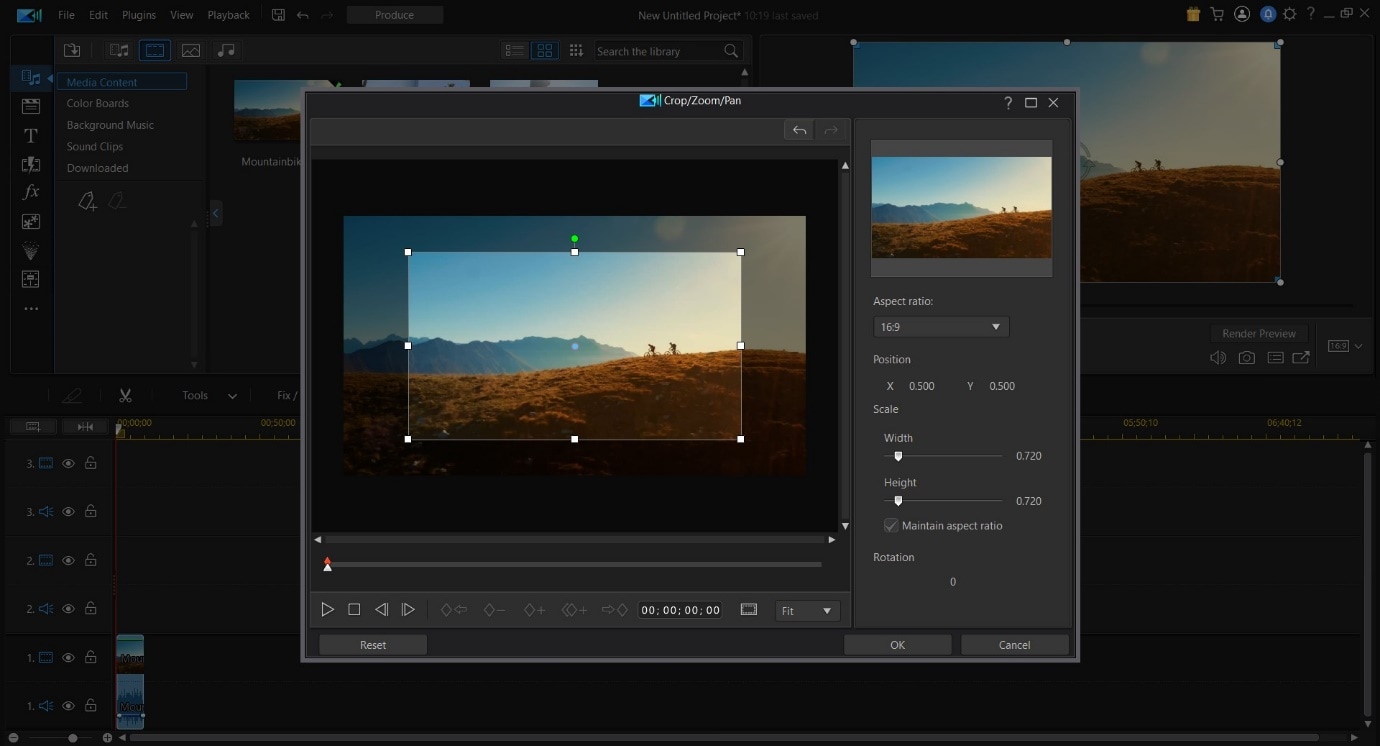
This action will crop the video clip according to your desired size.
Tip:
The activation of Keyframes while cropping will allow you to create an effect that slowly zooms into the footage. To do this, set Keyframe Point 1 at a specific time (say the fifth second) and at one zoom level (say zero) and create Keyframe Point 2 at another time (fifteenth second) and a different zoom level (say fifty). So, between the fifth second and fifteenth second, the zoom will steadily increase and raise emphasis on an object. You can also add an element of position to this action if you want the focus to be on something not in the center of the screen.
Definition: Keyframes while Video Editing is a software-based feature that allows you to set In and Out Points, giving clips between the two positions different properties that change as the playhead continues to move. These properties can be increased zoom, rotation, different colors, or even a gradual pan.
We recommend experimenting with this feature if you want to bring a more dynamic feeling to your video project.
An Easier Way to Crop Video with Wondershare Filmora
While Cyberlink PowerDirector 365 is a powerful video editing tool, in our experience, its menus are not as simple to navigate as some of the other competing video editing tools available, Wondershare Filmora Video Editor included.
An emphasis on quick accessibility is present with Filmora, and we believe this is a huge plus for beginning creators. The use of iconography resemblant to mobile software is another aspect that helps increase familiarity.
If you do not already have Wondershare Filmora, you can download the software by visiting the official website.
Now, to help you learn how to use the Crop Tool and to show you an example of what we mean, here is how you can use the feature Wondershare Filmora to get the desired output.
For Win 7 or later (64-bit)
For macOS 10.14 or later
Once you have the software open, follow the steps listed below.
Step 1: Import the Media File into your Video Project.

Step 2: Drag the clip onto the Timeline and then select it to activate further interactions.

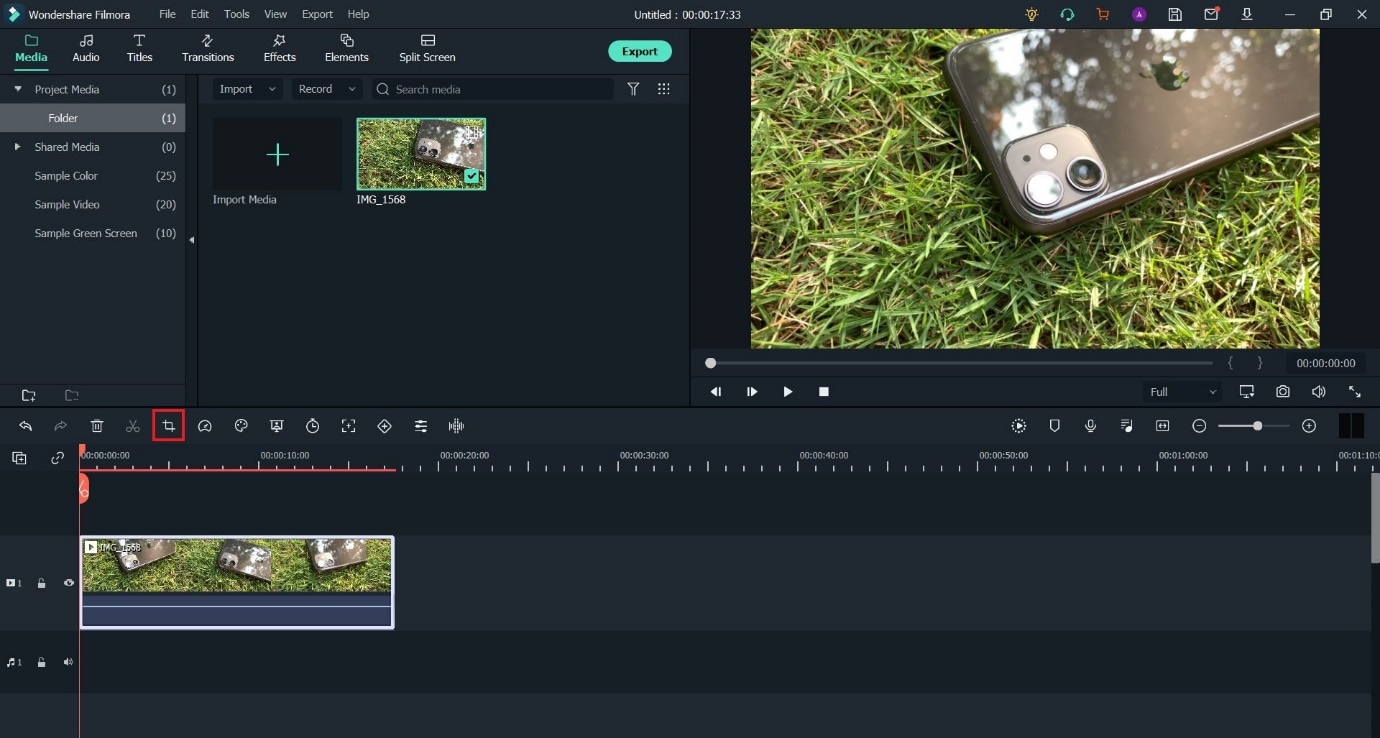
Step 3: Choose the Crop Options (marked in Red) to open the Crop window.
Step 4: Pick any edge within the visible box and resize them to select the portion you want to keep in the clip.
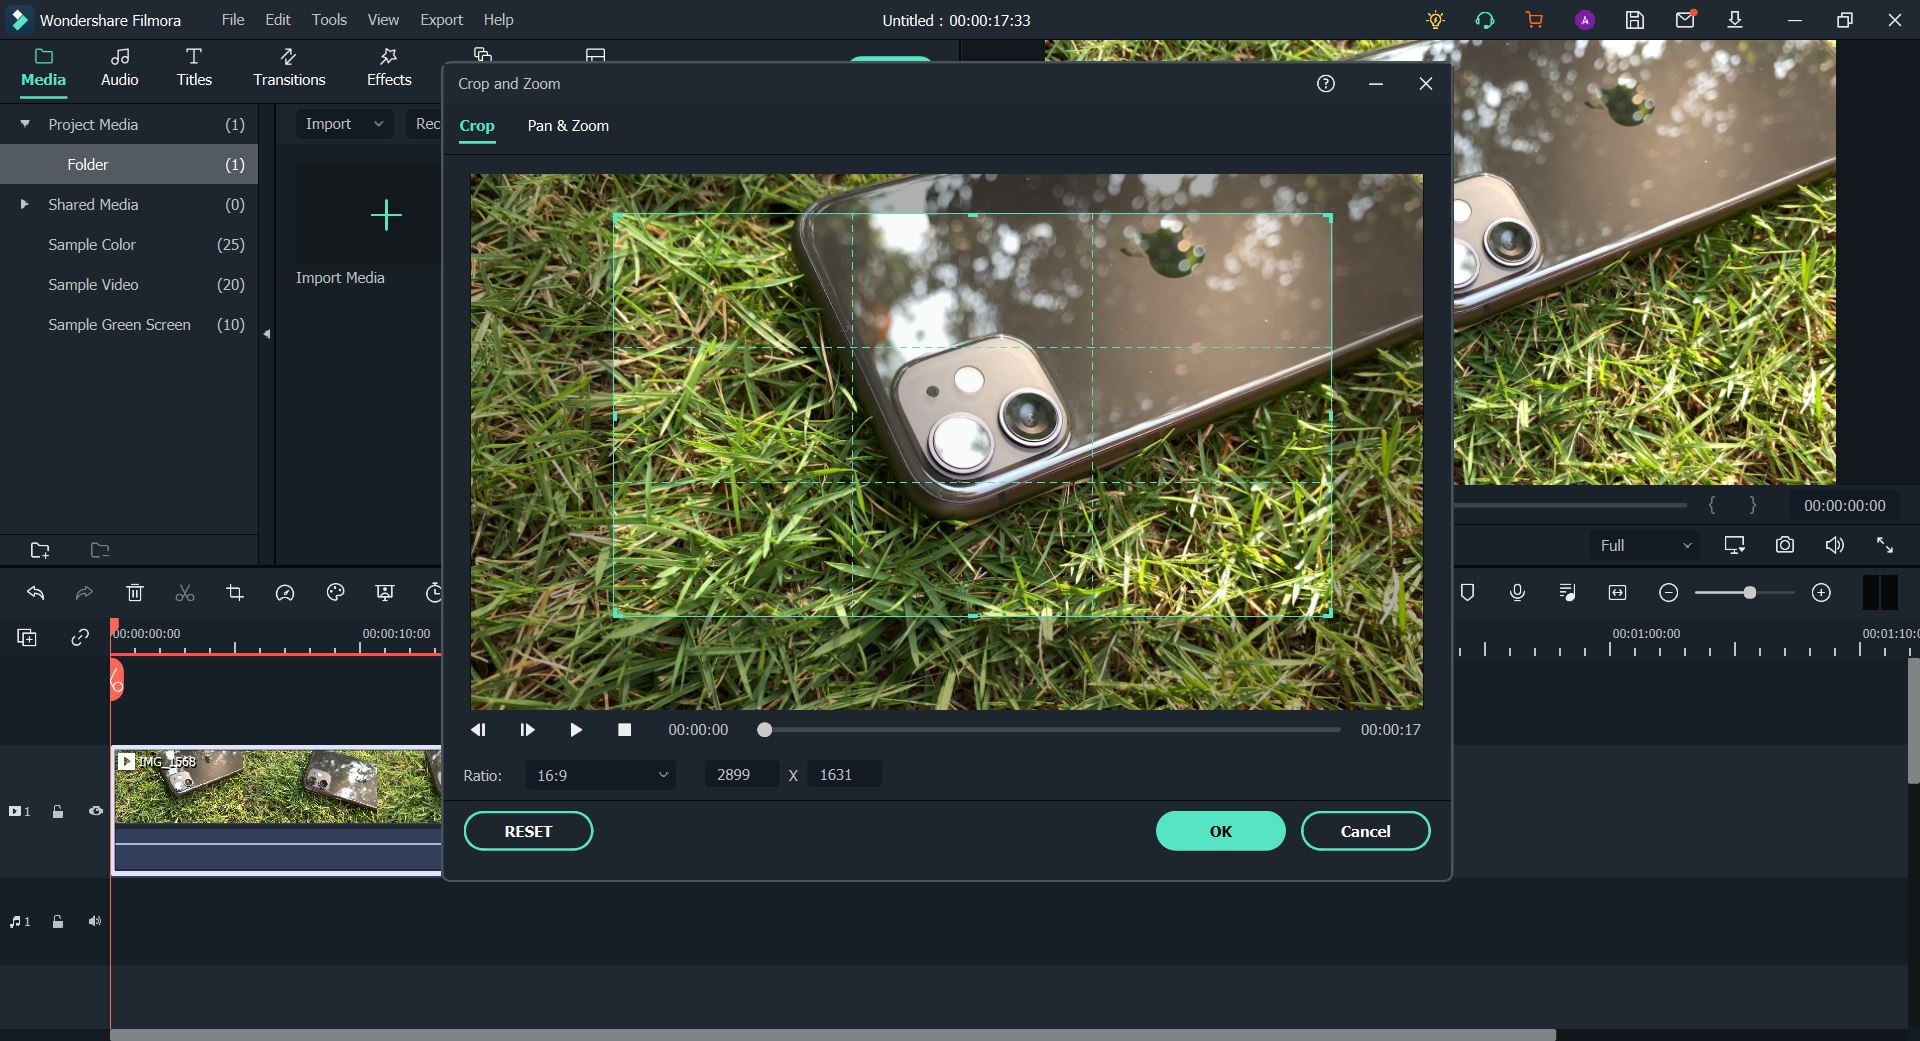
Having read this bit of the guide, we believe you may have noticed how Filmora is more convenient due to the easier access it provides to the crop function.
The Bottom Line
So, at the end of the day, both software listed in this article are fully functional and highly-capable video editing tools, but saving time spent in front of the computer is a huge factor for any video editor.
And Wondershare Filmora does just that with its modern iconography and increased accessibility. With its thoughtful, less-frills approach, Filmora is the one to pick if you do not want to be bogged down by needless menus and have to hunt for actions that will help you create a video that you would want to watch yourself.
Note: Full Mode in Cyberlink PowerDirector 365 provides access to a full-featured video editing tool, similar to Wondershare Filmora. The other available options cater to distinct video types.
Step 2: Import media onto the Timeline from the Media Library; in this guide, we have gone ahead and used the pre-existing stock footage.

Step 3: Now, click on the video file on the Timeline; this will activate the video toolbar giving you access to the various controls built into PowerDirector 365. Hover over the tools open, following which you need to click on the Crop, Zoom, and Pan option.

Step 4: Pick either corner of the frame visible around the video and set the area you want the clip to focus upon; following this, click Save.

This action will crop the video clip according to your desired size.
Tip:
The activation of Keyframes while cropping will allow you to create an effect that slowly zooms into the footage. To do this, set Keyframe Point 1 at a specific time (say the fifth second) and at one zoom level (say zero) and create Keyframe Point 2 at another time (fifteenth second) and a different zoom level (say fifty). So, between the fifth second and fifteenth second, the zoom will steadily increase and raise emphasis on an object. You can also add an element of position to this action if you want the focus to be on something not in the center of the screen.
Definition: Keyframes while Video Editing is a software-based feature that allows you to set In and Out Points, giving clips between the two positions different properties that change as the playhead continues to move. These properties can be increased zoom, rotation, different colors, or even a gradual pan.
We recommend experimenting with this feature if you want to bring a more dynamic feeling to your video project.
An Easier Way to Crop Video with Wondershare Filmora
While Cyberlink PowerDirector 365 is a powerful video editing tool, in our experience, its menus are not as simple to navigate as some of the other competing video editing tools available, Wondershare Filmora Video Editor included.
An emphasis on quick accessibility is present with Filmora, and we believe this is a huge plus for beginning creators. The use of iconography resemblant to mobile software is another aspect that helps increase familiarity.
If you do not already have Wondershare Filmora, you can download the software by visiting the official website.
Now, to help you learn how to use the Crop Tool and to show you an example of what we mean, here is how you can use the feature Wondershare Filmora to get the desired output.
For Win 7 or later (64-bit)
For macOS 10.14 or later
Once you have the software open, follow the steps listed below.
Step 1: Import the Media File into your Video Project.

Step 2: Drag the clip onto the Timeline and then select it to activate further interactions.

Step 3: Choose the Crop Options (marked in Red) to open the Crop window.

Step 4: Pick any edge within the visible box and resize them to select the portion you want to keep in the clip.

Having read this bit of the guide, we believe you may have noticed how Filmora is more convenient due to the easier access it provides to the crop function.
The Bottom Line
So, at the end of the day, both software listed in this article are fully functional and highly-capable video editing tools, but saving time spent in front of the computer is a huge factor for any video editor.
And Wondershare Filmora does just that with its modern iconography and increased accessibility. With its thoughtful, less-frills approach, Filmora is the one to pick if you do not want to be bogged down by needless menus and have to hunt for actions that will help you create a video that you would want to watch yourself.
Note: Full Mode in Cyberlink PowerDirector 365 provides access to a full-featured video editing tool, similar to Wondershare Filmora. The other available options cater to distinct video types.
Step 2: Import media onto the Timeline from the Media Library; in this guide, we have gone ahead and used the pre-existing stock footage.

Step 3: Now, click on the video file on the Timeline; this will activate the video toolbar giving you access to the various controls built into PowerDirector 365. Hover over the tools open, following which you need to click on the Crop, Zoom, and Pan option.

Step 4: Pick either corner of the frame visible around the video and set the area you want the clip to focus upon; following this, click Save.

This action will crop the video clip according to your desired size.
Tip:
The activation of Keyframes while cropping will allow you to create an effect that slowly zooms into the footage. To do this, set Keyframe Point 1 at a specific time (say the fifth second) and at one zoom level (say zero) and create Keyframe Point 2 at another time (fifteenth second) and a different zoom level (say fifty). So, between the fifth second and fifteenth second, the zoom will steadily increase and raise emphasis on an object. You can also add an element of position to this action if you want the focus to be on something not in the center of the screen.
Definition: Keyframes while Video Editing is a software-based feature that allows you to set In and Out Points, giving clips between the two positions different properties that change as the playhead continues to move. These properties can be increased zoom, rotation, different colors, or even a gradual pan.
We recommend experimenting with this feature if you want to bring a more dynamic feeling to your video project.
An Easier Way to Crop Video with Wondershare Filmora
While Cyberlink PowerDirector 365 is a powerful video editing tool, in our experience, its menus are not as simple to navigate as some of the other competing video editing tools available, Wondershare Filmora Video Editor included.
An emphasis on quick accessibility is present with Filmora, and we believe this is a huge plus for beginning creators. The use of iconography resemblant to mobile software is another aspect that helps increase familiarity.
If you do not already have Wondershare Filmora, you can download the software by visiting the official website.
Now, to help you learn how to use the Crop Tool and to show you an example of what we mean, here is how you can use the feature Wondershare Filmora to get the desired output.
For Win 7 or later (64-bit)
For macOS 10.14 or later
Once you have the software open, follow the steps listed below.
Step 1: Import the Media File into your Video Project.

Step 2: Drag the clip onto the Timeline and then select it to activate further interactions.

Step 3: Choose the Crop Options (marked in Red) to open the Crop window.

Step 4: Pick any edge within the visible box and resize them to select the portion you want to keep in the clip.

Having read this bit of the guide, we believe you may have noticed how Filmora is more convenient due to the easier access it provides to the crop function.
The Bottom Line
So, at the end of the day, both software listed in this article are fully functional and highly-capable video editing tools, but saving time spent in front of the computer is a huge factor for any video editor.
And Wondershare Filmora does just that with its modern iconography and increased accessibility. With its thoughtful, less-frills approach, Filmora is the one to pick if you do not want to be bogged down by needless menus and have to hunt for actions that will help you create a video that you would want to watch yourself.
Note: Full Mode in Cyberlink PowerDirector 365 provides access to a full-featured video editing tool, similar to Wondershare Filmora. The other available options cater to distinct video types.
Step 2: Import media onto the Timeline from the Media Library; in this guide, we have gone ahead and used the pre-existing stock footage.

Step 3: Now, click on the video file on the Timeline; this will activate the video toolbar giving you access to the various controls built into PowerDirector 365. Hover over the tools open, following which you need to click on the Crop, Zoom, and Pan option.

Step 4: Pick either corner of the frame visible around the video and set the area you want the clip to focus upon; following this, click Save.

This action will crop the video clip according to your desired size.
Tip:
The activation of Keyframes while cropping will allow you to create an effect that slowly zooms into the footage. To do this, set Keyframe Point 1 at a specific time (say the fifth second) and at one zoom level (say zero) and create Keyframe Point 2 at another time (fifteenth second) and a different zoom level (say fifty). So, between the fifth second and fifteenth second, the zoom will steadily increase and raise emphasis on an object. You can also add an element of position to this action if you want the focus to be on something not in the center of the screen.
Definition: Keyframes while Video Editing is a software-based feature that allows you to set In and Out Points, giving clips between the two positions different properties that change as the playhead continues to move. These properties can be increased zoom, rotation, different colors, or even a gradual pan.
We recommend experimenting with this feature if you want to bring a more dynamic feeling to your video project.
An Easier Way to Crop Video with Wondershare Filmora
While Cyberlink PowerDirector 365 is a powerful video editing tool, in our experience, its menus are not as simple to navigate as some of the other competing video editing tools available, Wondershare Filmora Video Editor included.
An emphasis on quick accessibility is present with Filmora, and we believe this is a huge plus for beginning creators. The use of iconography resemblant to mobile software is another aspect that helps increase familiarity.
If you do not already have Wondershare Filmora, you can download the software by visiting the official website.
Now, to help you learn how to use the Crop Tool and to show you an example of what we mean, here is how you can use the feature Wondershare Filmora to get the desired output.
For Win 7 or later (64-bit)
For macOS 10.14 or later
Once you have the software open, follow the steps listed below.
Step 1: Import the Media File into your Video Project.

Step 2: Drag the clip onto the Timeline and then select it to activate further interactions.

Step 3: Choose the Crop Options (marked in Red) to open the Crop window.

Step 4: Pick any edge within the visible box and resize them to select the portion you want to keep in the clip.

Having read this bit of the guide, we believe you may have noticed how Filmora is more convenient due to the easier access it provides to the crop function.
The Bottom Line
So, at the end of the day, both software listed in this article are fully functional and highly-capable video editing tools, but saving time spent in front of the computer is a huge factor for any video editor.
And Wondershare Filmora does just that with its modern iconography and increased accessibility. With its thoughtful, less-frills approach, Filmora is the one to pick if you do not want to be bogged down by needless menus and have to hunt for actions that will help you create a video that you would want to watch yourself.
How to Add Custom Subtitles to Netflix
Netflix is the most popular streaming service in the world. It offers loads of movies and series that you can watch on smartphones, tablets, and computers. Over the years, Netflix has become a one-stop destination for watching movies and TV shows in different languages.
While the user base of Netflix is quite diverse, the platform offers subtitles in limited languages for most movies and series. Suppose you want to view a Korean Drama on Netflix with French subtitles. However, you found that French subtitles are unavailable for that Korean Drama. In such a case, you might wonder if adding custom subtitles to Netflix is possible.
Well, you can add subtitles to Netflix, and there are two different methods to do the same. This guide will help you learn both methods available for adding custom subtitles to Netflix. So, let’s get started!
Method 1. Upload Your Custom Subtitle to Netflix
Before proceeding with this method, you must remember that it only works if you are a Netflix Premium user. Now, let’s discuss how to add subtitles to Netflix with this method.
Key Steps to Follow
Below are the steps for adding custom subtitles to Netflix.
Step 1 First of all, you need to install and add Language Learning with Netflix & YouTube™ extension to your web browser (Chrome or Edge).
Step 2 Make sure the extension is activated.
Step 3 Download the .srt file that contains the subtitles in your preferred language for a particular movie or TV show.
Step 4 Open Netflix on a Chrome or Edge browser and sign into your account.
Step 5 Play the movie or TV show for which you have downloaded the subtitles.
Step 6 Within the Netflix player, you will see a settings icon left to the Subtitles icon. Click on it.
Step 7 Among the various setting options, you need to choose the screen and find the one with the label “Lower Subtitles (Mother Language)”. You need to click on its field and select the “Upload Subtitle” option.
Step 8 You will see a pop-up window at the top of the screen where you need to click the “Choose File” button.
Step 9 You then need to navigate to the directory on your computer where you have downloaded the subtitles file, select it, and click the “Open” button.
Step 10 Click the “Okay” button to upload the subtitles to Netflix.
Step 11 Close the settings window and play the video. You can view the uploaded subtitles at the bottom of the player.
Method 2. Add Custom Subtitles to Netflix with Extensions
If you’re not a Netflix Premium user, you can still add subtitles to Netflix with the help of certain browser extensions. We’ll list them down and discuss the steps for using one of them; the basic steps for using all such extensions are pretty much the same.
1. Substital
Supported web browsers: C hrome | Firefox | Edge
Substital is among the most popular extensions that allow you to add subtitles to several online on-demand video streaming platforms, including Netflix. It has more than 100K users on the Chome Web Store.
Key Features
- Offers a built-in subtitles search feature.
- Supports .srt files and .zip files containing subtitles in the .srt format.
- You can manually sync the subtitles with the video.
- It allows you to customize the appearance of subtitles.
Steps to Add Custom Subtitles to Netflix with Substital
Following are the key steps to add custom subtitles to Netflix using the Substital extension:
Step 1 The first thing you need to do is to download and install the Substital extension on your browser.
Step 2 Open Netflix on the same browser and log in to your account.
Step 3 Play the movie or episode from a TV series for which you want to add custom subtitles.
Step 4 Download the subtitles file for the same movie or episode in your preferred language from the web.
Step 5 Now open the extensions menu in your browser and click on the Substital icon.
Step 6 You will see the name of the movie or TV show that you are watching on Netflix. Click on it.
Step 7 In this step, you need to drag and drop the subtitle file from your system (that you downloaded earlier) to the browser window.
Step 8 Finally, you can notice that the subtitles are loaded in the Netflix player.
2. Super Netflix
Web browsers: Chrome
Super Netflix is yet another reliable extension to add subtitles to Netflix. Apart from adding custom subtitles, this extension allows you to change the video playback speed. Like Substital, the Super Netflix extension on Chrome Web Store also has 100K+ users.
Key Features
- It can help you avoid spoilers by blurring images and episode descriptions.
- You can use the extension to skip intros automatically.
- Offers 5 different video modes.
- You get the option to change the Netflix streaming server.
3. Netflix SubStyler: customize subtitles
Web browsers: Chrome
Unlike the other two extensions mentioned above, Netflix SubStyler only allows you to change the styling of subtitles on Netflix. However, the thing that makes this extension worthy of your attention is that it comes loaded with several customization options.
Key Features
- You can choose a custom text color for the subtitles either with the help of an in-built color picker or by entering the RGB value of the color.
- The extension lets you add text outlines and change the size of the text.
- You can even add a text background and change its color and opacity.
Bonus Tip: How to Edit and Add Subtitles to Videos Available Offline
In certain cases, you may want to edit the subtitles of videos probably because either the subtitles are not available for a certain part of the video, or they are not correct. So, if you want to edit subtitles of videos that you have downloaded with ease, you can consider using Wondershare Filmora .
Free Download For Win 7 or later(64-bit)
Free Download For macOS 10.14 or later

Filmora is one of the most popular and powerful video editors out there. Developed by Wondershare, it allows you to import subtitle files in various formats, including .srt, and edit them directly. Some noteworthy features of Filmora for subtitles and video editing include the manual addition of subtitles, speech-to-text conversion, green screen, video stabilization, and color correction.
Wondershare Filmora also offers several advanced text editing tools that make it possible to customize the appearance of subtitles that you add to a video. You can change the color and size of the fonts and add a gradient effect to the text. Additionally, you can animate text to make it stand out.
Add Custom Subtitles with Filmora: A Step-by-Step Guide
If you want to add subtitles to any video using Filmora, you simply need to follow the steps mentioned below. Please note that for this tutorial, we’ll be using Filmora 11.
Step 1 Launch the Filmora app on your computer and create a new project.
Step 2 You can simply click the “Import media” button and load the video onto it.
Step 3 Hover over the video’s thumbnail and click on the (+) button to add it to the timeline.
Step 4 Now, you need to play the video and find the section of the video where you need to add subtitles. Pause the video and add a mark by pressing the M key on your keyboard. You can also do the same by clicking the marker button, which is located beside the microphone icon in the top right of the timeline tab.
Step 5 To add the subtitle, you need to click on the “Titles” button that you can see at the top of the Filmora window. You can see several subtitle templates available there.
Step 6 Download, preview, and choose a subtitle template that seems most appropriate.
Step 7 You can then drag and drop the subtitle to the timeline above the video timeline. You can also trim the subtitle length from any side of the subtitle timeline box.
Step 8 You need to double-click on the subtitle timeline box to add custom text, change font size, color, and alignment, and add animations.
Step 9 Once done, you can click on the “Ok” button to save the changes.
Step 10 Similarly, you can add subtitles for different sections of the video.
Conclusion
If you want to add custom subtitles to Netflix movies and TV shows, you can achieve the same with the two different methods mentioned above. For the first method to work, you must be a Netflix Premium user. On the other hand, the second method will work fine even if you aren’t a Netflix Premium user. Also, you can add custom subtitles to any offline videos using the Wondershare Filmora video editor.
Free Download For macOS 10.14 or later

Filmora is one of the most popular and powerful video editors out there. Developed by Wondershare, it allows you to import subtitle files in various formats, including .srt, and edit them directly. Some noteworthy features of Filmora for subtitles and video editing include the manual addition of subtitles, speech-to-text conversion, green screen, video stabilization, and color correction.
Wondershare Filmora also offers several advanced text editing tools that make it possible to customize the appearance of subtitles that you add to a video. You can change the color and size of the fonts and add a gradient effect to the text. Additionally, you can animate text to make it stand out.
Add Custom Subtitles with Filmora: A Step-by-Step Guide
If you want to add subtitles to any video using Filmora, you simply need to follow the steps mentioned below. Please note that for this tutorial, we’ll be using Filmora 11.
Step 1 Launch the Filmora app on your computer and create a new project.
Step 2 You can simply click the “Import media” button and load the video onto it.
Step 3 Hover over the video’s thumbnail and click on the (+) button to add it to the timeline.
Step 4 Now, you need to play the video and find the section of the video where you need to add subtitles. Pause the video and add a mark by pressing the M key on your keyboard. You can also do the same by clicking the marker button, which is located beside the microphone icon in the top right of the timeline tab.
Step 5 To add the subtitle, you need to click on the “Titles” button that you can see at the top of the Filmora window. You can see several subtitle templates available there.
Step 6 Download, preview, and choose a subtitle template that seems most appropriate.
Step 7 You can then drag and drop the subtitle to the timeline above the video timeline. You can also trim the subtitle length from any side of the subtitle timeline box.
Step 8 You need to double-click on the subtitle timeline box to add custom text, change font size, color, and alignment, and add animations.
Step 9 Once done, you can click on the “Ok” button to save the changes.
Step 10 Similarly, you can add subtitles for different sections of the video.
Conclusion
If you want to add custom subtitles to Netflix movies and TV shows, you can achieve the same with the two different methods mentioned above. For the first method to work, you must be a Netflix Premium user. On the other hand, the second method will work fine even if you aren’t a Netflix Premium user. Also, you can add custom subtitles to any offline videos using the Wondershare Filmora video editor.
What Is TS Format and How To Play TS Files? [Basic Tips]
Have you been downloading videos and looking at the files having the ‘.ts’ extension at the end? We guess you have seen them. The question is, do you know what the TS file format is? Many compressed video files have TS format. Do you want to learn more about the file format?
Take our help. Allow us to tell you what this extension means, along with what work they do. We will also tell you its difference with other formats. So, to learn in detail about TS video format, continue reading.
In this article
02 Pros and Coins about TS Video Format
03 How to Play TS Video Files with VLC Media Player?
04 How to Edit TS Video Files with Filmora Video Editor?
05 TS VS. MP4: What’s the Difference?
Part 1. What Is TS Video Format?
A TS format file is a Video Transport Stream file. The TS file extension is used to store video data, mostly on DVDs. The video files are standardly compressed with .MPEG video compression. If you are looking for a file extension to save streamed or broadcast videos, TS video format is ideal for this. Are you worried about how to play a TS file?
Well, a video file with this format can easily be played on a certain media player or video editing program . Various video playback apps, video development tools, and also DVD creation programs support the TS format. The .ts file extension can also contain any data, and TS files don’t always need to store media or documents.
Part 2. Pros and Coins about TS Video Format
Everything has its beneficial factors and disadvantages, so does TS video format has. Are you ready to know more about the TS file format? After learning about the format, it’s time to share its advantages and drawbacks with you. Let’s get started!
Advantages of TS File Format
A great thing about TS format is that, after each keyframe, the file information is added automatically. The format is impressive when it comes to maintaining transmission integrity. This is because of all the elementary streams, synchronization patterns, and error corrections; everything is encapsulated in a container format.
Do you know what else benefits TS format has? It is widely used for broadcasting because broadcasting doesn’t need the complete stream for playing it. You can easily share large files over the communication media in real-time as tiny chunks of the audio or video file are sent. Along with this, the error is easily detected as extra information is shared with every chunk, helping in error detection.
Drawbacks of TS File Format
Moving on to its disadvantages, let’s start with the device compatibility. The biggest drawback of using the TS file format is that it is not compatible with many devices. For instance, a built-in media player like Windows Media Player does not support the format; eventually, users must change the file format.
Do you know another significant disadvantage? You cannot share TS files online. Different platforms like Facebook, YouTube, etc., support other famous formats, so hence, sharing TS video files requires a format converter. Do you know how much space does a TS file occupies? Well, it acquires a significant storage space, more than other file formats.
Part 3. How to Play TS Video Files with VLC Media Player?
As mentioned, only specific programs support and play TS video format, so VLC Media Player is one of those. The software is famous among its competitors because it supports a wide range of file formats.
VLC is an open-source, free cross-platform media player that lets you play various multimedia files and DVDs, VCDs, Audio CDs, and other streaming protocols. VLC also plays most codecs like MPEG-2, MPEG-4, MKV, MP3, etc. The media player runs on Windows, macOS, Linux, Unix, iOS, and Android.
Do you know a great thing about VLC? Surprisingly, the software has no spyware, no user tracking, and no ads. VLC is a simple yet super-fast and powerful media player of all time. Learn how to play TS files on VLC by following the steps below:
Step 1: Install or Update VLC
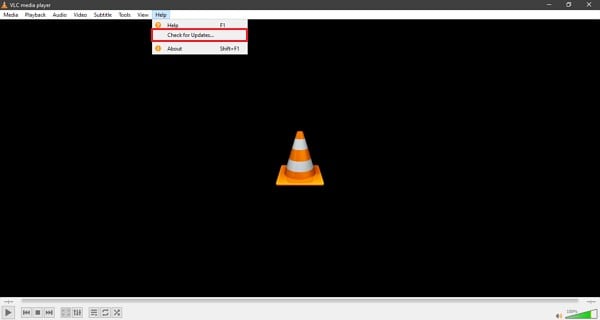
To play TS file format, first of all, download and install the VLC media player on your respective device. If you have already installed the media player, update it to the latest version. With this, all the codecs will be working properly. Move to the ‘Help’ section from the top menu and hit ‘Check for Updates.’
Step 2: Open the TS File
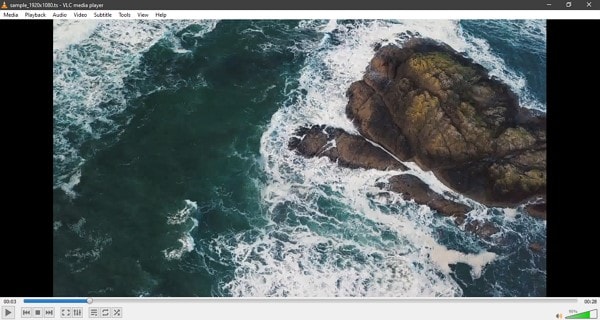
Now, launch the VLC media player and head over to the ‘Media’ option. From the menu list, select the ‘Open File’ option, locate the TS file from your device and add it to the media player. You can also directly drag the TS video file to VLC to play it.

Step 3: Enjoy Watching TS File
After your file has been successfully imported to the VLC media player, you can now enjoy watching the TS Video format without any trouble.
Part 4. How to Edit TS Video Files with Filmora Video Editor?
Now that you know how to play TS video format with a VLC media player let’s also share how you can edit your TS videos. With Wondershare Filmora , you can edit a stunning video. The video editor offers more features than you can imagine. The software comes with features like Record PC Screen, Color Match, Silence Detection, Scene Detection, etc.
For Win 7 or later (64-bit)
For macOS 10.12 or later
Some more advanced editing tools are offered, like Power Tool, Stabilize Video, Auto Reframe, Auto Highlight, and whatnot. If you are interested in editing your TS file format videos with Filmora, take help from the steps shared below.
Step 1: Import TS File
After you have launched Wondershare Filmora on your device, import the media file so that you can start the editing; for that, head to the ‘File’ tab and hover on the ‘Import Media’ option. By doing this, a sub-menu will appear, select the ‘Import Media Files’ option and locate the TS video.

Step 2: TS Audio Edit
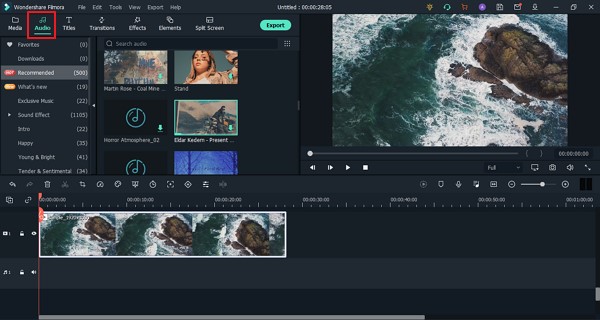
After importing the media file, drag it to the timeline to start the editing. With Filmora, add cool sound effects to your videos from the ‘Audio’ section. You get various effects like Happy, Jazz, Young & Bright, and other options.
Step 3: Use Transitions and Effects
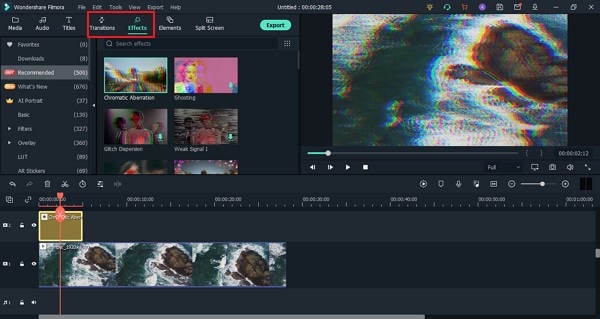
What is a video without Effects and Transitions? Filmora comes with a wide range of options to add unique effects and transitions to your videos.
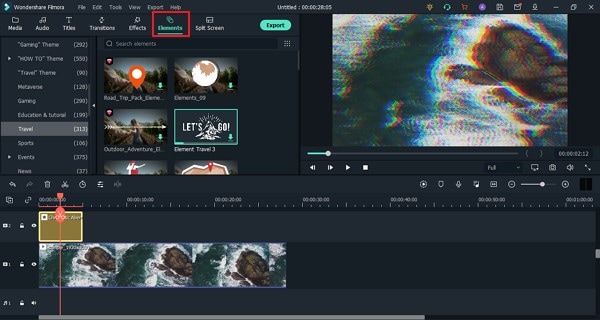
Step 4: Add Elements
Head to the ‘Elements’ section to add amazing little fun things to your video and make it interesting. You get elements like Laser Eye, various Emoji options, and a lot more.
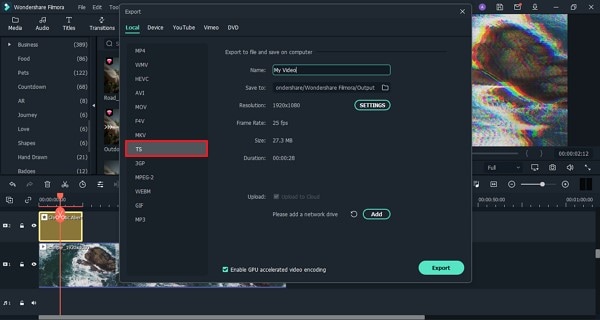
Step 5: Export TS Video
Once all the editing is complete and satisfied with the final result, export the video. Hit the ‘Export’ button and select TS file format from the ‘Locals’ tab as the output format.
Part 5. TS VS. MP4: What’s the Difference?
What is the difference between the TS file format and MP4? Allow us to tell you some. You might have read about both formats, but a few differences are discussed as follows:
TS
TS format is used in DVD and Blu-ray discs that you have on your respective device. It does the same work as MP4, but the TS file breaks the data into tiny chinks. TS format comprises a few elements, making it a faster transporter for MPEG-2 format compressed video data. It is used widely in broadcasting and streaming.
MP4
MP4 is considered more compatible as compared to TS format, as not all the software allows the ‘.ts’ extension. If the file is not transmitted properly or is not closed properly, it can lose the data it has. MP4 is divided into two parts, one has the media data, and the other has metadata. Due to compression differences in both formats, it has a smaller size than the TS format.
Bottom Line
The article has shared great details about the TS format. We talked about how you can play TS files on VLC and also shed light on its pros and cons. Moreover, we also shared a video editor to edit your TS file format videos. Now, let’s talk about Wondershare Filmora.
Wondershare Filmora is a great video editor and is perfect for creating brilliant videos. The comprehensive list of features that you get from Filmora makes it unique and unforgettable. AI Portrait, Auto Normalization, Video Snapshot, Animation Keyframing, and many others are among its various features. For creating good videos, Filmora is an ideal option.
Wondershare Filmora
Get started easily with Filmora’s powerful performance, intuitive interface, and countless effects!
Try It Free Try It Free Try It Free Learn More >

02 Pros and Coins about TS Video Format
03 How to Play TS Video Files with VLC Media Player?
04 How to Edit TS Video Files with Filmora Video Editor?
05 TS VS. MP4: What’s the Difference?
Part 1. What Is TS Video Format?
A TS format file is a Video Transport Stream file. The TS file extension is used to store video data, mostly on DVDs. The video files are standardly compressed with .MPEG video compression. If you are looking for a file extension to save streamed or broadcast videos, TS video format is ideal for this. Are you worried about how to play a TS file?

Well, a video file with this format can easily be played on a certain media player or video editing program . Various video playback apps, video development tools, and also DVD creation programs support the TS format. The .ts file extension can also contain any data, and TS files don’t always need to store media or documents.
Part 2. Pros and Coins about TS Video Format
Everything has its beneficial factors and disadvantages, so does TS video format has. Are you ready to know more about the TS file format? After learning about the format, it’s time to share its advantages and drawbacks with you. Let’s get started!
Advantages of TS File Format
A great thing about TS format is that, after each keyframe, the file information is added automatically. The format is impressive when it comes to maintaining transmission integrity. This is because of all the elementary streams, synchronization patterns, and error corrections; everything is encapsulated in a container format.
Do you know what else benefits TS format has? It is widely used for broadcasting because broadcasting doesn’t need the complete stream for playing it. You can easily share large files over the communication media in real-time as tiny chunks of the audio or video file are sent. Along with this, the error is easily detected as extra information is shared with every chunk, helping in error detection.
Drawbacks of TS File Format
Moving on to its disadvantages, let’s start with the device compatibility. The biggest drawback of using the TS file format is that it is not compatible with many devices. For instance, a built-in media player like Windows Media Player does not support the format; eventually, users must change the file format.
Do you know another significant disadvantage? You cannot share TS files online. Different platforms like Facebook, YouTube, etc., support other famous formats, so hence, sharing TS video files requires a format converter. Do you know how much space does a TS file occupies? Well, it acquires a significant storage space, more than other file formats.
Part 3. How to Play TS Video Files with VLC Media Player?
As mentioned, only specific programs support and play TS video format, so VLC Media Player is one of those. The software is famous among its competitors because it supports a wide range of file formats.
VLC is an open-source, free cross-platform media player that lets you play various multimedia files and DVDs, VCDs, Audio CDs, and other streaming protocols. VLC also plays most codecs like MPEG-2, MPEG-4, MKV, MP3, etc. The media player runs on Windows, macOS, Linux, Unix, iOS, and Android.
Do you know a great thing about VLC? Surprisingly, the software has no spyware, no user tracking, and no ads. VLC is a simple yet super-fast and powerful media player of all time. Learn how to play TS files on VLC by following the steps below:
Step 1: Install or Update VLC
To play TS file format, first of all, download and install the VLC media player on your respective device. If you have already installed the media player, update it to the latest version. With this, all the codecs will be working properly. Move to the ‘Help’ section from the top menu and hit ‘Check for Updates.’

Step 2: Open the TS File
Now, launch the VLC media player and head over to the ‘Media’ option. From the menu list, select the ‘Open File’ option, locate the TS file from your device and add it to the media player. You can also directly drag the TS video file to VLC to play it.

Step 3: Enjoy Watching TS File
After your file has been successfully imported to the VLC media player, you can now enjoy watching the TS Video format without any trouble.

Part 4. How to Edit TS Video Files with Filmora Video Editor?
Now that you know how to play TS video format with a VLC media player let’s also share how you can edit your TS videos. With Wondershare Filmora , you can edit a stunning video. The video editor offers more features than you can imagine. The software comes with features like Record PC Screen, Color Match, Silence Detection, Scene Detection, etc.
For Win 7 or later (64-bit)
For macOS 10.12 or later
Some more advanced editing tools are offered, like Power Tool, Stabilize Video, Auto Reframe, Auto Highlight, and whatnot. If you are interested in editing your TS file format videos with Filmora, take help from the steps shared below.
Step 1: Import TS File
After you have launched Wondershare Filmora on your device, import the media file so that you can start the editing; for that, head to the ‘File’ tab and hover on the ‘Import Media’ option. By doing this, a sub-menu will appear, select the ‘Import Media Files’ option and locate the TS video.

Step 2: TS Audio Edit
After importing the media file, drag it to the timeline to start the editing. With Filmora, add cool sound effects to your videos from the ‘Audio’ section. You get various effects like Happy, Jazz, Young & Bright, and other options.

Step 3: Use Transitions and Effects
What is a video without Effects and Transitions? Filmora comes with a wide range of options to add unique effects and transitions to your videos.

Step 4: Add Elements
Head to the ‘Elements’ section to add amazing little fun things to your video and make it interesting. You get elements like Laser Eye, various Emoji options, and a lot more.

Step 5: Export TS Video
Once all the editing is complete and satisfied with the final result, export the video. Hit the ‘Export’ button and select TS file format from the ‘Locals’ tab as the output format.

Part 5. TS VS. MP4: What’s the Difference?
What is the difference between the TS file format and MP4? Allow us to tell you some. You might have read about both formats, but a few differences are discussed as follows:
TS
TS format is used in DVD and Blu-ray discs that you have on your respective device. It does the same work as MP4, but the TS file breaks the data into tiny chinks. TS format comprises a few elements, making it a faster transporter for MPEG-2 format compressed video data. It is used widely in broadcasting and streaming.
MP4
MP4 is considered more compatible as compared to TS format, as not all the software allows the ‘.ts’ extension. If the file is not transmitted properly or is not closed properly, it can lose the data it has. MP4 is divided into two parts, one has the media data, and the other has metadata. Due to compression differences in both formats, it has a smaller size than the TS format.
Bottom Line
The article has shared great details about the TS format. We talked about how you can play TS files on VLC and also shed light on its pros and cons. Moreover, we also shared a video editor to edit your TS file format videos. Now, let’s talk about Wondershare Filmora.
Wondershare Filmora is a great video editor and is perfect for creating brilliant videos. The comprehensive list of features that you get from Filmora makes it unique and unforgettable. AI Portrait, Auto Normalization, Video Snapshot, Animation Keyframing, and many others are among its various features. For creating good videos, Filmora is an ideal option.
Wondershare Filmora
Get started easily with Filmora’s powerful performance, intuitive interface, and countless effects!
Try It Free Try It Free Try It Free Learn More >

02 Pros and Coins about TS Video Format
03 How to Play TS Video Files with VLC Media Player?
04 How to Edit TS Video Files with Filmora Video Editor?
05 TS VS. MP4: What’s the Difference?
Part 1. What Is TS Video Format?
A TS format file is a Video Transport Stream file. The TS file extension is used to store video data, mostly on DVDs. The video files are standardly compressed with .MPEG video compression. If you are looking for a file extension to save streamed or broadcast videos, TS video format is ideal for this. Are you worried about how to play a TS file?

Well, a video file with this format can easily be played on a certain media player or video editing program . Various video playback apps, video development tools, and also DVD creation programs support the TS format. The .ts file extension can also contain any data, and TS files don’t always need to store media or documents.
Part 2. Pros and Coins about TS Video Format
Everything has its beneficial factors and disadvantages, so does TS video format has. Are you ready to know more about the TS file format? After learning about the format, it’s time to share its advantages and drawbacks with you. Let’s get started!
Advantages of TS File Format
A great thing about TS format is that, after each keyframe, the file information is added automatically. The format is impressive when it comes to maintaining transmission integrity. This is because of all the elementary streams, synchronization patterns, and error corrections; everything is encapsulated in a container format.
Do you know what else benefits TS format has? It is widely used for broadcasting because broadcasting doesn’t need the complete stream for playing it. You can easily share large files over the communication media in real-time as tiny chunks of the audio or video file are sent. Along with this, the error is easily detected as extra information is shared with every chunk, helping in error detection.
Drawbacks of TS File Format
Moving on to its disadvantages, let’s start with the device compatibility. The biggest drawback of using the TS file format is that it is not compatible with many devices. For instance, a built-in media player like Windows Media Player does not support the format; eventually, users must change the file format.
Do you know another significant disadvantage? You cannot share TS files online. Different platforms like Facebook, YouTube, etc., support other famous formats, so hence, sharing TS video files requires a format converter. Do you know how much space does a TS file occupies? Well, it acquires a significant storage space, more than other file formats.
Part 3. How to Play TS Video Files with VLC Media Player?
As mentioned, only specific programs support and play TS video format, so VLC Media Player is one of those. The software is famous among its competitors because it supports a wide range of file formats.
VLC is an open-source, free cross-platform media player that lets you play various multimedia files and DVDs, VCDs, Audio CDs, and other streaming protocols. VLC also plays most codecs like MPEG-2, MPEG-4, MKV, MP3, etc. The media player runs on Windows, macOS, Linux, Unix, iOS, and Android.
Do you know a great thing about VLC? Surprisingly, the software has no spyware, no user tracking, and no ads. VLC is a simple yet super-fast and powerful media player of all time. Learn how to play TS files on VLC by following the steps below:
Step 1: Install or Update VLC
To play TS file format, first of all, download and install the VLC media player on your respective device. If you have already installed the media player, update it to the latest version. With this, all the codecs will be working properly. Move to the ‘Help’ section from the top menu and hit ‘Check for Updates.’

Step 2: Open the TS File
Now, launch the VLC media player and head over to the ‘Media’ option. From the menu list, select the ‘Open File’ option, locate the TS file from your device and add it to the media player. You can also directly drag the TS video file to VLC to play it.

Step 3: Enjoy Watching TS File
After your file has been successfully imported to the VLC media player, you can now enjoy watching the TS Video format without any trouble.

Part 4. How to Edit TS Video Files with Filmora Video Editor?
Now that you know how to play TS video format with a VLC media player let’s also share how you can edit your TS videos. With Wondershare Filmora , you can edit a stunning video. The video editor offers more features than you can imagine. The software comes with features like Record PC Screen, Color Match, Silence Detection, Scene Detection, etc.
For Win 7 or later (64-bit)
For macOS 10.12 or later
Some more advanced editing tools are offered, like Power Tool, Stabilize Video, Auto Reframe, Auto Highlight, and whatnot. If you are interested in editing your TS file format videos with Filmora, take help from the steps shared below.
Step 1: Import TS File
After you have launched Wondershare Filmora on your device, import the media file so that you can start the editing; for that, head to the ‘File’ tab and hover on the ‘Import Media’ option. By doing this, a sub-menu will appear, select the ‘Import Media Files’ option and locate the TS video.

Step 2: TS Audio Edit
After importing the media file, drag it to the timeline to start the editing. With Filmora, add cool sound effects to your videos from the ‘Audio’ section. You get various effects like Happy, Jazz, Young & Bright, and other options.

Step 3: Use Transitions and Effects
What is a video without Effects and Transitions? Filmora comes with a wide range of options to add unique effects and transitions to your videos.

Step 4: Add Elements
Head to the ‘Elements’ section to add amazing little fun things to your video and make it interesting. You get elements like Laser Eye, various Emoji options, and a lot more.

Step 5: Export TS Video
Once all the editing is complete and satisfied with the final result, export the video. Hit the ‘Export’ button and select TS file format from the ‘Locals’ tab as the output format.

Part 5. TS VS. MP4: What’s the Difference?
What is the difference between the TS file format and MP4? Allow us to tell you some. You might have read about both formats, but a few differences are discussed as follows:
TS
TS format is used in DVD and Blu-ray discs that you have on your respective device. It does the same work as MP4, but the TS file breaks the data into tiny chinks. TS format comprises a few elements, making it a faster transporter for MPEG-2 format compressed video data. It is used widely in broadcasting and streaming.
MP4
MP4 is considered more compatible as compared to TS format, as not all the software allows the ‘.ts’ extension. If the file is not transmitted properly or is not closed properly, it can lose the data it has. MP4 is divided into two parts, one has the media data, and the other has metadata. Due to compression differences in both formats, it has a smaller size than the TS format.
Bottom Line
The article has shared great details about the TS format. We talked about how you can play TS files on VLC and also shed light on its pros and cons. Moreover, we also shared a video editor to edit your TS file format videos. Now, let’s talk about Wondershare Filmora.
Wondershare Filmora is a great video editor and is perfect for creating brilliant videos. The comprehensive list of features that you get from Filmora makes it unique and unforgettable. AI Portrait, Auto Normalization, Video Snapshot, Animation Keyframing, and many others are among its various features. For creating good videos, Filmora is an ideal option.
Wondershare Filmora
Get started easily with Filmora’s powerful performance, intuitive interface, and countless effects!
Try It Free Try It Free Try It Free Learn More >

02 Pros and Coins about TS Video Format
03 How to Play TS Video Files with VLC Media Player?
04 How to Edit TS Video Files with Filmora Video Editor?
05 TS VS. MP4: What’s the Difference?
Part 1. What Is TS Video Format?
A TS format file is a Video Transport Stream file. The TS file extension is used to store video data, mostly on DVDs. The video files are standardly compressed with .MPEG video compression. If you are looking for a file extension to save streamed or broadcast videos, TS video format is ideal for this. Are you worried about how to play a TS file?

Well, a video file with this format can easily be played on a certain media player or video editing program . Various video playback apps, video development tools, and also DVD creation programs support the TS format. The .ts file extension can also contain any data, and TS files don’t always need to store media or documents.
Part 2. Pros and Coins about TS Video Format
Everything has its beneficial factors and disadvantages, so does TS video format has. Are you ready to know more about the TS file format? After learning about the format, it’s time to share its advantages and drawbacks with you. Let’s get started!
Advantages of TS File Format
A great thing about TS format is that, after each keyframe, the file information is added automatically. The format is impressive when it comes to maintaining transmission integrity. This is because of all the elementary streams, synchronization patterns, and error corrections; everything is encapsulated in a container format.
Do you know what else benefits TS format has? It is widely used for broadcasting because broadcasting doesn’t need the complete stream for playing it. You can easily share large files over the communication media in real-time as tiny chunks of the audio or video file are sent. Along with this, the error is easily detected as extra information is shared with every chunk, helping in error detection.
Drawbacks of TS File Format
Moving on to its disadvantages, let’s start with the device compatibility. The biggest drawback of using the TS file format is that it is not compatible with many devices. For instance, a built-in media player like Windows Media Player does not support the format; eventually, users must change the file format.
Do you know another significant disadvantage? You cannot share TS files online. Different platforms like Facebook, YouTube, etc., support other famous formats, so hence, sharing TS video files requires a format converter. Do you know how much space does a TS file occupies? Well, it acquires a significant storage space, more than other file formats.
Part 3. How to Play TS Video Files with VLC Media Player?
As mentioned, only specific programs support and play TS video format, so VLC Media Player is one of those. The software is famous among its competitors because it supports a wide range of file formats.
VLC is an open-source, free cross-platform media player that lets you play various multimedia files and DVDs, VCDs, Audio CDs, and other streaming protocols. VLC also plays most codecs like MPEG-2, MPEG-4, MKV, MP3, etc. The media player runs on Windows, macOS, Linux, Unix, iOS, and Android.
Do you know a great thing about VLC? Surprisingly, the software has no spyware, no user tracking, and no ads. VLC is a simple yet super-fast and powerful media player of all time. Learn how to play TS files on VLC by following the steps below:
Step 1: Install or Update VLC
To play TS file format, first of all, download and install the VLC media player on your respective device. If you have already installed the media player, update it to the latest version. With this, all the codecs will be working properly. Move to the ‘Help’ section from the top menu and hit ‘Check for Updates.’

Step 2: Open the TS File
Now, launch the VLC media player and head over to the ‘Media’ option. From the menu list, select the ‘Open File’ option, locate the TS file from your device and add it to the media player. You can also directly drag the TS video file to VLC to play it.

Step 3: Enjoy Watching TS File
After your file has been successfully imported to the VLC media player, you can now enjoy watching the TS Video format without any trouble.

Part 4. How to Edit TS Video Files with Filmora Video Editor?
Now that you know how to play TS video format with a VLC media player let’s also share how you can edit your TS videos. With Wondershare Filmora , you can edit a stunning video. The video editor offers more features than you can imagine. The software comes with features like Record PC Screen, Color Match, Silence Detection, Scene Detection, etc.
For Win 7 or later (64-bit)
For macOS 10.12 or later
Some more advanced editing tools are offered, like Power Tool, Stabilize Video, Auto Reframe, Auto Highlight, and whatnot. If you are interested in editing your TS file format videos with Filmora, take help from the steps shared below.
Step 1: Import TS File
After you have launched Wondershare Filmora on your device, import the media file so that you can start the editing; for that, head to the ‘File’ tab and hover on the ‘Import Media’ option. By doing this, a sub-menu will appear, select the ‘Import Media Files’ option and locate the TS video.

Step 2: TS Audio Edit
After importing the media file, drag it to the timeline to start the editing. With Filmora, add cool sound effects to your videos from the ‘Audio’ section. You get various effects like Happy, Jazz, Young & Bright, and other options.

Step 3: Use Transitions and Effects
What is a video without Effects and Transitions? Filmora comes with a wide range of options to add unique effects and transitions to your videos.

Step 4: Add Elements
Head to the ‘Elements’ section to add amazing little fun things to your video and make it interesting. You get elements like Laser Eye, various Emoji options, and a lot more.

Step 5: Export TS Video
Once all the editing is complete and satisfied with the final result, export the video. Hit the ‘Export’ button and select TS file format from the ‘Locals’ tab as the output format.

Part 5. TS VS. MP4: What’s the Difference?
What is the difference between the TS file format and MP4? Allow us to tell you some. You might have read about both formats, but a few differences are discussed as follows:
TS
TS format is used in DVD and Blu-ray discs that you have on your respective device. It does the same work as MP4, but the TS file breaks the data into tiny chinks. TS format comprises a few elements, making it a faster transporter for MPEG-2 format compressed video data. It is used widely in broadcasting and streaming.
MP4
MP4 is considered more compatible as compared to TS format, as not all the software allows the ‘.ts’ extension. If the file is not transmitted properly or is not closed properly, it can lose the data it has. MP4 is divided into two parts, one has the media data, and the other has metadata. Due to compression differences in both formats, it has a smaller size than the TS format.
Bottom Line
The article has shared great details about the TS format. We talked about how you can play TS files on VLC and also shed light on its pros and cons. Moreover, we also shared a video editor to edit your TS file format videos. Now, let’s talk about Wondershare Filmora.
Wondershare Filmora is a great video editor and is perfect for creating brilliant videos. The comprehensive list of features that you get from Filmora makes it unique and unforgettable. AI Portrait, Auto Normalization, Video Snapshot, Animation Keyframing, and many others are among its various features. For creating good videos, Filmora is an ideal option.
Wondershare Filmora
Get started easily with Filmora’s powerful performance, intuitive interface, and countless effects!
Try It Free Try It Free Try It Free Learn More >

Easy Way to Create a DIY Green Screen Video Effect
No matter how big the budget of a Hollywood movie is, at the end of the day, it has to rely on the humble green screens for special video effects. The stunning studios from where your favorite YouTubers and gamers stream their videos are graphical video effects created through green screens. Even the studios that you see on TV channels are a graphical creation of green screens. You must be wondering how they could achieve such awesome graphics with a simple green screen.
All you need is a good-quality green fabric, a professional video editing software, and a camera. You may not believe it, but that is all you need for creating DIY green screen video effect. You do not have to be a professional video editor to edit the green screen on your videos and add any special video effect. In this article, you will learn how to create your own DIY green backdrop.
What Is Green Screen Technique?
A green screen is nothing but a green fabric. In a video, a green screen is placed in the background behind the subject. In the editing phase of the video, the green screen is replaced with any background image or video effect that stays intact in the video as long as possible. In short, the green screen technique involves superimposing photos and videos on the green screen in a video.
Starting from the video game industry, movie industry to video streaming and TV channels, the green screen technique is used everywhere. The stunning graphical component of these industries is totally dependent on the green screen technique. In fact, DIY green screen for zoom meetings and video conferencing is widely used. Along with that, YouTubers and Twitch streamers use DIY green screen for streaming live.
Technically speaking, instead of a green screen, you can use any other color of screen. However, green screens are widely used, and it has become a norm. The main point to remember when using a green screen is that nothing else should have green color such as the dresses the subject is wearing. Therefore, in technical terms, the green screen is referred to as Chroma Key, and you will find Chroma Key option instead of green screen in most video editors.
Why Use Green Screen Technique?
The main reason why the green screen technique is used in movie and video making is that the video editor can replace the entire background at once instead of replacing the background frame by frame. Once you replace a green screen with an image or video effect, it stays the same throughout the video as long as required.
Therefore, the video editor can save a lot of time in editing and the editing stays uniform throughout which gives a realistic effect. If the green screen technique is not used and editing is done frame by frame of a video, there could be a manual error, inconsistent, and graphical glitches.
You can replace green screens with anything you want. It could be a still image of a beautiful studio with 3D effect like you see in case of YouTubers and gamers. It could be a moving, real-life landscape on any place in the world instead of a beautiful background picture. Similarly, it could be replaced by video effects such as explosions, stadiums full of people, battlefields, and likewise. At times, it could be live animations as you see on TV channels.
How To Create DIY Green Screen Stand Setup and Add Green Screen Effect?
If you want to have a green screen setup for your video, you need to have the following things ready.
- A green cloth that is large enough to cover the entire background.
- A video editing software to replace green screen in your video with anything.
- External light for more video clarity and a good camera with mic.
Step 1: Setup DIY Green Backdrop
Your green fabric should be soft and bright. If you are going to be the subject of the video, make sure you are not wearing anything green. Moreover, do not keep any object within the video frame that is green in color. If there are too many green objects, you can use a blue screen.
When it comes to hanging the green cloth in the background, people find it very difficult. If your video frame is going to be a close-up to the subject, you can use a green screen panel to hang green cloth. A green screen panel generally has a collapsible structure for easy storage and transportation.
Otherwise, you need to install hooks in the wall if you are planning to replace the green screen with a studio-like scene so that the entire background of the video frame stays covered with green screen. You should opt for multiple green screens and stitch them together to cover the background completely.
Step 2: Setup Camera and Light
Whether you are shooting with a DSLR camera or smartphone camera or webcam, make sure you are shooting at least HD video quality so that the editing could be great. Lights are important when you are using green screen though they are not a necessity. The video quality and brightness get enhanced with lights. Diffused lights work the best and the background should be well-lit.
Most importantly, you have to place the lights in such a way that your body arms should not be casting any shadow on the green screen. You can either stand very close to the green screen or away from the green screen so that your shadow does not go till the green screen. Instead of starting to shoot the video from the very beginning, you should capture for a few seconds and make sure everything is perfect including the camera angle.
Step 3: Get The Best Video Editor For Green Screen Effect
There are various video editors available, but not all of them are suitable for green screen effect. We recommend Wondershare Filmora as the best video editor to apply green screen effects on your video while editing. The reason behind the recommendation is that the steps to replace the green screen with any image or video are super simple and anyone can do it. There is no need to be a professional video editor.
Wondershare Filmora also lets you capture video through webcam and you can also capture your screen. It is perfect for recording gameplay as well as your reaction and commentary. Similarly, you can record demonstrations, tutorial videos, as well as video conferences. You can apply green screen effects to your recorded video instantly and publish on different platforms. In fact, you can adjust all the parameters such as color scheme, audio ducking, keyframing, motion tracking and much more to enhance the video output quality.
Conclusion
Making videos with DIY green screen stand is no more an esoteric concept. You can set it up anywhere and start shooting video. The magic begins in the post-production stage where you can use Wondershare Filmora to replace the green screen with video effects that will blow the mind of your viewers and followers. Filmora has intuitive options and controls through which you can apply green screen effect in simple steps.
Also read:
- Updated How Windows Movie Maker Save MP4 File for 2024
- New 2024 Approved The Only Guide Youll Ever Need to Learn GIF Design That Get Shared Like Crazy
- Updated Intro Videos Have the Potential to Make a First Impression on Viewers, and You Know How They Say that the First Impression Is the Last Impression
- Looking for Exciting Methods to Create Alluring GIFs Worthy of Making a Mass Appeal? Heres All About GIF Design You Will Ever Want to Know and Learn for 2024
- Updated Voice Changer for Discord | Use Voicemod on Discord
- 2024 Approved What Is Animated GIF
- Updated Techniques You Never Heard of for Learning AI Marketing YouTube
- Updated Best Ai Generated Memes for 2024
- In 2024, How to Remove Echo with Premiere Pro? Full Guide Here
- New Ultimate Guide on Converting Word to SRT
- New Which 10 Best Video Editing Online Makers Is Worth Your Attention?
- New 2024 Approved How to Create Datamoshing Effect to Your Footage in After Effects?
- Ideas for Time-Lapse Video
- 2024 Approved How To Record Video in Slow Motion Comprehending Important Points
- Updated Reversing Time Lapse Videos on iPhone Using Top Applications
- New Best Phantom Slow-Mo Camera For Recording Slow Motion Videos
- A Step-by-Step Guide on Using ADB and Fastboot to Remove FRP Lock from your Oppo
- How to Mirror PC Screen to Samsung Galaxy A05 Phones? | Dr.fone
- Updated 2024 Approved Ways on How to Liven Up Your Animate Website on Scroll
- In 2024, How to Unlock iPhone 12 Pro Max with a Mask On | Dr.fone
- Updated In 2024, Top 5 Free Streaming Options for Watching MLB Matches
- How To Unlock Nokia C32 Phone Without Password?
- New Best Celebrity Voice Generator Tools You Cannot Miss for 2024
- In 2024, How To Pause Life360 Location Sharing For Samsung Galaxy S24 | Dr.fone
- In 2024, How to Screen Mirroring Xiaomi Redmi Note 13 Pro 5G to PC? | Dr.fone
- Complete guide for recovering music files on Oppo F23 5G
- How To Transfer Data From Apple iPhone 12 mini To Other iPhone? | Dr.fone
- In 2024, How to Fix Locked Apple ID from Apple iPhone 12 mini
- 8 Solutions to Fix Find My Friends Location Not Available On Apple iPhone 6 | Dr.fone
- Full Guide to Bypass Oppo A58 4G FRP
- Title: Step by Step to Crop a Video with CyberLink PowerDirector
- Author: Chloe
- Created at : 2024-05-20 03:37:30
- Updated at : 2024-05-21 03:37:30
- Link: https://ai-editing-video.techidaily.com/step-by-step-to-crop-a-video-with-cyberlink-powerdirector/
- License: This work is licensed under CC BY-NC-SA 4.0.

