Step by Step to Crop Videos with CyberLink PowerDirector

Step by Step to Crop Videos with CyberLink PowerDirector
Video Editing is an art form dependent on various elements and factors that are part of your video; this means people, items, or objects in the background can often make or break the viewing experience.
Can you imagine having shot a scene with impeccable attention to detail, but a small uncontrollable action leaves a portion of an unwanted cable or equipment in the frame? Bummer, right? But luckily, due to the power of video editing software, it is not hard to deal with such problems.
A way to work with such clips is to use the crop function while editing, as it can help emphasize or detract attention from a particular part of any video project.
Author’s Note: While filming, try to capture footage in the highest resolution allowed by the available camera hardware; this will give you more room to play with while using the crop function.
To preface, CyberLink PowerDirector is a free video editing tool capable of accomplishing this and providing a professional touch to your video projects. And like other competing software, the program not only allows you to crop into clips but also uses keyframes to modify aspects like panning and zoom. So to help you perform this action, in this article, we list the steps you will need for cropping into video clips with PowerDirector. As an added bonus, we have also included the method to perform the same actions in WonderShare Filmora.
Note: We documented the steps in this guide with PowerDirector 365 and WonderShare Filmora X.
How to Crop Videos with CyberLink PowerDirector?
The idea of cropping into clips has always been an easy action to perform; once you have PowerDirector 365 open, follow the steps listed below.
If you do not already have CyberLink PowerDirector 365, download the software by visiting Cyberlink’s official website .
Step 1: Create a new video project in Cyberlink PowerDirector 365 by choosing Full Mode.

Note: Full Mode in Cyberlink PowerDirector 365 provides access to a full-featured video editing tool, similar to Wondershare Filmora. The other available options cater to distinct video types.
Step 2: Import media onto the Timeline from the Media Library; in this guide, we have gone ahead and used the pre-existing stock footage.

Step 3: Now, click on the video file on the Timeline; this will activate the video toolbar giving you access to the various controls built into PowerDirector 365. Hover over the tools open, following which you need to click on the Crop, Zoom, and Pan option.

Step 4: Pick either corner of the frame visible around the video and set the area you want the clip to focus upon; following this, click Save.

This action will crop the video clip according to your desired size.
Tip:
The activation of Keyframes while cropping will allow you to create an effect that slowly zooms into the footage. To do this, set Keyframe Point 1 at a specific time (say the fifth second) and at one zoom level (say zero) and create Keyframe Point 2 at another time (fifteenth second) and a different zoom level (say fifty). So, between the fifth second and fifteenth second, the zoom will steadily increase and raise emphasis on an object. You can also add an element of position to this action if you want the focus to be on something not in the center of the screen.
Definition: Keyframes while Video Editing is a software-based feature that allows you to set In and Out Points, giving clips between the two positions different properties that change as the playhead continues to move. These properties can be increased zoom, rotation, different colors, or even a gradual pan.
We recommend experimenting with this feature if you want to bring a more dynamic feeling to your video project.
An Easier Way to Crop Video with Wondershare Filmora
While Cyberlink PowerDirector 365 is a powerful video editing tool, in our experience, its menus are not as simple to navigate as some of the other competing video editing tools available, Wondershare Filmora Video Editor included.
An emphasis on quick accessibility is present with Filmora, and we believe this is a huge plus for beginning creators. The use of iconography resemblant to mobile software is another aspect that helps increase familiarity.
If you do not already have Wondershare Filmora, you can download the software by visiting the official website.
Now, to help you learn how to use the Crop Tool and to show you an example of what we mean, here is how you can use the feature Wondershare Filmora to get the desired output.
For Win 7 or later (64-bit)
For macOS 10.14 or later
Once you have the software open, follow the steps listed below.
Step 1: Import the Media File into your Video Project.

Step 2: Drag the clip onto the Timeline and then select it to activate further interactions.

Step 3: Choose the Crop Options (marked in Red) to open the Crop window.

Step 4: Pick any edge within the visible box and resize them to select the portion you want to keep in the clip.

Having read this bit of the guide, we believe you may have noticed how Filmora is more convenient due to the easier access it provides to the crop function.
The Bottom Line
So, at the end of the day, both software listed in this article are fully functional and highly-capable video editing tools, but saving time spent in front of the computer is a huge factor for any video editor.
And Wondershare Filmora does just that with its modern iconography and increased accessibility. With its thoughtful, less-frills approach, Filmora is the one to pick if you do not want to be bogged down by needless menus and have to hunt for actions that will help you create a video that you would want to watch yourself.
Note: Full Mode in Cyberlink PowerDirector 365 provides access to a full-featured video editing tool, similar to Wondershare Filmora. The other available options cater to distinct video types.
Step 2: Import media onto the Timeline from the Media Library; in this guide, we have gone ahead and used the pre-existing stock footage.

Step 3: Now, click on the video file on the Timeline; this will activate the video toolbar giving you access to the various controls built into PowerDirector 365. Hover over the tools open, following which you need to click on the Crop, Zoom, and Pan option.

Step 4: Pick either corner of the frame visible around the video and set the area you want the clip to focus upon; following this, click Save.

This action will crop the video clip according to your desired size.
Tip:
The activation of Keyframes while cropping will allow you to create an effect that slowly zooms into the footage. To do this, set Keyframe Point 1 at a specific time (say the fifth second) and at one zoom level (say zero) and create Keyframe Point 2 at another time (fifteenth second) and a different zoom level (say fifty). So, between the fifth second and fifteenth second, the zoom will steadily increase and raise emphasis on an object. You can also add an element of position to this action if you want the focus to be on something not in the center of the screen.
Definition: Keyframes while Video Editing is a software-based feature that allows you to set In and Out Points, giving clips between the two positions different properties that change as the playhead continues to move. These properties can be increased zoom, rotation, different colors, or even a gradual pan.
We recommend experimenting with this feature if you want to bring a more dynamic feeling to your video project.
An Easier Way to Crop Video with Wondershare Filmora
While Cyberlink PowerDirector 365 is a powerful video editing tool, in our experience, its menus are not as simple to navigate as some of the other competing video editing tools available, Wondershare Filmora Video Editor included.
An emphasis on quick accessibility is present with Filmora, and we believe this is a huge plus for beginning creators. The use of iconography resemblant to mobile software is another aspect that helps increase familiarity.
If you do not already have Wondershare Filmora, you can download the software by visiting the official website.
Now, to help you learn how to use the Crop Tool and to show you an example of what we mean, here is how you can use the feature Wondershare Filmora to get the desired output.
For Win 7 or later (64-bit)
For macOS 10.14 or later
Once you have the software open, follow the steps listed below.
Step 1: Import the Media File into your Video Project.

Step 2: Drag the clip onto the Timeline and then select it to activate further interactions.

Step 3: Choose the Crop Options (marked in Red) to open the Crop window.

Step 4: Pick any edge within the visible box and resize them to select the portion you want to keep in the clip.

Having read this bit of the guide, we believe you may have noticed how Filmora is more convenient due to the easier access it provides to the crop function.
The Bottom Line
So, at the end of the day, both software listed in this article are fully functional and highly-capable video editing tools, but saving time spent in front of the computer is a huge factor for any video editor.
And Wondershare Filmora does just that with its modern iconography and increased accessibility. With its thoughtful, less-frills approach, Filmora is the one to pick if you do not want to be bogged down by needless menus and have to hunt for actions that will help you create a video that you would want to watch yourself.
Note: Full Mode in Cyberlink PowerDirector 365 provides access to a full-featured video editing tool, similar to Wondershare Filmora. The other available options cater to distinct video types.
Step 2: Import media onto the Timeline from the Media Library; in this guide, we have gone ahead and used the pre-existing stock footage.

Step 3: Now, click on the video file on the Timeline; this will activate the video toolbar giving you access to the various controls built into PowerDirector 365. Hover over the tools open, following which you need to click on the Crop, Zoom, and Pan option.

Step 4: Pick either corner of the frame visible around the video and set the area you want the clip to focus upon; following this, click Save.

This action will crop the video clip according to your desired size.
Tip:
The activation of Keyframes while cropping will allow you to create an effect that slowly zooms into the footage. To do this, set Keyframe Point 1 at a specific time (say the fifth second) and at one zoom level (say zero) and create Keyframe Point 2 at another time (fifteenth second) and a different zoom level (say fifty). So, between the fifth second and fifteenth second, the zoom will steadily increase and raise emphasis on an object. You can also add an element of position to this action if you want the focus to be on something not in the center of the screen.
Definition: Keyframes while Video Editing is a software-based feature that allows you to set In and Out Points, giving clips between the two positions different properties that change as the playhead continues to move. These properties can be increased zoom, rotation, different colors, or even a gradual pan.
We recommend experimenting with this feature if you want to bring a more dynamic feeling to your video project.
An Easier Way to Crop Video with Wondershare Filmora
While Cyberlink PowerDirector 365 is a powerful video editing tool, in our experience, its menus are not as simple to navigate as some of the other competing video editing tools available, Wondershare Filmora Video Editor included.
An emphasis on quick accessibility is present with Filmora, and we believe this is a huge plus for beginning creators. The use of iconography resemblant to mobile software is another aspect that helps increase familiarity.
If you do not already have Wondershare Filmora, you can download the software by visiting the official website.
Now, to help you learn how to use the Crop Tool and to show you an example of what we mean, here is how you can use the feature Wondershare Filmora to get the desired output.
For Win 7 or later (64-bit)
For macOS 10.14 or later
Once you have the software open, follow the steps listed below.
Step 1: Import the Media File into your Video Project.

Step 2: Drag the clip onto the Timeline and then select it to activate further interactions.

Step 3: Choose the Crop Options (marked in Red) to open the Crop window.

Step 4: Pick any edge within the visible box and resize them to select the portion you want to keep in the clip.

Having read this bit of the guide, we believe you may have noticed how Filmora is more convenient due to the easier access it provides to the crop function.
The Bottom Line
So, at the end of the day, both software listed in this article are fully functional and highly-capable video editing tools, but saving time spent in front of the computer is a huge factor for any video editor.
And Wondershare Filmora does just that with its modern iconography and increased accessibility. With its thoughtful, less-frills approach, Filmora is the one to pick if you do not want to be bogged down by needless menus and have to hunt for actions that will help you create a video that you would want to watch yourself.
Note: Full Mode in Cyberlink PowerDirector 365 provides access to a full-featured video editing tool, similar to Wondershare Filmora. The other available options cater to distinct video types.
Step 2: Import media onto the Timeline from the Media Library; in this guide, we have gone ahead and used the pre-existing stock footage.

Step 3: Now, click on the video file on the Timeline; this will activate the video toolbar giving you access to the various controls built into PowerDirector 365. Hover over the tools open, following which you need to click on the Crop, Zoom, and Pan option.

Step 4: Pick either corner of the frame visible around the video and set the area you want the clip to focus upon; following this, click Save.

This action will crop the video clip according to your desired size.
Tip:
The activation of Keyframes while cropping will allow you to create an effect that slowly zooms into the footage. To do this, set Keyframe Point 1 at a specific time (say the fifth second) and at one zoom level (say zero) and create Keyframe Point 2 at another time (fifteenth second) and a different zoom level (say fifty). So, between the fifth second and fifteenth second, the zoom will steadily increase and raise emphasis on an object. You can also add an element of position to this action if you want the focus to be on something not in the center of the screen.
Definition: Keyframes while Video Editing is a software-based feature that allows you to set In and Out Points, giving clips between the two positions different properties that change as the playhead continues to move. These properties can be increased zoom, rotation, different colors, or even a gradual pan.
We recommend experimenting with this feature if you want to bring a more dynamic feeling to your video project.
An Easier Way to Crop Video with Wondershare Filmora
While Cyberlink PowerDirector 365 is a powerful video editing tool, in our experience, its menus are not as simple to navigate as some of the other competing video editing tools available, Wondershare Filmora Video Editor included.
An emphasis on quick accessibility is present with Filmora, and we believe this is a huge plus for beginning creators. The use of iconography resemblant to mobile software is another aspect that helps increase familiarity.
If you do not already have Wondershare Filmora, you can download the software by visiting the official website.
Now, to help you learn how to use the Crop Tool and to show you an example of what we mean, here is how you can use the feature Wondershare Filmora to get the desired output.
For Win 7 or later (64-bit)
For macOS 10.14 or later
Once you have the software open, follow the steps listed below.
Step 1: Import the Media File into your Video Project.

Step 2: Drag the clip onto the Timeline and then select it to activate further interactions.

Step 3: Choose the Crop Options (marked in Red) to open the Crop window.

Step 4: Pick any edge within the visible box and resize them to select the portion you want to keep in the clip.

Having read this bit of the guide, we believe you may have noticed how Filmora is more convenient due to the easier access it provides to the crop function.
The Bottom Line
So, at the end of the day, both software listed in this article are fully functional and highly-capable video editing tools, but saving time spent in front of the computer is a huge factor for any video editor.
And Wondershare Filmora does just that with its modern iconography and increased accessibility. With its thoughtful, less-frills approach, Filmora is the one to pick if you do not want to be bogged down by needless menus and have to hunt for actions that will help you create a video that you would want to watch yourself.
Boost the Pace of Your Instagram Reels Videos with These Simple Tricks
Undoubtedly, every social media video creator loves to make use of Instagram Reels for their widespread popularity. If you want to grab your audience’s attention and keep them engaged with your videos, then Instagram Reels should be your destination. On this platform, you can only make short videos maxing out the 90-second time limit. But what if your video content is lengthy? Don’t fret. One simple trick is to speed up the pace of your videos.

There are two scenarios regarding how to increase the speed of the video in Reels. You can speed up the video when recording directly on the Instagram app, or use a third-party editing tool if it is a pre-recorded video. We will illustrate below how to speed up video on Instagram Reels for both scenarios.
Part I. Basic Understanding of Instagram Reels
- What are Instagram Reels?
Instagram Reels are short-duration, vertically-oriented videos that are displayed in the dedicated reels tab on the Instagram app. You can compare Instagram Reels with TikTok videos. The maximum duration of Instagram Reels can be of 90 seconds.
Instagram displays the popular Reels on Explore tab so that the Instagram Reels creators get more exposure. Since short-duration videos and apps are in trend, Instagram Reels has become the most popular section on the Instagram app.
Reels can be entertaining videos with popular songs in the background. They can be funny videos as well as gripping slow-motion videos. Brands promote their products and services through Reels. You can add stunning AR effects and change the speed of the video while recording Reels through the Instagram app.
- Why Should You Make Instagram Reels?
Instagram Reels have been a game-changer in the social media world. From regular video creators and social media influencers to brands and businesses, Instagram Reels has become everyone’s real deal. Here are the reasons why you should make Instagram Reels:
Reach - The primary reason for making Instagram Reels is to reach out to the target audiences and get more followers. If your videos become popular, your Instagram Reels can get featured in the Explore tab. Once it does happen, there will be an exponential rise in views and followers. Besides, Instagram Reels have better reach to your followers than regular Instagram posts.
Engagement - The world has moved on from photos to videos. People love to check out short videos rather than still images. So naturally, when you start making Instagram reels, your followers’ engagement will increase dramatically. With more engagement, your Reels will get more exposure as people will love to share them with their friends. Of course, the content has to be top-notch so that people start to pay attention to your Reels.

Showcase Personality - Instagram Reels are the best way to showcase your personality on social media. Personality is the magical key that attracts followers on social media platforms. You can create different genres of videos and showcase your talent and personality to get noticed.
Brand Promotion - Brands and businesses use Instagram Reels to promote their products and services. They come up with creative Reels that audiences cannot ignore. Even social media influencers promote brands through Instagram Reels these days. It is a great way to make the target audiences aware of the products and services and build a strong brand image.
You can go through this informative article for more information about Instagram Reels.
Part II. Speed Up Video on Instagram Reels
If you prefer to film videos directly on Instagram Reels, you will find a dedicated option to change video speed on the Instagram app. When you use the option, you get to set the speed of the video even before you start recording.
However, if you are already recorded a video for Instagram Reels, you can jump to the next part to find out the best way to speed up existing videos for Reels. Here, you will illustrate how to speed up video on Instagram Reels directly on the Instagram app without needing any third-party app.
Step-by-step Guide to Speed Up Reels Video
Here are the simple steps to speed up the video in Reels on the Instagram app.
Step1 Open the Instagram app. Tap on the Camera icon at the bottom to film a video.
Step2 Swipe at the bottom to select the Reels option.
Step3 You will find the Speed option on the left panel. Tap on the Speed option.
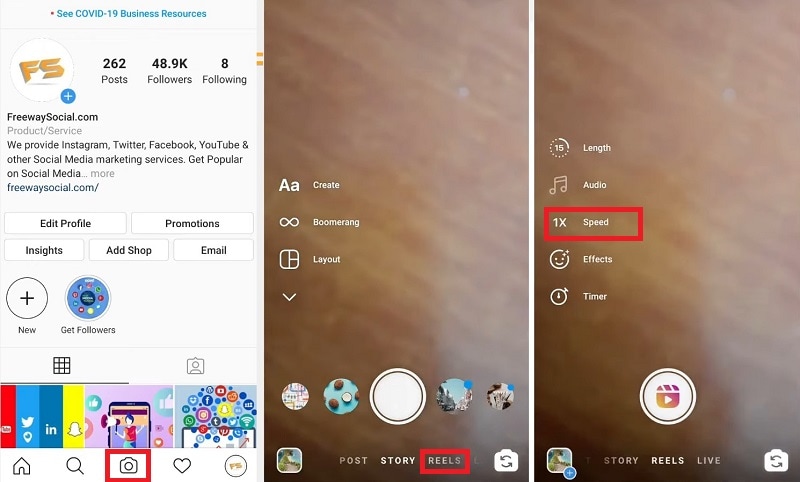
Step4 If you want to speed up your video, select a speed preset above 1X. For example, if you want double the speed than usual, you will tap on the 2X preset.
Step5 Tap the Record icon at the bottom to record the Reels video.
Step6 Once you are done recording, tap on the Stop icon.
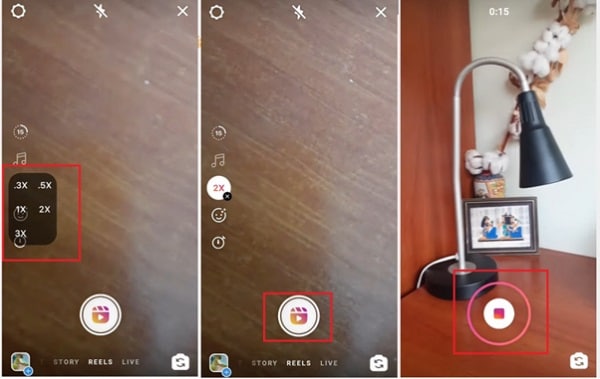
Step7 Tap the Preview option to check how the recorded video looks. After that, tap the Next option.
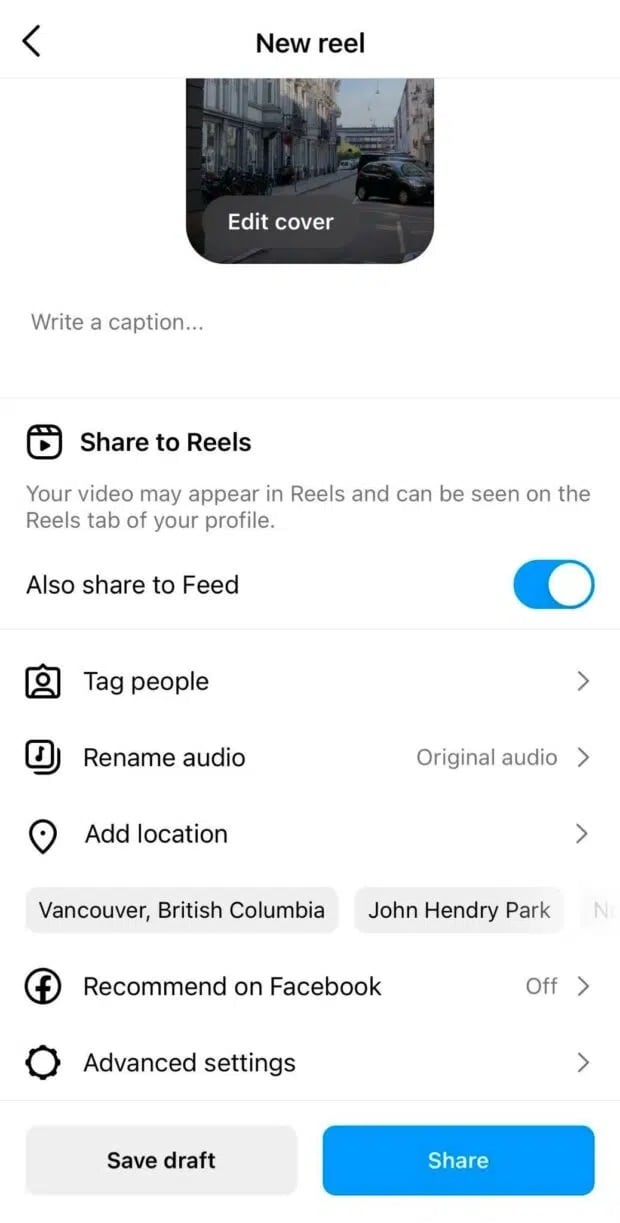
Step8 You can write a caption, add a cover, add a location, and even tag people. Finally, tap on the Share button to post the video under the Reels section.
Part III. Speed Up Existing Videos for Reels
When you have already recorded the video for Reels, you need to use a third-party tool to change the video speed. Depending on the device you are going to use to edit the speed of your video, you have to select an appropriate video editing application. We have handpicked the best applications to change Instagram Reels video speed for computers, smartphones as well as online users.
- Speed Up Video for Instagram Reels on PC
A professional video creator always prefers a computer to edit videos minutely. This is because a computer’s dedicated video editor has far more editing options than a video editor app or even an online video editor. If you have filmed and transferred the video to your computer, you can change its speed easily. Wondershare Filmora is the best video editor to alter video speed precisely as you need.
Free Download For Win 7 or later(64-bit)
Free Download For macOS 10.14 or later
There are various options available to change the speed of a video. You can choose from the speed presets for instant change. You can customize the speed through the Uniform Speed option. Besides, you can use Speed Ramping to vary the speed of the video differently for different sections. Most importantly, Filmora is super easy to use despite being a professional video editing software.
A Step-by-step Guide to speed up a video on Filmora
Instead of choosing from the speed presets, using the Uniform Speed option is always handy to speed up your video. This is because speed presets are limited and may not be suitable for your video. That is why Uniform Speed is effective, as you can set any desired speed up to 100X.
Here are the steps to speed up a Reels video (already recorded) using Filmora
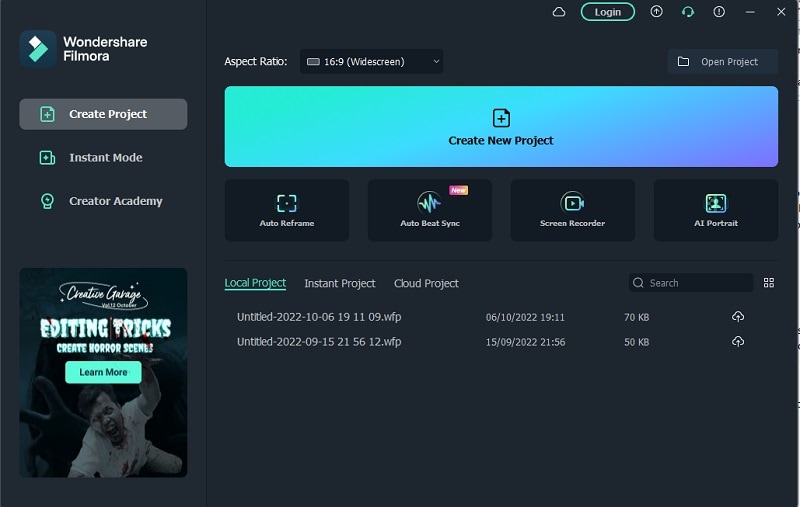
Step1 Download Wondershare Filmora on your computer based on your operating system. Filmora is available for macOS as well as Windows. After successful installation, open Filmora and click on Create New Project button.
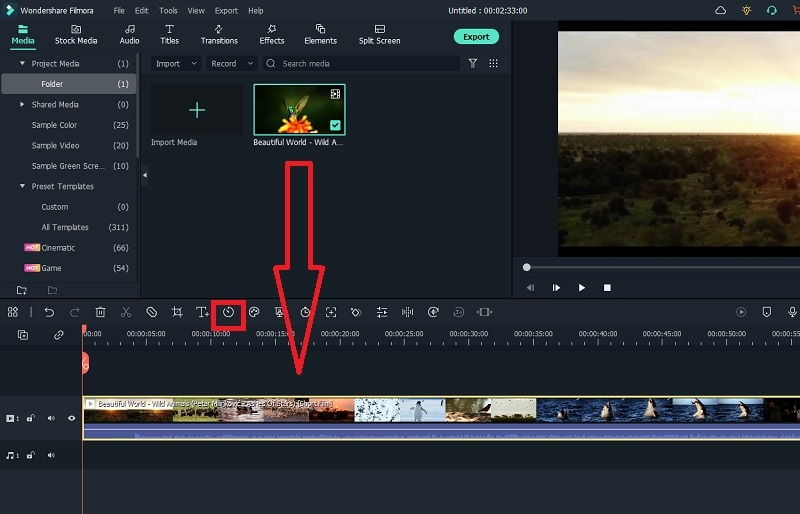
Step2 Go to the File menu and the Import Media option. Select Import Media Files and browse your computer to import the target video file into the Project Media folder. Now, drop that file into the timeline. Press the Speed (timer) icon that you will find at the top of the timeline.
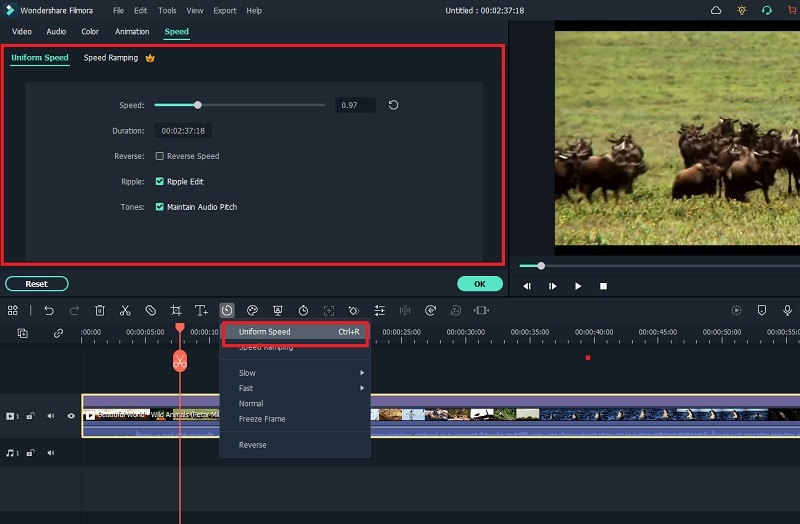
Step3 Press the Uniform Speed option from the displayed menu. This will open the Uniform Speed tab.
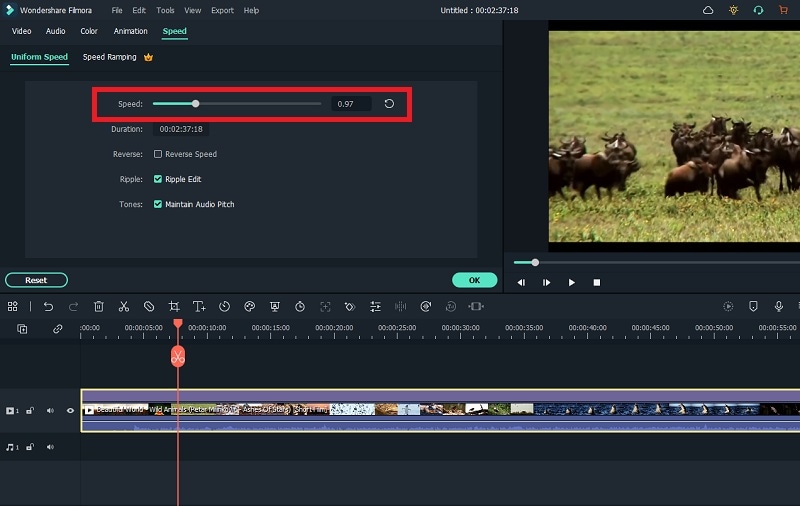
Step4 Move the speed slider to the right to speed up the video. Once you have set the desired speed, press the Ok button. Finally, tap Export to save the edited file. Thereafter, you can upload the video file as Instagram Reels.
For more details, you can check out this video where changing video speed in Filmora is fully illustrated.
![]()
Note: We have already mentioned that you can also use the Speed Ramping option to customize speed for different sections of your video. You will customize the visualization graph to set the speed unevenly with smooth transitions for the entire video. You can watch this tutorial video to find out how to change speed with Speed Ramping option in Filmora.
- Speed Up Video for Reels Online
If you do not want dedicated video editing software, you can still speed up your recorded video using an online video editor. There are several online video editors available where you can speed up your video for Reels. But Clideo is the most straightforward online video editor where you can speed up videos instantly. All you need is an internet connection and a supporting web browser on your device.
A Step-by-step Guide to speed up a video on Clideo
Step1 Open the web browser on your device. Visit the official website of Clideo.
Step2 Click on the Choose File option. Select the target video from your device storage.
Step3 Once the video gets uploaded on the platform, you will see different speed presets on the right side of the screen.
Step4 You can select from the speed presets. Otherwise, you can use the slider to alter the video’s speed as needed.
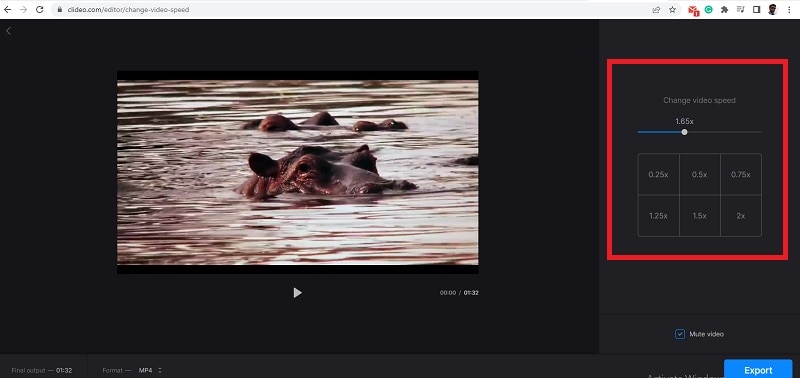
Step5 Play the video and if everything is perfect, click on the Export button to save the video on your device storage.
- Speed up Video for Instagram Reels on iPhone
If you have already recorded a video on your iPhone for Reels Instagram, you can use the VN Video app (VlogNow) to alter its speed before uploading it. Previously, Instagram used to provide Hyperlapse to change video speed. But Instagram has pulled down the app from App Store. VN Video is a complete video editing app where you can instantly change the video speed. It is an extremely popular video editor with a high average rating, proving its usefulness.
A Step-by-step Guide to speed up a video on VN Video
Step1 Install the VN Video app from App Store on your iPhone. Launch the app after installation.
Step2 Tap on the Plus icon located at the bottom. Tap on New Project to get started.
Step3 Select the pre-recorded video from the device storage and tap on the Next arrow icon at the bottom of the screen.
Step4 Tap on the Speed icon at the bottom and select the regular tab at the top.

Step5 Adjust the speed slider as per your need to change the video speed. Once done, tap on the Tick icon at the bottom.

Step6 Finally, tap on the Export icon to save the video file on the device storage.
- Speed up Video for Instagram on Android
Filmora happens to be the easiest video editing app to change the speed of your video for Instagram Reels. Filmora by Wondershare is a complete video editor that is extremely popular among social media video creators. There are trending video effects and stickers available to make short videos engaging. You can speed up as well as slow down videos. Besides, you get the basic as well as some advanced video editing options for Reels.
A Step-by-step Guide to speed up a video on Filmora
Step1 Install the Filmora app on your Android phone from Play Store. Launch the Filmora app and tap on the New Project option. Select the pre-recorded video from your device gallery.
Step2 After the video appears on Filmora, tap on the Trim tab at the bottom of the screen.
Step3 Tap on the Speed option from the bottom. Adjust the speed slider and move it to the right to speed up your video.
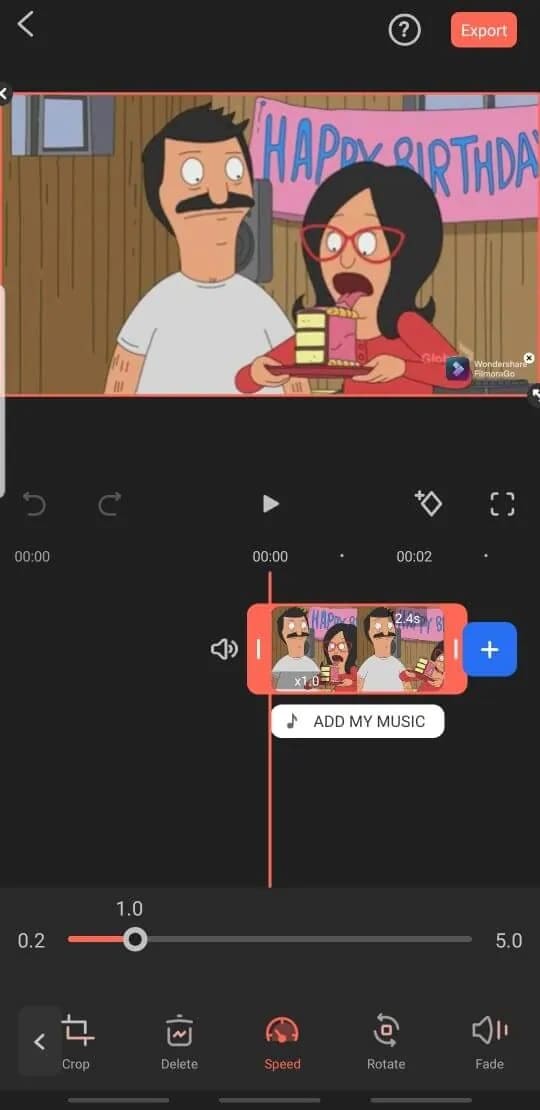
Step4 Tap on the Export button at the top-right corner to save the video on your phone.
FAQs
- Why are my Instagram videos slow?
Multiple reasons can explain why is my Instagram slow. First of all, the videos could be in slow-motion. Secondly, your internet speed may not be up to the mark. Thirdly, Instagram cache and storage could be full when your device runs out of free space. Besides, your device RAM could be fully occupied due to several apps running in the background. Moreover, if you have an older Instagram app version, your Instagram videos can be slow.
- What’s the difference between Instagram Reels and Instagram Stories?
There are several differences between Reels and Stories. Reels stay forever, while Stories get deleted after 24 hours. You can upload a 15-second video for Instagram Story. You can upload a 90-second video for Instagram Reel. Instagram Reels focus on content and entertainment, while Stories focus on real-time events. You can change the video speed of Reels directly from Instagram while no such option is available for Stories. Stories cannot be saved but you can save Reels.
Conclusion
We have answered your question, “Can you speed up a pre-recorded video on reels?” You can definitely speed up your video through different methods as applicable in your case. If you are going to film the footage through Instagram Reels, you can set the speed beforehand directly on the Instagram app. If you want to change the speed of a pre-recorded video, you can use VN editor on your iPhone and Filmora app on your Android smartphone. If you want to customize the video speed on PC, Wondershare Filmora will be your best video editor.
Free Download For macOS 10.14 or later
There are various options available to change the speed of a video. You can choose from the speed presets for instant change. You can customize the speed through the Uniform Speed option. Besides, you can use Speed Ramping to vary the speed of the video differently for different sections. Most importantly, Filmora is super easy to use despite being a professional video editing software.
A Step-by-step Guide to speed up a video on Filmora
Instead of choosing from the speed presets, using the Uniform Speed option is always handy to speed up your video. This is because speed presets are limited and may not be suitable for your video. That is why Uniform Speed is effective, as you can set any desired speed up to 100X.
Here are the steps to speed up a Reels video (already recorded) using Filmora
Step1 Download Wondershare Filmora on your computer based on your operating system. Filmora is available for macOS as well as Windows. After successful installation, open Filmora and click on Create New Project button.

Step2 Go to the File menu and the Import Media option. Select Import Media Files and browse your computer to import the target video file into the Project Media folder. Now, drop that file into the timeline. Press the Speed (timer) icon that you will find at the top of the timeline.

Step3 Press the Uniform Speed option from the displayed menu. This will open the Uniform Speed tab.

Step4 Move the speed slider to the right to speed up the video. Once you have set the desired speed, press the Ok button. Finally, tap Export to save the edited file. Thereafter, you can upload the video file as Instagram Reels.

For more details, you can check out this video where changing video speed in Filmora is fully illustrated.
![]()
Note: We have already mentioned that you can also use the Speed Ramping option to customize speed for different sections of your video. You will customize the visualization graph to set the speed unevenly with smooth transitions for the entire video. You can watch this tutorial video to find out how to change speed with Speed Ramping option in Filmora.
- Speed Up Video for Reels Online
If you do not want dedicated video editing software, you can still speed up your recorded video using an online video editor. There are several online video editors available where you can speed up your video for Reels. But Clideo is the most straightforward online video editor where you can speed up videos instantly. All you need is an internet connection and a supporting web browser on your device.
A Step-by-step Guide to speed up a video on Clideo
Step1 Open the web browser on your device. Visit the official website of Clideo.
Step2 Click on the Choose File option. Select the target video from your device storage.
Step3 Once the video gets uploaded on the platform, you will see different speed presets on the right side of the screen.
Step4 You can select from the speed presets. Otherwise, you can use the slider to alter the video’s speed as needed.

Step5 Play the video and if everything is perfect, click on the Export button to save the video on your device storage.
- Speed up Video for Instagram Reels on iPhone
If you have already recorded a video on your iPhone for Reels Instagram, you can use the VN Video app (VlogNow) to alter its speed before uploading it. Previously, Instagram used to provide Hyperlapse to change video speed. But Instagram has pulled down the app from App Store. VN Video is a complete video editing app where you can instantly change the video speed. It is an extremely popular video editor with a high average rating, proving its usefulness.
A Step-by-step Guide to speed up a video on VN Video
Step1 Install the VN Video app from App Store on your iPhone. Launch the app after installation.
Step2 Tap on the Plus icon located at the bottom. Tap on New Project to get started.
Step3 Select the pre-recorded video from the device storage and tap on the Next arrow icon at the bottom of the screen.
Step4 Tap on the Speed icon at the bottom and select the regular tab at the top.

Step5 Adjust the speed slider as per your need to change the video speed. Once done, tap on the Tick icon at the bottom.

Step6 Finally, tap on the Export icon to save the video file on the device storage.
- Speed up Video for Instagram on Android
Filmora happens to be the easiest video editing app to change the speed of your video for Instagram Reels. Filmora by Wondershare is a complete video editor that is extremely popular among social media video creators. There are trending video effects and stickers available to make short videos engaging. You can speed up as well as slow down videos. Besides, you get the basic as well as some advanced video editing options for Reels.
A Step-by-step Guide to speed up a video on Filmora
Step1 Install the Filmora app on your Android phone from Play Store. Launch the Filmora app and tap on the New Project option. Select the pre-recorded video from your device gallery.
Step2 After the video appears on Filmora, tap on the Trim tab at the bottom of the screen.
Step3 Tap on the Speed option from the bottom. Adjust the speed slider and move it to the right to speed up your video.

Step4 Tap on the Export button at the top-right corner to save the video on your phone.
FAQs
- Why are my Instagram videos slow?
Multiple reasons can explain why is my Instagram slow. First of all, the videos could be in slow-motion. Secondly, your internet speed may not be up to the mark. Thirdly, Instagram cache and storage could be full when your device runs out of free space. Besides, your device RAM could be fully occupied due to several apps running in the background. Moreover, if you have an older Instagram app version, your Instagram videos can be slow.
- What’s the difference between Instagram Reels and Instagram Stories?
There are several differences between Reels and Stories. Reels stay forever, while Stories get deleted after 24 hours. You can upload a 15-second video for Instagram Story. You can upload a 90-second video for Instagram Reel. Instagram Reels focus on content and entertainment, while Stories focus on real-time events. You can change the video speed of Reels directly from Instagram while no such option is available for Stories. Stories cannot be saved but you can save Reels.
Conclusion
We have answered your question, “Can you speed up a pre-recorded video on reels?” You can definitely speed up your video through different methods as applicable in your case. If you are going to film the footage through Instagram Reels, you can set the speed beforehand directly on the Instagram app. If you want to change the speed of a pre-recorded video, you can use VN editor on your iPhone and Filmora app on your Android smartphone. If you want to customize the video speed on PC, Wondershare Filmora will be your best video editor.
How to Enable and Use OBS Zoom Camera
The number of online meetings, seminars, and networking events for translators and interpreters has increased dramatically in the last year. The OBS Studio is one of them. A streaming program called OBS Studio aids users in planning and arranging their material. To create enlightening and captivating visual sceneries, you may combine several sources. You’ve undoubtedly acquired a reliable webcam by this point and learned how to adjust your lighting and frame to appear decent on video. You could have even splashed out on a green screen to make your online meetings’ backgrounds seem more branded and professional. Without OBS, you may utilize your webcam directly with Zoom, but the picture quality will be poor. This is due to Zoom’s lack of access to your webcam’s exposure and white balance settings. Additionally, you cannot apply any filters, such as LUTs. This tutorial will show you how to use the OBS Virtual Camera to install OBS as a camera in Zoom.
A video source option called “OBS Virtual Camera” may be found in the settings of video conferencing applications like Zoom, Teams, and Google Meet. You may also be curious about it and how to use the virtual camera. With Zoom, OBS is now easy to set up. Every single scene, overlay, and widget you have access to may be used as a video source for the well-liked conference meetings program. Your ability to utilize OBS Studio with Zoom will help you make your meetings more professional. You may utilize an external media resource, such as a video file, screenshot, app, game, etc., as the camera output for Zoom, Teams, Meet, or other video calls by using the OBS virtual camera. Instead of your face from the camera, your conference partner will see the video source you just selected. We’ll walk you through setting up OBS Studio as a virtual camera in this post so that you may utilize any of your OBS collections in Zoom rather than your webcam. Find out more here:
Reviewing Efectum App and The Best Alternatives for Smartphone Users
Video editors, from professionals to beginners, might be aware of the Efectum app. If not, then let us tell you it’s an editing app widely known as a pro video maker or editor. This platform was launched publicly on August 10, 2017, by Craigpark Limited. Users can avail themselves of its latest version from the Play Store or App Store of their smartphones.
Although Efectum is free to use, you must pay to use some exclusive features. Additionally, Android users benefit from the Efectum app download without a watermark facility. At the same time, Apple users have to pay for a subscription to remove watermarks from videos. Before downloading it, read this article and review your decision to work on the Efectum slow-motion app.
Slow Motion Video Maker Slow your video’s speed with better control of your keyframes to create unique cinematic effects 

Part 1: A Review of Efectum App and How to Use It to Perfection?
Efectum is a pro video editing or making application that adds fun to your social media feed. With various editing features, this application helps users to follow social media trends. It is a popular platform for adding fast-motion or slow-motion effects to your media. For users interested in exploring the Efectum app, below is a list of features that it offers:
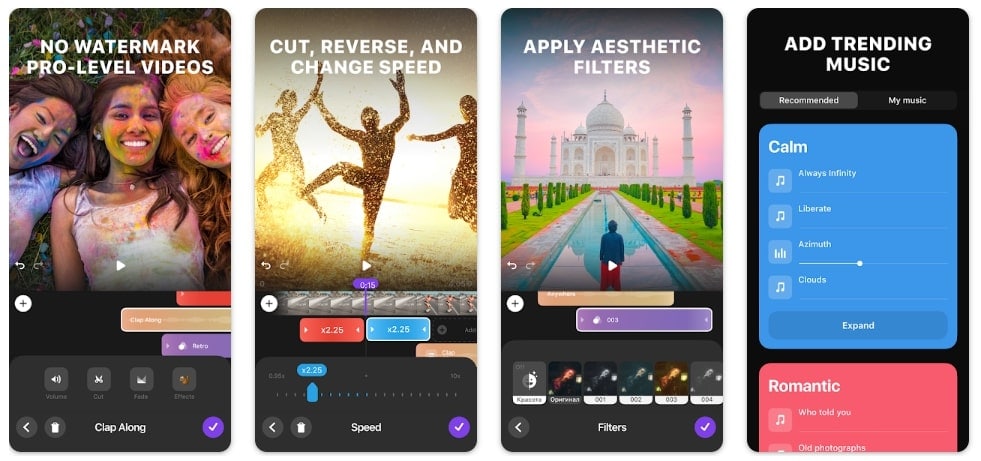
- Timelapse: It’s a photographic technique to turn a longer period into a shorter clip. This application can make a timelapse video to reveal events that might skip to the eye.
- Rewind Video: The Efectum app can edit your video into reverse or rewind certain actions. To do so, you just need simple clicks, and creativity will be added to your content.
- Video Formats: Another specialty of this app is to let you import the video in a popular format. It enables you to share the clip directly on social media platforms.
- Favorites Music: In this app, you can browse music of your choice for your content. This app can extract audio from existing videos. Besides, users can pick one from the recommended list.
- Multiple Speeds: You might have heard this app as an Efectum slow-motion app. It is true because Efectum offers easy slow-motion and fast-motion transformation of clips.
- Clips Editing: Cutting, trimming, and merging clips are general features that every editing tool offers. Efectum can also combine several shots, add text, and apply filters where required.
After discovering all the possible functionalities, come to the point. As this app can convert your normal video into slow motion, the question arises: how? To solve this query, we have shown you how to use Efectum apps to create a slow-motion video.
Step 1
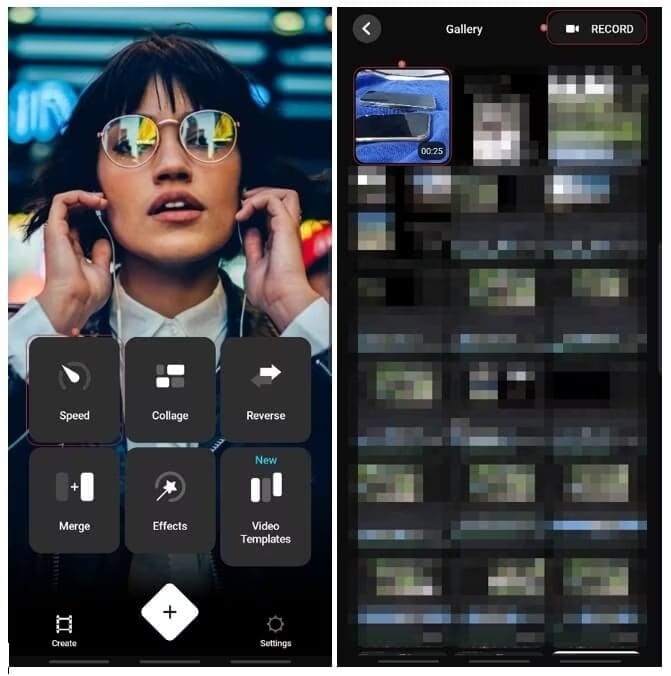
Take your first step and download Efectum on your smartphone. Launch the app and allow necessary permissions. From its home screen, tap the “Speed” option and access another window to import media. Choose an existing video from your phone album. Otherwise, hit the “Record” button at the top left side to capture new media (only available on Android).
Step 2
You will enter the main editing screen as you import media. Touch the “Speed” icon from the bottom toolbar and find an extended speed section. Use the slider and move it to the left for slow-motion or right for fast-motion videos. You can drag the slider to the extent you want to slow down the footage. Later, tap the Correct icon from the bottom right to save the changes.
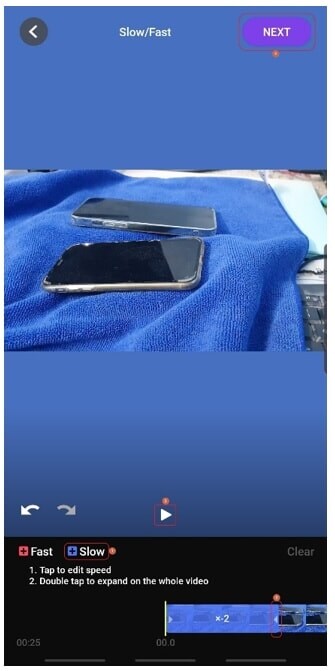
Step 3
Now, you can also try “Trim,” “Filters,” and “Color” icons to polish your video. Afterward, go to the top right side and click the “Export” button. Wait for the processing and navigate to another screen. Choose “Save Video” to get the clip on your phone or “Share” to export on other platforms.
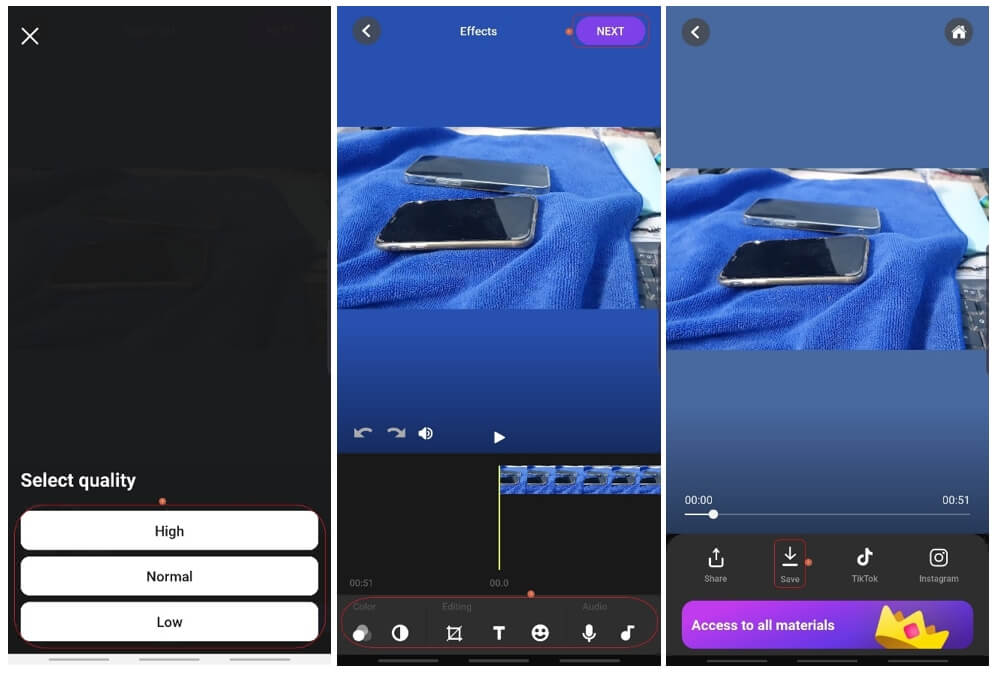
Part 2: Some Quick Alternatives to Efectum App for Slowing Down Videos
Efectum is undoubtedly a good platform to change video speed with other editing options. Some users might find it boring and get annoyed due to the watermark it locates in videos. They want an alternative to the Efectum app download without a watermark. Thus, in this section, we have enlisted the current best replacements for Efectum that are worth trying.
- FXMotion Slow Fast Video Maker
- CapCut - Video Editor
- InVideo
- VN-Video Editor & Maker
- InShot Video Editor & Maker
1. FXMotion Slow Fast Video Maker ( iOS
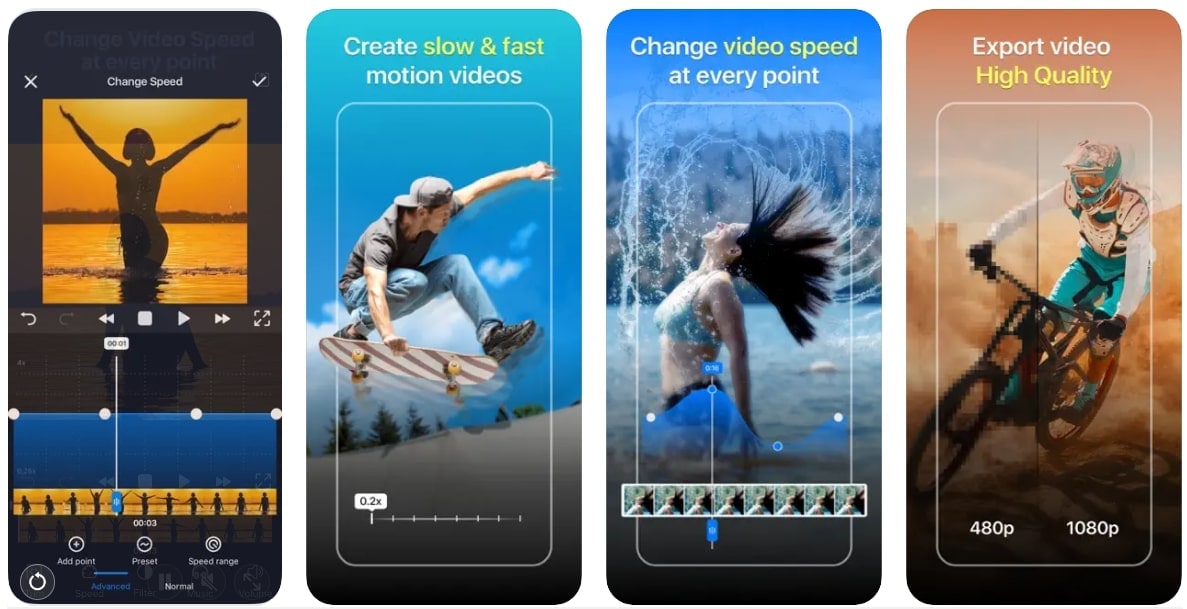
If you are unsatisfied with the Efectum app for limited speed adjustments, try this app. It is designed to change video speed in your own way with the speed graph. You can create a slow-motion video of up to 0.1x speed and a fast motion of up to 10x speed. With high-quality resolution output, it serves quick response. This application lets you share the edited video with friends on social media.
Pros
- Allow choosing output quality from 480p and 1080p resolution options.
- Provides a music library to add thrill or sensation to slow-down videos.
Cons
- Restrict you just to change speed and does not offer any feature for video editing.
2. CapCut - Video Editor ( iOS
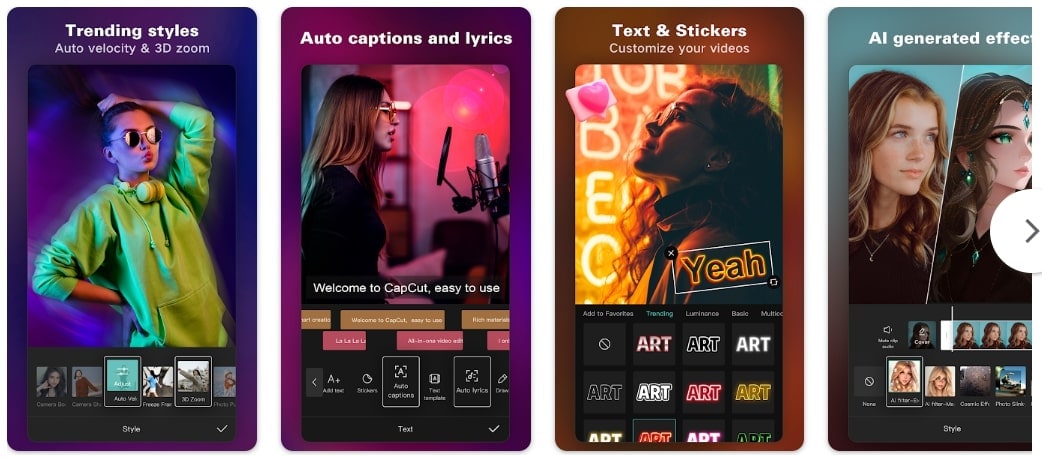
It’s a popular video editor with advanced editing and pre-designed video templates. This platform offers built-in fonts, effects, and stickers to add creativity to your content. Furthermore, CapCut provides you with Chroma key, stabilization, and Keyframe animation options. Besides these advanced features, you can alter video speed from 0.1x to 10x. Also, it lets you add a speed curve for a smooth, slow motion.
Pros
- Add auto-caption and lyrics in videos with speech recognition ability.
- Extract audio clips or add sound effects from a rich music library.
Cons
- It does not offer exporting in frame rate higher than 60fps.
3. InVideo ( Android
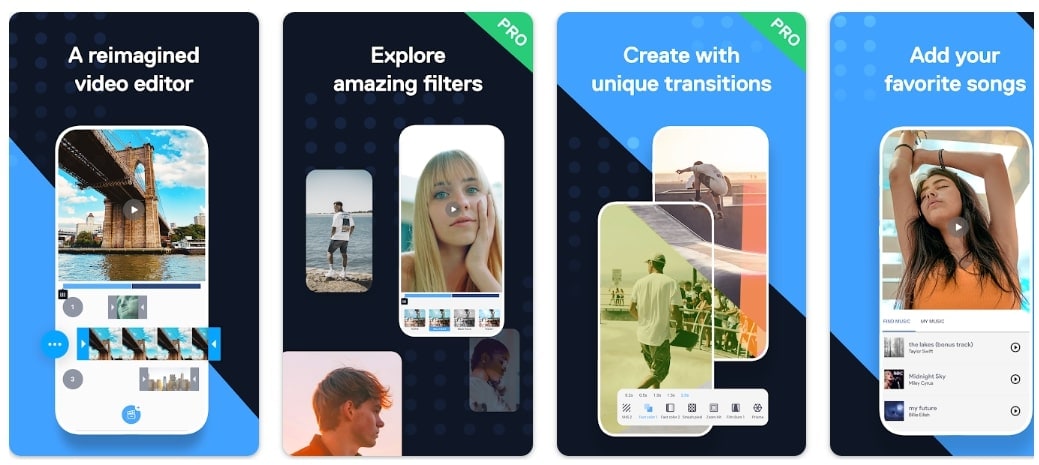
Instead of an Efectum app download, discover possibilities with InVideo. This app is an expert in creating aesthetic stop motions, ads, reels, and tutorials. It can speed up and speed down your clips. In addition, you can make a boomerang of shots and add cinematic transitions in clips. From its extensive music library, users can add music or import voiceovers.
Pros
- Utilize over 150 stickers, filters, and text templates to level up your projects.
- Record new footage with a built-in 60fps frame rate and 4k resolution.
Cons
- The best footage stock and other assets are reserved for subscribed users.
4. VN-Video Editor & Maker ( iOS
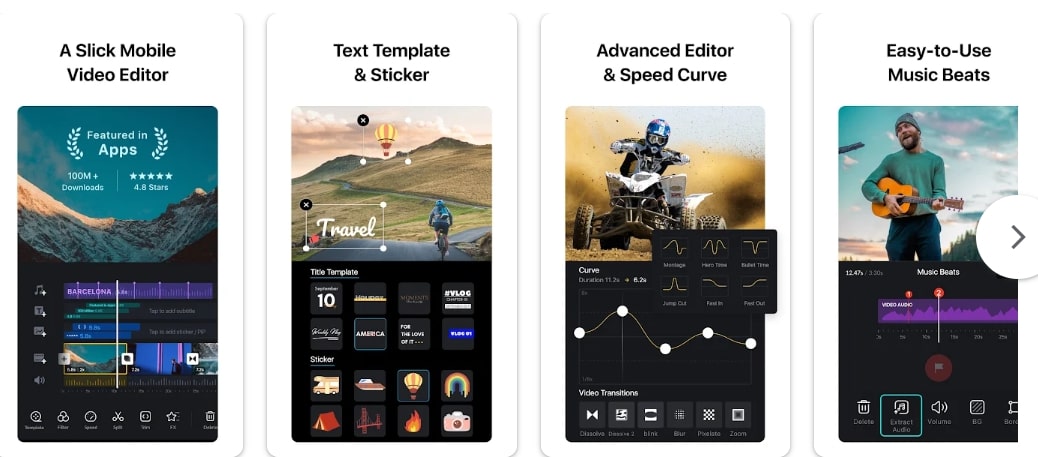
If searching for an alternative like the Efectum app, download without the watermark; use this app. It satisfies the needs of professionals and amateur video editors with high-quality videos. VN’s speed curve is more like Adobe Premiere Pro’s speed ramping. Thus, you can adjust the playback of your video with 6-speed adjustment curves.
Pros
- It enables you to freeze frames, reverse videos, and add keyframe animations.
- Perform multi-trach timeline editing and save non-destructive editing drafts anytime.
Cons
- You might face laggings in playback or missing audio in exported videos.
5. Video Editor & Maker – InShot ( iOS
Another good option in place of the Efectum app that you can consider is InShot. This platform offers some AI features such as auto-caption, smart tracking, and AI effects. InShot enables you to make smooth slow-mo with a speed ramping feature and keyframe editing. Plus, you can create multi-layered videos with filters, transitions, and AI effects.

Pros
- Make photo collages with AI effects and blend screenshots with AI context recognition.
- Export videos in 4K resolution to YouTube, Instagram, Twitter, and WhatsApp.
Cons
- Impose a watermark on videos unless you pay to remove it, which annoys many users.
Part 3: Want to Make Advanced Changes to Your Slow-Motion Videos? Shift To Wondershare Filmora
Mobile apps have enabled you to work anywhere but with a strong internet connection. If you don’t have an active internet connection, you will not process video editing. That’s exactly where desktop tools ensure smooth work progress without the internet. Moreover, desktop applications offer more flexibility in editing with advanced features.
In this regard, you should use Wondershare Filmora as an exception video editor. This software proves to be the right platform for slowing down videos with many customization options. It is integrated with AI and offers AI features to boost your productivity with creativity. You can get assistance from AI Copilot and generate copyright-free music or images on Filmora.
Free Download For Win 7 or later(64-bit)
Free Download For macOS 10.14 or later
How to Use Filmora for Creating Slow-Motion Videos
This AI platform is not limited to cutting and merging clips; thus, explore it by installing it. Using Filmora is not a big deal, but you can follow the step-by-step guide for further clarity.
Step 1Launch Filmora 13 and Initiate a Project
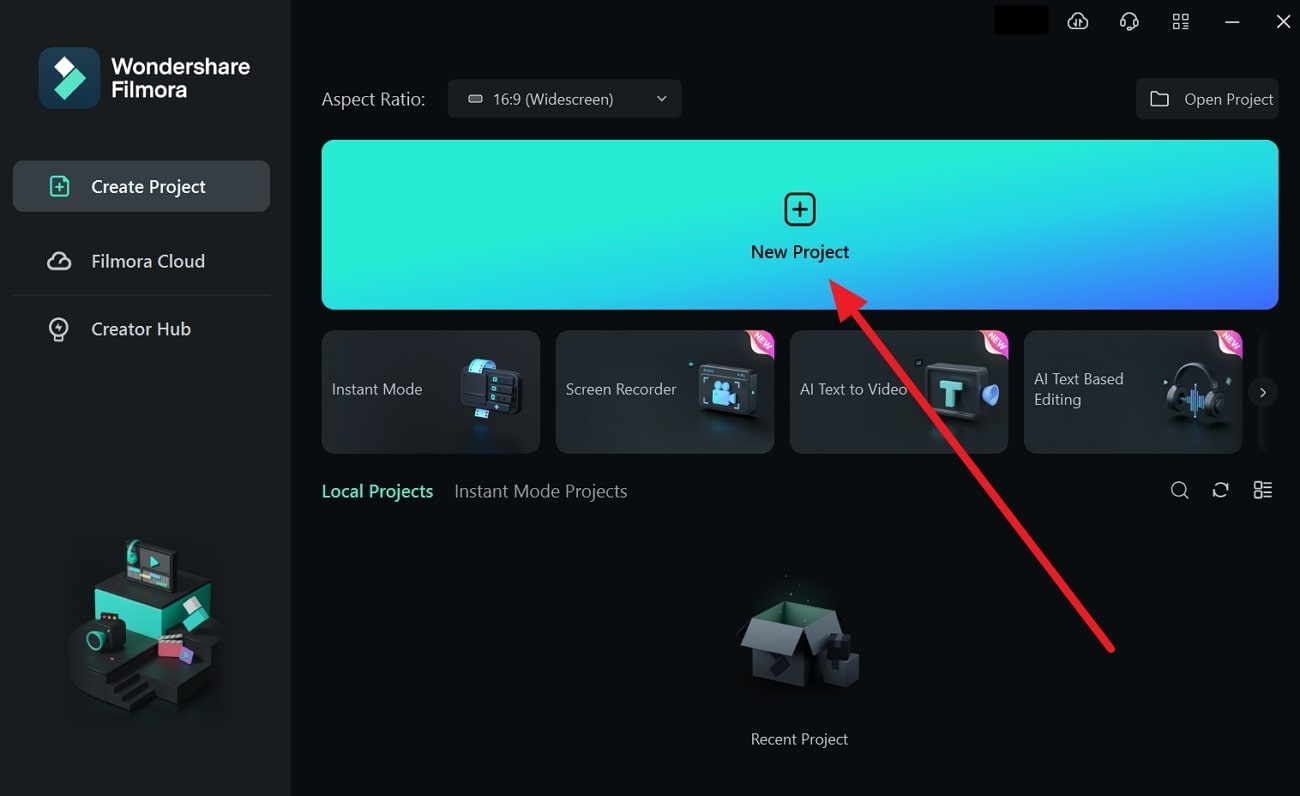
To begin creativity, you need to launch Filmora in your system. Ensure that you download the latest version, which is Filmora 13. Afterward, enter its main interface and tap on the “New Project” to access the editing window. Import your project in the media panel and drag it to the timeline.
Step 2Slow Down the Speed with Uniform Speed Option
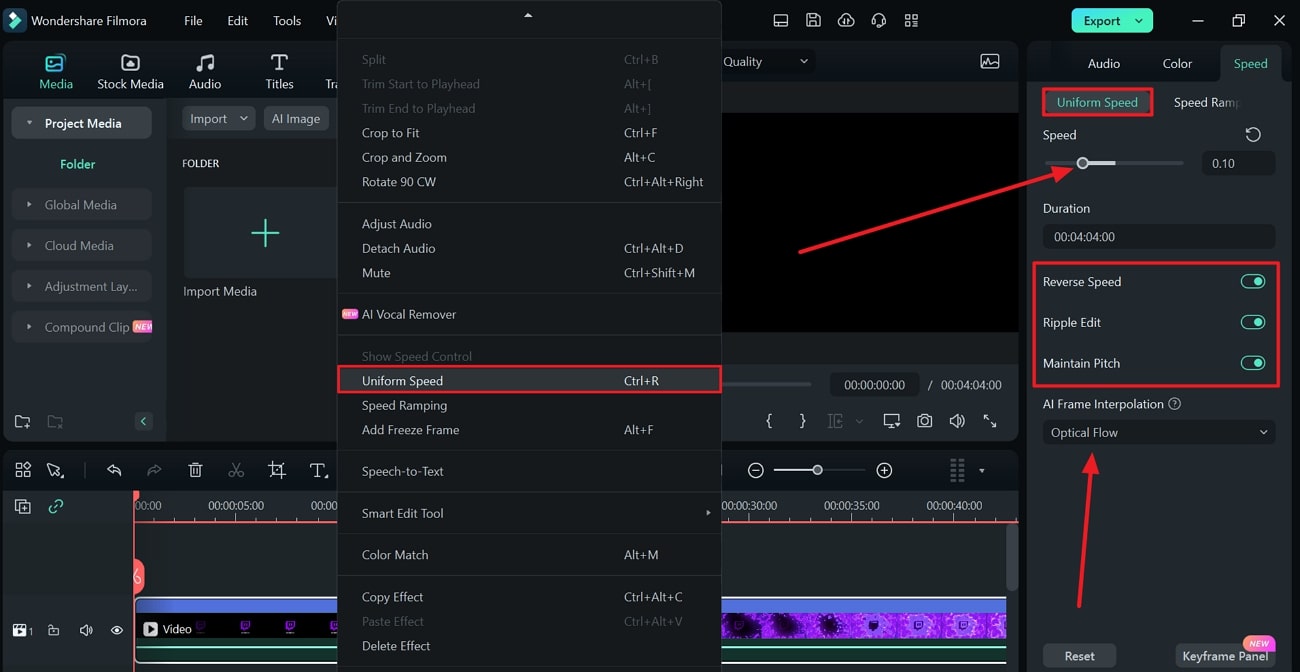
Right-click on the video and select the “Uniform Speed” option from the list. Direct toward the right side and find a “Speed” slider to adjust the speed. Move it to the left for slow-motion video and preview changes simultaneously. Toggle the “Ripple Edit” and “Maintain Pitch” for better results. Go to the “AI Frame Interpolation” and choose “Optical Flow” from the extended list.
Step 3Use Speed Ramping to Customize Slow Motion and Export
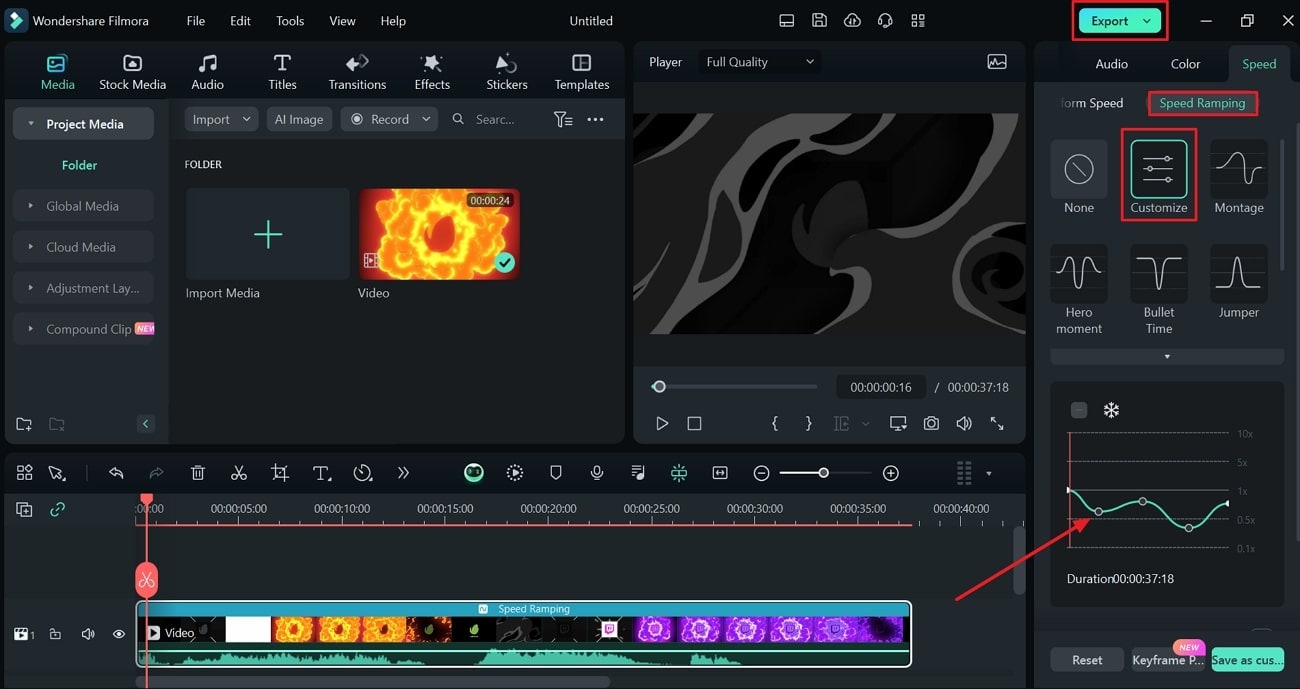
If you want to shift speed in videos smoothly, press the “Speed Ramping” from the top. Pick any ramping template or tap on the “Customize” option. Reach the graph below and slow down the speed by moving the dots downward. Adjust the speed ramping by locating the graph dots and seeing changes. Now, go to the top right side and choose “Export” to get the video on your device.
Conclusion
Ultimately, the Efectum app is a fun way to play videos fast forward or slow forward. This guide has highlighted every aspect of Efectum to achieve perfection in video editing. If someone is uncomfortable with this platform, they can use an alternative explained earlier. Yet, if you haven’t found a perfect platform, use Wondershare Filmora and unlock creativity with AI.
Make A Slow Motion Video Make A Slow Motion Video More Features

Part 1: A Review of Efectum App and How to Use It to Perfection?
Efectum is a pro video editing or making application that adds fun to your social media feed. With various editing features, this application helps users to follow social media trends. It is a popular platform for adding fast-motion or slow-motion effects to your media. For users interested in exploring the Efectum app, below is a list of features that it offers:

- Timelapse: It’s a photographic technique to turn a longer period into a shorter clip. This application can make a timelapse video to reveal events that might skip to the eye.
- Rewind Video: The Efectum app can edit your video into reverse or rewind certain actions. To do so, you just need simple clicks, and creativity will be added to your content.
- Video Formats: Another specialty of this app is to let you import the video in a popular format. It enables you to share the clip directly on social media platforms.
- Favorites Music: In this app, you can browse music of your choice for your content. This app can extract audio from existing videos. Besides, users can pick one from the recommended list.
- Multiple Speeds: You might have heard this app as an Efectum slow-motion app. It is true because Efectum offers easy slow-motion and fast-motion transformation of clips.
- Clips Editing: Cutting, trimming, and merging clips are general features that every editing tool offers. Efectum can also combine several shots, add text, and apply filters where required.
After discovering all the possible functionalities, come to the point. As this app can convert your normal video into slow motion, the question arises: how? To solve this query, we have shown you how to use Efectum apps to create a slow-motion video.
Step 1
Take your first step and download Efectum on your smartphone. Launch the app and allow necessary permissions. From its home screen, tap the “Speed” option and access another window to import media. Choose an existing video from your phone album. Otherwise, hit the “Record” button at the top left side to capture new media (only available on Android).

Step 2
You will enter the main editing screen as you import media. Touch the “Speed” icon from the bottom toolbar and find an extended speed section. Use the slider and move it to the left for slow-motion or right for fast-motion videos. You can drag the slider to the extent you want to slow down the footage. Later, tap the Correct icon from the bottom right to save the changes.

Step 3
Now, you can also try “Trim,” “Filters,” and “Color” icons to polish your video. Afterward, go to the top right side and click the “Export” button. Wait for the processing and navigate to another screen. Choose “Save Video” to get the clip on your phone or “Share” to export on other platforms.

Part 2: Some Quick Alternatives to Efectum App for Slowing Down Videos
Efectum is undoubtedly a good platform to change video speed with other editing options. Some users might find it boring and get annoyed due to the watermark it locates in videos. They want an alternative to the Efectum app download without a watermark. Thus, in this section, we have enlisted the current best replacements for Efectum that are worth trying.
- FXMotion Slow Fast Video Maker
- CapCut - Video Editor
- InVideo
- VN-Video Editor & Maker
- InShot Video Editor & Maker
1. FXMotion Slow Fast Video Maker ( iOS
If you are unsatisfied with the Efectum app for limited speed adjustments, try this app. It is designed to change video speed in your own way with the speed graph. You can create a slow-motion video of up to 0.1x speed and a fast motion of up to 10x speed. With high-quality resolution output, it serves quick response. This application lets you share the edited video with friends on social media.

Pros
- Allow choosing output quality from 480p and 1080p resolution options.
- Provides a music library to add thrill or sensation to slow-down videos.
Cons
- Restrict you just to change speed and does not offer any feature for video editing.
2. CapCut - Video Editor ( iOS
It’s a popular video editor with advanced editing and pre-designed video templates. This platform offers built-in fonts, effects, and stickers to add creativity to your content. Furthermore, CapCut provides you with Chroma key, stabilization, and Keyframe animation options. Besides these advanced features, you can alter video speed from 0.1x to 10x. Also, it lets you add a speed curve for a smooth, slow motion.

Pros
- Add auto-caption and lyrics in videos with speech recognition ability.
- Extract audio clips or add sound effects from a rich music library.
Cons
- It does not offer exporting in frame rate higher than 60fps.
3. InVideo ( Android
Instead of an Efectum app download, discover possibilities with InVideo. This app is an expert in creating aesthetic stop motions, ads, reels, and tutorials. It can speed up and speed down your clips. In addition, you can make a boomerang of shots and add cinematic transitions in clips. From its extensive music library, users can add music or import voiceovers.

Pros
- Utilize over 150 stickers, filters, and text templates to level up your projects.
- Record new footage with a built-in 60fps frame rate and 4k resolution.
Cons
- The best footage stock and other assets are reserved for subscribed users.
4. VN-Video Editor & Maker ( iOS
If searching for an alternative like the Efectum app, download without the watermark; use this app. It satisfies the needs of professionals and amateur video editors with high-quality videos. VN’s speed curve is more like Adobe Premiere Pro’s speed ramping. Thus, you can adjust the playback of your video with 6-speed adjustment curves.

Pros
- It enables you to freeze frames, reverse videos, and add keyframe animations.
- Perform multi-trach timeline editing and save non-destructive editing drafts anytime.
Cons
- You might face laggings in playback or missing audio in exported videos.
5. Video Editor & Maker – InShot ( iOS
Another good option in place of the Efectum app that you can consider is InShot. This platform offers some AI features such as auto-caption, smart tracking, and AI effects. InShot enables you to make smooth slow-mo with a speed ramping feature and keyframe editing. Plus, you can create multi-layered videos with filters, transitions, and AI effects.

Pros
- Make photo collages with AI effects and blend screenshots with AI context recognition.
- Export videos in 4K resolution to YouTube, Instagram, Twitter, and WhatsApp.
Cons
- Impose a watermark on videos unless you pay to remove it, which annoys many users.
Part 3: Want to Make Advanced Changes to Your Slow-Motion Videos? Shift To Wondershare Filmora
Mobile apps have enabled you to work anywhere but with a strong internet connection. If you don’t have an active internet connection, you will not process video editing. That’s exactly where desktop tools ensure smooth work progress without the internet. Moreover, desktop applications offer more flexibility in editing with advanced features.
In this regard, you should use Wondershare Filmora as an exception video editor. This software proves to be the right platform for slowing down videos with many customization options. It is integrated with AI and offers AI features to boost your productivity with creativity. You can get assistance from AI Copilot and generate copyright-free music or images on Filmora.
Free Download For Win 7 or later(64-bit)
Free Download For macOS 10.14 or later
How to Use Filmora for Creating Slow-Motion Videos
This AI platform is not limited to cutting and merging clips; thus, explore it by installing it. Using Filmora is not a big deal, but you can follow the step-by-step guide for further clarity.
Step 1Launch Filmora 13 and Initiate a Project
To begin creativity, you need to launch Filmora in your system. Ensure that you download the latest version, which is Filmora 13. Afterward, enter its main interface and tap on the “New Project” to access the editing window. Import your project in the media panel and drag it to the timeline.

Step 2Slow Down the Speed with Uniform Speed Option
Right-click on the video and select the “Uniform Speed” option from the list. Direct toward the right side and find a “Speed” slider to adjust the speed. Move it to the left for slow-motion video and preview changes simultaneously. Toggle the “Ripple Edit” and “Maintain Pitch” for better results. Go to the “AI Frame Interpolation” and choose “Optical Flow” from the extended list.

Step 3Use Speed Ramping to Customize Slow Motion and Export
If you want to shift speed in videos smoothly, press the “Speed Ramping” from the top. Pick any ramping template or tap on the “Customize” option. Reach the graph below and slow down the speed by moving the dots downward. Adjust the speed ramping by locating the graph dots and seeing changes. Now, go to the top right side and choose “Export” to get the video on your device.

Conclusion
Ultimately, the Efectum app is a fun way to play videos fast forward or slow forward. This guide has highlighted every aspect of Efectum to achieve perfection in video editing. If someone is uncomfortable with this platform, they can use an alternative explained earlier. Yet, if you haven’t found a perfect platform, use Wondershare Filmora and unlock creativity with AI.
Also read:
- In 2024, Phone Aspect Ratio Vertical Definition, Types and Tips
- New Complete Guide to Change Video Resolution in Filmora
- Updated Finest Approach to Slow Down a Video CapCut All-in-One Video Editor for 2024
- In 2024, Do You Know How You Can Trim or Merge Using Wondershare Filmora? Trimming and Merging Using This Tool Is an Easy Task; Learn How
- 2024 Approved Do You Want to Edit a TikTok After Posting? This Article Will Provide Multiple Methods Through Which You Can Do It in No Time
- New Clone Yourself in Videos with Filmora for 2024
- Top 5 Solutions on How to Add Emojis to iPhone for 2024
- New In 2024, Best Phantom Slow-Mo Camera For Recording Slow Motion Videos
- Updated 2024 Approved 10 Catchy Pixel Art Wallpapers and How to Custom Your Own with Ease
- Learn How to Make Modern TikTok Velocity Dance Videos in Filmora Just Like the Ones You See on TikTok and Instagram Reels for 2024
- Splice App for Android - Guide to Download & Use
- Updated 3D LUT Mobile App Review - A Composite Application for Editing Media
- Updated 2024 Approved 10 Best Camera for YouTube Beginners
- Updated In 2024, Change Video Speed with FFmpeg
- New 2024 Approved Benefits of Live Streaming on YouTube
- Updated In 2024, Best 8 Srt File Creators
- New Simple Tricks Make 3D GIF Production of Inspiration Pop up Constantly
- New Are You Also a Fan of the Slow Mo Guys? Well! Who Isnt? Learn How You Can Create Compelling Slow-Mo Videos Like the Slow Mo Guys Here
- 2 Effective Ways to Add Text Behind Objects for 2024
- The Definite Guide to Craig Bot Discord
- New 2024 Approved A Guide to Use Distortion Effect in Premeiere Pro
- Best 10 3D Slideshow Software Review for 2024
- New In 2024, 3 Best Effects to Appear on Camera Made with Filmora
- New Storyboards Are Amazing Way if You Want to Present Your Story in a Visual Way, Like Explaining Any Process or Giving Any Information. It Is a Graphic Layout to Tell You a Story
- New Are You a Vlogger Looking for Good Color Correction and Video Grading Presets? Here Youll Find Different Vlog LUTs that You Can Use for Your Videos
- New Speed up Video on Splice
- In 2024, You Can Splice Video on the iPhone Using Various Applications. This Article Will Guide You Through the Steps Necessary to Splice Your Videos
- Updated The Complete Guide to Zoho Slides with Ease
- Updated 2024 Approved Some Facts About GIF Background You Didnt Know
- With This Article, We Will Be Looking at Steps to Rotate a Video in Cyberlink PowerDirector to Help You when Required. We Have Also Mentioned the Steps You Will Need to Follow in Wondershare Filmora for 2024
- New Learn Top Best Free LUTs For Premiere Pro
- Top 16 Motion Blur Apps for Videos & Photos for 2024
- 2024 Approved Replacing Sky Background Using Adobe Photoshop A Comprehensive Guide
- Updated How to Color Grade Your Picture in LightRoom
- New Facts About GIF Background You Didnt Know
- How to enter the iSpoofer discord server On Apple iPhone 15 Plus | Dr.fone
- In 2024, Top IMEI Unlokers for Your Lava Yuva 2 Phone
- How To Remove Phone Number From Your Apple ID from Your iPhone 6?
- Best Video Repair tool to Fix and Repair Corrupt MP4,MOV,AVI video files of Tecno
- Methods to Change GPS Location On Samsung Galaxy S23+ | Dr.fone
- Why Your WhatsApp Location is Not Updating and How to Fix On Samsung Galaxy A54 5G | Dr.fone
- In 2024, Detailed Review of doctorSIM Unlock Service For iPhone 15
- Best Vivo Y36i Pattern Lock Removal Tools Remove Android Pattern Lock Without Losing Data
- In 2024, Lock Your Nokia C12 Phone in Style The Top 5 Gesture Lock Screen Apps
- In 2024, How To Unlock SIM Cards Of Samsung Galaxy S23 FE Without PUK Codes
- How to Screen Mirroring Nokia C32 to PC? | Dr.fone
- Updated Learn Easy Blender Rigging in Only 2 Minutes
- Fix Cant Take Screenshot Due to Security Policy on Motorola Edge 40 Neo | Dr.fone
- Easy Ways to Manage Your Xiaomi Mix Fold 3 Location Settings | Dr.fone
- Cloning Voices in Real-Time With Top GitHub Repositories
- In 2024, How to Reset your Samsung Galaxy F54 5G Lock Screen Password
- In 2024, How to Transfer Contacts from Oppo Reno 11 5G To Phone | Dr.fone
- The way to convert MTS for Huawei Nova Y91
- How to Unlock Vivo S18 Pro Phone without Any Data Loss
- How To Change Samsung Galaxy S24+ Lock Screen Password?
- MKV stutters on Galaxy F14 5G and stops randomly
- In 2024, How to Bypass Activation Lock on Apple iPhone 6 Plus or iPad?
- Title: Step by Step to Crop Videos with CyberLink PowerDirector
- Author: Chloe
- Created at : 2024-06-26 06:24:02
- Updated at : 2024-06-27 06:24:02
- Link: https://ai-editing-video.techidaily.com/step-by-step-to-crop-videos-with-cyberlink-powerdirector/
- License: This work is licensed under CC BY-NC-SA 4.0.

